


SupraPro I.D.
INSTALLATION AND OPERATION
INSTRUCTIONS
TM
1

TABLE OF CONTENTS |
|
INTRODUCTION ............................................................................................................. |
1 |
SPECIFICATIONS ........................................................................................................... |
1 |
INSTALLATION .................................................................................. |
2 |
INSTALLATION - Bracket ................................................................................................ |
2 |
POWER CONNECTIONS ................................................................................................ |
3 |
PORTABLE INSTALLATION ........................................................................................... |
4 |
KEYBOARD BASICS ....................................................................................................... |
7 |
DISPLAY .......................................................................................................................... |
7 |
OPERATION ...................................................................................... |
8 |
MENUS ............................................................................................................................ |
8 |
AUTOMATIC .................................................................................................................... |
8 |
RANGE ............................................................................................................................ |
8 |
ZOOM .............................................................................................................................. |
9 |
FISH ID ............................................................................................................................ |
9 |
FISHTRACK™ ................................................................................................................ |
10 |
DISPLAY MODE ............................................................................................................. |
10 |
SENSITIVITY .................................................................................................................. |
11 |
CHART SPEED .............................................................................................................. |
12 |
ALARMS ......................................................................................................................... |
12 |
FISH ALARM .................................................................................................................. |
12 |
SHALLOW ALARM ......................................................................................................... |
12 |
BACK LIGHT ................................................................................................................... |
13 |
FEET/METERS ............................................................................................................... |
13 |
DISPLAY CONTRAST .................................................................................................... |
14 |
ASP (Advanced Signal Processing) ................................................................................ |
14 |
SIMULATOR ................................................................................................................... |
15 |
APPLICATION .................................................................................. |
15 |
TRANSDUCER CONE ANGLES .................................................................................... |
15 |
SIGNAL INTERPRETATION .......................................................................................... |
16 |
WATER TEMPERATURE AND THERMOCLINES ......................................................... |
16 |
FISH ARCHES ................................................................................................................ |
18 |
SURVEYING A LAKE ..................................................................................................... |
19 |
BAIT FISH ....................................................................................................................... |
19 |
SONAR TROUBLESHOOTING ...................................................................................... |
20 |
MENU SUMMARY .......................................................................................................... |
23 |
MISSING PARTS ............................................................................................................ |
24 |
WARRANTY STATEMENT ............................................................................................. |
25 |
UPS RETURN SERVICE ................................................................................................ |
26 |
HOW TO OBTAIN SERVICE - INTERNATIONAL .......................................................... |
28 |
Copyright © 1995, 1996 |
Eagle Electronics |
All rights reserved. |
|
All features and specifications in this manual are subject to change |
|
without notice. |
|
All screens in this manual are simulated. |
|
Eagle Electronics |
|
PO Box 669 |
|
Catoosa, OK 74015 |
|
2

INTRODUCTION
Thank you for purchasing an Eagle®sonar. Your SupraPro I.D.™ is a high quality sonar designed for both professional and novice fishermen. Although it's a low cost unit, it has features available only on other units that cost much more. This unit has an automatic feature that finds and displays the bottom, fish, structure, and more! All you have to do is press the ON key. However, if you wish to fine tune the unit, simply press the menu key. The SupraPro I.D. has powerful features available through easy-to-use menus.
To get started with your Eagle unit, first read the installation section. This is where it all begins. Improper installation can cause problems down the road. After you’ve read the instructions, install the unit, then read the rest of the manual. The more you know about your unit, the better it will perform for you. Take this manual for reference when you head for the water.
SPECIFICATIONS |
|
Dimensions |
5.9" W x 5.75" H x 3.4" D |
Input Voltage |
10 - 15 vDC |
Current Drain |
350 ma (lights off) |
|
500 ma (lights on) |
Transmitter |
|
Frequency |
192 kHz |
Output Power |
275 watts (peak-to-peak) |
|
34.4 watts (RMS) |
Display |
100 pixels (H) x 65 pixels (W) |
|
Supertwist Liquid Crystal Display |
|
|
NOTICE!
The storage temperature for your unit is from -4 degrees to +167 degrees Fahrenheit (-20 degrees to +75 degrees Celcius). Extended storage in temperatures higher or lower than specified will damage the liquid crystal display in your unit. This type of damage is not covered by the warranty. For more information, contact the factory customer service department or your local service center.
3
INSTALLATION - Bracket
You can install the SupraPro I.D. on the top of a dash or from an overhead with the supplied bracket. It can also be installed in the dash with an optional IDA-3 mounting kit. If you use the supplied bracket, you may be interested in the optional GBSA-1 swivel bracket kit. This converts the SupraPro I.D.'s gimbal bracket to a swivel mount which can be used on the dash mounting position. Installation instructions for the in-dash and swivel mounting kits are supplied with the adapter kits.
Mount the SupraPro I.D. in any convenient location, provided there is clearance when it’s tilted for the best viewing angle. Holes in the bracket’s base allow wood screw or through bolt mounting. It may be necessary to place a piece of plywood on the back side of thin panels to reinforce the panel. Make certain there is enough room behind the unit to attach the power and transducer cables.
Drill a hole in the dash for the power and transducer cables. The best location for this hole is immediately under the gimbal bracket. This way, the bracket covers the hole. The smallest hole the power and transducer cable connector can pass through is 5/8". INSTALL THE TRANSDUCER FIRST! Then route the cable from the transducer to the unit by passing the power and transducer cables through the hole from under the dash. Slide the bracket over the hole, then route the transducer and power cables out the slot in the back of the bracket. Finally, fasten the bracket to the dash.
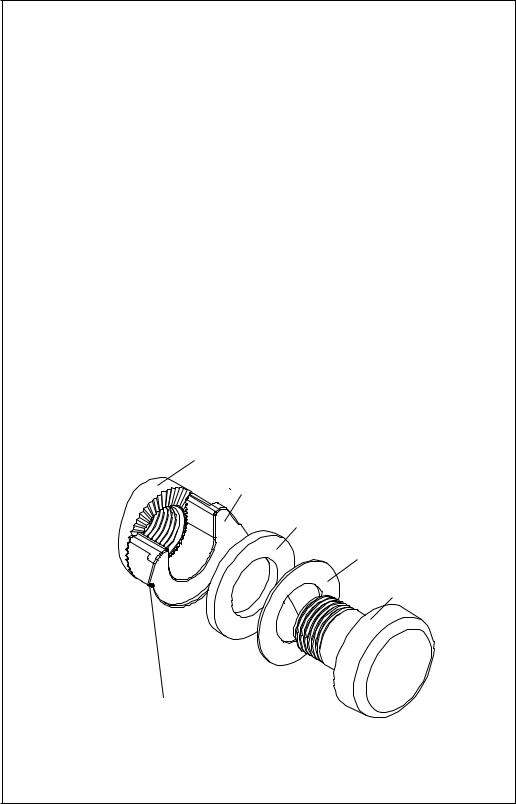
SUPRAPRO I.D.
GIMBAL BRACKET
THICK WASHER
THIN WASHER (PORTABLE UNITS ONLY!)
GIMBAL KNOB
Attach the SupraPro I.D. to the gimbal bracket using the supplied gimbal knobs and washers as shown above.
4
DASH MOUNT
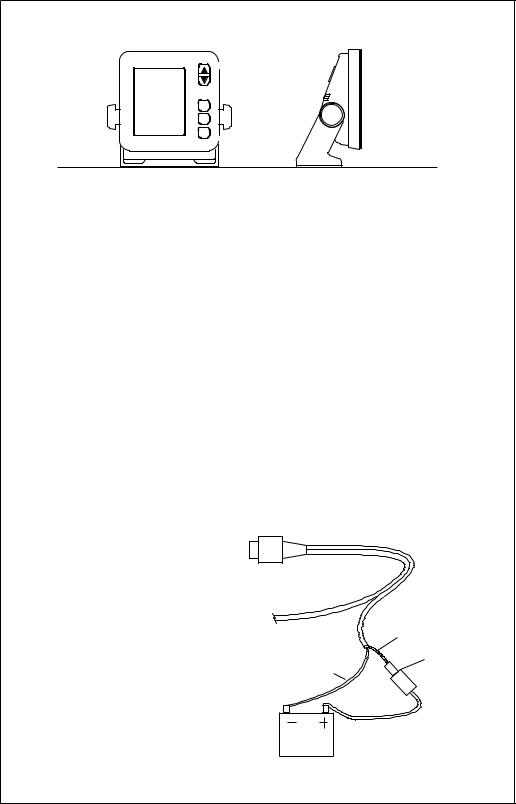
POWER CONNECTIONS
NOTE! INSTALL THE TRANSDUCER BEFORE MAKING THE POWER CONNECTIONS!
The SupraPro I.D. works from a 12 volt DC system only. For the best results, run the power cable directly to the boat’s battery. Keep the power cable away from other boat wiring, especially the engine’s wires. This will give the best isolation from electrical noise. If the supplied cable is not long enough to reach the battery, splice #18 gauge insulated wire to it. You can attach the power cable to an accessory or power buss, however, you may have problems with electrical interference. Make certain to attach the inline fuse holder to the positive lead as close to the battery or terminal strip as possible. This will protect both the unit and the power cable in the event of a short. The SupraPro I.D. uses a 3-amp fuse.
WARNING!
Do not use this product without a 3-amp fuse wired into the power cable! Failure to use a 3-amp fuse will void your warranty!
TO TRANSDUCER
This unit has reverse polarity protection. No damage will occur if the power wires are reversed. However, the unit will not work until the wires are attached correctly.
|
RED |
|
WIRE |
BLACK |
3 amp |
FUSE |
|
WIRE |
|
12 VOLT
5

SUPRAPRO I.D. PORTABLE ASSEMBLY
INSTALLING THE BATTERIES
Release the latch on the front of the battery case. Open the compartment and install four "D" cell batteries into the adapter. For the longest life, we recommend you use alkaline batteries. This battery case will also hold one rechargable battery instead of the "D" cells. See the enclosed coupon for more information on the rechargable battery.
"D" CELL BATTERY
After installing the batteries, close the case and plug the power cable on the battery case into the SupraPro I.D Portable. Plug the adapter cable into the back of the sonar unit. Turn the sonar unit on. If it doesn't work, make certain the battery terminals are making good contact against the battery contacts. Also check the wiring connections on the D-cell battery adapter. The red wire on the power cable should be attached to the red wire on the D-cell battery adapter and the power cable's black wire should be connected to the black wire on the D-cell battery adapter. If it still doesn't work, check the battery voltage. Most of the complaints we receive about
6

portable units result from stale batteries. Make certain the ones you buy are fresh. Always remove batteries from the battery compartment before storing the unit as dead batteries can leak and corrode the contacts.
In cold weather the efficiency of dry cell batteries drops with the temperature. It's a good idea to have the SupraPro I.D. Portable good and warm along with the batteries before we leave home. If the batteries do lose a charge, you can sometimes restore them by placing them in a warm room or car interior. A better way is to replace them with batteries that have been kept warm. Don't ever heat the batteries over an open flame or direct hot air onto them. A fire or explosion could result.
PORTABLE TRANSDUCER ASSEMBLY
Assemble the transducer and bracket as shown below. Attach the transducer to the bracket with the supplied hardware. Make certain there is one washer on each side of the transducer, inside the bracket. Slide the other washer over the end of the bolt and thread the nut onto it. Screw the suction cup onto the bracket using the supplied screw and flat washer. Tie the nylon cord through the hole in the top of the bracket. When using this transducer, tie the other end of the nylon cord to the boat. This will help prevent the loss of the transducer if it comes off the boat.
TIE
NYLON
CORD
HERE
SCREW
NUT
BOLT
WASHER 

 WASHER
7
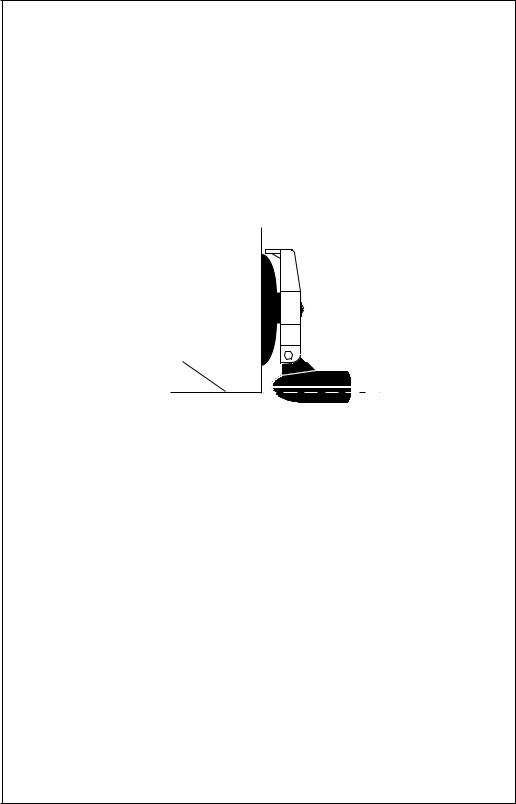
Clean the chosen area of the hull before attaching the suction cup. Locate the transducer on the hull as shown below. Don't allow the bracket to go below the hull, as water pressure against it can cause the suction cup to come off at speed. Moisten the cup, then press it onto the hull as firmly as possible. Tie the nylon cord to the boat and route the transducer cable to the sonar unit. Plug the transducer connector into the "Y" power cable on the SupraPro ID's battery case. Your portable sonar is now ready for use.
HULL
PERMANENT MOUNT TRANSDUCER INSTALLATION
The HS-WSPC supplied with your SupraPro I.D. is a transom mount transducer. It can be installed on any outboard or stern-drive (inboard\outboard) powered boat. It can also be permanently installed inside the boat to "shoot-through" the hull on some fiberglass boats.
The “kick-up” mounting bracket helps prevent damage if the transducer strikes an object while the boat is moving. If the transducer does “kickup”, the bracket can easily be pushed back in place without tools.
Read the enclosed transducer installation manual carefully before attempting the installation. Determine which of the mounting positions is right for your boat. Use extreme care if mounting the transducer inside the hull, since once it is epoxied into position, the transducer usually cannot be removed. Remember, the transducer location is the most critical part of a sonar installation. If it isn’t done properly, the sonar can’t perform to it’s designed potential.
8
KEYBOARD BASICS
The unit sounds a tone when you press any key. This tells you the unit has accepted a command.
ON/CLEAR
Use this key to turn the unit on. It also clears menu selections and the menus from the screen.
OFF
This key turns the unit off.
MENU
The SupraPro I.D. has
many menus of features that are accessed with this key.
UP and DOWN ARROWS
Use these keys to adjust virtually every feature and function on the unit. They are used to adjust the sensitivity, chart speed, range, and more.
DISPLAY - General
The lights flash for about ten seconds when the SupraPro I.D. is turned on. Two menus appear, one after the other. The menus are the lights (LAMP) and contrast adjustment (DARK/LIGHT). To turn the lights on, press the up arrow key while the LAMP menu is showing. To adjust the contrast, wait for the DARK/LIGHT menu to appear. Now press the up arrow key to darken the screen, the down arrow to lighten it. The menus disappear after a few seconds. If you don’t want to wait, press
the ON/CLEAR key to clear the menus from the screen.
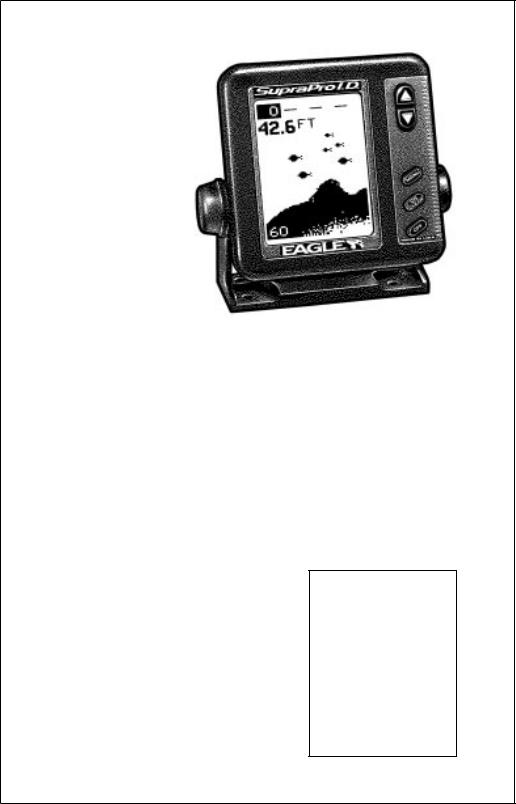
When the SupraPro I.D. is first turned on, the display appears similar to the one at right. The unit is in the automatic mode and the Fish ID feature is on. The depth range displays on the left side of the screen. In this example, the range is from 0 to 60 feet. The digital bottom depth display shows near the top left portion of the screen. The water's surface is indicated by a dashed line at the top of the screen.
9

OPERATION
MENUS
The SupraPro I.D. use menus to guide you through the unit’s functions and features. The menu key accesses these features, allowing you to customize the unit to your particular needs and water conditions. All you have to do to leave one menu and enter another is press the menu key repeatedly. Press the ON/CLEAR key to clear the menus from the screen.
AUTOMATIC
When the SupraPro I.D. is first turned on, the automatic feature is enabled. This feature automatically adjusts the unit’s range and sensitivity according to water conditions. It always keeps the bottom displayed in the lower portion of the screen.
To turn the automatic feature off, press the menu key until the AUTO/MAN menu appears. Now press the down arrow key. This moves the black bar to the letters “MAN.” The unit is now in the manual mode. To turn the automatic feature on again, repeat the above steps, except this time press the uparrow key to move the black bar to the word "AUTO".
RANGE
You can’t adjust the range when the SupraPro I.D. is in the automatic mode. It is adjustable when the unit is in the manual mode. To do so, first put the unit in the manual mode. Now press the ON/CLEAR key to clear the screen. Then press the menu key until the “RANGE SEL” menu appears as shown at right. The current range shows at the bottom of the menu. In this case, the range is 60 feet. Now press the
up arrow key to decrease the range, the down arrow key increases the range. After you select the desired range, press the ON/CLEAR key to clear the display. If you wait a few seconds, it will automatically clear.
The SupraPro I.D. has the following ranges:
0 - 10, 20, 40, 60, 120, 240, 480 and 900 feet. Metric range has 0 - 5, 10, 20, 40, 60, 100, 200, and 300 meters.
10
 Loading...