


User guide
Please read this handbook carefully before use.
This user guide also contains tips on effective washing and important safety notes.
Helpline 08706 002 701
TM
Dyson Ltd Tetbury Hill Malmesbury
Wiltshire SN16 ORP

Contents
Overview |
1 01 |
Overview of your Dyson ContrarotatorTM |
Your ContrarotatorTM |
2 01 |
The only 2-drum wash action |
User instructions |
3 01 |
Registration |
|
|
Important safety notes |
Before installation |
4 01 |
Inner transit packaging removal |
|
|
Moving |
Installation |
5 01 |
Location |
|
02 |
Drainage |
|
|
Water supply |
|
03 |
Electrical installation |
Operation |
6 01 |
First wash cycle |
|
|
Sorting your clothes |
|
02 |
Loading your ContrarotatorTM |
Starting your wash |
7 01 |
Using default settings |
Optional settings |
8 01 |
Personalising the wash programme |
Programme table |
9 01 |
Programme wash table |
Maintenance |
10 01 |
Cleaning |
|
02 |
Coin trap maintenance |
|
03 |
Water filter maintenance |
|
|
Emergency door release |
Troubleshooting |
11 01 |
Problem solving |
Overview |
1 |
01 |
|
|
|
Overview of your Dyson ContrarotatorTM
Control panel |
|
Soap tray |
||||||
|
01 & |
|
|
6 |
02 & |
10 |
01 |
|
7 |
8 |
01 |
||||||
|
|
|
|
|||||
Outer door
Inner door
6 02
6 02
Coin trap 10 02
RollerjackTM
4 01
|
|
|
|
|
Power cable |
|
Hot water inlet |
Cold water inlet |
with plug |
||||
5 01 |
& |
5 02 |
4 01 & 6 02 |
|||
5 01 & 5 |
02 |
|||||
|
|
|
|
|||
Rating Plate |
|
|
|
|
|
|
3 01 |
|
|
|
|
|
|
Drainage hose & adjustable clip
5 02
Adjustable feet
5 03
Cold inlet pipe |
Hot inlet pipe |
Dyson guarantee form |
||
5 01 & 5 02 |
5 01 & |
5 02 |
||
|
||||
|
|
|
Reply envelope |
|
|
Dyson spanner |
|
Fabric care leaflet |
|
|
|
|
||
Drainage hose hook |
4 01 & 5 01 |
|
|
|
5 01 & 5 02 |
|
|
|
|
Your ContrarotatorTM |
2 |
01 |
|
|
|
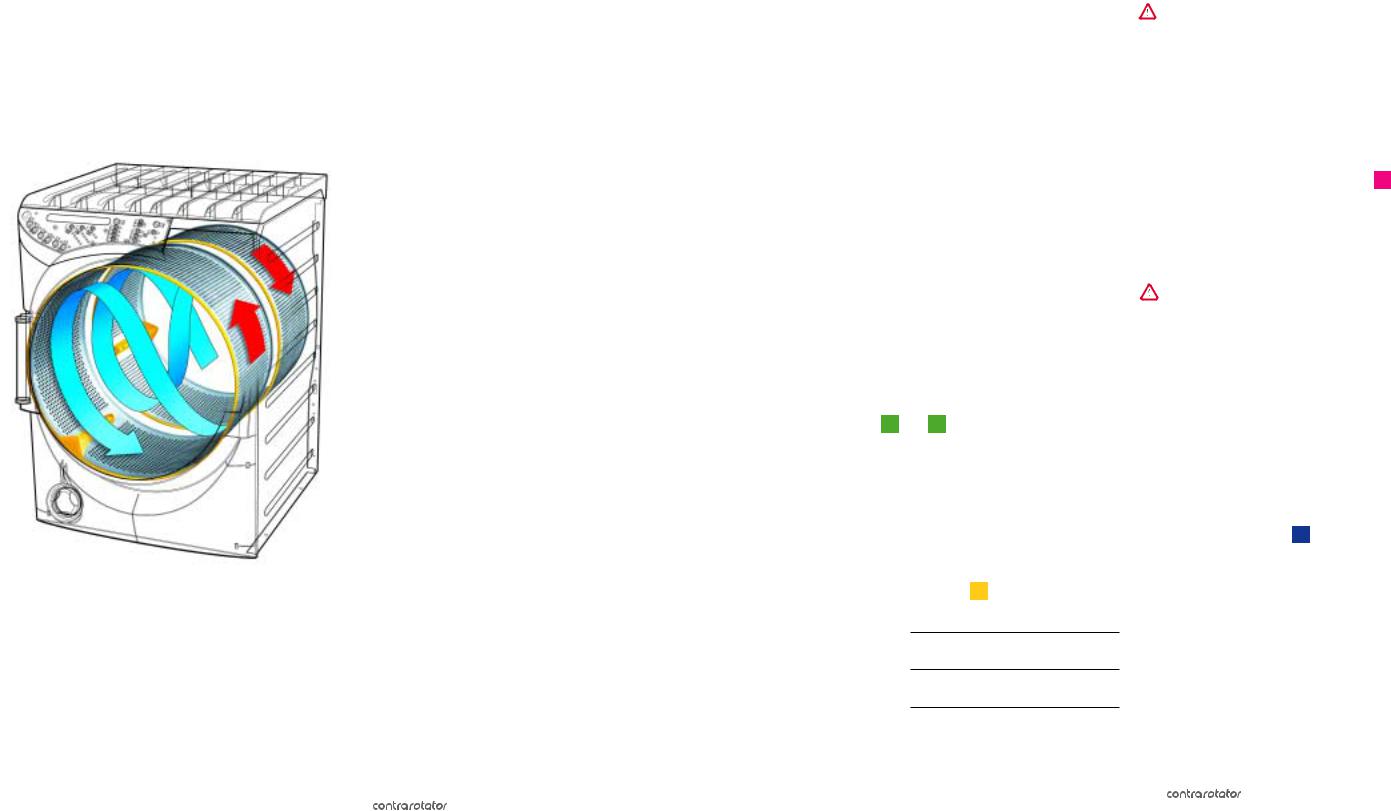
The only 2-drum wash action
Conventional washing machines may seem convenient, but their poor performance lets you down. So James Dyson asked his engineers to experiment with every imaginable way of washing to design a better washing machine.
Along the way, Dyson’s engineers made a surprising discovery: washing by hand gave better wash results than single drum machines. Because the clothes are constantly on the move, they are manipulated and flexed – every centimetre of the fabric is exposed to the detergent. It opens the weave of the fabric and agitates the dirt more, to release it easily and quickly. It’s an active, efficient process.
To replicate the movement of hand washing Dyson’s engineers designed two aligned drums and engineered them to rotate in opposite directions at the same time. The effect of this revolutionary action on the clothes is dramatic. Instead of revolving in the old single pattern of ‘drop and flop’, the clothes are much more active, moving in an infinitely variable dance, to flex the fabric and open the weave to the detergent.
Because the ContrarotatorTM releases dirt more effectively, it can wash clothes cleaner.
User instructions |
3 |
01 |
|
|
|
Registration |
Important safety notes |
Registering your Dyson ContrarotatorTM
Every Dyson washing machine comes with a 2 year guarantee, with an option to extend the guarantee for a further 1 to 3 years. For more details on these options, please refer to the enclosed guarantee form.
It is important to register your Dyson washing machine. This will ensure that you receive prompt and efficient service if your machine requires attention during the 2 year guarantee period. Registration will also entitle you to software upgrades as they become available.
How to register
To register your Dyson washing machine, please:
•complete the enclosed guarantee card and return it in the freepost envelope to: Dyson Registration Department, P.O. Box 26, Bedworth, Warwickshire, CV12 8ZZ.
•alternatively you can register the machine at www.dyson.com.
Helpline 08706 002 701
•If a problem arises with your Dyson washing machine, or if it is displaying a fault code, please refer to the troubleshooting
guide section 11 01 to 11 03.
•If you still cannot solve the problem, please:
•contact the helpline 08706 002701 8am-8pm, 7 days a week,
•visit our website at www.dyson.com,
•or you can email us at service@dyson.com.
Serial number
For future reference, fill in your machine's details in the space
provided. The serial number can be located on the rating plate, position shown in section 1 01.
Serial Number
Date of purchase
Place of purchase
Do not:
•stack tumble dryers or other appliances on top of the machine.
•alter the machine or modify it in any way, as this will invalidate your guarantee and could be dangerous.
•carry out any maintenance work on the machine other than that outlined in this handbook.
•use the washing machine if any part appears to be faulty, missing or damaged.
•overload the washing machine; the maximum loads are
indicated in the programme table section 9 01.
•use adapters or extension cables.
•use the washing machine for commercial or industrial purposes, as this will invalidate your guarantee. The machine is designed for domestic use.
Always:
•use the RollerjackTM for moving the machine as it is very heavy. Care must be taken when moving it.
•turn off the machine using the ‘Mains on/off’ button when not in use and switch off at the socket.
•turn off the water supply to the machine when it is not in use for long periods.
•close both the inner and the outer doors when not in use.
•close soap tray before starting the machine.
Child safety
•Never allow children to play with or use the washing machine.
•If children are present, always use the child lock when running
the machine; see section 8 01.
•Always engage the child lock when the machine is not in use. To do this, close both doors, press and hold ‘minimum iron’ button, switch the machine off at ‘Mains on/off’ button.
•Always check drums are empty before loading the machine.
•Keep all packaging out of the reach of children.

Before installation |
4 |
01 |
|
|
|
Inner transit packaging removal
Before installation, check the washing machine for damage. A qualified person should always carry out installation.
All packaging must be removed before the machine is connected to power or water supplies.
1 Remove the rear panel by removing the five screws.
2 Carefully withdraw the foam block and then refit the rear panel and screws.
3 Remove the two screws from the rear of the lid.
4 Remove the machine lid by sliding it rearwards and then up. Remove the plug from under the lid by cutting the ties holding it on to the transit bracket.
3

 4
4

1
2
5 Using the Dyson spanner remove the four bolts securing the top transit bracket.
6 Remove the four screws securing the bracket to the machine casing and lift out the transit bracket.
5
6
• Refit the lid and two screws.
7 Open the outer door and carefully lift out the two foam inserts from the front of the inner door.
Please retain the transit packaging for future use, as it should be used whenever the machine is moved.
• To replace the packaging, reverse the above procedure.
Moving
•To move the machine, pull out the RollerjackTM handle from under the front of the machine which enables you to
manoeuvre the machine easily into your desired position.
 • Replace the RollerjackTM slowly because the handle may return with force. The RollerjackTM is not designed for moving the machine over long distances.
Installation
Location
Every Dyson machine is tested before it is dispatched. As a result, there may be some dampness or water in the machine.
•The machine should not be installed in a location where the temperature may drop below freezing.
•The machine should not be installed in a bathroom.
•The machine must be installed on a secure and flat surface.
•Soft floors, such as carpet or carpet tiles, are not suitable surfaces.
•If the machine is to be installed on floorboards, the unit must be placed on a water-resistant wooden board at least 30mm thick with at least 50mm spare on each side of the machine. This board must be screwed securely to at least two joists.
If possible, the machine should also be positioned in the corner of the room.
The maximum distance and suggested layout of the drain, taps and power socket from the machine are illustrated below. The inlet water pipes, drain hose and the electrical mains lead must be positioned carefully to avoid damage or kinking when the machine is fully installed. The machine can be connected to a standpipe, under sink pipe connection or other drainage system, but the critical dimensions must be followed.
 Important
600 mm |
|
450 mm |
|
|
|
|
|
|
|
|
|
|
|
|
|
||
|
|
|
|
|
|
|
||
|
|
|
|
|
|
|
||
|
|
|
|
|
|
|
||
|
|
|
|
|
|
|
||
|
|
|
|
|
|
|
||
|
|
|
|
|
|
|
||
MAX. |
|
MIN. |
|
|
|
|
|
|
|
|
|
|
|
|
|
|
|
|
|
|
|
|
|
|
|
|
|
|
|
|
|
|
|
|
|
|
|
|
|
|
|
|
|
|
Stand pipe connection
5 01
600 mm |
MAX. |
450 mm |
MIN. |
Sink pipe connection
Water supply, drainage and electricity
The washing machine comes with:
2 inlet pipes (one blue, one red).
1 drainage hose hook.
1 Dyson spanner.
1 drainage hose located at the rear of the machine.
Cold inlet pipe
Hot inlet pipe
Dyson spanner
Drainage hose hook
All of the above items can be found in the drums.
NB: the model ‘CRO1 Memory’ has leak protection hoses with a small rectangular block at the end of the cold inlet pipe which are different from those illustrated.
 Loading...