

Page 1
2-BAY NETWORK VIDEO REcORDER
DNS-722-4
DNS-726-4
Quick Installation Guide+
Installations-Anleitung+
Guide d’installation+
Guía de instalación+
Guida di Installazione+
Page 2
Quick Install Guide
DNS-722-4/DNS-726-4
2-Bay Network Video Recorder
Page 3

System Requirements
Hardware Requirements
One or two 3.5” SATA hard disk drives*
Network Requirements
• IP Camera(s) (See the D-Link website for a list of supported cameras.)
• Subscribed broadband internet connection (for remote access)
• Gigabit Ethernet Switch and Internet Router (or Internet Router with a
with an available Gigabit Ethernet LAN port)
Remote PC Minimum Requirements
• Operating System: Windows® 2000/XP/2003/Vista
• CPU: Pentium 4 – 2.4GHz or greater
• RAM: 512MB
• Web Browser: Internet Explorer v6.0 or later
™
Optional
UPS with USB interface
*Hard disk drives should be from the same manufacturer. To ensure maximum performance,
identical drives are recommended for RAID 1 congurations.
Package Contents
• D-Link DNS-722-4/ DNS-726-4 Network Video Recorder (NVR)
• CAT5 Ethernet Cable
• Power Adapter
• Cable Holder
• Keys
• Manual and Software on CD
• Quick Install Guide
Note: Using a power supply with a different voltage than the one included with
your product will cause damage and void the warranty for this product.
2D-Link DNS-722-4/726-4 Quick Install Guide
Page 4

Hardware Overview
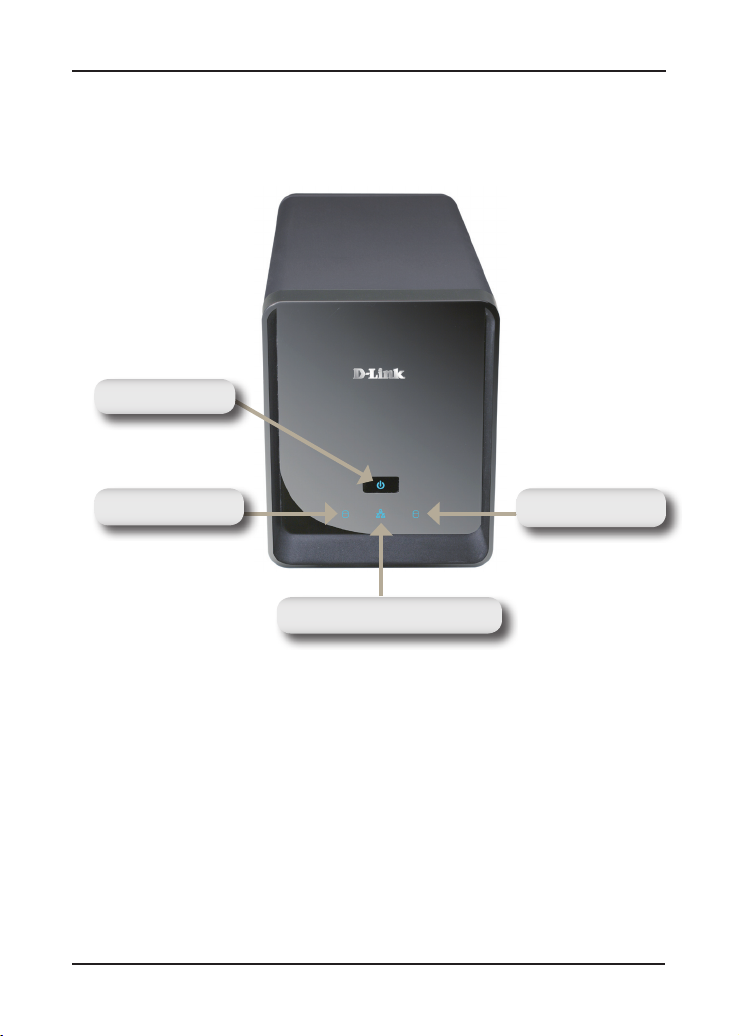
Front View
Power Button
Drive LED Drive LED
Network Activity LED
Power Button:
Press once to power on the NVR. Press and hold the button until the LED
begins to blink to power down the NVR.
Drive LEDs:
These LEDs will be solid BLUE when the drives are connected but inactive.
The LEDs will blink when the drives are being accessed, formatted or
synchronized. They will illuminate AMBER if a drive has failed.
Activity LED:
The LED will be solid BLUE when there is an Ethernet connection. It will
blink to indicate LAN trafc.
3 D-Link DNS-722-4/726-4 Quick Install Guide
Page 5

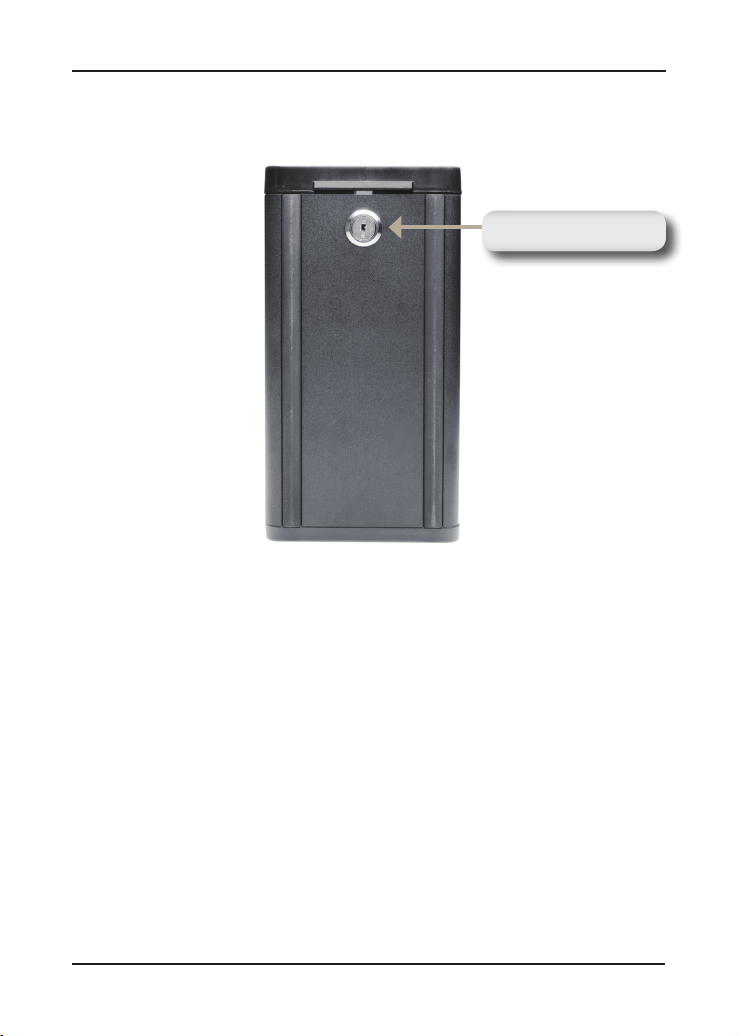
Bottom
Key Lock
Key Lock:
Use this lock to secure the front panel of the NVR. The panel can be
unlocked with the provided key for initial installation.
4D-Link DNS-722-4/726-4 Quick Install Guide
Page 6
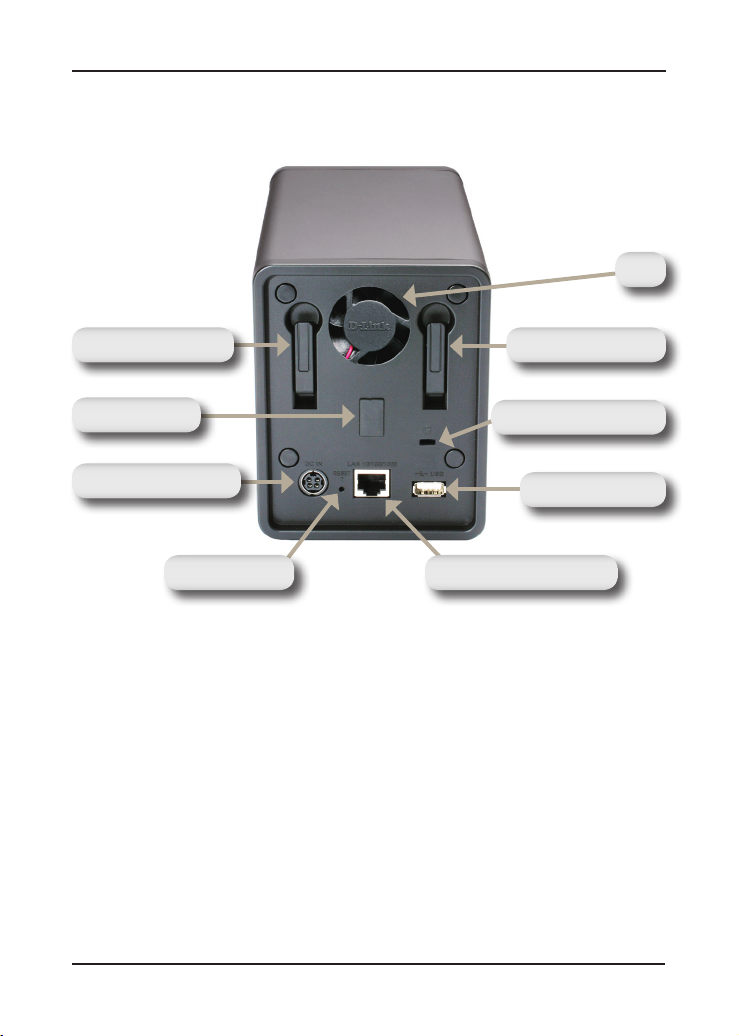
Rear Panel (Connections)
Fan
Drive Eject Lever Drive Eject Lever
Cable Holder
Power Receptacle
Reset Button Gigabit Ethernet Port
Security Cable Slot
USB Connector
Power Receptacle:
The supplied power adapter connects here.
Gigabit Ethernet Port:
The Gigabit Ethernet port connects the NVR to a network.
Drive Eject Lever:
Use these levers to eject the hard drives. The front panel must be removed
before ejecting the drives. Make sure to reset the ejector before installing
the new hard drive.
5 D-Link DNS-722-4/726-4 Quick Install Guide
Page 7

Reset Button:
A pinhole button located beside the Ethernet socket is used to reset the
system or restore the factory default settings. To reset, simply press and
hold the button until the power LED ashes.
USB Connector:
A UPS can be used as an emergency power supply for the NVR. The UPS
can use the USB interface to notify the NVR to perform a proper shutdown
before battery power runs out.
Security Cable Slot:
An external lock can be afxed to this slot to prevent theft.
Fan:
The NVR will adjust the system temperature automatically by turning the
fan on/off.
Cable Holder:
Holds the power cable to ensure a safe operating environment.
Note: After resetting the unit, you will still be able to access the recorded data
on your hard drives.
6D-Link DNS-722-4/726-4 Quick Install Guide
Page 8
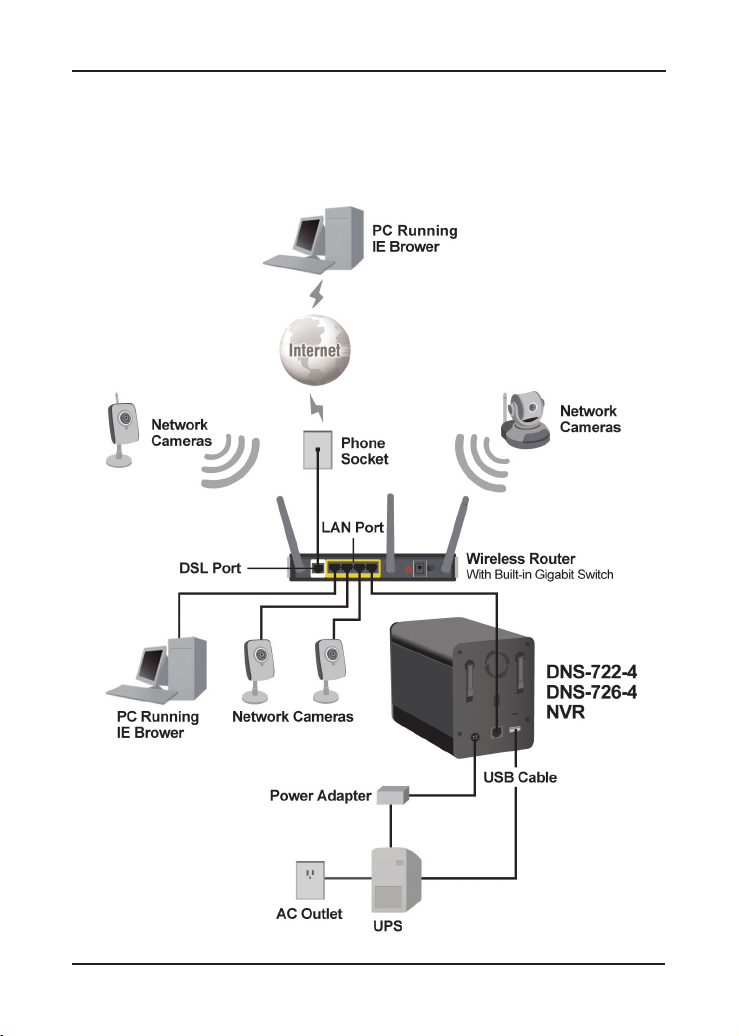
Connecting Your NVR to the Network
Your Network Setup
7 D-Link DNS-722-4/726-4 Quick Install Guide
Page 9
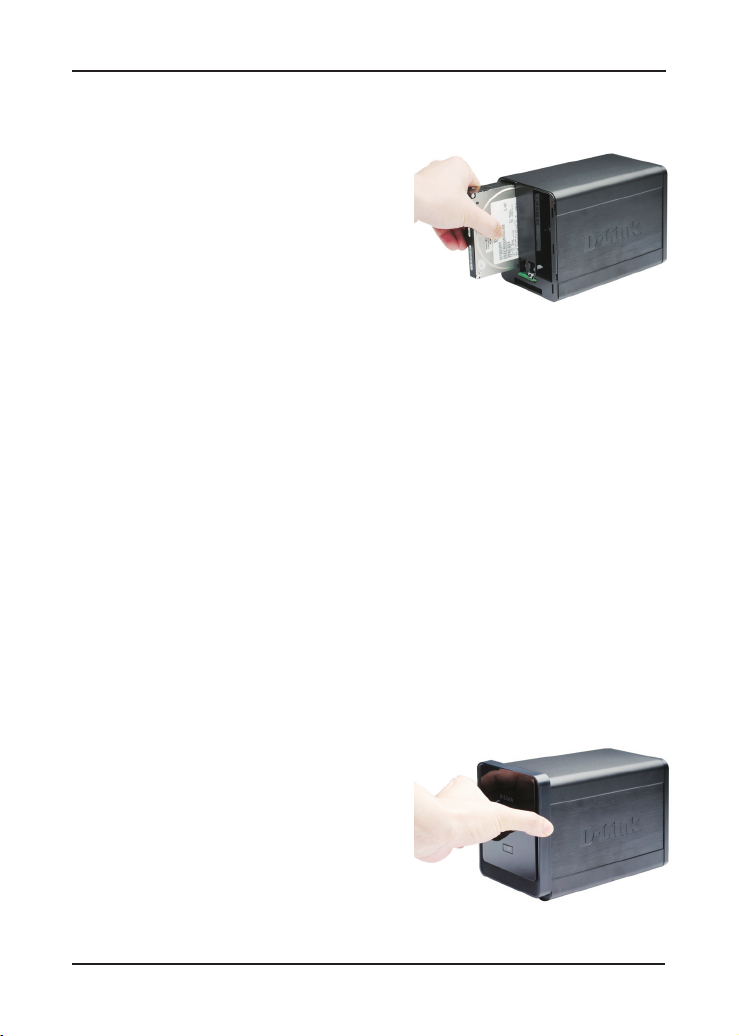
Hardware Installation
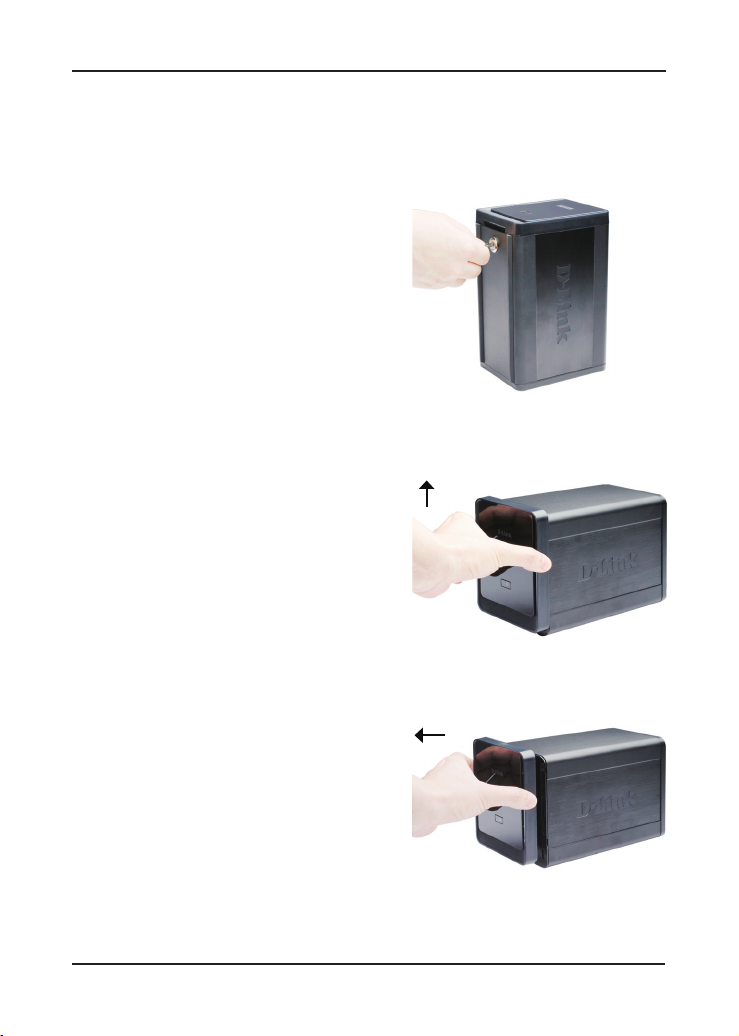
Install the Hard Drives:
1. Please install a SATA HDD before
turning on the NVR. Use the key to
unlock the faceplate from the bottom
of the NVR.
2. Slide the faceplate up until it
unlatches from the device.
3. Once the faceplate is unlatched, pull
it off the device, exposing the drive
bays.
8D-Link DNS-722-4/726-4 Quick Install Guide
Page 10
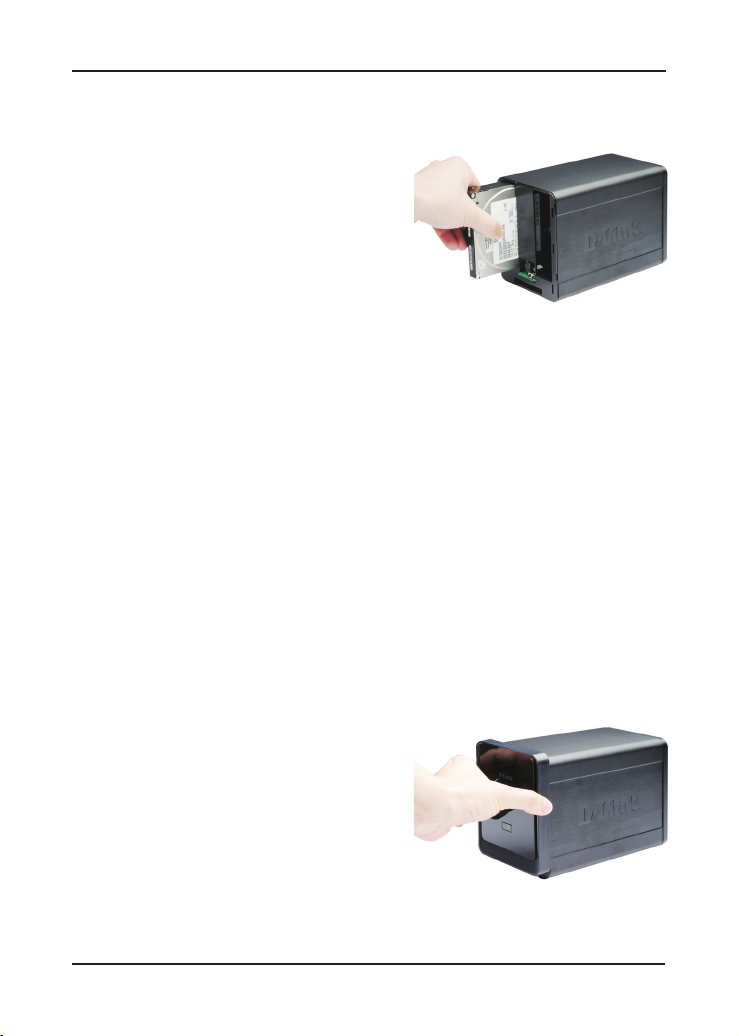
4. Insert a 3.5” SATA hard drive into an
available drive bay. Make sure to
align the drive connector to the SATA
connector on the bottom edge inside
the drive bay of the NVR. Gently push
the drive in until it connects. When a
drive is inserted properly, you will feel
it “seat” into the connector. Some
hard drives that are thin or oddly
shaped may need to be guided
carefully into position. If a drive is not
properly seated, the LED will not
illuminate after powering on the device.
Optional: When installing an optional
second HDD, please repeat Step 4.
To avoid data incompatibility in
RAID 1 operation, useidentical SATA
drives from the same manufacturer.
Formatted drive capacity for RAID 1
operation is dependant on the HDD
with the lowest capacity.
5. Attach the faceplate to the front of the
device.
9 D-Link DNS-722-4/726-4 Quick Install Guide
Page 11

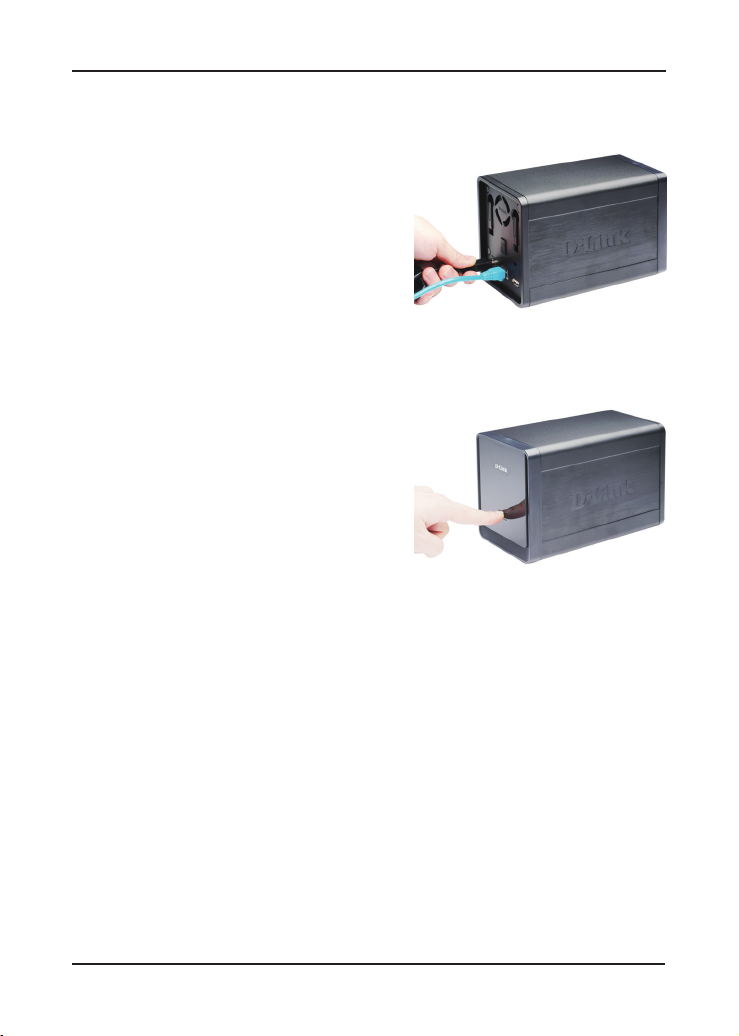
6. Lock the faceplate to secure the HDDs.
Connect the Ethernet Cable
Connect an Ethernet cable to the Ethernet
port. Connect one end of the Ethernet
cable to the NVR. Connect the opposite
end of this cable to a Gigabit Ethernet
LAN port of a router or a switch, or directly
to a computer.
Connect the UPS (Optional)
If you have a Universal Power Supply
(UPS) that you would like to use with the
NVR, you may connect it before powering
the unit on.
1. Connect the USB cable from the UPS to
the port on the back of the NVR.
2. Connect the power cable to the UPS.
(Ensure that the UPS is plugged in and
receiving power.)
Note: To turn off the NVR, simply push the power button for 5 seconds. The
power LED will blink and the NVR will turn off after a moment.
10D-Link DNS-722-4/726-4 Quick Install Guide
Page 12
Attach the External Power Supply
Attach the external power supply to the
DC power receptacle located on the
NVR’s rear panel (labeled DC12V) and
connect the other end to an AC power
outlet.
Turn on the Power and Initialize
the HDD
Push the power button at the front panel.
The LED on the NVR will begin to blink.
When you have a proper connection,
wait about 60 seconds, the NVR power
LED will stay steady and the HDD and
network LEDs will begin to blink. The
NVR will initialize the HDD to default
settings. To change HDD settings, please
visit the SETUP page in the web-based
conguration utility.
Supported Cameras
DNS-722-4: Supports all D-Link network
cameras. Includes support for auto-discovery,
and up to 1.3 megapixel resolution.
DNS-726-4: Supports known-brand
network cameras including D-Link, Axis,
Panasonic, and SONY. Specic feature
support depends on software.
11 D-Link DNS-722-4/726-4 Quick Install Guide
Page 13

Getting Started
Step 1: Make sure the NVR is connected to a network via a router or a
switch, or directly connected to PC.
Step 2: Turn on the computer and insert the D-Link DNS-722-4/DNS-726-4
Autorun CD into the CD-ROM drive. The following step-by-step instructions
displayed are shown when using Windows Vista operating system. The
steps and screens are similar for other Windows operating systems.
Click NVR Search Utility.
Highlight an available NVR
and click Configuration to
access the web-based utility.
For detailed conguration instructions, please refer to the User Manual on
the CD-ROM.
Technical Support
United Kingdom (Mon-Fri)
Home Wireless/Broadband 0871 873 3000 (9.00am–06.00pm, Sat 10.00am-02.00pm)
Managed, Smart, & Wireless Switches, or Firewalls 0871 873 0909 (09.00am – 05.30pm)
(BT 10ppm, other carriers may vary.)
Ireland (Mon-Fri)
All Products 1890 886 899 (09.00am-06.00pm, Sat 10.00am-02.00pm)
€0.05ppm peak, €0.045ppm off peak Times
Internet
http://www.dlink.co.uk
ftp://ftp.dlink.co.uk
12D-Link DNS-722-4/726-4 Quick Install Guide
Page 14

Schnellinstallationsanleitung
DNS-722-4/DNS-726-4
2-Bay Network Video Recorder
Page 15

Systemanforderungen
Hardwarevoraussetzungen
Ein oder zwei 3,5” SATA-Festplatten*
Netzwerkanforderungen
• IP-Kamera(s) (Eine Liste unterstützter Kameras nden Sie auf der D-Link
Website.)
• Internetverbindung (für den Fernzugriff)
• Gigabit Ethernet Switch und Internet Router (oder Internet Router mit einem
verfügbaren Gigabit Ethernet LAN-Port)
PC-Mindestanforderung für den Fernzugriff
• Betriebssystem: Windows® 2000/XP/2003/Vista™
• CPU: Pentium 4 – 2,4 GHz oder höher
• RAM: 512 MB
• Webbrowser: Internet Explorer V 6.0 oder höher
Optional
UVS (unterbrechnungsfreie Stromversorgung) mit USB-Schnittstelle
*Festplattenlaufwerke sollten vom gleichen Hersteller sein. Um die bestmögliche
Leistung zu gewährleisten, werden für RAID 1 Kongurationen identische
Laufwerke empfohlen.
Packungsinhalt
• D-Link DNS-722-4/ DNS-726-4 Network Video Recorder (NVR)
• CAT5-Ethernetkabel
• Stromadapter
• Kabelhalter
• Schlüssel
• Handbuch und Software auf CD
• Schnellinstallationsanleitung
Hinweis: Die Verwendung eines Netzteils mit einer anderen Spannung als in dem
zum Lieferumfang gehörenden Netzteil führt zu Schäden. In diesem Falle erlischt der
Garantieanspruch für dieses Produkt.
14D-Link DNS-722-4/726-4 Quick Install Guide
Page 16
Hardware-Überblick
Vorderansicht
Ein-/Aus-Taste
Laufwerks-LED Laufwerks-LED
Netzwerkaktivität-LED
Ein-/Aus-Taste:
Diese LEDs leuchten durchgehend BLAU, wenn die Festplattenlaufwerke
angeschlossen, aber inaktiv sind. Die LEDs blinken, wenn auf die Laufwerke
zugegriffen wird oder wenn sie formatiert oder synchronisiert werden. Sie
leuchten GELB, wenn ein Laufwerk ausgefallen ist.
Laufwerk-LEDs:
Diese LEDs leuchten durchgehend BLAU, wenn die Festplattenlaufwerke angeschlossen, aber inaktiv sind. Die LEDs blinken, wenn auf die
Laufwerke zugegriffen wird oder wenn sie formatiert oder synchronisiert
werden. Sie leuchten GELB, wenn ein Laufwerk ausgefallen ist.
Aktivitäts-LED:
Die LED leuchtet bei einer Ethernet-Verbindung durchgehend BLAU. Sie
blinkt, um LAN-Verkehr anzuzeigen.
15 D-Link DNS-722-4/726-4 Quick Install Guide
Page 17
Unterseite
Schließvorrichtung
Schließvorrichtung:
Verwenden Sie diese Schließvorrichtung, um die Vorderplatte des NVR
zu sichern. Sie kann mit dem im Lieferumfang enthaltenen Schlüssel zur
Erstinstallation aufgeschlossen werden.
16D-Link DNS-722-4/726-4 Quick Install Guide
Page 18

Rückseite (Anschlüsse)
Lüfter
Laufwerkauswurfhebel
Kabelhalter
Stromanschluss
Rücksetzknopf (Reset) Gigabit-Ethernet-Port
Laufwerkauswurfhebel
Anschluss für ein
Sicherheitsschloss
oder - kabel
USB-Anschluss
Stromanschluss:
Anschluss für den mitgelieferten Stromadapter.
Gigabit-Ethernet-Port:
Der Gigabit Ethernet-Port verbindet den NVR mit dem Netzwerk.
Laufwerkauswurfhebel:
Wird zum Auswerfen der Laufwerke verwendet. Vor dem Auswerfen der
Laufwerke muss die Vorderplatte entfernt werden. Vergessen Sie nicht den
Hebel zurückzusetzen, bevor Sie das neue Festplattenlaufwerk installieren.
17 D-Link DNS-722-4/726-4 Quick Install Guide
Page 19

Rücksetzknopf:
Ein vertiefter Knopf, der sich neben der Ethernetbuchse bendet und der
zum Zurücksetzen oder zur Wiederherstellung des Systems auf die werkseitigen Standardeinstellungen verwendet wird. Drücken Sie zur Rücksetzung des Systems auf den Knopf und halten Sie ihn so lange gedrückt, bis
die LED-Betriebsanzeige blinkt.
USB-Anschluss:
Für den NVR kann eine unterbrechungsfreie Stromversorgung (UVS)
verwendet werden. Das UVS-Gerät kann die USB-Schnittstelle nutzen, um
den NVR zu veranlassen, das System ordnungsgemäß herunterzufahren,
bevor die Batterieleistung zu Ende geht.
Anschluss für ein Sicherheitsschloss oder -kabel:
Ein externes Schloss kann hier angebracht werden, um Diebstahl zu
verhindern.
Lüfter:
Der NVR passt die Systemtemperatur automatisch durch entsprechendes
Ein-/Ausschalten des Lüfters an.
Kabelhalter:
Halter für das Stromkabel zur Sicherung der Betriebsumgebung.
Hinweis: Sie haben auch nach einem Rücksetzen des Systems weiterhin
Zugriff auf die auf Ihren Festplattenlaufwerken bendlichen Daten.
18D-Link DNS-722-4/726-4 Quick Install Guide
Page 20

Anschließen Ihres NVR an das Netzwerk
Your Network Setup
19 D-Link DNS-722-4/726-4 Quick Install Guide
Page 21

Hardware-Installation
Laufwerke installieren:
1. Installieren Sie ein SATA-
Festplattenlaufwerk, bevor Sie den
NVR einschalten. Verwenden Sie
den Schlüssel, um die Abdeckung
auf der Unterseite des NVR zu
entriegeln.
2. Schieben Sie die Abdeckung nach
oben, bis sie vom Gerät ausklinkt.
3. Wenn die Abdeckung ausgeklinkt
ist, ziehen Sie sie von dem Gerät.
Die Laufwerkeinschübe sind nun
sichtbar.
20D-Link DNS-722-4/726-4 Quick Install Guide
Page 22

4. Schieben Sie ein 3.5” SATA-
Festplattenlaufwerk in einen verfügbaren
Laufwerkeinschub ein. Stellen Sie dabei
sicher, dass der Laufwerkanschluss
an den SATA-Anschluss auf der
Unterseite im Laufwerkeinschub
des NVR ausgerichtet ist. Drücken
Sie das Festplattenlaufwerk dann
vorsichtig weiter in den Einschub, bis
es eingerastet ist. Wenn ein Laufwerk
ordnungsgemäß eingeschoben ist,
fühlen Sie, wie es im Anschluss
„einrastet“. Einige Laufwerke, die dünn
oder ungewöhnlich geformt sind, müssen
möglicherweise vorsichtig an die richtige
Position geführt werden. Wenn ein
Laufwerk nicht ordnungsgemäß sitzt,
leuchtet die LED nach dem Einschalten
des Gerätes nicht auf.
Optional: Wiederholen Sie Schritt 4 für
die Installation eines optionalen zweiten
Festplattenlaufwerks. Um mögliche
Dateninkompatibilitäten bei RAID 1 Betrieb zu vermeiden, sollten Sie identische
SATA-Festplattenlaufwerke vom gleichen
Hersteller verwenden.
Die formatierte Laufwerkskapazität für
den RAID 1 Betrieb richtet sich nach dem
Festplattenlaufwerk mit der niedrigsten
Kapazität.
5. Bringen Sie die Abdeckung wieder
an der Vorderseite des Gerätes an.
21 D-Link DNS-722-4/726-4 Quick Install Guide
Page 23

6. Schließen Sie die Abdeckung ab, um
die Festplattenlaufwerke zu sichern.
Ethernetkabel anschließen
Stecken Sie ein Ethernet-Kabel in den
Ethernet-Port. Schließen Sie das eine Ende
des Ethernetkabels am NVR an. Stecken
Sie das andere Ende dieses Kabels in
einen Gigabit Ethernet LAN-Port eines
Routers oder Switch oder direkt in einen
Computer.
UVS anschließen (optional)
Wenn Sie ein USV (Gerät zur
unterbrechnungsfreien Stromversorung)
mit dem NVR verwenden möchten,
können Sie es vor dem Einschalten der
Einheit anschließen.
1. Stecken Sie das USB-Kabel vom UVS-
Gerät in den Port auf der Rückseite des
NVR.
2. Schließen Sie das Stromkabel an das
UVS-Gerät. (Vergewissern Sie sich, dass
das UVS-Gerät angeschlossen ist und
mit Strom versorgt wird.)
Hinweis: Um den NVR auszuschalten,halten Sie die Ein-/Aus-Taste einfach 5
Sekunden lang gedrückt. Die LED-Betriebsanzeige blinkt und der NVR schaltet sich
nach einem kurzen Moment aus.
22D-Link DNS-722-4/726-4 Quick Install Guide
Page 24

Externes Netzteil anschließen
Schließen Sie die externe
Stromversorgung an den
Gleichstromeingang auf der Rückseite
des NVR (durch DC 12V gekennzeichnet)
an und stecken Sie das andere Ende in
eine Wechselstrom-Steckdose.
Stromversorgung einschalten und
Festplattenlaufwerk initialisieren
Drücken Sie auf die Ein-/Aus-Taste auf
der Vorderseite des Geräts. Die LED auf
dem NVR beginnt zu blinken. Sobald
eine ordnungsgemäße Verbindung
hergestellt ist, warten Sie etwa 60
Sekunden. Die LED-Betriebsanzeige
des NVR leuchtet durchgehend und
die Festplattenlaufwerk- und NetzwerkLEDs beginnen zu blinken. Der NVR
initialisiert die Festplattenlaufwerke und
setzt sie auf die Standardeinstellungen.
Diese Einstellungen können auf der
SETUP-Seite des webbasierten
Kongurationshilfsprogramms geändert
werden.
Unterstützte Kameras
DNS-722-4: Unterstützt alle
Netzwerkkameras von D-Link. Unterstützt
die Auto-Discovery-Funktion und
Auösungen von bis zu 1,3 Megapixel.
DNS-726-4: Unterstützt Netzwerkkameras
bekannter Marken, einschließlich
D-Link, Axis, Panasonic und SONY. Die
Unterstützung bestimmter Funktionen
hängt von der Software ab.
23 D-Link DNS-722-4/726-4 Quick Install Guide
Page 25

Erste Schritte
Schritt 1: Stellen Sie sicher, dass der NVR über Router oder Switch an ein
Netzwerk angeschlossen oder direkt mit einem PC verbunden ist.
Schritt 2: Schalten Sie den Computer ein und legen Sie die Autorun CD
“D-Link DNS-722-4/DNS-726-4” in das CD-ROM-Laufwerk ein. Die folgenden
schrittweise durchzuführenden Anweisungen gelten für das Betriebssystem
Windows Vista. Ähnliche Schritte und Bildschirmseiten werden bei anderen
Windows-Betriebssystemen angezeigt.операционным системам Windows.
Klicken Sie auf Easy Search Utility.
Markieren Sie einen
verfügbaren NVR und klicken
Sie auf Conguration,
um auf das webbasierte
Hilfsprogramm zuzugreifen.
Genaue Kongurationsanleitungen nden Sie im Benutzerhandbuch auf der CD ROM.
Deutschland: Web: http://www.dlink.de
Technische Unterstützung
E-Mail: support@dlink.de
Telefon: +49(0)1805 2787 0,14 € pro Minute
Zeiten: Mo. –Fr. 09:00 – 17:30 Uhr
Österreich: Web: http://www.dlink.at
E-Mail: support@dlink.at
Telefon: +43(0)820 480084 0,116 € pro Minute
Zeiten: Mo. –Fr. 09:00 – 17:30 Uhr
Schweiz: Web: http://www.dlink.ch
E-Mail: support@dlink.ch
Telefon: +41(0)848 331100 0,08 CHF pro Minute
Zeiten: Mo. –Fr. 09:00 – 17:30 Uhr
* Gebühren aus Mobilnetzen und von anderen Providern können abweichen.
24D-Link DNS-722-4/726-4 Quick Install Guide
Page 26

Guide d’installation rapide
DNS-722-4/DNS-726-4
2-Bay Network Video Recorder
Page 27

Conguration système requise
Matériel requis
Un ou deux disques durs SATA de 3,5 pouces*
Conguration réseau requise
• Caméra(s) IP (Veuillez consulter le site Web de D-Link pour obtenir une liste
des caméras prises en charge.)
• Abonnement à une connexion Internet haut débit (pour un accès à distance)
• Commutateur et routeur Gigabit Ethernet (ou routeur Internet avec un port
de réseau local Gigabit Ethernet disponible)
Conguration minimale requise pour le PC distant
• Système d’exploitation : Windows® 2000/XP/2003/Vista™
• Processeur : Pentium 4 - 2,4 GHz ou plus rapide
• Mémoire vive : 512 Mo
• Navigateur Web : Internet Explorer 6.0 ou une version supérieure
Option facultative
ASI avec interface USB
* Les disques durs doivent provenir du même fabricant. An d’assurer une performance
optimale, il est conseillé d’utiliser des disques identiques pour les congurations RAID 1.
Contenu de la boîte
• Enregistreur vidéo réseau (NVR) D-Link DNS-722-4/ DNS-726-4
• Câble Ethernet CAT5
• Adaptateur secteur
• Support de câble
• Clés
• CD avec manuel et logiciel
• Guide d’installation rapide
Remarque : L’utilisation d’une alimentation dont la tension diffère de celle de votre
produit l’endommagera et en annulera la garantie.
26D-Link DNS-722-4/726-4 Quick Install Guide
Page 28

Description du matériel
Vue avant
Bouton de mise
sous tension
Voyant de disque Voyant de disque
Voyant d’activité réseau
Bouton de mise sous tension :
Appuyez une fois pour allumer l’enregistreur NVR. Pour éteindre
l’enregistreur NVR, maintenez enfoncé le bouton jusqu’à ce que le voyant
commence à clignoter.
Voyants de disque :
Ces voyants s’allument xement en BLEU lorsque les disques sont
connectés mais inactifs. Les voyants clignotent lorsque les disques sont
utilisés, formatés ou synchronisés. Ils s’allument en ORANGE en cas de
défaillance d’un disque.
Voyant d’activité :
Le voyant s’allume xement en BLEU quand il y a une connexion Ethernet.
Il clignote en cas de trac sur le réseau local.
27 D-Link DNS-722-4/726-4 Quick Install Guide
Page 29

Dessous
Serrure
Serrure :
Utilisez cette serrure pour verrouiller le panneau avant de l’enregistreur NVR.
Le panneau avant peut être déverrouillé à l’aide de la clé fournie an d’effectuer
l’installation initiale.
28D-Link DNS-722-4/726-4 Quick Install Guide
Page 30

Panneau arrière (Connexions)
Ventilateur
Levier d’éjection
de disque
Support
de câble
Fiche
d’alimentation
Bouton Reset
(Réinitialisation)
Port Gigabit Ethernet
Levier d’éjection
de disque
Slot de câble
de sécurité
Connecteur USB
Fiche d’alimentation :
L’adaptateur secteur fourni est branché ici.
Port Gigabit Ethernet :
Le port Gigabit Ethernet sert à connecter l’enregistreur NVR au réseau.
Levier d’éjection de disque :
Utilisez ces leviers pour éjecter les disques durs. Le panneau avant doit
être enlevé avant d’éjecter les disques. Vériez que le levier est remis à
l’état initial avant d’installer le nouveau disque dur.
29 D-Link DNS-722-4/726-4 Quick Install Guide
Page 31

Bouton Reset (Réinitialisation) :
Un bouton situé dans le trou d’épingle à côté du port Ethernet permet
de réinitialiser le système ou de restaurer les paramètres d’usine. Pour
réinitialiser, maintenez enfoncé le bouton jusqu’à ce que le voyant
d’alimentation clignote.
Connecteur USB :
Vous pouvez utiliser une ASI comme alimentation de secours pour
l’enregistreur NVR. L’ASI peut utiliser l’interface USB pour indiquer à
l’enregistreur NVR d’effectuer un arrêt approprié avant l’épuisement des
batteries d’alimentation.
Slot de câble de sécurité :
Un verrouillage externe peut être apposé à ce slot an de prévenir le vol.
Ventilateur :
L’enregistreur NVR réglera automatiquement la température du système en
allumant ou en éteignant le ventilateur.
Support de câble :
Maintient le câble d’alimentation afin d’assurer un environnement de
fonctionnement sécurisé.
Remarque : Après la réinitialisation de l’appareil, vous aurez toujours accès
aux données enregistrées sur vos disques durs.
30D-Link DNS-722-4/726-4 Quick Install Guide
Page 32

Connexion de votre enregistreur NVR au réseau
Your Network Setup
31 D-Link DNS-722-4/726-4 Quick Install Guide
Page 33

Installation du matériel
Installez les disques durs :
1. Veuillez installer un disque dur SATA
avant d’allumer l’enregistreur NVR.
Utilisez la clé pour déverrouiller la
face avant du bas de l’enregistreur
NVR.
2. Faites glisser la face avant vers le
haut jusqu’à ce qu’elle se décroche
de l’appareil.
3. Une fois que la face avant est
décrochée, retirez-la de l’appareil
pour faire apparaître les baies.
32D-Link DNS-722-4/726-4 Quick Install Guide
Page 34

4. Insérez un disque dur SATA de 3,5
pouces dans une baie disponible.
Veillez à bien aligner les connecteurs
du disque avec le connecteur SATA se
trouvant sur le bord inférieur à l’intérieur
de la baie de disque de l’enregistreur
NVR. Insérez délicatement le disque
jusqu’à ce qu’il se connecte. Lorsqu’un
disque est inséré correctement, vous
le sentirez “prendre sa place” dans
le connecteur. Certains disques durs
qui sont minces ou qui ont une forme
inhabituelle doivent être guidés en
position avec soin. Si disque n’est pas
correctement en place, le voyant ne
s’allumera pas après l’allumage de
l’appareil.
Option facultative : Lors de l’installation
d’un deuxième disque dur, veuillez
répéter l’étape 4. An d’éviter
l’incompatibilité des données dans un
fonctionnement en RAID 1, utilisez des
disques identiques SATA provenant du
même fabricant.
La capacité de disque formaté pour
un fonctionnement RAID 1 dépend
du disque dur ayant la plus faible
capacité.
5. Remontez la face avant sur l’appareil.
33 D-Link DNS-722-4/726-4 Quick Install Guide
Page 35

6. Verrouillez la face avant pour sécuriser
les disques durs.
Connectez le câble Ethernet
Connectez un câble Ethernet au port
Ethernet. Connectez une extrémité du
câble Ethernet à l’enregistreur NVR.
Connectez l’autre extrémité de ce câble
au port de réseau local Gigabit Ethernet
d’un routeur ou d’un commutateur, ou
directement à un ordinateur.
Connectez l’ASI (Facultatif)
Si vous possédez une alimentation sans
interruption (ASI) que vous souhaitez
utiliser avec l’enregistreur NVR, vous
pouvez la connecter avant d’allumer
l’appareil.
1. Connectez le câble USB entre l’ASI et le
port à l’arrière de l’enregistreur NVR.
2. Connectez le câble d’alimentation à
l’ASI. (Vériez que l’ASI est branchée et
qu’elle est sous tension.)
Remarque : Pour éteindre l’enregistreur NVR, appuyez simplement sur le bouton
de mise sous tension pendant 5 secondes. Le voyant d’alimentation clignotera et
l’enregistreur NVR s’éteindra après un moment.
34D-Link DNS-722-4/726-4 Quick Install Guide
Page 36

Branchez l’adaptateur secteur
externe
Branchez l’adaptateur secteur externe à la
che d’alimentation située sur le panneau
arrière de l’enregistreur NVR (étiquetée
DC 12V), puis branchez l’autre extrémité
à une prise de courant CA.
Allumez l’appareil et initialisez le
disque dur
Appuyez sur le bouton de mise sous
tension sur le panneau avant. Le voyant
d’alimentation de l’enregistreur NVR
commencera à clignoter. Lorsque vous avez
une connexion appropriée, attendez environ
60 secondes, le voyant d’alimentation de
l’enregistreur NVR restera xe et les voyants
de disque et d’activité réseau commenceront
à clignoter. L’enregistreur NVR initialisera
le disque dur avec les paramètres par
défaut. Pour modier les paramètres du
disque dur, veuillez vous reporter à la page
SETUP (CONFIGURATION) de l’utilitaire de
conguration Web.
Caméras prises en charge
DNS-722-4 : Prend en charge toutes
les caméras réseau D-Link. Comprend
la prise en charge de la détection
automatique, et une résolution allant
jusqu’à 1,3 megapixels.
DNS-726-4 : Prend en charge les
caméras réseau des marques connues,
dont D-Link, Axis, Panasonic, et
SONY. La prise en charge de fonctions
spéciques dépend du logiciel.
35 D-Link DNS-722-4/726-4 Quick Install Guide
Page 37

Mise en route
Étape 1 : Vériez que l’enregistreur NVR est connecté à un réseau via un
routeur ou un commutateur, ou qu’il est directement connecté à un PC.
Étape 2 : Allumez l’ordinateur et insérez le CD D-Link DNS-722-4/
DNS-726-4 à exécution automatique dans le lecteur de CD-ROM. Les
instructions pas à pas suivantes seront montrées pour le système
d’exploitation Windows Vista. Les étapes et écrans sont similaires pour
d’autres systèmes d’exploitation Windows.
Cliquez sur NVR Search
Utility (Utilitaire de recherche
d’enregistreur NVR).
Sélectionnez un enregistreur
NVR disponible, puis cliquez
sur Conguration pour
accéder à l’utilitaire Web.
Veuillez consulter le manuel de l’utilisateur sur le CD-ROM pour obtenir
des directives détaillées concernant la conguration.
Assistance technique
Assistance technique D-Link par téléphone : 0 820 0803 03
0,12 €/min la minute : Lundi – Vendredi de 9h à 13h et de 14h à 19h
Samedi 9h à 13h et de 14h à 16h
Assistance technique D-Link sur internet :
http://www.dlink.fr
36D-Link DNS-722-4/726-4 Quick Install Guide
Page 38

Guía de instalación rápida
DNS-722-4/DNS-726-4
2-Bay Network Video Recorder
Page 39

Requisitos del sistema
Requisitos de hardware
Una o dos unidades de disco duro* SATA de 3,5”
Requisitos de red
• Cámara(s) IP (consulte el sitio web de D-Link para ver una lista de las
cámaras compatibles).
• Conexión a Internet de banda ancha contratada (para acceso remoto)
• Conmutador Gigabit Ethernet y router para Internet (o router de Internet
con un puerto LAN Gigabit Ethernet disponible)
Requisitos mínimos del PC remoto
• Sistema operativo: Windows® 2000/XP/2003/Vista™
• CPU: Pentium 4 – 2,4 GHz o superior
• RAM: 512 MB
• Explorador de web: Internet Explorer v6.0 o posterior
Opcional
UPS con interfaz USB
*Las unidades de disco duro deben ser del mismo fabricante. Para garantizar el máximo
rendimiento, se recomienda utilizar unidades idénticas para las conguraciones RAID 1.
¿Qué contiene la caja?
• D-Link DNS-722-4/ DNS-726-4 Network Video Recorder (NVR)
• Cable Ethernet CAT5
• Adaptador de alimentación
• Soporte para cable
• Llaves
• Manual y software en CD
• Guía de instalación rápida
Nota: la utilización de una alimentación de corriente con un voltaje distinto del
incluido con el producto provocará daños y anulará la garantía de este producto.
38D-Link DNS-722-4/726-4 Quick Install Guide
Page 40

Descripción general del hardware
Vista frontal
Botón Alimentación
LED de la unidad
LED de actividad de red
LED de la unidad
Botón Alimentación:
Púlselo una vez para encender el NVR. Pulse y mantenga pulsado el botón
hasta que el indicador LED comience a parpadear para apagar el NVR.
LED de la unidad:
Estos LED estarán en AZUL continuo cuando las unidades están conectadas pero inactivas. Los LED parpadearán cuando se está accediendo,
dando formato o sincronizando las unidades. Se encenderán en ÁMBAR si
la unidad ha fallado.
LED de actividad:
El LED estará en AZUL continuo cuando exista una conexión Ethernet.
Parpadeará para indicar el tráco de la LAN.
39 D-Link DNS-722-4/726-4 Quick Install Guide
Page 41

Parte inferior
Cerradura
Cerradura:
Utilice este cierre para asegurar el panel frontal del NVR. Se puede
desbloquear el panel con la llave suministrada para la instalación inicial.
40D-Link DNS-722-4/726-4 Quick Install Guide
Page 42

Panel posterior (conexiones)
Ventilador
Palanca de
expulsión de
la unidad
Soporte para cable
Receptáculo de
alimentación
Botón Reiniciar Puerto Gigabit Ethernet
Palanca de expulsión
de la unidad
Espacio para
cable de
seguridad
Conector USB
Receptáculo de alimentación:
El adaptador de alimentación suministrado se conecta aquí.
Puerto Gigabit Ethernet:
El puerto Gigabit Ethernet conecta el NVR a una red.
Palanca de expulsión de la unidad:
Utilice estas palancas para expulsar los discos duros. Se debe extraer
el panel frontal antes de expulsar las unidades. Asegúrese de reiniciar el
eyector antes de instalar el nuevo disco duro.
41 D-Link DNS-722-4/726-4 Quick Install Guide
Page 43

Botón Reiniciar:
Botón situado al lado de la toma Ethernet que se utiliza para reiniciar el
sistema o restablecer los ajustes predeterminados de fábrica. Para reiniciar,
simplemente pulse y mantenga pulsado el botón hasta que parpadee el
indicador LED.
Conector USB:
Se puede utilizar una SAI como suministro de energía de emergencia para
el NVR. La SAI puede utilizar la interfaz USB para noticar al NVR que
debe realizar una parada correcta antes de que se agote la energía de la
batería.
Espacio para cable de seguridad:
Puede acoplarse una cerradura externa a este espacio para evitar robos.
Ventilador:
El NVR ajustará automáticamente la temperatura del sistema activando o
desactivando el ventilador.
Soporte para cable:
Sujeta el cable de alimentación para garantizar un entorno de funcionamiento
seguro.
Nota: después de reiniciar la unidad podrá seguir accediendo a los datos
grabados en los discos duros.
42D-Link DNS-722-4/726-4 Quick Install Guide
Page 44

Conexión del NVR a la red
Your Network Setup
43 D-Link DNS-722-4/726-4 Quick Install Guide
Page 45

Instalación del hardware
Instalar los discos duros:
1. Instale una UDD SATA antes de
encender el NVR. Utilice la llave
para desbloquear la tapa de la parte
inferior del NVR.
2. Desplace hacia arriba la tapa hasta
desencajarla del dispositivo.
3. Una vez desencajada la tapa,
extráigala del dispositivo, mostrando
las bahías de la unidad.
44D-Link DNS-722-4/726-4 Quick Install Guide
Page 46

4. Introduzca un disco duro de 3,5” SATA
en una de las bahías vacías de la
unidad de almacenamiento. Asegúrese
de alinear el conector de la unidad con
el conector SATA en el borde inferior
del interior de la bahía de la unidad del
NVR. Empuje suavemente la unidad
hasta que se conecte. Cuando la
unidad está correctamente insertada,
notará que se “asienta” en el conector.
En algunos discos duros finos o con
formas raras, puede ser necesario
guiarlos suavemente para colocarlos
en su lugar. Si la unidad no está
correctamente asentada, el indicador
LED no se iluminará después de
encender el dispositivo.
Opcional: al instalar una segunda UDD
opcional, repita el paso 4. Para evitar
la incompatibilidad de los datos en el
funcionamiento RAID 1, utilice unidades
SATA idénticas del mismo fabricante.
La capacidad de la unidad formateada
para el funcionamiento RAID 1 depende
de la UDD de menor capacidad.
5. Coloque la tapa en la parte frontal del
dispositivo.
45 D-Link DNS-722-4/726-4 Quick Install Guide
Page 47

6. Bloquee la tapa para asegurar las UDD.
Conectar el cable Ethernet
Conecte un cable Ethernet al puerto
Ethernet. Conecte un extremo del cable
Ethernet al NVR. Conecte el extremo
opuesto de dicho cable a un puerto
LAN Gigabit Ethernet de un router o
un conmutador o directamente a un
ordenador.
Conectar la SAI (opcional)
Si dispone de un suministro de aliment-
ación universal (SAI) que desee utilizar
con el NVR, puede conectarlo antes de
encender la unidad.
1. Conecte el cable USB desde la SAI al
puerto de la parte posterior del NVR.
2. Conecte el cable de alimentación a
la SAI (asegúrese de que la SAI está
enchufada y recibiendo energía).
Nota: para apagar el NVR, simplemente pulse el botón de alimentación durante 5
segundos. El indicador LED de alimentación parpadeará y el NVR se apagará poco
después.
46D-Link DNS-722-4/726-4 Quick Install Guide
Page 48

Acoplar el suministro externo de
energía
Acople el suministro externo de energía
al receptáculo de alimentación de CC
situado en el panel posterior del NVR
(con la etiqueta CC 12V) y conecte el otro
extremo a una salida de alimentación de
CA.
Apagar la alimentación e inicializar
la UDD
Pulse el botón de alimentación del
panel frontal. El indicador LED del NVR
empezará a parpadear. Cuando tenga
una conexión correcta, espere alrededor
de 60 segundos, el indicador LED de
alimentación del NVR se mantendrá jo
y empezarán a parpadear los LED de la
UDD y de la red. El NVR inicializará la
UDD en los parámetros predeterminados.
Para cambiar los parámetros de la UDD,
visite la página CONFIGURACIÓN de la
utilidad de conguración disponible en la
web.
Cámaras compatibles
DNS-722-4: es compatible con todas las
cámaras de red D-Link. Incluye soporte
para Descubrir automáticamente y una
resolución de hasta 1,3 megapíxeles.
DNS-726-4: es compatible con cámaras de
red de marcas conocidas, incluidas D-Link,
Axis, Panasonic y SONY. El soporte de
características especícas depende del
software.
47 D-Link DNS-722-4/726-4 Quick Install Guide
Page 49

Introducción
Paso 1: Asegúrese de que el NVR está conectado a una red a través de un
router o un conmutador o que está conectado directamente al PC.
Paso 2: Encienda el ordenador e introduzca el CD de ejecución automática
de D-Link DNS-722-4/DNS-726-4 en la unidad de CD-ROM. Las siguientes
instrucciones paso a paso mostradas aparecen cuando se utiliza el sistema
operativo Windows Vista. Los pasos y las pantallas son similares a las de otros
sistemas operativos Windows.
Haga clic en Utilidad Easy Search.
Resalte un NVR disponible y
haga clic en Conguración
para acceder a la utilidad
disponible en la web.
Para obtener instrucciones de conguración detalladas, consulte el Manual
del usuario en el CD ROM.
Asistencia Técnica
Asistencia Técnica Telefónica de D-Link: +34 902 30 45 45
0,067 €/min
De Lunes a Viernes de 9:00 a 14:00 y de 15:00 a 18:00
http://www.dlink.es
48D-Link DNS-722-4/726-4 Quick Install Guide
Page 50

Guida di installazione rapida
DNS-722-4/DNS-726-4
2-Bay Network Video Recorder
Page 51

Requisiti di sistema
Requisiti hardware
Una o due unità disco sso SATA da 3,5”*
Requisiti di rete
• Videocamera/e IP (per un elenco delle videocamere supportate, visitare il
sito Web D-Link)
• Connessione Internet a banda larga (per l’accesso remoto)
• Switch Gigabit Ethernet e router Internet (oppure router Internet con porta
LAN Gigabit Ethernet disponibile)
Requisiti minimi PC remoto
• Sistema operativo: Windows® 2000/XP/2003/Vista™
• CPU: Pentium 4 – 2,4GHz o superiore
• RAM: 512 MB
• Browser Web: Internet Explorer 6.0 o versione successiva
Facoltativo
UPS con interfaccia USB
*Le unità disco sso devono essere dello stesso produttore. Per prestazioni ottimali, si
consigliano unità identiche per congurazioni RAID 1.
Contenuto della confezione
• D-Link DNS-722-4/ DNS-726-4 Network Video Recorder (NVR)
• Cavo Ethernet CAT5
• Alimentatore
• Supporto per cavo
• Chiavi
• Manuale e software su CD
• Guida di installazione rapida
Nota: l’utilizzo di un alimentatore con tensione diversa rispetto a quella
dell’alimentatore fornito con il prodotto causerà danni e invaliderà la garanzia del
prodotto.
50D-Link DNS-722-4/726-4 Quick Install Guide
Page 52

Panoramica hardware
Vista frontale
Pulsante di
alimentazione
LED unità LED unità
LED attività di rete
Pulsante di alimentazione
Premere una volta per accendere il videoregistratore di rete (NVR). Per
spegnere il videoregistratore di rete, tenere premuto il pulsante nché il
LED non inizia a lampeggiare.
LED unità
Questi LED sono ssi di colore BLU quando le unità sono connesse ma inattive. I LED lampeggiano quando sulle unità vengono effettuate operazioni
di accesso, formattazione o sincronizzazione. Diventano di colore GIALLO
se un’unità non funziona correttamente.
LED attività
Il LED è sso di colore BLU in presenza di una connessione Ethernet.
Lampeggia per indicare trafco LAN.
51 D-Link DNS-722-4/726-4 Quick Install Guide
Page 53

Parte inferiore
Serratura
a chiave
Serratura a chiave
Utilizzare questa serratura per proteggere il pannello frontale del
videoregistratore di rete. Per aprire il pannello, è necessario utilizzare
l’apposita chiave fornita per l’installazione iniziale.
52D-Link DNS-722-4/726-4 Quick Install Guide
Page 54

Pannello posteriore (Connessioni)
Ventola
Leva per
espulsione unità
Supporto per cavo
Presa per cavo di
alimentazione
Pulsante di ripristino Porta Gigabit Ethernet
Leva per
espulsione unità
Alloggiamento
per cavo di
protezione
Connettore USB
Presa per cavo di alimentazione
Presa alla quale collegare l’alimentatore.
Porta Gigabit Ethernet
Utilizzare questa porta per connettere il videoregistratore di rete a una rete.
Leva per espulsione unità
Utilizzare queste leve per espellere le unità disco sso. Prima di espellere
le unità, è necessario rimuovere il pannello frontale. Assicurarsi di
riposizionare la leva di espulsione prima di installare la nuova unità disco
sso.
53 D-Link DNS-722-4/726-4 Quick Install Guide
Page 55

Pulsante di ripristino
Un pulsante a foro presente accanto alla presa Ethernet consente di
reimpostare il sistema o di ripristinare le impostazioni di default. Per
reimpostare il sistema, è sufciente tenere premuto il pulsante nché il LED
alimentazione non lampeggia.
Connettore USB
È possibile utilizzare un UPS come alimentatore di emergenza del
videoregistratore di rete. L’UPS può utilizzare l’interfaccia USB per noticare
al videoregistratore di rete di eseguire la procedura di arresto corretta prima
che la batteria si esaurisca.
Alloggiamento per cavo di protezione
È possibile applicare un blocco esterno a questo alloggiamento come misura
di protezione dal furto.
Ventola
Il videoregistratore di rete regola automaticamente la temperatura del sistema
accendendo e spegnendo la ventola.
Supporto per cavo
Consente di sistemare il cavo di alimentazione per una maggior sicurezza
dell’ambiente operativo.
Nota: dopo aver ripristinato l’unità, sarà comunque possibile accedere ai dati
registrati nelle unità disco sso.
54D-Link DNS-722-4/726-4 Quick Install Guide
Page 56

Connessione del videoregistratore di rete alla rete
Your Network Setup
55 D-Link DNS-722-4/726-4 Quick Install Guide
Page 57

Installazione dell’hardware
Installazione dell’unità disco sso
1. Installare un’unità disco sso
SATA prima di accendere il
videoregistratore di rete. Utilizzare
la chiave per sbloccare la piastra di
copertura dalla parte inferiore del
videoregistratore di rete.
2. Far scorrere la piastra di copertura
nché non si sgancia dal dispositivo.
3. Dopo aver sganciato la piastra di
copertura, staccarla dal dispositivo
in modo da rendere visibili gli slot.
56D-Link DNS-722-4/726-4 Quick Install Guide
Page 58
4. Inserire un’unità disco SATA da
3,5” SATA in uno slot disponibile.
Assicurarsi di allineare il connettore
dell’unità al connettore SATA sul
bordo inferiore all’interno dello slot
del videoregistratore. Premere
delicatamente l’unità finché non risulta
collegata. Quando un’unità è inserita
correttamente, risulta ben agganciata
al connettore. È necessario prestare
particolare attenzione quando si
inseriscono alcune unità disco fisso
sottili o di forma insolita. Se un’unità
non è correttamente inserita, il LED
non si illumina dopo l’accensione del
dispositivo.
Facoltativo: quando si installa una
seconda unità disco sso facoltativa,
ripetere l’operazione descritta al
punto 4. Per evitare incompatibilità
tra i dati durante il funzionamento
come RAID 1, utilizzare unità SATA
identiche dello stesso produttore.
La capacità formattata dell’unità
durante il funzionamento come RAID
1 è quella dell’unità disco sso con la
capacità minore.
5. Fissare la piastra di copertura alla
parte frontale del dispositivo.
57 D-Link DNS-722-4/726-4 Quick Install Guide
Page 59

6. Bloccare la piastra di copertura per
proteggere le unità disco sso.
Collegamento del cavo Ethernet
Collegare un cavo Ethernet alla porta
Ethernet. Collegare un’estremità del
cavo Ethernet al videoregistratore di rete.
Collegare l’altra estremità del cavo a una
porta LAN Gigabit Ethernet di un router o
di uno switch, oppure direttamente a un
computer.
Collegamento dell’UPS
(facoltativo)
Se si dispone di un UPS (Universal
Power Supply) che si desidera utilizzare
con il videoregistratore di rete, è possibile
collegarlo prima di accendere l’unità.
1. Collegare il cavo USB all’UPS e alla
porta sul retro del videoregistratore di
rete.
2. Collegare il cavo di alimentazione
all’UPS. Assicurarsi che l’UPS sia
collegato e alimentato.
Nota: Per spegnere il videoregistratore di rete, è sufciente tenere premuto il
pulsante di alimentazione per 5 secondi. Il LED alimentazione lampeggerà e il
videoregistratore di rete si spegnerà dopo qualche secondo.
58D-Link DNS-722-4/726-4 Quick Install Guide
Page 60

Collegamento dell’alimentatore
esterno
Collegare un’estremità del cavo
dell’alimentatore esterno alla presa di
alimentazione CC presente sul pannello
posteriore del videoregistratore di rete
(identicabile dall’etichetta DC 12V),
quindi collegare l’altra estremità a una
presa elettrica CA.
Accensione dell’unità e
inizializzazione dell’unità disco sso
Premere il pulsante di alimentazione
sul pannello frontale. Il LED sul
videoregistratore di rete inizierà a
lampeggiare. Se il collegamento è
corretto, attendere circa 60 secondi, il
LED alimentazione del videoregistratore
di rete rimarrà acceso sso, mentre i LED
dell’unità disco sso e di rete inizieranno
a lampeggiare. Il videoregistratore di rete
inizializzerà l’unità disco sso in base alle
impostazioni di default. Per modicare le
impostazioni dell’unità disco sso, visitare
la pagina di CONFIGURAZIONE nell’utilità
di congurazione basata su Web.
Videocamere supportate
DNS-722-4: supporta tutte le videocamere
di rete D-Link. Include il supporto per la
rilevazione automatica e una risoluzione
massima di 1,3 megapixel.
DNS-726-4: supporta le videocamere
di rete di marche note, tra cui D-Link,
Axis, Panasonic e SONY. Il supporto
di funzionalità speciche dipende dal
software.
59 D-Link DNS-722-4/726-4 Quick Install Guide
Page 61

Operazioni preliminari
Passo 1: assicurarsi che il videoregistratore di rete sia connesso a una rete
tramite router o switch oppure sia connesso direttamente al PC.
Passo 2: accendere il computer e inserire il CD ad esecuzione automatica
di D-Link DNS-722-4/DNS-726-4 nell’unità CD-ROM. Le seguenti istruzioni
dettagliate vengono visualizzate quando si utilizza il sistema operativo Windows Vista. Procedure e schermate sono simili per gli altri sistemi operativi
Windows.
Fare clic su Utilità di ricerca
semplicata.
Evidenziare un videoregistratore
di rete disponibile, quindi fare
clic su Congurazione per
accedere all’utilità basata su Web.
Per istruzioni dettagliate sulla congurazione, fare riferimento al manuale
dell’utente disponibile sul CD ROM.
Supporto tecnico
Supporto Tecnico dal lunedì al venerdì dalle ore 9.00 alle ore 19.00 con orario
continuato
Telefono: 199400057
URL : http://www.dlink.it/support
60D-Link DNS-722-4/726-4 Quick Install Guide
Page 62

Notes
61 D-Link DNS-722-4/726-4 Quick Install Guide
Page 63

Ver. 1.00(E)
2009/01/09
6ENS7264Q.01G
 Loading...