

Page 1
Page 2

Table of Contents
Table of Contents
Product Overview ........................................................3
Package Contents....................................................3
System Requirements ............................................. 3
Introduction ..............................................................4
Features ...................................................................5
Hardware Overview .................................................6
Front View .......................................................... 6
Rear Panel (Connections) ..................................7
Installation .................................................................... 8
Hardware Setup .......................................................8
Configuration .............................................................11
Easy Search Utility.................................................11
Getting Started ......................................................12
Web UI ...................................................................17
Setup .....................................................................18
Wizard ..............................................................18
DHCP Server ................................................... 37
LLTD ................................................................38
Tools ......................................................................39
Admin ...............................................................39
Time ................................................................. 40
System ............................................................. 41
Firmware ..........................................................42
E-Mail Alerts ....................................................43
Power Management .........................................46
RAID ................................................................ 47
DDNS ...............................................................49
Status.....................................................................50
Device Information ...........................................50
Support .................................................................. 51
Mapping a Drive .....................................................52
Download Scheduling ............................................55
Schedule Downloads ....................................... 57
LAN .................................................................. 22
Device Settings ................................................23
Advanced ...............................................................24
Users and Groups ............................................24
Quotas ............................................................. 26
Network Access ............................................... 29
FTP Server ......................................................31
UPnP AV Server ..............................................34
iTunes Server ................................................... 35
Scheduling Settings ......................................... 58
Replacing or Adding a New Hard Drive ................... 59
Contacting Technical Support .................................. 60
GNU/Linux GPL .......................................................... 61
GNU General Public License .................................62
Warranty .....................................................................68
Registration ................................................................ 73
2D-Link DNS-321 User Manual
Page 3
Section 1 - Product Overview
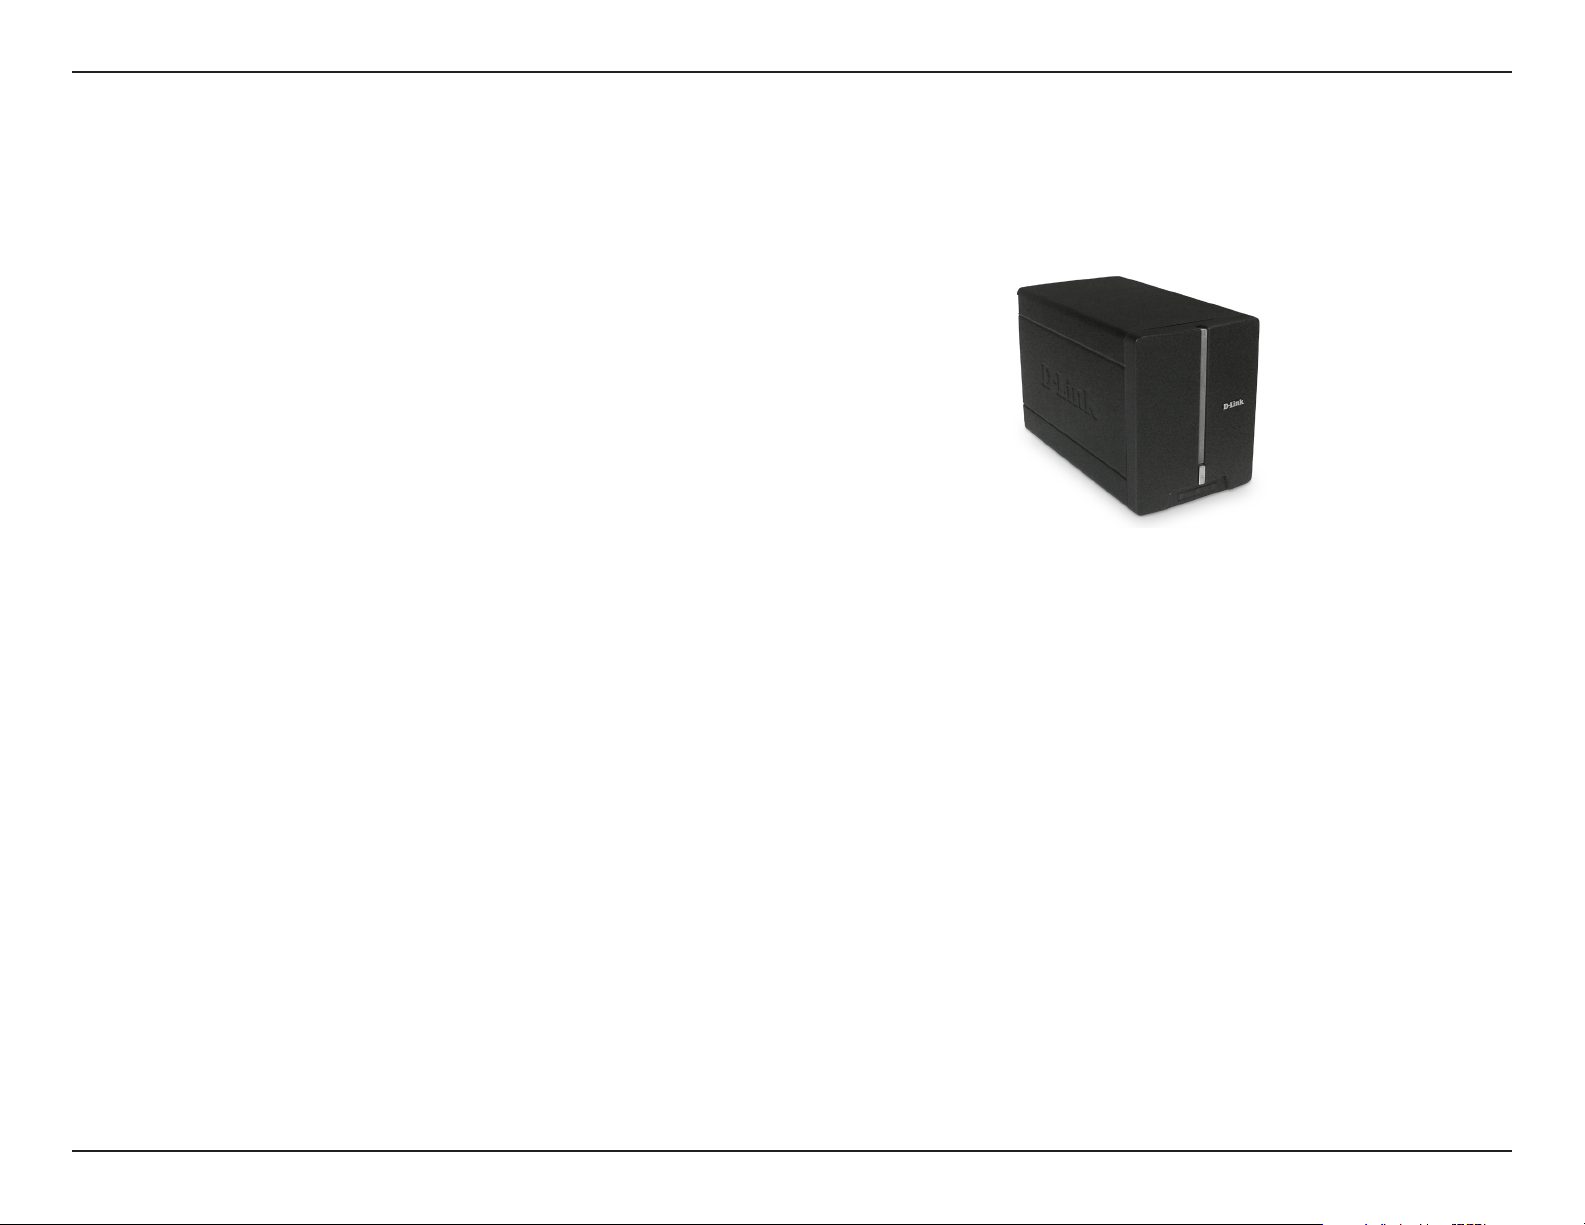
D-Link DNS-321 2-Bay Network Storage Enclosure
CD-ROM with Manual and Software
Quick Installation Guide
Power Adapter
CAT5 Ethernet Cable
Product Overview
Package Contents
Note: Using a power supply with a different voltage than the one included with the DNS-321 will cause damage and void
the warranty for this product.
If any of the above items are missing, please contact your reseller.
System Requirements
For best results, the following system requirements are recommended:
Computer with: 1GHz processor / 512 MB RAM / 200 MB available space / CD-ROM drive
Internet Explorer version 6.0 or Mozilla Firefox 1.0 and above
3.5” SATA Hard Drive(s)
Windows® XP (with Service Pack 2) or Vista
™
3D-Link DNS-321 User Manual
Page 4

Section 1 - Product Overview
Introduction
The D-Link DNS-321 2-Bay Network Storage Enclosure shares your documents, photos, music, and videos across
the network and on the Internet (via FTP server) so family members, friends, or employees can access them. This
enclosure, which can hold two 3.5” SATA hard drives of any capacity1, creates a central network point for backing up
valuable files. The built-in RAID 12 mirroring technology protects these files from drive failure. Other options such as
Standard, JBOD, and RAID 0 are also available.
The DNS-321 shares files over the Internet via the built-in FTP server3. Users and groups can be created and assigned
to folders with either read or read/write permissions. Quotas can be set per user or group to restrict space usage.
In addition, the DNS-321 can be used to stream photos, music, and videos to UPnP AV compatible network media
players4.
The included CD contains D-Link’s Easy Search Utility. This utility allows you to locate the DNS-321 on the network
and map drives to your computer. Backup software is also included on the CD. This software allows you to backup your
files from a computer to the DNS-321 manually, by a schedule, or in real-time. Real-time backups are a great way to
safeguard against unfortunate accidents that may result in the loss of important files.
Combining ease of use with practical and high performance features, the DNS-321 is an organized solution for any
network. Free up drive space on computers and centralize data on your network with the DNS-321 2-Bay Network
Storage Enclosure!
1 Hard Drive(s) not included.
2 RAID 1 mirroring requires the use of 2 internal SATA drives.
3 Note that use of an FTP Server to access files over the Internet does not provide for secure or encrypted transmissions.
4 D-Link cannot guarantee full compatibility or proper playback with all codecs. Playback capability depends on the codec support of the UPnP™ AV media player.
4D-Link DNS-321 User Manual
Page 5

Section 1 - Product Overview
Features
The DNS-321 is designed for easy installation and allows remote access to important data via LAN or WAN:
Two Hard Drive Bays for 3.5” SATA Hard Drives of Any Capacity
1
Simplified Hard Drive Installation Process – No Tools Required
Four Hard Drive Configurations: Standard, JBOD (Linear), RAID 0, and RAID 1
2
High Performance Gigabit Ethernet Connectivity
Built-in FTP Server for File Access Over the Internet
3
Scheduled Downloads from Web or FTP Sites
Full or Incremental Backups
Real Time Backups With the Included Backup Software
Users and Groups Can Be Assigned to Folders with Read or Read/Write Permissions
Quotas For Users and Groups
Automatic E-Mail Notifications
Power Management for Conserving Energy and Extending Hard Drive Life
UPnP AV Server for Streaming Music, Photos, and Video to Compatible Media Players
iTunes
®
Software will be able to automatically find and play music directly from the DNS-321
D-Link Easy Search Utility
Configurable by Web Browser
4
1 Hard Drive(s) not included.
2 RAID 1 mirroring requires the use of 2 internal SATA drives.
3 Note that use of an FTP Server to access files over the Internet does not provide for secure or encrypted transmissions.
4 D-Link cannot guarantee full compatibility or proper playback with all codecs. Playback capability depends on the codec support of the UPnP™ AV media player.
5D-Link DNS-321 User Manual
Page 6
Section 1 - Product Overview
Hardware Overview
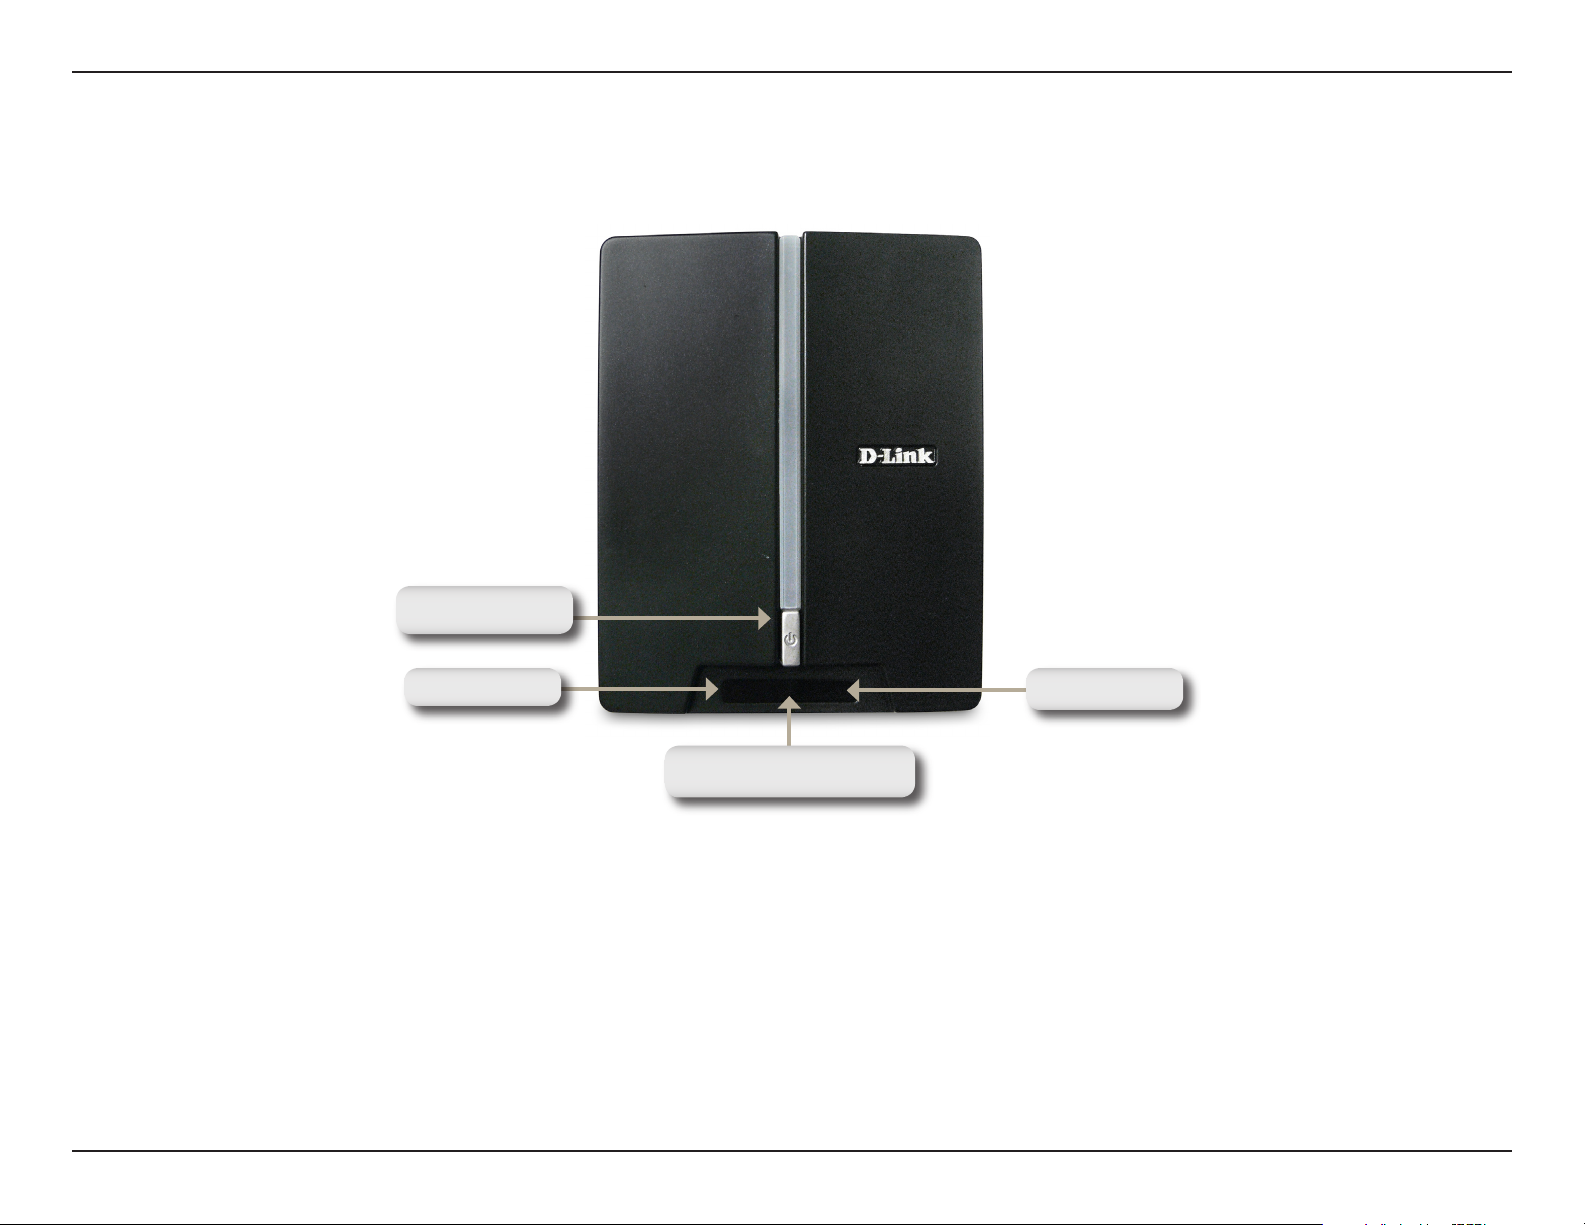
Front View
Power Button
Drive Light
Network Activity Light
Power Button:
Press once to power on the DNS-321. Press and hold the button until it begins to blink to power down the DNS-321.
Drive Light:
These lights will be solid BLUE when drives are connected but inactive. The lights will blink when the drives are being
accessed, formatted or synchronized. They will illuminate AMBER if a drive has failed.
Network Activity Light:
The light will be solid BLUE when there is an Ethernet connection. It will blink to indicate LAN traffic.
Drive Light
6D-Link DNS-321 User Manual
Page 7
Section 1 - Product Overview
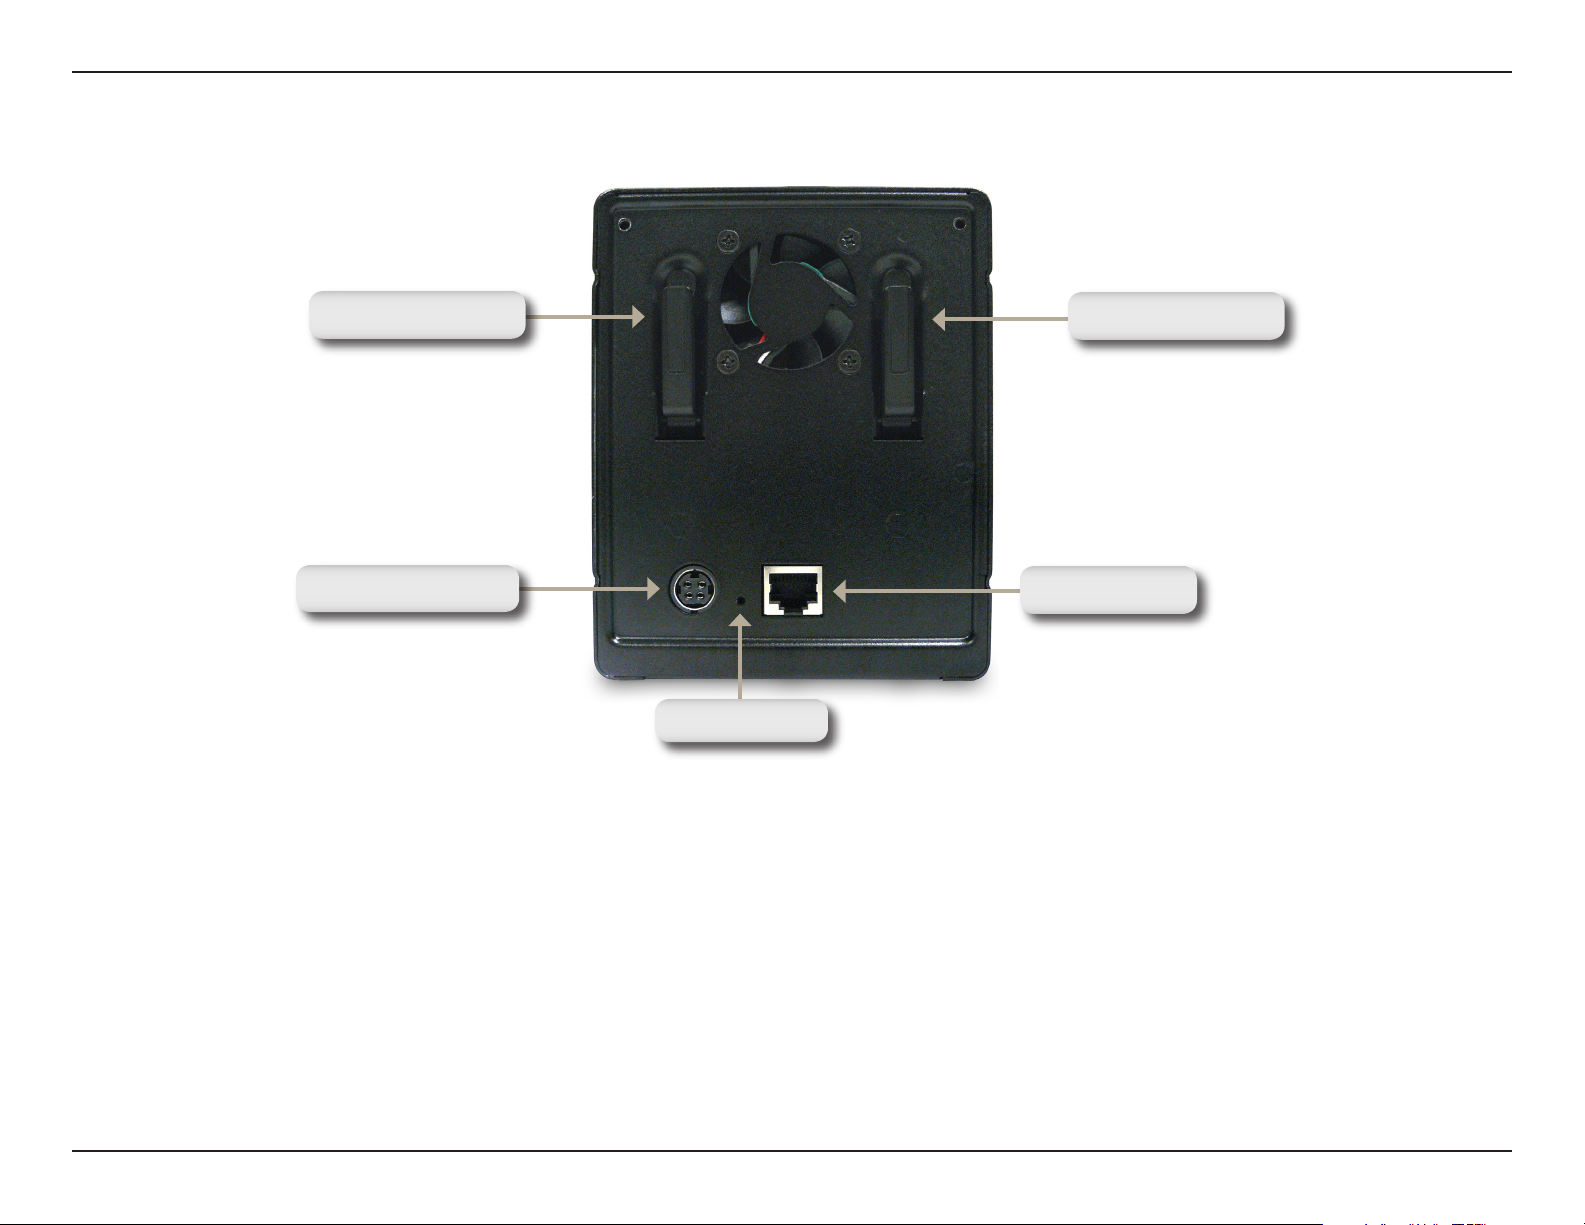
Rear Panel (Connections)
Drive Eject Lever
Power Receptacle
Reset Button
Power Receptacle:
The supplied power adapter connects here.
Ethernet Port:
A Gigabit Ethernet port that connects the DNS-321 to a network.
Drive Eject Lever
Ethernet Port
Drive Eject Lever:
Use the provided levers to eject the hard drives. The front panel must be removed before ejecting the drives.
Reset Button:
A pinhole button located beside the Ethernet socket is used to reset the system or restore the factory default settings.
Note: After resetting the unit you will still be able to access the data on your hard drives.
7D-Link DNS-321 User Manual
Page 8
Section 2 - Installation
Installation
Hardware Setup
This section provides installation information for the DNS-321. To install the DNS-321 on your local network, refer to
the steps below:
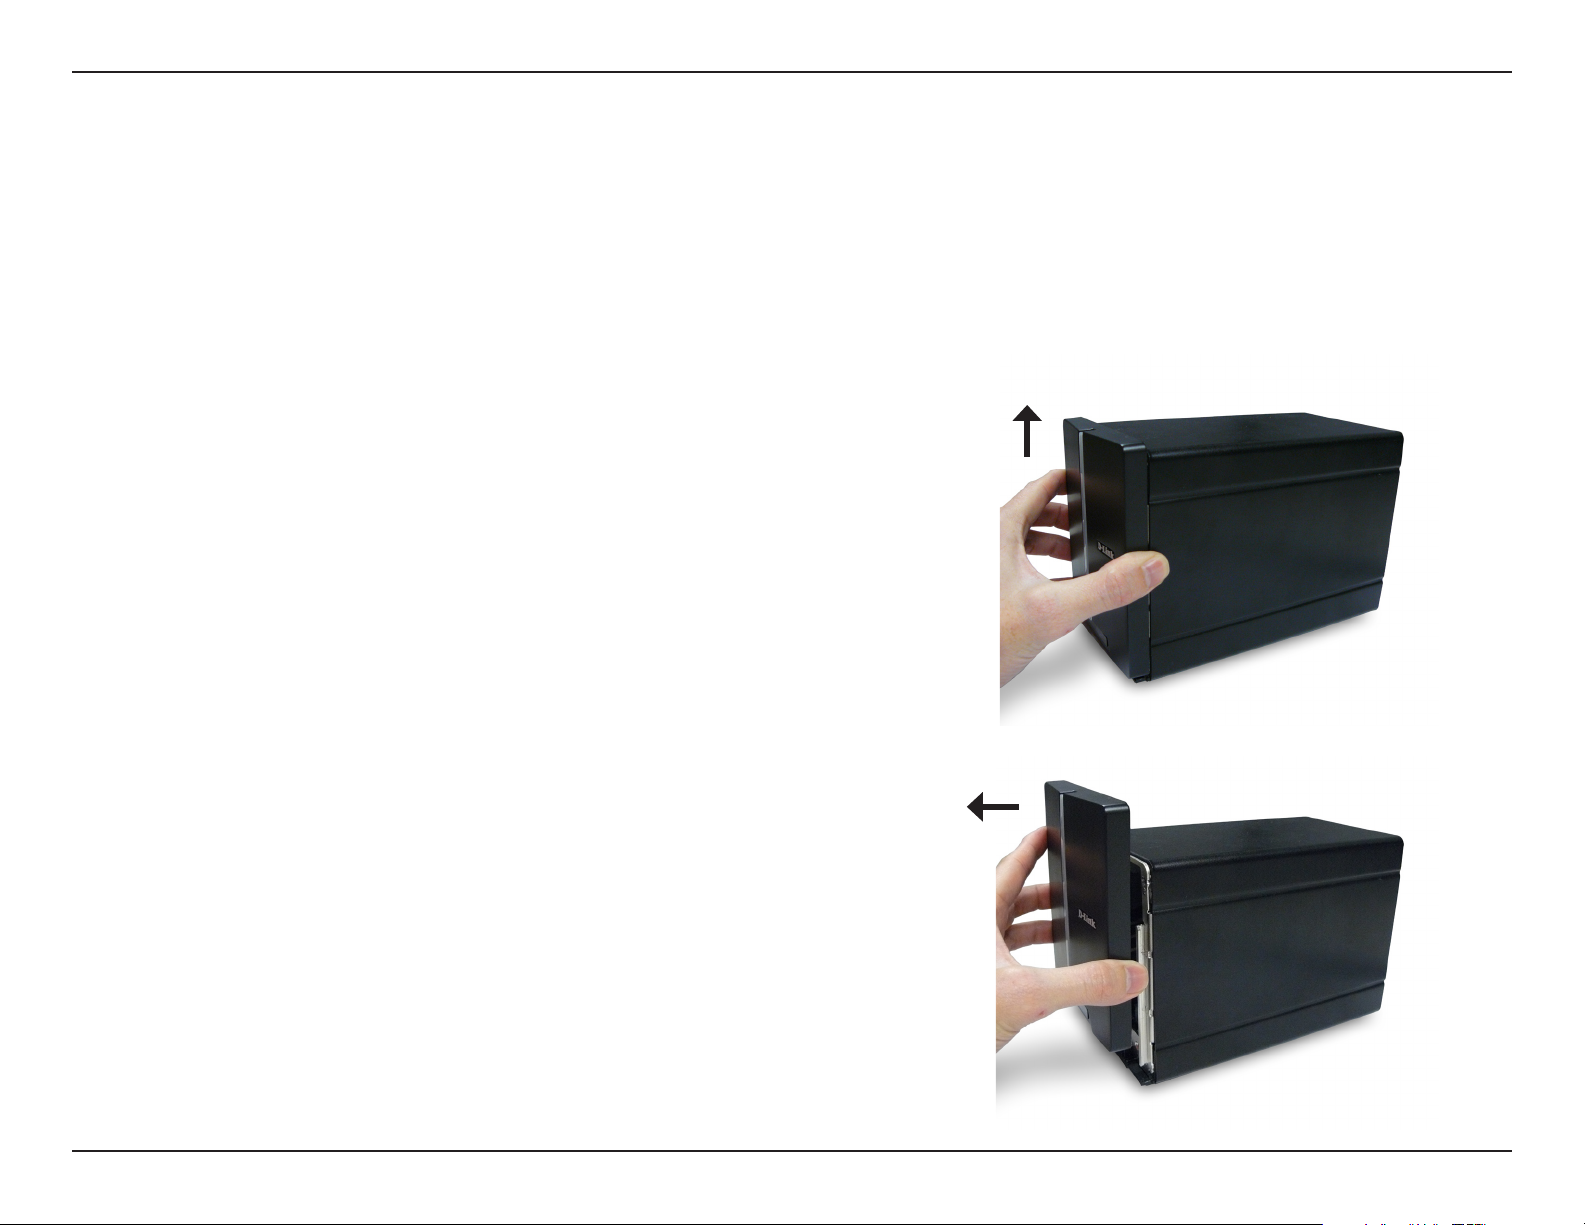
1. Slide the faceplate up until it unlatches from the device.
2. Once the faceplate is unlatched, pull it off the device, exposing
the drive bays.
8D-Link DNS-321 User Manual
Page 9

Section 2 - Installation
3. Insert a 3.5” SATA hard drive into an available drive
bay. Make sure to align the drive connector to the SATA
connector on the bottom edge inside the drive bay of the
DNS-321. Gently push the drive in until it connects. When
a drive is inserted properly, you will feel it “seat” into the
connector. Some hard drives that are thin or oddly shaped
may need to be guided carefully into position. If a drive
is not properly seated, the light will not illuminate after
powering on the device.
4. Attach the faceplate to the front of the device.
9D-Link DNS-321 User Manual
Page 10
Section 2 - Installation
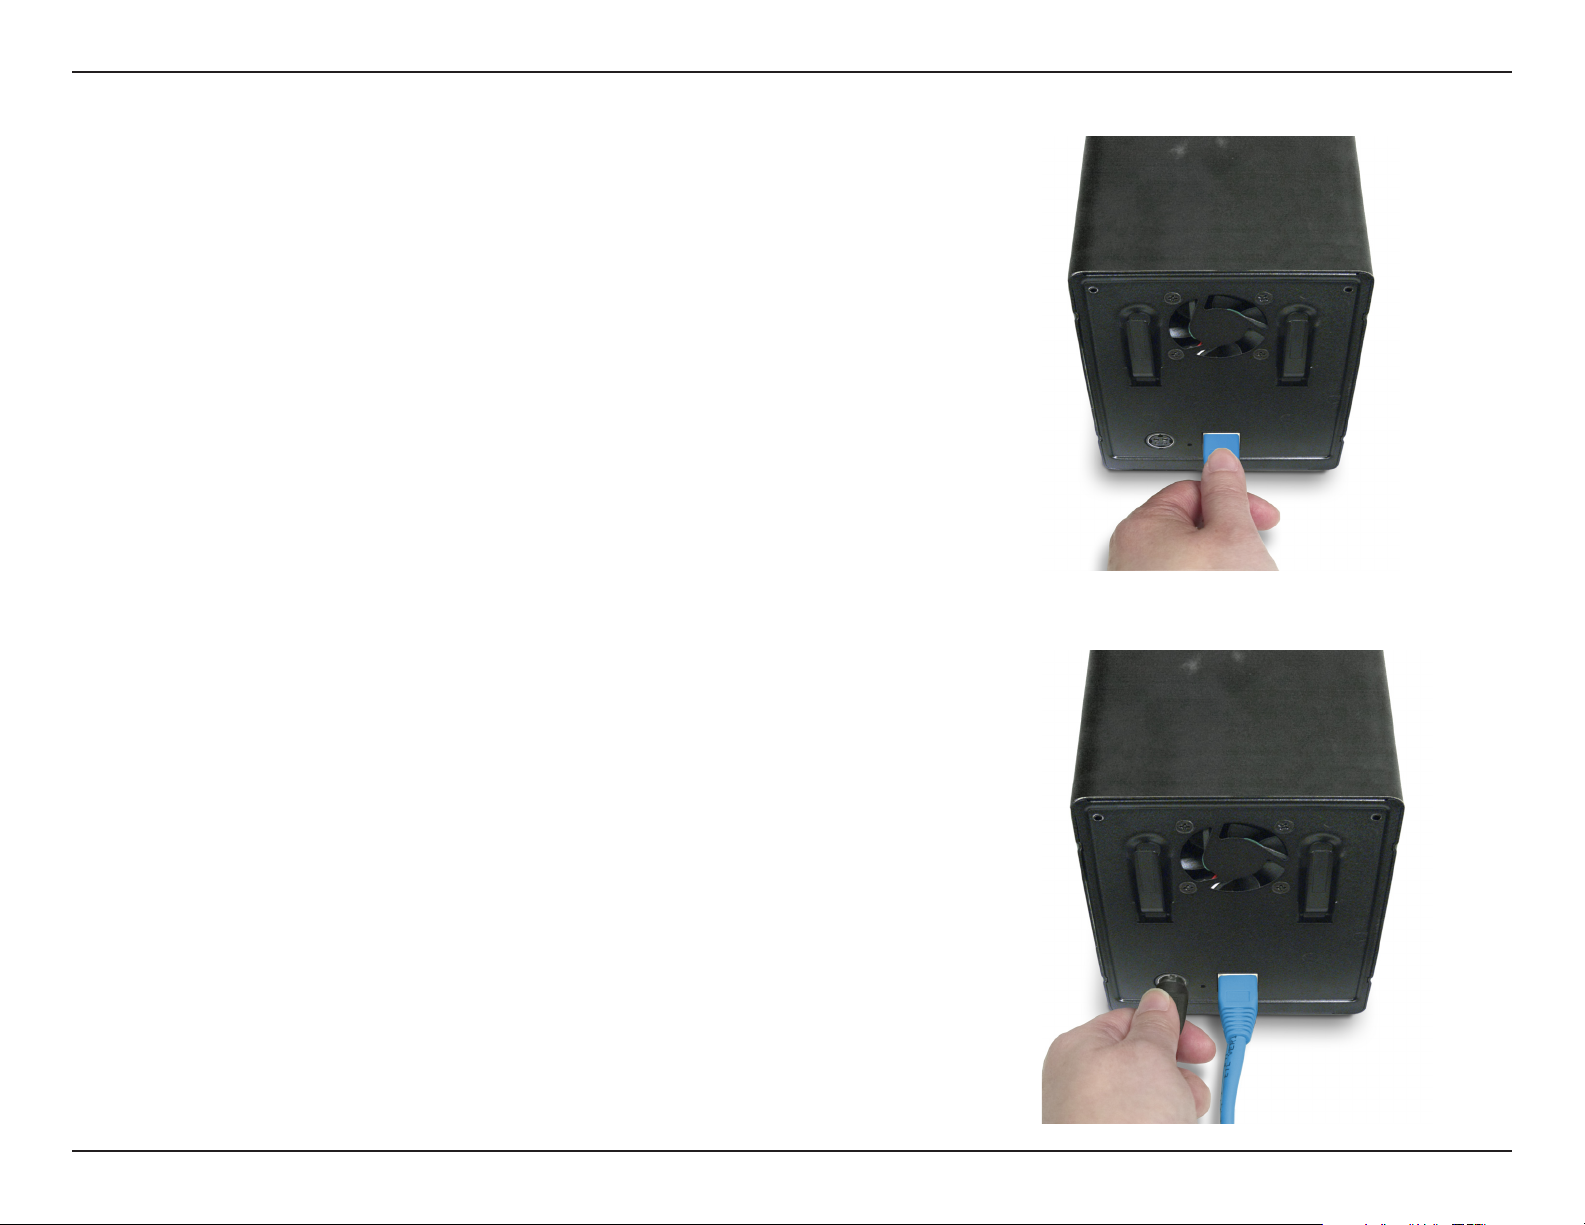
5. Connect an Ethernet cable to the available Ethernet port. This
cable should connect the DNS-321 to your local network via a
router or switch, or directly to a computer for configuration.
6. Connect the power adapter to the power receptacle.
10D-Link DNS-321 User Manual
Page 11
Section 3 - Configuration
Configuration
Easy Search Utility
When first powered on, during the initial boot sequence, the DNS-321 will wait to be assigned an IP address via DHCP.
If it does not receive a DHCP assigned IP address, by default it will have a self-assigned IP address of 192.168.0.32.
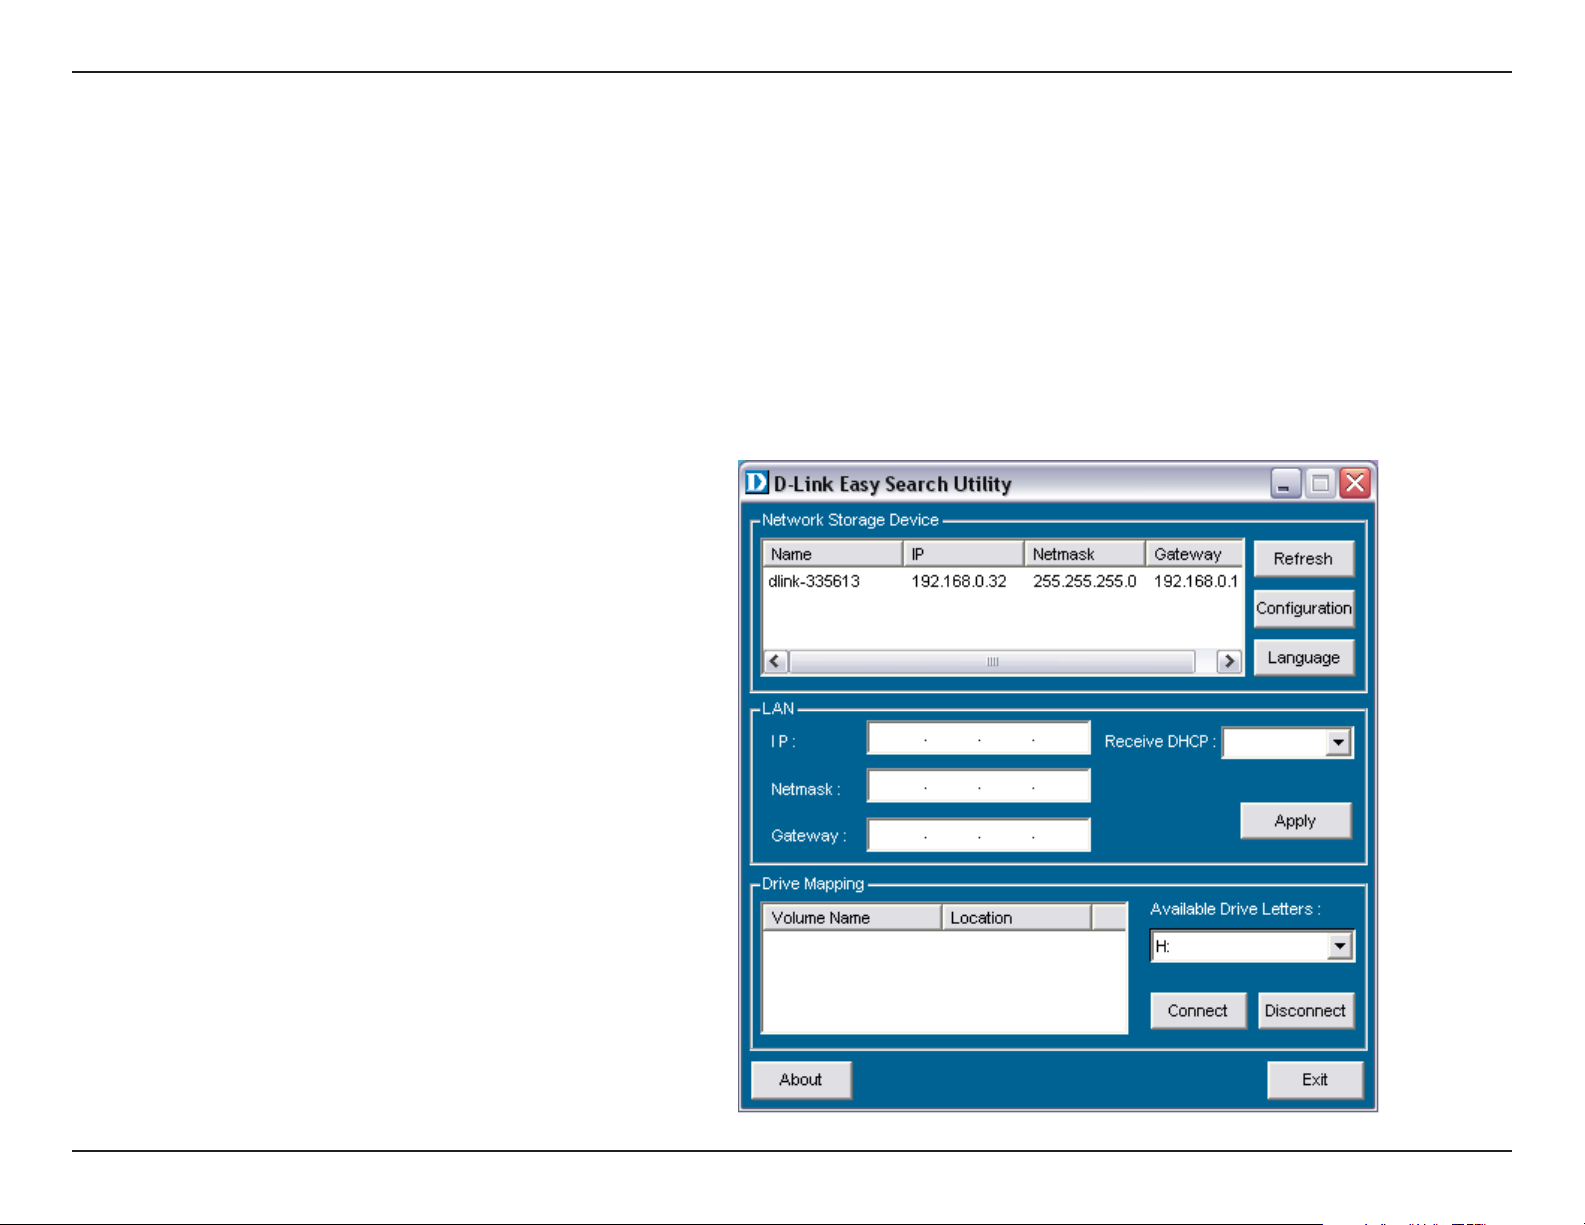
It is recommended to use the included D-Link Easy Search Utility when accessing and configuring the DNS-321 for
the first time. If you want to change the IP address before logging in or if you are unable to connect to the DNS-321
IP address, you can use the Easy Search Utility provided on the product CD to locate the device on your network and
make any needed changes.
Network
Storage Device
Refresh
Configuration
LAN
Apply
Drive Mapping
Available
Drive Letters
The Easy Search Utility displays
the available DNS-321 devices on
the network.
Refreshes the device list.
Click Configuration to access the
Web-based configuration utility of
the DNS-321.
Configure the LAN Settings for the
DNS-321 here.
Click Apply to save changes to the
LAN Settings.
Volumes available for mapping are
displayed here.
Choose an available drive letter.
Click Connect to map the selected
vo lume. Cli ck Dis conn ect to
disconnect the selected mapped
volume.
Exit
Click Exit to close the utility.
11D-Link DNS-321 User Manual
Page 12
Section 3 - Configuration
Getting Started
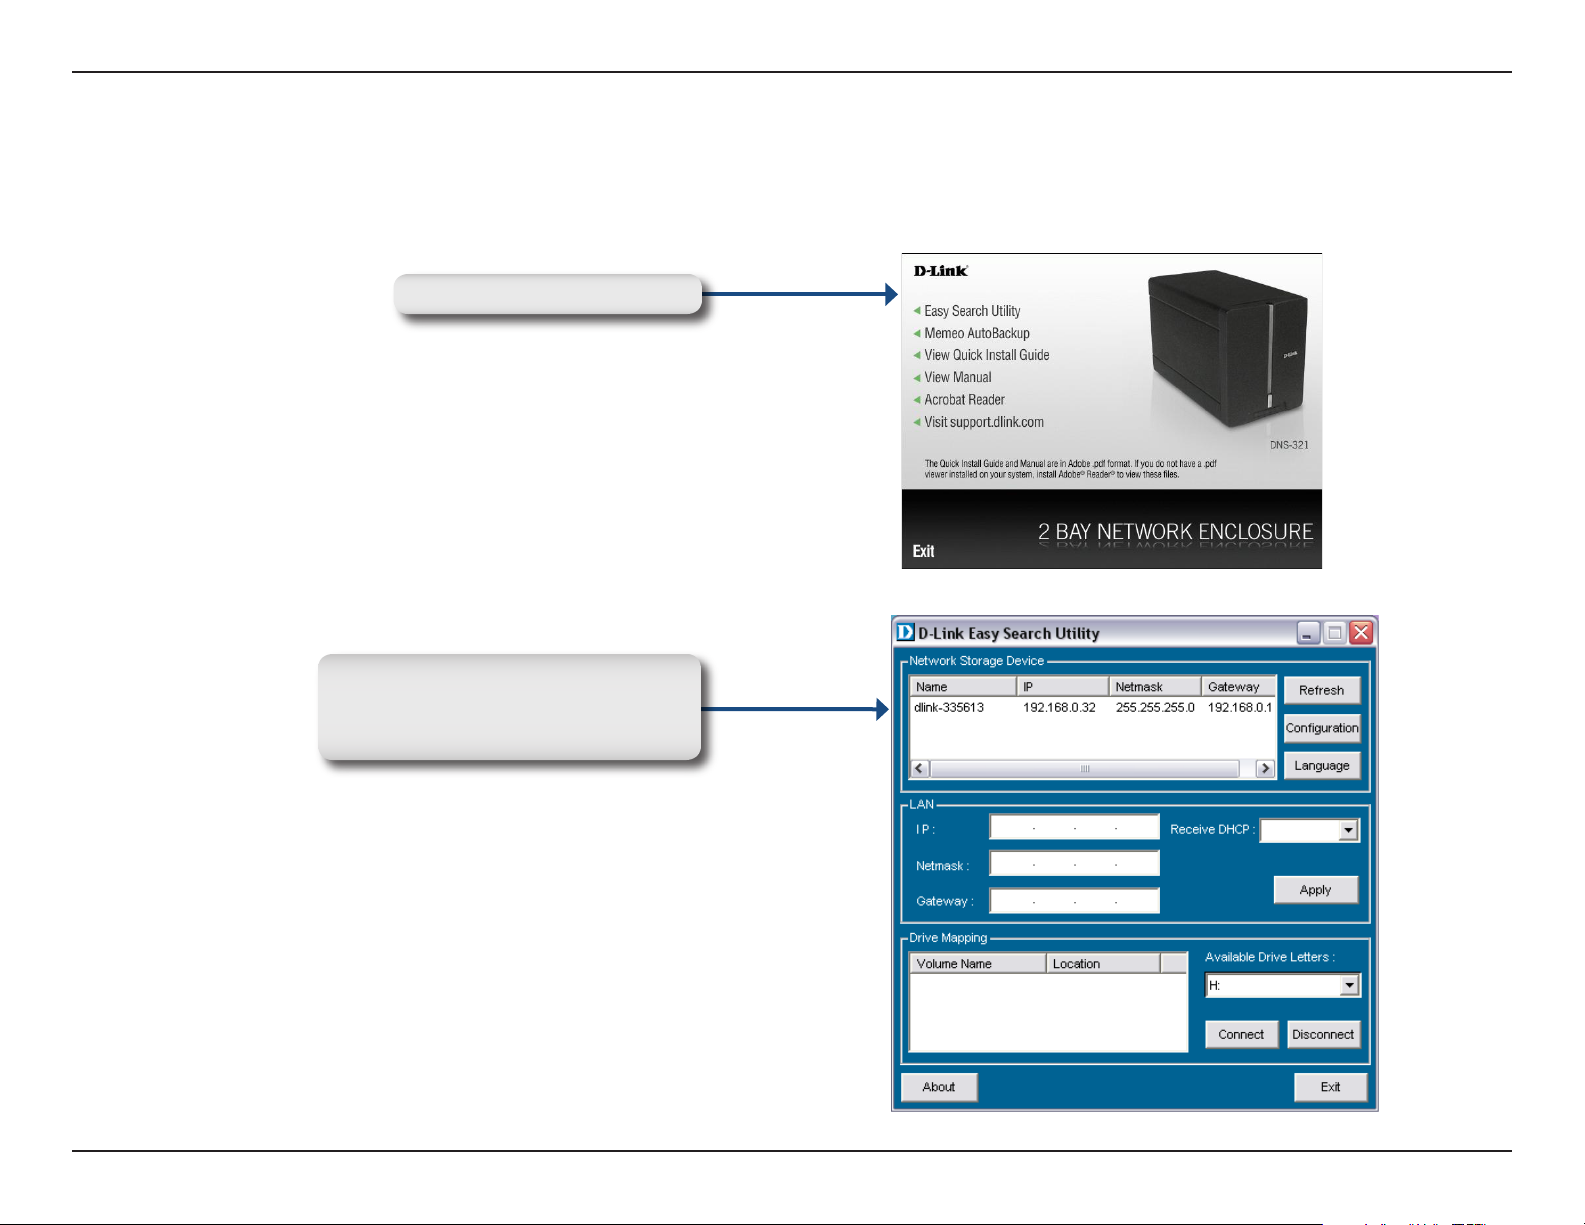
To run the Easy Search Utility, insert the DNS-321 CD into your CD-ROM drive:
Click Easy Search Utility.
Highlight an available DNS-321
and click Configuration to access
the web-based utility.
12D-Link DNS-321 User Manual
Page 13
Section 3 - Configuration
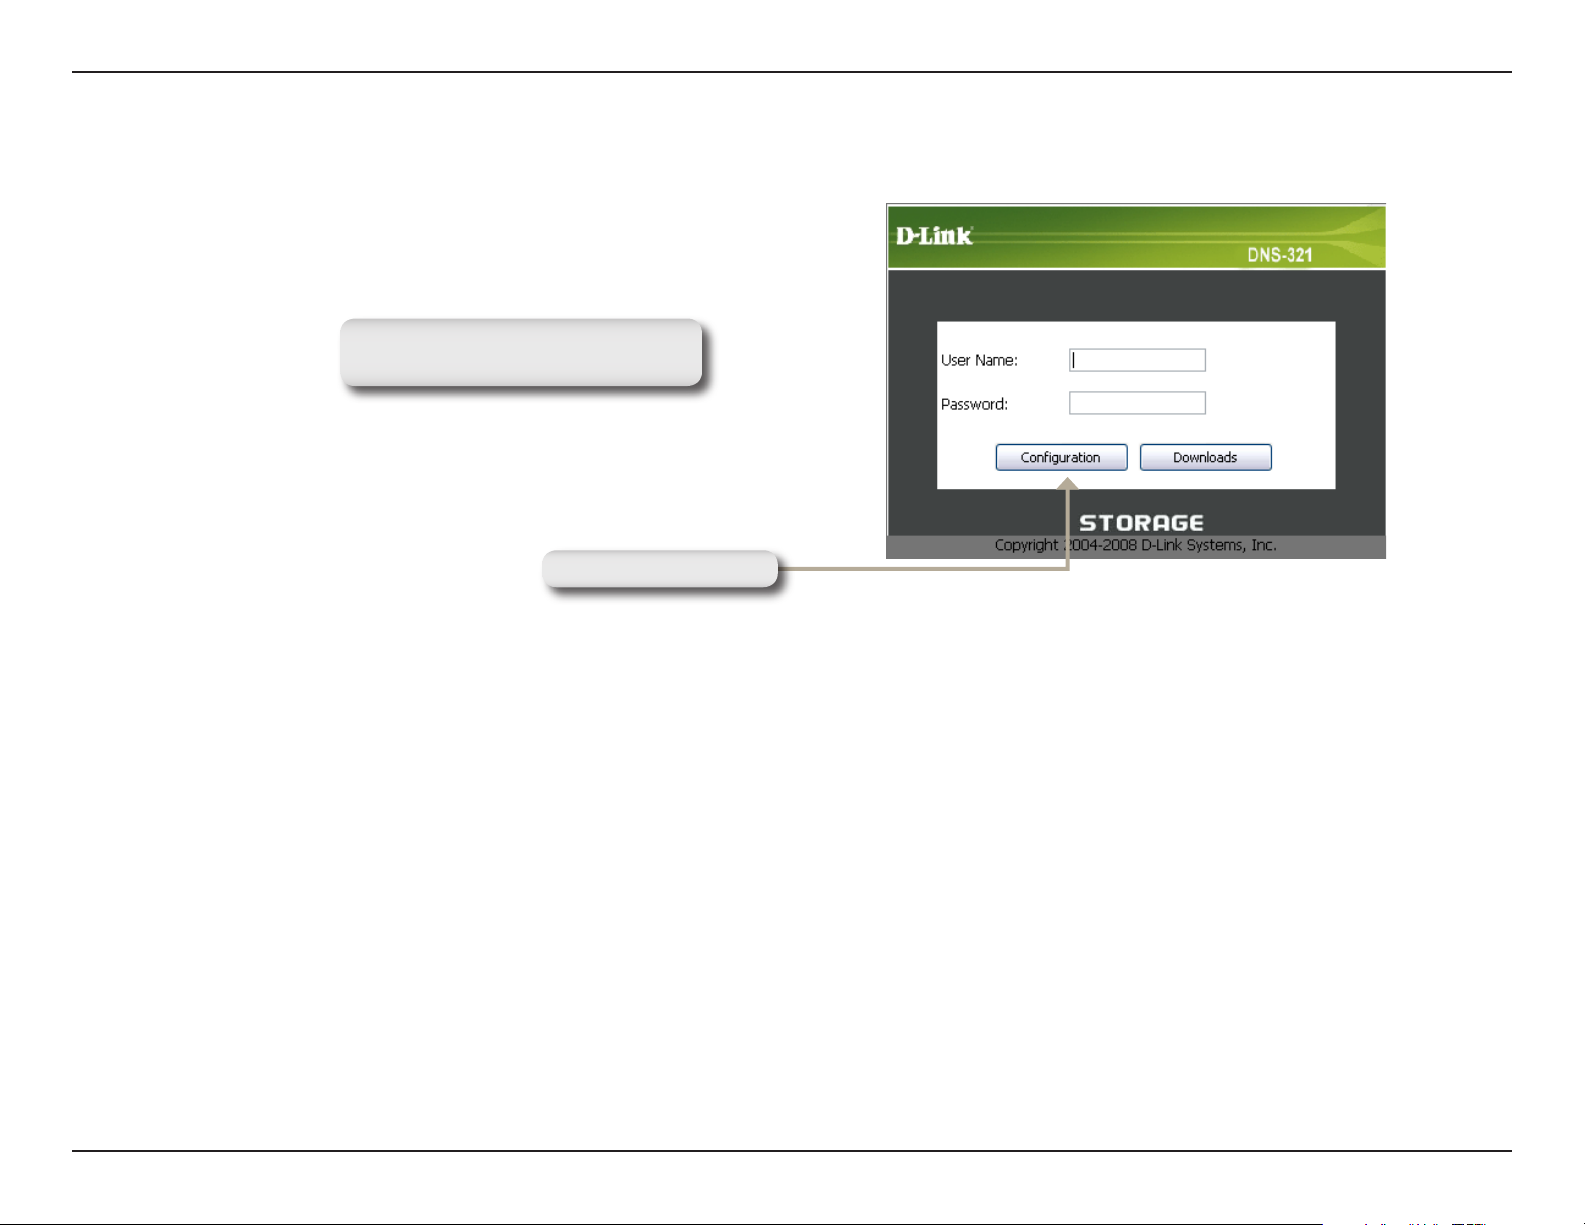
The Login screen will appear:
Type admin for the username and
leave the password field blank.
Click Configuration
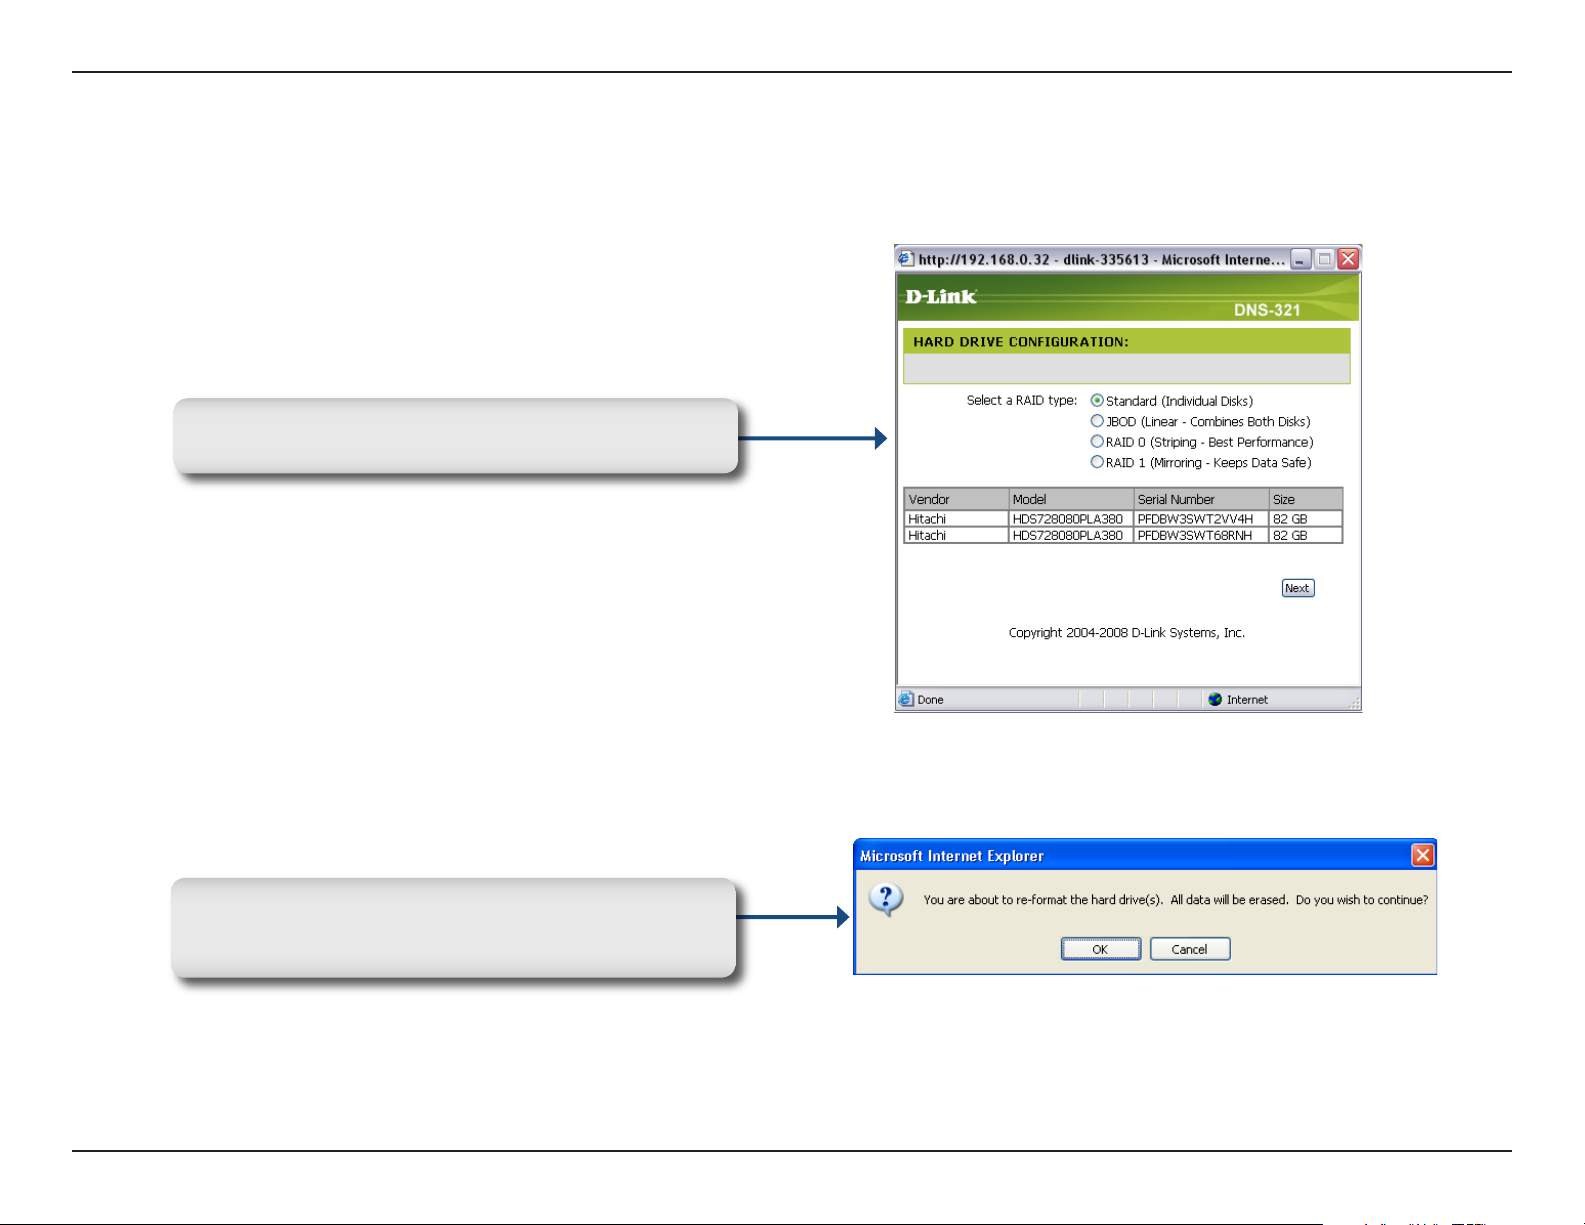
When logging into the DNS-321 for the first time, you will be asked to choose a drive configuration type and format the
drives.There are four options: Standard, JBOD, RAID 0 and RAID 1. Standard configures each disk as a separate
volume, while JBOD combines both disks into a single volume. See page 47 for more details on using the RAID
configurations.
Note: All data will be erased during the format process.
13D-Link DNS-321 User Manual
Page 14
Section 3 - Configuration
When prompted to configure the Hard Drive Settings:
Select the type of hard drive configuration, Standard,
JBOD, RAID 0 or RAID 1.
A warning message appears informing you that your
drives will be formatted and all data will be erased.
Click OK to continue.
14D-Link DNS-321 User Manual
Page 15
Section 3 - Configuration
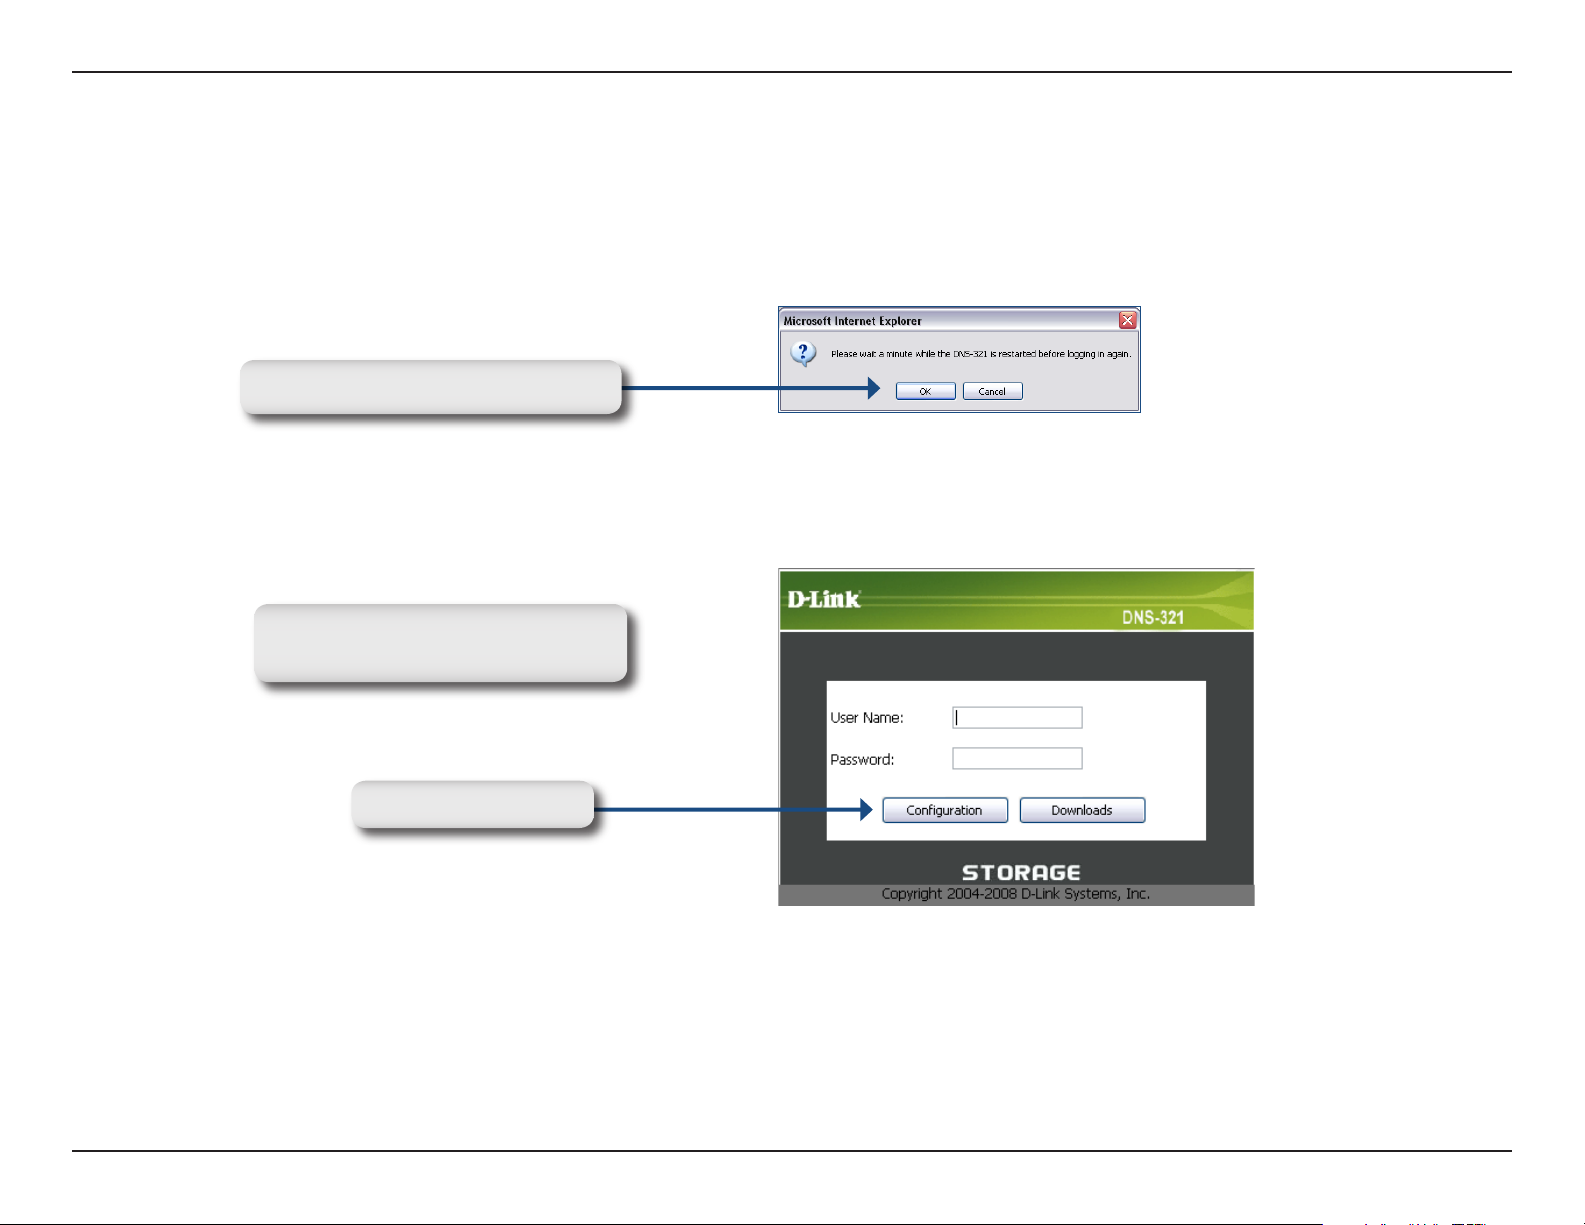
When formatting of the drive completes, the DNS-321 will prompt the user to restart. A restart countdown screen will
appear, and when the restart is complete, the login screen will appear:
Press OK to restart the DNS-321.
Type admin for the username and
leave the password field blank.
Click Configuration
Note: After logging in to the DNS-321 for the first time it is recommended to add a password to the admin account.
(See page 39 for details.)
15D-Link DNS-321 User Manual
Page 16
Section 3 - Configuration
After login, you will be redirected to the DNS-321 web UI:
16D-Link DNS-321 User Manual
Page 17

Section 3 - Configuration
Web UI
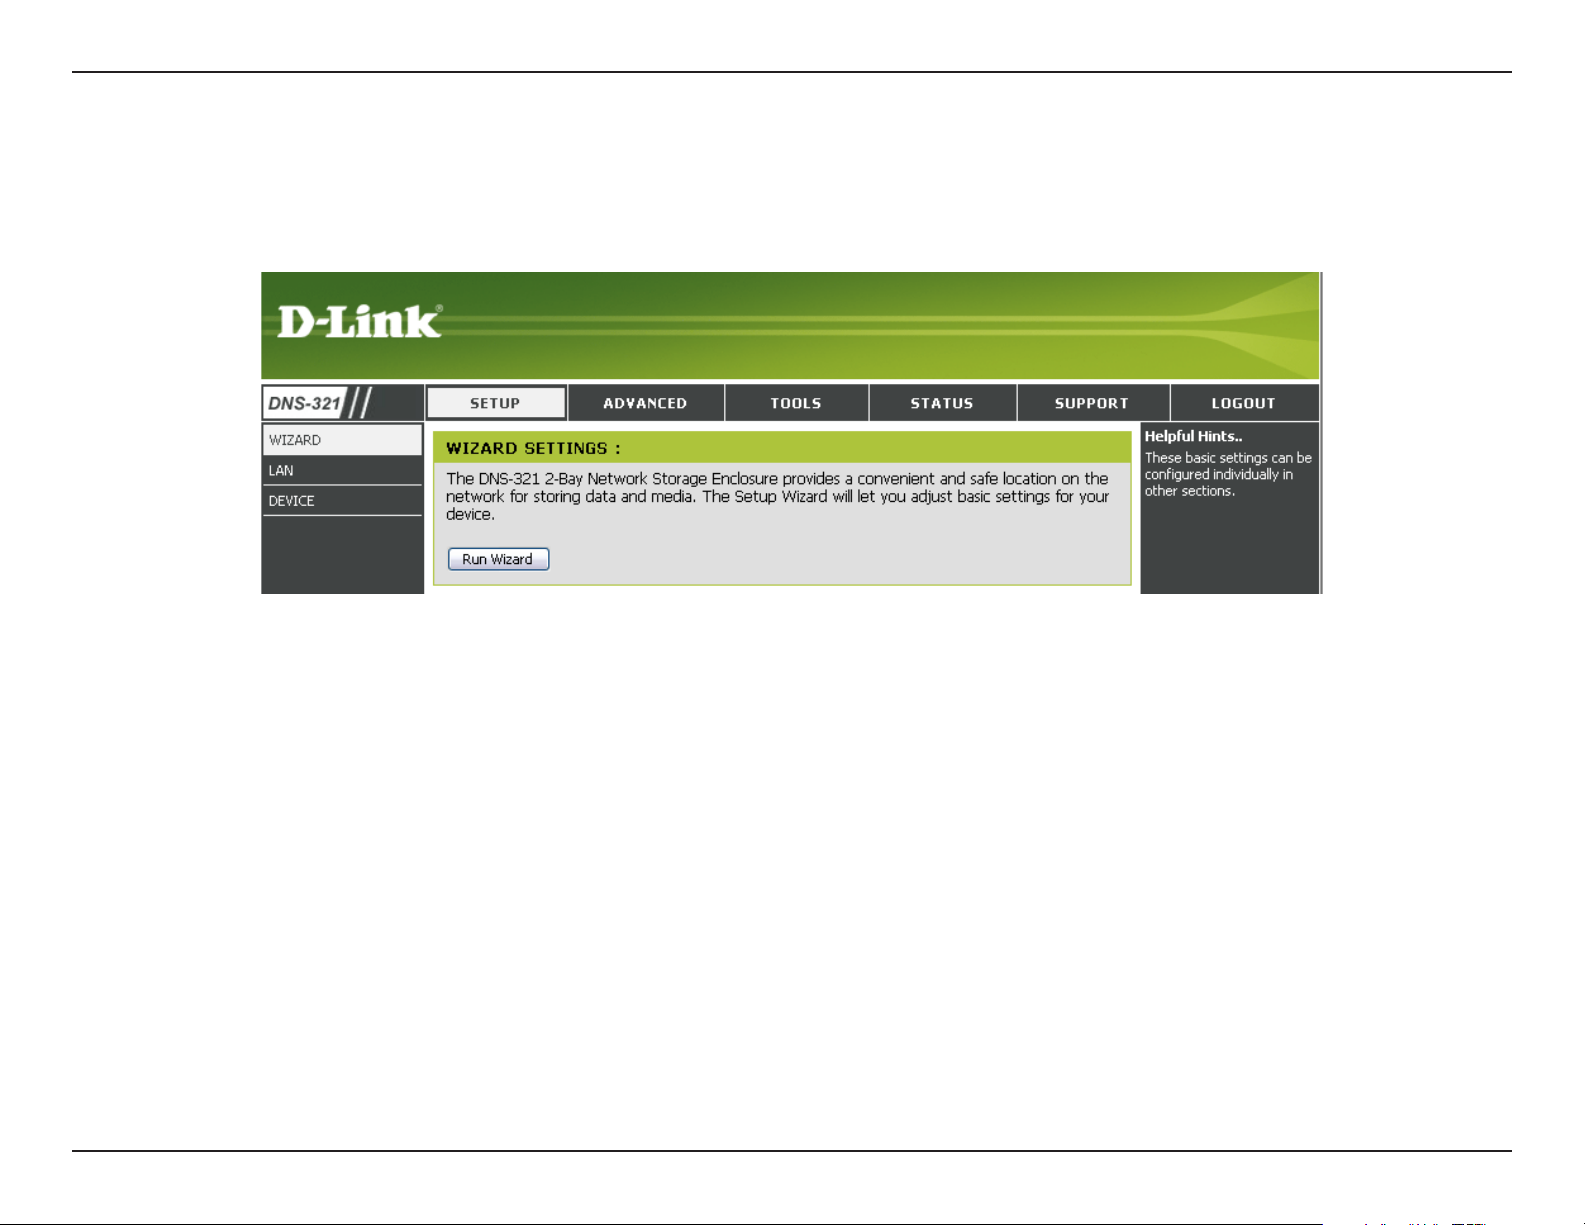
The DNS-321 web UI defaults to the Setup page. The main categories for configuration are located in the menu tabs
at the top of the page. These categories include:
Setup - Contains the DNS-321 setup wizard, as well as the LAN configuration settings and device
settings.
Advanced - Allows the DNS-321 administrator to configure users, groups of users and their storage
quotas. The UPnP AV server, iTunes server, FTP server and DHCP server settings are all contained
here as well.
Tools - Contains the configuration options for Admin account, time and system settings, and e-mail alerts.
Power management options and RAID configuration options are also available.
Status - Contains a summary of DNS-321.
Support - Contains the DNS-321 help files.
Logout - Clicking this button will log the admin out and end the DNS-321 configuration session.
These pages and their configuration options will be discussed in detail in the following pages of this manual.
17D-Link DNS-321 User Manual
Page 18
Section 3 - Configuration
Setup
Wizard
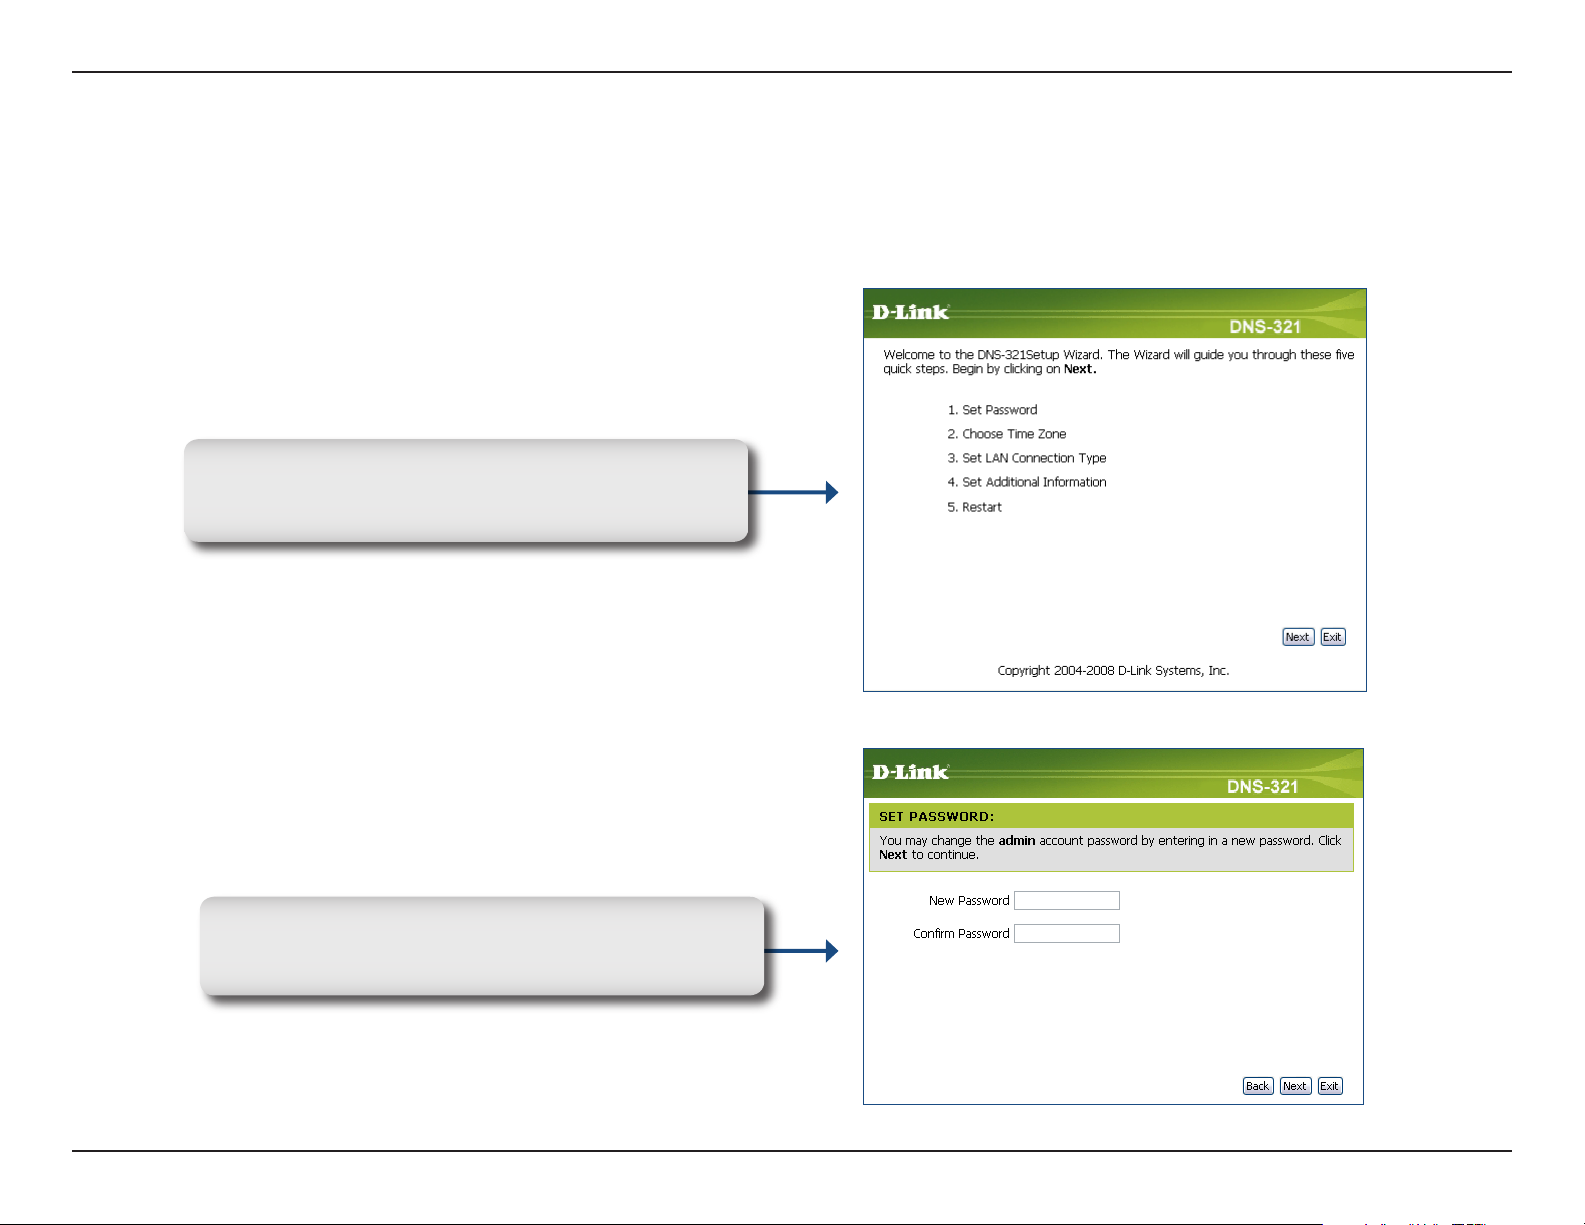
The DNS-321 has a setup Wizard that allows you to quickly configure some of the basic device settings.
When running the DNS-321 setup wizard, the
welcome screen details the five steps of the wizard.
Click Next to continue.
It is recommended you set an admin password
here. Enter the new password and re-enter it for
confirmation. Click Next to continue.
18D-Link DNS-321 User Manual
Page 19

Section 3 - Configuration
Set the appropriate Time Zone and click Next to
continue.
Edit or change the DNS-321 LAN information, or keep
the current settings, click Next to continue.
19D-Link DNS-321 User Manual
Page 20
Section 3 - Configuration
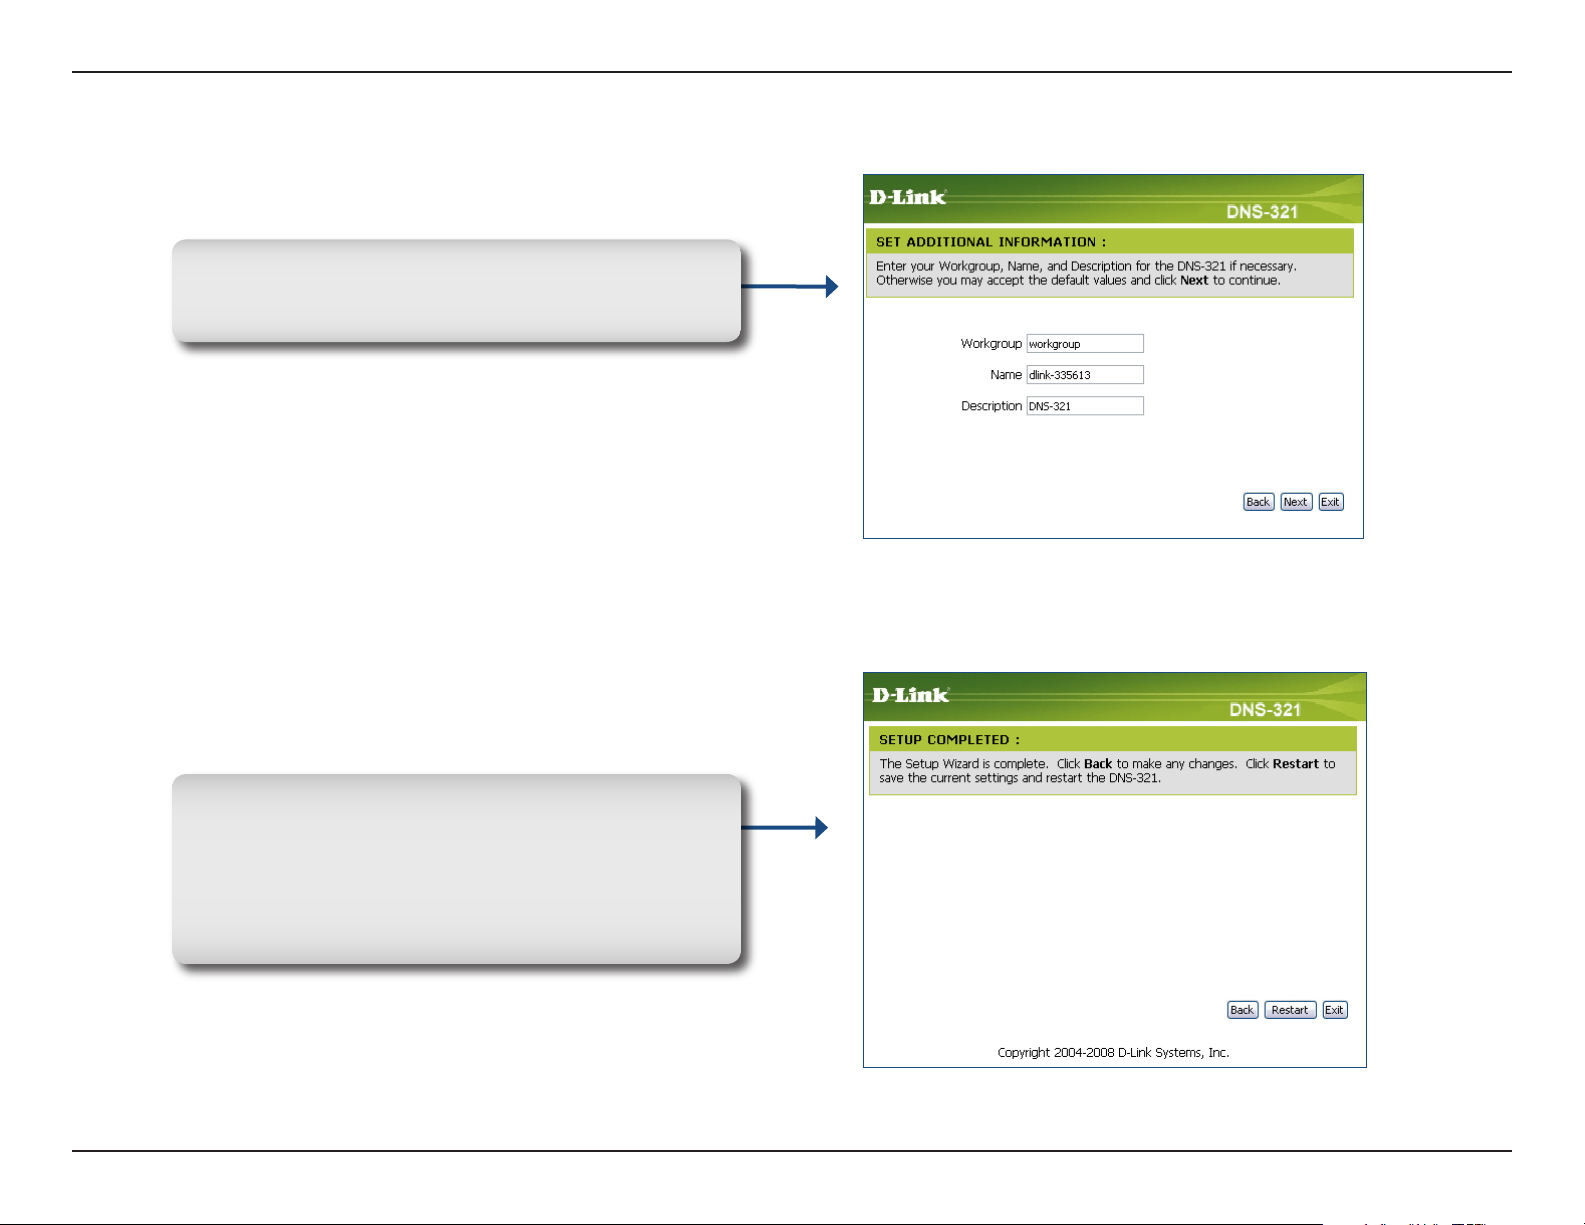
Enter a workgroup, name, and description for the
DNS-321, or leave the default values and click Next
to continue.
When the wizard completes, click Back to go back
and make changes or click Restart to restart the
DNS-321 and save the configuration.
While the DNS-321 is restarting, a countdown screen
will appear.
20D-Link DNS-321 User Manual
Page 21
Section 3 - Configuration
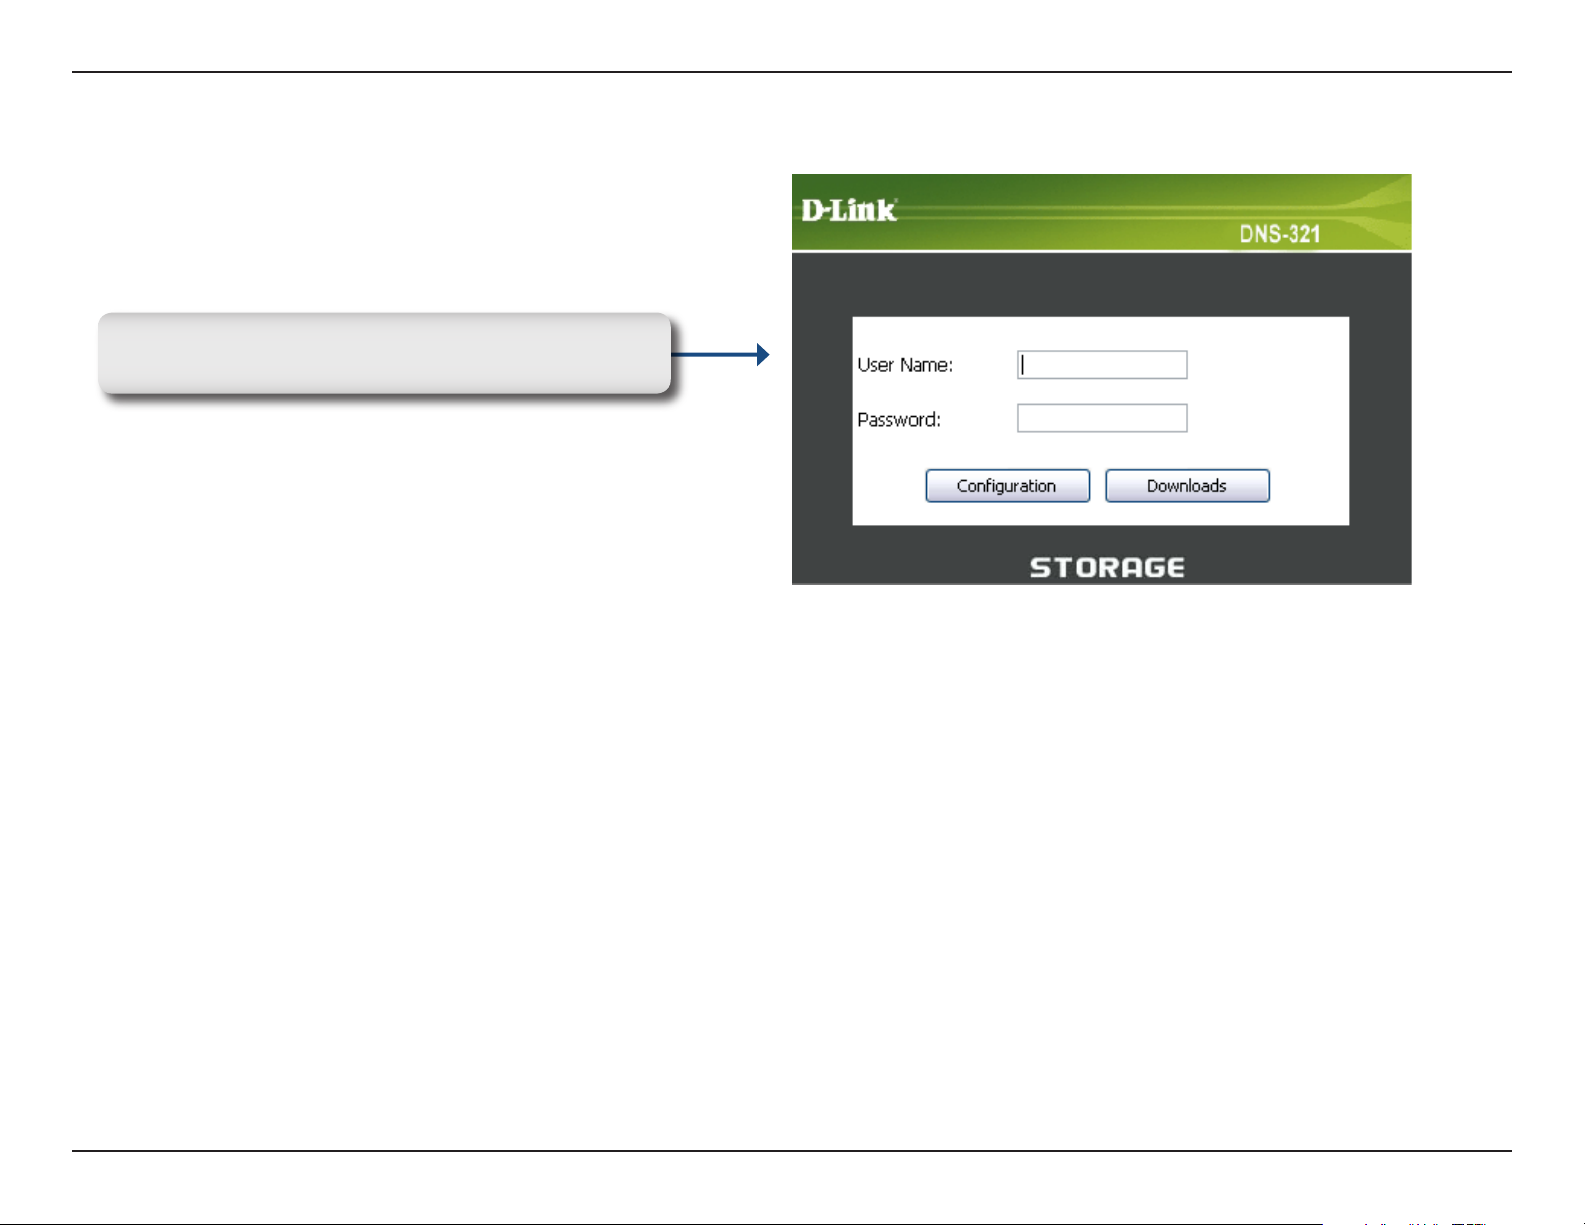
When the login prompt appears, login using the new
administrator password.
21D-Link DNS-321 User Manual
Page 22

Section 3 - Configuration
LAN
The Local Area Network settings for the DNS-321 can be configured on the LAN page.
Link Speed
DHCP Client
Static IP
The LAN Link Speed is set to Auto
by default, but can be manually set
to 100Mbps or 1000Mbps.
Selecting DHCP Client will cause
the DNS-321 to obtain an IP address
from the local DHCP server, such
as your router.
Selecting Static IP requires you to
assign the IP information for the
DNS-321 manually.
22D-Link DNS-321 User Manual
Page 23

Section 3 - Configuration
Device Settings
The device settings page allows you to assign a workgroup, name and description to the DNS-321.
Workgroup
Name
Description
Assign a workgroup name to the
DNS-321.
Assign a unique name to the
DNS-321. The name can be used
to access the device from a web
browser instead of using the IP
address.
For example, http://dlink-xxxxxx.
This is useful if there is more than
one DNS-321 on the network.
By default, the device name is
dlink-xxxxxx, where xxxxxx is the
last six digits of the MAC address.
Assign a device description to the
DNS-321.
23D-Link DNS-321 User Manual
Page 24

Section 3 - Configuration
Advanced
Users/Groups
The Users/Groups menu is used to create and manage user and group accounts. Up to 64 users and 10 groups can be
created. By default, all users have read and write access to all folders but access rules can be created in the Network
Access menu.
To create user names and passwords in the User and Group Creation
menu:
• Click the User radio button
• Type a unique User Name for each user added
• Enter and confirm the user Password
• Click Add to create the new user
The user will be added to the User List and will be available for assignment
to a user group.
To create a Group:
• Click the Group radio button
• Type a unique group name and click Add
The group will appear in the Group List and will be available for user
assignment in the Group Settings menu.
To add a user to a user group, under Group Settings:
• Select an available group from the Select Group drop-down
menu
• Highlight the user from List of all users
• Click the Add>> button
24D-Link DNS-321 User Manual
Page 25

Section 3 - Configuration
The user is now listed in the Users in group list.
To delete a user from a group, under Group Setting:
• Select the group
• Highlight the user to be removed
• Click the <<Remove button
To remove a user or group from the User or Group lists, click the trash can icon of that group or user.
To change a user password, click the notepad icon of the user.
25D-Link DNS-321 User Manual
Page 26

Section 3 - Configuration
Quotas
The DNS-321 supports storage quotas for both groups and individual users. Assigning a quota to a group or user will
limit the amount of storage they are allocated. By default, users and groups do not have a quota.
User Quota
Settings
Group Quota
Settings
Quota Status
User quotas are displayed here.
Quotas can be edited by clicking
on the notepad icon.
Group quotas are displayed here.
Quotas can be edited by clicking on
the notepad icon.
Displays the current status of the
quota feature. The quota function
can be started or stopped here.
26D-Link DNS-321 User Manual
Page 27

Section 3 - Configuration
Configuring Quotas
By default, all users and groups are displayed on the Quota Settings page and cannot be deleted. The default quota
setting is “Unlimited”.
To add a quota:
Click the notepad icon of the user
you want to add a quota.
Set a quota amount (MB) for the
user and click Apply.
27D-Link DNS-321 User Manual
Page 28

Section 3 - Configuration
The user, amount of used storage,
and storage limit are displayed.
Click Enabled to turn quota function
on. Once enabled, the status will
change to Started.
28D-Link DNS-321 User Manual
Page 29

Section 3 - Configuration
Network Access
The Network Access settings allow you to assign users and groups access rights to specific folders or volumes. By
default, all volumes are open to anyone with read/write access on the local network. Before specific user or group rules
can be created, the default rules must be deleted.
Network Access
Settings
Category
User
Folder
Permission
Oplocks
Assign permissions for users and groups on the
local network here.
Determines whether the access rule will apply to
a group or an individual user.
Select the user or group the access rule will apply
to.
Browse and select the folder or directory you are
controlling access to.
Set the user or group permission to Read Only or
Read/Write.
Opportunistic locks (oplocks) are a characteristic of
the LAN Manager networking protocol implemented
in th e 32-Bit Windows family. Oplocks are
guarantees made by a server for a shared logical
volume to its clients. These guarantees inform
the Client that a file’s content will not be allowed
to be changed by the server, or if some change
is imminent, the client will be notified before the
change is allowed to proceed.
Op locks are desig ned to increase network
performance when it comes to network file sharing. However it is recommended to set the share oplocks to No (off) when using file-based database
applications
By default Windows Vista™ has Oplocks enabled and cannot be disabled. If you are having network performance issues with applications sharing
files from the DNS-321, you may try to improve performance by setting Oplocks to No (off).
29D-Link DNS-321 User Manual
Page 30

Section 3 - Configuration
Map Archive
Comment
Network Access List
When enabled, the file attribute ”Archive” will be copied as the file is being stored on the DNS-321. Certain backup software attach this attribute
to files that are being stored as backups.
Enter a comment for reference or description of the rule.
Lists all defined access rules.
30D-Link DNS-321 User Manual
Page 31

Section 3 - Configuration
FTP Server
The DNS-321 is equipped with a built in FTP Server. The server is easy to configure and allows users access to important
data whether they are on the local network or at a remote location. The FTP server can be configured to allow user
access to specific directories, and will allow up to 10 users to access the DNS-321 simultaneously.
FTP Account
Settings
Category
User
Folder
Permission
FTP Server
Settings
FTP Access
List
This section contains the user and group
configuration settings for access to the FTP
folder to the DNS-321.
Determines whether the FTP server rule will
apply to an individual user or a group.
Select the group or user the FTP server rule
will apply to.
Browse and select the folder or directory you
are granting FTP access to. Select root to
grant access to all volumes.
Set the user or group permission to Read
Only or Read/Write.
This section contains the configuration
settings for the DNS-321 FTP Server (refer
to the next page).
The FTP access rights for users and groups
can be added and edited here.
FTP Server
Status
The current settings and status of the
DNS-321 FTP Server are displayed here.
31D-Link DNS-321 User Manual
Page 32

Section 3 - Configuration
FTP Server Settings
Max User
Idle Time
Port
Flow Control
Client Language
Apply
Set the maximum amount of users that
can connect to the FTP server.
Set the amount of time a user can remain
idle before being disconnected.
Set the FTP port. Default is 21.
Allow you to limit the amount of
bandwidth available for each user.
Most standard FTP clients like Windows
FTP, only support Western European
codepage when transferring files.
Northern European, Central European,
Traditional and Simplified Chinese as
well as Cyrillic codepage support has
been added for non standard FTP
clients that are capable of supporting
these character sets.
Click Apply to save your rule.
FTP Access List
List all defined FTP Rules.
32D-Link DNS-321 User Manual
Page 33

Section 3 - Configuration
If you are behind a router, you will need to forward the FTP port from the router to the DNS-321. Additional filtering
and firewall settings may need to be modified on your router to allow FTP Access to the DNS-321 from the Internet.
Once the port has been forwarded on the router, users from the internet will access the FTP server through the WAN
IP address of the router.
If you are using a D-Link router, such as the WBR-2310 used in the example below, your port forwarding rule should
be similar to the following:
Name
IP Address
Public Port
Private Port
Traffic Type
Name the DNS-321 FTP server
rule.
Enter the IP address of the
DNS-321.
Enter the public FTP port. By
default, the port is 21.
Enter the private FTP port. By
default, the port is 21.
Set the traffic type to TCP.
If you use an FTP port other than 21, then users accessing the FTP server using an FTP client will have to
specify the non-standard port, and3 users who are using a browser will have to specify the port in the URL
(e.g. ftp://ftp.dns321.com:3000, where the FTP port is 3000).
33D-Link DNS-321 User Manual
Page 34

Section 3 - Configuration
UPnP AV Server
The DNS-321 features a UPnP AV Server. This server provides the ability to stream photos, music and videos to UPnP
AV compatible network media players. If the server is enabled, the DNS-321 will be automatically detected by UPnP
AV compatible media players on your local network.
UPnP AV
Server
Folder
Auto Refresh
Refresh
Select Enable or Disable to enable
or disable the DNS-321 UPnP AV
server.
Specifies the folder or directory
that will be shared by the UPnP AV
server. Select root to share all files
on all volumes, or click Browse to
select a specific folder.
Set the device to auto refresh your
media every 5 minutes up to every
24hrs.
Click Refresh after adding new files
to be used by UPnP AV compatible
devices.
34D-Link DNS-321 User Manual
Page 35

Section 3 - Configuration
iTunes Server
The DNS-321 features an iTunes Server. This server provides the ability to share music and videos to computers on
the local network running iTunes. If the server is enabled, the DNS-321 will be automatically detected by the iTunes
program and the music and videos contained in the specified directory will be available to stream over the network.
iTunes Server
Folder
Password
Auto Refresh
Refresh
Select Enable or Disable to enable
or disable the DNS-321 iTunes
server.
Specifies the folder or directory that
will be shared by the iTunes server.
Select root to share all files on all
volumes, or click Browse to select
a specific folder.
Sets password for the iTunes
server. (Optional)
Set the device to auto refresh your
media every 5 minutes up to every
24hrs.
Click Refresh after adding new files
to be used with iTunes.
35D-Link DNS-321 User Manual
Page 36

Section 3 - Configuration
After enabling the iTunes server on the DNS-321, launch iTunes. In your iTunes utility, select the DNS-321 and enter
the iTunes server password if required.
Select the DNS-321. When prompted,
enter in the iTunes server password.
Click OK.
Media stored on the DNS-321
will then be available for use in
iTunes.
36D-Link DNS-321 User Manual
Page 37

Section 3 - Configuration
DHCP Server
The DNS-321 can be used as a DHCP Server. As a DHCP server, it can be used to serve IP addresses to devices on
your local network. However, this feature should not be enabled if you already have a DHCP server, such as a router
on your local network.
DHCP Server
Starting IP
Address
Ending IP
Address
Lease Time
DHCP Client
List
Enable or Disable the DNS-321
DHCP Server.
Enter the starting IP address for the
range of addresses assigned by the
DHCP server.
Enter the ending IP address for the
range of addresses assigned by the
DHCP server.
Set the duration of time that an IP
address will remain assigned to a
device.
Displays the Hostname, IP address,
MAC address, and Expired Time of
the clients that have received a
DHCP address.
37D-Link DNS-321 User Manual
Page 38

Section 3 - Configuration
LLTD
The DNS-321 supports LLTD (Link Layer Topology Discovery) and is used by the Network Map application that is
included in Windows Vista™.
LLTD
Select to enable or disable LLTD on
your DNS-321.
38D-Link DNS-321 User Manual
Page 39

Section 3 - Configuration
Tools
Admin
The Admin menu allows you to set a password for the admin account. It is recommended to set an admin account
password when first configuring the DNS-321.
User Name
Password
New Password
Confirm
Password
Save Settings
The administrator user name is
admin, and this cannot be changed.
Enter the current password. (Leave
this blank if you have not set a
password yet.)
Enter a new password.
Enter the new password again for
confirmation.
Click Save Settings to save the new
password.
39D-Link DNS-321 User Manual
Page 40

Section 3 - Configuration
Time
The DNS-321 Time page contains several different options for setting the device’s internal clock. It is important that
accurate time is set so that scheduled backups and downloads will be accurate.
Time Zone
NTP Server
From My
Computer
Select your time zone from the
drop-down menu.
Click Set Time after selecting your
time zone.
Network Time Protocol (NTP)
synchronizes the DNS-321 with an
Internet time server.
D-Link provides two time servers
for your convenience. Choose the
one closest to your location.
Click Set Time after selecting the
location.
Th is o ption wil l sync hr oni ze
the DNS- 321 cl ock with your
computer.
Set Time
Manually
Click Set Time to sync with the local
computer.
This option allows you to set the
time and date manually.
Enter the appropriate time and date
and click Set Time.
40D-Link DNS-321 User Manual
Page 41

Section 3 - Configuration
System
The DNS-321 System menu provides options for system restarts, saving and loading configuration settings, and idle
times setting.
Restart
Restore
Defaults
Shutdown
Configuration
Settings
Idle Time
Cl ic k R es ta r t t o re bo ot the
DNS-321.
Click Restore to reset the DNS-321
to its factory default settings. This
will erase all previous configuration
changes.
Click Shutdown to turn off the
DNS-321.
Click Save to save the current
DNS-321 configuration settings to
a file on the local computer. If at a
later time you need to reload this
configuration after a system reset,
browse the file and click Load.
Enter the time (in minutes) that
the administrator will be allowed
to remain idle while accessing the
DNS-321 configuration utility that
users will be allowed to remain
idle while accessing the download
schedule settings.
Click Apply to activate and save
the settings.
41D-Link DNS-321 User Manual
Page 42

Section 3 - Configuration
Firmware
The DNS-321 Firmware menu makes it simple to check for new firmware releases and upload them to the device.
Firmware
Upgrade
Current
Firmware Info
This section provides a link to
check for new firmware on the
D-Link support website.
If a new firmware is available,
download the file to your local
computer.
This section provides information
abo u t t h e cu r r en t D NS- 3 21
firmware.
When upgrading the firmware, click
Browse to select the new firmware
file on your local computer.
Click Apply to begin the firmware
upgrade process.
42D-Link DNS-321 User Manual
Page 43

Section 3 - Configuration
E-Mail Alerts
With the DNS-321 E-Mail Alerts, you can configure e-mails to be sent alerting you to certain operational conditions and
drive status conditions. These alerts can prove helpful with the management and safeguarding of important data.
Email Alert
Settings
Email Alert
Types
T h i s s e c t i o n contai n s th e
conf igurati on sett ings for the
your e-mail account and alert
preferences.
Once configured, use the Test
E-Mail bu tton to sen d a test
e-mail and confirm your settings
are correct.
This section contains the alert
options and their configuration
settings.
43D-Link DNS-321 User Manual
Page 44

Section 3 - Configuration
E-Mail Alert Settings
Login Method
User Name
Password
SMTP Server
Sender E-Mail
Select either Account or Anonymous.
Choosing Anonymous does not require
a User Name or Password.
Enter the appropriate user name for your
e-mail account.
Enter the appropriate password for your
e-mail account.
Enter the IP address or domain name
of your outgoing mail server. If you are
unsure of this value, contact your e-mail
provider.
Enter the “from” e-mail address (e.g.
alerts@dns321.com). This field does not
require a valid e-mail address. However,
if your e-mail client is filtering spam,
make sure you allow this address to be
received.
Receiver
E-Mail
Test E-Mail
Enter the e-mail address you want to
send the alerts to. This address must
correspond with the SMTP ser ver
configured above.
Click the Test E-Mail button to send a
test alert and confirm your settings are
correct.
44D-Link DNS-321 User Manual
Page 45

Section 3 - Configuration
E-Mail Alert Types
Space Status
A Volume Is Full
A Hard Drive Has
Failed
The Administrator
Password Change
Firmware has
been Upgraded
System
Temperature
Exceeded
Select an interval in hours and
minutes to have a status of space
remaining on the drives e-mailed.
An alert will be sent when the hard
drive is full.
An alert will be sent if a critical error
occurs on one of the drives.
An alert will be sent if the admin
password is changed.
An alert will be sent if the firmware
is upgraded.
An alert will be sent if the DNS-321
device temperature exceeds the set
threshold. After the alert has been
sent, the DNS-321 will power off
for safety.
45D-Link DNS-321 User Manual
Page 46

Section 3 - Configuration
Power Management
The DNS-321 Power Management feature allows you to configure the drives to shut down while power remains constant
to the device. The drives will power up again when data is accessed.
Power
Management
Turn off Hard
Drives
E n a b l e or D i s a b l e Po we r
Management on the DNS-321.
Set the amount of idle time before
the drives will shut down.
Click Save Settings to activate
and save your changes.
46D-Link DNS-321 User Manual
Page 47

Section 3 - Configuration
RAID
The DNS-321 supports four different disk configuration types: Standard, where each drive is a unique volume, JBOD,
which combines both drives in a linear fashion to create one volume, as well as RAID 0 and RAID 1.
RAID Settings
Click Set RAID Type and Re-Format to
change the current drive configuration.
All data will be lost on your hard drives
when changing the drive configuration.
A pop-up window will appear with the drive
configuration options:
47D-Link DNS-321 User Manual
Page 48

Section 3 - Configuration
What is RAID?
RAID, short for Redundant Array of Independent Disks, is a combination of two or more disks with the aim of providing
fault tolerance and improving performance. There are several different levels of RAID, with each providing a different
method of sharing or distributing data amongst the drives. The DNS-321 supports RAID levels 0 and 1.
RAID 0
RAID 1
RAID 0 provides data striping, which spreads
out blocks of data over both drives, but does not
provide data redundancy.
Although performance is improved, the lack of
fault tolerance means that if one drive fails, all
data in the array will be lost.
RAID 1 provides mirroring over both disks, with
the same read/write speed of a single disk. A
RAID 1 array can only be as large as it’s smallest
member disk.
RAID 0
RAID 1
Because the data is stored on both disks,
RAID 1 provides fault tolerance and protection,
in addition to performance advantages.
48D-Link DNS-321 User Manual
Page 49

Section 3 - Configuration
DDNS
The DDNS feature allows you to host a server (Web, FTP, Game Server, etc…) using a domain name that you have
purchased (www.whateveryournameis.com) with your dynamically assigned IP address. Most broadband Internet
Service Providers assign dynamic (changing) IP addresses. Using a DDNS service provider, your friends can enter
your domain name to connect to your server regardless your IP address.
DDNS
Server Address
Host Name
Username or Key
Password or Key
Verify Password
or Key
Timeout
Status
Select Enable or Disable.
Enter the DDNS server address or select
from the drop-down menu.
Enter your DDNS host name.
Enter your DDNS username or key*.
Enter your DDNS password or key*.
Re-enter your password or key*.
The time between per iodic updates to
the Dynamic DNS. The timeout period is
measured in hours
Displays your DDNS status.
* If a key is provided and utilized by your DDNS provider, enter the key in all three fields (username, password, and verify password).
49D-Link DNS-321 User Manual
Page 50

Section 3 - Configuration
Status
Device Information
LAN Info
Device Info
Hard Drive
Info
Displays the local network settings
of the DNS-321.
Displays the workgroup, name,
description and current temperature
of the DNS-321.
Displays the hard drive information,
including the disk mode, total size,
used and remaining drive space.
50D-Link DNS-321 User Manual
Page 51

Section 3 - Configuration
Support
The DNS-321 Support page provides a menu of Support topics explaining the features of the device.
51D-Link DNS-321 User Manual
Page 52

Section 3 - Configuration
Mapping a Drive
You can use the D-Link Easy Search Utility to map drives to your computer. Insert the DNS-321 CD into your CD-ROM
drive.
Click Easy Search Utility.
The Easy Search Utility will load and detect any DNS-321 devices that are on the local network. If the DNS-321 you
are working with does not show up in the device list, click Refresh.
52D-Link DNS-321 User Manual
Page 53

Section 3 - Configuration
If the DNS-321 you are working with does not show up in the device list, click Refresh.
Highlight an available DNS-321.
Available volumes will be displayed
under Drive Mapping. Highlight the
volume you want to map.
Select an available drive letter from the
drop-down menu and click Connect.
Once connected, your mapped drive(s) will appear in My Computer.
53D-Link DNS-321 User Manual
Page 54

Section 3 - Configuration
Double-click the My Computer
icon on your desktop.
Double-click on the mapped
drive to access the files and
folders.
54D-Link DNS-321 User Manual
Page 55

Section 3 - Configuration
Download Scheduling
The DNS-321 Download Scheduling feature allows you to schedule folder or file downloads and backup sessions.
Begin by accessing the configuration page of the DNS-321:
Click Easy Search Utility.
Highlight an available DNS-321
and click Configuration to access
the web-based utility.
55D-Link DNS-321 User Manual
Page 56

Section 3 - Configuration
The DNS-321 login screen will appear:
Type admin for the username
and leave the password field
blank.
Click Downloads
The DNS-321 Download Scheduling configuration page will appear.
56D-Link DNS-321 User Manual
Page 57

Section 3 - Configuration
Schedule Downloads
Scheduling
Settings
Schedule List
Configure download and backup schedules
here.
The Schedule List will display all completed,
active, and pending scheduled downloads
and backups.
57D-Link DNS-321 User Manual
Page 58

Section 3 - Configuration
Scheduling Settings
Login Method
Type
URL
Test
Select the appropriate login method
to access the files for download. If the
site requires login credentials, select
Account and enter a valid username
and password.
Select File or Folder, depending
on what you want to download or
backup.
Enter the URL of the site or server
you are initiating a transfer from.
E.g. ftp://123.456.789/Test
ftp://123.456.789/test.txt
http://www.test.com/test.txt
Click Test to test if the URL is valid,
and the user name and password
are correct.
Local
Save To
When
Recurring
Backup
Incremental
Backup
Click Local to set the source file or folder from one of the internal drive volumes. Browse the file or folder, and click OK
to accept the network path.
Enter a valid destination drive on the DNS-321, or click Browse to select the destination.
Enter the date and time you want the scheduled backup or download to initiate.
Designate the interval and time you want the backup or download to run unattended.
By default all local backups and file/folder downloads are in Overwrite mode, meaning that identical files in the destination
folder will be overwritten by the source files. Checking Incremental Backup will have the DNS-321 compare identical
file names at the source and destination. Files will only be overwritten if the source file is more recent.
58D-Link DNS-321 User Manual
Page 59

Section 3 - Configuration
Replacing or Adding a New Hard Drive
It is recommended that you backup your important files before replacing or adding a new hard drive to the DNS-321.
Replacing a Hard Drive:
Please make sure the power is off before replacing a hard drive. After you have installed the new drive, turn on the
DNS-321 and then connect to the Web UI. The DNS-321 will prompt you to format the new drive (Standard, RAID 1
mode) or both drives (JBOD, RAID 0 mode).
Adding a New Hard Drive:
The DNS-321 is able to work with one single hard drive under Standard mode. Please make sure the power is off before
installing a second hard drive.
After you have installed the new drive, turn on the DNS-321 and then connect to the Web UI. The DNS-321 will prompt
you to format the new drive.
Note: Formatting a hard drive will erase the data stored on the hard drive. Please backup important data before
formatting a hard drive.
59D-Link DNS-321 User Manual
Page 60

Appendix A - Contacting Technical Support
Contacting Technical Support
U.S. and Canadian customers can contact D-Link technical support through our web site or by phone.
Before you contact technical support, please have the following ready:
• Model number of the product (e.g. DNS-321)
• Hardware Revision (located on the label on the bottom of the device (e.g. rev A1))
• Serial Number (s/n number located on the label on the bottom of the device).
You can find software updates and user documentation on the D-Link website as well as frequently asked questions
and answers to technical issues.
For customers within the United States:
Phone Support:
(877) 453-5465
Internet Support:
http://support.dlink.com
For customers within Canada:
Phone Support:
(800) 361-5265
Internet Support:
http://support.dlink.com
60D-Link DNS-321 User Manual
Page 61

Appendix B - Warranty
GNU/Linux GPL
• “GPL Software” means GPL software licensed to you under the GNU General Public License as published by the
Free Software Foundation (GPL). A copy of the GPL is included below.
• “Open Source Software” means various open source software components licensed under the terms of applicable open
source license agreements included in the materials relating to such software. Open Source Software is composed
of individual software components, each of which has its own copyright and its own applicable license conditions.
The Open Source Software licenses can be found in the gpl.pdf file, other materials accompanying the software
package, the documentation or corresponding source files available from http://support.dlink.com/GPL.asp.
61D-Link DNS-321 User Manual
Page 62

Appendix B - Warranty
GNU General Public License
Version 2, June 1991
Copyright (C) 1989, 1991 Free Software Foundation, Inc.,
51 Franklin Street, Fifth Floor, Boston, MA 02110-1301 USA
Everyone is permitted to copy and distribute verbatim copies of this license document, but changing it is not allowed.
Preamble
The licenses for most software are designed to take away your freedom to share and change it. By contrast, the GNU General Public
License is intended to guarantee your freedom to share and change free software--to make sure the software is free for all its users. This
General Public License applies to most of the Free Software Foundation’s software and to any other program whose authors commit to
using it. (Some other Free Software Foundation software is covered by the GNU Lesser General Public License instead.) You can apply
it to your programs, too.
When we speak of free software, we are referring to freedom, not price. Our General Public Licenses are designed to make sure that you
have the freedom to distribute copies of free software (and charge for this service if you wish), that you receive source code or can get it
if you want it, that you can change the software or use pieces of it in new free programs; and that you know you can do these things.
To protect your rights, we need to make restrictions that forbid anyone to deny you these rights or to ask you to surrender the rights.
These restrictions translate to certain responsibilities for you if you distribute copies of the software, or if you modify it.
For example, if you distribute copies of such a program, whether gratis or for a fee, you must give the recipients all the rights that you have.
You must make sure that they, too, receive or can get the source code. And you must show them these terms so they know their rights.
We protect your rights with two steps:
(1) copyright the software, and
(2) offer you this license which gives you legal permission to copy, distribute and/or modify the software.
Also, for each author’s protection and ours, we want to make certain that everyone understands that there is no warranty for this free
software. If the software is modified by someone else and passed on, we want its recipients to know that hat they have is not the original,
so that any problems introduced by others will not reflect on the original authors’ reputations.
62D-Link DNS-321 User Manual
Page 63

Appendix B - Warranty
Finally, any free program is threatened constantly by software patents. We wish to avoid the danger that redistributors of a free program
will individually obtain patent licenses, in effect making the program proprietary. To prevent this, we have made it clear that any patent
must be licensed for everyone’s free use or not licensed at all.
The precise terms and conditions for copying, distribution and modification follow.
GNU GENERAL PUBLIC LICENSE
TERMS AND CONDITIONS FOR COPYING, DISTRIBUTION AND MODIFICATION
0. This License applies to any program or other work which contains a notice placed by the copyright holder saying it may be
distributed under the terms of this General Public License. The “Program”, below, refers to any such program or work, and a “work
based on the Program” means either the Program or any derivative work under copyright law: that is to say, a work containing the
Program or a portion of it, either verbatim or with modifications and/or translated into another language. (Hereinafter, translation
is included without limitation in the term “modification”.) Each licensee is addressed as “you”.
Activities other than copying, distribution and modification are not covered by this License; they are outside its scope. The act of
running the Program is not restricted, and the output from the Program is covered only if its contents constitute a work based on
the Program (independent of having been made by running the Program).
Whether that is true depends on what the Program does.
1. You may copy and distribute verbatim copies of the Program’s source code as you receive it, in any medium, provided that you
conspicuously and appropriately publish on each copy an appropriate copyright notice and disclaimer of warranty; keep intact all
the notices that refer to this License and to the absence of any warranty; and give any other recipients of the Program a copy of
this License along with the Program.
You may charge a fee for the physical act of transferring a copy, and you may at your option offer warranty protection in exchange
for a fee.
2. You may modify your copy or copies of the Program or any portion of it, thus forming a work based on the Program, and copy and
distribute such modifications or work under the terms of Section 1 above, provided that you also meet all of these conditions:
a) You must cause the modified files to carry prominent notices stating that you changed the files and the date of any
change.
63D-Link DNS-321 User Manual
Page 64

Appendix B - Warranty
b) You must cause any work that you distribute or publish, that in whole or in part contains or is derived from the Program
or any part thereof, to be licensed as a whole at no charge to all third parties under the terms of this License.
c) If the modified program normally reads commands interactively when run, you must cause it, when started running
for such interactive use in the most ordinary way, to print or display an announcement including an appropriate
copyright notice and a notice that there is no warranty (or else, saying that you provide a warranty) and that users
may redistribute the program under these conditions, and telling the user how to view a copy of this License.
(Exception: if the Program itself is interactive but does not normally print such an announcement, your work based
on the Program is not required to print an announcement.)
These requirements apply to the modified work as a whole. If identifiable sections of that work are not derived from the Program, and can
be reasonably considered independent and separate works in themselves, then this License, and its terms, do not apply to those sections
when you distribute them as separate works. But when you distribute the same sections as part of a whole which is a work based on the
Program, the distribution of the whole must be on the terms of this License, whose permissions for other licensees extend to the entire
whole, and thus to each and every part regardless of who wrote it.
Thus, it is not the intent of this section to claim rights or contest your rights to work written entirely by you; rather, the intent is to exercise
the right to control the distribution of derivative or collective works based on the Program.
In addition, mere aggregation of another work not based on the Program with the Program (or with a work based on the Program) on a
volume of a storage or distribution medium does not bring the other work under the scope of this License.
3. You may copy and distribute the Program (or a work based on it, under Section 2) in object code or executable form under the
terms of Sections 1 and 2 above provided that you also do one of the following:
a) Accompany it with the complete corresponding machine-readable source code, which must be distributed under the
terms of Sections 1 and 2 above on a medium customarily used for software interchange; or,
b) Accompany it with a written offer, valid for at least three years, to give any third party, for a charge no more than your
cost of physically performing source distribution, a complete machine-readable copy of the corresponding source
code, to be distributed under the terms of Sections 1 and 2 above on a medium customarily used for software
interchange; or,
c) Accompany it with the information you received as to the offer to distribute corresponding source code. (This
alternative is allowed only for noncommercial distribution and only if you received the program in object code or
executable form with such an offer, in accord with Subsection b above.)
64D-Link DNS-321 User Manual
Page 65

Appendix B - Warranty
The source code for a work means the preferred form of the work for making modifications to it. For an executable work, complete source
code means all the source code for all modules it contains, plus any associated interface definition files, plus the scripts used to control
compilation and installation of the executable. However, as a special exception, the source code distributed need not include anything that
is normally distributed (in either source or binary form) with the major components (compiler, kernel, and so on) of the operating system
on which the executable runs, unless that component itself accompanies the executable.
If distribution of executable or object code is made by offering access to copy from a designated place, then offering equivalent access to
copy the source code from the same place counts as distribution of the source code, even though third parties are not compelled to copy
the source along with the object code.
4. You may not copy, modify, sublicense, or distribute the Program except as expressly provided under this License. Any attempt
otherwise to copy, modify, sublicense or distribute the Program is void, and will automatically terminate your rights under this
License. However, parties who have received copies, or rights, from you under this License will not have their licenses terminated
so long as such parties remain in full compliance.
5. You are not required to accept this License, since you have not signed it. However, nothing else grants you permission to modify
or distribute the Program or its derivative works. These actions are prohibited by law if you do not accept this License. Therefore,
by modifying or distributing the Program (or any work based on the Program), you indicate your acceptance of this License to do
so, and all its terms and conditions for copying, distributing or modifying the Program or works based on it.
6. Each time you redistribute the Program (or any work based on the Program), the recipient automatically receives a license from
the original licensor to copy, distribute or modify the Program subject to these terms and conditions. You may not impose any
further restrictions on the recipients’ exercise of the rights granted herein. You are not responsible for enforcing compliance by
third parties to this License.
7. If, as a consequence of a court judgment or allegation of patent infringement or for any other reason (not limited to patent
issues), conditions are imposed on you (whether by court order, agreement or otherwise) that contradict the conditions of this
License, they do not excuse you from the conditions of this License. If you cannot distribute so as to satisfy simultaneously your
obligations under this License and any other pertinent obligations, then as a consequence you may not distribute the Program
at all. For example, if a patent license would not permit royalty-free redistribution of the Program by all those who receive copies
directly or indirectly through you, then the only way you could satisfy both it and this License would be to refrain entirely from
distribution of the Program.
If any portion of this section is held invalid or unenforceable under any particular circumstance, the balance of the section is intended to
apply and the section as a whole is intended to apply in other circumstances.
65D-Link DNS-321 User Manual
Page 66

Appendix B - Warranty
It is not the purpose of this section to induce you to infringe any patents or other property right claims or to contest validity of any such
claims; this section has the sole purpose of protecting the integrity of the free software distribution system, which is implemented by
public license practices. Many people have made generous contributions to the wide range of software distributed through that system in
reliance on consistent application of that system; it is up to the author/donor to decide if he or she is willing to distribute software through
any other system and a licensee cannot impose that choice.
This section is intended to make thoroughly clear what is believed to be a consequence of the rest of this License.
8. If the distribution and/or use of the Program is restricted in certain countries either by patents or by copyrighted interfaces, the
original copyright holder who places the Program under this License may add an explicit geographical distribution limitation
excluding those countries, so that distribution is permitted only in or among countries not thus excluded. In such case, this
License incorporates the limitation as if written in the body of this License.
9. The Free Software Foundation may publish revised and/or new versions of the General Public License from time to time. Such
new versions will be similar in spirit to the present version, but may differ in detail to address new problems or concerns.
Each version is given a distinguishing version number. If the Program specifies a version number of this License which applies
to it and “any later version”, you have the option of following the terms and conditions either of that version or of any later version
published by the Free Software Foundation. If the Program does not specify a version number of this License, you may choose
any version ever published by the Free Software Foundation.
10. If you wish to incorporate parts of the Program into other free programs whose distribution conditions are different, write to the
author to ask for permission. For software which is copyrighted by the Free Software Foundation, write to the Free Software
Foundation; we sometimes make exceptions for this. Our decision will be guided by the two goals of preserving the free status
of all derivatives of our free software and of promoting the sharing and reuse of software generally.
NO WARRANTY
11. BECAUSE THE PROGRAM IS LICENSED FREE OF CHARGE, THERE IS NO WARRANTY FOR THE PROGRAM, TO THE
EXTENT PERMITTED BY APPLICABLE LAW. EXCEPT WHEN OTHERWISE STATED IN WRITING THE COPYRIGHT
HOLDERS AND/OR OTHER PARTIES PROVIDE THE PROGRAM “AS IS” WITHOUT WARRANTY OF ANY KIND, EITHER
EXPRESSED OR IMPLIED, INCLUDING, BUT NOT LIMITED TO, THE IMPLIED WARRANTIES OF MERCHANTABILITY
AND FITNESS FOR A PARTICULAR PURPOSE. THE ENTIRE RISK AS TO THE QUALITY AND PERFORMANCE OF THE
PROGRAM IS WITH YOU. SHOULD THE PROGRAM PROVE DEFECTIVE, YOU ASSUME THE COST OF ALL NECESSARY
SERVICING, REPAIR OR CORRECTION.
66D-Link DNS-321 User Manual
Page 67

Appendix B - Warranty
12. IN NO EVENT UNLESS REQUIRED BY APPLICABLE LAW OR AGREED TO IN WRITING WILL ANY COPYRIGHT HOLDER,
OR ANY OTHER PARTY WHO MAY MODIFY AND/OR REDISTRIBUTE THE PROGRAM AS PERMITTED ABOVE, BE
LIABLE TO YOU FOR DAMAGES, INCLUDING ANY GENERAL, SPECIAL, INCIDENTAL OR CONSEQUENTIAL DAMAGES
ARISING OUT OF THE USE OR INABILITY TO USE THE PROGRAM (INCLUDING BUT NOT LIMITED TO LOSS OF DATA
OR DATA BEING RENDERED INACCURATE OR LOSSES SUSTAINED BY YOU OR THIRD PARTIES OR A FAILURE OF
THE PROGRAM TO OPERATE WITH ANY OTHER PROGRAMS), EVEN IF SUCH HOLDER OR OTHER PARTY HAS BEEN
ADVISED OF THE POSSIBILITY OF SUCH DAMAGES.
END OF TERMS AND CONDITIONS
67D-Link DNS-321 User Manual
Page 68

Appendix B - Warranty
Warranty
Subject to the terms and conditions set forth herein, D-Link Systems, Inc. (“D-Link”) provides this Limited Warranty:
• Only to the person or entity that originally purchased the product from D-Link or its authorized reseller or distributor, and
• Only for products purchased and delivered within the fifty states of the United States, the District of Columbia, U.S. Possessions
or Protectorates, U.S. Military Installations, or addresses with an APO or FPO.
Limited Warranty:
D-Link warrants that the hardware portion of the D-Link product described below (“Hardware”) will be free from material defects in
workmanship and materials under normal use from the date of original retail purchase of the product, for the period set forth below
(“Warranty Period”), except as otherwise stated herein.
• Hardware (excluding power supplies): One (1) year
• Free Technical Support - Basic Installation: Ninety (90) days
The customer’s sole and exclusive remedy and the entire liability of D-Link and its suppliers under this Limited Warranty will be, at
D-Link’s option, to repair or replace the defective Hardware during the Warranty Period at no charge to the original owner or to refund the
actual purchase price paid. Any repair or replacement will be rendered by D-Link at an Authorized D-Link Service Office. The replacement
hardware need not be new or have an identical make, model or part. D-Link may, at its option, replace the defective Hardware or any part
thereof with any reconditioned product that D-Link reasonably determines is substantially equivalent (or superior) in all material respects
to the defective Hardware. Repaired or replacement hardware will be warranted for the remainder of the original Warranty Period or ninety
(90) days, whichever is longer, and is subject to the same limitations and exclusions. If a material defect is incapable of correction, or if
D-Link determines that it is not practical to repair or replace the defective Hardware, the actual price paid by the original purchaser for the
defective Hardware will be refunded by D-Link upon return to D-Link of the defective Hardware. All Hardware or part thereof that is replaced
by D-Link, or for which the purchase price is refunded, shall become the property of D-Link upon replacement or refund.
68D-Link DNS-321 User Manual
Page 69

Appendix B - Warranty
Limited Software Warranty:
D-Link warrants that the software portion of the product (“Software”) will substantially conform to D-Link’s then current functional specifications
for the Software, as set forth in the applicable documentation, from the date of original retail purchase of the Software for a period of ninety
(90) days (“Software Warranty Period”), provided that the Software is properly installed on approved hardware and operated as contemplated
in its documentation. D-Link further warrants that, during the Software Warranty Period, the magnetic media on which D-Link delivers the
Software will be free of physical defects. The customer’s sole and exclusive remedy and the entire liability of D-Link and its suppliers under
this Limited Warranty will be, at D-Link’s option, to replace the non-conforming Software (or defective media) with software that substantially
conforms to D-Link’s functional specifications for the Software or to refund the portion of the actual purchase price paid that is attributable
to the Software. Except as otherwise agreed by D-Link in writing, the replacement Software is provided only to the original licensee, and
is subject to the terms and conditions of the license granted by D-Link for the Software. Replacement Software will be warranted for the
remainder of the original Warranty Period and is subject to the same limitations and exclusions. If a material non-conformance is incapable
of correction, or if D-Link determines in its sole discretion that it is not practical to replace the non-conforming Software, the price paid by
the original licensee for the non-conforming Software will be refunded by D-Link; provided that the non-conforming Software (and all copies
thereof) is first returned to D-Link. The license granted respecting any Software for which a refund is given automatically terminates.
Non-Applicability of Warranty:
The Limited Warranty provided hereunder for Hardware and Software portions of D-Link’s products will not be applied to and does not cover
any refurbished product and any product purchased through the inventory clearance or liquidation sale or other sales in which D-Link, the
sellers, or the liquidators expressly disclaim their warranty obligation pertaining to the product and in that case, the product is being sold
“As-Is” without any warranty whatsoever including, without limitation, the Limited Warranty as described herein, notwithstanding anything
stated herein to the contrary.
Submitting A Claim:
The customer shall return the product to the original purchase point based on its return policy. In case the return policy period has expired
and the product is within warranty, the customer shall submit a claim to D-Link as outlined below:
• The customer must submit with the product as part of the claim a written description of the Hardware defect or Software
nonconformance in sufficient detail to allow D-Link to confirm the same, along with proof of purchase of the product (such
as a copy of the dated purchase invoice for the product) if the product is not registered.
• The customer must obtain a Case ID Number from D-Link Technical Support at 1-877-453-5465, who will attempt to assist
the customer in resolving any suspected defects with the product. If the product is considered defective, the customer must
obtain a Return Material Authorization (“RMA”) number by completing the RMA form and entering the assigned Case ID
Number at https://rma.dlink.com/.
69D-Link DNS-321 User Manual
Page 70

Appendix B - Warranty
• After an RMA number is issued, the defective product must be packaged securely in the original or other suitable shipping
package to ensure that it will not be damaged in transit, and the RMA number must be prominently marked on the outside
of the package. Do not include any manuals or accessories in the shipping package. D-Link will only replace the defective
portion of the product and will not ship back any accessories.
• The customer is responsible for all in-bound shipping charges to D-Link. No Cash on Delivery (“COD”) is allowed. Products
sent COD will either be rejected by D-Link or become the property of D-Link. Products shall be fully insured by the customer
and shipped to D-Link Systems, Inc., 17595 Mt. Herrmann, Fountain Valley, CA 92708. D-Link will not be held responsible
for any packages that are lost in transit to D-Link. The repaired or replaced packages will be shipped to the customer via
UPS Ground or any common carrier selected by D-Link. Return shipping charges shall be prepaid by D-Link if you use an
address in the United States, otherwise we will ship the product to you freight collect. Expedited shipping is available upon
request and provided shipping charges are prepaid by the customer. D-Link may reject or return any product that is not
packaged and shipped in strict compliance with the foregoing requirements, or for which an RMA number is not visible from
the outside of the package. The product owner agrees to pay D-Link’s reasonable handling and return shipping charges
for any product that is not packaged and shipped in accordance with the foregoing requirements, or that is determined by
D-Link not to be defective or non-conforming.
What Is Not Covered:
The Limited Warranty provided herein by D-Link does not cover:
Products that, in D-Link’s judgment, have been subjected to abuse, accident, alteration, modification, tampering, negligence, misuse, faulty
installation, lack of reasonable care, repair or service in any way that is not contemplated in the documentation for the product, or if the
model or serial number has been altered, tampered with, defaced or removed; Initial installation, installation and removal of the product for
repair, and shipping costs; Operational adjustments covered in the operating manual for the product, and normal maintenance; Damage
that occurs in shipment, due to act of God, failures due to power surge, and cosmetic damage; Any hardware, software, firmware or other
products or services provided by anyone other than D-Link; and Products that have been purchased from inventory clearance or liquidation
sales or other sales in which D-Link, the sellers, or the liquidators expressly disclaim their warranty obligation pertaining to the product.
While necessary maintenance or repairs on your Product can be performed by any company, we recommend that you use only an Authorized
D-Link Service Office. Improper or incorrectly performed maintenance or repair voids this Limited Warranty.
Disclaimer of Other Warranties:
EXCEPT FOR THE LIMITED WARRANTY SPECIFIED HEREIN, THE PRODUCT IS PROVIDED “AS-IS” WITHOUT ANY WARRANTY
OF ANY KIND WHATSOEVER INCLUDING, WITHOUT LIMITATION, ANY WARRANTY OF MERCHANTABILITY, FITNESS FOR A
PARTICULAR PURPOSE AND NON-INFRINGEMENT.
70D-Link DNS-321 User Manual
Page 71

Appendix B - Warranty
IF ANY IMPLIED WARRANTY CANNOT BE DISCLAIMED IN ANY TERRITORY WHERE A PRODUCT IS SOLD, THE DURATION OF
SUCH IMPLIED WARRANTY SHALL BE LIMITED TO THE DURATION OF THE APPLICABLE WARRANTY PERIOD SET FORTH ABOVE.
EXCEPT AS EXPRESSLY COVERED UNDER THE LIMITED WARRANTY PROVIDED HEREIN, THE ENTIRE RISK AS TO THE QUALITY,
SELECTION AND PERFORMANCE OF THE PRODUCT IS WITH THE PURCHASER OF THE PRODUCT.
Limitation of Liability:
TO THE MAXIMUM EXTENT PERMITTED BY LAW, D-LINK IS NOT LIABLE UNDER ANY CONTRACT, NEGLIGENCE, STRICT LIABILITY
OR OTHER LEGAL OR EQUITABLE THEORY FOR ANY LOSS OF USE OF THE PRODUCT, INCONVENIENCE OR DAMAGES OF ANY
CHARACTER, WHETHER DIRECT, SPECIAL, INCIDENTAL OR CONSEQUENTIAL (INCLUDING, BUT NOT LIMITED TO, DAMAGES FOR
LOSS OF GOODWILL, LOSS OF REVENUE OR PROFIT, WORK STOPPAGE, COMPUTER FAILURE OR MALFUNCTION, FAILURE OF
OTHER EQUIPMENT OR COMPUTER PROGRAMS TO WHICH D-LINK’S PRODUCT IS CONNECTED WITH, LOSS OF INFORMATION
OR DATA CONTAINED IN, STORED ON, OR INTEGRATED WITH ANY PRODUCT RETURNED TO D-LINK FOR WARRANTY SERVICE)
RESULTING FROM THE USE OF THE PRODUCT, RELATING TO WARRANTY SERVICE, OR ARISING OUT OF ANY BREACH OF
THIS LIMITED WARRANTY, EVEN IF D-LINK HAS BEEN ADVISED OF THE POSSIBILITY OF SUCH DAMAGES. THE SOLE REMEDY
FOR A BREACH OF THE FOREGOING LIMITED WARRANTY IS REPAIR, REPLACEMENT OR REFUND OF THE DEFECTIVE OR
NONCONFORMING PRODUCT. THE MAXIMUM LIABILITY OF D-LINK UNDER THIS WARRANTY IS LIMITED TO THE PURCHASE
PRICE OF THE PRODUCT COVERED BY THE WARRANTY. THE FOREGOING EXPRESS WRITTEN WARRANTIES AND REMEDIES
ARE EXCLUSIVE AND ARE IN LIEU OF ANY OTHER WARRANTIES OR REMEDIES, EXPRESS, IMPLIED OR STATUTORY.
Governing Law:
This Limited Warranty shall be governed by the laws of the State of California. Some states do not allow exclusion or limitation of incidental
or consequential damages, or limitations on how long an implied warranty lasts, so the foregoing limitations and exclusions may not apply.
This Limited Warranty provides specific legal rights and you may also have other rights which vary from state to state.
Trademarks:
D-Link is a registered trademark of D-Link Systems, Inc. Other trademarks or registered trademarks are the property of their respective
owners.
Copyright Statement:
No part of this publication or documentation accompanying this product may be reproduced in any form or by any means or used to make
any derivative such as translation, transformation, or adaptation without permission from D-Link Corporation/D-Link Systems, Inc., as
stipulated by the United States Copyright Act of 1976 and any amendments thereto. Contents are subject to change without prior notice.
Copyright ©2008 by D-Link Corporation/D-Link Systems, Inc. All rights reserved.
71D-Link DNS-321 User Manual
Page 72

Appendix B - Warranty
CE Mark Warning:
This is a Class A product. In a domestic environment, this product may cause radio interference, in which case the user may be required
to take adequate measures.
FCC Statement:
This equipment has been tested and found to comply with the limits for a Class A digital device, pursuant to part 15 of the FCC Rules.
These limits are designed to provide reasonable protection against harmful interference in a residential installation. This equipment
generates, uses, and can radiate radio frequency energy and, if not installed and used in accordance with the instructions, may cause
harmful interference to radio communication. However, there is no guarantee that interference will not occur in a particular installation. If
this equipment does cause harmful interference to radio or television reception, which can be determined by turning the equipment off
and on, the user is encouraged to try to correct the interference by one or more of the following measures:
• Reorient or relocate the receiving antenna.
• Increase the separation between the equipment and receiver.
• Connect the equipment into an outlet on a circuit different from that to which the receiver is connected.
• Consult the dealer or an experienced radio/TV technician for help.
For detailed warranty information applicable to products purchased outside the United States, please contact the corresponding local
D-Link office.
72D-Link DNS-321 User Manual
Page 73

Appendix C - Registration
Registration
Product registration is entirely voluntary and failure to complete or return this form will not diminish your warranty
rights.
Version 1.0
March 20, 2008
73D-Link DNS-321 User Manual
 Loading...