

Page 1
Version 1.30 | 09/17/2014
User Manual
ShareCenter™ 2-Bay Cloud Network Storage Enclosure
DNS-320L
Page 2
Preface
D-Link reserves the right to revise this publication and to make changes in the content hereof without obligation to notify
any person or organization of such revisions or changes.
Manual Revisions
Revision Date Description
1.0 March 28, 2013 • Initial release for Revision A1
1.01 November 07, 2013 • Content revision and correction
1.20 November 13, 2013 • add “My Surveillance “ Section
1.30 September 17, 2014 • mydlink updates, multimedia, Google Drive
Trademarks
D-Link and the D-Link logo are trademarks or registered trademarks of D-Link Corporation or its subsidiaries in the United
States or other countries. All other company or product names mentioned herein are trademarks or registered trademarks
of their respective companies.
Copyright © 2014 by D-Link Corporation.
All rights reserved. This publication may not be reproduced, in whole or in part, without prior expressed written permission
from D-Link Corporation.
Power Usage
This device is an Energy Related Product (ErP) designed to be always on. It can be turned o through a power switch to save
energy when it is not needed.
Switched O: 0.37 watts
iD-Link ShareCenter DNS-320L User Manual
Page 3

Table of Contents
Table of Contents
Preface ................................................................................. i
Manual Revisions ........................................................................... i
Trademarks ...................................................................................... i
Power Usage .................................................................................... i
Product Overview .............................................................. 1
Before you Begin ...........................................................................2
System Requirements ................................................................. 2
Package Contents .........................................................................2
Features ............................................................................................3
Checking the Hardware Requirements ................................6
Hardware Overview ..................................................................... 7
Front Panel .............................................................................. 7
LED Description ................................................................ 8
Rear Panel ................................................................................ 9
Bottom Panel ........................................................................10
Getting Started ................................................................ 11
RAID 0 .................................................................................36
RAID 1 .................................................................................39
Mapping a Drive .........................................................................48
Alternative Methods for Mapping a Drive .................51
Mac - Setup Wizard Installation ...................................... 52
Conguration ................................................................... 53
Managing your DNS-320L .......................................................53
D-Link Storage Utility ................................................................54
D-Link Storage Utility - For Mac ............................................56
Web UI Login ................................................................................59
Web UI General Layout .....................................................60
Home ..................................................................................60
Applications .....................................................................61
Management ...................................................................62
Management ........................................................................63
Setup Wizard (Web UI) .................................................63
Hardware Setup ..........................................................................11
Zero Conguration Setup ........................................................14
mydlink on the DNS-320L ................................................19
Windows Installation .......................................................20
Setup Wizard ................................................................................20
Hard Drive Conguration .................................................29
Standard RAID .................................................................30
JBOD ...................................................................................33
Disk Management .........................................................68
Hard Drive Conguration ......................................68
Hard Drive Conguration Wizard .................69
Upgrading from Standard Mode to RAID 1 75
SMART Test .................................................................81
Creating a Schedule ..........................................82
Scan Disk .....................................................................83
Volume Encryption ..................................................85
iiD-Link ShareCenter DNS-320L User Manual
Page 4

Table of Contents
Account Management .................................................88
Users / Groups ...........................................................88
Creating a Single User ......................................88
Creating Multiple Users ...................................93
Modify Users ........................................................97
Delete Users ...................................................... 101
Import Users ..................................................... 102
Creating a Group ............................................. 105
Modifying a Group .......................................... 110
Deleting a Group ............................................. 115
Quotas ....................................................................... 116
Network Shares ...................................................... 120
Add/Modify Network Shares Wizard ........ 121
Deleting a Network Share ............................ 127
Resetting the Network Shares .................... 128
ISO Shares Setup Wizard ............................... 129
Creating an ISO Image .................................. 133
Application Management ........................................ 157
FTP server ................................................................ 157
Block IP List .............................................................. 159
Add-ons .................................................................... 162
Installing Add-ons from the Web UI ............... 164
AFP Service .............................................................. 166
NFS Service .............................................................. 166
Multimedia Services ............................................. 167
UPnP AV Server ...................................................... 174
iTunes Server ..........................................................175
System Management ................................................177
Language ................................................................. 177
Time and Date ........................................................ 178
Device ....................................................................... 179
System Settings ..................................................... 180
Power Management ............................................181
Notications ............................................................ 182
ISO Name and File Path Settings ............... 134
ISO Tree Editing ................................................ 136
Verifying the ISO image ................................ 137
Admin Password .................................................... 138
mydlink Account ................................................... 139
mydlink Account online ..................................... 145
Network Management .............................................. 148
LAN Setup ................................................................ 148
IPv6 Settings ..................................................... 150
Link Speed and LLTD Settings .................... 152
DDNS ......................................................................... 153
Port Forwarding.....................................................154
Email Settings ................................................... 182
SMS Settings ..................................................... 184
Adding an SMS Service Provider ............... 185
Event Settings ..................................................186
Logs ............................................................................187
Firmware Upgrade ................................................ 188
USB Devices ............................................................ 189
UPS Settings ...................................................... 189
USB Storage Information ..............................190
Printer Information ......................................... 191
System Status ............................................................... 192
System Info ..............................................................192
iiiD-Link ShareCenter DNS-320L User Manual
Page 5

Table of Contents
Home .................................................................................... 195
My Photos ...................................................................... 196
Creating an Album ...............................................197
Editing Photos in an Album ..............................201
Select a Photo as a Cover image......................202
Select a Photo to Move ....................................... 203
Delete a Photo .......................................................204
Share a Photo to Picasa .......................................205
Share a Photo to Facebook ................................207
Share a Photo to Flickr ........................................210
Deleting an Album ............................................... 212
Refreshing the Album Database .....................213
Managing Photos .................................................214
Slideshow Toolbar ...........................................215
Viewing images using Cooliris ...................217
Stream a Slideshow to your Airplay
Device .................................................................. 220
Unzipping a Zipped File .....................................238
Unzipping a Tar File .............................................. 239
Opening a File ........................................................ 240
Previewing a File ................................................... 241
Share to Facebook ................................................ 242
My Music ........................................................................ 243
My Music - The Interface .......................................... 245
My Music - Categories ............................................... 246
My Music - Music on your DNS-320L ................... 247
My Music - Playback Music on an Apple Device 249
My Music - The Player ................................................ 250
My Music - Create a Playlist ..................................... 251
My Surveillance ........................................................... 253
My Surveillance ........................................................... 261
My Surveillance - Live View ..................................... 262
My Surveillance - Live View ..................................... 263
My Surveillance - Single Camera Live Video
Photo Gallery .......................................................... 221
My Files ........................................................................... 223
My Files - Icons ............................................................. 224
Upload ...................................................................... 225
Download ................................................................ 226
Copy ........................................................................... 227
Move .......................................................................... 229
Delete ........................................................................ 231
Rename ..................................................................... 232
Properties................................................................. 234
Create a Zip le from the Selected Folder .... 235
Add to Zip ................................................................ 236
Mode ............................................................................... 264
My Surveillance - Full Screen Live Video Mode 265
My Surveillance - Digital Zoom Video Mode..... 266
My Surveillance - E-Map View ................................267
My Surveillance - Snapshot View ..........................268
My Surveillance - Motion Detection Camera
Mode ............................................................................... 269
My Surveillance - Conguring Patrol Settings ..270
My Surveillance - Conguring Patrol Preset
Points ...............................................................................271
My Surveillance - Viewing Preset Points ............. 272
My Surveillance - Live Video/Playback Settings 273
ivD-Link ShareCenter DNS-320L User Manual
Page 6

Table of Contents
My Surveillance - OSD Settings ............................. 274
My Surveillance - Playback ...................................... 275
My Surveillance - Playback ...................................... 276
My Surveillance - Recording Information .......... 277
My Surveillance - Setup ............................................ 279
My Surveillance - Setup - Camera Setup ............ 280
My Surveillance -Search and Add Camera .........287
My Surveillance -Setup - Audio and Video ........290
My Surveillance - Setup - Recording Setup ....... 292
My Surveillance -Setup - Event Setup ................. 300
My Surveillance - Setup - E-map Upload ............ 303
My Surveillance - Setup - Backup .......................... 306
My Surveillance - Setup - Server Port .................. 311
My Surveillance - Status ........................................... 312
My Surveillance - Status ........................................... 313
My Favorite Applications..........................................316
Adding Applications ............................................ 317
MTP Backup Process.......................................340
P2P Downloads ...................................................... 342
Settings ..................................................................... 347
Amazon S3 ...............................................................348
Creating an AWS Account ............................ 349
Google Drive ........................................................... 354
mydlink ..................................................................... 364
mydlink Verication ............................................. 365
mydlink Java Runtime Environment .............. 367
Creating a New Folder ......................................... 372
mydlink Settings Details .....................................373
ShareCenter NAS Status .....................................374
Deleting a mydlink device ................................. 375
Deleting a mydlink account .............................. 376
The mydlink Access NAS App ........................... 378
The mydlink Access NAS App - Features ......379
The mydlink Access NAS App - Compatibility 381
Applications ....................................................................... 318
FTP/HTTP Downloads ............................................... 318
Remote Backups .......................................................... 320
Create Wizard ......................................................... 321
Local Backups .........................................................325
Time Machine ......................................................... 327
Time Machine Setup Wizard ............................. 328
Time Machine Setup - Mac OS ......................... 331
Time Machine - Delete a Volume .................... 335
USB Backups ........................................................... 337
MTP Backups ..................................................... 338
USB Backups ..................................................... 339
Knowledge Base ............................................................382
What is RAID? ............................................................................ 382
RAID Options ..................................................................... 384
UPS Connectivity ..................................................................... 386
Deleting a UPS Slave .......................................................390
USB Print Server ....................................................................... 391
Setting up a Printer Using Mac OS 10.8 ................... 394
Technical Specications ................................................ 399
vD-Link ShareCenter DNS-320L User Manual
Page 7

Section 1 - Product Overview
Product Overview
The D-Link ShareCenter® DNS-320L is a 2-Bay Cloud Network Storage device. This cloud-centric network storage device
oers all the features a regular NAS oers but brings advanced data backup and storage to the Cloud. This is provided
through the “mydlink Account Management” console. The mydlink Cloud service oers complete data management of
les, music, photos, and video in the Cloud. So not only can you use the DNS-320L via the Cloud but you can also continue
accessing les through the Internet using the built-in FTP server, web le server and the WebDAV protocol. Whether you are
allowing access locally or over the Internet, you can keep data safe by only giving rights to specic users or groups. Users
can also access their DNS-320L remotely using the mydlink™ portal, or by using the mydlink Access NAS app on a mobile
phone or tablet. When conguring the DNS-320L, you can create and assign users and groups to folders with either read or
read/write permissions. This is ideal for an oce environment with employee-specic sensitive data, or for the home where
you can limit children’s access to certain material. The DNS-320L will be available to any computer (PC, Mac, or Linux) on
your network, without the need to install any software.
You may back up your music, photo, and video collections to the DNS-320L for safekeeping, as well as enjoy the benets
1
of the built-in UPnP AV media server as you stream digital content to compatible media players
D-Link’s MediaLounge product line). This feature is highly convenient as it allows you to turn o a computer that would
normally be needed for the same function.
(such as those found in
The availability of four dierent hard drive modes (Standard, JBOD, RAID 0, RAID 1) allows you to choose the conguration
best suited to your needs. Standard mode creates two separately accessible hard drives. JBOD combines both drives in
linear fashion for maximum space eciency. RAID 0 combines both drives in a ‘striped’ conguration, which provides the
highest performance when accessing data across disks. RAID 1 causes the drives to mirror each other, providing maximum
protection. If one drive fails while congured as RAID 1, the unaected drive continues to function as a single drive until the
failed drive is replaced. The new drive will then be re-mirrored, allowing the DNS-320L to return to its full protective state.
The DNS-320L also has several add-on features to enhance your experience, including PhotoCenter, Blogging, Transmission
and Audio Streamer. The DNS-320L Cloud network storage also provides access to Google Drive. This allows you to access,
save, and manage Google apps like Google Docs, Google Spreadsheets, and Google Presentations to your NAS.
1
D-Link cannot guarantee full compatibility or proper playback with all codecs. Playback capability depends on the codec support of the UPnP AV media player.
1D-Link ShareCenter DNS-320L User Manual
Page 8

Section 1 - Product Overview
Before you Begin
• Check package contents
• Check system requirements
• Ensure that you have the hardware you need for your ShareCenter device
System Requirements
For best results, the following minimum requirements are recommended on any system used to congure and use the
ShareCenter:
• Computer with: 1 GHz processor / 512 MB RAM / 200 MB available space / CD-ROM drive
• Internet Explorer® version 9, Mozilla® Firefox® 26.0, Google® Chrome 33.0, or Apple® Safari® 5 and above
• Windows® XP (with Service Pack 2), Windows Vista®, Windows® 7, Windows® 8, or Mac OS® X 10.5.6 or higher
• Up to two 3.5” SATA Hard Drive(s)
• D-Link ShareCenter DNS-320L
• CD-ROM with Manual and Software
• Quick Installation Guide
• 12 V DC 3A Output Power Adapter
• CAT5e Ethernet Cable
Package Contents
2D-Link ShareCenter DNS-320L User Manual
Page 9

Section 1 - Product Overview
Features
The ShareCenter DNS-320L is an easy to install data storage platform used for remote access through a local network or over the
Internet. This ShareCenter supports up to 2 SATA hard drives and includes the product features listed below:
• Equipped with one 10/100/1000 Mbps auto-MDIX Gigabit
Ethernet LAN port, 1000BASE-T supports half-duplex and fullduplex mode
• Two embedded SATA II 3.5” HDD interfaces support drives up
to 4 TB
• 2-bay SATA with RAID 0/1 and JBOD support
• Equipped with Ultra Cooler (Plastic housing + FAN speed
control)
• Included hard drive trays
• Supports Real-Time Clock (RTC)
• Networking Support
• DHCP Client or Static IP
• NTP Client
• Windows 7/Vista x32/64 PnP-X/LLTD
• Dynamic DNS
• Bonjour
• UPnP port forwarding
• HTTP and HTTPS for web browsers
• WebDAV
• File System
• EXT4 for internal HDD
• FAT32, NTFS for USB external storage
• File System Management
• Unicode support for both Samba and FTP server
• File sharing: Windows/Mac/Linux
• File searching
• FTP server
• FTP over explicit SSL/ TLS mode (FTPES)
• FTP bandwidth and connection control
• FTP support FXP
• IP blocking
• Disk Management
• Hot-swappable
• RAID: Standard, JBOD, 0, 1
• IPv6
• Network File Services
• Supports Windows XP/Vista/7/8, Mac OSX 10.5+, Linux
clients
• CIFS/SMB for Windows and Mac OS X and Linux
• NFSv3 Server for Linux and UNIX
• AFP 3.3 for Mac OS X
• RAID 1 Auto/Manual rebuild
• RAID migration: Standard to RAID 1
• SMART Disk Status Monitoring
• HDD SMART test
• Scandisk
• Supports advanced format HDD
• AES-based volume encryption
3D-Link ShareCenter DNS-320L User Manual
Page 10

Section 1 - Product Overview
• Disk roaming
• RAID roaming
• Folder Management
• Share folder level permission
• Supports ISO mount
• ISO creator
• Remote File Sharing
• My les (Web File Server)
• WebDAV
• FTP server
• Mobile device access (mydlink Access NAS)
• User/Group Management
• User/Group assignment for network sharing and FTP server
• Quota for user and group
• Assign users to multiple groups
• Create user/Import user(s) batch les
• Backup Management
• Peer-to-peer (P2P) downloads, aMule and Transmission
support
• System Management
• Supports mydlink portal
• Supports D-Link storage utility/setup wizard
• OS Support: Windows XP/Vista/7/8 and Mac OS X
• Two access modes supported: Open (Share) mode and
Account (User) mode, no setup account and password
necessary in Open mode
• Supports conguration le save/load
• System Service Management
• mydlink Account Management
• System Status
• Email / SMS notications
• Network recycle bin
• System /FTP Log (Syslog Client)
• Rescue F/W image
• Scheduled backup from PC to NAS (ShareCenter Sync)
• Remote network backup (Rsync, Remote Snapshot)
• Apple Time Machine® support
• Local backup
• USB backup
• USB copy button
• Cloud storage backup (Amazon S3, Google Drive, D-Link
Vault)
• Download Management
• HTTP/FTP schedule download
• Resource monitor
• Multi-lingual GUI support
• Power Management
• Power saving (disk idle spin-down)
• Automatic power recovery (with UPS)
• Schedule power on/o
• Auto-shutdown on UPS low battery
• Smart Fan control
• Network UPS
• USB Port Support
• Print server
4D-Link ShareCenter DNS-320L User Manual
Page 11

Section 1 - Product Overview
• UPS monitoring
• External storage device
• MTP/PTP
• Media Streaming
• UPnP AV Server
• Supports PS3 / XBOX 360
• Supports UPnP AV > 4 GB
• Complies with DLNA HNv1.5
• Supports Logitech® Media Server
• Support Sonos digital music system via Samba
• iTunes server
• Audio streamer (IceStation)
• My Music (Music Center)
• My Photos (Photo Center)
• Enhance Contents Aggregation
• Cloud Service - mydlink Portal Web Access
• Remote les access through web browser
• Content classication: Classify contents according to media
type (photo, video, music)
• iPhone®, iPad®, and Android® app support
• My Surveillance
• Camera auto installation
• 4-Channel Motion JPEG, MPEG4 or H.264 recording
• Audio & video recording in synchronization
• Auto recycling recording
• 4-channel live video
• 4-channel synchronous playback
• Recording type : Record by schedule, manual record
• E-map support
• Backup recorded video
• Add-on Applications
• Multilingual language package
• Photo center (Gallery2)
• Blog (Wordpress)
• Browse, upload/download, and manage le/folders
• Redirect to NAS device UI for the access of NAS applications
• Email notication to registered mydlink account
• Supports zero conguration
• Supports surveillance redirect
• Cloud Service – mobile apps (the “mydlink Access-NAS” app)
• Ability to access content from mobile devices
• Browse, upload/download, open, and manage les/folders
• Auto-upload photos stored on mobile devices to NAS
• View photos and play back multimedia les
• Access to media: Streaming for music, photo galleries
• Audio streamer
• Logitech Media Center
• AjaXplorer
• aMule
• phpMyAdmin
• phpBB
• Joomla
• Transmission
5D-Link ShareCenter DNS-320L User Manual
Page 12

Section 1 - Product Overview
Checking the Hardware Requirements
To use your DNS-320L, you will need at least one hard drive installed. If you plan to use RAID 1, which protects your data
against failure of one hard drive, you will need to install two hard drives.
This section will help you:
• Select the appropriate hard drives
• Determine how much hard disk space you will need
• Ensure your data is protected
• Understand the basic requirements for a router or switch
Selecting hard drives:
You can use hard drives from any manufacturer and with any capacity with your DNS-320L. The D-Link ShareCenter supports
standard 3.5” internal SATA drives. If you are unsure, check with your administrator or hard drive retailer/manufacturer to
verify that your hard drives meet this standard
*Warning - Any pre-existing data on the drives will be erased during installation.
Determining how much hard drive space you need:
In order to protect your data from hard drive failure, your DNS-320L requires more space than what you will use for your data,
sometimes more than double the amount of space required. You should select hard drives that are larger in capacity than
your maximum storage requirements.
Using a Router or Switch:
If you are connecting your ShareCenter to a router or switch, your router or switch should support Gigabit Ethernet
(1000 Mbit/s) for maximum performance. The ShareCenter will auto-negotiate the highest connection speed available to your
router or switch. If you are using port bonding, use a managed switch.
Using an Uninterrupted Power Supply (UPS):
We highly recommend that you use your ShareCenter in conjunction with an Uninterrupted Power Supply (UPS), which will
protect against sudden data loss in power outages surges.
6D-Link ShareCenter DNS-320L User Manual
Page 13
Section 1 - Product Overview
Hardware Overview
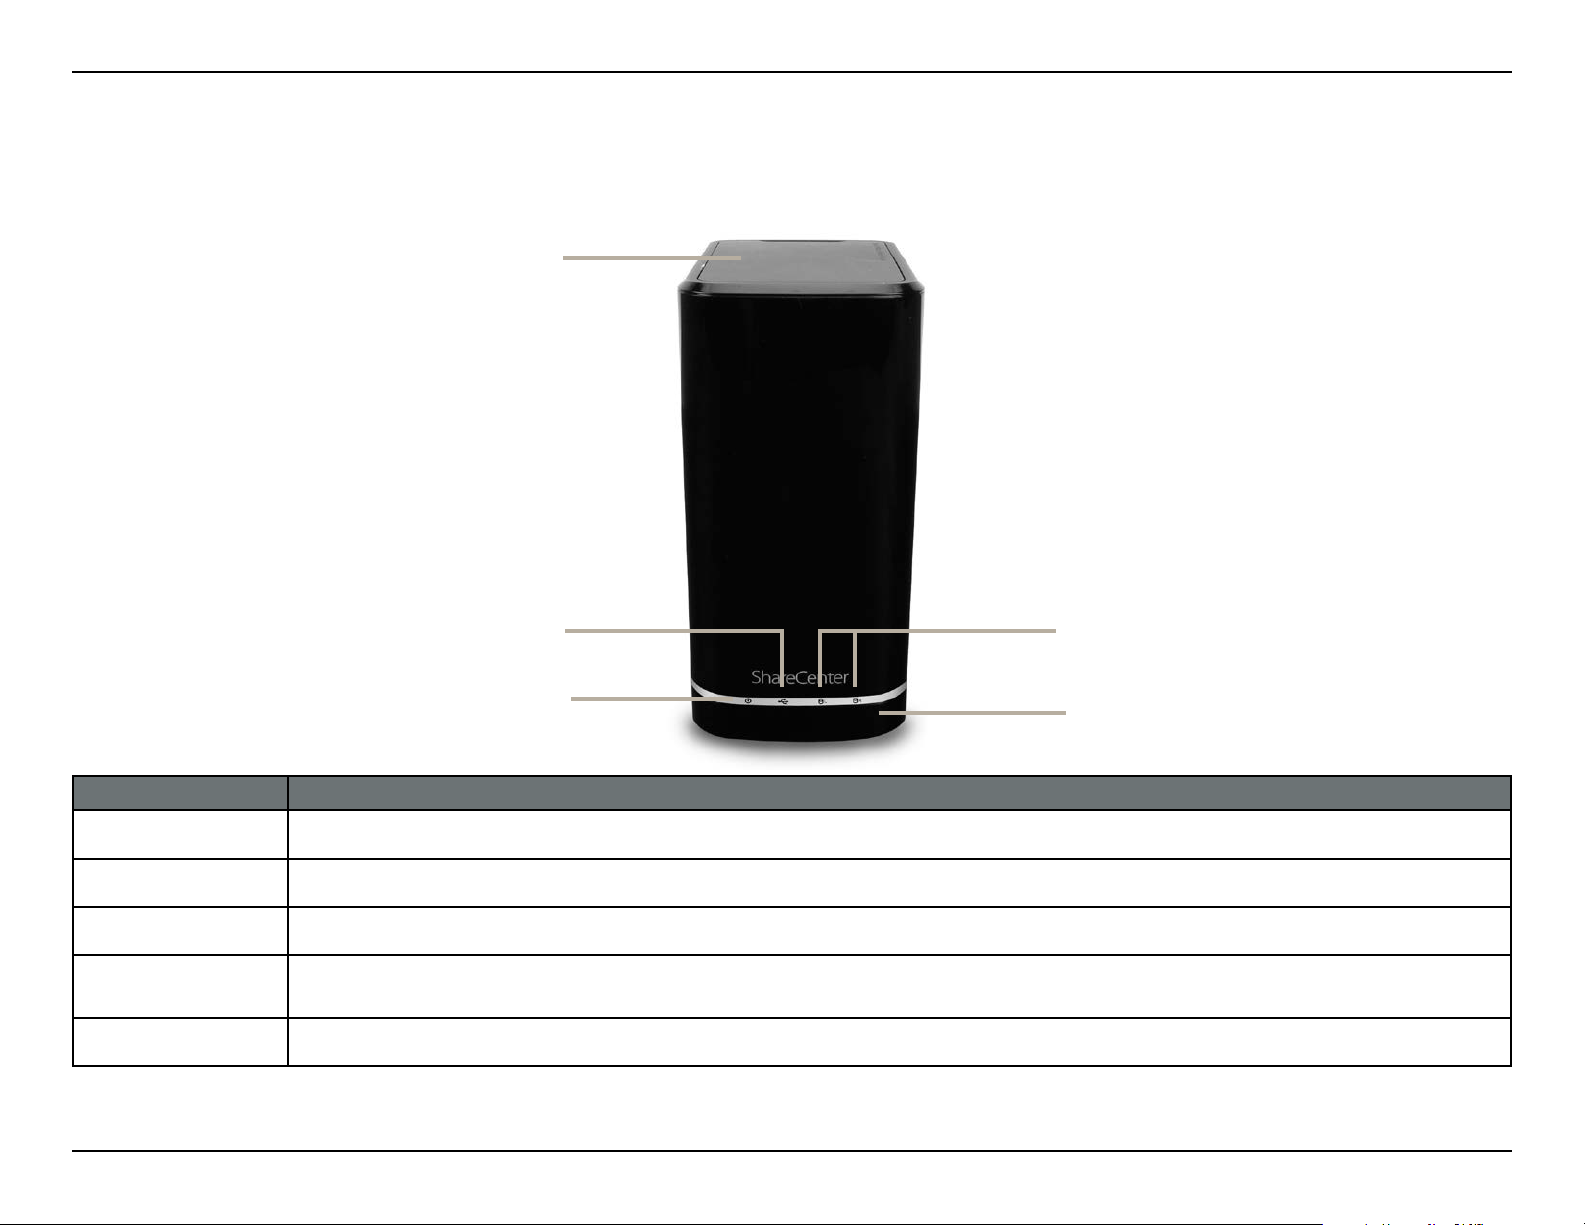
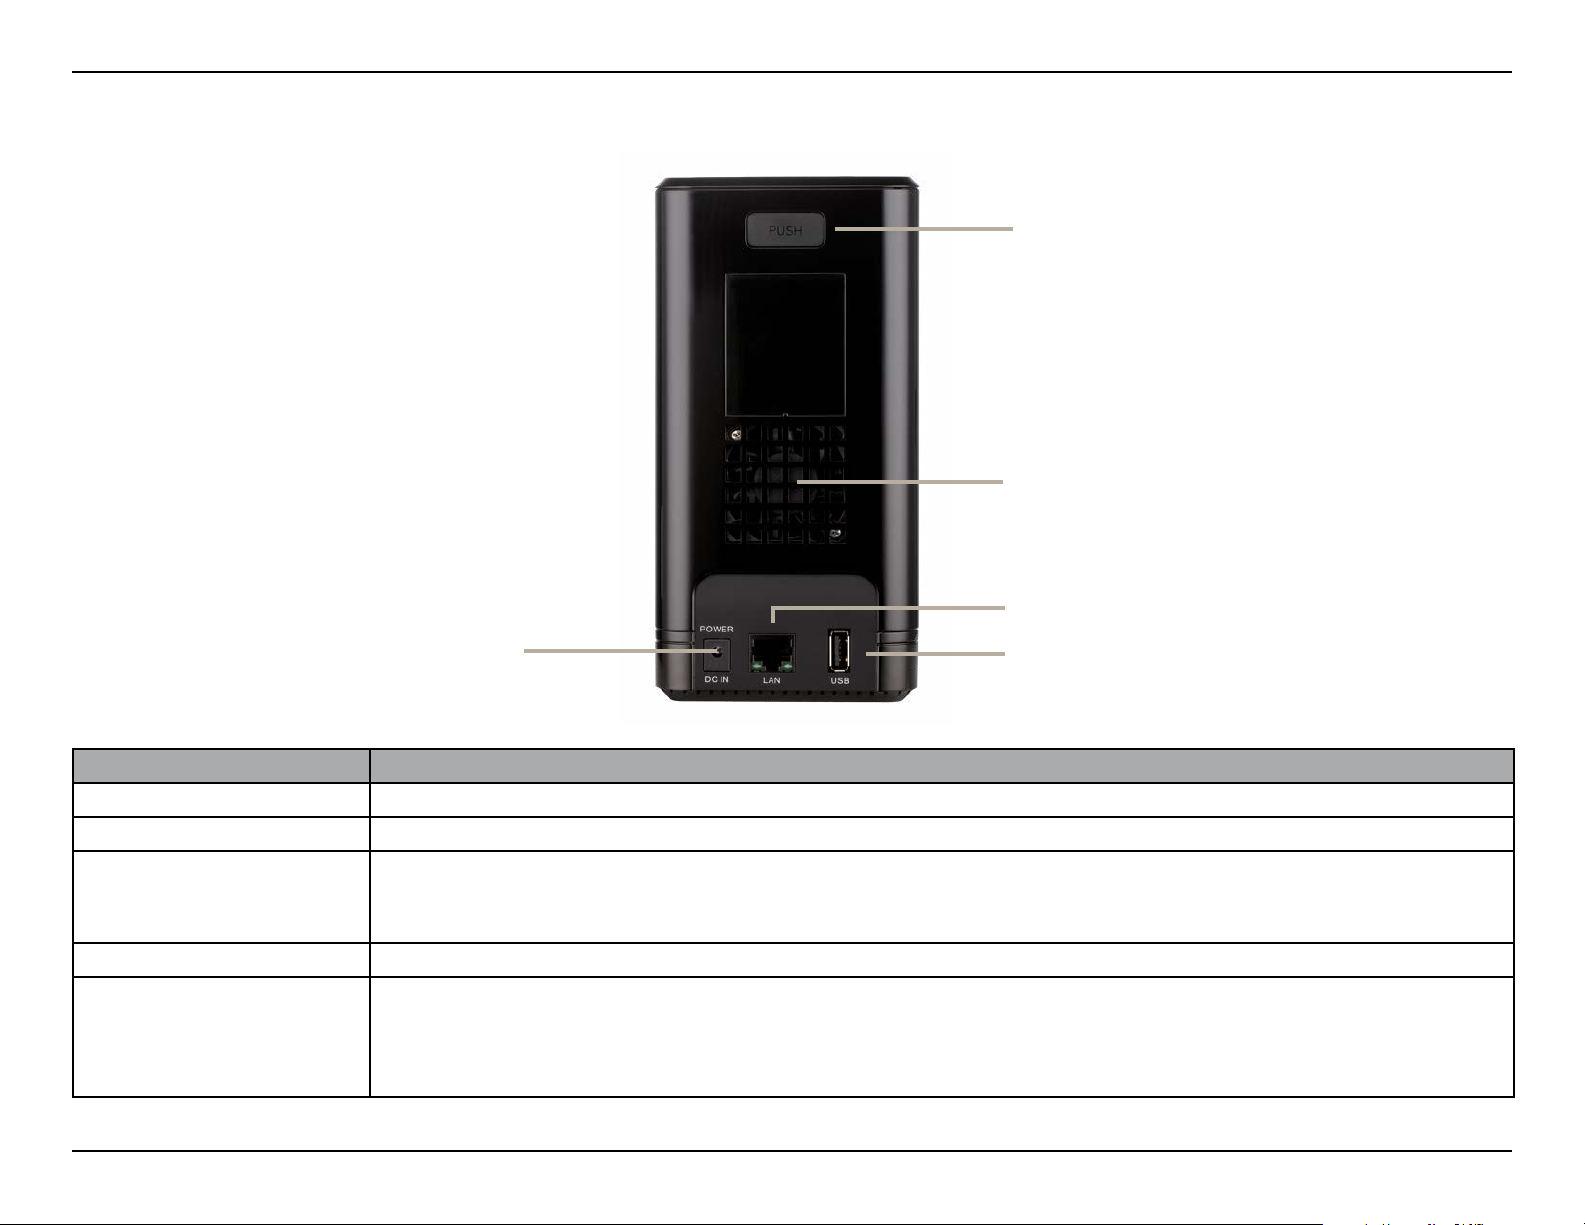
Front Panel
Top Panel
USB Button
Power Button
COMPONENT DESCRIPTION
Top Panel This panel unlatches simply by pressing the lever at the back. Unhook and lift up to insert or remove your hard drive(s).
Power Button Press once to power on the ShareCenter. Press and hold the button for more than 5 seconds to power it down.
USB Button Press once to activate the USB port, or press and hold the button for more than 5 seconds to unmount the USB device.
Left HDD/Right
HDD
LED Indicators Illuminate depending on activity (see next page for details).
Identies the left and right hard drives.
Left HDD/ Right HDD
LED Indicators
7D-Link ShareCenter DNS-320L User Manual
Page 14
Section 1 - Product Overview
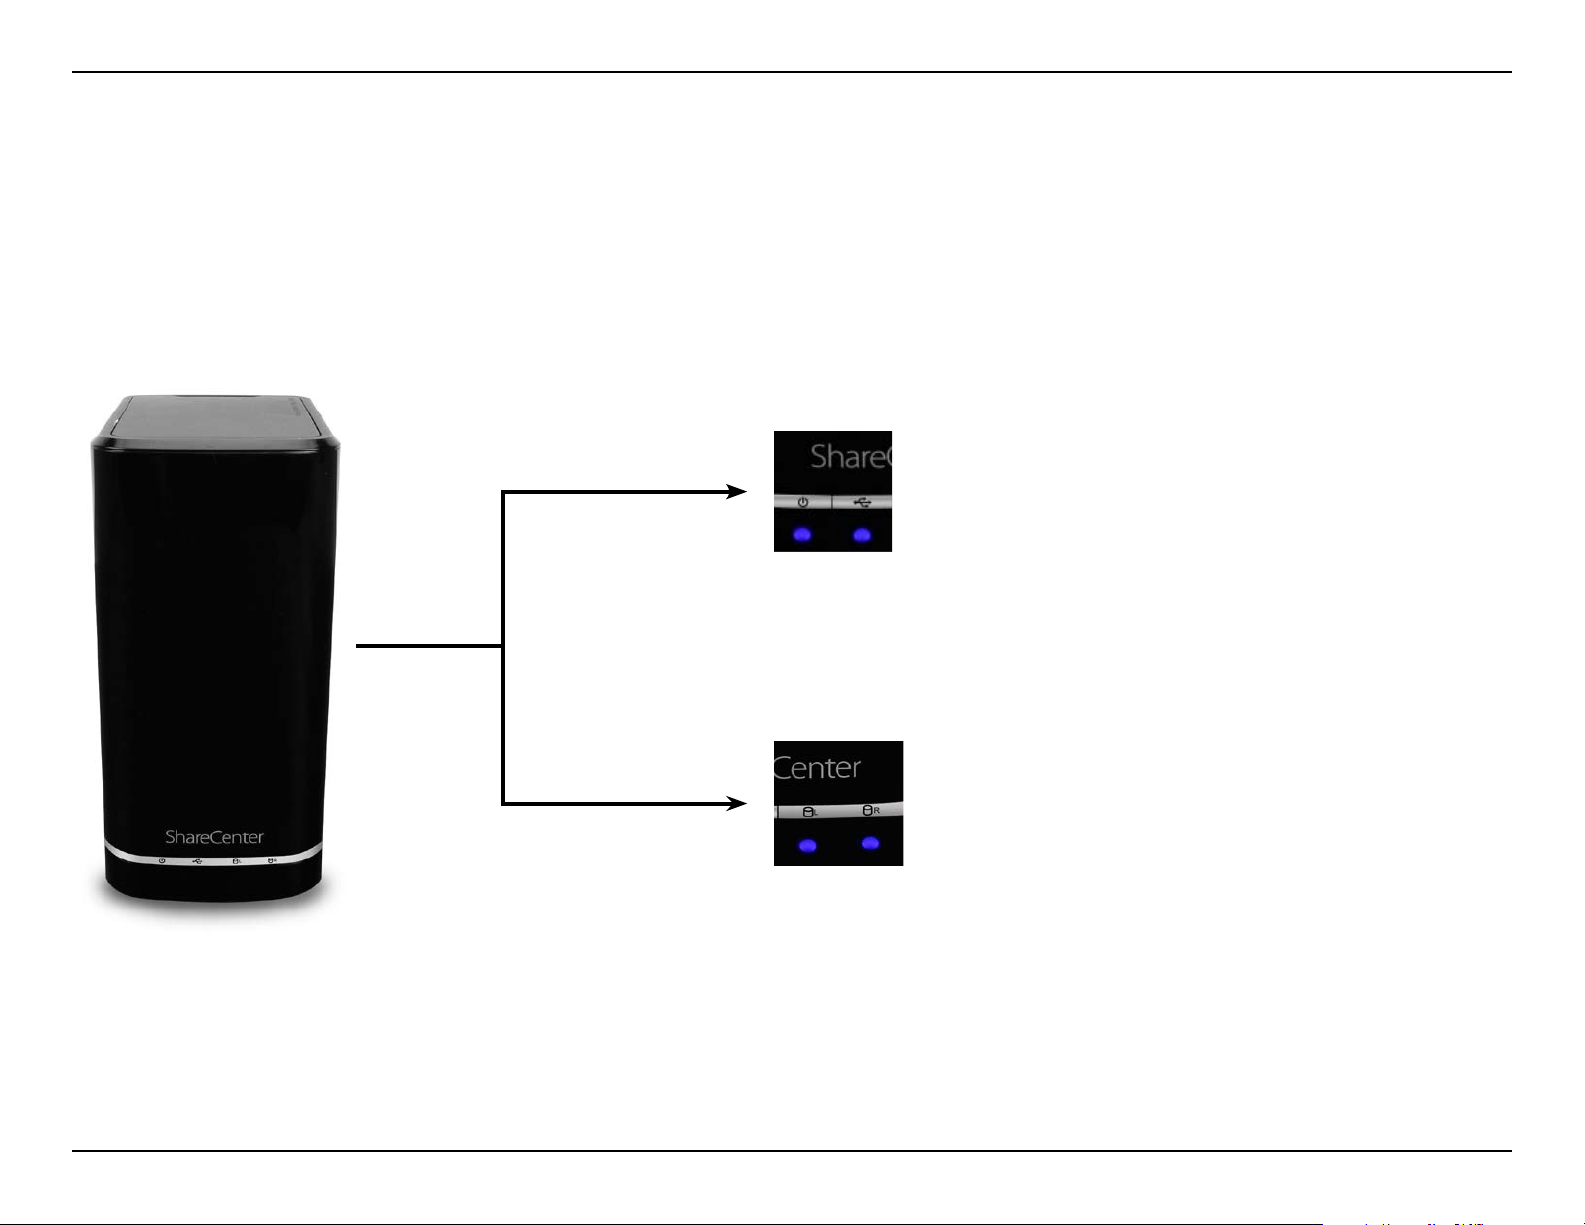
LED Description
Power:
Solid Blue - the device is on
Blinking Blue - the device is booting or restarting
No Light - the device is o or in power saving mode
USB:
Solid Blue - USB Storage is connected
Blinking Blue - transferring data, or a USB device is being
installed or unmounted
Solid Orange - USB storage failed to mount
No Light - No USB storage or the device is o
HDD (Left/Right):
Solid Orange - the specied hard drive has a problem
No Light - the specied hard drive is inactive
Solid Blue - the specied hard drive is functioning correctly
Blinking Blue - there is reading / writing / hot-swapping
activity on the specied hard drive
8D-Link ShareCenter DNS-320L User Manual
Page 15
Section 1 - Product Overview
Rear Panel
Latch for Top Panel
Cooling Fan/Outlet
Gigabit Ethernet Port
Power Receptor
COMPONENT DESCRIPTION
Power Receptor Connect the supplied power cord to the receptor.
Latch Press the latch to release the top panel for inserting or removing the hard drives.
The cooling fan cools the hard drives and features speed control. When the unit is rst powered on, the fans
Cooling Fan/Outlet
USB Port A single USB 3.0 (type A) connector. The USB Host port is for Printers, USB storage, or UPS monitoring.
Gigabit Ethernet Port
rotate at a low speed and later rotate at a high speed when the temperature inside the unit rises above 49 °C. Do
not cover or obstruct this outlet.
Use the Gigabit Ethernet port to connect the ShareCenter to your local network. The port is equipped with 2 LEDs.
The LED on the left will illuminate solid green for a good connection and will blink during data transmission. If this
LED is o, check the connection/cable to the device you are connecting to. The LED on the right will light solid for a
Gigabit connection and will remain o when connected to a 10/100 Mbps device.
USB Port
9D-Link ShareCenter DNS-320L User Manual
Page 16
Section 1 - Product Overview
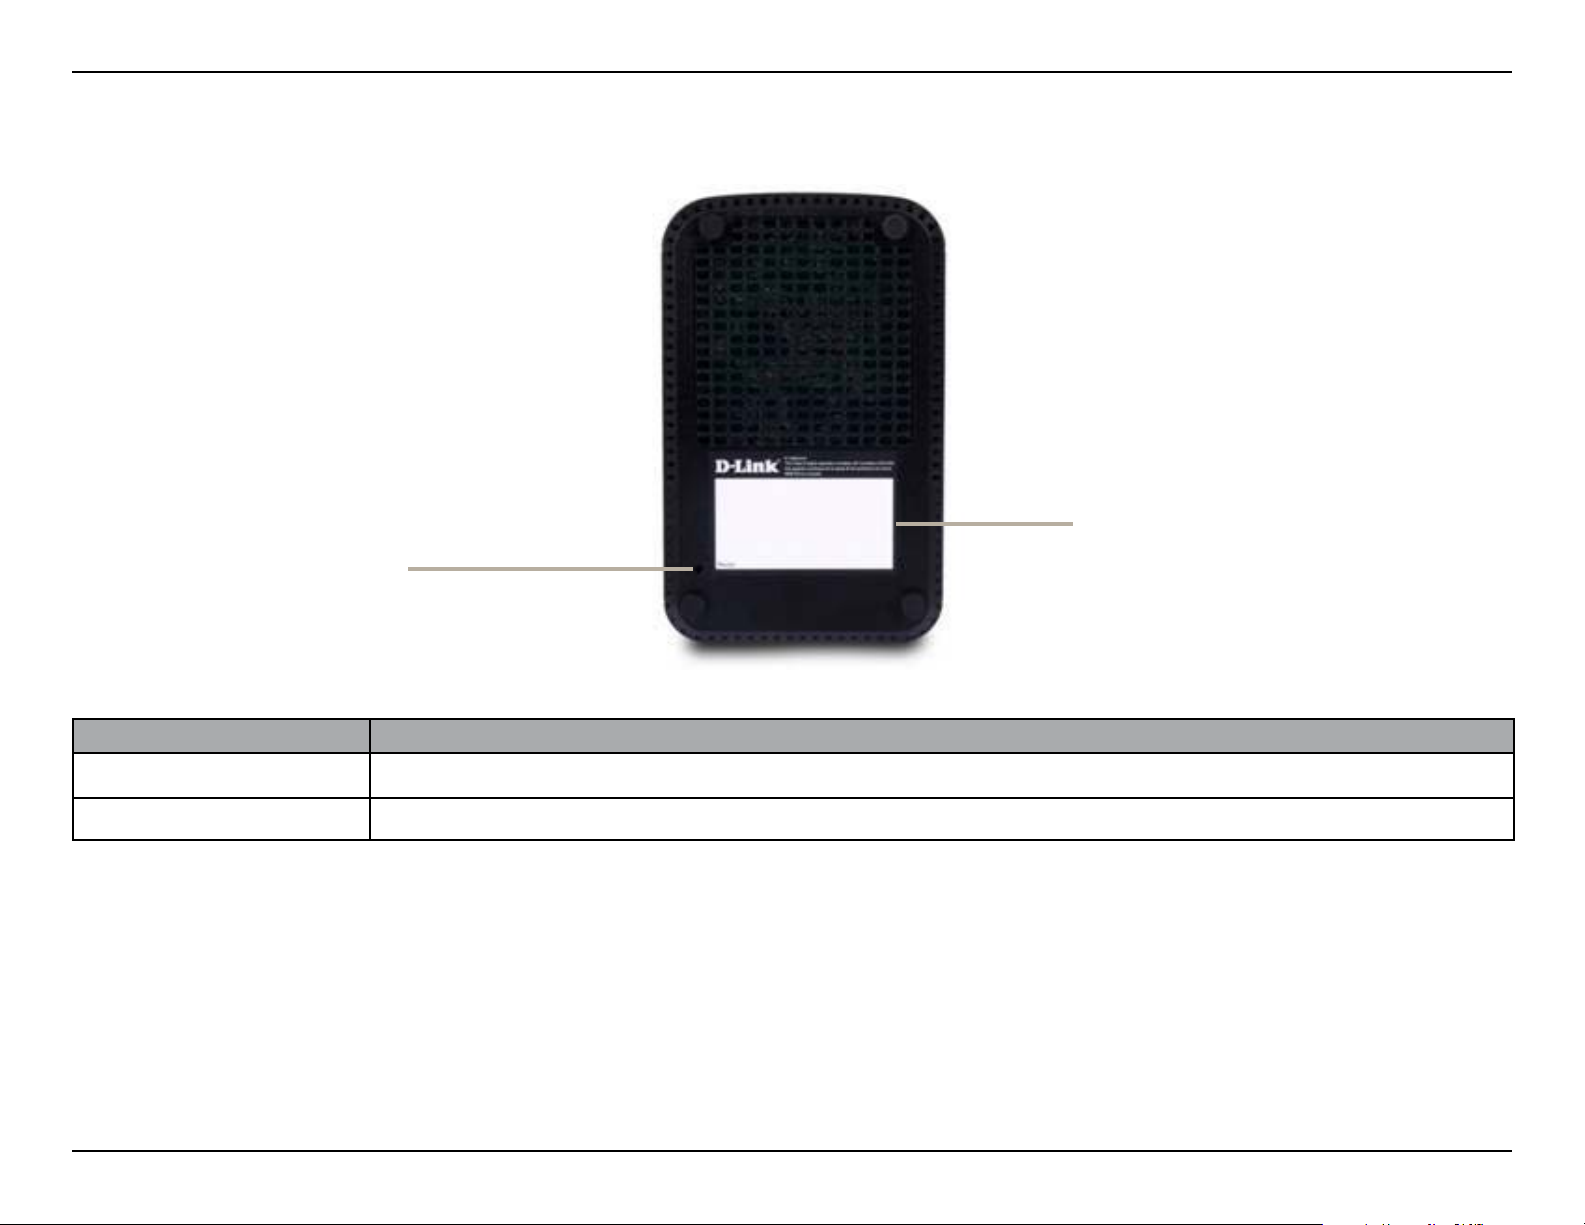
Reset Button
Bottom Panel
Product Details
COMPONENT DESCRIPTION
Product Details Information about the product - DNS-320L including serial number, part number, manufacturer number etc.
Reset Button Press and hold this button for more than 5 seconds to reset the unit to its factory defaults.
10D-Link ShareCenter DNS-320L User Manual
Page 17
Section 2 - Getting Started
Getting Started
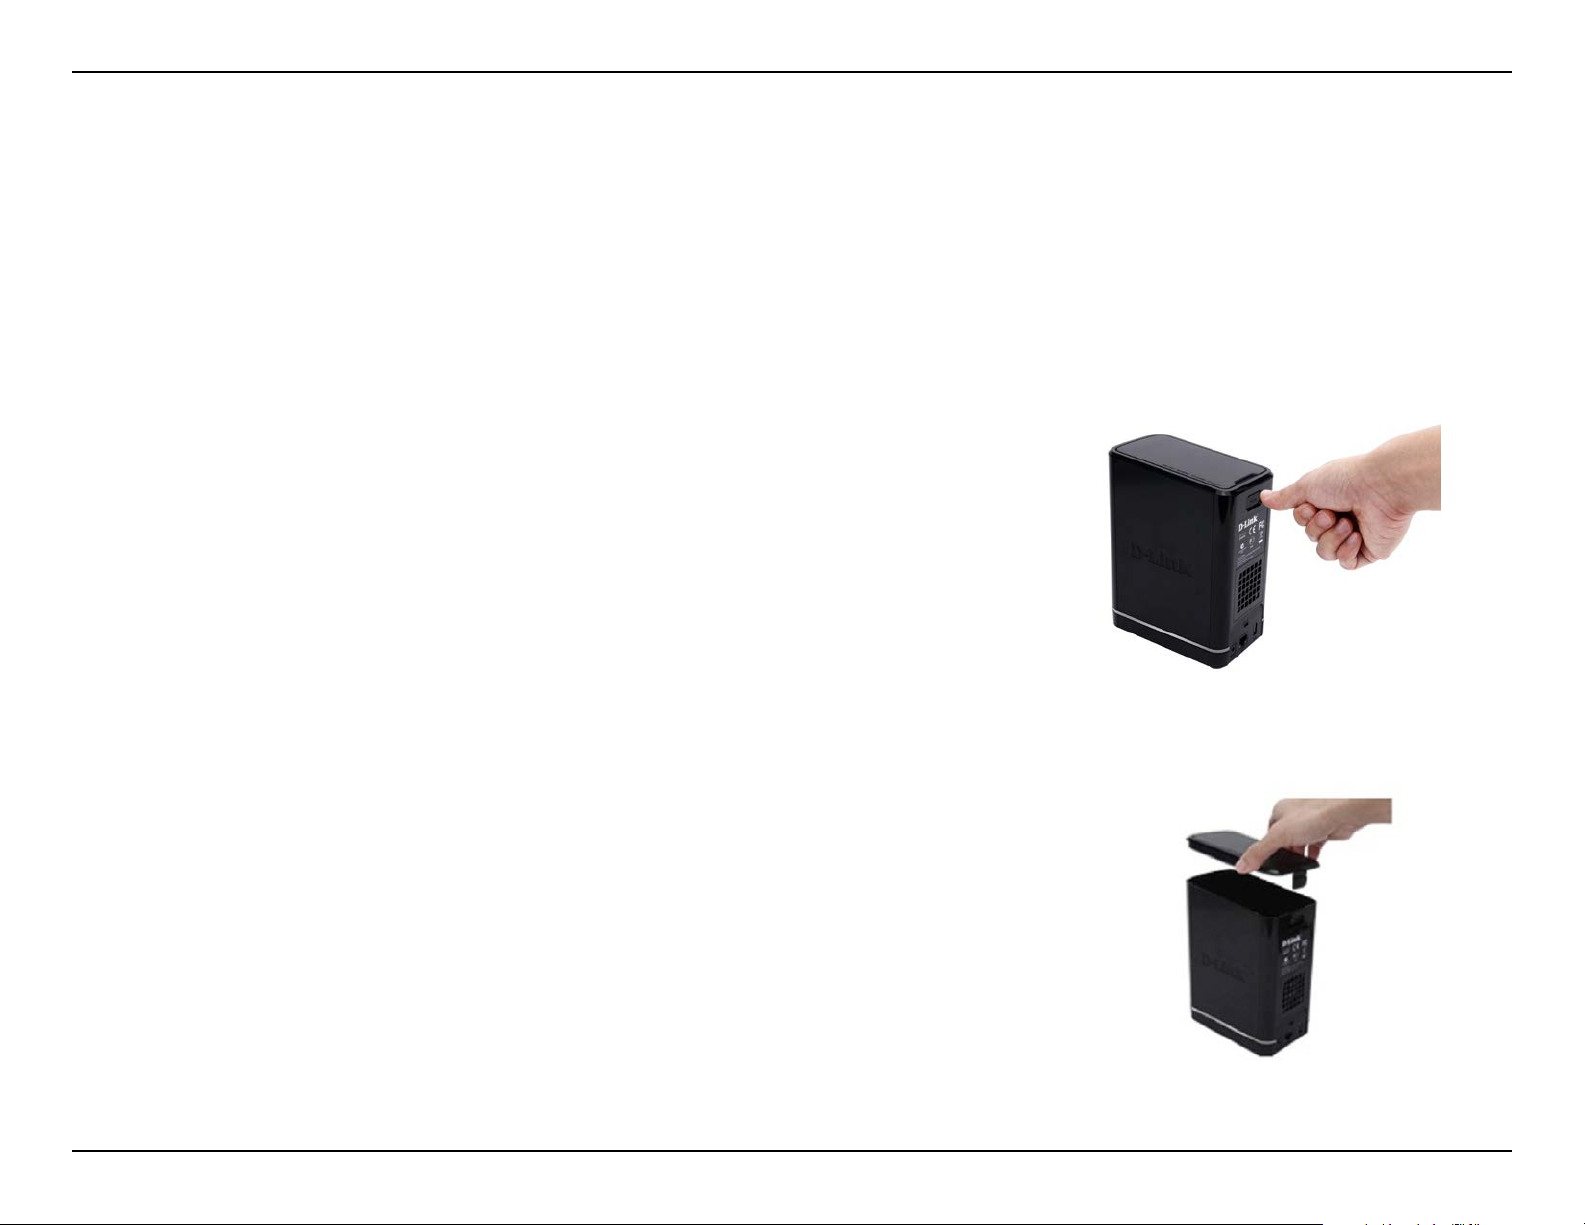
Hardware Setup
This user guide will help you get your ShareCenter set up in just a few steps. To install the ShareCenter on your local network, refer to the steps below, or skip to Zero Conguration Setup on page 14 to run the setup wizard which will show you
how to install and congure your DNS-320L.
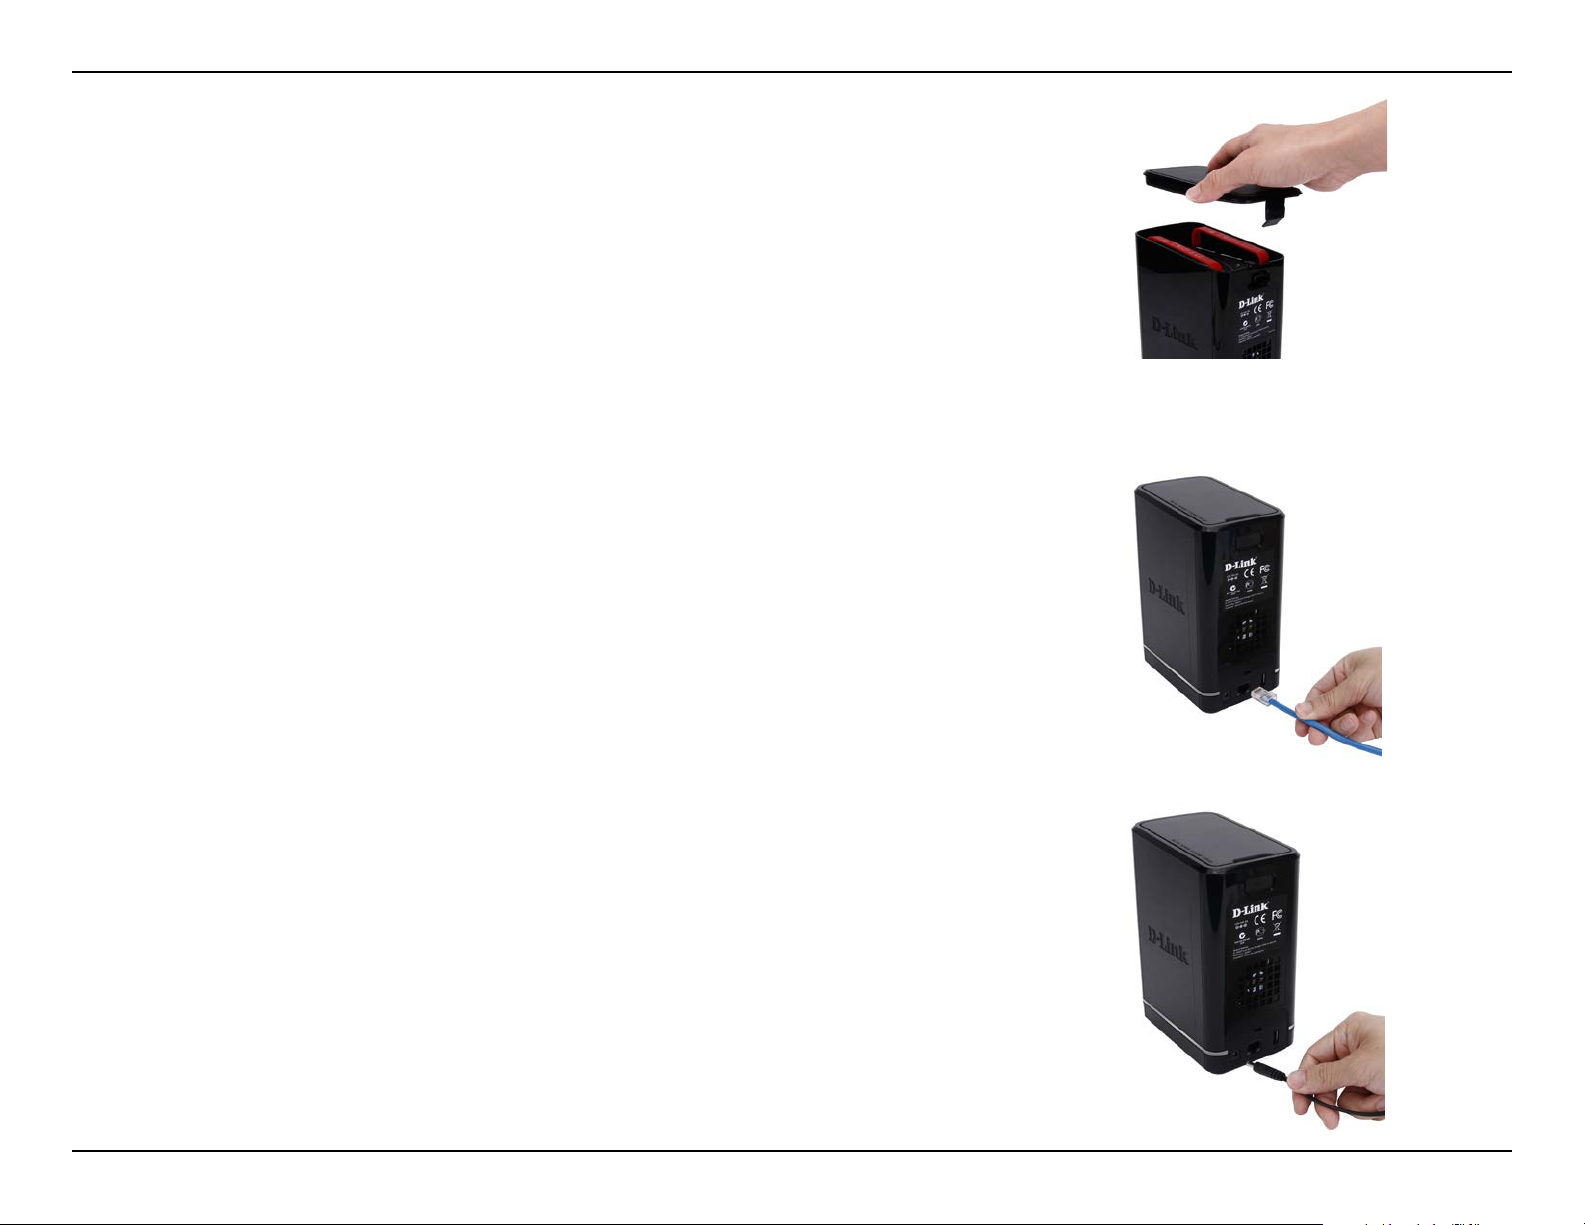
Release the top panel by rmly pressing the latch at the back.
Once the faceplate is unlatched, remove it to expose the hard drive bays.
11D-Link ShareCenter DNS-320L User Manual
Page 18
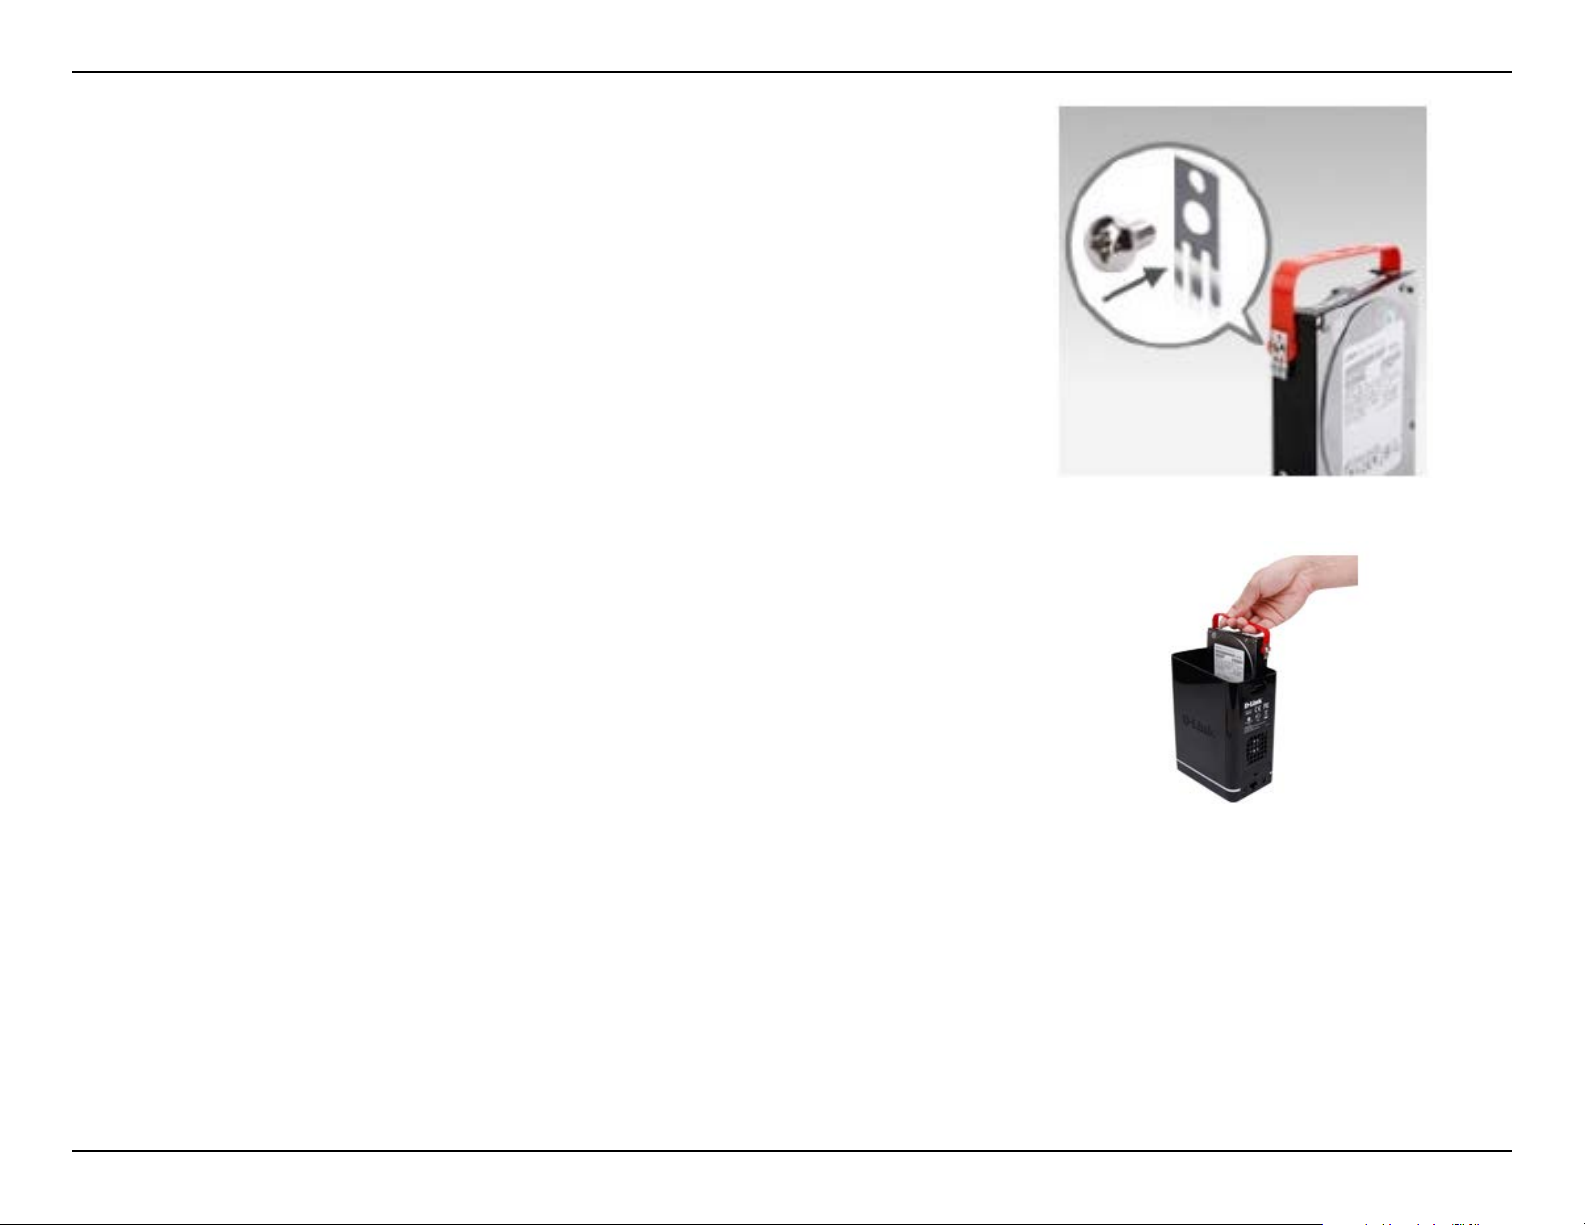
Section 2 - Getting Started
Attach the hard drive brackets to the sides of your hard drives with the included screws. Ensure the brackets are aligned so that when the hard drive is
inserted, the arrow on the bracket points to the front of the ShareCenter .
Insert up to two 3.5” SATA hard drives into the drive bays.
Note: Make sure to align the drive connector to the SATA connector at the
back edge inside the drive bay of the ShareCenter. Gently push the drive in
until it connects. When a drive is inserted properly, you will feel it “set” into
the connector. Some hard drives that are thin or oddly shaped may need to
be inserted carefully into position. If a drive is not properly set in place, the
hard drive LED will not illuminate after powering on the device.
12D-Link ShareCenter DNS-320L User Manual
Page 19
Section 2 - Getting Started
Re-attach the top panel. Ensure the latch is inserted inside the panel.
Connect an Ethernet cable to the Ethernet port. This cable should connect
the ShareCenter to your local network via a router, switch, or directly to a
computer for conguration (cross-over cable required).
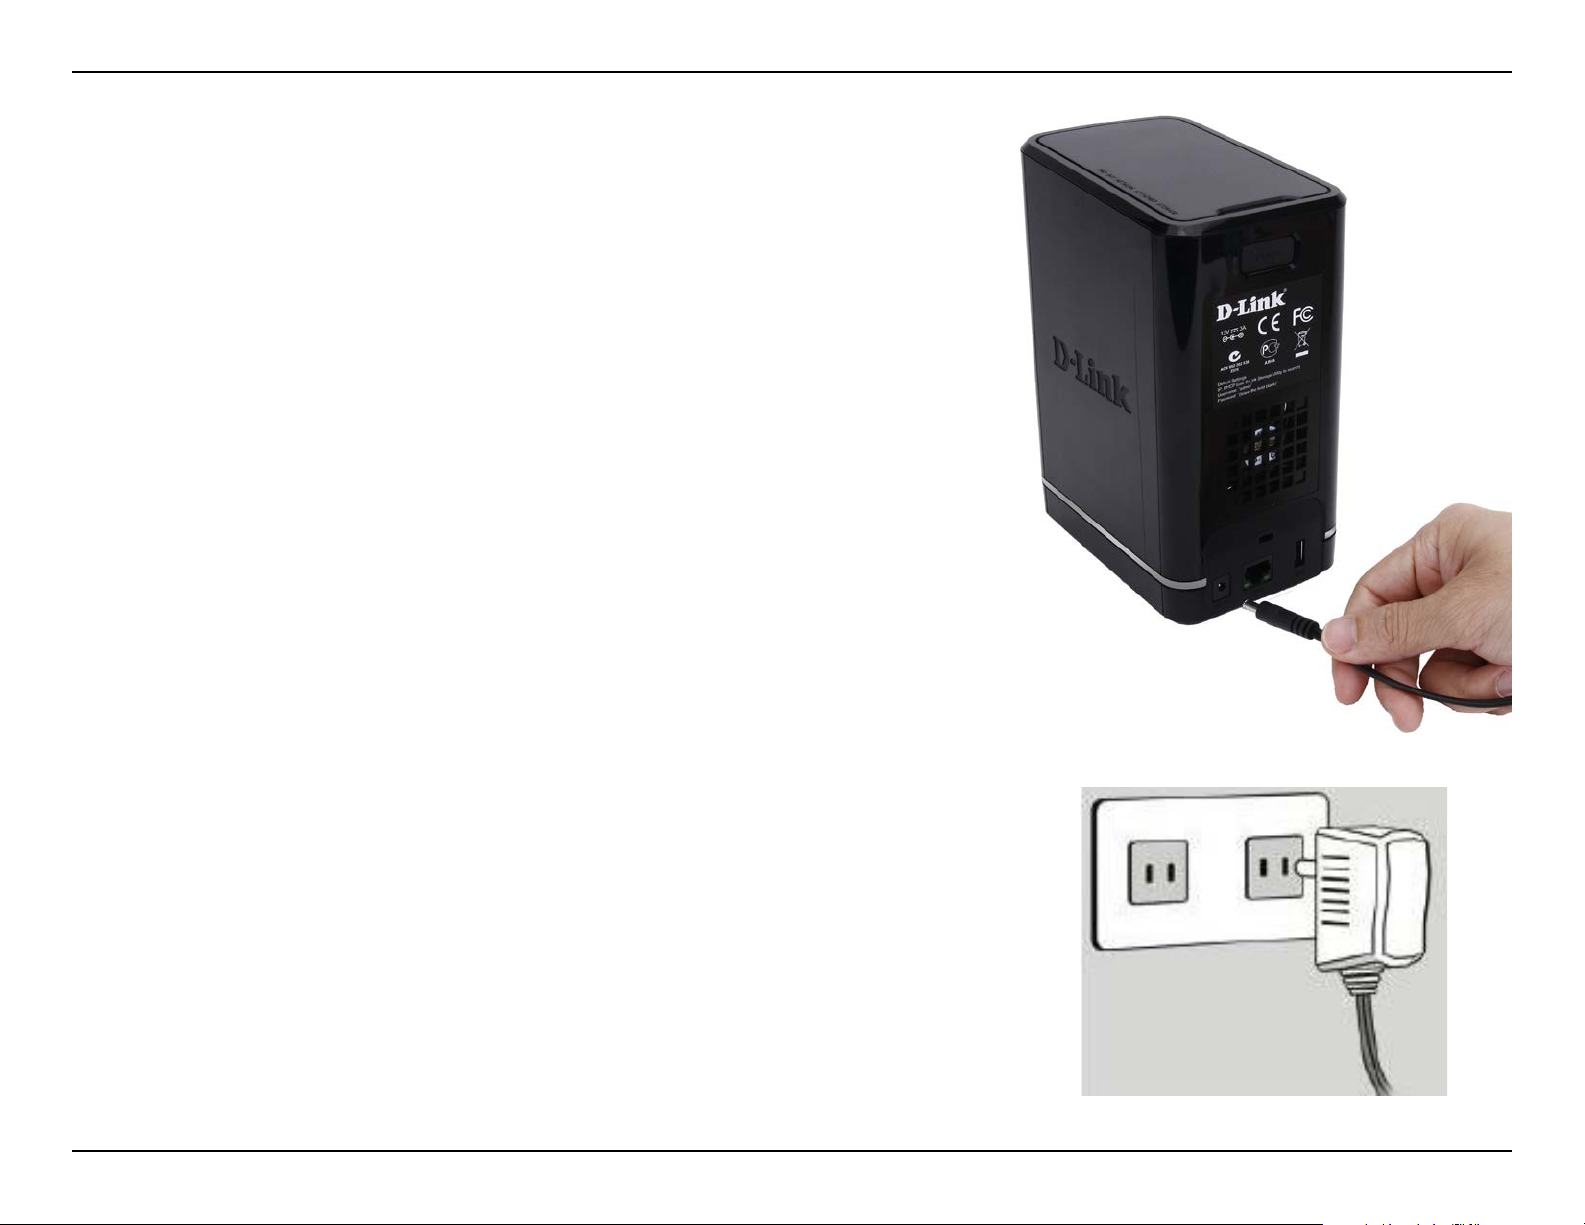
Connect the power adapter to the power receptor.
13D-Link ShareCenter DNS-320L User Manual
Page 20
Section 2 - Getting Started
Zero Conguration Setup
If you have a mydlink-enabled cloud router (DIR-808L, DIR-810L, DIR-820L
DIR-850L, DIR-860L, DIR-868L, DIR-865L, DIR-855L, DIR-836L), you can take
advantage of Zero Conguration setup. Zero Conguration automatically
congures your NAS’s settings for you, and adds it to your mydlink account.
This type of setup allows you to set up your DNS-320L by simply plugging it
in and connecting it to your mydlink-enabled router.
Connect your NAS to your mydlink-enabled cloud router and Zero Conguration will automatically congure your DNS-320L and automatically add
it to your mydlink account. After the short time it takes to do this you can
remotely access your NAS from the www.mydlink.com website to manage
and monitor your DNS-320L.
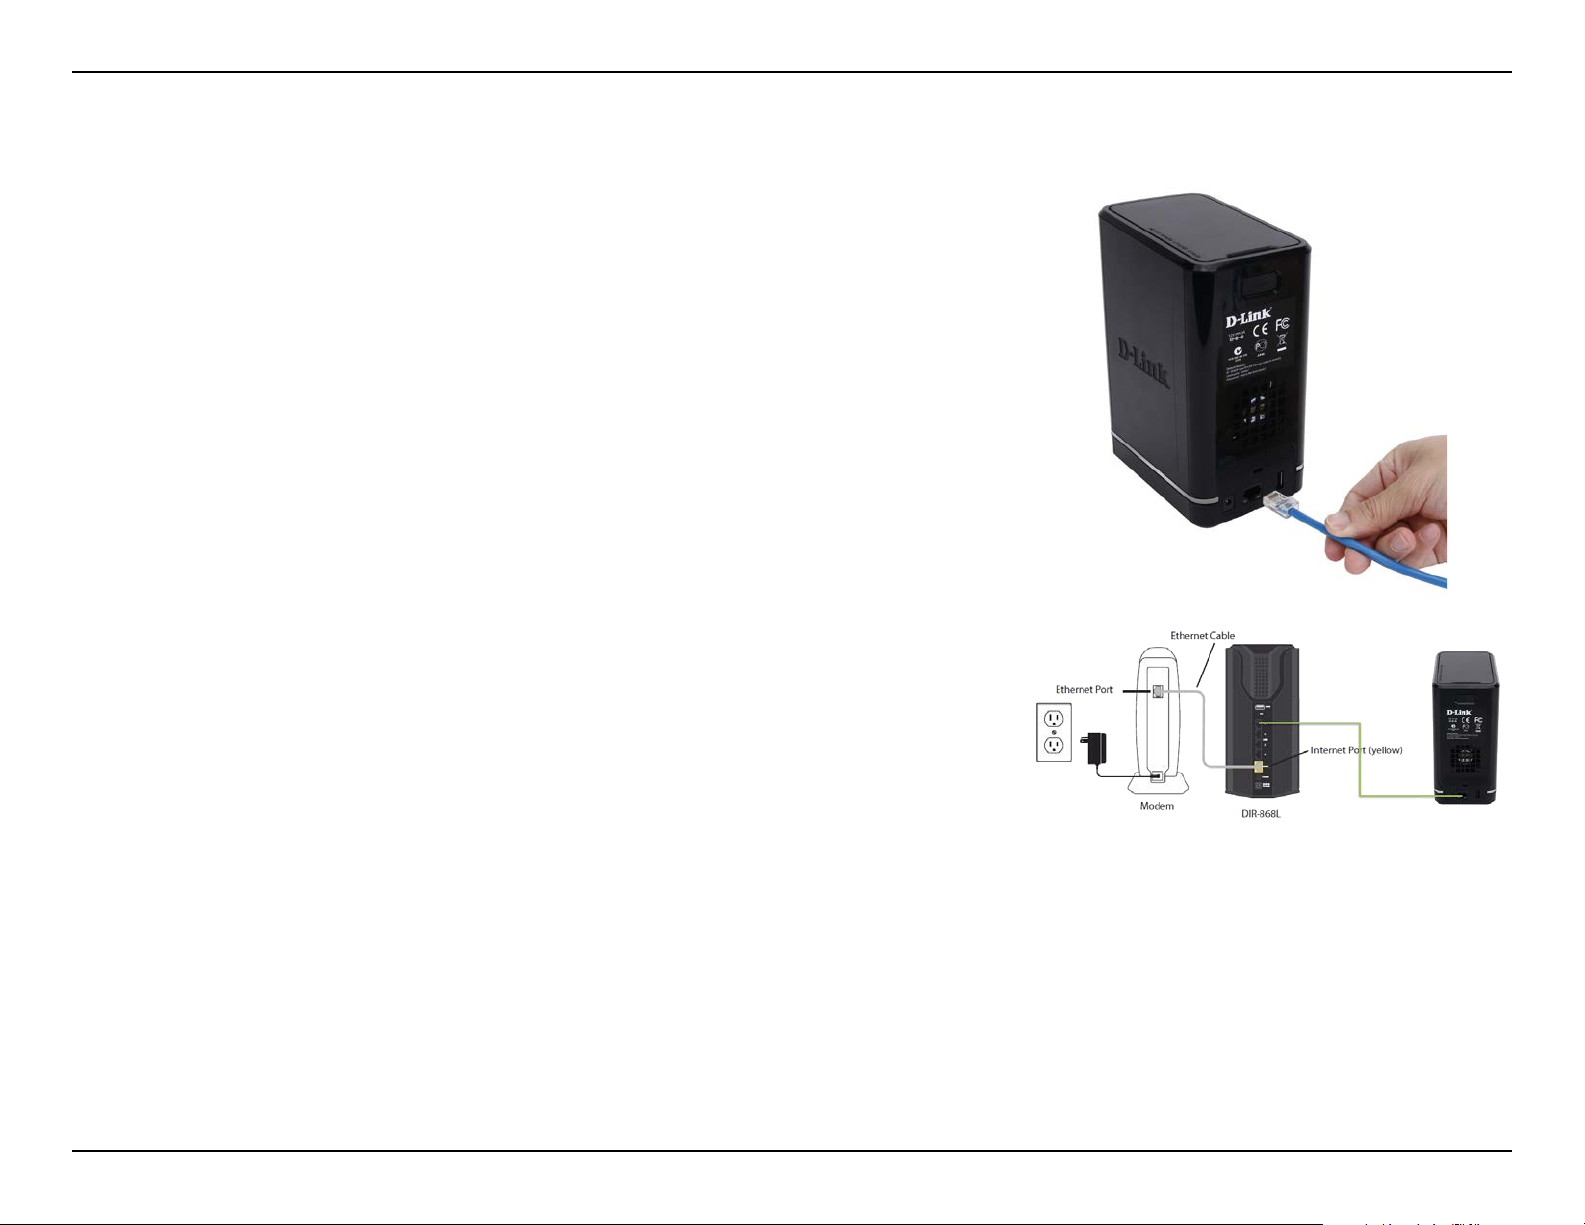
Connect the Ethernet Cable
Use the included Ethernet cable and plug it into the DNS-320L. Plug the
other end into an available port on your router. If you wish to use your NAS
wirelessly, you will be able to remove the cable from the router after Zero
Conguration Setup is complete.
14D-Link ShareCenter DNS-320L User Manual
Page 21
Section 2 - Getting Started
Attach the External Power Adapter
Connect the power adapter to the power connector on your NAS, then plug
the power adapter into a wall outlet.
15D-Link ShareCenter DNS-320L User Manual
Page 22
Section 2 - Getting Started
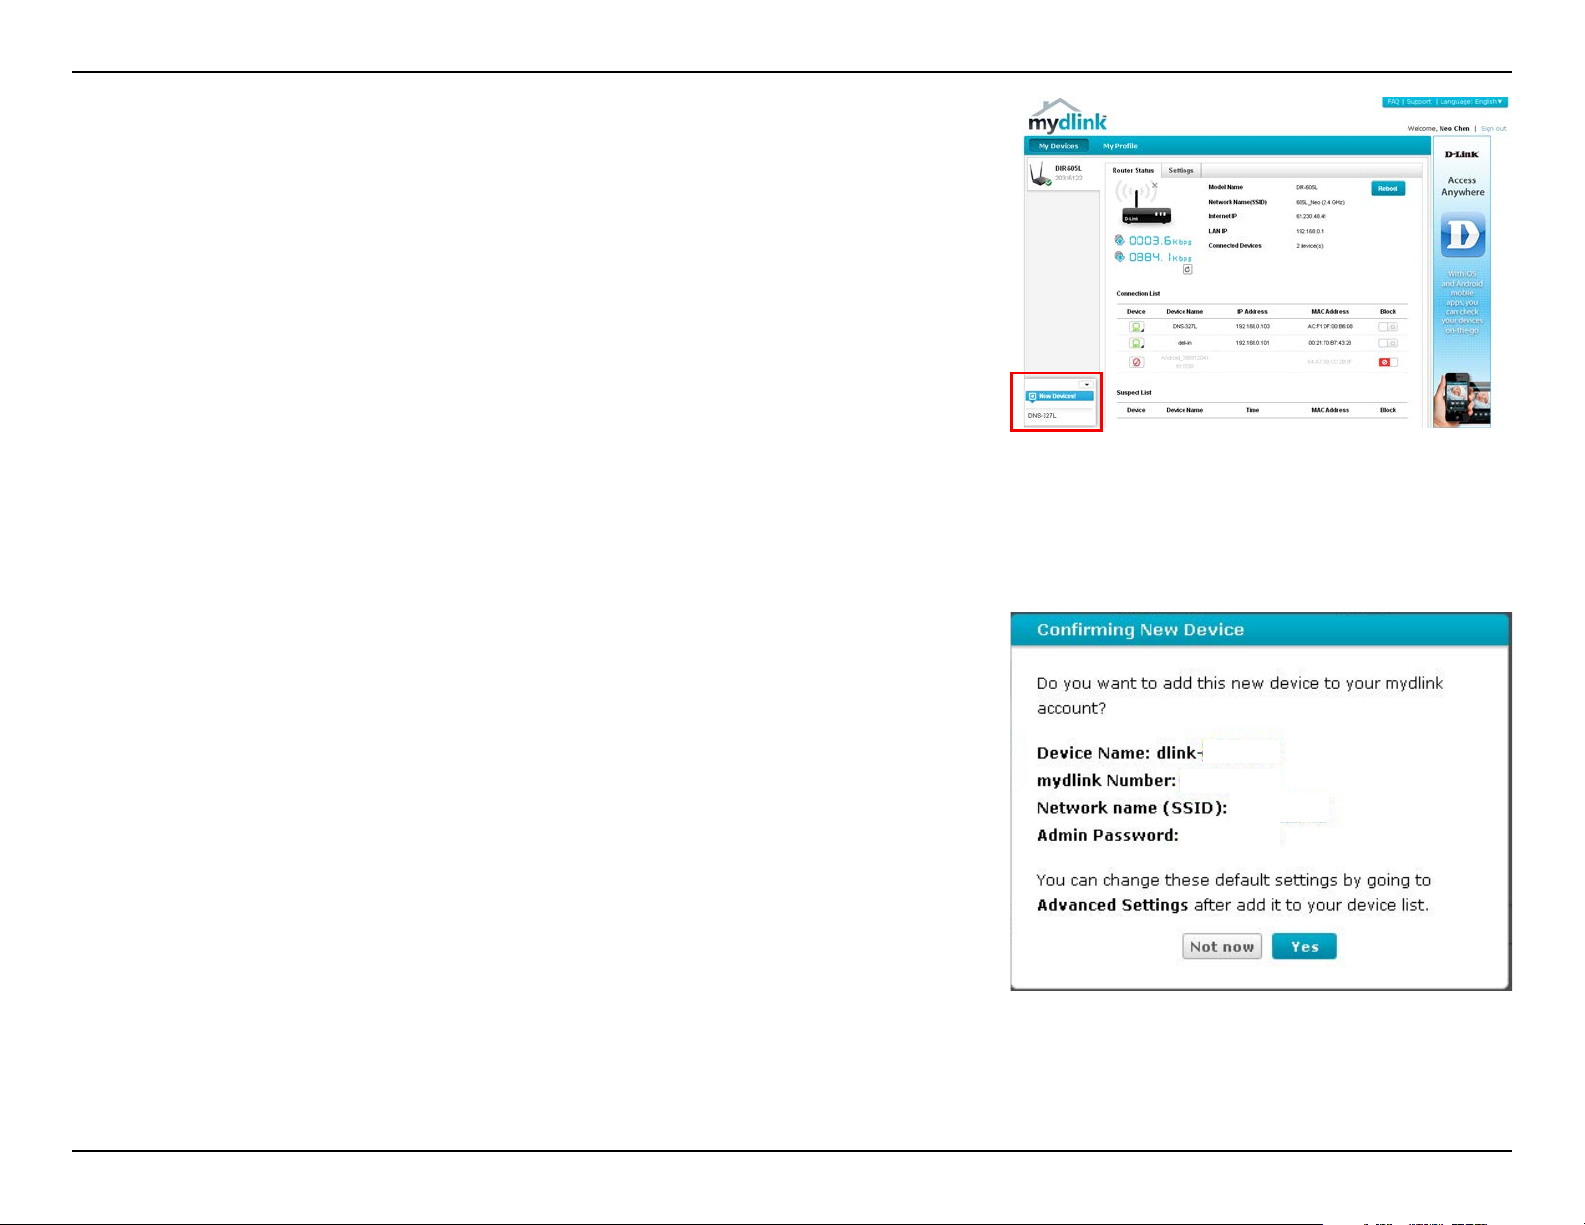
Check Your mydlink Account
Open a web browser and login to your mydlink account. The mydlink page
will check for new devices and display a New Device Found! pop-up notica-
tion in the bottom-left corner. Click the notication to continue.
Double-click the device to add it to your mydlink devices. If you wish to add it
immediately, click Yes , but if you are unsure of what to do click No. The popup screen displays the Device Name, mydlink number, Network Name, and
Admin Password. If you are unsure of what to do, you can always go back to
Advanced Settings.
16D-Link ShareCenter DNS-320L User Manual
Page 23
Section 2 - Getting Started
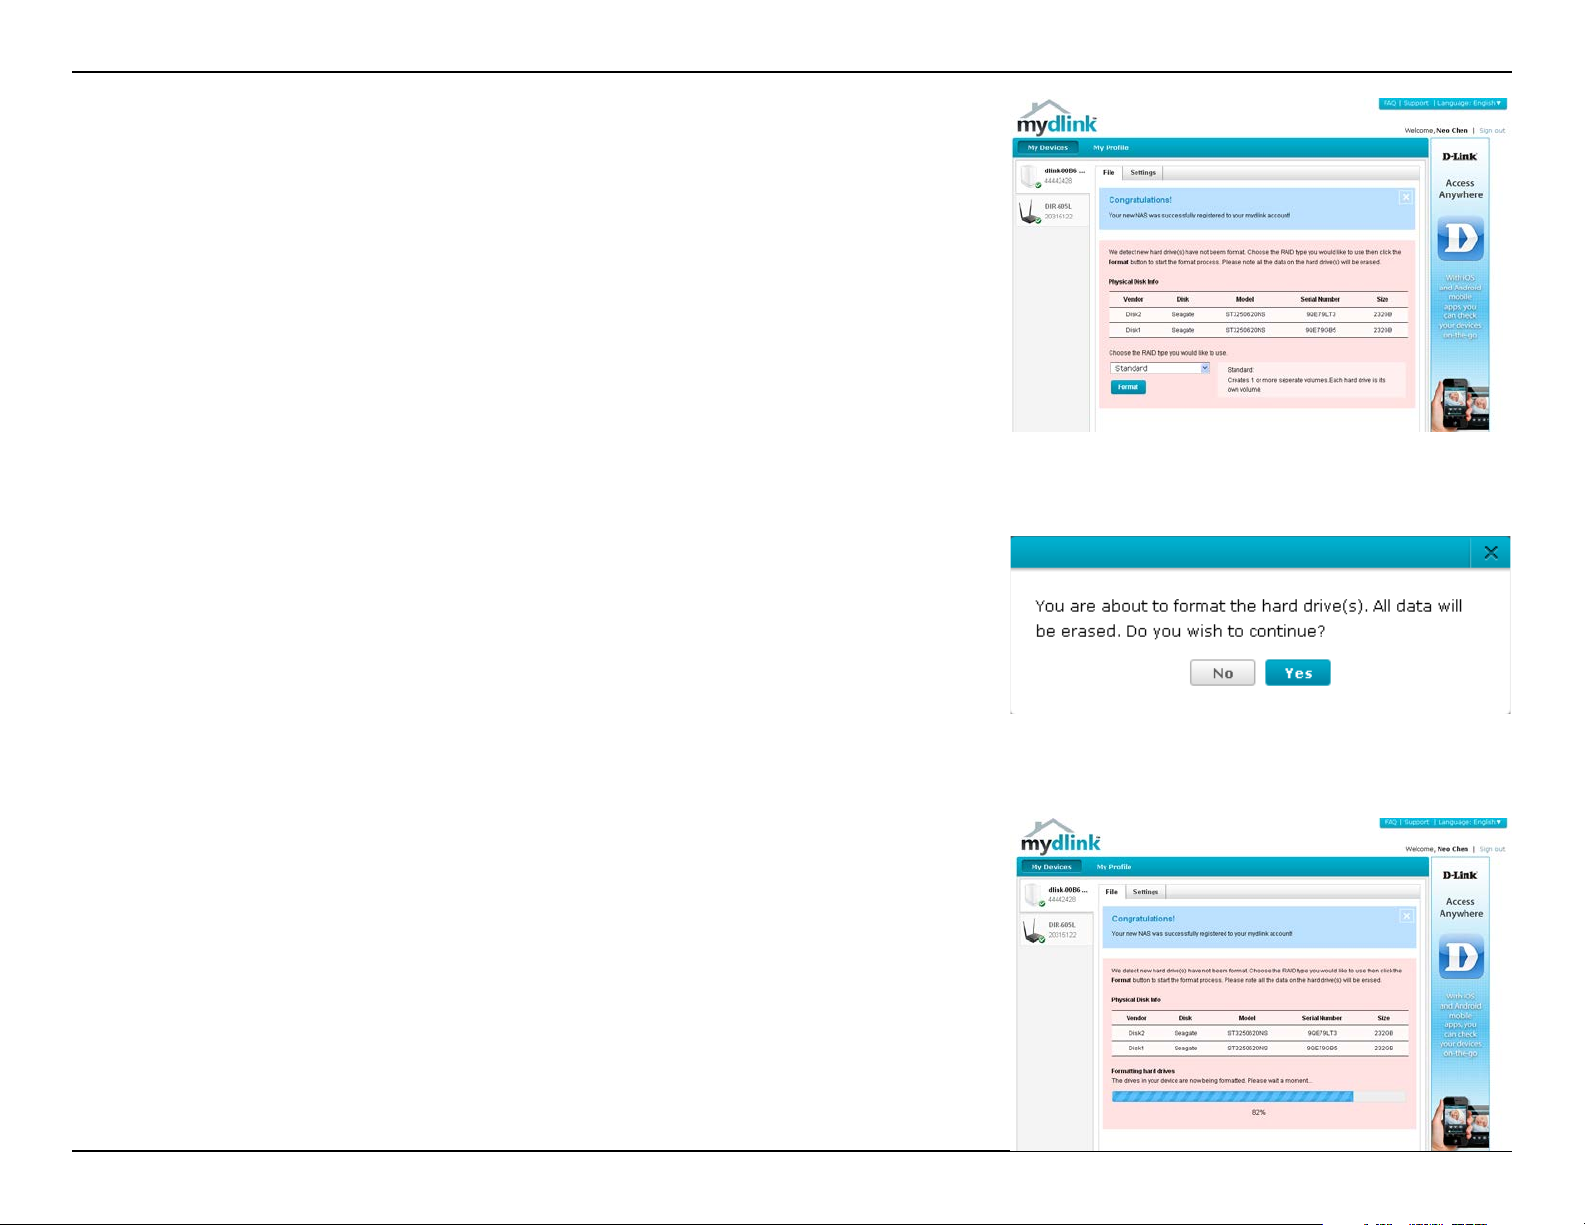
After your DNS-320L is registered, you will be able to access all information
about the NAS from the cloud service. This information is already available
locally, but the mydlink service provides a way for you to view these details
from any location. From this location, you can view all physical disk information,
and congure RAID. Please be advised that conguring RAID over the mydlink
service will slow your system down and the speed of this service will depend
on your ISP and the speeds you are using to connect to mydlink.
If you have decided to format your NAS using mydlink, select the RAID method
from the drop-down list and then click the Format button. A pop-up message
appears asking you to conrm your choice to format the volume using mydlink.
Click Yes to format, or No to return to the menu.
The format process may take some time to complete. The format process
depends on the speed of your network connection and client CPU.
17D-Link ShareCenter DNS-320L User Manual
Page 24
Section 2 - Getting Started
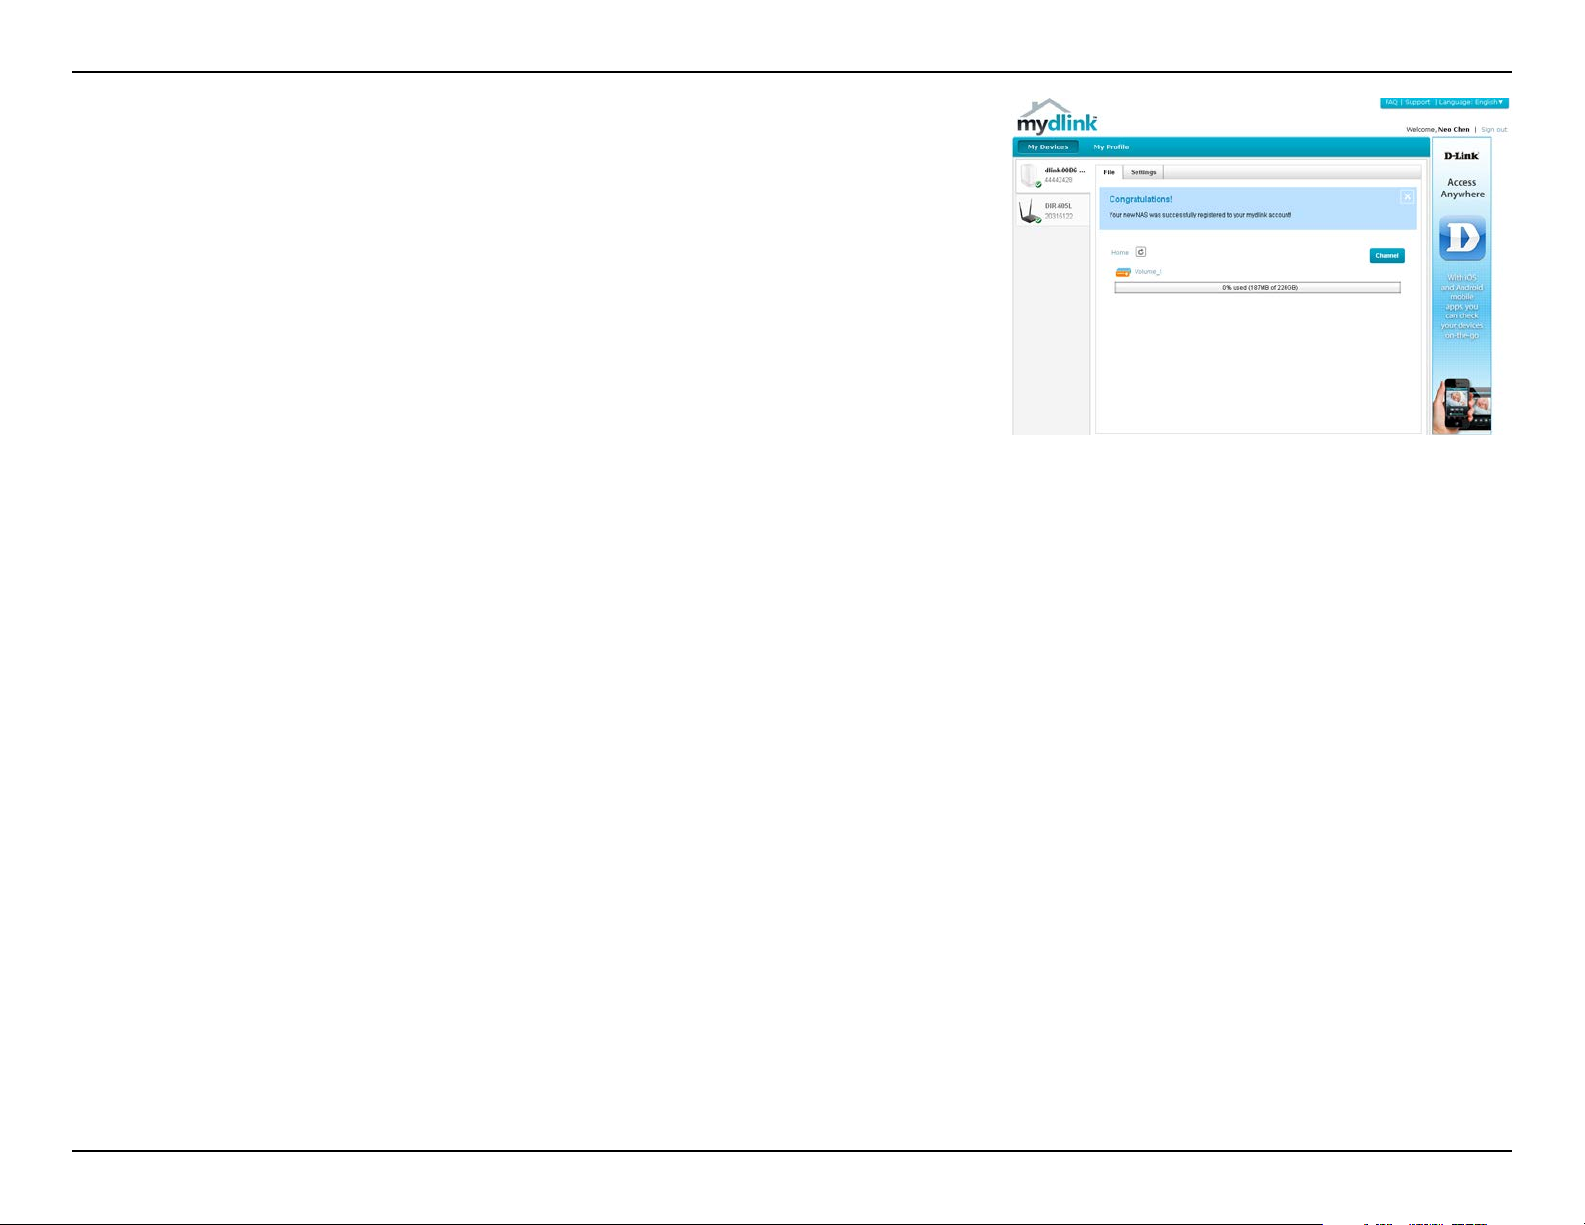
Once the format process is complete, your mydlink cloud service will show
you the RAID status and the Volume Status. It also displays the size of the drive,
and available and used space.
18D-Link ShareCenter DNS-320L User Manual
Page 25
Section 2 - Getting Started
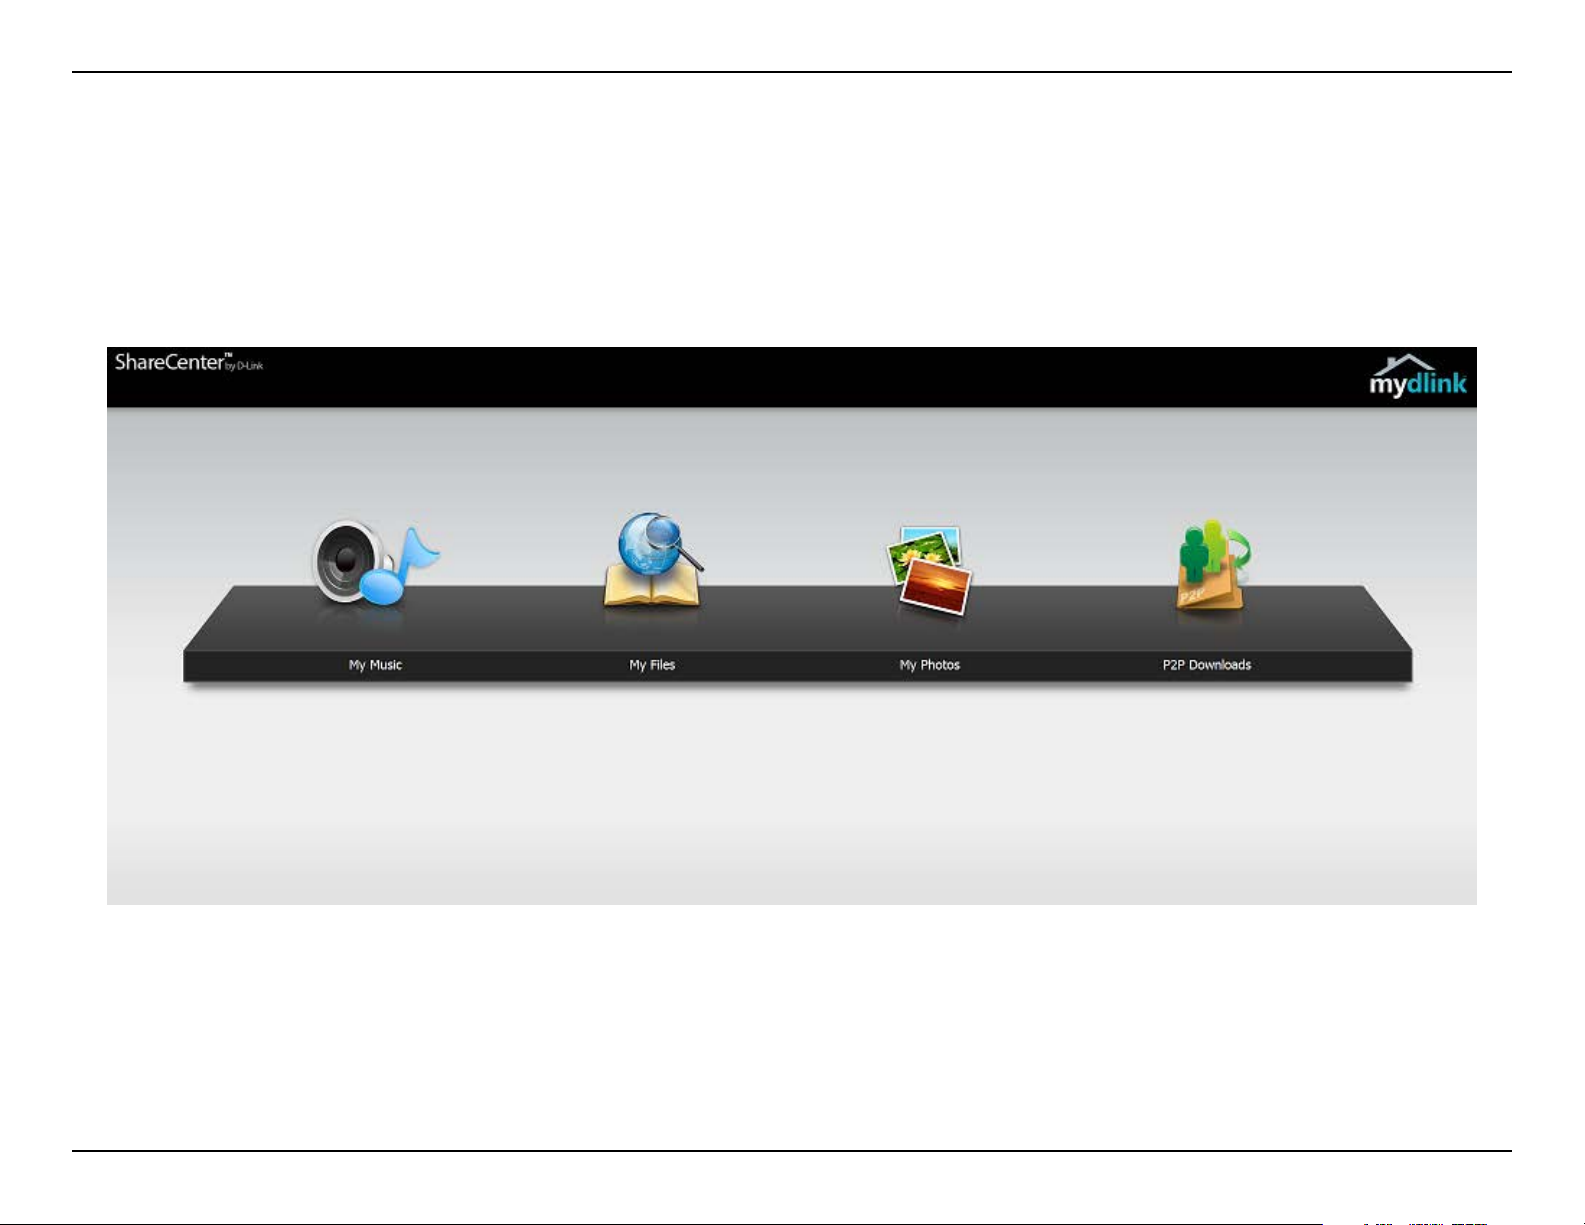
mydlink on the DNS-320L
Accessing the DNS-320L using mydlink provides a dierent user interface experience than the usual NAS interface. Once connected to the mydlink
service, click the Application button to access My Music, My Files, My Photos, and P2P Downloads from the main panel.
19D-Link ShareCenter DNS-320L User Manual
Page 26
Section 3 - Installation
Windows Installation
Setup Wizard
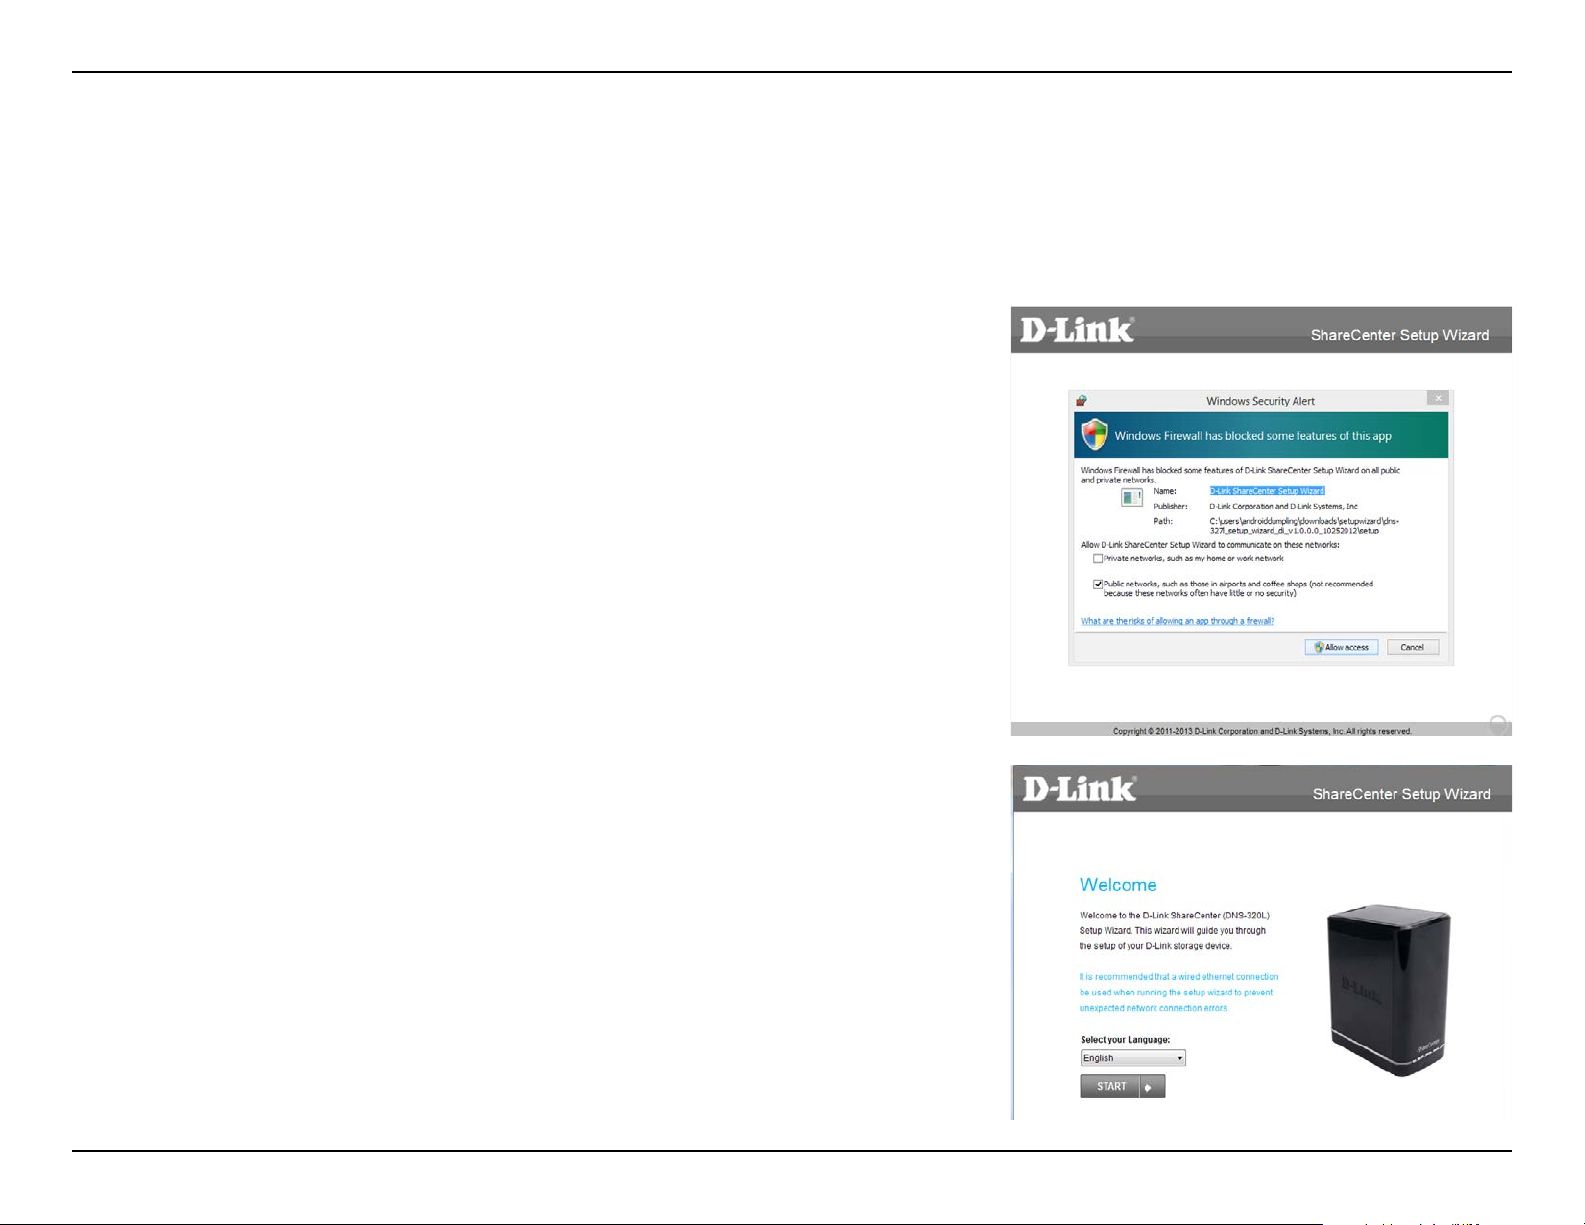
To run the setup wizard, insert the ShareCenter CD into your CD-ROM drive.
When the autorun screen appears, click Install
Note: Windows Firewall may present you with a warning message to unblock
the device. Click Allow Access to allow your computer access to the NAS.
Select the language of your choice and then click the Start button.
20D-Link ShareCenter DNS-320L User Manual
Page 27
Section 3 - Installation
Installing the Hard Drives
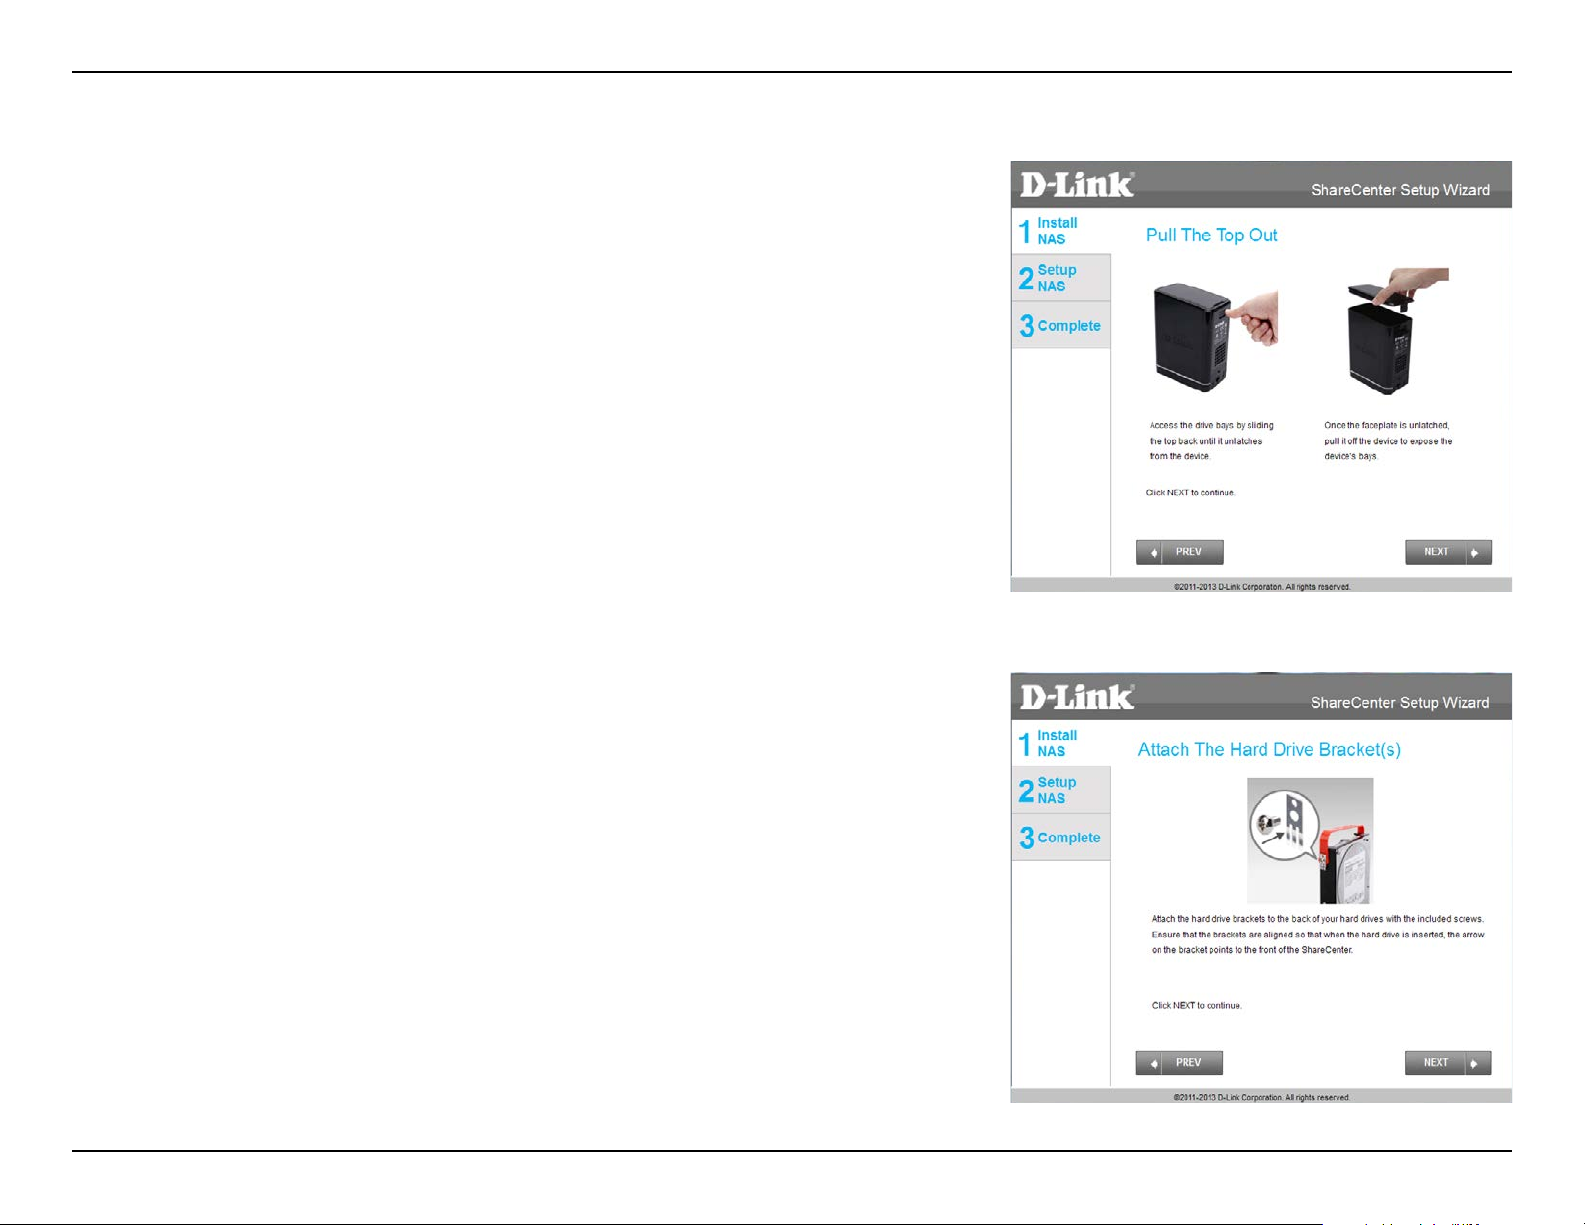
Follow the instructions to remove the top cover of your ShareCenter.
Click Next to continue.
Attach the hard drive bracket(s) to the side of the hard drives as indicated.
Click Next to continue.
21D-Link ShareCenter DNS-320L User Manual
Page 28
Section 3 - Installation
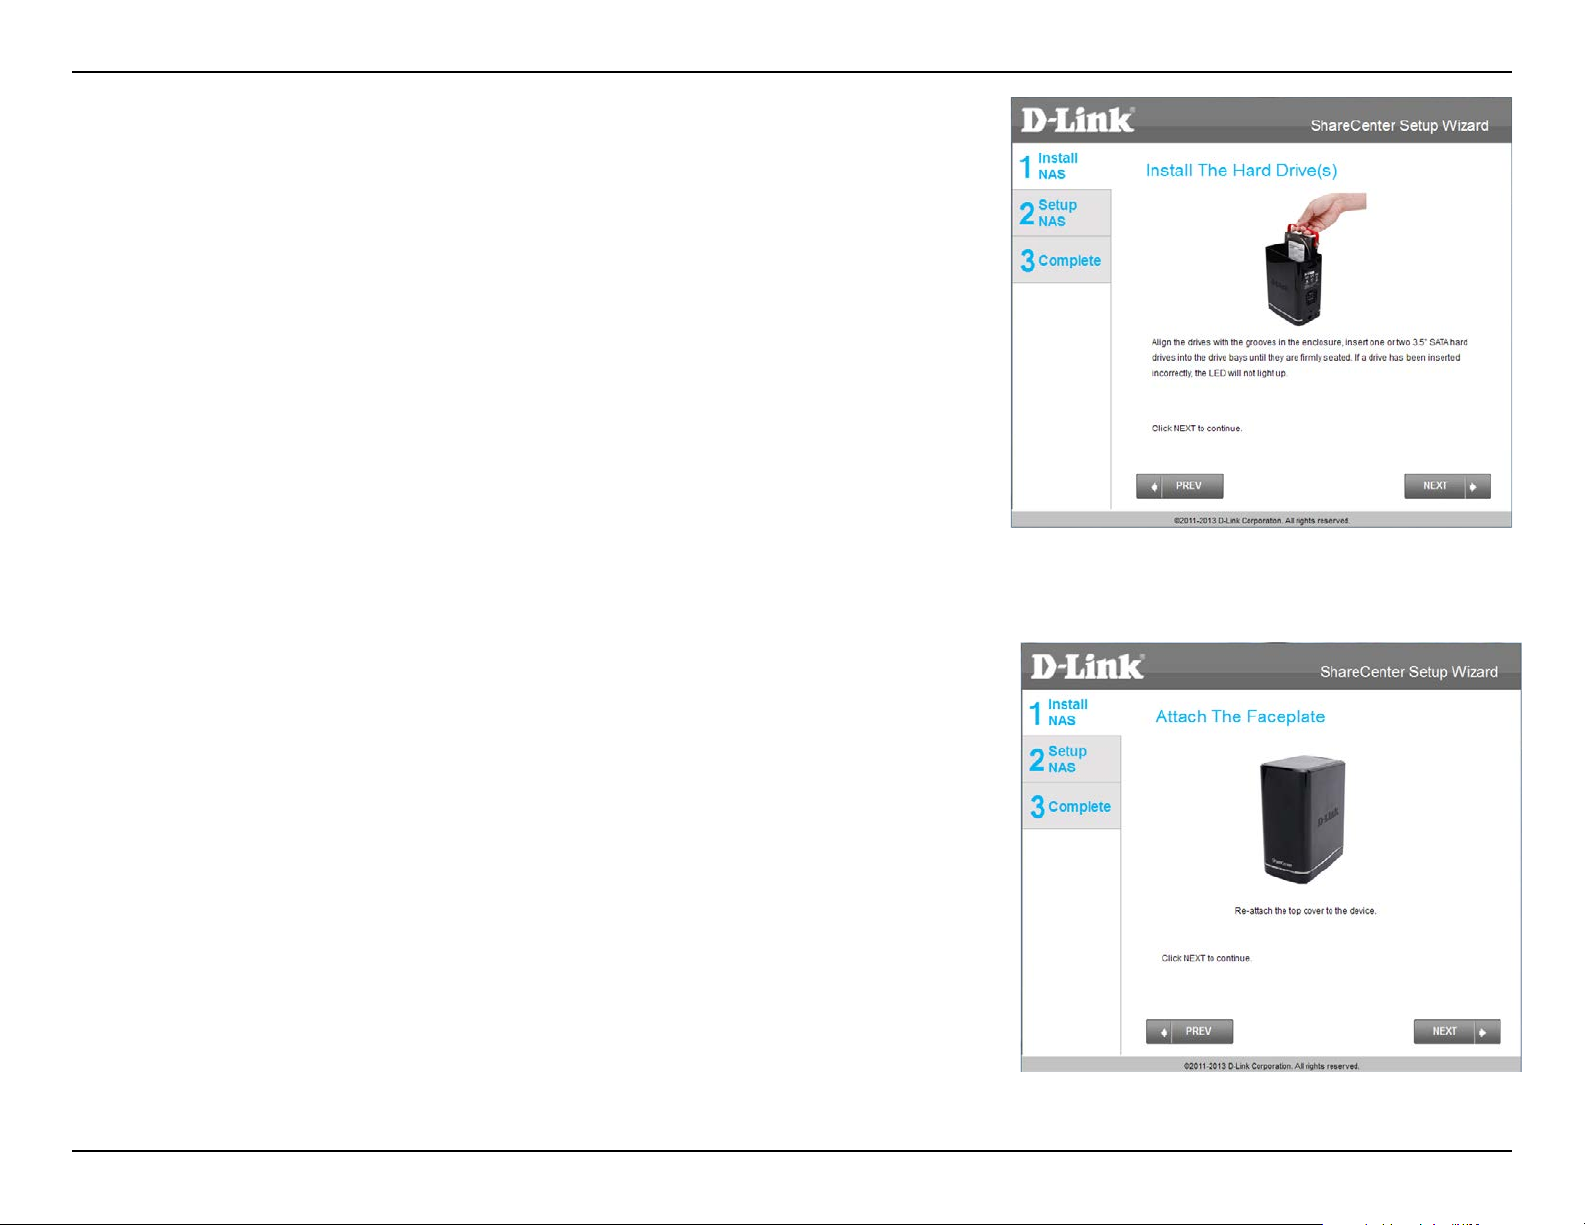
Slide one or two hard drives into an available hard drive bay of your ShareCenter.
Click Next to continue.
With the hard drives installed properly into each bay, close the chassis by reattaching the top panel into place.
Click Next to continue.
22D-Link ShareCenter DNS-320L User Manual
Page 29

Section 3 - Installation
Connect a CAT5 Ethernet cable to your ShareCenter and connect the other
end to a switch or router (Local LAN).
Click Next to continue.
Connect the power adapter connector to the power receptor on the back of
the ShareCenter. Then, power on the ShareCenter by pressing the power button located on the front panel.
Click Next to continue.
23D-Link ShareCenter DNS-320L User Manual
Page 30

Section 3 - Installation
Setting up the NAS
With the power on, press the Next button on the device and check and make
sure the IP address of your ShareCenter matches what you see on the screen.
Note: Allow 1-2 minutes for the DNS-320L to be recognized.
Click Next to continue.
Note: To double-check the NAS’s IP address, go to settings of your local router
and check the IP address table.
A warning message will appear prompting you to conrm that the LED on
the front of your device is blinking. If so, click Yes to proceed.
Click Next to continue.
24D-Link ShareCenter DNS-320L User Manual
Page 31

Section 3 - Installation
Enter the administrator password. If this is the rst time you are installing this
NAS, leave the password eld blank.
Click Next to continue.
In this step, you can create a new admin password. It is recommended you
set a password, however you may also leave the elds blank. You should
make a record of this password for future reference.
Click Next to continue.
25D-Link ShareCenter DNS-320L User Manual
Page 32

Section 3 - Installation
You may use either Static IP or DHCP Client to congure the IP network settings of the ShareCenter. If you select Static IP, then enter the IP parameters
according to your network settings.
Click Next to continue.
You may also use DHCP to congure the IP network settings of the ShareCenter. In this situation, leave the parameters blank, as your router will automatically provide this information.
Click Next to continue.
26D-Link ShareCenter DNS-320L User Manual
Page 33
Section 3 - Installation
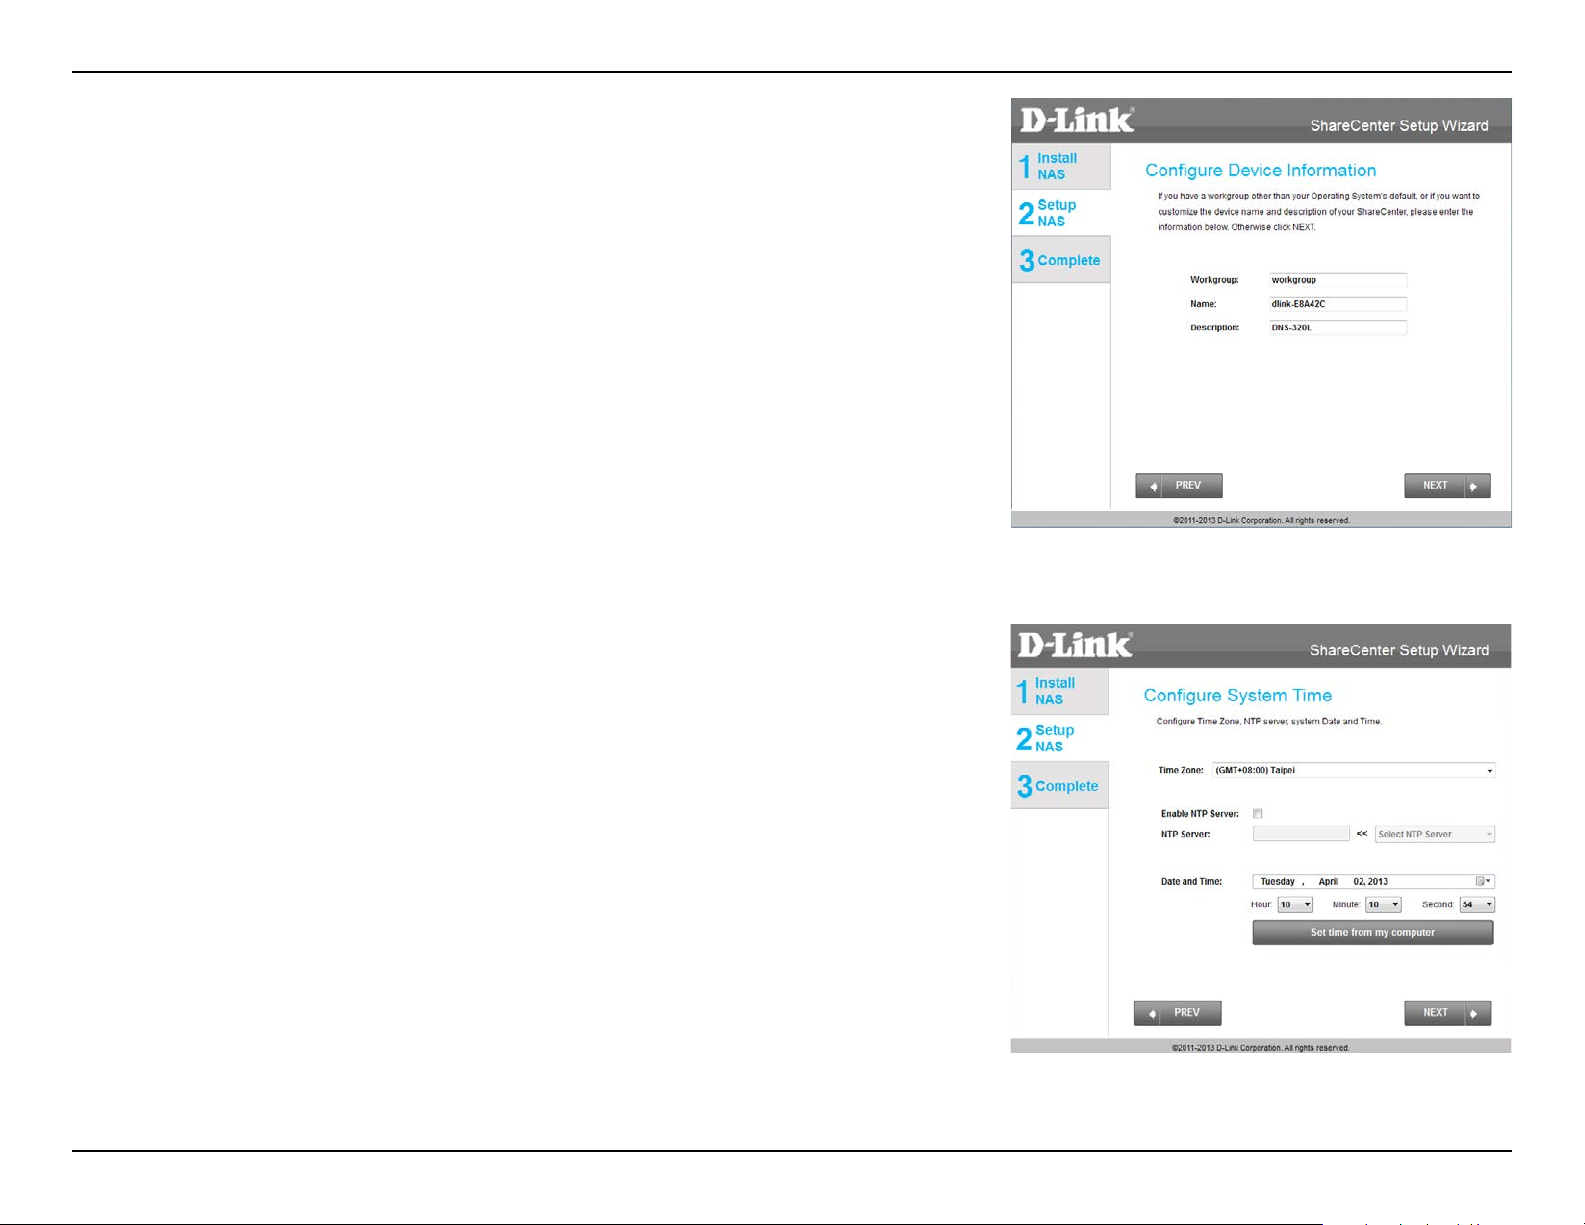
Congure the Device Information. Type the Workgroup name, a device
Name, and a Description for the device. This workgroup should be the same
name as your network’s current workgroup settings. If you haven’t set up
a workgroup yet, type a name that best suits the environment or leave the
default “workgroup” name.
Click Next to continue.
Congure the System Time. Select a Time Zone from the drop-down list.
Click Enable NTP Server and select NTP Server from the drop-down list if
you wish to automatically synchronize your time and date settings with an
online Network Time Protocol (NTP) server. Set the Date & Time settings using the calendar drop-down menu. Congure the time settings by manually
conguring the Hour, Minute, and Second settings, or click the “Set time
from my computer” button to copy your computer’s time and date settings.
Click Next to continue.
27D-Link ShareCenter DNS-320L User Manual
Page 34

Section 3 - Installation
The Disk Information window provides the current RAID type. However, if
this isn’t already congured, read the instructions under the Note displayed
on the screen.
Click Next to continue.
28D-Link ShareCenter DNS-320L User Manual
Page 35

Section 3 - Installation
Hard Drive Conguration
The next part of the setup wizard helps you to congure your hard drive storage. The DNS-320L oers four options for hard
drive storage conguration. You should choose the option which best suits your storage, redundancy, and backup needs.
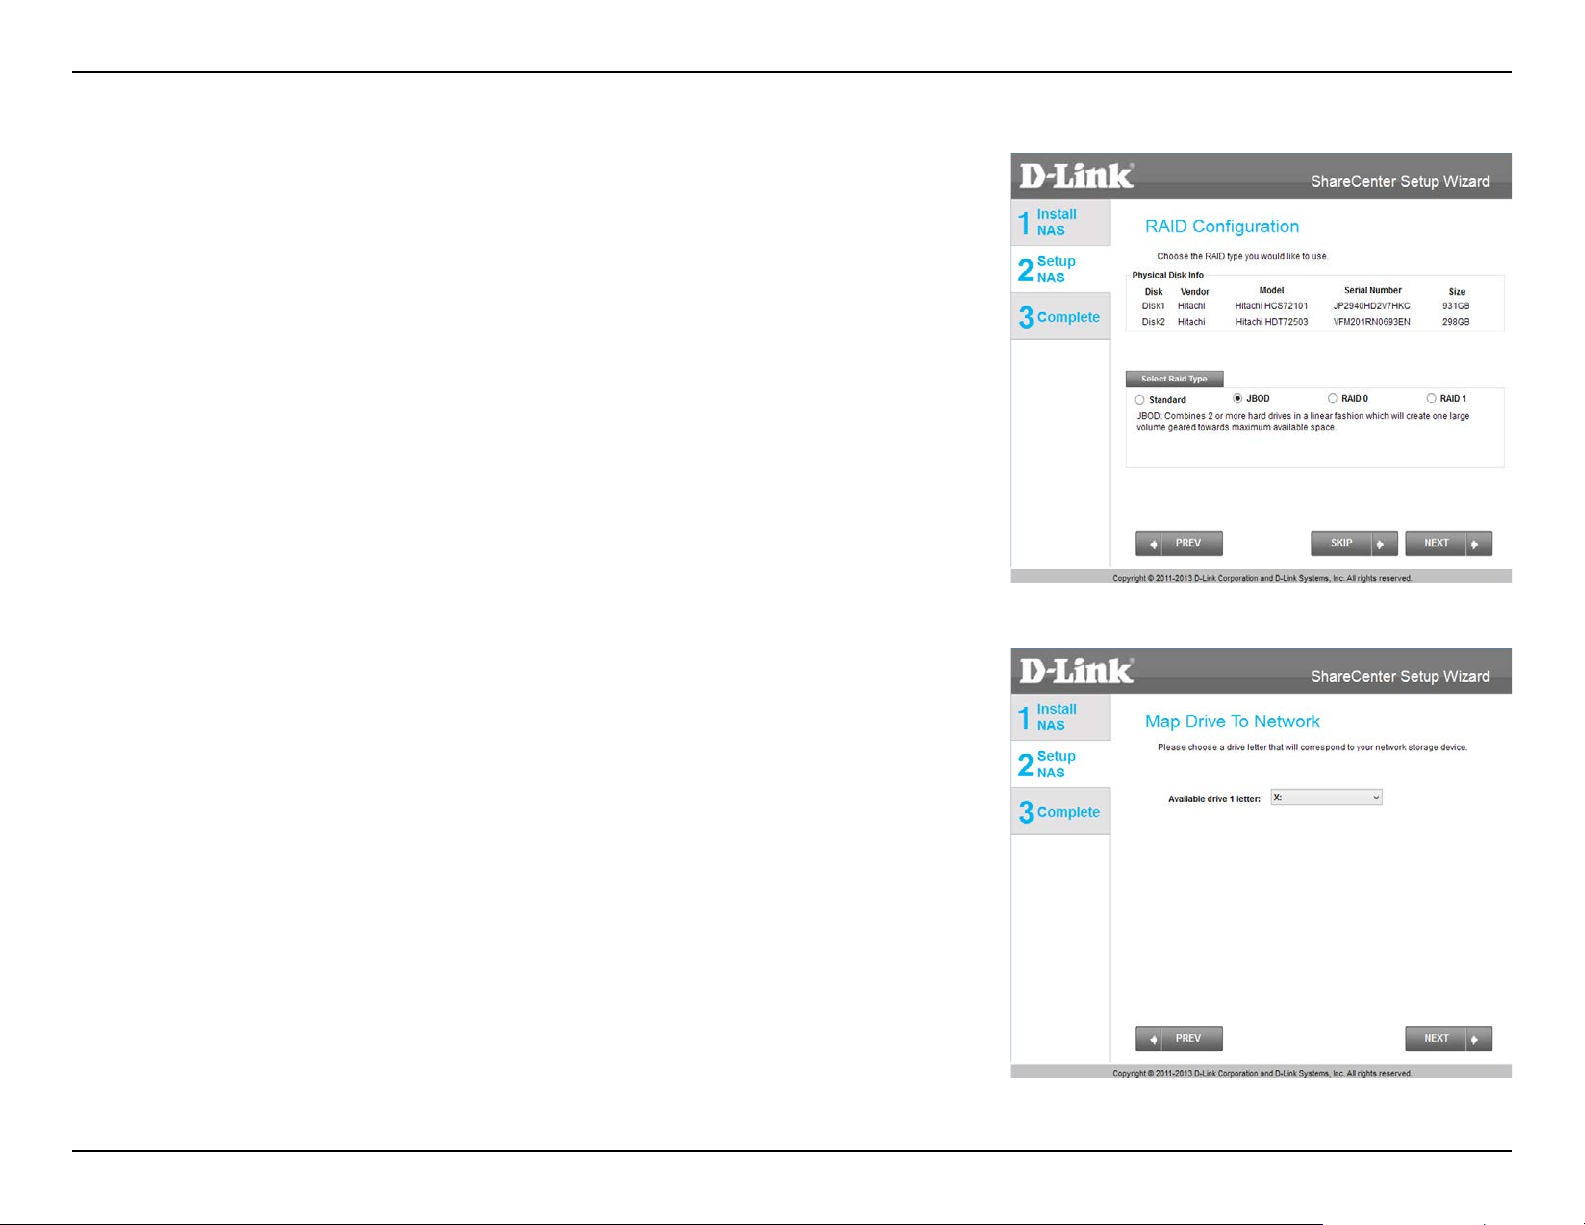
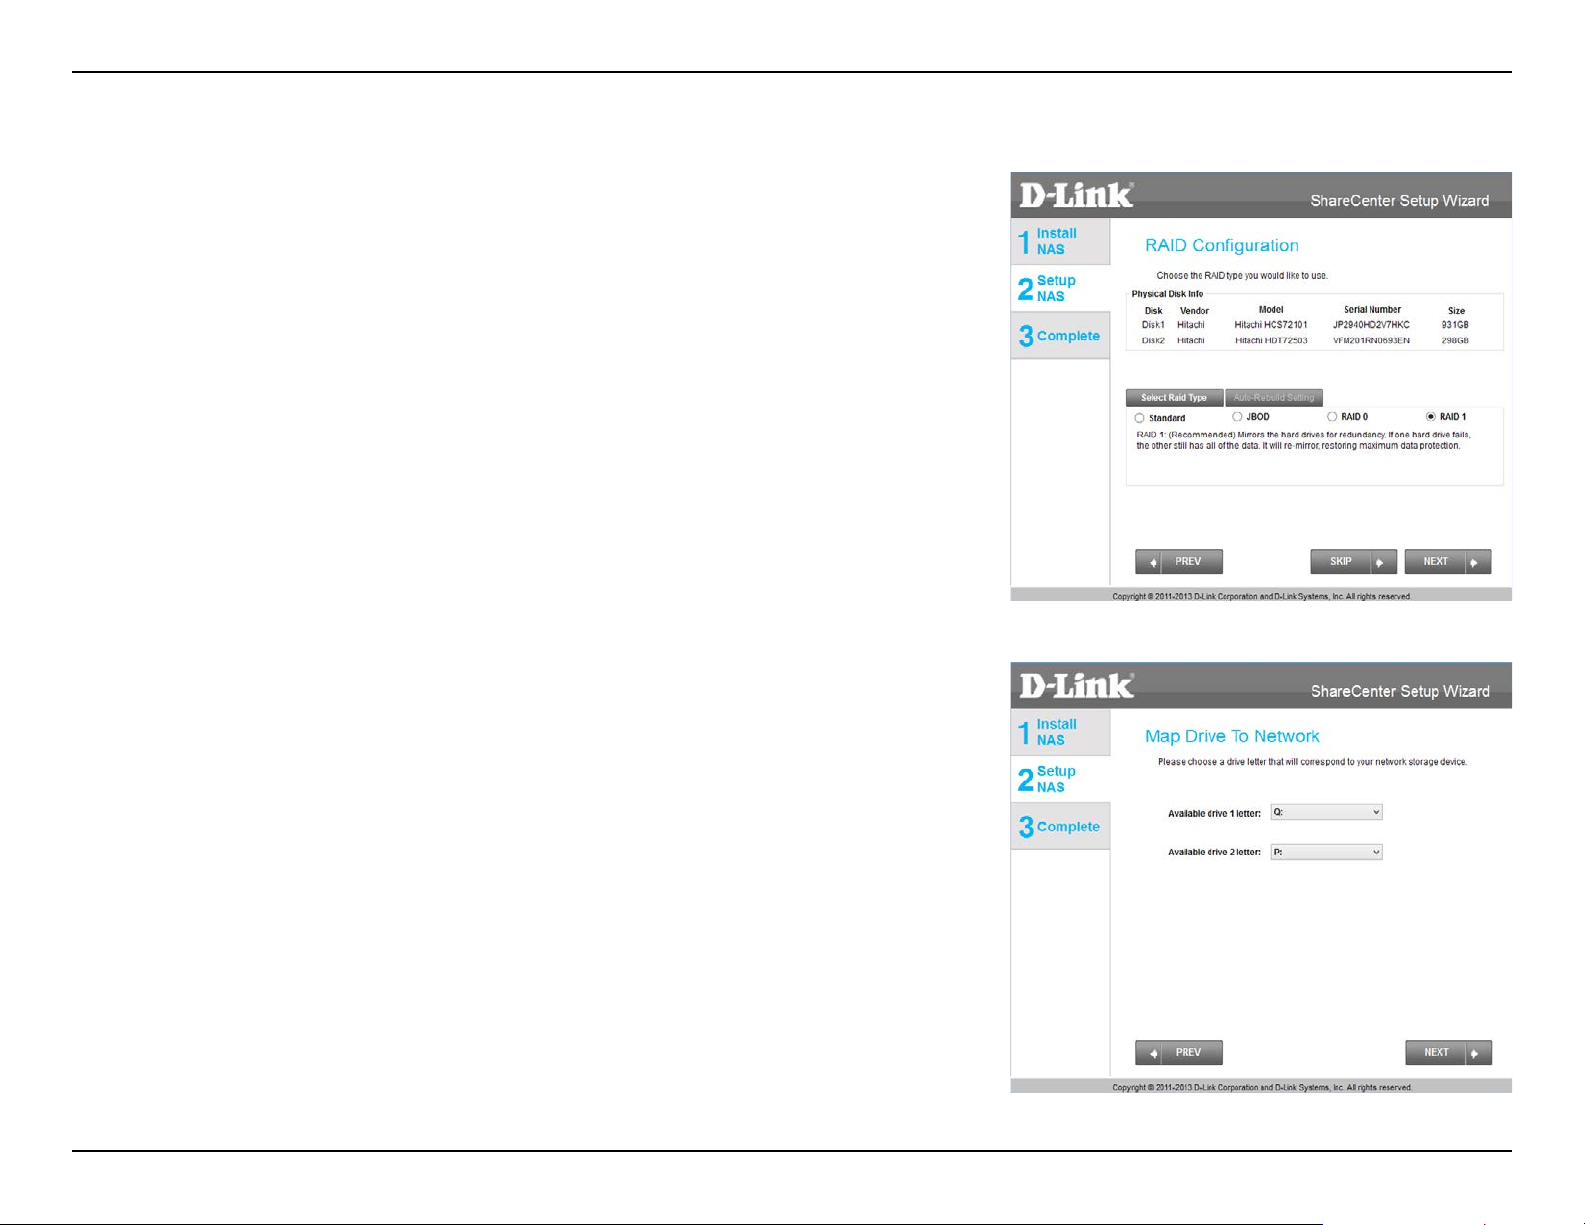
The RAID Conguration window provides more detailed Physical Disk
information. Here you can analyze your Disk, Vendor, Model number, Serial
number, and Disk size. Under Select RAID Type, there are four options to
choose from:
y Standard (default) - This option creates one or more volumes on each
hard drive which is inserted into the NAS. Each hard drive will have its
own volume. Please skip to Standard RAID on page 30 to continue the
setup process using this option.
y JBOD - This option combines the two hard drives into one or more vol-
umes, but does not use a RAID conguration. Please skip to JBOD on
page 33 to continue the setup process using this option.
y RAID 0 - This option splits data evenly across the two drives to create
one array. The size of the array will be limited to the twice the size of the
smallest hard drive in use. Please skip to RAID 0 on page 36 to continue the
setup process using this option.
y RAID 1 - This option uses one hard drive for storage, and the other hard
drive to create a mirror of the rst drive for redundancy. If the rst hard
drive fails, the second hard drive will serve as the primary storage drive
until the failed drive is replaced. Please skip to RAID 1 on page 39 to continue the setup process using this option.
Note: You can skip this step if you have set up this system before.
29D-Link ShareCenter DNS-320L User Manual
Page 36

Section 3 - Installation
Standard RAID
Select Standard using the radio button. Click Next to congure the Standard RAID or click Skip to bypass this step.
Map Drive to Network. This window makes it possible for you and users on
your network to communicate with your NAS directly. The Map Drive assigns
a letter to each volume on your NAS. Use the drop-down menus to assign
drive letters to the volumes in your NAS. Please refer to Mapping a Drive on
page 48 for further information on mapping drive volumes.
Click Next to continue.
After doing this, the wizard automatically maps drives to your congured
volumes.
Click Next to continue.
30D-Link ShareCenter DNS-320L User Manual
Page 37

Section 3 - Installation
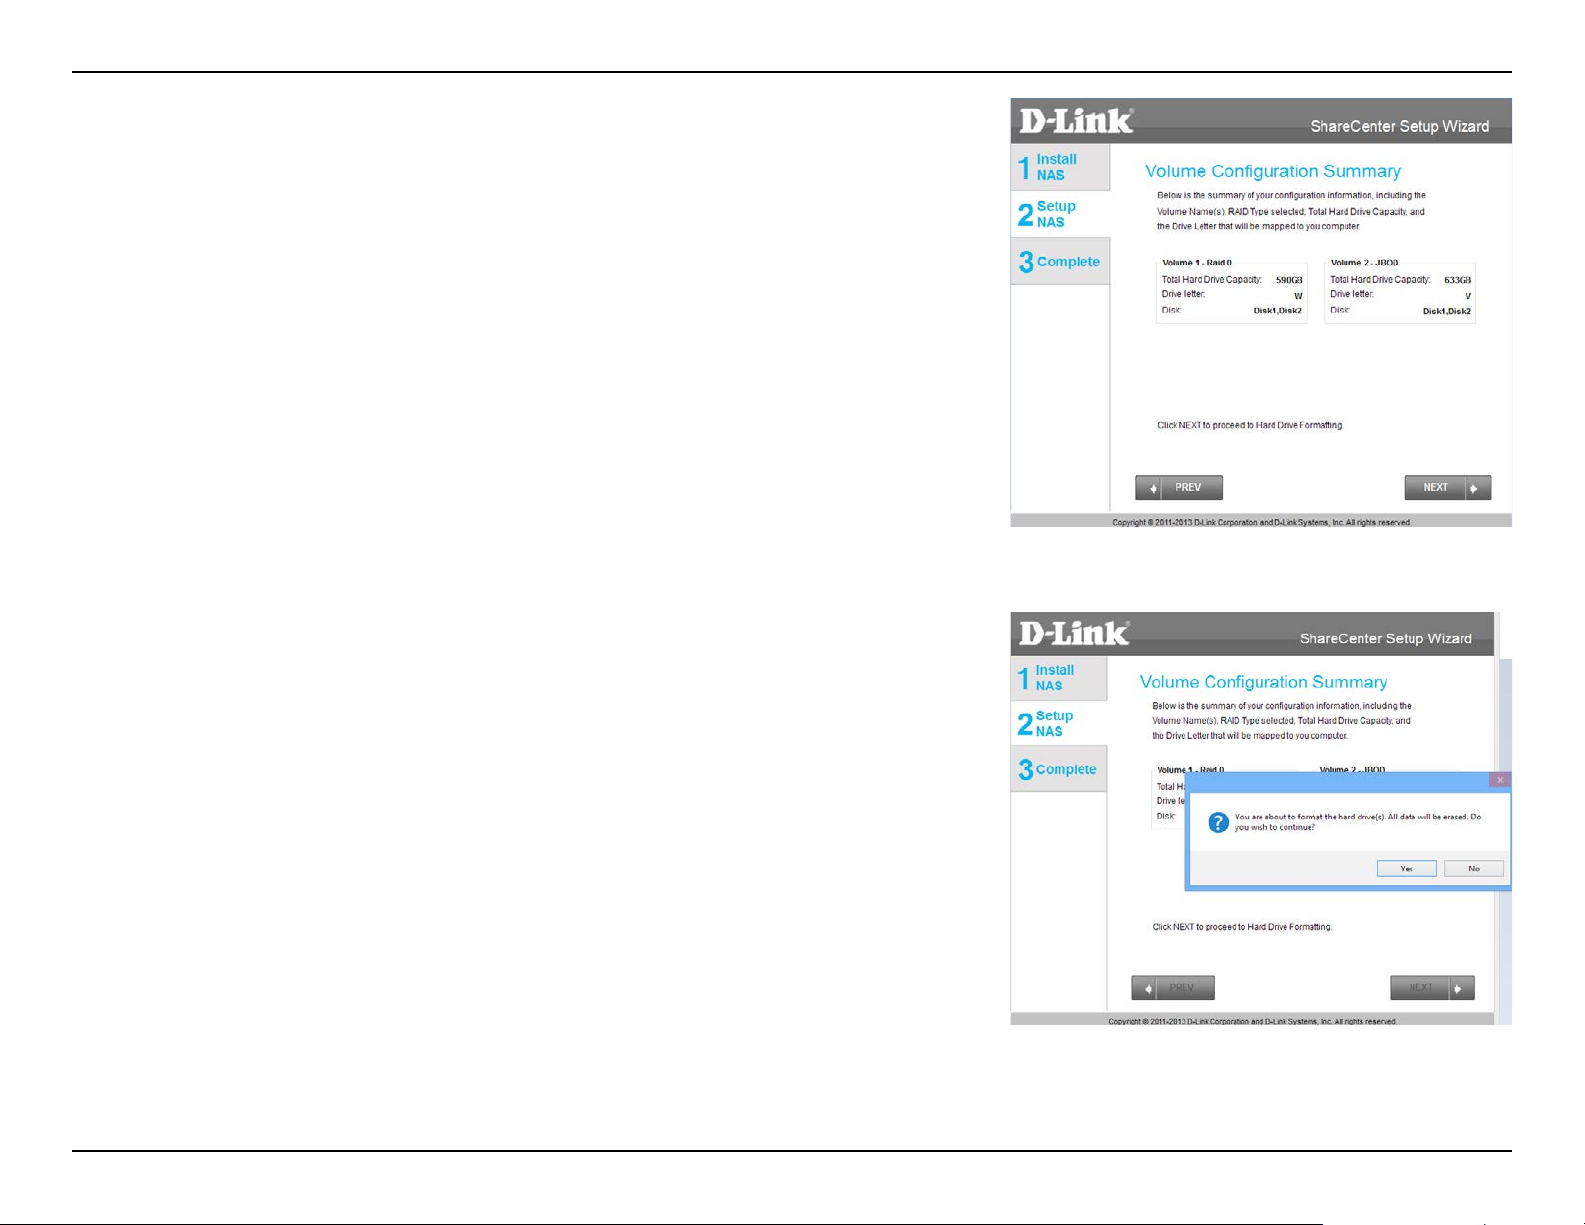
Volume Conguration Summary. This window provides a detailed summary of your current conguration. If you are satised with your conguration,
click Next, or if you want to change your settings click Prev to go back and
change your settings. Read the details carefully before continuing.
When you click Next, you are prompted to verify your decision before you
can continue.
31D-Link ShareCenter DNS-320L User Manual
Page 38

Section 3 - Installation
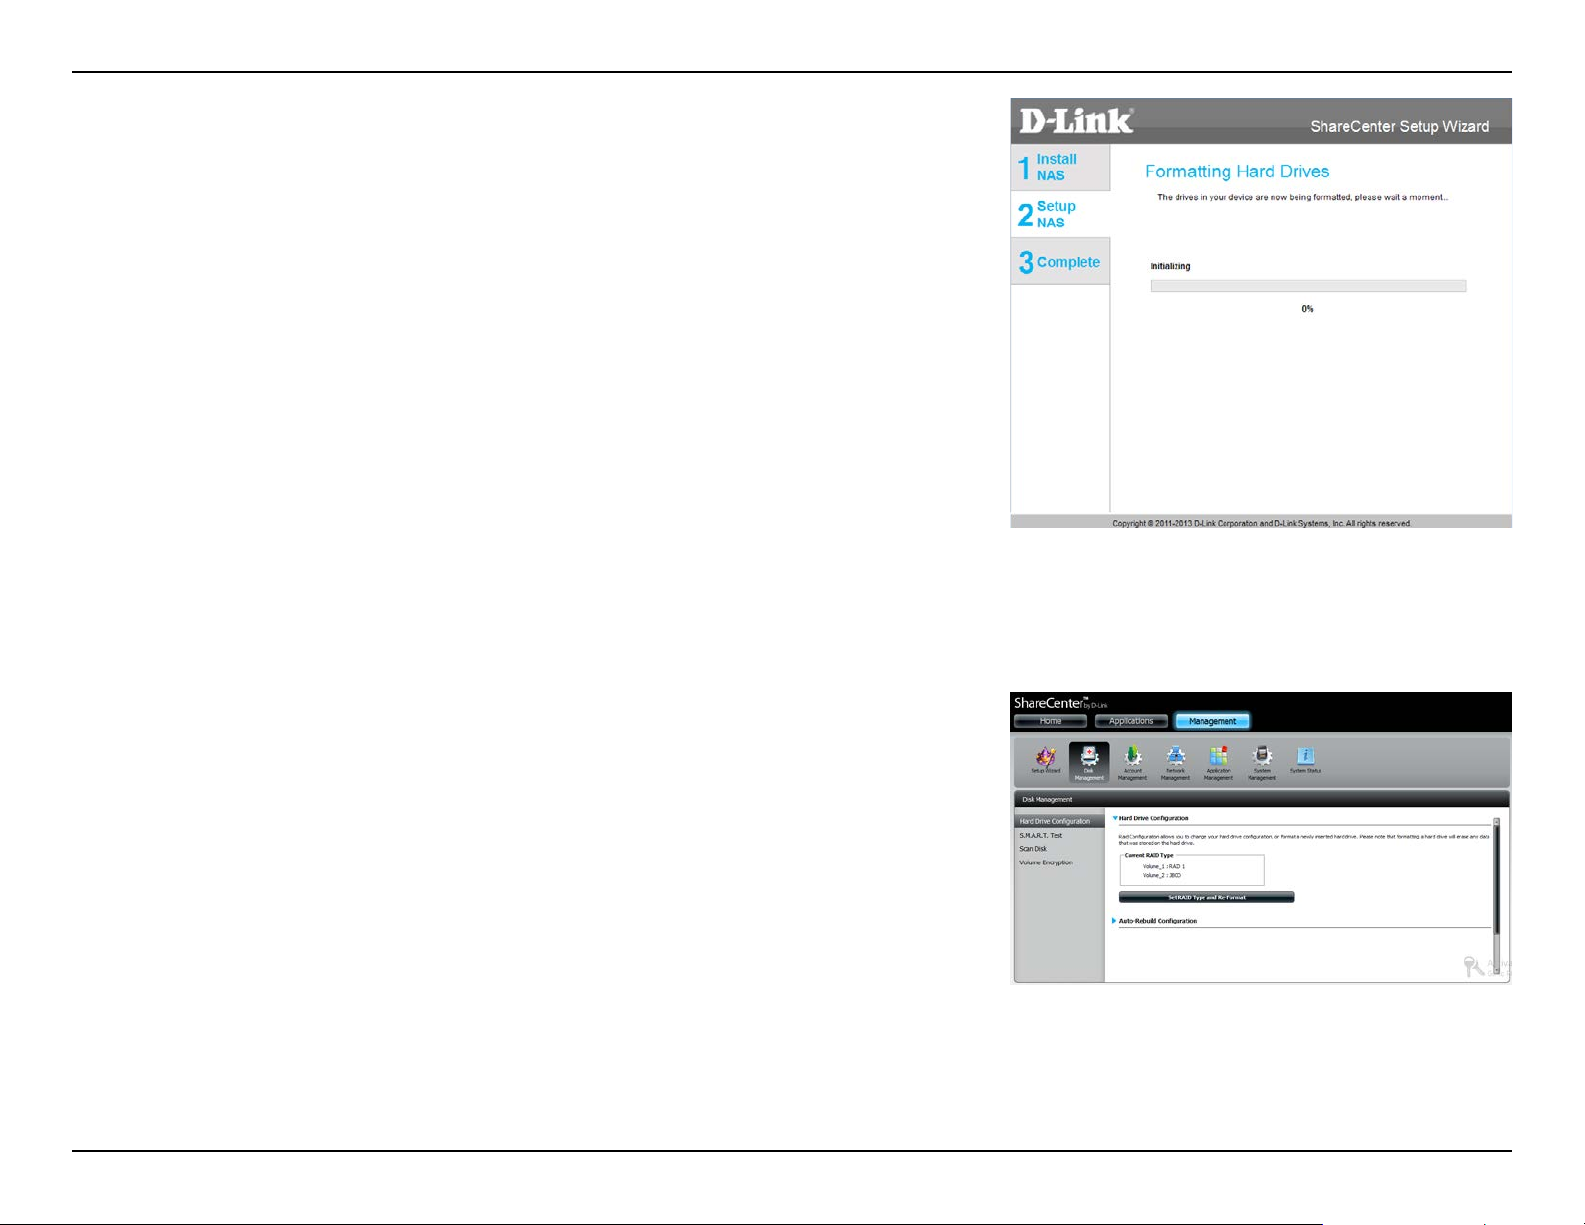
The wizard software will start the formatting process. After this is complete,
click Next to continue.
Note: Do not close the wizard or use other applications until the process is
complete.
32D-Link ShareCenter DNS-320L User Manual
Page 39
Section 3 - Installation
JBOD
Under RAID Conguration, Select RAID Type, choose JBOD. Read the JBOD
RAID conguration requirements.
Click Next to continue.
Under JBOD more than one disk is classied as a complete volume, so when
mapping a drive, only one drive letter is needed. Map Drive to Network only
shows one drive. Select a drive letter using the drop-down menu. For further
information, please refer to Mapping a Drive on page 48.
Click Next to continue.
33D-Link ShareCenter DNS-320L User Manual
Page 40

Section 3 - Installation
The Volume Conguration Summary displays a detailed summary of your
JBOD conguration.
Click Next to continue.
Click Next, you are prompted to verify your decision before you can continue. Click Yes to continue.
34D-Link ShareCenter DNS-320L User Manual
Page 41

Section 3 - Installation
The wizard software will start the formatting process. After this is complete,
click Next to continue.
Note: Do not close the wizard or use other applications until the process is
complete.
To verify your JBOD, login to your NAS, go to Management >> Disk Man-
agement >> Hard Drive Conguration. This shows the current status of
your drive(s).
35D-Link ShareCenter DNS-320L User Manual
Page 42

Section 3 - Installation
RAID 0
Under RAID Conguration, Select RAID Type, choose RAID 0. Read the
RAID 0 conguration requirements.
Click Next to continue.
With RAID 0, the two drives are ‘striped’ into one volume, making it appear
that you have one drive. Data is saved evenly across the two drives.
Map Drive to Network indicates that the NAS has separated the drive into
2 volumes; if the two drives are dierent sizes, the excess drive space will be
formatted as a separate JBOD volume. To have only one volume, you should
use two hard drives of the same size.
Use the drop-down menus to select a drive letter to map each of the volumes to. For further information, please refer to Mapping a Drive on page 48.
Click Next to continue.
36D-Link ShareCenter DNS-320L User Manual
Page 43
Section 3 - Installation
The Volume Conguration Summary, displays the details of the new
conguration.
Click Next to continue.
Verify your conguration selection before continuing. Click Yes to continue
37D-Link ShareCenter DNS-320L User Manual
Page 44

Section 3 - Installation
The wizard software will start the formatting process. After this is complete,
click Next to continue.
Note: Do not close the wizard or use other applications until the process is
complete.
To verify your RAID 0 conguration, log in to your NAS, go to
Management>>Disk Management>>Hard Drive Conguration. This
shows the current status of your drives.
38D-Link ShareCenter DNS-320L User Manual
Page 45
Section 3 - Installation
RAID 1
Under RAID Conguration, Select RAID Type, choose RAID 1. Read the
RAID 1 conguration requirements.
Click Next to continue.
With RAID 1, the drives are mirrored for redundancy. Map Drive to Network
indicates that the NAS has separated the drive into a RAID array. Use the
drop-down menus to select drive letters to map the drives to. For further
information, refer to Mapping a Drive on page 48.
Note: If the size of these two drives are dierent, the excess space on the
larger drive will be formatted as a JBOD Volume.
Click Next to continue.
39D-Link ShareCenter DNS-320L User Manual
Page 46

Section 3 - Installation
The Volume Conguration Summary, displays the details of the new conguration.
Click Next to continue.
Verify your conguration selection before continuing. Click Yes to continue.
40D-Link ShareCenter DNS-320L User Manual
Page 47
Section 3 - Installation
The wizard software will start the formatting process. After this is complete,
click Next to continue.
Note: Do not close the wizard or use other applications until the process is
complete.
To verify your RAID 1, login to your NAS, go to Management>>Disk
Management>>Hard Drive Conguration. This shows the current status of
your drives.
41D-Link ShareCenter DNS-320L User Manual
Page 48

Section 3 - Installation
The DNS-320L also oers add-on packages. Select the desired add-on packages from the menu by checking the appropriate boxes.
Alternatively, you can install the add-on packages available on the CD or
from the D-Link website at a later stage. Refer to Add-ons on page 162 for details.
Click Next to accept these installations or click Skip to continue. If you wish
not to install Squeeze Center (Logitech Media Server) please continue to
Step 22.
If you wish to install the remaining Squeeze Center, click the box next to
Squeeze Center. If you do not require Squeeze Center, or are unfamiliar with
this product, you should skip this step.
Click Next to accept these installations or click Skip to continue.
Once you have selected it and clicked Next, a window will appear. Click
Download to download the Squeeze Center installation les.
42D-Link ShareCenter DNS-320L User Manual
Page 49

Section 3 - Installation
Opting to download the Squeeze Center automatically opens your default
browser to download the application. Once Squeeze Center is downloaded,
continue with the rest of the installation. Click Save to save the le to your
local hard drive.
Once the download has completed, copy the Squeeze Center package from
your local hard drive to Volume_1 of the ShareCenter. Click OK in the dialog
box to continue the installation.
43D-Link ShareCenter DNS-320L User Manual
Page 50

Section 3 - Installation
After the Add-on Packages are installed, click Next to continue.
The following screens display the installed Add-on Packages. To enable an
add-on, click the Enable button next to the name of the add-on that you
wish to enable. Click Next to continue to the next window.
44D-Link ShareCenter DNS-320L User Manual
Page 51

Section 3 - Installation
Registering With mydlink
mydlink service allows you to remotely access the les from your NAS
through the mydlink website. If you wish to register your DNS-320L with
mydlink, select the Yes radio button. If you do not wish to register with
mydlink, select the No radio button.
Click Next to continue.
The wizard will connect to the mydlink servers and congure your cloud service.
45D-Link ShareCenter DNS-320L User Manual
Page 52

Section 3 - Installation
If you already have a mydlink account, select the Yes radio button and enter
your account information in the Email and Password elds.
Click Next to continue.
Alternatively, you can create a new account if you select “No, I need to sign
up for a new account.”
Enter your e-mail address in the E-mail eld, and choose a password in the
Password and Retype Password elds. Enter your First Name and Last
Name in the appropriate elds. Then click the checkbox to accept the terms
and conditions of the mydlink service. You can read the terms and conditions
by clicking on the link.
Click Next to continue.
The mydlink service will send a conrmation e-mail to the address you specied in the previous step. Click the activation link in the e-mail to activate
your mydlink account.
46D-Link ShareCenter DNS-320L User Manual
Page 53

Section 3 - Installation
When the mydlink section of the wizard installation is complete, the wizard
provides you with a mydlink number. You can also tick the Add mydlink to
My Favorites checkbox, or Save a shortcut to mydlink on my computer
checkbox. You should make a record of this mydlink number for future reference.
Click Finish to complete the setup process.
Your ShareCenter is now installed and ready to use. If your drives are mapped
using the wizard, you will be able to access them using your operating system’s
le explorer.
If you did not use the wizard to map the drives, you can manually map or access
the created volumes through your computer’s operating system. Detailed
instructions for conguration using the web UI are provided in the conguration
section of this manual.
47D-Link ShareCenter DNS-320L User Manual
Page 54

Section 3 - Installation
Mapping a Drive
You can map a volume on your DNS-320L using Windows Explorer in Windows 7.
Open My Computer by clicking on the icon on your desktop, or press the
Windows key and the letter E on your keyboard at the same time.
The right-side panel displays a list of your hard drives, removable storage,
and network locations. If you do not have any network locations, this may be
the rst time you set up a network drive. Begin by clicking on Map Network
Drive.
The Map Network Drive screen will appear. Choose a letter from the drop
down menu to map the new drive to. Click Browse to nd the NAS volume
you wish to map on your network.
48D-Link ShareCenter DNS-320L User Manual
Page 55

Section 3 - Installation
Windows will automatically detect all devices on your network including
your ShareCenter
Click on your ShareCenter to see the volumes you created earlier. Then select
the volume that you wish to access and click OK.
49D-Link ShareCenter DNS-320L User Manual
Page 56

Section 3 - Installation
After selecting your volume, click Finish to proceed.
The drive will then appear in your Windows Explorer under Network. This
means the drive is active and ready for use.
50D-Link ShareCenter DNS-320L User Manual
Page 57

Section 3 - Installation
Alternative Methods for Mapping a Drive
You can also map a drive using the D-Link Storage Utility. Once the DNS-320L
is discovered in the Storage Utility and the LAN conguration settings are
complete, nding the drives happens automatically. Select the drive letter and
click Connect. To disconnect the drive, click the Disconnect button.
Another method is using the Setup Wizard. As you go through the Setup
Wizard process, there is a step in the process to map the drive. The Map Drive
to Network screen should look similar to the image on the right. Please refer
to the relevant section of Setup Wizard on page 20 for further instructions on
how to map drives using the setup wizard.
51D-Link ShareCenter DNS-320L User Manual
Page 58

Section 3 - Installation
Mac - Setup Wizard Installation
To run the Setup Wizard, insert the ShareCenter CD into your CD-ROM drive.
When the autorun screen appears, double-click the .dmg le.
Double-click the SetupWizardDNS icon.
Click Start to begin the wizard. Follow the instructions on the screen to nish
setting up your DNS-320L. For more details, refer to Setup Wizard on page 20.
52D-Link ShareCenter DNS-320L User Manual
Page 59
Section 4 - Conguration
Conguration
Managing your DNS-320L
The ShareCenter web UI (User Interface) is a browser-based utility that allows you to manage and congure the dierent tools and services
associated with your NAS. The web UI is divided into three main sections:
1. Home
2. Applications
3. Management
SECTION OPTION DESCRIPTION
Home - My Folder My Photos Create albums and manage photos, create slideshows, and share photos through social networking sites.
My Files Access les on your NAS via a web browser
My Music Access your music collection. Add tracks, albums, etc
My Surveillance View and control security cameras connected to your NAS
My Favorites Application Add the favorite applications you use on a regular basis to the Home page
Applications FTP/HTTP Downloads Congure FTP and HTTP download settings
Remote Backup Congure remote backup services
Local Backups Congures local backups, and USB backups
P2P Downloads Congure your P2P downloads and control your download schedules
My Files Access les on your NAS via a web browser
Amazon S3 Create, modify, and delete your Amazon S3© settings
Google Drive Create, modify, and delete folders and les to Google Drive
Xunlei Downloads Create, modify, and delete folders and les to Xunlei. This is a Chinese Download Manager.
Management Setup Wizard Step by step guide through password & time settings, connectivity, and device conguration
Disk Management Congures disk volumes, RAID, and performs disk diagnostics
Account Management Congures user and group management, network shares
Network Management Congures LAN, Dynamic DNS, and Port Forwarding
Application Management Congures FTP, add-ons, AFP, NFS, and multimedia services
System Management Congures language, time and date, device, and system settings. Also allows you to control power, notica-
tions, view logs, do rmware upgrades, and manage USB devices.
System Status Displays system and hard drive information along with resource monitoring
53D-Link ShareCenter DNS-320L User Manual
Page 60
Section 4 - Conguration
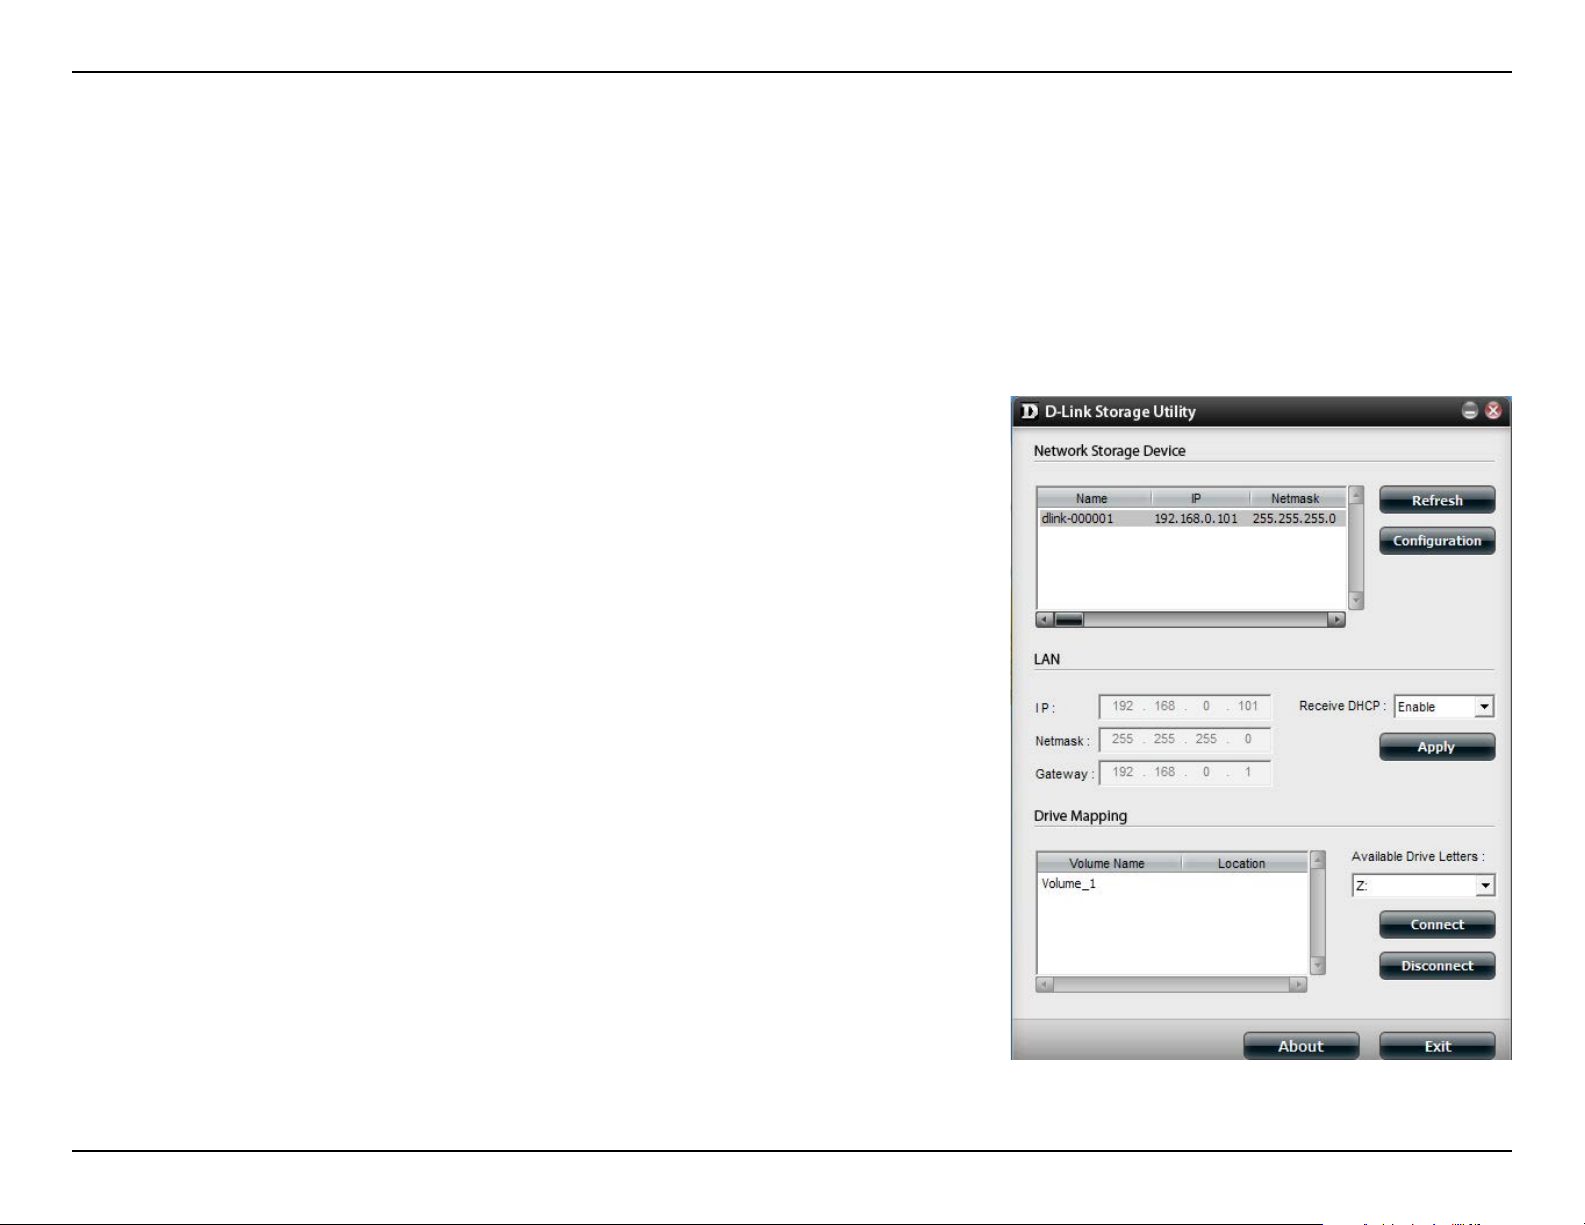
D-Link Storage Utility
When rst powered on, during the initial boot sequence, the ShareCenter will wait to be assigned an IP address via DHCP. If
it does not receive a DHCP assigned IP address, the ShareCenter will be automatically assigned a 169.254.xxx.xxx address. It
is recommended that you use the included D-Link Storage Utility software when accessing and conguring the ShareCenter
for the rst time. If you want to change the IP address before logging in or you are having trouble connecting to the ShareCenter IP address, you can use the Storage Utility software included on the product CD to locate the device on your network
and make any necessary changes.
Network Storage
Device:
Refresh:
Conguration:
LAN:
Apply:
Drive Mapping:
Available Drive
Letters:
About:
The D-Link Storage Utility displays any ShareCenter devices it detects on the network here.
Click Refresh to refresh the device list.
Click Conguration to access the web-based conguration utility of the ShareCenter.
Congure the LAN Settings for the ShareCenter here. You
can only adjust these settings if Receive DHCP is disabled.
Click Apply to save changes to the LAN Settings.
Volumes available for mapping are displayed here.
Choose an available drive letter. Click Connect to map
the selected volume. Click Disconnect to disconnect the
selected mapped volume.
Click About to view the software version of the Easy
Search Utility.
Exit:
Click Exit to close the utility.
54D-Link ShareCenter DNS-320L User Manual
Page 61

Section 4 - Conguration
Select the ShareCenter from the list and click the Conguration button. This
will launch the computer’s default web browser and direct it to the IP address
listed for the device. Make sure the browser is not congured to use a proxy
server.
Note: The computer used to access the ShareCenter web-based
.
conguration manager must be on the same subnet as the ShareCenter
If
your network is using a DHCP server and the computer receives IP settings
from DHCP server, the ShareCenterwill automatically be in the same subnet.
55D-Link ShareCenter DNS-320L User Manual
Page 62

Section 4 - Conguration
D-Link Storage Utility - For Mac
To get started with the ShareCenter Storage Utility for Mac, insert the supplied CD into your CD-ROM drive: Double-click the .dmg le.
Double-click the .dmg le to install the program. In the end you should have
the D-link Storage Utility for Mac.
56D-Link ShareCenter DNS-320L User Manual
Page 63

Section 4 - Conguration
The D-Link Storage Utility will open. Make sure you are connected to your local LAN, then click the Refresh button. The D-Link Storage Utility will nd the
D-Link DNS-320L.
Click Conguration to open the web-based conguration utility using your
computer’s default web browser.
Use the drop-down list to enable or disable Receive DHCP. If this is disabled,
you will be able to manually congure your LAN settings. Click Apply to save
the current conguration.
To map a NAS volume, select a Volume from the list then click the Connect
button.
57D-Link ShareCenter DNS-320L User Manual
Page 64

Section 4 - Conguration
The log-in window will appear. Select Guest or Registered User. Enter your
Name and Password in the elds provided and click Connect.
A pop-up window appears notifying you that mapping the drive was a success. Click OK to continue. Use the Disconnect button in the D-Link Storage
Utility to disconnect from the mapped drive(s).
Finder will now open the drive and display the DNS-320L under the Shared
column on the left and the Volumes on the right.
58D-Link ShareCenter DNS-320L User Manual
Page 65

Section 4 - Conguration
Web UI Login
To access the web UI, open the D-Link Storage Utility, select DNS-320L from the Network Storage Device list, then click the
Conguration button.
The following screen will appear:
Select System Administrator and enter the password created during the
Setup Wizard. Click Login or press Enter.
Note: The computer used to access the
manager must be on the same subnet as the
using a DHCP server and the computer receives IP settings from the DHCP, the
ShareCenter
will automatically be in the same subnet.
ShareCenter
ShareCenter.
web-based conguration
If your network is
59D-Link ShareCenter DNS-320L User Manual
Page 66

Section 4 - Conguration
Web UI General Layout
Home
After logging in, the ShareCenter Home tab will appear. You will see the Applications and Management tabs alongside it.
By default, My Folder, My Files, My Music, and My Surveillance will appear under the Home tab. You can also add favorite
applications to this tab.
60D-Link ShareCenter DNS-320L User Manual
Page 67

Section 4 - Conguration
Applications
By default, the Applications tab contains FTP/HTTP Downloads, Remote Backups, Local Backups, P2P Downloads, My
Files, Amazon S3 icons, Google Drive, and Xunlei Downloads. Click on each icon to see the submenus. Any additional
add-ons which you have enabled will also appear here. Disabled add-ons will appear under the “Disabled Add Ons”
heading below.
61D-Link ShareCenter DNS-320L User Manual
Page 68

Section 4 - Conguration
Management
The Management tab contains the Setup Wizard, Disk Management, Account Management, Network Management,
Application Management, System Management, and Status icons. Click on each icon to see the submenus.
62D-Link ShareCenter DNS-320L User Manual
Page 69

Section 4 - Conguration
Management
Setup Wizard (Web UI)
The ShareCenter has a Setup Wizard that allows you to quickly congure some of the basic device settings. Click the Setup
Wizard icon to start the Setup Wizard.
Click the Run Wizard button to start the setup wizard.
Click Next to continue.
63D-Link ShareCenter DNS-320L User Manual
Page 70

Section 4 - Conguration
To update the Administrator password, enter the existing password in the
Password eld, and then enter the New Password and conrm the new
password in the Conrm Password eld.
Click Next to continue.
Set the time zone from the drop-down menu to the appropriate geographical zone closest to your location.
Click Next to continue or click Skip to ignore these settings.
64D-Link ShareCenter DNS-320L User Manual
Page 71

Section 4 - Conguration
Select DHCP Client to obtain IP settings automatically from a DHCP server
(router), or Static IP to assign the parameters below manually.
IP Address: Enter an IP address for the DNS-320L.
Subnet Mask: Enter the subnet mask of your network.
Gateway IP Address: Enter the IP address of your gateway (usually the local
IP of your router).
DNS Servers: Enter the IP address(es) of your DNS server(s). DNS1 is usually
the IP address of your router.
Click Next to continue or click Skip to ignore these settings.
Type the workgroup name, a device name, and a description for the device.
This workgroup should be the same name as your current workgroup settings. If you haven’t set up a workgroup yet, type a name that best suits the
environment or leave the default “workgroup” name.
Click Next to continue or click Skip to ignore these settings.
65D-Link ShareCenter DNS-320L User Manual
Page 72

Section 4 - Conguration
The DNS-320L can be congured to send e-mails containing status information to you or another designated person.
To send e-mails from a specic account, click Account and enter your e-mail
account User Name, Password, Port, SMTP Server, and Sender E-mail.
Next, enter the e-mail account which you wish to send e-mail alerts to in the
Receiver E-mail eld. If you require a secure e-mail connection, select your
Secure Connection type from the drop-down menu. Click the Test E-mail
button to test your settings.
If you want to send e-mails without using a specic account, click Anony-
mous to create an e-mail account with no specic settings.
Enter your e-mail server’s Port and SMTP Server, and then enter the Sender
E-mail and Receiver E-mail. If you require a secure e-mail connection, select
your Secure Connection type from the drop-down menu. Click the Test E-
mail button to test your settings.
Click Next to continue or click Skip to ignore these settings.
66D-Link ShareCenter DNS-320L User Manual
Page 73

Section 4 - Conguration
If you are satised with the settings, click the Finish button to save and complete the wizard. You can also click the Previous button to go back and check
your settings, or click Exit to end the wizard without saving your settings.
67D-Link ShareCenter DNS-320L User Manual
Page 74

Section 4 - Conguration
Disk Management
Hard Drive Conguration
To setup the Hard Drive RAID conguration of your ShareCenter, click on the Management tab and then the Disk Management
icon. Select the Hard Drive Conguration menu item on the left of the window. This menu will allow you to set the RAID type
and format your hard drives.
Hard Drive
Conguration:
Current Raid Type:
Set RAID type and
Reformat:
Auto-Rebuild
Conguration:
Enable Auto-Rebuild:
Disable Auto-Rebuild:
Your ShareCenter hard drives can be congured here
and formatted in various RAID congurations.
If the drives are already formatted the RAID
conguration will be displayed here.
Click on this button to launch a wizard that allows you
to select the RAID conguration and format the drives.
If you have chosen RAID 1 as the conguration option,
you can Enable or Disable the Auto-Rebuild function
here using the radio buttons.
Enabling Auto-Rebuild will rebuild a failed RAID 1
drive when a new drive has replaced the failed one.
If you do not want to automatically rebuild drives after
a failure when using the RAID 1 functionality then you
can check this option.
Note: You can still rebuild a drive using the RAID 1
functionality however you must initiate the rebuild
manually.
Manually Rebuild Now:
If Auto-Rebuild is disabled then you can use the
Manual Rebuild option by clicking this button.
68D-Link ShareCenter DNS-320L User Manual
Page 75
Section 4 - Conguration
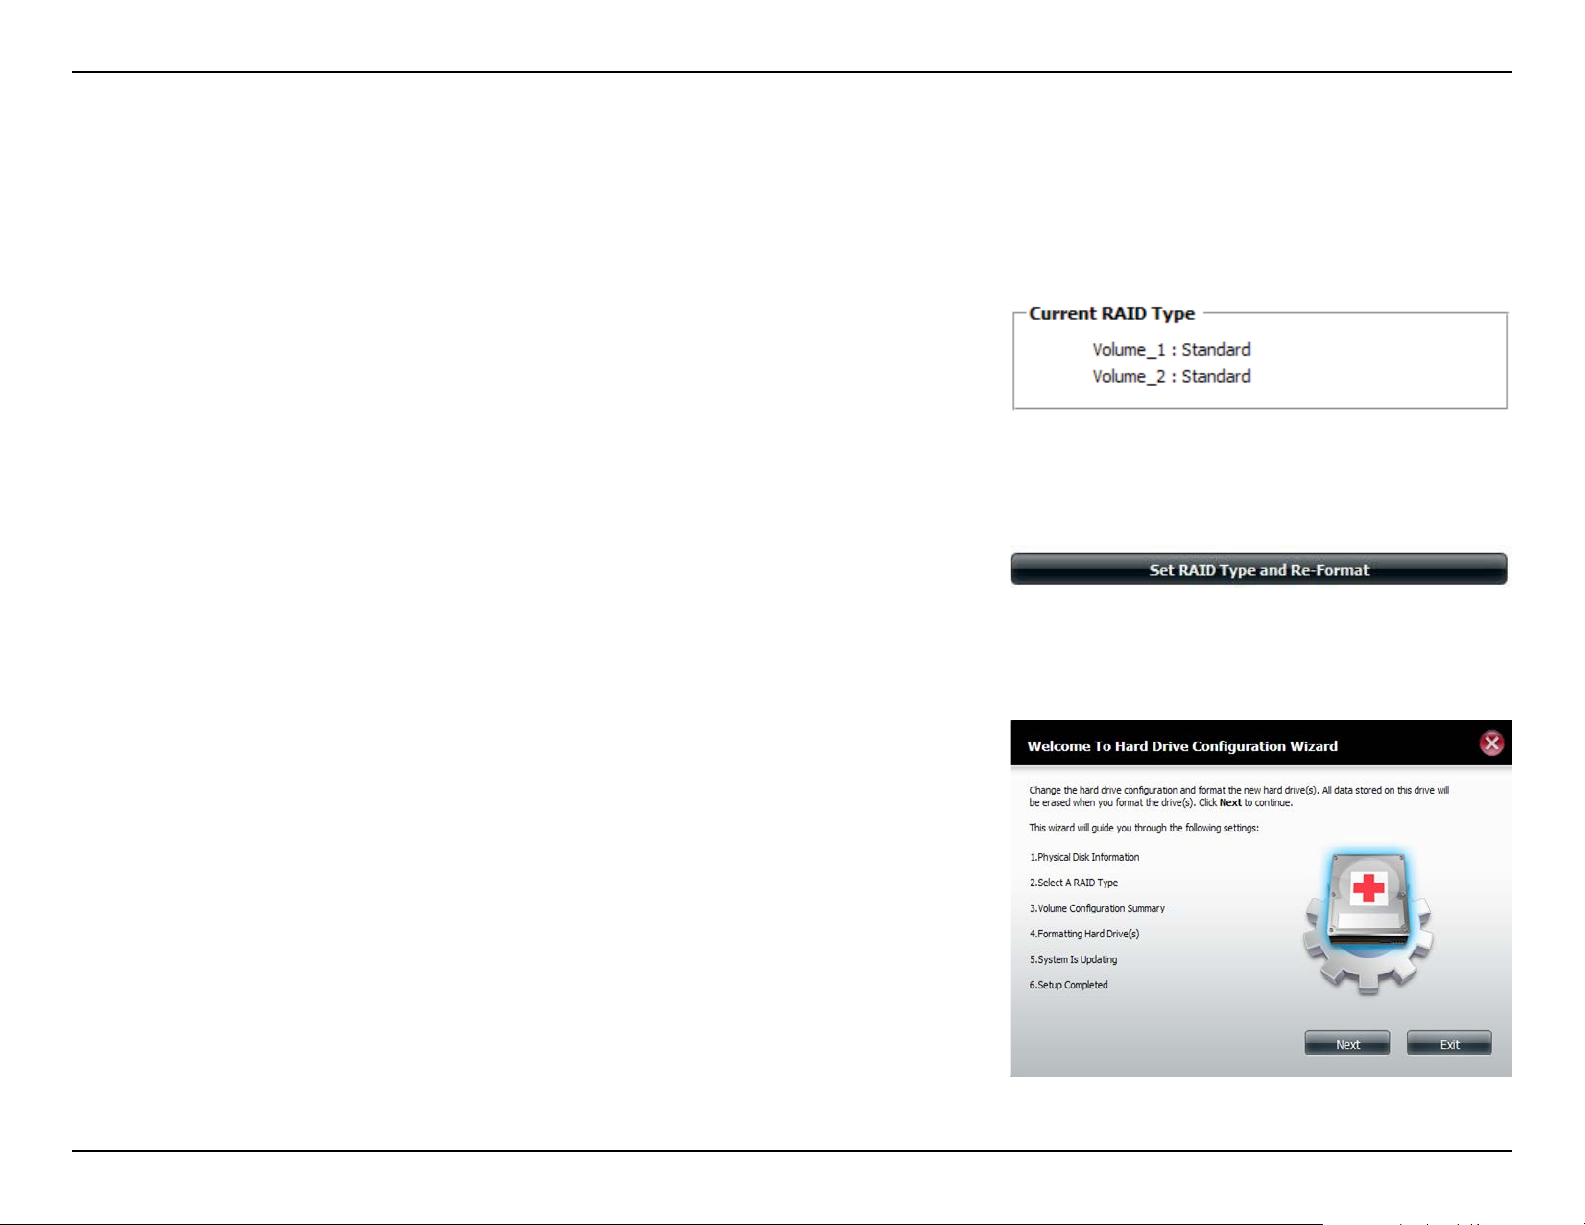
Hard Drive Conguration Wizard
When you click on the Set RAID type and Re-Format button in the Disk Management-Hard Drive Conguration menu, a wizard
will start, allowing you to format your drives and create the volume RAID format. The following is an example of a standard
volume conguration:
The Hard Drive Conguration page displays the current RAID conguration
under ‘Current RAID Type’.
Click Set RAID Type and Re-Format.
The Hard Drive Conguration Wizard will begin. Click Next to continue.
69D-Link ShareCenter DNS-320L User Manual
Page 76
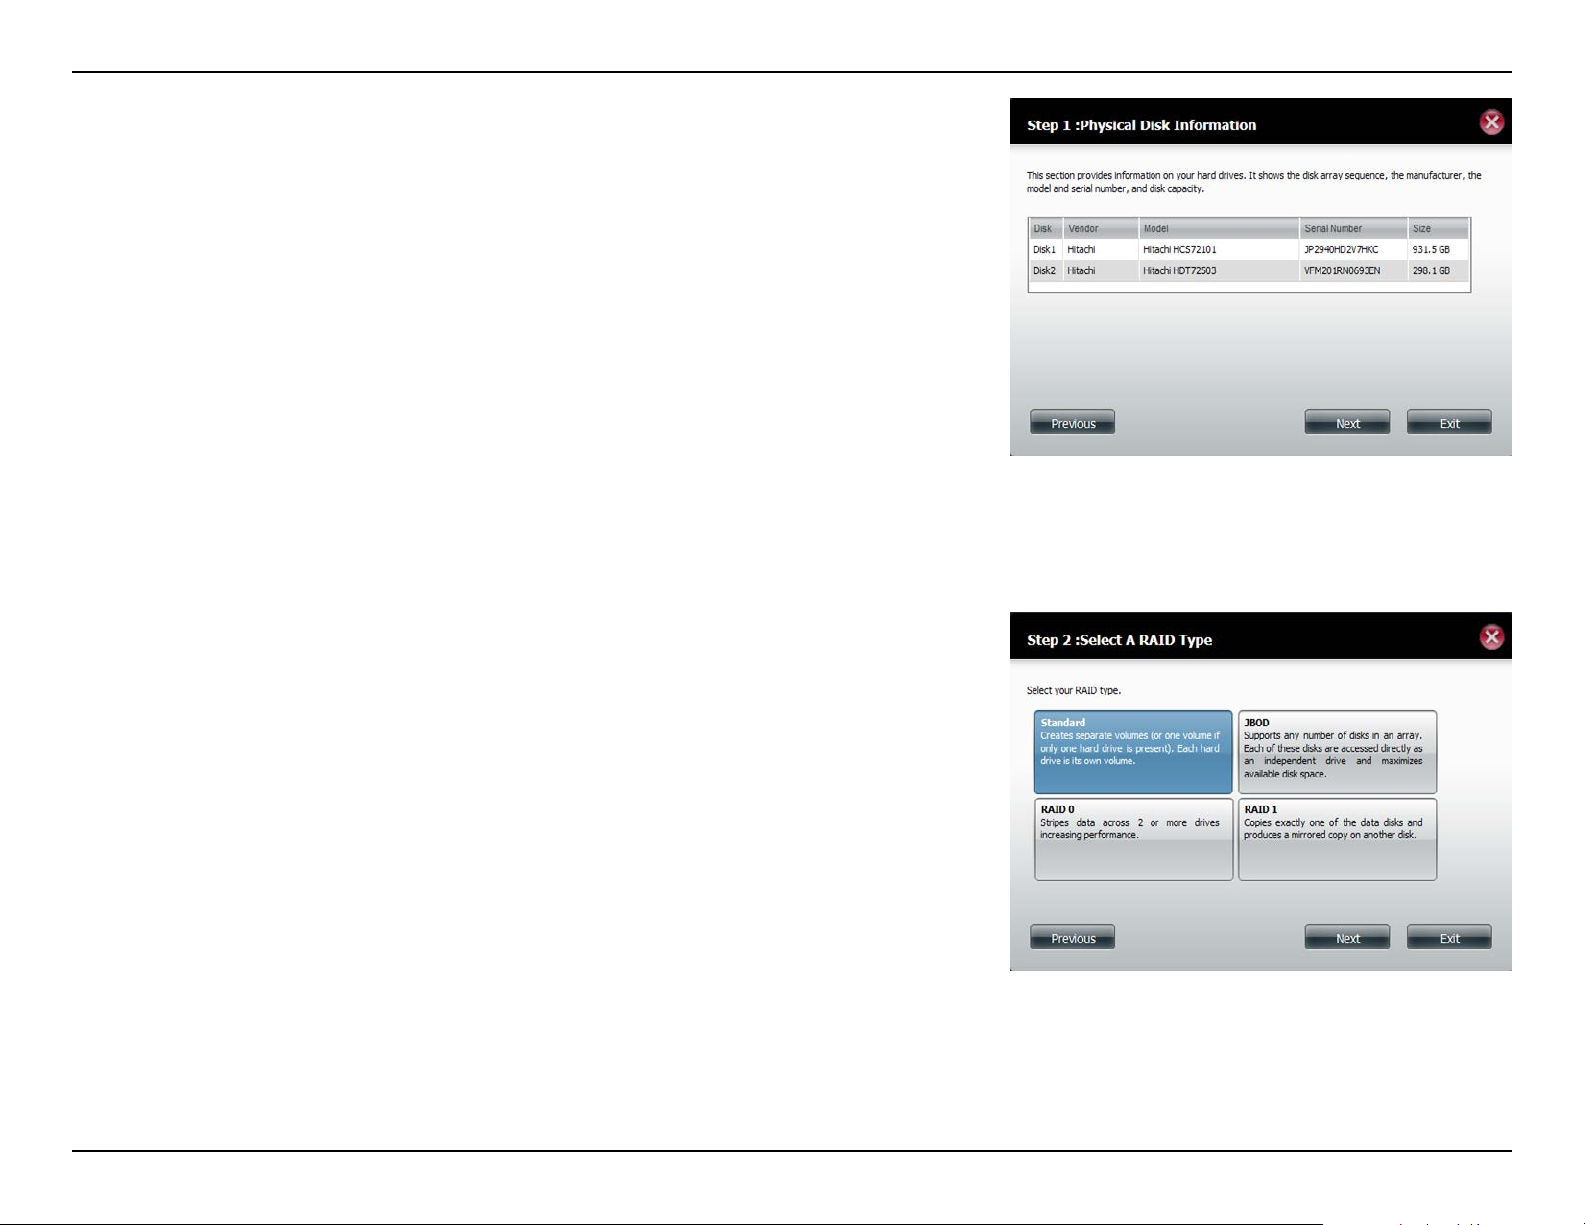
Section 4 - Conguration
The ‘Physical Disk Information’ page displays information about all of the
hard drives connected to the DNS-320L. It shows the array number, vendor,
model, serial number, and drive capacity.
Click Next to continue.
Select the format you want by clicking on the RAID type box (highlighted in
blue).
Click Next to continue.
70D-Link ShareCenter DNS-320L User Manual
Page 77

Section 4 - Conguration
If you selected RAID 0 or RAID 1, this screen will appear to allow you to adjust the size of the RAID Volume.
Use the slider to change the RAID size or enter an amount in the eld provided. Check “Congure the remaining disk space as JBOD” if you wish to use
the remaining space for another RAID conguration.
Click Next to continue.
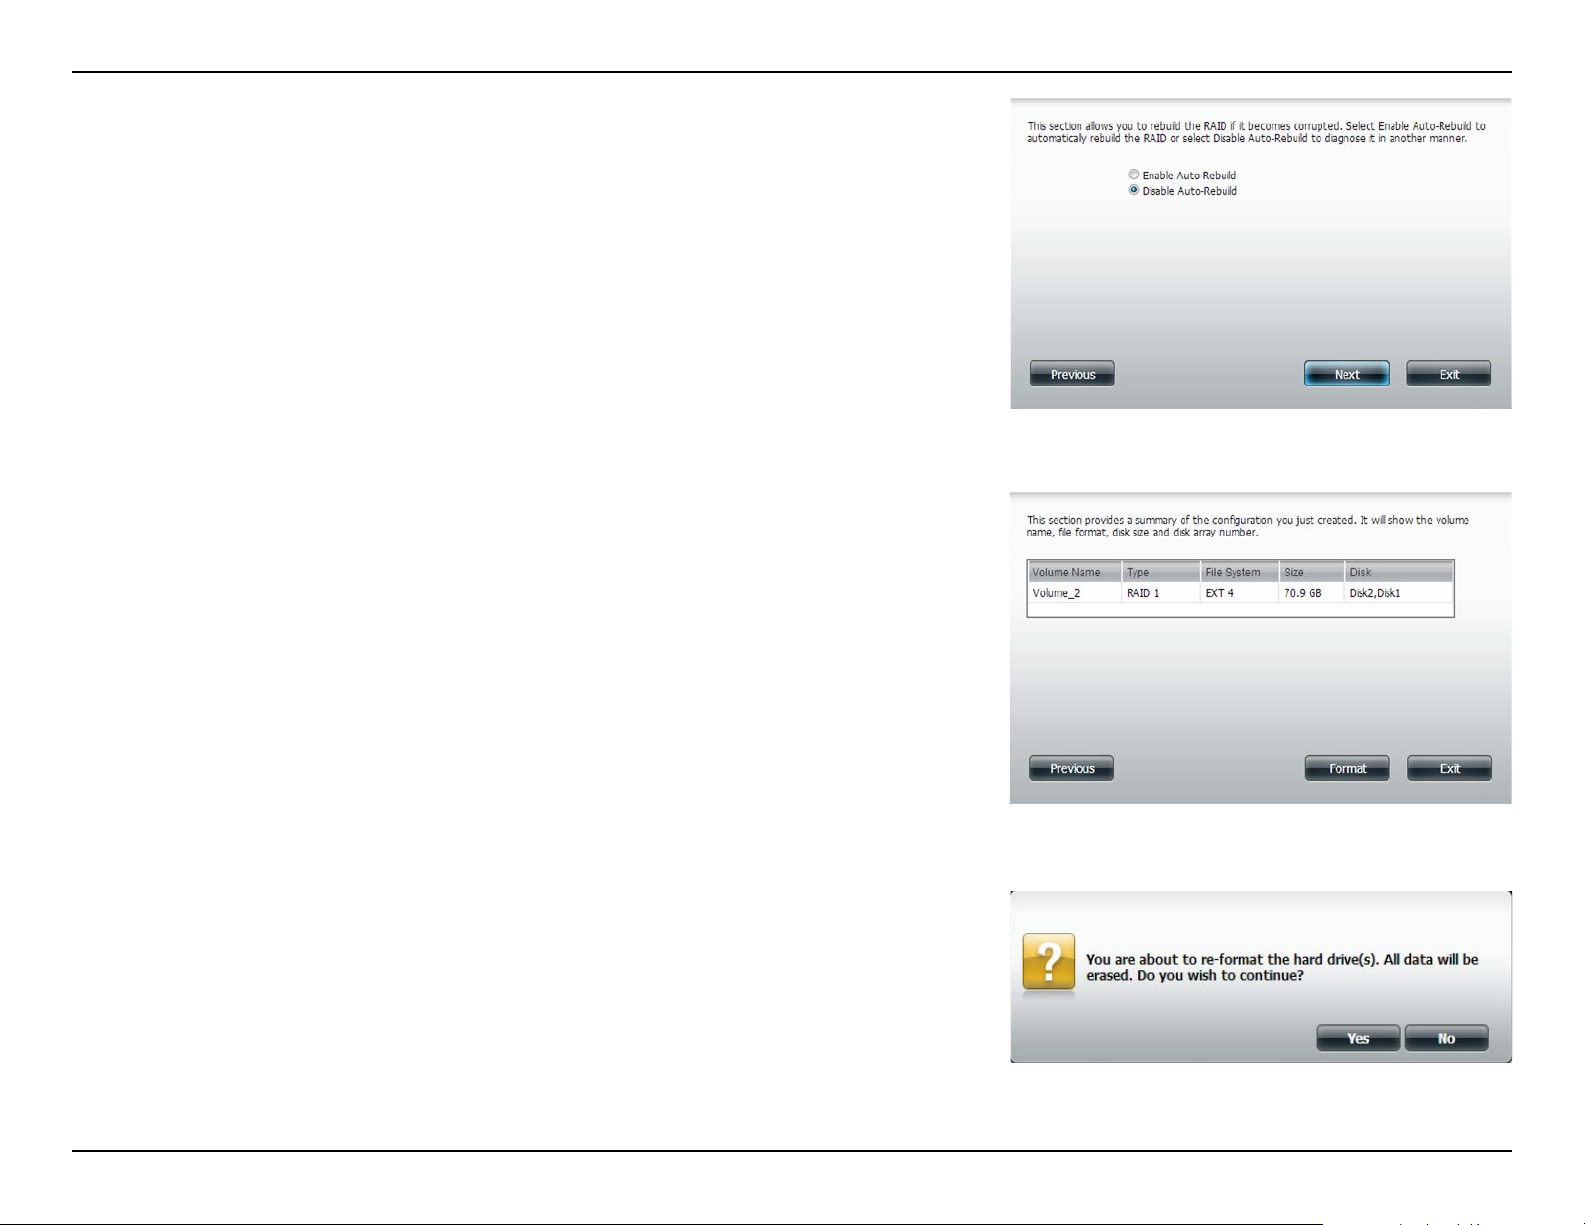
If you selected RAID 1, this screen will appear to let you congure your
auto-rebuild settings.
Click Enable Auto-Rebuild to automatically rebuild a failed drive if it has
been replaced with a new one.
Select Disable Auto-Rebuild if you want to start the rebuild process manually after replacing a failed drive.
Click Next to continue.
71D-Link ShareCenter DNS-320L User Manual
Page 78

Section 4 - Conguration
Volume Encryption encodes your volumes to keep them safe from unauthorized access. Select the volume you wish to encrypt by clicking the checkbox
next to it. You can select one volume or many.
Click Next to continue.
Note: If you choose to use encryption, a warning message will appear to
remind you that access speeds may be slowed down as a result. Click Yes to
continue.
If you chose to use encryption, this screen will appear. Check Auto Mount
if you wish the encrypted volume to be automatically mounted. Enter a pass-
word and re-enter the same password to verify your settings.
Click Next to continue.
72D-Link ShareCenter DNS-320L User Manual
Page 79

Section 4 - Conguration
The Volume Conguration Summary will show your selected settings for
Volume Name, the RAID type, the File System used, and Size for each Disk.
Click Format to continue.
A warning message will appear to inform you that all volumes and data will
be formatted and erased.
Click Yes to continue, or click No to cancel the reformatting.
After clicking Ye s , your drives will be formatted and partitioned through
several stages. Please be patient while this process takes place. Do not turn
o your NAS during this process.
73D-Link ShareCenter DNS-320L User Manual
Page 80

Section 4 - Conguration
The wizard is now complete. It shows the Volume Name, File System
selected, the type of RAID Mode, and the Disk formation in the RAID.
Click Finish to complete the process and start using your DNS-320L.
You can conrm encryption use on your volumes by going to
Management>>Disk Management>>Volume Encryption.
You can also select an encrypted volume and click the Save button to save
the encryption key on your local hard drive for future reference.
74D-Link ShareCenter DNS-320L User Manual
Page 81

Section 4 - Conguration
Upgrading from Standard Mode to RAID 1
Standard Mode doesn’t oer any redundancy or security of data. If, after formatting for Standard Mode you nd that you require
the additional features of RAID 1, it is best then to migrate from Standard Mode to RAID 1. To do this, follow these instructions:
Insert a second hard drive into the DNS-320L as per the instructions for the
initial installation. The existing hard drive should be the volume which you
wish to create a mirror of using the RAID 1 format.
Replace the top cover and restart the DNS-320L.
75D-Link ShareCenter DNS-320L User Manual
Page 82

Section 4 - Conguration
Go to Management>>Disk Management>>Hard Drive Conguration.
There will be two options available: Set RAID Type and Re-Format or Format
the new drive as Standard type
The images below shows the conguration steps for each procedure.
Once you have selected the required conguration procedure, click Next to
continue.
Set RAID Type and Re-Format.
If you choose the rst option, “Set RAID Type and Re-Format”, you can con-
gure the new disk volume as two standard disks; JBOD, RAID 0, and RAID 1,
but all data on the disk volume will be erased. Please backup all data before
taking this action. If you select the second option, “Format the new drive as
Standard type”, the data on the original disk will remain.
Format the new drive as Standard type.
76D-Link ShareCenter DNS-320L User Manual
Page 83
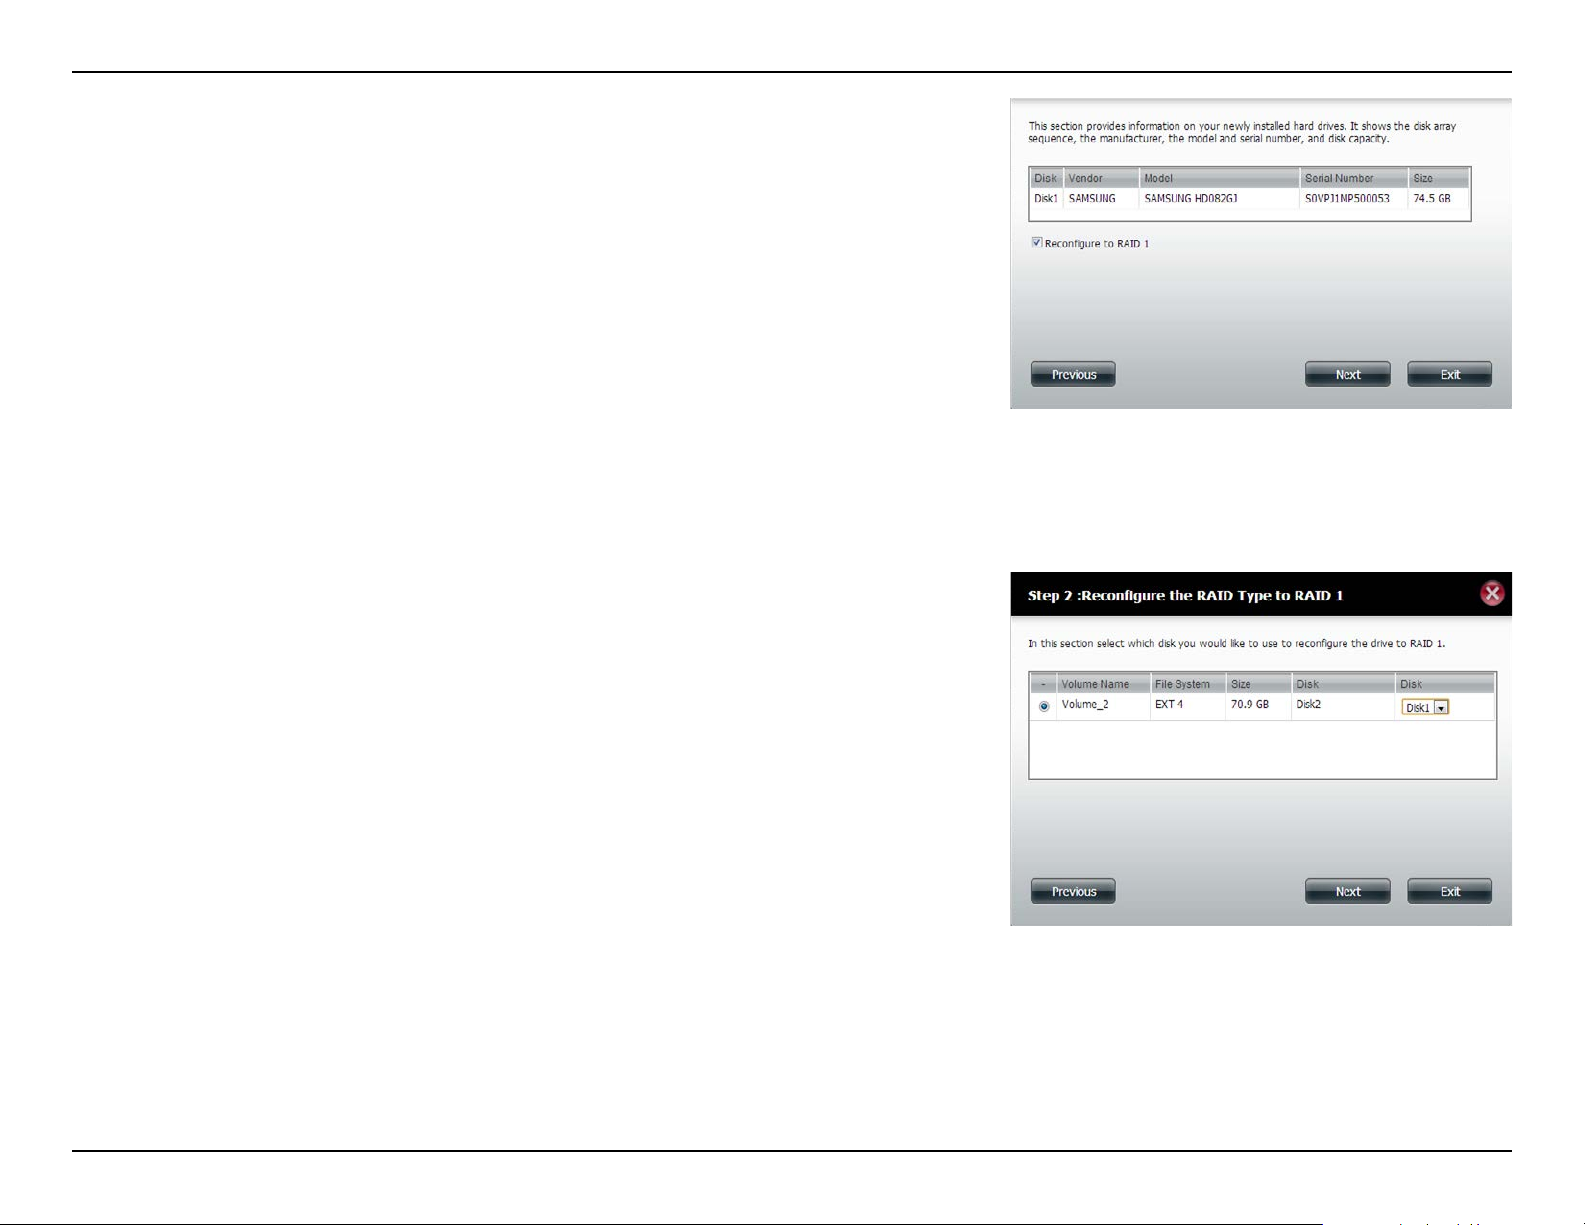
Section 4 - Conguration
Under Physical Disk Information, you will be able to see the drive you just
installed. It provides the Slot location, Vendor, Model, Serial Number, and
disk Size. Just below this informational box is a checkbox that oers you the
option to Recongure to RAID 1. Click the checkbox to proceed by
migrating to RAID 1.
Click Next to continue.
Select the disk drive you would like to use to recongure the drive to RAID 1.
Click Next to continue.
77D-Link ShareCenter DNS-320L User Manual
Page 84
Section 4 - Conguration
Under Auto-Rebuild Settings, select whether you want to Enable AutoRebuild or Disable Auto-Rebuild.
Click Next to continue.
The following screen will show the summarized conguration for the drive
you are about to format.
Click Format to continue.
A warning message will appear prompting you to conrm whether you want
to format your hard drive. Click Yes to continue, or No to exit.
If you select re-format, all data will be erased. Please back up all data before
continuing. Click Next to continue.
78D-Link ShareCenter DNS-320L User Manual
Page 85

Section 4 - Conguration
Please wait while the wizard formats the hard drive.
Click Next to continue.
Please wait while the system updates the volume information.
Click Next to continue.
79D-Link ShareCenter DNS-320L User Manual
Page 86

Section 4 - Conguration
When the setup is complete a summary will show the Slot, Vendor, Model,
and Serial Number.
Click Finish to continue.
Once complete, the wizard will return to the main conguration page.
80D-Link ShareCenter DNS-320L User Manual
Page 87

Section 4 - Conguration
SMART Test
Self-Monitoring, Analysis, and Reporting Technology (SMART) is a system on a hard drive used to monitor and report on the
health of the drive. Under this tab, your hard drives will be listed, and can be selected to conduct a SMART test. If the hard drive
is grayed out, then it does not support SMART test functionality.
To run the SMART test, select the hard drive you wish to perform the SMART
test on. Select whether to run a Quick Test or Extended Test:
• The Quick Test usually takes less than 10 minutes to complete. This test will
check the electrical, mechanical, and read performance of the hard drive.
The results will be displayed as Passed/Failed on the web UI.
• The Extended Test is a much more thorough test and therefore requires a lot
more time to complete. The total time taken will depend on the specications
of the hard drives being tested.
After selecting a test, click Start to run the test. When the test is complete, the
results will be displayed in the Result column.
You can also click the Create Schedule button to run the test at a pre-determined
time and date (refer to Creating a Schedule on page 82). You can also check the
Send Results by E-mail checkbox to send the test results to the e-mail account
specied in the E-mail Settings section of the conguration.
81D-Link ShareCenter DNS-320L User Manual
Page 88

Section 4 - Conguration
Creating a Schedule
You can create a schedule to have the SMART test carried out automatically.
To create a schedule, select the disks/volumes to run the test on, and click the
Create Schedule button. Under Schedule, select the period (Daily/Weekly/
Monthly) and then select the time from the drop-down menu.
Click Create.
To view the Schedule List, click on the Schedule List arrow. A new table will
appear showing details of the new schedule created.
To delete a schedule, click on the Trash Can icon next to the schedule that
you wish to delete.
82D-Link ShareCenter DNS-320L User Manual
Page 89

Section 4 - Conguration
Scan Disk
Scan Disk provides a method to test the le system on your ShareCenter disks. Scan Disk scans your disk’s le system for
errors and/or corruption.
Select Scan Disk from the side menu under the Disk Management tab.
Using the drop-down menu, select the volume that you wish to conduct a
scan of.
Click Scan Disk to start the scan.
83D-Link ShareCenter DNS-320L User Manual
Page 90

Section 4 - Conguration
A warning message will prompt you to stop running all services (hard drive
and network activity).
Click Yes to proceed or No to cancel.
The DNS-320L will initialize the volume(s) and begin scanning.
Please wait while the software scans the volume(s), or click Exit to cancel the
scan.
When the scan is complete, the table will either display Success or Failure.
Click Finish to exit.
84D-Link ShareCenter DNS-320L User Manual
Page 91

Section 4 - Conguration
Volume Encryption
Volume Encryption allows you to use encryption to protect your data against unauthorized access. The use of volume
encryption may slow disk performance due to the additional processing required.
Select Volume Encryption from the side menu under the Disk Management
tab. If you created an encrypted volume using the setup wizard, the volume
will be shown in the list. If you did not create an encrypted volume, there
will be no options available for conguration. You will need to re-format the
volume in order to enable encryption.
Before proceeding with modifying the encryption data, click the volume you
wish to modify. It will turn red. Click Modify.
85D-Link ShareCenter DNS-320L User Manual
Page 92
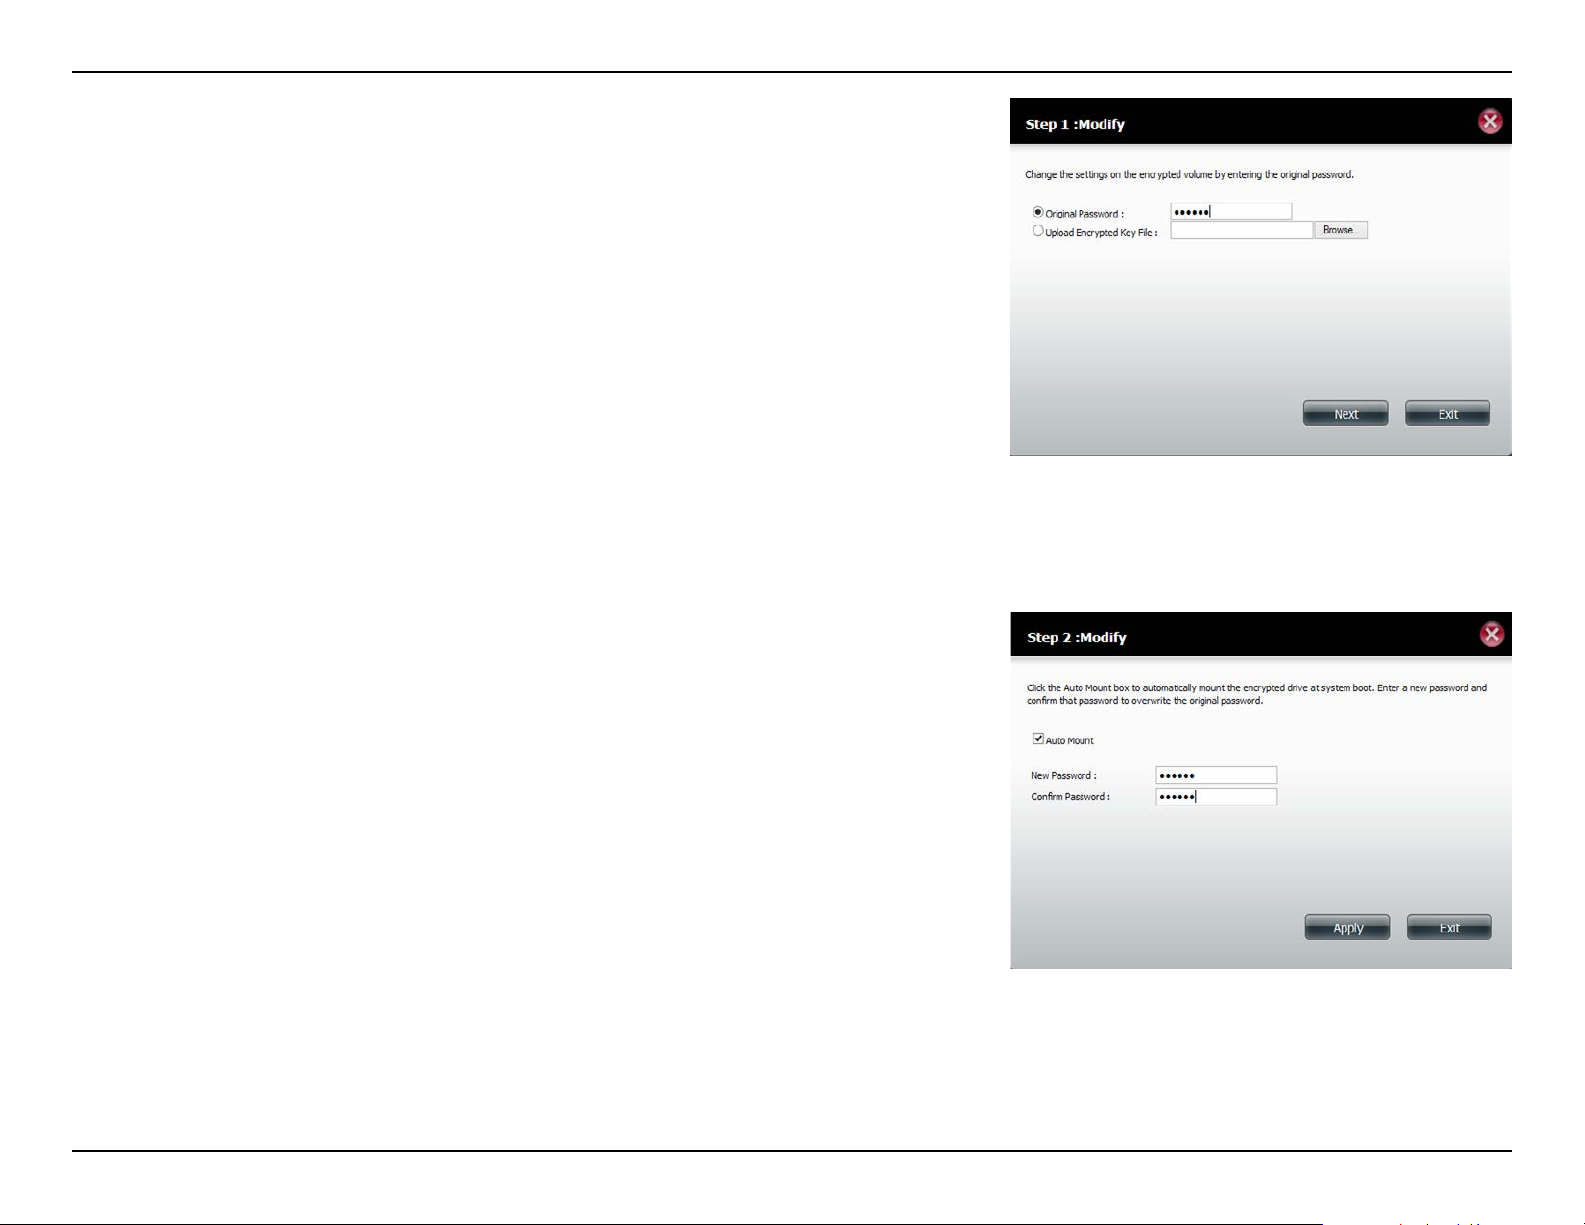
Section 4 - Conguration
To change the settings for volume encryption, you need to enter the
Original Password in the eld provided. Alternatively, click the Browse
button to upload an Encrypted Key File which is saved on the local
computer.
Click Next to continue.
Click the Auto-Mount checkbox to have the system mount the volume
automatically. Enter a new password in the New Password and Conrm
Password elds.
Click Apply to continue.
86D-Link ShareCenter DNS-320L User Manual
Page 93

Section 4 - Conguration
Once the encryption process has been completed, click Exit to close the
wizard and return to main Volume Encryption window.
You can also click Download Encrypted Key File to save the encryption key
to your local computer.
If you choose to save the encryption key le, a ‘Save File’ dialog will appear in
your web browser. Follow the instructions to save the le to your computer.
87D-Link ShareCenter DNS-320L User Manual
Page 94
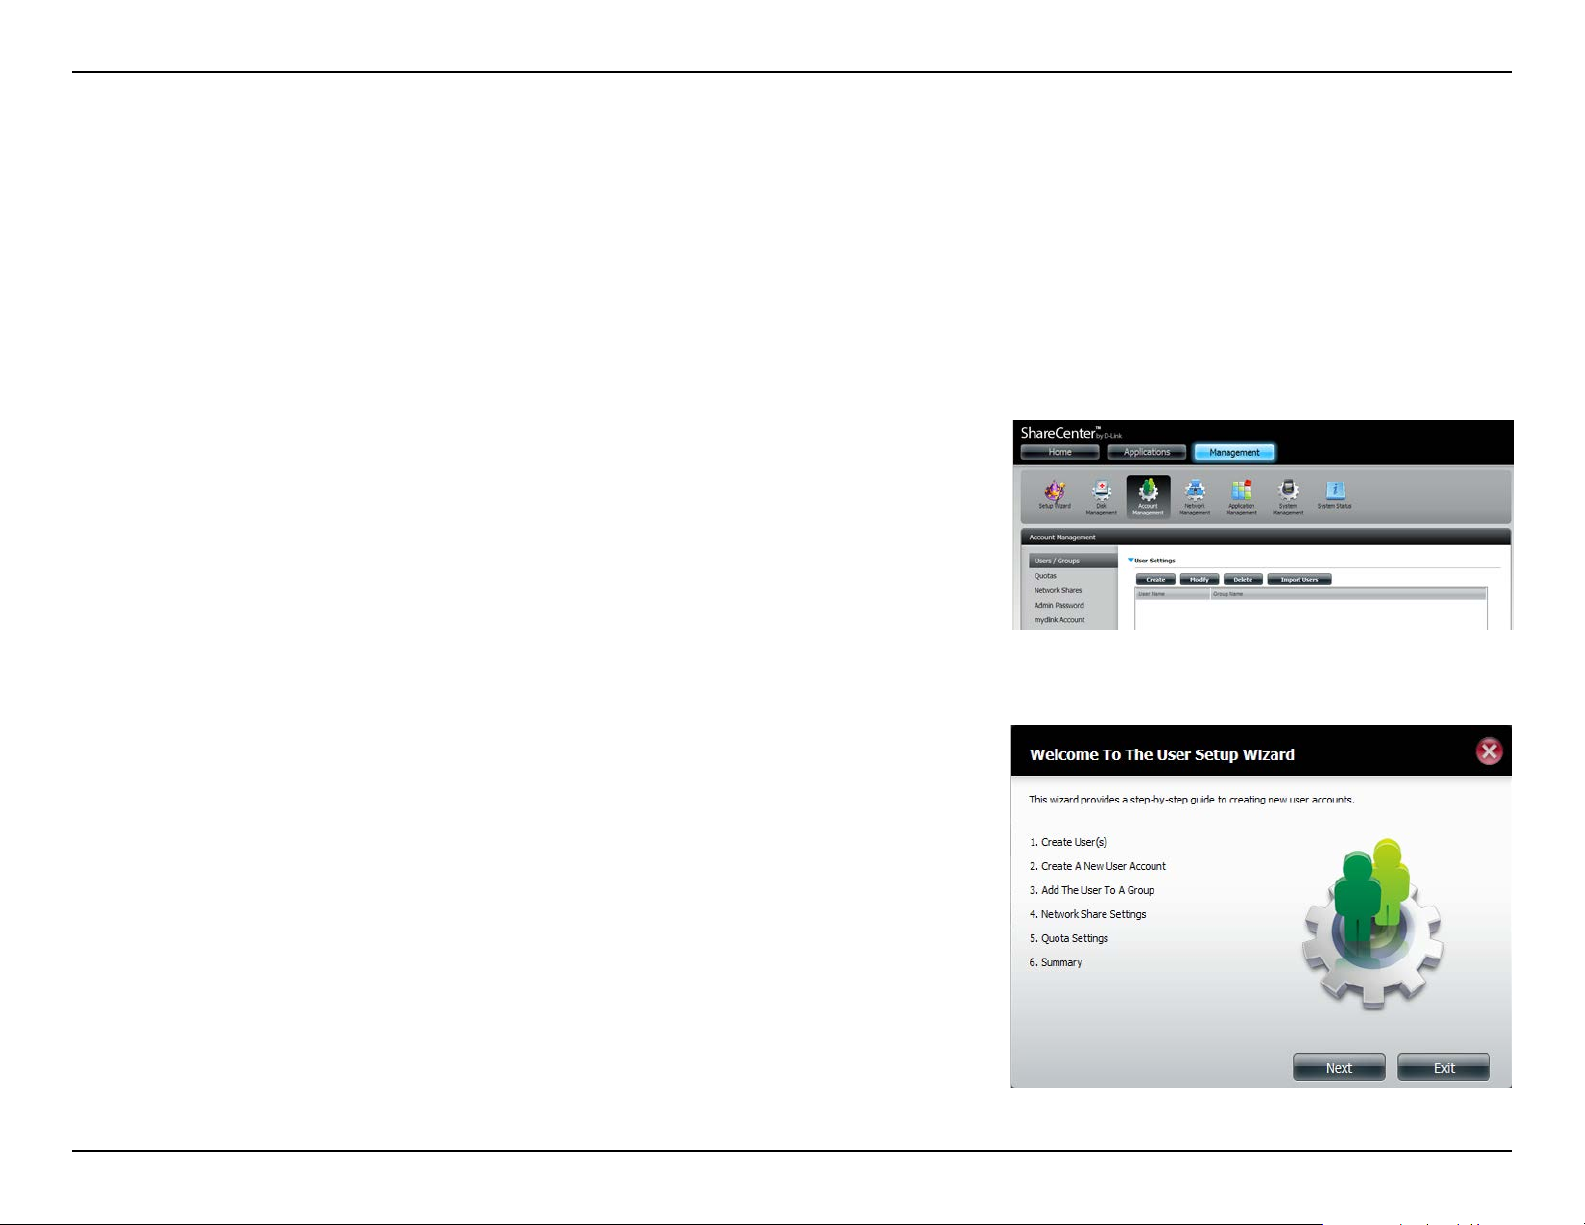
Section 4 - Conguration
Account Management
Users / Groups
The Users/Groups menu is used to create and manage user and group accounts. Up to 256 users and 32 groups can be created.
By default, all users have read and write access to all folders, however access rules can be created and edited in the Network
Shares menu.
Creating a Single User
Click Management >> Account Management.
Click Users/Groups on the left side and then click Create.
The User Setup Wizard will appear.
Click Next to continue.
88D-Link ShareCenter DNS-320L User Manual
Page 95

Section 4 - Conguration
Select Create A New User Account and then click Next to continue.
Enter a User Name and Password for the new user in the elds provided. Re-
enter the password in the Conrm Password eld.
Click Next to continue.
89D-Link ShareCenter DNS-320L User Manual
Page 96

Section 4 - Conguration
If you have already created user groups, you can add the user to a group by
clicking the Group checkbox. If you have not created any groups, this option
will not be available.
Click Next to continue.
Select the network share settings using the checkboxes:
y Read Only - Users will only be permitted to read the contents of the
volume.
y Read/Write - Users will be permitted to read the contents of the vol-
ume, and make changes to the contents.
y Deny Access - Users will be denied access to the volume.
Click Next to continue.
90D-Link ShareCenter DNS-320L User Manual
Page 97

Section 4 - Conguration
Assign Privileges/Access Methods to the user. Select either FTP or WebDAV.
CIFS and AFP are set by default.
• CIFS - Common Internet File System.
• AFP - Apple Filing Protocol.
• FTP - File Transfer Protocol.
• WebDAV - Web-based Distribution, Authoring, and Versioning.
Click Next to continue.
If you enabled WebDAV in the previous step, select the volumes the user can
have WebDAV access to and then select whether to give Read Only or Read/
Write rights.
Click Next to continue.
91D-Link ShareCenter DNS-320L User Manual
Page 98

Section 4 - Conguration
Enter the amount of disk space you wish to assign the user on each volume.
Enter zero to provide unlimited disk space to the user.
Click Next to continue.
The nal step is a summary of the conguration for the new user. Click Finish
to accept the changes or click Exit to cancel the changes.
92D-Link ShareCenter DNS-320L User Manual
Page 99

Section 4 - Conguration
Creating Multiple Users
Start the Create Users wizard as described for creating a single user above.
Select Create Multiple Users and then click Next to continue.
Enter the following information:
Enter a Username Prex for the account group. This prex will be used
to identify all user accounts in this group. Usernames will be in the format
Username Prex+Account Prex.
Enter an Account Prex. The Account Prex is a starting number (Eg. 1, no
alphabet letters are allowed) used to identify users in this group.
Enter the Number of Users you want to create. The remaining amount of users which can be added is displayed below the input eld.
Enter a password in the Password eld and conrm the password in the
Conrm Password eld
Check the Overwrite Duplicate Accounts box to have existing accounts
with the same credentials overwritten by the new accounts.
Click Next to continue.
93D-Link ShareCenter DNS-320L User Manual
Page 100
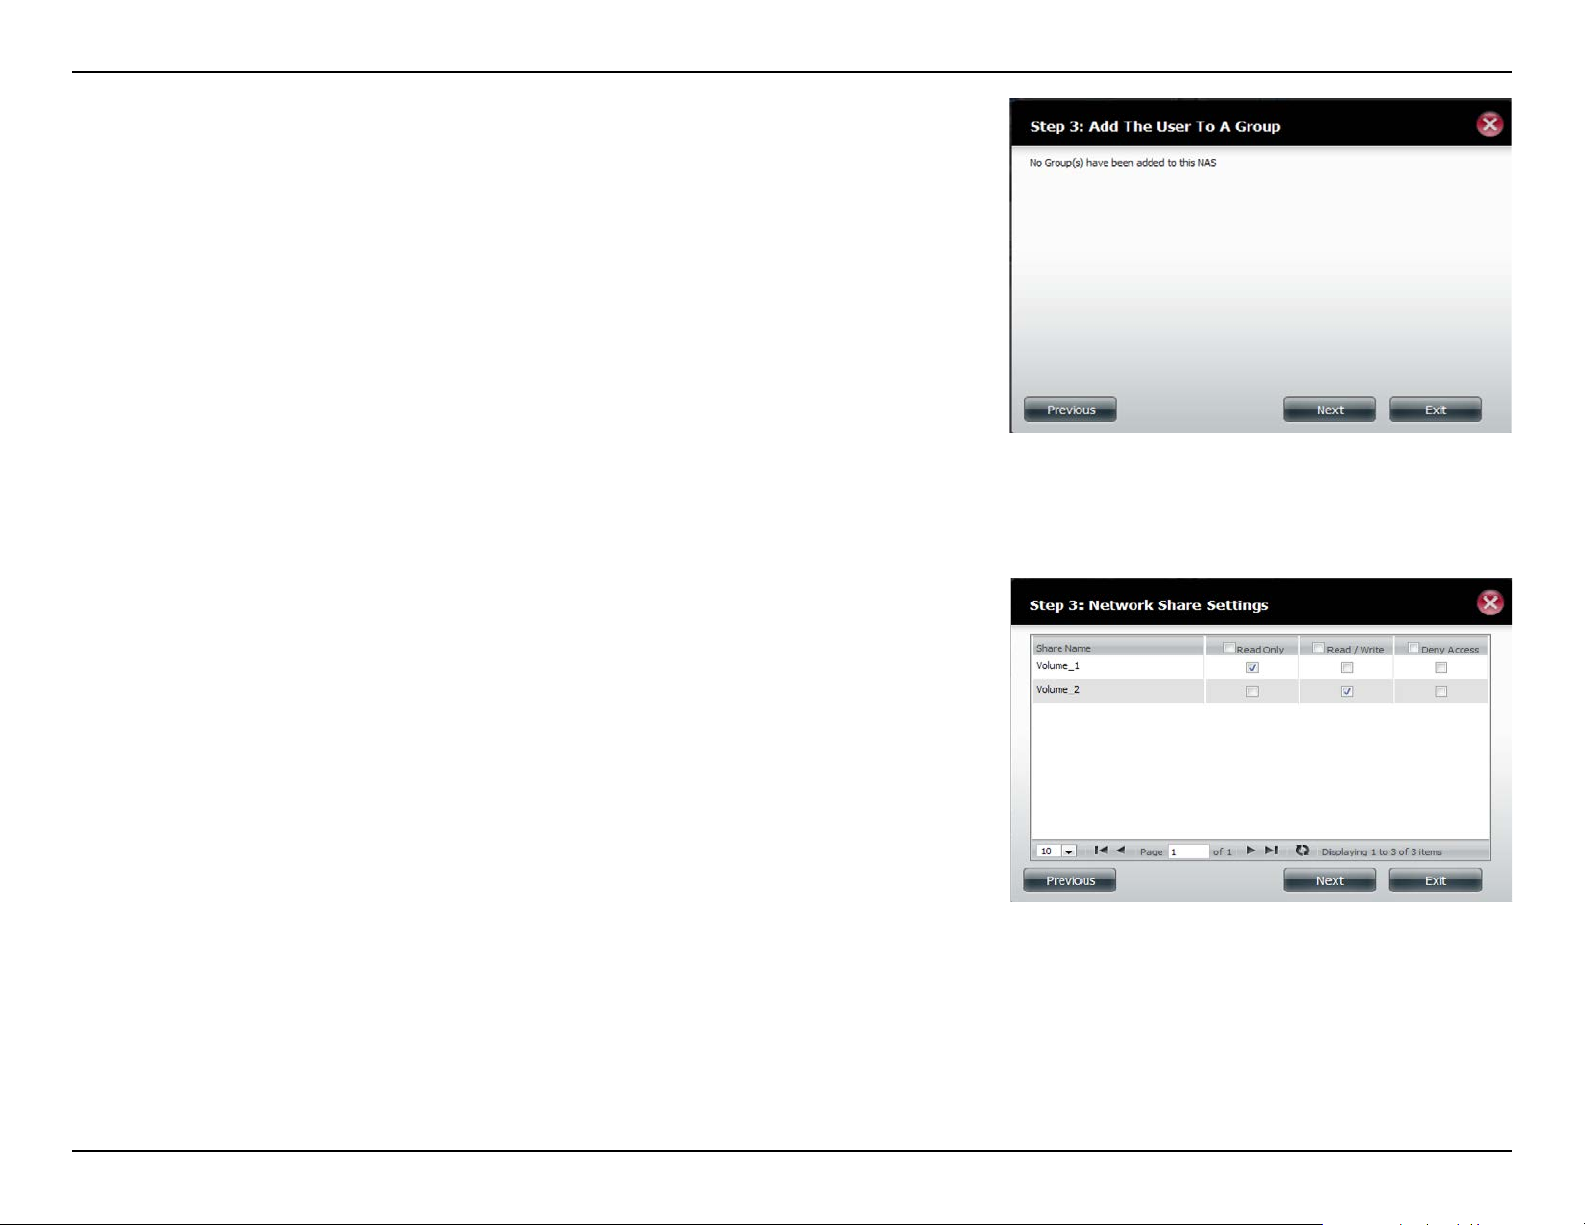
Section 4 - Conguration
If you have already created user groups, you can add the user to a group by
clicking the Group checkbox. If you have not created any groups, this option
will not be available.
Click Next to continue.
Select the network share settings using the checkboxes:
Read Only - Users will only be permitted to read the contents of the volume.
Read/Write - Users will be permitted to read the contents of the volume, and
make changes to the contents.
Deny Access - Users will be denied access to the volume.
Click Next to continue.
94D-Link ShareCenter DNS-320L User Manual
 Loading...