

Page 1

SUPER AUDIO CD RECEIVER
RCD-CX1
Owner’s Manual
Manuel de l’Utilisateur
Manual del usuario
Page 2
ESPAÑOLFRANCAISENGLISH
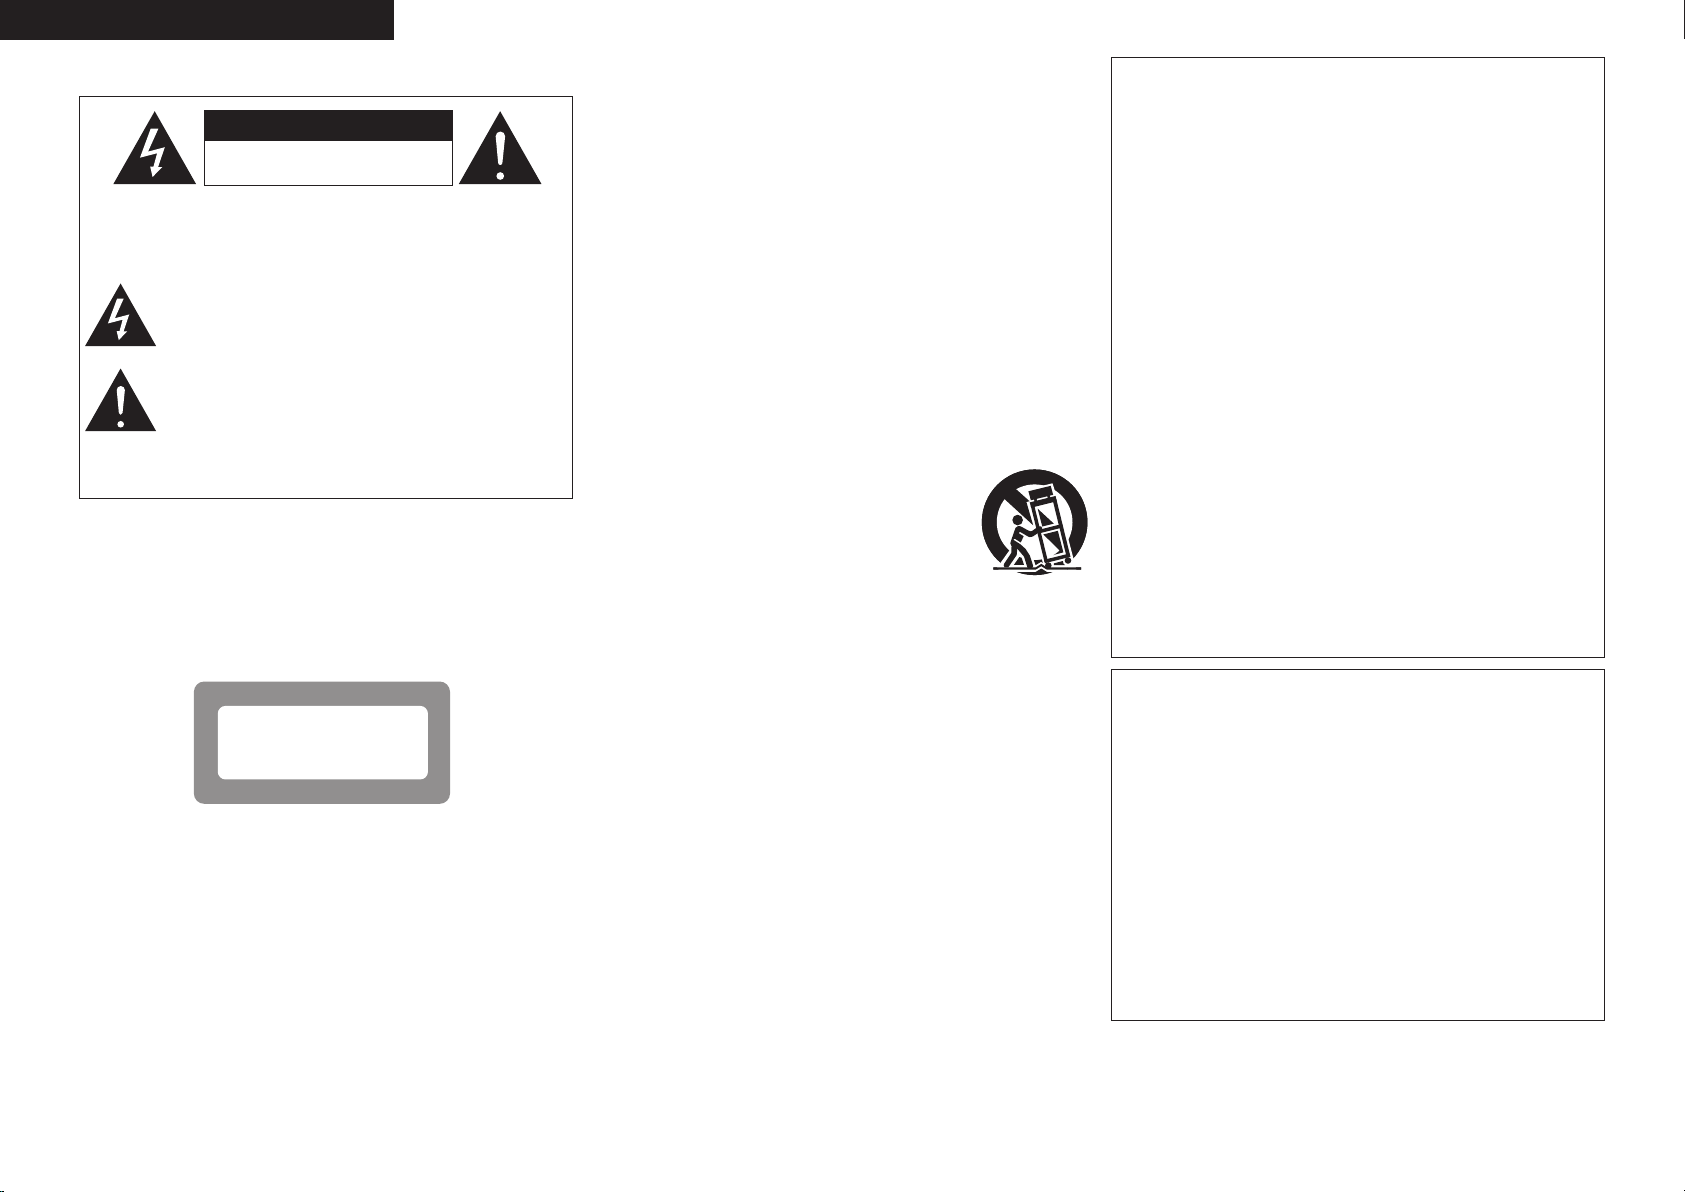
CAUTION
RISK OF ELECTRIC SHOCK
DO NOT OPEN
$-"44
-"4&3
130%6$5
SAFETY PRECAUTIONS
n
CAUTION:
TO REDUCE THE RISK OF ELECTRIC SHOCK, DO NOT REMOVE
COVER (OR BACK). NO USER-SERVICEABLE PARTS INSIDE.
REFER SERVICING TO QUALIFIED SERVICE PERSONNEL.
The lightning flash with arrowhead symbol, within an equilateral
triangle, is intended to alert the user to the presence of
uninsulated “dangerous voltage” within the product’s enclosure
that may be of sufficient magnitude to constitute a risk of electric
shock to persons.
The exclamation point within an equilateral triangle is intended
to alert the user to the presence of important operating
and maintenance (servicing) instructions in the literature
accompanying the appliance.
WARNING:
TO REDUCE THE RISK OF FIRE OR ELECTRIC SHOCK, DO NOT
EXPOSE THIS APPLIANCE TO RAIN OR MOISTURE.
CAUTION:
USE OF CONTROLS OR ADJUSTMENTS OR PERFORMANCE
OF PROCEDURES OTHER THAN THOSE SPECIFIED HEREIN MAY
RESULT IN HAZARDOUS RADIATION EXPOSURE.
THIS PRODUCT SHOULD NOT BE ADJUSTED OR REPAIRED BY
ANYONE EXCEPT PROPERLY QUALIFIED SERVICE PERSONNEL.
Laser Class (IEC 60825-1:2001)
n
Copyrights / Droits d’auteur / Derechos de Autor
n
• It is prohibited by law to reproduce, broadcast, rent or play discs in
public without the consent of the copyright holder.
• La reproduction, la diffusion, la location, le prêt ou la lecture
publique de ces disques sont interdits sans le consentement du
détenteur des droits d’auteur.
• De acuerdo con las leyes está prohibido reproducir, emitir, alquilar
o interpretar discos en público sin la autorización del propietario de
los derechos de autor.
IMPOTANT SAFETY
INSTRUCTIONS
1. Read these instructions.
2. Keep these instructions.
3. Heed all warnings.
4. Follow all instructions.
5. Do not use this apparatus near water.
6. Clean only with dry cloth.
7. Do not block any ventilation openings.
Install in accordance with the manufacturer's instructions.
8. Do not install near any heat sources such as radiators, heat registers, stoves,
or other apparatus (including amplifiers) that produce heat.
9. Do not defeat the safety purpose of the polarized or grounding-type plug. A
polarized plug has two blades with one wider than the other. A grounding
type plug has two blades and a third grounding prong. The wide blade or the
third prong are provided for your safety. If the provided plug does not fit into
your outlet, consult an electrician for replacement of the obsolete outlet.
10. Protect the power cord from being walked on or pinched particularly at
plugs, convenience receptacles, and the point where they exit from the
apparatus.
11. Only use attachments/accessories specified by the manufacturer.
12. Use only with the cart, stand, tripod, bracket, or table
specified by the manufacturer, or sold with the apparatus.
When a cart is used, use caution when moving the cart/
apparatus combination to avoid injury from tip-over.
13. Unplug this apparatus during lightning storms or when
unused for long periods of time.
14. Refer all servicing to qualified service personnel.
Servicing is required when the apparatus has been damaged in any way,
such as power-supply cord or plug is damaged, liquid has been spilled or
objects have fallen into the apparatus, the apparatus has been exposed to
rain or moisture, does not operate normally, or has been dropped.
15. Batteries shall not be exposed to excessive heat such as sunshine, fire or
the like.
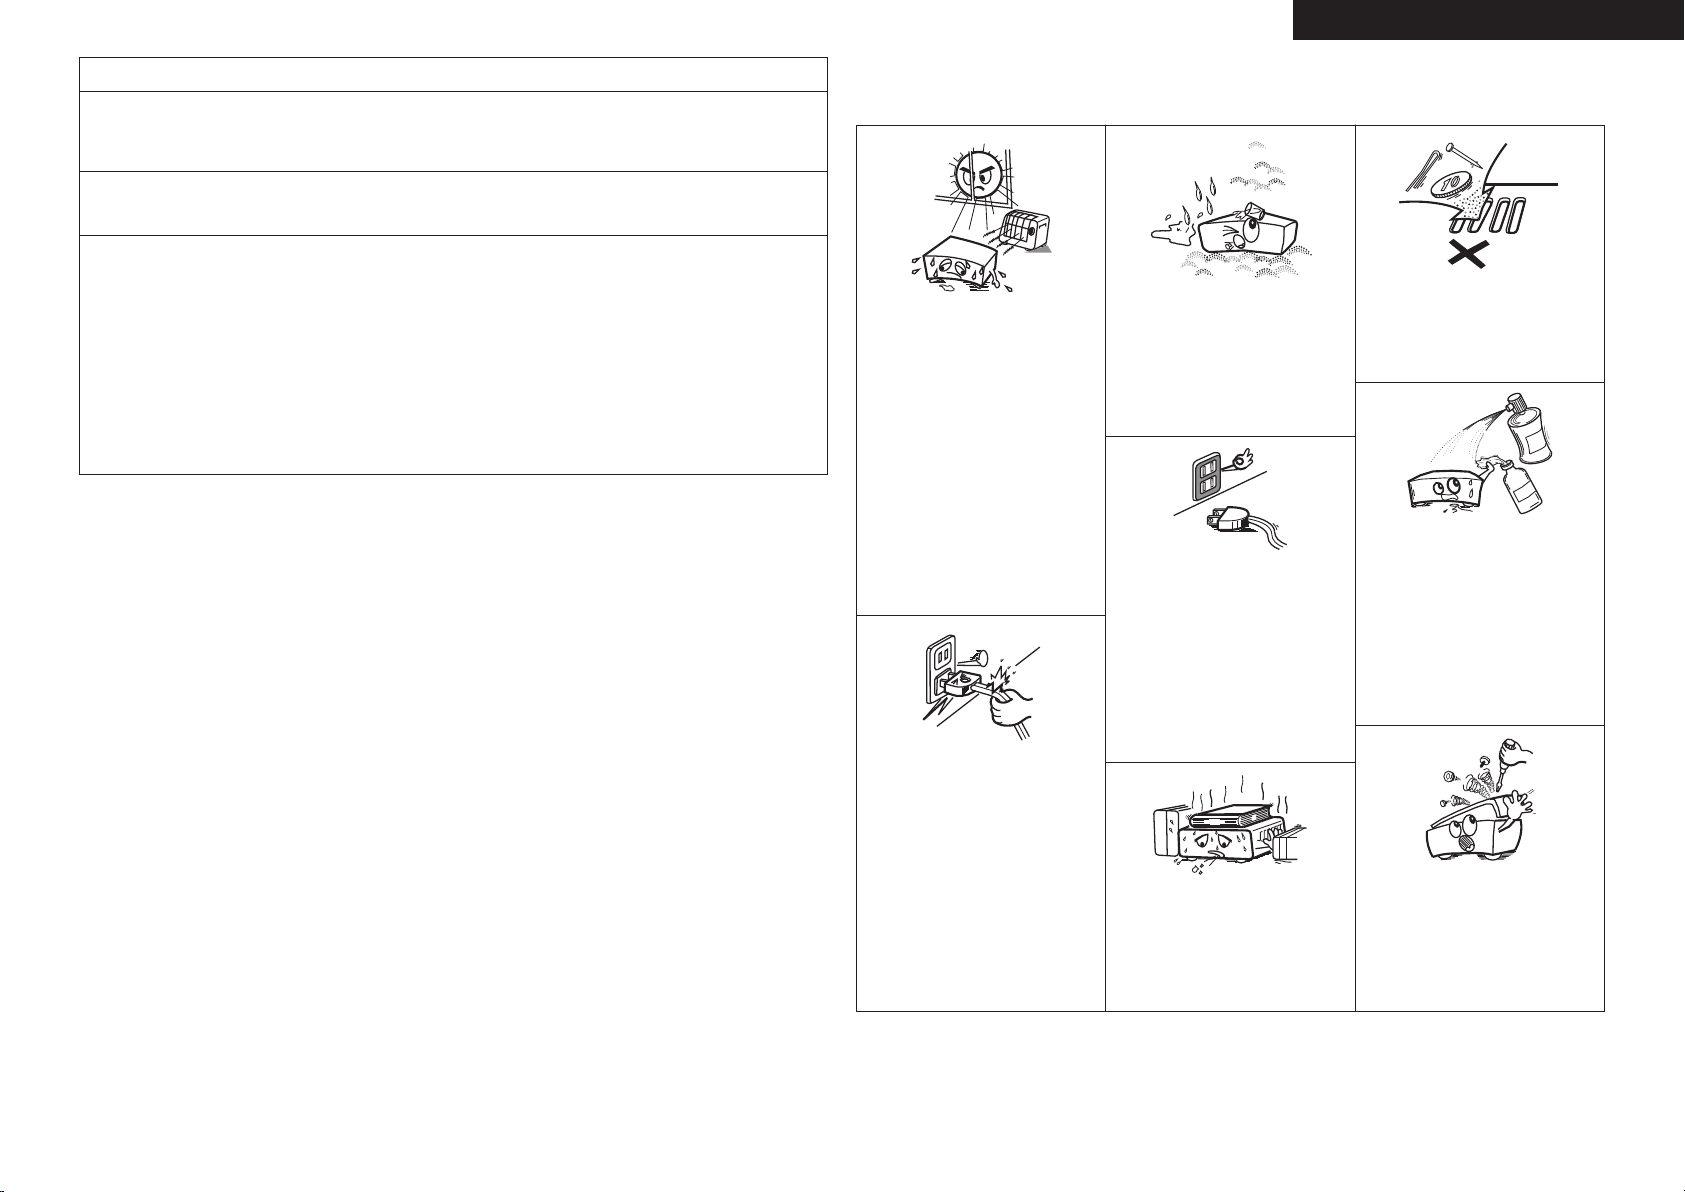
CAUTION:
• The ventilation should not be impeded by covering the ventilation
openings with items, such as newspapers, tablecloths, curtains,
etc.
• No naked flame sources, such as lighted candles, should be
placed on the unit.
• Observe and follow local regulations regarding battery disposal.
• Do not expose the unit to dripping or splashing fluids.
• Do not place objects filled with liquids, such as vases, on the
unit.
ATTENTION:
• La ventilation ne doit pas être gênée en recouvrant les ouvertures
de la ventilation avec des objets tels que journaux, rideaux, tissus,
etc.
• Aucune flamme nue, par exemple une bougie, ne doit être placée
sur l’appareil.
• Veillez à respecter les lois en vigueur lorsque vous jetez les piles
usagées.
• L’appareil ne doit pas être exposé à l’eau ou à l’humidité.
• Ne pas poser d’objet contenant du liquide, par exemple un vase,
sur l’appareil.
PRECAUCIÓN:
• La ventilación no debe quedar obstruida por haberse cubierto las
aperturas con objetos como periódicos, manteles, cortinas, etc.
• No debe colocarse sobre el aparato ninguna fuente inflamable sin
protección, como velas encendidas.
• A la hora de deshacerse de las pilas, respete la normativa para el
cuidado del medio ambiente.
• No exponer el aparato al goteo o salpicaduras cuando se utilice.
• No colocar sobre el aparato objetos llenos de líquido, como
jarros.
CAUTION:
To completely disconnect this product from the mains, disconnect
the plug from the wall socket outlet.
The mains plug is used to completely interrupt the power supply to
the unit and must be within easy access by the user.
PRECAUTION:
Pour déconnecter complètement ce produit du courant secteur,
débranchez la prise de la prise murale.
La prise secteur est utilisée pour couper complètement
l’alimentation de l’appareil et l’utilisateur doit pouvoir y accéder
facilement.
PRECAUCIÓN:
Para desconectar completamente este producto de la alimentación
eléctrica, desconecte el enchufe del enchufe de la pared.
El enchufe de la alimentación eléctrica se utiliza para interrumpir por
completo el suministro de alimentación eléctrica a la unidad y debe
de encontrarse en un lugar al que el usuario tenga fácil acceso.
I
Page 3
FRANCAISESPAÑOL ENGLISH
ENGLISH
FCC Information (For US customers)
1. PRODUCT
This product complies with Part 15 of the FCC Rules. Operation is subject to the following two conditions: (1) this
product may not cause harmful interference, and (2) this product must accept any interference received, including
interference that may cause undesired operation.
2. IMPORTANT NOTICE: DO NOT MODIFY THIS PRODUCT
This product, when installed as indicated in the instructions contained in this manual, meets FCC requirements.
Modification not expressly approved by DENON may void your authority, granted by the FCC, to use the product.
3. NOTE
This product has been tested and found to comply with the limits for a Class B digital device, pursuant to Part 15
of the FCC Rules. These limits are designed to provide reasonable protection against harmful interference in a
residential installation.
This product generates, uses and can radiate radio frequency energy and, if not installed and used in accordance
with the instructions, may cause harmful interference to radio communications. However, there is no guarantee
that interference will not occur in a particular installation. If this product does cause harmful interference to radio or
television reception, which can be determined by turning the product OFF and ON, the user is encouraged to try to
correct the interference by one or more of the following measures:
• Reorient or relocate the receiving antenna.
• Increase the separation between the equipment and receiver.
• Connect the product into an outlet on a circuit different from that to which the receiver is connected.
• Consult the local retailer authorized to distribute this type of product or an experienced radio/TV technician for
help.
This Class B digital apparatus complies with Canadian ICES-003.
Cet appareil numérique de la classe B est conforme à la norme NMB-003 du Canada.
NOTE ON USE / OBSERVATIONS RELATIVES A L’UTILISATION /
n
NOTAS SOBRE EL USO
• Do not let foreign objects into the unit.
• Ne pas laisser des objets étrangers dans
l’appareil.
• No deje objetos extraños dentro del
equipo.
• Do not let insecticides, benzene, and
thinner come in contact with the unit.
• Ne pas mettre en contact des insecticides,
du benzène et un diluant avec l’appareil.
• No permita el contacto de insecticidas,
gasolina y diluyentes con el equipo.
• Avoid high temperatures.
Allow for sufficient heat dispersion when
installed in a rack.
• Eviter des températures élevées.
Tenir compte d’une dispersion de chaleur
suffisante lors de l’installation sur une
étagère.
• Evite altas temperaturas.
Permite la suficiente dispersión del calor
cuando está instalado en la consola.
• Keep the unit free from moisture, water,
and dust.
• Protéger l’appareil contre l’humidité, l’eau
et la poussière.
• Mantenga el equipo libre de humedad,
agua y polvo.
• Unplug the power cord when not using the
unit for long periods of time.
• Débrancher le cordon d’alimentation
lorsque l’appareil n’est pas utilisé pendant
de longues périodes.
• Desconecte el cordón de energía cuando
no utilice el equipo por mucho tiempo.
• Handle the power cord carefully.
Hold the plug when unplugging the cord.
• Manipuler le cordon d’alimentation avec
précaution.
Tenir la prise lors du débranchement du
cordon.
• Maneje el cordón de energía con cuidado.
Sostenga el enchufe cuando desconecte el
cordón de energía.
* (For apparatuses with ventilation holes)
• Do not obstruct the ventilation holes.
• Ne pas obstruer les trous d’aération.
• No obstruya los orificios de ventilación.
• Never disassemble or modify the unit in
any way.
• Ne jamais démonter ou modifier l’appareil
d’une manière ou d’une autre.
• Nunca desarme o modifique el equipo de
ninguna manera.
II
Page 4

ENGLISH
n Contents
Getting Started
Accessories ······················································································2
Cautions on Handling ····································································· 2
Cautions on Installation ·································································2
About Discs ·····················································································2
Discs Usable on the RCD-CX1 ·······················································2
Holding Discs ·················································································3
Loading Discs ·················································································3
Cautions on Loading Discs ·····························································3
Cautions on Handling ·····································································3
Cautions on Storing Discs ······························································ 3
Cleaning Discs ···············································································4
About the Remote Control Unit ···················································· 4
Inserting the Batteries ····································································4
Operating Range of the Remote Control Unit ································4
Part Names and Functions ·····························································5
Front Panel ·····················································································5
Display ···························································································5
Rear Panel ······················································································ 5
Remote Control Unit ······································································6
Connections
Preparations ····················································································7
Cables Used for Connections ························································7
Using the AM Loop Antenna ··························································7
Assembling the AM Loop Antenna ················································7
Speaker Connections ····································································· 8
Connecting the Speaker Cables ····················································· 8
Connecting the Playback Components ········································ 8
Record Player ················································································· 8
iPod® ······························································································9
Connecting a Power Amp and Subwoofer ··································9
Connecting the Recording Components ······································9
CD Recorder / MD Recorder / Tape Deck ·······································9
Connections to Other Devices ····················································· 10
Antenna terminals ······································································· 10
Connecting the Power Cord························································· 10
Once Connections are Completed ·············································· 10
Setup Setting the Timer
Setting the Current Time (12-Hour Display) ······························· 11
Playback
Preparations ·················································································· 12
Turning the Power On ·································································· 12
Setting the layer to be played with priority ··································· 12
Loading Discs ··············································································· 12
Operations During Playback ························································12
Adjusting the Master Volume ······················································· 12
Input Source Switching ································································ 12
Listening with Headphones ························································· 12
Adjusting the Tone ········································································ 13
Turning the Sound Off Temporarily (Muting) ································· 13
Switching the Brightness of the Display ······································13
CD Playback ··················································································14
Playing CDs ·················································································· 14
Switching the Display ··································································· 14
Repeat Play or Random Play ························································ 14
Playing Tracks in the Desired Order <Program> ··························15
Playback of MP3 and WMA Files ················································· 15
About the MP3 and WMA Formats that can be Played ···············15
Playing MP3 and WMA Files ························································ 16
Repeat Play or Random Play ························································ 16
TUNER Playback ··········································································· 17
Tuning in Broadcast Stations ························································ 17
Automatically Presetting FM Stations (Auto Preset) ···················· 17
Presetting FM/AM Stations Manually ·········································· 17
Listening to Preset Stations ························································· 18
Naming the Currently Tuned in Broadcast Station ························ 18
iPod® Playback ············································································· 18
Preparations ················································································· 18
Listening to Audio ········································································18
Disconnecting the iPod ································································ 19
Recording ······················································································ 19
Recording on an External Device ················································· 19
Timer Playback··············································································20
Setting the Timer ·········································································· 20
Set the Timer ON/OFF ·································································21
Setting the Sleep Timer ································································ 22
Other Functions
Convenient Functions ·································································· 22
Auto Power On ············································································· 22
Auto Function Selector Function ·················································· 22
Last Function Memory ································································· 22
Resetting the Microprocessor ······················································22
Troubleshooting ····························································· 23
Specifications ·································································· 24
Page 5
e
r t
q
Getting Started
ENGLISH
Getting Started
Thank you for purchasing this DENON product. To ensure proper
operation, please read this owner’s manual carefully before using the
product.
After reading them, be sure to keep them for future reference.
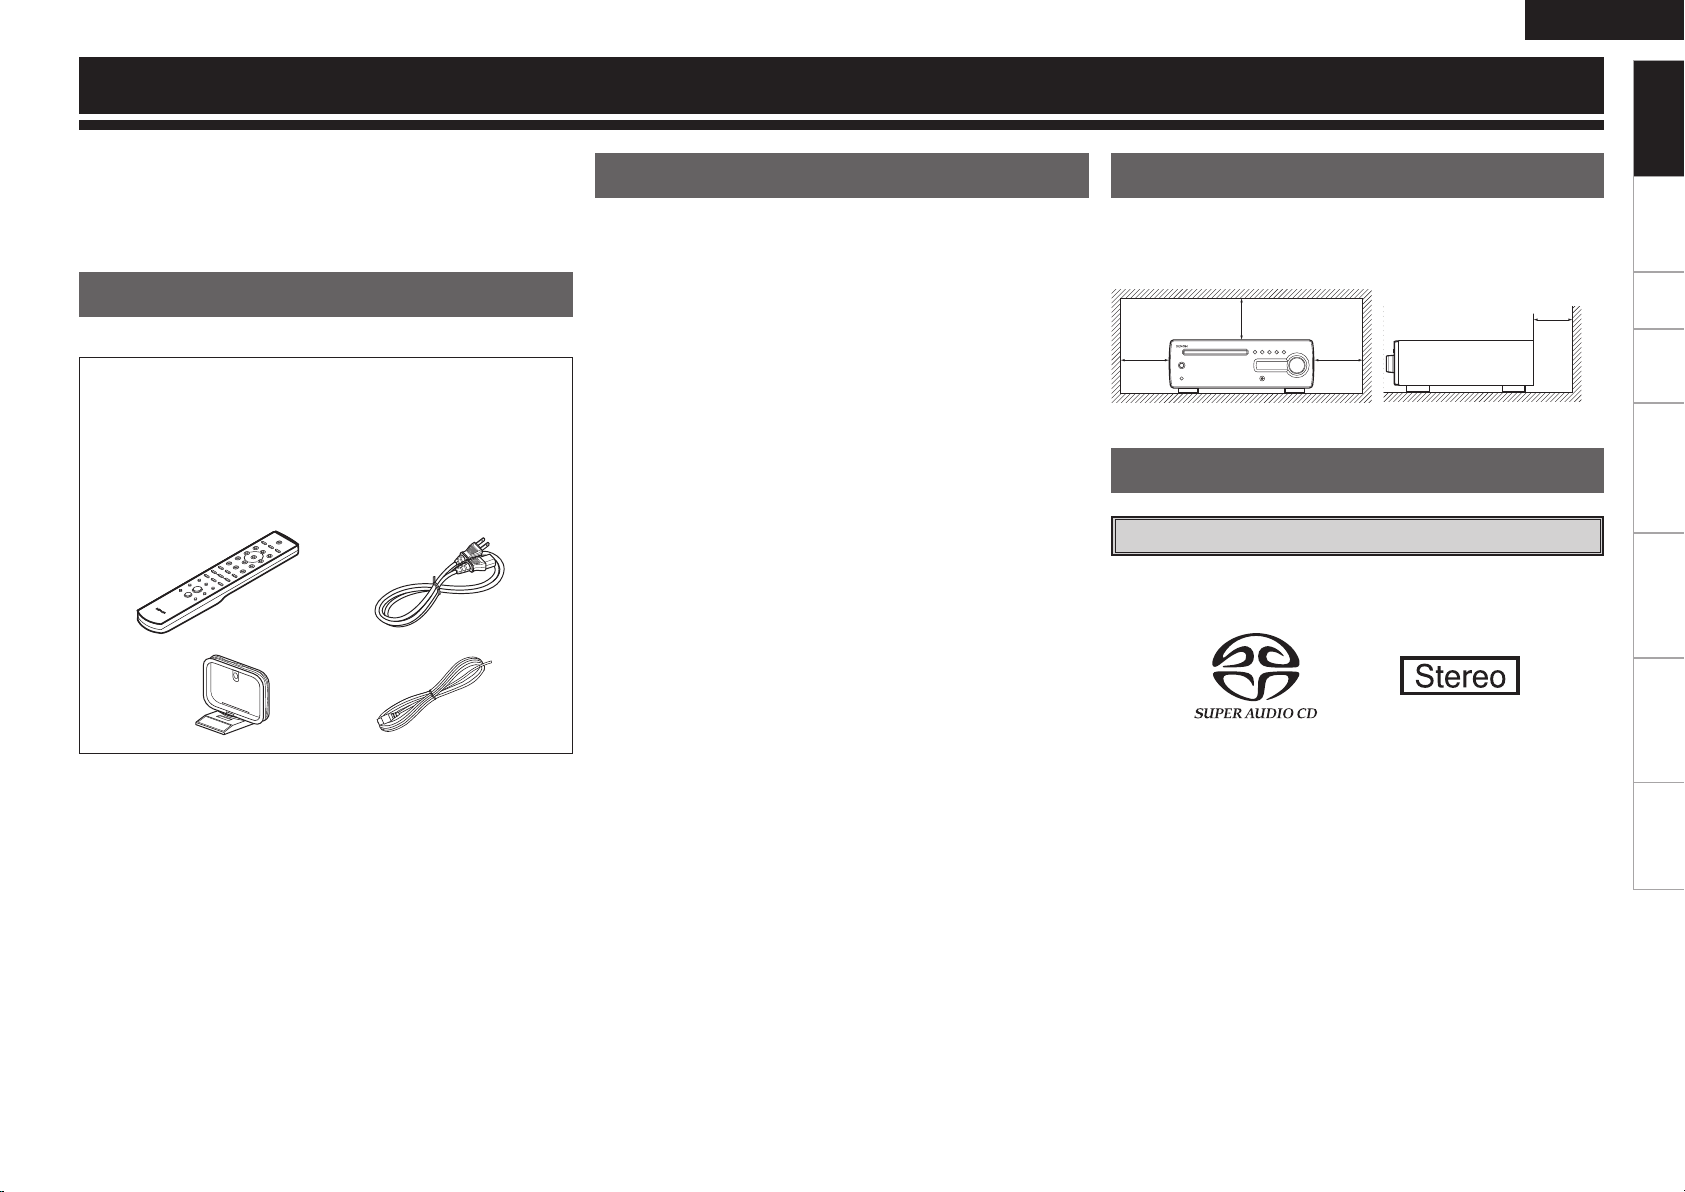
Accessories
Check that the following parts are supplied with the product.
q Remote control (RC-1109) ........................................................ 1
w R03/AAA batteries ...................................................................2
e Power cord (Cord length: Approx. 6.6 ft /2 m) ......................... 1
r AM loop antenna ..................................................................... 1
t FM indoor antenna ..................................................................1
y Owner’s manual ...................................................................... 1
u Service station list ...................................................................1
Cautions on Handling
• Before turning the power switch on
Check once again that all connections are correct and that there are
no problems with the connection cables.
•
Power is supplied to some of the circuitry even when the unit is
set to the standby mode. When traveling or leaving home for long
periods of time, be sure to unplug the power cord from the power
outlet.
• Sufficiently ventilate the place of installation
If the unit is left in a room full of the smoke from cigarettes, etc., for
long periods of time, the surface of the optical pickup could get dirty,
in which case it will not be able to read the signals properly.
• About condensation
If there is a major difference in temperature between the inside of
the unit and the surroundings, condensation (dew) may form on
the operating parts inside the unit, causing the unit not to operate
properly.
If this happens, let the unit sit for an hour or two with the power
turned off and wait until there is little difference in temperature
before using the unit.
• Cautions on using mobile phones
Using a mobile phone near this unit may result in noise. If so, move
the mobile phone away from this unit when it is in use.
• Moving the unit
Turn off the power and unplug the power cord from the power
outlet.
Next, disconnect the connection cables to other system units before
moving the unit.
•
Note that the illustrations in these instructions may differ from the
actual unit for explanation purposes.
Cautions on Installation
Note:
For proper heat dispersal, do not install this unit in a confined
space, such as a bookcase or similar enclosure.
b Note
b
b
b
Wall
About Discs
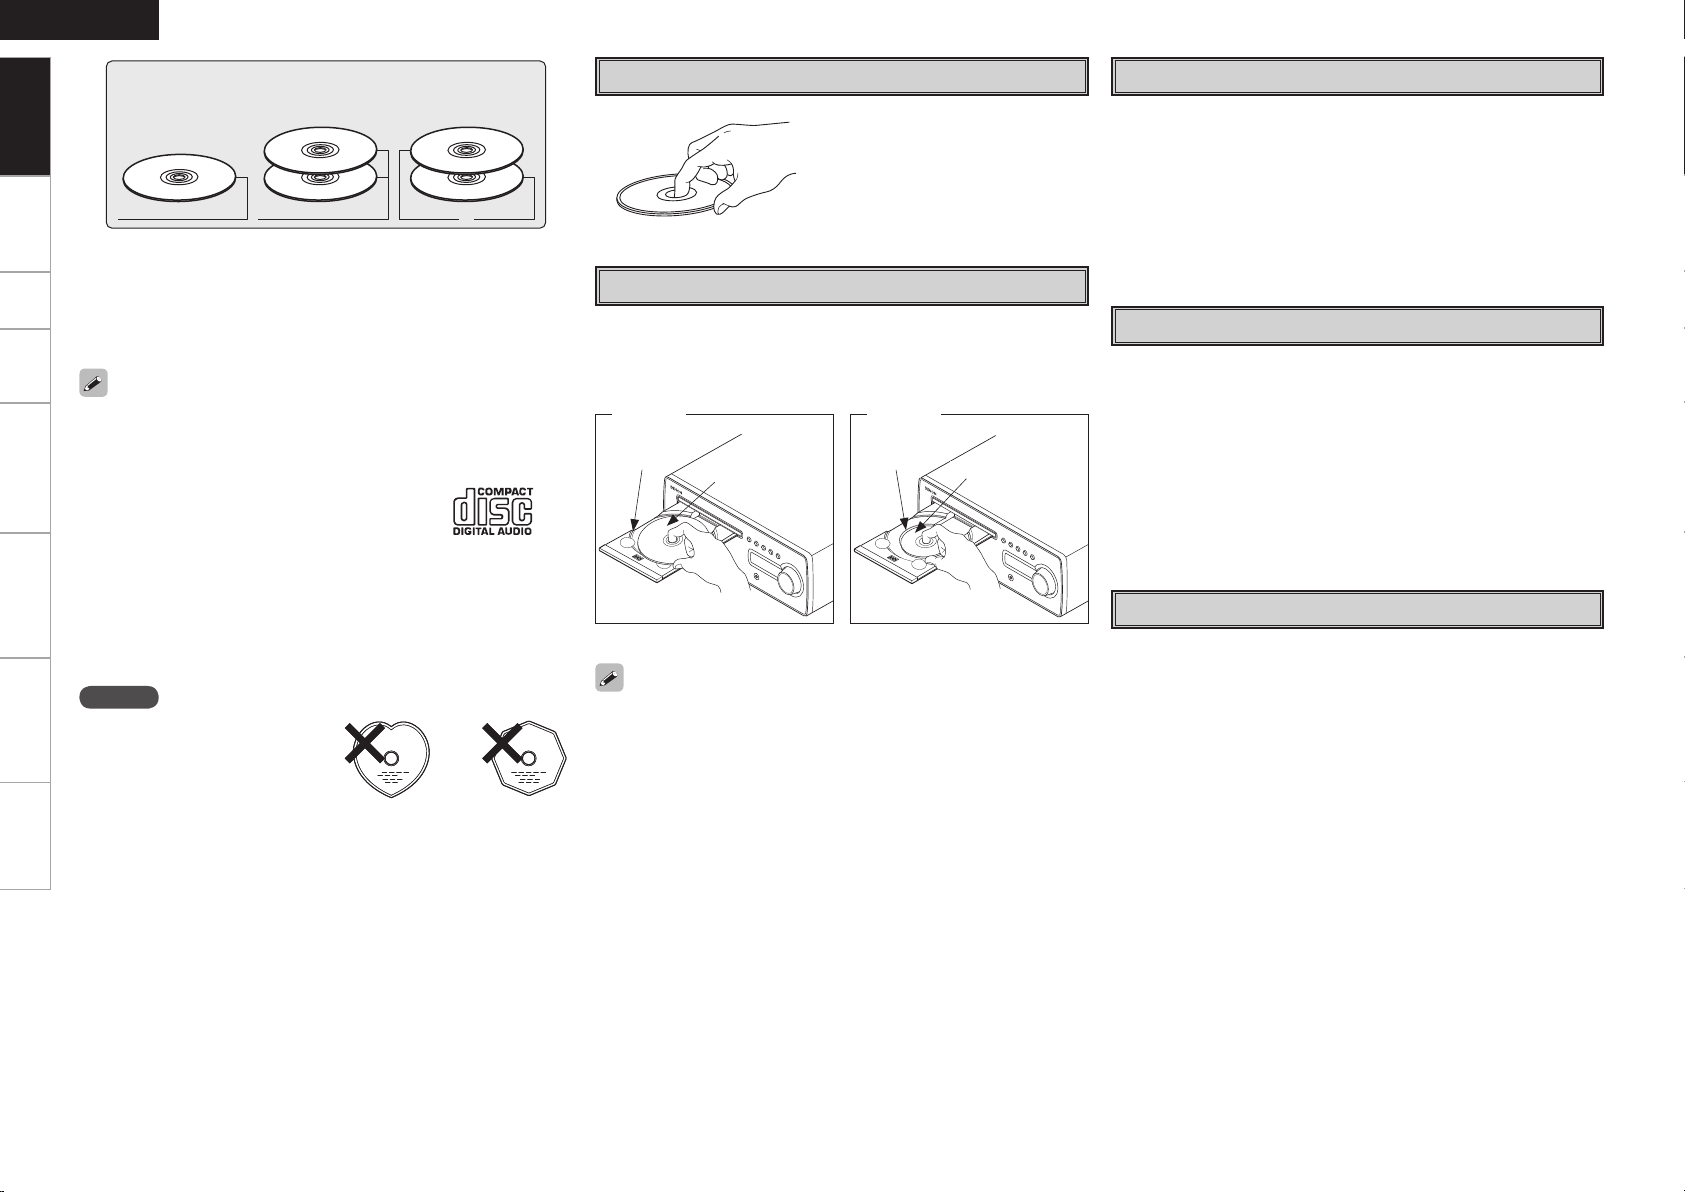
Discs Usable on the RCD-CX1
q Super Audio CDs
Super Audio CDs marked with the logotypes indicated below can
be played on this unit.
There are three types of Super Audio CDs:
q Single layer disc
Single layer Super Audio CD with only an HD layer.
w Dual layer disc
Super Audio CD with a double HD layer, offering extended playing
time and high sound quality.
e Hybrid disc
Two-layer Super Audio CD with an HD layer and a CD layer.
The signals on the CD layer can be played on a regular CD player.
Connections Setup Playback Setting the Timer Other Functions Troubleshooting Specifications
Page 6
ENGLISH
Getting Started Setup Playback Setting the Timer Other Functions Troubleshooting Specifications
Getting Started
Connections
HD layer
b What is the HD layer?
The HD layer is a layer of high density signals for Super Audio
CDs.
b What is the CD layer?
The CD layer is the layer of signals that can be read on a regular CD
player.
This unit is not compatible with multi-channel playback.
w Music CDs
Discs marked with the logotype below can be played in this unit.
e CD-R/CD-RW
• Some discs and some recording formats may not be playable.
• Non-finalized discs cannot be played.
b What is finalization?
Finalization is the process that makes recorded CD-R/CD-RW discs
playable on compatible players.
NOTE
Discs with special shapes (heartshaped discs, octagonal discs,
etc.) cannot be played. Do not
attempt to play them, as doing so
can damage the product.
Types of Super Audio CDs
Hybrid discDual layer discSingle layer disc
HD layer CD layer HD layer
Holding Discs
Do not touch the signal surface.
Loading Discs
• Set the disc with the labeled side facing up.
• Make sure the disc tray is fully open when inserting the disc.
• Place the discs flatly, 12 cm discs in the outer tray guide (Figure 1), 8
cm discs in the inner tray guide (Figure 2).
Figure 1 Figure 2
Outer tray
guide
• Place 8 cm discs in the inner tray guide without using an adapter.
• “00:00” is displayed if a disc that cannot be played is loaded.
• “NO DISC” is displayed if the disc is loaded upside-down or if no disc
is loaded.
12 cm disc
Inner tray
guide
8 cm disc
Cautions on Loading Discs
• Only load one disc at a time. Loading two or more discs can damage
the unit or scratch the discs.
• Do not use cracked or warped discs or discs that have been repaired
with adhesive, etc.
• Do not use discs on which the sticky part of cellophane tape or labels
is exposed or on which there are traces of where labels have been
removed. Such discs can get caught inside the player and damage
it.
Cautions on Handling
• Do not get fingerprints, oil or dirt on discs.
• Take special care not to scratch discs when removing them from
their cases.
• Do not bend or heat discs.
• Do not enlarge the hole at the center.
• Do not write on the labeled (printed) surface with ball-point pens,
pencils, etc., or stick new labels on discs.
• Water droplets may form on discs if they are moved suddenly from a
cold place (outdoors for example) to a warm place, but do not try to
dry them off using a hairdryer, etc.
Cautions on Storing Discs
• Be sure to remove discs after using them.
• Be sure to store discs in their cases to protect them from dust,
scratches, warping, etc.
• Do not store discs in the following places:
1. Places exposed to direct sunlight for long periods of time
2. Dusty or humid places
3. Places exposed to heat from heating appliances, etc.
Page 7
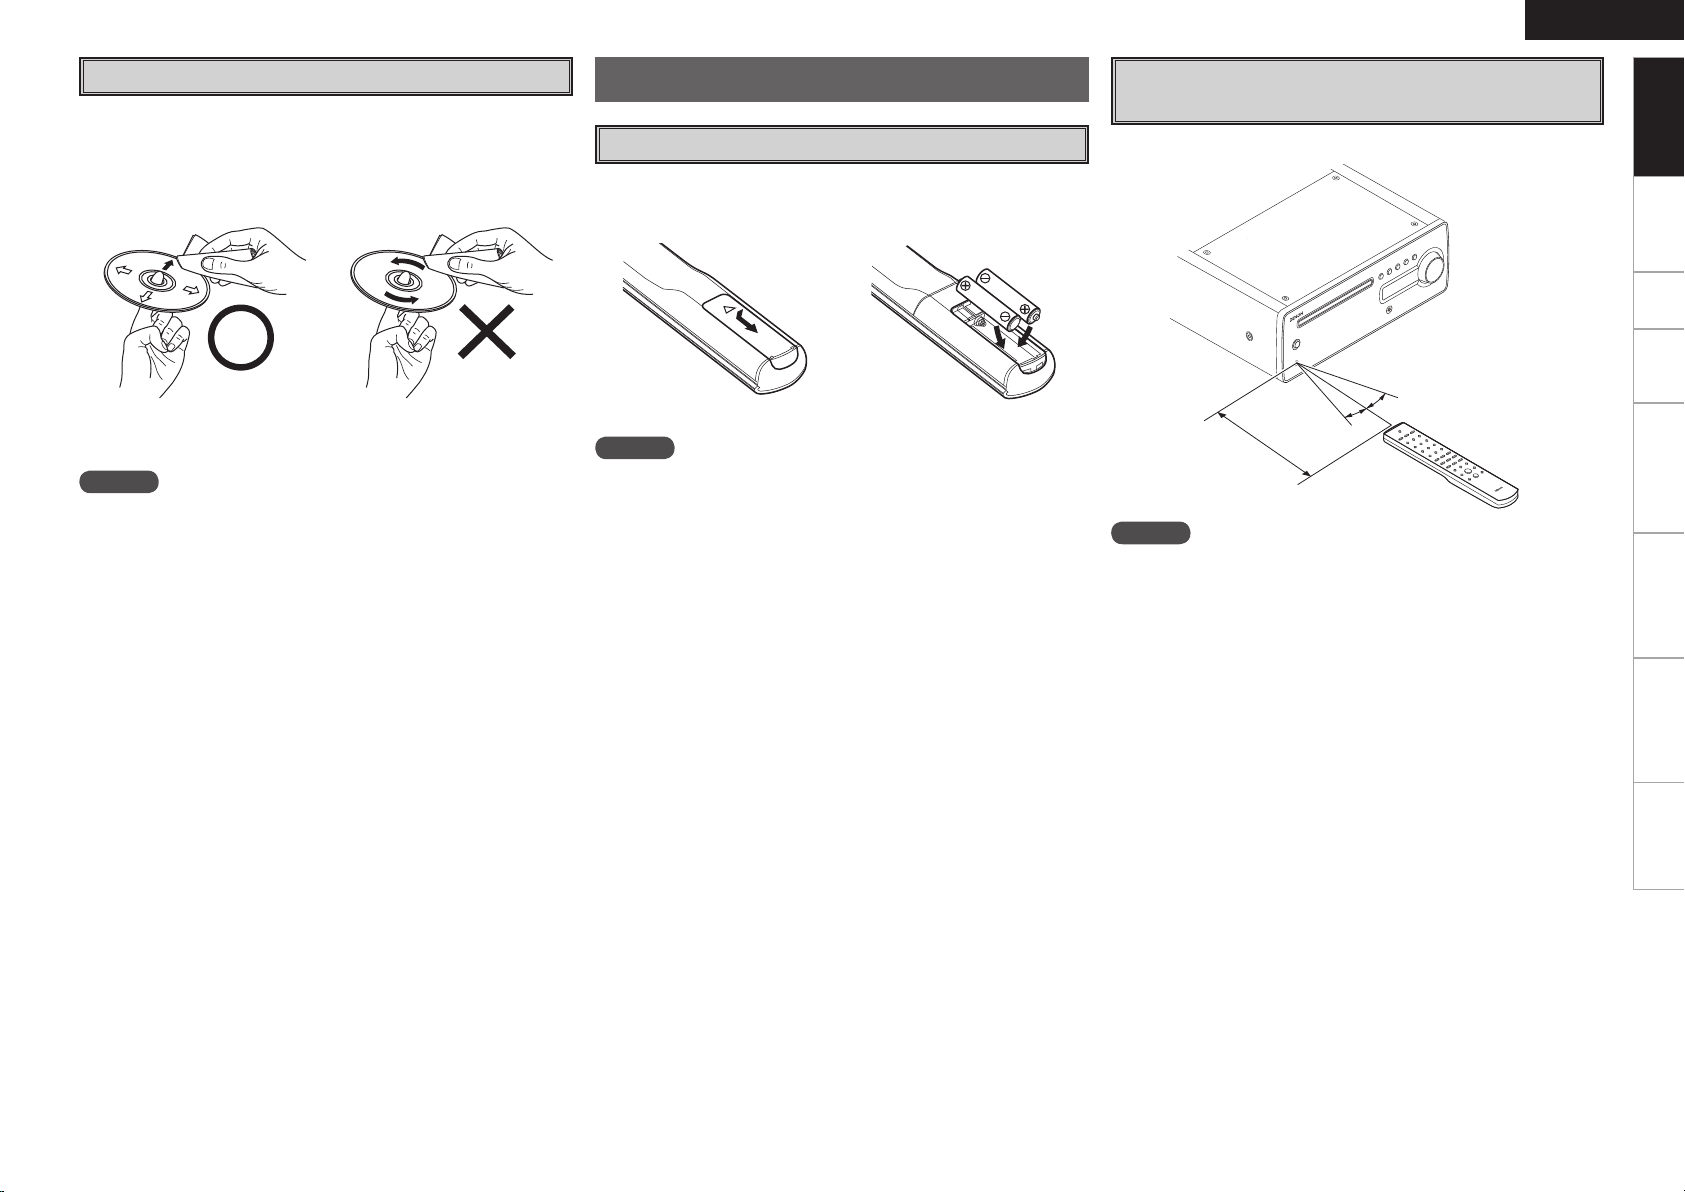
Cleaning Discs
• If there are fingerprints or dirt on discs, wipe them off before using
the disc. Fingerprints and dirt can impair sound quality and cause
interruptions in playback.
• Use a commercially available disc cleaning set or a soft cloth to clean
discs.
About the Remote Control Unit
Inserting the Batteries
q Remove the remote control
unit’s rear cover.
w Set two R03/AAA batteries in
the battery compartment in the
indicated direction.
ENGLISH
Operating Range of the Remote Control
Unit
Point the remote control unit at the remote sensor when operating it.
Getting Started Connections Setup Playback Setting the Timer Other Functions Troubleshooting
Getting Started
Gently wipe the disc from the
inside towards the outside.
Do not wipe with a circular
motion.
NOTE
Do not use record spray, antistatic agents, or benzene, thinner or other
solvents.
e Put the rear cover back on.
NOTE
• Replace the batteries with new ones if the set does not operate even
when the remote control unit is operated close to the unit.
• The supplied batteries are only for verifying operation.
• When inserting the batteries, be sure to do so in the proper direction,
following the “q” and “w” marks in the battery compartment.
• To prevent damage or leakage of battery fluid:
• Do not use a new battery together with an old one.
• Do not use two different types of batteries.
• Do not attempt to charge dry batteries.
• Do not short-circuit, disassemble, heat or dispose of batteries in
flames.
• If the battery fluid should leak, carefully wipe the fluid off the inside
of the battery compartment and insert new batteries.
• Remove the batteries from the remote control unit if it will not be in
use for long periods.
30°
30°
Approx. 23 feet / 7 m
NOTE
The set may function improperly or the remote control unit may not
operate if the remote control sensor is exposed to direct sunlight,
strong artificial light from an inverter type fluorescent lamp or infrared
light.
Specifications
Page 8
ENGLISH
q w e r t
yuioQ0Q1
q
e
w
q
o i u y
w e r t
Getting Started Connections Setup Playback Setting the Timer Other Functions Troubleshooting
Getting Started
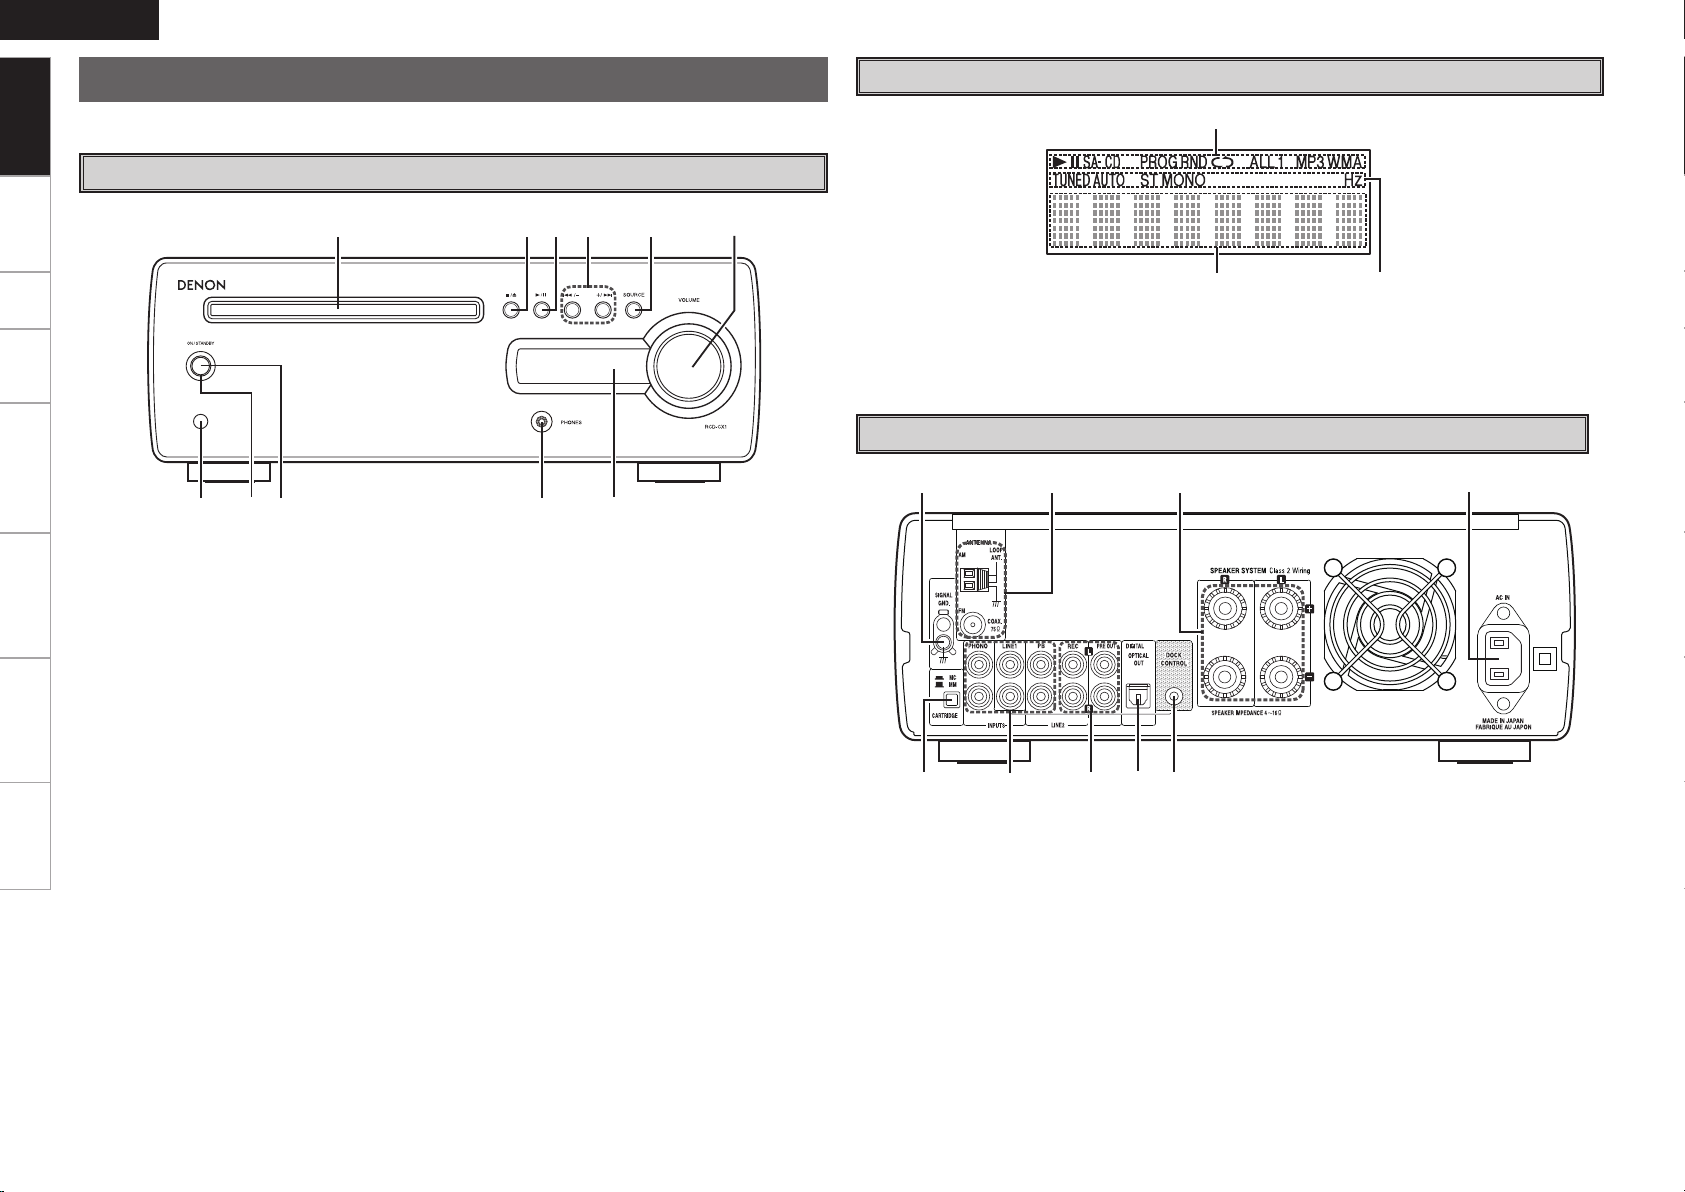
Part Names and Functions
For buttons not explained here, see the page indicated in parentheses ( ).
Front Panel
Display
q Remote control sensor ································· (4)
w Power indicator ··········································· (12)
e Power operation button
(ON/STANDBY) ······································(11, 12)
r Headphones jack (PHONES) ······················ (12)
t Display
y
Master volume control knob (VOLUME)
Specifications
····· (12)
u SOURCE button ·········································· (12)
i Reverse-skip/Forward-skip buttons
(8/–, +/9) ··································(14, 16, 17)
o Play/Pause button (1/3) ···························(14)
Q0 Stop / Disc tray open/close button
(2/5) ···························································· (12)
Q1 Disc tray ························································· (3)
q Information display
Various information is displayed here, depending
on the operation mode.
w Tuner reception mode indicators ········· (17, 18)
e Mode indicators ·································· (14 ~ 19)
Rear Panel
q CARTRIDGE selection switch ······················ (8)
w Analog audio input connectors ··············· (8, 9)
e Analog audio output connectors ··············· (9)
r Digital audio output connector
(OPTICAL OUT) ············································· (9)
t DOCK CONTROL jack ··································· (9)
y AC inlet (AC IN) ··········································· (10)
u Speaker terminals (SPEAKER SYSTEM) ····· (8)
i FM/AM antenna terminals ························· (10)
o SIGNAL GND terminal ·································(8)
Page 9
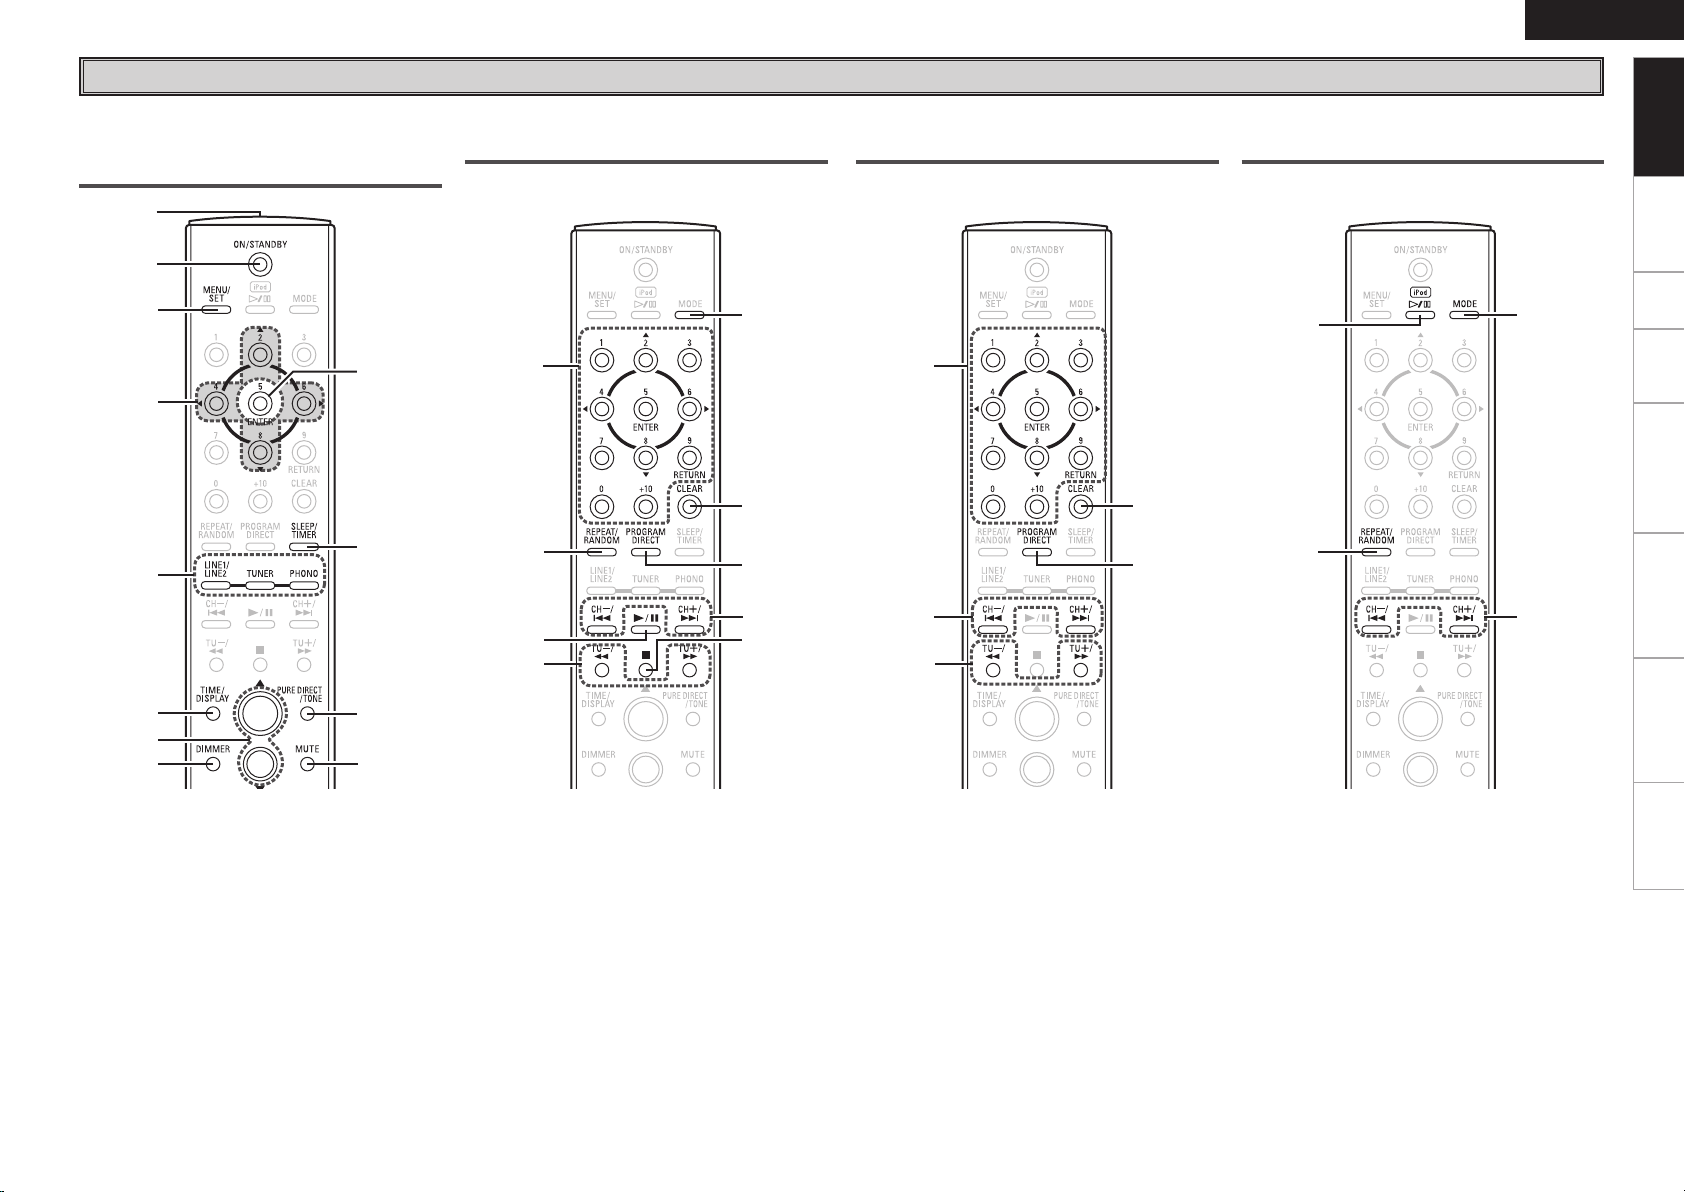
Remote Control Unit
w
q
t
e
r
u
Q1
Q0
o
Q2
i
y
q
y
u
i
o
r
e
w
t
q
w
r
t
e
r
e
q
w
ENGLISH
Getting Started Connections Setup Playback Setting the Timer Other Functions Troubleshooting
Getting Started
Buttons Operable for All Functions
(CD, PHONO, TUNER, LINE1, LINE2
and iPod)
Buttons Operable When the Function
is Set to “CD”
The buttons listed at “Buttons Operable for All
Functions” can also be used.
Buttons Operable When the Function
is Set to “TUNER”
The buttons listed at “Buttons Operable for All
Functions” can also be used.
Buttons Operable When the Function
is Set to “iPod”
The buttons listed at “Buttons Operable for All
Functions” can also be used.
q Remote control signal transmitter ·············· (4)
w ON/STANDBY button ··································(11)
e MENU/SET button ······································(11)
r Cursor buttons
(2/u, 8/i, 4/o, 6/p) ···································(11)
t Function buttons
(LINE1/LINE2, TUNER, PHONO) ················· (12)
y TIME/DISPLAY button ·································(11)
u Master volume control buttons
(VOLUME) ···················································(12)
i DIMMER button ·········································· (13)
o ENTER button (5/ENTER) ···························(11)
Q0 SLEEP/TIMER button ································· (22)
Q1 PURE DIRECT/TONE button ······················ (13)
Q2 MUTE button ·············································· (13)
q Number buttons ········································· (14)
w REPEAT/RANDOM button ························· (14)
e Play/Pause button (1/3) ···························(14)
r Fast-reversing/Fast-forwarding buttons
(TU–/6, TU+/7)···································· (14)
t MODE button ·············································· (16)
y CLEAR button ············································· (15)
u PROGRAM DIRECT button ························· (15)
i Reverse-skip/Forward-skip buttons
(CH–/8, CH+/9) ································· (14)
o Stop button (2) ··········································· (14)
q Number buttons ···································· (17, 18)
w Channel +, – buttons
(CH–/8, CH+/9) ···························· (17, 18)
e Tuning +, – buttons
(TU–/6, TU+/7)···································· (17)
r CLEAR button ·············································(18)
t PROGRAM/DIRECT button ························ (17)
Specifications
q iPod 1/3 button ········································· (18)
w REPEAT/RANDOM button ························· (18)
e MODE button ·············································· (18)
r Reverse-skip/Forward-skip /
Fast-reversing/Fast-forwarding buttons
(CH–/8, CH+/9) ································· (18)
Page 10

ENGLISH
R
L
R
L
Getting Started Connections Setup Playback Setting the Timer Other Functions Troubleshooting
Connections
Connections for all compatible audio signal format is described in
Connections
this operating instructions. Please select the types of connections
suited for the equipment you are connecting.
With some types of connections, certain settings must be made
on the RCD-CX1. For details, refer to the instructions for the
respective connection items below.
NOTE
• Do not plug in the power cord until all connections have been
completed.
• When making connections, also refer to the operating instructions of
the other components.
• Be sure to connect the left and right channels properly (left with left,
right with right).
• Do not bundle power cords together with connection cables. Doing
so can result in humming or noise.
Preparations
Cables Used for Connections
Select the cables according to the equipment being connected.
Audio cables
Optical digital connections
Optical cable
Analog connections (stereo)
(White)
(Red)
Stereo pin-plug cable
Speaker connections
Speaker cables
Signal direction
Using the AM Loop Antenna
n To use suspended on a wall
Suspend directly on the wall without assembling.
Nail, tack, etc.
n To use standing alone
Use the procedure below to assemble.
Assembling the AM Loop Antenna
Bend in the direction of the arrow.
1
Specifications
Audio signal:
Output
Input
Insert into the hole.
2
Input
Output
Page 11

w qw q
(R) (L)
Speaker Connections
(/%
"6%*0
065
R
L
Speakers
NOTE
• Use speakers with an impedance of 4 to 16 Ω/ohms. The protection
circuit may be activated if speakers with an impedance other than
specified are used.
• Connect the speaker cables in such a way that they do not stick out
of the speaker terminals. The protection circuit may be activated if
the core wires touch the rear panel or if the + and – sides touch each
other (v “Protection circuit”).
• Never touch the speaker terminals while the power supply is
connected. Doing so could result in electric shock.
Protection circuit
The protection circuit will be activated in thefollowing cases:
• When the speaker cable’s core wires are touching the rear
panel or screws or when the speaker cable’s + and – sides are
touching
• When the surrounding temperature is extremely high
• When the internal temperature rises due to extended use with a
high output
If this happens, unplug the power cord, then check the connections
of the speaker cables and input cables. If the set’s temperature
is extremely high, wait for it to cool off and improve surrounding
ventilation. After doing this, plug the power cord back in.
If the protection circuit is activated though there are no problems
in ventilation around the set or in connections, the set could be
damaged. Turn off the power, then contact a DENON servicing and
inquiry outlet.
Connecting the Playback
Components
Record Player
Turntable
ENGLISH
Getting Started Connections Setup Playback Setting the Timer Other Functions Troubleshooting
Connections
Connecting the Speaker Cables
Carefully check the left (L) and right (R) channels and + (red) and –
(black) polarities on the speakers being connected to the RCD-CX1,
and be sure to interconnect the channels and polarities correctly.
Peel off about 10 mm of sheathing from
1
the tip of the speaker cable, then either
twist the core wire tightly or terminate
it.
Turn the speaker terminal
2
counterclockwise to loosen it.
Insert the speaker cable’s core wire to
3
the hilt into the speaker terminal.
Turn the speaker terminal clockwise to
4
tighten it.
Specifications
• With some record players, noise may be generated when the ground
wire is connected. If so, disconnect the ground wire.
• Set the CARTRIDGE selection switch to “jMM” or “hMC”
according to the cartridge being used.
NOTE
The RCD-CX1’s SIGNAL GND terminal is meant to reduce noise when
a record player is connected. This is not a safety ground terminal.
Page 12

ENGLISH
"4%/8
R
L
R
L
R
L
R
L
3-
*/
R
L
R
L
R
L
R
L
3- 3-
065 */
"6%*0
"6%*0 "6%*0
*/
015*$"-
®
iPod
Use a DENON control dock for iPod (ASD-1R, ASD-11R or ASD-3N/3W,
sold separately) to connect the iPod to the RCD-CX1.
Connections Setup Playback Setting the Timer Other Functions Troubleshooting SpecificationsConnectionsGetting Started
iPod
Connecting a Power Amp and
Subwoofer
Use when adding a power amp, subwoofer, etc.
Power amp /
Subwoofer
Connecting the Recording
Components
CD Recorder / MD Recorder / Tape Deck
Analog connections
CD recorder /
MD recorder /
Tape deck
Digital connections
CD recorder /
MD recorder
• When using a control dock for iPod, the Control Dock for iPod must
be set. For details, refer to the operating instructions of the Control
Dock for iPod.
• When the control dock for iPod is connected, the function indicator
switches from “LINE1” to “iPod”.
• To use an iPod, see “iPod® Playback” (vpage 18).
NOTE
DO NOT insert a short pin plug for recording output (REC) and pre-out
terminals, as this may result in damage.
No digital signals are output for Super Audio CDs.
n When connecting the optical digital output connector
with an optical transmission cable (sold separately)
Protective cap Match the shapes
Remove the protective cap, match the shapes, then insert firmly all
the way in.
Store the protective cap in a safe place so as not to lose it, and use it
when not using the terminal.
Page 13

Connections to Other Devices Connecting the Power Cord
Wait until all connections have been completed before connecting the power cord.
Antenna terminals
AM / FM
The AM and FM reception sensitivity depends on the place the antenna
is set and the direction in which it is set. Set it so that reception is
best.
ENGLISH
Getting Started Connections Setup Playback Setting the Timer Other Functions Troubleshooting
Connections
To household
power outlet
(AC 120 V, 60 Hz)
AM loop
antenna
(supplied)
n Connecting the AM loop antenna
Push the lever.
1
Insert the conductor.
2
Return the lever.
3
FM indoor antenna
(supplied)
NOTE
• Make sure the AM loop
antenna lead terminals
do not touch metal parts
of the panel.
• Do not connect two FM
antennas simultaneously.
Power cord
(supplied)
NOTE
• Insert the AC plugs securely. Incomplete connections could cause noise.
• When the power cord is plugged into the power outlet, the power indicator flashes orange for about 10 seconds.
Do not unplug the power cord before the power indicator turns off and the RCD-CX1 enters Standby mode.
• Only use the supplied power cord.
• Be sure the power cord is unplugged from the power outlet before connecting or disconnecting it to the AC IN.
Once Connections are Completed
Turning the Power On (vpage 12)
Specifications
Note to CATV system installer:
This reminder is provided to call the CATV system installer’s
attention to Article 820-40 of the NEC which provides guidelines
for proper grounding and, in particular, specifies that the cable
ground shall be connected to the grounding system of the building,
as close to the point of cable entry as practical.
0
Page 14

ENGLISH
[MENU/SET]
[2/u]
[5/ENTER]
[8/i]
[TIME/DISPLAY]
ON/STANDBY
[VOLUME df]
SOURCE
1/3
ON/STANDBY
SOURCE
<PHONES>
<2/5>1/
3
<VOLUME>
TIM E A djTIM E A dj
AM1 0 : 00AM1 0 : 00
AM1 0 : 00AM1 0 : 00
AM1 0 : 15AM1 0 : 15
Getting Started Connections Setup Playback Setting the Timer Other Functions Troubleshooting Specifi cations
Setup
Setup
Symbols used to indicate buttons in this manual
Button located on both the main unit and the remote control
unit
Button only on the main unit
Button only on the remote control unit
BUTTON
<BUTTON>
[BUTTON]
Setting the Current Time
(12-Hour Display)
GExampleH Setting the current time to 10:15 am
Press ON/STANDBY to turn the power on.
1
Press and hold in [TIME/DISPLAY].
The time is displayed.
2
Press and hold in [MENU/SET] to enter time setting
3
mode.
“TIME Adj” is displayed for about 2 seconds.
Use [2/u] or [8/i] to set the “hours”.
4
Press [MENU/SET] or [5/ENTER].
5
The “minutes” display fl ashes.
Use [2/u] or [8/i] to set the “minutes”.
6
Press [MENU/SET] or [5/ENTER].
The current time is set, and the normal display reappears.
7
n Checking the current time when the power is on
Press and hold in [TIME/DISPLAY].
Press once more and the display returns to its original condition.
n Checking the current time when the power is set
to standby
Press [TIME/DISPLAY].
Press once more, and the standby display is resumed.
Displaying the time when the power is set to standby consumes
electricity. To reduce electric consumption, turn the time display off.
NOTE
The time cannot be set when in the standby mode. Turn on the power
fi rst.
Page 15

Playback
SA-CD CD
CD TUNER PHONO
LINE1 (iPod)LINE2
b
ENGLISH
Getting Started Connections Setup Playback Setting the Timer Other Functions Troubleshooting
Preparations
Turning the Power On
Press ON/STANDBY.
• The power turns on. Press again to set the power to standby.
• When the power is turned on, the function that was being used
when the power was last turned off is selected (vpage 22 “Last
function memory”).
GWhen the last function was CDH
When no disc is loaded, “NO DISC” is displayed.
Power indicator
Standby ∙∙∙∙∙∙∙∙∙∙∙∙∙∙∙∙∙∙∙∙∙∙∙∙∙∙∙∙∙∙∙∙∙∙∙∙∙∙∙∙∙∙∙∙∙∙∙∙∙∙∙∙∙∙∙∙∙∙∙∙∙∙∙∙∙∙∙∙∙∙∙∙∙∙∙∙∙∙∙∙∙∙∙∙∙∙∙∙∙∙∙∙ Off
Power on ∙∙∙∙∙∙∙∙∙∙∙∙∙∙∙∙∙∙∙∙∙∙∙∙∙∙∙∙∙∙∙∙∙∙∙∙∙∙∙∙∙∙∙∙∙∙∙∙∙∙∙∙∙∙∙∙∙∙∙∙∙∙∙∙∙∙∙∙∙∙∙∙∙∙∙∙∙∙∙∙∙∙∙∙∙∙∙∙ Red
When the timer is set ∙∙∙∙∙∙∙∙∙∙∙∙∙∙∙∙∙∙∙∙∙∙∙∙∙∙∙∙∙∙∙∙∙∙∙∙∙∙∙∙∙∙∙∙∙∙∙∙∙∙∙∙∙∙∙∙∙∙∙∙∙∙∙∙Orange
NOTE
• Power continues to be supplied to some of the circuitry even when
the power is in the standby mode. When leaving home for long
periods of time or when traveling, either press ON/STANDBY to turn
off the power, or unplug the power cord from the power outlet.
• Be sure to stop playback before turning the power off.
n Completely turning off the power
Unplug the power cord from the wall outlet.
b Note that the time setting is cleared when the power cord is
unplugged from the outlet.
b The settings made for the various functions may be cleared if the
power cord is left unplugged from a power outlet for an extended
period of time.
Setting the layer to be played with
priority
• The layer that is played with priority when the disc is loaded can be
set.
• Upon purchase, the priority layer is set to the “SA-CD”.
When “NO DISC” is displayed, press and hold
1
[MENU/SET].
The current priority layer is displayed.
Press [MENU/SET] again and select the layer to be
2
played with priority.
[Selectable items]
SA-CD
CD
This setting is stored in the RCD-CX1’s memory and is not canceled
even when the disc tray is opened or closed or the power is turned on
or off. To change the setting, perform the above procedure again.
: The SA-CD layer mode for Super Audio CDs.
: The CD layer mode for Super Audio CDs.
Loading Discs
In the stop mode, press <2/5> to open the disc tray.
b “Loading Discs” (vpage 3).
n To close the disc tray
Press <2/5> again.
b The disc tray also closes when 1/3 is pressed.
NOTE
• The power must be on when opening and closing the disc tray.
• Do not push the disc tray in by hand when the power is off. Doing so
can damage it.
•
Do not insert foreign objects into the disc tray. Doing so will damage it.
Operations During Playback
Adjusting the Master Volume
Either turn <VOLUME> or press [VOLUME df].
The volume level is displayed.
[Variable range]
b When lowering the volume from –90.0 dB, the display shows
“– –.– dB”.
Input Source Switching
Press SOURCE to select input source.
b The “iPod” indicator is displayed when a Control Dock for iPod is
connected. (“NO iPod” is displayed if no iPod is connected to the
Control Dock for iPod.)
Listening with Headphones
Plug the headphones (sold separately) into the <PHONES>.
b The sound from the speakers is automatically cut off.
NOTE
Be careful not to set the volume too high when using headphones.
–90.0dB
~
0.0dB
Playback
Specifications
Page 16

ENGLISH
BASS
TREBLE
Pure D
(PURE DIRECT)
BALANCE
100% 40%
OFF
[VOLUME df]
[PURE DIRECT/
TONE]
[MUTE]
[DIMMER]
[4/o]
[6/p]
1/3
[2]
[TU–/6,TU+/7]
[CH–/8, CH+/9]
[NUMBER]
[REPEAT/RANDOM]
[TIME/DISPLAY]
<2/5>1/
3
<VOLUME>
<SOURCE>
<
8
/–, +/
9
>
Getting Started Connections Setup Playback Setting the Timer Other Functions Troubleshooting Specifi cations
Symbols used to indicate buttons in this manual
Button located on both the main unit and the remote control
unit
Button only on the main unit
Button only on the remote control unit
Playback
BUTTON
<BUTTON>
[BUTTON]
Adjusting the Tone
Press [PURE DIRECT/TONE] and select the mode you
1
want to adjust.
Adjust the volume with [4/o, 6/p].
2
b Thereafter, to adjust another mode, press [PURE DIRECT/TONE].
b If no operation is performed for 3 seconds, the adjustment is
retained and the normal display reappears.
[Selectable modes]
Pure D
(PURE
DIRECT)
[Selectable items]
BASS
[Variable range]
TREBLE
[Variable range]
BALANCE
[Variable range]
Settings made upon purchase:
• Pure D (PURE DIRECT) ·············off
• BASS ·······································0dB
• TREBLE ···································0dB
• BALANCE ························ CENTER
: This is the mode that recreates the original sound most
faithfully, providing extremely high quality sound.
on off
: Adjusts the bass sound.
–8dB
: Adjusts the treble sound.
–8dB
: Adjusts the left/right volume balance.
+L10
Press [4/o] when you want to adjust the left channel,
and [6/p] when you want to adjust the right channel.
~
~
~
+8dB
+8dB
CENTER
~
+R10
When “Pure D” is set to “on”, digital output is switched off. What is
shown on the display also goes off. (When not playing or when no disc
is loaded, only part of the display is shown.)
NOTE
• When “Pure D” is set to “on”, you cannot set “BASS”, “TREBLE” or
“BALANCE”.
• When “Pure D” is set to “on”, you cannot use [DIMMER].
Turning the Sound Off Temporarily
(Muting)
Press [MUTE].
The “Mute on” is displayed.
To cancel, press [MUTE] again.
(The mute mode is also canceled when the <VOLUME> is turned or a
[VOLUME df] is pressed.)
Switching the Brightness of the Display
Press [DIMMER].
b The display’s brightness switches each time the button is
pressed.
Page 17

z
z z
CD Playback
Playing CDs
Press 1/3.
The “1” indicator lights and playback begins.
• If the function is set to something other than “CD”, press 1/3 to
switch the function to “CD” and start playback (vpage 22 “Auto
Function Selector Function”).
• The function can also be switched to “CD” using <SOURCE>.
NOTE
It is not possible to switch to a layer not recorded on the disc.
n Stopping playback
Press <2/5> or [2].
n Stopping playback temporarily
Press 1/3.
The “3” indicator lights.
b To resume playback, press 1/3.
n Fast-forwarding and fast-reversing (searching)
During playback, press and hold in [TU –/6
The “1” indicator flashes.
b Normal playback resumes when the button is released.
The sound may be interrupted for a brief moment when resuming
normal playback after searching.
,
TU +/7].
n
To play the desired track (remote control unit only)
Press [NUMBER] (0 ~ 9, +10) to select the track.
GExampleH : Track 4 : [4]
GExampleH : Track 12 : [+10] [2]
GExampleH : Track 20 : [+10] [+10] [0]
Switching the Display
Press [TIME/DISPLAY].
[During Play or Pause]
z
Elapsed time
of currently
playing track
Remaining time of
all remaining tracks
Currently playing
track number
Title name
[During Stop]
Total number of
tracks
z
Displayed only when Super Audio CD is in use.
z
b The display switches each time the button is pressed.
When a Super Audio CD with no recorded text information is loaded,
“NO TEXT” is displayed when you select “Title name”, “Album title” or
“Artist name”.
Remaining time
of currently
playing track
Total time
Album titleArtist name
Repeat Play or Random Play
Press [REPEAT/RANDOM].
[During Stop]
Single-track repeat All-track repeat
OFF
(indicator
turns off)
When setting is completed, press 1/3 to play.
Random Repeat
[During Play]
Single-track repeat All-track repeat
OFF
(indicator turns off)
b The display switches each time the button is pressed.
[Selectable items]
(Single-track repeat)
(All-track repeat)
(Random)
(Single-track
random repeat)
: Only 1 track is played repeatedly.
: All tracks are played repeatedly.
: Tracks are selected and played automatically in
random order.
: Automatically selected single-track is played
repeatedly.
Random
Single-track
random repeat
ENGLISH
Getting Started Connections Setup Playback Setting the Timer Other Functions Troubleshooting
Playback
n Moving to the beginning of tracks (skipping)
During playback, press <8/–, +/9> or [CH –/8, CH +/9].
b The disc is skipped the number of tracks equal to the number of
times the button is pressed.
b When pressed once in the return direction, playback returns to the
beginning of the currently playing track.
: All the tracks are played once in random order,
(Random Repeat)
OFF
(indicator turns off)
then played again repeatedly, each time in a
different random order.
: Normal playback resumes.
NOTE
• Random play cannot be set or canceled during playback.
• Direct searching is not possible during random playback.
Specifications
Page 18

ENGLISH
[CLEAR]
[CH–/8, CH+/9]
1/3
[NUMBER]
[PROGRAM/
DIRECT]
[REPEAT/RANDOM]
[TIME/DISPLAY]
[2/u, 8/i,
4/o, 6/p]
[5/ENTER]
[MODE]
<2/5>
<
8
/–, +/
9
>
1/3
Getting Started Connections Setup Playback Setting the Timer Other Functions Troubleshooting Specifi cations
Symbols used to indicate buttons in this manual
Button located on both the main unit and the remote control
unit
Button only on the main unit
Button only on the remote control unit
BUTTON
<BUTTON>
[BUTTON]
n To cancel random play and repeat play
During stop, press
“ ”, “ ”, “ ”, “ ” are unlit.
b You can cancel even if you press <2/5> to open the disc tray.
[REPEAT/RANDOM]
until displays of “ ”,
Playback of MP3 and WMA Files
There are many music distribution sites on the Internet allowing you
to download music fi les in MP3 or WMA (Windows Media® Audio)
format. The music (fi les) downloaded from such sites can be stored on
CD-R or CD-RW discs and played on the RCD-CX1.
Playing Tracks in the Desired Order
<Program>
Up to 20 tracks can be programmed.
In the stop mode, press [PROGRAM/DIRECT].
Playback
The “PROG” indicator lights.
1
Use [NUMBER] (0 ~ 9, +10) to select the traks.
2
b Example : To program tracks 3, 12, 7 to play in that order:
Press [PROGRAM/DIRECT], [3], [+10], [2], [7].
Press 1/3.
3
Playback starts in the programmed order.
n Checking the order of the programmed tracks
In the stop mode, press <+/9> or [CH +/9].
The track numbers are displayed in the programmed order each
time the button is pressed.
n To delete programmed tracks one track at a time
In the stop mode, press [CLEAR].
The last track programmed is cleared each time the button is
pressed.
n Clearing the all programmed track
In the stop mode, press [PROGRAM/DIRECT].
The “PROG” indicator turns off.
b You can cancel even if you press <2/5> to open the disc tray.
“Windows Media” and “Windows” are registered trademarks or
trademarks in the United States and other countries of Microsoft
Corporation of the United States.
About the MP3 and WMA Formats that
can be Played
CD-R and CD-RW discs created in the format described below can be
played.
Writing software format
ISO9660 level 1
b When written in other formats, it may not be possible to play the
disc properly.
Maximum number of playable fi les and folders
Total number of folders + fi les : 1000
Maximum number of folders : 255
File format
MPEG-1 Audio Layer-3
WMA (Windows Media Audio)
“– – :– –” is displayed if the total programmed time exceeds 99 minutes,
59 seconds.
NOTE
• Direct searching is not possible during programmed playback.
• Programmed playback is not possible with MP3 and WMA fi les.
Page 19

Playable MP3/WMA file
File format
MP3 32, 44.1, 48 kHz 32 ~ 320 kbps .MP3
WMA 32, 44.1, 48 kHz 64 ~ 160 kbps .WMA
Sampling
frequency
Bit rate Extension
Playing MP3 and WMA Files Repeat Play or Random Play
Load a CD-R or CD-RW disc containing music les in
1
the MP3 or WMA format into the disc tray (vpage
3).
Using the folder mode
Press [REPEAT/RANDOM].
ENGLISH
Getting Started Connections Setup Playback Setting the Timer Other Functions Troubleshooting
• With the RCD-CX1, the folder and file names can be displayed like
titles. Up to 8 characters consisting of numbers, letters and the
underscore can be displayed. Characters that cannot be displayed
are replaced with asterisks.
• Copyright-protected files cannot be played. Note that depending on
the software used for burning and other conditions, some files may
not play or display correctly.
• JPEG and DivX® files are handled as files but cannot be played.
• Be sure to give files the extension “.MP3” or “.WMA”. Files with any
other extensions or with no extensions cannot be played.
• Recordings you have made should only be used for your personal
enjoyment, and as per copyright laws may not be used in other ways
without permission of the copyright holder.
Press [MODE] and select “Folder Mode” or “Disc
2
Mode”.
Folder mode :
The “WMA” or “MP3” indicator flashes.
The files in the selected folder are played.
Disc mode :
The “WMA” or “MP3” indicator lights.
All the files on the disc are played.
Use [2/u, 8/i] to select the folder to be played.
3
Use <8/–, +/9>, [4/o, 6/p] or [
4
CH +/9
Press 1/3 or [5/ENTER].
Playback starts.
5
] to select the le to be played.
n To switch the folder or file during playback
• Folder
Use [2/u, 8/i] to select the folder.
b When a folder is selected, playback switches to the first track of
the selected folder.
File
•
Use <8/–, +/9> or [CH –/8, CH +/9] to select the
file, or use [4/o, 6/p] to select the file number.
b The file numbers are set automatically when the disc is loaded.
n Switching the display
Press [TIME/DISPLAY] during play or pause.
Currently
playing track
number
File name Folder name
b In the stop mode, only the total number of tracks is displayed.
Elapsed time
of currently
playing track
CH –/8
Remaining time
of currently
playing track
Single-track repeat Repeat of all the
OFF
(indicator turns off)
b The display switches each time the button is pressed.
[Selectable items]
: Only the selected track is played repeatedly.
(Single-track repeat)
(Repeat of all the
tracks in the folder)
,
OFF
(indicator turns off)
NOTE
• Random playback is not possible in the folder mode.
• Programmed playback is not possible with MP3/WMA discs.
: All the files in the selected folder are played
repeatedly.
: Folder mode playback resumes.
tracks in the folder
Using the disc mode
Same as setting method for CD.
See “Repeat Play or Random Play” (vpage 14).
NOTE
Programmed playback is not possible with MP3/WMA discs.
Playback
Specifications
Page 20

ENGLISH
FM MONO AMFM AUTO
<
8
/–, +/
9
>
<SOURCE>
[2/u, 8/i,
4/o, 6/p]
[REPEAT/RANDOM]
[5/ENTER]
[TUNER]
[LINE1/LINE2]
[MODE]
[TU–/6,TU+/7]
[CH–/8, CH+/9]
[2/u, 8/i,
4/o, 6/p]
[PROGRAM/DIRECT]
[5/ENTER]
[CLEAR]
[MODE]
[iPod 13]
[NUMBER]
[MENU/SET]
Getting Started Connections Setup Playback Setting the Timer Other Functions Troubleshooting Specifi cations
Symbols used to indicate buttons in this manual
Button located on both the main unit and the remote control
unit
Button only on the main unit
Button only on the remote control unit
BUTTON
<BUTTON>
[BUTTON]
TUNER Playback
Tuning in Broadcast Stations
Connect the antenna beforehand (vpage 10).
Press [TUNER] to select the reception band.
1
About the FM Broadcast Reception Status Display
When the reception band mode is set to “FM AUTO”, the “ST”
indicator lights when a stereo broadcast is tuned in.
If the signal is weak and stable stereo reception is not possible, select
“FM MONO” to receive in monaural.
Playback
GAbout the displayH
When “FM AUTO” is selected ∙∙∙∙∙∙∙∙∙∙“AUTO” is displayed.
When “FM MONO” is selected ∙∙∙∙∙∙∙“MONO” is displayed.
When “AM” is selected ∙∙∙∙∙∙∙∙∙∙∙∙∙∙∙∙∙∙∙∙ The reception mode is not
displayed.
Use [TU –/6, TU +/7] to select the reception
2
band.
When a station is received, the “TUNED” indication will light.
• If the function is set to something other than “TUNER”, press
[TUNER] to switch the function to “TUNER” (vpage 22 “Auto
Function Selector Function”).
• The function can also be switched to “TUNER” using <SOURCE>.
n To tune automatically
Press and hold in <8/–, +/9> or [TU –/6, TU +/7] to
automatically search and tune in broadcast stations.
b Stations whose signal is weak cannot be tuned in.
n To stop auto tuning
Press <8/–, +/9> or [TU –/6, TU +/7].
n To tune manually
The reception frequency switches each time [TU –/6, TU +/7]
is pressed.
A humming sound may be heard when using a TV nearby while
receiving AM programs. If this happens, move the system as far from
the TV as possible.
Automatically Presetting FM Stations
(Auto Preset)
Up to 40 stations can be preset.
Auto preset is not possible with AM broadcast stations.
Press [TUNER] to select “FM AUTO” or “FM
1
MONO”.
Press and hold in [MENU/SET].
2
“A.PRESET” fl ashes.
Press [MENU/SET] again.
Broadcast stations are preset automatically.
3
• Broadcast stations whose antenna signal are weak cannot be preset
automatically. If you wish to preset such stations, tune them in
manually.
• Once auto presetting starts, it cannot be stopped before it is
completed. (It takes about 30 seconds for auto presetting to be
completed.)
Presetting FM/AM Stations Manually
Up to 40 stations (total for FM and AM) can be preset.
Tune in the station.
1
Press [PROGRAM/DIRECT].
The minimum number display “P– –” for the unregistered preset
2
fl ashes.
Select the number to be preset using [NUMBER]
3
(0 ~ 9, +10) or [CH –/8, CH +/9] and press
[PROGRAM/DIRECT].
The reception frequency and reception mode are preset.
Page 21

Listening to Preset Stations
Use [NUMBER] (0 ~ 9, +10) or [CH –/8, CH +/9] to
select the preset number.
Naming the Currently Tuned in Broadcast
Station
Names of up to 8 characters can be input.
Press [MENU/SET] three times.
1
Press [2/u] or [8/i].
2
The name input mode is set.
Use [2/u, 8/i] to select the character, then press
3
[6/p] to set.
b Characters that can be input.
A to Z, 0 to 9,
b Press [4/o, 6/p] to move the cursor.
b Press [CLEAR] to delete characters.
When the name has been entered, press
4
conrm the entry.
If a preset number has not been registered for the broadcast station
you have entered, you are prompted to enter it now. Set the number
to be preset using [CH–/8, CH+/9].
n Changing the Broadcast Station Name
q Call out the preset name to be changed, then press [MENU/SET]
three times.
w Use [4/o, 6/p] to select the character to be changed, then press
[CLEAR].
e Perform step 3 and 4 at “Naming the Currently Tuned in Broadcast
Station”.
^ ’ ( ) * + , - . / =
(space)
[5/ENTER]
to
iPod® Playback
With the RCD-CX1, you can listen to music on an iPod. It is also
possible to operate the iPod from the main unit or remote control
unit.
iPod is a trademark of Apple Inc., registered in the U.S.
and other countries.
b The iPod may only be used to copy or play contents that are not
copyrighted or contents for which copying or playback is legally
permitted for your private use as an individual. Be sure to comply
with applicable copyright legislation.
Preparations
Set the iPod on the DENON Control Dock for iPod.
(vSee the control dock for iPod’s operating instructions.)
1
Press <SOURCE> or [LINE1/LINE2] to select “iPod”.
2
Press [MODE] to select the display mode.
The mode switches each time the button is pressed.
3
[Selectable mode]
Display location Main unit display
Playable
files
Active
buttons
: Video may not be output, depending on the combination of
z
ASD-1R and iPod.
Audio file
Video file
Remote
control unit
(RCD-CX1)
iPod
Browse mode Remote mode
iPod display
S S
A S
S S
A S
z
ENGLISH
Listening to Audio
Use
[2/u, 8/i]
1
to select the music le to be played.
Press
[iPod 1/3]
Playback starts.
2
• If the function is set to something other than “iPod”, press [iPod
1/3] to switch the function to “iPod” and start playback. (vpage
22 “Auto Function Selector Function”.)
• The function can also be switched to “iPod” using <SOURCE> or
[LINE1/LINE2].
n Stopping playback temporarily
During playback, press [iPod 1/3].
Press again to resume playback.
n Fast-forwarding or fast-reversing
During playback, either press and hold [CH–/8] or [CH+/9].
n To cue to the beginning of a track
During playback, press [CH–/8] or [CH+/9].
n To perform Repeat/Random playback
(Browse mode only)
Press [REPEAT/RANDOM].
Single-track repeat All-track repeat
OFF
(indicator
turns off)
n
To switch between the Browse and Remote modes
Press [MODE].
to select the item, then press
.
Random
Random Repeat Single-track
random repeat
[5/ENTER]
Getting Started Connections Setup Playback Setting the Timer Other Functions Troubleshooting
Playback
Specifications
Page 22

ENGLISH
[5/ENTER]
[MENU/SET]
ON STANDBY
[2/u]
[8/i]
[TIME/DISPLAY]
ON/STANDBY
<SOURCE>
Getting Started Connections Setup Playback Setting the Timer Other Functions Troubleshooting Specifi cations
Playback
Symbols used to indicate buttons in this manual
Button located on both the main unit and the remote control
unit
Button only on the main unit
Button only on the remote control unit
BUTTON
<BUTTON>
[BUTTON]
Browse mode
Operating mode that shows iPod information on the RCD-CX1
display.
In this mode, it is not possible to operate the iPod directly or to
perform the operations associated with the slide show function. Set
the Remote mode to play slide shows.
Remote mode
This mode is for operating the iPod directly while watching the
information displayed on the iPod’s screen.
Also see the control dock for iPod operating manual regarding
connection and operation.
NOTE
• DENON will accept no responsibility whatsoever for any loss of iPod
data.
• Depending on the type of iPod and the software version, some
functions may not operate.
To Switch the Display
During playback, press [TIME/DISPLAY].
The display switches each time the button is pressed.
Album title Artist nameTitle name
Elapsed time of
currently playing track
Disconnecting the iPod
Press ON/STANDBY to set the standby mode.
1
Remove the iPod from the control dock for iPod.
2
Recording
Recording on an External Device
First connect the device from which you want to record to the
RCD-CX1 (vpage 9).
Press
1
Set the recorder to the recording mode.
<SOURCE>
recorded.
to choose the input source to be
2
b For instructions on operating, see the operating instructions of the
connected component.
Start playback on the player.
3
b For instructions on operating, see the operating instructions of the
connected component.
• The LINE2 input signal is not output to the recording output terminal
(REC).
• Adjusting the volume or tone does not affect the sound being
recorded.
Page 23

ONCE
EVERYDAY
EVE R Y D AYEVE R Y D AY
CD TUNER
iPod
b
P01
REG _ N A ME
CDCD
AM1 2 : 00AM1 2 : 00
AM1 0 : 00AM1 0 : 00
Setting the Timer
AM1 2 : 00AM1 2 : 00
AM1 0 : 00AM1 0 : 00
ENGLISH
Getting Started Connections Setup Playback Other Functions Troubleshooting
Timer Playback
The everyday timer, once timer and sleep timer can be set.
Timer order of priorityTimer order of priority
The order of priority when the times set for the different
timers overlap is as follows:
1. Sleep timer
2. Once timer
3. Everyday timer
If the current time is not set, enter timer setting mode to get time
setting mode.
Setting the Timer
• Everyday timer playback
Playback starts (the power turns on) and stops (the power turns
off) at the set times each day.
• Once timer playback
Playback starts (the power turns on) and stops (the power turns
off) once only at the set times.
Press [MENU/SET].
The “TIMER” is displayed.
1
Use [2/
u
, 8/i] to select the timer play mode.
2
Use [2/
u
, 8/i] to select the function to be played.
4
b “iPod” is displayed only when control dock for
iPod is connected.
Press [MENU/SET] or [5/ENTER].
The function to be played is set.
5
b In the case of functions other than tuner, “ON” is displayed and
the display advances to step 7.
GOnly when the “TUNER” function is selectedH
-q Use [2/
u
, 8/i] to select the preset number.
6
After 2 seconds
b When no name has been registered for the selected preset
number, the program service or frequency appears after the preset
number is displayed.
-w Press [MENU/SET] or [5/ENTER].
The station of the selected preset number is set, and “ON”
is displayed.
Use [2/
7
Press [MENU/SET] or [5/ENTER].
8
u
, 8/i] to set the “hours” for the timer start
time.
The “hours” for the timer start time are set.
Use [2/
11
Press [MENU/SET] or [5/ENTER].
12
Use [2/
13
14
Use [2/
u
, 8/i] to set the “hours” for the timer stop
time.
The “hours” for the timer stop time are set.
u
, 8/i] to set the “minutes” for the timer stop
time.
Press [MENU/SET] or [5/ENTER].
The “minutes” for the timer stop time are set.
u
, 8/i] to turn timer playback on.
15
Display Once timer Everyday timer
1_ _ / E_ _ OFF OFF
1on / Eon ON ON
1_ _ / Eon OFF ON
1on / E_ _ ON OFF
Press [MENU/SET] or [5/ENTER].
16
The timer setting is set.
Set the power to standby.
17
Timer playback standby mode is set, and the power indicator
lights orange.
Setting the Timer
Specifications
3
Press [MENU/SET] or [5/ENTER].
Timer playback mode is set, and “FUNC” is displayed.
Use [2/
9
start time.
Press [MENU/SET] or [5/ENTER].
10
The “minutes” for the timer start time are set and “OFF” is
displayed.
u
, 8/i] to set the “minutes” for the timer
0
Page 24

ENGLISH
[2/u]
[MENU/SET]
ON/STANDBY
[2]
13
[8/i]
[5/ENTER]
[LINE1/LINE2]
[TUNER]
[PHONO]
[SLEEP/TIMER]
[iPod 13]
ON/STANDBY
<SOURCE>
<2/5>1/
3
<+/
9
>
1_ _ /E_ _
1_ _ /Eon1on /E_ _
1on /Eon
1_ _ /E_ _ 1_ _ /Eon
1_ _ /E_ _
1on /E_ _
Getting Started Connections Setup Playback Setting the Timer Other Functions Troubleshooting Specifi cations
Symbols used to indicate buttons in this manual
Button located on both the main unit and the remote control
unit
Button only on the main unit
Button only on the remote control unit
BUTTON
<BUTTON>
[BUTTON]
n To check the timer settings
q Press [MENU/SET].
The “TIMER” is displayed.
w Press [2/u, 8/i].
The “EVERYDAY” or “ONCE” is displayed.
e Press [MENU/SET].
The display switches as follows each time the button is pressed:
Function selection
Timer ON/OFF
Timer On time
Timer Off time
n To change the timer settings
Repeat the procedure under “Setting the Timer” (vpage 20).
Set the Timer ON/OFF
After setting with “Setting the Timer” (vpage 20), you can set
timer on/off for timer operations you want to perform.
Press [MENU/SET] twice or press and hold
1
[SLEEP/TIMER].
The current settings are displayed.
Press [2/u, 8/i] and select the timer for the timer
2
operation you want.
Setting the Timer
n To change the setting while setting the timer
Press <2/5> or [2].
Return to step 2 under “Setting the Timer” (vpage 20). Repeat
the procedure.
NOTE
During setting, you can change with <2/5> or [2] up to step 14.
n To clear the timer settings
q Press [MENU/SET].
The “TIMER” is displayed.
w Press [2/u, 8/i].
The “EVERYDAY” or “ONCE” is displayed.
e While “EVERYDAY” or ”ONCE” is displayed, press <2/5> or [2]
for at least 2 seconds.
n If there is a power failure
• The current time setting is canceled. Turn the power on and reset
the current time (vpage 11).
• The timer settings are cleared. Set the timer again.
• The tuner’s presettings may be cleared. If so, perform the
presetting procedure again.
n When performing a timer setting with DENON
control dock for iPod (ASD-3N or ASD-3W)
Pause the track you want to play, and keep the power on for DENON
control dock for iPod.
b In “Setting the Timer” (vpage 20), in the case of reserving
Everyday Timer only, the change is as follows when you press
[2/u, 8/i].
b In “Setting the Timer” (vpage 20), in the case of reserving
Once Timer only, the change is as follows when you press
[2/u, 8/i].
Press [MENU/SET] or [5/ENTER].
The timer setting is set.
3
Press ON/STANDBY to set the RCD-CX1 to Standby
4
mode.
The power indicator lights orange.
Page 25

Setting the Sleep Timer
SLEEP 40SLEEP 30SLEEP 20SLEEP 10SLEEPOFF
SLEEP 90 SLEEP 80 SLEEP 70 SLEEP 60 SLEEP 50
Use this function to automatically switch the power to the standby
mode after a specific amount of time (minutes).
The sleep timer can be set to up to 90 minutes, in steps of 10
minutes.
Select and play the desired function.
1
Press [SLEEP/TIMER] and select the setting time.
2
b After about 5 seconds, the set returns to as it was before the
sleep timer was set.
n Canceling the sleep timer
Either press [SLEEP/TIMER] at step 2 under “Setting the Sleep
Timer” until “SLEEPOFF” is displayed, or press ON/STANDBY.
n
Checking the time remaining until the sleep timer
starts
Press [SLEEP/TIMER].
Other Functions
Convenient Functions
Auto Power On
When the power is in standby, the power turns on when any of
the buttons below other than ON/STANDBY is operated, and the
respective operation is performed.
•
<2/5> ··············The disc tray opens.
• 1/3 for the different functions
························
• [TUNER] ············Playback of the tuner starts.
• [2] ··················· Change the function to “CD” and switch the
• [PHONO] ··········· Change the function to “PHONO” and switch
• [LINE1/LINE2] ···· Change the function to the finally set “LINE”
NOTE
When the iPod can be played, press [iPod 1/3] to start iPod
playback.
Playback of that source starts.
power on.
the power on.
and switch the power on.
ENGLISH
Last Function Memory
This stores the settings as they were directly before the standby
mode was set.
When the power is turned back on, the settings are restored to as
they were directly before the standby mode was set.
Resetting the Microprocessor
Perform this procedure if the display is abnormal or if operations
cannot be performed.
When the microprocessor is reset, all the settings are reset to
their default values.
Unplug the power cord.
1
Plug the power cord into a power outlet while pressing
2
<+/9> and <SOURCE> simultaneously.
After about 15 seconds “RESET” is displayed to indicate that the
microprocessor has been reset.
Getting Started Connections Setup Playback Troubleshooting
Other FunctionsSetting the Timer
Auto Function Selector Function
When one of the buttons below is pressed, the function switches
to the respective function and playback of that source starts.
•
1/3 ················· The function switches to “CD” and the CD
starts playing.
• [2] ··················· The function switches to “CD” and the stop.
• [iPod 1/3] ········ The function switches to “iPod” and the iPod
• [TUNER] ············ The functions switches to “TUNER” and the
starts playing.
band last set is tuned in.
If “RESET” is not displayed in step 2, start over from step 1.
Specifications
Page 26

ENGLISH
Getting Started Connections Setup Playback Setting the Timer Other Functions Troubleshooting
Troubleshooting
If a problem should arise, first check the following:
1. Are the connections correct?
2. Is the set being operated as described in the owner’s manual?
3. Are the other components operating properly?
If this unit does not operate properly, check the items listed in the table below. Should the problem persist,
there may be a malfunction.
In this case, disconnect the power immediately and contact your store of purchase.
GGeneralH
Symptom Cause Countermeasure Page
Set does not
operate properly.
When the power
is turned on, the
power indicator
does not light
and no sound is
produced.
The power
indicator lights
but no sound is
produced.
Troubleshooting Specifications
No sound is
produced from
one side.
For stereo
sources, the
positions of the
instruments are
inverted.
• External noise or interference is
causing the set to malfunction.
• Connection of the power cord is
faulty.
• The speaker cables are not
properly connected.
• The function (input) is incorrect.
• The volume is set too low.
• The speaker cables are not
properly connected.
• The input cables are not properly
connected.
• The left/right balance is off.
• The connections of the speaker
cables or input cables are
inverted.
• Reset the microprocessor. 22
• Check that the power plugs are
securely inserted into the RCDCX1’s AC inlet and the wall power
outlet.
• Connect securely.
• Switch to the correct function
(input).
• Adjust the volume to an
appropriate level.
• Connect securely.
• Connect securely.
• Adjust the left/right balance.
• Check and remedy the
connections.
10
8
12
12
8
8, 9
13
8 ~ 10
GCDH
Symptom Cause Countermeasure Page
Disc tray does not
open.
“NO DISC” is
displayed even
though a disc is
loaded.
“00 : 00” is
displayed even
though a disc is
loaded.
Playback does not
start even when
the 1/3 button is
pressed.
No digital signals
are output.
A specific section
of the disc
cannot be played
properly.
Programmed
playback is not
possible.
A CD-R or CD-RW
disc cannot be
played.
Files recorded
in MP3 or WMA
format cannot be
played.
• The power is not on. • Turn on the power. 12
• The disc is not properly loaded. • Reload the disc. 3
• A disc other than a CD or Super
Audio CD is loaded.
• The disc is dirty or scratched. • Wipe the dirt off the disc or
• For Super Audio CDs, no digital
signals are output.
• Turn the pure direct mode on.
• The disc is dirty or scratched. • Wipe the dirt off the disc or
• The tracks have not been
programmed properly.
• The disc has not been finalized.
• The recording conditions are bad
or the quality of the disc itself is
poor.
• You have selected a copyrightprotected WMA file or a file that
cannot be played normally.
• Load a CD or Super Audio CD. 3
replace the disc.
• For Super Audio CDs, use the
analog audio output signals.
• Turn the pure direct mode off.
replace the disc.
• Program properly. 15
• Finalize the disc then play it.
• Use a properly recorded disc.
• Press the
select a different file.
8 or 9 button to
3, 4
9
13
3, 4
3
–
16
Page 27

GTunerH
Symptom Cause Countermeasure Page
Buzzing noise in
FM broadcasts.
Hissing or buzzing
noise is heard in
AM broadcasts.
Humming noise
is heard in AM
• The antenna cable is not properly
connected.
• Noise interference from a nearby
electronic device equipped with
a microprocessor, or the radio
broadcast signal is weak.
• Noise interference from a
nearby monitor, etc., or there
is interference in the broadcast
signal.
• There is interference from current
in power cords.
• Connect the antenna properly.
• Reposition the equipment or the
positions or directions of the
connection cables, antenna, etc.
• Connect an outdoor antenna.
• Turn off the monitor.
• Change the position or direction
of the AM loop antenna.
• Connect an outdoor antenna.
• Connect an outdoor antenna. –
broadcasts.
GRecord PlayerH
Symptom Cause Countermeasure Page
When playing
records, a wailing
noise (howling) is
produced when
the volume is
• The player and speakers are too
close together.
• The floor is soft and vibrates
easily.
• Move the player and speakers as
far apart as possible.
• Use cushions or spikes to absorb
the vibrations of the speakers
being conveyed from the floor.
raised.
GiPodH
Symptom Cause Countermeasure Page
iPod cannot be
played.
• Device you want to play and set
input source do not match.
• Cable is not properly connected.
• Control dock for iPod’s AC
adapter is not connected to
• Select an appropriate input
source.
• Reconnect.
• Plug the control dock for iPod’s
AC adapter into a power outlet.
power outlet.
GRemote Control UnitH
Symptom Cause Countermeasure Page
Set does not work
properly when
remote control
unit operated.
• Batteries are worn.
• You are operating outside of the
specified range.
• Obstacle between main unit and
• Replace with new batteries.
• Operate within the specified
range.
• Remove the obstacle.
remote control unit.
• The batteries are not inserted in
the proper direction, as indicated
by the polarity marks in the
battery compartment.
• The set’s remote control sensor
is exposed to strong light (direct
sunlight, inverter type fluorescent
• Insert the batteries in the
proper direction, following the
polarity marks in the battery
compartment.
• Move the set to a place in which
the remote control sensor will
not be exposed to strong light.
bulb light, etc.).
10
18
ENGLISH
Getting Started Connections Setup Playback Setting the Timer Other Functions Troubleshooting
Specifications
–
–
–
–
–
–
–
9
–
4
4
4
4
4
Receiver section
n
Rated output: 2-channel driving
37.5 W + 37.5 W (8 Ω/ohms, DIN, 1 kHz, T.H.D. 0.7 %)
75 W + 75 W (4 Ω/ohms, DIN, 1 kHz, T.H.D. 0.7 %)
High frequency distortion:
Output terminals:
Suited for headphones/stereo headphones
Equalizer amplifier output
(REC OUT terminals):
Input sensitivity / Input impedance: PHONO (MM) : 2.5 mV / 47 kΩ/kohms
PHONO (MC) : 0.2 mV / 100 Ω/ohms
CD, LINE1, LINE2 : 130 mV / 47 kΩ/kohms
RIAA deviation:
PHONO (MC) : 30 Hz ~ 20 kHz ±0.5 dB
Reception frequency range: FM : 87.5 MHz ~ 107.9 MHz AM : 520 kHz ~ 1710 kHz
Reception sensitivity: FM : 1.5 μV / 75 Ω/ohms AM : 20 μV
FM channel separation: 35 dB (1 kHz)
FM S/N ratio: Monaural : 74 dB Stereo : 70 dB
FM harmonic distortion: Monaural : 0.3 % Stereo : 0.4 %
S/N ratio: PHONO (MM) :
(With input terminals short-circuited, 5 mV input signal)
PHONO (MC) : 70 dB
(With input terminals short-circuited, 0.5 mV input signal)
(A-weighted network):
Tone control: BASS : 100 Hz ± 8 dB
TREBLE : 10 kHz ± 8 dB
Frequency response:
Clock/Timer section
n
Clock type:
Timer: Everyday timer / Once timer : One system each
Sleep timer : Max. 90 minutes
CD section
n
[Super Audio CD] [CD]
• Analog output
Signal type: 1-bit DSD 16-bit linear PCM
Sampling frequency: 2.822 MHz 44.1 kHz
Usable discs: Super Audio CD Compact Disc
• Digital output
Optical: – –15 ~ –21 dBm
Emission wavelength: – 660 nm
General
n
Power supply: AC 120 V, 60 Hz
Power consumption:
0.3 W (Standby)
Maximum external dimensions:
Weight: 8.0 kg
Remote control unit (RC-1109)
n
Remote control method: Infrared pulse method
Batteries:
Maximum external dimensions:
Weight: 165 g (including batteries)
0.05 % (Rated output: –3 dB), 8 Ω/ohms, 1 kHz
Speaker 4 ~ 16 Ω/ohms
Rated output : 150 mV
PHONO (MM) : 20 Hz ~ 20 kHz ±0.5 dB
84 dB
LINE1, LINE2 : 95 dB (input terminals short-circuited)
10 Hz ~ 40 kHz (+0.5 dB, –3 dB) (INPUT: LINE1, PURE DIRECT: ON)
Power line frequency synchronized method (Within ±60 seconds per month)
50 W
300 (W) x 110 (H) x 341 (D) mm
R03/AAA Type (two batteries)
44 (W) x 233 (H) x 22 (D) mm
z For purposes of improvement, specifications and design are subject to change without notice.
Troubleshooting
Specifications
Page 28

www.denon.com
Denon Brand Company, D&M Holdings Inc.
Printed in Japan 5411 10058 001D
 Loading...