


 Loading...
User Guide
English
Manual Version v1.2

Table of Contents |
|
Introduction............................................................................... |
5 |
Box Contents..................................................................................... |
5 |
Support.............................................................................................. |
5 |
Setup ......................................................................................... |
6 |
Devices & File Analysis ...................................................................... |
7 |
Configuration ..................................................................................... |
7 |
Features .................................................................................... |
8 |
Top Panel........................................................................................... |
8 |
Front Panel ....................................................................................... |
13 |
Rear Panel ........................................................................................ |
14 |
2

Operation ................................................................................ |
15 |
Touchscreen Overview ..................................................................... |
15 |
Performance View........................................................................................... |
15 |
Track Overview & Waveform ......................................................................................... |
15 |
Central Library Preview ................................................................................................... |
16 |
Library View .................................................................................................... |
17 |
Platter Display Overview ................................................................... |
18 |
Performing ........................................................................................ |
18 |
Loading Tracks................................................................................................ |
18 |
Searching & Filtering Tracks............................................................................ |
19 |
Editing Crates and Playlists ............................................................................. |
20 |
Playback & Cueing .......................................................................................... |
21 |
Looping & Beat-Jumping ................................................................................ |
22 |
Syncing & Pitch Adjustment ............................................................................ |
22 |
Pad Modes...................................................................................................... |
23 |
Hot Cue Mode................................................................................................................. |
23 |
Loop Modes .................................................................................................................... |
23 |
Roll Mode ......................................................................................................................... |
24 |
Slicer Mode ...................................................................................................................... |
24 |
Menu ............................................................................................... |
25 |
Utility ............................................................................................................... |
25 |
Preferences .................................................................................................... |
27 |
Source............................................................................................................. |
29 |
Record ............................................................................................................ |
29 |
3

Appendix ................................................................................ |
30 |
SATA Drive Installation ..................................................................... |
30 |
FX Parameters.................................................................................. |
31 |
Technical Specifications................................................................... |
34 |
Trademarks & Licenses ................................................................... |
36 |
4

Introduction
Thank you for purchasing the Prime 4. At Denon DJ, we know how serious music is to you. That’s why we design our equipment with only one thing in mind—to make your performance the best it can be.
Box Contents
Prime 4 Standalone DJ System
Display Protective Cover
Display Cleaning Cloth
IEC Power Cable
USB 3.0 Cable
Hard Drive Mounting Screws
Engine Prime Software Download Card
Quickstart Guide
Safety & Warranty Manual
Important: Visit denondj.com/downloads to download the Engine Prime software.
Support
For the latest information about this product (documentation, technical specifications, system requirements, compatibility information, etc.) and product registration, visit denondj.com.
For additional product support, visit denondj.com/support.
5

Setup
Important: Occasionally, we may update Prime 4’s firmware to add exciting new features and improvements. Visit denondj.com to check for available firmware updates, especially after you update your software (firmware updates may address new software features).
1.Visit denondj.com and log into your account. (Create an account if this is your first Denon DJ product.)
2.In your account, download and install the latest version of Engine Prime. Double-click the .exe (Windows®) or
.dmg (macOS®) installer file you downloaded, and then follow the on-screen instructions to install Engine Prime.
3.Connect input sources (microphones, CD players, etc.) to Prime 4.
4.Connect output devices (headphones, power amplifiers, loudspeakers, etc.) to Prime 4.
5.Plug all devices into power sources, and turn on devices in proper order:
•When starting a session, turn on (1) input sources, (2) Prime 4, (3) output devices.
•When ending a session, turn off (1) output devices, (2) Prime 4, (3) input sources.
6.To use Engine (standalone playback): Insert a USB flash drive or SD card (with an Engine-configured music library) to one of Prime 4’s USB ports or SD Card Slot.
Media Player
Computer |
Booth Monitors |
(optional)
Headphones
(front panel)
Hard Drive
Microphone
Power |
|
Smartphone |
|
or Tablet |
|
Powered Loudspeakers |
Turntable |
|
Items not listed under the Introduction > Box Contents are sold separately.
6

Devices & File Analysis
Prime 4 can play music files from USB drives, SD cards, or other connected Prime 4 units. Make sure you are using only the supported file systems (for USB drives or SD cards) and file formats (for music files) listed below.
Supported file systems: |
exFAT, FAT32 |
|
Supported file formats: |
AAC/M4A |
MP3 (32–320 kbps) |
|
AIF/AIFF (44.1–192 kHz, 16–32-bit) |
MP4 |
|
ALAC |
Ogg Vorbis |
|
FLAC |
WAV (44.1–192 kHz, 16–32-bit) |
Although Prime 4 can play tracks that have not been analyzed yet, pre-analyzing them allows its features to work most effectively. You can analyze tracks in one of two ways:
•On Prime 4, load the track: When you load a track to play, Prime 4 will automatically analyze it (if it has not already been analyzed). This may take a moment to complete, depending on the length of the track. You can start playing the track from the beginning immediately, though you will need to wait a moment for the analysis to finish.
•Use Engine Prime software: The included Engine Prime software can pre-analyze your music library to use with Prime 4. You can also use it to organize your library by creating crates and playlists. It also manages your Prime 4 hardware preferences (see Operation to learn more about this).
Visit denondj.com/downloads and find the webpage for Prime 4 to download the Engine Prime software.
To eject a USB drive or SD card:
1. Make sure none of its tracks are being played on any connected Prime 4 units. Ejecting a device unloads its tracks from all networked Prime 4 units.
2. Press Eject. A list of connected devices will appear in the main display.
3. Tap the eject icon for the device you would like to eject. If a track on the device is currently playing, you will be asked if you want to continue ejecting, which will stop the track and clear the deck. Tap Cancel to cancel ejecting the device, or tap Eject Anyway to eject it.
To eject additional devices, repeat Step 3.
To return to the previous screen, press Eject again, or tap the X in the upper-right corner.
Configuration
Prime 4 has several settings that you can customize in the Utility (basic settings) and Preferences (advanced settings) menus. See Operation > Menu to learn about these settings.
7

Features
Top Panel
|
55 |
56 |
57 |
57 |
57 |
58 |
|
|
|
|
|
|
61 |
62 63 |
64 |
64 |
67 |
68 |
|
60 |
55 |
56 |
57 |
57 |
59 |
58 |
|
|
|
1 |
|
|
65 |
66 |
66 |
|
|
||
|
|
|
|
|
|
|
|
|
|
||||||||||
|
|
|
|
|
|
|
|
|
|
|
|
|
|
|
|
|
|
|
69 |
48 |
|
50 |
|
52 |
53 |
|
|
|
|
|
|
|
|
48 |
50 |
52 |
53 |
|
|
47 |
|
49 |
|
51 |
54 |
|
8 |
8 |
3 |
4 |
8 |
8 |
47 |
49 |
51 |
54 |
|||
45 |
37 |
|
|
30 |
31 |
45 |
37 |
|
|
30 |
31 |
||||||||
|
|
9 |
9 |
|
2 |
9 |
9 |
|
|
||||||||||
|
|
|
|
|
|
|
|
|
|
|
|
|
|
|
|||||
|
|
|
|
|
|
|
|
5 |
6 |
|
|
|
|
|
|
||||
46 |
|
|
|
|
|
|
|
11 |
11 |
11 |
11 |
46 |
|
|
|
|
|
||
|
|
|
|
|
|
|
|
7 |
|
|
|
|
|
||||||
38 |
|
|
|
|
22 |
|
|
|
38 |
|
|
|
22 |
|
|||||
|
|
|
|
|
32 |
|
|
|
|
|
|
|
|
32 |
|||||
|
|
|
|
|
|
|
11 |
11 |
|
|
11 |
11 |
|
|
|
|
|
||
24 |
|
|
23 |
|
|
|
|
|
24 |
|
23 |
|
|
||||||
|
|
|
|
|
11 |
11 |
|
17 |
11 |
11 |
|
|
|
||||||
|
|
|
|
|
|
|
|
|
|
|
|
|
|
|
|||||
|
|
|
|
|
|
|
10 |
10 |
|
|
10 |
10 |
|
|
|
|
|
|
|
25 |
|
|
|
|
|
|
|
12 |
12 |
|
18 |
12 |
12 |
25 |
|
|
|
|
|
26 |
|
40 |
41 |
42 |
43 |
33 |
|
13 |
13 |
|
19 |
13 |
13 |
26 |
40 |
41 |
42 |
33 |
|
27 |
|
34 |
|
14 |
14 |
|
20 |
14 |
14 |
27 |
43 |
|
|||||||
|
|
|
|
|
|
|
|
|
|
34 |
|||||||||
28 |
|
|
|
|
|
|
35 |
|
|
|
21 |
|
|
28 |
|
|
|
|
35 |
|
|
39 |
|
|
36 |
15 |
15 |
|
15 |
15 |
|
39 |
|
36 |
|||||
29 |
|
|
|
|
|
|
29 |
|
|
||||||||||
|
|
|
|
|
44 |
|
16 |
|
|
|
|
|
|
|
44 |
||||
|
|
|
|
|
|
|
|
|
|
|
|
|
|
|
|
|
|||
1.Touchscreen: This full-color multi-touch display shows information relevant to Prime 4's current operation. Touch the touchscreen (and use the hardware controls) to control the Prime 4 interface. See Operation >
Touchscreen Overview for more information.
Tip: If you adjust the angle of the touchscreen, use the stand on its back panel to secure it in place.
2.Browse Knob: Turn this knob to navigate through lists. Press the knob to move
forward in the touchscreen or select an item.
3.Back: Press this button to move back in the touchscreen.
4.Forward (FWD): Press this button to move forward in the touchscreen.
5.Load : Press this button to load the selected track to Deck 1 or Deck 3.
6.Load : Press this button to load the selected track to Deck 2 or Deck 4.
3 |
4 |
|
2 |
5 |
6 |
7. View: Press this button to cycle between the Library and Performance views. Press |
7 |
and hold this button to show the Menu, which includes Source Selection, Record Menu and the Utility/Preferences Menu. See Operation > Menu for more information.
8

8.Channel FX: Use these buttons to route audio from the corresponding channel to the Effect 1 or 2 module.
9.Channel Level: Turn this knob to adjust the level of the pre-fader, pre-EQ audio signal for the channel.
10.Channel Level Meters: These LEDs display the audio signal level of the channel.
11.Channel EQ: Turn these knobs to boost or cut the high, mid-range, and low frequencies for the channel.
12.Sweep FX: Turn this knob to control the effect selected by the Sweep FX buttons.
13.Channel Cue: Press this button to send the channel’s pre-fader signal to the headphones’ cue channel.
14.Channel Fader: Use this fader to adjust the channel’s volume level.
15.Crossfader Assign: Routes the audio playing on the corresponding channel to either side of the crossfader (L or R), or bypasses the crossfader and sends the audio directly to the program mix (center,
Thru).
16.Crossfader: Use this crossfader to mix between channels assigned to the left and right sides of the crossfader.
17.Master Level Meters: These LEDs display the audio signal level of the master mix (sent out of the Master Outputs).
18.Phones Mix: Adjusts the software’s audio output to the headphones, mixing between the cue output and the master mix output.
19.Phones Level: Adjusts the volume of the headphones.
20.Split Cue: When this switch is in the On position, the headphone audio will be “split” such that all channels sent to cue channel are summed to mono and sent to the left headphone channel and the master mix is summed to mono and sent to the right channel. When the switch is in the Off position, the cue channel and master mix will be “blended” together.
21.Sweep FX Buttons: Press one of these buttons to enable or disable an effect that you can control with the Sweep FX knobs. Only one of these buttons can be enabled at a time.
•Filter: This effect applies a filter to the channel. Starting from the center (12:00) position, turn a Sweep FX knob counter-clockwise to apply a low-pass filter, or turn it clockwise to apply a high-pass filter.
•Echo: This effect is a brief echo. Starting from the center (12:00) position, turn a Sweep FX knob counter-clockwise to decrease the length of the delay and increase the feedback, or turn it clockwise to increase the length of the delay as well as the feedback.
•Noise: This effect adds noise to the signal. Starting from the center (12:00) position, turn a Sweep FX knob counterclockwise to add pink noise, or turn it clockwise to add white noise.
•Wash Out: This creates a transition effect. Turn a Sweep FX knob to its most counter-clockwise (minimum) position to apply a 1-beat echo that will also mute the channel’s normal audio signal, or turn it to its most clockwise (maximum) position to apply a 1/2-beat echo.
8 |
|
|
9 |
|
|
11 |
|
|
10 |
|
|
11 |
|
|
11 |
17 |
|
12 |
18 |
|
13 |
||
19 |
||
14 |
||
20 |
||
|
||
15 |
21 |
|
|
||
|
16 |
9
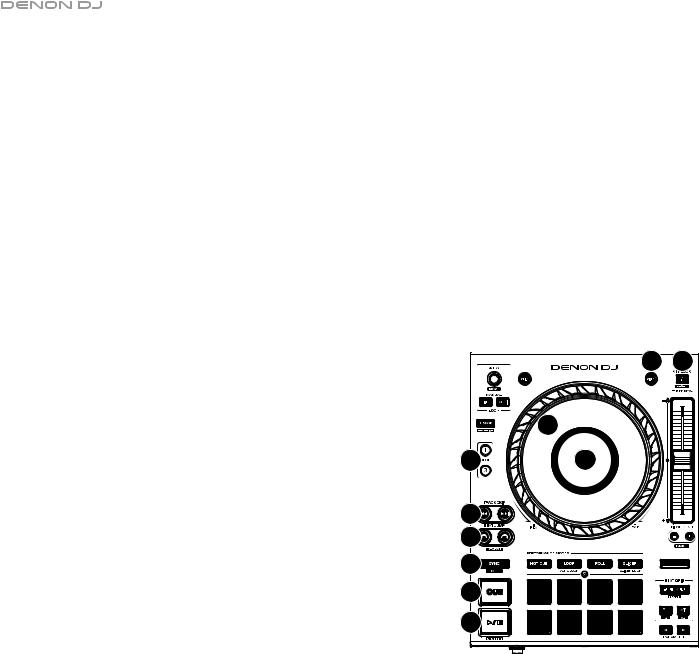
22.Platter: This capacitive, touch-sensitive platter controls the audio playhead when the wheel is touched and moved. When the Vinyl button is on, move the platter to “scratch” the track as you would with a vinyl record. When the Vinyl button is off (or if you are touching only the side of the platter), move the platter to temporarily adjust the track’s speed.
23.Platter Display: This display shows track artwork and information relevant to the performance, including the current playhead position, the current auto loop size, or current layer. See Operation > Platter Display Overview for more information.
24.Deck: Selects which deck in the software is controlled by that hardware deck. The left deck can control Deck 1 or 3; the right deck can control Deck 2 or 4.
Press and hold Shift and then press the Deck 3 or Deck 4 buttons to switch between four-deck and two-deck operation.
25.Track Skip: Press either of these buttons to skip to the previous or next track.
Press the Previous Track button in the middle of a track to return to the beginning of the track.
26.Beat Jump: Press either of these buttons to skip backward or forward through the track. Use the Auto Loop knob to determine the beat jump size.
Press and hold Shift and then press one of these buttons to search backward or forward through the track.
27.Sync / Sync Off: Press this button to activate sync.
Press and hold Shift and press this button to deactivate Sync. You can also set Sync to deactivate without using Shift by changing the Sync Button Action setting in the Preferences menu.
28.Cue / Track Start: During playback, press this button to return the track to a temporary cue point. If you have not set a temporary cue point, then press this button to return to the start of the track. (To set a temporary cue point, make sure the track is paused, move the platter to place the audio playhead at the desired location, and then press this button.)
During playback, press and hold Shift and press this button to set the cue point at the current playhead position.
If the deck is paused, press and hold this button to play the track from the temporary cue point. Release the button to return the track to the temporary cue point and pause it. To continue playback without returning to the temporary cue point, press and hold this button and then press and hold the Play button, and then release both buttons.
29.Play/Pause: This button pauses or resumes playback.
Press and hold Shift and then press this button to “stutter-play” the track from the initial cue point.
30.Vinyl: Press this button to activate/deactivate a “vinyl mode” for the platter. When activated, you can use the platter to “scratch” the track as you would with a vinyl record.
31.Key Lock / Key Sync: Press this button to activate/deactivate Key Lock. When Key Lock is activated, the track’s key will remain the same (0%) even if you adjust its speed. Press and hold Shift and press this button to reset Key Lock.
Press and hold this button to activate key sync.
|
30 |
31 |
|
22 |
|
24 |
23 |
|
25 |
|
|
26 |
|
|
27 |
|
|
28 |
|
|
29 |
|
|
10
32.Pitch Fader: Move this fader to adjust the speed (pitch) of the track. You can adjust its total range with the Pitch Bend buttons.
When you select another Deck with the Deck select buttons, the position of the Pitch Fader may not match the Pitch setting for the previous Deck. Slowly move the Pitch Fader in the direction indicated by the green takeover LED arrow until it turns off. At this point, the Pitch Fader matches the Pitch setting of the previous deck and can control it again.
33.Pitch Bend –/+: Press and hold one of these buttons to momentarily reduce or increase (respectively) the speed of the track.
Press and hold Shift and then press one of these buttons to set the range of the pitch fader.
34.Shift: Press and hold this button to access secondary functions of other controls.
35.Edit Grid: Press and hold this button to enable beat grid editing. Press and hold Shift and then press this button to reset the beat grid.
36.Grid Marker: When beat grid editing is enabled, press either of these buttons to move a downbeat marker backward or forward based on the current analyzed grid.
Press and hold Shift and then press these buttons to halve or double the current tempo.
37.Slip: Press this button to enable or disable Slip Mode. In Slip Mode, you can jump to cue points, trigger loop rolls, or use the platters, while the track’s timeline continues. In other words, when you stop the action, the track will resume normal playback from where it would have been if you had never done anything (i.e., as if the track had been playing forward the whole time).
38.Censor / Reverse: Press this button to activate/deactivate the Censor feature: the playback of the track will be reversed, but when you release the button, normal playback will resume from where it would have been if you had never engaged the Censor feature (i.e., as if the track had been playing forward the whole time).
Press and hold Shift and then press this button to reverse the playback of the track normally.
39.Performance Pads: These pads have different functions on each deck depending on the current pad mode. See Performing > Pad Modes for more information.
40.Hot Cue: Press this button to enter Hot Cue Mode.
41.Loop: Press this button once to enter Manual Loop Mode.
42.Roll: Press this button to enter Roll Mode.
43.Slicer: Press this button to enter Slicer Mode.
44.Parameter /: Use these buttons for various functions in each Pad Mode. See Performing > Pad Modes for more information.
45.Auto Loop/Loop Move: Turn this knob to set the size of an automatic loop. The value will be shown in the touchscreen and platter display.
Press this knob to activate or deactivate an automatic loop at the current location of the track.
Press and hold Shift and turn this knob to shift the active loop to the left or right.
45 |
37 |
|
|
|
46 |
|
|
|
|
38 |
|
|
|
32 |
|
|
|
|
|
|
40 |
41 |
42 |
33 |
|
43 |
|||
|
|
|
|
34 |
|
|
|
|
35 |
|
|
39 |
36 |
|
|
|
|
|
44 |
46.Loop In/Loop Out: Press either of these buttons to create a Loop In or Loop Out point at the current location. Their placement will be affected by the Quantize and Smart Loops settings. See Performing >
Looping & Beat-Jumping for more information.
11
|
55 |
56 |
57 |
57 |
57 |
58 |
60 |
55 |
56 |
57 |
57 |
59 |
58 |
|
||||||
|
48 |
50 |
|
52 |
53 |
|
|
47 |
49 |
|
51 |
54 |
|
61 |
62 63 |
64 |
64 |
67 |
68 |
65 |
66 |
66 |
|
|
|
|
|
|
|||
|
|
|
|
|
69 |
48 |
50 |
52 |
53 |
|
|
47 |
49 |
51 |
54 |
||
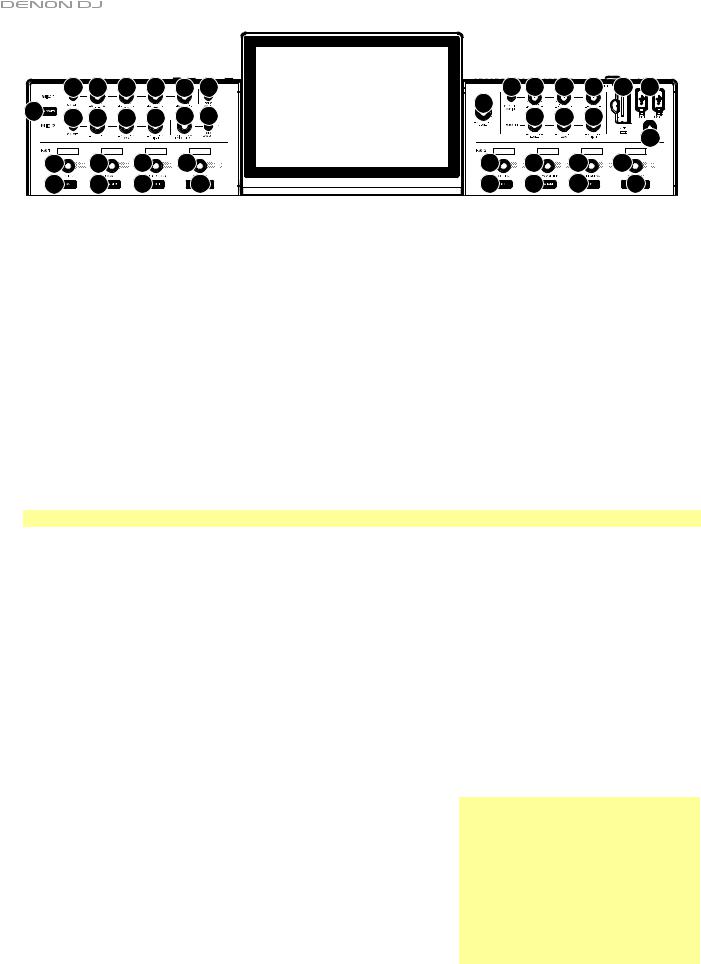
47.FX On: Press these buttons to enable or disable FX 1 and FX 2.
48.FX Select: Turn these knobs to select the active effect for FX 1 and FX 2.
49.FX Parameter: When lit, press this button to activate the secondary parameter for an effect.
50.FX Parameter Knob: Use these knobs to adjust the effect parameter.
51.FX Reset: Press these buttons to reset the FX Frequency to center.
Press and hold Shift and press these buttons to set the effect to its default state, with Wet/Dry set to 0.
52.FX Frequency: Turn this knob to select a frequency band of the audio signal to which the BPM effects will be applied. Select the center (12 o'clock) position to apply effects to the entire spectrum of frequencies.
53.FX Wet/Dry Knob: Turn this knob to adjust the wet/dry mix of the effects.
54.FX Beats Buttons: Press either of these buttons to decrease or increase the rate of time-based effects on that deck.
55.Mic On/Off: Press this button to activate/deactivate the microphones.
56.Mic Level: Turn these knobs to adjust the volume levels of the corresponding microphone inputs. The Peak light next to each knob indicates the current signal level by its color: green (low), amber (normal/optimal), or red (maximum/peak). You can adjust the microphone attenuation in the Utility menu.
Important: The audio signals from the microphones are routed directly to the Master Outputs.
57.Mic EQ: Turn these knobs to boost or cut the high, mid-range (Mic 1 only) and low frequencies for the corresponding microphones.
58.Echo On/Off: Press this button to activate/deactivate the reverb effect on the microphones’ audio signal.
59.Mic Echo Level: Turn this knob to adjust the amount of the reverb effect on the microphones’ audio signal.
60.Talkover: Press this button to use the “talkover” feature, which automatically reduces the volume level of the master mix when you speak into the microphone. You can adjust the talkover level in the Utility menu.
61.Master Level: Turn this knob to adjust the volume level of the Master Outputs.
62.Zone Channel Assign: Press this button to set Deck 4 as a Zone Playlist, which will play from the Zone Outputs. By default, the master output will play through the zone if a zone playlist is not assigned.
63.Zone Level: Turn this knob to adjust the volume level of the Zone Outputs.
64.Zone EQ: Turn these knobs to boost or cut the high and low frequencies for the Zone Outputs.
65.Booth Level: Turn this knob to adjust the volume level of the Booth Outputs.
66.Booth EQ: Turn these knobs to boost or cut the high and low frequencies for the Booth Outputs.
67.SD Card Slot: Insert a standard SD card to this slot. When you select
that SD card as a source, you can use the display to select and load tracks on your SD card.
68.USB 1/2 Ports: Connect standard USB flash drives to these USB ports. When you select that USB flash drive as a source, you can use the display to select and load tracks on your USB flash drive.
69.Eject: Press this button to bring up on the touchscreen a list of connected media devices which can be ejected. Tap one of the listed media sources to eject that device. To prevent data corruption, drives must be ejected before being removed from the player.
Press and hold Shift and press this button to open the Source menu.
Note: Although Prime 4 can play tracks that have not been analyzed yet, pre-analyzing them allows its features to work most effectively. We recommend using the Engine Prime software to configure your music library on your SD card or USB flash drive before connecting to Prime 4. See the complete Engine Prime User Guide to learn how to do this.
12
Loading...