

Page 1
Contents Preparation Connections
.
.
PORTABLE PREMIUM SOUND
BLUETOOTH SPEAKER
Owner’s Manual
Volume adjustment
Troubleshooting
Appendix
You can print more than one page of a PDF onto a single sheet of paper.
1
Index
Page 2
Contents Preparation Connections
Contents
Volume adjustment
Troubleshooting
Appendix
Preparation
Unpacking the speaker
Overview
Sound quality
Design
Operation
Features and functions
Using the built-in stand
Charging
Turning the power on
Turning the power off
Connections
4
Bluetooth operation
5
Pairing
5
Connecting
5
1: Connecting for the first time
5
2: Reconnecting paired devices
6
3: Reconnecting NFC devices
Simultaneously connecting multiple Bluetooth devices (Multipoint
8
function)
9
Disconnecting the Bluetooth connection
12
Listening to music using a wired connection
12
Volume adjustment
Adjusting the volume
13
13
13
14
16
17
18
19
19
20
2
Index
Page 3
Contents Preparation Connections
Troubleshooting
Tips
Troubleshooting
Changing the device name of Envaya displayed on the
Bluetooth device
Restarting the unit
Appendix
Replacing the grill cloth
Charging Your Mobile Device
Playing back a Bluetooth device
Trademark information
Specifications
Index
Volume adjustment
22
23
27
28
29
30
31
31
32
34
Troubleshooting
Appendix
3
Index
Page 4
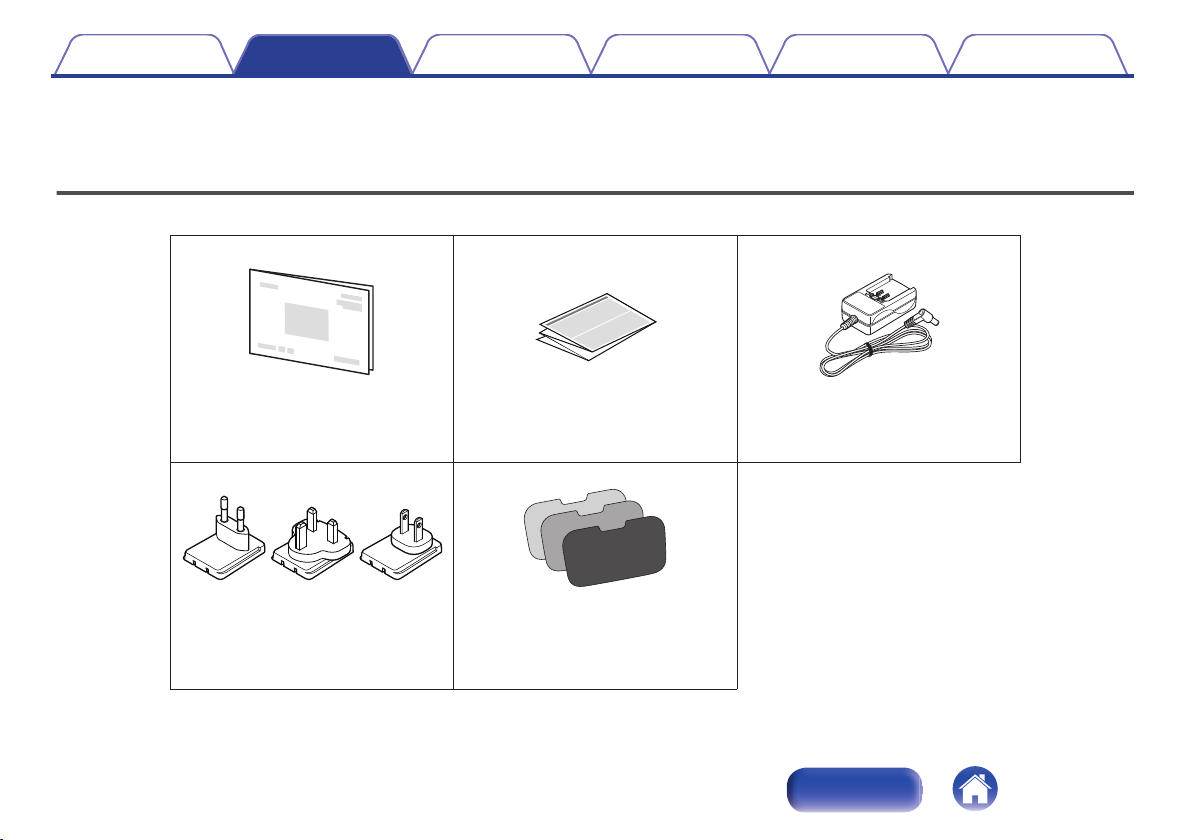
Safety InstructionsQuick Start Guide
Optional speaker grill cloths
(3 colors)
AC charger adapter plugs
(3 pieces)
AC charger/power supply
Contents Preparation Connections
To ensure proper operation, please read this owner’s manual carefully before using the product.
After reading this manual, be sure to keep it for future reference.
Preparation
Volume adjustment
Unpacking the speaker
Unpack your new Envaya and verify that the following items are included.
Troubleshooting
Appendix
.
4
Index
Page 5
Contents Preparation Connections
Overview
Volume adjustment
Troubleshooting
Appendix
Sound quality
Despite its compact size, Envaya is equipped with 2 high quality
0
full range speakers, and a passive radiator that utilizes double
suspension to provide sound with a realistic, overflowing
presence and deep base.
Envaya is compatible with a wide range of codecs, including the
0
high sound quality aptX, AAC and SBC. Envaya automatically
selects the optimum compatible codec for your Bluetooth device
(smartphone or tablet) so you can enjoy high-grade wireless
sound. Additionally, aptX is Low Latency compatible so you can
enjoy videos and gaming without audio lag.
Design
Envaya is equipped with a slim shape for the proper balance
0
between portability and sound.
Envaya comes packaged with 3 additional speaker grill cloths (4
0
total: orange, pink, blue, and gray) so you can have your Envaya
match your decor or mood.
Operation
Multiple Bluetooth devices can be paired with Envaya and mobile
0
devices equipped with the NFC function can be easily paired and
connected with just a touch of the device on the top of Envaya.
5
Index
Page 6
BACD GFEH
Contents Preparation Connections
Features and functions
.
Battery/Charging Indicator
A
Indicates the amount of remaining battery power and charging status.
(v p. 11)
Power button (X)
B
Turns the speaker on or off. (v p. 12)
0
Press this button to check the amount of remaining battery power.
0
(v p. 11)
AUX button
C
Switches the input source to the device connected to the AUX input.
Bluetooth button
D
(v
p. 16)
p. 19)
Switches the input source to a Bluetooth device. (v
0
p. 13)
Used to enter Bluetooth pairing mode.
0
Used to disconnect the current Bluetooth device.
0
(v
Volume adjustment
Status Indicator
E
Power on (using the AC adapter): Always lit
0
Power on (using batteries): Lit
0
Troubleshooting
Appendix
(turns off 8 seconds after the power is turned on.)
Power off: Off
0
Muted: Fades off/on
0
Volume up/down: Blinking
0
N mark
F
Contact location for pairing and connecting NFC compatible Bluetooth
devices. (v
Mute button
G
Mutes/Unmutes the volume.
Volume adjustment buttons (–,+)
H
Adjusts the volume up and down. (v
p. 17)
(v
p. 20)
p. 20)
6
Index
Page 7
L
M
K
J
I
Contents Preparation Connections
Volume adjustment
Mobile charging port
I
Used to charge a connected USB device. (v p. 30)
Reset button
J
Resets the Envaya.
AUX Input connector
K
Used to connect an external audio player with an analog output.
(v p. 19)
DC IN connector
L
Connect the supplied AC charger/power supply. (v p. 10)
Built-in stand
M
Troubleshooting
(v
p. 28)
Appendix
.
7
Index
Page 8
Contents Preparation Connections
Using the built-in stand
Volume adjustment
Troubleshooting
Appendix
Place the speaker on a flat surface facing towards you
1
supporting it with one hand.
.
Place the fingers of your other hand across the back
2
top of the speaker and gently “squeeze” to extend the
built-in stand from the back of the speaker.
.
8
Index
Page 9
A
Contents Preparation Connections
Volume adjustment
Troubleshooting
Appendix
Charging
Envaya can be powered by an AC power source or from it’s internal battery.
Please make sure you charge the battery completely before listening on battery power.
It takes approximately 2.5 hours to fully charge the battery when it is completely discharged.
0
Envaya can be used for approximately 10 hours when the battery is fully charged. (The playback time may differ depending on the ambient temperature, playback volume,
0
and usage conditions)
NOTE
Only use the supplied AC charger/power supply.
0
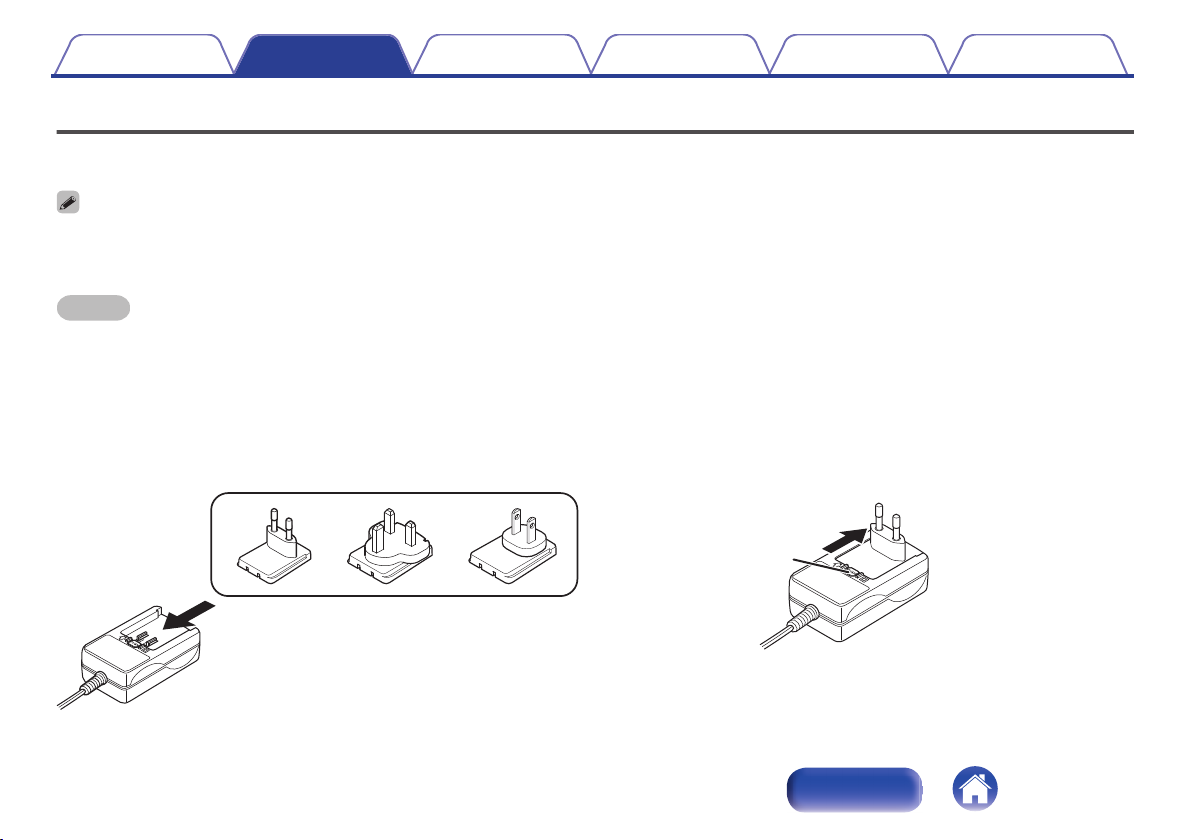
Attach the correct adapter for your region.
0
Changing the AC adapter plug
o
Attach the adapter plug that fits the power outlet in your region as shown below:
[Attaching an AC adapter plug]
Push in the direction of the arrow until a “click” sound is heard.
[Removing an AC adapter plug]
While pressing the A button, slide in the direction of the arrow.
.
9
.
Index
Page 10
Household power outlet
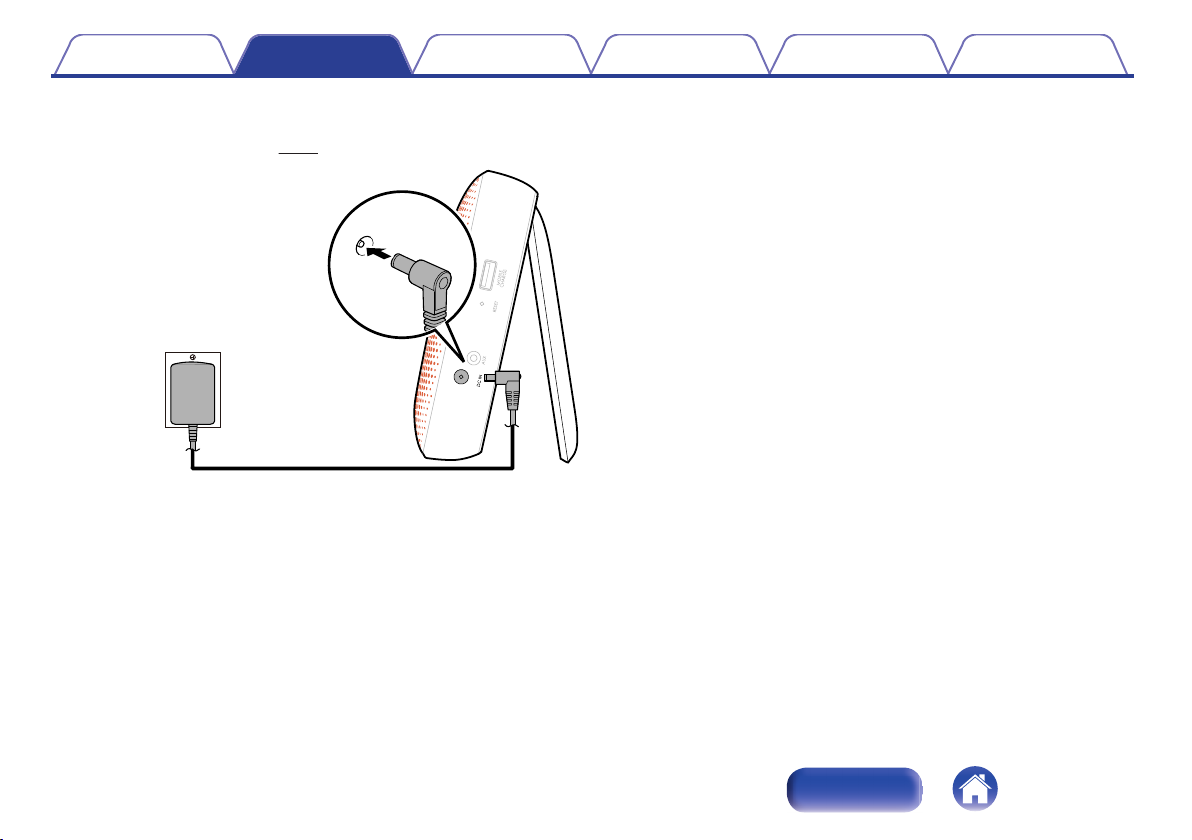
Contents Preparation Connections
Connecting the AC charger/power supply
o
Envaya automatically starts charging when the AC charger/power supply is connected to a power source and the speaker.
See
“Battery indicator” (v
.
p. 11) for details about understanding the battery indicator.
Volume adjustment
Troubleshooting
Appendix
10
Index
Page 11
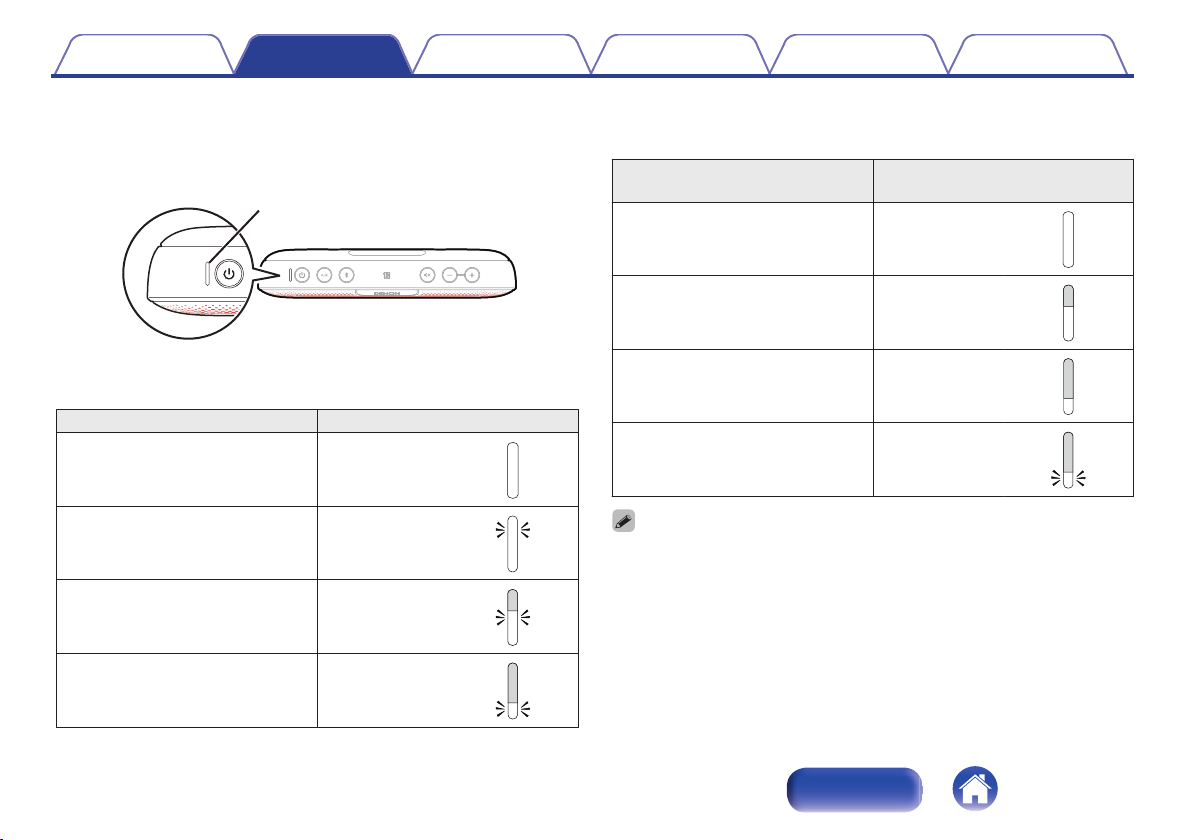
Battery Indicator
Contents Preparation Connections
Volume adjustment
Troubleshooting
Appendix
Battery indicator
o
The battery indicator uses 3 LEDs to indicate the approximate time
remaining on the internal battery and the status of the charge process
when connected to an AC power source.
.
When connected to the AC charger/power supply (charging)
The battery indicator is always lit when charging.
Charging status (Approximate) Battery Indicator
100 % Lit
70 – 100 % Blinking
.
30 – 70 % Blinking
.
When running on battery power
Press and release the X
button to check the remaining battery. The
remaining battery level is displayed for approximately 5 seconds.
Remaining battery
(Approximate)
Battery Indicator
70 – 100 % Lit
.
30 – 70 % Lit
.
5 – 30 % Lit
.
0 – 5 % Blinking
.
Low Battery Indicator: When the battery level is very low, the bottom LED will flash.
This indicates that the AC charger needs to be connected as soon as possible.
.
0 – 30 % Blinking
.
11
Index
Page 12

Contents Preparation Connections
Volume adjustment
Troubleshooting
Appendix
Turning the power on
Press and hold X
1
The status indicator illuminates and Envaya turns on.
.
When Envaya is running on battery power, the status and battery indicators
will turn off to save power in approximately 8 seconds.
until a notification sound is heard.
Turning the power off
Press and hold X
1
The status indicator and source button lights turn off and the
speaker’s power is turned off.
.
Envaya automatically turns off when there is no audio output from a Bluetooth
0
device for approximately 15 minutes and the unit is not operated during this time.
If the input of Envaya is set to AUX and it is not operated for approximately 8
0
hours, Envaya automatically turns off.
until a notification sound is heard.
12
Index
Page 13

Envaya
Contents Preparation Connections
Connections
Volume adjustment
Bluetooth operation
You can enjoy listening to music wirelessly by connecting Envaya to your Bluetooth device.
Troubleshooting
Appendix
Pairing
Pairing (registration) is an operation that is required in order to connect a
Bluetooth device to Envaya.
When using Bluetooth for the first time, you need to pair Envaya and your
Bluetooth device so they can communicate with each other.
Envaya can store pairing information for up to 8 devices.
.
NOTE
Multiple Bluetooth devices cannot be played back at the same time.
Connecting
There are three methods for connecting with Bluetooth devices:
1
Connecting for the first time (v p. 14)
2
Reconnecting paired devices (v p. 16)
3
Reconnecting NFC devices (v p. 17)
13
Index
Page 14

Bluetooth ON
Contents Preparation Connections
Volume adjustment
Troubleshooting
Appendix
1: Connecting for the first time
Turn on Bluetooth on your mobile device.
1
For details, see the Owner’s Manual of your Bluetooth device.
0
.
Press and hold X
2
The status indicator illuminates and Envaya turns on.
Envaya automatically enters pairing mode the first time the power
0
is turned on after purchase. In this case, you do not need to
perform step 3.
Press and hold the Bluetooth button for 3 seconds until
3
a notification sound is heard.
The Bluetooth button blinks rapidly and Envaya enters pairing mode.
.
until a notification sound is heard.
14
Index
Page 15

Envaya
Contents Preparation Connections
Volume adjustment
Troubleshooting
Appendix
Select “Envaya” from the list of devices displayed on
4
the screen of your Bluetooth device.
When pairing is complete a notification sound is heard and the
Bluetooth button changes from blinking to on.
.
If you are asked to enter a pass key in the Bluetooth device screen, enter
“0000”.
Listening to music.
5
Music played back on the Bluetooth device will now play through
your Envaya speaker.
Adjust the volume to an appropriate level.
NOTE
Envaya remains in the pairing mode for approximately 5 minutes and then will exit
0
pairing mode. If your device could not connect, please try again from step 3.
Envaya cannot pair with Bluetooth devices that require a pass key other than
0
“0000”.
15
Index
Page 16

Bluetooth ON
Envaya
Contents Preparation Connections
Volume adjustment
Troubleshooting
Appendix
2: Reconnecting paired devices
Turn on Bluetooth on your mobile device.
1
2
For details, see the Owner’s Manual of your Bluetooth device.
0
.
Press and hold X
The status indicator illuminates and Envaya turns on.
If the last device which was connected to Envaya is turned on, in
0
range, and has Bluetooth enabled, it automatically connects to
Envaya.
If the input on Envaya is set to AUX, press the Bluetooth button to
0
switch to the Bluetooth input.
until a notification sound is heard.
Select “Envaya” from the list of devices displayed on
3
the screen of your Bluetooth device.
When a device is connected by Bluetooth, a notification sound is
heard and the Bluetooth button changes from blinking to on.
.
Listening to music.
4
Music played back on the Bluetooth device will now play through
your Envaya speaker.
16
Index
Page 17

Contents Preparation Connections
Volume adjustment
Troubleshooting
Appendix
3: Reconnecting NFC devices
Simply touch Envaya with the Bluetooth device. Envaya automatically
turns on and the Bluetooth device reconnects.
Turn on the NFC function of the Bluetooth device.
1
2
For details, see the Owner’s Manual of your Bluetooth device.
0
Touch the NFC antenna section of the Bluetooth device
onto the Q
The power supply to Envaya turns on and the device automatically
reconnects.
When a device is connected by Bluetooth, a notification sound is
heard and the Bluetooth button changes from blinking to on.
Follow the instructions displayed on the screen of your Bluetooth
0
device to complete the operation.
mark on Envaya.
.
Listening to music.
3
Music played back on the Bluetooth device will now play through
your Envaya speaker.
When a Bluetooth device that is playing back music touches the Q mark on
Envaya, the music starts being output from Envaya.
NOTE
When connecting using the NFC connection, release the lock function on the
Bluetooth device.
17
Index
Page 18

During Bluetooth connection
During
playback
Audio signal
Contents Preparation Connections
Simultaneously connecting multiple Bluetooth devices (Multipoint function)
Three Bluetooth devices can be simultaneously connected to Envaya so
you can easily switch between multiple Bluetooth audio sources without
having to disconnect and reconnect each device.
(“Bluetooth operation” (v
It is convenient to connect devices that you use frequently so that you do
not need to re-connect each time you want to switch playback devices.
Pair the devices that you want to connect in advance.
p. 13))
Volume adjustment
Switching playback devices
o
Stop or pause playback on the device that you are
1
currently listening to.
Begin playback on the device that you want to listen to.
2
Envaya cannot be paired with a 4th device when it is connected simultaneously to 3
Bluetooth devices. Disconnect one of the connected Bluetooth devices before
pairing another device.
Troubleshooting
Appendix
.
18
Index
Page 19

Stereo mini plug cable
(sold separately)
Contents Preparation Connections
Volume adjustment
Troubleshooting
Appendix
Disconnecting the Bluetooth connection
Press and hold the Bluetooth button.
1
The Bluetooth connection is disconnected and the Bluetooth button
changes from being on to blinking slowly.
If multiple Bluetooth devices are connected all devices are
0
disconnected.
The Bluetooth device can also be disconnected by turning the Bluetooth function of
the Bluetooth device off.
Listening to music using a wired connection
You can enjoy listening to music from devices that do not support
Bluetooth audio by connecting to Envaya using a stereo mini plug cable
(sold separately).
Press and hold X until a notification sound is heard.
1
The status indicator illuminates and Envaya turns on.
Connect the AUX input connector on Envaya to the
2
headphones jack of the portable music player using a
stereo mini plug cable (sold separately).
When a stereo mini plug cable is connected to the AUX input
0
connector of Envaya, the input of Envaya automatically switches
to AUX.
.
Start playing music from the device. You may need to
3
adjust the volume up on the connected device, then
adjust the volume on Envaya.
19
Index
Page 20

Contents Preparation Connections
Adjusting the volume
Volume adjustment
Volume adjustment
Troubleshooting
Appendix
While playing music, press the + button to increase the
1
volume. Press the – button to decrease the volume.
For the best signal to noise ratio, you may have to raise the
0
volume of your connected music player up to an appropriate level
then adjust the volume of the speaker up or down.
.
Muting the volume
o
Press :.
1
The status indicator blinks slowly and the volume is reduced to 0.
Press : again to unmute the sound and return to the previous
0
volume level.
.
To cancel mute, press the : button again. Mute can also be canceled by adjusting
the volume on Envaya while the sound is muted.
20
Index
Page 21

Contents Preparation Connections
Volume adjustment
Troubleshooting
Troubleshooting
Appendix
Tips
Charging your mobile device 22
Changing the color of the grill 22
Connecting multiple Bluetooth devices and switching easily between
them 22
Using an NFC compatible mobile device 22
I want to disconnect an NFC compatible device 22
I want to switch connection between multiple NFC compatible devices 22
Changing the Bluetooth name of your Envaya speaker 22
Troubleshooting
Speaker does not turn on 23
No sound from the speaker 24
Sound is distorted, noisy, or cuts in and out 24
Cannot pair a Bluetooth device with the speaker 25
Cannot pair or connect an NFC device 25
Speaker is turning off automatically 26
Speaker is malfunctioning 26
21
Index
Page 22

Contents Preparation Connections
Volume adjustment
Troubleshooting
Appendix
Tips
Charging your mobile device
Use the USB cable supplied with the your device and connect it to the Mobile Charge port.
0
Changing the color of the grill
Remove the grill and attach one of the supplied optional speaker grill cloths.
0
Connecting multiple Bluetooth devices and switching easily between them
Music can only be output from Envaya from one Bluetooth device connected using Bluetooth, but three Bluetooth devices can be simultaneously
0
connected to Envaya. To switch easily between connections, connect Bluetooth devices that you use frequently to Envaya. To switch playback to a
different Bluetooth device when multiple Bluetooth devices are connected, stop playback on the device that is currently playing back, and then start
playback on a different Bluetooth device.
Using an NFC compatible mobile device
0
Enable the NFC function on the NFC compatible device, and touch the NFC device to the Q
I want to disconnect an NFC compatible device
0
Touch the Q mark with the NFC compatible device again while the device is connected to disconnect it.
I want to switch connection between multiple NFC compatible devices
0
Touch the Q mark with a different NFC compatible device while an NFC compatible device is connected. Playback of the current NFC compatible
device stops, and the different NFC compatible device is now connected.
Changing the Bluetooth name of your Envaya speaker
If you have more than one of Envaya, you need to change the device name displayed on the Bluetooth device in order to identify which speakers to
0
output sound from. Change the device name of Envaya displayed on the Bluetooth device.
(v
p. 18)
(v
p. 29)
(v
p. 30)
mark on Envaya. (v
p. 27)
(v
p. 17)
22
Index
Page 23

Contents Preparation Connections
Volume adjustment
Troubleshooting
Appendix
Troubleshooting
Check all connections.
If Envaya does not operate properly, check the items listed in the table below.
Should the problem persist, there may be a malfunction. In this case, disconnect the power immediately and contact your store of purchase.
Speaker does not turn on
o
Symptom Cause / Solution Page
Speaker does not turn on
(AC power)
Speaker does not turn on
(Battery power)
To turn on the speaker press and hold the power button for 2 seconds.
0
The speaker is not connected to an AC power source. Make sure the AC charger is connected to a
0
working power source (AC wall outlet).
The speaker is not connected to an AC power source. Make sure the AC charger is inserted correctly into
0
the speaker.
Check that the appropriate adapter plug is correctly attached to the AC charger.
0
The battery is completely discharged. Connect the AC charger and recharge the battery. 10
0
12
10
10
9
23
Index
Page 24

Contents Preparation Connections
No sound from the speaker
o
Symptom Cause / Solution Page
No sound from the speaker
Sound is distorted, noisy, or cuts in and out
o
Symptom Cause / Solution Page
Sound is distorted, noisy, or
cuts in and out
The speaker is not connected to AC power or the battery is not charged. Connect power and turn on the
0
speaker.
The volume is too low or muted. Turn up the volume on your device to about 90 % and then turn up the
0
volume on the speaker.
There is no connected Bluetooth device. Pair and connect a Bluetooth device and try again.
0
There is no connected AUX device. Connect an audio device to the AUX input using a stereo 3.5mm
0
cable and make sure music playing music on your device.
The AUX input connector of Envaya is compatible with stereo mini plug cables that have 3-conductor
0
plugs. Be sure to use a 3-conductor stereo mini plug cable.
If Envaya is in mute mode, cancel mute mode by pressing the mute button again or increase the volume.
0
The volume is too low on your connected device. Turn up the volume on your device to about 90 % and
0
then adjust the volume on the speaker.
The Bluetooth device is out of range. Bring the Bluetooth device closer to the speaker. -
0
The Bluetooth connection is experiencing wireless interference. Move the speaker away from appliances
0
such as microwave ovens and other wireless devices.
The Bluetooth device is having connectivity issues. Cycle the power on the Bluetooth and reconnect to
0
the speaker.
Volume adjustment
Troubleshooting
Appendix
12
20
13
19
19
20
20
-
-
24
Index
Page 25

Contents Preparation Connections
Cannot pair a Bluetooth device with the speaker
o
Symptom Cause / Solution Page
Cannot pair a Bluetooth
device with the speaker
Cannot pair or connect an NFC device
o
Symptom Cause / Solution Page
Cannot pair or connect an
NFC device
The Bluetooth connection is experiencing wireless interference. Move the speaker away from appliances
0
such as microwave ovens and other wireless devices.
The Bluetooth device is out of range. Bring the Bluetooth device closer to the speaker. -
0
The Bluetooth device is malfunctioning. Power cycle the device and try again. -
0
The Bluetooth device is malfunctioning. Power cycle the device, remove the pairing information (Forget
0
this Device on iOS and Unpair on Android) and re-pair the speaker to the device.
Bluetooth is off on the device. Make sure Bluetooth is set to ON on your device. -
0
Bluetooth is off on the device. Make sure Bluetooth is set to ON on your device. -
0
NFC is off on the device. Check that NFC is set to ON on your device. -
0
The device is not placed at the correct location on the speaker. Make sure to position of the NFC antenna
0
of the Bluetooth device directly over the Q mark located on the top of the speaker.
Volume adjustment
Troubleshooting
Appendix
-
-
17
25
Index
Page 26
Contents Preparation Connections
Speaker is turning off automatically
o
Symptom Cause / Solution Page
Speaker is turning off
automatically
Speaker is malfunctioning
o
Symptom Cause / Solution Page
Speaker is malfunctioning
If you need additional help in solving problems, contact Denon customer service in your area.
z
For more information, visit www.denon.com.
No audio is played via Bluetooth for approximately 15 minutes. Power on the speaker by pressing and
0
holding the power button for 2 seconds.
The speaker needs to be reset.
0
Using a small paper clip, press and release the reset button located on the side of the speaker.
The speaker needs to be rest to the factory default settings. Turn on the speaker. Press and hold the
0
POWER and VOLUME + buttons together for approximately 4 seconds. The status indicator will blink 4
times to indicate a reset (Note : All pairing information from Bluetooth devices will be erased).
Volume adjustment
Troubleshooting
Appendix
-
28
-
26
Index
Page 27

Envaya4
Envaya2
Envaya3
Envaya
Envaya2
Envaya4
Envaya3
Envaya
Contents Preparation Connections
Volume adjustment
Troubleshooting
Appendix
Changing the device name of Envaya displayed on the Bluetooth device
When the power is on, press and hold the Bluetooth
1
button and MUTE button simultaneously for
approximately 4 seconds.
A notification sound is heard and the status indicator blinks 3 times.
Press the volume adjustment button.
2
The device name changes as shown below each time the volume
adjustment button is pressed.
Button The device name of Envaya
Volume adjustment
button (+)
.
Volume adjustment
button (-)
.
The status indicator blinks as shown below each time the device
name is switched.
The device name of Envaya Status Indicator
Envaya Blinks once
Envaya2 Blinks twice
Envaya3 Blinks three times
Envaya4 Blinks four times
The notification sound beeps at the same time as the status indicator blinks.
z
NOTE
If you change envaya’s Bluetooth device name, you must repair and
0
reconnect all of your Bluetooth devices using the selected name.
When the volume adjustment button is not operated for approximately 5
0
seconds, the selected device name is entered and Envaya restarts.
You cannot change to a different device name other than those listed above.
27
Index
Page 28

Contents Preparation Connections
Restarting the unit
If Envaya does not operate correctly, use a pointed object such as a paper
clip to press the reset button on the side of the unit.
.
Volume adjustment
Troubleshooting
Appendix
28
Index
Page 29

Contents Preparation Connections
Replacing the grill cloth
Volume adjustment
Troubleshooting
Appendix
Appendix
You can replace the grill cloth with a different colored cloth.
Gently pull up on the metal outer grill from the bottom.
1
.
Position the grill so that the top (where the notch is
2
located) is aimed towards you.
Insert your fingers into the plastic tension holes on the
inner plastic grill cloth frame, and gently pull down
towards you until the frame lifts out and away from the
metal grill.
.
Insert the top of the new cloth frame first (the side
3
closest to you) then gently pull down on the tension
holes and slip the top side under the metal tabs to
secure it into place.
.
Fit the replacement cloth tightly against the grill so that there are no wrinkles in
the cloth.
Press the metal grill assembly containing the new cloth
4
color back onto the speaker as shown.
.
29
Index
Page 30

USB Cable
Contents Preparation Connections
Volume adjustment
Troubleshooting
Appendix
Charging Your Mobile Device
Envaya’s power supply can be used to charge your USB powered mobile device by connecting the device using the device’s USB charging cable.
Envaya is designed to use its power supply or internal battery to charge devices connected to it.
Connect your mobile device.
If a USB cable is not supplied with the Bluetooth device or portable music player,
Devices are always charged when the AC adapter is connected.
0
When Envaya is running on battery power, devices can be
0
charged when the unit power is switched on. However, charging
of the connected device is continued for up to 2.5 hours when the
unit’s power is turned off.
When Envaya is running on battery power, USB charging is
0
automatically disabled when the battery level becomes critically
low.
.
0
use the type of USB cable recommended by the device manufacturer.
Certain devices cannot be recharged with Envaya.
0
Disconnect your mobile device when it is fully charged. Envaya can not tell when
0
the device is fully charged.
30
Index
Page 31

Contents Preparation Connections
Volume adjustment
Troubleshooting
Appendix
Playing back a Bluetooth device
Envaya supports the following Bluetooth profile.
A2DP (Advanced Audio Distribution Profile):
0
When a Bluetooth device that supports this standard is connected,
monaural and stereo sound data can be streamed at a high quality.
AVRCP (Audio/Video Remote Control Profile):
0
When a Bluetooth device that supports this standard is connected, the
Bluetooth device can be operated from Envaya.
About Bluetooth Communications
o
Radio waves broadcast from Envaya may interfere with the operation of
medical devices. Make sure you turn off the power of Envaya and
Bluetooth device in the following locations as radio wave interference may
cause malfunctions.
Hospitals, trains, aircraft, petrol kiosks and places where flammable
0
gases are generated
Near automatic doors and fire alarms
0
Trademark information
.
The Bluetooth® word mark and logos are registered trademarks owned
by Bluetooth SIG, Inc. and any use of such marks by D&M Holdings Inc.
is under license. Other trademarks and trade names are those of their
respective owners.
.
©2013 CSR plc and its group companies.
The aptX® mark and the aptX logo are trade marks of CSR plc or one of
its group companies and may be registered in one or more jurisdictions.
.
The N mark is a trademark or registered trademark of NFC Forum, Inc. in
the United States and in other countries.
31
Index
Page 32

Contents Preparation Connections
Specifications
Speaker section
o
Type: 57 mm full range × 2
100 mm passive radiator × 1
Bluetooth section
o
Communication system: Bluetooth Specification version 3.0
Compatible Bluetooth profiles: A2DP/AVRCP
Supported codecs: aptX Low Latency/AAC/SBC
Supported content protection: SCMS-T method
General
o
AC charger/power supply: Input AC100 – 240 V, 50/60 Hz
(YJS036K-1302300D: DONGGUAN CITY YINGJU
ELECTRONICS CO.,LTD)
Power consumption
(When the AC adapter is used) :
For purposes of improvement, specifications and design are subject to change without notice.
z
Output 13 V I 2.3 A
8 W (When the battery and USB device are not being charged)
0.3 W and under (Power off)
Volume adjustment
Troubleshooting
Appendix
32
Index
Page 33

96
138
141
255
47.5
47.5
Contents Preparation Connections
Dimensions (Unit : mm)
o
.
Weight : 1.28 kg
o
Volume adjustment
Troubleshooting
Appendix
33
Index
Page 34

Contents Preparation Connections
Volume adjustment
Troubleshooting
Appendix
Index
v A
Accessories .....................................................
v B
Bluetooth connection (NFC connection)
v C
Changing the device name
Charging Envaya .............................................. 9
Charging of the connected device .................. 30
Connecting the AC Adapter ........................... 10
v D
Disconnects the Bluetooth connection
v M
Multipoint function
Mute ............................................................... 20
............................. 27
.......................................... 18
........ 17
........... 19
v N
N mark .............................................................
v P
4
............................................................ 13
Pairing
Part names and functions ................................. 6
Playback Bluetooth device ............................. 13
v R
Remaining battery indicator
Replacing the AC plug ..................................... 9
Replacing the grill cloth .................................. 29
Reset button ................................................... 28
Restarting the unit .......................................... 28
v S
Stand ................................................................
Stereo mini plug cable .................................... 19
........................... 11
v T
Troubleshooting .............................................
6
Turning the power off ..................................... 12
Turning the power on ..................................... 12
v U
USB Cable
v V
Volume adjustment ........................................
v W
Wired connection (AUX)
8
..................................................... 30
................................. 19
21
20
34
Index
Page 35

www.denon.com
35
D&M Holdings Inc.
3520 10324 00AD
 Loading...