

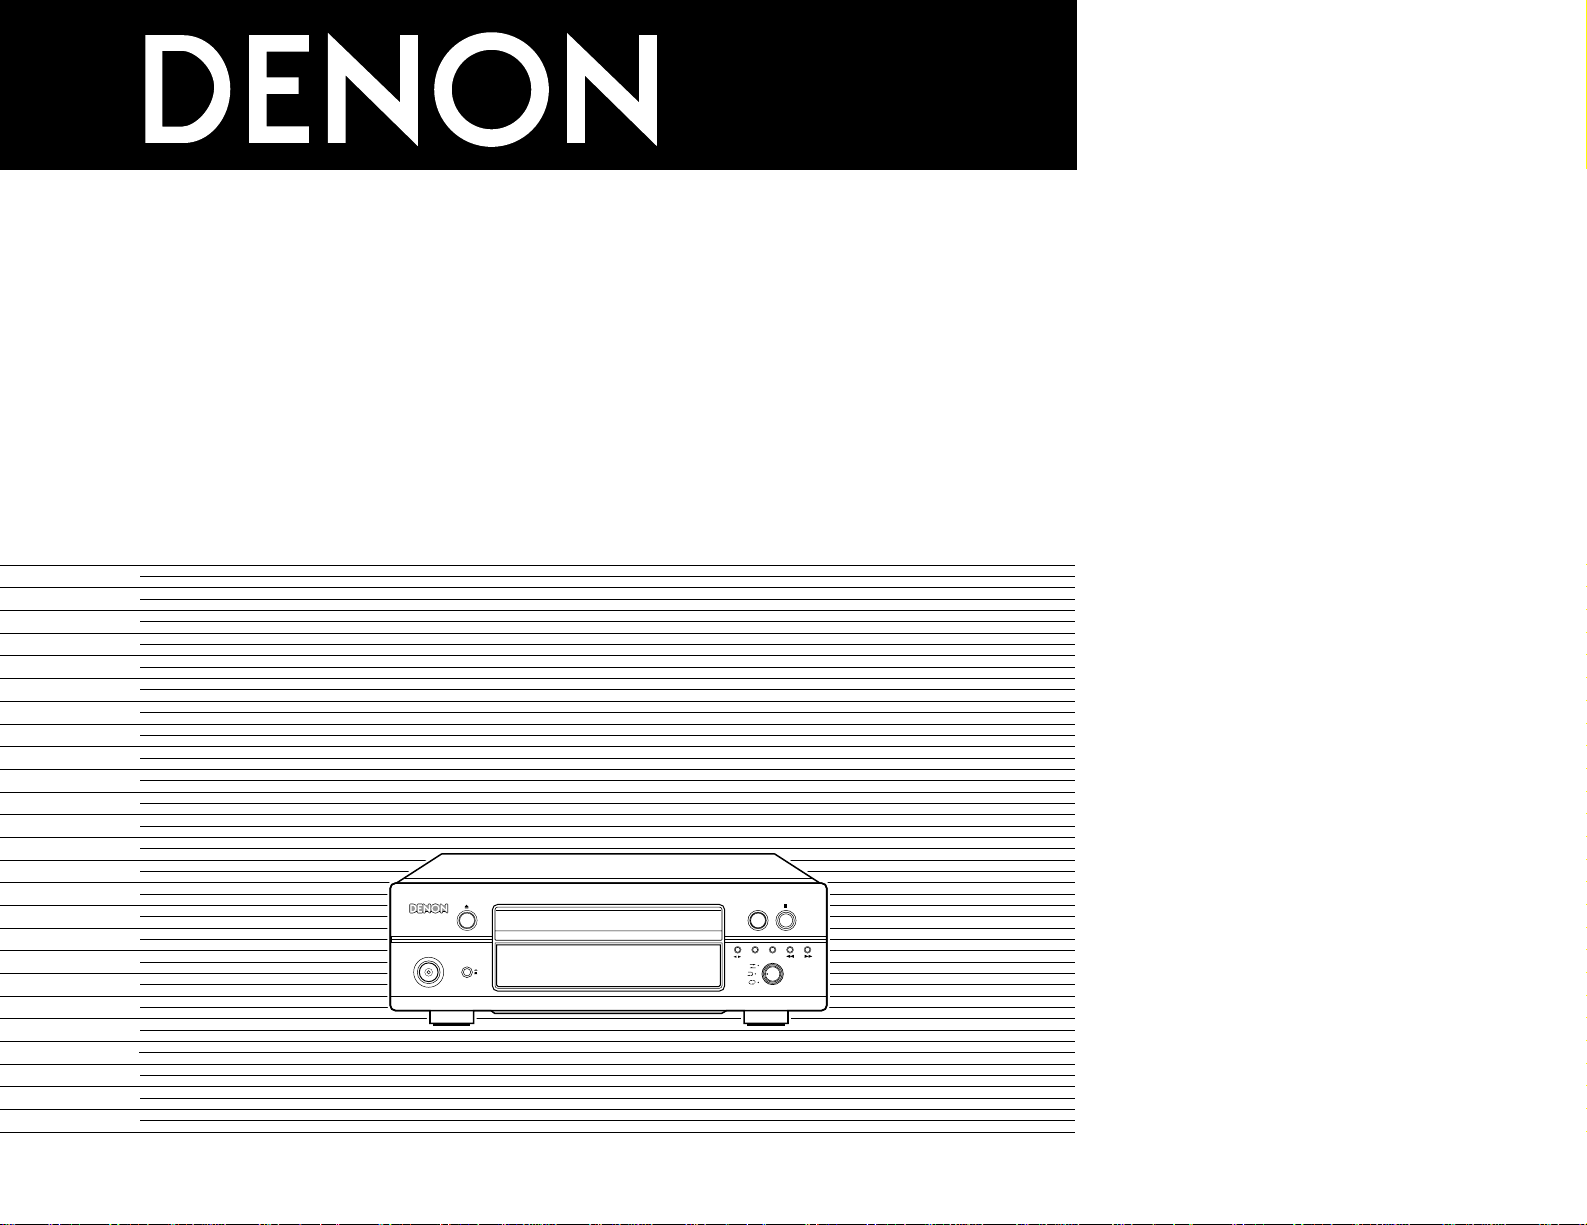
Page 1
STEREO CASSETTE TAPE DECK
DRR-F101
CD SRS
REC
0
1
PLAY
CASSETTE DECK DRR-F101
REC
CD SRS
PLAY
ON / STANDBY
e
DOLBY NR
ON
OFF
REVERSE
MODE
OPERATING INSTRUCTIONS
BEDIENUNGSANLEITUNG
MODE D’EMPLOI
ISTRUZIONI PER L’USO
INSTRUCCIONES DE OPERACION
GEBRUIKSAANWIJZING
BRUKSANVISNING
FOR ENGLISH READERS PAGE 004 ~ PAGE 013
FÜR DEUTSCHE LESER SEITE 014 ~ SEITE 023
POUR LES LECTEURS FRANCAIS PAGE 024 ~ PAGE 033
PER IL LETTORE ITALIANO PAGINA 034 ~ PAGINA 043
PARA LECTORES DE ESPAÑOL PAGINA 044 ~ PAGINA 053
VOOR NEDERLANDSTALIGE LEZERS PAGINA 054 ~ PAGINA 063
FOR SVENSKA LÄSARE SIDA 064 ~ SIDA 073
Page 2
2
ENGLISH
• DECLARATION OF CONFORMITY
We declare under our sole responsibility that this
product, to which this declaration relates, is in
conformity with the following standards:
EN60065, EN55013, EN55020, EN61000-3-2 and
EN61000-3-3.
Following the provisions of 73/23/EEC, 89/336/EEC and
93/68/EEC Directive.
• ÜBEREINSTIMMUNGSERKLÄRUNG
Wir erklären unter unserer Verantwortung, daß dieses
Produkt, auf das sich diese Erklärung bezieht, den
folgenden Standards entspricht:
EN60065, EN55013, EN55020, EN61000-3-2 und
EN61000-3-3.
Entspricht den Verordnungen der Direktive 73/23/EEC,
89/336/EEC und 93/68/EEC.
• DECLARATION DE CONFORMITE
Nous déclarons sous notre seule responsabilité que
l’appareil, auquel se réfère cette déclaration, est
conforme aux standards suivants:
EN60065, EN55013, EN55020, EN61000-3-2 et
EN61000-3-3.
D’après les dispositions de la Directive 73/23/EEC,
89/336/EEC et 93/68/EEC.
• DICHIARAZIONE DI CONFORMITÀ
Dichiariamo con piena responsabilità che questo
prodotto, al quale la nostra dichiarazione si riferisce, è
conforme alle seguenti normative:
EN60065, EN55013, EN55020, EN61000-3-2 e
EN61000-3-3.
In conformità con le condizioni delle direttive 73/23/EEC,
89/336/EEC e 93/68/EEC.
QUESTO PRODOTTO E’ CONFORME
AL D.M. 28/08/95 N. 548
• DECLARACIÓN DE CONFORMIDAD
Declaramos bajo nuestra exclusiva responsabilidad que
este producto al que hace referencia esta declaración,
está conforme con los siguientes estándares:
EN60065, EN55013, EN55020, EN61000-3-2 y EN610003-3.
Siguiendo las provisiones de las Directivas 73/23/EEC,
89/336/EEC y 93/68/EEC.
• EENVORMIGHEIDSVERKLARING
Wij verklaren uitsluitend op onze verantwoordelijkheid
dat dit produkt, waarop deze verklaring betrekking heeft,
in overeenstemming is met de volgende normen:
EN60065, EN55013, EN55020, EN61000-3-2 en
EN61000-3-3.
Volgens de bepalingen van de Richtlijnen 73/23/EEC,
89/336/EEC en 93/68/EEC.
• ÖVERENSSTÄMMELSESINTYG
Härmed intygas helt på eget ansvar att denna produkt,
vilken detta intyg avser, uppfyller följande standarder:
EN60065, EN55013, EN55020, EN61000-3-2 och
EN61000-3-3.
Enligt stadgarna i direktiv 73/23/EEC, 89/336/EEC och
93/68/EEC.
NOTE ON USE / HINWEISE ZUM GEBRAUCH /
OBSERVATIONS RELATIVES A L’UTILISATION / NOTE SULL’USO
NOTAS SOBRE EL USO / ALVORENS TE GEBRUIKEN / OBSERVERA
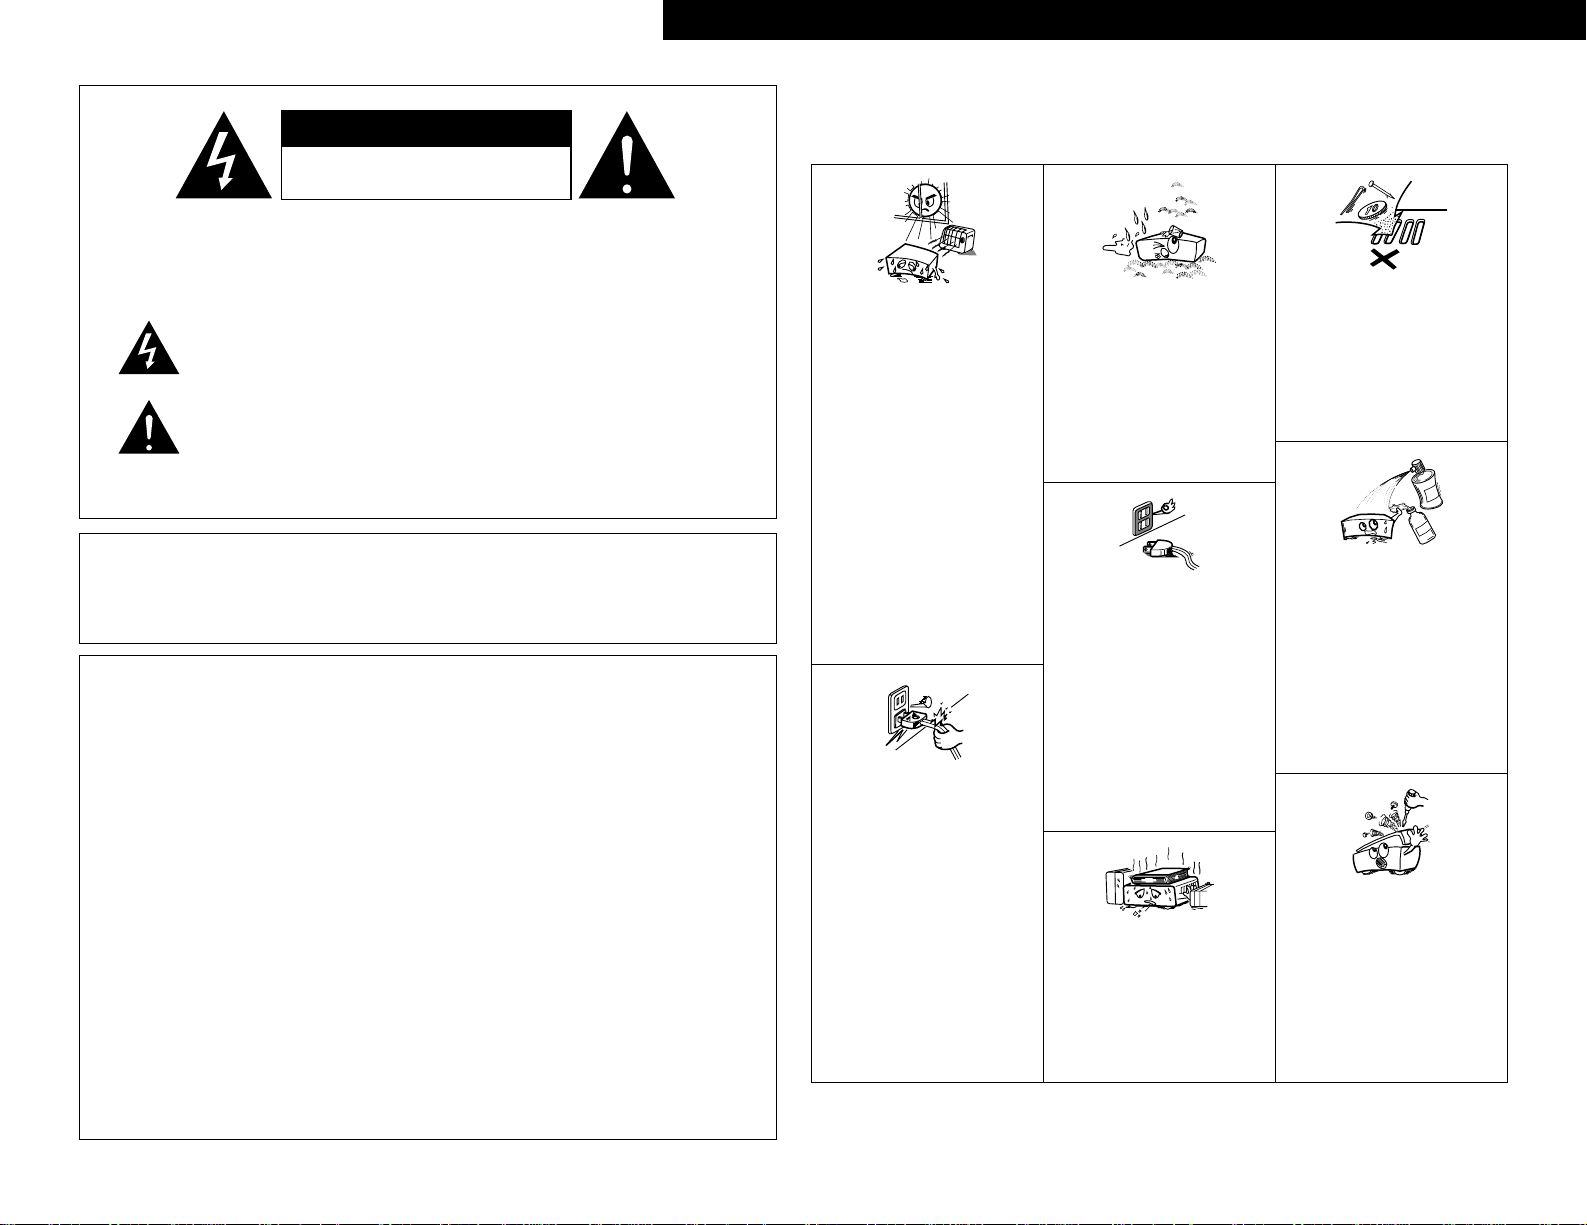
• Avoid high temperatures.
Allow for sufficient heat dispersion when
installed on a rack.
• Vermeiden Sie hohe Temperaturen.
Beachten Sie, daß eine ausreichend
Luftzirkulation gewährleistet wird, wenn das
Gerät auf ein Regal gestellt wird.
• Eviter des températures élevées
Tenir compte d’une dispersion de chaleur
suffisante lors de l’installation sur une
étagère.
• Evitate di esporre l’unità a temperature alte.
Assicuratevi che ci sia un’adeguata
dispersione del calore quando installate
l’unità in un mobile per componenti audio.
• Evite altas temperaturas
Permite la suficiente dispersión del calor
cuando está instalado en la consola.
• Vermijd hoge temperaturen.
Zorg voor een degelijk hitteafvoer indien het
apparaat op een rek wordt geplaatst.
• Undvik höga temperaturer.
Se till att det finns möjlighet till god
värmeavledning vid montering i ett rack.
• Keep the set free from moisture, water, and
dust.
• Halten Sie das Gerät von Feuchtigkeit,
Wasser und Staub fern.
• Protéger l’appareil contre l’humidité, l’eau et
lapoussière.
• Tenete l’unità lontana dall’umidità, dall’acqua
e dalla polvere.
• Mantenga el equipo libre de humedad, agua
y polvo.
• Laat geen vochtigheid, water of stof in het
apparaat binnendringen.
• Utsätt inte apparaten för fukt, vatten och
damm.
• Do not let foreign objects in the set.
• Keine fremden Gegenstände in das Gerät
kommen lassen.
• Ne pas laisser des objets étrangers dans
l’appareil.
• E’ importante che nessun oggetto è inserito
all’interno dell’unità.
• No deje objetos extraños dentro del equipo.
• Laat geen vreemde voorwerpen in dit
apparaat vallen.
• Se till att främmande föremål inte tränger in
i apparaten.
• Handle the power cord carefully.
Hold the plug when unplugging the cord.
• Gehen Sie vorsichtig mit dem Netzkabel um.
Halten Sie das Kabel am Stecker, wenn Sie
den Stecker herausziehen.
• Manipuler le cordon d’alimentation avec
précaution.
Tenir la prise lors du débranchement du
cordon.
• Manneggiate il filo di alimentazione con
cura.
Agite per la spina quando scollegate il cavo
dalla presa.
• Maneje el cordón de energía con cuidado.
Sostenga el enchufe cuando desconecte el
cordón de energía.
• Hanteer het netsnoer voorzichtig.
Houd het snoer bij de stekker vast wanneer
deze moet worden aan- of losgekoppeld.
• Hantera nätkabeln varsamt.
Håll i kabeln när den kopplas från el-uttaget.
• Unplug the power cord when not using the
set for long periods of time.
• Wenn das Gerät eine längere Zeit nicht
verwendet werden soll, trennen Sie das
Netzkabel vom Netzstecker.
• Débrancher le cordon d’alimentation lorsque
l’appareil n’est pas utilisé pendant de
longues périodes.
• Disinnestate il filo di alimentazione quando
avete l’intenzione di non usare il filo di
alimentazione per un lungo periodo di
tempo.
• Desconecte el cordón de energía cuando no
utilice el equipo por mucho tiempo.
• Neem altijd het netsnoer uit het stopkontakt
wanneer het apparaat gedurende een lange
periode niet wordt gebruikt.
• Koppla ur nätkabeln om apparaten inte
kommer att användas i lång tid.
• Do not let insecticides, benzene, and thinner
come in contact with the set.
• Lassen Sie das Gerät nicht mit Insektiziden,
Benzin oder Verdünnungsmitteln in
Berührung kommen.
• Ne pas mettre en contact des insecticides,
du benzène et un diluant avec l’appareil.
• Assicuratevvi che l’unità non venga in
contatto con insetticidi, benzolo o solventi.
• No permita el contacto de insecticidas,
gasolina y diluyentes con el equipo.
• Laat geen insektenverdelgende middelen,
benzine of verfverdunner met dit apparaat in
kontakt komen.
• Se till att inte insektsmedel på spraybruk,
bensen och thinner kommer i kontakt med
apparatens hölje.
• Never disassemble or modify the set in any
way.
• Versuchen Sie niemals das Gerät
auseinander zu nehmen oder auf jegliche Art
zu verändern.
• Ne jamais démonter ou modifier l’appareil
d’une manière ou d’une autre.
• Non smontate mai, nè modificate l’unità in
nessun modo.
• Nunca desarme o modifique el equipo de
ninguna manera.
• Nooit dit apparaat demonteren of op andere
wijze modifiëren.
• Ta inte isär apparaten och försök inte bygga
om den.
• Do not obstruct the ventilation holes.
• Die Belüftungsöffnungen dürfen nicht
verdeckt werden.
• Ne pas obstruer les trous d’aération.
• Non coprite i fori di ventilazione.
• No obstruya los orificios de ventilación.
• De ventilatieopeningen mogen niet worden
beblokkeerd.
• Täpp inte till ventilationsöppningarna.
* (For sets with ventilation holes)
DEUTSCHFRANCAISITALIANOESPAÑOLNEDERLANDSSVENSKA
CAUTION
CAUTION: TO REDUCE THE RISK OF ELECTRIC SHOCK, DO
NOT REMOVE COVER (OR BACK). NO USER
SERVICEABLE PARTS INSIDE. REFER SERVICING
TO QUALIFIED SERVICE PERSONNEL.
The lightning flash with arrowhead symbol, within an equilateral triangle,
is intended to alert the user to the presence of uninsulated “dangerous
voltage” within the product’s enclosure that may be of sufficient
magnitude to constitute a risk of electric shock to persons.
The exclamation point within an equilateral triangle is intended to alert the
user to the presence of important operating and maintenance (servicing)
instructions in the literature accompanying the appliance.
WARNING: TO REDUCE THE RISK OF FIRE OR ELECTRIC SHOCK, DO
NOT EXPOSE THIS APPLIANCE TO RAIN OR MOISTURE.
CAUTION
• The ventilation should not be impeded by covering the ventilation openings with items, such as newspapers, table-cloths,
curtains, etc.
• No naked flame sources, such as lighted candles, should be placed on the apparatus.
• Please be care the environmental aspects of battery disposal.
• The apparatus shall not be exposed to dripping or splashing for use.
• No objects filled with liquids, such as vases, shall be placed on the apparatus.
RISK OF ELECTRIC SHOCK
DO NOT OPEN
Page 3
3
ENGLISH
CD SRS
REC
0
1
PLAY
CASSETTE DECK DRR-F101
REC
CD SRS
PLAY
ON / STANDBY
e
DOLBY NR
ON
OFF
REVERSE
MODE
!2!3!4 !1
q
w
e r
t iyu
o !0
!5
!7!6
!8
!9
DEUTSCH FRANCAIS ITALIANO ESPAÑOL NEDERLANDS SVENSKA
FRONT PANEL
FRONTPLATTE
PANNEAU AVANT
PANNELLO FRONTALE
TABLERO FRONTAL
VOORPANEEL
FRONT PANELEN
REAR PANEL
RÜCKWAND
PANNEAU ARRIERE
IL PANNELLO POSTERIORE
PANEL TRASERO
ACHTERPANEEL
BAKSIDAN
Page 4
4
ENGLISH
TABLE OF CONTENTS
z
MAIN FEATURES ………………………………………
4
x
BEFORE USING …………………………………………
4
c
CAUTIONS ON INSTALLATION ………………………
4
v
CONNECTIONS …………………………………………
5
b
PART NAMES AND FUNCTIONS ...…………………
6
n
HANDLING CASSETTE TAPES AND CAUTIONS…6
m
BEFORE RECORDING AND
PLAYING CASSETTE TAPES
…………………………
7
,
PLAYBACK
……………………………………………
8
.
RECORDING
…………………………………………
9
⁄0
SYSTEM FUNCTIONS
…………………………
9~12
⁄1
TROUBLESHOOTING ………………………………
13
⁄2
OTHER INFORMATION ………………………………
13
⁄3
SPECIFICATIONS ……………………………………
13
1. Horizontal loading for stable travel
The horizontal loading mechanism used on the DRRF101 is the ideal type of tray for the rotating parts, the
most important part of the cassette deck. Mounting
the deck mechanism horizontally lessens vibration of
the flywheel in the thrust direction and reduces
modulation noise.
2. Various editing and playback functions
• Auto reverse mechanism for recording and playing
for long periods of time.
• Auto tape selector for automatically identifying the
tape type.
• Music search for choosing selections up to 16
selections away in either direction.
3. Convenient system functions
The DRR-F101 is equipped for system functions
allowing easy CD synchronized recording, auto function
and auto power on operations when used in
combination with a DRA/DCD/DMD-F101 series. In
addition, the main operations of the system
components can be performed using the system
remote control unit (RC-927) included with the receiver
(DRA-F101).
1
MAIN FEATURES
3
CAUTIONS ON INSTALLATION
2
BEFORE USING
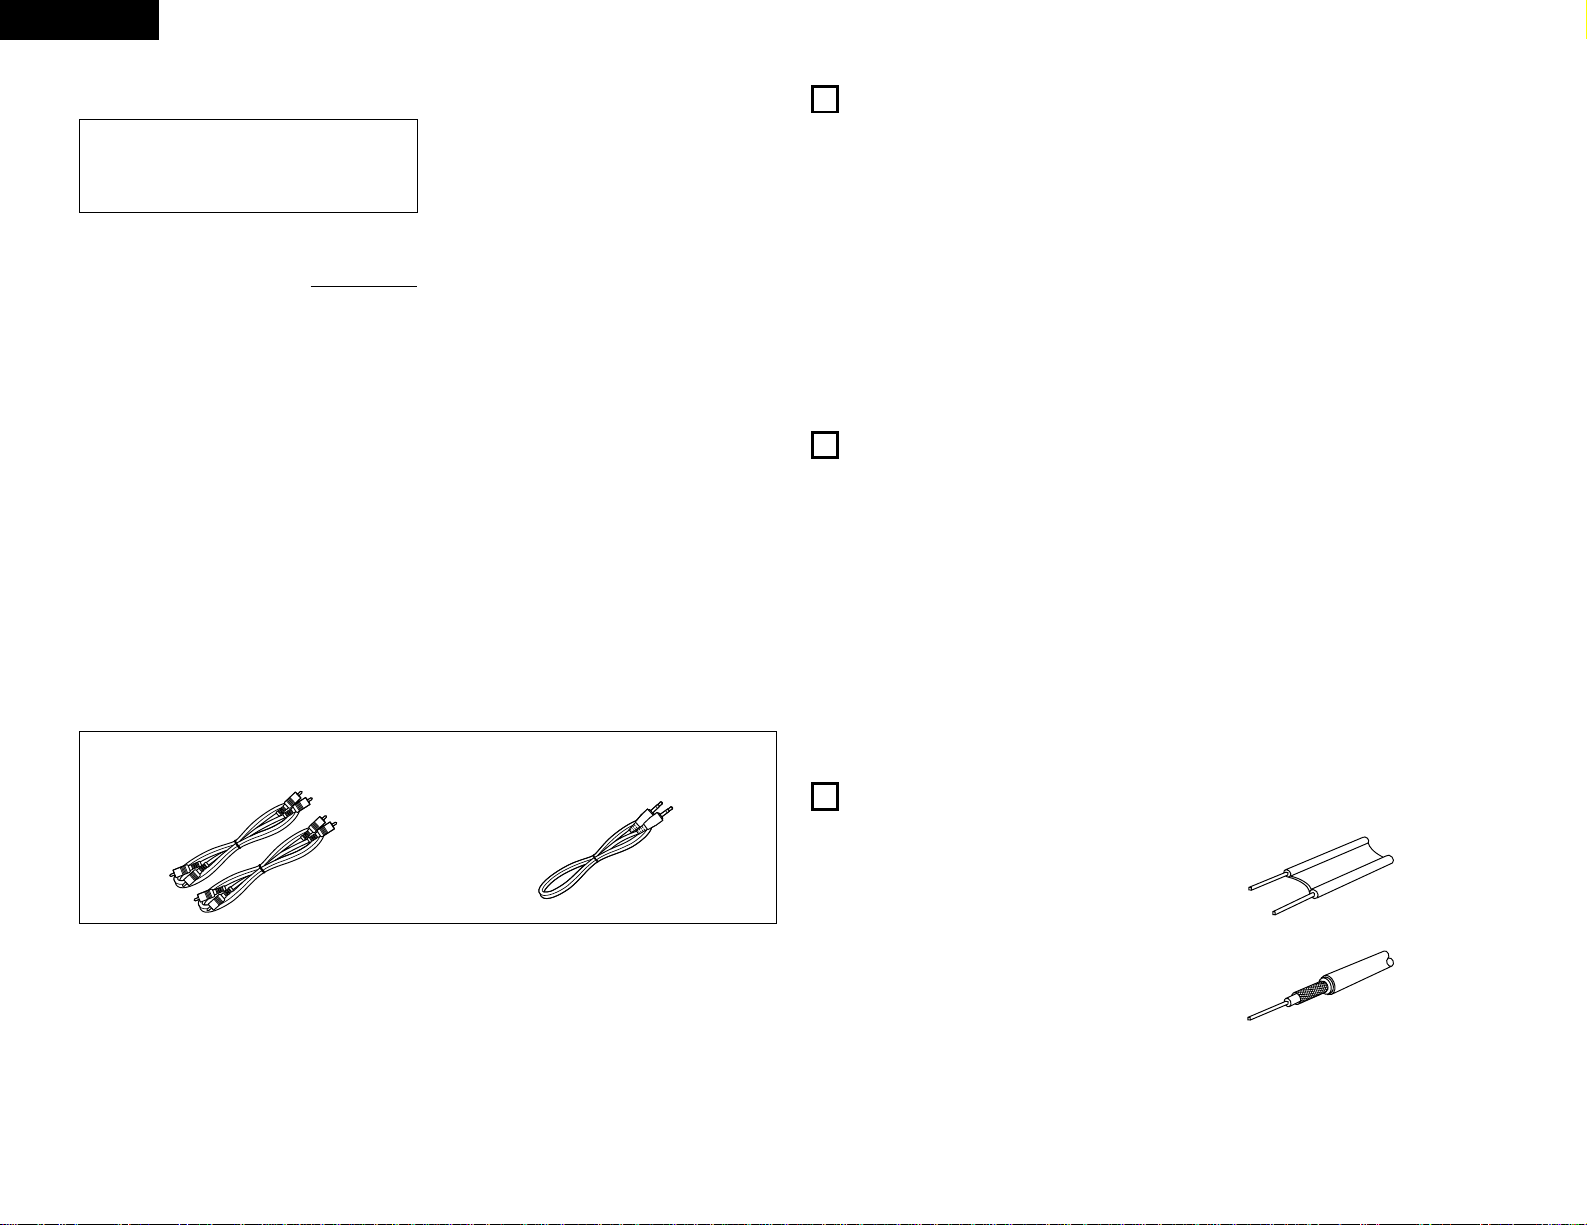
Check that the following parts are included in the package aside from the main unit:
q
Operating instructions.............................................1
w
RCA pin plug cord ...................................................2
e System connector cable ...................................……1
r Service Station List ..........................................….…1
ew
Read the following before using the set.
• Before turning on the power
Check again that all connections are correct and that
there are no problems with the connection cords. Be
sure to unplug the power cord before connecting or
disconnecting the connection cords.
• Moving the set
To prevent short-circuits or damage to the connection
cords, always unplug the power cord and disconnect
the connection cords between all other audio
components when moving the set.
• Condensation (dew)
Water droplets may condense on internal operation
parts if the set is brought into a heated room from the
cold outdoors or when the room is heated rapidly. If
this happens, the set may not operate properly.
• Should condensation occur:
The condensation will evaporate in one hour or less, at
which time the system will function normally.
• Store this instructions in safe place
After reading, store this instructions along with the
warranty in a safe place. Also fill in the items on the
back paper for your convenience.
• Illustrations in this manual
Note that some of the illustrations used for
explanations in this manual may differ from the actual
set.
300 Ω/ohms feeder cable
75 Ω/ohms coaxial cable
IMPORTANT TO SAFETY
WARNING:
TO PREVENT FIRE OR SHOCK HAZARD,
DO NOT EXPOSE THIS APPLIANCE TO
RAIN OR MOISTURE.
Please, record and retain the Model name and serial
number of your set shown on the rating label.
Model No. DRR-F101 Serial No.
Thank you for purchasing this DENON cassette tape
deck. Please read the operation instructions thoroughly in
order to acquaint yourself with the cassette tape deck
and achieve maximum satisfaction from it.
CAUTION
1. Handle the power supply cord carefully
Do not damage or deform the power supply cord. If it
is damaged or deformed, it may cause electric shock
or malfunction when used. When removing from wall
outlet, be sure to remove by holding the plug
attachment and not by pulling the cord.
2. Do not open the top cover
In order to prevent electric shock, do not open the top
cover.
If problems occur, contact your DENON DEALER.
3. Do not place anything inside
Do not place metal objects or spill liquid inside this
unit.
Electric shock or malfunction may result.
The cassette tape deck uses a microcomputer for
controlling internal electronic circuits.
In the event that the player is used while a near-by tuner
or TV is turned on, although unlikely, interference could
occur either in the sound from the tuner or the picture of
the TV. To avoid this, please take the following
precautions.
• Keep the cassette tape deck as far away from the tuner
or TV set as possible.
• Keep the power cable and connecting cable of the
cassette tape deck separate from the antenna wires of
the tuner and TV.
• Interference is particular likely to occur when an indoor
antenna or a 300 Ω/ohms feeder cable is used. Thus,
use of an outdoor antenna and 75 Ω/ohms coaxial cable
is strongly recommended.
Page 5
5
ENGLISH
4
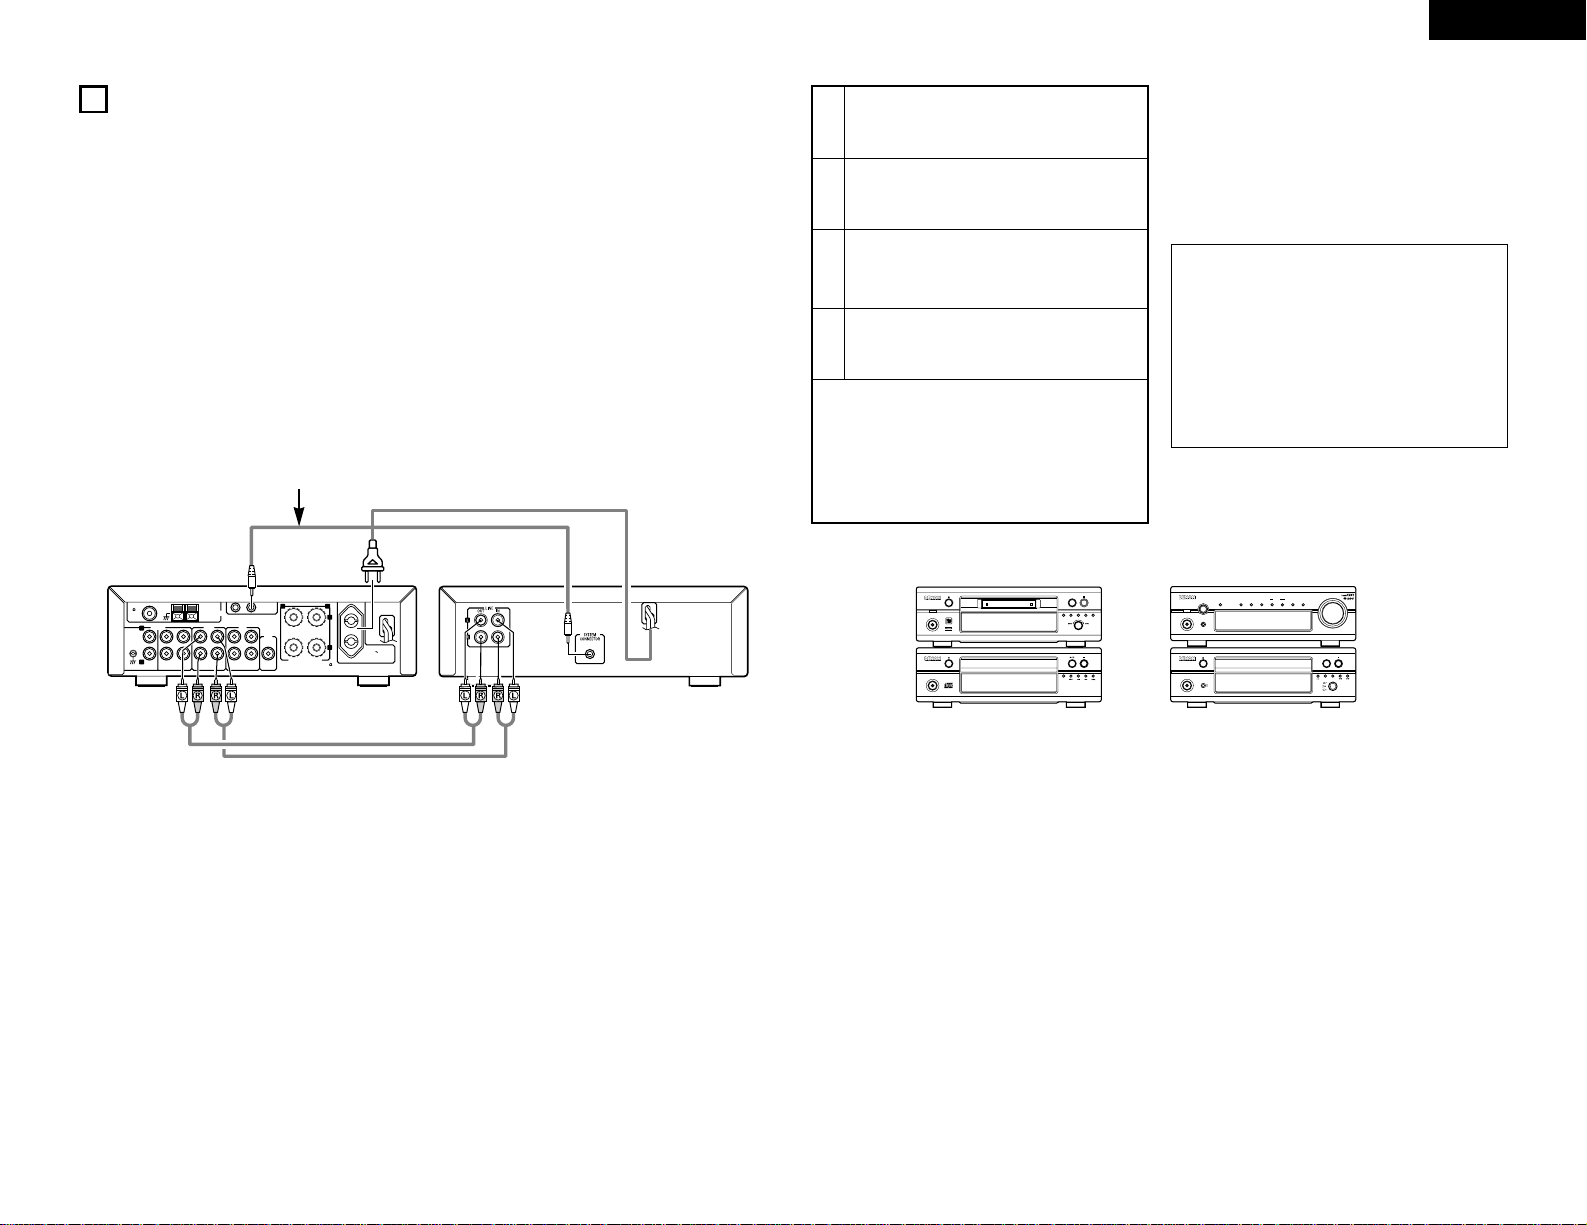
CONNECTIONS
SPEAKER SYSTEM
SYSTEM
CONNECTOR
PRE
OUT
SUB
WOOFER
RECPB
MDTAPEINPUTS
RECPBDVD/AUXCDPHONO
1
AM LOOP ANT.
ANTENNA
2
L
+
-
R
SPEAKER IMPEDANCE 4~16
FM COAX.
75
L
R
AC OUTLET
230V 50Hz
SWITCHED
W MAX
1
2
3
4
Connect the DRR-F101‘s SYSTEM CONNECTOR
jack to the SYSTEM CONNECTOR jack (1 or 2) of
one of the other components using the included
system cord.
Connect this unit’s power cord to the AC outlet
on the CD player (DCD-F101) or one of the other
components.
Connect the DRR-F101‘s LINE OUT jacks to the
receiver‘s TAPE input jacks using the included
stereo audio cord.
Connect the DRR-F101‘s LINE IN jacks to the
receiver‘s TAPE output jacks using the included
stereo audio cord.
NOTES:
• Do not plug power cords into power outlets until all
connections have been completed.
• Check the left and right channels and be sure to
interconnect them correctly (R to R, L to L).
• Plug in the power cords securely. Incomplete
connections will result in noise.
• Clasping the power cords and connection cords
together may result in humming or noise.
• After unplugging the power cord, wait at least 5
seconds before plugging it back in.
✽ The DRR-F101 can also be used when connected to
a receiver other than the DRA-F101. In this case,
none of the system functions (auto power on, etc.)
will work.
✽ Some receivers are equipped for connections of
two or more cassette deck‘s, allowing tapes to be
copied. Read your receiver‘s operating instructions
carefully before using it.
Connecting to the D-F101 Series
2 When connecting to a receiver other than the one in the DRA-F101 there is no need to make connection 3. Note that
in this case none of the system functions (auto power on, etc.) will work.
• System operations such as the auto power on function
can only be used if stereo audio cords and system cords
are connected between all the system components. Be
sure to securely connect all the connection cords
between all the units.
• Disconnecting a system cord during system operation
may result in malfunction. Be sure to unplug the power
cords before changing the connections.
DRA-F101
(Receiver)
Plug into the open SYSTEM CONNECTOR jack of another
component. Any SYSTEM CONNECTOR jack is OK.
DRR-F101
(this unit)
Recommended System Installation
• To ensure performance and stability, install the D-F101
series as shown below.
• Do not place another component directly on top of the
receiver (DRA-F101).
• For stability, do not stack more than three components
on top of each other.
• To ensure stability, do not stack more than three units.
• Install the components in such a way that the ventilation
holes of the receiver (DRA-F101) are not obstructed.
• Use the AC OUTLET for audio equipment only. Do
not use them for hair driers, etc.
DRR-F101
(Cassette deck)
1
2
3
4
1
18Tr02 m 46s
-60 40 -30 -20 -12 -6 -2 0
L
dB
R
POWER LOADING MECHANISM
ON / STANDBY
MINIDISC RECORDER DMD-F101
INPUT
-
+
MULTI RECCD SRSEDIT
13
REC LEVEL
/ ENTER
MEMO REC /
CHARACTER
PHONES
SYSTEM
VOLUME
ON / STANDBY
AM-FM STEREO RECEIVER DRA-F101
SOURCE
DIRECT
BANDUPDOWN
TUNING
MEMORY
/ SET
FUNCTION
TIMERTONE RDS
CD SRS
REC
0
1
PLAY
CASSETTE DECK DRR-F101
REC
CD SRS
PLAY
ON / STANDBY
e
DOLBY NR
ON
OFF
TRACK
ON / STANDBY
COMPACT DISC PLAYER DCD-F101
REPEAT
REVERSE
MODE
DMD-F101 DRA-F101
DCD-F101 DRR-F101
Page 6
6
ENGLISH
5
PART NAMES AND FUNCTIONS
q
Power operation switch
(ON/STANDBY)
• Press this once to turn the cassette deck’s power
on. Press again to set the cassette deck to the
standby mode.
• The LED color changes as follows, according to
the condition:
• During power ON: green
• During STANDBY: red
w
DOLBY NR mode selector switch
• Use this to select the Dolby NR mode (ON or
OFF). When playing a tape, set the Dolby NR
mode to the same mode as when the tape was
recorded.
e
CD SRS indicator
• This lights during system synchronized recording
of a CD.
r
REC indicator
• This lights during recording.
t
PLAY mode indicator
• The direction of tape travel and play mode are
displayed here.
y
01(direction) button
• Press to reverse the direction of tape playback or
recording.
u
CD SRS
(Synchronized Recording System)
button
• Use this button for synchronized recording of
CDs.
• For details, refer to page 11.
i
REVERSE MODE selector switch
• Use this to select the direction of tape travel.
• For details refer to page 7.
o
REC button
• This button is used when recording and when
creating blank spaces between selections. If only
the REC button is pressed, the recording pause
mode is set.
• For details, refer to page 9.
NOTE:
• If the play button on the CD player (DCD-F101)
or MD recorder (DMD-F101) is pressed during
the recording pause mode when connected
with other components of the D-F101 series,
recording of the CD or MD begins automatically.
5
!0
6 (rewind) button
• Press this button to rewind the front side of the
tape. (The back side of the tape is fast-forwarded.)
Also use this button to search for the beginning of
the current selection when playing in the forward
(
1) direction, or to search for the beginning of the
following selection when playing in the reverse
(
0) direction.
!11
7 (fast-forward) button
• Press this button to fast-forward the front side of
the tape. (The back side of the tape is rewind.)
Also use this button to search for the beginning of
the following selection when playing in the
forward (
1 ) direction, or to search for the
beginning of the current selection when playing in
the reverse (
0) direction.
!2
2 (stop) button
• Press this button while the tape is moving to stop
the tape.
!3
PLAY button
• Press this button to play the tape.
!4
Cassette tray
• The cassette tray opens out when the
OPEN/CLOSE button is pressed. Load the
cassette tape with the side on which the tape is
exposed facing away from you. To close the
cassette tray, press the OPEN/CLOSE button
again. For details, refer to page 7.
!5
5 OPEN/CLOSE button
• Press this to open and close the cassette tray.
• When pressed in the standby mode, the cassette
deck’s power turns on.
!6
LINE OUT (analog output) jacks
• When these jacks are connected to the tape input
(TAPE PB) jacks on the receiver, the sound from
the DRR-F101 can be heard through the speakers
connected to them.
!7
LINE IN (analog input) jacks
• When this jacks are connected to the tape output
(TAPE REC) jacks on the receiver, the sound of
other components connected to them can be
recorded on the DRR-F101.
!8
SYSTEM CONNECTOR
• When using with the D-F101 series, connect this
connector to the system connector on another
unit using the included system connector cable.
!9
POWER CORD
• Connect this unit’s power cord to the AC outlet on
the CD player (DCD-F101) or the MD recorder
(DMD-F101).
6
HANDLING CASSETTE TAPES AND CAUTIONS
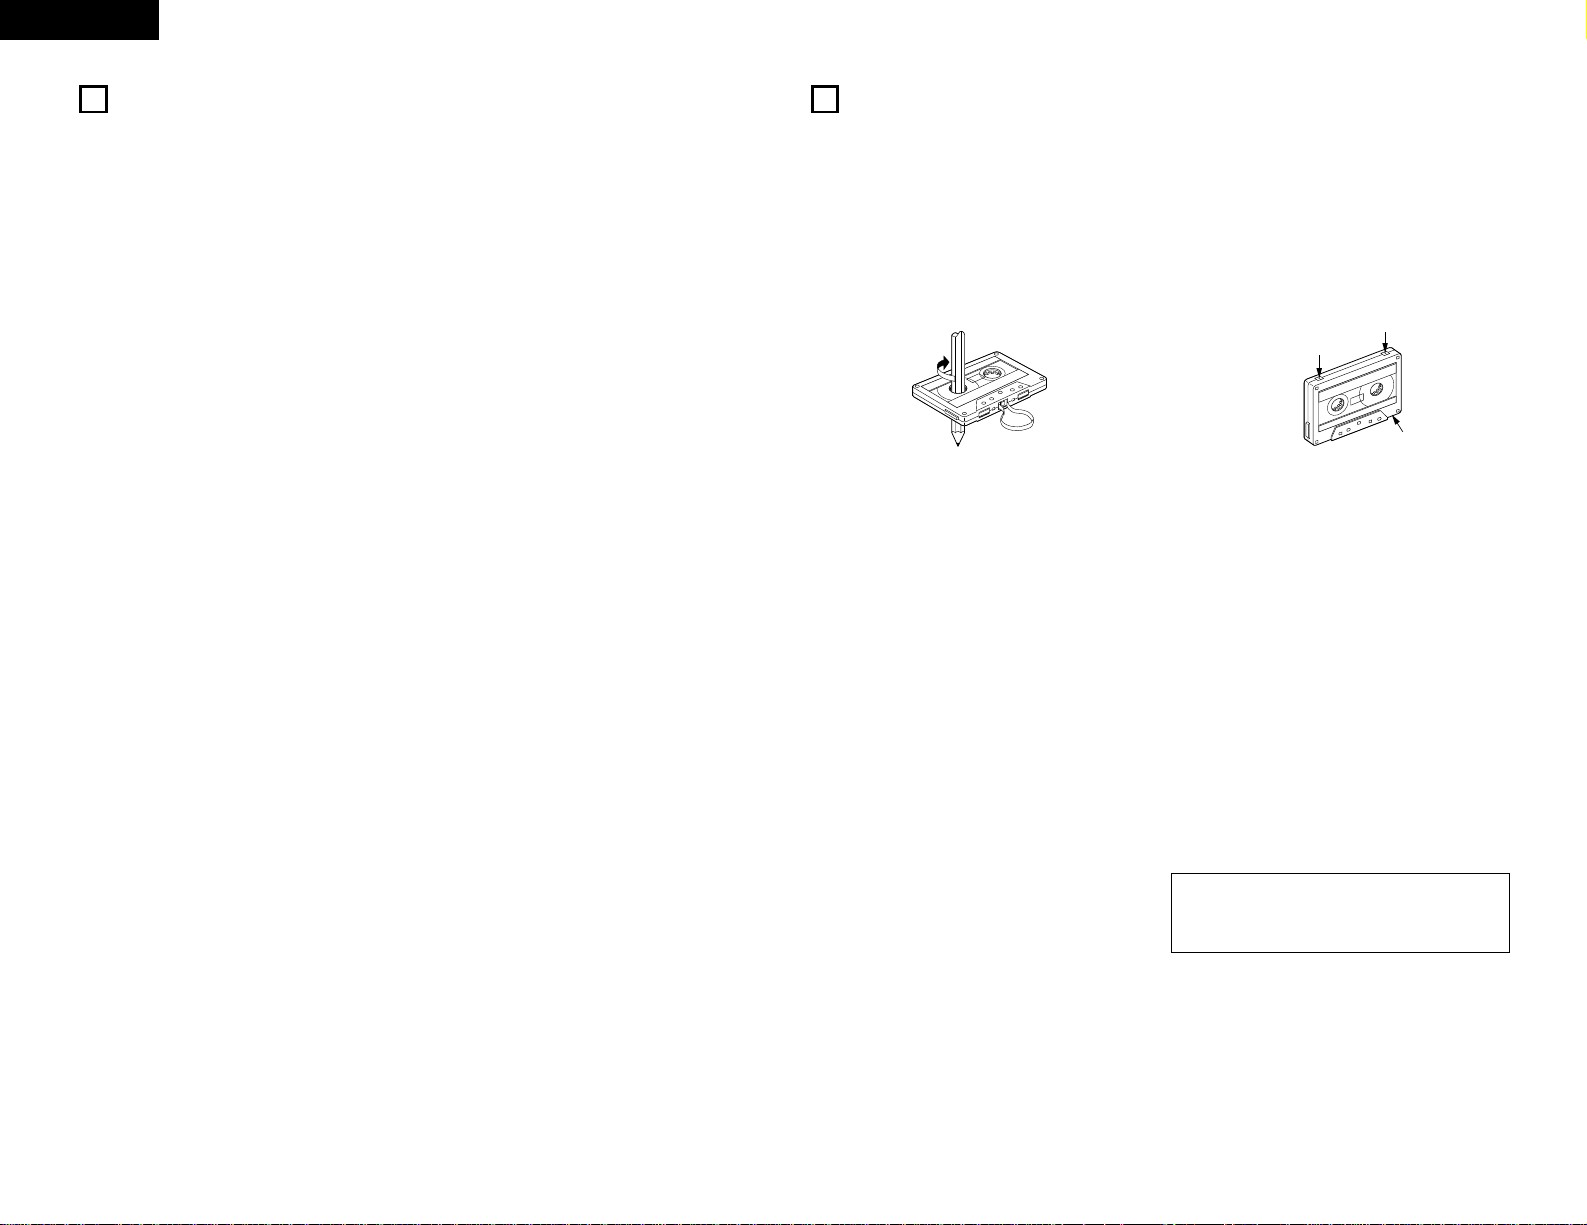
• C-120 and C-150 tapes
C-120 and C-150 cassette tapes use extremely thin tape
that can easily get caught in the capstan or pinch roller.
Do not use such cassette tapes.
• Slack in the tape
The tape may get caught on the capstan and be
damaged if the tape is slack when the cassette is
loaded. Use a pencil, etc., to take up any slack in the
tape before loading the cassette.
• Cassette tapes are equipped with accidental erasure
prevention tabs. To protect recordings from being
erased accidentally, use a screwdriver, etc., to press on
the tabs and break them off.
• To record on a cassette tape whose tabs have been
broken off, cover the holes with cellophane tape, etc.
Cautions on Handling Cassette Tapes Accidental Erasure Prevention Tabs
Cleaning the Heads
Cautions on Storing Cassette Tapes
• Do not place cassette tapes in the following places:
1. Hot or humid places
2. Dusty places
3. Places exposed to direct sunlight
4.Places exposed to magnetic forces (near TVs,
speakers, etc.)
• Store cassette tapes in cases with stoppers to prevent
the tape from becoming slack.
A
Side A
Accidental erasure protection
tab for side B
Accidental erasure protection
tab for side A
A commercially available head cleaning cassette (wet
type) is required to clean the heads (recording/playback
and erasing) on this product.
• If the heads are dirty, sound cannot be recorded or
played with good quality.
• To take full advantage of this product‘s performance and
to achieve good sound quality, clean the heads
periodically after approximately 10 hours of use.
• We recommend using a wet type commercially
available head cleaning cassette that also cleans the
pinch roller and capstan.
Degaussing the Heads
• The heads become magnetized after extended use or
after being exposed to magnetized objects. This results
in noise or a loss of high frequencies.
• Use a commercially available cassette type head
degausser to demagnetize the heads.
NOTE:
• Set the amplifier‘s volume to the minimum when
cleaning and degaussing the heads.
Page 7
7
ENGLISH
BEFORE RECORDING AND PLAYING CASSETTE TAPES
7
NOTES:
• If a foreign object is caught in the cassette tray during closing, simply press the OPEN/CLOSE button again and
the tray will open.
• Do not press the cassette tray in by hand when the power is off. Doing so will damage it.
• Do not place foreign objects in the cassette tray. Doing so will damage it.
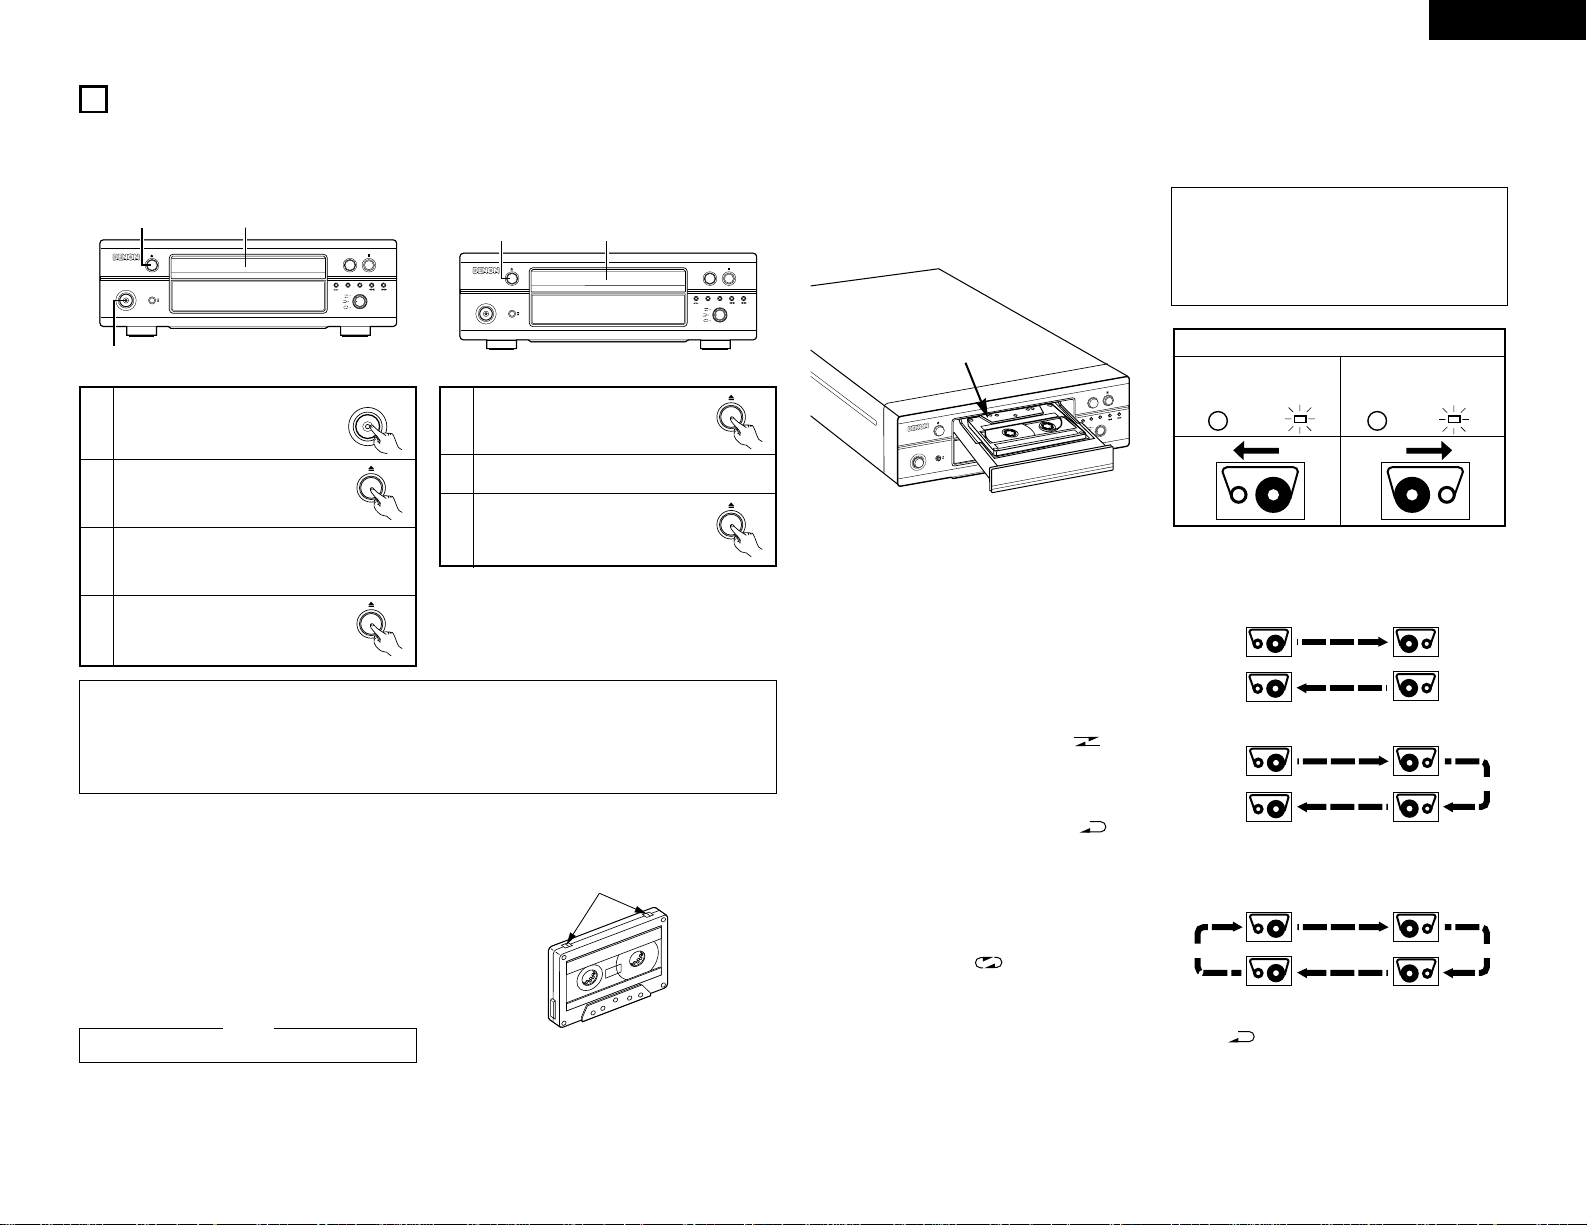
(1)
Loading and Unloading Cassette Tapes
(2)
Auto Tape Select Mechanism
z
Loading
x
Unloading
CD SRS
REC
0
1
PLAY
CASSETTE DECK DRR-F101
REC
CD SRS
PLAY
ON / STANDBY
e
DOLBY NR
ON
OFF
REVERSE
MODE
3
2,4
1
1
2
3
4
Turn on the power.
In the stop mode, press the cassette
holder open/close button.
• The cassette holder opens.
Set the cassette tape in the cassette tray with
the side on which the tape is exposed facing the
inside.
Close the cassette holder.
ON / STANDBY
CD SRS
REC
0
1
PLAY
CASSETTE DECK DRR-F101
REC
CD SRS
PLAY
ON / STANDBY
e
DOLBY NR
ON
OFF
REVERSE
MODE
2
1,3
1
2
3
In the stop mode, press the cassette
holder open/close button.
• The cassette holder opens.
Remove the cassette tape.
Close the cassette holder.
The DRR-F101 is equipped with an auto tape selector
mechanism which uses the detection holes in the
cassette halves to detect the type of tape and
automatically set the most appropriate recording bias and
equalization for that type of tape.
Detection holes
High tape (TYPE
II)
The metal tapes can only be used for playback.
NOTE:
(3)
Using the Auto Reverse Function
2 This set is equipped with an auto reverse mechanism allowing one-sided recording and playback, two-sided recording
and playback or continuous playback without removing the cassette tape.
z
Direction of cassette tape travel
2 Playback can be switched to the other side of the tape
during playback by pressing the direction selector
button (
01).
C
D
S
R
S
R
E
C
0
1
P
L
A
Y
C
A
S
S
E
T
T
E
D
E
C
K
D
R
R
-F
1
0
1
R
E
C
C
D
S
R
S
P
L
A
Y
O
N
/
S
T
A
N
D
B
Y
e
D
O
L
B
Y
N
R
O
N
O
F
F
R
E
V
E
R
S
E
M
O
D
E
NOTE:
• The diagram below shows the relationship between
the play direction indicators and the direction of
cassette tape travel. When loading cassette tapes
in the cassette tray, pay attention to the direction of
the tape.
The front side
of the tape.
A
A
0
1
0
1
PLAY
PLAY
Buttons pressed and direction of tape travel.
(Operation
buttons)
(Operation
buttons)
(Direction of
travel indication)
(Direction of
travel indication)
Front
Side
Back
Side
x Reverse modes
A
A
A
A
A
A
A
A
A
A
A
A
There are three reverse modes, as described below. For
instructions on switching between them, refer to pages
7, 8.
• Single-sided recording/playback mode ( )
Use this to record or play only the front or back side.
(The stop mode is set automatically when the end of
that side of the tape is reached.)
• Double-sided recording/playback mode ( )
• In this mode, when the end of the front side of the
tape is reached during recording or playback, the tape
automatically switches to the back side and playback
or recording continues.
(The stop mode is set automatically when the end of
the tape on the back side is reached.)
• Continuous play mode ( )
In this mode, playback continues until the stop button is
pressed.
Start from
front side
Start from
front side
Auto stop
Auto stop
Reverse
ReverseReverse
Start from
back side
Auto stop
* During recording, the deck automatically operates in the
same way as for the double-sided recording/playback
mode ( ).
* When started from the back side, only the back side is
recorded or played.
F
G
Page 8
8
ENGLISH
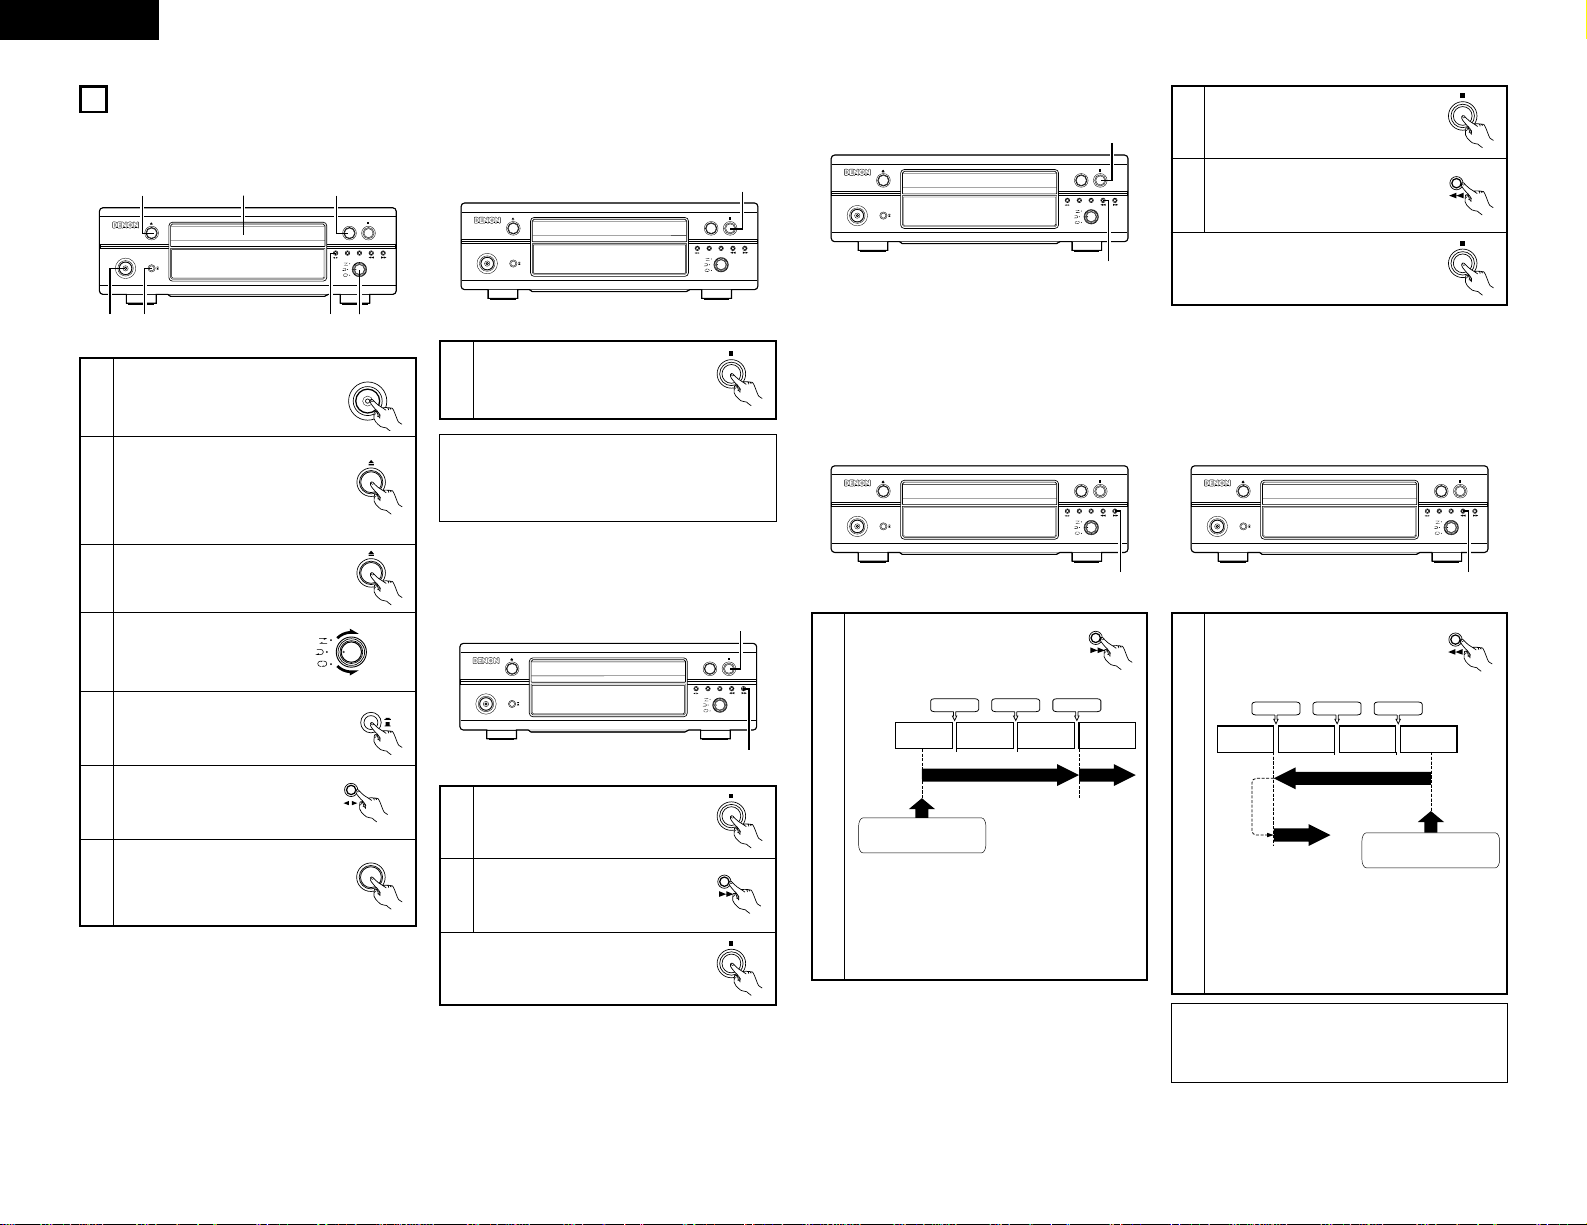
PLAYBACK
8
(1)
Starting Playback
CD SRS
REC
0
1
PLAY
CASSETTE DECK DRR-F101
REC
CD SRS
PLAY
ON / STANDBY
e
DOLBY NR
ON
OFF
REVERSE
MODE
1
5
4
6
2 7
2,3
1
2
3
4
5
6
7
Turn on the power.
ON / STANDBY
REVERSE
MODE
DOLBY NR
ON
OFF
PLAY
Load the cassette tape you want to
play.
✽ Load the cassette tape with side A
facing up.
✽ Refer to page 7.
Close the cassette holder.
Set the reverse mode.
✽ Refer to page 7.
Set the Dolby NR mode.
Press the direction (
01
) button
to change the direction of
playback.
Press the play (
PLAY
) button.
• Playback starts.
The PLAY mode indicator flashes
slowly.
(2)
Stopping Playback
CD SRS
REC
0
1
PLAY
CASSETTE DECK DRR-F101
REC
CD SRS
PLAY
ON / STANDBY
e
DOLBY NR
ON
OFF
REVERSE
MODE
1
1
During playback, press the stop
button.
• Playback stops.
NOTE:
• Be sure to press the stop button (
2 ) to stop
playback before turning off the power or unplugging
the power cord.
(3)
Fast-forwarding and Rewinding
z
To fast-forward the tape
CD SRS
REC
0
1
PLAY
CASSETTE DECK DRR-F101
REC
CD SRS
PLAY
ON / STANDBY
e
DOLBY NR
ON
OFF
REVERSE
MODE
1
2
1
2
Stop playback.
Press the fast-forward (11) button.
✽ To stop fast-forwarding, press the stop
button.
CD SRS
REC
0
1
PLAY
CASSETTE DECK DRR-F101
REC
CD SRS
PLAY
ON / STANDBY
e
DOLBY NR
ON
OFF
REVERSE
MODE
1
2
x
To rewind the tape
1
2
Stop playback.
Press the rewind (00) button.
✽ To stop rewinding, press the stop
button.
NOTE:
• The music search function detects blank spaces of
4 seconds or more. It will not detect blank spaces
that are less than 4 seconds long.
(4)
Using the Music Search Function
CD SRS
REC
0
1
PLAY
CASSETTE DECK DRR-F101
REC
CD SRS
PLAY
ON / STANDBY
e
DOLBY NR
ON
OFF
REVERSE
MODE
1
1
During playback, push the fastforward (
11) button three times.
Example 1: Finding the beginning of the 4th selection on
side A while playing the 1st selection.
Example 2: Finding the beginning of the 2nd selection on
side A while playing the 4th selection.
• The music search function detects and counts
the blank (non-recorded) spaces between
selections. Press the fast-forward button a
number of times equal to the number of blank
spaces between the current position and the
desired position.
CD SRS
REC
0
1
PLAY
CASSETTE DECK DRR-F101
REC
CD SRS
PLAY
ON / STANDBY
e
DOLBY NR
ON
OFF
REVERSE
MODE
1
1
During playback, push the rewind
(
00) button three times.
Blank space Blank space Blank space
1st
selection
2nd
selection
3rd
selection
4th
selection
Music search operation
Playback
starts
Press three times.
Blank space Blank space Blank space
1st
selection
2nd
selection
3rd
selection
4th
selection
Music search operation
Playback starts
Press three times.
• The music search function detects and counts
the blank (non-recorded) spaces between
selections. Press the rewind button a number
of times equal to the number of blank spaces
between the current position and the desired
position.
Page 9

9
ENGLISH
RECORDING
9
(1)
Starting Recording
(2)
Stopping Recording
CD SRS
REC
0
1
PLAY
CASSETTE DECK DRR-F101
REC
CD SRS
PLAY
ON / STANDBY
e
DOLBY NR
ON
OFF
REVERSE
MODE
1
5
4
2
6
7
2.3 8
CD SRS
REC
0
1
PLAY
CASSETTE DECK DRR-F101
REC
CD SRS
PLAY
ON / STANDBY
e
DOLBY NR
ON
OFF
REVERSE
MODE
1
1
2
3
4
Turn on the power.
Load the cassette tape onto which
you want to record.
✽ Load the cassette tape with side A
facing up.
✽ Refer to page 7.
Close the cassette holder.
Set the reverse mode.
✽ Refer to page 7.
ON / STANDBY
REVERSE
MODE
5
1
Set the Dolby NR mode.
6
7
8
9
Press the recording button.
• The recording pause mode is set.
During recording, press the stop
button.
• Playback stops.
DOLBY NR
ON
OFF
NOTE:
• Be sure to press the stop button (
2 ) to stop
recording before turning off the power or
unplugging the power cord.
Press the play button (PLAY).
• Recording starts
Start playing the track on the CD player or MD
recorder.
PLAY
Set the DRR-F101‘s play direction
indicator (
0 or 1) to the direction in
which you want to record.
RC-927
REMOTE CONTROL UNIT
CLEAR
123
546
789
+1010
CD SRS
MDTAPE
TUNING
REPEAT
CALL
PROG/
DIRECT
RANDOM
BAND
RDS
DIMMER
TIME/
PANEL
TIME EDIT
SYSTEM
POWER
OFF ON
STOP PLAY
VOLUME
/SELECT
SLEEP MODE
TAPE
FUNCTION
PRESET
+
-
TUNER
CD
MD
TAPE
SYSTEM FUNCTIONS
10
2 Operation is even easier when the components in the D-F101 series are connected to the DRR-F101 with system
connections. (For instructions on connections, refer to “CONNECTIONS” on page 5 and refer to the respective
operating instructions of receiver (DRA-F101).)
2 The system functions will only work when the components of the D-F101 series are connected. They will not work
with other components. To use the system functions, connect the receiver (DRA-F101).
2 When the DRR-F101 is used in a system with the D-F101 series, it can be operated with the system remote control
unit (RC-927) included with the receiver (DRA-F101).
2 When system connections are made, all the remote control signals are received at the DRA-F101‘s remote sensor.
2 The buttons on the remote control unit function in the same way as the corresponding buttons on the set. (Refer to
“PART NAMES AND FUNCTIONS” on page 6.)
2 For instructions on operating the receiver (DRA-F101) and CD player (DCD-F101) and MD player (DMD-F101), refer to
the respective operating instructions.
2 The system function signals for operating the components in the D-F101 series are all output from the receiver (DRA-
F101). Thus, when making system connections, be sure to connect the receiver (DRA-F101).
(1)
System Remote Control
2 Names of remote control unit buttons (cassette deck section)
Power standby button
(SYSTEM POWER STANDBY)
Press this to set the system’s
power to the standby mode.
(This button cannot be used to
set the DRR-F101’s power
individually to the standby
mode.)
Power on button (SYSTEM
POWER ON)
Play button (1)
Stop button (2)
Direction selector
button (
01)
Press this to turn on the
system’s power.
(This button cannot be used to
turn on only the DRR-F101’s
power.)
Rewind button (6)
Fast-forward button (7)
CD synchronized recording
button (CD SRS TAPE)
Power on button
(SYSTEM POWER ON)
REC
Function selector switch
Use this to select which
function to operate with the
remote control unit. Set the
switch to “TAPE” to operate
the DRR-F101.
Page 10

10
ENGLISH
(2) Auto power on function (when connected to the D-F101 series
components)
2 When the system is set to the standby mode, you can start the playback of tape simply by pressing the play button.
1
Set the function select
switch on the remote
control to
“TAPE”
position.
(RC-927)
2
Press the play button.
• System’s power turn on and
the function of receiver
automatically switches to
“TAPE”.
And then, the TAPE starts
playing.
✽ The auto power on function
does not work even when
the DRR-F101’s PLAY
button is pressed.
✽ When a TAPE is loaded with the DRR-F101 in the
standby mode, cassette deck can be started simply
by pressing the DRR-F101’s play button.
RC-927
REMOTE CONTROL UNIT
CLEAR
123
546
789
10
+10
CD SRS
MDTAPE
TUNING
REPEAT
CALL
PROG/
DIRECT
RANDOM
BAND
RDS
DIMMER
TIME/
PANEL
TIME EDIT
SYSTEM
POWER
OFF ON
STOP PLAY
VOLUME
/SELECT
SLEEP MODE
TAPE
FUNCTION
PRESET
+
-
TUNER
CD
MD
TAPE
1
2
(RC-927)
PLAY
TUNER
CD
MD
TAPE
RC-927 (system remote control unit)
(3) Auto function selection (when connected to the D-F101 series)
2 Use this function to switch the function to “TAPE” and start playing the tape simply by pressing a single button.
1
Press the play button while a unit other than the
DRR-F101 (CD player or MD recorder) is playing.
• Playback on the currently playing unit stops.
At the same time, the receiver’s function
switches to “TAPE” and the cassette deck
playing.
✽ To perform this operation from the system
remote control unit, first turn the remote
control unit’s function select switch and set
the function to “TAPE”.
DRR-F101 (this unit)
(Main unit) (RC-927)
CD SRS
REC
0
1
PLAY
CASSETTE DECK DRR-F101
REC
CD SRS
PLAY
ON / STANDBY
e
DOLBY NR
ON
OFF
REVERSE
MODE
1
RC-927
REMOTE CONTROL UNIT
CLEAR
123
546
789
10
+10
CD SRS
MDTAPE
TUNING
REPEAT
CALL
PROG/
DIRECT
RANDOM
BAND
RDS
DIMMER
TIME/
PANEL
TIME EDIT
SYSTEM
POWER
OFF ON
STOP PLAY
VOLUME
/SELECT
SLEEP MODE
TAPE
FUNCTION
PRESET
+
-
TUNER
CD
MD
TAPE
1
PLAY
PLAY
RC-927
(system remote
control unit)
Page 11

11
ENGLISH
(4)
CD synchronized recording (when connected to the DRA-F101 and DCD-F101)
2 Use this function to record CDs easily.
DRA-F101 (receiver)
DRR-F101 (this unit)
DCD-F101 (CD player)
(Main unit)
(DCD-F101)
2
3
4
Load the cassette tape onto which
you want to record.
Load the CD into the CD player.
(Main unit)
(Main unit)
5
6
Set the DRRF101‘s play
direction indicator
(
0 or 1) to the
direction in which
you want to record.
Set the reverse mode.
✽ Refer to page 8.
Set the Dolby NR mode.
DOLBY NR
ON
OFF
CLEAR
123
546
789
+1010
CD SRS
MDTAPE
TUNING
REPEAT
CALL
PROG/
DIRECT
RANDOM
BAND
RDS
DIMMER
TIME/
PANEL
TIME EDIT
SYSTEM
POWER
OFF ON
7
1
RC-927 (system remote control unit)
SLEEP MODE
TAPE
FUNCTION
CD
4
REVERSE
MODE
(Main unit)
7
Press the DRR-F101‘s CD
synchronized recording button.
• Recording of the CD starts
automatically.
✽ Once all the tracks on the CD
have been played, the CD player
is automatically set to the stop
mode, a 5-second blank space is
created on the tape in the DRRF101 and the stop mode is set.
✽ The DRR-F101 and the CD player
are also automatically set to the
stop mode if the cassette tape is
fully recorded before playback of
the CD has ended.
CD SRS
TAPE
(System remote
control unit)
✽ To stop recording in the middle, press the stop
button (
2 ) on the DRR-F101 or CD player to stop
CD playback. CD synchro recording continues if any
other buttons are operated.
(DRA-F101) (System remote control unit)
1
Turn on the power of the receiver.
• The system‘s power turns on.
SYSTEM
ON / STANDBY
SYSTEM
POWER
ON
CD SRS
TAPE
(System remote
control unit)
(Main unit)
PHONES
SYSTEM
VOLUME
ON / STANDBY
AM-FM STEREO RECEIVER DRA-F101
SOURCE
DIRECT
BANDUPDOWN
TUNING
MEMORY
/ SET
FUNCTION
TIMERTONE RDS
1
CD SRS
REC
0
1
PLAY
CASSETTE DECK DRR-F101
REC
CD SRS
PLAY
ON / STANDBY
e
DOLBY NR
ON
OFF
REVERSE
MODE
722
6
5
4
TRACK
ON / STANDBY
COMPACT DISC PLAYER DCD-F101
REPEAT
38
1
3
Turn on the power of the receiver.
• The system‘s power turns on.
Make the CD player or MD recorder settings.
2 When the DRR-F101 is set to the recording pause
mode, recording starts automatically when the
play/pause button (1 /3 ) on the CD player or MD
recorder is pressed.
4
Set the DRR-F101‘s play direction indicator (0 or
1) to the direction in which you want to record.
(5)
Synchronized recording (when connected to D-F101 series)
DRA-F101 (receiver)
DRR-F101 (this unit)
DCD-F101 (CD player)
(System remote control unit)
TAPE
2
Load the cassette tape onto which
you want to record into the DRRF101’s cassette holder.
7
8
Press the DRR-F101‘s recording
button once to set the recording
pause mode.
Press the
PLAY/PAUSE
button (
1/3) on
the CD player or
MD recorder.
✽ To stop recording in the middle, press the stop
button (
2 ) on the DRR-F101 CD player or MD
recorder to stop playback of the CD.
1
18Tr0 2m 46 s
-60 40 -30 -20 -12 -6 -2 0
L
dB
R
POWER LOADING MECHANISM
ON / STANDBY
MINIDISC RECORDER DMD-F101
INPUT
-
+
MULTI RECCD SRSEDIT
13
REC LEVEL
/ ENTER
MEMO REC /
CHARACTER
38
DMD-F101 (MD recorder)
123
546
CALL
PROG/
DIRECT
SYSTEM
POWER
1
RC-927 (system remote control unit)
SLEEP MODE
TAPE
FUNCTION
-
4
(Main unit)
(DRA-F101) (System remote control unit)
SYSTEM
ON / STANDBY
SYSTEM
POWER
ON
5
6
Set the reverse mode.
✽ Refer to page 7.
Set the Dolby NR mode.
REVERSE
MODE
(Main unit)
REC
(Main unit)
(Main unit)
(Main unit)
DOLBY NR
ON
OFF
NOTE:
• The CD synchronized recording function does not
work when the CD player is set to the program play
mode.
(DCD-F101)
(DMD-F101)
(System remote
control unit)
PLAY
13
• Recording starts automatically.
• When playback on the CD player or MD
recorder ends, the CD player or MD recorder is
automatically set to the stop mode, a 5-second
blank space is made on the DRR-F101, and the
DRR-F101 stops.
•
In addition, if the end of the cassette tape is
reached before disc playback has ended, both the
DRR-F101 and the CD player or MD recorder are
automatically set to the stop mode.
TUNING
TIMERTONE RDS
MEMORY
/ SET
ON / STANDBY
FUNCTION
SYSTEM
PHONES
1
22
ON / STANDBY
e
DOLBY NR
ON
OFF
PLAY
REC
CD SRS
0
6
33
ON / STANDBY
TRACK
VOLUME
SOURCE
DIRECT
BANDUPDOWN
AM-FM STEREO RECEIVER DRA-F101
PLAY
REC
1
CD SRS
4 7
REPEAT
COMPACT DISC PLAYER DCD-F101
REVERSE
MODE
CASSETTE DECK DRR-F101
5
Page 12

12
ENGLISH
2 The timer functions of the receiver (DRA-F101) can be used to play cassette tapes or record radio programs (“Air
Check”) at set times.
• Refer to the operating instruction included with the DRA-F101.
(6)
Timer functions (when connected to the DRA-F101)
2 Use this function to automatically edit the tracks on the CD to fit on the tape to be used for recording.
2 The editing function is set from system remote control unit (RC-927) included with the receiver (DRA-F101).
1
2
3
4
Turn on the power of the receiver.
• The system‘s power turns on.
Load the cassette tape onto which
you want to record into the DRRF101’s cassette holder.
Load the CD in the DCD-F101.
Now operate as described in the “Editing
Function” section of the operating instructions
included with the CD player (DCD-F101).
(7) Editing functions (when connected to the DRA-F101 and DCD-F101)
(Main unit)
(DCD-F101)
PHONES
SYSTEM
VOLUME
ON / STANDBY
AM-FM STEREO RECEIVER DRA-F101
SOURCE
DIRECT
BANDUPDOWN
TUNING
MEMORY
/ SET
FUNCTION
TIMERTONE RDS
1
CD SRS
REC
0
1
PLAY
CASSETTE DECK DRR-F101
REC
CD SRS
PLAY
ON / STANDBY
e
DOLBY NR
ON
OFF
REVERSE
MODE
2
2
TRACK
ON / STANDBY
COMPACT DISC PLAYER DCD-F101
REPEAT
33
DRA-F101 (receiver)
DRR-F101 (this unit)
DCD-F101 (CD player)
CLEAR
123
546
789
+1010
CD SRS
MDTAPE
REPEAT
CALL
PROG/
DIRECT
RANDOM
DIMMER
TIME/
PANEL
TIME EDIT
SYSTEM
POWER
OFF ON
1
RC-927 (system remote control unit)
(DRA-F101) (System remote control unit)
SYSTEM
ON / STANDBY
SYSTEM
POWER
ON
NOTES:
• The editing function will not work with discs containing more than 21 tracks.
• Load the cassette tape onto which you want to record into the cassette deck‘s cassette tray with side A facing up
before starting edited recording. The beginning of the tape is automatically found before recording starts.
• When using a recorded cassette tape for edited recording, recording stops and a blank section is left on side B of
the tape if the tape is longer than the set time, so erase the tape beforehand.
• When the editing function is used for recording, set the reverse mode switch to if not, it is not possible to
record on side B after side A.
• In some cases it may not be possible to record all the tracks on the disc, even if the tape is longer than the disc‘s
recorded time (because of how the tracks are divided onto sides A and B of the tape). The “OVER” indicator on
the CD player flashes if there are tracks that cannot be recorded.
• Recording button (REC),
67button, CD SRS button, DIRECTION button and OPEN/CLOSE button will not
function during editing.
• When recording using the editing function, the CD player‘s auto space function is activated and blank spaces of
approximately 4 seconds are automatically created between tracks. Because of this, when recording CDs
containing for example recordings of concerts without spaces between tracks, blank spaces will be created in the
middle of the piece. In this case, do not record using the editing function.
• To cancel the editing mode, press the stop button (
2) on the DRR-F101 or the CD player to stop playback of the
CD. The editing mode is not canceled if other buttons are pressed.
Page 13

13
ENGLISH
11
TROUBLESHOOTING
Check the following before you draw the conclusion that your Stereo Cassette Deck is malfunctioning:
1. Are all the connections correct?
2. Are all system components being operated correctly in accordance with the operating instructions?
3. Are the speakers and amplifier/receiver functioning correctly?
If the tape deck still does not function properly, check the symptom against the list below. If the symptom does not
correspond to the check list, please contact your DENON dealer.
13
SPECIFICATIONS
Type: Horizontal 4-track 2-channel stereo auto reverse cassette deck
Heads: 1 hard permalloy recording/playback head
1 double-gap ferrite erasing head
Tape speed: 4.75 cm/s
Noise reduction: Dolby B NR
Usable tapes: Normal, High (TYPE I, II)
The metal tapes (TYPE IV) can only be used for playback
Power supply: AC 230 V, 50 Hz
Power consumption: 9 W
Maximum external dimensions: 250 (W) x 81.5 (H) x 269 (D) mm
(including feet, controls and terminals)
Weight: 2.8 kg
* Maximum dimensions include controls, jacks, and covers.
(W) = width, (H) = height, (D) = depth
• For improvement purposes, specifications and functions are subject to change without advanced notice.
2 Dolby noise reduction manufactured under license from Dolby Laboratories Licensing Corporation.
2 “DOLBY” and the double-D symbol are trademarks of Dolby Laboratories Licensing Corporation.
12
OTHER INFORMATION
Cleaning the Heads
Demagnetizing the Heads
• If the cassette deck‘s head are dirty, tapes cannot be
played or recorded with good sound quality.
• To take full advantage of all the performance this
cassette deck has to offer and ensure good quality
sound, clean the heads periodically after approximately
10 hours of use, using a commercially available cleaning
cassette.
• The heads become magnetized after they have been used for an extended period of time or if they are exposed to a
magnetic object. This results in noise or a loss of the treble sound.
• If the heads are magnetized, use a commercially available cassette-type head demagnetizer to demagnetize them.
NOTE:
• Some commercially available cleaning cassettes are
highly abrasive and may damage the heads. Avoid
using such cleaning cassettes.
Symptom
Recording does not start
when REC button is
pressed.
Cause
• No cassette tape is loaded.
• Accidental erasure protection tabs
are broken off.
Countermeasure Page
• Load a cassette tape.
• Cover the tab holes with
cellophane tape.
7
6
Sound is broken or no
sound is produced during
recording and playback.
• Heads are dirty.
• Cassette tape is defective.
• Clean the heads.
• Replace the cassette tape.
6
–
Humming sound is heard
while playing cassette
tapes.
• Noise from a TV.
(Noise may be produced by some
types of TVs.)
• Move the TV away from the
system.
• Turn the TV off.
4
–
Wow (shaky sound) is
heavy during recording or
playback.
• Capstans or pinch rollers are dirty. • Clean them. 6
Page 14

14
DEUTSCH
INHALT
z
HAUPTMERKMALE …………………………………
14
x
VOR INBETRIEBNAHME ........…………………….....
14
c
VORSICHTSMASSNAHMEN ZUR INSTALLATION
....
14
v
ANSCHLÜSSE …………………………………………
15
b
BENENNUNGEN DER BAUTEILE
UND FUNKTIONEN ..................................…………
16
n
HANDHABUNG VON KASSETTENBÄNDERN
UND VORSICHTSMASSNAHMEN
….......................
16
m
VOR DER AUFNAHME UND WIEDERGABE
VON CASSETTENBÄNDERN
………………………
17
,
WIEDERGABE VON CASSETTENBÄNDERN
…...…
18
.
AUFNAHME VON CASSETTENBÄNDERN
…………
19
⁄0
SYSTEMFUNKTIONEN
…………………………
19~22
⁄1
FEHLERSUCHE ……………............…………………
23
⁄2
ALLGEMEINE INFORMATIONEN……………………
23
⁄3
TECHNISCHE DATEN ………………………………
23
1. Horizontaleinlage für beständigen Lauf
Der vom DRR-F101 verwendete Horizontaleinlegemechanismus ist das ideale Magazinmodell für die
rotierenden Teile, das wichtigste Teil des
Kassettendecks. Horizontales Anbringen des
Deckmechanismus verringert die Vibration des
Schwungrades in der Schubrichtung und reduziert
Modulationsgeräusche.
2. Verschiedene Editier- und Wiedergabefunktionen
• Auto-Reverse-Mechanismus zum Aufnehmen und
Abspielen über lange Zeitperioden.
• Auto-Band-Wähler für ein automatisches Erkennen
des Bandtyps.
• Musik-Search zum Aussuchen von Selektionen bis zu
16 Selektionen entfernt in beide Richtungen.
3. Praktische Systemfunktionen
Der DRR-F101 ist für Systemfunktionen ausgerüstet,
die ein synchronisiertes Aufnehmen, TimerAufnahme/Wiedergabe und Auto-Funktions- und AutoPower On-Betrieb erlauben, wenn es in Kombination
mit der DRA/DCD/DMD-F101-Reihe verwendet wird.
Darüber hinaus können Systemgeräte mit dem
Systemfernbedienungsgerät (RC-927), das zum
Lieferumfang des Receivers (DRA-F101) gehört,
betrieben werden.
1
HAUPTMERKMALE
3
VORSICHTSMASSNAHMEN ZUR INSTALLATION
2
VOR INBETRIEBNAHME
Überprüfen Sie, daß die nachfolgend aufgeführten Teile in der Verpackung – seitlich des Gerätes – enthalten sind:
q
Bedienungsanleitung ..............................................1
w
RCA-Stiftsteckerkabel
..............................................2
e
System-Anschlußkabel ......................................……1
r
Servicestation-Liste ..........................................……1
ew
Beachten Sie vor der Inbetriebnahme des Gerätes die
nachfolgend aufgeführten Hinweise:
• Vor dem Einschalten des Netzschalters
Vergewissern Sie sich noch einmal, daß alle
Anschlüsse richtig ausgeführt worden sind und es
keinerlei Probleme mit den Anschlußkabeln gibt.
Stellen Sie den Netzschalter vor dem Anschließen bzw.
Abtrennen von Anschlußkabeln stets auf die StandbyPosition.
• Transport des Gerätes
Um sowohl Kurzschlüsse als auch eine Beschädigung
der Drähte in den Anschlußkabeln zu vermeiden,
müssen vor einem Transport des Gerätes sowohl das
Netzkabel als auch alle Anschlußkabel zwischen den
einzelnen Audio-Komponenten abgetrennt sein.
• Bewahren Sie diese Betriebsanleitung an einem
sicheren Ort auf.
Bewahren Sie diese Betriebsanleitung nach dem
Durchlesen zusammen mit der Garantiekarte an einem
sicheren Ort auf.
• Beachten Sie bitte, daß die Abbildungen in dieser
Betriebsanleitung für Erklärungszwecke vom
aktuellen Gerätemodell abweichen können.
300 Ω/Ohm Flachbandkabel
75 Ω/Ohm Koaxialkabe
Dieses Cassettendeck ist zur Steuerung der internen
Elektronikschaltungen mit einem Mikroprozessor
ausgestattet. Falls dieses Gerät gleichzeitig mit einem
Tuner oder einem Fernsehgerät betrieben wird, kann der
Rundfunkempfang sowohl in Ton und Bild gestört
werden. Beachten Sie folgende Vorsichtsmaßnahmen zur
Vermeidung derartiger Störungen:
• Stellen Sie das Cassettendeck so weit wie möglich
entfernt vom Tuner und Fernsehgerät auf.
• Das Netzkabel und alle anderen am
Cassettendeckangeschlossenen Kabel getrennt von den
Antennenkabeln des Tuners bzw. Fernsehgerätes
verlegen.
• Insbesondere machen sich bei der Verwendung einer
Zimmerantenne bzw. eines 300 Ω/Ohm
Flachbandkabels Empfangsstörungen schnell
bemerkbar, so daß sich stattdessen der Anschluß an
eine Außenantenne über ein 75 Ω/Ohm Koaxialkabel
wärmstens empfiehlt.
Page 15

15
DEUTSCH
4
ANSCHLÜSSE
SPEAKER SYSTEM
SYSTEM
CONNECTOR
PRE
OUT
SUB
WOOFER
RECPB
MDTAPEINPUTS
RECPBDVD/AUXCDPHONO
1
AM LOOP ANT.
ANTENNA
2
L
+
-
R
SPEAKER IMPEDANCE 4~16
FM COAX.
75
L
R
AC OUTLET
230V 50Hz
SWITCHED
W MAX
1
2
3
4
Schließen Sie die SYSTEM CONNECTOR-Buchse
des DRR-F101 mittels des beiliegenden
Systemkabels an die SYSTEM CONNECTORBuchse (1 oder 2) der anderen Komponenten an.
Schließen Sie dieses Netzkabel des Gerätes an
den Wechselstrom-Ausgang am CD-Player (DCDF101) oder an den Ausgang einer anderen
Komponente an.
Schließen Sie die LINE OUT-Buchsen des DRRF101 mittels des beiliegenden Stereoaudiokabels an
die TAPE-Eingangsbuchsen des Receivers an.
Schließen Sie die LINE IN-Buchsen des DRR-F101
mittels des beiliegenden Stereoaudiokabels an die
TAPE-Eingangsbuchsen des Receivers an.
HINWEISE:
• Schließen Sie das Netzkabel erst dann an, wenn alle
Anschlüsse vorgenommen wurden.
• Vergewissern Sie sich, dass der linke und rechte
Kanal richtig angeschlossen ist (links mit links,
rechts mit rechts).
• Stecken Sie die Stecker fest ein. Unvollständige
Anschlüsse erzeugen Rauschen.
• Beachten Sie, dass das Zusammenbinden von
Stiftsteckerkabeln mit Netzkabeln neben einem
Leistungstransformator Brummen oder Rauschen
erzeugt.
• Warten Sie nach Abziehen des Netzkabels
mindestens 5 Sekunden, bevor Sie es wieder
einstecken.
✽ Der DRR-F101 kann auch verwendet werden, wenn
er an einen anderen
Receivers
als den der DRA-F101
angeschlossen wird. In diesem Fall arbeitet keine
der Systemfunktionen (autom. Einschaltung, usw.).
✽ Einige
Receivers
sind mit Anschlüssen für zwei oder
mehr Cassetten Decks ausgestattet, mit denen
Kassettenbänder kopiert werden können. Lesen Sie
sich vor der Inbetriebnahme die
Bedienungsanleitung Ihres
Receivers
sorgfältig
durch.
Anschluss an die D-F101-Serie
2 Wenn ein Anschluss an einen anderen Verstärker als den Receivers der DRA-F101 erfolgt, ist kein Anschluss 3
erforderlich. Beachten Sie, dass in diesem Fall keine der Systemfunktionen (autom. Stromeinschaltung, usw.)
arbeitet.
• Systemfunktionen wie die autom. Einschaltung können
nur aktiviert werden, wenn Stereo-Audiokabel und
Systemkabel zwischen allen Systemkomponenten
angeschlossen werden. Vergewissern Sie sich, dass alle
Anschlusskabel zwischen den Einheiten fest
angeschlossen sind.
• Wenn ein Systemkabel während des Betriebs
abgezogen wird, kann eine Fehlfunktion auftreten.
Ziehen Sie unbedingt das Netzkabel ab, bevor
Anschlussänderungen vorgenommen werden.
DRA-F101
(Receivers)
Stecken Sie ihn in die freie SYSTEM CONNECTOR-Buchse
einer anderen Komponente. Jede SYSTEM CONNECTORBuchse kann benutzt werden.
DRR-F101
Empfohlene Systeminstallation
• Installieren Sie die D-F101-Serie wie unten beschrieben,
um Leistung und Stabilität zu gewährleisten.
• Installieren Sie die Komponenten so, dass die
Ventilationsöffnungen am Receivers (DRA-F101) nicht
blockiert werden.
• Schließen Sie nur Audiogeräte an die AC OUTLET
an. Verwenden Sie die AC OUTLET nicht zum
Anschluß von Haartrocknern o.ä.
DRR-F101
(Cassettendeck)
1
2
3
4
1
18Tr02 m 46s
-60 40 -30 -20 -12 -6 -2 0
L
dB
R
POWER LOADING MECHANISM
ON / STANDBY
MINIDISC RECORDER DMD-F101
INPUT
-
+
MULTI RECCD SRSEDIT
13
REC LEVEL
/ ENTER
MEMO REC /
CHARACTER
PHONES
SYSTEM
VOLUME
ON / STANDBY
AM-FM STEREO RECEIVER DRA-F101
SOURCE
DIRECT
BANDUPDOWN
TUNING
MEMORY
/ SET
FUNCTION
TIMERTONE RDS
CD SRS
REC
0
1
PLAY
CASSETTE DECK DRR-F101
REC
CD SRS
PLAY
ON / STANDBY
e
DOLBY NR
ON
OFF
TRACK
ON / STANDBY
COMPACT DISC PLAYER DCD-F101
REPEAT
REVERSE
MODE
DMD-F101 DRA-F101
DCD-F101 DRR-F101
Page 16

16
DEUTSCH
5
BENENNUNGEN DER BAUTEILE UND FUNKTIONEN
q
Netzbetriebschalter
(ON/STANDBY)
• Diese Taste drücken, um das Kassettendeck
einzuschalten, dann erneut drücken, um das
Kassettendeck in den Standby-Modus
einzustellen.
• Die Farbe der LED wechselt je nach
Betriebszustand:
• Gerät eingeschaltet: grün
• Im Bereitschaftsmodus (STANDBY): rot
w
DOLBY NR-Modus-Auswahlschalter
• Um den Dolby NR-Modus (ON oder OFF)
auszuwählen. Wenn Sie ein Band abspielen, dann
setzen Sie den Dolby NR-Modus auf den gleichen
Modus, mit dem das Band aufgenommen wurde.
e
CD SRS-Anzeige
• Leuchtet während einer systemsynchronisierten
Aufnahme einer CD auf.
r
REC-Anzeige
• Leuchtet während einer Aufnahme auf.
t
WIEDERGABE-Modus-Anzeige
• Die Bandlaufrichtung und der Wiedergabe-Modus
werden hier angezeigt.
y
01(Richtung)-Taste
• Drücken Sie diese Taste, um die Bandlaufrichtung
während der Wiedergabe oder Aufnahme eines
Bandes umzukehren.
u
CD SRS
(Synchronisiert. Aufnahmesystem)Taste
• Benutzen Sie diese Taste, um die Aufnahme von
CD’s zu synchronisieren.
• Details entnehmen Sie bitte Seite 21.
i
REVERSE MODUS-Auswahlschalter
• Um die Bandlaufrichtung auszuwählen.
• Details entnehmen Sie auf Seite 17.
o
REC-Taste
• Diese Taste wird für das Aufnehmen und für das
Schaffen von freien Platz zwischen Selektionen
verwendet. Wenn nur die REC-Taste gedrückt
wird, ist der Aufnahme-Pause-Modus eingestellt.
• Details entnehmen Sie bitte Seite 19.
HINWEIS:
• Wenn die Wiedergabe-Taste auf dem CD-Player
(DCD-F101) oder MD-Recorder (DMD-F101)
während des Aufnahme-Pause-Modus gedrückt
wird, beginnt die Aufnahme der CD oder MD
automatisch, wenn andere Komponenten der DF101-Serie angeschlossen sind.
!0
6 (Rückspul-)Taste
•
Drücken Sie diese Taste, um die Vorderseite des
Bandes zurückzuspulen. (Die Rückseite des Bandes
wird schnell vorgespult.) Benutzen Sie diese Taste
auch, um den Anfang der aktuellen Selektion beim
Abspielen in der Vorwärtsrichtung (
1
), oder um den
Anfang der nächsten Selektion beim Abspielen in der
Rückwärtsrichtung (
0
) zu suchen.
5
!11
7 (Schnellvorspul-) Taste
• Drücken Sie diese Taste, um die Vorderseite des
Bandes schnell vorzuspulen. (Die Rückseite des
Bandes wird zurückgespult.) Benutzen Sie auch
diese Taste, um den Anfang der nächsten
Selektion zu finden, wenn das Band in VorwärtsRichtung (
1 ) läuft, oder um den Anfang der
aktuellen Selektion zu finden, wenn das Band in
umgekehrter Richtung (
0) läuft.
!2
2 (Stopp)-Taste
• Drücken Sie diese Taste, um das Band zu
stoppen.
!3
PLAY-Taste
• Diese Taste drücken, das Band abzuspielen.
!4
Kassettenmagazin
• Das Kassettenmagazin öffnet sich, wenn die
OPEN/CLOSE-Taste gedrückt wird. Legen Sie die
Kassette mit der Bandöffnung von sich
wegweisend ein. Um das Kassettenmagazin zu
schließen, die OPEN/CLOSE-Taste erneut
drücken. Details entnehmen Sie Seite 17.
!5
5 OPEN/CLOSE-Taste
• Diese Taste drücken, um das Kassettenmagazin
zu öffnen und zu schließen.
• Taste im Standby-Modus gedrückt wird, wird das
Kassettendeck eingeschaltet.
!6
LINE OUT (analoger Ausgang) Stecker
• Wenn diese Buchsen an die
Bandeingangsbuchsen (TAPE PB) am Receivers
angeschlossen werden, kann der Ton vom DRRF101 durch die am Tuner-Verstärker oder
Receivers
angeschlossenen Lautsprecher ausgegeben
werden.
!7
LINE IN (analoger Eingang) Stecker
• Wenn diese Buchsen an die
Bandausgangsbuchsen (TAPE REC) am Receivers
angeschlossen werden, kann der Ton anderer am
Tuner-Verstärker oder Receivers angeschlossenen Komponenten mit dem DRR-F101
aufgenommen werden.
!8
SYSTEMVERBINDER
• Schließen Sie den Verbinder der D-F101-Serie mit
Hilfe eines Systemverbindungskabel an einen
Systemverbinder einer anderen Einheit an.
!9
NETZKABEL
• Schließen Sie dieses Netzkabel des Gerätes an
den Wechselstrom-Ausgang am CD-Player (DCDF101) oder MD-Recorder (DMD-F101) an.
6
HANDHABUNG VON KASSETTENBÄNDERN UND VORSICHTSMASSNAHMEN
• C-120 und C-150 Cassettenbänder
C-120 und C-150
-Cassetten haben ein sehr dünnes
Band, das sich leicht um die Tonwellen und die
Andruckrollen wickeln kann. Wir raten daher von der
Benutzung solcher
C-120 und C-150-Cassetten ab.
• Bandschlaufen
Bandschlaufen können sich im Mechanismus
verwickeln und dadurch das Band beschädigen.
Beseitigen Sie vor dem Einlegen der Cassette sämtliche
Bandschlaufen mit einem Bleistift o.ä.
• Cassettenbänder sind mit Laschen zum Schutz vor
versehentlichem Löschen ausgestattet. Brechen Sie die
Löschschutzlaschen mit einem Schraubenzieher o.ä.
heraus, um ein versehentliches Löschen von wertvollen
Aufnahmen zu verhindern.
• Wenn Sie auf ein Cassettenband aufnehmen möchten,
dessen Löschschutzlaschen herausgebrochen sind,
überkleben Sie die durch das Herausbrechen
entstandenen Öffnungen einfach mit Klebeband.
Vorsichtsmaßnahmen zur Handhabung von
Cassettenbändern
Löschschutzlaschen
Reinigung der Tonköpfe
Hinweise zur Aufbewahrung von
Cassettenbändern
• Vermeiden Sie die Aufbewahrung von Cassetten-
bändern an den nachfolgen aufgeführten Orten:
1. An heißen oder feuchten Orten
2. An staubigen Orten
3. An Orten, die direktem Sonnenlicht ausgesetzt sind
4. In der Nähe von Magnetquellen (Fernsehgeräten,
Lautsprechern usw.)
• Bewahren Sie Cassettenbänder in mit Stoppern
ausgestatteten Boxen auf, damit sich keine
Bandschlaufen bilden können.
A
Seite A
Löschschutzlasche
für Seite B
Löschschutzlasche
für Seite A
Einige im Handel erhältliche Reinigungscassetten
haben einen Poliereffekt und können die Tonköpfe
beschädigen. Vermeiden Sie die Benutzung derartiger
Reinigungscassetten.
• Wenn die Tonköpfe des Cassettendecks verschmutzt
sind, läßt die Klangqualität bei der Wiedergabe oder
Aufnahme von Cassettenbändern zu wünschen übrig.
• Reinigen Sie die Tonköpfe regelmäßig nach ungefähr 10
Betriebsstunden mit einer im Handel erhältlichen
Reinigungscassette, damit Sie die Leistungsfähigkeit
dieses Cassettendecks voll ausnutzen und sich bester
Tonqualität erfreuen können.
Entmagnetisierung der Tonköpfe
• Nachdem das Cassettendeck über einen längeren
Zeitraum hinweg benutzt worden ist, werden die
Tonköpfe magnetisiert. Dies geschieht ebenfalls, wenn
die Tonköpfe einem magnetischen Gegenstand
ausgesetzt sind. Das Ergebnis davon sind
Nebengeräusche und reduzierte Höhen.
• Wenn die Tonköpfe magnetisiert sind, entmagnetisieren
Sie sie mit einem im Handel erhältlichen
Demagnetisierer.
HINWEIS:
• Stellen Sie die Lautstärke des Verstärkers auf ein
Minimum ein, wenn die Köpfe gereinigt und
entmagnetisiert werden.
Page 17

17
DEUTSCH
VOR DER AUFNAHME UND WIEDERGABE VON CASSETTENBÄNDERN
7
HINWEISE:
• Wenn ein Fremdkörper beim Schließen in das Kassettenmagazin gelangt, drücken Sie einfach erneut auf die
OPEN/CLOSE-Taste, damit sich das Fach wieder öffnet.
• Drücken Sie das Kassettenmagazin nicht mit der Hand zurück, wenn die Stromversorgung ausgeschaltet ist.
Anderenfalls wird das Fach beschädigt.
• Legen Sie keine Fremdkörper in das Kassettenmagazin hinein. Anderenfalls wird das Fach beschädigt.
(1) Einlegen und Herausnehmen von Cassettenbändern
(2) Automatischer Bandsortenwahl-Mechanismus
z
Einlegen
x
Herausnehmen
CD SRS
REC
0
1
PLAY
CASSETTE DECK DRR-F101
REC
CD SRS
PLAY
ON / STANDBY
e
DOLBY NR
ON
OFF
REVERSE
MODE
3
2,4
1
1
2
3
4
Schalten Sie die Stromversorgung
ein.
Drücken Sie die Öffnen-/SchließenTaste (OPEN/ CLOSE).
• Die Cassettenlade öffnet sich.
Legen Sie Cassettenbänder mit der freiliegenden Seite
zum Gerät hin zeigend ein. Ein Einlegen in anderer
Richtung kann Beschädigungen zur Folge haben.
Drücken Sie die Öffnen-/SchließenTaste (OPEN/ CLOSE), um die
Cassettenlade zu schließen.
ON / STANDBY
CD SRS
REC
0
1
PLAY
CASSETTE DECK DRR-F101
REC
CD SRS
PLAY
ON / STANDBY
e
DOLBY NR
ON
OFF
REVERSE
MODE
2
1,3
1
2
3
Drücken Sie die Öffnen-/SchließenTaste (OPEN/ CLOSE).
• Die Cassettenlade öffnet sich.
Nehmen Sie das Cassettenband aus dem Gerät
heraus.
Drücken Sie die Öffnen-/SchließenTaste (OPEN/ CLOSE), um die
Cassettenlade zu schließen.
Das DRR-F101 ist mit einem automatischen
Bandsortenwahl-Mechanismus ausgestattet, der anhand
der Erkennungsöffnungen in den Cassettenhälften den
Bandtyp erkennt und die am besten geeignete AufnahmeVormagnetisierung sowie die beste Entzerrung für den
jeweiligen Bandtyp automatisch einstellt.
Erkennungsöffnung
Hochband (TYP
II)
Die Metallbänder können nur für die Wiedergabe
verwendet werden.
HINWEIS:
(3) Anwendung der Automatik-Reverse-Funktion
2 Das Cassettendeck ist mit einer Automatik-Reverse-Funktion ausgestattet, so daß das Band beidseitig wiedergegeben,
aufgenommen und fortlaufend wiedergegeben kann, ohne daß ein Herausnehmen des Bandes erforderlich ist.
z Bandlaufrichtung
2 Drücken Sie vor der Wiedergabe oder Aufnahme mit
diesem Gerät zunächst die Richtungstaste
(01) und
wählen Sie entweder die Vorwärts-
(1 ) oder
Rückwärtsrichtung
(0) an.
C
D
S
R
S
R
E
C
0
1
P
L
A
Y
C
A
S
S
E
T
T
E
D
E
C
K
D
R
R
-F
1
0
1
R
E
C
C
D
S
R
S
P
L
A
Y
O
N
/
S
T
A
N
D
B
Y
e
D
O
L
B
Y
N
R
O
N
O
F
F
R
E
V
E
R
S
E
M
O
D
E
HINWEIS:
• Gedrückte Tasten und Bandlaufrichtung. Die
Vorderseite ist die Seite, die nach oben zeigt, wenn
das Band in das Cassettenfach eingelegt ist.
Die Vorderseite
des Bandes.
A
A
0
1
0
1
PLAY
PLAY
Gedrückte Tasten und Bandlaufrichtung.
(Betriebstaste)
(Betriebstaste)
(Anzeige der
Bandlaufrichtung)
(Anzeige der
Bandlaufrichtung)
Vorderseite
Rückseite
x Reverse-Modus
A
A
A
A
A
A
A
A
A
A
A
A
Sie können – wie nachfolgend beschrieben – zwischen
drei Reverse-Modi wählen. Beziehen Sie sich für
Hinweise zum Wechseln dieser Modi auf Seite 17 und
18.
• Modus für die einseitige Aufnahme/Wiedergabe
()
Wählen Sie diesen Modus, wenn Sie nur die
Vorderseite des Bandes wiedergeben oder auf diese
aufnehmen möchten.
(Der Stopp-Modus wird automatisch eingestellt, wenn
das Ende dieser Bandseite erreicht ist.)
• Modus für die beidseitige Aufnahme/Wiedergabe
()
• Wenn in diesem Modus während der Aufnahme oder
Wiedergabe das Ende der Vorderseite erreicht ist,
schaltet das Band automatisch auf die Rückseite um
und die Wiedergabe oder Aufnahme wird fortgesetzt.
(Der Stopp-Modus wird automatisch eingestellt, wenn
das Ende der Rückseite erreicht ist.)
• Modus für die fortlaufende Wiedergabe ( )
Wenn Sie diesen Modus wählen, wird das Band solange
wiedergegeben, bis die Stopptaste gedrückt wird.
Start von der
Vorderseite
Start von der
Vorderseite
AutomatikStopp
AutomatikStopp
Reverse
ReverseReverse
Start von
der
Rückseite
AutomatikStopp
* Während der Aufnahme funktioniert das Cassettendeck
automatisch auf gleiche Weise wie im Modus für die
beidseitige Aufnahme/Wiedergabe ( ).
* Wenn Sie die Wiedergabe von der Rückseite aus
starten, wird nur die Rückseite wiedergegeben.
F
G
Page 18

18
DEUTSCH
WIEDERGABE VON CASSETTENBÄNDERN
8
(1) Wiedergabe starten
CD SRS
REC
0
1
PLAY
CASSETTE DECK DRR-F101
REC
CD SRS
PLAY
ON / STANDBY
e
DOLBY NR
ON
OFF
REVERSE
MODE
1
5
4
6
2 7
2,3
1
2
3
4
5
6
7
Schalten Sie die Stromversorgung
ein.
ON / STANDBY
REVERSE
MODE
DOLBY NR
ON
OFF
PLAY
Drücken Sie den Öffnen-/SchließenTaste (
5
OPEN/CLOSE) und legen Sie
ein bespieltes Band in die
Cassettenlade ein.
✽ Beziehen Sie sich auf Seite 17.
Drücken Sie die Öffnen-/SchließenTaste (OPEN/ CLOSE), um die
Cassettenlade zu schließen.
Aktivieren Sie den ReverseBetrieb.
✽ Beziehen Sie sich auf Seite
17.
Aktivieren Sie den Dolby NR-Betrieb.
Die Richtungstaste (
01
)
drücken, um die
Wiedergaberichtung zu ändern.
Drücken Sie die PLAY-Taste.
• Die Wiedergabe wird gestartet.
-
Die PLAY-Modus-Anzeige blinkt
langsam.
(2) Wiedergabe beenden
CD SRS
REC
0
1
PLAY
CASSETTE DECK DRR-F101
REC
CD SRS
PLAY
ON / STANDBY
e
DOLBY NR
ON
OFF
REVERSE
MODE
1
1
Drücken Sie die 2 STOP-Taste.
• Wenn bereits alle Titel der
eingelegten CD gespielt wurden,
endet die Wiedergabe automatisch.
(3) Schnellvorlauf und Rücklauf
z
Die Kassette vorspulen
CD SRS
REC
0
1
PLAY
CASSETTE DECK DRR-F101
REC
CD SRS
PLAY
ON / STANDBY
e
DOLBY NR
ON
OFF
REVERSE
MODE
1
2
1
2
Drücken Sie die 2 (Stopp)-Taste um
die Wiedergabe zu beenden.
Drücken Sie die Schnellvorlauf (
11
)-
Taste.
CD SRS
REC
0
1
PLAY
CASSETTE DECK DRR-F101
REC
CD SRS
PLAY
ON / STANDBY
e
DOLBY NR
ON
OFF
REVERSE
MODE
1
2
x
Die Kassette zurückspulen
1
2
Drücken Sie die 2 (Stopp)-Taste um
die Wiedergabe zu beenden.
Drücken Sie die Rücklauf (
00
)-
Taste.
HINWEIS:
•
Die Musik-Suchlauffunktion kann nur dann
erfolgreich angewendet werden, wenn zwischen
den einzelnen Titeln unbespielte Abschnitte von
mindestens 4 Sekunden Länge vorhanden sind.
(4) Anwendung der Musik-Suchlauffunktion
CD SRS
REC
0
1
PLAY
CASSETTE DECK DRR-F101
REC
CD SRS
PLAY
ON / STANDBY
e
DOLBY NR
ON
OFF
REVERSE
MODE
1
1
Drücken Sie während der Wiedergabe
die Schnellvorlauf (
11)-Taste drei
Mal.
Beispiel 1:
Den Anfang des 4. Musikstücks auf Seite A finden,
während das 1. Musikstück abgespielt wird.
Beispiel 2:
Den Anfang des 2. Musikstücks auf Seite A finden,
während das 4. Musikstück abgespielt wird.
• Die Musiksuchfunktion erkennt und zählt die
Leerstellen (ohne Aufnahme) zwischen den
Liedern. Drücken Sie die Vorspultaste so oft,
bis die Anzahl der Leerstellen zwischen der
gegenwärtigen Position und der gewünschten
Position erreicht wird.
CD SRS
REC
0
1
PLAY
CASSETTE DECK DRR-F101
REC
CD SRS
PLAY
ON / STANDBY
e
DOLBY NR
ON
OFF
REVERSE
MODE
1
1
Drücken Sie während der Wiedergabe
die Rücklauf(
00)-Taste drei Mal.
Unbespielter Abschnitt Unbespielter Abschnitt Unbespielter Abschnitt
Erster
Titel
Zweiter
Titel
Dritter
Titel
Viert
Titel
Suchlauf
Wiedergabe
Drücken Sie die
Taste drei Mal.
Unbespielter Abschnitt Unbespielter Abschnitt Unbespielter Abschnitt
Erster
Titel
Zweiter
Titel
Dritter
Titel
Viert
Titel
Suchlauf
Wiedergabe
Drücken Sie die
Taste drei Mal.
• Die Musiksuchfunktion erkennt und zählt die
Leerstellen (ohne Aufnahme) zwischen den
Liedern. Drücken Sie die Rücklauf so oft, bis
die Anzahl der Leerstellen zwischen der
gegenwärtigen Position und der gewünschten
Position erreicht wird.
Page 19

19
DEUTSCH
AUFNAHME VON CASSETTENBÄNDERN
9
(1) Aufnahme starten
(2)
Aufnahme stoppen
CD SRS
REC
0
1
PLAY
CASSETTE DECK DRR-F101
REC
CD SRS
PLAY
ON / STANDBY
e
DOLBY NR
ON
OFF
REVERSE
MODE
1
5
4
2
6
7
2.3 8
CD SRS
REC
0
1
PLAY
CASSETTE DECK DRR-F101
REC
CD SRS
PLAY
ON / STANDBY
e
DOLBY NR
ON
OFF
REVERSE
MODE
1
1
2
3
4
Schalten Sie die Stromversorgung
ein.
Drücken Sie die Öffnen-/SchließenTaste (5OPEN/CLOSE) und legen
Sie das Band, auf das Sie aufnehmen
möchten, in die Cassettenlade ein.
✽ Beziehen Sie sich auf Seite 17.
Drücken Sie die Öffnen-/SchließenTaste (OPEN/ CLOSE), um die
Cassettenlade zu schließen.
Aktivieren Sie den ReverseBetrieb.
✽ Beziehen Sie sich auf Seite
17.
ON / STANDBY
REVERSE
MODE
5
1
Aktivieren Sie den Dolby NR-Betrieb.
6
7
8
9
Drücken Sie die Aufnahme-taste (REC).
• Der Aufnahmepausen-Modus ist
eingestellt.
Drücken Sie die
2 (Stopp)-Taste um
die Aufnahme zu beenden.
•
Die Wiedergabe stoppt.
DOLBY NR
ON
OFF
Drücken Sie die PLAY-Taste.
• Die Aufnahme beginnt.
Beginnen Sie mit der Wiedergabe des Titels vom
CD-Spieler oder MD-Recorder.
PLAY
Stellen Sie die
Wiedergaberichtungsanzeige des
DRR-F101 auf die Richtung ein, in der
Sie die Aufnahme ausführen wollen.
RC-927
REMOTE CONTROL UNIT
CLEAR
123
546
789
+1010
CD SRS
MDTAPE
TUNING
REPEAT
CALL
PROG/
DIRECT
RANDOM
BAND
RDS
DIMMER
TIME/
PANEL
TIME EDIT
SYSTEM
POWER
OFF ON
STOP PLAY
VOLUME
/SELECT
SLEEP MODE
TAPE
FUNCTION
PRESET
+
-
TUNER
CD
MD
TAPE
SYSTEMFUNKTIONEN
10
2
Der Betrieb ist auch dann einfacher, wenn die Komponenten der D-F101-Serie über die Systemanschlüsse an den DRRF101 angeschlossen werden. (Beziehen Sie sich hinsichtlich der Anschlüsse auf die entsprechende Bedienungsanleitung
des Receivers (DRA-F101) und auf die entsprechenden Bedienungsanleitungen die Receivers (DRA-F101).)
2 Die Systemfunktionen arbeiten einwandfrei, wenn Komponenten der D-F101-Serie angeschlossen werden. Sie
funktionieren nicht zusammen mit anderen Komponenten.
2 Wenn der DRR-F101 zusammen in einem System der D-F101-Serie verwendet wird, kann er mit der
Systemfernbedienung (RC-927) gesteuert werden, die dem Receivers (DRA-F101) beiliegt.
2 Wenn die Systemanschlüsse ausgeführt worden sind, werden alle Fernbedienungssignale vom
Fernbedienungssensor des DRA-F101 empfangen.
2 Die Tasten auf der Fernbedienung haben die gleiche Funktion wie die entsprechenden Tasten am Gerät. (Beziehen
Sie sich auf “BAUTEILBEZEICHNUNG UND FUNKTION” auf Seite 16.)
2 Beziehen Sie sich hinsichtlich des Betriebs des Receivers (DRA-F101) und CD-Spieler (DCD-F101) und MD-Recorder
(DMD-F101) auf die entsprechenden Bedienungsanleitungen.
2 Die Systemfunktionssignale für den Betrieb der Komponenten der D-F101-Serie werden alle vom Receivers (DRA-
F101) ausgegeben. Schließen Sie deshalb bei Systemanschlüssen unbedingt den Receivers (DRA-F101) an.
(1)
Systemfernbedienung
2 Bezeichnung der Fernbedienungstasten (Cassetten Deck)
Bereitschaftsbetriebstaste
(SYSTEM POWER STANDBY)
Drücken Sie diese Taste, um
die Stromversorgung des
Systems in Bereitschaft zu
schalten. (Diese Taste kann
nicht verwendet werden, um
nur die Stromversorgung des
DRR-F101 in Bereitschaft zu
schalten.)
Power on button (SYSTEM
POWER ON)
Wiedergabetaste (1 PLAY)
Stopptaste (2 STOP)
Richtung-Taste (01)
Drücken Sie diese Taste, um
die Stromversorgung des
Systems einzuschalten.
(Diese Taste kann nicht
verwendet werden, um nur die
Stromversorgung des DRRF101 einzuschalten.)
Tasto 6 (riavvolgimento)
Tasto 7 (avanzamento rapido)
CD-SRS (Tasto di
sincronizzazione del CD)
Netztaste
(SYSTEM POWER ON)
REC
Funktionswahlschalter
Wählen Sie mit diesem
Schalter die Funktion aus, die
mit der Fernbedienung
gesteuert werden soll. Stellen
Sie den Schalter auf “TAPE”,
um den DRR-F101 zu bedienen.
Page 20

20
DEUTSCH
(2) Autom. Einschaltfunktion (bei Anschluss an Komponenten der D-
F101-Serie)
2 Wenn das System in den Standby-Modus geschaltet ist, können Sie die Wiedergabe von Cassetten durch einfaches
Drücken der Wiedergabe-Taste starten.
1
Stellen Sie den
Funktionswahlschalter
auf der Fernbedienung
auf die Position “TAPE”.
(RC-927)
2
Drücken Sie die PLAY-Taste.
• Das System wird
eingeschaltet und die
Funktion des Receivers
schaltet automatisch auf
“TAPE”.
Danach startet die TAPEWiedergabe.
✽ Die Auto-Stromeinschalt-
Funktion arbeitet selbst bei
Drücken der PLAY-Taste
des DRR-F101 nicht.
✽ Wenn eine TAPE eingelegt ist und sich der DRR-
F101 im Bereitschaftsbetrieb befindet, kann die
Cassettendeck einfach durch Drücken der
Wiedergabe-Taste des DRR-F101 gestartet
werden.
RC-927
REMOTE CONTROL UNIT
CLEAR
123
546
789
10
+10
CD SRS
MDTAPE
TUNING
REPEAT
CALL
PROG/
DIRECT
RANDOM
BAND
RDS
DIMMER
TIME/
PANEL
TIME EDIT
SYSTEM
POWER
OFF ON
STOP PLAY
VOLUME
/SELECT
SLEEP MODE
TAPE
FUNCTION
PRESET
+
-
TUNER
CD
MD
TAPE
1
2
(RC-927)
PLAY
TUNER
CD
MD
TAPE
RC-927 (System-Fernbedienungsgerät)
(3) Autom. Funktionswahl (bei Anschluss an die D-F101-Serie)
2 Verwenden Sie diese Funktion, um die Funktion auf “TAPE” umzuschalten und die Wiedergabe von Cassetten durch
einfaches Drücken einer einzigen Taste zu starten.
1
Drücken Sie die Wiedergabe-Taste, während ein
anderes Gerät als der DRR-F101 (CD-Player oder
MD-Recorder) abgespielt wird.
• Die Wiedergabe der gegenwärtig aktivierten
Einheit stoppt.
Gleichzeitig schaltet die Receiver-Funktion zu
“TAPE” und die Cassettendeck beginnt.
✽ Um diesen Schritt mit der
Systemfernbedienung auszuführen, müssen
Sie zuerst den Funktionswahlschalter auf der
Fernbedienung auf die Position “TAPE”
stellen.
DRR-F101 (Haupteinheit)
(Haupteinheit) (RC-927)
CD SRS
REC
0
1
PLAY
CASSETTE DECK DRR-F101
REC
CD SRS
PLAY
ON / STANDBY
e
DOLBY NR
ON
OFF
REVERSE
MODE
1
RC-927
REMOTE CONTROL UNIT
CLEAR
123
546
789
10
+10
CD SRS
MDTAPE
TUNING
REPEAT
CALL
PROG/
DIRECT
RANDOM
BAND
RDS
DIMMER
TIME/
PANEL
TIME EDIT
SYSTEM
POWER
OFF ON
STOP PLAY
VOLUME
/SELECT
SLEEP MODE
TAPE
FUNCTION
PRESET
+
-
TUNER
CD
MD
TAPE
1
PLAY
PLAY
RC-927
(System-
Fernbedienungsgerät)
Page 21

21
DEUTSCH
(4)
Synchronisiertes Aufnehmen von CDs (wenn DRA-F101 und DCDF101 angeschlossen sind)
2 CDs können ganz einfach aufgenommen werden.
DRA-F101 (Receivers)
DRR-F101
DCD-F101 (CD-Spieler)
(Haupteinheit)
(DCD-F101)
2
3
4
Drücken Sie die Öffnen-/SchließenTaste (
5
OPEN/CLOSE) und legen
Sie das Band, auf das Sie aufnehmen
möchten, in die Cassettenlade ein.
Legen Sie die CD in den DCDF101.
(Haupteinheit)
(Haupteinheit)
5
6
Stellen Sie die
Wiedergaberichtun
gsanzeige des
DRR-F101 auf die
Richtung ein, in der
Sie die Aufnahme
ausführen wollen.
Aktivieren Sie den ReverseBetrieb.
✽ Beziehen Sie sich auf Seite
18.
Aktivieren Sie den Dolby NR-Betrieb.
DOLBY NR
ON
OFF
CLEAR
123
546
789
+1010
CD SRS
MDTAPE
TUNING
REPEAT
CALL
PROG/
DIRECT
RANDOM
BAND
RDS
DIMMER
TIME/
PANEL
TIME EDIT
SYSTEM
POWER
OFF ON
7
1
RC-927 (Fernbedienung)
SLEEP MODE
TAPE
FUNCTION
CD
4
REVERSE
MODE
(Haupteinheit)
7
Drücken Sie die CD SRS-Taste.
• Die Aufnahme beginnt automatisch.
✽ Wenn alle Titel der CD abgespielt
worden sind, aktiviert der CDSpieler automatisch den StoppBetrieb, eine 5 Sekunden lange
Leerstelle wird auf der sich im DRRF101 und der Stoppmodus ist
eingeschaltet.
✽ Beim DRR-F101 und dem CD-
Spieler wird der Stopp-Betrieb
ebenfalls automatisch aktiviert,
wenn auf dem Kassettenband kein
Platz für weitere Aufnahmen
vorhanden ist, obwohl die
Wiedergabe der CD noch nicht
beendet ist.
CD SRS
TAPE
(Fernbedienung)
✽ Drücken Sie für den CD-Wiedergabestopp die
Stopp-Taste (
2) am DRR-F101 oder am CD-Spieler,
um die Aufnahme mittendrin zu stoppen.CDSynchronaufnahme wird fortgesetzt, wenn eine der
anderen Tasten gedrückt wird.
(DRA-F101) (Fernbedienung)
1
Schalten Sie den Receivers ein.
•
Die Stromversorgung des Systems wird eingeschaltet.
SYSTEM
ON / STANDBY
SYSTEM
POWER
ON
CD SRS
TAPE
(Fernbedienung)
(Haupteinheit)
PHONES
SYSTEM
VOLUME
ON / STANDBY
AM-FM STEREO RECEIVER DRA-F101
SOURCE
DIRECT
BANDUPDOWN
TUNING
MEMORY
/ SET
FUNCTION
TIMERTONE RDS
1
CD SRS
REC
0
1
PLAY
CASSETTE DECK DRR-F101
REC
CD SRS
PLAY
ON / STANDBY
e
DOLBY NR
ON
OFF
REVERSE
MODE
722
6
5
4
TRACK
ON / STANDBY
COMPACT DISC PLAYER DCD-F101
REPEAT
38
1
3
Schalten Sie den Receivers ein.
•
Die Stromversorgung des Systems wird eingeschaltet.
Legen Sie die Disc ein, die wiedergegeben
werden soll.
2 Setzen Sie den DRR-F101 in den
Aufnahmepausemodus und drücken Sie dann die
PLAY-Taste am CD-Spieler (DCD-F101) oder MDRekorder (DMD-F101).
4
Stellen Sie die Wiedergaberichtungsanzeige des
DRR-F101 auf die Richtung ein, in der Sie die
Aufnahme ausführen wollen.
(5)
Synchronisiertes Aufnehmen (wenn D-F101 angeschlossen sind)
DRA-F101 (Receivers)
DRR-F101
DCD-F101 (CD-Spieler)
(Fernbedienung)
TAPE
2
Drücken Sie die Öffnen-/SchließenTaste (
5
OPEN/CLOSE) und legen Sie
das Band, auf das Sie aufnehmen
möchten, in die Cassettenlade ein.
7
8
Drücken Sie die Aufnahme-taste
(REC).
Der Aufnahmepausen-Modus ist
eingestellt.
Drücken Sie die
PLAY/PAUSE-Taste
(
1/3).
• Die Aufnahme
beginnt
automatisch.
✽ Drücken Sie für den CD-Wiedergabestopp die
Stopp-Taste (2) am DRR-F101 oder am CD-Spieler,
um die Aufnahme mittendrin zu stoppen.
1
18Tr0 2m 46 s
-60 40 -30 -20 -12 -6 -2 0
L
dB
R
POWER LOADING MECHANISM
ON / STANDBY
MINIDISC RECORDER DMD-F101
INPUT
-
+
MULTI RECCD SRSEDIT
13
REC LEVEL
/ ENTER
MEMO REC /
CHARACTER
38
DMD-F101 (MD-Rekorder)
123
546
CALL
PROG/
DIRECT
SYSTEM
POWER
1
RC-927 (Fernbedienung)
SLEEP MODE
TAPE
FUNCTION
-
4
(Haupteinheit)
(DRA-F101) (Fernbedienung)
SYSTEM
ON / STANDBY
SYSTEM
POWER
ON
5
6
Aktivieren Sie den ReverseBetrieb.
✽ Beziehen Sie sich auf Seite
17.
Aktivieren Sie den Dolby NR-Betrieb.
REVERSE
MODE
(Haupteinheit)
REC
(Haupteinheit)
(Haupteinheit)
(Haupteinheit)
DOLBY NR
ON
OFF
HINWEIS:
• Die synchronisierte CD-Aufnahmefunktion arbeitet
nicht, wenn der CD-Player in den ProgammWiedergabemodus geschaltet ist.
(DCD-F101)
(DMD-F101)
(Fernbedienung)
PLAY
13
• Wenn die Wiedergabe am CD-Player oder MD-
Recorder beendet ist, wird der CD-Player oder
der MD-Recorder automatisch in den
Stoppmodus geschaltet; am DRR-F101 wird
eine 5 Sekunden lange Leerstelle eingefügt
und anschließend stoppt der DRR-F101.
•
Wenn zudem das Ende des Cassettenbandes
erreicht wird, bevor die Wiedergabe der Disc
beendet worden ist, wird sowohl der CD-Player
oder der MD Recorder als auch der DRR-F101
automatisch in den Stoppmodus geschaltet.
TIMERTONE RDS
MEMORY
/ SET
ON / STANDBY
FUNCTION
SYSTEM
PHONES
1
22
ON / STANDBY
e
DOLBY NR
ON
OFF
PLAY
REC
CD SRS
0
6
33
ON / STANDBY
TRACK
TUNING
1
VOLUME
SOURCE
DIRECT
BANDUPDOWN
AM-FM STEREO RECEIVER DRA-F101
4 7
PLAY
REC
CD SRS
CASSETTE DECK DRR-F101
5
REVERSE
MODE
REPEAT
COMPACT DISC PLAYER DCD-F101
Page 22

22
DEUTSCH
2 Der Timer kann zum Abspielen von Quellen oder Aufnehmen von Radiosendungen (“AIR CHECK”), die zeitlich
festgelegt sind, verwendet werden.
• Beziehen Sie sich hierfür auf die Bedienungsanleitung, die dem DRA-F101 beiliegt.
(6) TIMER-FUNKTIONEN (wenn DRA-F101 angeschlossen sind)
2 Editieren Sie mit dieser Funktion automatisch Titel auf der CD, damit sie auf eine Kassette aufgenommen werden
können.
2 Die Editierfunktion wird mit der Systemfernbedienung (RC-927) aktiviert, die dem Receivers (DRA-F101) beiliegt.
1
2
3
4
Schalten Sie den Receivers ein.
•
Die Stromversorgung des Systems wird eingeschaltet.
Drücken Sie die Öffnen-/SchließenTaste (5OPEN/CLOSE) und legen Sie
das Band, auf das Sie aufnehmen
möchten, in die Cassettenlade ein.
Legen Sie die CD in den DCD-F101.
Jetzt wie im Abschnitt "Editierfunktion" in der
Bedienungsanleitung beschrieben vorgehen, die
dem CD-Spieler (DCD-F101) beiliegt.
(7) Editierfunktionen
(wenn DRA-F101 und DCD-F101 angeschlossen sind)
(Haupteinheit)
(DCD-F101)
PHONES
SYSTEM
VOLUME
ON / STANDBY
AM-FM STEREO RECEIVER DRA-F101
SOURCE
DIRECT
BANDUPDOWN
TUNING
MEMORY
/ SET
FUNCTION
TIMERTONE RDS
1
CD SRS
REC
0
1
PLAY
CASSETTE DECK DRR-F101
REC
CD SRS
PLAY
ON / STANDBY
e
DOLBY NR
ON
OFF
REVERSE
MODE
2
2
TRACK
ON / STANDBY
COMPACT DISC PLAYER DCD-F101
REPEAT
33
DRA-F101 (Receivers)
DRR-F101
DCD-F101 (CD-Spieler)
CLEAR
123
546
789
+1010
CD SRS
MDTAPE
REPEAT
CALL
PROG/
DIRECT
RANDOM
DIMMER
TIME/
PANEL
TIME EDIT
SYSTEM
POWER
OFF ON
1
RC-927 (Fernbedienung
(DRA-F101) (Fernbedienung)
SYSTEM
ON / STANDBY
SYSTEM
POWER
ON
HINWEISE:
• Die Editierfunktion kann nicht bei Discs aktiviert werden, die mehr als 21 Titel enthalten.
• Legen Sie die für die Aufnahme bestimmte Kassette mit der Seite A nach oben hin weisend in das Kassettenfach
des Cassetten Decks ein, bevor die Editieraufnahme gestartet wird. Der Anfang der Kassette wird automatisch
gefunden, bevor die Aufnahme beginnt.
• Wenn eine schon bespielte Kassette für die Editieraufnahme verwendet wird, stoppt die Aufnahme und es wird ein
Abschnitt auf der Kassettenseite B leer gelassen, wenn die Kassette länger ist als die eingestellte Zeit; löschen Sie
aus diesem Grund zuvor die Kassette.
• Wenn bei der Aufnahme die Editierfunktion verwendet wird, stellen Sie bitte den Rücklaufmodus-Schalter auf
; wenn Sie dies nicht tun, ist nach der Aufnahme auf Seite A keine Aufnahme auf Seite B möglich.
• In einigen Fällen ist es vielleicht nicht möglich, alle Titel der Disc aufzunehmen, auch wenn die Kassette länger ist
als die aufgenommene Zeit der Disc (dies hängt davon ab, wie die Titel auf die Kassettenseiten A und B verteilt
werden). Die “OVER”-Anzeige blinkt, wenn Titel nicht aufgenommen werden können.
• Während der Editierfunktion funktionieren Aufnahmetaste (REC),
67-Taste, CD SRS-Taste, DIRECTION-
Taste und OPEN/CLOSE-Taste nicht.
• Wenn mit der Editierfunktion Aufnahmen ausgeführt werden, wird die autom. Leerabschnittsfunktion aktiviert und
ein ca. 4 Sekunden langer Leerabschnitt wird zwischen den Titeln eingefügt. Deshalb werden bei Aufnahmen von
CDs, die beispielsweise Konzertaufnahmen ohne Leerabschnitte zwischen den Titeln enthalten, Leerabschnitte
mitten im Musikstück eingefügt. Führen Sie in solchen Fällen die Aufnahme nicht mit der Editierfunktion aus.
•
Drücken Sie die Stopp-Taste (2) am DRR-F101, um den Editierbetrieb zu stoppen, oder am CD-Spieler, um die Wiedergabe
der CD zu beenden.
Der Editierbetrieb wird nicht beendet, wenn eine andere Taste gedrückt wird.
Page 23

23
DEUTSCH
11
FEHLERSUCHE
Überprüfen Sie zunächst folgende Punkte, bevor Sie den Schluß ziehen, daß Ihr Stereo-Cassettendeck nicht
ordungsgemäß arbeitet.
1. Wurden alle Anschlüsse richtig ausgeführt?
2. Arbeiten alle verwendeten System-Komponenten entsprechend ihrer Bedienungsanleitungen?
3. Arbeiten die Lautsprecher und der Verstärker/Receivers richtig?
Wenn Ihr Cassettendeck nach wie vor nicht ordnungsgemäß arbeitet, überprüfen Sie die Punkte der nachfolgend aufgeführten
Liste. Wenn die Ursache nicht in einem der genannten Punkte zu finden ist, kontaktieren Sie Ihrn DENON-Händler.
13
TECHNISCHE DATEN
Typ: Vierspur, Zweikanal, Stereo-Cassettendeck mit horizontalem Lademechanismus
Tonköpfe: Aufnahme-/Wiedergabekopf aus Hartpermalloy x 1
Doppelspalt-Ferritkopf x 1
Umspulzeit: 4,75 cm/s
Reduzierung der Störgeräusche: Dolby B NR
Bandsorten: Normal, Hoch (TYP I, II)
Die Metallbänder (TYP IV) können nur für die Wiedergabe verwendet werden
Netzteil: 230 V Wechselstrom, 50 Hz
Leistungsaufnahme: 9 W
Abmessungen: 250 (B) x 81,5 (H) x 269 (T) mm
(inkl. Füße, Regler und Anschlüsse)
Gewicht: 2,8 kg
* Die Abmessungen schließen Regler, Buchsen und Abdeckungen mit ein.
(B) = Breite, (H) = Höhe, (D) = Tiefe
• Änderungen der technischen Daten und Funktion zum Zwecke derVerbesserung ohne Ankündigung vorbehalten.
2 Dolby Rauschunterdrückung hergestellt unter Lizenz von Dolby Laboratories Licensing Corporation.
2 DOLBY und das Doppel-D-Symbol sind Warenzeichen der Dolby Laboratories Licensing Corporation.
12
ALLGEMEINE INFORMATIONEN
Reinigung der Tonköpfe
Entmagnetisierung der Tonköpfe
• Wenn die Tonköpfe des Cassettendecks verschmutzt
sind, läßt die Klangqualität bei der Wiedergabe oder
Aufnahme von Cassettenbändern zu wünschen übrig.
• Reinigen Sie die Tonköpfe regelmäßig nach ungefähr 10
Betriebsstunden mit einer im Handel erhältlichen
Reinigungscassette, damit Sie die Leistungsfähigkeit
dieses Cassettendecks voll ausnutzen und sich bester
Tonqualität erfreuen können.
• Nachdem das Cassettendeck über einen längeren Zeitraum hinweg benutzt worden ist, werden die Tonköpfe
magnetisiert. Dies geschieht ebenfalls, wenn die Tonköpfe einem magnetischen Gegenstand ausgesetzt sind. Das
Ergebnis davon sind Nebengeräusche und reduzierte Höhen.
• Wenn die Tonköpfe magnetisiert sind, entmagnetisieren Sie sie mit einem im Handel erhältlichen Demagnetisierer.
HINWEIS:
• Einige im Handel erhältliche Reinigungscassetten
haben einen Poliereffekt und können die Tonköpfe
beschädigen. Vermeiden Sie die Benutzung
derartiger Reinigungscassetten.
Symptom
Bei Betätigung der
Aufnahme taste (REC MUTE)
beginnt die Aufnahme nicht.
Ursache
• Es wurde kein Cassettenband
eingelegt.
• Die Löschschutzlaschen sind
herausgebrochen.
Abhilfemaßnahme Seite
• Legen Sie ein Cassettenband
ein.
• Überkleben Sie die durch das
Herausbrechen entstandenen
Öffnungen mit Klebeband.
17
16
Während der Aufnahme und
Wiedergabe treten Tonausfälle auf oder es wird
überhaupt kein Ton ausgegeben.
• Die Tonköpfe sind verschmutzt.
• Das Cassettenband ist defekt.
• Reinigen Sie die Tonköpfe.
• Tauschen Sie das Cassettenband aus.
21
–
Während der CassettenbandWiedergabe ist ein Brummen
zu hören.
• Nebengeräusche von einem
Fernsehgerät.
• (Von einigen Fernsehgeräten
werden Nebengeräusche
produziert.)
• Stellen Sie das Fernsehgerät in
einiger Entfernung zu diesem
System auf.
• Schalten Sie das Fernsehgerät
aus.
14
–
Während der Aufnahme oder
Wiedergabe treten starke
Tonschwankungen auf.
• Die Tonwellen oder Andruckrollen sind verschmutzt.
• Reinigen Sie die Tonwellen und
Andruckrollen.
21
Page 24

Printed in China 511 3914
004
205
16-11, YUSHIMA 3-CHOME, BUNKYOU-KU, TOKYO 113-0034, JAPAN
Telephone: (03) 3837-5321
 Loading...