

Page 1
1
FULLY AUTOMATIC TURNTABLE SYSTEM
DP-29F
OPERATING INSTRUCTIONS
MODE D’EMPLOI
INSTRUCCIONES DE OPERACION
FOR ENGLISH READERS PAGE 05 ~ PAGE 10
POUR LES LECTEURS FRANCAIS PAGE 11 ~ PAGE 16
PARA LECTORES DE ESPAÑOL PAGINA 17 ~ PAGINA 22
45
SPEED
30
17
SIZE
33
45
SPEED
30
17
SIZE
33
Page 2
2
CAUTION:
1. Handle the power supply cord carefully
Do not damage or deform the power supply cord. If it is damaged
or deformed, it may cause electric shock or malfunction when
used. When removing from wall outlet, be sure to remove by
holding the plug attachment and not by pulling the cord.
2. Do not open the bottom cover
In order to prevent electric shock, do not open the bottom cover.
If problems occur, contact your DENON dealer.
3. Do not place anything inside
Do not place metal objects or spill liquid inside the turntable
system.
Electric shock or malfunction may result.
Please, record and retain the Model name and serial number of your
set shown on the rating label.
Model No. DP-29F Serial No.
NOTE:
This unit may cause interference to radio and television
reception if you do not operate it in strict accordance with this
OPERATING INSTRUCTIONS.
This unit complies with Class B computing device rules in
accordance with the specifications in Sub-part J or Part 15 of
the FCC Rules, which are designed to provide reasonable
protection against such interference in a residential installation.
If the unit does cause interference to any radio or television
reception, try to reduce it by one or more of the following
means:
a) Turn the other unit to improve reception
b) Move this unit
c) Move this unit away from others
d) Plug this unit respectively into a different AC outlet
✽ This is note in accordance with Section 15.838 of the FCC
Rules.
• FOR U.S.A. & CANADA MODEL ONLY
CAUTION
TO PREVENT ELECTRIC SHOCK, MATCH WIDE BLADE OF
PLUG TO WIDE SLOT, FULLY INSERT.
• POUR LES MODELES AMERICAINS ET
CANADIENS UNIQUEMENT
ATTENTION
POUR ÉVITER LES CHOCS ÉLECTRIQUES, INTERODUIRE LA
LAME LA PLUS LARGE DE LA FICHE DANS LA BORNE
CORRESPONDANTE DE LA PRISE ET POUSSER JUSQU’ AU
FOND.
IMPORTANT TO SAFETY
WARNING:
TO PREVENT FIRE OR SHOCK HAZARD, DO NOT
EXPOSE THIS APPLIANCE TO RAIN OR MOISTURE.
CAUTION
RISK OF ELECTRIC SHOCK
DO NOT OPEN
CAUTION:
TO REDUCE THE RISK OF ELECTRIC
SHOCK, DO NOT REMOVE COVER (OR
BACK). NO USER-SERVICEABLE PARTS
INSIDE. REFER SERVICING TO QUALIFIED
SERVICE PERSONNEL.
The lightning flash with arrowhead symbol, within an
equilateral triangle, is intended to alert the user to
the presence of uninsulated “dangerous voltage”
within the product’s enclosure that may be of
sufficient magnitude to constitute a risk of electric
shock to persons.
The exclamation point within an equilateral triangle is
intended to alert the user to the presence of
important operating and maintenance (servicing)
instructions in the literature accompanying the
appliance.
• CAUTION:
Whenever the turntable is in the “STOP” position, the unit is still
connected on AC line voltage.
Please be sure to unplug the cord when you leave home for, say, a
vacation.
•PRECAUTION:
Quand le tourne-disque est en mode “STOP”, l’appareil est encore
connecté à la tension de ligne secteur.
Prière de s’assurer de débrancher le cordon en quittant la maison
par exemple lors d’un départ en vacances.
• PRECAUZIONI:
Anche quando il giradischi é nella posizione “STOP”, é sempre
collegato al voltaggio AC.
Asegúrese de desconectar el cable de alimentación cuando vaya a
ausentarse de casa (por ejemplo, durante las vacaciones).
FOR EUROPEAN MODELS ONLY
• DECLARATION OF CONFORMITY
We declare under our sole responsibility that this product, to which this
declaration relates, is in conformity with the following standards:
EN60065, EN55013, EN55020, EN61000-3-2 and EN61000-3-3.
Following the provisions of 73/23/EEC, 89/336/EEC and 93/68/EEC
Directive.
• DECLARATION DE CONFORMITE
Nous déclarons sous notre seule responsabilité que l’appareil, auquel se
réfère cette déclaration, est conforme aux standards suivants:
EN60065, EN55013, EN55020, EN61000-3-2 et EN61000-3-3.
D’après les dispositions de la Directive 73/23/EEC, 89/336/EEC et
93/68/EEC.
• DECLARACIÓN DE CONFORMIDAD
Declaramos bajo nuestra exclusiva responsabilidad que este producto al
que hace referencia esta declaración, está conforme con los siguientes
estándares:
EN60065, EN55013, EN55020, EN61000-3-2 y EN61000-3-3.
Siguiendo las provisiones de las Directivas 73/23/EEC, 89/336/EEC y
93/68/EEC.
Page 3
3
SAFETY INSTRUCTIONS
1. Read Instructions – All the safety and operating instructions
should be read before the product is operated.
2. Retain Instructions – The safety and operating instructions
should be retained for future reference.
3. Heed Warnings – All warnings on the product and in the
operating instructions should be adhered to.
4. Follow Instructions – All operating and use instructions should
be followed.
5. Cleaning – Unplug this product from the wall outlet before
cleaning. Do not use liquid cleaners or aerosol cleaners.
6. Attachments – Do not use attachments not recommended by
the product manufacturer as they may cause hazards.
7. Water and Moisture – Do not use this product near water – for
example, near a bath tub, wash bowl, kitchen sink, or laundry
tub; in a wet basement; or near a swimming pool; and the like.
8. Accessories – Do not place this product on an unstable cart,
stand, tripod, bracket, or table. The product may fall, causing
serious injury to a child or adult, and serious damage to the
product. Use only with a cart, stand, tripod, bracket, or table
recommended by the manufacturer, or sold with the product.
Any mounting of the product should follow the manufacturer’s
instructions, and should use a
mounting accessory
recommended by the
manufacturer.
9. A product and cart
combination should be
moved with care. Quick
stops, excessive force,
and uneven surfaces may
cause the product and cart
combination to overturn.
10. Ventilation – Slots and openings in the cabinet are provided for
ventilation and to ensure reliable operation of the product and
to protect it from overheating, and these openings must not be
blocked or covered. The openings should never be blocked by
placing the product on a bed, sofa, rug, or other similar
surface. This product should not be placed in a built-in
installation such as a bookcase or rack unless proper
ventilation is provided or the manufacturer’s instructions have
been adhered to.
11. Power Sources – This product should be operated only from
the type of power source indicated on the marking label. If
you are not sure of the type of power supply to your home,
consult your product dealer or local power company. For
products intended to operate from battery power, or other
sources, refer to the operating instructions.
12. Grounding or Polarization – This product may be equipped with
a polarized alternating-current line plug (a plug having one
blade wider than the other). This plug will fit into the power
outlet only one way. This is a safety feature. If you are unable
to insert the plug fully into the outlet, try reversing the plug. If
the plug should still fail to fit, contact your electrician to replace
your obsolete outlet. Do not defeat the safety purpose of the
polarized plug.
13. Power-Cord Protection – Power-supply cords should be routed
so that they are not likely to be walked on or pinched by items
placed upon or against them, paying particular attention to
cords at plugs, convenience receptacles, and the point where
they exit from the product.
15. Outdoor Antenna Grounding – If an outside antenna or cable
system is connected to the product, be sure the antenna or
cable system is grounded so as to provide some protection
against voltage surges and built-up static charges. Article 810
of the National Electrical Code, ANSI/NFPA 70, provides
information with regard to proper grounding of the mast and
supporting structure, grounding of the lead-in wire to an
antenna discharge unit, size of grounding conductors, location
of antenna-discharge unit, connection to grounding electrodes,
and requirements for the grounding electrode. See Figure A.
16. Lightning – For added protection for this product during a
lightning storm, or when it is left unattended and unused for
long periods of time, unplug it from the wall outlet and
disconnect the antenna or cable system. This will prevent
damage to the product due to lightning and power-line surges.
17. Power Lines – An outside antenna system should not be
located in the vicinity of overhead power lines or other electric
light or power circuits, or where it can fall into such power
lines or circuits. When installing an outside antenna system,
extreme care should be taken to keep from touching such
power lines or circuits as contact with them might be fatal.
18. Overloading – Do not overload wall outlets, extension cords, or
integral convenience receptacles as this can result in a risk of
fire or electric shock.
19. Object and Liquid Entry – Never push objects of any kind into
this product through openings as they may touch dangerous
voltage points or short-out parts that could result in a fire or
electric shock. Never spill liquid of any kind on the product.
20.
Servicing – Do not attempt to service this product yourself
as opening or removing covers may expose you to
dangerous voltage or other hazards. Refer all servicing to
qualified service personnel.
21.
Damage Requiring Service – Unplug this product from the
wall outlet and refer servicing to qualified service
personnel
under the following conditions:
a) When the power-supply cord or plug is damaged,
b) If liquid has been spilled, or objects have fallen into the
product,
c) If the product has been exposed to rain or water,
d) If the product does not operate normally by following the
operating instructions. Adjust only those controls that are
covered by the operating instructions as an improper
adjustment of other controls may result in damage and will
often require extensive work by a qualified technician to
restore the product to its normal operation,
e) If the product has been dropped or damaged in any way,
and
f) When the product exhibits a distinct change in performance
– this indicates a need for service.
22. Replacement Parts – When replacement parts are required, be
sure the service technician has used replacement parts
specified by the manufacturer or have the same characteristics
as the original part. Unauthorized substitutions may result in
fire, electric shock, or other hazards.
23. Safety Check – Upon completion of any service or repairs to
this product, ask the service technician to perform safety
checks to determine that the product is in proper operating
condition.
24. Wall or Ceiling Mounting – The product should be mounted to
a wall or ceiling only as recommended by the manufacturer.
25. Heat – The product should be situated away from heat sources
such as radiators, heat registers, stoves, or other products
(including amplifiers) that produce heat.
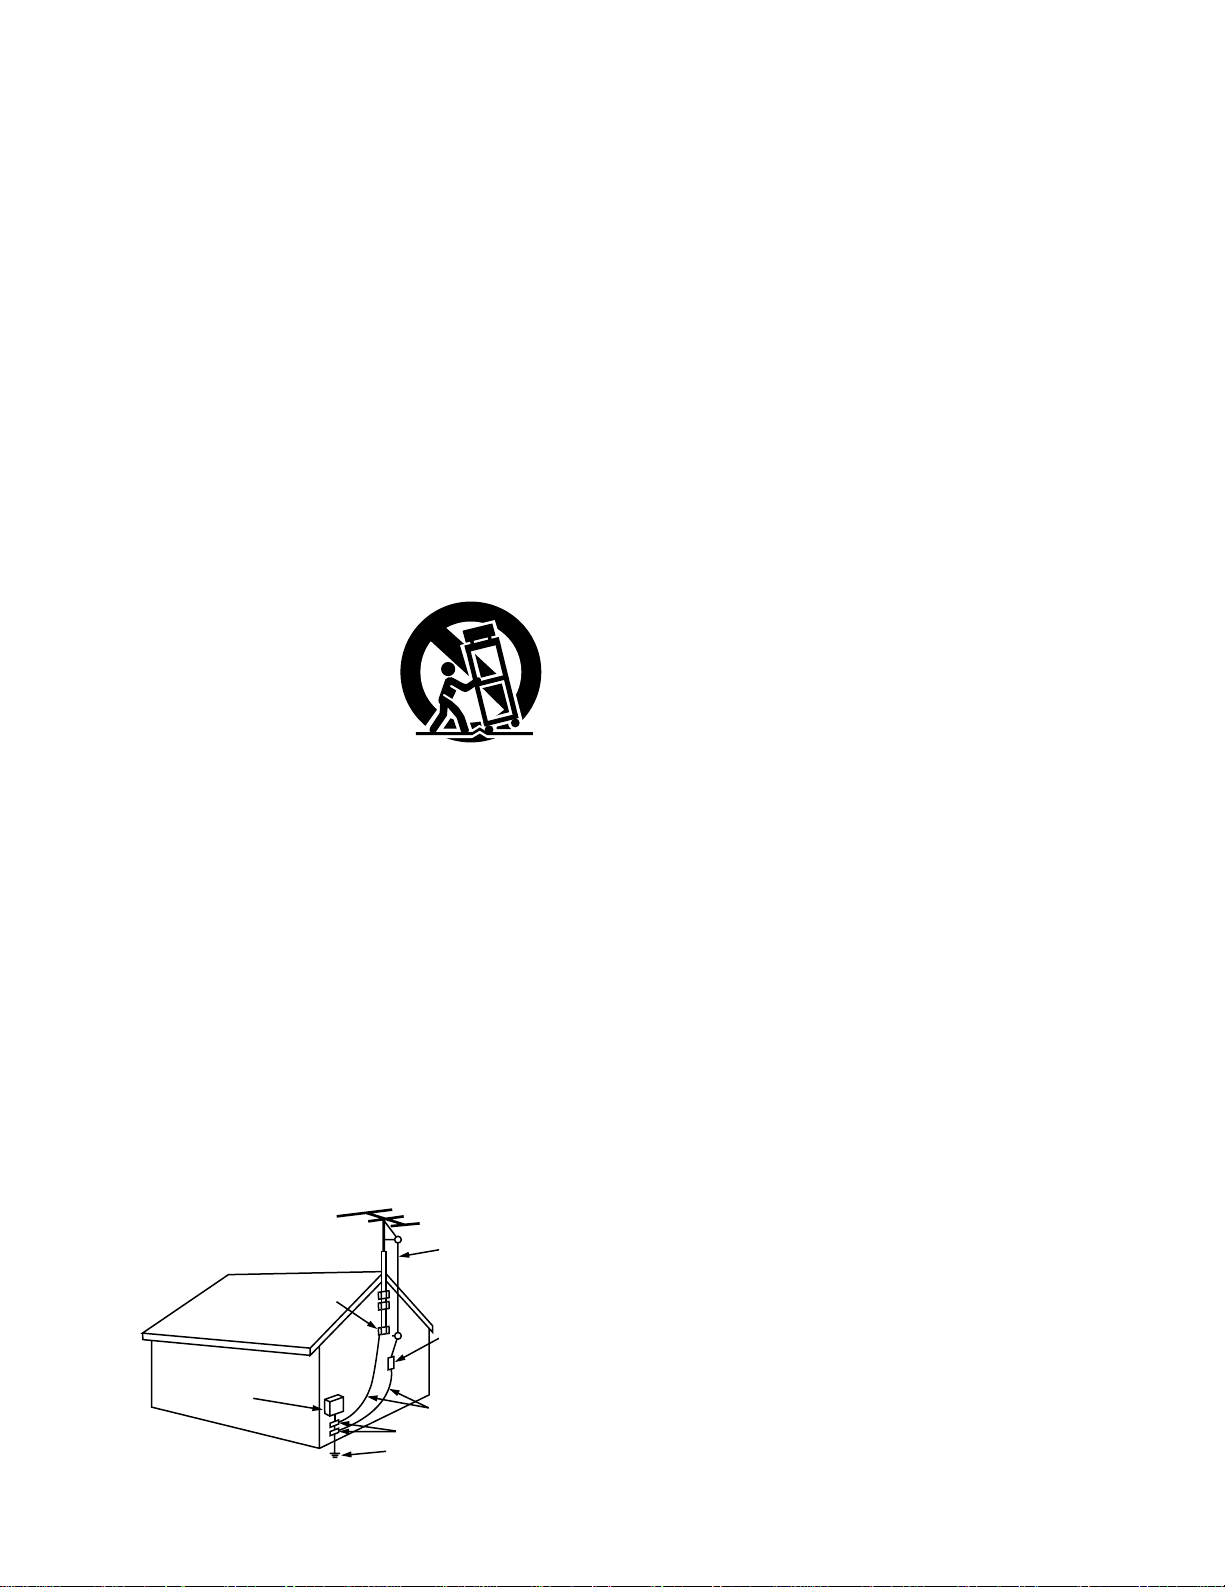
FIGURE A
EXAMPLE OF ANTENNA GROUNDING
AS PER NATIONAL
ELECTRICAL CODE
ANTENNA
LEAD IN
WIRE
GROUND
CLAMP
ELECTRIC
SERVICE
EQUIPMENT
ANTENNA
DISCHARGE UNIT
(NEC SECTION 810-20)
GROUNDING CONDUCTORS
(NEC SECTION 810-21)
GROUND CLAMPS
POWER SERVICE GROUNDING
ELECTRODE SYSTEM
(NEC ART 250, PART H)
NEC - NATIONAL ELECTRICAL CODE
Page 4
4
ENGLISH FRANCAIS ESPAÑOL
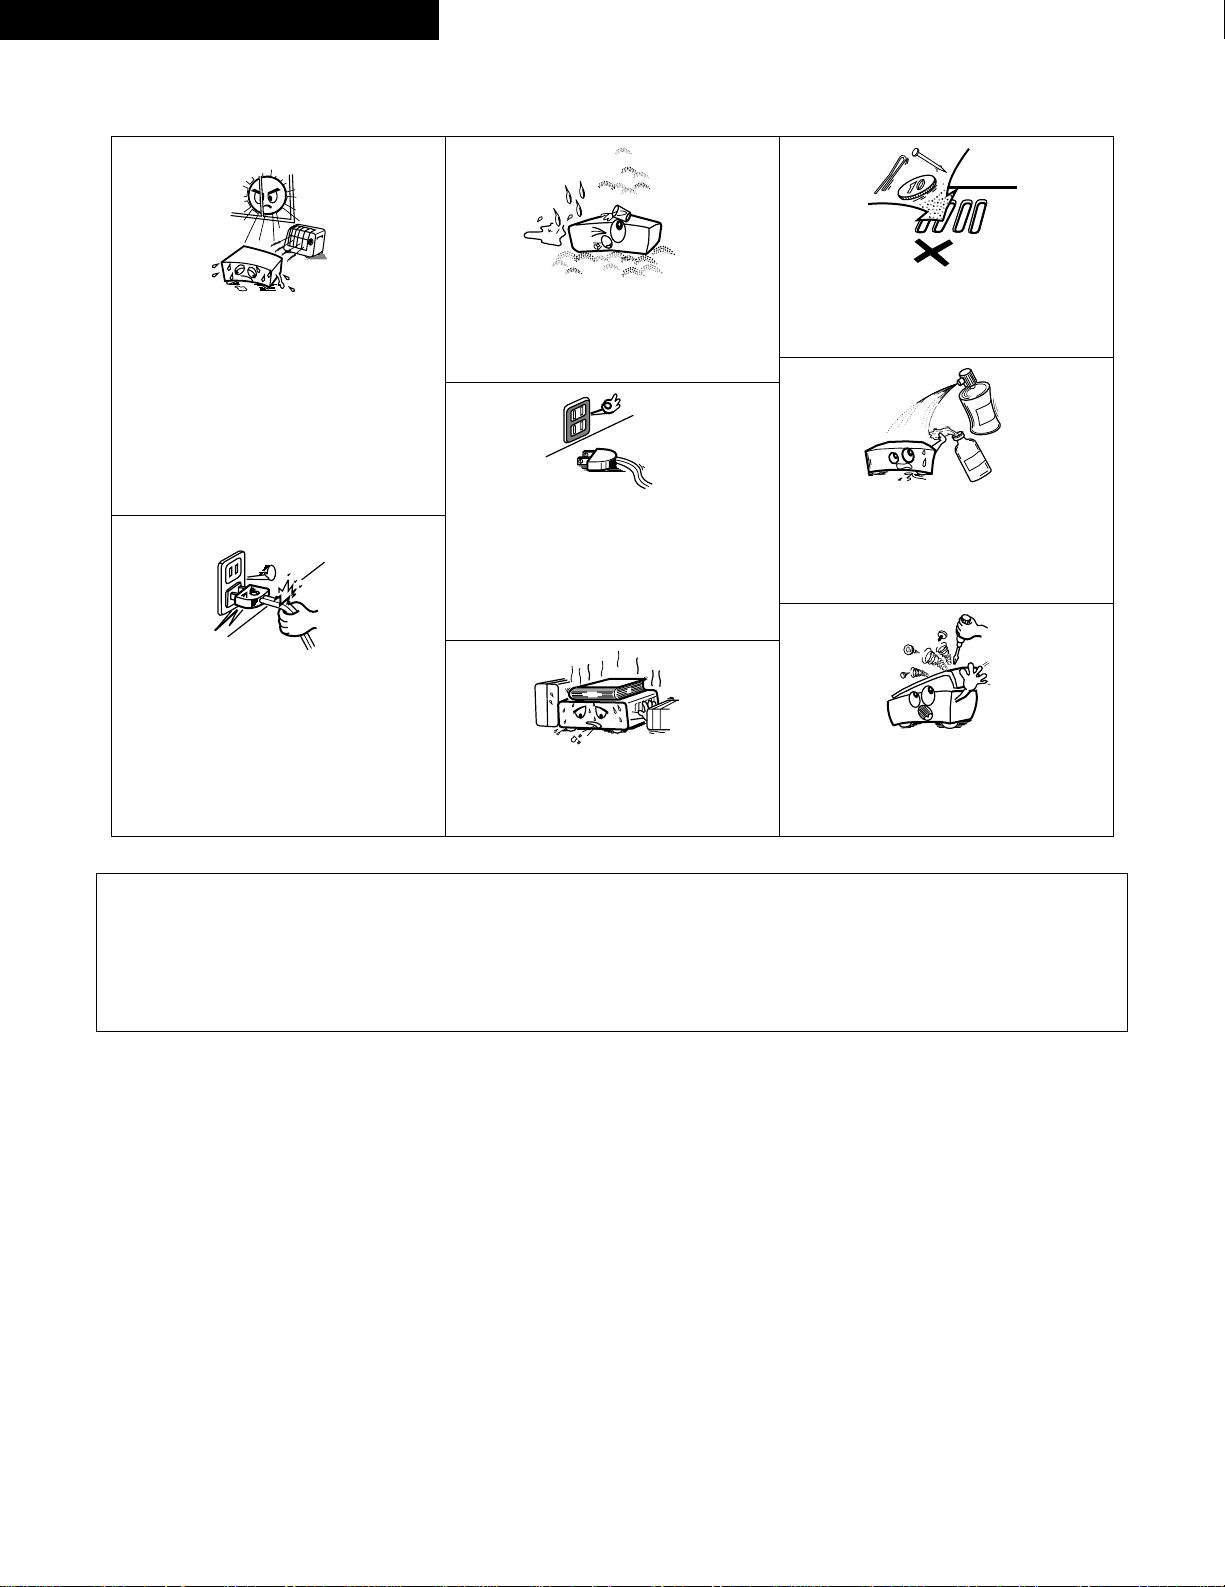
NOTE ON USE /OBSERVATIONS RELATIVES A L’UTILISATION /
NOTAS SOBRE EL USO
• Avoid high temperatures.
Allow for sufficient heat dispersion when installed
on a rack.
• Eviter des températures élevées.
Tenir compte d’une dispersion de chaleur
suffisante lors de l’installation sur une étagère.
• Evite altas temperaturas.
Permite la suficiente dispersión del calor cuando
está instalado en la consola.
• Handle the power cord carefully.
Hold the plug when unplugging the cord.
•Manipuler le cordon d’alimentation avec
précaution.
Tenir la prise lors du débranchement du cordon.
• Maneje el cordón de energía con cuidado.
Sostenga el enchufe cuando desconecte el cordón
d energía.
• Keep the set free from moisture, water, and dust.
• Protéger l’appareil contre l’humidité, l’eau et la
poussière.
• Mantenga el equipo libre de humedad, agua y
polvo.
•
Unplug the power cord when not using the set for
long periods of time.
•
Débrancher le cordon d’alimentation lorsque
l’appareil n’est pas utilisé pendant de longues
périodes.
•
Desconecte el cordón de energía cuando no utilice
el equipo por mucho tiempo.
✽ (For sets with ventilation holes)
• Do not obstruct the ventilation holes.
• Ne pas obstruer les trous d’aération.
• No obstruya los orificios de ventilación.
• Do not let foreign objects in the set.
• Ne pas laisser des objets étrangers dans l’appareil.
• No deje objetos extraños dentro del equipo.
• Do not let insecticides, benzene, and thinner come
in contact with the set.
• Ne pas mettre en contact des insecticides, du
benzène et un diluant avec l’appareil.
• No permita el contacto de insecticidas, gasolina y
diluyentes con el equipo.
• Never disassemble or modify the set in any way.
• Ne jamais démonter ou modifier l’appareil d’une
manière ou d’une autre.
• Nunca desarme o modifique el equipo de ninguna
manera.
CAUTION
• The ventilation should not be impeded by covering the ventilation openings with items, such as newspapers, table-cloths, curtains, etc.
• No naked flame sources, such as lighted candles, should be placed on the apparatus.
• Please be care the environmental aspects of battery disposal.
• The apparatus shall not be exposed to dripping or splashing for use.
• No objects filled with liquids, such as vases, shall be placed on the apparatus.
Page 5

ENGLISH
5
Thank you very much for purchasing the DENON fully automatic turntable system.
Please read the operating instructions thoroughly in order to acquaint
yourself with the turntable system and achieve maximum satisfaction from it.
Please check to make sure the following items are included with
the main unit in the carton:
(1) Operating instructions (these instructions) …………………1
(2) Service station list ………………………………………………1
(3) Platter ……………………………………………………………1
(4) Rubber mat ………………………………………………………1
(5) 45 rpm adaptor …………………………………………………1
z
Precautions …………………………………………………………5
x
Before using the turntable …………………………………………6
c
Connections …………………………………………………………7
v
Controls ………………………………………………………………8
b
Record playback……………………………………………………8, 9
n
Operation details ……………………………………………………9
m
Troubleshooting ……………………………………………………10
,
Specifications ………………………………………………………10
– TABLE OF CONTENTS –
1
PRECAUTIONS
Power requirements
Power requirements for electrical equipment differ from area
to area. Please ensure that your machine meets the power
requirements in your area.
If it doubt, consult a qualified electrician.
About the power switch
This turntable is not equipped with a primary power switch.
The power switch is incorporated in the tone arm of the
turntable. The power to the turntable is cut when the tone arm
returns to the tone arm rest. Note however, that the power is
not completely turned off in this case. If you wish to
completely turn the power off, disconnect the power cord
from the household AC outlet.
What you should know to protect yourself
• Never touch the plug with wet hands.
• Always pull out by the plug and never the cord.
• Only let a qualified professional repair or reassemble the turntable.
An unauthorized person might touch the internal parts and receive
a serious electric shock.
• Never allow a child to put anything, especially metal, into the
turntable.
Protect the turntable too
• Use only a household AC power source. Never use a DC power
source.
• If water is spilled on the turntable, disconnect it and call your
dealer.
• Make sure that the turntable is well ventilated and away from
direct sunlight.
• To avoid damage to the internal circuits and the external surface,
keep it away from heat (stoves, etc.).
• Avoid using spray type insecticide near the turntable it can damage
the finish and might ignite suddenly.
• To avoid damaging the finish, never use paint thinner or other
similar chemicals to clean the turntable.
• Place the turntable on a flat and solid surface.
• If you don’t plan to use the turntable for a long period of time,
disconnect the power cord.
• To protect the insulators, always lift the turntable when you move
it. And before moving the turntable, disconnect all the connecting
cables.
• When transporting the turntable over a long distance, place it in its
original box wrapped in protective wrappers.
Page 6
ENGLISH
6
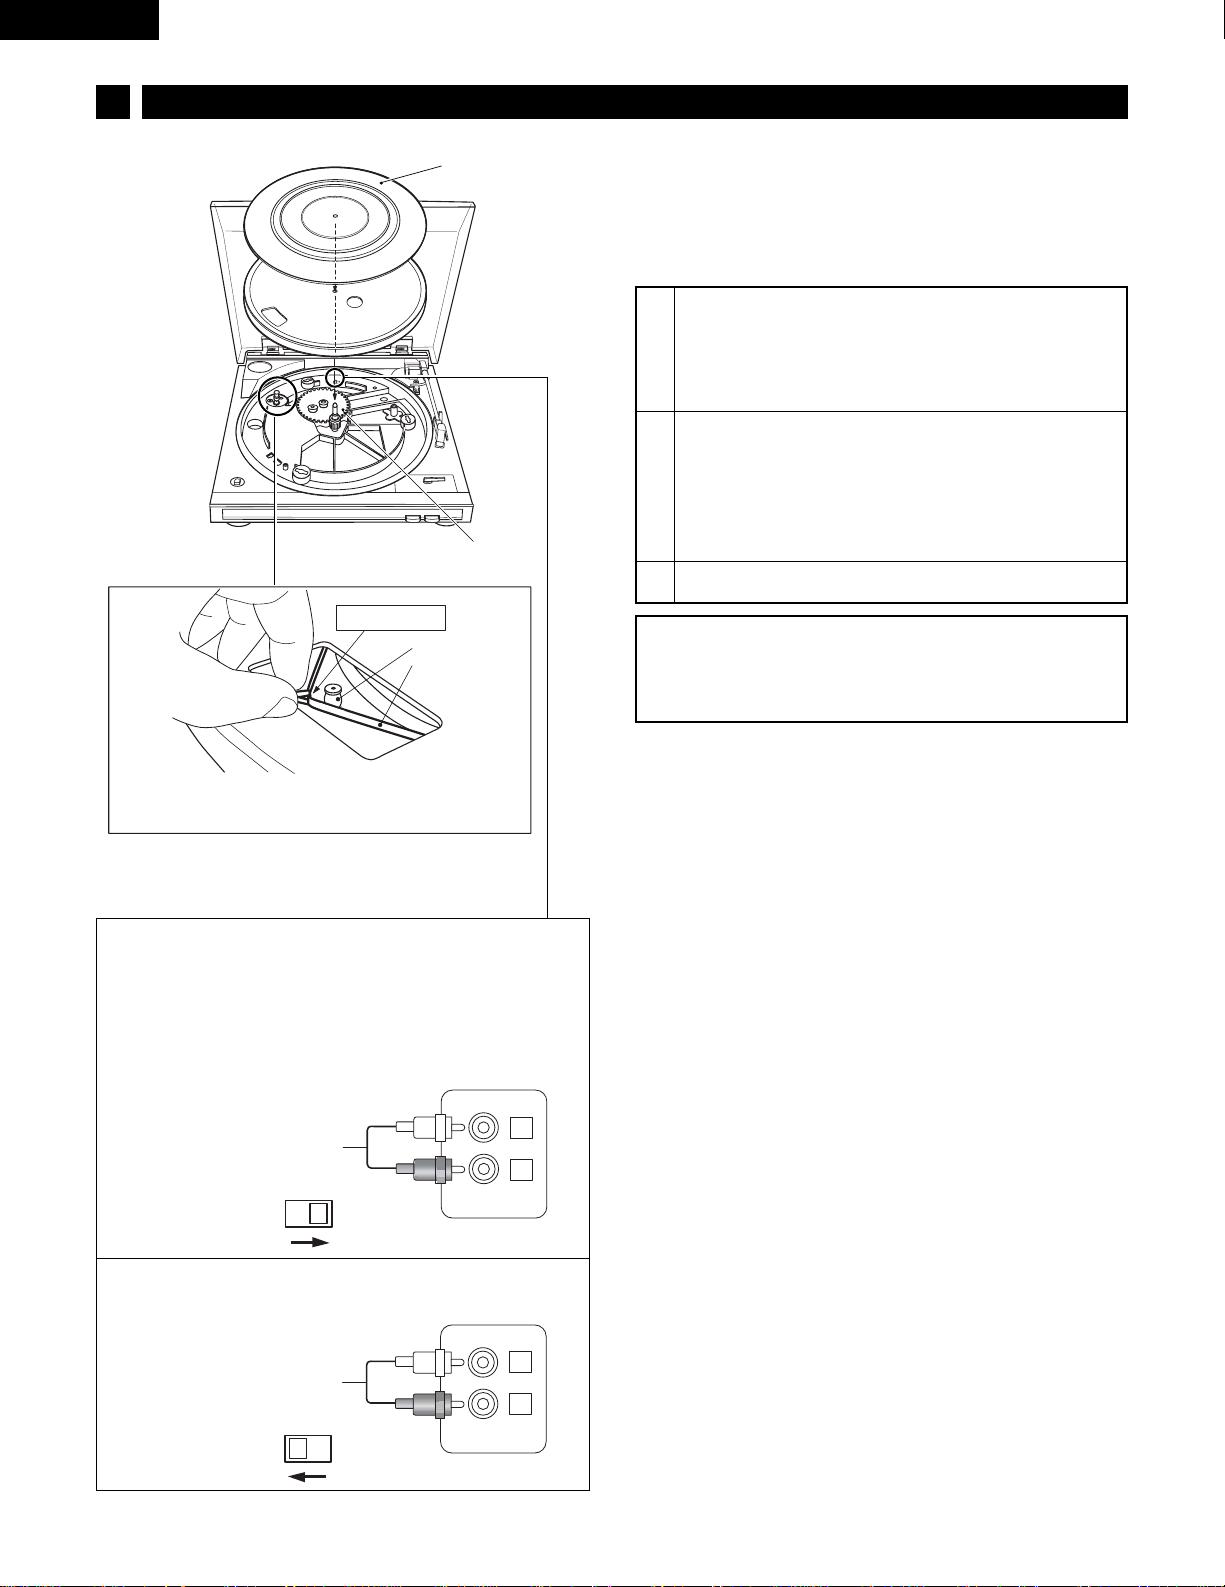
2
BEFORE USING THE TURNTABLE
Rubber mat
Spindle
Ribbon tape
Driving roller
Drive belt
Equalizer Amplifier switch
This unit has built-in RIAA equalizer amplifier, so it can be
connected to an amplifier without PHONO (turntable) input
jack. According to the amplifier, set the EQUALIZER
AMPLIFIER SWITCH.
When the unit is connected
to the PHONO (MM) jacks:
Rear panel of the
amplifier
L
R
PHONO
ON
OFF
White
Red
When the unit is connected
to the AUX jacks, etc:
Rear panel of the
amplifier
L
R
AUX
ON
OFF
White
Red
• The drive belt is fitted under the platter. When assembling the
player, please handle the drive belt with care.
• Remove all packing materials attached to the tone arm, except
that on the stylus, and then open the dust cover and assemble.
Remove the stylus cover after assembling.
1
Hold the platter by the holes at its outer surface, and
then carefully lower the platter so that the center
spindle enters the center hole.
Rotate the platter until one of its outer openings is
aligned with the driving roller. (Refer to illustration.)
2
3
Gently grasp and pull at the ribbon tape of the drive
belt that is would under the turntable, and then
extend the belt around the driving roller. (After
attaching, remove the ribbon tape.)
In order to make sure that the drive belt has been
correctly fitted, slowly rotate the platter 3 or 4 turns.
Place the rubber mat on the platter.
IMPORTANT! Please Check.
Check that the drive belt and ribbon tape have been attached
under the platter. Grasp the ribbon tape as shown in the
illustration to the left, and extend it onto the driving roller.
Page 7
L
R
L
R
L
R
SIGNAL
GND
12
SYSTEM
CONNECTOR
L
R
SPEAKER SYSTEM
SPEAKER IMPEDANCE
4 16
CD
DVD/AUX
TUNER PHONO TAPE MD
AUX-2 TAPE MD
PB
REC
INPUTS
L
R
L
R
1
ENGLISH
7
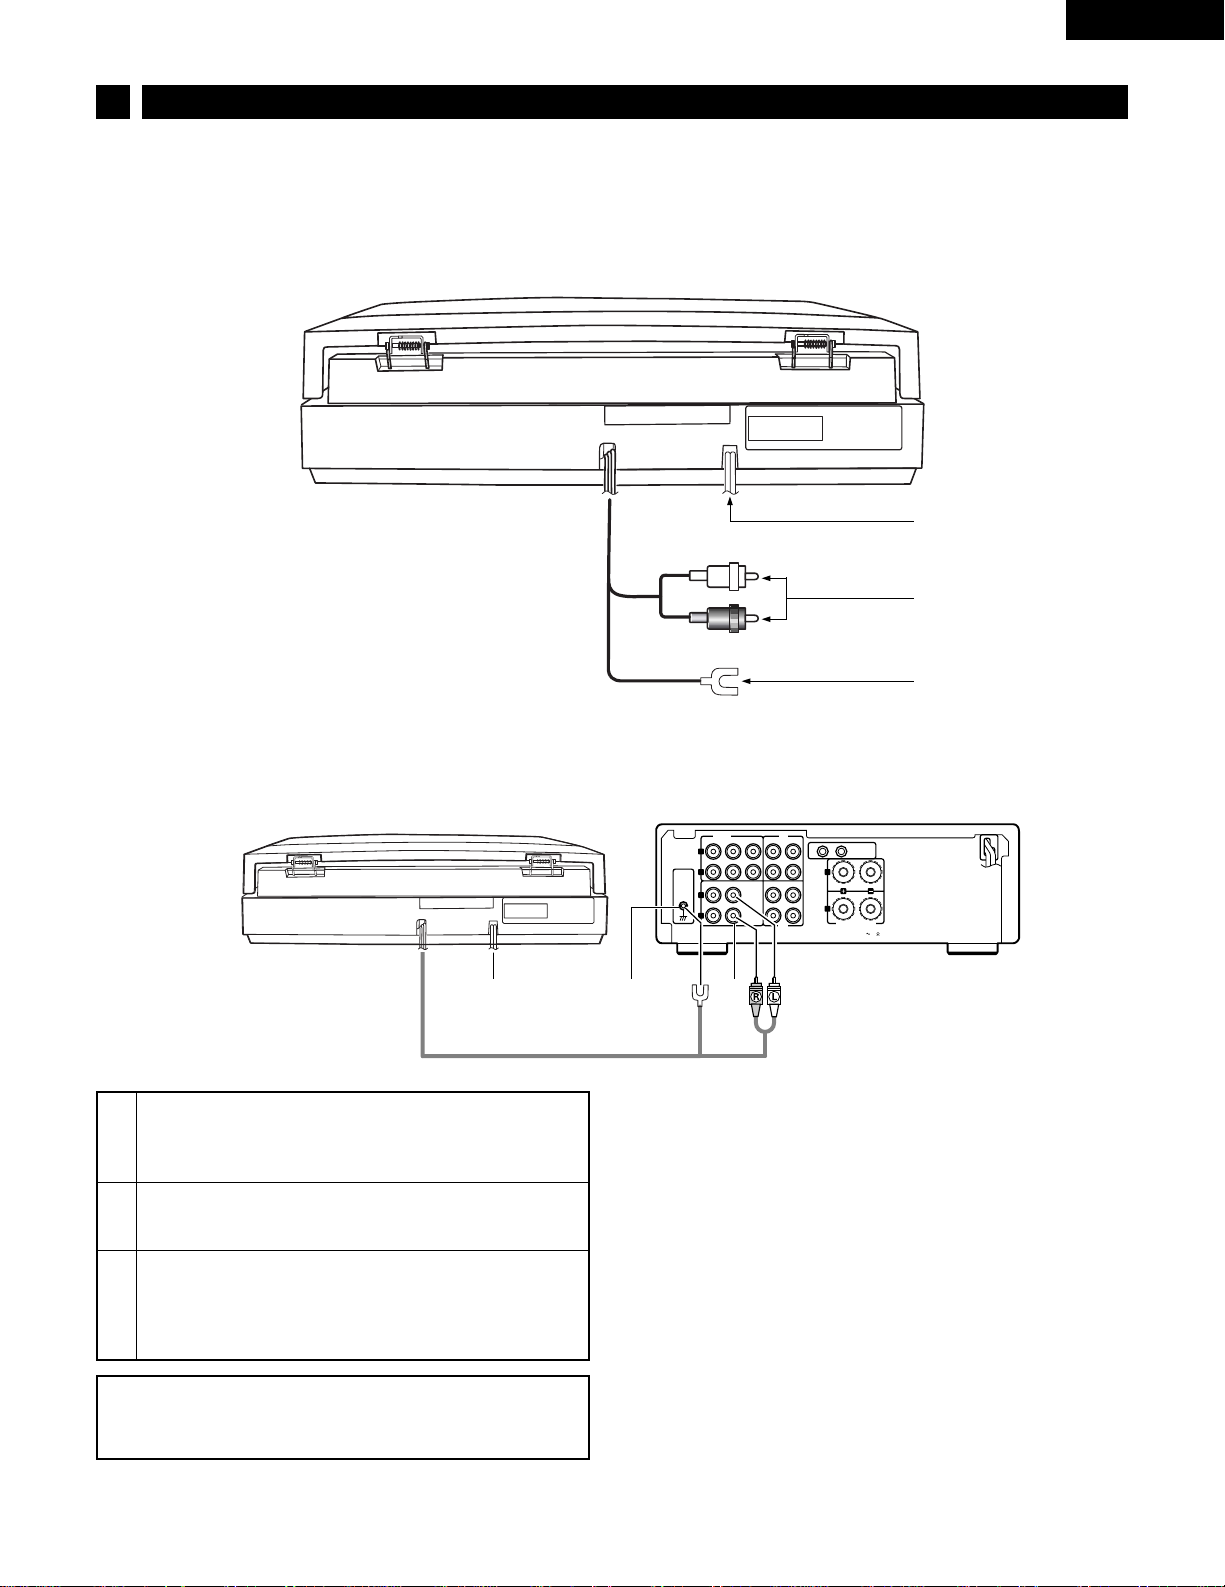
3
CONNECTIONS
Before beginning
• Turn off components.
• Connect the power cord last.
• Connect everything securely. Loose connections can lead to
distortion.
• To prevent damage to cords, connect and disconnect by holding
the plug, not the cord.
• Make sure that you connect the white PIN-plug to the left (Lwhite) jack and the red PIN-plug to the right (R-red) jack.
Power cord and plug
Left (White) and Right (Red)
out PIN-plugs
Ground wire
DP-29F Amplifier
Connections
1
Connect the Left and Right PIN-plugs of the
turntable’s output cord to your amplifier’s PHONO
jacks etc.
2
3
Connect the ground wire of the turntable to your
amplifier’s SIGNAL GND (Ground) terminal securely.
After all connections have been made.
• Connect the turntable’s power cord to the AC OUTLET
of your stereo amplifier, optional audio timer or directly
to a household AC outlet.
NOTE:
• If the platter starts rotating when the power cord is
connected, press the STOP button once.
3
2
Page 8

ENGLISH
8
4
CONTROLS
q
Dust cover
w
Dust cover hinge
e
45 rpm adaptor and holder
r
Equalizer amplifier switch
t
Finger lever
y
Size select lever
u
STOP button
• To stop playback.
i
START button
• To start playback.
o
Cartridge
!0
Tone arm rest
• Holds the tone arm.
!1
Platter
!2
Spindle
!3
Rubber mat
!4
SPEED button (33 £ / 45 ¢ )
• To select the playback speed.
5
RECORD PLAYBACK
Before beginning
• Turn on all the components.
• Set your amplifier’s input selector to PHONO or AUX.
• Remove the stylus cover before playback.
• Use the provided 45 rpm adaptor when playing back 17 cm
records (provided the center hole is a large one).
1 243
q we r
tyuio
!0!1!2!3!4
Page 9

ENGLISH
9
1
Open the dust cover and place the record you wish
to playback on the platter.
2
Set the SPEED button according to the record
playback speed.
• 33-1/3 rpm record.......................................Set to 33 £
• 45 rpm record.............................................Set to 45 ¢
3
Set the selector lever according to the record size.
4
Press the START button firmly for at least 1 second.
• The platter will start rotating, and playback will start
automatically.
After the full record has been played, the tone arm will return
to the tone arm rest and the platter stops rotating
automatically.
To stop playback
Press the STOP button.
Playback will stop and the tone arm will return to the tone arm
rest.
On the automatic playback system
• Do not touch the tone arm and platter or turn off the power during
playback.
• The auto return system is set to return the tone arm at a specific
point on the record. There should be no problem with regular sized
records, but with some record types which contain music grooves
past this set point, playback will be interrupted.
• 25 cm records cannot be used with the automatic playback
system. Playback these records manually. If the auto return
system does not engage after playback is finished, press the
STOP button.
6
OPERATION DETAILS
Manual playback
1
Place the record you with to play back on the platter.
2
Set the SPEED button according to the record.
3
Take hold of the finger lever, and move the tone arm
to a point just above the beginning of the track you
wish to play.
• The platter will start to rotate.
Stylus replacement
To provided stylus should be changed after approximately 400
hours of record playback. Grasp the cartridge firmly with one
hand, and gently pull the stylus free from the cartridge with
the other hand. Replace the stylus with the DSN-82.
Before replacing the stylus
Turn off the turntable and your amplifier.
Stylus
Stylus
q
w
w
q
123
Page 10

10
ENGLISH
7
TROUBLESHOOTING
No power.
Platter is not turning.
• Power cord is not connected properly. Check the power cord
connection.
• The drive belt is not fitted to pulley. Check the drive belt.
No sound.
• The output cords are not connected properly. Connect them
securely to your amplifier’s PHONO or AUX jacks.
• The input selector on your amplifier is not set to PHONO or AUX.
Set to PHONO or AUX.
Scratching noise.
Stylus jumps.
Distorted sound.
• Dirty stylus or record. Clean both the stylus and record before
playback.
• Worn out stylus or record. Replace stylus or record.
Howling.
• The turntable is too close to the speaker system. Move it away
from the speaker system.
• The turntable is placed in an unstable location. Place it on a flat and
solid surface.
• The playback volume is too high. Turn down the volume control of
your amplifier.
Humming noise.
• The ground wire is not connected to the SIGNAL GND (Ground)
terminal of your amplifier. Connect it to the SIGNAL GND (Ground)
terminal securely.
The tone arm will not move when pressing the START button.
• The tone arm is locked to the tone arm rest. Remove the tone arm
lock before playback.
Should a problem persist, write down the model and serial number
and all pertinent data regarding warranty coverage as well as clear
description of the existing trouble. Then contact your nearest
authorized DENON service station.
8
SPECIFICATIONS
Drive system: Belt drive
Motor: DC servo motor
Speed: 33-1/3 and 45 rpm
Wow & flutter: 0.15% WRMS
Tone arm: Dynamic balanced type
Effective arm length: 195 mm
Stylus pressure
adjustment range: 3.5 g (fixed)
Cartridge: DSN-82
Output voltage: 2.5 mV
Optimal stylus pressure: 3.5 g
Power supply: AC 120 V, 60 Hz (U.S.A. & Canada)
AC 230 V, 50 Hz (Europe)
Power consumption: 2 W
Dimensions: 360 (W) x 97 (H) x 357 (D) mm
14-3/16(W) x 3-13/16(H) x 14-1/16(D) in
Mass: 2.8 kg (6.2 lbs)
For improvement purposes, specifications and design are subject to change without notice.
Page 11

FRANCAIS
11
Nous vous remercions d’avoir acheté ce système de tourne-disque
entièrement automatique DENON.
Lire attentivement ce mode d’emploi afin de vous familiariser avec la
platine-disque et d’obtenir un maximum de satisfaction.
Prière de vérifier pour s’assurer que les articles suivants sont
inclus dans le carton avec l’unité principale.
(1) Mode d’emploi (cette notice) …………………………………1
(2) Liste des stations techniques agreees ………………………1
(3) Plateau ……………………………………………………………1
(4) Tapis en caoutchouc …………………………………………1
(5) Adaptateur 45 tours ……………………………………………1
z
Précautions …………………………………………………………11
x
Avant d’utiliser la table de lecture …………………………………12
c
Connexions …………………………………………………………13
v
Commandes …………………………………………………………14
b
Reproduction d’un disque ……………………………………14, 15
n
Détails de fonctionnement …………………………………………15
m
Remèdes aux incidents ……………………………………………16
,
Spécifications ………………………………………………………16
– TABLE DES MATIERES –
1
PRECAUTIONS
MISE EN GARDE
Pour éviter tout risque d’incendie ou de décharge électrique,
ne pas exposer cet appareil aux intempréries ou à l’humidité.
Puissance d’alimentation
La puissance d’alimentation des appareils électriques varie
selon les pays. Veuillez vous assurer que votre appareil est
conform á la puissance d’alimentation de votre région. En cas
de doute, consultez un électricien qualifié.
Ce que vous devez savoir pour vous protéger
• Ne touchez jamais la prise avec mains humides.
• Dèbranchez l’appareil en tenant la prise elle-même et non pas le
cordon.
• Ne faites réparer ou remonter la table de lecture que par un
technicien de service. Une personne non qualifiée pourrait toucher
des pièces internes et recevoir une décharge électrique
dangereuse.
• Ne jamais laisser un enfant mettre quelque chose, en particulier en
métal, dans la table de lecture.
Protéges également la table de lecture
• N’utilisez que des sources de courant secteur. N’utilisez jamais de
sources d’alimentation CC.
• Au cas où de l’eau est renversée sur la table de lecture,
déconnectez-la et prenez contact avec votre concessionnaire.
• Assurez-vous que la table de lectrue est bien aéré et hors
d’atteinte des rayons directs du soleil.
• Gardez l’appareil à l’écart des sources de chaleur (fours, etc.) pour
éviter d’endommager la surface extérieure ou les circuits internes.
• Eviter d’utilliser des insecticides de type aérosol près de la platine
tourne-disque. Ils pourraient endommager la finition et
s’enflammer soudainement.
• Afin d’éviter d’endommager la finition, n’utilisez jamains d’alcool,
de diluants ou autres produits chimiques similaires pour nettoyer la
table de lecture.
• Placez la table de lecture sur une surface plane et solide.
• Si vous pensez ne pas utiliser la table de lecture pendant
longtemps, déconnectez le cordon secteur.
• Pour protéger les isolants, soulevez toujours la table de lecture
lorsque vous la déplacez. Et avant de la déplacer, déconnectez
tous les câbles de connexion.
• En transportant la table de lecture sur de longues distances,
placez-la dans coffret d’origine empaquetée dans l’emballage de
protection.
Sur l’interrupteur d’alimentation
Cette table de lecture est équipée d’un interrupteur de courant
primaire. L’interrupteur d’alimentation est incorporé au bras
acoustique de la table de lecture. Le courant de la table de
lecture est coupé lorsque le bras accoustique retourne à la
position de repos. Remarquez toutefois que le courantn’est
pas complètement débranché dans ce cas. Si vous souhaitez
mettre l’appareil hors circuit complètement, déconnectez le
cordon secteur de la sortie secteur murale.
Page 12

FRANCAIS
12
2
AVANT D’UTILISER LA TABLE DE LECTURE
Tapis en caoutchouc
Axe
Ruban
Cabestan
Courroie
d’entra nement
Commutateur d’ampli-galiseur
Cet appareil contiet un ampli-égaliseur RIAA et il pent être
raccordé à un amplificateur sans prise d’entrée PHONO
(tourne-disque).
Réglez le commutateur d’ampli-égaliseur qui se trouve à côté
en fonction des prises de l’amplificateur.
Quand l’appareil est raccord
aux prises PHONO (MM):
Panneau arri re de
l’amplificateur
L
R
PHONO
ON
OFF
Blanc
Rouge
Quand l’appareil est raccord
aux prises AUX, etc:
Panneau arri re de
l’amplificateur
L
R
AUX
ON
OFF
Blanc
Rouge
• La courroie d’entraînement se trouve sous le plateau. Quand
vous assemblez la platine, veuillez manipuler la courroie
d’entraînement avec précaution.
• Enlevez les matériaux d’emballage qui protègent le bras de
lecture, sauf ceux qui protègent la tête, puis ouvrez le couvercle et
assemblez le tout. Enlevez la protection de la tête de lecture
quand l’assemblage est terminé.
1
Saisissez le plateau par les orifices sur le pourtour et
posez-le avec précaution en insérant l’axe dans
l’orifice central. Tournez le plateau jusqu’à ce qu’une
des ouvertures soit au-dessus du cabestan. (Voir
l’illustration.)
2
3
Saisissez doucement et tirez sur le ruban de la
courroie d’entraînement qui se trouve sous le
plateau, et faites passer la courroie derrière le
cabestan. (Une foi fixée, vous pouvez enlever le
ruban.) Pour vous assurer que la courroie est bien en
place, tournez lentement le plateau trois ou quatre
fois.
Posez le tapis en caoutchouc sur le plateau.
IMPORTANT! A vérifier.
Vérifiez que la courroie d’entraînement et le ruban se trouvent
bien sous le plateau. Saisissez le ruban comme indiqué sur
l’illustration de droite et tirez dessus pour faire passer la
courroie derrière le cabestan.
Page 13

FRANCAIS
L
R
L
R
L
R
SIGNAL
GND
12
SYSTEM
CONNECTOR
L
R
SPEAKER SYSTEM
SPEAKER IMPEDANCE
4 16
CD
DVD/AUX
TUNER PHONO TAPE MD
AUX-2 TAPE MD
PB
REC
INPUTS
L
R
L
R
1
13
3
CONNEXIONS
Avant de connecter
• Mettez tous les éléments hors circuit.
• Connectez le cordon secteur en dernier.
• Connectez tous les éléments de façon ferme. Des connexions
lâches peuvent entraîner des distorsions.
• Pour éviter d’endommager les cordons, connectez et
déconnectez-les en tenant la prise et non pas le cordon.
• Assurez-vous de connecter la prise PIN blanche au jack gauche (L)
et la prise PIN rouge à au jack droit (R).
Cordon secteur et prise
Prises PIN gauche (blanche)
et droite (rouge)
Câble de terre
DP-29F Amplificateur
Connexions
1
Connectez les prises PIN gauche et droite du cordon
de la table de lecture aux jacks PHONO ou AUX de
votre amplificateur.
2
3
Connectez le câble de terre de votre de lecture à la
borne de masse SIGNAL GND de votre amplificateur
de facon sûre.
Après avoir tout connecté
• Connectez le cordon secteur de la table de lecture à la
sortie secteur de votre amplificateur stéréo, votre
minuterie audio ou directement à une sortie secteur
murale.
REMARQUE:
• Si le plateau commence à tourner lorsque le cordon secteur
est connecté, appuyez sur la touche de
démarrage/interruption STOP encore une fois.
3
2
Page 14

FRANCAIS
14
4
COMMANDES
q
Pare-poussière
w
Charnière de pare-poussière
e
Adaptateur de 45 tours et réceptacle
r
Commutateur d’ampli-égaliseur
t
Levier à doigt
y
Levier de sélection de taille
u
Touche Arrêt
• Pour arrêter la reproduction.
i
Touche de démarrage (START)
• Pour engager la reproduction.
o
Cellule
!0
Soutien du bras acoustique
• Soutient le bros acoustique.
!1
Plateau
!2
Axe
!3
Tapis en caoutchouc
!4
Touche de vitesse (SPEED 33 £ / 45 ¢ )
• Pour sélectionner la vitesse de reproduction.
5
REPRODUCTION D’UN DISQUE
Avant de commencer
• Mettez tous les éléments sous tension.
• Réglez le sélecteur d’entrée de votre amplificateur sur PHONO ou
AUX.
• Enlevez le couvercle de la pointe de lecture avant de reproduire.
• Utilisez l’adaptateur de 45 tours en reproduisant des disques de 17
cm (pourvu que le trou du centre est grand).
1 243
q we r
tyuio
!0!1!2!3!4
Page 15

FRANCAIS
15
1
Ouvrez le pare-poussière et placez le disque que vous
voulez reproduire sur le plateau.
2
Réglez le sélecteur de vitesse (SPEED) selon le type
de disque que vous voulez reproduire.
•Disques de 33-1/3 tr/mn......................Réglez sur 33 £
• Disques de 45 tr/mn............................Réglez sur 45 ¢
3
Placer le levier de sélection de taille selon la taille du
disque.
4
Gardez la touch de démarrage/interruption START
fermement enfoncée pendant au moins 1 seconde.
• Le plateau commencera de tourner, et la reproduction
commencera automatiquement.
Après la reproduction complète du disque, le bras de lecture
retournera à sa position de repos et le plateau s’arrêtera de
tourner automatiquement.
Pour arrêter la reproduction
Appuyez sur la touche de démarrage/interruption STOP.
La reproduction s’arrêtera et le bras acoustique retournera à la
position de repos.
Système de reproduction automatique
• Ne touchez pas le bras acoustique et le plateau et n’enlevez jamais
le courant pendant la reproduction.
• Le système de retour automatique est réglé de facon à faire
revenir le bras acoustique en un pointe donné du disque. Il ne
devrait pas y avoir de problèmes avec des disques de dimensions
normales, mais pour certaines catégories de disques qui
contiennent un nomber de sillons de musique qui dépasse la
quantité permise par le réglage, la reproduction sera interrompue.
• Des disques de 25 cm suivants ne peuvent pas être utilisés avec
le système de reproduction automatique.
Reproduisez ces disques de façon manuelle. Si le système de
retour automatique ne se remet pas en marche après la fin de la
reproduction, appuyez sur la touche de démarrage/interruption
STOP.
6
DETAILS DE FONCTIONNEMENT
Reproduction manuelle
1
Placez le disque que vous voulez zeproduire sur le
plateau.
2
Réglez l’interrupteur de vitesse (SPEED) selon le type
de disque utilisé.
3
Saisissez le levier à doigt, puis déplacez le bras de
lecture en un point juste au-dessus du
commencement du morceau que vous voulez
reproduire.
• Le plateau de lecture se mettra à tourner.
Remplacement de la pointe de lecture
La pointe de lecture fournie doit être changée au bout
d’approximativement 400 heures de reproduction de disque.
Saisissez la cellule fermement avec und main, puis libérez la
pointe de lecture en tiarnt doucement sur celle-ci avec l’autre
main de façon à la libérer de la cellule.
Remplacez la pointe par und pointe DSN-82.
123
Avant de remplacer la pointe
Mettez la table de lecture et l’amplificateur hors circuit.
Pointe de lecture
Pointe de lecture
q
w
w
q
Page 16

FRANCAIS
16
7
REMEDES AUX INCIDENTS
Absence d’alimentation.
Le plateau ne tourne pas.
• Le cordon secteur n’est pas bien connecté. Vérifiez la connexion
du cordon secteur.
• La courroie d’entraînement n’est pas bien attachée autour du
cabestan. Vérifiez la courroie d’entraînement.
Pas de son.
• Les cordons de sortie ne sont pas branchés correctement.
Branchez-les à foud sur les prises PHONO or AUX de
l’amplificateur.
• Le sélécteur d’entrée de l’amplificateur n’est pas réglé sur
PHONO ou AUX. Réglez-le sur PHONO ou AUX.
Bruit de grattement.
La pointe de lecture saute.
Distorsion du son.
• La pointe de lecture ou le disque est sale. Nettoyez la pointe de
lecture et le disque avant la reproduction.
• Usure de la pointe de lecture ou du disque. Remplacez la pointe de
lecture ou disque.
Ronflement.
• La table de lecture est trop proche du système d’enceintes.
Eloignez-la du système d’enceintes.
• La table de lecture est placée dans un endroit instable. Placez-la
sur une surface solide.
• Le niveau volume de la reproduction est trop élevé. Baissez le
volume en tournant sur la commande du volume de votre
amplificateur.
Bruit de bourdonnement.
• Le câble de terre n’est pas connecté à la brone de terre de signal
de votre amplificateur. Connectez-le à la borne de terre de signal
fermement.
Le bras acoustique ne se déplacera pas lorsque vous appuyez
sur la touche de démarrage/interruption (START).
• Le bras acoustique est verrouille dans la position de repos. Enlevez
le bres acoustique avant la reproduction.
En cas de problém, notez le nom du modéle, le numéro de série et
toutes les données perinentes concernant l’étendue de la garantie
ainsi qu’une description claire des défaillances techniques. Prenez
ensuite contact avec la Station Service DENON la plus proche.
8
SPECIFICATIONS
Système d’entraînement: à courroie
Moteur: servo DC
Vitesse: 33-1/3 et 45 tr/mn
Pleurage et scintillement: 0,15% (WRMS)
Bras acoustique: type à équilibrage dynamique
Longueur effective du bras: 195 mm
Gamme de réglage de la
pression de la pointe de lecture: 3,5 g (fixe)
Cellule: DSN-82
Tension de sortie: 2,5 mV
Pression optimale de la pointe
de lecture: 3,5 g
Alimentation: CA 120 V, 50 Hz (Etats-Unis & Canada)
CA 230 V, 60 Hz (Europe)
Consommation: 2 W
Dimensions: 360(L) x 97(H) x 357(P) mm
Poids: 2,8 kg
Les spécifications et la présentation sont successibles de modification sans préavis dans un but d’amélioration.
Page 17

ESPAÑOL
17
Gracias por haber adquirido el sistema de placa giratoria
completamente automática de DENON.
Rogamos lea atentamente las instrucciones de funcionamiento para
familiarizarse con el tocadiscos y lograr la máxima satisfacción.
Compruebe para asegurarse de que los siguiente itemes van
incluidos con la unidad principal en el cartón:
(1) Instrucciones de funcionamiento (estas instrucciones) ……1
(2) Lista de estaciones de servicio ………………………………1
(3) Plato ……………………………………………………………1
(4) Esterilla protectora de goma……………………………………1
(5) Adaptador de 45 rpm ……………………………………………1
z
Precauciones ………………………………………………………17
x
Antes de usar el giradiscos ………………………………………18
c
Conexiones …………………………………………………………19
v
Controles ……………………………………………………………20
b
Reproducción de discos ………………………………………20, 21
n
Detalles de funcionamiento ………………………………………21
m
Guía para la localización de averías ………………………………22
,
Especificaciones …………………………………………………22
– TABLA DE CONTENIDOS –
1
PRECAUCIONES
REQUERIMIENTOS DE POTENCIA
Los requerimientos de potencia para equipos eléctricos
difieren de un área a otra. Por favor, asegúrese de que la
potencia que necesita su aparato es la misma que su área
requiere.
En caso de duda, consulte con un electricista cualificado.
ACERCA DEL INTERRUPTOR DE POTENCIA
Este plato giratorio no va equipado con un interruptor de
energía primaria. El interruptor de energía va incorporado al
brazo fonocaptor del giradiscos. La energía del giradiscos se
corta cuando el brazo fonocaptor vuelve a su lugar de apoyo.
Tomar nota, sin embargo, que la corriente no se habrá quitado
completamente en este caso. Si usted desea quitar
completamente la corriente, deberá desconectar el cable de la
salida de corriente AC del enchufe de la pared de casa.
LO QUE DEBE SABER PARA PROTEGERSE USTED
MISMO
• No tocar nunca la clavija con las manos húmedas.
• Tirar siempre de la clavija y nunca del cable.
• Las reparaciones o reajustes del giradiscos las deberá hacer
siempre un profesional cualificado. Una persona no autorizada
podría tocar las piezas internas y recibir una importante descarga
eléctrica.
• No permita nunca que un niño ponga cualquier cosa,
especialmente metálica, dentro del giradiscos.
PROTECCION DEL GIRADISCOS TAMBIÉN
• Use solamente una fuente de energía AC de casa. No use nunca
una fuente de energía DC.
• Si se derrama agua sobre el giradiscos, desconéctelo y llame a su
distribuidor.
• Asegúrese de que el giradiscos está bien ventilado y fuera de la luz
solar directa.
• Para evitar daños en los circuitos internos y a la superficie externa,
mantenerlo lejos de fuentes de calor, (estufas, etc.).
• Evitar el uso de tipos de sprays de insecticidas cerca del giradiscos
ya que pueden dañar su superficie y podrían producir un incendio
repentino.
• Para evitar daños en la superficie, no emplear nunca disolventes o
productos químicos similares para limpiar el giradiscos.
• Colocar el giradiscos en una superficie plana y sólida.
• Si no va a utilizar el giradiscos durante un largo período de tiempo,
desconecte el cable de toma de energía.
• Para proteger los aislantes, levante siempre el giradiscos cuando
vaya a moverlo. Y antes de mover el giradiscos, desconecte todos
los cables de conexión.
• Cuando se vaya a transportar el giradiscos a una gran distancia,
colocarlo dentro de su caja original envuelto en sus rellenos
protectores.
Page 18

ESPAÑOL
18
2
ANTES DE USAR EL GIRADISCOS
Esterilla protectora
de goma
Eje central
Cinta extensible
(Ribbon tape)
Polea de mando del motor
(Driving Roller)
Correa de
accionamiento
(Drive belt)
Conexión a un Amplificador ecualizador
Este equipo lleva incorporado un amplificador ecualizador
RIAA por lo que puede ser conectado a un amplificador sin
un enchufe de toma PHONO (giradiscos). De acuerdo con el
amplificador, ajustar el INTERRUPTOR AMPLIFICADOR
ECUALIZADOR.
Cuando la unidad está
conectada a enchufes de
PHONO (MM):
Panel trasero del
amplificador
L
R
PHONO
ON
OFF
Blanco
Rojo
Cuando la unidad está
conectada a enchufes AUX,
etc.:
Panel trasero del
amplificador
L
R
AUX
ON
OFF
Blanco
Rojo
• La polea del mando del motor está situada bajo el plato
giratorio. Cuando se monte el equipo reproductor, manipular con
cuidado la polea del mando del motor.
• Retirar todos los materiales de embalaje alrededor del brazo
fonocaptor, excepto los de la aguja, y después abrir la cubierta
protectora de polvo y a continuación realizar el ensamblaje. Quitar
la cubierta de la aguja después del ensamblaje.
1
Sujetar el plato giratorio por los orificios situados en
la superficie exterior y después bajar con cuidado el
plato de tal manera que el eje central entre en el
agujero central.
Hacer girar el plato hasta que una de sus aberturas
exteriores quede alineada con la polea de mando del
motor. (Ver la ilustración).
2
3
Sujetar y tirar de la cinta extensible de la correa de
accionamiento suavemente para enrollarla bajo el
plato giratorio y a continuación extender la correa
alrededor de la polea de mando del motor. (Después
de sujeta, quitar la cinta extensible). Con el fin de
asegurarse de que la correa de accionamiento has
sido correctamente colocada, hacer girar lentamente
el plato 3 o 4 vueltas.
Colocar la esterilla de goma sobre el plato.
¡IMPORTANTE! Por favor compruebe.
Comprobar que la correa de accionamiento y la cinta
extensible han quedado sujetas bajo el plato. Tirar de la cinta
extensible según se muestra en la ilustración de la izquierda y
extenderla hasta la polea de mando del motor.
Page 19

ESPAÑOL
L
R
L
R
L
R
SIGNAL
GND
12
SYSTEM
CONNECTOR
L
R
SPEAKER SYSTEM
SPEAKER IMPEDANCE
4 16
CD
DVD/AUX
TUNER PHONO TAPE MD
AUX-2 TAPE MD
PB
REC
INPUTS
L
R
L
R
1
19
3
CONEXIONES
Antes de comenzar
• Desconectar todos los componentes.
• Conectar el cable de potencia.
• Todas las conexiones deben quedar bien fijas. Las conexiones que
quedan flojas pueden causar distorsión.
• Para evitar daños en los cables, hacer las conexiones y
desconexiones sujetando los enchufes, no los cables.
• Asegúrese de que conecta el enchufe-PIN blanco al conector
izquierdo blanco (L-blanco) y el enchufe-PIN rojo al conector
derecho (R-rojo).
Cable de corriente y enchufe
Enchufes-PIN izquierdo
(Blanco) y Derecho (Rojo)
Terminal de cable
de toma de tierra
DP-29F Amplificador
Conexiones
1
Conectar los enchufes-PIN izquierdo y Derecho del
cable de salida de su giradiscos a la toma PHONO de
su amplificador, etc.
2
3
Conectar firmemente el cable de conexión a tierra de
su giradiscos al terminal de toma de tierra (SIGNAL
GND) de su amplificador.
Después de que se hayan hecho todas las
conexiones.
• Conectar el cable de corriente del giradiscos a la toma
de corriente de su amplificador estéreo, al
temporizador de audio opcional o directamente a la
toma de corriente de la pared.
NOTA:
• Si el plato comiena a girar cuando se conecta el cable de
corriente, pulsar inmediatamente el botón de STOP.
3
2
Page 20

ESPAÑOL
20
4
CONTROLES
q
Cubierta protectora contra el polvo
w
Bisagra de la cubierta contra el polvo
e
Adaptador y soporte de 45 rpm
r
Interruptor de amplificador ecualizador
t
Gancho para el dedo
y
Palanca de selección de tamaño
u
Botón STOP (Detener)
• Para detener la reproducción.
i
Botón START (Arranque)
• Para comenzar la reproducción.
o
Cápsula fonocaptora
!0
Soporte del brazo fonocaptor
• Sujeta el brazo fonocaptor.
!1
Plato giratorio
!2
Eje central
!3
Esterilla de goma
!4
Botón de SPEED (velocidad) (33 £ / 45 ¢ )
• Para seleccionar la velocidad de reproducción.
5
REPRODUCCIÓN DE DISCOS
Antes de comenzar la reproducción
• Enchufar todos los componentes.
• Situar el selector de entrada de su amplificador en PHONO o AUX.
• Retirar la cubierta protectora de la aguja antes de comenzar la
reproducción.
• Usar el adaptador de 45 rpm que se proporciona cuando se vayan
a escuchar discos de 17 cm. (siempre que el orificio central sea
uno grande).
1 243
q we r
tyuio
!0!1!2!3!4
Page 21

ESPAÑOL
21
1
Levantar la cubierta protectora contra el polvo y
colocar sobre el plato el disco que se desee escuchar.
2
Ajustar el botón de velocidad “SPEED” de acuerdo
con la velocidad del disco que se va a reproducir.
• disco de 33-1/3 rpm.............................ajustarlo a 33 £
• disco de 45 rpm...................................ajustarlo a 45 ¢
3
Ajuste la palanca selectora de acuerdo al tamaño del
disco.
4
Presionar el botón START con firmeza, al menos
durante 1 segundo.
• El plato empezará a girar y la reproducción dará
comienzo automáticamente.
Después de que se haya escuchado el disco totalmente, el
brazo fonocaptor volverá a su punto de apoyo y el plato dejará
de girar automáticamente.
PARA FINALIZAR LA REPRODUCCIÓN
Presionar el botón STOP.
La reproducción se parará y el brazo fonocaptor volverá a su
largo de apoyo.
EN SISTEMA DE REPRODUCCIÓN AUTOMÁTICA
• No tocar el brazo fonocaptor ni el plato ni tampoco quitar la
corriente durante la reproducción.
• El sistema de auto retorno está ajustado para que vuelva el brazo
fonocaptor en un punto específico del disco. Esto no sería
problema con discos de tamaño normal pero con algunos tipos de
discos que contienen surcos musicales, pasado este punto de
ajuste, la reproducción quedará interrumpida.
• Discos de 25 cm no pueden ser usados con el sistema de
reproducción automática. Estos discos tendrán que reproducirse
de forma manual. Si el sistema de retorno automático no
engancha después de haber terminado la reproducción, presionar
el botón de STOP.
6
DETALLES DE FUNCIONAMIENTO
REPRODUCCIÓN MANUAL
1
Colocar en el plato el disco que se desea escuchar.
2
Ajustar el botón de SPEED (velocidad) con el disco.
3
Coger y mantener el gancho para el dedo y mover el
brazo fonocaptor justo hasta encima del punto de
comienzo de la pista que se desea escuchar.
• El plato empezará a girar.
Sustitución de la aguja
La aguja que se proporciona con el equipo deberá ser
cambiada después de aproximadamente 400 horas de
reproducción de discos. Sujetar la cápsula firmemente con una
mano y con la otra mano tirar con suavidad de la aguja hasta
que salga de la cápsula fotocaptora. Sustituir la aguja con otra
DSN-82.
123
Antes de sustituir la aguja
Desenchufar el giradiscos y su amplificador.
Aguja
Aguja
q
w
w
q
Page 22

ESPAÑOL
22
7
GUÍA PARA LA LOCALIZACIÓN DE AVERÍAS
No hay energía.
El plato no está girando.
• El cable de corriente no está conectado adecuadamente.
Comprobar la conexión del cable de energía.
• La correa no está sujeta a la polea de mando del motor.
Comprobar la correa.
No hay sonido.
• Los cables de salida no están conectados adecuadamente.
Conectarlo firmemente a sus tomas PHONO o AUX de su
amplificador.
• El selector de entrada de su amplificador no está situado en
posición PHONO o AUX. Colóquelo en posición PHONO o AUX.
Ruido de arañazos.
La aguja salta.
Sonido distorsionado.
• La aguja o el disco están sucios. Antes de la reproducción limpiar
tanto la aguja como el disco.
• La aguja o el disco están desgastados. Sustituir la aguja o el disco.
Los sonidos se escuchan con chillidos.
• El giradiscos está situado demasiado cerca del sistema de
altavoces. Alejarlo del sistema de altavoces.
• El giradiscos está colocado en una posición inestable. Colocarlo en
una superficie plana y sólida.
• El volumen de reproducción está demasiado alto. Bajar el control
de volumen de su amplificador.
Ruido de murmullo.
• El cable de conexión a tierra no está conectado al terminal de tierra
(SIGNAL GND) de su amplificador. Conectarlo firmemente a la
terminal SIGNAL GND (tierra).
El brazo fonocaptor no se mueve cuando se presiona el botón
de START.
• El brazo fonocaptor está sujeto con el cierre en su lugar de apoyo.
Retirar el cierre del apoyo del brazo antes de comenzar con la
reproducción.
Caso de que el problema persistiera, escriba el modelo y número de
serie, todos los datos pertinentes relativos a la cobertura de la
garantía así como una clara descripción del problema existente.
Después contacte con el punto de servicio autorizado DENON más
cercano.
8
ESPECIFICACIONES
Sistema de accionamiento: Correa de mando
Motor: Servo motor DC
Velocidad: 33-1/3 y 45 rpm
Lloro y trémolo (Wow & flutter): 0,15% WRMS
Brazo fonocaptor: Tipo balanceado din.mico
Largo real del brazo: 195 mm
Gama ajuste de presión aguja: 3,5 g (fijado)
Cartílago: DSN-82
Voltaje de salida: 2,5 mV
Presión óptima de la aguja: 3,5 g
Necesidad de energía: CA 120 V, 60 Hz (EE.UU. y Canada)
CA 230 V, 50 Hz (Europa)
Consumo: 2 W
Dimensiones:
360(ancho) x 97(alto) x 357(profund) mm
Peso: 2,8 kg
A los efectos de un continuo perfeccionamiento, las especificaciones y los diseños están sujetos a cambios sin previo aviso.
Page 23

Denon Brand Company, D&M Holdings Inc.
Printed in China 00D 511 3872 104
TOKYO, JAPAN
www.denon.com
 Loading...