

Page 1
MICROWAVE OVEN
COMBINED WITH GRILL
FORNO A
MICRO-
ONDAS
COMBINADO
COM GRILL
ºOYPNO™ MIKPOKYMATøN
ME GRILL
MMIIKKRROOHHUULLLLÁÁMMÚÚ SSÜÜTTÃÃ
GGRRIILLLLEELL KKOOMMBBIINNÁÁLLTT
ååààääêêééÇÇééããççééÇÇÄÄüü
èèÖÖóóúú
ääééååÅÅààççààêêééÇÇÄÄççççÄÄüü ëë
ÉÉêêààããÖÖåå
MIKROVLNNÁ
TROUBA
S GRILEM
NÁVOD K POUÎITÍ
GB Instructions for use . . . . . . . 4
P Instruções para o uso . . . . . 26
GR O‰ËÁ›Â˜ ¯Ú‹Û˘ . . . . . . . . . 48
HH
Használati utasítás . . . . . . . 70
SSUU
аМТЪЫНˆЛЛ ФУ ˝НТФОЫ‡Ъ‡ˆЛЛ 92
CCZZ
Návod k pouÏití . . . . . . . . . .114
MW600GB 15-10-2001 13:57 Pagina 1
Page 2
DESCRIPTION . . . . . . . . . . . . . . . . . . . . . . . . . . . . . . . . . . .3
HOW TO GET THE BEST RESULTS FROM YOUR OVEN . . . . . . .4
IMPORTANT SAFEGUARDS . . . . . . . . . . . . . . . . . . . . . . . . . .5
TECHNICAL DATA . . . . . . . . . . . . . . . . . . . . . . . . . . . . . . . .6
ELECTRICAL INSTRUCTIONS . . . . . . . . . . . . . . . . . . . . . . . . .6
INSTALLATION . . . . . . . . . . . . . . . . . . . . . . . . . . . . . . . . . . .7
OUTPUT POWER . . . . . . . . . . . . . . . . . . . . . . . . . . . . . . . . .7
DESCRIPTION AND USE OF THE CONTROLS . . . . . . . . . . . . . .8
ACCESSORIES PROVIDED . . . . . . . . . . . . . . . . . . . . . . . . . . .8
GLASSWARE AND SIMILAR ITEMS . . . . . . . . . . . . . . . . . . . . .9
ELECTRICAL CONNECTION (U.K. ONLY) . . . . . . . . . . . . . . . . .9
ADVICE ON THE USE OF MICROWAVES OVENS . . . . . . . . . .10
MICROWAVE ONLY FUNCTION . . . . . . . . . . . . . . . . . . . . . .11
SIMULTANEOUS COOKING ON 2 LEVELS . . . . . . . . . . . . . . .12
COMBINED MICROWAVE + GRILL FUNCTION . . . . . . . . . . . .21
GRILL ONLY FUNCTION . . . . . . . . . . . . . . . . . . . . . . . . . . .23
CLEANING AND MAINTENANCE . . . . . . . . . . . . . . . . . . . . .25
ÍNDICE P
DESCRIÇÃO . . . . . . . . . . . . . . . . . . . . . . . . . . . . . . . . . . . . 3
COMO OBTER OS MELHORES RESULTADOS DO
SEU FORNO . . . . . . . . . . . . . . . . . . . . . . . . . . . . . . . . . . . 26
PRECAUÇÕES . . . . . . . . . . . . . . . . . . . . . . . . . . . . . . . . . .27
DADOS TÉCNICOS . . . . . . . . . . . . . . . . . . . . . . . . . . . . . . .28
CONEXÃO ELÉCTRICA . . . . . . . . . . . . . . . . . . . . . . . . . . . .28
INSTALAÇÃO . . . . . . . . . . . . . . . . . . . . . . . . . . . . . . . . . . .29
POTÊNCIA . . . . . . . . . . . . . . . . . . . . . . . . . . . . . . . . . . . . . 29
DESCRIÇÃO DOS COMANDOS . . . . . . . . . . . . . . . . . . . . . . 30
ACCESSÓRIOS . . . . . . . . . . . . . . . . . . . . . . . . . . . . . . . . . .30
RECIPIENTES A SEREM USADOS . . . . . . . . . . . . . . . . . . . . . .31
CONSELHOS PARA UMA UTILIZAÇÃO CORRECTA DO FORNO 32
FUNÇÃO SÓ MICROONDAS . . . . . . . . . . . . . . . . . . . . . . . .33
COZEDURA SIMULTÂNEA EM DUAS ALTURAS . . . . . . . . . . .34
FUNÇÃO COMBINADA MICROONDAS + GRILL . . . . . . . . . . .43
FUNÇÃO SÓ GRILL . . . . . . . . . . . . . . . . . . . . . . . . . . . . . . .45
MANUTENÇÃO E LIMPEZA . . . . . . . . . . . . . . . . . . . . . . . . .47
CONTENTS GB
¶ВЪИБЪ·К‹ . . . . . . . . . . . . . . . . . . . . . . . . . . . . . . . . . . . . . . .3
¶ˆ˜ Ó· ÂÙ‡¯ÂÙ ٷ ηχÙÂÚ· ·ÔÙÂϤÛÌ·Ù·
ÌÂ ÙÔ ÊÔ‡ÚÓÔ Û·˜ . . . . . . . . . . . . . . . . . . . . . . . . . . . . . . . . .48
¶ÚÔÂȉÔÔÈ‹ÛÂȘ . . . . . . . . . . . . . . . . . . . . . . . . . . . . . . . . .49
TВ¯УИО¿ ¯·Ъ·ОЩЛЪИЫЩИО¿ . . . . . . . . . . . . . . . . . . . . . . . . . . . .50
HПВОЩЪИО‹ Ы‡У‰ВЫЛ . . . . . . . . . . . . . . . . . . . . . . . . . . . . . . .50
EÁηٿÛÙ·ÛË . . . . . . . . . . . . . . . . . . . . . . . . . . . . . . . . . . . .51
AԉȉÞÌÂÓË ÈÛ¯‡˜ . . . . . . . . . . . . . . . . . . . . . . . . . . . . . . .51
¶ВЪИБЪ·К‹ О·И ¯Ъ‹ЫЛ ЩˆУ ¯ВИЪИЫЩЛЪ›ˆУ . . . . . . . . . . . . . . .52
AÍÂÛÔù¿Ú Ôù ¯ФЪЛБФ‡УЩ·И . . . . . . . . . . . . . . . . . . . . . . . . .52
™ÎÂ‡Ë Ôù Ú¤ВИ У· ¯ЪЛЫИМФÔÈÔ‡ÓÙ·È . . . . . . . . . . . . . . . .53
™ùÌ‚ÔùП¤˜ БИ· ЩЛ ¯Ъ‹ЫЛ ЩˆУ МИОЪФОùÌ¿ÙˆÓ . . . . . . . . . . . .54
§ÂÈÙÔùÚÁ›· ÌÞУФ МВ МИОЪФО‡М·Щ· . . . . . . . . . . . . . . . . . . . . .55
T·ùÙÞ¯ÚÔÓÔ Ì·Á›ÚÂÌ· Û 2 ›‰· . . . . . . . . . . . . . . . . . .56
§ÂÈÙÔùЪБ›· МИОЪФО‡М·Щ· + grill . . . . . . . . . . . . . . . . . . . . . . .65
§ÂÈÙÔùÚÁ›· ÌÞÓÔ grill . . . . . . . . . . . . . . . . . . . . . . . . . . . . . .67
™ùÓÙ‹ÚËÛË Î·È Î·õ·ÚÈÛÌÞ˜ . . . . . . . . . . . . . . . . . . . . . . . . .69
¶EPIEXOMENA GR
LLEEÍÍRRÁÁSS .. .. .. .. .. .. .. .. .. .. .. .. .. .. .. .. .. .. .. .. .. .. .. .. .. .. .. .. .. .. .. .. .. .. .. .. .. .. .. .. ..33
HHOOGGYYAANN LLEEHHEETT AA LLEEGGJJOOBBBB EERREEDDMMÉÉNNYYTT EELLÉÉRRNNII AA
SSÜÜTTŒŒVVEELL .. .. .. .. .. .. .. .. .. .. .. .. .. .. .. .. .. .. .. .. .. .. .. .. .. .. .. .. .. .. .. .. .. .. .. .. .. ..7700
FFIIGGYYEELLMMEEZZTTEETTÉÉSS .. .. .. .. .. .. .. .. .. .. .. .. .. .. .. .. .. .. .. .. .. .. .. .. .. .. .. .. .. ..7711
MMııSSZZAAKKII AADDAATTOOKK .. .. .. .. .. .. .. .. .. .. .. .. .. .. .. .. .. .. .. .. .. .. .. .. .. .. .. .. .. .. ..7722
EELLEEKKTTRROOMMOOSS BBEEKKÖÖTTÉÉSS .. .. .. .. .. .. .. .. .. .. .. .. .. .. .. .. .. .. .. .. .. .. .. .. ..7722
BBEEÁÁLLLLÍÍTTÁÁSS .. .. .. .. .. .. .. .. .. .. .. .. .. .. .. .. .. .. .. .. .. .. .. .. .. .. .. .. .. .. .. .. .. .. .. ..7733
HHAATTÁÁSSFFOOKK .. .. .. .. .. .. .. .. .. .. .. .. .. .. .. .. .. .. .. .. .. .. .. .. .. .. .. .. .. .. .. .. .. .. .. ..7733
KKEEZZEELLŒŒGGOOMMBBOOKK LLEEÍÍRRÁÁSSAA ÉÉSS HHAASSZZNNÁÁLLAATTAA .. .. .. .. .. .. .. .. ..7744
MMEELLLLÉÉKKEELLTT TTAARRTTOOZZÉÉKKOOKK .. .. .. .. .. .. .. .. .. .. .. .. .. .. .. .. .. .. .. .. .. .. .. ..7744
MMIIKKRROOEEDDÉÉNNYYEEKK .. .. .. .. .. .. .. .. .. .. .. .. .. .. .. .. .. .. .. .. .. .. .. .. .. .. .. .. .. .. .. ..7755
TTAANNÁÁCCSSOOKK AA MMIIKKRROOHHUULLLLÁÁMM HHAASSZZNNÁÁLLAATTÁÁHHOOZZ .. .. .. .. .. ..7766
CCSSAAKK MMIIKKRROOHHUULLLLÁÁMM FFUUNNKKCCIIÓÓ .. .. .. .. .. .. .. .. .. .. .. .. .. .. .. .. .. .. .. ..7777
ÉÉTTEELLKKÉÉSSZZÍÍTTÉÉSS EEGGYYSSZZEERRRREE KKÉÉTT SSZZIINNTTEENN .. .. .. .. .. .. .. .. .. ..7788
KKOOMMBBIINNÁÁLLTT MMIIKKRROOHHUULLLLÁÁMM++GGRRIILLLL FFUUNNKKCCIIÓÓ .. .. .. .. .. .. .. .. ..8877
CCSSAAKK GGRRIILLLL FFUUNNKKCCIIÓÓ .. .. .. .. .. .. .. .. .. .. .. .. .. .. .. .. .. .. .. .. .. .. .. .. .. .. ..8899
KKAARRBBAANNTTAARRTTÁÁSS ÉÉSS TTIISSZZTTÍÍTTÁÁSS .. .. .. .. .. .. .. .. .. .. .. .. .. .. .. .. .. .. .. ..9911
éÔËÒ‡ÌË . . . . . . . . . . . . . . . . . . . . . . . . . . . . . . . .3
ä‡Í ‰Ó·ËÚ¸Òfl ̇ËÎÛ˜¯Ëı ÂÁÛθڇÚÓ‚ ÓÚ Ç‡¯ÂÈ ÔÂ˜Ë 92
кВНУПВМ‰‡ˆЛЛ . . . . . . . . . . . . . . . . . . . . . . . . . . .93
нВıМЛ˜ВТНЛВ ‰‡ММ˚В . . . . . . . . . . . . . . . . . . . . . .94
èÓ‰Íβ˜ÂÌË ÔËÚ‡ÌËfl . . . . . . . . . . . . . . . . . . . .94
ìÒÚ‡Ìӂ͇ . . . . . . . . . . . . . . . . . . . . . . . . . . . . . .95
åÓ˘ÌÓÒÚ¸ ÔÂ˜Ë . . . . . . . . . . . . . . . . . . . . . . . . . .95
éÔËÒ‡ÌËÂ Ë Ì‡Á̇˜ÂÌË ӄ‡ÌÓ‚ ÛÔ‡‚ÎÂÌËfl . . .96
иЛМ‡‰ОВКМУТЪЛ ФВ˜Л . . . . . . . . . . . . . . . . . . . . .96
аТФУО¸БЫВП‡fl ФУТЫ‰‡ . . . . . . . . . . . . . . . . . . . . .97
кВНУПВМ‰‡ˆЛЛ ФУ Ф‡‚ЛО¸МУПЫ ЛТФУО¸БУ‚‡МЛ˛ ФВ˜Л 98
îÛÌ͈Ëfl “ÚÓθÍÓ ÏËÍÓ‚ÓÎÌ˚” . . . . . . . . . . . . . .99
й‰МУ‚ВПВММ‡fl „УЪУ‚Н‡ 2 ·О˛‰ . . . . . . . . . . . .100
äÓÏ·ËÌËÓ‚‡Ì̇fl ÙÛÌ͈Ëfl “ÏËÍÓ‚ÓÎÌ˚ + „Ëθ”109
îÛÌ͈Ëfl “ÚÓθÍÓ „Ëθ” . . . . . . . . . . . . . . . . . . .111
уЛТЪН‡ Л ЫıУ‰ . . . . . . . . . . . . . . . . . . . . . . . . . .113
TTAARRTTAALLOOMMJJEEGGYYZZÉÉKK HH
éé ÉÉ ãã ÄÄ ÇÇ ãã ÖÖ çç àà ÖÖ SS UU
POPIS
.. .. .. .. .. .. .. .. .. .. .. .. .. .. .. .. .. .. .. .. .. .. .. .. .. .. .. .. .. .. .. .. .. .. .. .. .. .. .. .. .. .. .. ..33
J
AK CO NEJLÉPE VYUÏÍT MIKROVLNNOU TROUBU
.. .. .. .. .. .. .. .. .. .. .. .. .. .. ..111144
U
POZORNÛNÍ
.. .. .. .. .. .. .. .. .. .. .. .. .. .. .. .. .. .. .. .. .. .. .. .. .. .. .. .. .. .. .. .. .. .. .. ..111155
T
ECHNICKÉ ÚDAJE
.. .. .. .. .. .. .. .. .. .. .. .. .. .. .. .. .. .. .. .. .. .. .. .. .. .. .. .. .. .. .. .. .. ..111166
E
LEKTRICKÉ NAPOJENÍ
.. .. .. .. .. .. .. .. .. .. .. .. .. .. .. .. .. .. .. .. .. .. .. .. .. .. .. .. .. .. ..111166
I
NSTALACE
.. .. .. .. .. .. .. .. .. .. .. .. .. .. .. .. .. .. .. .. .. .. .. .. .. .. .. .. .. .. .. .. .. .. .. .. .. ..111177
V˘
KON
.. .. .. .. .. .. .. .. .. .. .. .. .. .. .. .. .. .. .. .. .. .. .. .. .. .. .. .. .. .. .. .. .. .. .. .. .. .. ..111177
P
OPIS A UÏITÍ OVLADAÃÛ
.. .. .. .. .. .. .. .. .. .. .. .. .. .. .. .. .. .. .. .. .. .. .. .. .. .. .. .. ..111188
V
YBAVENOST PfiÍSLU‰ENSTVÍM
.. .. .. .. .. .. .. .. .. .. .. .. .. .. .. .. .. .. .. .. .. .. .. .. .. .. ..111188
V
HODNÉ NÁDOBÍ
.. .. .. .. .. .. .. .. .. .. .. .. .. .. .. .. .. .. .. .. .. .. .. .. .. .. .. .. .. .. .. .. .. ..111199
R
ADYKUÏÍVÁNÍ MIKROVLN
.. .. .. .. .. .. .. .. .. .. .. .. .. .. .. .. .. .. .. .. .. .. .. .. .. .. .. ..112200
S
AMOSTATNÁ FUNKCE MIKROVLN
.. .. .. .. .. .. .. .. .. .. .. .. .. .. .. .. .. .. .. .. .. .. .. ..112211
V
AfiENÍ SOUÃASNÛ VE DVOU POSCHODÍCH
.. .. .. .. .. .. .. .. .. .. .. .. .. .. .. .. .. ..112222
K
OMBINOVANÁ FUNKCE MIKROVLNY + GRIL
.. .. .. .. .. .. .. .. .. .. .. .. .. .. .. .. ..113311
S
AMOSTATNÁ FUNKCE GRILU
.. .. .. .. .. .. .. .. .. .. .. .. .. .. .. .. .. .. .. .. .. .. .. .. .. .. ..113333
Ú
DRÏBA A ÃI‰TÛNÍ
.. .. .. .. .. .. .. .. .. .. .. .. .. .. .. .. .. .. .. .. .. .. .. .. .. .. .. .. .. .. .. .. ..113355
NÁVOD K POUÏITÍ
CCZZ
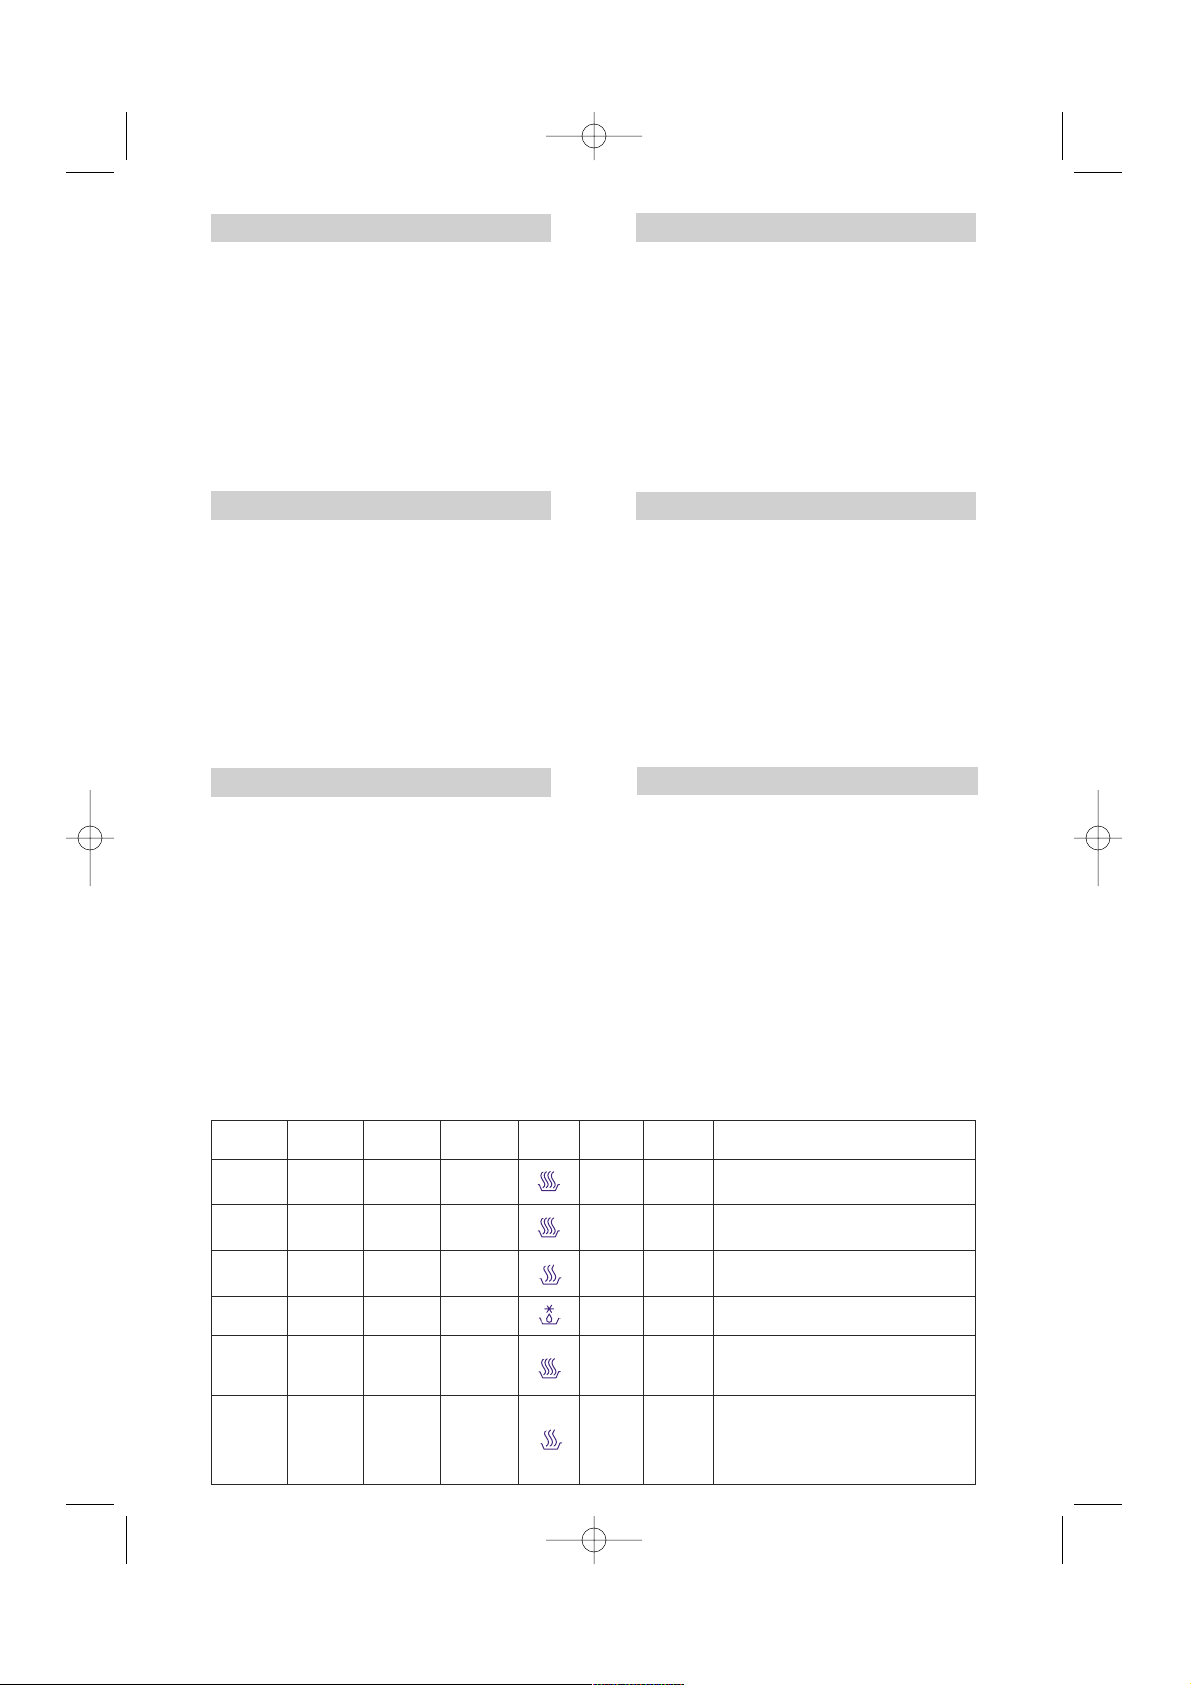
Data and instruction for Performance Tests according to IEC 705 and further Amendment Document 59H/69/CD
The International Electrotechnical Commission SC 59H, has developed a Standard for comparative testing of heating performances
of microwave ovens. The draft of the new Edition of this standard has been circulated with Document 59H/69/CD, which also
describes the tests marked with (
*
) in this table.
We recommend the following for this oven:
Test Nr. on
standard
Item
Power
level
Weight
Standing
time
A
750 gr
B
475 gr
C
900 gr
Defrosting
500 gr
Duration
Function
Note
Egg
custard
16’
6’
20’
12’
Sponge
cake
Meat loaf
Defrosting
minced meat
only MW
only MW
only MW
only MW
5 min.
5 min.
5 min.
15 min.
The upper surface shall be evaluated after the standing
time. The inner custard evaluation shall be conducted
after two hours.
Use the borosilicate glass container stated in the Standard
(max dia. 210 mm) or a Pyrex® glass container dia. 210
mm, height 50 mm and wall thick. 6mm.
Cover the container with cling film and pierce the film. Use
the rectangular borosilicate glass container stated in the
Standard or the Arcopal® Cat. nr Z1/B8 (01)10460-1
Place the frozen load directly on the turnable (G). Turn
upsidedown the load after half of the defrosting time.
Use the borosilicate glass container stated in the Standard
(max dia. 210 mm) or a Pyrex® glass container dia. 210
mm, height 50 mm and wall thick. 6mm. Put the container
directly on the turnable. Do not preheat the oven.
The following instructions shall be strictly observed for this
type of load: put the chicken in Pyrex® glass container dia.
210 mm, height 50 mm and wall thickness of 6 mm. Pour
1/2 glass of water in the container. put the container directly
on the turnable. Do not use any wire rack or drip tray. Turn
upsidedown the load after half of the cooking time.
D (
*
)
F (
*
)
Potato
gratin
Poultry
23’
40’
comby
Mw + grill
(simult.)
comby
Mw + grill
(simult.)
1100 gr
1200 gr
5 min.
5 min.
MW600GB 15-10-2001 13:57 Pagina 2
Page 3
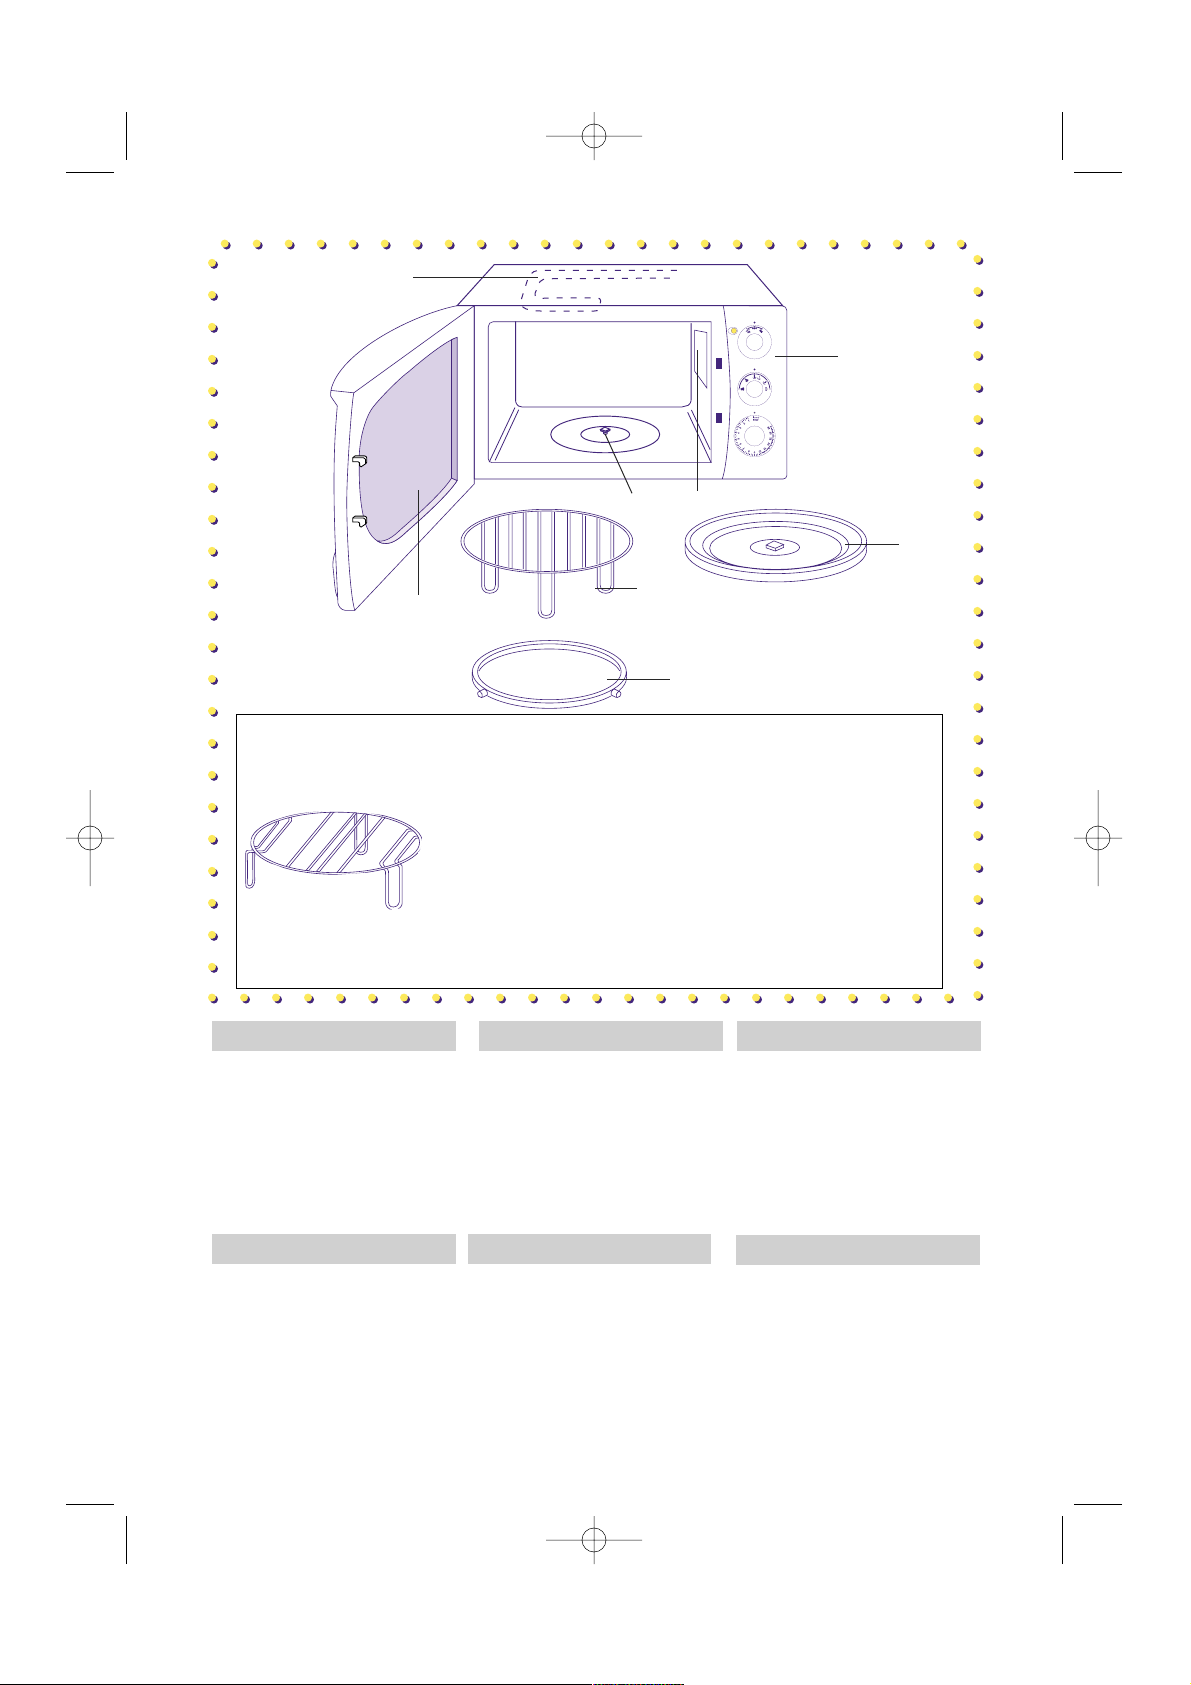
DESCRIPTION GGBB
A
Heating element
B Control panel
C Microwave outlet cover
D Turntable spindle
E Interior door side
F Wire rack
G Turntable
H Turntable support
¶EPI°PAºH GGRR
A
AÓÙ›ÛÙ·ÛË
B XВИЪИЫЩ‹ЪИ·
C K·¿ÎÈ ÂÍÞ‰Ôù МИОЪФОùÌ¿ÙˆÓ
D AÍÔÓ·˜ ВЪИЫЩЪВКÞÌ. È¿ÙÔù
E EЫˆЩВЪИО‹ ÏÂùÚ¿ ÞÚÙ·˜
F ™¯¿Ú·
G ¶ВЪИЫЩЪВКÞÌÂÓÔ È¿ÙÔ
H ™Ù‹ÚÈÁÌ· ВЪИЫЩЪВК. È¿ÙÔù
LLEEÍÍRRÁÁSS
HH
AA
GrillcsŒ
BB
Kapcsolótábla
CC
Mikrohullám kijövetel fedele
DD
Forgótányér tengelye
EE
Ajtó belsŒ oldala
FF
Rács
GG
Forgótányér
HH
Forgótányér tartója
ééèèààëëÄÄççààÖÖ
SSUU
AA
燄‚‡ЪВО¸М˚И ˝ОВПВМЪ
BB
è‡ÌÂθ ÛÔ‡‚ÎÂÌËfl
CC
ä˚¯Í‡ ‰Îfl ‚˚ıÓ‰‡ ÏËÍÓ‚ÓÎÌ
DD
éÒ¸ ‚‡˘‡˛˘ÂÈÒfl Ú‡ÂÎÍË
EE
ÇÌÛÚÂÌÌflfl ÒÚÓÓ̇ ‰‚ˆ˚
FF
ê¯fiÚ͇
GG
LJ˘‡˛˘‡flÒfl Ú‡ÂÎ͇
HH
éÔÓ‡ ‚‡˘‡˛˘ÂÈÒfl Ú‡ÂÎÍË
A
B
D
E
F
H
G
C
Some models have a seperator or low spacer rack that makes it possible to cook two food
dishes at the same time (simultaneous insertion of two plates or pans). Consult the instructions
given on page 12
Alguns modelos possuem a grelha distanciadora baixa que permite a coze dura simultânea de
dois alimentos (colocação simultânea de dois recipientes/pratos). Seguir as instruções à pág. 34
™В МВЪИО¿ МФУЩ¤П· ù¿Ú¯ÂÈ ÌÈ· ¯·ÌËÏ‹ Û¯¿Ú· Ôù ÂÈÙÚ¤ÂÈ ÙÔ Ù·ùÙÞ¯ÚÔÓÔ Ì·Á›ÚÂÌ· ‰‡Ô
К·БЛЩТУ (Щ·ùÙÞ¯ÚÔÓË ÂÈÛ·ÁˆÁ‹ ‰‡Ô ÛÎÂùÒÓ/ È¿ÙˆÓ). BϤ ÙȘ Ô‰ËÁ›Â˜ Ù˘ ÛÂÏ. 55.
EEggyyeess mmooddeelllleekkhheezz eeggyy aallaaccssoonnyy ttáávvoollssáággttaarrttóó rrááccss
is mellékelve van, mely
segítségével két étel együttes elkészítése lehetséges (két edényt/tányért tehet be
egyszerre). Olvassa el a 78 oldalon leírt utasítást.
ççÂÂÍÍÓÓÚÚÓÓ˚˚ ÏÏÓÓ‰‰ÂÂÎÎËË
ËϲÚ
‡‡ÁÁ‰‰ÂÂÎÎËËÚÚÂÂÎθ¸ÌÌÛÛ˛˛ ÔÔÓÓ‰‰ÒÒÚÚ‡‡‚‚ÍÍÛÛ
, НУЪУ‡fl ФУБ‚УОflВЪ
У‰МУ‚ВПВММУ „УЪУ‚ЛЪ¸ ‰‚‡ ·О˛‰‡ (У‰МУ‚ВПВММУВ ФУПВ˘ВМЛВ ‚ ФВ˜¸ ‰‚Ыı
НУМЪВИМВУ‚/Ъ‡ВОУН). аМТЪЫНˆЛЛ ФЛ‚У‰flЪТfl М‡ ТЪ‡МЛˆ‡ı 100.
Nûkteré modely jsou vybaveny oddûlovací nízkou mfiíÏkou, která umoÏÀuje vafiení
dvou jídel zároveÀ (souãasn˘m vloÏením dvou talífiÛ/misek s jídlem. Odkazy v instrukcích
na str. 122.
DESCRIÇÃO PP
A
Resistência do grill
B Painel de comandos
C Tampa de saída das microondas
D Pino do prato rotativo
E Lado interno da por ta
F Suporte metálico
G Prato rotativo
H Base do prato rotativo
AA
Gril
BB
Ovládací panel
CC
Kryt mikrovlnného zdroje
DD
âep otoãného talífie
EE
Vnitfiní strana dvífiek
FF
Spodní grilovací ro‰t
GG
Otoãn˘ talífi
HH
PodloÏka otoãného talífie
POPIS CCZZ
MW600GB 15-10-2001 13:57 Pagina 3
Page 4

4
HOW TO GET THE BEST RESULTS FROM YOUR OVEN
What function should I
choose?
Use Instr.
page
Amt. &
time chart
page
What do I want to do?
Microwave only
• Defrost
Microwave only
• Soften chocolate & icing
• Melt butter and soften cheese
• Heat pastry goods
Microwave only
• Cook stew, chicken breasts
Microwave only
• Cook fruit, vegetables, rice,
soup, fish
• Heat up all types of ready
cooked or frozen food
• Quickly make all kinds of
roasts, poultry, skewered
meats, potatoes
• Au gratin dishes (e.g.,
lasagne, vegetables au gratin,
macaroni)
Combined microwave + grill
Grill only
• Grill hamburgers, chops,
frankfurters, sausages, toast,
etc. in a “traditional” way
Microwave only
14
11
14
11
14
16
20
14
18
14
18
16
21
22
23
24
15
15
17
20
19
19
17
22
24
• Keep food warm
Power
level
Power
level
Power
level
or
Power
level
Power
level
MICROWAVE
MICROWAVE
+ GRILL
GB
• Defrost, reheat, cook on two
levels at the same time
Microwave only with low
SPACER WIRE RACK (Not with
all models)
2
1
MICROWAVE
12 13
85 w
125 w
300 w
425 w
600 w
850 w
MW600GB 15-10-2001 13:57 Pagina 4
Page 5
5
Before beginning to use this oven, read this important information to
obtain the best possible result.
1) This oven has been designed to thaw, heat up and cook foods at home. It must not be used for
other purposes and must not be altered or tampered with in any way.
2) Before connecting this oven to your electrical system, check to be certain
that the door closes tightly. Also check to see that the metal frame is not
warped and that the hinges and hooks have not loosened. In the event
that these parts have been damaged, the microwave oven cannot be
used until a qualified technician (trained by the manufacturer or by its
Customer Service) has made the necessar y repairs.
3) Do not try to make the oven operate while the door is open by tampering
with the safety devices.
4) Do not operate this oven if objects of any type whatsoever get caught
between the front of the oven and the oven door. Also keep the inside of
the door (E) completely clean by using a damp cloth and non-abrasive
detergent. Do not let dirt or food residue build up between the front of
the oven and the oven door.
5) Do not operate the oven if its electrical power cable or plug are damaged
(because there is the danger of electric shocks).
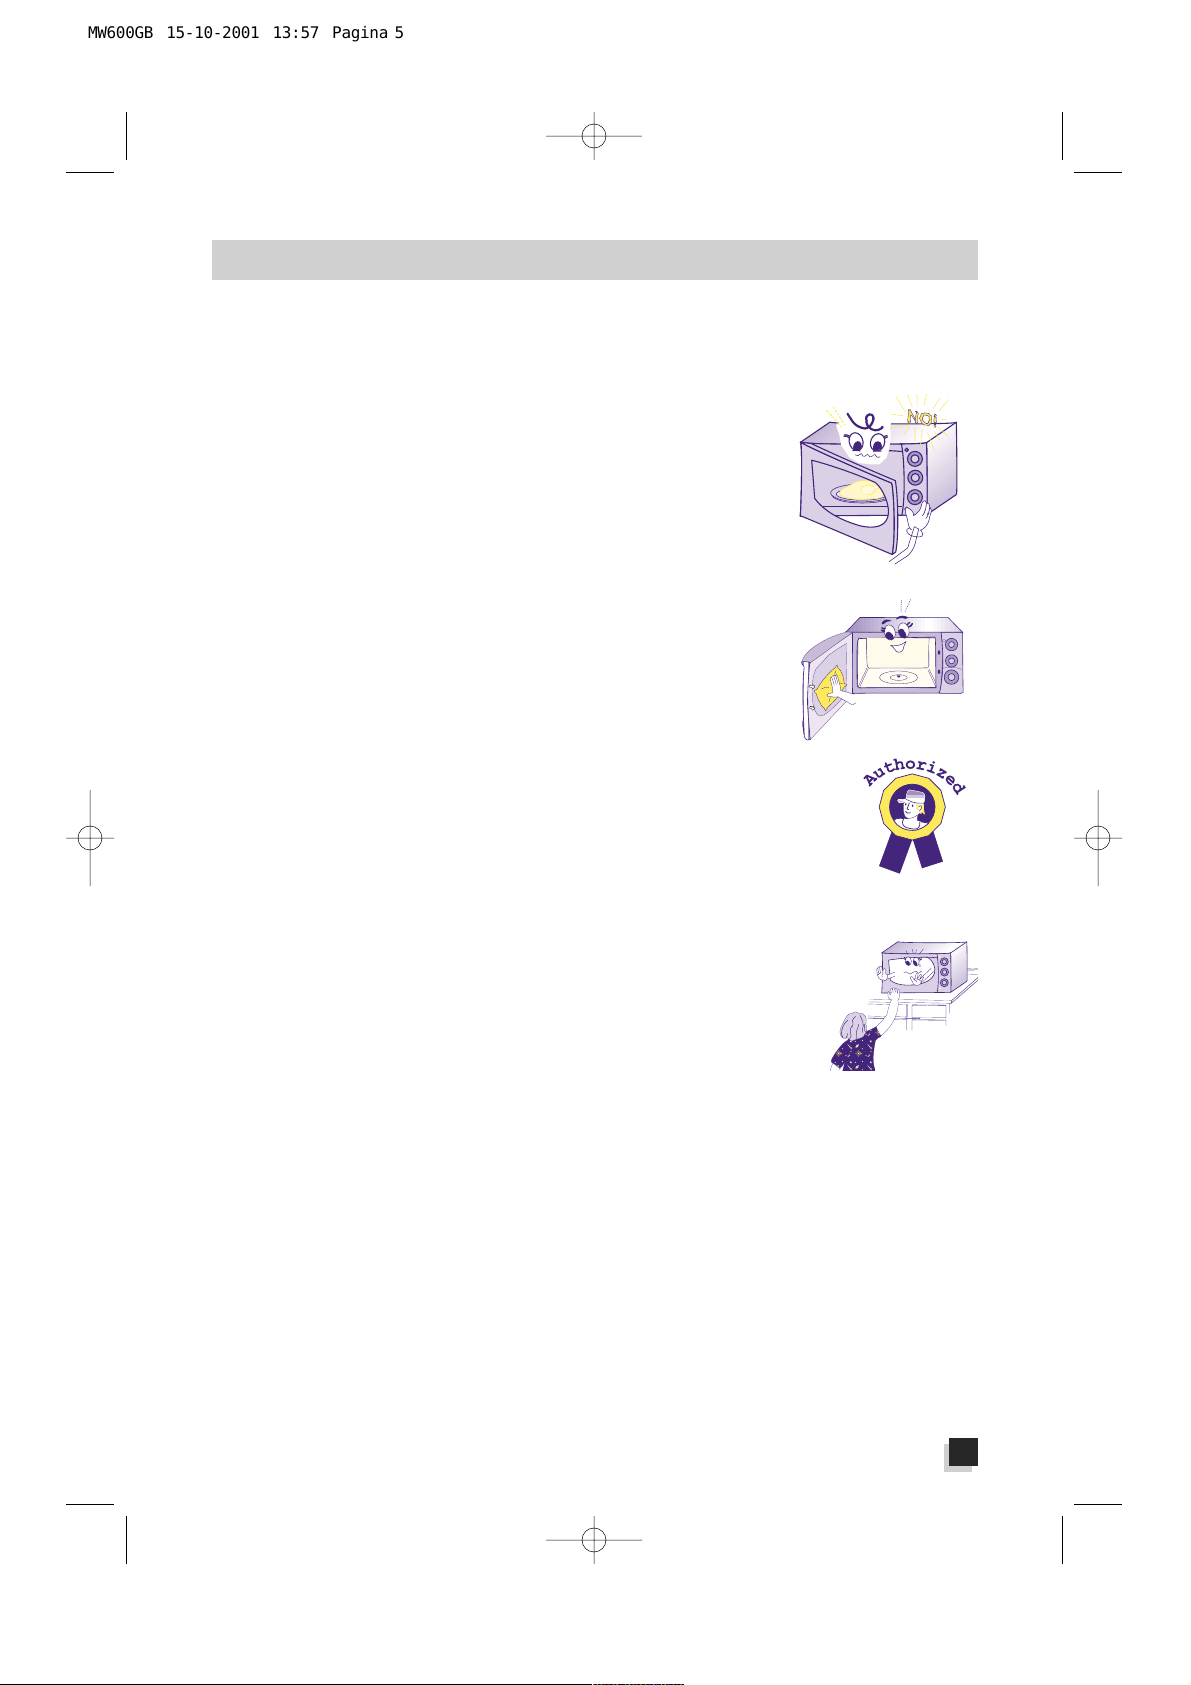
6) Adjustments, repairs and replacement of the power cable must be carried out
only by technicians trained by the manufacturer or by one of the latter’s
Technical Service Centres. Repair work performed by non-professional or
unqualified individuals can be inherently dangerous.
7) If you should see smoke coming out of the oven, DO NOT OPEN THE
OVEN DOOR. Instead, immediately turn the oven off or pull the plug from
its electric socket.
8) This oven must be used only by adults. Never allow small children to
approach the oven when it is operating (because they may burn
themselves).
9) When cooking “Only MICROWAVE” and “COMBINED WITH MICROWAVE”, you absolutely
must not pre-heat the oven (without foodstuffs in it) and you must not operate it when it is
empty, because you might cause sparking.
10)Never place the turntable in water after it has been heated for a long time. The high thermal
shock resulting would break the turntable.
11)Before using this oven, check to be certain that the utensils and containers chosen are suitable for
microwave oven use (see the section on “Glassware and Similar Items”).
12) Look at the oven from time to time when food is heated or cooked in disposable containers of
plastic, paper or other combustible material. Also, small portion of food may become combustible
if over heated.
IMPORTANT SAFEGUARDS
MW600GB 15-10-2001 13:57 Pagina 5
Page 6

6
Connect this equipment only to electrical outlets
having a capacity of at least 13A. Also check to
be certain that the circuit breaker in your home
has a minimum capacity of 13A so as to prevent
it from switching off while your oven is working.
Before using this oven, check to make certain
that the electrical network is the same as that
indicated on the equipment’ s data plate and that
the electrical outlet is connected to an efficient
grounding (earth) terminal. The manufacturer
shall not be responsible in any manner whatsoever for harm or damage caused by failure
to observe this norm.
ELECTRICAL CONNECTIONS
Outer measurements (LxDxH) 515x305x400
Inner measurements (LxDxH) 322x193x322
Oven’s net volume 23 lt.
Approximate weight 21,6 kg.
Turntable diameter 31 cm
Oven light 25 W
For additional data, consult the serial plate
glued to the back of the equipment.
This equipment is in compliance with EEC
Directives 89/336 and 92/31 related to
Electromagnetic Compatibility.
TECHNICAL DATA
13) Do not use recycled kitchen paper as it way contain metal
particles that could cause it to ignite.
14)Do not cook eggs still in their shell. The pressure which might form
inside the shell would make the egg itself explode (even after it has
already been cooked). Never heat up eggs that have already been
cooked (unless such eggs are scrambled).
15) Always pierce sealed container or loosen the lid before heating or cooking food. Other wise the
pressure inside those containers might build up and cause an explosion, even after the food
itself has been cooked.
16)When heating liquids (water, coffee, milk, etc.), you may find that, because of delayed
boiling, the liquid in question may suddenly boil up and spill out when removing the
container scalding to your hand in the process. T o prevent such a situation, you must place a heatresistant plastic spoon or a glass stirrer in the container before starting to heat that liquid.
17)Do not heat up liquor having a high alcohol content or large amounts of oil (because overheating
could cause such substances to burst into flame).
18)Refer to the charts in this instruction manual for the correct heating and cooking times.
19)ALWAYS check the temperature of heated infant food before ser ving it so as to
prevent burning. Always mix or shake the food to distribute the heat.
When using commercially available bottle sterilisers, before turning the oven on,
ALWAYS make sure the container is filled with the quantity of water indicated by the
manufacturer.
• Electrical Connection for UK only . . . . .see page 9
MW600GB 15-10-2001 13:57 Pagina 6
Page 7
7
INSTALLATION
1) After having taken the oven out of its packing case, remove the protective section containing the
turntable (G) and its support (H). Make sure that the turntable spindle (D) is properly inserted in
its housing in the oven, lined up with the middle of the turntable.
2) Wipe the inside clean with a soft, damp cloth.
3) Check to make certain that this equipment has not been damaged in transport and check
especially to see if the door opens and closes correctly.
4) Set the oven on a flat, steady sur face at least 85 cm. above the floor and out of the reach of
small children, because when the oven is operating its door can get very hot.
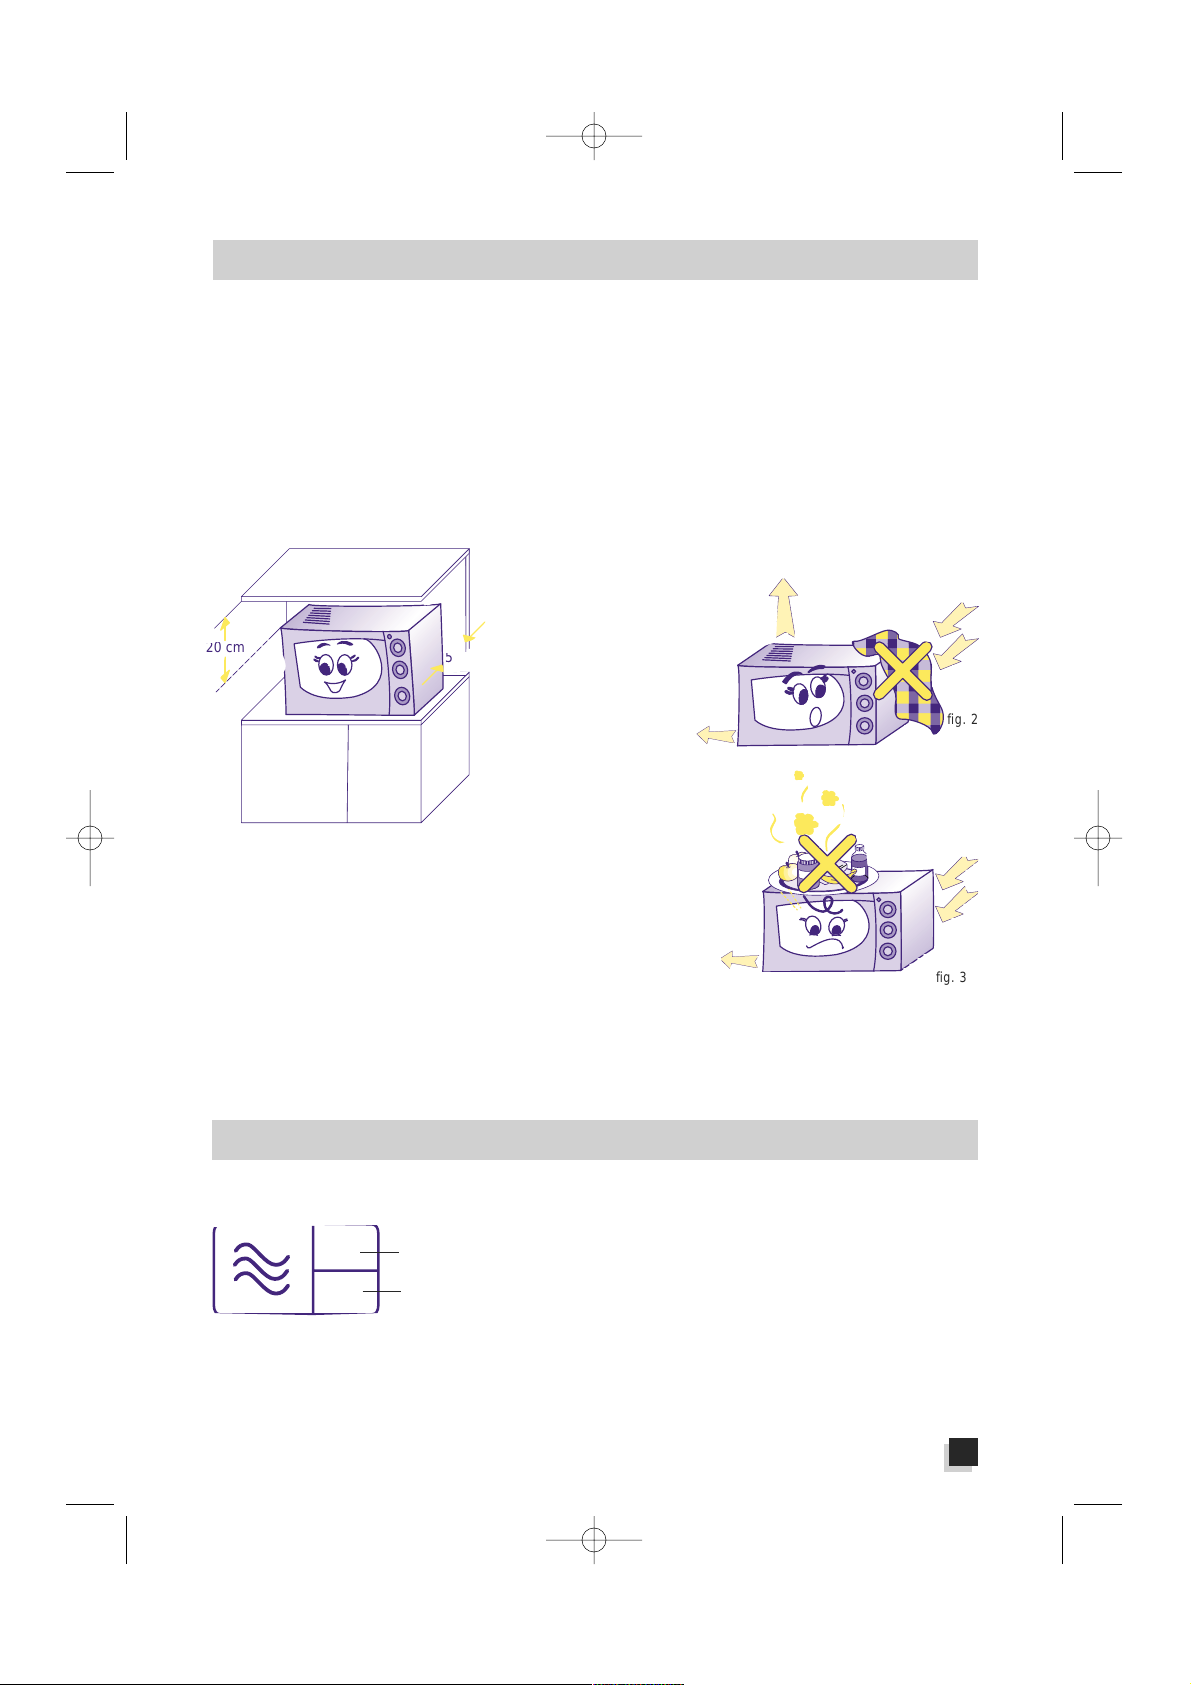
5) After having placed the oven on its work level, make sure that there is still a free space of at
least 5 cm. between the oven’s surfaces and the side as
well as back walls, and a free
space of at least 20 cm.
above the oven (see Fig. 1).
6) Do not block the air intake.
In particular, do not set
anything atop the oven
and check to be
certain that the air outlet
slots (located above, under
and in the back of the
oven) are ALWAYS FREE
from obstruction (see Figs. 2 and 3).
7) Place the suppor t unit (H) in the middle of the circular housing
and set the turntable (G) atop the support. The spindle (D) must
match up perfectly with its housing in the middle of the
turntable.
8) When you turn the oven on for the first time, there may be
an odour of “newness” and a bit of smoke for about ten
minutes. This is completely normal, and it is caused by substances used to protect the heating
elements.
9) Position the appliance so that the plug and the outlet can be easily reached even after installation.
fig. 3
fig. 2
20 cm
5 cm
fig. 1
air outlet
air
intake
air
intake
OUTPUT POWER
air outlet
air outlet
In some models the maximum power yielded in WATTS, is also indicated in
the symbol on the side, shown on the door.
(ONLY FOR U.K.) The letter indicates the heating categor y to which your
oven belongs: some chilled food pre-cooked frozen or chilled give heating
instructions corresponding to the various categories. Follow those instructions related to the category indicated for your oven.
In this oven the maximum power yielded by the microwaves is 850W . This value is shown on the data
plate placed on the back of the appliance, under the heading MICRO OUTPUT.
The levels of intermediate power available are shown on the following page. This information will be
useful for you to consult the prescription pads for microwaves currently on sale.
MW600GB 15-10-2001 13:57 Pagina 7
Page 8
8
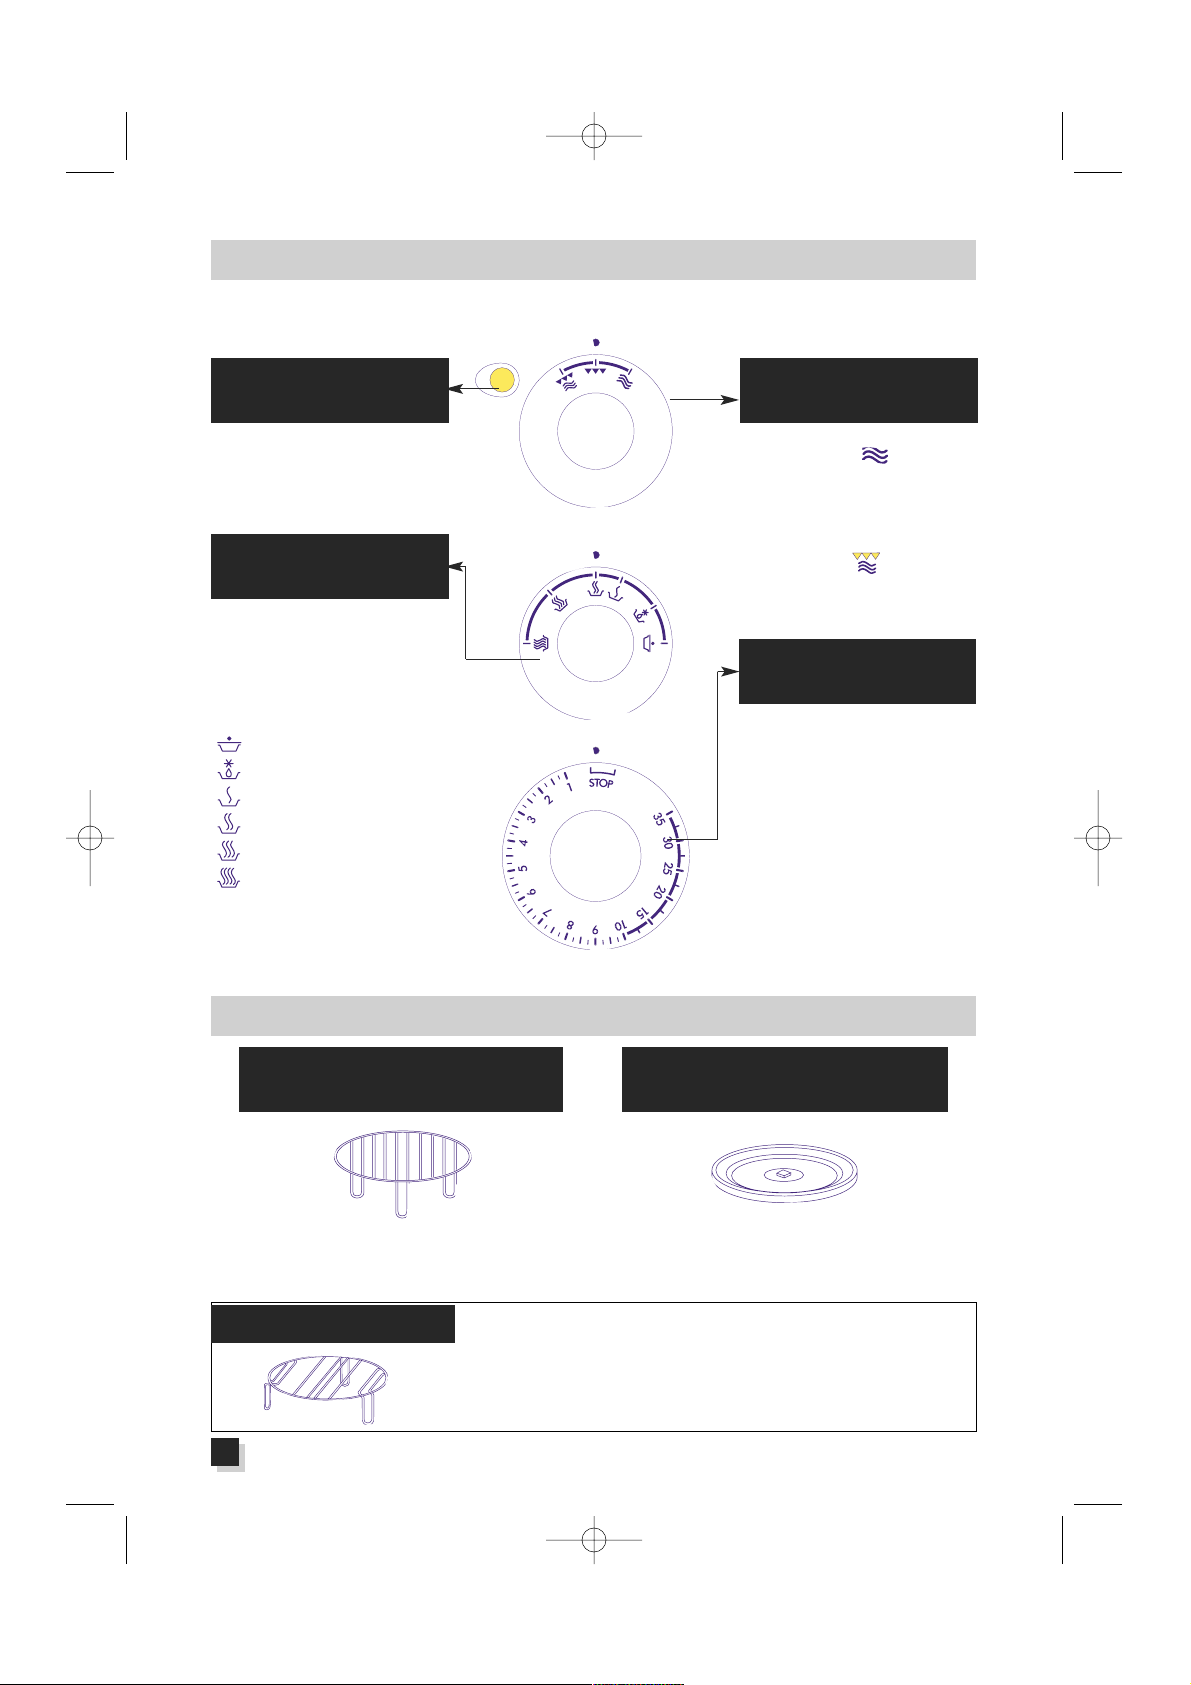
DESCRIPTION AND USE OF THE CONTROLS
WARNING LIGHT: GRILL
Grill only or combined microwave
+ grill:
Stays always lighted
PROGRAMME SELECTOR
KNOB
Microwave only :
Set the knob at .
Grill only:
Set the knob at “
▼▼▼
▼▼▼“.
Combined microwave + grill:
Set the knob at .
MICROWAVE POWER KNOB
Microwave only or combined
microwave + grill:
Turn the knob to the desired power
The available power levels of the
microwaves are the following:
- 85 W
- 125 W
(defrost)
- 300 W
- 425 W
- 600 W
- 850 W
TIMER KNOB
THIS KNOB STARTS ALL THE
COOKING OPERATIONS
Microwave only, Combined
microwave + grill, Grill only:
Turn clockwise from 1 to 35
minutes. Once the set time expires,
the oven will turn off and a buzzer
will sound.
ACCESSORIES PROVIDED
WIRE RACK TURNTABLE
Grill only:
For all types of grilling.
The turntable is used for all the functions.
ONLY WITH SOME MODELS
Microwave-only function
For all types of cooking on two levels AT THE SAME TIME
(e.g., large amounts of food or different foods).
See the instructions on page 12
SPACER WIRE RACK
MW600GB 15-10-2001 13:57 Pagina 8
Page 9

9
You can make use of all types of containers
made of glass (preferably Pyrex), ceramics,
porcelain and glazed pottery as long as they do
not have decorations or metal parts (gilded
borders, handles, feet). Heat resistant plastic
containers can also be used, but only for
“Microwave Only” cooking. If you are still
doubtful about using a particular container, you
can perform a simple test. Place the empty
container in the oven for 30 seconds at
maximum power (“Microwave Only” function).
If the container is still cold or only slightly warm,
it is suitable for microwave cooking.
If it is very hot or gives out sparks, it is not
suitable.
For short heating periods, you may use paper
napkins, cardboard trays and plastic
“throwaway” plates as a base. As far as shape
and size are concerned, it is absolutely essential
that containers be such as to allow the turntable
to rotate.
In order to use large-size rectangular containers
(which may not be able to rotate inside the
cooking cavity), you can remove the spindle (D)
from its housing to prevent the turntable (G)
moving. Bear in mind that to be assured of
good results when carrying this out you must
stir the food and turn the container around
several times during the cooking process.
Containers made of metal, wood, recycled
kitchen paper, cane and plate glass are not
suitable for use in microwave ovens. The metal
rack supplied with your microwave have been
fully tested for safe use. You should remember,
too, that since microwaves heat the food and
not the glassware, earthenware or similar
containers for that food, it is possible to cook
such foods in the serving dish and thereby
avoid the problem of having to clean pans later.
If the oven is used in its grill only functions, any
type of oven container may be used (see chart).
GLASSWARE AND SIMILAR ITEMS
Glass
YES
NO
NO
Pyrex
YES
YES
YES
Ceramic-
glass
YES
YES
YES
Earthen-
ware
YES
YES
YES
Aluminium foil
NO
NO
YES
Plastic
YES
NO
NO
Paper or
cardboard*
YES
NO
NO
Metal
containers
NO
NO
YES
Microwave only
Combined microwave + grill
Grill only
* If the cooking time required is too long, there is a possibility of fire.
WARNING - THIS APPLIANCE MUST BE EARTHED
IMPORTANT
The wires in the mains lead are coloured in accordance with the
following code:
Green and yellow: Earth
Blue: Neutral
Brown: Live
As the colours of the wires in the mains lead may not correspond
with the coloured markings identifying the terminals in your plug,
proceed as follows:
The green and yellow wire must be connected to the terminal in the
plug marked with the letter E or the earth symbol or coloured
green or green and yellow.
The blue wire must be connected to the terminal marked with the
letter N or coloured black.
The brown wire must be connected to the terminal marked with the
letter L or coloured red.
N
E
L
ELECTRICAL CONNECTION (U.K. ONLY)
A) If your appliance comes fitted with a plug, it will incorporate
a 13 Amp fuse. If it does not fit your socket, the plug should
be cut off from the mains lead, and an appropriate plug
fitted, as below.
WARNING: Ver y carefully dispose of the cut off plug after
removing the fuse: do not insert in a 13 Amp socket
elsewhere in the house as this could cause a shock hazard.
With alternative plugs not incorporating a fuse, the circuit must be
protected by a 15 Amp fuse.
If the plug is a moulded-on type, the fuse cover must be refitted when changing the fuse using a 13 Amp Asta approved
fuse to BS 1362. In the event of losing the fuse cover , the plug
must NOT be used until a replacement fuse cover can be
obtained from your nearest electrical dealer. The colour of the
correct replacement fuse cover is that as marked on the base
of the plug.
B) If your appliance is not fitted with a plug, please follow the
instructions provided below:
MW600GB 15-10-2001 13:57 Pagina 9
Page 10

10
1) In order to set cooking times correctly, remember (in referring to the charts on the following pages)
that when you increase the amount of foodstuffs the cooking time must likewise be proportionately
increased and vice-versa. It is important to respect the “standing” times: standing time means that
period during which the food must be left to “rest” after being cooked so as to allow an even
greater spreading of the temperature within. The temperature of meat, for example, will rise about
5°-8° C. (approx. 9°-15° F.) during the standing time. Standing times may be observed either
inside or outside the oven.
2) One of the main things you must do is stir the food where appropriate several times while
it is being cooked. This helps distribute the heat more uniformly and thus shortens the
cooking time.
3) It is also advisable to turn the foodstuff over where appropriate during its cooking process: this applies especially for meat, whether it is in large pieces
(roasts, whole chickens, etc.) or small (chicken breasts, etc.).
4) Foods with a skin, shell or peel (e.g., apples, potatoes, tomatoes,
frankfurters, fish) must be pierced with a fork or sharp knife in several points so as to allow steam to escape and prevent exploding.
(see fig. 4)
5) If you are preparing a large number of por tions of the same food item
(e.g., boiled potatoes), place them in a large dish to allow uniform cooking. (see fig. 5)
6) The lower the temperature at which a foodstuff is placed in a microwave
oven, the longer the cooking time required. Food having a room temperature will cook more quickly than food having a refrigerator temperature.
7) Always cook by placing the food container in the centre of the turntable.
8) It is perfectly normal for condensation to form inside the oven and near the air outlet. T o reduce such
condensation, cover the foodstuffs with clear-film, wax paper , a glass lid or simply an overturned
plate. Foods having a water content (e.g., greens and vegetables) cook better when covered. The
covering of food also helps keep the oven clean on the inside. Make sure when using clear films that
they are suitable for microwave use.
Microwaves consist of electromagnetic radiation
found in nature under the form of light waves
(e.g., sunlight). Inside the oven, these waves
penetrate food from all directions and heat up the
water, fatty and sugar molecules.
Heat is produced very quickly only in the food
itself, whereas the container being used warms
up indirectly by means of heat given off by the
heated food. This prevents food from sticking to
its container , so you can use very little fatty substance or , in some cases, no fat at all during the
cooking process.
Therefore cooking in a microwave oven is considered to be healthy and good for one’s diet.
And in contrast to traditional methods, cooking
in a microwave foodstuffs are less dehydrated,
lose less of their nutritional value, and retain
more of their original flavour.
ADVICE ON THE USE OF MICROWAVE OVENS
fig. 4
Basic rules for microwave cooking
fig. 5
MW600GB 15-10-2001 13:57 Pagina 10
Page 11

11
TURNING THE OVEN ON USING ONLY THE MICROWAVE FUNCTION
1
Place the food in a
container suitable for
microwave cooking and
place it in the centre of
the turntable
3
Choose the power level
you want by turning the
power selector knob.
4
Set the cooking time
desired by turning the
timer knob in a clockwise
direction.
5
Once the set cooking time
has expired, a buzzer
will sound to signal that
your food is ready.
It is possible to interrupt the oven’s operations at any time simply by turning the timer knob to its STOP
setting. You may also change the cooking time (while the cooking itself is in progress) by turning that
same knob back or forth. You can check on the situation while the cooking is in progress by opening
the door and examining the food. That move will interrupt the oven’s operations, but they will begin
again once the door has been closed.
Ding
N.B: You do not have to
pre-heat the oven.
MICROWAVE-ONLY FUNCTION
This function is suitable for:
• Keeping food hot . . . . . . . . . . . . . .page 14
• Defrosting . . . . . . . . . . . . . . . . . . .page 14
• Heating . . . . . . . . . . . . . . . . . . . .
page 16
• Cooking stew, white meats, fruit, vegetables,
rice, soup and fish . . . . . . . . . . . . . . .page 18
• To brown the foods, to bake pastry and fruit
. . . . . . . . . . . . . . . . . . . . . . . . . . . . .page 20
2
Check to make sure that
the programme selector
knob is in position .
MICROWAVE
MW600GB 15-10-2001 13:57 Pagina 11
Page 12

12
By using the low spacer rack with the microwave-only function, you can defrost, reheat and cook
foods at the same time, even different dishes on two levels. The special double-microwave-emission
system makes possible, in fact, a perfect distribution of energy.
When you wish to cook two food dishes at the same time, all you have to do is keep these basic rules
in mind:
1) The cooking times for food dishes cooked at the same time are different from those for the cooking
of single dishes. So always consult the reference table on page 13.
2) Be careful to ALWAYS place on the low SPACER RACK that food which requires less cookig time:
it will thus be easier to remove the upper pan.
Take the grill out and finish cooking the food underneath.
3) Pay strict attention to the indications and recommendations in the tables. In particular , always check to be sure
that the food being reheated is very hot before removing it from the oven.
Only for models provided with a low spacer rack
USE THE MICROWAVE-ONLY FUNCTION WHEN
COOKING ON TWO LEVELS AT THE SAME TIME
MICROWAVE
2
1
MICROWAVE
Potatoes
(above)
Goulash
(below)
24 min
48 min
Times for simultaneous cooking
Potatoes
Goulash
10 - 14 min
35 - 40 min
Cooking times for single dishes
Upper food dish
(less time)
Lower food dish
(more time)
Low spacer rack
Turntable
MW600GB 15-10-2001 13:57 Pagina 12
Page 13

13
Defrosting times
Type
Quantity
(grams)
Knob
power
Minutes
• Ground meat
• Ground meat
• Chicken in pieces
• Stew
• Cauliflower
• Whole fish
• Meat, single serving
•
Vegetables, single serving
• Plate of lasagne
• Plate of lasagne
• Meat, single serving
• Plate of lasagne
• Potatoes
• Potatoes
• Carrots
• Carrots
• Sliced fish
• Zucchini
• Whole fish
• Zucchini
• Whole fish
• Whole fish
• Potatoes
• Goulash
• Rice
• Cabbage
• Peas
• Brussels sprouts
500
500
500
500
450
500
150
250
500
500
150
500
500
500
500
500
400
475
200
475
200
200
500
1500
300
500
500
500
24
24
28
28
26
26
8
8
11
11
8
10
24
24
20
20
15
18
13
17
13
13
24
48
24
24
22
22
Notes
Pan
position
above
below
above
below
above
below
above
below
above
below
above
below
above
below
above
below
above
below
above
below
above
below
above
below
above
below
above
below
Turn the meat over after 15 min. When the
cooking is finished, let the meat sit for 15 min.
During the defrosting, pull the pieces apart. When
the cooking is finished, let the meat sit for 15 min.
At the end, let sit for 5 to 10 min.
At the end, let sit for 5 to 10 min.
Cover the food with plastic wrap
Cover the food with plastic wrap
Cover the food with plastic wrap
Cover the food with plastic wrap
Cover the food with plastic wrap
Cover the food with plastic wrap
Cut in equal-size pieces and cover with plastic wrap.
Cut in equal-size pieces and cover with plastic wrap
.
Cut in equal-size pieces and cover with plastic wrap.
Cut in equal-size pieces and cover with plastic wrap.
Cover with plastic wrap. After 15 min., take out the grill.
Leave whole and cover with plastic wrap.
Cover with plastic wrap. After 13 min., take out the grill.
Leave whole and cover with plastic wrap
Cover with plastic wrap.
Cover with plastic wrap.
Cut in equal-size pieces and cover with plastic wrap.
After 24 min., take out the grill. Stir 2 or 3 times.
Cover with plastic wrap and stir 2 times
Leave whole and cover with plastic wrap
Cover with plastic wrap.
Cover with plastic wrap.
REFERENCE TABLES FOR COOKING ON TWO LEVELS
Tempi di riscaldamento
Type
Quantity
(grams)
Knob
power
Minutes
Notes
Pan
position
Tempi di cottura
Type
Quantity
(grams)
Knob
power
Minutes
Notes
Pan
position
2
1
MICROWAVE
MW600GB 15-10-2001 13:57 Pagina 13
Page 14

14
USING THE MICROWAVE-ONLY FUNCTION FOR DEFROSTING
• Foods frozen in bags or plastic sheeting or in their packaging may be placed directly in the oven,
as long as they have no metal parts (e.g., bands or closure rivets).
• Certain foods, such as greens, vegetables and fish, do not generally require defrosting before you
begin cooking them.
• Stewed foods and meats as well as meat sauces defrost better and quicker if they are stirred from
time to time, turned over or croken cup .
• While defrosting, meat and fish lose their liquid content. It is recommended, therefore, that you
defrost such items in a tray or basin.
• It is advisable to separate each individual piece of meat from its bag before putting it in the
freezer. This will help you save valuable time will preparing foods.
• Be careful about following the timings printed on frozen products, because they are guideline
and may not always be correct. It is best to use defrosting times slightly less than those indicated.
The time needed for defrosting will vary in terms of the degree to which the food has been frozen.
USING THE MICROWAVE-ONLY FUNCTION TO KEEP FOOD HOT
• This function enables you to keep food hot, whether that food be just cooked or re-heated, without
having it get dry or stick to its container.
• Selecting the setting and covering the food with a plate or plastic film, you will find that
foods will remain warm up to serving time
• You can leave foods in their cooking container if they are covered.
MICROWAVE
MW600GB 15-10-2001 13:57 Pagina 14
Page 15

15
Defrosting times
Type Quantity Power knob
Timer knob
(minutes)
Standing time
(minutes)
MEAT
• Roasts (pork, beef, veal, etc.)
• Steaks, cutlets, meat slices
• Stew, goulash
• Ground meat
“
• Hamburger
• Sausages
POULTRY
• Duck, turkey
• Whole chickens
• Cut-up chicken
• Chicken breasts
VEGETABLES
• Cubed eggplant
• Cut-up peppers
• Shelled peas
• Ar tichoke hear ts
• Pieces of asparagus
• Cut-up green beans
• Whole broccoli
• Brussels sprouts
• Cut-up carrots
• Cauliflower tops
• Mixed vegetables
• Cut-up spinach
FISH
• Filleted fish
• Cut-up fish
• Whole fish
• Prawn, shrimps
DAIRY PRODUCTS
• Butter
• Cheese
• Cream
BREAD PRODUCTS
• 2 average-size rolls
• 4 average-size rolls
• Sliced home-style bread
• Whole-wheat bread
FRUIT
• Strawberries, prunes, cherries,
currants, apricots
• Raspberries
• Blackberries
1 kg
200 gr
500 gr
500 gr
250 gr
200 gr
300 gr
1,5 kg
1,5 kg
500 gr
300 gr
500 gr
500 gr
500 gr
300 gr
500 gr
500 gr
500 gr
500 gr
500 gr
450 gr
300 gr
300 gr
300 gr
400 gr
500 gr
400 gr
250 gr
250 gr
200 ml
150 gr
300 gr
250 gr
250 gr
500 gr
300 gr
250 gr
“
“
“
“
“
“
“
“
“
“
“
“
“
“
“
“
“
“
“
“
“
“
“
“
“
“
“
“
“
“
“
“
“
“
“
“
25 - 28
6 - 8
14 - 16
11 - 13
5 - 7
7 - 9
9 - 11
35 - 40
35 - 40
14 - 16
13 - 15
16 - 19
15 - 18
12 - 15
9 - 11
14 - 16
15 - 18
15 - 17
15 - 17
14 - 16
13 - 15
8 - 10
9 - 11
9 - 11
10 - 12
13 - 15
10 - 12
5 - 7
6 - 8
8 - 10
1 - 2
4 - 6
4 - 6
4 - 6
12 - 14
8 - 10
6 - 8
Notes
20
5
10
15
10
10
10
20
20
10
10
5
5
5
5
5
5
5
5
5
5
5
5
7
7
7
7
10
15
5
3
3
3
3
10
10
6
Remove the aluminium
paper and metal pieces.
Partially defrosted. Needs
the standing time.
Cream is to be removed
from its container and put
on a plate.
Put the bread directly on the
turntable
Mix 2 or 3 times
Mix 2 or 3 times
Mix 2 or 3 times
At the end of the rest period, wash under hot water
to remove possible ice
To make defrosting easier,
stir the vegetables from
time to time
MICROWAVE
NOTE: heck to make sure that the programme selector knob is in position .
(*)
(
*
) These indications are suitable for carrying out the mincemeat defrosting test in accordance with
IEC regulation 705, par. 18.3.
Turn the load upside-down halfway through the time set. The load should rest directly on the
rotating plate. Further indications, also regarding other performance tests in accordance with IEC
regulation 705, are shown in the table on page 2
Fish is better cook from
frozen if it does not require
further preparation.
MW600GB 15-10-2001 13:57 Pagina 15
Page 16

16
Heating food in a microwave oven is much quicker and energy efficient than traditional methods.
• We recommend that you heat foodstuffs (especially if they are frozen)
to a temperature of at least 70° C. (it must be piping hot!). Leave to
stand for a few minutes as you will not be able to eat that food immediately because it will be too hot.
• This will ensure that any possible bacteria present in food will have
been killed.
• To heat pre-cooked or frozen foods, follow these rules:
- remove the food from its metal containers;
- cover it with plastic wrap (the clear-film type suitable for microwave ovens) or wax paper; in
this way , all the food’s natural flavour will be preserved and the oven will stay cleaner; you may
also cover the food with an upside-down plate;
- if possible, stir or turn the food over frequently so as to speed up the heating process and keep
the heat uniform at the same time;
- follow the cooking times listed with great caution; remember that under certain conditions the
timings given must be lengthened
• Frozen foods must be defrosted before the heating process begins. The lower the food’s initial temperature, the longer the time needed for heating.
• Foodstuffs and drinks may be heated briefly in paper or plastic containers. In any event, however, such containers may become misshapen if the heating time is too long.
USING THE MICROWAVE-ONLY FUNCTION FOR RE-HEATING
MICROWAVE
MW600GB 15-10-2001 13:57 Pagina 16
Page 17

17
Heating times
SOFTENING FOOD
• Chocolate/icing
• Butter
• Yoghurt
• Baby’s bottle
• Packet of lasagne or of
pasta with filling
• Packet of meat with and/or
vegetables
• Packet of fish and/or
vegetables
• Plate of meat and/or
vegetables
• plate of pasta, cannelloni or
lasagne
• Plate of fish and/or rice
• Packet of lasagne or of
pasta with filling
• Packet of meat with rice
and/or vegetables
• Packet of fish and/or precooked vegetables
• Packet of fish and/or raw
vegetables
• Por tion of meat and/or
vegetables
• Por tion of pasta, cannelloni
or lasagne
• Por tion of fish and/or rice
• 1 cup of water
• 1 cup of milk
• 1 cup of cof fee
• 1 plate of broth
• 1 cup of water
• 1 cup of milk
• 1 cup of cof fee
• 1 plate of broth
100 gr
50 -70 gr
125 gr
240 gr
400 gr
400 gr
300 gr
400 gr
400 gr
300 gr
400 gr
400 gr
300 gr
300 gr
400 gr
400 gr
300 gr
180 cc
150 cc
100 cc
300 cc
180 cc
150 cc
100 cc
300 cc
4 - 5
0.5-0.10
0.15-0.20
0.30-0.35
4 - 6
4 - 6
3 - 5
5 - 7
5 - 7
4 - 6
6 - 8
5 - 7
3 - 5
8 - 10
6 - 8
7 - 9
4 - 6
2 - 2.30
1.30 - 2
1.30 - 2
4 - 5
1.30 - 2
1 - 1.30
1 - 1.30
3 - 4
Put on a plate. Mix the icing once.
Remove metal foil
Heat the baby’s bottle without the teat
and mix it immediately after heating to
make the temperature uniform. Check the
temperature of the contents before use.
With milk at room temperature the heating
time is lower. To avoid risk of fire when
using dried milk please stir evenly. Please
use already sterilized milk.
Packets of any kind of commercially
available pre-cooked food, to be
heated to a temp. of 70° C. Remove
the food from any rice metal packets
and put it directly onto the plate from
which it is to be eaten. For best
results, always cover the food.
Portions of any kind of already cooked
food, to heat to a temp. of 70°C. The food
is placed directly onto the plate from
which it is to be eaten and is always
covered either with a transparent film or
with an upturned plate.
Packets of any kind of commercially
available pre-cooked frozen food, to be
heated to a temp. of 70° C directly in its
packet. Remove the food from any metal
containers and put it directly onto the plate
from which it is to be eaten, increasing
cooking time by a few minutes.
Remove the raw food from the packets and
place it in a container suitable for
microwaves and cover.
Portions of any kind of already cooked
frozen food, to be heated to a temperature
of 70°C. Place the frozen food in the plate
from which it is to be eaten and cover it
with another upturned plate or pyrex dish.
Check that it is hot in the centre; where
possible, mix the food.
All the drinks should be mixed after being
heated to make the temperature uniform.
For the broth we recommend covering it
with an upturned plate.
All the drinks should be mixed after being
heated to make the temperature uniform.
For the broth we recommend covering it
with an upturned plate.
Type Quantity
power
level
times
(minuts)
Notes
Function
MW
“
“
“
“
“
“
“
“
“
“
“
“
“
“
“
“
“
“
“
“
“
“
“
“
“
“
“
“
“
“
“
“
“
“
“
“
“
“
“
“
“
“
“
MICROWAVE
CHILLED FOOD (INITIAL TEMP. 5/8°C) UP TO 20/30°C
CHILLED PRECOOKED FOOD (INITIAL TEMP. 5/8°C) UP TO APPROX. 70° C
FROZEN FOOD TO REHEAT/COOK (INITIAL TEMP. -18°/-20°C) UP TO APPROX. 70° C
CHILLED DRINKS (INITIAL TEMP. 5°/8° C) UP TO APPROX. 70°C
DRINKS A T ROOM TEMPERATURE (INITIAL TEMP. 20°/30°C) UP TO APPROX. 70°C
MW600GB 15-10-2001 13:57 Pagina 17
Page 18

18
GREENS AND VEGETABLES
Greens and vegetables cooked in a microwave oven retain more of their colour and nutritional value
than when cooked in traditional ovens. Before cooking greens and vegetables, wash and clean them.
Larger-sized varieties of this category are to be cut up into uniform pieces.
Per every 500 gr. of greens or vegetables add about 5 teaspoons of water (fibre-type vegetables need
more water).
Greens and vegetables must always be covered with plastic wrap.
Stir greens and vegetables at least once at the halfway point. Add a little salt only at the end.
MEATS
When using the microwave-only function to cook meat, you should cover the meat with plastic wrap
made for microwave oven use; in this way, the heat is distributed better and you will prevent the loss
of juices that often leads to dried-up and stringy meat. This oven function is suitable for making stews,
goulash, chicken breasts, etc. To prepare roasts and skewered meat dishes (among others), you must
use the combined function.
FISH
In a microwave oven, fish can be prepared very quickly and with excellent results. You can season it with a little
oil or butter (or not season it at all, if you so prefer). Cover the fish with clear-sheet. The skin is to be slit, of course,
and filleted fish must be placed in a uniform fashion. We recommend that you not use this oven to cook fish which
has been dipped in egg batter.
USING THE MICROWAVE-ONLY FUNCTION FOR COOKING
SOUPS AND RICE
• Soups or broth usually require a smaller amount of liquid because the evaporation in microwave
ovens is rather limited. Because it is a dehydrating agent, salt must be added only when the
cooking is finished or during the standing time.
• It is correct to say that the temperature required for cooking rice in a microwave oven (as is true
also for pasta) is more or less the same as that needed to cook this foodstuff over a burner on a
regular stove. The advantage of preparing a risotto dish in a microwave oven lies in the fact that
you do not have to stir the rice constantly (two or three times is enough).
The ingredients are placed in a container suitable for microwave ovens and covered with plastic
wrap (for about 300 gr. of rice, you need 750 gr. of broth with the oven programmed at top
power for about 12 to 15 minutes). In addition, the rice will not stick to the bottom of its container
and, since it can be cooked in a tureen or some other such receptacle to be brought to the table,
you will not have to transfer that rice to a serving plate.
MICROWAVE
MW600GB 15-10-2001 13:57 Pagina 18
Page 19

19
“
“
“
“
“
“
“
“
“
“
“
“
“
“
“
“
“
“
“
“
“
“
“
“
“
“
300 gr
300 gr
500 gr
250 gr
400 gr
500 gr
500 gr
300 gr
500 gr
500 gr
500 gr
500 gr
500 gr
500 gr
500 gr
500 gr
500 gr
500 gr
500 gr
250 gr
300 gr
500 gr
500 gr
500 gr
500 gr
500 gr
1,5 kg
500 gr
900 gr
5 - 7
7 - 9
8 - 10
5 - 7
7 - 9
7 - 9
9 - 10
11 - 12
11 - 12
7 - 8
7 - 8
7 - 8
7 - 8
9 - 10
11 - 12
7 - 8
6 - 7
6 - 7
6 - 7
5 - 6
6 - 7
10 - 11
12 - 13
9 - 10
8 - 9
7 - 8
35 - 40
13 - 15
19 - 21
2
2
2
2
2
2
4
4
4
4
4
4
4
4
4
4
4
4
4
4
4
4
4
4
4
4
10
3
5
Cover with plastic wrap
Cover with plastic wrap
Cover with plastic wrap
Cover with plastic wrap
Cover with plastic wrap
Cover with plastic wrap
Cut into 2-cm. pieces.
It would be better to use
artichoke bottoms.
Cut into pieces.
Separate into individual
“florets”.
Leave whole.
Leave whole.
Leave whole.
Cut into same-size pieces.
Separate into stalks.
Separate into pieces .
Cut into cubes.
Leave whole.
Leave whole. No water is
needed
Whole, but of the same
size. No water is needed.
Cover after having washed
and drained the leaves.
Cut into quarters.
Cut into pieces.
Cut into same-size pieces.
Leave whole.
Cook covered and stir 2 or
3 times.
T urn over at the halfway point
(*)
Type Quantity Power knob
Timer knob
(minutes)
Notes
Standing time
(minutes)
FISH
• Filleted
• Slices
• Whole
• Whole
• Cut-up fish
• Crayfish
GREENS AND VEGETABLES
• Asparagus
• Artichokes
• Green beans
• Broccoli
• Brussels sprouts
• White cabbage
• Red cabbage
• Carrots
• Cauliflower
• Celery
• Eggplant
• Leek
• Mushrooms
• Onions
• Spinach
• Peas
• Fennel
• Peppers
• Potatoes
• Zucchini
MEATS
• Stew
• Chicken breasts
• Meat loaf
Cooking times
N.B: These cooking times are but approximate and are better determined by the weight as well as
the starting temperature of the foodstuffs and — for greens and vegetables — by the foodstuffs’
consistency and general make-up.
(
*
) These indications are suitable for carrying out the minced meat cooking test in accordance with
IEC regulation 705, test C.
Cover the container with a transparent film for microwave oven, perforated in several places.
Further instructions, also with regard to other performance tests in accordance with IEC regulation
705, are shown in the table on page 2
MICROWAVE
MW600GB 15-10-2001 13:57 Pagina 19
Page 20

20
May be used in combination with any
cream whatsoever
To be filled with jam or jelly.
The pineapple slices can be laid on the
bottom of the pin plate or cut into pieces
and mixed into the dough.
The apples are spread on top as a decorative effect.
Excellent when filled with cream.
Mix with a whisk every 30 seconds
The pears are to be cut into quarters.
The apples are to be cut into pieces.
These indications are suitable for carrying
out the cooking test in accordance with
IEC regulation 705, par. 17.3, test A and
test B respectively. Further instructions,
also with regard to other performance
tests in accordance with IEC regulation
705, are shown in the table on page 2
Nut cake (700 gr)
Viennese torte (850 gr)
Pineapple cake (800 gr)
Apple cake (1000 gr)
Coffee cake (750 gr)
Zabaione
Cooked pears (300 gr)
Cooked apples (300 gr)
Egg custard (750 gr)
Test A
Sponge cake (475 gr)
Test B
“
“
“
“
“
“
“
5
5
5
5
5
3
3
3
5
5
15 - 17
19 - 21
17 - 19
19 - 21
15 - 17
2 - 4
4 - 6
5 - 7
15 - 17
5 - 7
Type/quantity
Power
Selector
Standing time
(minutes)
Observations and advice
Cooking times for baked goods and fruit
Timer
(minutes)
FRUIT AND BAKED GOODS
Baked goods rise (at lower oven power) much more than then do with regular baking. Since no crust
is formed, it is better to garnish the surface portions with cream or icing (e.g., chocolate); in addition,
you must keep the item being baked fully covered, because such foodstuffs tend to dry out more quickly than those baked in a regular oven. Fruit is to be pierced if cooked with its peel on and is to be
kept covered: it is essential that you adhere to the standing time (3 to 5 minutes).
MW600GB 15-10-2001 13:57 Pagina 20
Page 21

21
TURNING ON THE OVEN WITH THE MICROWAVE + GRILL FUNCTION
1
Put the food in a
receptacle made for
microwave cooking and
place it on the turntable.
2
Turn the programme
selector knob in position
to
4
Turn the timer knob to the
temperature you want.
The grill operating light
will come on.
5
Once the set cooking time
has expired, a buzzer
will sound to signal that
your food is ready.
N.B.: The grill operating
light will turn off when the
cooking is finished.
Ding
3
Choose the power level
you want by turning the
power selector knob.
COMBINED MICROWAVE + GRILL FUNCTION
This function is suitable for:
• Quick preparation of roasts, poultry, skewered meat and potatoes. . . . . . . . . . . . .pag 22
• Au gratin dishes (e.g., lasagne, vegetables au gratin, macaroni) . . . . . . . . . . . . .pag. 22
MICROWAVE
+ GRILL
MW600GB 15-10-2001 13:57 Pagina 21
Page 22

22
MICROWAVE
+ GRILL
USING THE COMBINED MICROWAVE + GRILL FUNCTION TO COOK
This setting is ideal for all those dishes which have to be “au gratin” or must be given a certain colour .
You must keep the following in mind.
• Do not spunkle with seasonings in general (use only 1/2 cup of water to keep meat tender).
• Tur n roasts and large cuts of meat over when they are half-cooked.
• If the upper portion seems sufficiently browned before the set time has expired, turn the programme selector knob to position in order to complete the cooking of the foodstuff on the
inside only with microwaves. To check on how the food is cooking, open the oven door. This will
interrupt the microwave operations, but the grill will continue to operate. We recommend, therefore, that you use a pot holder. The door must always be closed again after you have checked the
food being cooked.
• In cooking with the combined grill function, do not pre-heat the oven and do not operate the oven
if there are no foodstuffs in it.
Cooking times
“
“
“
“
“
“
Type Quantity
Power
knob
Timer knob
(minutes)
Notes
Standing time
(minutes)
1100 gr
600 gr
1500 gr
1000 gr
1100 gr
800 gr
1400 gr
1300 gr
750 gr
1000 gr
800 gr
1200 gr
600 gr
1000 gr
1000 gr
1500 gr
“
“
“
“
“
“
“
“
“
“
“
“
“
“
“
11 +
9
14
11
18
20
20
14
30
23
55
20
40
20
40
45
50
5
5
5
5
5
5
5
5
10
5
10
10
10
10
10
10
Programme
selector knob
only
microwave
Times listed are for uncooked
pasta. If pasta is pre-cooked,
use the combined function until
the desired color is obtained.
Avoid excessive melting.
The pasta should first be
partly boiled.
Times listed are for raw cauliflower.
If
raw cauliflower
is
pre-boiled
, use the combined
function until the desired color
is obtained.
The tomatoes should all
be of the same size.
Short wide peppers are best.
The aubergine may first
be fried or grilled.
Stir 2 or 3 times.
(*)
Turn at the halfway point.
Turn after 35’-40’.
Mix together 500 grams of
ground beef, eggs, ham,
bread crumbs, etc.
(**)
T urn at the halfway point.
T urn at the halfway point.
T urn at the halfway point.
T urn at the halfway point
• Lasagne
• Gnocchi alla
romana
• Well-seasoned
macaroni
• Cauliflower in
bechamel sauce
• Tomatoes au gratin
• Stuffed peppers
• Aubergine alla
parmigiana
• Roast potatoes
• Potatoes au gratin
• Roasts (pork, beef)
• Meat loaf
These instructions do not refer
to test C of IEC regulation 705
which is represented in the
table on page 2
• Whole chicken
• Skewered meat
• Lamb
• Turkey (pieces)
• Duck
(*)
These indications are suitable for carrying out the minced meat defrosting test in accordance with IEC
regulation 705, par. 17.3 Test D. Further indications, also regarding other performance tests in accordance
with IEC regulation 705, are shown in the table on page 2
(**)Puncture the skin with a fork to let the fat seep out. These indications are suitable for carr ying out the cooking
tests in accordance with IEC regulation 705, par. 17.3 Test F. Further indications, also regarding other
performance tests in accordance with IEC regulation 705, are shown in the table on page 2
MW600GB 15-10-2001 13:57 Pagina 22
Page 23

23
TURNING THE OVEN ON WITH THE GRILL-ONLY FUNCTION
3
1
Pre-heat the grill as
follows:
Turn the thermostat knob
to the ▼▼▼ setting.
4
2
Set the reheating time
desired by turning the
timer knob in a clockwise
direction.
The grill operating light
will come on. The door
must be kept closed.
After about 5 to 8
minutes, put the food on
the wire rack and place
everything on the
turntable. While the
grilling is in progress, the
turntable will collect all
the escaping fat. Set the
cooking time desired by
turning the timer knob in
a clockwise direction.
GRILL-ONLY FUNCTION
This function is suitable for:
• All types of traditional grilling (e.g., chops,
hamburgers, frankfurters, toast, etc.) . . . . . . . . . . . . . . . . . . . . . .pag. 24
Once the set cooking time
has expired, a buzzer
will sound to signal that
your food is ready.
NOTE: The grill operating
light will turn off when the
cooking is finished.
Ding
MW600GB 15-10-2001 13:57 Pagina 23
Page 24

24
22 - 25
15 - 18
14 - 17
13 - 16
13 - 16
12 - 15
4
▼▼▼
“
“
“
“
“
“
Turn over after 15 minutes.
Must always be pierced. If particularly fatty, the sausages should be cut in
half.
Turn over after 9 minutes.
Turn over after 8 minutes.
Cut in quarters.
Turn over after 8 minutes
Slices one cm. thick. Turn over after 8
minutes.
Slices one cm. thick. Turn over after 8
minutes.
Trim the crusts carefully. Turn over
after 2 minutes.
Type Quantity
Timer knob
(minutes)
Notes
• Veal or pork chops
• Sausages
• Hamburger
• Peppers
•Aubergine (eggplant)
• Zucchini
• Toasted bread
3
3
3
1
4 slices
6 strips
4 slices
Thermostat
knob
Cooking times
USING THE OVEN-GRILL-ONLY FUNCTION FOR GRILLING
By using this function, you can make all kinds of delicious grilled dishes.
Always pre-heat the grill for 5 to 8 minutes before starting the cooking process.
All dishes being prepared must be turned over at the halfway point, to archive even browning.
When you open the door to check the grilling process, the heating element continues to operate:
always be careful to wear padded gloves made for oven use. You must always close the door again
after checking the food.
MW600GB 15-10-2001 13:57 Pagina 24
Page 25

25
CLEANING AND MAINTENANCE
Before beginning any cleaning or maintenance, always pull this oven’s plug from the electrical
outlet and wait for the oven itself to cool down completely
Cleaning
Thanks to the special enamel coating on your oven’s inner compartment,
enamel which does not retain the fatty splashes and food particles which
normally build up inside an oven, it is extremely easy to clean this
appliance. Always keep the microwave outlet cover (C) free of fat or
splashed grease.
Never use abrasive detergents, scouring pads or tools with metal rivets when you clean the oven’s exterior. In addition, be careful not to let
water or liquid detergent seep into the air and steam outlet slots located atop the oven. Do not use ammonia-based detergents. We likewise
recommend that you do not use alcohol, steel wool or abrasive detergents to clean the inside and outside door surfaces in order to avoid
scraches. To ensure perfect closing, always keep the inside of the door
clean, and do not let dirt and food residue get caught between the door
and the oven’s façade.
Clean the air inlet holes located on the back of the oven regularly so that
no dust or dirt will build up over time to obstruct those holes.
From time to time, it will be necessary to remove the turntable (G) and its suppor t
(H) and clean them, just as it will be necessary to clean the bottom of the oven. Wash the turntable and
its support in warm soapy water with neutral soap. These parts may also be cleaned in a
dishwasher. Do not place the turntable in cold water after the oven has been hot for a long time. The
strong thermal shock could cause the turntable to break.
The turntable’s motor is sealed tight. When you are cleaning the bottom of the oven, however, be careful
not to let water seep under the turntable spindle (D).
If something seems not to be working just right .....
If you should discover a flaw or defect, contact a Service Centre authorised by the manufacturer. In
any case, before calling our technicians, you should carry out the following simple checks:
problem cause/remedy
• The oven is not working
• Condensation on the cooking rack and
inside the oven.
• Sparks inside the oven.
• The food is not heating sufficiently
• The food is burning
• The food is not cooking evenly
• The door is not properly closed.
• The plug is not properly inserted in the electric outlet.
• The outlet is not supplying power (check the building’s fuse box).
• The knobs are not set correctly.
• When foods containing water are being cooked, it is completely normal for
the steam generated within the oven to escape and to condense either inside
the oven or on the cooking rack.
• When using the microwave-only and combined functions, do not turn the oven
on unless there is already food inside it.
• When cooking by microwaves, do not use metal containers, bags, or
packages with metal clips.
• Select the correct cooking method or increase the cooking time.
• The food was not completely defrosted before being cooked.
• Use the correct cooking method or lower the cooking time.
• Stir the food while it is being cooked. Remember that foodstuffs cook better
when cut into uniform pieces.
• The turntable is not spinning.
C
In case oven-light is burned, you may continue to use the oven anyway. To replace the light, contact authorised
Assistance.
MW600GB 15-10-2001 13:57 Pagina 25
Page 26

26
MW600GB 15-10-2001 13:57 Pagina 26
 Loading...