


Daewoo DWF-5510 User Manual
INSTRUCTION MANUAL
Model: DWF-5510
=
■SAFETY INSTRUCTIONS &
SPECIFICATIONS ..........................................2
■PARTS DESCRIPTIONS................................3
■DIRECTIONS FOR SAFE USE .....................4
•How To Install.................................................4
•Water Connection..........................................6
•Drain Hose Setting.........................................7
■HOW TO OPERATE .......................................8
• Preparation for Washing ...............................8
• Descriptions of Control Panel.......................9
• General Procedures for Operation .............10
• Guides for Basic Washing Programs .........11
• Guides for Other Useful Programs.............13
■PERIODIC MAINTENANCE ........................14
■
SPECIAL GUIDES FOR REMOVING STAINS ...
16
■TROUBLE SHOOTING GUIDES .................17
TABLE OF CONTENTS
※ PLEASE READ CAREFULLY THIS INSTRUCTION
MANUAL BEFORE USING YOUR WASHER AND
SAVE THIS FOR FUTURE REFERENCE.
※ Your safety is important to us.※
Read all instructions before using your washer.
☞ Do not wash items cleaned, washed, soaked in, or spotted with wax, paint, gasoline, oil, or other flammable
fluids. The fumes can create a fire hazard or explosion.
☞ Flammable fluids (dry-cleaning solvents, kerosene, gasoline, etc.) should not be used or stored in or near
your washer. Do not add flammable fluids to your wash water. These substances give off vapors that can
create a fire hazard or explosion.
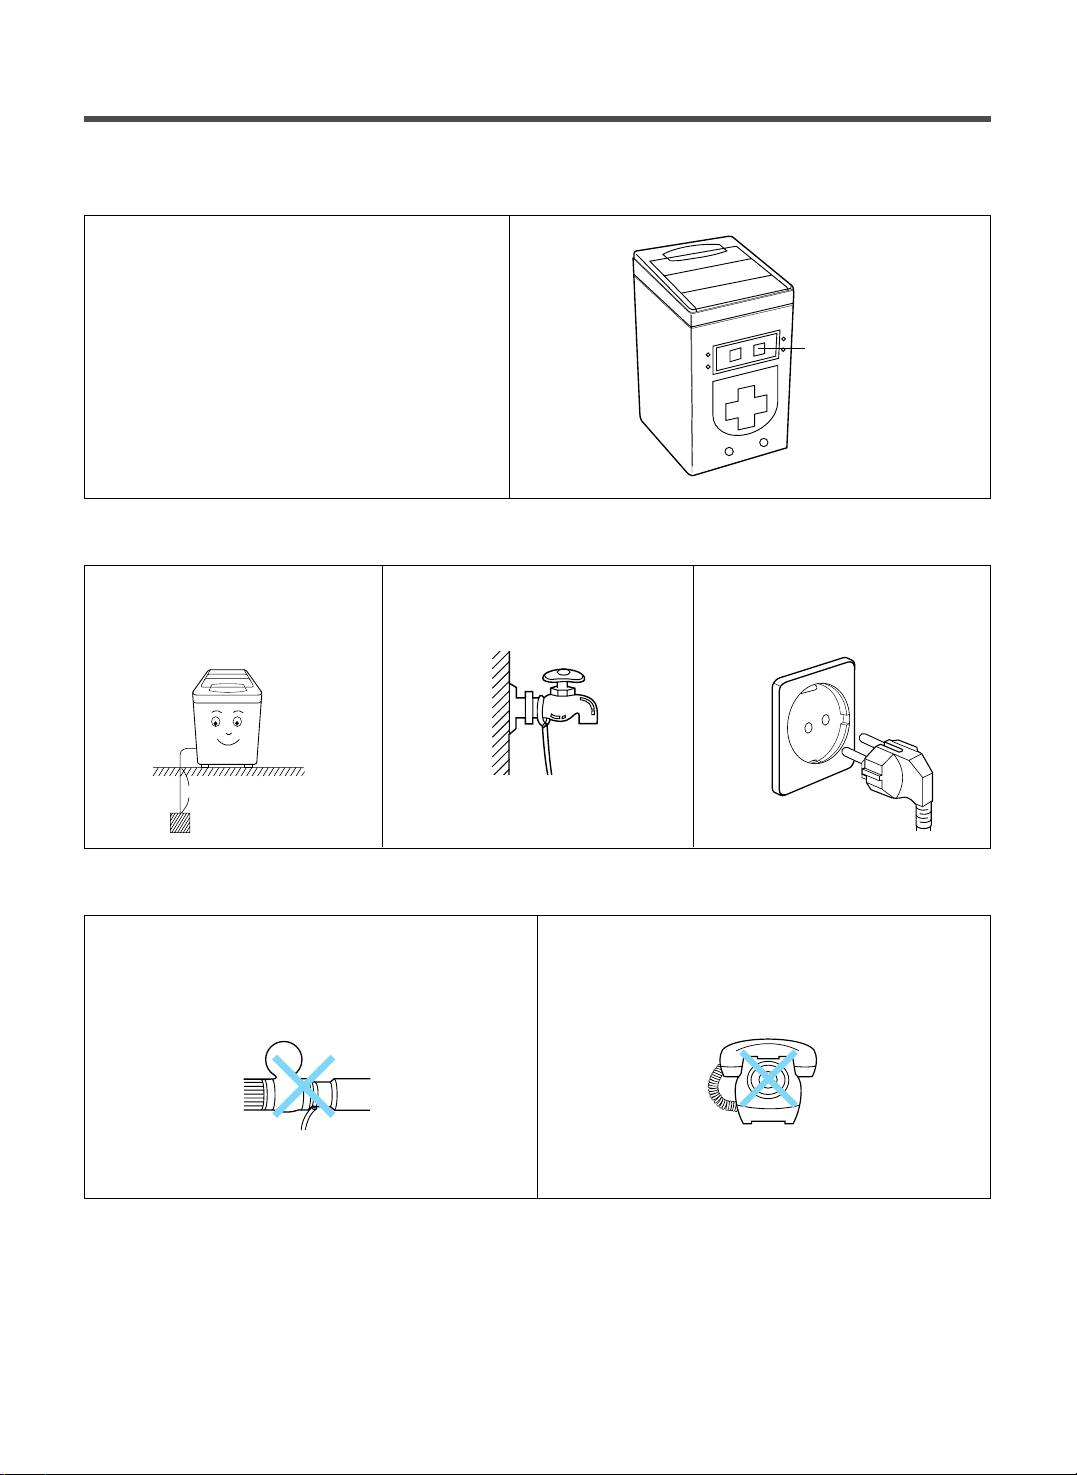
☞ Do not allow children to operate, play with, or crawl on or inside your washer.
Supervise children closely when your washer is used near them.
☞ Do not reach into the wash tub unless
START/HOLD
button is pressed and all motion stops, while spinning.
☞ Do not use chlorine bleach and ammonia or acids (such as vinegar or rust remover) in the same wash.
Hazardous fumes can form.
☞ Unplug power supply cord before attempting to service your washer.
☞ Do not pour water on the control panel.
☞ Remove foreign objects (such as coin, pin, knife, other metallic materials, etc.) inside your wash load.
They may damage any fabric.
☞ Do not overload your washer to avoid poor cleaning, wrinkling and/or any abnormal operation.
SAFETY INSTRUCTIONS & SPECIFICATIONS
2
MODEL NO DWF-5510
Power Source Please refer to the rating label at the back of your washer.
Power Consumption 250W
Width ✕ Depth (mm) 532 ✕ 542
Height (mm) 855
Net Weight (Kg) 32
Maximum Mass of Textile 5.5kg
Material of Internal Tub Recyclable Poly Propylene
Water Consumption Approx. 135 Liters/Cycle
Washing Capacity Please refer to the rating label at the back of your washer.
Washing Program 4 Programs
Water Level High (55 Liters), Medium (45 Liters), Low (31 Liters)
Direction of Inlet Valve Backward
Operating Water Pressure 0.3Kgf/cm
2
~8Kgf/cm2(2.94N/cm2~78.4N/cm2)
Pulsator Provided with 6 Spouting Holes for Powerful Upward Water Stream
1. Air Bubble Generator
Optional Features 2. Reserved Washing with Display for remaining time
3. Signal Buzzer for the Operation of Control Button
Coin Filter Only in Pump Model identified with ‘P’ added to Model No. (e.g., DWF-5510NP)
※ The above specifications and features are subject to change without prior notice.
SAFETY INSTRUCTIONS
SPECIFICATIONS
3
PARTS DESCRIPTIONS
◆ The drawings in this book may vary from your washer model. They are designed to show the
different features of all models covered by this book. Your model may not include all features.
Drain Hose
Inlet Hose
(option)
Dryten
(option)
Hose Adapter
Under Cover
(option)
Hose Clamp
In case of screw-shaped inlet hoses water
tap adapters will not be provided.
Non-Pump Model Pump Model
DETERGENT CASE (Symbol )
WATER CONNECTOR
(Blue Color: Cold,
Pink Color: Hot)
DOOR
DRAIN HOSE
LINT FILTER
PLUG
ADJUSTABLE LEG
(Optional)
GROUND WIRE
(This will not be
provided in
case of 3-wire
power cord)
FABRIC SOFTNER INLET
(Symbol, See page 10)
LIQUID BLEACH INLET
(Symbol, See page 10)
CONTROL PANEL
(88 display and some
buttons may be excluded)
WASH TUB
PULSATOR
BASE
(Height is optional)
ACCESSORIES
UP
Before installing your washer, remove the
pad from the bottom of the cabinet.
Then, separate under cover from rear side
of cabinet by unscrewing and insert it into
the base.
Push the under-base cover into the end,
which decrease the noise made by this
washer.
Installation of the Under Base Cover (Option)
-DWF-5510
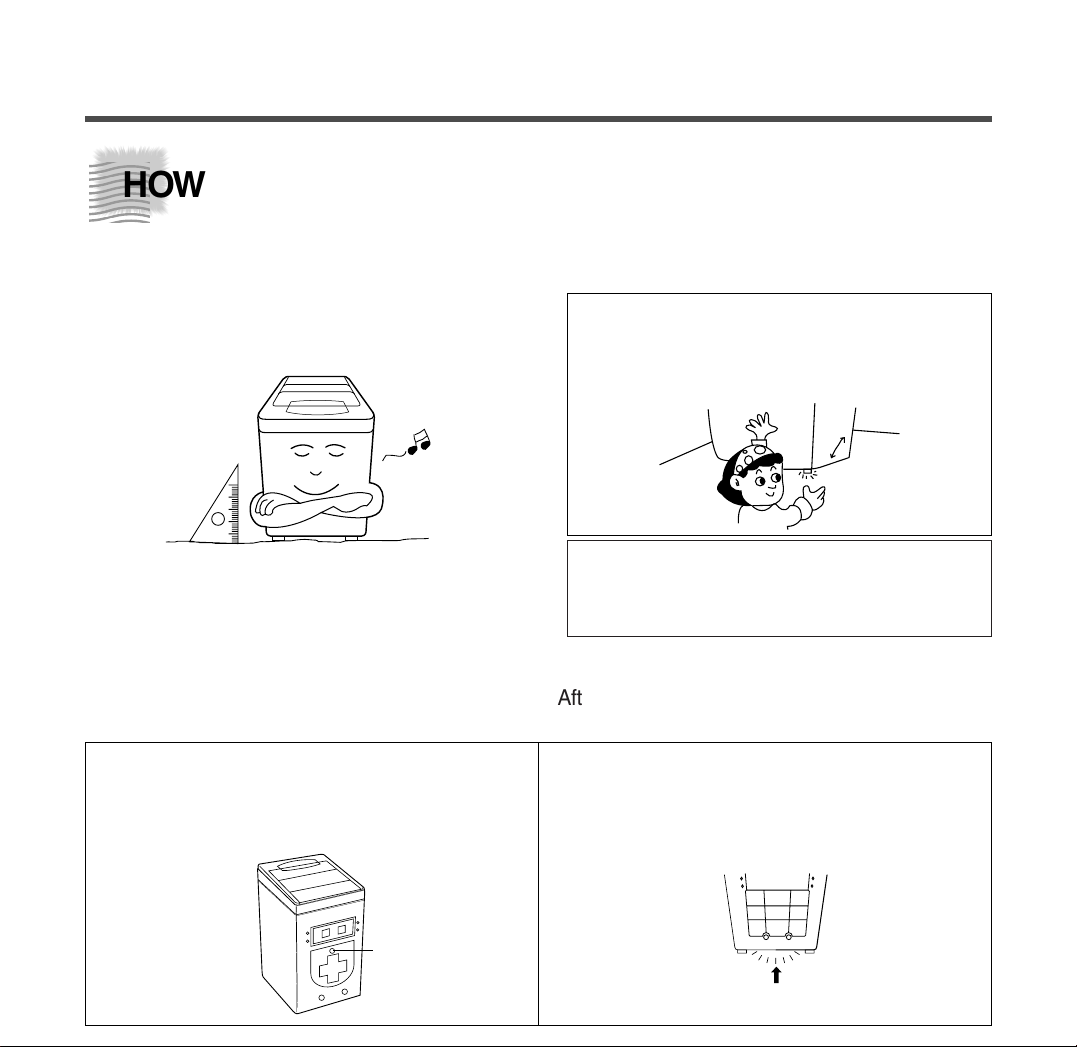
Location
Place your washer on a level and solid floor,
considering the length of inlet hose, drain
hose and power supply cord.
Do not place or store your washer below 0°C(32°F) to avoid
any damage from freezing.
Do not place your washer where it may be splashed during
bathing.
If washer is not level, it should be corrected
by the adjustable leg (provided optionally) in
the front-right side under the base and/or, a
thin block or brick.
DIRECTIONS FOR SAFE USE
HOW TO INSTALL
å∫
SCREW
After installing the washing machine, assemble
the under-base cover.
NOTES:
The opening muse not be obstructed by carpeting when
the washing machine is installed on a carpeted floor.
* Before plugging the plug into wall
receptacle, check the voltage rating is
in the range of rating, marked on the
label at the back side of your washer.
Power Supply
LABEL
5
Grounding
• If your water tap or water pipe
is not made of metal, connect
the ground wire to a copper
plate or a metal rod and bury
it in the earth.
• If both your water tap and
water pipe are made of metal,
connect the ground wire to the
base of the water tap.
• It is of no use connecting the
ground wire to the water pipe
made of plastic.
• In case of using 3-core cord,
there is no need for
grounding.
• Never connect it to a gas pipe because of danger
of a explosion.
• Never connect it to a telephone wire or a lightning
rod because of os very dangerous at a
thunderbolt.
Never Connect the Ground Wire to Such a Thing
Gas Pipe Telephone Wire
20Cm
6
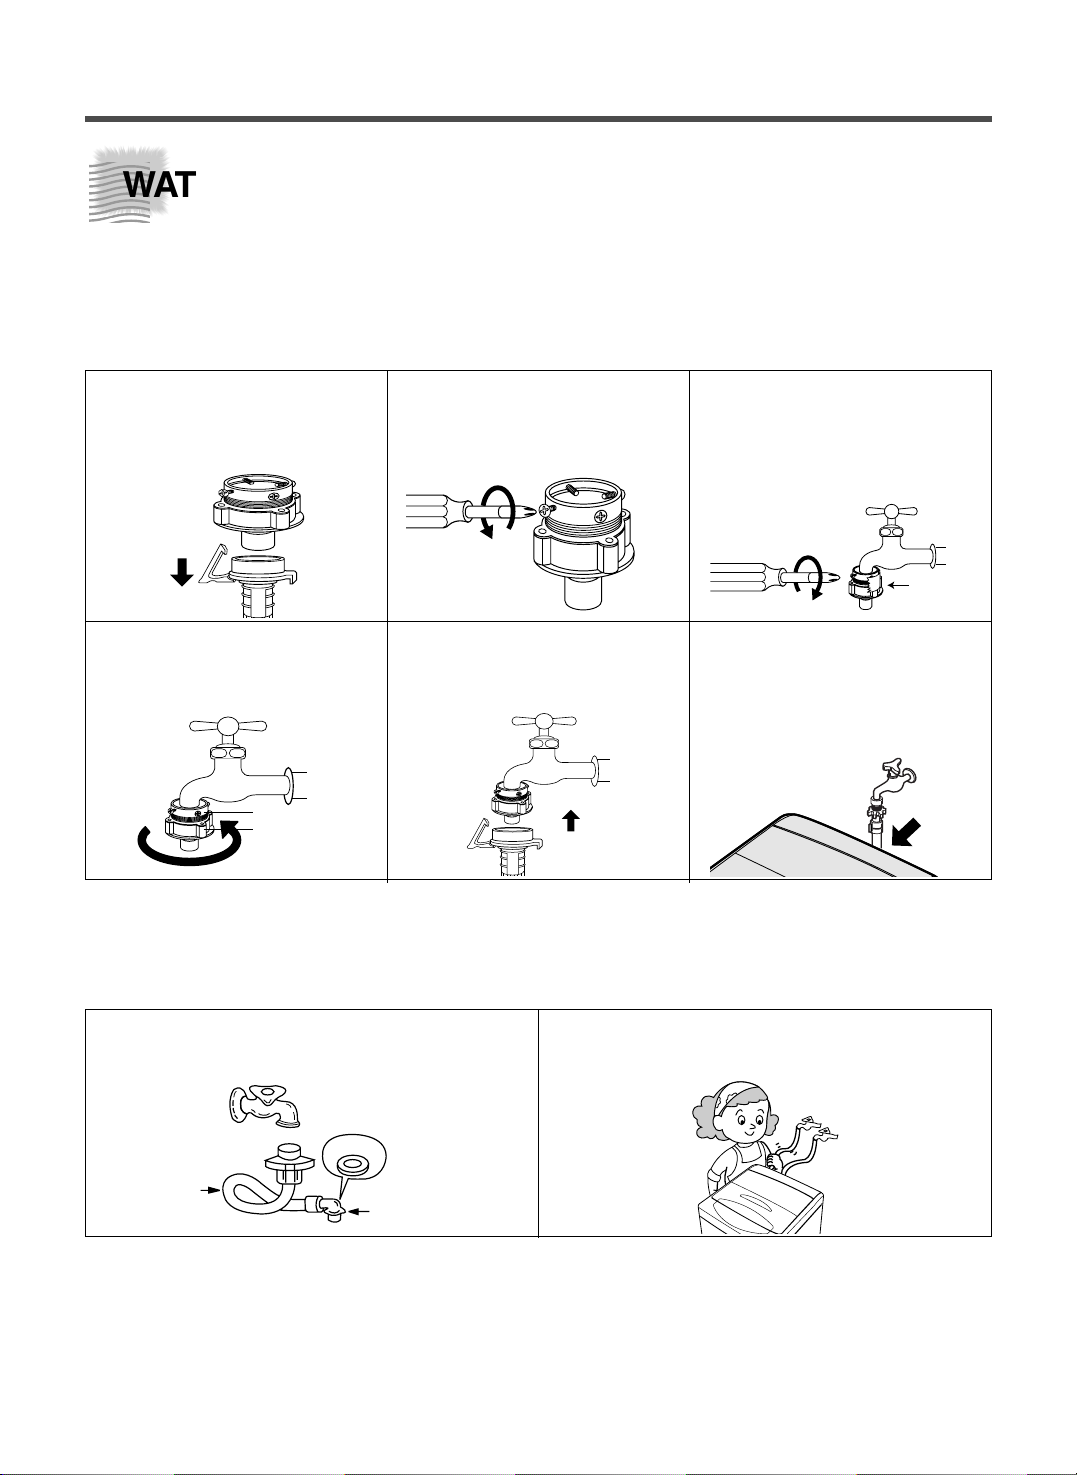
Be careful not to confuse hot water inlet (pink color) and cold water inlet (blue color),
if your washer is provided with dual water inlets.
Also if you have only one water tap, connect the inlet hose with cold water inlet (blue color).
* In case that your washer is not provided with collar compartment, procedure # and % is not
necessary.
For normal tap
! Pull down the collar of the
inlet hose to separate it
from the hose adapter.
@ Loosen the four screws
properly in fitting into
water tap.
#
Fit the hose adapter into the water
tap and tighten the four screws
evenly while pushing up the
adapter so that the rubber packing
can stick to the water tap tightly.
$ Remove the tape, and
screw connector B into
connector A tightly.
% Connect the inlet hose to
the hose adapter, pulling
down the collar of hose
end.
^ Connect the opposite end
of the hose to water inlet
of your washer tightly.
• Please check the rubber
packing is inside the
hose end.
TAPE
Connector B
Connector A
WATER CONNECTION
For Thread-Fitting Type
! Connect the inlet hose to the thread of
water tap or water pipe by tightening.
@ For the opposite end, connect it to water
inlet as the above procedure ^.
Connector
Connector
Rubber
Packing
Hose
Turn on the water completely to check for any leakage. If any leakage, turn off the water, try
again as the above procedures.
For the special tap, call a qualified plumber for the installation.
Leak Test
 Loading...