


PowerDirector - 17.0

User's Guide
PowerDirector 17
CyberLink

Copyright and Disclaimer
All rights reserved.
To the extent allowed by law, PowerDirector IS PROVIDED “AS IS”,
WITHOUT WARRANTY OF ANY KIND, EITHER EXPRESS OR IMPLIED,
INCLUDING WITHOUT LIMITATION ANY WARRANTY FOR
INFORMATION, SERVICES, OR PRODUCTS PROVIDED THROUGH OR IN
CONNECTION WITH PowerDirector AND ANY IMPLIED WARRANTIES OF
MERCHANTABILITY, FITNESS FOR A PARTICULAR PURPOSE,
EXPECTATION OF PRIVACY, OR NON-INFRINGEMENT.
BY USING THIS SOFTWARE, YOU AGREE THAT CYBERLINK WILL NOT BE
LIABLE FOR ANY DIRECT, INDIRECT, OR CONSEQUENTIAL LOSS
ARISING FROM THE USE OF THIS SOFTWARE OR MATERIALS
CONTAINED EITHER IN THIS PACKAGE.
The terms and conditions here under shall be governed and
construed in accordance with the laws of Taiwan.
PowerDirector is a registered trademark along with other company
and product names mentioned in this publication, used for
identification purposes and remain the exclusive property of their
respective owners.
Manufactured under license from Dolby Laboratories. Dolby and the
double-D symbol are registered trademarks of Dolby Laboratories.
Confidential unpublished works. Copyright 1995-2005 Dolby
Laboratories. All rights reserved.
For DTS patents, see http://patents.dts.com. Manufactured under
license from DTS Licensing Limited. DTS, the Symbol, & DTS and the
Symbol together are registered trademarks, and DTS 5.1 Producer is a
trademark of DTS, Inc. © DTS, Inc. All Rights Reserved.
International Headquarters
Mailing Address CyberLink Corporation
15F., No. 100, Minquan Rd., Xindian Dist.
New Taipei City 231, Taiwan (R.O.C.)
Web Site https://www.cyberlink.com
Telephone 886-2-8667-1298
Fax 886-2-8667-1385
Copyright © 2018 CyberLink Corporation. All rights reserved.

i
Contents
..................................................1
Introduction
................................................................................................1Welcome
.................................................................................................1Latest Features
.................................................................................................2DirectorZone and CyberLink Cloud
.................................................................................................3PowerDirector Versions
................................................................................................5Minimum System Requirements
..................................................6
PowerDirector Editing Modes
................................................................................................7Auto Mode
................................................................................................9Slideshow Creator
.................................................................................................11Adding Slideshow Background Music
.................................................................................................12Customizing Slideshows in the Slideshow Designer
..................................................17
PowerDirector Workspace
................................................................................................17PowerDirector Modules
................................................................................................18Rooms
.................................................................................................18Media Room
.................................................................................................20Effect Room
.................................................................................................20Video Overlay (PiP Objects) Room
.................................................................................................20Particle Room
.................................................................................................20Title Room
.................................................................................................21Transition Room
.................................................................................................21Audio Mixing Room
.................................................................................................21Voice-Over Recording Room
.................................................................................................21Chapter Room
.................................................................................................21Subtitle Room

CyberLink PowerDirector Help
ii
................................................................................................22Library Window
.................................................................................................23Explorer View
.................................................................................................24Searching the PowerDirector Library
.................................................................................................24Filtering Media in the Library
.................................................................................................26Library Menu
................................................................................................26Expanding the Workspace
................................................................................................27Preview Window
.................................................................................................28Preview Player Controls
.................................................................................................28Preview Screen Snapshots
.................................................................................................29Preview/Display Options
.................................................................................................31Zoom In/Out
.................................................................................................31Undocking the Preview Window
.................................................................................................31Playing 360° Media Files
.................................................................................................33Previewing in 3D Mode
................................................................................................34Editing Workspace
.................................................................................................34Timeline Mode
.................................................................................................45Storyboard Mode
..................................................46
PowerDirector Projects
................................................................................................46Setting Project Aspect Ratio
................................................................................................47360° Video Projects
................................................................................................48Exporting Projects
................................................................................................48Reusing PowerDirector Projects
................................................................................................50CyberLink Cloud Projects
..................................................52
Importing Media into
PowerDirector
................................................................................................52Importing Media Files
.................................................................................................53360° Media Files
.................................................................................................543D Media
.................................................................................................56Importing PowerDirector Projects
................................................................................................60Capturing Media

iii
.................................................................................................61Capturing from a DV Camcorder
.................................................................................................63Capturing from an HDV Camcorder
.................................................................................................63Capturing from a TV Signal
.................................................................................................63Capturing from a Digital TV Signal
.................................................................................................64Capturing from a Webcam
.................................................................................................64Capturing from a Microphone
.................................................................................................64Capturing from a CD
.................................................................................................64Capturing from an AVCHD Camcorder
.................................................................................................65Capturing from an Optical Device
.................................................................................................65Capture Desktop with Screen Recorder
.................................................................................................65Captured Content
.................................................................................................65Quality Profile Setup
.................................................................................................66Capture Settings
.................................................................................................66Capture Preferences
................................................................................................67Downloading Media
.................................................................................................67Downloading Content from DirectorZone/CyberLink Cloud
.................................................................................................69Downloading Photos From Flickr
.................................................................................................70Downloading Royalty Free Music
................................................................................................70
Precutting Video, Detecting Scenes, Extracting Audio,
and Capturing Snapshots
.................................................................................................71Precutting Video Clips
.................................................................................................71Detecting Scenes in a Video Clip
.................................................................................................73Extracting Audio from a Video Clip
.................................................................................................73Capturing Screen Snapshots from a Video Clip
..................................................75
PowerDirector Plugins
................................................................................................75Using the MultiCam Designer
.................................................................................................76Importing Media
.................................................................................................78Synchronizing Clips
.................................................................................................79Creating Recorded Content
.................................................................................................81Changing the Recorded Content
................................................................................................83Using the Theme Designer
.................................................................................................84Overview

CyberLink PowerDirector Help
iv
.................................................................................................84Adding Theme Templates/Sequences
.................................................................................................87Adding Media Clips
.................................................................................................90Importing More Media Files
.................................................................................................91Editing Media Clips
.................................................................................................92Editing Background Music
.................................................................................................93Editing Title Text
.................................................................................................94Replacing Background Images
.................................................................................................94Adding Transitions Between Sequences
.................................................................................................95Previewing and Saving Movies
.................................................................................................95Editing Created Movies
................................................................................................96Editing Video in the Action Camera Center
.................................................................................................98Fixing Video Clips
.................................................................................................100Creating Action Effects on Video Clips
.................................................................................................106Action Camera Center Settings
.................................................................................................107Changing the Action Camera Center Content
................................................................................................108Using an Express Project
................................................................................................109Recording Your Desktop with the Screen Recorder
................................................................................................110Creating Overlays with the Blending Effect
.................................................................................................111Blending Image Presets/Templates
................................................................................................114
Designing Custom Slideshows in the Slideshow
Creator
................................................................................................115Design Hand-Drawn Animation in the Paint Designer
................................................................................................115Creating Video Collages
.................................................................................................116Creating a Video Collage
.................................................................................................120Saving and Sharing Collage Templates
................................................................................................121Creating Movies Quickly with the Magic Movie Wizard
................................................................................................121Transforming Video with the AI Style Plugin
..................................................124
Arranging Media in Your
Production
................................................................................................125Adding Video Clips and Images to the Timeline
.................................................................................................125Adding Video Clips and Images

v
.................................................................................................127Adding Color Boards and Backgrounds
................................................................................................131Adding Audio Clips
.................................................................................................133Syncing Audio
................................................................................................135Syncing Clips by Audio
..................................................137
Editing Your Media
................................................................................................137Editing 360° Video Projects
................................................................................................139Content Aware Editing
.................................................................................................140Using Content Aware Editing
................................................................................................144Splitting a Clip
................................................................................................145Unlinking Video/Audio Clips
................................................................................................146Trimming Video and Audio Clips
.................................................................................................146Trimming a Video Clip
.................................................................................................150Trimming an Audio Clip
................................................................................................152Setting a Media Clip's Duration
................................................................................................152Setting TV (Video Clip Interlacing) Format
................................................................................................153Adjusting Video Clip Aspect Ratio
................................................................................................154Stretching Images
................................................................................................155Cropping Images
................................................................................................156Rotating Images/Videos
................................................................................................157Changing the Shape of Media
................................................................................................158Fixing and Enhancing Images/Videos
.................................................................................................166Advanced Fixes and Enhancements
.................................................................................................167Enhanced VR Stabilizer
................................................................................................170Utilizing Keyframes on Media
.................................................................................................172Adding Keyframes
................................................................................................175Muting Audio
................................................................................................175Editing Audio
.................................................................................................175Editing Audio in the Audio Editor
.................................................................................................181Editing Audio in CyberLink AudioDirector

CyberLink PowerDirector Help
vi
................................................................................................182Time Info
................................................................................................182Magic Cut
..................................................183
Using the Tools
................................................................................................183Using the Power Tools
.................................................................................................184Adjusting Video Speed in the Video Speed Designer
.................................................................................................188Crop, Zoom, and Pan Video
................................................................................................190Audio Ducking
................................................................................................190Motion Tracker
.................................................................................................191Tracking the Motion of Objects in Videos
.................................................................................................196Adding and Editing Trackers
.................................................................................................198Adding Motion Tracking Effects
................................................................................................203Action Camera Center
................................................................................................203Blending Effect
................................................................................................204View Designer
.................................................................................................205Customizing Direction of View in 360º Video Clips
.................................................................................................214Creating Little Planet Videos
................................................................................................221360º Start View Setting
..................................................224
Adding Effects
................................................................................................224Blending Clips on the Timeline
................................................................................................226Adding Video Effects
.................................................................................................228Modifying a Video Effect
................................................................................................229Adding Pans & Zooms on Images
.................................................................................................230Magic Motion Designer
................................................................................................231Using the Freeze Frame Effect
..................................................233
Creating PiP Effects
................................................................................................233Adding PiP Objects
.................................................................................................235Types of PiP Objects
.................................................................................................235Creating Custom PiP Objects
................................................................................................236Using the Paint Designer

vii
.................................................................................................237Creating a Paint Animation
................................................................................................240Modifying Media in the PiP Designer
.................................................................................................241Mode Selection and Zoom Tools
.................................................................................................242Modifying PiP Media Size and Position
.................................................................................................242Modifying PiP Media Properties
.................................................................................................247Adding Motion to PiP Media
.................................................................................................250Utilizing PiP Keyframes
.................................................................................................255Saving and Sharing PiP Objects
..................................................257
Adding Particle Effects
................................................................................................259Modifying Particle Effects in the Particle Designer
.................................................................................................260Mode Selection and Zoom Tools
.................................................................................................261Adding Objects, Images, and Backgrounds
.................................................................................................262Modifying Particle Object Range and Position
.................................................................................................263Modifying Particle Object Properties
.................................................................................................268Adding Motion to Particle Objects
.................................................................................................268Utilizing Particle Keyframes
.................................................................................................270Saving and Sharing Particle Effect Templates
..................................................273
Adding Title Effects
................................................................................................275Title Effect Categories
.................................................................................................275Standard 2D Title Effects
.................................................................................................2763D Title Effects
.................................................................................................276360º Title Effects
................................................................................................277Modifying Titles in the Title Designer - Basic
.................................................................................................279Zoom Tools
.................................................................................................279Adding Additional Title Text
.................................................................................................279Modifying Title Effect Position
.................................................................................................279Modifying Title Text Properties
.................................................................................................284Setting Title Text Length
.................................................................................................286Saving and Sharing Title Templates
................................................................................................287Modifying Titles in the Title Designer - Advanced
.................................................................................................289Mode Selection and Zoom Tools

CyberLink PowerDirector Help
viii
.................................................................................................292Adding Text, Particles, Images, and Backgrounds
.................................................................................................294Modifying Title Effect Position
.................................................................................................295Modifying Title Text and Image Properties
.................................................................................................304Applying Animation Effects to Title Text
.................................................................................................307Adding Motion to Title Text
.................................................................................................310Utilizing Title Effect Keyframes
.................................................................................................314Saving and Sharing Title Templates
..................................................316
Creating Custom Masks in the
Mask Designer
................................................................................................317Mode Selection and Zoom Tools
................................................................................................318Selecting Masks
................................................................................................321Creating Custom Masks
.................................................................................................321Creating Image Masks
.................................................................................................325Creating a Text Mask in the Mask Composer
.................................................................................................332Creating Custom Brushed Masks
................................................................................................338Modifying Mask Size and Position
................................................................................................339Modifying Mask Object Settings
................................................................................................340Adding Motion to Masks
................................................................................................342Utilizing Mask Keyframes
................................................................................................347Saving and Sharing Masks
..................................................348
Using Transitions
................................................................................................348Adding Transitions to a Single Clip
................................................................................................350Adding Transitions Between Two Clips
................................................................................................351Using Audio Transitions
................................................................................................353Setting Transition Behavior
................................................................................................354Modifying Transition Settings
................................................................................................354Modifying Alpha Transitions in the Transition Designer
.................................................................................................356Creating New Alpha Transitions
.................................................................................................356Modifying Alpha Transition Properties

ix
.................................................................................................369Saving Alpha Transitions
..................................................372
Mixing Audio and Recording
Voice-Overs
................................................................................................372Adjusting Audio Clip Volume Levels
.................................................................................................372Mixing Audio In-Track
.................................................................................................373Mixing Audio in the Audio Mixing Room
.................................................................................................375Adding Fade Effects to Audio Clips
.................................................................................................375Restoring Audio Clip Volume Levels
................................................................................................376Recording Voice-Overs
..................................................378
Adding Chapters
................................................................................................378Adding Chapter Markers
................................................................................................378Setting Chapter Thumbnails
..................................................379
Adding Subtitles
................................................................................................379Adding Subtitle Markers
................................................................................................380Importing Subtitles from a File
................................................................................................380Extracting Subtitles from an MKV File
................................................................................................381Editing Subtitles
................................................................................................381Syncing Subtitles
..................................................383
Producing Your Project
................................................................................................383Profile Analyzer
.................................................................................................383Best Matched Format
.................................................................................................383Utilizing Intelligent SVRT
................................................................................................384Produce Window
.................................................................................................386Outputting to a Standard 2D Video File
.................................................................................................389Exporting Video Frames with Image Sequence
.................................................................................................390Exporting Audio Only
.................................................................................................391Producing a 360° Video
.................................................................................................393Outputting in a 3D Format
.................................................................................................397Outputting to a Device

CyberLink PowerDirector Help
x
.................................................................................................399Uploading Video to Online Media Sites
.................................................................................................407Uploading a 360° Video
.................................................................................................410Batch Produce
..................................................412
Creating Discs
................................................................................................413Importing Additional Disc Content
................................................................................................415Selecting a Disc Menu
................................................................................................417Editing Disc Menu Properties
.................................................................................................417Configuring Disc Menu Settings
.................................................................................................417Editing Disc Menu Text
.................................................................................................418Setting Disc Menu Music
.................................................................................................419Adding a First Play Video
.................................................................................................419Setting Disc Playback Mode
.................................................................................................420Specifying Buttons Per Page
.................................................................................................420Modifying Menu Object Properties
................................................................................................421Customizing Disc Menus in the Menu Designer
.................................................................................................423Mode Selection, Zoom Tools, and Context Menu
.................................................................................................424Setting Menu Opening and Background
.................................................................................................426Adding Title Text and Images to Menus
.................................................................................................426Modifying Text Object and Image Properties
.................................................................................................432Adding and Editing Menu Buttons
.................................................................................................434Enabling 3D Depth in Disc Menus
.................................................................................................434Saving and Sharing Disc Menu Templates
................................................................................................436Burning Your Production to Disc
.................................................................................................436Burning a Disc in 2D
.................................................................................................438Burning a Disc in 3D
.................................................................................................441Configuring Burn Settings
.................................................................................................441Erasing Discs
..................................................442
PowerDirector Preferences
................................................................................................442General Preferences
................................................................................................444Editing Preferences
................................................................................................446File Preferences

xi
................................................................................................446Display Preferences
................................................................................................447Hardware Acceleration Preferences
................................................................................................448Project Preferences
................................................................................................449Produce Preferences
................................................................................................449Capture Preferences
................................................................................................450Confirmation Preferences
................................................................................................452DirectorZone Preferences
................................................................................................453CyberLink Cloud Preferences
................................................................................................454Improvement Program Preferences
..................................................455
PowerDirector Hotkeys
................................................................................................455Default Keyboard Hotkeys
.................................................................................................456Application Menu Bar Hotkeys
.................................................................................................459System Hotkeys
.................................................................................................459Capture Hotkeys
.................................................................................................460Edit Hotkeys
.................................................................................................460Designer Hotkeys
................................................................................................461Customizing Keyboard Hotkeys
.................................................................................................462Hotkey Sets
..................................................464
Appendix
................................................................................................464Intelligent SVRT: When Is Used?
................................................................................................465Licensing and Copyright Information
.................................................................................................467Licenses and Copyrights
..................................................479
Technical Support
................................................................................................479Before Contacting Technical Support
................................................................................................480Web Support
................................................................................................480Help Resources

1
CyberLink PowerDirector Help
Introduction
Chapter 1:
This chapter introduces CyberLink PowerDirector and the digital video editing
process. It also outlines all of the latest features, available versions, and reviews the
minimum system requirements for CyberLink PowerDirector.
Note: this document is for reference and informational use only. Its content and the
corresponding program are subject to change without notice. For more helpful tips on
using the program, please visit our members forum or see the video tutorials at
https://directorzone.cyberlink.com/tutorial/pdr.
Welcome
Welcome to the CyberLink family of digital media tools. CyberLink PowerDirector is
a digital video editing program that lets you create professional-looking videos and
photo slideshows, complete with music, voice-overs, special effects, transitions,
and much more. You can then output your project to a file, camcorder, portable
device, upload it directly to various online video sharing web sites, or burn it to a
disc, complete with stylish menus.
Latest Features
Below is a list of some of the latest features within the CyberLink PowerDirector
program.
Redesigned Auto Mode and Slideshow Creator for easier video project
creation.
Improved hardware acceleration optimization for faster video
decoding/encoding.
More codec support for captured video and audio in Capture module.
Precut videos in the media library for more efficient video project creation.
Import your saved projects as nested projects/sequences for more flexible
project editing.
Adds HEIF (.HEIC) image and WEBM (including with Opus audio) video
support.

2
Introduction
Utilize the new chroma key algorithm, including multiple key support, for
better chroma key/green effects.
Add special effects on title effects, such as neon, lighting, and fire effects on
text.
Customize text backdrops in the Title Designer for better looking video titles.
Improved Paint Designer for easier to design hand-drawn artwork.
Export video clips with synchronized audio from the MultiCam Designer to the
Video Collage Designer.
Enhanced Video Collage Designer with more editing options and flexibility.
Utilize the Motion Tracker UI improvements for more professional-quality
results.
Create custom masks in the Mask Designer using the virtual mask brush tools.
Transform your videos into living works of art with the AI Style Plugin.
Stabilize 360º video in the Enhanced VR Stabilizer.
Apply video effects to 360º video.
Transform the color in your video with the use of color lookup tables (LUTs).
Enhanced SRT subtitle support with more text options available.
Access the enriched Screen Recorder plugin.
Utilize the integrated audio editing tools for better sounding audio.
Produce 360º video in the H.265 HEVC format.
Export the frames in a video file as JPEG or PNG image sequence files.
Produce MKV video with AAC or DTS audio, and MP4 with lossless LPCM
audio.
Note: * optional feature in CyberLink PowerDirector. Check the version table on our
web site for detailed versioning information.
DirectorZone and CyberLink Cloud
You can upload/download effects and templates, and back up media, preferences,
projects, and more with the DirectorZone and CyberLink Cloud* features.
3
CyberLink PowerDirector Help
Note: * optional feature in CyberLink PowerDirector. Check the version table on our
web site for detailed versioning information.
DirectorZone
DirectorZone is a free web service that lets you search for and download theme
templates, PiP objects, paint animations, title templates, particle objects, sound
clips, and disc menus created by other users of CyberLink PowerDirector.
To access the benefits of DirectorZone, you can sign in by:
clicking the Sign in to DirectorZone link in the top right corner of the
CyberLink PowerDirector window.
clicking the button at the top of the window to open the PowerDirector
preferences, and then on the DirectorZone tab. See DirectorZone Preferences
for more information.
Also, be sure to periodically click the button to check out the latest
DirectorZone Bulletin and view the Popular templates on DirectorZone. Just click
in either of these sections in the Notifications window to view the bulletin or
download these templates. Or go to https://directorzone.cyberlink.com to find out
more information on the features and benefits of the DirectorZone web service.
CyberLink Cloud
CyberLink Cloud is a cloud storage service from CyberLink where users can upload
and download their effects and templates, PowerDirector projects, produced video
clips, and more. CyberLink Cloud allows users to back up media, preferences,
projects, etc., and ensure their working environment is the same on multiple
computers.
Note: CyberLink Cloud is a subscription cloud storage service that is included with
some CyberLink products, and is available for purchase through our web site. For
more detailed information, see https://www.cyberlink.com/products/cyberlink-cloud/.
PowerDirector Versions
The features that are available to you within CyberLink PowerDirector are
completely dependent on the version you have installed on your computer.

4
Introduction
Supported file formats, editing features, disc-making functions, and other features
vary depending on the version that you have.
To view the PowerDirector version table, please go to our web site:
https://www.cyberlink.com/products/powerdirector-ultra/compare_en_US.html
To determine your version of CyberLink PowerDirector, click on the CyberLink
PowerDirector logo in the top right corner or select ? > About CyberLink
PowerDirector.
PowerDirector 365
PowerDirector 365 is a subscription based version of CyberLink PowerDirector that
provides all the editing features you expect, and adds the CyberLink Cloud storage
service and more.
With a PowerDirector 365 subscription, you get:
All the award-winning features of the Ultimate version of CyberLink
PowerDirector, including the production of 4K ultra HD video and stunning 3D
movies.
The ability to back up program preferences, projects, project media, and (PiP
object, paint animation, title effect, particle effect, disc menu) templates on
the cloud storage space CyberLink Cloud.
Guaranteed updates to the latest versions of CyberLink PowerDirector
Ultimate.
PowerDirector 365 is the must-have solution for on-the-go video editors who want
easy access to their media and the latest up-to-date editing technologies.
Updating PowerDirector
Software upgrades and updates (patches) are periodically available from CyberLink.
CyberLink PowerDirector automatically prompts you when either is available.
Note: you can prevent CyberLink PowerDirector from auto checking for
updates/upgrades in General Preferences.
To update your software, do this:
1. Click the button to open the Notifications window.
5
CyberLink PowerDirector Help
2. Check the New Updates and Upgrade Info sections.
3. Select an item in these sections to open your web browser, where you can
purchase product upgrades or download the latest patch update.
Note: you must connect to the Internet to use this feature.
Minimum System Requirements
The system requirements listed below are recommended as minimums for general
digital video production work.
System Requirements
Operating System
Microsoft Windows 10, 8/8.1, 7 (64 bit OS
recommended)
Processor (CPU)
Intel Core™ i-series or AMD Phenom® II
Graphics Processor
(VGA)
NVIDIA GTX220/470 (2010 Fermi)
AMD 5450 (2010 Evergreen)
Intel Ivy Bridge (2012)
Memory
2 GB required (6 GB or above recommended)
Screen Resolution
1024 x 768, 16-bit color
Hard Disk Space
7 GB required
Burning Drive
Burning drive is required for disc burning purpose
Sound Card
Windows compatible sound card is required
Internet Connection
Internet connection required for initial software &
file formats activation
Note: please consult the CyberLink web site
(https://www.cyberlink.com/products/powerdirector-ultimate/spec_en_US.html) for the
most recent system requirements information. * optional feature in CyberLink
PowerDirector. Check the version table on our web site for detailed versioning
information.

6
PowerDirector Editing Modes
PowerDirector Editing
Modes
Chapter 2:
When you launch the program from the start menu, or the CyberLink PowerDirector
shortcut on the desktop, you are prompted to choose one of the following editing
modes:
Note: before selecting your preferred editing mode, be sure to set the video aspect
ratio for your project (16:9, 4:3, or 9:16).
Timeline Mode: select this option to enter timeline mode, a multi video track
editing mode, where all of the program's features are available to you. For
more details about this mode and the available tracks, see Timeline Mode.
Storyboard Mode: select this option if you want to view a large graphical
display of all your video clips and images on the first track in the timeline. See
Storyboard Mode for more information about what's available in this mode.
Slideshow Creator: with the Slideshow Creator you can instantly turn your
photos into a dynamic slideshow. Follow the steps in the Slideshow Creator to
import your photos, add background music, and stylish slideshow templates.
Once done, you can preview the slideshow, before outputting it as a video file
or burning it to disc.
Auto Mode: if you are new to the editing process and not sure how or where
to get started, then auto mode's Magic Movie Wizard can help. The Magic
Movie Wizard takes you through a step-by-step process to import, style,
adjust, and preview your finished movie, in just a few steps. You can then edit
the created production, output it to a video file, or burn it to a disc.
360° Editor*: select this option to create a 360° virtual reality video. See 360°
Media Files for information on importing these types of media files, or Editing
360° Video Projects for information on how to edit them.
Note: select the Always enter timeline mode option at the bottom of this dialog to
skip this window at startup. You can always reset this selection at any time in
Confirmation Preferences.

7
CyberLink PowerDirector Help
Auto Mode
If you are new to the editing process and not sure how or where to get started, then
auto mode's Magic Movie Wizard can help. The Magic Movie Wizard takes all of your
media and creates a completed video production in just a few steps.
To create your video production using the Magic Movie Wizard in auto mode, do
this:
1. Select Auto Mode when prompted which mode you prefer at startup. The
Magic Movie Wizard displays.
Note: if you are in the timeline mode, you can quickly launch the Magic Movie Wizard
by clicking on the button above the Media Room lib rary in the Edit module
and then selecting M agic M ovie Wiza rd.
2. In the Source window, click to import all of the media you want to use in
your video production. Select Import Media Files to import a number of
individual video or image files, or select Import a Media Folder if all of your
media is in a specific folder on your computer's hard drive. CyberLink
PowerDirector will import all of the supported media file formats in the
selected folder.
Note: if you entered the Magic Movie Wizard in the Edit module, follow the instructions
in the Source window to select the media you want to use. Click to remove any
unwanted media files from your production.
3. When in Auto Mode, before proceeding to the next window, you can perform
simple trims on video clips and crop any imported images as follows:
hover your mouse over a video clip you want to trim, and then click on
its thumbnail to open the Trim window. See Performing a Single Trim for
information on how to trim video clips.
hover your mouse over an image you want to crop, and then click on its
thumbnail to open the Crop window. See Cropping Images for information on
how to crop images.
4. Once you are done importing, trimming, and cropping, click Next to
continue.
Note: once you proceed, you can always click the Previous button to return to the
Source window to import more media or trim/crop the imported video clips/images.

8
PowerDirector Editing Modes
5. In the Style window, select from the available movie styles and themes. Each
style/theme you select will result in a different outputted video. Select Free
Download* to get more style and theme templates. See DirectorZone for
more information.
Note: the style templates with the 3D icon produce a 3D effect in 3D mode and when
outputted in 3D video productions. * optional feature in CyberLink PowerDirector.
Check the version table on our web site for detailed versioning information.
6. Click the Settings* button to add background music, set the movie's duration,
and more by doing the following:
Note: * optional feature in CyberLink PowerDirector. Check the version table on our
web site for detailed versioning information.
use the button to add music files to the background music playlist.
Use the and buttons to set the order of the music in the playlist.
The total duration of all the music added is noted above the playlist.
Mix audio level between music and the video's audio: use the slider to mix the
audio level, by deciding whether to have more background music or the
original video's audio in the production.
Specify the movie duration: here you can specify how long your movie will
be. Select Original duration if you don't want the Magic Movie Wizard to make
any edits to your imported media; Select Set output duration to manually
specify how long you want the movie to be in the field provided; Select Fit
duration to background music if you want your video production to match
the duration of the music you imported into the playlist.
7. Click the Advanced Settings button to use the sliders to customize the criteria
the Magic Movie Wizard's AI engine uses when cutting your movie. Click the
OK buttons to set all your changes, and return to the Style window.
8. Click Next to continue.
9. In the Preview window the Magic Movie Wizard generates a version of your
production. If available, enter a Starting title and Ending title for your
production in the fields provided, and then use the available player controls to
preview it.
Note: if you are not satisfied with the current video production you can click the
Previ ous button to return to previous windows to add/remove music, select a different
style, change the criteria settings, duration, or import more media. You can also click
the Edit in the Theme Designer button (if available) if you want to customize the
theme template used. See Using the Theme Designer for more information.

9
CyberLink PowerDirector Help
10. Click Next to continue.
11. You are done. To finish and close the Easy Editor, choose one of the following:
Produce Video: click to enter the Produce module where you can output your
production to a video file, device, or upload it to a video sharing web site. See
Producing Your Project.
Create Disc: click to burn your production to a disc, complete with a
professional looking disc menu, in the Create Disc module. See Creating Discs.
Advanced Editing: click this option if you'd like to perform some more
advanced editing on your production in the Edit module.
Slideshow Creator
The Slideshow Creator is the easiest way to create a dynamic slideshow with your
photos.
To create a slideshow in the Slideshow Creator, do this:
1. Select Slideshow Creator when prompted which mode you prefer at startup.
The first Slideshow Creator window displays.
Note: if you are in the timeline mode, you can launch the Slideshow Creator by adding
photos to the timeline, selecting them, and then clicking on the Slideshow button
above the timeline.
2. In the Source window, click to import all of the photos you want to use in
your slideshow. Select Import Image Files to import a number of individual
photos, or select Import an Image Folder if all of your photos are in a specific
folder on your computer's hard drive. CyberLink PowerDirector will import all
of the supported image formats in the selected folder.
Note: you can right-click on a photo and select Set 3D Source Format if required. For
more information, please refer to Setting 3D Source Format. You can also click
to remove any unwanted photos from your slideshow.
3. Click Next to continue.
4. In the Style & Music window, select a slideshow style. Each style you select will
result in a different slideshow.
5. In the Style & Music window, click the button to add background
music to your slideshow.

10
PowerDirector Editing Modes
6. In the Style & Music window, click the Slideshow Preferences button to set
your slideshow preferences as follows:
Duration: use this option to set the length of your slideshow. Select Fit photos
to music to have the length of the slideshow match the duration of the added
background music. Select Fit music to photos (if launched in Full Feature
Mode) for the length of the music to match the duration of the slideshow, i.e.
its specified length on the timeline.
Sequence: use this option to set the order of the photos in the slideshow.
Select Timeline order (if launched in Full Feature Mode) to have the sequence
match the order the photos are currently displayed in the timeline. Select
Date/time taken for the photos to display in chronological order based on the
date and time they were taken.
Detect faces: some slideshow templates include this option. When selected,
the Slideshow Creator will scan and detect the faces in the photos included in
the slideshow. The faces in the photos will then become the area of focus in
the created photo slideshows.
Click OK to save your changes.
7. Click Next to continue.
8. In the Preview window, the Slideshow Creator generates a version of your
slideshow. Use the available player controls to preview it.
Note: if you are not satisfied with the current slideshow, you can click the Previous
button to return to previous windows to select a different style, or import more photos.
Also, if availab le, click the Replace Background button in the Preview window to
replace the background image used in the slideshow, or Customize to fully customize
your slideshow in the Slideshow Designer. See Customizing Slideshows in the
Slideshow Designer for a detailed description of all the available options for your
selected slideshow style.
9. Click Next to continue.
10. You are done. To finish and close the Easy Editor, choose one of the following:
Produce Video: click to enter the Produce window where you can output your
slideshow to a video file, device, or upload it to a video sharing web site. See
Producing Your Project.
Create Disc: click to burn your slideshow to a disc, complete with a
professional looking disc menu, in the Create Disc window. See Creating Disc.
11
CyberLink PowerDirector Help
Advanced Editing: click this option if you'd like to perform some more
advanced editing on your slideshow in the Edit window.
Note: if you select the Advanced Editi ng option, the Slideshow Creator adds your
created slideshow to the timeline in the Edit window as a combined video file. If you'd
like to do further editing on this slideshow (combined video file), just select it and click
the Customi ze button above the timeline to edit in the Slideshow Designer. If you
would like to remove the slideshow effects added by the template and display each
individual photo in the slideshow on the timeline, just right-click on the file and then
select Remove Sli deshow Effects.
Adding Slideshow Background Music
If you want to use background music in your slideshow, click the button in
the Style & Music window of the Slideshow Creator to add music as follows:
1. In the Add Background Music window, click the button, select the audio
file you want to use, and then click Open.
2. If necessary, you can repeat step 1 to add more audio files, and then use the
buttons to set the playback order.
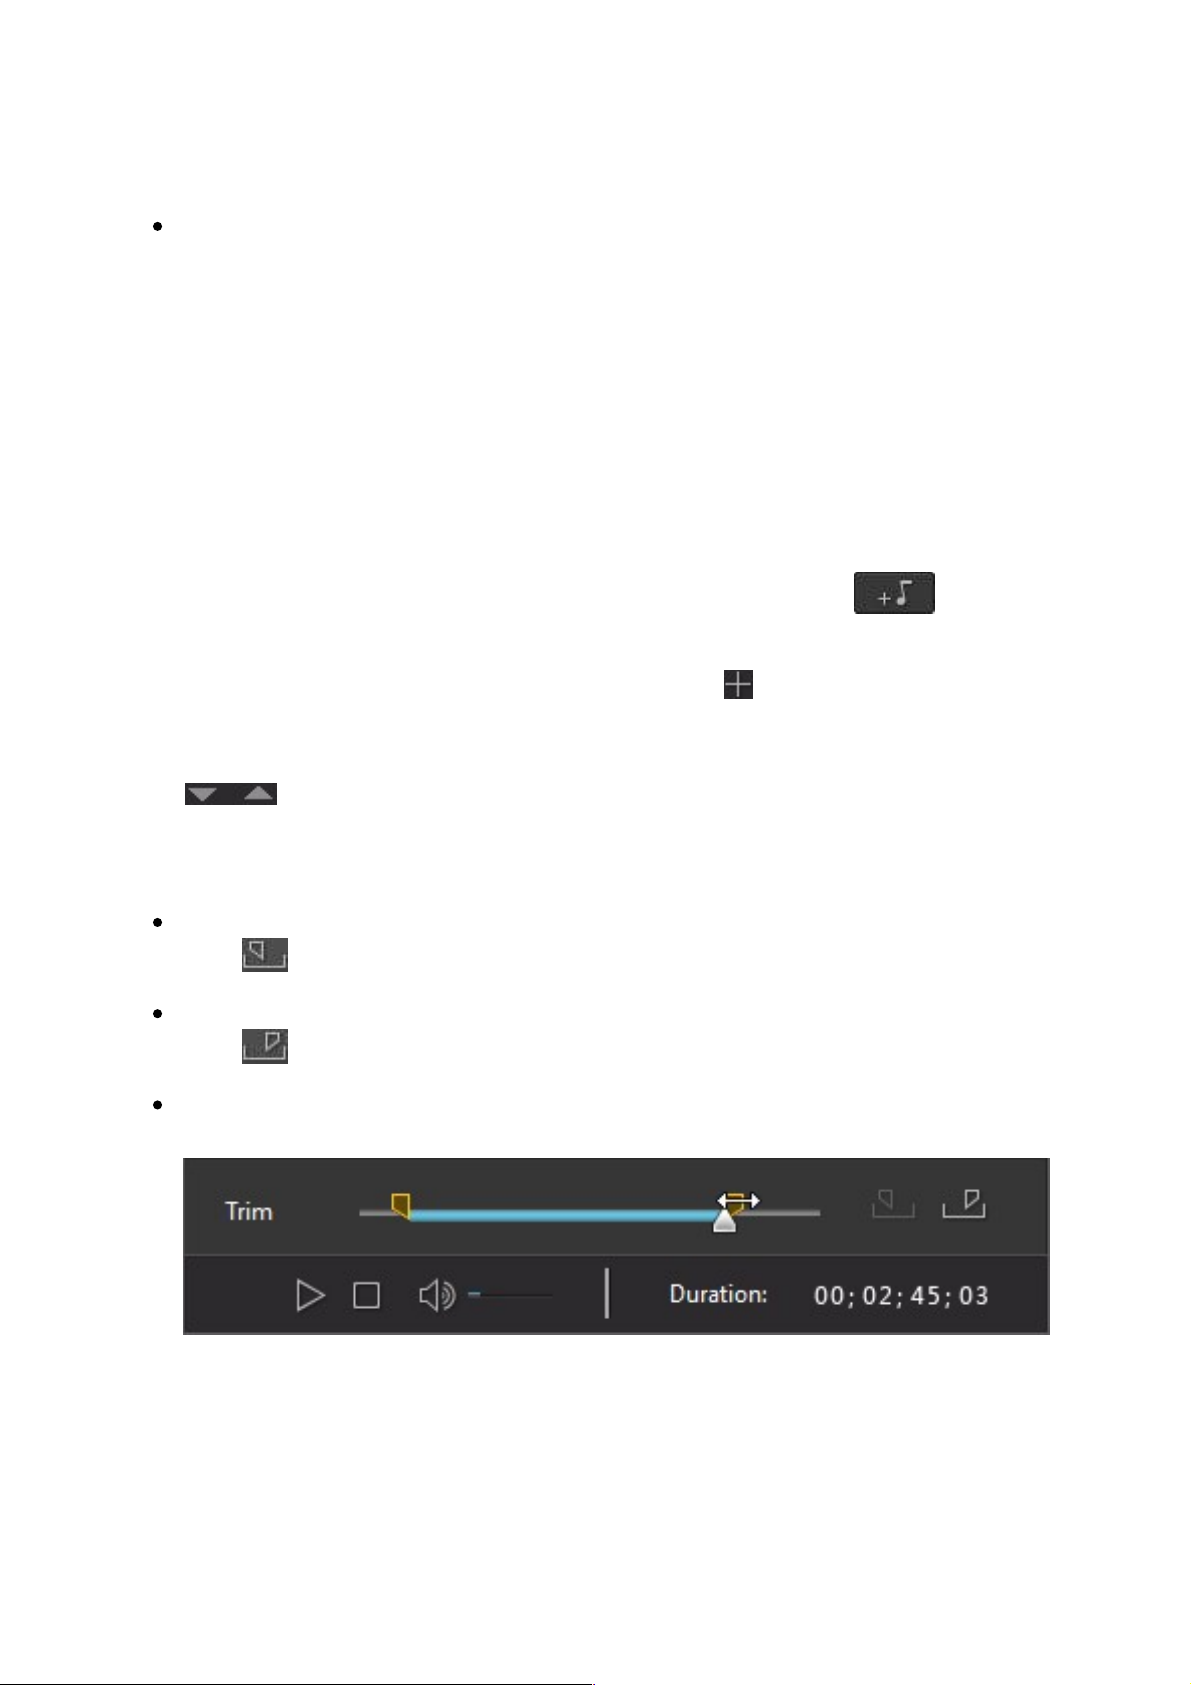
3. In the Trim audio section you can trim the length of the audio files you added
as background music as follows:
use the player controls to find the desired start point for the music, and then
click .
use the player controls to find the desired end point for the music, and then
click .
drag the markers on the music timeline to set the desired start and end times
manually.
4. Select the Fade-in option to have the background music gradually fade-in at
the beginning of the slideshow.

12
PowerDirector Editing Modes
5. Select the Fade out option to have the background music gradually fade-out
at the end of the slideshow.
6. Click OK to save your changes.
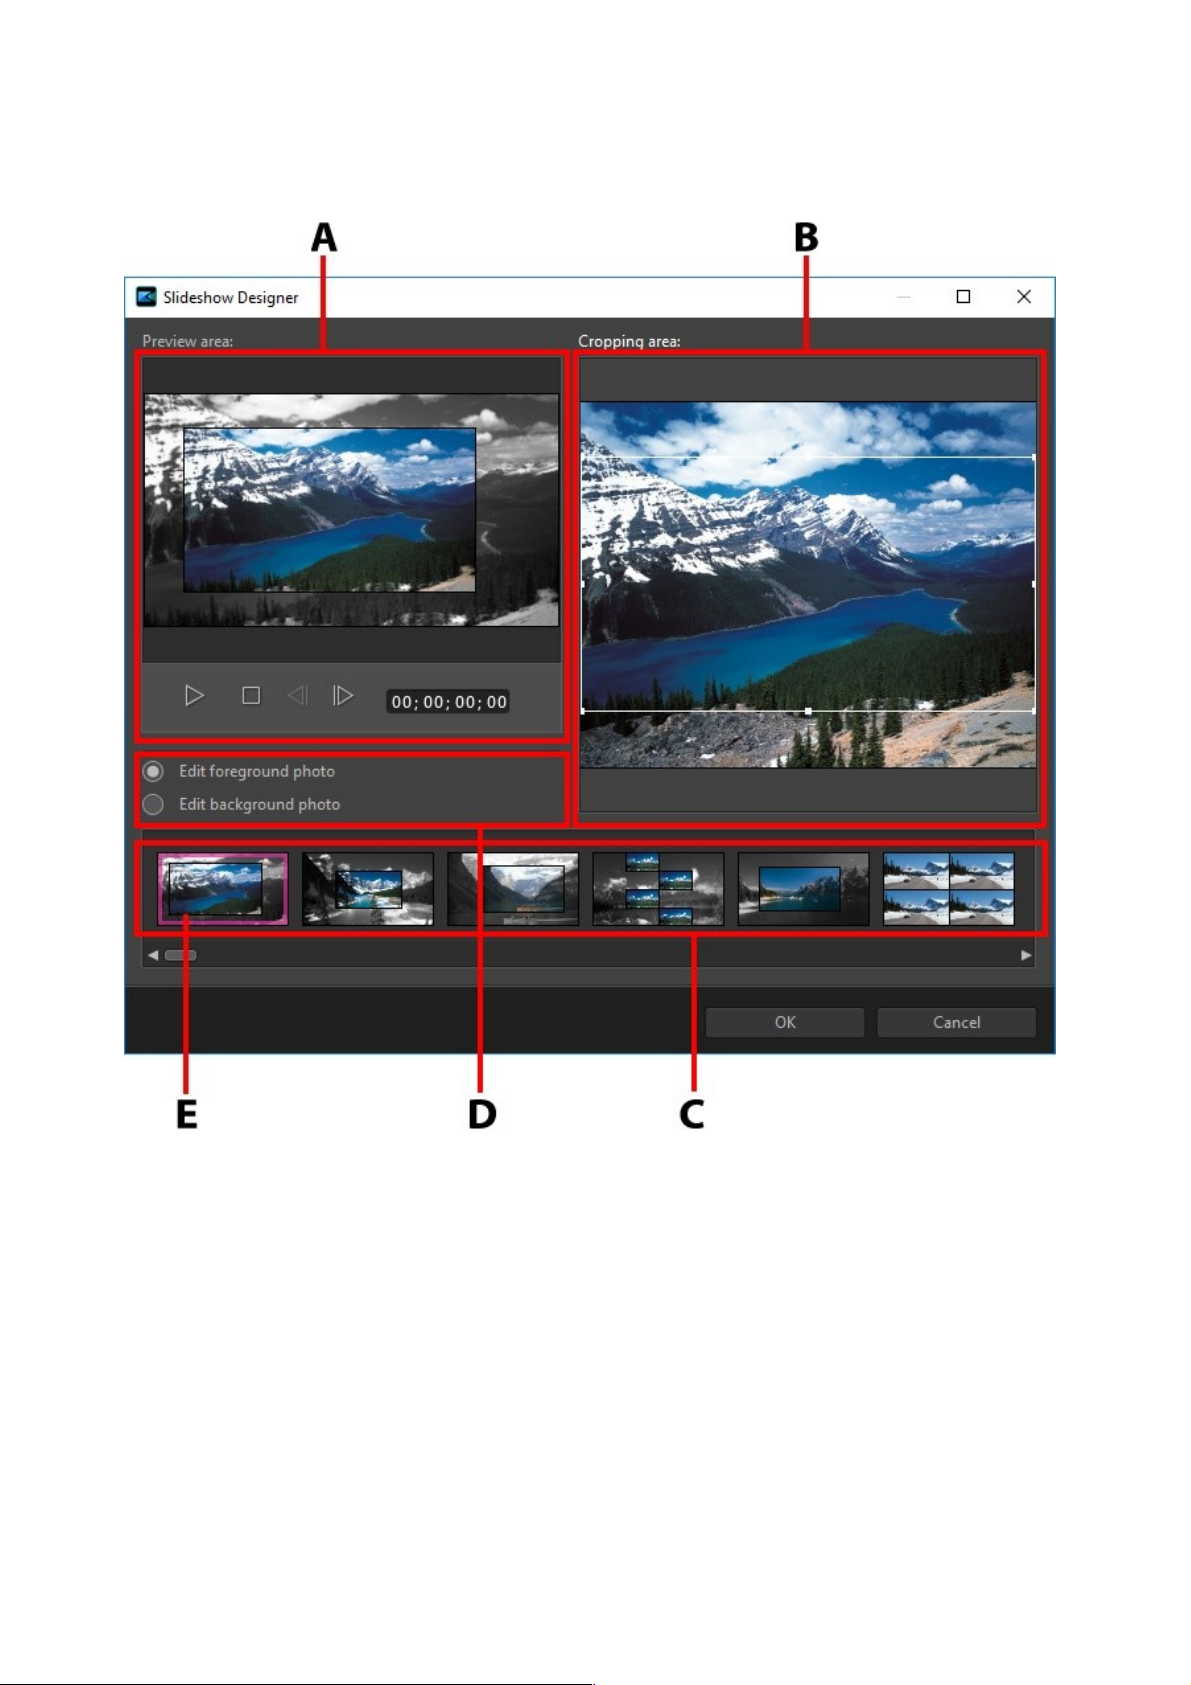
Customizing Slideshows in the Slideshow
Designer
In the Preview window of the Slideshow Creator, click on the Customize button to
open the Slideshow Designer to modify the selected slideshow style.
Note: if the Customi ze button is not availab le in the Preview window, the slideshow
style template you selected cannot be customized in the Slideshow Designer.
13
CyberLink PowerDirector Help
A - Preview Area, B - Editing Area, C - Slide Area, D - Extra Tools Area, E - Selected Slide
The editing options and tools that are available in the Slideshow Designer, depend
on the slideshow style template you selected. The following outlines the editing
options available for the style templates that utilize the Slideshow Designer.
Camera/Cell Slideshow
When customizing a Camera or Cell slideshow in the Slideshow Designer, you can
perform the following functions:
14
PowerDirector Editing Modes
in the slide area, click on a specific slideshow slide to view and edit it.
in the preview area, click and drag a photo to an alternative cell.
in the editing area (Unused photos), click the Add Photos button to import
additional photos for use in the slideshow.
in the editing area (Unused photos), indicate the maximum number of photos
that are displayed on a slide.
in the editing area, drag and drop the photos from Unused photos to the cell
in the preview area where you want it on the slide. You can also highlight a
cell by clicking it and use the buttons to add or remove selected
photos.
in the preview area, select a cell with a photo and then click on the button
to set the focus of that cell on a specific portion of the photo. Manually resize
and drag the box to set the desired focus area.
in the extra tools area, click the Remix button to generate a new version of the
slideshow.
in the preview area, use the player controls to preview the slideshow.
Motion Slideshow
When customizing a motion slideshow in the Slideshow Designer, you can perform
the following functions:
in the slide area, click on a specific slideshow slide to view and edit it.
in the editing area (Cropping area), use the Magic Motion Designer to
customize the motion on the slide. See Magic Motion Designer for detailed
instructions on using all its features.
in the preview area, use the player controls to preview the slideshow.
Highlight Slideshow
When customizing a Highlight slideshow in the Slideshow Designer, you can
perform the following functions:
in the slide area, click on a specific slideshow slide to view and edit it.

15
CyberLink PowerDirector Help
in the extra tools area, select whether you want to edit the foreground or
background photo.
in the editing area (Cropping area), resize and drag the box to the area of the
photo you want highlighted on the slide.
in the preview area, use the player controls to preview the slideshow.
3D/Balloon/Frozen Space/Outer Space
Slideshow
When customizing a 3D, Frozen Space, or Future slideshow in the Slideshow
Designer, you can perform the following functions:
in the slide area, click on a specific slideshow slide to view and edit it.
in the editing area (Cropping area), resize and drag the box to the area of the
photo you want highlighted in the photo on the slide.
click the Replace Background button if you want to import a custom image
to use as the slideshow's background.
Note: the slideshow background cannot be replaced for slideshows using the Balloon
template.
in the preview area, use the player controls to preview the slideshow.
Time-Lapse Slideshow
When customizing a time-lapse slideshow in the Slideshow Designer, you can
specify the following settings:
Note: to create a time-lapse slideshow, you need to prepare the photos for it ahead of
time. This feature works best with a series of photos taken with a camera that supports
time-lapse photography.
Duration of each image: in the field provided, specify how long you want each
of the imported images to display. Each image can display for as long as 99
frames, or as short as for 1 single video frame.
For each displayed image, skip: when importing a large number of images
that were taken over a period of time, you may find the need to remove some
of the images to reduce the slideshow's duration. In the field provided, enter

16
PowerDirector Editing Modes
the number of images you want to remove for each displayed image in your
slideshow.
17
CyberLink PowerDirector Help
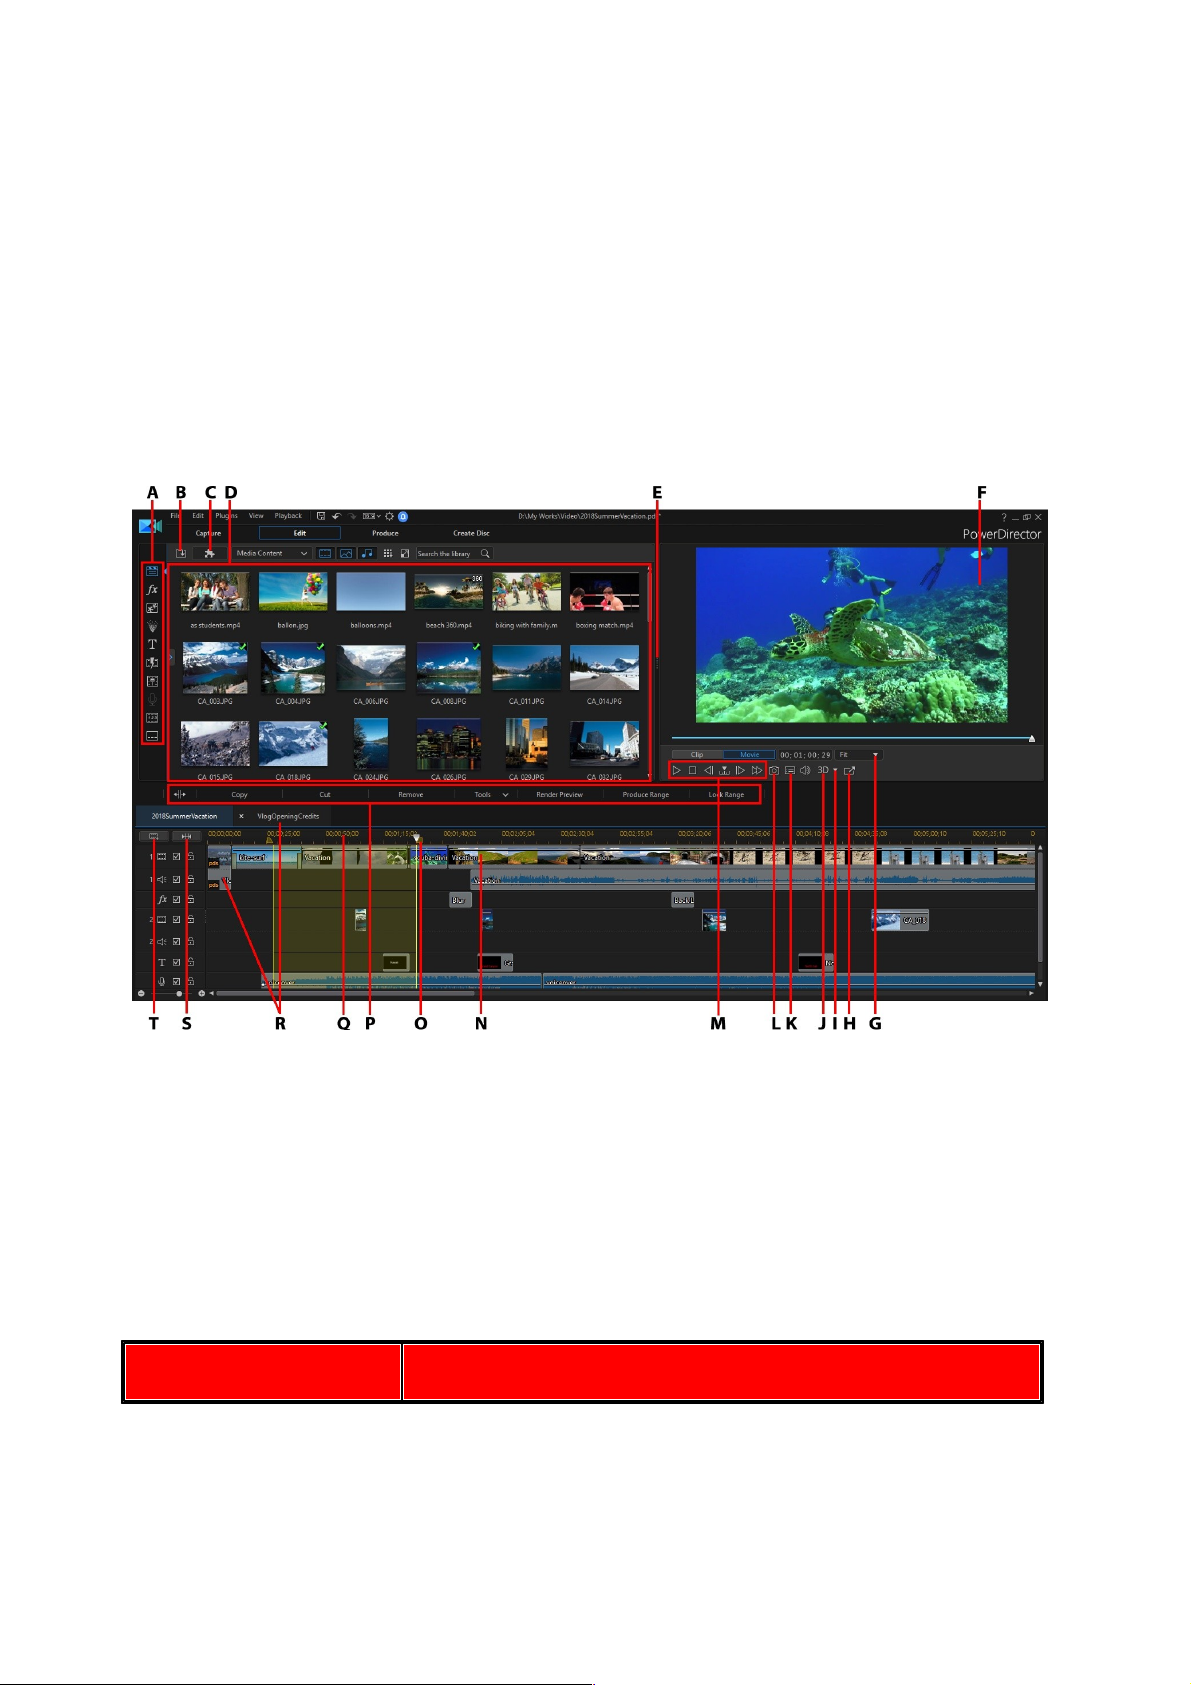
PowerDirector Workspace
Chapter 3:
This chapter outlines the CyberLink PowerDirector workspace, and all of its features.
The workspace in the Edit module is where you will spend most of your time when
using CyberLink PowerDirector, so getting familiar with everything it has to offer is
recommended.
A - Rooms, B - Import Media, C - PowerDirector Plugins, D - Library Window, E - Expandable
Workspace, F - Preview Window, G - Zoom In/Out, H - Undock Preview Window, I - 3D Display
Configuration, J - Enable/Disable 3D Mode, K - Preview Quality/Display Options, L - Take Snapshot,
M - Preview Player Controls, N - Editing Workspace, O - Range Selection, P - Function Buttons, Q Timeline Ruler, R - Nested Projects/Sequences, S - View Entire Movie, T - Track Manager
PowerDirector Modules
When you are within the main program window of CyberLink PowerDirector, there
are four main modules available to you.
Module
Description
 Loading...