


 Loading...
CyberLink
Media Suite
User's Guide
Copyright and Disclaimer
All rights reserved. No part of this publication may be reproduced, stored in a retrieval system, or transmitted in any form or by any means electronic, mechanical, photocopying, recording, or otherwise without the prior written permission of CyberLink Corporation.
To the extent allowed by law, Media Suite IS PROVIDED “AS IS”, WITHOUT WARRANTY OF ANY KIND, EITHER EXPRESS OR IMPLIED, INCLUDING WITHOUT LIMITATION ANY WARRANTY FOR INFORMATION, SERVICES, OR PRODUCTS PROVIDED THROUGH OR IN CONNECTION WITH Media Suite AND ANY IMPLIED WARRANTIES OF MERCHANTABILITY, FITNESS FOR A PARTICULAR PURPOSE, EXPECTATION OF PRIVACY, OR NON-INFRINGEMENT.
BY USING THIS SOFTWARE, YOU AGREE THAT CYBERLINK WILL NOT BE LIABLE FOR ANY DIRECT, INDIRECT, OR CONSEQUENTIAL LOSS ARISING FROM THE USE OF THIS SOFTWARE OR MATERIALS CONTAINED EITHER IN THIS PACKAGE.
The terms and conditions here under shall be governed and construed in accordance with the laws of Taiwan.
Media Suite is a registered trademark along with other company and product names mentioned in this publication, used for identification purposes and remain the exclusive property of their respective owners.
International Headquarters
Mailing Address |
CyberLink Corporation |
|
15F., No. 100, Minquan Rd., Xindian Dist. |
|
New Taipei City 231, Taiwan (R.O.C.) |
Web Site |
http://www.cyberlink.com |
Telephone |
886-2-8667-1298 |
Fax |
886-2-8667-1385 |
Copyright © 2014 CyberLink Corporation. All rights reserved.
Contents
Introduction.................................................... |
1 |
CyberLink................................................................................................Media Suite Programs |
2 |
The PowerStarter............................................................................Program |
2 |
System Requirements................................................................................................ |
7 |
Movie.................................................... |
9 |
Play a Movie................................................................................................Disc |
9 |
Supported Disc Formats............................................................................ |
9 |
Movie Disc Playback............................................................................Controls |
10 |
Playback Features............................................................................ |
14 |
Browse................................................................................................and Play Movies in Movie Library |
19 |
Browsing Through............................................................................Movies in the Movie Library |
19 |
Supported Movie............................................................................File Formats |
20 |
Playing Movie Files............................................................................in PowerDVD |
20 |
Play a Movie................................................................................................Folder |
20 |
View Online................................................................................................Movie Info |
21 |
Video.................................................... |
23 |
Play Video................................................................................................Files |
23 |
Supported Video............................................................................File Formats |
24 |
Video Playback Controls............................................................................ |
24 |
Advanced................................................................................................Video Editing |
28 |
Organize................................................................................................Videos |
28 |
Managing Video............................................................................Files |
28 |
Easy Video................................................................................................Editing |
30 |
i
CyberLink M edia Suite
Making Video Fixes............................................................................ |
31 |
Fine Tuning Videos............................................................................ |
31 |
Trimming Videos............................................................................ |
32 |
Upload ................................................................................................to Social Networks |
32 |
Uploading Videos............................................................................to YouTube |
32 |
Uploading Videos............................................................................to Facebook |
33 |
Convert................................................................................................Videos |
33 |
Create a................................................................................................Movie Disc |
34 |
Edit a Movie................................................................................................Disc |
35 |
Photo.................................................... |
37 |
Play Back................................................................................................2D Photos in 3D Mode |
37 |
Import and................................................................................................Organize Photos |
38 |
Importing Photos............................................................................ |
38 |
Organizing Photos............................................................................ |
39 |
Edit and................................................................................................Print Photos |
43 |
Editing Photos ............................................................................ |
43 |
Print Photos ............................................................................ |
46 |
Create or................................................................................................Play a Slideshow |
46 |
Playing Slideshows............................................................................ |
46 |
Creating Slideshows............................................................................ |
47 |
Create a................................................................................................Photo Gallery Disc |
50 |
Create a................................................................................................Slideshow Disc |
53 |
Selecting Photos............................................................................for Disc |
53 |
Creating the Disc............................................................................ |
53 |
Editing Slideshow............................................................................Style and Music |
54 |
Configuring Advanced............................................................................Disc Settings |
55 |
Burning Your Disc............................................................................ |
56 |
Upload ................................................................................................to Social Network |
56 |
Uploading Photos............................................................................to Facebook |
56 |
Uploading Photos............................................................................to Flickr |
57 |
Advanced................................................................................................Photo Adjustment |
57 |
ii
Music.................................................... |
61 |
Play Music................................................................................................ |
61 |
Supported Audio............................................................................Formats |
62 |
Music Playback Controls............................................................................ |
62 |
Playing Music in............................................................................Mini Player Mode |
64 |
Rip an Audio................................................................................................CD |
65 |
Convert................................................................................................an Audio File |
66 |
Burn a Music................................................................................................Disc |
67 |
Record ................................................................................................Audio |
68 |
Edit Audio................................................................................................ |
69 |
Adding Audio into............................................................................the Library |
69 |
Editing Audio ............................................................................ |
69 |
Audio Effects ............................................................................ |
71 |
Exporting Audio............................................................................ |
72 |
Data....................................................& Backup |
75 |
Create a................................................................................................Data Disc |
75 |
Copy a Disc................................................................................................or Burn a Disc Image |
76 |
Copying a Disc ............................................................................ |
76 |
Burning a Disc Image............................................................................ |
77 |
Back Up................................................................................................and Restore Files |
78 |
Backing Up Files............................................................................ |
78 |
Restoring Files ............................................................................ |
79 |
Duplicate................................................................................................a Movie Disc |
81 |
Organize................................................................................................Discs in the Disc Manager |
81 |
Manually Importing............................................................................Discs to the Disc Library |
82 |
Utilities.................................................... |
85 |
Erase a Disc................................................................................................ |
85 |
Extract Files................................................................................................From a Disc Image |
85 |
iii
CyberLink M edia Suite
Mount a................................................................................................Virtual Drive |
86 |
|
Transfer................................................................................................Media to Devices |
87 |
|
Burn a DVD................................................................................................Folder |
87 |
|
Print a Disc................................................................................................Label |
87 |
|
Step 1 |
- Select a............................................................................Label Type |
88 |
Step 2 |
- Edit Disc............................................................................Information |
88 |
Step 3 |
- Edit Layout............................................................................ |
88 |
Step 4 |
- Print ............................................................................ |
88 |
CyberLink....................................................Apps |
89 |
|
Technical....................................................Support |
91 |
|
Before Contacting................................................................................................Technical Support |
91 |
|
Web Support................................................................................................ |
92 |
|
iv

Introduction
Chapter 1:
Introduction
Welcome to CyberLink Media Suite, the all-in-one multimedia suite that opens up the world of digital entertainment on your PC.
Note: this document is for reference and informational use only. Its content and the
corresponding program are subject to change without notice.
Using CyberLink Media Suite you can perform the following functions, and more:
play discs, movie files, disc folders, video files, photo slideshows, and music with the world's #1 playback software on the PC.
burn music or data discs in a variety of formats.
perform advanced editing on videos with a powerful editing tool that provides unlimited move-making possibilities.
convert photos, videos, and audio to other media formats and transfer them to portable devices.
apply easy edits and enhancements to both your photos and videos.
make advanced adjustments on photos manually or by applying adjustment presets.
author Blu-ray Disc, AVCHD, and DVD discs with motion menus.
organize your photos with features such as face tagging, or use them to create dazzling slideshows and photo gallery discs.
record, trim, cut, and add effects to your audio files that you want to use in your video editing or share with friends.
share your photos on Flickr and Facebook, and upload your videos to YouTube or Facebook.
keep track of all your burned media and discs with the Disc Manager.
back up and restore your data.
create and print disc labels.
erase and copy discs, or duplicate a movie disc.
1

CyberLink M edia Suite
extract files from or mount a disc image, or burn it to a disc.
CyberLink Media Suite
Programs
You can access all the CyberLink Media Suite programs through the CyberLink PowerStarter interface. It provides easy access to all of the CyberLink software on your PC, for whatever task you have at hand. From managing your media files and creating movies, to organizing your disc content, burning discs and much more.
The PowerStarter Program
CyberLink PowerStarter is the complete portal for all of your CyberLink software.
CyberLink PowerStarter helps you work with your media using a task-based approach. You can also quickly launch all your CyberLink software from one convenient location, or easily upgrade/update any of these programs.
2
Introduction
Menu Icons
Clicking a menu icon reveals a list of features and functions you can choose from, and provides instant and direct access to all of your CyberLink programs. Click the menu icon that corresponds to the type of media you want to access or features you want to explore.
Movie
From the Movie menu you can watch movies on a disc or play back movie files and folders on your hard drive. In this section you can also access MoovieLive.com to view all the latest movie information, trailers. and reviews.
Video
In the Video menu you can organize and play the videos files on your computer, or edit them into creative movie productions. You can also burn the videos to a disc with menus, convert the videos to different formats, or share them with the world by uploading them to the Internet.
Photo
The Photo menu contains a variety of functions for importing, managing, fixing, editing, and touching up your photos. Features also include the creation of slideshows and photo discs, and the sharing and printing of your photos.
Music
Within Music you can play back your music or burn it to a disc in a variety of formats. You can also rip the music to your hard drive, convert it to another format, record new audio, and edit and enhance it with rich effects.
Data & Backup
Access the Data & Backup menu to burn data files to a variety of different disc types or search for previously burned discs in the Disc Manager. You can also copy your data and movie discs, back up and restore all of the important data on your computer, and more.
Utilities
Use the Utilities menu to manage your discs by creating, burning or extracting files from disc images. You can also erase rewritable discs, edit some video discs, burn DVD folders to disc, design and print disc labels, and more.
3
CyberLink M edia Suite
Function Items
Select one of the menu items to reveal all the available functions and tasks you can perform using your CyberLink software. Select any of the functions to open the corresponding software program and complete the specified task, or access the requested feature.
Quick Access Buttons
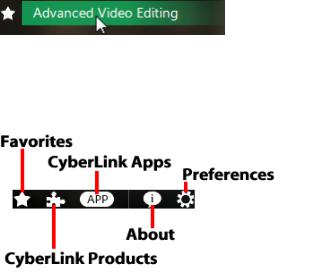
CyberLink PowerStarter includes the following buttons that provide quick access to the Favorites, CyberLink Products, CyberLink Apps, About, and Preferences windows.
Favorites
You can add the functions and programs you use most often into the Favorites
menu, so you can quickly and easily access them when required. Click the  button to view the Favorites menu.
By default, this window is empty, but you can add a function or program to the Favorites menu by doing this:
1.Click the menu icon to display the function/program you want to add to your favorites.
2.Hover your mouse over the function/program and then click  .
.
4
Introduction
Note: if you would like to remove a function/program from your favorites, just
deselect the highlighted star next to the function in the menu.
CyberLink Products
To view a list of the CyberLink programs installed on your computer, click  . You can then select any of the program names to open the corresponding software.
Note: the specific programs available in CyberLink PowerStarter are dependent on
the products installed on your computer and the versions you purchased.
CyberLink Apps
Click the  button to discover CyberLink's award-winning software apps for your Android, iOS, and Windows devices. See CyberLink Apps for more information.
About
Click  to display CyberLink PowerStarter version information.
Preferences
To configure the behavior of the CyberLink PowerStarter program, click the  button, and then set your desired preferences.
Return to CyberLink Media Suite after you close a program: select this option to return to the CyberLink Media Suite (PowerStarter) main window after you close a program you accessed through the program portal.
Automatically check for the latest version: select this option if you want CyberLink PowerStarter to automatically check for newer versions of the installed software programs every 14 days. When new versions are available, the corresponding Update and Upgrade buttons in the Upgrade window are enabled.
Receive CyberLink product information: allows you to enable/disable banner and running text in the About window.
5

CyberLink M edia Suite
Use my photos as cover photos: select this option to display your photos on
the CyberLink PowerStarter start-up window. Click  to select the folder on your computer that contains the photos you want to use.
Display language: select the Use system default language option to use the same language as your current operating system language, or select the other option and manually select the UI language from the drop down list that you want to use.
Note: CyberLink PowerStarter will default to English if your operating system's
language is not supported by the program.
Upgrading/Updating CyberLink Software
Select the  button to access the Upgrade/Update window, where you can view product version information for the CyberLink programs currently installed on your computer. They are listed in a table, along with the current version number, and buttons indicating whether or not there is a free update or an upgrade for the software available.
When enabled, click on  in the Update column to open a page that lets you download the latest patch update for the corresponding software.
You may also click on  in the Upgrade column to open a page that allows you to upgrade a specific product, when available.
6

Introduction
System Requirements
The system requirements listed below are recommended as minimums for working with the programs. You may find that your system, while meeting these recommended minimums, requires expanded capacity for some tasks.
Minimum System Requirements
Operating System |
Microsoft® Windows® XP Home Edition, Professional |
|
(32 bit with Service Pack 3). |
|
Microsoft® Windows Vista® Home Basic, Home |
|
Premium, Business, Ultimate (32 bit and 64 bit). |
|
Microsoft® Windows 7 Home Basic, Home Premium, |
|
Professional, Ultimate (32 bit and 64 bit). |
|
Microsoft® Windows 8/8.1 (32 bit and 64 bit). |
Screen Resolution |
1024 x 768, 16-bit color or above. |
Memory |
512 MB required (1 GB above recommended). |
|
3 GB DDR2 or above recommended. |
Hard Disk Space |
5 GB required (400 MB is for Magic Music Library). |
|
10 GB (20 GB recommended) for DVD production. |
|
60 GB (100 GB recommended) for Blu-ray Disc/AVCHD |
|
production. |
CPU |
SD video editing and export: Pentium 4 3.0 GHz or |
|
AMD Athlon 64 X2 or above (Required). |
|
AVCHD and BD burning: Pentium Core 2 Duo E6400, or |
|
AMD Phenom II X2 (Recommended). |
|
Full-HD video editing and export: Intel Corei5/7 or |
|
AMD Phenom II X4 (Recommended). |
|
3D video editing and export: Intel Corei7 or AMD |
|
Phenom II X4 (Recommended). |
VGA |
128 MB VGA VRAM or higher (1 GB or higher VRAM |
|
and OpenCL capable are recommended). |
Video Capturing |
OHCI IEEE 1394 compliant device. |
Device |
PCI or USB 1.0/2.0 capture device compliant with WDM |
|
standard. |
|
DV camcorder connected via OHCI-compliant with |
|
IEEE 1394. |
|
|
7

CyberLink M edia Suite
|
DVD camcorder connected via USB 2.0. |
|
Sony MicroMV/AVCHD/HDV camcorder. |
Burning Device |
A BD-RE burner is required to burn Blu-ray Discs. |
|
A DVD burner (DVD+R/RW or DVD-R/RW) is required to |
|
burn DVD/MiniDVD/AVCHD titles. |
|
A CD burner (CD-R/RW) is required to burn VCD/SVCD |
|
titles. |
Microphone |
A microphone is required for recording audio. |
Internet |
Internet connection required for web services. |
Connection |
|
Additional Hardware Support for Blu-ray™ 3D and TrueTheater™ 3D |
|
|
|
HDMI 1.4 Enabled |
Eye wear: active shutter glasses. |
3DTV |
Supported hardware: HDMI 1.4 enabled 3D TV. |
|
Supported graphics card: NVIDIA GeForce GTX 460 and |
|
AMD Radeon HD 6800 series. |
NVIDIA 3D Vision |
NVIDIA 3D Vision or 3D Vision 2 Wireless Glasses Kit + |
|
3D Vision-Ready Display + 3D Vision Compatible |
|
NVIDIA Graphics Card are required. |
|
Please download and install 3D VISION CD for Desktop |
|
GPUs v1.38 or Verde Notebook 3D VISION CD v1.3. |
|
120Hz Frame-sequential 3D LCD (NVIDIA 3D Vision- |
|
Ready). |
|
Native format: 120 fps left and right. |
|
Eye wear: Active shutter glasses (NVIDIA 3D Vision Kit). |
|
Supported hardware: Asus VG278H, Asus G51J- |
|
SZ028V, Acer GD245HQ, Acer GD235H. |
3D Polarizer LCD |
Native format: row-interleaved. |
|
Eye wear: polarized glasses. |
|
Supported hardware: Zalman ZM-M220W, Acer |
|
5738DG (Notebook). |
3D Ready HDTV |
Native format: checkerboard. |
(DLP) |
Eye wear: Active shutter glasses. |
|
Supported hardware: Mitsubishi 1080p DLP HDTV, |
|
Samsung 3D Ready DLP HDTV. |
8

M ovie
Chapter 2:
Movie
CyberLink Media Suite provides access to CyberLink PowerDVD, a software disc player with all the features and controls of a normal living room disc player. It offers feature-rich navigation controls for an interactive and tailored viewing experience.
Note: for a detailed description of all the playback features available in CyberLink PowerDVD, press the F1 key on your keyboard when within the program window to open the help file.
CyberLink PowerDVD also provides access to all the movie information you will need from the Internet.
Play a Movie Disc
In CyberLink Media Suite you can play all of your movie discs with the world's #1 playback software on the PC, CyberLink PowerDVD. To start watching a movie disc, select the Play a Movie Disc function within the Movie menu of CyberLink PowerStarter.
Note: for a detailed description of all the playback features available in CyberLink PowerDVD, press the F1 key on your keyboard when within the program window to open the help file.
Insert a movie disc into your disc drive, and CyberLink PowerDVD will play it automatically. If there is a disc already in your disc drive when you opened CyberLink PowerDVD, do this:
1.Click on Movies and then BD/DVD Movie in the media library.
2.Click the play button.
Supported Disc Formats
The optical disc formats that CyberLink PowerDVD supports are listed below:
Optical Disc Types |
File Formats |
|
|
Blu-ray Discs*/Blu-ray 3D** |
BDAV, BDMV |
Discs |
|
9
CyberLink M edia Suite
DVD |
DVD-Video, AVCHD*, AVCREC*, DVD-VR, |
|
|
DVD+VR |
|
CD |
VCD, SVCD |
|
|
|
|
Note: * this feature is not available in some versions of CyberLink PowerDVD. ** If your version of CyberLink PowerDVD supports Blu-ray 3D playback, you may have to enable playback in More Blu-ray Disc Settings.
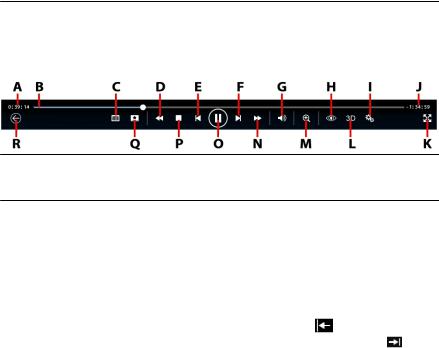
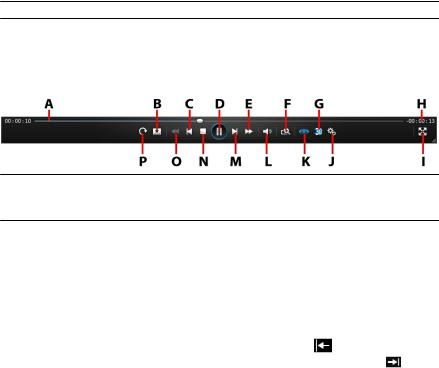
Movie Disc Playback Controls
When playing back a movie disc in the BD/DVD Movies section of the Media Library tab, the playback controls display as follows:
Note: the below table includes the hotkey for each specific button on the playback controls, if available. For a complete list of all the hotkeys in PowerDVD and the corresponding behavior, see the hotkey table in the program's help file.
|
Icon |
Button |
Hotkey |
Description |
|
|
|
|
|
|
|
||
A |
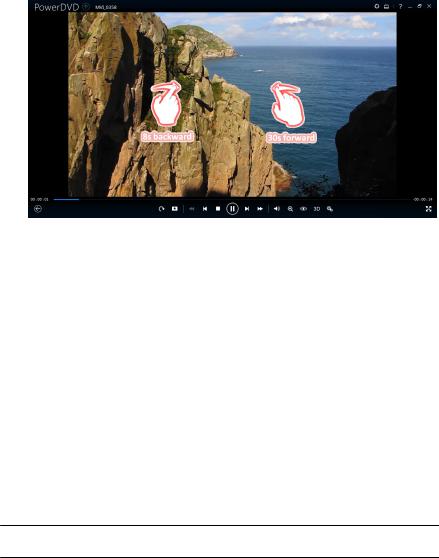
|
Elapsed time |
|
Displays the time elapsed |
||
|
|
|
|
for the current movie. |
|
|
|
|
|
|
Hover your mouse over it |
||
|
|
|
|
to reveal two buttons that |
||
|
|
|
|
let you jump backward |
||
|
|
|
|
and forward in the movie. |
||
|
|
|
|
Click |
to quickly jump |
|
|
|
|
|
back 8 seconds, or |
to |
|
|
|
|
|
skip forward 30 seconds. |
||
|
|
|
|
If you have a touch |
|
|
|
|
|
|
enabled display, you can |
||
|
|
|
|
also use Gesture Controls |
||
|
|
|
|
to skip forward or |
|
|
|
|
|
|
backward during movie |
||
|
|
|
|
playback. |
|
|
B |
|
Navigational |
|
Visually displays elapsed |
||
|
|
|
|
|
|
|
10

M ovie
|
|
slider |
|
playback time. Click along |
|
|
|
|
|
the navigational slider to |
|
|
|
|
|
jump to different |
|
|
|
|
|
moments in the movie, or |
|
|
|
|
|
click and drag it to use |
|
|
|
|
|
Instant Seek to quickly |
|
|
|
|
|
browse and find specific |
|
|
|
|
|
scenes in your movie. |
|
|
|
|
|
Hover your mouse over |
|
|
|
|
|
the slider to use Instant |
|
|
|
|
|
Thumbnails to quickly |
|
|
|
|
|
find scenes you |
|
|
|
|
|
previously viewed during |
|
|
|
|
|
DVD playback. |
|
C |
|
Access DVD |
M |
During DVD playback, this |
|
|
|
menu controls/ |
|
button provides quick |
|
|
|
Pop-up menu |
|
access to the title and |
|
|
|
(Blu-ray* |
|
root menus on the DVD. |
|
|
|
playback only) |
|
During Blu-ray Disc* |
|
|
|
|
|
playback, the pop-up |
|
|
|
|
|
menu button displays |
|
|
|
|
|
here. Click |
or press M |
|
|
|
|
on your keyboard to |
|
|
|
|
|
display the pop-up menu |
|
|
|
|
|
over the disc content. |
|
D |
|
Rewind/Step |
[ |
During playback click this |
|
|
|
backward (when |
|
button to reverse through |
|
|
|
paused) |
|
content and access the |
|
|
|
|
|
Play Speed Navigator. |
|
|
|
|
|
When playback is paused, |
|
|
|
|
|
use the |
button to go |
|
|
|
|
to the previous frame of |
|
|
|
|
|
video. |
|
E |
|
Previous |
P |
Returns to the previous |
|
|
|
|
|
chapter on the movie |
|
|
|
|
|
disc. |
|
F |
|
Next |
N |
Jumps to the next chapter |
|
|
|
|
|
on the movie disc. |
|
11

CyberLink M edia Suite
G |
|
Mute/Volume |
Q / + and - |
Click to mute the volume; |
|
|
adjustment |
|
click again to turn mute |
|
|
|
|
off. To manually adjust |
|
|
|
|
the volume, hover your |
|
|
|
|
mouse over this button |
|
|
|
|
and then use the slider to |
|
|
|
|
increase or decrease the |
|
|
|
|
volume. |
H |
|
TrueTheater |
|
Provides access to the |
|
|
effects |
|
TrueTheater video effect |
|
|
|
|
controls. See TrueTheater |
|
|
|
|
Effects. |
I |
|
PowerDVD |
|
Opens the PowerDVD |
|
|
settings menu |
|
settings menu, where you |
|
|
|
|
can access player settings |
|
|
|
|
and PowerDVD |
|
|
|
|
preferences. |
J |
|
Movie duration/ |
|
Click to toggle between |
|
|
Remaining time |
|
movie duration and |
|
|
|
|
remaining playback time. |
K |
|
Go to full screen |
Z |
Click to enter full screen |
|
|
|
|
mode. |
L |
|
Enable 3D* |
|
Enable 3D movie |
|
|
|
|
playback. See 3D Playback |
|
|
|
|
for more information. |
M |
|
Zoom |
Ctrl+mouse |
Hover your mouse over |
|
|
|
wheel** |
this button, and then use |
|
|
|
|
the slider to use Instant |
|
|
|
|
Zoom to digitally zoom in |
|
|
|
|
or out on a DVD movie's |
|
|
|
|
video image (note: this |
|
|
|
|
feature is not available |
|
|
|
|
during Blu-ray Disc |
|
|
|
|
playback). When zoomed |
|
|
|
|
in, you can click and drag |
|
|
|
|
on the video image to |
|
|
|
|
view different areas of the |
|
|
|
|
image. ** note that this |
|
|
|
|
|
12
M ovie
|
|
|
|
hotkey can be modified in |
|
|
|
|
|
settings, so the behavior |
|
|
|
|
|
may differ. If you have a |
|
|
|
|
|
touch enabled display, |
|
|
|
|
|
you can also use Gesture |
|
|
|
|
|
Controls to digitally zoom |
|
|
|
|
|
in or out on the video |
|
|
|
|
|
image. |
|
N |
|
Fast forward/Step |
] |
During playback click this |
|
|
|
forward (when |
|
button to fast forward |
|
|
|
paused) |
|
through content and |
|
|
|
|
|
access the Play Speed |
|
|
|
|
|
Navigator. When playback |
|
|
|
|
|
is paused, use the |
|
|
|
|
|
button to go to the next |
|
|
|
|
|
frame of video. |
|
O |
|
Play/Pause |
Space bar |
Plays and pauses media |
|
|
|
|
|
playback. |
|
|
|
|
|
|
|
P |
|
Stop |
S |
Stops playback of media. |
|
Q |
|
Media playback |
|
During playback, this |
|
|
|
menu |
|
button provides access to |
|
|
|
|
|
the media playback |
|
|
|
|
|
menu. |
|
R |
|
Return to |
|
Click to stop playback and |
|
|
|
previous window |
|
return to the BD/DVD |
|
|
|
|
|
Movie section. |
|
|
|
Restore from full |
Esc |
Click to exit full screen |
|
|
|
screen |
|
mode. |
|
|
|
Eject disc |
Ctrl+E |
When playback is |
|
|
|
|
|
stopped, this button is |
|
|
|
|
|
displayed. Click it to eject |
|
|
|
|
|
the disc in the selected |
|
|
|
|
|
disc drive. |
|
|
|
|
|
|
|
Note: * this feature is not available in some versions of CyberLink PowerDVD.
13

CyberLink M edia Suite
Playback Features
The following are some playback features that are sure to enhance your movie viewing experience:
TrueTheater Video Enhancements and Hardware Decoding
3D Playback
Play Speed Navigator
Gesture Controls
TrueTheater Video Enhancements and Hardware
Decoding
During the playback of DVDs, video files, and videos on YouTube, you can enable TrueTheater video enhancements to maximize the video playback quality. In this window you can also enable hardware acceleration or software decoding for smoother playback.
Note: CyberLink PowerDVD cannot apply certain TrueTheater video effects to
some video file formats.
Enabling Hardware/Software Decoding and TrueTheater Enhancements
At the top of the Videos tab of the TrueTheater Enhancements window, you can enable hardware or software decoding for smoother video playback. Or you can enable both software decoding and TrueTheater video enhancements.
Enable hardware acceleration decoding whenever possible: if your computer supports NVIDIA CUDA/AMD Accelerated Parallel Processing technology, select this option to use GPU acceleration to decode the video for smoother movie playback. When selected, the TrueTheater Effects are disabled.
Use software decoding: select this option to use CyberLink's built in software decoding codec. Select this option if your computer does not support hardware acceleration, but you still want to decode the video for smoother movie playback. When selected, the TrueTheater Effects are disabled.
Use software decoding with TrueTheater enhancements: select this option if you want to use CyberLink's built in codec to decode the video for smoother movie playback, and enable also the TrueTheater enhancements. Once enabled, modify the enhancements as required below.
14
M ovie
Modifying TrueTheater Video Enhancement Settings
Auto adjustment: select this option to apply all TrueTheater enhancements automatically when playing DVDs and videos. CyberLink PowerDVD dynamically adjusts (turns on or off) TrueTheater HD and Motion according to the CPU usage and mobile power settings (notebook/laptop users only).
Manual adjustment: select this option to manually enable and set the amount of TrueTheater enhancements applied to the video as follows:.
TrueTheater HD: select this option to up scale the original video to a higher resolution version, which is sharper and artifact-free. TrueTheater HD is capable of boosting 480p video to 1080p. Use the slider to adjust the sharpness to the best output that suits your configuration.
TrueTheater Lighting (CyberLink Eagle Vision 2): is a video enhancement technology developed by CyberLink that detects video content and dynamically adjusts the brightness/contrast/saturation ratios so that you do not need to change the color settings if the video you are watching contains scenes that are overly dark or too bright. Use the level slider to adjust the TrueTheater Lighting effect the desired amount.
TrueTheater Motion: select this option to enable frame rate upsampling, from 24 fps up to 60 fps, to make panning scenes, particularly in action movies, play more smoothly. TrueTheater Motion can improve the frame rate of video content to 60 or 72 fps, depending on the output frame rate of your display.
TrueTheater Noise Reduction: select this option to reduce the amount of video noise when playing home video files in CyberLink PowerDVD, including High-ISO and TV signal noise. Once enabled, drag the slider to increase or decrease the level of noise reduction on the video.
Note: this feature is not available for disc playback.
TrueTheater Stabilizer: select this option to employ motion compensation technology when playing home video files that are shaky. This feature is ideal for use with video files taken without a tripod or recorded while moving.
Note: this feature is not available for disc playback.
TrueTheater Display Mode
The TrueTheater display mode option is available when you enable TrueTheater enhancements, and lets you select how the video enhancements are displayed during playback.
15

CyberLink M edia Suite
You can select from the following display modes:
 : select to view the applied TrueTheater enhancements on the entire video in normal mode.
 : select to compare the applied TrueTheater enhancements in split mode, with the left half of the video played back with the original video, while the right half has the video enhancements applied.
 : select to preview the applied TrueTheater enhancements on the entire video using compare mode, with the left side containing the original video, while the right side contains the same video with the video enhancements applied.
3D Playback
CyberLink PowerDVD supports the playback of 3D* Blu-ray Discs*, DVDs, video files, and 3D YouTube videos, and also lets you view JPS, MPO, and side by side 3D photos in 3D. CyberLink PowerDVD can also convert any regular 2D Blu-ray Disc**, DVD movie, video file, YouTube video, and photo into 3D using TrueTheater 3D*.
3D Playback Warning: if you experience headaches, dizziness, nausea, blurry eyesight or other symptoms while watching 3D video content, it is highly recommended that you stop playback immediately and see your doctor.
Note: * this feature is not available in some versions of CyberLink PowerDVD.
Enabling 3D Playback
When you insert a 3D** Blu-ray Disc or DVD, or play a 3D video file, CyberLink PowerDVD plays it back automatically in 3D if 3D mode is enabled.
Note: ** if your version of CyberLink PowerDVD supports 3D Blu-ray Disc
playback, you may have to enable playback in settings.
CyberLink PowerDVD also automatically converts all 2D Blu-ray Discs, DVDs, video files, and YouTube videos to 3D using TrueTheater 3D once 3D mode is enabled.
Note: you must manually enable 3D playback when viewing 3D photos or if you
want to convert 2D photos to 3D.
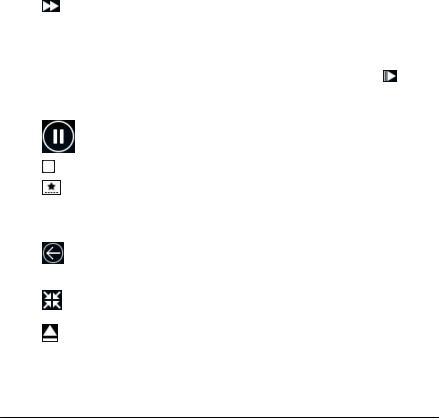
To enable 3D playback, just select the  button on the playback controls.
Note: 3D mode is enabled when the 3D icon on the playback controls displays as
 . Note that a number of features are disabled during 3D playback.
If you need to adjust your 3D display configuration or the playback preferences,
16
M ovie
click  on the playback controls and then select 3D Display.
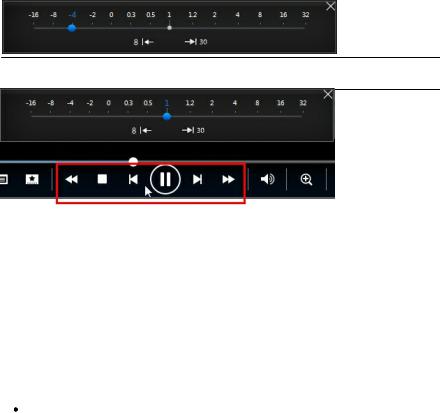
Play Speed Navigator
When wanting to rewind or fast forward through content on movie discs, in movie files, or when playing videos files, you can click the  or
or  button to access the Play Speed Navigator for easier control.
Note: you can also access this panel by right-clicking above or below the player
controls.
Drag the blue control slider left to increase the rewind speed up to 16 times the normal playback speed, or right to increase the forward speed up to 32 times. You can also click  to quickly jump back 8 seconds, or
  to skip forward 30 seconds.
Press the space bar on your keyboard to close the control panel and resume normal playback.
Gesture Controls
If CyberLink PowerDVD is installed on a computer that has a touch enabled display, you can use gesture controls to browse through your media and during media playback.
When viewing a photo, movie, or video, use the spread and pinch gestures to zoom in and out on the image. These gesture controls are also available in calendar view, so you can change the calendar view to show more than one month, or zoom in on a specific day.
17

CyberLink M edia Suite
When viewing a photo, use the swipe right and left gestures to view the previous or next photo. When in calendar view you can swipe up or down to scroll through the days and months in the calendar.
When playing movies or video files, use the swipe right gesture to quickly jump backward 8 seconds. Swipe left to skip forward 30 seconds.
18
M ovie
Browse and Play Movies in
Movie Library
Select the Browse and Play Movies in Movie Library function within the Movie menu of CyberLink PowerStarter to launch CyberLink PowerDVD.
In the Movie Library you can browse through and play the movie files in your personal movie library. Movies files are DVD/Blu-ray Disc* folders and individual video files (movie files or TV show files you recorded with a PVR) that are saved on your computer's hard drive.
Browsing Through Movies in the
Movie Library
When browsing through the movie files in the Movie tab's Movie Library section of the media library, you can view their movie cover art, rating information, and more. Click the down arrow in the top right of the window to filter the movies by
10 Recently Played Movies or Movies Not Watched Yet if required.
Note: use the zoom slider on the playback controls to use Instant Scale to
dynamically resize the movie cover art to a desired size.
If a movie file is not displaying the cover art, you can insert an image file (in the JPG or PNG format) in the movie file's folder and name it “folder” to use it as the
19

CyberLink M edia Suite
cover art. You can also right click on the movie file and then select Set Cover Art. In the Select Image dialog, browse to and then select an image on your computer's hard drive to use as the cover art.
Note: if the cover art for a movie file in the movie library is incorrect, you can right click on it and select Hide Online Info to remove it and the related movie information.
Right-click on a movie file thumbnail in the media window and then select Locate on Disk to view the folder where the file is located in Windows Explorer. If you'd like to remove a movie file from the media library (but not from your computer's hard drive), just right click on it and select Remove from Library.
Supported Movie File Formats
In CyberLink PowerDVD you can play back movie files in the following formats:
Movie file formats: 264, 265, 26L, 3G2, 3GP, 3GP2, 3GPP, ASF, AVC, AVI, BSF, DIV, DIVX*, DVR-MS, FLV, H264, H265*, HEVC*, JSV, JVT, M1V, M2P, M2T, M2TS, M2V, M4V, MK3D*, MKV, MOD, MOV, MP4, MP4V, MPE, MPEG, MPG, MPV, MTS, MVC*, QT, TOD, TP, TPD, TRP, TS, TTS, VC1*, VOB, VRO, WM, WMV, WTV.
Note: * this feature is not available in some versions of CyberLink PowerDVD.
Playing Movie Files in PowerDVD
To play a movie file in your media library, select Movies in the media panel, and then Movie Library. Double-click on a movie file to begin playback.
Note: see Video Playback Controls for a list and description of the controls and
playback features available during movie file playback.
Play a Movie Folder
You can play back any DVD and unprotected Blu-ray Disc* folders that are on your hard drive. To play a movie folder, do this:
1.Select the Play a Movie Folder function within the Movie menu to open CyberLink PowerDVD.
2.Select Movies in the media panel.
3.Click the  button on the playback controls, and then browse to and select the movie folder.
20

M ovie
4.Click on OK and then play button to begin playback.
Note: * this feature is not available in some versions of CyberLink PowerDVD.
View Online Movie Info
If you'd like to browse through the latest movie information available, select the View Online Movie Info option in the Movie menu of CyberLink PowerStarter to go to the MoovieLive web site. There you can view information about all the latest movie releases, find out what are the top rated movies, and which are the most watched by CyberLink PowerDVD users. You can also read movie reviews, watch movie trailers, read bios on your favorite actors, and much more.
21
CyberLink M edia Suite
22

Video
Chapter 3:
Video
The video functions in CyberLink Media Suite let you play video files in CyberLink PowerDVD, edit your videos in CyberLink PowerDirector, produce movie discs with CyberLink PowerProducer, and much more. You can also convert videos to other file formats with CyberLink MediaEspresso, or use CyberLink MediaShow to organize, enhance, and share your videos.
Note: for a more detailed description of these programs and there functions, please
consult the product help files.
Play Video Files
To play back videos files in CyberLink PowerDVD, select the Play Video Files function within the Video menu of CyberLink PowerStarter. The CyberLink PowerDVD main window displays.
Note: for a detailed description of all the playback features available in CyberLink PowerDVD, press the F1 key on your keyboard when within the program window to open the help file.
You can play back videos files by doing any of the following:
drag and drop a video file directly onto the CyberLink PowerDVD user interface or the PowerDVD desktop icon.
to play a video file in your media library, select Videos in the media panel, and then browse to the folder that contains your videos. Double-click on a video file to begin playback.
to play a video file on your hard drive, click the My Computer tab in the media panel, and then browse to the folder that contains your video file. Doubleclick on a video file to begin playback.
if CyberLink PowerDVD is set as the default player for a video file on your computer, you can also just double-click on a file in Windows Explorer to play it back.
Note: for a list of the available playback controls, see Video Playback Controls. For information on some of the playback features that are available during video file playback, see Playback Features.
23
CyberLink M edia Suite
Supported Video File Formats
In CyberLink PowerDVD you can play back videos in the following file formats:
Video formats: 264, 265, 26L, 3G2, 3GP, 3GP2, 3GPP, ASF, AVC, AVI, BSF, DIV, DIVX*, DVR-MS, FLV, H264, H265*, HEVC*, JSV, JVT, M1V, M2P, M2T, M2TS, M2V, M4V, MK3D*, MKV, MOD, MOV, MP4, MP4V, MPE, MPEG, MPG, MPV, MTS, MVC*, QT, TOD, TP, TPD, TRP, TS, TTS, VC1*, VOB, VRO, WM, WMV, WTV.
Note: * this feature is not available in some versions of CyberLink PowerDVD.
Video Playback Controls
When playing back a video file in the Videos section of the Media Library tab, or a movie file in the Movie Library section, the playback controls display as follows:
Note: the below table includes the hotkey for each specific button on the playback controls, if available. For a complete list of all the hotkeys in PowerDVD and the corresponding behavior, see the hotkey table in the program's help file.
|
Icon |
Button |
Hotkey |
Description |
|
|
|
|
|
|
|
||
A |
|
Elapsed time |
|
Displays the time elapsed |
||
|
|
|
|
for the current video. |
|
|
|
|
|
|
Hover your mouse over it |
||
|
|
|
|
to reveal two buttons that |
||
|
|
|
|
let you jump backward |
||
|
|
|
|
and forward in the video. |
||
|
|
|
|
Click |
to quickly jump |
|
|
|
|
|
back 8 seconds, or |
to |
|
|
|
|
|
skip forward 30 seconds. If |
||
|
|
|
|
you have a touch enabled |
||
|
|
|
|
display, you can also use |
||
|
|
|
|
Gesture Controls to skip |
||
|
|
|
|
forward or backward |
|
|
|
|
|
|
during video playback. |
||
24
Loading...