


 Loading...
CyberLink
PowerDirector
User's Guide
Copyright and Disclaimer
All rights reserved.
To the extent allowed by law, PowerDirector IS PROVIDED “AS IS”, WITHOUT WARRANTY OF ANY KIND, EITHER EXPRESS OR IMPLIED, INCLUDING WITHOUT LIMITATION ANY WARRANTY FOR INFORMATION, SERVICES, OR PRODUCTS PROVIDED THROUGH OR IN CONNECTION WITH PowerDirector AND ANY IMPLIED WARRANTIES OF MERCHANTABILITY, FITNESS FOR A PARTICULAR PURPOSE, EXPECTATION OF PRIVACY, OR NON-INFRINGEMENT.
BY USING THIS SOFTWARE, YOU AGREE THAT CYBERLINK WILL NOT BE LIABLE FOR ANY DIRECT, INDIRECT, OR CONSEQUENTIAL LOSS ARISING FROM THE USE OF THIS SOFTWARE OR MATERIALS CONTAINED EITHER IN THIS PACKAGE.
The terms and conditions here under shall be governed and construed in accordance with the laws of Taiwan.
PowerDirector is a registered trademark along with other company and product names mentioned in this publication, used for identification purposes and remain the exclusive property of their respective owners.
Manufactured under license from Dolby Laboratories. Dolby and the double-D symbol are registered trademarks of Dolby Laboratories. Confidential unpublished works. Copyright 1995-2005 Dolby Laboratories. All rights reserved.
For DTS patents, see http://patents.dts.com. Manufactured under license from DTS Licensing Limited. DTS, the Symbol, & DTS and the Symbol together are registered trademarks, and DTS 5.1 Producer is a trademark of DTS, Inc. © DTS, Inc. All Rights Reserved.
International Headquarters
Mailing Address |
CyberLink Corporation |
|
15F., No. 100, Minquan Rd., Xindian Dist. |
|
New Taipei City 231, Taiwan (R.O.C.) |
Web Site |
https://www.cyberlink.com |
Telephone |
886-2-8667-1298 |
Fax |
886-2-8667-1385 |
Copyright © 2017 CyberLink Corporation. All rights reserved.
Contents
.................................................. |
1 |
Introduction |
|
Welcome................................................................................................ |
1 |
Latest.................................................................................................Features |
1 |
DirectorZone.................................................................................................and CyberLink Cloud |
2 |
PowerDirector.................................................................................................Versions |
4 |
Minimum................................................................................................System Requirements |
5 |
.................................................. |
7 |
PowerDirector Editing Modes |
|
Auto Mode................................................................................................ |
8 |
Slideshow................................................................................................Creator |
10 |
Setting.................................................................................................Music Preferences |
12 |
Customizing.................................................................................................Slideshows in the Slideshow Designer |
13 |
.................................................. |
18 |
PowerDirector Workspace |
|
PowerDirector................................................................................................Modules |
18 |
Rooms................................................................................................ |
19 |
Media.................................................................................................Room |
19 |
Effect.................................................................................................Room |
21 |
PiP.................................................................................................Objects Room |
21 |
Particle.................................................................................................Room |
21 |
Title.................................................................................................Room |
22 |
Transition.................................................................................................Room |
22 |
Audio.................................................................................................Mixing Room |
22 |
Voice.................................................................................................-Over Recording Room |
22 |
Chapter.................................................................................................Room |
23 |
Subtitle.................................................................................................Room |
23 |
i
CyberLink PowerDirector Help
Library................................................................................................Window |
23 |
Explorer.................................................................................................View |
25 |
Searching.................................................................................................the PowerDirector Library |
25 |
Filtering.................................................................................................Media in the Library |
26 |
Library.................................................................................................Menu |
28 |
Expanding................................................................................................the Workspace |
28 |
Preview................................................................................................Window |
29 |
Preview.................................................................................................Player Controls |
30 |
Preview.................................................................................................Screen Snapshots |
31 |
Preview/Display.................................................................................................Options |
31 |
Zoom.................................................................................................In/Out |
34 |
Undocking.................................................................................................the Preview Window |
34 |
Playing.................................................................................................360° Media Files |
34 |
Previewing.................................................................................................in 3D Mode |
36 |
Editing................................................................................................Workspace |
37 |
Timeline.................................................................................................Mode |
37 |
Storyboard.................................................................................................Mode |
49 |
.................................................. |
50 |
PowerDirector Projects |
|
Setting................................................................................................Project Aspect Ratio |
50 |
360° Video................................................................................................Projects |
51 |
Exporting................................................................................................Projects |
52 |
Reusing................................................................................................PowerDirector Projects |
52 |
CyberLink................................................................................................Cloud Projects |
55 |
Importing Media into |
|
.................................................. |
57 |
PowerDirector |
|
Importing................................................................................................Media Files |
57 |
360°.................................................................................................Media Files |
58 |
3D.................................................................................................Media |
59 |
Importing.................................................................................................PowerDirector Projects |
62 |
Capturing................................................................................................Media |
62 |
ii
Capturing.................................................................................................from a DV Camcorder |
63 |
Capturing.................................................................................................from an HDV Camcorder |
64 |
Capturing.................................................................................................from a TV Signal |
65 |
Capturing.................................................................................................from a Digital TV Signal |
65 |
Capturing.................................................................................................from a Webcam |
65 |
Capturing.................................................................................................from a Microphone |
65 |
Capturing.................................................................................................from a CD |
65 |
Capturing.................................................................................................from an AVCHD Camcorder |
66 |
Capturing.................................................................................................from an Optical Device |
66 |
Capture.................................................................................................Desktop with Screen Recorder |
66 |
Captured.................................................................................................Content |
66 |
Quality.................................................................................................Profile Setup |
67 |
Capture.................................................................................................Settings |
67 |
Capture.................................................................................................Preferences |
67 |
Downloading................................................................................................Media |
68 |
Downloading.................................................................................................Content from DirectorZone/CyberLink Cloud69 |
|
Downloading.................................................................................................Photos From Flickr |
70 |
Downloading.................................................................................................Royalty Free Music |
71 |
Detecting Scenes, Extracting Audio, and Capturing |
|
................................................................................................ |
72 |
Snapshots |
|
Detecting.................................................................................................Scenes in a Video Clip |
72 |
Extracting.................................................................................................Audio from a Video Clip |
73 |
Capturing.................................................................................................Screen Snapshots from a Video Clip |
74 |
.................................................. |
76 |
PowerDirector Plug-ins |
|
Using the................................................................................................MultiCam Designer |
76 |
Importing.................................................................................................Media |
77 |
Synchronizing.................................................................................................Clips |
79 |
Creating.................................................................................................Recorded Content |
80 |
Changing.................................................................................................the Recorded Content |
82 |
Using the................................................................................................Theme Designer |
84 |
Overview................................................................................................. |
85 |
Adding.................................................................................................Theme Templates/Sequences |
85 |
iii
CyberLink PowerDirector Help
Adding.................................................................................................Media Clips |
87 |
Importing.................................................................................................More Media Files |
90 |
Editing.................................................................................................Media Clips |
91 |
Editing.................................................................................................Background Music |
92 |
Editing.................................................................................................Title Text |
93 |
Replacing.................................................................................................Background Images |
94 |
Adding.................................................................................................Transitions Between Sequences |
94 |
Previewing.................................................................................................and Saving Movies |
95 |
Editing.................................................................................................Created Movies |
95 |
Editing................................................................................................Video in the Action Camera Center |
96 |
Fixing.................................................................................................Video Clips |
98 |
Creating.................................................................................................Action Effects on Video Clips |
100 |
Action.................................................................................................Camera Center Settings |
106 |
Changing.................................................................................................the Action Camera Center Content |
107 |
Using................................................................................................an Express Project |
108 |
Recording................................................................................................Your Desktop with the Screen Recorder |
109 |
Setting.................................................................................................Capture Area |
111 |
Configuring.................................................................................................the Screen Recorder Settings |
117 |
Creating................................................................................................Overlays with the Blending Effect |
118 |
Blending.................................................................................................Image Presets/Templates |
119 |
Creating................................................................................................Video Collages |
123 |
Creating.................................................................................................a Video Collage |
124 |
Arranging Media in Your |
|
.................................................. |
128 |
Production |
|
Adding................................................................................................Video Clips and Images to the Timeline |
129 |
Adding.................................................................................................Video Clips and Images |
129 |
Adding.................................................................................................Color Boards and Backgrounds |
131 |
Adding................................................................................................Audio Clips |
135 |
Syncing.................................................................................................Audio |
137 |
Syncing................................................................................................Clips by Audio |
140 |
Using................................................................................................the Magic Movie Wizard |
140 |
iv
Using................................................................................................the Slideshow Creator |
141 |
.................................................. |
142 |
Editing Your Media |
|
Editing................................................................................................360° Video Projects |
142 |
Content................................................................................................Aware Editing |
144 |
Using.................................................................................................Content Aware Editing |
145 |
Splitting................................................................................................a Clip |
149 |
Unlinking................................................................................................Video/Audio Clips |
150 |
Trimming................................................................................................Video and Audio Clips |
151 |
Trimming.................................................................................................a Video Clip |
151 |
Trimming.................................................................................................an Audio Clip |
155 |
Setting................................................................................................a Media Clip's Duration |
157 |
Setting................................................................................................TV (Video Clip Interlacing) Format |
158 |
Adjusting................................................................................................Video Clip Aspect Ratio |
158 |
Stretching................................................................................................Images |
160 |
Cropping................................................................................................Images |
160 |
Changing................................................................................................the Shape of Media |
161 |
Fixing................................................................................................and Enhancing Images/Videos |
162 |
Advanced.................................................................................................Fixes and Enhancements |
170 |
Utilizing................................................................................................Keyframes on Media |
171 |
Adding.................................................................................................Keyframes |
173 |
Muting................................................................................................Audio |
176 |
Advanced................................................................................................Audio Editing |
176 |
Time ................................................................................................Info |
177 |
Magic................................................................................................Fix |
177 |
Magic................................................................................................Cut |
177 |
.................................................. |
179 |
Using the Tools |
|
Using................................................................................................the Power Tools |
179 |
Crop.................................................................................................& Zoom Video |
180 |
v
CyberLink PowerDirector Help
Adjusting.................................................................................................Video Speed in the Video Speed Designer |
182 |
Audio................................................................................................Ducking |
186 |
Motion................................................................................................Tracker |
187 |
Tracking.................................................................................................the Motion of Objects in Videos |
188 |
Adding.................................................................................................and Editing Trackers |
192 |
Adding.................................................................................................Motion Tracking Effects |
194 |
Action................................................................................................Camera Center |
198 |
Blending................................................................................................Effect |
198 |
View ................................................................................................Designer |
199 |
Customizing.................................................................................................Direction of View in 360º Video Clips |
200 |
Creating.................................................................................................Little Planet Videos |
210 |
360º ................................................................................................Start View Setting |
217 |
.................................................. |
220 |
Adding Effects |
|
Blending................................................................................................Clips on the Timeline |
220 |
Adding................................................................................................Video Effects |
222 |
Modifying.................................................................................................a Video Effect |
224 |
Using................................................................................................Magic Motion |
225 |
Magic.................................................................................................Motion Designer |
226 |
Using................................................................................................Magic Style |
227 |
Using................................................................................................the Freeze Frame Effect |
228 |
.................................................. |
229 |
Creating PiP Effects |
|
Adding................................................................................................PiP Objects |
229 |
Types.................................................................................................of PiP Objects |
231 |
Creating.................................................................................................Custom PiP Objects |
231 |
Using................................................................................................the Paint Designer |
232 |
Creating.................................................................................................a Paint Animation |
233 |
Modifying................................................................................................Media in the PiP Designer |
236 |
Mode.................................................................................................Selection and Zoom Tools |
237 |
Modifying.................................................................................................PiP Media Size and Position |
238 |
vi
Modifying.................................................................................................PiP Media Properties |
239 |
Adding.................................................................................................Motion to PiP Media |
243 |
Utilizing.................................................................................................PiP Keyframes |
247 |
Saving.................................................................................................and Sharing PiP Objects |
251 |
.................................................. |
253 |
Adding Particle Effects |
|
Modifying................................................................................................Particle Effects in the Particle Designer |
255 |
Mode.................................................................................................Selection and Zoom Tools |
256 |
Adding.................................................................................................Objects, Images, and Backgrounds |
257 |
Modifying.................................................................................................Particle Object Range and Position |
258 |
Modifying.................................................................................................Particle Object Properties |
259 |
Adding.................................................................................................Motion to Particle Objects |
264 |
Utilizing.................................................................................................Particle Keyframes |
264 |
Saving.................................................................................................and Sharing Particle Effect Templates |
267 |
.................................................. |
269 |
Adding Title Effects |
|
Title Effect................................................................................................Categories |
271 |
Standard.................................................................................................2D Title Effects |
271 |
3D.................................................................................................Title Effects |
272 |
360º.................................................................................................Title Effects |
272 |
Modifying................................................................................................Titles in the Title Designer - Basic |
274 |
Zoom.................................................................................................Tools |
275 |
Adding.................................................................................................Additional Title Text |
275 |
Modifying.................................................................................................Title Effect Position |
275 |
Modifying.................................................................................................Title Text Properties |
276 |
Setting.................................................................................................Title Text Length |
280 |
Saving.................................................................................................and Sharing Title Templates |
281 |
Modifying................................................................................................Titles in the Title Designer - Advanced |
283 |
Mode.................................................................................................Selection and Zoom Tools |
284 |
Adding.................................................................................................Text, Particles, Images, and Backgrounds |
287 |
Modifying.................................................................................................Title Effect Position |
289 |
Modifying.................................................................................................Title Text and Image Properties |
290 |
Applying.................................................................................................Animation Effects to Title Text |
299 |
vii
CyberLink PowerDirector Help
Adding.................................................................................................Motion to Title Text |
302 |
Utilizing.................................................................................................Title Effect Keyframes |
305 |
Saving.................................................................................................and Sharing Title Templates |
308 |
Creating Custom Masks in the |
|
.................................................. |
310 |
Mask Designer |
|
Mode................................................................................................Selection and Zoom Tools |
311 |
Selecting................................................................................................Masks |
312 |
Creating................................................................................................Custom Masks |
315 |
Modifying................................................................................................Mask Size and Position |
325 |
Modifying................................................................................................Mask Object Settings |
326 |
Adding................................................................................................Motion to Masks |
327 |
Utilizing................................................................................................Mask Keyframes |
330 |
Saving................................................................................................and Sharing Masks |
334 |
.................................................. |
335 |
Using Transitions |
|
Adding................................................................................................Transitions to a Single Clip |
335 |
Adding................................................................................................Transitions Between Two Clips |
337 |
Using................................................................................................Audio Transitions |
338 |
Setting................................................................................................Transition Behavior |
340 |
Modifying................................................................................................Transition Settings |
341 |
Modifying................................................................................................Alpha Transitions in the Transition Designer |
342 |
Creating.................................................................................................New Alpha Transitions |
343 |
Modifying.................................................................................................Alpha Transition Properties |
344 |
Saving.................................................................................................Alpha Transitions |
357 |
Mixing Audio and Recording |
|
.................................................. |
360 |
Voice-Overs |
|
Adjusting................................................................................................Audio Clip Volume Levels |
360 |
Mixing.................................................................................................Audio In-Track |
360 |
Mixing.................................................................................................Audio in the Audio Mixing Room |
362 |
Adding.................................................................................................Fade Effects to Audio Clips |
363 |
viii
Restoring.................................................................................................Audio Clip Volume Levels |
364 |
Recording................................................................................................Voice-Overs |
364 |
.................................................. |
366 |
Adding Chapters |
|
Adding................................................................................................Chapter Markers |
366 |
Setting................................................................................................Chapter Thumbnails |
366 |
.................................................. |
367 |
Adding Subtitles |
|
Adding................................................................................................Subtitle Markers |
367 |
Importing................................................................................................Subtitles from a File |
368 |
Extracting................................................................................................Subtitles from an MKV File |
368 |
Editing................................................................................................Subtitles |
369 |
Syncing................................................................................................Subtitles |
370 |
.................................................. |
371 |
Producing Your Project |
|
Utilizing................................................................................................Intelligent SVRT |
371 |
Produce................................................................................................Window |
372 |
Outputting.................................................................................................to a Standard 2D File |
374 |
Producing.................................................................................................a 360° Video |
376 |
Outputting.................................................................................................in a 3D Format |
378 |
Outputting.................................................................................................to a Device |
381 |
Uploading.................................................................................................Video to Online Media Sites |
383 |
Uploading.................................................................................................a 360° Video |
392 |
Batch.................................................................................................Produce |
396 |
.................................................. |
398 |
Creating Discs |
|
Importing................................................................................................Additional Disc Content |
399 |
Selecting................................................................................................a Disc Menu |
401 |
Editing................................................................................................Disc Menu Properties |
403 |
Configuring.................................................................................................Disc Menu Settings |
403 |
Editing.................................................................................................Disc Menu Text |
404 |
Setting.................................................................................................Disc Menu Music |
404 |
Adding.................................................................................................a First Play Video |
405 |
ix
CyberLink PowerDirector Help
Setting.................................................................................................Disc Playback Mode |
406 |
Specifying.................................................................................................Buttons Per Page |
406 |
Modifying.................................................................................................Menu Object Properties |
407 |
Customizing................................................................................................Disc Menus in the Menu Designer |
408 |
Mode.................................................................................................Selection, Zoom Tools, and Context Menu |
409 |
Setting.................................................................................................Menu Opening and Background |
410 |
Adding.................................................................................................Title Text and Images to Menus |
412 |
Modifying.................................................................................................Text Object and Image Properties |
413 |
Adding.................................................................................................and Editing Menu Buttons |
419 |
Enabling.................................................................................................3D Depth in Disc Menus |
421 |
Saving.................................................................................................and Sharing Disc Menu Templates |
421 |
Burning................................................................................................Your Production to Disc |
423 |
Burning.................................................................................................a Disc in 2D |
423 |
Burning.................................................................................................a Disc in 3D |
425 |
Configuring.................................................................................................Burn Settings |
428 |
Erasing.................................................................................................Discs |
429 |
.................................................. |
430 |
PowerDirector Preferences |
|
General................................................................................................Preferences |
430 |
Editing................................................................................................Preferences |
432 |
File Preferences................................................................................................ |
434 |
Display................................................................................................Preferences |
434 |
Hardware................................................................................................Acceleration Preferences |
436 |
Project................................................................................................Preferences |
436 |
Produce................................................................................................Preferences |
437 |
Capture................................................................................................Preferences |
437 |
Confirmation................................................................................................Preferences |
438 |
DirectorZone................................................................................................Preferences |
440 |
CyberLink................................................................................................Cloud Preferences |
441 |
Improvement................................................................................................Program Preferences |
442 |
x
.................................................. |
443 |
PowerDirector Hotkeys |
|
Default................................................................................................Keyboard Hotkeys |
443 |
Application.................................................................................................Menu Bar Hotkeys |
444 |
System.................................................................................................Hotkeys |
447 |
Capture.................................................................................................Hotkeys |
447 |
Edit.................................................................................................Hotkeys |
448 |
Designer.................................................................................................Hotkeys |
448 |
Customizing................................................................................................Keyboard Hotkeys |
449 |
Hotkey.................................................................................................Sets |
450 |
.................................................. |
452 |
Appendix |
|
Intelligent................................................................................................SVRT: When Is Used? |
452 |
Licensing................................................................................................and Copyright Information |
453 |
Licenses.................................................................................................and Copyrights |
455 |
.................................................. |
467 |
Technical Support |
|
Before................................................................................................Contacting Technical Support |
467 |
Web Support................................................................................................ |
468 |
Help Resources................................................................................................ |
468 |
xi

CyberLink PowerDirector Help
Chapter 1:
Introduction
This chapter introduces CyberLink PowerDirector and the digital video editing process. It also outlines all of the latest features, available versions, and reviews the minimum system requirements for CyberLink PowerDirector.
Note: this document is for reference and informational use only. Its content and the corresponding program are subject to change without notice. For more helpful tips on using the program, please visit our members forum or see the video tutorials at https://directorzone.cyberlink.com/tutorial/pdr.
Welcome
Welcome to the CyberLink family of digital media tools. CyberLink PowerDirector is a digital video editing program that lets you create professional-looking videos and photo slideshows, complete with music, voice-overs, special effects, transitions, and much more. You can then output your project to a file, camcorder, portable device, upload it directly to various online video sharing web sites, or burn it to a disc, complete with stylish menus.
Latest Features
Below is a list of some of the latest features within the CyberLink PowerDirector program.
More True360* Video Editing Options
Use 360º Start View Setting to change the starting view in your 360º video clips.
Apply more fixes to 360º video, including stabilization, brightness, and denoise.
Convert titles and non-360º media clips in 360º video projects for better looking results.
Track moving objects in 360º videos in the Motion Tracker to apply motion tracking effects.
1

Introduction
More Editing Tools for Enhanced Creativity
Create professional looking edits of your video quickly in the Video Collage Designer*.
Utilize Audio Ducking to auto lower background music during dialogue or voice overs.
Use 360º video clips to create unique little planet* videos.
Auto create conventional videos in the View Designer* by tracking moving objects in 360º video.
Adds support for Academy Award winning Boris FX* plugin effects.
More Video Enhancement Options for Better Looking Videos
Set a matching color tone in your videos with Color Match. Transform the colors in a video using color look-up tables (CLUT). Produce creative color effects on your videos with Split Toning. Apply the HDR effect on video clips and images.
More Usability Improvements
Choose the new Basic mode in the Title Designer for a simpler editing experience.
Set the resolution of created shadow files.
Choose how to apply shadow effects in Title and PiP Designers.
Adds support for .MOV video (alpha PNG) and 10-bit video (H.265 decode only) import.
Note: * optional feature in CyberLink PowerDirector. Check the version
table on our web site for detailed versioning information.
DirectorZone and CyberLink Cloud
You can upload/download effects and templates, and back up media, preferences, projects, and more with the DirectorZone and CyberLink Cloud* features.
2

CyberLink PowerDirector Help
Note: * optional feature in CyberLink PowerDirector. Check the version
table on our web site for detailed versioning information.
DirectorZone
DirectorZone is a free web service that lets you search for and download theme templates, PiP objects, paint animations, title templates, particle objects, sound clips, and disc menus created by other users of CyberLink PowerDirector.
To access the benefits of DirectorZone, you can sign in by:
clicking the Sign in to DirectorZone link in the top right corner of the CyberLink PowerDirector window.
clicking the  button at the top of the window to open the PowerDirector preferences, and then on the DirectorZone tab. See DirectorZone Preferences for more information.
Also, be sure to periodically click the  button to check out the latest
DirectorZone Bulletin and view the Popular templates on DirectorZone. Just click in either of these sections in the Notifications window to view the bulletin or download these templates. Or go to https://directorzone.cyberlink.com to find out more information on the features and benefits of the DirectorZone web service.
CyberLink Cloud
CyberLink Cloud is a cloud storage service from CyberLink where users can upload and download their effects and templates, PowerDirector projects, produced video clips, and more. CyberLink Cloud allows users to back up media, preferences, projects, etc., and ensure their working environment is the same on multiple computers.
Note: CyberLink Cloud is a subscription cloud storage service that is included with some CyberLink products, and is available for purchase through our web site. For more detailed information, see https://www.cyberlink.com/products/cyberlink-cloud/.
3
Introduction
PowerDirector Versions
The features that are available to you within CyberLink PowerDirector are completely dependent on the version you have installed on your computer. Supported file formats, editing features, disc-making functions, and other features vary depending on the version that you have.
To view the PowerDirector version table, please go to our web site: https://www.cyberlink.com/products/powerdirector-ultra/compare_en_US.html
To determine your version of CyberLink PowerDirector, click on the CyberLink PowerDirector logo in the top right corner or select ? > About CyberLink PowerDirector.
PowerDirector Live
PowerDirector Live is a subscription based version of CyberLink PowerDirector that provides all the editing features you expect, and adds the CyberLink Cloud storage service and more.
With a PowerDirector Live subscription, you get:
All the award-winning features of the Ultimate version of CyberLink PowerDirector, including the production of 4K ultra HD video and stunning 3D movies.
The ability to back up program preferences, projects, project media, and (PiP object, paint animation, title effect, particle effect, disc menu) templates on the cloud storage space CyberLink Cloud.
Guaranteed updates to the latest versions of CyberLink PowerDirector Ultimate.
PowerDirector Live is the must-have solution for on-the-go video editors who want easy access to their media and the latest up-to-date editing technologies.
Updating PowerDirector
Software upgrades and updates (patches) are periodically available from CyberLink. CyberLink PowerDirector automatically prompts you when either is available.
4
CyberLink PowerDirector Help
Note: you can prevent CyberLink PowerDirector from auto checking for
updates/upgrades in General Preferences.
To update your software, do this:
1.Click the  button to open the Notifications window.
2.Check the New Updates and Upgrade Info sections.
3.Select an item in these sections to open your web browser, where you can purchase product upgrades or download the latest patch update.
Note: you must connect to the Internet to use this feature.
Minimum System Requirements
The system requirements listed below are recommended as minimums for general digital video production work.
System Requirements
Operating System |
Microsoft Windows 10, 8/8.1, 7 (64 bit OS |
|
recommended) |
|
|
Processor (CPU) |
Intel Core™ i-series or AMD Phenom® II |
|
|
Graphics Processor |
NVIDIA GTX220/470 (2010 Fermi) |
(VGA) |
AMD 5450 (2010 Evergreen) |
|
Intel Ivy Bridge (2012) |
|
|
Memory |
2 GB required (6 GB or above recommended) |
|
|
Screen Resolution |
1024 x 768, 16-bit color |
|
|
Hard Disk Space |
7 GB required |
|
|
Burning Drive |
Burning drive is required for disc burning purpose |
|
|
Sound Card |
Windows compatible sound card is required |
|
|
Internet Connection |
Internet connection required for initial software & |
|
file formats activation |
|
|
5

Introduction
Note: please consult the CyberLink web site
(https://www.cyberlink.com/products/powerdirector-
ultimate/spec_en_US.html) for the most recent system requirements information. * optional feature in CyberLink PowerDirector. Check the version table on our web site for detailed versioning information.
6

CyberLink PowerDirector Help
Chapter 2:
PowerDirector Editing
Modes
When you launch the program from the start menu, or the CyberLink PowerDirector shortcut on the desktop, you are prompted to choose one of the following editing modes:
Note: before selecting your preferred editing mode, be sure to set the video
aspect ratio for your project (16:9, 4:3, or 9:16).
Timeline Mode: select this option to enter timeline mode, a multi video track editing mode, where all of the program's features are available to you. For more details about this mode and the available tracks, see Timeline Mode.
Storyboard Mode: select this option if you want to view a large graphical display of all your video clips and images on the first track in the timeline. See Storyboard Mode for more information about what's available in this mode.
Slideshow Creator: with the Slideshow Creator you can instantly turn your photos into a dynamic slideshow. Follow the steps in the Slideshow Creator to import your photos, add background music, and stylish slideshow templates. Once done, you can preview the slideshow, before outputting it as a video file or burning it to disc.
Auto Mode: if you are new to the editing process and not sure how or where to get started, then auto mode's Magic Movie Wizard can help. The Magic Movie Wizard takes you through a step-by-step process to import, style, adjust, and preview your finished movie, in just a few steps. You can then edit the created production, output it to a video file, or burn it to a disc.
360° Editor*: select this option to create a 360° virtual reality video. See 360° Media Files for information on importing these types of media files, or Editing 360° Video Projects for information on how to edit them.
Note: select the Always enter timeline mode option at the bottom of this dialog to skip this window at startup. You can always reset this selection at any time in Confirmation Preferences.
7
PowerDirector Editing Modes
Auto Mode
If you are new to the editing process and not sure how or where to get started, then auto mode's Magic Movie Wizard can help. The Magic Movie Wizard takes all of your media and creates a completed video production in just a few steps.
To create your video production using the Magic Movie Wizard in auto mode, do this:
Note: if you want more creative control than the Magic Movie Wizard provides, you can also use the Theme Designer to create your video production. The Theme Designer allows you to customize the theme templates used and choose the exact images, video clips, and background music you want in your production. See Using the Theme Designer for more information.
1.Select Auto Mode when prompted which mode you prefer at startup. The Magic Movie Wizard displays.
Note: if you are in the timeline mode, you can quickly launch the Magic
Movie Wizard by clicking on the  button above the timeline and selecting M agic M ovie Wizard.
2.In the Source window, click  to import all of the media you want to use in your video production. Select Import Media Files to import a number of individual video or image files, or select Import a Media Folder if all of your media is in a specific folder on your computer's hard drive. CyberLink PowerDirector will import all of the supported media file formats in the selected folder.
Note: click  to remove any unwanted media files from your production.
3.Before proceeding to the next window, you can perform simple trims on video clips and crop any imported images as follows:
hover your mouse over a video clip you want to trim, and then click  on its thumbnail to open the Trim window. See Performing a Single Trim for information on how to trim video clips.
hover your mouse over an image you want to crop, and then click  on its thumbnail to open the Crop window. See Cropping Images for information on how to crop images.
8

CyberLink PowerDirector Help
4.Once you are done importing, trimming and cropping, click Next to continue.
Note: once you proceed, you can always click the Previous button to return to the Source window to import more media or trim/crop the imported video clips/images.
5.In the Style window, select from the available movie styles. Each style you select will result in a different outputted video. Select Free Download* to get more style templates. See DirectorZone for more information.
Note: the style templates with the 3D icon produce a 3D effect in 3D mode and when outputted in 3D video productions. * optional feature in CyberLink PowerDirector. Check the version table on our web site for detailed versioning information.
6.Click Next to continue.
7.In the Adjustment window, click  to add music to your production. Then use the available controls to do the following:
use the  button to add more music files to the background music playlist. Use the
  and
and  buttons to set the order of the music in the
playlist. The total duration of all the music added is noted above the playlist.
Mix audio level between music and the video's audio: use the slider to mix the audio level, by deciding whether to have more background music or the original video's audio in the production.
Specify the movie duration: here you can specify how long your movie will be. Select Original duration if you don't want the Magic Movie Wizard to make any edits to your imported media; Select Set output duration to manually specify how long you want the movie to be in the field provided; Select Fit duration to background music if you want your video production to match the duration of the music you imported into the playlist.
8.Click the Settings* button to use the sliders to customize the criteria the Magic Movie Wizard uses to cut your movie. Click OK to save the settings.
Note: * optional feature in CyberLink PowerDirector. Check the version
table on our web site for detailed versioning information.
9.Click Next to continue.
10.In the Preview window the Magic Movie Wizard generates a version of your production. If available, enter a Starting title and Ending title for your
9

PowerDirector Editing Modes
production in the fields provided, and then use the available player controls to preview it.
Note: if you are not satisfied with the current video production you can click the Previous button to return to previous windows to add/remove music, select a different style, change the criteria settings, duration, or import more media. You can also click the Reorder M edia button (if available) to shuffle the media files in the created production for a different look, or the
Edit in the Theme Designer button if you want to customize the style template used. See Using the Theme Designer for more information.
11.Click Next to continue.
12.You are done. To finish and close the Easy Editor, choose one of the following:
Produce Video: click to enter the Produce module where you can output your production to a video file, device, or upload it to a video sharing web site. See Producing Your Project.
Create Disc: click to burn your production to a disc, complete with a professional looking disc menu, in the Create Disc module. See Creating Discs.
Advanced Editing: click this option if you'd like to perform some more advanced editing on your production in the Edit module.
Slideshow Creator
The Slideshow Creator is the easiest way to create a dynamic slideshow with your photos.
To create a slideshow in the Slideshow Creator, do this:
1.Select Slideshow Creator when prompted which mode you prefer at startup. The first Slideshow Creator window displays.
Note: if you are in the timeline mode, you can launch the Slideshow Creator by adding photos to the timeline, selecting them, and then clicking on the
Slideshow button above the timeline. See Using the Slideshow Creator for more information.
2.In the Source window, click  to import all of the photos you want to use in your slideshow. Select Import Image Files to import a number of individual photos, or select Import an Image Folder if all of your photos are in a specific folder on your computer's hard drive. CyberLink PowerDirector will import all of the supported image formats in the selected folder.
10

CyberLink PowerDirector Help
Note: you can right-click on a photo and select Set 3D Source Format if required. For more information, please refer to Setting 3D Source Format.
You can also click  to remove any unwanted photos from your slideshow.
3.Click Next to continue.
4.In the Style & Music window, select a slideshow style. Each style you select will result in a different slideshow.
5.In the Style & Music window, click the  button to add background music to your slideshow. After adding music, click the Music Preferences button to customize the music duration and add fades. See Setting Music Preferences for a detail description of the available preferences.
6.In the Style & Music window, click the Slideshow Preferences button to set your slideshow preferences as follows:
Duration: use this option to set the length of your slideshow. Select Fit photos to music to have the length of the slideshow match the duration of the added background music. Select Fit music to photos (if launched in Full Feature Mode) for the length of the music to match the duration of the slideshow, i.e. its specified length on the timeline.
Sequence: use this option to set the order of the photos in the slideshow. Select Timeline order (if launched in Full Feature Mode) to have the sequence match the order the photos are currently displayed in the timeline. Select Date/time taken for the photos to display in chronological order based on the date and time they were taken.
Detect faces: some slideshow templates include this option. When selected, the Slideshow Creator will scan and detect the faces in the photos included in the slideshow. The faces in the photos will then become the area of focus in the created photo slideshows.
Click OK to save your changes.
7.Click Next to continue.
8.In the Preview window, the Slideshow Creator generates a version of your slideshow. Use the available player controls to preview it.
11

PowerDirector Editing Modes
Note: if you are not satisfied with the current slideshow, you can click the
Previous button to return to previous windows to select a different style, or import more photos. Also, if available, click the Replace Background button in the Preview window to replace the background image used in the slideshow, or Customize to fully customize your slideshow in the Slideshow Designer. See Customizing Slideshows in the Slideshow Designer for a detailed description of all the available options for your selected slideshow style.
9.Click Next to continue.
10.You are done. To finish and close the Easy Editor, choose one of the following:
Produce Video: click to enter the Produce window where you can output your slideshow to a video file, device, or upload it to a video sharing web site. See Producing Your Project.
Create Disc: click to burn your slideshow to a disc, complete with a professional looking disc menu, in the Create Disc window. See Creating Disc.
Advanced Editing: click this option if you'd like to perform some more advanced editing on your slideshow in the Edit window.
Note: if you select the Advanced Editing option, the Slideshow Creator adds your created slideshow to the timeline in the Edit window as a combined video file. If you'd like to do further editing on this slideshow (combined video file), just select it and click the Customize button above the timeline to edit in the Slideshow Designer. If you would like to remove the slideshow effects added by the template and display each individual photo in the slideshow on the timeline, just right-click on the file and then select Remove Slideshow Effects.
Setting Music Preferences
If you are using background music in your slideshow, click on the Music Preferences button in the Style & Music window of the Slideshow Creator to configure the preferences as follows:
1.In the Trim audio section you can trim the length of the music file you added as background music as follows:
use the player controls to find the desired start point for the music, and then click  .
.
12
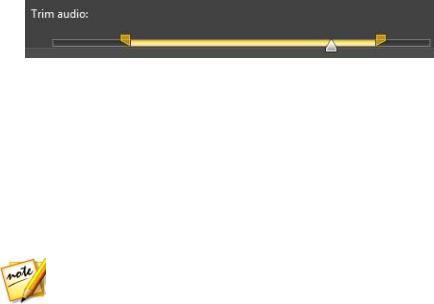
CyberLink PowerDirector Help
use the player controls to find the desired end point for the music, and then click  .
.
drag the markers on the music timeline to set the desired start and end times manually.
2.Select the Fade-in option to have the background music gradually fade-in at the beginning of the slideshow.
3.Select the Fade out option to have the background music gradually fade-out at the end of the slideshow.
4.Click OK to save your changes.
Customizing Slideshows in the Slideshow
Designer
In the Preview window of the Slideshow Creator, click on the Customize button to open the Slideshow Designer to modify the selected slideshow style.
Note: if the Customize button is not available in the Preview window, the
slideshow style template you selected cannot be customized in the
Slideshow Designer.
13

PowerDirector Editing Modes
A - Preview Area, B - Editing Area, C - Slide Area, D - Extra Tools Area, E - Selected Slide
The editing options and tools that are available in the Slideshow Designer, depend on the slideshow style template you selected. The following outlines the editing options available for the style templates that utilize the Slideshow Designer.
Camera/Cell Slideshow
When customizing a Camera or Cell slideshow in the Slideshow Designer, you can perform the following functions:
14
CyberLink PowerDirector Help
in the slide area, click on a specific slideshow slide to view and edit it.
in the preview area, click and drag a photo to an alternative cell.
in the editing area (Unused photos), click the Add Photos button to import additional photos for use in the slideshow.
in the editing area (Unused photos), indicate the maximum number of photos that are displayed on a slide.
in the editing area, drag and drop the photos from Unused photos to the cell in the preview area where you want it on the slide. You can also highlight a
cell by clicking it and use the 
 buttons to add or remove selected photos.
in the preview area, select a cell with a photo and then click on the  button to set the focus of that cell on a specific portion of the photo. Manually resize and drag the box to set the desired focus area.
in the extra tools area, click the Remix button to generate a new version of the slideshow.
in the preview area, use the player controls to preview the slideshow.
Motion Slideshow
When customizing a Motion slideshow in the Slideshow Designer, you can perform the following functions:
in the slide area, click on a specific slideshow slide to view and edit it.
in the editing area (Cropping area), use the Magic Motion Designer to customize the motion on the slide. See Magic Motion Designer for detailed instructions on using all its features.
in the preview area, use the player controls to preview the slideshow.
Highlight Slideshow
When customizing a Highlight slideshow in the Slideshow Designer, you can perform the following functions:
in the slide area, click on a specific slideshow slide to view and edit it.
15

PowerDirector Editing Modes
in the extra tools area, select whether you want to edit the foreground or background photo.
in the editing area (Cropping area), resize and drag the box to the area of the photo you want highlighted on the slide.
in the preview area, use the player controls to preview the slideshow.
3D/Balloon/Frozen Space/Outer Space
Slideshow
When customizing a 3D, Frozen Space, or Future slideshow in the Slideshow Designer, you can perform the following functions:
in the slide area, click on a specific slideshow slide to view and edit it.
in the editing area (Cropping area), resize and drag the box to the area of the photo you want highlighted in the photo on the slide.
click the Replace Background button if you want to import a custom image to use as the slideshow's background.
Note: the slideshow background cannot be replaced for slideshows using
the Balloon template.
in the preview area, use the player controls to preview the slideshow.
Time-Lapse Slideshow
When customizing a time-lapse slideshow in the Slideshow Designer, you can specify the following settings:
Note: to create a time-lapse slideshow, you need to prepare the photos for it ahead of time. This feature works best with a series of photos taken with a camera that supports time-lapse photography.
Duration of each image: in the field provided, specify how long you want each of the imported images to display. Each image can display for as long as 99 frames, or as short as for 1 single video frame.
For each displayed image, skip: when importing a large number of images that were taken over a period of time, you may find the need to remove some
16
CyberLink PowerDirector Help
of the images to reduce the slideshow's duration. In the field provided, enter the number of images you want to remove for each displayed image in your slideshow.
17
Loading...