


CyberLink
PhotoDirector 10
User's Guide
Copyright and Disclaimer
All rights reserved.
To the extent allowed by law, PhotoDirector IS PROVIDED “AS IS”, WITHOUT WARRANTY OF ANY KIND, EITHER EXPRESS OR IMPLIED, INCLUDING WITHOUT LIMITATION ANY WARRANTY FOR INFORMATION, SERVICES, OR PRODUCTS PROVIDED THROUGH OR IN CONNECTION WITH PhotoDirector AND ANY IMPLIED WARRANTIES OF MERCHANTABILITY, FITNESS FOR A PARTICULAR PURPOSE, EXPECTATION OF PRIVACY, OR NON-INFRINGEMENT. BY USING THIS SOFTWARE, YOU AGREE THAT CYBERLINK WILL NOT BE LIABLE FOR ANY DIRECT, INDIRECT, OR CONSEQUENTIAL LOSS ARISING FROM THE USE OF THIS SOFTWARE OR MATERIALS CONTAINED EITHER IN THIS PACKAGE.
The terms and conditions here under shall be governed and construed in accordance with the laws of Taiwan.
PhotoDirector is a registered trademark along with other company and product names mentioned in this publication, used for identification purposes and remain the exclusive property of their respective owners.
International Headquarters
Mailing Address |
CyberLink Corporation |
|
15F., No. 100, Minquan Rd., Xindian Dist. |
|
New Taipei City 231, Taiwan (R.O.C.) |
Web Site |
https://www.cyberlink.com |
Telephone |
886-2-8667-1298 |
Fax |
886-2-8667-1385 |
Copyright © 2018 CyberLink Corporation. All rights reserved.
Contents
.............................................................. |
1 |
Introduction |
|
Welcome................................................................................................ |
1 |
Latest.................................................................................................Features |
1 |
DirectorZone.................................................................................................and CyberLink Cloud |
2 |
PhotoDirector.................................................................................................Versions |
3 |
Minimum................................................................................................System Requirements |
4 |
.............................................................. |
5 |
Importing Photos |
|
Supported................................................................................................File Formats |
5 |
Importing................................................................................................Photos into the Library |
5 |
Rename.................................................................................................During Import |
7 |
Apply.................................................................................................During Import |
8 |
Importing.................................................................................................Animated GIFs |
9 |
Importing................................................................................................Photos From a Digital Camera |
9 |
Importing.................................................................................................Photos From Camera Storage |
9 |
Tethered.................................................................................................Shooting |
11 |
Importing................................................................................................Videos (Video-to-Photo) |
12 |
Supported.................................................................................................Video File Formats |
14 |
Trimming.................................................................................................a Video Clip |
14 |
Applying.................................................................................................TrueTheater Adjustments |
15 |
Manually.................................................................................................Capturing Video Frames as New Photos |
15 |
Auto.................................................................................................Capturing Video Frames as New Photos |
16 |
Auto.................................................................................................Create Panorama from Video |
17 |
Advanced.................................................................................................Capture Settings |
18 |
.............................................................. |
20 |
The PhotoDirector Workspace |
|
i
CyberLink PhotoDirector Help
PhotoDirector................................................................................................Modules |
20 |
Library................................................................................................. |
21 |
Adjustment................................................................................................. |
21 |
Edit................................................................................................. |
22 |
Layers................................................................................................. |
22 |
Create................................................................................................. |
22 |
Print................................................................................................. |
22 |
Photo Library................................................................................................ |
22 |
Project.................................................................................................Tab |
23 |
Tagging.................................................................................................Faces in Photos |
29 |
Metadata.................................................................................................Tab |
32 |
Adjustment................................................................................................Panel |
37 |
Photo Browser................................................................................................Panel |
38 |
Entering.................................................................................................360º Photo Editor |
40 |
Stacking.................................................................................................Photos |
41 |
Searching.................................................................................................for Photos |
43 |
Virtual.................................................................................................Photos |
43 |
Photo Viewer................................................................................................Window |
44 |
Selecting.................................................................................................View Mode |
44 |
Selecting.................................................................................................Viewer Display Mode |
45 |
Soft.................................................................................................Proofing |
47 |
History................................................................................................. |
47 |
Photo.................................................................................................Viewer Toolbar |
48 |
Viewer.................................................................................................Zoom |
49 |
.............................................................. |
51 |
PhotoDirector Projects |
|
Exporting................................................................................................Projects |
51 |
CyberLink................................................................................................Cloud Projects |
51 |
.............................................................. |
53 |
Adjustments |
|
Histogram................................................................................................ |
53 |
Converting.................................................................................................Photos to Black and White |
54 |
Viewing.................................................................................................Exposed Areas |
54 |
ii
Regional................................................................................................Adjustment Tools |
55 |
Cropping.................................................................................................and Straightening Photos |
56 |
Removing.................................................................................................Spots |
59 |
Removing.................................................................................................Red-Eye |
61 |
Using.................................................................................................the Adjustment Brush |
61 |
Using.................................................................................................Adjustment Selection |
65 |
Using.................................................................................................a Gradient Mask |
68 |
Using.................................................................................................a Radial Filter |
71 |
Regional.................................................................................................Adjustment Options |
75 |
Global ................................................................................................Adjustment Tools |
77 |
White.................................................................................................Balance |
77 |
Tone................................................................................................. |
79 |
HDR.................................................................................................Effect |
81 |
Level................................................................................................. |
82 |
Curve................................................................................................. |
83 |
HSL/Color................................................................................................. |
85 |
Black.................................................................................................and White Mix |
88 |
Split.................................................................................................Toning |
89 |
Detail................................................................................................. |
90 |
Keystone................................................................................................. |
92 |
Lens.................................................................................................Correction |
92 |
Copying................................................................................................Adjustments |
95 |
Using Adjustment................................................................................................Presets |
96 |
Downloading.................................................................................................Presets from DirectorZone |
96 |
Downloading.................................................................................................Presets from CyberLink Cloud |
97 |
Saving.................................................................................................Custom Presets |
98 |
Applying.................................................................................................Presets on Photos |
98 |
Sharing.................................................................................................and Backing Up Presets |
99 |
Exporting/Import.................................................................................................Presets |
100 |
Viewing................................................................................................History |
100 |
Turning................................................................................................Adjustments On/Off |
101 |
iii
CyberLink PhotoDirector Help
.............................................................. |
102 |
Edits |
|
People................................................................................................Beautifier |
102 |
Face.................................................................................................Tools |
102 |
Skin.................................................................................................Tools |
107 |
Body.................................................................................................Shaper |
110 |
Photo................................................................................................Effects |
112 |
AI.................................................................................................Style Transfer |
112 |
Color.................................................................................................Effects |
113 |
Blur.................................................................................................Tools |
117 |
Grain.................................................................................................Effect |
120 |
Overlay................................................................................................. |
121 |
360º ................................................................................................Photo Editor |
123 |
Straightening.................................................................................................360º Photos |
123 |
Removing.................................................................................................Tripod From 360º Photos |
125 |
Adjusting.................................................................................................360º Photos |
125 |
Creating.................................................................................................Little Planet Photos |
126 |
Converting.................................................................................................360º Photos to Panoramas |
127 |
Object................................................................................................Removal |
127 |
Smart.................................................................................................Patch |
127 |
Content.................................................................................................Aware Removal |
128 |
Extract................................................................................................or Compose |
130 |
Background.................................................................................................Removal |
130 |
Photo.................................................................................................Composer |
132 |
Content.................................................................................................Aware Move |
133 |
Content.................................................................................................Aware Clone |
134 |
Photo................................................................................................Merge |
135 |
Bracket.................................................................................................HDR |
135 |
Panorama................................................................................................. |
138 |
Face.................................................................................................Swap |
138 |
Multi.................................................................................................Exposure |
139 |
Frames................................................................................................& Watermarks |
141 |
iv
Using.................................................................................................Watermark Templates |
141 |
Creating.................................................................................................New Frames and Watermarks |
142 |
.............................................................. |
147 |
Layers |
|
Layers................................................................................................Overview |
148 |
PhotoDirector.................................................................................................Layers Projects |
155 |
Using.................................................................................................Express Templates |
156 |
Using................................................................................................the Layer Manager |
157 |
Adding.................................................................................................New Layers |
157 |
Adding.................................................................................................Adjustment Layer |
159 |
Adjusting.................................................................................................a Photo Layer |
159 |
Adjusting.................................................................................................Layer Opacity |
161 |
Adding.................................................................................................Shadows and Borders |
162 |
Blending.................................................................................................Layers |
164 |
Managing.................................................................................................Layers |
169 |
Creating................................................................................................Layer Masks |
170 |
Adding.................................................................................................a Layer Mask on a Layer |
171 |
Applying.................................................................................................a Clipping Mask |
174 |
Creating.................................................................................................Mask From File |
175 |
Creating.................................................................................................Mask From Other Layer |
178 |
Creating.................................................................................................Mask From Transparency |
179 |
Rotating................................................................................................and Flipping Layers |
181 |
Rotate.................................................................................................Tool |
182 |
Flip.................................................................................................Tool |
182 |
Using................................................................................................the Layer Tools |
182 |
Pick.................................................................................................and Move Tool |
183 |
Select.................................................................................................Area Tool |
187 |
Pen.................................................................................................Tool |
190 |
Eraser.................................................................................................Tool |
190 |
Shape.................................................................................................Tool |
191 |
Text.................................................................................................Tool |
194 |
Fill.................................................................................................Tool |
196 |
Gradient.................................................................................................Tool |
197 |
v
CyberLink PhotoDirector Help
Blur.................................................................................................Tool |
197 |
Saving................................................................................................and Sharing Layers Projects |
198 |
.............................................................. |
200 |
Creating |
|
Creating................................................................................................Photo Slideshows |
200 |
Producing.................................................................................................Slideshows |
201 |
Sharing.................................................................................................Slideshow Videos on YouTube |
201 |
Creating................................................................................................Animated GIFs |
203 |
Saving.................................................................................................Animated GIFs |
204 |
Creating................................................................................................Motion Stills™ |
205 |
Saving.................................................................................................Motion Stills™ |
207 |
.............................................................. |
209 |
Exporting and Sharing Photos |
|
Exporting................................................................................................Photos |
209 |
Basic.................................................................................................Photo Export |
210 |
Advanced.................................................................................................Photo Export |
211 |
Sharing................................................................................................Photos |
214 |
Uploading.................................................................................................Photos to Flickr |
214 |
Backing.................................................................................................Up Photos on CyberLink Cloud |
215 |
Uploading.................................................................................................Photos to DirectorZone |
216 |
E-.................................................................................................mailing Photos |
217 |
.............................................................. |
218 |
Printing |
|
Printing................................................................................................Photos |
218 |
Customizing.................................................................................................the Layout |
218 |
Customizing.................................................................................................the Image Settings |
220 |
Customizing.................................................................................................the Print Settings |
220 |
Adding.................................................................................................Watermarks to Printed Photos |
221 |
.............................................................. |
222 |
PhotoDirector Preferences |
|
General................................................................................................Preferences |
222 |
Project................................................................................................Preferences |
223 |
DirectorZone................................................................................................Preferences |
223 |
vi
File Handling................................................................................................Preferences |
224 |
Improvement................................................................................................Program Preferences |
225 |
CyberLink................................................................................................Cloud Preferences |
225 |
Hardware................................................................................................Acceleration Preferences |
226 |
.............................................................. |
227 |
PhotoDirector Hotkeys |
|
.............................................................. |
234 |
Technical Support |
|
Before................................................................................................Contacting Technical Support |
234 |
Web Support................................................................................................ |
235 |
Help Resources................................................................................................ |
235 |
vii

CyberLink PhotoDirector Help
Chapter 1:
Introduction
This chapter introduces CyberLink PhotoDirector and provides an overview of all its features. It also outlines the system requirements for installing and using the program.
Note: this document is for reference and informational use only. Its content and the corresponding program are subject to change without notice. For more helpful tips on using the program, please visit our user forum, or see the video tutorials in the Learning Center at https://www.cyberlink.com/learning/photo.
Welcome
Welcome to the CyberLink family of digital media tools. CyberLink PhotoDirector is a photography program that lets you manage, adjust, and edit your digital photos, or create new ones using layers. You can then share your photos on Flickr, use them in slideshows, produce slideshow videos you can upload to YouTube, and much more.
Latest Features
This section outlines some of the latest features within the CyberLink PhotoDirector program.
Import photos as you capture them with tethered shooting*.
Adds support for photos in the HEIF (.HEIC)* format.
Import one or all frames from an animated GIF.
View photos in the library by date taken in calendar view.
Use soft proofing* to change the display color space to fit your printer's color setting.
Instantly correct the perspective of your photos with the auto keystone* feature.
Transform your photos into works of art using AI Style Transfer.
Duplicate objects in a photo with Content Aware Clone.
1
Introduction
Add a non destructive layer of adjustments on photos in your layers* projects. Improved text fonts and layout in the Layers* module.
Use layer and clipping masks to create exquisite photos in the Layers* module.
Note: * optional feature in CyberLink PhotoDirector. Check the version table on our web site for detailed versioning information.
DirectorZone and CyberLink Cloud
You can upload/download color presets and lens profiles, and back up photos, preferences, projects, and more with the DirectorZone and CyberLink Cloud* features.
Note: * optional feature in CyberLink PhotoDirector. Check the version table on our web site for detailed versioning information.
DirectorZone
DirectorZone is a free web service that lets you search for and download color presets and lens profiles created by other users of CyberLink PhotoDirector.
To access the benefits of DirectorZone, you can sign in by:
clicking the Sign in to DirectorZone link in the top right corner of the CyberLink PhotoDirector window.
clicking the  button at the top of the window to open the PhotoDirector preferences, and then on the DirectorZone tab. See DirectorZone Preferences for more information.
Also, be sure to periodically click the  button to check out the latest
DirectorZone Bulletin, and view Templates and Tutorials on DirectorZone or the
Photo Gallery on DirectorZone. Just click in one of these sections in the Notifications window to view the bulletin or download these templates. Or go to https://directorzone.cyberlink.com to find out more information on the features and benefits of the DirectorZone web service.
2

CyberLink PhotoDirector Help
CyberLink Cloud
CyberLink Cloud is a cloud storage service from CyberLink where users can upload and download their presets, PhotoDirector projects, exported photos, and more. CyberLink Cloud allows users to back up media, preferences, projects, etc., and ensure their working environment is the same on multiple computers.
Note: CyberLink Cloud is a subscription cloud storage service that is included with some CyberLink products, and is available for purchase through our web site. For more detailed information, see https://www.cyberlink.com/products/cyberlink-cloud/.
PhotoDirector Versions
The features that are available in CyberLink PhotoDirector are completely dependent on the version you have installed on your computer.
To view the PhotoDirector version table, please go to our web site: https://www.cyberlink.com/products/photodirector-ultra/compare_en_US.html
Click the CyberLink PhotoDirector logo in the top right, or select Help > About CyberLink PhotoDirector from the menu, to determine the version and build number for your copy of CyberLink PhotoDirector.
PhotoDirector 365
PhotoDirector 365 is a subscription based version of CyberLink PhotoDirector that provides all the photo adjustment features you expect, and adds the CyberLink Cloud storage service and more.
With a PhotoDirector 365 subscription, you get:
All the advanced photo adjustment and editing features of the Ultra version of CyberLink PhotoDirector.
The ability to back up program preferences, projects, and presets on the cloud storage space CyberLink Cloud.
Guaranteed updates to the latest versions of CyberLink PhotoDirector Ultra.
PhotoDirector 365 is the must-have solution for on-the-go photo editors who want easy access to their media and the latest up-to-date photo editing technologies.
3

Introduction
Updating PhotoDirector
Software upgrades and updates (patches) are periodically available from CyberLink. CyberLink PhotoDirector automatically prompts you when either is available.
Note: you can prevent CyberLink PhotoDirector from auto checking for updates/upgrades in General Preferences.
To update your software, do this:
1.Click the  button to open the Notifications window.
2.Check the New Updates and Upgrade Info sections.
3.Select an item in these sections to open your web browser, where you can purchase product upgrades or download the latest patch update.
Note: you must connect to the Internet to use this feature.
Minimum System Requirements
The system requirements listed below are recommended as minimums for using the CyberLink PhotoDirector program.
System Requirements
Operating System |
Microsoft Windows 10, 8/8.1, 7 (64 bit OS |
|
recommended) |
|
|
Processor (CPU) |
Intel Core™ i-series or AMD Phenom® II and above |
|
|
Graphics Processor |
128 MB VGA VRAM or higher |
(VGA) |
|
|
|
Memory |
2 GB required |
|
|
Screen Resolution |
1024 x 768, 16-bit color or above |
|
|
Hard Disk Space |
2 GB required |
|
|
Internet |
Internet connection also required for initial software & |
Connection |
file formats activation |
|
|
4
CyberLink PhotoDirector Help
Chapter 2:
Importing Photos
The first step when using CyberLink PhotoDirector is to import your photos into the program. CyberLink PhotoDirector supports a variety of different photo file types, including most camera RAW file formats.
Supported File Formats
CyberLink PhotoDirector supports the following photo file formats for importing:
Photos: BMP, GIF, HEIF (.HEIC)*, JPEG, PNG, TIFF.
Note: * optional feature in CyberLink PhotoDirector. Check the version table on our web site for detailed versioning information.
RAW photo formats: CyberLink PhotoDirector also supports the import of most camera RAW photo formats. See the PhotoDirector spec page on the CyberLink web site for an up-to-date list of all the supported RAW photo formats: https://www.cyberlink.com/products/photodirector-ultra/spec_en_US.html
Note: you can also import PHI files into CyberLink PhotoDirector, which are PhotoDirector layers project files. See Layers for more information.
Importing Photos into the Library
You can import photos into CyberLink PhotoDirector from your computer's hard drive, and also from removable devices, such as memory cards and portable hard drives.
Note: if you want to import photos from a connected digital camera, see Importing Photos From a Digital Camera.
To import photos into CyberLink PhotoDirector, do this:
1.Click on Library, and then on the Import button at the bottom of the library panel.
2.Select one of the following import options:
5
Importing Photos
Photos: select to import individual photo files. Once selected, browse to and then select all of the photos on your computer/removable device that you want to import, and then click Open. Thumbnails of all the photos display in the Photo Import window.
Note: if the photo files you want to import are not displayed in the current folder, ensure that the correct file type is selected in the bottom right corner of the Select Some Photos dialog.
Folder: select to import a folder that contains your photos. Once selected, browse to and then select the folder on your computer/removable device that you want to import photos from, and then click Select Folder. Thumbnails of all the photos in the selected folder display in the Photo Import window.
From Cloud*: if you have a subscription to CyberLink Cloud, select this option to download photos that are in your CyberLink Cloud storage. Once selected, find all the photos you want to download, select them, and then click the
Download button.
Note: you can use  in the bottom right of the preview window to resize the photo thumbnails. * optional feature in CyberLink PhotoDirector. Check the version table on our web site for detailed versioning information.
3.Select Include subfolders, if you are importing photos from a folder, device, or digital camera, to display and import photos that are in any subfolders.
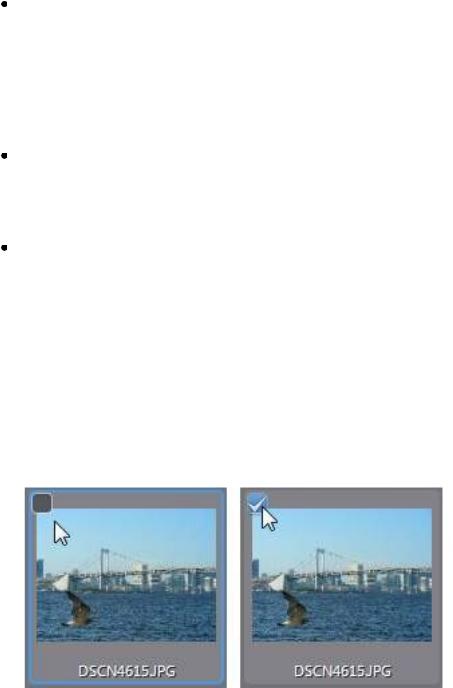
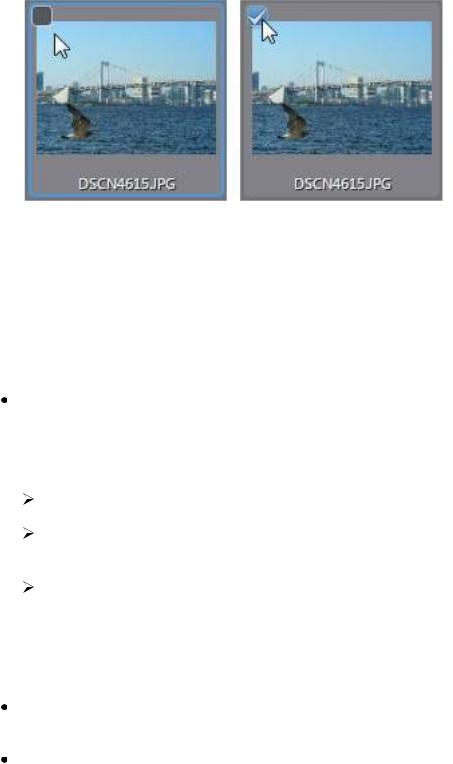
4.Manually select the thumbnails of the photos you want to import, or click Select All or Deselect All buttons if necessary.
5.Click Import. CyberLink PhotoDirector imports the photos into your project library.
6

CyberLink PhotoDirector Help
Advanced Import Options
Before clicking the Import button, you can click the Advanced button at the top of the import window to use these advanced import options.
Make Extra Copy: click this option and then select Copy to below path if you want CyberLink PhotoDirector to make a copy of the imported photos in
another folder. Click  to select the folder and then how you want to Organize them by selecting one of the following:
Put in Single Folder: puts all of the photos in one folder.
By Original Folder Structure: duplicates the original folder structure from the source location.
By Capture Date: puts the photos in a series of folders, labeled by the date they were captured. Click  to set the date format for the folder
naming, and  to edit the name of the folder that will be created in this location.
Rename During Import: select this option to rename the photos during the import process.
Apply During Import: select this option to apply photo presets and more during the import process.
Rename During Import
When importing photos into CyberLink PhotoDirector, if you chose to make an extra copy in another photo, you can rename them as they are being imported.
To rename photos during import, do this:
1.In the Photo Import window, click Advanced button at the top of the window.
2.Select the Make Extra Copy option on the right and then Copy to below path. See Advanced Import Options for more details.
3.Click the Rename During Import option and then select Rename.
4.Once selected, choose the naming Format from the drop-down. The Original filename options use the name of the photo file, but will add a numbering
7

Importing Photos
sequence or the capture date to the end. Select a Custom filename option to enter in your own Custom name for the photo files in the field provided. You can also specify the photo file numbering format (sequence number or X of Y), and the starting number used.
Note: see the Example field for a preview of the new photo file names.
Apply During Import
CyberLink PhotoDirector can apply adjustment presets and auto fixes to photos during the import process. You can also begin organizing your photos by adding copyright information, keyword tags, and IPTC profiles as they are imported.
To apply presets, auto fixes, and more during import, do this:
1.In the Photo Import window, click Advanced button at the top of the window.
2.Click the Apply During Import option on the right of the window.
3.Select one or more of the following options:
Apply preset: select to apply the adjustment preset you select from the dropdown to all of the photos during import. See Using Adjustment Presets for more detailed information about adjustment presets.
Apply auto fix: select this option and then Auto tone if you want CyberLink PhotoDirector to auto adjust the color tone in the photos as they are imported. You can also select Auto denoise if you want to automatically remove image noise during the import process.
Note: you can either apply a preset or auto fix during import. You cannot apply both at the same time.
IPTC profile: select a created IPTC profile from the drop-down to add its IPTC metadata during import. See Creating IPTC Profiles for more information.
Copyright: in the field provided, enter in the copyright text you would like to embed in each photo. The copyright information can be viewed and edited later on the Metadata tab in the library panel.
Tags: in the field provided, enter in the keyword tags you want to apply to each photo, separated by a semi colon. Use " > " between them if you want to create hierarchical tags.
Note: you can add existing tags by typing in the tag name and then selecting them. To add new tags, just enter the new tag name in the field provided, and they will be added to the library during import.
8

CyberLink PhotoDirector Help
Importing Animated GIFs
You can now import animated GIF files into CyberLink PhotoDirector. When one is detected during import, a message will display asking you whether you want to:
Import Single Frame: select this option if you only want to import the first frame of the animated GIF into the PhotoDirector library.
Import All Frames: select this option to extract and import all frames in the animated GIF as individual photos. In the Photo Import window you can deselect some of the photos if required before proceeding.
Importing Photos From a Digital
Camera
You can import photos into CyberLink PhotoDirector from a connected digital camera's storage, or immediately when taking photos through tethered shooting.
Importing Photos From Camera Storage
You can import photos into CyberLink PhotoDirector from a connected digital camera.
To import photos from a connected digital camera, do this:
1.Click on Library, and then on the Import button at the bottom of the library panel.
2.Select the From Camera > Camera Storage option to import photos directly from the digital camera or a card reader. Ensure that your camera is connected to your computer (and turned on) and then select From Camera > Camera Storage to import photos from it. Once selected, the Photo Import window displays. Select your camera (or card reader) from the Source dropdown to display thumbnails of all the photos in the Photo Import window.
Note: you can use  in the bottom right of the preview window to resize the photo thumbnails.
3.Select Include subfolders, if you are importing photos from a folder, device, or digital camera, to display and import photos that are in any subfolders.
4.Manually select the thumbnails of the photos you want to import, or click Select All or Deselect All buttons if necessary.
9
Importing Photos
5.Click Import. CyberLink PhotoDirector imports the photos into your project library.
Advanced Import Options
Before clicking the Import button, you can click the Advanced button at the top of the import window to use these advanced import options.
Make Extra Copy: click this option and then select Copy to below path if you want CyberLink PhotoDirector to make a copy of the imported photos in
another folder. Click  to select the folder and then how you want to Organize them by selecting one of the following:
Put in Single Folder: puts all of the photos in one folder.
By Original Folder Structure: duplicates the original folder structure from the source location.
By Capture Date: puts the photos in a series of folders, labeled by the date they were captured. Click  to set the date format for the folder
naming, and  to edit the name of the folder that will be created in this location.
Rename During Import: select this option to rename the photos during the import process.
Apply During Import: select this option to apply photo presets and more during the import process.
10

CyberLink PhotoDirector Help
Tethered Shooting
You can import photos into CyberLink PhotoDirector's photo library automatically as you capture them from a connected digital camera using the tethered shooting* feature.
Note: * optional feature in CyberLink PhotoDirector. Check the version table on our web site for detailed versioning information.
To import photos using tethered shooting, do this:
1.Click on Library, and then on the Import button at the bottom of the library panel.
2.Select Tethered Shooting and then the connected camera you want to use.
3.In the Tethered Shooting Settings window, specify the following preferences:
Destination: click on  to set the folder on your computer where the captured photos are imported to. Select the Put in subfolder option to create a new folder in the selected destination folder. Enter a name for the subfolder in the field provided.
Naming: set the naming scheme for all the captured photos, as required. Check the Example to preview how the captured photos will be named.
IPTC: select the IPTC metadata profile you want applied to each captured photo. You can select New to create a new IPTC profile.
Click OK to save your settings. You can click  at anytime to reenter the Tethered Shooting Settings window.
4.The tethered shooting bar displays at the bottom of the PhotoDirector window. If required you can adjust your camera's shutter speed, aperture value, ISO setting, and color temperature while you shoot.
5.When ready, begin capturing photos and importing them into the PhotoDirector library by pressing the shutter button on your camera, or clicking the capture button on the tethered shooting bar.
11
Importing Photos
Importing Videos (Video-to-Photo)
You can import videos files into CyberLink PhotoDirector, and then capture selected video frames. These video frames are imported as new photos into the library, where they can be adjusted, edited, and much more.
A - Preview Window, B - Captured Frames/New Photos Panel, C - TrueTheater Adjustments, D - Captured Frame Indicators, E - Playback Controls, F - Auto Capture, G - Capture Frame, H - Trim Video, I - Go to Library/Import New Photos
To import videos into CyberLink PhotoDirector, do this:
1.Click on Library, the Import button at the bottom of the library panel, and then select Video-to-Photo.
2.Browse to and select the video file you want to import, and then click Open.
3.Select one of the following Video-to-Photo import options:
Capture Video Frames as New Photos: select this option to just capture frames of your video file and import them into the library. Once in the library you can make adjustments to them, or use them with any of the other features available in CyberLink PhotoDirector.
12

CyberLink PhotoDirector Help
Create a Panorama Photo: use this option to capture frames of your video file and use them to create a panorama image. See Panorama for information on creating a panorama image once imported, or Auto Create Panorama from Video if you want CyberLink PhotoDirector to create it for you automatically.
Note: for the best results, use a video file where the camera steadily pans left or right.
Make a Perfect Group Shot: select this option to capture frames of your video file and then use them to incorporate the best faces in a new photo. See Face Swap for information once imported.
Note: for the best results, make sure there is minimal camera, background, and head movement of the subjects in the video you are using for this feature.
Compose a Multi Exposure Photo: use this option to capture frames of your video file to create a multi exposure photo. See Multi Exposure for information once imported.
Note: for the best results, make sure there is minimal camera or background movement in the video you are using for this feature.
Create Animated GIF File: select this option to capture video frames and then use them to create an animated GIF. See Creating Animated GIFs for information once imported.
Create Motion Stills™ Image: use this option to capture video frames to create Motion Stills™. See Creating Motion Stills™ for information once imported.
Note: for the best results, make sure there is minimal camera or background movement in the video you are using for this feature.
4.In the Video-to-Photo window, before capturing any frames, you can:
Trim the imported video clip.
Apply TrueTheater adjustments.
5.You can import photos from your video by:
Manually Capturing Video Frames as New Photos.
Auto Capturing Video Frames as New Photos
6.After capturing photos, click the Go to Library button.
7.Set the Capture Settings as follows:
Folder: indicates the folder on your computer where the photos will be saved.
To change the folder, click  and then browse to and select the new folder.
13
Importing Photos
Put in subfolder: select this option if you want to place the imported photos in a new subfolder. Input the name of the new folder in the field provided.
Note: you can click Advanced for more capture settings. See Advanced Capture Settings for more information.
8.Click Import to import the new photos into the library, and use them in the selected feature.
Supported Video File Formats
CyberLink PhotoDirector supports the following video file formats for importing:
3G2, 3GP, 3GPP, ASF, AVI, DAT, FLV, M2T, M2TS, M2V, M4V, MKV, MOD, MOV, MP4, MPE, MPG, MPEG, MTS, TOD, TPD, TRP, TS, VOB, VRO, WMV
Trimming a Video Clip
Before importing a video and capturing its frames, you can trim the imported video clip. To trim the video clip, do this:
1.Click the  button to open the Trim window.
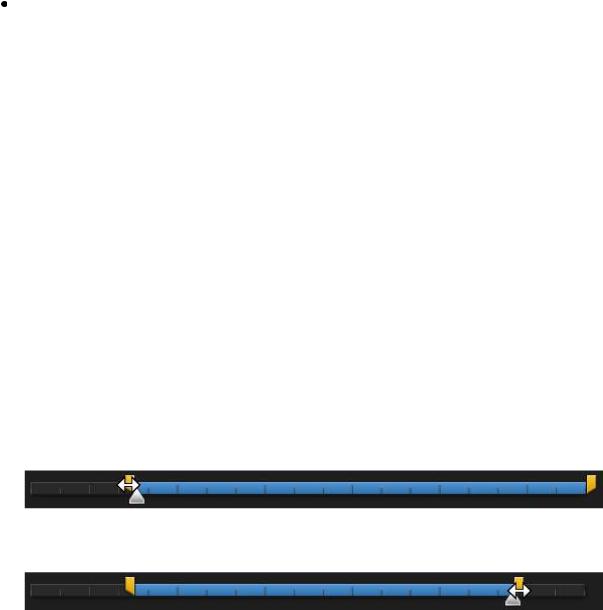
2.Use the player controls to find where you want the trimmed clip to begin, and then drag the mark in position slider to this position.
3.Use the player controls to find where you want the trimmed clip to end, and then drag the mark out position slider to this position.
4.If required, you can preview what the trimmed clip will look like by clicking Output and then clicking the play button on the player controls. Click Original if you want to play the original video.
5.Click OK to set your changes and trim the clip.
Note: you can reenter the trim window to refine the trimmed clip at any time.
14

CyberLink PhotoDirector Help
Applying TrueTheater Adjustments
Before importing a video and capturing its frames, you can apply TrueTheater Adjustments to enhance your video and the resulting photos.
To apply TrueTheater Adjustments, do this:
1.Select the TrueTheater Adjustments check box in the bottom left corner to enable them.
2.Click  and then adjust the TrueTheater Adjustments options as follows:
Sharpness: select this option to up scale the original video to a higher resolution version, which is sharper and artifact-free. Use the slider to adjust the sharpness to the best output that suits your configuration.
Lighting: is a video enhancement technology developed by CyberLink that detects video content and dynamically adjusts the brightness/contrast ratios. Use the level slider to adjust the TrueTheater Lighting effect the desired amount.
Color: select this option to dynamically adjust the color saturation ratio in the video. Use the level slider to make the colors in the video more vivid, without affecting skin tones.
Note: you can click and hold  while applying the TrueTheater Adjustments to view the original video and compare how the adjustments have enhanced your video.
Manually Capturing Video Frames as New Photos
After importing a video into CyberLink PhotoDirector, to manually capture its frames, do this:
1.Use the playback controls to find a moment in your video where you want to capture the video and then pause the video.
Note: if you find that the video preview is not smooth during playback, you can click
 and then select Non Real-time Preview. This mutes the audio and displays the preview at a reduced speed to help make the preview go more smoothly.
2.If required, use the  and
and  buttons to find the exact video frame you want to capture.
15

Importing Photos
3.When ready, click  to capture the frame of video and add it to the captured frames panel.
4.Repeat steps 1-3 to capture as many frames as required.
5.If required, hover your mouse over a photo in the captured frames panel and then click  for a larger view. Click X to remove any captured photos from the panel.
6.When you are done, click the Go to Library button.
7.Set the Capture Settings as follows:
Folder: indicates the folder on your computer where the photos will be saved.
To change the folder, click  and then browse to and select the new folder.
Put in subfolder: select this option if you want to place the imported photos in a new subfolder. Input the name of the new folder in the field provided.
Note: you can click Advanced for more capture settings. See Advanced Capture Settings for more information.
8.Click Import to import the new photos into the library.
Auto Capturing Video Frames as New
Photos
After importing a video into CyberLink PhotoDirector, if you selected the Import Video Frames as New Photos option, you can use this feature to capture a large number of photos quickly. To auto* capture frames as new photos, do this:
Note: * optional feature in CyberLink PhotoDirector. Check the version table on our web site for detailed versioning information.
1.Click on Library, the Import button at the bottom of the library panel, and then select Video-to-Photo.
2.Browse to and select the video file you want to import, and then click Open.
3.Select the Import Video Frames as New Photos option.
4.In the Video-to-Photo window, click on the Auto button.
16

CyberLink PhotoDirector Help
5.In the Frames field, input how many photos (frames of video) you want captured from the video.
6.Click the Start button. CyberLink PhotoDirector will capture the specified number of frames and import them into the captured frames panel.
7.If required, hover your mouse over a photo in the captured frames panel and then click  for a larger view. Click X to remove any captured photos from the panel.
8.When you are done, click the Go to Library button.
9.Set the Capture Settings as follows:
Folder: indicates the folder on your computer where the photos will be saved.
To change the folder, click  and then browse to and select the new folder.
Put in subfolder: select this option if you want to place the imported photos in a new subfolder. Input the name of the new folder in the field provided.
Note: you can click Advanced for more capture settings. See Advanced Capture Settings for more information.
10. Click Import to import the new photos into the library.
Auto Create Panorama from Video
After importing a video, if you selected the Create a Panorama Photo* option, CyberLink PhotoDirector can create a panorama for you automatically. To auto create a panorama from a video, do this:
Note: * optional feature in CyberLink PhotoDirector. Check the version table on our web site for detailed versioning information.
1.Click on Library, the Import button at the bottom of the library panel, and then select Video-to-Photo.
2.Browse to and select the video file you want to import, and then click Open.
3.Select the Create a Panorama Photo option.
4.In the Video-to-Photo window, click on the Auto button. CyberLink PhotoDirector will auto capture video frames and then merge the photos to create the panorama.
17

Importing Photos
Note: if you are not satisfied with the results, click Retry to try again.
5.When the merge is complete, adjust the position and size of the crop area to create the panorama image you want.
Note: by default, CyberLink PhotoDirector does not include any of the black areas in the crop area. However, if you expand/move the crop area and it includes some black areas, select the Auto fill boundary option. CyberLink PhotoDirector will fill in the black area using nearby pixels to create a complete image.
6.When you are done, click on the Save button to save the panorama to your computer's hard drive.
7.Enter in a file name for the panorama, select the save location on your computer, and then click Save.
Advanced Capture Settings
During the video import and capture process, you can set the following advanced capture settings:
1.In the Destination section of the Import Settings window, specify the import location as follows:
Folder: specify the folder that photos are imported to as follows:
Click on  to specify a specific folder on your computer where the photos are imported to.
Put in subfolder: select this option if you want to place the imported photos in a new subfolder. Input the name of the new folder in the field provided.
2.In the File Settings section of the Import Settings window, if required, you can specify the file format and color space as follows.
Format: specify whether you want the captured photos to be in the JPEG, PNG, or TIFF file format.
Color space: select the type of color space you want used on the imported photos.
3.In the Image Size section of the Import Settings window is where you can set the size of the imported photos, as follows:
Keep original resolution as video frame: select this option if you don't want the photos resized during the import process.
18

CyberLink PhotoDirector Help
Resize to fit: select this option if you want CyberLink PhotoDirector to resize the photos during the import process. In the fields provided, specify the new size as follows:
Width/Height: specify the width or height of each photo in the fields provided. CyberLink PhotoDirector will resize photos to the specified size, and ensure the photos maintain their current aspect ratio.
Resolution: enter the desired resolution of the photos in the field provided.
4.In the Naming format section of the Import Settings window, specify the naming convention used on the imported photo files as follows:
Note: see the Example field at the bottom of Naming format section to view an example of the naming that will be used on the imported photos.
Prefix: in the field provided, enter the prefix used in each photo file name.
Start number: if you want the file name to contain a number sequence, specify the starting number in the field provided.
5.In the Apply during import section of the Import Settings window, you can add copyright information and keyword tags as follows:
Copyright: in the field provided, enter in the copyright text you would like to embed in each photo. The copyright information can be viewed and edited later on the Metadata tab in the library panel.
Tags: in the field provided, enter in the keyword tags you want to apply to each photo, separated by a semi colon.
6.Click Import. CyberLink PhotoDirector will capture and import the photos as specified.
19

The PhotoDirector Workspace
Chapter 3:
The PhotoDirector
Workspace
This chapter outlines the CyberLink PhotoDirector workspace, and all of its features. Getting familiar with the workspace is helpful, because it is where you spend all of your time when using CyberLink PhotoDirector.
A - PhotoDirector Modules, B - Adjustment Panel, C - Photo Browser Panel, D - Photo Viewer Window
PhotoDirector Modules
CyberLink PhotoDirector is comprised of six main modules: Library, Adjustment,
Edit, Layers, Create, and Print.
20
CyberLink PhotoDirector Help
Hiding PhotoDirector Modules
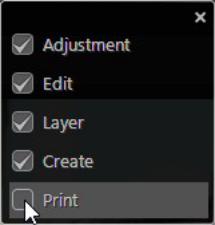
If required you can customize which modules are displayed/available in CyberLink PhotoDirector. To hide any of the modules, just right click at the top of CyberLink PhotoDirector window and then deselect it from the list.
Note: the Library module cannot be hidden.
You can also click  at the bottom of the photo viewer to hide any of the PhotoDirector modules. If you'd like to make the module available again, just right click and then reselect it in the list.
Note: before you can hide a module, you must exit that module/enter a different module.
Library
Click the Library button to open the photo library of CyberLink PhotoDirector. When you import photos into CyberLink PhotoDirector, they are stored in the photo library. Once in the library you can organize them in a smart collection, folder, album, and by keyword tags. See Photo Library for more information.
Adjustment
The Adjustment module is where you touch up and make adjustments to the photos in your library. Click the Adjustment button to apply presets, crop and rotate photos, apply gradients, remove spots, red-eye, and make other corrections. You can also adjust white balance, sharpness, color, and much, much more. See Adjustments for more information.
21
 Loading...