


 Loading...
CyberLink
AudioDirector 9
User's Guide
Copyright and Disclaimer
All rights reserved.
To the extent allowed by law, AudioDirector IS PROVIDED “AS IS”, WITHOUT WARRANTY OF ANY KIND, EITHER EXPRESS OR IMPLIED, INCLUDING WITHOUT LIMITATION ANY WARRANTY FOR INFORMATION, SERVICES, OR PRODUCTS PROVIDED THROUGH OR IN CONNECTION WITH AudioDirector AND ANY IMPLIED WARRANTIES OF MERCHANTABILITY, FITNESS FOR A PARTICULAR PURPOSE, EXPECTATION OF PRIVACY, OR NON-INFRINGEMENT.
BY USING THIS SOFTWARE, YOU AGREE THAT CYBERLINK WILL NOT BE LIABLE FOR ANY DIRECT, INDIRECT, OR CONSEQUENTIAL LOSS ARISING FROM THE USE OF THIS SOFTWARE OR MATERIALS CONTAINED EITHER IN THIS PACKAGE.
The terms and conditions here under shall be governed and construed in accordance with the laws of Taiwan.
AudioDirector is a registered trademark along with other company and product names mentioned in this publication, used for identification purposes and remain the exclusive property of their respective owners.
Manufactured under license from Dolby Laboratories. Dolby and the double-D symbol are registered trademarks of Dolby Laboratories. Confidential unpublished works. Copyright 1995-2005 Dolby Laboratories. All rights reserved.
International Headquarters
Mailing Address |
CyberLink Corporation |
|
15F., No. 100, Minquan Rd., Xindian Dist. |
|
New Taipei City 231, Taiwan (R.O.C.) |
Web Site |
https://wwws.cyberlink.com |
Telephone |
886-2-8667-1298 |
Fax |
886-2-8667-1385 |
Copyright © 2018 CyberLink Corporation. All rights reserved.
Contents
.................................................. |
1 |
Introduction |
|
Welcome................................................................................................ |
1 |
Latest.................................................................................................Features |
1 |
DirectorZone.................................................................................................and CyberLink Cloud |
1 |
AudioDirector.................................................................................................Versions |
2 |
System Requirements................................................................................................ |
4 |
.................................................. |
5 |
AudioDirector Workspace |
|
AudioDirector................................................................................................Rooms |
5 |
Media Library................................................................................................ |
6 |
Sorting.................................................................................................Media in the Library |
6 |
Adjustments................................................................................................and Effects Panel |
7 |
AudioDirector................................................................................................Timeline |
7 |
Audio.................................................................................................Channels |
8 |
Range.................................................................................................Selection |
10 |
Timeline.................................................................................................View |
11 |
Timeline.................................................................................................Markers |
12 |
Timeline.................................................................................................Zoom |
13 |
Determine.................................................................................................Tempo/Metronome |
14 |
AudioDirector................................................................................................Quick Bar |
15 |
Playback................................................................................................Controls |
16 |
Video.................................................................................................File Playback |
17 |
Audio.................................................................................................Level Meter |
20 |
Audio Output................................................................................................(Codec) Preview |
21 |
Expanding................................................................................................the Workspace |
22 |
i
CyberLink AudioDirector Help
Keyframes................................................................................................Panel |
23 |
Volume.................................................................................................Tab |
24 |
Effect.................................................................................................Tab |
24 |
.................................................. |
25 |
Importing Media |
|
Importing................................................................................................Audio and Video Files |
25 |
Supported.................................................................................................Formats |
25 |
Downloading................................................................................................Sound Clips and Media Files |
26 |
Downloading.................................................................................................Sound Clips from DirectorZone |
26 |
Downloading.................................................................................................Media Files from CyberLink Cloud |
27 |
Sound.................................................................................................Clips Library |
28 |
Recording................................................................................................Audio |
28 |
Record.................................................................................................Audio Settings |
29 |
Using.................................................................................................Loop Recording to Record Audio |
30 |
.................................................. |
32 |
AudioDirector Projects |
|
Exporting................................................................................................Projects |
32 |
CyberLink................................................................................................Cloud Projects |
33 |
.................................................. |
34 |
Basic Audio Editing |
|
Converting................................................................................................Audio Profiles |
34 |
Using the................................................................................................Editing Tools |
35 |
Normalizing................................................................................................Audio |
35 |
.................................................. |
37 |
Adjusting Audio |
|
Boosting................................................................................................Audio Volume |
37 |
Applying................................................................................................Fades |
38 |
Trimming................................................................................................Audio |
40 |
Adjusting................................................................................................Length (Change Speed) |
41 |
Shifting................................................................................................Pitch |
42 |
Using the................................................................................................Pitch Bender |
43 |
Inserting................................................................................................Silence |
44 |
ii
Inserting................................................................................................Noise |
45 |
Reversing................................................................................................Audio |
45 |
Ambience................................................................................................Match |
46 |
Adding.................................................................................................Ambience |
47 |
Extracting.................................................................................................Ambience |
47 |
Adjusting................................................................................................the Master Volume |
49 |
Panning................................................................................................Audio Left/Right |
50 |
.................................................. |
52 |
Applying Audio Effects |
|
Using Dynamic................................................................................................Range Control |
52 |
Adding................................................................................................Delays |
53 |
Adding................................................................................................Reverb |
55 |
Creating................................................................................................a Phase Effect |
56 |
Creating................................................................................................a Flange Effect |
57 |
Adding................................................................................................a Chorus Effect |
59 |
Adding................................................................................................an Echo Effect |
60 |
Transforming................................................................................................Vocals |
61 |
Using the................................................................................................Equalizer |
63 |
Using the................................................................................................Stereo Expander |
64 |
Applying................................................................................................the Radio Effect |
65 |
Applying................................................................................................the Phone Effect |
65 |
Applying................................................................................................a Noise Gate |
66 |
Removing................................................................................................Vocals in Music |
67 |
Applying................................................................................................VST Effects |
68 |
.................................................. |
70 |
Restoring Audio |
|
Using Visual................................................................................................Repair |
70 |
Regional.................................................................................................Selection Tools |
70 |
Repairing.................................................................................................the Audio |
81 |
iii
CyberLink AudioDirector Help
Using Noise................................................................................................Reduction |
83 |
Auto.................................................................................................Denoise |
84 |
Noise.................................................................................................Reduction |
84 |
Using Clipping................................................................................................Removal |
86 |
Using Click................................................................................................Removal |
87 |
Using Hum................................................................................................Removal |
87 |
Simple.................................................................................................Mode |
88 |
Advanced.................................................................................................Mode |
89 |
Using Hiss................................................................................................Removal |
91 |
Using Plosive................................................................................................Removal |
92 |
.................................................. |
94 |
Mix Room |
|
Creating................................................................................................an Audio Mix |
94 |
Configuring.................................................................................................Audio Profile Settings |
96 |
Adding.................................................................................................Media to Your Mix |
96 |
Mixing.................................................................................................Audio |
97 |
Using.................................................................................................Audio Transitions |
103 |
Applying................................................................................................Adjustments in the Mix Room |
106 |
Using.................................................................................................Adjust Length (Auto Remix) |
107 |
Using.................................................................................................the Surround Sound Panner |
108 |
Using................................................................................................the Track Panner |
109 |
Customizing Audio for 360º Video in the Spatial Audio |
|
................................................................................................ |
110 |
Panner |
|
Using................................................................................................Automated Dialogue Alignment |
111 |
.................................................. |
114 |
Producing the Audio |
|
Supported................................................................................................Output Formats |
114 |
Producing................................................................................................Audio |
114 |
Producing................................................................................................Video |
116 |
Batch................................................................................................Processing |
117 |
.................................................. |
119 |
Sharing and Backing Up Audio |
|
iv
.................................................. |
120 |
Creating CDs |
|
.................................................. |
122 |
AudioDirector Preferences |
|
General................................................................................................Preferences |
122 |
File Preferences................................................................................................ |
123 |
Project................................................................................................Preferences |
123 |
DirectorZone................................................................................................Preferences |
124 |
Audio................................................................................................Settings Preferences |
124 |
Hardware................................................................................................Acceleration Preferences |
125 |
CyberLink................................................................................................Cloud Preferences |
125 |
.................................................. |
127 |
AudioDirector Hotkeys |
|
Customizing................................................................................................Keyboard Hotkeys |
129 |
Hotkey.................................................................................................Sets |
129 |
Licensing and Copyright |
|
.................................................. |
131 |
Information |
|
.................................................. |
132 |
Technical Support |
|
Before................................................................................................Contacting Technical Support |
132 |
Web Support................................................................................................ |
133 |
Help Resources................................................................................................ |
133 |
v
CyberLink AudioDirector Help
Chapter 1:
Introduction
This chapter introduces the CyberLink AudioDirector program and includes an overview of its features. It also outlines the recommended system requirements for running the program.
Note: this document is for reference and informational use only. Its content and the
corresponding program are subject to change without notice.
Welcome
Welcome to the CyberLink family of digital software programs. CyberLink AudioDirector lets you record, trim, cut, restore, and enhance digital audio from both imported audio files or the audio track in your videos. You can also apply effects to audio, save audio in different formats, and mix the audio from multiple sources into one file.
Latest Features
This section outlines some of the latest features within the CyberLink AudioDirector program.
Playback and edit a video with 4ch spatial audio.
Convert mono/stereo audio to spatial audio in the Spatial Audio Panner.
Adds support for .WEBM (VP9+Opus) video.
Create track alternatives in the Mix room to switch between different audio on a single track.
Produce multiple audio files at once or favorite profiles quickly with batch processing.
Customize keyboard hotkeys to your editing preference.
DirectorZone and CyberLink Cloud
You can upload/download sound clips, and back up media, preferences, projects, and more with the DirectorZone and CyberLink Cloud features.
1
Introduction
DirectorZone
DirectorZone is a web service that lets you download sound clips created by other users, so you can use them in your audio. You may also share your own custom sound clips by uploading them to DirectorZone.
To access the benefits of DirectorZone, you can sign in by clicking the  button at the top of the window to open the AudioDirector preferences, and then on the DirectorZone tab. See DirectorZone Preferences for more information.
Also, be sure to periodically click the  button to check out the latest DirectorZone Bulletin. Just click in this section in the Notifications window to view the bulletin. Or go to https://directorzone.cyberlink.com to find out more information on the features and benefits of the DirectorZone web service.
CyberLink Cloud
CyberLink Cloud is a cloud storage service from CyberLink where users can upload and download their sound clips, AudioDirector projects, produced media clips, and more. CyberLink Cloud allows users to back up media, preferences, projects, etc., and ensure their working environment is the same on multiple computers.
Note: CyberLink Cloud is a subscription cloud storage service that is included with some CyberLink products, and is available for purchase through our web site. For more detailed information, see https://www.cyberlink.com/products/cyberlink-cloud/.
AudioDirector Versions
The features that are available in CyberLink AudioDirector are completely dependent on the version you have installed on your computer. Click the AudioDirector logo in the top right to determine the version and build number for your copy of CyberLink AudioDirector.
AudioDirector 365
AudioDirector 365 is a subscription based version of CyberLink AudioDirector that provides all the audio editing features you expect, and adds the CyberLink Cloud storage service and more.
2
CyberLink AudioDirector Help
With a AudioDirector 365 subscription, you get:
All the advanced audio editing features of CyberLink AudioDirector.
The ability to back up program preferences, projects, and sound clips on the cloud storage space CyberLink Cloud.
Guaranteed updates to the latest versions of CyberLink AudioDirector.
AudioDirector 365 is the must-have solution for on-the-go audio editors who want easy access to their media and the latest up-to-date editing technologies.
Updating AudioDirector
Software upgrades and updates (patches) are periodically available from CyberLink. CyberLink AudioDirector automatically prompts you when either is available.
Note: you must connect to the Internet to use this feature.
To update your software, do this:
1.Click the  button to open the Notifications window.
2.Check the New Updates and Upgrade Info sections.
3.Select an item in these sections to open your web browser, where you can purchase product upgrades or download the latest patch update.
3
Introduction
System Requirements
The system requirements listed below are recommended as minimums for running CyberLink AudioDirector.
Note: to ensure you can enjoy all the features within CyberLink AudioDirector, make
sure your computer meets or exceeds the minimum system requirements.
Minimum System Requirements
Operating |
Microsoft Windows 10, 8/8.1, 7 (64-bit OS recommended) |
System |
|
|
|
Processor (CPU) |
Multi-core Intel processor with 64-bit support |
|
|
Graphics |
128 MB VGA VRAM or higher |
Processor |
|
(GPU) |
|
|
|
Memory |
2 GB required (6 GB or above recommended) |
|
|
Hard Disk |
1 GB required |
Space |
|
|
|
Screen |
1024 x 768, 16-bit color or above |
Resolution |
|
|
|
Sound Card |
Windows compatible sound card is required |
|
|
Internet |
Internet connection also required for initial software and |
Connection |
file formats activation |
|
|
4
CyberLink AudioDirector Help
Chapter 2:
AudioDirector Workspace
This chapter provides a complete overview of the CyberLink AudioDirector workspace. It also takes you through the settings used to customize the program to your preference.
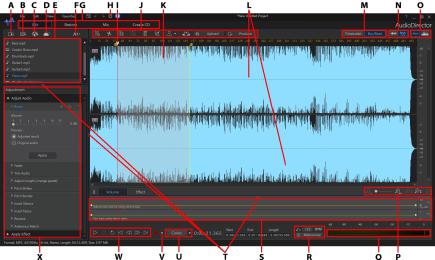
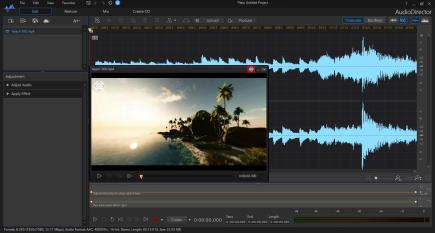
A - Import Media, B - Open Sound Clips Library, C - Download Sound Clips From DirectorZone, D - Download Your Audio Files From DirectorZone/CyberLink Cloud, E - Media Library, F - Sort Media, G - AudioDirector Rooms, H - AudioDirector Preferences, I - Timeline Slider, J - AudioDirector Quick Bar, K - Range Selection, L - Audio Channels, M - Timebase Display (Timecode/Tempo), N - Channel Selection, O - Toggle Timeline View, P - Timeline Zoom Controls, Q - Audio Level Meter, R - Determine Tempo/Metronome, S - Keyframe Panel, T - Expand Workspace, U - Audio Output (Codec) Preview, V - Record Audio, W - Playback Controls, X - Adjustments and Effects Panel
AudioDirector Rooms
CyberLink AudioDirector has the following main rooms: the Edit, Restore, Mix, and Create CD rooms.
Edit: in this room you can adjust, trim, cut, and enhance digital audio, and much more. See Editing Audio for more information.
5
AudioDirector Workspace
Restore: in this room you can repair audio clips using the Click Removal, Clipping Removal, and Noise Reduction features, or manually fix audio using the Visual Repair. See Restoring Audio for more information.
Mix: in this room you can record and mix multiple audio tracks into one customized file. See Mixing Audio for more information.
Create CD: in this room you can use the media in the library to create CDs in the audio CD format. See Creating CDs for more information.
The workspace within each CyberLink AudioDirector room is different, but do contain common features and areas. All the rooms have the audio library, as well as the AudioDirector quick bar you use to edit and add audio as required.
Media Library
When you import media into CyberLink AudioDirector, it is available in the media library. You can freely edit, restore, and apply effects to all of the media in the media library, or use the media in the Mix room.
You can import audio and also video files into the media library, as CyberLink AudioDirector lets you edit and restore the audio track of videos you import.
See Importing Media into the Library for more information on importing audio and videos files into the media library.
Sorting Media in the Library
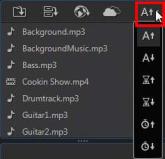
You can easily sort the media in the AudioDirector library by selecting a sort option from the list.
6
CyberLink AudioDirector Help
You have the option of sorting the media in ascending or descending order by file name, duration, or the date the media was created.
Adjustments and Effects Panel
The adjustments and effects panel is where you set the edits you want to make to your audio clips and apply effects. The adjustments and effects that are displayed depends on which room you are in.
AudioDirector Timeline
The timeline is a visual representation of the digital audio files selected in the media library. When a media file is selected, CyberLink AudioDirector displays each of its audio channels separately in the timeline.
Note: the timeline can display up to 8 channels (7.1 channel). See Audio Channels for
more information.
The values along the top of the timeline display either the audio file's playback time (timecode) or tempo (bar/beat), depending on your selected timebase display preference.
Note: you can change the timebase display (the values along the top of the timeline) by clicking either the Timecode or Bar/Beat button above the timeline. Timecode displays the audio by playback time, while Bar/Beat displays the audio by beats per minute (BPM) or its tempo. See Determine Tempo/Metronome for more information on using Bar/Beat as your timebase display.
The values along the right of the timeline indicate the audio intensity, or loudness, measured in decibels.
7
AudioDirector Workspace
Note: you can switch the view of the timeline by clicking the buttons in the top right
corner of the program. See Timeline View for more information.
The timeline is available in the Edit, Restore, and Mix rooms of CyberLink AudioDirector, and is where you work on editing, restoring, and mixing your audio files.
When you click the play button, the timeline slider begins to move, indicating the current playback position. If required, you can click and drag the timeline slider to any position if you want to jump forward in the audio.
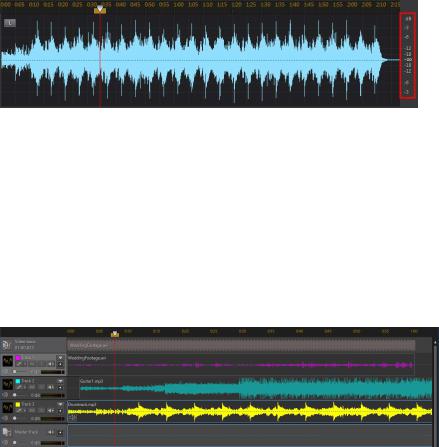
In the Mix room there are multiple tracks in the timeline. Each file you add, adds another layer of audio onto the final outputted media represented by the Master Track.
See Mixing Audio for information on mixing audio in CyberLink AudioDirector.
Audio Channels
When a media file is selected in the library, CyberLink AudioDirector displays all of its audio channels in the timeline. The timeline can display up to eight channels, and supports the following audio channel configurations:
7.1 surround sound (8 channels).
8
CyberLink AudioDirector Help
5.1 surround sound (6 channels).
spatial audio (4 channels).
Note: CyberLink AudioDirector now supports the import and edit of 360º video files with 4 channel spatial audio. Spatial audio can only be outputted with 360º video. It cannot be produced as an audio file only.
stereo (2 channels).
mono (1 channel).
Note: CyberLink AudioDirector supports the import and edit of audio and video files with 5.1 channel audio. It also supports the import of audio and video files with 7.1 channels, but only for .WAV audio files are all 8 channels displayed in the program and available for editing. For video files with 7.1 channel audio, two of the audio channels (BL/BR) are hidden and unavailable for editing.
Multi-Channel Display
When a media file has more than one audio channel, each audio channel is labeled in the top left corner. The following table defines the terminology for all the possible audio channel types available in a selected media file and the possible availability for the various audio channel configurations:
Channel Label |
Channel Type |
|
|
L |
Front left |
|
|
R |
Front right |
|
|
C |
Center |
|
|
LFE |
Low-frequency effects |
|
|
Lb |
Back left |
|
|
Rb |
Back right |
|
|
Lc |
Front left of center |
|
|
Rc |
Front right of center |
|
|
BC |
Back center |
|
|
Ls |
Side left |
|
|
Rs |
Side right |
|
|
9
AudioDirector Workspace
Channel Label |
Channel Type |
|
|
TpC |
Top center |
|
|
TpFL |
Top front left |
|
|
TpFC |
Top front center |
|
|
TpFR |
Top front right |
|
|
TpBL |
Top back left |
|
|
TpBC |
Top back center |
|
|
TpBR |
Top back left |
|
|
1, 2, 3, 4 |
Directional audio tracks for spatial audio, where 1 is the |
|
start view position. |
|
|
Note: the type of channel that is available in the selected media file is completely
dependent on the audio configuration of the file.
Selecting Channels for Editing
When you are editing and restoring audio in CyberLink AudioDirector, you can choose to apply the edits, effects, fixes, etc. to all the channels, or just one single channel.
Click  if you want to apply the edits to all of the audio channels, or
  to make edits on one specific channel only. Once selected, just click the channel you want to apply the edits to in the timeline.
Range Selection
When editing and restoring audio, drag the timeline slider to a position in the timeline (or use the playback controls to find the position), and then click and drag one of the yellow nodes on either side of the timeline slider to select a range of the audio.
10

CyberLink AudioDirector Help
You can also click and drag on the waveform directly to select a range of the audio.
Note that when you select a range of the audio, the editing tools on the AudioDirector quick bar become active. See Using the Editing Tools for detailed information about using each of these tools.
Details about the selected range are indicated in the Start, End, and Length fields below the timeline. Once you have a range of an audio file's wave form selected, you can then preview, cut, copy, delete or crop it as required.
Timeline View
When a file is selected in the media library in the Edit or Restore rooms, CyberLink AudioDirector by default displays the waveform view for each channel in the timeline.
There are two available timeline views to choose from: click  for the waveform view, or
  for spectral frequency view.
Click the buttons in the top right corner of the timeline to switch between the two available views.
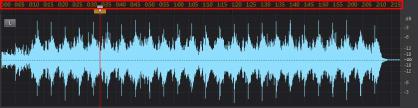
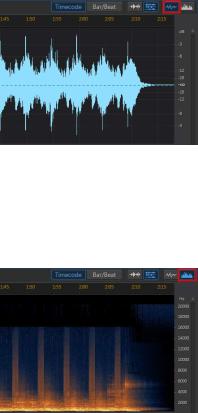
Waveform View
When a file is selected in the media library, CyberLink AudioDirector by default displays the waveform information for each channel in the timeline. The waveform view is a visual representation of both the time and the audio intensity (or loudness, measured in decibels) of the audio in each channel.
11
AudioDirector Workspace
Spectral Frequency View
The spectral frequency view is a graphical representation of the audio in each channel, and is ideal when using the Visual Repair feature. The colored graph you see in this view is a three dimensional illustration of the audio attributes in the selected media file.
The graph shows playback time along the top, and the frequency (relative pitch) of the audio (measured in hertz) along the right. The colors on the graph indicate the amplitude or strength of the audio at the point in time. The lighter the color, the louder the audio is at that frequency and time.
Timeline Markers
When editing, restoring, or mixing audio, click  to add a timeline marker at the current position of the timeline slider. Markers are used to mark the positions in your audio files where you might want to edit the audio file or start an effect from.
12

CyberLink AudioDirector Help
In the Mix room, use markers when adding audio clips as they will snap to the timeline markers.
Adding Timeline Markers
To add a timeline marker, do this:
1.Use the playback controls to find, or drag the timeline slider to the position where you want the marker, and then click  .
.
2.Input a Description for the new timeline marker, if required.
3.Click on OK to add the new timeline marker.
Note: you can double-click on a time marker to edit its properties, if required.
Timeline Zoom
When editing, restoring, or mixing audio on the timeline, use the controls to zoom in on the audio timeline to make your editing more precise. There are two types of zooming available: horizontal zoom and vertical zoom.
Note: when using the zoom controls, you can click the  button at any to time to
zoom all the way back out for a full view of the audio waveform.
Horizontal Zoom
The horizontal zoom controls let you increase/decrease the time magnification of the audio in the timeline.
Use these zoom controls if you want to, for example, zoom in on a specific two seconds in an audio clip.
Vertical Zoom
Vertical zoom lets you increase/decrease the intensity magnification of the audio in the timeline.
13
AudioDirector Workspace
Use these zoom controls if you want to, for example, zoom in on a specific noise to get a closer look at the waveform.
Determine Tempo/Metronome
When your timebase display is set to Bar/Beat, if required, you can determine your audio file's tempo or enable the metronome for assistance.
Note: CyberLink AudioDirector does not automatically calculate the tempo of audio clips in the timeline. The Bar/Beat timebase display is just a guideline for tempo you can use in your audio and video editing.
Determining Tempo
If you are not sure what the tempo of an audio file is, click the BPM button at the bottom of the Edit, Restore, and Mix rooms to open the Determine Tempo window. You can also access this window in General preferences by clicking the Tempo button.
Note: if you know the tempo of the audio or you want to manually set the tempo used in the timebase display, you can click in the field next to the  icon and enter it. It must be a number between 1 and 1280.
To determine the tempo of an audio file, do this:
1.Start the playback of the audio you want to determine the tempo of.
2.Click the BPM button at the bottom of the Edit, Restore, or Mix room to open the Determine Tempo window.
3.When ready, click the Tap button (or the T key on your keyboard) to the beat of music. Tap several quarter notes, as the more taps your provide, the more precise it will be in determining the tempo.
4.When you are done, click OK to set the detected tempo as the timebase display.
Note: before closing the Determine Tempo window, you can click Preview to hear the tempo you set. You can also use the metronome to hear the tempo during audio playback.
14

CyberLink AudioDirector Help
Metronome
When using the Bar/Beat timebase display, you can click the Metronome button to enable the metronome during playback. Once you click play to start the audio playback, the metronome will accurately play tapping sounds to the set tempo.
Use this to check that the set tempo is precise, and make any adjustments if required. You can change the set tempo by clicking in the field next to the  icon and entering it, or by clicking the BPM button to determine it manually. See Determining Tempo for more information.
AudioDirector Quick Bar
The AudioDirector quick bar offers you several tools you can access in all the rooms. Depending on which room you are in, the buttons on the quick bar differ.
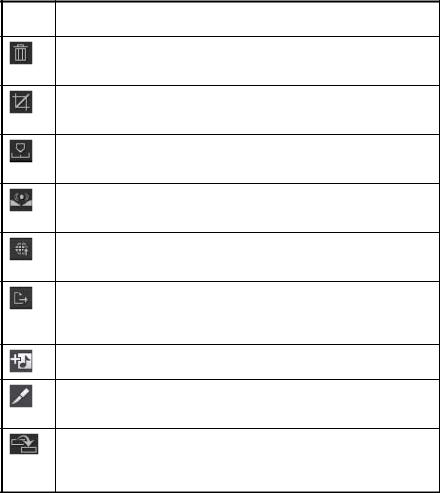
The available functions on the AudioDirector quick bar are as follows:
Note: see Creating CDs for a description of the tools on the quick bar in the Create CD
room.
Button Function
If in the Edit or Restore room, click this button to change the profile or quality of the selected media file. See Converting Audio Profiles for more information. If you're in the Mix room, click it to configure the profile settings of the mixed audio you produce. See Mixing Audio for more detailed information
In the Edit, Restore, and Mix rooms you can click on this button to cut a selected portion out of the audio file, and place it on your clipboard for pasting. See Using the Editing Tools for more detailed information.
In the Edit, Restore, and Mix rooms you can click on this button to make a copy of a selected portion on your clipboard for pasting. See Using the Editing Tools for more detailed information.
In the Edit, Restore, and Mix rooms you can click on this button to paste the audio wave form you cut or copied to the right of the
15
AudioDirector Workspace
current timeline position. See Using the Editing Tools for more detailed information.
In the Edit, Restore, and Mix rooms you can click on this button to delete a selected portion of the audio file. See Using the Editing Tools for more detailed information.
In the Edit and Restore rooms you can click on this button to crop to the selected portion of the audio file. See Using the Editing Tools for more detailed information.
In the Edit, Restore, and Mix rooms you can click this button to add timeline markers at the current timeline slider position. See Timeline Markers for more detailed information.
In the Edit, Restore, and Mix rooms you can click this button to normalize the selected audio. See Normalizing Audio for more information.
In the Edit, Restore, and Mix rooms you can click this button to share the selected audio file on DirectorZone. See Sharing Audio on DirectorZone for more detailed information.
In the Edit, Restore, and Mix rooms you can click this button to produce the selected audio or video file, exporting it with all the edits you made applied. See Producing Audio for more detailed information.
Click this button in the Mix room to add a mix track to the timeline. See Mixing Audio for more detailed information.
Click this button in the Mix room to split an audio file that is selected on a mix track into two separate parts. See Mixing Audio for more detailed information.
If you have a video clip that has audio recorded in a noisy environment, click this button to use Automated Dialogue Alignment to replace the audio. See Using Automated Dialogue Alignment for more information.
Playback Controls
While adjusting, editing, and mixing audio in CyberLink AudioDirector, use the available playback controls to preview the audio. To preview the audio, use the controls as follows:
16
CyberLink AudioDirector Help
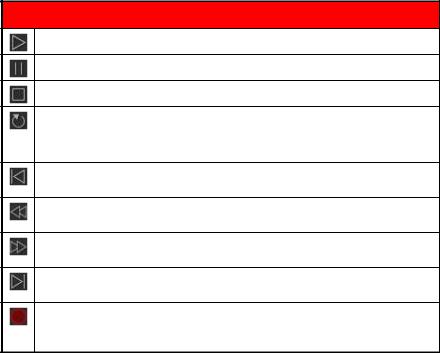
Playback Controls
Click to play the audio from the current position to the end of the track.
Click to pause playback.
Click to stop playback.
If  is displayed, the current audio file plays to the end of the track. If
  is displayed, the audio will loop continuously until you click pause or stop. Click to toggle between the two available audio playback behaviors.
Click to make the timeline slider jump to the beginning of the current selected audio track or selected range of the audio waveform.
During playback, click and hold this button to rewind through the current audio track.
During playback, click and hold this button to fast forward through the current audio track.
Click to make the timeline slider jump to the end of the current selected audio track or selected range of the audio waveform.
Click to record custom audio in CyberLink AudioDirector. See Recording Audio for detailed information on recording custom audio in the program.
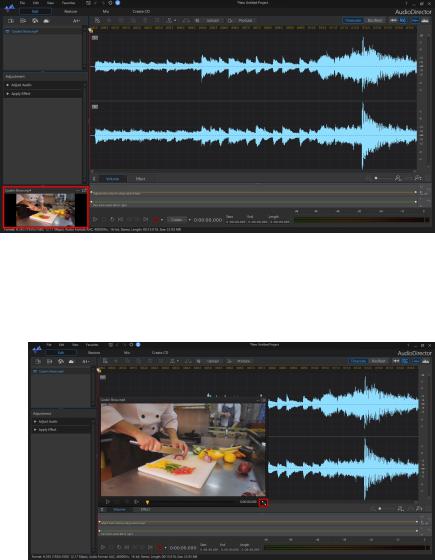
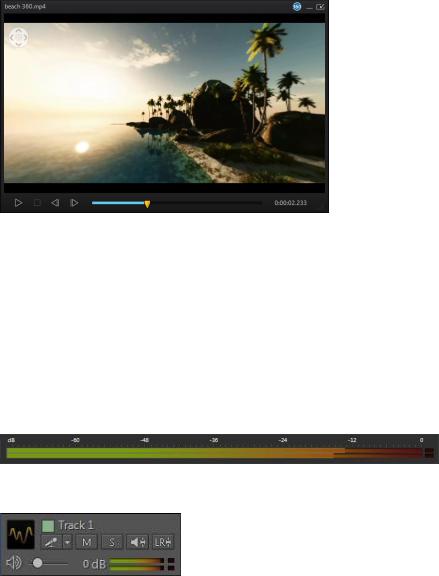
Video File Playback
When you import video files into the library, a small video preview displays in the bottom left corner of the CyberLink AudioDirector window when it is selected. When you click play, the video plays with the audio for added reference when editing the video file's audio track.
17
AudioDirector Workspace
During playback, you can:
click  to minimize the video preview window. Click
  to restore it.
click  to undock the preview window if you would like a larger preview that you can resize to your preference. You can also double-click on the undocked window's title bar to go to full screen, if required.
18
CyberLink AudioDirector Help
the video preview window also includes slightly different playback controls,
that include the  and
and  buttons you can use to step backwards or forwards one frame when the video is paused.
click  to re-dock the preview window to the bottom left.
360º Videos
When 360º video files are imported into CyberLink AudioDirector, you can click the  button to view it in the 360º mode.
360 Controls
When playing 360° video files, there are extra 360° controls available in the preview window.
19
AudioDirector Workspace
When viewing or playing a 360° video file, you can click and drag on the preview
window to pan around the 360° environment or use the  controls to pan left,
right, up, or down. Note that you can click the  in the middle of the controls at any time to reset to the default viewing position.
Note: you can also use your mouse's scroll wheel to zoom in and out within the 360°
view.
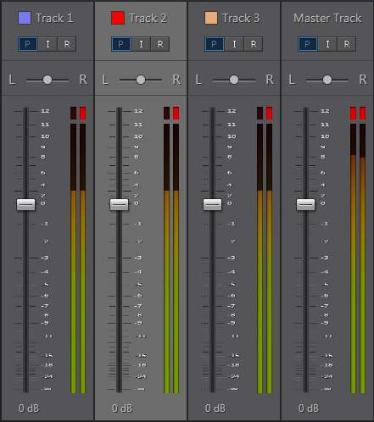
Audio Level Meter
Use the audio level meter to view the audio level, or loudness in decibels, of the current clip at different moments in time during playback. If the audio levels rise to the red levels, you can adjust the master volume to lower the audio level.
In the Mix room, each mix track has its own audio level meter. Just use the volume slider to the left of the track to adjust the audio level as necessary.
20
CyberLink AudioDirector Help
There are also audio level meters for each track in the Mix room's mixer panel. See Mixer Panel for more information.
Audio Output (Codec) Preview
Before you adjust, edit, and mix audio in CyberLink AudioDirector, you can click the Codec button below the timeline to enable audio output preview. Enabling this allows you to preview your audio with a selected codec in real-time while you work.
Note: when previewing a video file's audio with a selected codec, the video is not
available.
21
AudioDirector Workspace
Click the  next to the Codec button to change the audio output preview options as follows:
Format: select the format you want to use in the audio preview from the drop-down.
Bitrate/Compression level: if required, set the bitrate for the audio preview by selecting it from the drop-down.
Sample rate: set the sample rate of the audio preview by selecting it from the drop-down.
Note: the audio output preview options you set, will be used in the default profile
settings when you produce the audio.
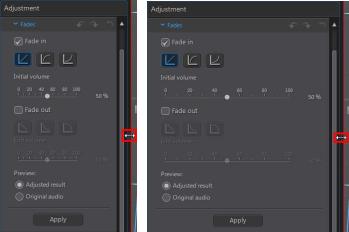
Expanding the Workspace
You can adjust the CyberLink AudioDirector workspace to fit your editing requirements. For example, you can expand out the adjustment and effects panel to get better look at all the available controls, if required.
You can also expand the keyframe panel for a better view when adjusting the master volume and panning audio left or right. Doing so, reduces the width of the audio tracks in the timeline.
22

CyberLink AudioDirector Help
If you have lots of media in the library, you can expand it to view all the files.
Keyframes Panel
The keyframes panel provides powerful and precise editing tools in the Edit room. On the Volume tab you can adjust the master volume of audio, or pan audio to the
23
Loading...