


 Loading...
CyberLink
Power2Go 5
User’s Guide
Copyright and Disclaimer
All rights reserved. No part of this publication may be reproduced, stored in a retrieval system, or transmitted in any form or by any means electronic, mechanical, photocopying, recording, or otherwise without the prior written permission of CyberLink Corporation.
To the extent allowed by law, Power2Go IS PROVIDED “AS IS”, WITHOUT WARRANTY OF ANY KIND, EITHER EXPRESS OR IMPLIED, INCLUDING WITHOUT LIMITATION ANY WARRANTY FOR INFORMATION, SERVICES, OR PRODUCTS PROVIDED THROUGH OR IN CONNECTION WITH POWER2GO AND ANY IMPLIED WARRANTIES OF MERCHANTABILITY, FITNESS FOR A PARTICULAR PURPOSE, EXPECTATION OF PRIVACY, OR NONINFRINGEMENT.
BY USING THIS SOFTWARE, YOU AGREE THAT CYBERLINK WILL NOT BE LIABLE FOR ANY DIRECT, INDIRECT, OR CONSEQUENTIAL LOSS ARISING FROM THE USE OF THIS SOFTWARE OR MATERIALS CONTAINED EITHER IN THIS PACKAGE.
The terms and conditions here under shall be governed and construed in accordance with the laws of Taiwan.
Power2Go is a registered trademark along with other company and product names mentioned in this publication, used for identification purposes and remain the exclusive property of their respective owners.
International Headquarters
Mailing Address |
CyberLink Corporation |
|
15F, #100, Min Chuan Road, Hsin Tian City |
|
Taipei County, Taiwan |
Web Site |
www.cyberlink.com |
Telephone |
886-2-8667-1298 |
Fax |
886-2-8667-1300 |
Copyright © 2005 CyberLink Corporation. All rights reserved.

Contents
1
2
Introduction.............................................. |
1 |
Welcome ................................................................................... |
2 |
The Power2Go Program ........................................................ |
3 |
Power2Go Express Mode ................................................. |
3 |
Power2Go Mode ............................................................... |
6 |
Disc Capacity Bar ............................................................ |
10 |
Register Your Software ........................................................ |
11 |
CD-Key Activation ......................................................... |
12 |
Latest Features ...................................................................... |
13 |
Supported File & Disc Types .............................................. |
14 |
System Requirements ........................................................... |
14 |
Burning.................................................. |
17 |
Before Burning a Disc ........................................................... |
18 |
Preferences ....................................................................... |
18 |
Configuration Options ................................................... |
20 |
Burning Discs ........................................................................ |
30 |
Multisession Discs .......................................................... |
30 |
Burn a Data Disc ............................................................. |
31 |
Burn a Music Disc ........................................................... |
35 |
Burn a Video/Photo Disc .............................................. |
39 |
Burn a Mixed Disc .......................................................... |
45 |
Copying Discs ....................................................................... |
51 |
i

CyberLink Power2Go |
|
|
3 |
Disc Utilities ........................................... |
53 |
|
Burning a Disc Image ........................................................... |
54 |
|
Saving a Disc Image ............................................................. |
55 |
|
Erasing a Disc ........................................................................ |
56 |
|
Ripping Audio ...................................................................... |
57 |
|
Converting Audio Files ........................................................ |
59 |
|
Appendix ............................................... |
61 |
|
Technical Support ................................................................. |
62 |
|
Web Support .................................................................... |
62 |
|
Fax Support ...................................................................... |
62 |
|
Telephone Support ......................................................... |
63 |
|
Disc Types .............................................................................. |
64 |
|
CD Types .......................................................................... |
65 |
|
DVD Types ....................................................................... |
66 |
|
Blu-ray Discs .................................................................... |
68 |
|
Index ..................................................... |
69 |
ii
Chapter 1:
Introduction
This chapter introduces the CyberLink Power2Go program, starting with a description of the program’s functions, followed by an explanation of Power2Go’s two burning modes, Power2Go mode and Power2Go Express mode. The chapter ends with a list of recommended system minimum requirements.
This chapter contains the following sections:
•Welcome on p.2
•The Power2Go Program on p.3
•Register Your Software on p.11
•Latest Features on p.13
•Supported File & Disc Types on p.14
•System Requirements on p.14
1
CyberLink Power2Go
Welcome
Welcome to the CyberLink family of digital video tools! CyberLink Power2Go is a disc-burning program, which is a handy utility for burning discs containing movies made using CyberLink’s moviemaking software, or when you want to make music discs, data discs, and even bootable discs.
Power2Go’s main features include the following:
•burns data, music, movie, and mixed media discs
•converts audio files to and from the MP3, WAV, and WMA formats as well as different qualities
•erases discs that contain unwanted content
•copies entire discs
•creates slideshows from individual photo files
•Power2Go Express mode supports drag-and-drop to desktop icons for burning in the fewest number of steps
•burns DVD folders to disc
•supports CD text for additional textual information (such as a description of the artist or song) with audio tracks
2

Chapter 1: Introduction
The Power2Go Program
The CyberLink Power2Go program can run in either of two modes: Power2Go Express mode or Power2Go mode. Power2Go Express mode is the simpler of the two modes, allowing you to burn discs in two steps. Power2Go mode, on the other hand, offers you access to more options and disc utilities.
Power2Go Express Mode
Power2Go Express mode uses the following icons, placed on your desktop:
Drag data files to this icon to burn a data disc. (See Burn a Data Disc in Power2Go Express Mode on p.31.)
Drag music files to this icon to burn an Audio CD music disc. (See Burn an Audio CD Music Disc in Power2Go Express Mode on p.35.)
Drag video files to this icon to burn a movie disc. (See Burn a Video/Photo Disc in Power2Go Express Mode on p.39.)
Double-click this icon to copy a disc. (See Copying Discs on p.51.)
Note: You can click and drag the entire column of icons to a different location on your desktop, or right-click on a single icon to move it individually.
3
CyberLink Power2Go
Burning in Power2Go Express Mode
Dragging files in appropriate formats to these icons prepares Power2Go to burn a disc. You can double-click the icon to open a window for further modification of your burning configuration.
•To burn a data disc, see Burn a Data Disc in Power2Go Express Mode on p.31.
•To burn an Audio CD music disc, see Burn an Audio CD Music Disc in Power2Go Express Mode on p.35.
•To burn a movie disc, see Burn a Video/Photo Disc in Power2Go Express Mode on p.39.
•To copy a disc, see Copying Discs on p.51.
If you do not need to add any more files or modify your burning configuration, click the Rec button after dragging files onto the icon. Burning begins immediately, and the process is displayed on the icon. (Click Stop to cancel the burning process.)
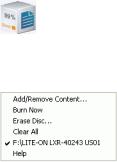
Right-clicking an icon on the desktop opens a command menu to control burning tasks.
Click a menu item to perform the corresponding task.
4

Chapter 1: Introduction
Configuring Power2Go Express Mode
Right-clicking the icon on the system tray opens a command menu to control Power2Go Express mode icons, to erase a disc, and to control the Power2Go program.
Use one of the Hide options to remove an icon from display on the desktop. (The option then becomes Show, allowing you to display the icon again.) You can also choose to display large or normal-sized icons on the desktop.
Check the Always on Top option to keep Power2Go on top of any other programs you are running.
Check the Start Program When System Starts option to run Power2Go whenever you power on your computer.
Click Erase Disc... to erase a rewritable disc.
Click About to display Power2Go version information, click Help to open the help file, and click Exit to close Power2Go Express mode.
Changing Power2Go Express Mode Skins
Power2Go Express Mode provides several different skins that allow you to change the look of the desktop icons. To use a different skin, right-click the icon on the system tray to open the command menu, click the Change Skin... option, then select a skin. If you would like to use a custom skin, click the Browse... option. In the dialog box that opens, open the skin file you want to use. The Power2Go Express icons change to the skin you have selected.
5
CyberLink Power2Go
Power2Go Mode
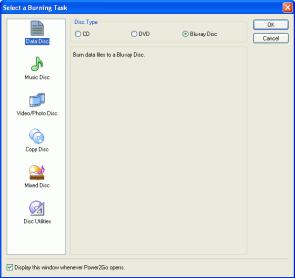
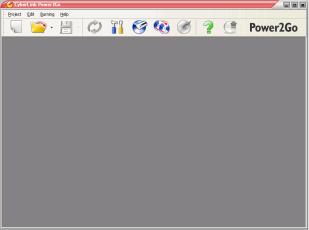
Power2Go mode opens in a program interface. By default, the Select a Burning Task window opens each time you run the program in Power2Go mode. Power2Go mode also displays a program window with a column of buttons that allow you to perform each of Power2Go’s different tasks.
To begin a burning task in the Select a Burning Task window, click an icon, then click OK to begin your task.
You can disable the Select a Burning Task window by unchecking the
Display this window whenever Power2Go opens option.
6

Chapter 1: Introduction
The icons available in the Select a Burning Task window are described below:
Burns data files to disc.
Burns audio files to disc.
Burns video files to disc.
Copies disc content onto a blank disc.
Burns mixed media content to disc.
>Burns a disc image to disc. (See Burning a Disc Image on p.54.)
>
Saves a disc image to your hard drive for future burning. (See Saving a Disc Image on p.55.)
Erases a rewritable disc. (See Erasing a Disc on p.56.)
>
>
Rips audio tracks from an Audio CD to your hard drive. (See Ripping Audio on p.57.)
>
Converts an audio file to a different audio format. (You can convert to and from the MP3, WAV, and WMA formats.) Also converts audio files to a different quality. (See Converting Audio Files on p.59.)
>
Opens the LabelPrint program. For detailed help related to this topic, see the LabelPrint help. (LabelPrint is an optional feature for Power2Go. In your version of Power2Go, this feature may be limited or unavailable.)
7
CyberLink Power2Go
When you close (or disable) the Select a Burning Task window, the Power2Go program displays a row of buttons at the top, which allow you to access certain important functions.
8
Chapter 1: Introduction
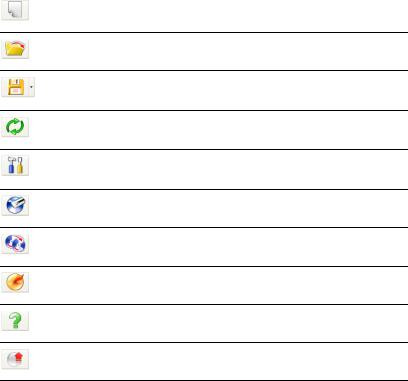
The available buttons are described below:
Starts a new burning task.
Opens an existing project.
Saves an existing project. Click the down-arrow to save a project under a different name.
Refreshes the displayed disc/drive information.
Displays disc, drive, and project configuration information.
Erases a disc.
Copies a disc.
Burns a disc.
Opens the help file.
Upgrade the program over the Internet.
 Displays Power2Go version information.
9

CyberLink Power2Go
Disc Capacity Bar
At the bottom of the program window is the disc capacity bar, which displays a graph of the current and maximum capacity of the disc. (The capacity bar appears after you have selected a burning task.) Below the graph is detailed information about the disc, such as the number of folders and files in the current project and on the disc, as well as the disc’s free and used space. Use this bar to keep track of the amount of content you add to the disc.
The capacity bar may display a certain amount of used space even before you add files to be burned to your disc. This is because more data gets burned to the disc than just the files you select. This extra data includes the disc's file system, data specific to the file format you choose, as well as fixed spaces that must be retained between files, sessions, and audio tracks. The real used space is displayed on the capacity bar to give you an accurate indication of how much data can be burned to a disc, instead of relying on trial and error when filling a disc to capacity.
10
Chapter 1: Introduction
Register Your Software
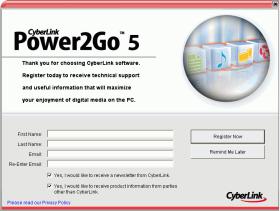
After you install the program, a registration window opens, prompting you to register your product. It is important to register your software in order to receive technical support or other information from CyberLink.
To register your software, do this:
1.Enter your personal information in the First Name, Last Name, and Email entry boxes.
•Check one or both of the options to receive information from CyberLink, or uncheck if you do not wish to receive this information.
2.Click Register Now.
•If you would like to register this product at a later time, click Remind Me Later. The registration box will open each time you run the program until you register.
11
CyberLink Power2Go
CD-Key Activation
After your trial period is over, you will need a CD-Key to activate Cyberlink Power2Go Deluxe version. You can find the CD-Key in the Box, on the CD Cover or in your purchase confirmation e-mail.
To activate your software before your trial period is over, do this:
1.Open Power2Go. Click Help on the Menu Bar, then click Enter Activation Key. The Power2Go Key Activation window opens.
2.Enter your CD-Key and click Activate. Power2Go is now upgraded to the Deluxe version.
12
Chapter 1: Introduction
Latest Features
This section describes the latest features in the CyberLink Power2Go program.
Data Burning
•Burning Blu-ray discs
•Burning on DVD-R DL (8.5G) discs
•Custom CD size
Music Burning
•Enhanced CD Text support
•Burning music CDs using audio from video clips
•Track gap customization while creating audio CDs
Video Burning
•Video trimming
•Thumbnail image setting for VCD/DVD menus
•Chapter-based DVD movie authoring for better navigation
Other
•Reading speed options during disc copy
•UDF 2.5 file system support
•Newly added Express skins
•View burning logs
13

CyberLink Power2Go
Supported File & Disc Types
•Music formats: Audio CD, .MP3, .WMA, .WAV
•Video formats: .AVI, .DAT (MPEG-1), .MPE, .MPG, .MPEG,
.WMV
•Image formats: .BMP, .GIF, .JPE, .JPEG, .JPG, .PSD
•Disc types: CD-R/RW, DVD-R/RW, DVD+R/RW, DVDRAM, DVD+R/-R DL, Blu-ray Discs (BD)
System Requirements
The system requirements listed below are recommended as minimums for burning. You may find that your system, while meeting these recommended minimums, requires expanded capacity during specific burning tasks.
Minimum System Requirements
OS |
• Windows XP/2000/ME/98SE (Windows |
|
XP/2000 recommended) |
|
|
Screen Resolution |
• 800 x 600 pixels or higher |
|
|
Memory |
• 128 MB SDRAM for music and data |
|
burning |
|
• 256 MB DDR RAM (512MB |
|
recommended) for video burning |
|
|
CPU |
• VCD (MPEG-1) production: Intel |
|
Pentium II 450 MHz |
|
• DVD (MPEG-2) production: Intel |
|
Pentium III 800 MHz, or AMD Athlon 700 |
|
MHz (Intel Pentium 4 2.0 GHz, or AMD |
|
Athlon 2100+ or above recommanded) |
14

Chapter 1: Introduction
Minimum System Requirements
HDD Space |
• 1 GB for making VCD videos |
|
• 5~10 GB for making DVD videos |
15
CyberLink Power2Go
16
Chapter 2:
Burning
CyberLink Power2Go offers a number of burning functions, including burning data discs, music discs, video/photo discs, mixed discs, and bootable discs, as well as copying the entire contents of a disc. You can burn to CD or DVD in a variety of formats. Before burning a disc, you can set your burning configuration to ensure proper burning.
This chapter contains the following sections:
•Before Burning a Disc on p.18
•Burning Discs on p.30
•Copying Discs on p.51
17
CyberLink Power2Go
Before Burning a Disc
Before you begin burning discs, you may want to set your burning configuration to match your burning drive and the discs you want to
burn. Click the Configuration/Information button  to open a window that displays disc and drive configuration information.
Preferences
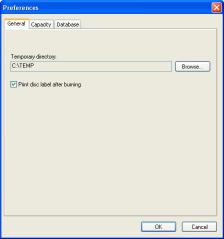
Power2Go offers several different types of preferences to suit the program to your working methods. To view the program’s preferences, click Project, then Preferences.
General
Click the General tab to display the General preferences.
•Temporary directory: allows you to set a working directory where Power2Go saves temporary files while burning.
18
Chapter 2: Burning
•Print disc label after burning: displays a button to open the LabelPrint program immediately after burning, so you can print disc labels and other label types.
Note: LabelPrint is an optional feature for Power2Go. In your version of Power2Go, this feature may be limited or unavailable. To obtain the full functioning of this feature, please purchase or install the retail version of LabelPrint. Please consult Cyberlink's online website for further information on acquiring LabelPrint.
Capacity
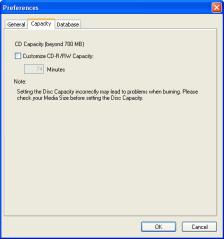
Click the Capacity tab to display the Capacity preferences.
•CD Capacity: allows you to set a custom disc size if the CD you are using can hold more than 700MB. To enable this option, check Customize CD-R/RW capacity, then enter the new size in the Minutes entry box.
19
CyberLink Power2Go
Database
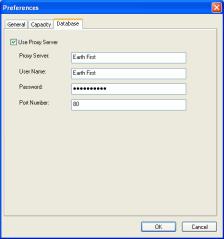
Click the Database tab to display the Internet connection preferences.
•Use Proxy Server: allows you to retrieve information related to your music CDs from the Internet before burning. To enable this option, check Use Proxy Server, then enter the necessary information in the Proxy Server, User Name, Password, and Port Number entry boxes. (This option may be particularly useful for passing through a firewall.)
Configuration Options
To open the Configuration/Information window, click  in the
main program window. The Configuration/Information window opens, displaying tabs that contain configuration information related to your current burning task. (Only the Information tab appears if you have not selected a burning task.) Which tabs appear and which options they contain depend on the burning task you have selected.
20
Loading...