

Page 1
BASTONE DA PASSEGGIO
IN ALLUMINIO
BASTONE DA PASSEGGIO IN ALLUMINIO
Istruzioni per l‘uso
ALUMINIUM HIKING POLE
Instructions for use
ALUMINIUM-WANDERSTOCK
Gebrauchsanleitung
IAN 96710
111
Page 2
A
B C
2
Page 3
Indice/Contents/Inhaltsverzeichnis
Dotazione ...................................................................................................... 4
Dati tecnici ..................................................................................................... 4
Utilizzo conforme ......................................................................................... 4
Avvertenze per la sicurezza .................................................................. 4 - 5
Regolazione della lunghezza del bastone ................................................ 5
Attivazione/disattivazione del sistema di smorzamento ........................... 6
Posizionamento delle cinghie per le mani .................................................. 6
Avvertenze importanti per l‘utilizzo ............................................................ 6
Supporto combinato per gommino da asfalto e ‘piatto‘ .......................... 6
Cura e manutenzione ................................................................................... 6
Conservazione e trasporto .......................................................................... 7
Smaltimento ................................................................................................... 7
3 anni di garanzia ........................................................................................ 7
List of contents ............................................................................................... 8
Technical specifications ................................................................................ 8
Intended use .................................................................................................. 8
Safety instructions ................................................................................... 8 - 9
Adjusting the pole length ............................................................................. 9
Turning the shock absorption system on/off ............................................ 10
Putting on the hand strap ........................................................................... 10
Useful information about use ..................................................................... 10
Combination support for asphalt pad and plate ..................................... 10
Cleaning and maintenance ....................................................................... 10
Storage and transport ................................................................................ 11
Disposal ....................................................................................................... 11
3 Years warranty ........................................................................................ 11
Lieferumfang ................................................................................................ 12
Technische Daten ........................................................................................ 12
Bestimmungsgemäße Verwendung ........................................................... 12
Sicherheitshinweise ............................................................................. 12 - 13
Einstellen der Stocklänge ........................................................................... 13
Ein-/Ausschalten des Dämpfungssystems ................................................. 14
Anlegen der Handschlaufe ........................................................................ 14
Nützliche Hinweise zur Benutzung ........................................................... 14
Kombinationshalterung für Asphaltpad & Teller ...................................... 14
Reinigung und Pflege ................................................................................. 14
Lagerung und Transport ............................................................................. 15
Entsorgung .................................................................................................. 15
3 Jahre Garantie ........................................................................................ 15
3
Page 4

Congratulazioni!
Con il vostro acquisto avete scelto un prodotto altamente qualitativo. Familiarizzate con il prodotto prima di prenderlo in funzione.
Leggete attentamente le seguenti istruzioni per l‘uso.
Utilizzate il prodotto soltanto per lo scopo previsto e i campi d´impiego
indicati. Conservate bene queste istruzioni. In caso di inoltro del prodotto
a terzi, pregasi consegnare tutta la documentazione.
Dotazione
1 x Bastone da passeggio in alluminio con passante per mano
1 x Supporto combinato
1 x Pad per utilizzo su asfalto
1 x Disco antiaff ondo
1 x Istruzioni per l‘uso
Dati tecnici
Dimensioni: regolabili da 61 a 120 cm
Peso incl. accessori: ca. 302 g
Utilizzo conforme
Questo articolo è provvisto di una punta in metallo duro per l’utilizzo su
terreni, ghiaccio o altre superfici lisce. Dispone inoltre di un gommino da
asfalto facile da staccare e da applicare per l‘utilizzo sull’asfalto o su
altri tipi di terreno duro. L‘articolo è destinato esclusivamente alla pratica
della camminata nordica.
Avvertenze per la sicurezza
• Non apportare riparazioni o modifiche che condizionerebbero la
funzionalità dell’articolo e quindi la sicurezza!
• Indossare dei dispositivi catarifrangenti.
• Prima di ogni utilizzo verificare se l’articolo è correttamente assem blato.
• Prima di ogni utilizzo verificare se l’articolo presenta segni di danneg giamento.
• Se si riscontrano segni di danneggiamento o una funzionalità non
corretta, non utilizzare l’articolo ed eliminarlo.
• Non utilizzare olio. Qualsiasi tipo di olio condizionerebbe la forza di
tenuta del meccanismo di regolazione.
• Ricordare che l‘articolo è provvisto di una punta che può danneggiare
la pavimentazione.
• Non sedersi sull’articolo perché potrebbe rompersi.
• Un bastone provvisto di punta costituisce un pericolo per i bambini!
• L’articolo è destinato esclusivamente all’uso privato.
• Per l’uso professionale non sussiste alcuna garanzia.
• Non utilizzare l’articolo per sciare!
4
IT/MT
Page 5

AVVERTENZE:
Non utilizzare questo articolo come ausilio per la
deambulazione secondo EN 1985!
• Dopo l‘assemblaggio, appoggiandosi leggermente sul bastone
verificare che i punti di attacco sia correttamente innestati.
• Non regolare mai la lunghezza del bastone oltre il contrassegno
“STOP“!
• In caso di elevate forze di serraggio il sistema di fissaggio dell’articolo
raggiunge una forza di tenuta di circa 140 kg.
• Con carichi superiori a 100 kg, in caso di disattivazione del sistema di
smorzamento, quest’ultimo potrebbe danneggiarsi.
• Se risulta impossibile modificare la lunghezza del bastone, staccare
il segmento interessato dal bastone. Ruotare il sistema di fissaggio
manualmente e per 2-3 volte verso destra fino a quando il dispositivo
di blocco arancione non inizia ad allargarsi leggermente.
Quindi reinserire il segmento nel bastone e regolarlo alla lunghezza
desiderata.
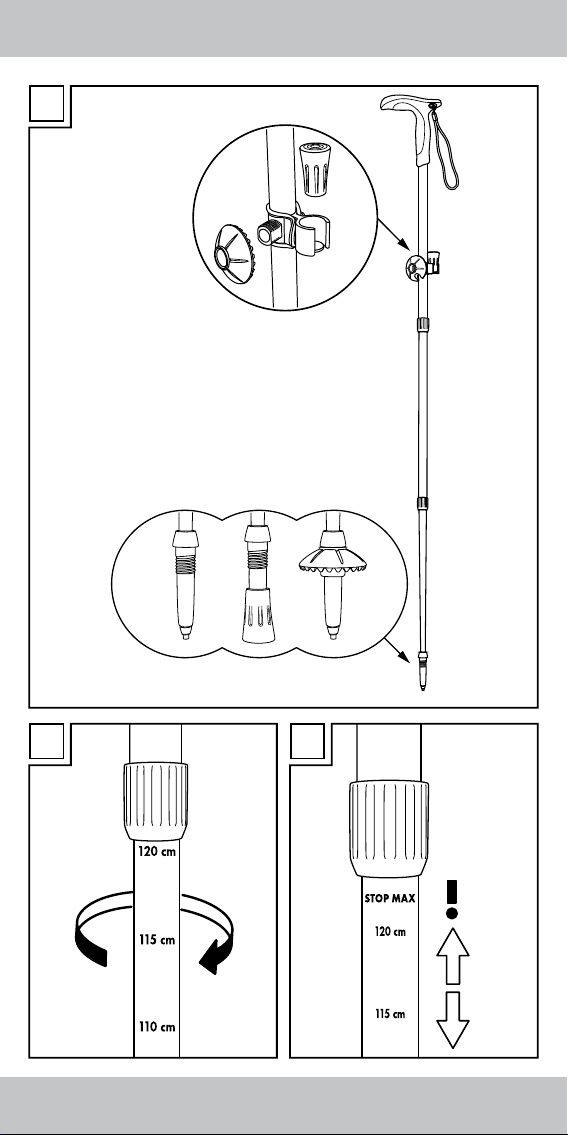
Regolazione della lunghezza del bastone
L’articolo è regolabile in altezza da 61 cm a 120 cm. Deve essere regolato in base alla propria statura e al tipo di utilizzo. Il senso di rotazione
per l‘allungamento e l‘accorciamento è indicato sulla parte superiore
dell’articolo.
Allungamento/Accorciamento
1. Tenendo la parte superiore dell’articolo con una mano, ruotare la
parte centrale verso sinistra (Fig. B).
2. Tenendo la parte centrale, ruotare la parte inferiore verso sinistra
(Fig. B).
3. Estendere entrambe le parti alla lunghezza desiderata. Ad esempio,
se si vuole regolare la lunghezza a 120 cm, fissare le due parti
inferiori dell’articolo in modo che i contrassegni indicanti 120 cm
risultino visibili.
Attenzione! Non portare mai la lunghezza del bastone oltre
il contrassegno “STOP“ (Fig. C)!
4. Tenendo la parte centrale dell’articolo con una mano, ruotare quella
inferiore verso destra fino a quando non è più possibile ruotarla eserci tando una forza normale.
5. Tenendo la parte superiore dell‘articolo con una mano, ruotare quella
centrale verso destra fino a quando non è più possibile ruotarla eserci tando una forza normale.
Avvertenza: il meccanismo di rotazione può allentarsi! Pertanto, prima
di ogni utilizzo verificare che sia perfettamente serrato!
Attenzione! Se la parte inferiore del bastone non è serrata a sufficienza,
il bastone perde stabilità!
IT/MT
5
Page 6

Attivazione/disattivazione del sistema di
smorzamento
Per disattivare il sistema di smorzamento, fissare la lunghezza del
bastone come indicato nel paragrafo “Regolazione della lunghezza del
bastone“.
1. Ruotare la parte centrale solo un poco in direzione contraria a quella
di accorciamento. Si sentirà un ‘clic‘. In questo modo il sistema di
smorzamento è disattivato.
2. Ruotare di nuovo la parte centrale nella direzione di accorciamento
per riattivare il sistema di smorzamento.
Posizionamento delle cinghie per le mani
Inserire le mani dentro le cinghie e afferrare le impugnature.
Avvertenze importanti per l‘utilizzo
• In caso di freddo indossare i guanti.
• In caso di lunghe camminate, portare con sé qualcosa da bere
(usare ad esempio la cintura porta-borraccia oppure uno zaino).
• Indossare abiti idonei alle condizioni atmosferiche.
Supporto combinato per gommino da asfalto
e ‘piatto‘
Nel supporto combinato potete custodire il gommino da asfalto. Il gommino viene utilizzato su terreni duri e pietrosi, il ‘piatto‘ su terreni morbidi
per impedire che il bastone affondi nel terreno. Il supporto combinato
può essere anche rimosso. Tirando l’apposita linguetta, estrarre l’anello
di gomma rosso dalla relativa guida nel supporto. Sarà quindi possibile
staccare il supporto dal bastone. Per installare il supporto combinato
riposizionarlo sul bastone e riapplicare l’anello in gomma inserendolo
nella guida del supporto. Se non si desidera usare il gommino da asfalto
e il ‘piatto‘ è possibile fissarli o alloggiarli nel dispositivo del sistema di
scambio del ‘piatto‘.
Cura e manutenzione
Pulire l‘articolo con un panno imbevuto di acqua tiepida o insaponata.
Non usare mai detergenti aggressivi o contenenti solventi perché questi
prodotti possono danneggiare i materiali di rivestimento e i contrassegni
riducendo la durata di servizio dell’articolo.
IT/MT
6
Page 7

Conservazione e trasporto
Non esporre l’articolo alla luce solare diretta o a fonti di calore eccessive perché tali condizioni danneggerebbero l’articolo e la sua funzionalità, accorciandone la vita di servizio. Conservare l’articolo in un ambiente asciutto. Se dopo l’uso è bagnato, asciugarlo prima di riaccorciarlo
per evitare che si corroda. Per il trasporto mantenere sempre applicato
sulla punta il gommino da asfalto.
Smaltimento
Smaltire il materiale di imballaggio dell’articolo nel rispetto delle normative per la protezione ambientale. Per smaltire l’articolo rivolgersi ai
servizi locali per lo smaltimento rifiuti.
3 anni di garanzia
Questo prodotto è stato fabbricato con grande attenzione e sottoposto a
costanti controlli. La garanzia è di tre anni dalla data d’acquisto.
Conservi lo scontrino fiscale.
La garanzia vale solo su difetti di materiale o di fabbricazione e decade
in caso di uso errato o non conforme. Questa garanzia non costituisce
una limitazione ai Suoi diritti legali e in particolare al diritto di garanzia.
Per eventuali reclami vi preghiamo di contattare il seguente servizio
hotline o mettervi in comunicazione con noi via e-mail. I nostri addetti
all‘assistenza concorderanno con voi come procedere nel modo più
rapido possibile. In qualsiasi caso vi consiglieremo per le vostre esigenze
specifiche.
Il periodo di garanzia non viene prolungato a seguito di riparazioni
effettuate in garanzia, secondo il diritto di garanzia o per correntezza
commerciale. Lo stesso vale anche per le parti sostituite o riparate.
Le riparazioni dopo la scadenza della garanzia verranno effettuate a
pagamento.
IAN: 96710
Assistenza Italia
Tel.: 0236003201
E-Mail: deltasport@lidl.it
Assistenza Malta
Tel.: 80062230
E-Mail: deltasport@lidl.com.mt
E‘ possibile trovare i pezzi di ricambio del vostro prodotto anche su:
www.delta-sport.com, rubrica servizio di assistenza - pezzi di ricambio Lidl
IT/MT
7
Page 8

Congratulations!
With your purchase you have decided on a high-quality product.
Get to know the product before you start to use it. Carefully read the
following operating instructions.
Use the product only as described and only for the given areas of application. Keep these instructions safe. When passing the product on to a
third party, always make sure that the documentation is included.
List of contents
1 x Aluminium hiking pole with wrist strap
1 x Combo-holder
1 x Asphalt pads
1 x Hiking pole disc
1 x Instructions for use
Technical specifications
Dimensions: adjustable: 61 - 120cm
Weight incl. accessories: approx. 302g
Intended use
This product is provided with a carbide tip for hiking off road, on ice or
on other smooth surfaces. It is also equipped with an asphalt pad which
can be attached and removed easily when hiking on asphalt or other
hard surfaces. The product is intended solely for hiking.
Safety instructions
• Do not carry out any repairs that may compromise safety!
• Use reflectors which are worn on the body.
• Check the product’s screw connection before every use.
• Check for damage to the product before every use.
• The moment you notice a crack or a defective function on the product,
stop using it and dispose of it.
• Please do not use oil, as any oil may negatively affect the retention
force of the adjustment mechanism.
• Please note that the tip of the product may damage floors.
• Please do not sit on the product, as it may break.
• Sharp poles are inherently dangerous for children!
• The equipment is intended for private use only.
• There is no guarantee for professional use.
• Do not use for skiing!
8
GB/MT
Page 9

INFORMATION:
This product must not be used as a walking aid under
EN 1985!
• After closing, check whether the fasteners are secure by leaning gently
on the pole.
• Never fix the pole length beyond the “STOP” mark!
• In the event of very high tightening forces, the product’s locking system
reaches a clamping force of approximately 140kg.
• Loads of over 100kg may cause damage to the shock absorption
system if this is disabled.
• If the pole will not lock, pull the particular pole segment out of the pole.
Turn the locking system 2-3 rotations clockwise by hand until the
orange clamping device begins to spread apart slightly. Then put the
individual pole segment back into the pole and secure it at the desired
length.
Adjusting the pole length
The product is continuously height adjustable from 61cm to 120cm, and
should be set depending on your height and the type of application.
The rotation direction for opening and closing is indicated on the top part
of the product.
Opening/closing
1. Hold the upper part of the product with one hand and turn the middle
part to the left (Fig. B).
2. Hold the middle part of the product and turn the lower part to the left
(Fig. B).
3. Pull both parts of the product apart until they reach the desired length.
For example, if you wish to set the pole length to a height of 120cm,
fix the two lower parts of the product so that the 120cm marks are just
still visible.
Attention! Never fix the pole length beyond the “STOP”
mark (Fig. C)!
4. Hold the middle part of the product with one hand and turn the lower
parts to the right, until you cannot turn any further using normal force.
5. Hold the upper part of the pole with one hand and turn the middle
part to the right, until you cannot turn any further using normal force.
Note: The turning mechanism may come loose! Ensure that the turning
mechanism is firmly tightened before every use!
Caution! If you do not turn the lower part of the pole tightly enough, the
pole will lose stability!
GB/MT
9
Page 10

Turning the shock absorption system on/off
To disable the shock absorption system, fix the pole length as described
under “Adjusting the pole length”.
1. Turn the middle part of the product back fractionally against the
locking direction. You will then hear a clear click. This indicates that the
shock absorption system is disabled.
2. Turn the middle part back slightly in the locking direction in order to
activate the shock absorption system again.
Putting on the hand strap
Place the strap over the back of your hand and grip the handle.
Useful information about use
• Wear gloves in cold weather.
• On longer tours, you should ensure that you take enough to drink
(possibly a drinks belt or a drinks backpack).
• Wear clothing that is suitable for the weather.
Combination support for asphalt pad and
plate
The combination support can be used to store the asphalt pad.
Use the asphalt pad on rocky and hard surfaces, and use the hiking pole
plate on soft surfaces to prevent the product from sinking.
You can also remove the combination support. Pull the loop of the red
rubber ring from the duct on the support. The support can then be removed from the pole. To apply the combination support, put it back on the
pole, pull the rubber ring once around the pole and then place it back
in the duct on the combination support. If you are not using the asphalt
pads or the hiking pole plates for your current hiking trail, you can attach
them or insert them in the plate changer system mechanism.
Cleaning and maintenance
To clean the product, you can use a cloth soaked in lukewarm water
or soapy water. Never clean the product with solvent-based or strong
cleaning agents.
These may affect the plastic materials and markings and cause long-term
damage.
GB/MT
10
Page 11

Storage and transport
Do not expose the product to direct sunlight or increased heat supply, as
these influences will cause crack formation or corrosion on your product
and may thus shorten its lifespan and significantly impair its serviceability.
Store the product strictly in dry spaces. If the product is wet, dry it before
pushing together to prevent corrosion. When transporting the product,
always place the asphalt pads on the tips.
Disposal
Please dispose of the packaging materials in an environmentally friendly
way. If you wish to dispose of the product, please contact your local
waste disposal service.
3 Years warranty
The product was produced with great care and under constant supervision. You receive a three-year warranty for this product from the date of
purchase. Please retain your receipt.
The warranty applies only to material and workmanship and does not
apply to misuse or improper handling. Your statutory rights, especially the
warranty rights, are not affected by this warranty.
With regard to complaints, please contact the following service hotline or
contact us by e-mail. Our service employees will advise as to the subsequent procedure as quickly as possible. We will be personally available
to discuss the situation with you.
Any repairs under the warranty, statutory guarantees or through goodwill
do not extend the warranty period. This also applies to replaced and
repaired parts. Repairs after the warranty are subject to a charge.
IAN: 96710
Service Great Britain
Tel.: 0871 5000 720
(£ 0.10/Min.)
E-Mail: deltasport@lidl.co.uk
Service Malta
Tel.: 80062230
E-Mail: deltasport@lidl.com.mt
You can also find spare parts for your product at:
www.delta-sport.com, category Service - Lidl Spare Parts Service
GB/MT
11
Page 12

Herzlichen Glückwunsch!
Mit Ihrem Kauf haben Sie sich für einen hochwertigen Artikel
entschieden. Machen Sie sich vor der ersten Verwendung mit dem Artikel
vertraut. Lesen Sie hierzu aufmerksam die nachfolgende Gebrauchsanleitung. Benutzen Sie den Artikel nur wie beschrieben und für die angegebenen Einsatzbereiche. Bewahren Sie diese Anleitung gut auf.
Händigen Sie alle Unterlagen bei Weitergabe des Artikels an Dritte
ebenfalls mit aus.
Lieferumfang
1 x Wanderstock mit Handschlaufe
1 x Kombinationshalterung
1 x Asphaltpad
1 x Teller
1 x Gebrauchsanleitung
Technische Daten
Maße: verstellbar: 61 - 120 cm
Gewicht inkl. Zubehör: ca. 302 g
Bestimmungsgemäße Verwendung
Dieser Artikel ist mit einer Hartmetallspitze für das Wandern im Gelände,
auf Eis oder anderen glatten Oberflächen vorgesehen. Er verfügt außerdem über ein Asphalt-Pad, das leicht aufgesteckt und abgenommen
werden kann, wenn Sie auf Asphalt oder anderem harten Untergrund
wandern. Der Artikel ist ausschließlich zum Wandern vorgesehen.
Sicherheitshinweise
• Keine Reparaturen durchführen, die die Sicherheit gefährden!
• Reflektoren verwenden, die am Körper getragen werden.
• Überprüfen Sie vor jeder Benutzung die Verschraubung des Artikels.
• Überprüfen Sie vor jeder Benutzung, ob sich Beschädigungen am
Artikel befinden.
• Sobald Sie einen Riss oder eine nicht einwandfreie Funktion des
Artikels feststellen, verwenden Sie diesen nicht mehr und entsorgen Sie
ihn.
• Bitte kein Öl verwenden, da jedes Öl die Haltekraft des Verstellmecha nismus negativ beeinflussen kann.
• Bitte beachten Sie, dass die Spitze des Artikels Böden beschädigen
kann.
• Bitte setzen Sie sich nicht auf den Artikel, da er abknicken kann.
• Ein spitzer Stock ist grundsätzlich gefährlich für Kinder!
• Das Gerät ist nur für den privaten Zweck bestimmt.
• Für die professionelle Nutzung besteht keine Garantie.
• Nicht zum Skifahren verwenden!
12
DE/AT/CH
Page 13

HINWEISE:
Dieses Produkt ist nicht als Gehhilfe nach EN 1985 zu
verwenden!
• Überprüfen Sie nach dem Schließen, ob die Verschlüsse halten, indem
Sie sich leicht auf den Stock auflehnen.
• Fixieren Sie die Stocklänge niemals hinter der „STOP“-Markierung!
• Bei sehr hohen Anzugskräften erreicht das Verschlusssystem des
Artikels eine Klemmkraft von ca. 140 kg.
• Bei Belastungen von über 100 kg kann es bei deaktiviertem Dämp fungssystem, zu Beschädigungen des Dämpfungssystems kommen.
• Sollte sich der Stock nicht schließen lassen, ziehen Sie das jeweilige
Stocksegment aus dem Stock heraus. Drehen Sie das Verschlusssystem
von Hand 2-3 Umdrehungen rechtsherum, bis die orange Klemmvor richtung sich leicht zu spreizen beginnt.
Anschließend stecken Sie das einzelne Stocksegment wieder in den
Stock und fixieren es auf der gewünschten Länge.
Einstellen der Stocklänge
Der Artikel ist stufenlos höhenverstellbar von 61 cm bis 120 cm und sollte
nach Ihrer Körpergröße und Art der Anwendung eingestellt werden.
Die Drehrichtung zum Öffnen und Schließen ist auf dem oberen Teil des
Artikels angegeben.
Öffnen/Schließen
1. Halten Sie den oberen Teil des Artikels mit einer Hand fest und drehen
Sie den mittleren Teil nach links (Abb. B).
2. Halten Sie den mittleren Teil des Artikels fest und drehen Sie den
unteren Teil nach links (Abb. B).
3. Ziehen Sie die beiden Teile des Artikels auf die gewünschte Länge
auseinander. Wenn Sie zum Beispiel die Stocklänge auf eine Höhe
von 120 cm einstellen wollen, fixieren Sie die beiden unteren Teile des
Artikels so, dass die 120 cm Markierungen gerade noch sichtbar her ausragen.
Achtung! Fixieren Sie die Stocklänge niemals hinter der
„STOP“-Markierung (Abb. C)!
4. Halten Sie den mittleren Teil des Artikels mit einer Hand fest und
drehen Sie die unteren Teile nach rechts, bis Sie mit normaler Kraft
nicht weiter drehen können.
5. Halten Sie den oberen Teil des Stockes mit einer Hand fest und drehen
Sie den mittleren Teil nach rechts, bis Sie mit normaler Kraft nicht
weiter drehen können.
Hinweis: Der Drehmechanismus kann sich lockern! Stellen Sie vor jeder
Benutzung sicher, dass der Drehmechanismus fest angezogen ist!
Vorsicht! Wenn Sie den unteren Teil des Stockes nicht fest genug fest
drehen, verliert der Stock an Stabilität!
DE/AT/CH
13
Page 14

Ein-/Ausschalten des Dämpfungssystems
Um das Dämpfungssystem zu deaktivieren, fixieren Sie die Stocklänge
wie unter „Einstellen der Stocklänge“ beschrieben.
1. Drehen Sie den mittleren Teil des Artikels entgegen der Verschlussrich tung wieder minimal zurück. Sie hören nun ein deutliches Klicken.
Das Dämpfungssystem ist auf diese Weise deaktiviert.
2. Drehen Sie den mittleren Teil wieder leicht in Verschlussrichtung, um
das Dämpfungssystem erneut zu aktivieren.
Anlegen der Handschlaufe
Legen Sie die Schlaufe über Ihren Handrücken und greifen Sie den
Handgriff.
Nützliche Hinweise zur Benutzung
• Tragen Sie bei kaltem Wetter Handschuhe.
• Bei längeren Touren sollten Sie sicherstellen, ausreichend Getränke
(evtl. Trinkgürtel oder Trinkrucksack) dabei zu haben.
• Tragen Sie dem Wetter entsprechende Kleidung.
Kombinationshalterung für
Asphaltpad & Teller
An der Kombinationshalterung können Sie den Asphaltpad aufbewahren.
Den Asphaltpad verwenden Sie auf steinigen und harten Untergründen,
den Wanderstock-Teller verwenden Sie bei weichen Untergründen um
ein Einsinken des Artikels zu verhindern. Sie können die Kombinationshalterung auch entfernen. Ziehen Sie den roten Gummiring an seiner Lasche
aus der Führung der Halterung. Anschließend kann die Halterung vom
Stock abgezogen werden. Zum Anlegen der Kombinationshalterung, stecken Sie diese wieder auf den Stock, führen Sie den Gummiring einmal
um den Stock und legen ihn wieder in die Führung an der Kombinationshalterung. Wenn Sie die Asphalt-Pads oder die Wanderstock-Teller
für Ihren aktuellen Wanderweg nicht einsetzen, können Sie diese an der
Tellerwechselsystemvorrichtung befestigen bzw. einstecken.
Reinigung und Pflege
Zum Reinigen des Artikels können Sie ein mit lauwarmem Wasser oder
Seifenwasser getränktes Tuch verwenden. Reinigen Sie den Artikel niemals mit lösungsmittelhaltigen oder starken Reinigungsmitteln.
Diese könnten die Kunststoffmaterialien und Markierungen angreifen und
auf Dauer beschädigen.
DE/AT/CH
14
Page 15

Lagerung und Transport
Setzen Sie den Artikel nicht direkter Sonnenbestrahlung oder erhöhter
Wärmezufuhr aus, da diese Einflüsse an Ihrem Artikel Rissbildungen oder
Zersetzungen hervorrufen und somit ihre Lebensdauer verkürzen und die
Gebrauchsfähigkeit erheblich beeinträchtigen können.
Lagern Sie den Artikel grundsätzlich in trockenen Räumen.
Trocknen Sie den Artikel vor dem Zusammenschieben, wenn er nass ist,
um Korrosion zu vermeiden. Zum Transport immer die Asphaltpads auf
die Spitzen setzen.
Entsorgung
Bitte entsorgen Sie die Verpackungsmaterialien auf eine umweltgerechte
Art. Wenn Sie den Artikel entsorgen möchten, wenden Sie sich bitte an
Ihren lokalen Müllentsorgungsbetrieb.
3 Jahre Garantie
Das Produkt wurde mit großer Sorgfalt und unter ständiger Kontrolle
produziert. Sie erhalten auf dieses Produkt drei Jahre Garantie ab
Kaufdatum. Bitte bewahren Sie den Kassenbon auf.
Die Garantie gilt nur für Material- und Fabrikationsfehler und entfällt bei
missbräuchlicher oder unsachgemäßer Behandlung. Ihre gesetzlichen
Rechte, insbesondere die Gewährleistungsrechte, werden durch diese
Garantie nicht eingeschränkt.
Bei etwaigen Beanstandungen wenden Sie sich bitte an die unten stehende Service-Hotline oder setzen Sie sich per E-Mail mit uns in Verbindung.
Unsere Servicemitarbeiter werden das weitere Vorgehen schnellstmöglich
mit Ihnen abstimmen. Wir werden Sie in jedem Fall persönlich beraten.
Die Garantiezeit wird durch etwaige Reparaturen aufgrund der Garantie,
gesetzlicher Gewährleistung oder Kulanz nicht verlängert. Dies gilt auch
für ersetzte und reparierte Teile. Nach Ablauf der Garantie anfallende
Reparaturen sind kostenpflichtig.
IAN: 96710
Service Deutschland Service Österreich
Tel.: 0800-5435111 Tel.: 0820 201 222
E-Mail: deltasport@lidl.de (0,15 EUR/Min.)
E-Mail: deltasport@lidl.at
Service Schweiz
Tel.: 0842 665566
(0,08 CHF/Min.,
Mobilfunk max. 0,40 CHF/Min.)
E-Mail: deltasport@lidl.ch
Ersatzteile zu Ihrem Produkt finden Sie auch unter:
www.delta-sport.com, Rubrik Service - Ersatzteilservice Lidl
DE/AT/CH
15
Page 16

DELTA-SPORT HANDELSKONTOR GMBH
Wragekamp 6
D-22397 Hamburg
Version: 03/2014
Delta-Sport-Nr.: TS-1808
IAN 96710
 Loading...