

Page 1
3A
KOMPERNASS GMBH
BURGSTRASSE 21 · D - 44867 BOCHUM
www.kompernass.com
ID-Nr.: KH260-10/09-V2
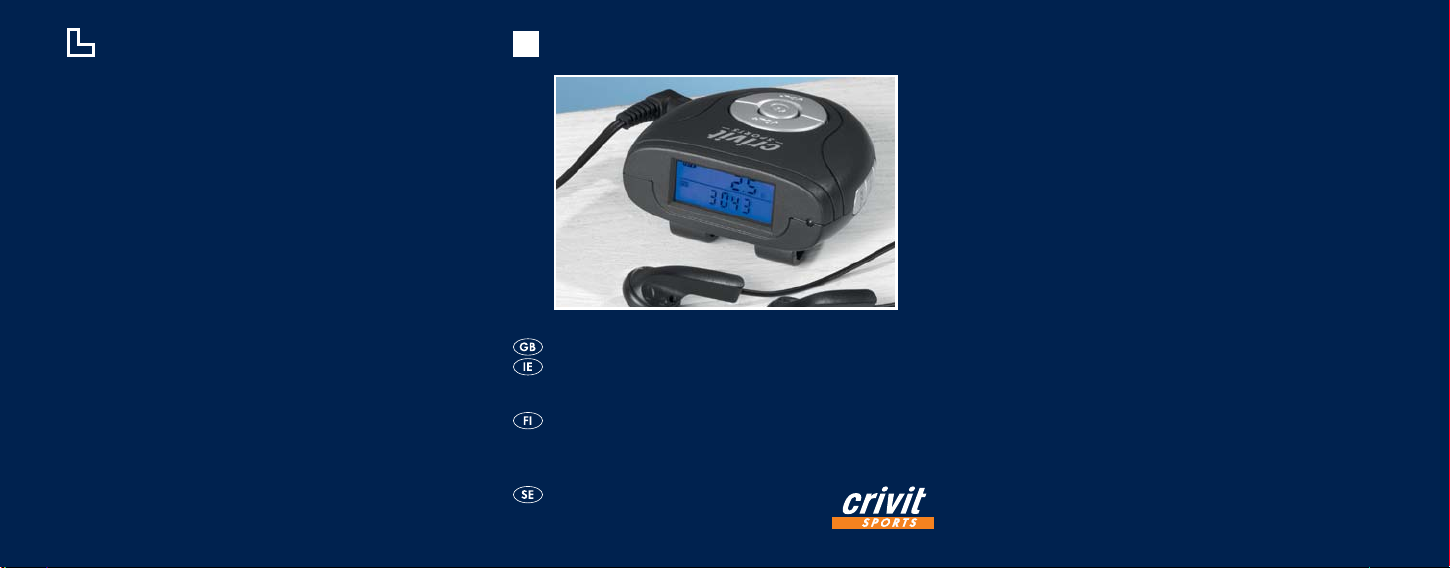
PEDOMETER
KH 260
Pedometer
Operating instructions
Askelmittari
Käyttöohje
Stegräknare
Bruksanvisning
Page 2
1 2
q
w
4
3
5
8
9
0
6
7
Page 3

CONTENT PAGE
Intended use 3
Safety instructions 4
Items supplied 5
Functions 6
Technical Data 6
Description of the device 8
Wearing the pedometer 9
Determining your pace length 9
Commissioning 10
Programming your pace length 10
Programming your weight 11
Programming the time 12
Using the stopwatch 13
Using the countdown function 13
- 1 -
Page 4
Adjusting the measurement units 15
Checking the distance covered and calorie
consumption 16
Returning the data to null 17
Radio operation 17
Changing the batteries 19
Cleaning and care 20
Troubleshooting 21
Disposal 22
Warranty and Service 23
Importer 25
Before using the device for fi rst time, please read these
operating instructions carefully and keep this instruction
manual in a safe place for later reference. Pass this manual
on to whoever might acquire the device at a future date.
- 2 -
Page 5

Intended use
This pedometer is fastened to your trouser waistband or
belt and serves to record the number of steps taken when
walking or jogging etc. Additionally, VHF radio can be
received with the device.
This device is intended exclusively for use in domestic environments, it is not intended for commercial applications.
Usage other than as described here is not permitted
and could lead to damage or injury. No liability will be
accepted for damage resulting from abusive or improper
handling, the application of violence or unauthorised
modifi cation. The technical features of this device enable
an adjustable reception capability that exceeds the
permitted frequency range of 87,5 - 108 MHz. In some
countries, diff erent national regulations may apply to the
assigned radio frequency ranges. Please note that information received outside of the assigned radio frequency
ranges may not be used, passed on to third parties or
otherwise misused.
- 3 -
Page 6

Safety instructions
• Before using the device for fi rst time, please read these
operating instructions carefully and keep this instruction
manual in a safe place for later reference. Pass this
manual on to whoever might acquire the device at
a future date.
To avoid damage, do not allow liquids to permeate •
the device and do not submerse it in water.
Avoid also a possible penetration by foreign objects.•
Never open the housing, except the battery compart-•
ment to change batteries, there are no user-serviceable
elements inside
To avoid damage, never touch the display with •
pointed objects and do not exert any pressure on it.
In the event of malfunction or apparent damage, make •
contact with our Customer Services.
If you do not intend to use the device for an extended •
period, remove the batteries - batteries can discharge
themselves and then leak.
- 4 -
Page 7

Should the batteries leak: Put on protective gloves and •
clean the battery compartment with a dry cloth.
Use ONLY the type of new battery detailed in the •
Technical Data as replacements for discharged batteries.
Do not throw the batteries into a fi re. Do not short •
circuit the batteries. Do not attempt to recharge the
batteries. There is the risk of an explosion!
Keep batteries away from small children. Children could •
put batteries into their mouths and swallow them.
If a battery is swallowed, seek medical assistance
IMMEDIATELY. There is a risk to life!
Items supplied
Before using the device for the fi rst time, check to ensure
that it is complete and free of visible damage.
Pedometer
Headphone Type KH260E
2 x CR2032 Batteries
This operating manual
- 5 -
Page 8

Functions
This pedometer has the following functions available:
12/24 Time (CLOCK)•
Stopwatch (STW)•
Countdown Function (TIMER)•
Pace counter (STEP)•
Distance covered (DIST)•
Calorie counter (KCAL)•
Fat burner (FAT B.)•
VHF radio with Auto-Scan function•
Technical Data
Radio:
Power supply: 1 x 3 V Type CR2032
Frequency range : 87.5 - 108 MHz
Output level: 100 mW
Max. Output voltage
at headphone socket: ≤ 150 mV
- 6 -
Page 9

Headphone impedance: 32 Ω
Sensitivity: 97dB +/- 3dB bei 1 kHz
Nominal output: 30 mW
Broadband-Recognition.
(WBCV): 400 mV
Pedometer:
Power supply: 1 x 3 V Type CR2032
Stopwatch: 0 – 99h, 59 min, 59 s
Countdown function: 99h, 59 min, 59 s
Pace length: 30 -180 cm
Weight: 10 -150 kg
Pedometer: 0 – 99999 Paces
Distance: 0 – 199,99 km
Fat burning: 0 – 999,9 g
Calorie consumption: 0 – 99999 kcal
Operating temperature: -10°C – 40°C
Storage temperature: -20°C – 60°C
Dimensions: 5.7 x 3.1 x 5.9 cm
Weight: 54 g approx.
(including batteries and
headphone)
- 7 -
Page 10

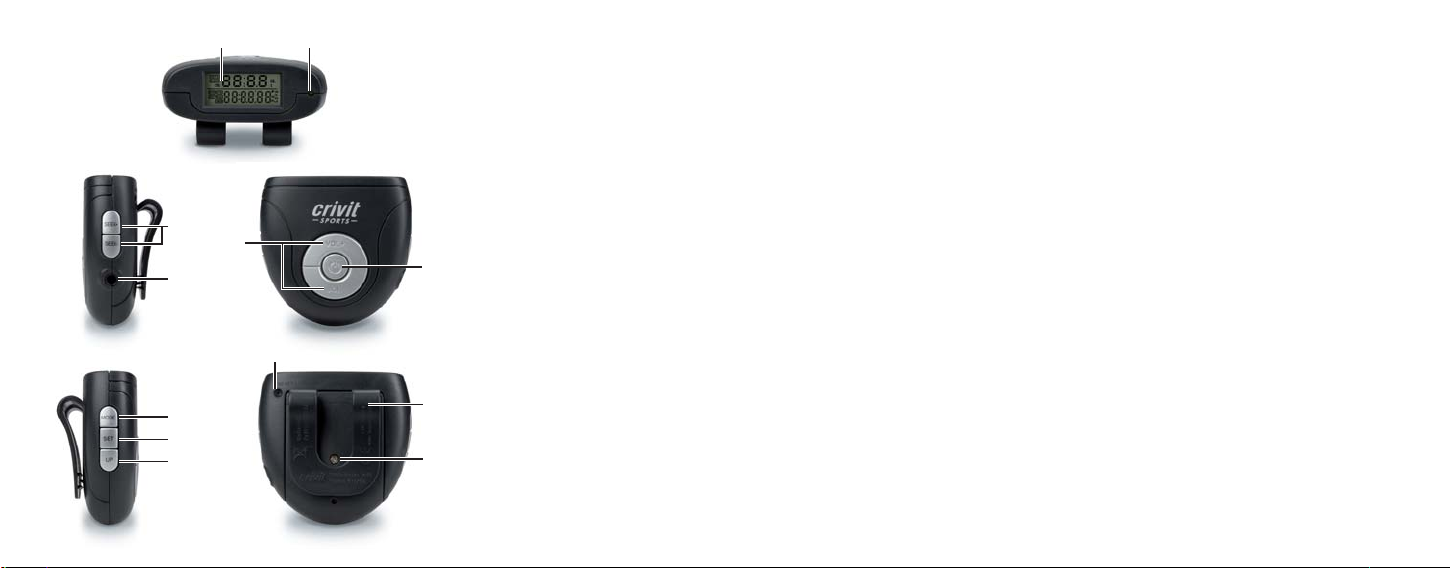
Description of the device
1 LCD-Display (two-line display with various display
modes and background illumination)
2 Indicator LED (glows green with switched-on radio)
3 Button
4 VOL+/VOL– (Increase/decrease sound volume)
5 RESET (Return the device to factory settings)
6 Belt clip (To secure the pedometer onto a belt or the
waistband)
7 Screw for the battery compartment cover
8 MODE button (For switching between various display
modes)
9 SET button (Recall adjustment mode)
0 UP button (Carry out adjustments, start/stop for
countdown function and stopwatch)
q SEEK+/SEEK- button (Search frequency range,
up or down, for radio stations )
w Headphone connection socket
(Radio on and off switch)
- 8 -
Page 11
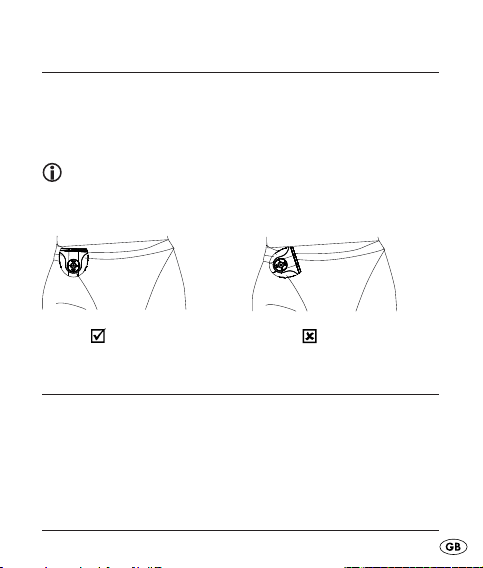
Wearing the pedometer
Secure the pedometer by means of the belt clip onto a
belt or the waistband of your training clothing, approx.
a handwidth away from your hip. The display of the
pedometer should face upwards.
Note:
If the pedometer is attached incorrectly it could cause
incorrect motion values to be displayed.
correct
incorrect
Determining your pace length
For this, traverse a known measured distance, e.g. between
two lampposts, and count your steps. Divide the distance
by the number of steps taken and then enter this value in,
in either cms or inches.
Example 6 Meter / 10 Paces = 60 cm pace length
- 9 -
Page 12
Commissioning
Before the fi rst usage, remove the transparent isolation
strip from the battery compartment (see also Changing
the batteries).
Programming your pace length
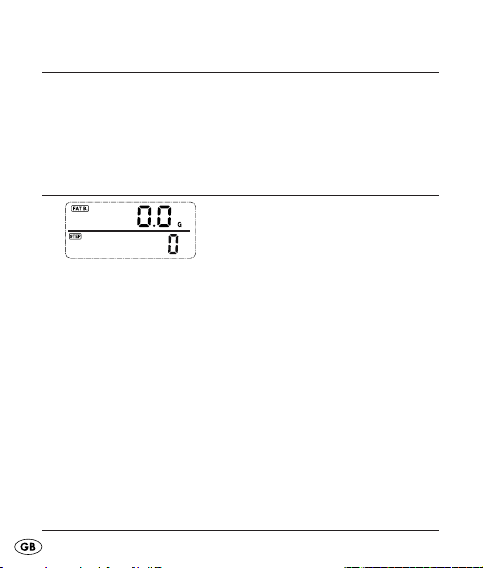
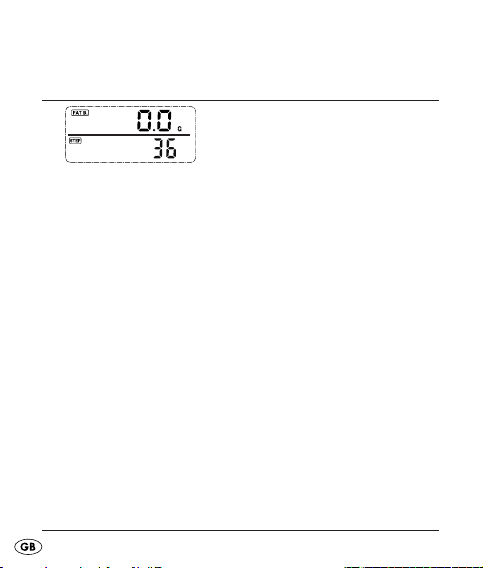
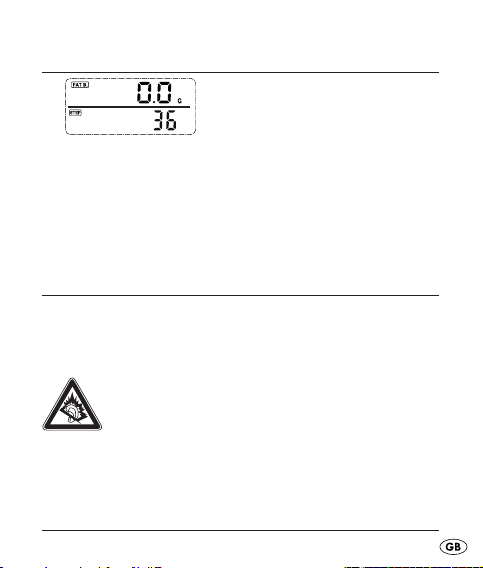
Fig.: Fat burning/Number of paces
This programming is only necessary on fi rst taking the
device into use and after a battery exchange.
Repeatedly press the button MODE until you are in the •
display mode Fat burning/Number of paces.
Press the button UP to switch to the display mode Fat •
burning/Number of paces.
Press the button SET for three seconds, the standard •
pace value (60 cm) blinks.
Press the button UP to adjust the pace length •
(Adjustment range 30 – 180 cm).
Press the button SET to accept the settings and to •
depart the adjustment mode.
- 10 -
Page 13
Programming your weight
Fig.: Fat burning/Number of paces
This programming is only necessary on fi rst taking the
device into use and after a battery exchange.
Repeatedly press the button MODE until you are in the •
display mode Fat burning/Number of paces.
Press the button UP twice to switch to the display mode •
Fat burning/Number of paces.
Press the button SET for three seconds, the standard •
weight value (60 kg) blinks.
Press the button UP to adjust the body weight •
(Adjustment range 10 – 150 kg).
Press the button SET to accept the adjustment and to •
depart the adjustment mode.
- 11 -
Page 14
Programming the time
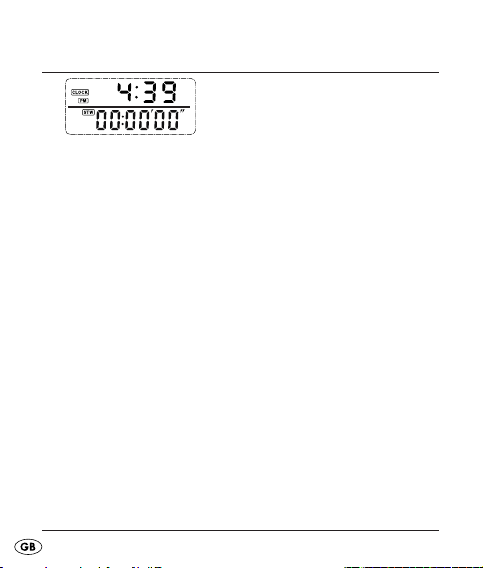
Fig.: Clock/Stopwatch
Repeatedly press the button MODE until you are in the •
display mode Clock/Stopwatch.
Press the button SET for three seconds, the 24 hour •
display blinks.
Press the button UP to switch between the 12 hour and •
the 24 hour formats.
Press the button SET to confi rm the setting and to •
switch to hour adjustment.
Press the button UP to set the hours.•
Press the button SET to switch to minutes adjustment.•
Press the button UP to set the minutes.•
Press the button SET to accept the adjustment and to •
depart the adjustment mode.
- 12 -
Page 15
Using the stopwatch
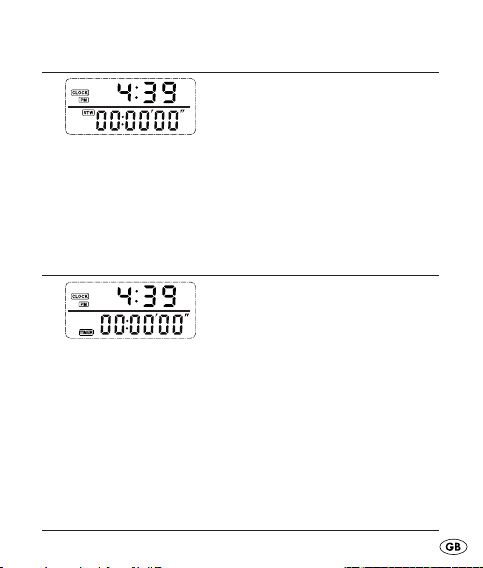
Fig.: Clock/Stopwatch
Repeatedly press the button MODE until you are in the
•
display mode Clock/Stopwatch.
Press the button UP to start and to stop the clockwatch.•
Press the button SET to return the stopwatch to null.•
Using the countdown function
Repeatedly press the button MODE until you are in the •
display mode Clock/Countdown.
Press the button SET for three seconds, the hour •
display blinks.
Press the button UP to set the countdown hours.•
Fig.: Clock/Countdown
- 13 -
Page 16

Press the button SET to confi rm the setting and to •
switch to minute adjustment.
Press the button UP to set the countdown minutes.•
Press the button SET to confi rm the setting and to •
switch to seconds adjustment.
Press the button UP to set the seconds.•
Press the button SET to accept the settings and to •
depart the adjustment mode.
Press the button UP to start and to stop the countdown.•
When the confi gured time has elapsed, a signal tone •
sounds for 60 seconds.
Press one of the buttons MODE, SET or UP to switch •
the signal tone off .
- 14 -
Page 17

Adjusting the measurement units
The units in the pedometer can be displayed in either the
metric (m, g, kg, km) or in the Anglo-American (in, oz, lb,
mi) system. The device is supplied with the metric system
as default.
Repeatedly press the button MODE until you are in the •
display mode Fat burning/Number of paces.
Press the button MODE for 5 seconds, in the display •
the measurement units of the metric system blink.
Press the button UP to switch to the Anglo-American •
system.
Press one of the buttons MODE or SET to accept the •
adjustment and to depart the adjustment mode.
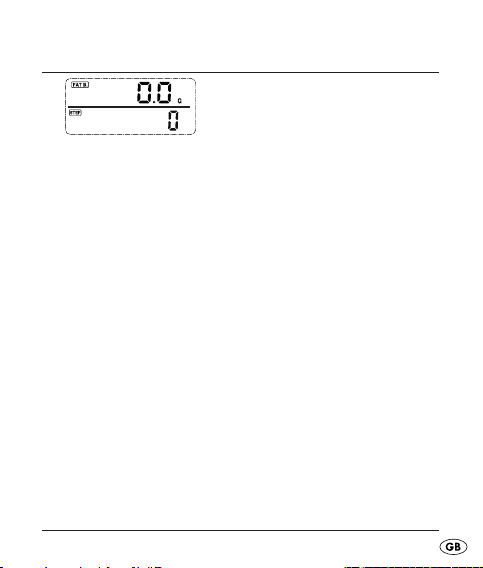
Fig.: Fat burning/Number of paces
- 15 -
Page 18
Checking the distance covered and
calorie consumption
Repeatedly press the button MODE until you are in the •
display mode Fat burning/Number of paces.
Press the button UP to switch to the display mode Fat •
burning/Number of paces.
Press the button UP once again to switch to the display •
mode Fat burning/Number of paces.
Press the button UP once again to switch to the display •
mode Fat burning/Number of paces.
Fig.: Fat burning/Number of paces
- 16 -
Page 19
Returning the data to null
Repeatedly press the button MODE until you are in •
the display mode Fat burning/Number of paces.
Press the button UP for 3 seconds, the pace number, •
distance, fat burning and calorie consumption are
returned to null.
Fig.: Fat burning/Number of paces
Radio operation
Insert the headphones into the connection socket.
Completely unwind the headphone cable, as it also serves
as the aerial and you can thus improve the reception.
Warning:
Listening to music with headphones over a long
period of time and with full volume can result in
loss of heaving!
- 17 -
Page 20
Press the button • to switch the radio on. The Indicator
LED glows.
Press the button SEEK + to start the station search. •
The device now searches the frequency range upwards
until a station with a strong enough transmission signal
is found.
Press the button SEEK + once again to search for a •
station at the next higher frequency.
Press the button SEEK - to search the frequency range •
downwards until a station with a strong enough transmission signal is found.
Adjust the desired sound volume level with the buttons •
VOL+/VOL-.
Press the button •
once again to switch the radio off .
The Indicator LED extinguishes.
- 18 -
Page 21
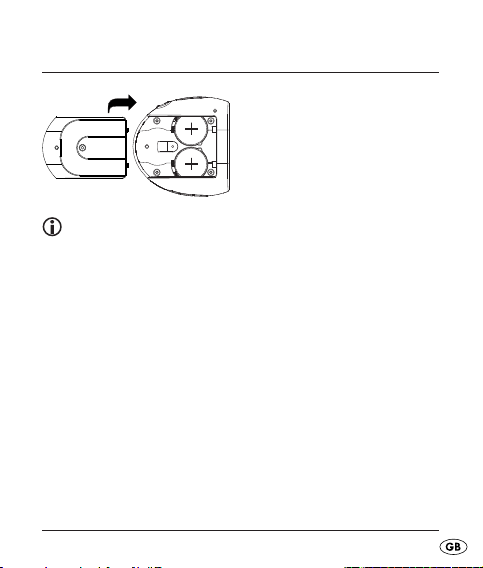
Changing the batteries
CR2032 CR2032
Fig.: Changing the batteries
Note:
After a battery change, all saved data is erased. Pace
length and body weight must be programmed back in.
Replace the batteries if the display indicators are weak or
the radio reception is poor.
Unscrew the battery compartment at the rear of the device
and remove the battery compartment cover.
Replace the batteries (2 x 3V CR2032). Pay attention
to the correct polarity.
The plus marking must point upwards.
Replace the battery compartment cover and screw it
down fi rmly.
- 19 -
Page 22

Cleaning and care
NEVER submerse the device in water and ensure that
liquids cannot permeate into the device.
Clean the applicance only with a lightly moistened cloth.
Do not use abrasive or chemical cleaning materials.
They could damage the plastic surfaces.
Ensure that there are no water drops remaining on the
display. Water can cause permanent discolouration.
- 20 -
Page 23

Troubleshooting
Display indicators weak: Replace the batteries •
(see also Changing the batteries).
Radio reception becoming worse: Replace the batteries •
(see also Changing the batteries). Completely unwind
the cable of the headphones.
Irregular signs in the display: Return the pedometer to •
factory settings, to do this press a pointed object into
the hole at the rear of the device (RESET).
False display of the distance: Check the input details •
for pace length.
False display of calorie consumption and fat burning: •
Check the input details for pace length and body weight.
- 21 -
Page 24
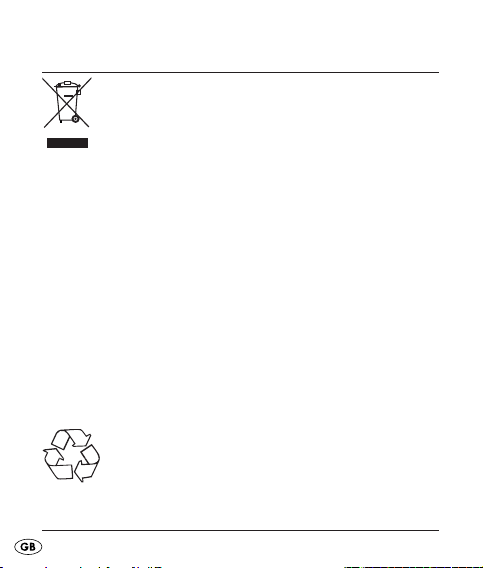
Disposal
Do not dispose of the device in your normal
domestic waste. This product is subject to the
provisions of European Directive 2002/96/EC.
Dispose of the device through an approved disposal
centre or at your community waste facility. Observe the
currently applicable regulations.
In case of doubt, please contact your waste disposal centre.
Disposal of batteries/accumulators
Used batteries/rechargeable batteries may not be
disposed of in household waste. Every consumer is legally
obliged to dispose of batteries at a collection site of his
community/city district or at a retail store.
The purpose of this obligation is to ensure that batteries
are disposed of in a non-polluting manner. Only dispose
of batteries/cells when they are fully discharged.
Dispose of all packaging materials in an environmentally friendly manner.
- 22 -
Page 25

Warranty and Service
This device is guaranteed for 3 years from the date of
purchase. This device has been manufactured with care
and meticulously examined before delivery.
Please retain your receipt as proof of purchase. In the
case of a warranty claim, please make contact by telephone with our service department. Only in this way can
a post-free despatch for your goods be assured.
The warranty covers only claims for material and manufacturing defects, not for wearing parts or for damage to
fragile components, e.g. buttons or batteries. This product
is for private use only and is not intended for commercial
applications. In the event of misuse and improper handling,
use of force and interference not carried out by our authorized service branch, the warranty will become void.
Your statutory rights are not restricted in any way by this
warranty.
The warranty period is not extended on completion of repairs made under warranty. This applies also to replaced
and repaired parts. Damage or defects apparent on
purchase must be reported directly after unpacking, at the
latest with two days of purchase. Repairs carried out after
the lapse of the warranty period are subject to payment.
- 23 -
Page 26

DES UK LTD
Tel.: 0871 5000 700
(£ 0.10 / minute)
e-mail: support.uk@kompernass.com
Kompernass Service Ireland
Tel: 1850 930 412
Standard call rates apply. Mobile operators may vary.
(0,082 EUR/Min.)
e-mail: support.ie@kompernass.com
- 24 -
Page 27

Importer
KOMPERNASS GMBH
BURGSTRASSE 21
44867 BOCHUM, GERMANY
www.kompernass.com
- 25 -
Page 28

- 26 -
Page 29

SISÄLLYSLUETTELO SIVU
Määräystenmukainen käyttö 29
Turvaohjeet 30
Toimituslaajuus 31
Toiminnot 32
Tekniset tiedot 32
Laitteen kuvaus 34
Askelmittarin asettaminen 35
Askelpituuden selvittäminen 35
Käyttöönotto 36
Askelpituuden asettaminen 36
Painon asettaminen 37
Ajan asettaminen 38
Sekuntikellon käyttö 39
Ajastintoiminnon käyttö 39
- 27 -
Page 30

Mittayksikköjen asettaminen 41
Matkan ja kalorikulutuksen tarkastaminen 42
Tietojen nollaaminen 43
Radiokäyttö 43
Paristojen vaihtaminen 45
Puhdistus ja hoito 46
Vianetsintä 47
Hävittäminen 48
Takuu ja huolto 49
Maahantuoja 51
Lue käyttöohje ennen ensimmäistä käyttökertaa huolellisesti
läpi ja pidä sitä lähettyvillä myös myöhemmissä käytöissä.
Jos myyt laitteen, anna ohje myös seuraavalle omistajalle.
- 28 -
Page 31

Määräystenmukainen käyttö
Tämä askelmittari kiinnitetään housujen vyötärönauhaan
tai vyöhön ja se laskee askelia juostaessa, vaellettaessa,
hölkätessä tai vastaavasti liikuttaessa. Lisäksi laitteella
voidaan vastaanottaa ULA-radiolähetyksiä.
Tämä laite on tarkoitettu ainoastaan yksityiskäyttöön,
ei ammattitarkoituksiin.
Muu kuin tässä kuvattu käyttö on kiellettyä ja voi johtaa
vaurioihin ja vammoihin. Valmistaja ei vastaa virheellisestä tai asiattomasta käytöstä, väkivallan käytöstä tai
luvattomista muutoksista aiheutuvista vahingoista. Laitteen
tekniset ominaisuudet mahdollistavat taajuusalueen säädön
87,5–108 MHz sallitun taajuusalueen ulkopuolella.
Eri maissa saattaa olla poikkeavia kansallisia määräyksiä
määrätyille radiotaajuuksille. Ota tällöin huomioon, ettei
sallitun radiotaajuusalueen ulkopuolella vastaanotettuja
tietoja saa käyttää hyväksi, luovuttaa edelleen ulkopuoliselle tai käyttää tarkoituksenvastaisesti väärin.
- 29 -
Page 32

Turvaohjeet
Lue käyttöohje ennen ensimmäistä käyttökertaa huolel-•
lisesti läpi ja pidä sitä lähettyvillä myös myöhemmissä
käytöissä. Jos myyt laitteen, anna ohje myös seuraavalle
omistajalle.
Älä päästä laitteeseen mitään nesteitä, äläkä upota •
sitä veteen. Näin vältytään vaurioilta.
Vältä vierasesineiden sisäänpääsyä. •
Älä koskaan avaa koteloa, paristolokeroa lukuun •
ottamatta paristonvaihtoa varten. Laitteessa ei ole
huollettavia osia.
Älä koske näyttöön kulmikkailla esineillä, äläkä kohdista •
näyttöön painetta. Näin vältytään vaurioilta.
Käänny toimintahäiriöitä tai vaurioita huomatessasi •
valtuutetun huoltoliikkeen puoleen.
Poista paristot, jos et käytä laitetta pidempään. •
Paristot purkautuvat itsestään ja voivat siten vuotaa.
- 30 -
Page 33

Jos paristot vuotavat: Pue suojakäsineet ja puhdista •
paristolokero kuivalla liinalla.
Käytä aina ainoastaan uusia, teknisissä tiedoissa •
ilmoitetun tyyppisiä paristoja.
Älä heitä paristoja tuleen. Älä oikosulje paristoja. •
Älä yritä ladata paristoja uudelleen. Räjähdysvaara!
Pidä paristot poissa pienten lasten ulottuvilta. Pienet •
lapset saattavat pistää paristot suuhunsa ja niellä ne.
Jos paristo on joutunut nieluun, on hakeuduttava välittömästi lääkärin hoitoon. On olemassa hengenvaara!
Toimituslaajuus
Tarkasta toimituksen täydellisyys ennen käyttöön ottoa ja
toimitetut osat mahdollisten näkyvien vaurioiden varalta.
Askelmittari
Kuulokkeet tyyppiä KH260E
2 x CR2032 paristoa
Tämä käyttöohje
- 31 -
Page 34

Toiminnot
Askelmittarissa on seuraavat toiminnot:
12/24 kellonaika (CLOCK)•
Sekuntikello (STW)•
Ajastintoiminto (TIMER)•
Askelmittari (STEP)•
Matka (DIST)•
Kalorikulutus (KCAL)•
Rasvanpoltto (FAT B.)•
ULA-radio ja Auto-Scan-toiminto•
Tekniset tiedot
Radio:
Jännitelähde: 1 x 3 V tyyppiä CR2032
Taajuusalue: 87,5 - 108 MHz
Lähtöteho: 100 mW
Maks. lähtöjännite
kuulokeliitäntä: ≤ 150 mV
- 32 -
Page 35

Kuulokkeiden impedanssi: 32 Ω
Herkkyys: 97 dB +/- 3 dB – 1 kHz
Nimellisteho: 30 mW
Laajakaista-tunnusjännite.
(WBCV): 400 mV
Askelmittari:
Jännitelähde: 1 x 3 V tyyppiä CR2032
Sekuntikello: 0 – 99 h, 59 min, 59 s
Ajastintoiminto: 99 h, 59 min, 59 s
Askelpituus: 30-180 cm
Paino: 10-150 kg
Askelmittari: 0 – 99999 askelta
Matka: 0 – 199,99 km
Rasvanpoltto: 0 – 999,9 g
Kalorikulutus: 0 – 99999 kcal
Käyttölämpötila: -10–40 °C
Varastointilämpötila: -20–60 °C
Ulkomitat: 5,7 x 3,1 x 5,9 cm
Paino: n. 54 g
(ml. paristot ja kuulokkeet)
- 33 -
Page 36

Laitteen kuvaus
1 LCD-näyttö (Kaksirivinen näyttö, jossa erilaiset näyttötilat
ja taustavalaistus)
2 Merkkivalo (Palaa vihreänä, kun radiokäyttö päällä)
3 Painike
4 VOL+/VOL– (Äänenvoimakkuuden lisääminen /
alentaminen)
5 RESET (Laite palautetaan tehdasasetuksiin)
6 Vyönipistin (Askelmittarin kiinnitys vyöhön tai housujen
vyötärönauhaan)
7 Ruuvi paristokotelon kantta varten
8 MODE-painike (Vaihto eri näyttötilojen välillä)
9 SET-painike (Asetustilan kutsuminen esiin)
0 UP-painike (Asetusten suorittaminen, ajastintoiminnon
ja sekuntikellon käynnistys/pysäytys)
q SEEK+/SEEK- -painike (Taajuuskaistan selaaminen
radioasemahakua varten ylöspäin/alaspäin)
w Kuulokeliitäntä
(Radiokäyttö päälle ja pois päältä)
- 34 -
Page 37

Askelmittarin asettaminen
Kiinnitä askelmittari vyönipistimen avulla treenivaatetuksesi
vyöhön tai vyötärönauhaan n. yhden kädenleveyden päähän lantiosta. Askelmittarin näytön tulee näyttää ylöspäin.
Huomaa:
Virheellinen askelmittarin kiinnittäminen voi aiheuttaa
virheellisten liikearvojen näytön näytössä.
correct
incorrect
Askelpituuden selvittäminen
Kulje tätä varten mitattu matka, esim. lyhtypylväälle, ja
laske samalla askeleesi. Jaa matka astuttujen askelten
määrällä ja syötä sitten tämä arvo cm:inä tai tuumina.
Esimerkki: 6 metriä / 10 askelta = askelpituus 60 cm
- 35 -
Page 38

Käyttöönotto
Poista ennen ensimmäistä käyttöä läpinäkyvät eristysliuskat
paristolokerosta (katso myös Pariston vaihtaminen).
Askelpituuden asettaminen
Kuva: Rasvapoltto/Askelmäärä
Tämä asetus on tarpeen vain ensimmäisellä käyttöönottokerralla ja paristojen vaihtamisen jälkeen.
Paina MODE-painiketta niin monta kertaa, kunnes •
näyttö on tilassa rasvanpoltto/askelmäärä.
Vaihda näyttötilaan rasvanpoltto/matka painamalla •
UP-painiketta.
Paina 3 sekunnin ajan SET-painiketta, askelpituuden •
vakioarvo (60 cm) vilkkuu.
Aseta askelpituus (säätöalue 30 – 180 cm) painamalla •
UP-painiketta.
Ota asetus käyttöön ja poistu asetustilasta painamalla •
SET-painiketta.
- 36 -
Page 39

Painon asettaminen
Kuva: Rasvapoltto/Askelmäärä
Tämä asetus on tarpeen vain ensimmäisellä käyttöönottokerralla ja paristojen vaihtamisen jälkeen.
Paina MODE-painiketta niin monta kertaa, kunnes •
näyttö on tilassa rasvanpoltto/askelmäärä.
Vaihda näyttötilaan rasvanpoltto/kalorikulutus paina-•
malla UP-painiketta kahdesti
Paina 3 sekunnin ajan SET-painiketta, painon vakioarvo •
(60 kg) vilkkuu.
Aseta paino (säätöalue 10 – 150 kg) painamalla •
UP-painiketta.
Ota asetus käyttöön ja poistu asetustilasta painamalla •
SET-painiketta.
- 37 -
Page 40

Ajan asettaminen
Kuva: Kello/Sekuntikello
Paina MODE-painiketta niin monta kertaa, kunnes •
näyttö on tilassa kello/sekuntikello.
Paina 3 sekunnin ajan SET-painiketta, 24-tunnin näyttö •
vilkkuu.
Vaihda 12-tunnin ja 24-tunnin näytön välillä painamalla •
UP-painiketta.
Vahvista asetus ja vaihda tuntiasetukseen painamalla •
SET-painiketta.
Aseta tunnit painamalla UP-painiketta.•
Vaihda minuuttiasetukseen painamalla SET-painiketta.•
Aseta minuutit painamalla UP-painiketta.•
Ota asetus käyttöön ja poistu asetustilasta painamalla •
SET-painiketta.
- 38 -
Page 41

Sekuntikellon käyttö
Kuva: Kello/Sekuntikello
Paina MODE-painiketta niin monta kertaa, kunnes
•
näyttö on tilassa kello/sekuntikello.
Käynnistä ja pysäytä sekuntikello painamalla •
UP-painiketta.
Nollaa sekuntikello painamalla SET-painiketta.•
Ajastintoiminnon käyttö
Paina MODE-painiketta niin monta kertaa, kunnes •
näyttö on tilassa kello/ajastin.
Paina 3 sekunnin ajan SET-painiketta, tuntinäyttö vilkkuu.•
Aseta ajastimen tunnit painamalla UP-painiketta.•
Kuva: Kello/Ajastin
- 39 -
Page 42

Vahvista asetus ja vaihda minuuttiasetukseen paina-•
malla SET-painiketta.
Aseta ajastimen minuutit painamalla UP-painiketta.•
Vahvista asetus ja vaihda sekuntiasetukseen painamalla •
SET-painiketta.
Aseta sekunnit painamalla UP-painiketta.•
Ota asetus käyttöön ja poistu asetustilasta painamalla •
SET-painiketta.
Käynnistä ja pysäytä ajastin painamalla UP-painiketta.•
Kun asetettu aika on kulunut, kuuluu minuutin mittainen •
äänimerkki.
Sammuta äänimerkki painamalla yhtä painikkeista •
MODE, SET tai UP.
- 40 -
Page 43

Mittayksikköjen asettaminen
Voit näyttää askelmittarin yksiköt joko metrijärjestelmässä
(m, g, kg, km) tai angloamerikkalaisessa järjestelmässä
(in, oz, lb, mi). Toimitustilassa on valittuna metrijärjestelmä.
Paina MODE-painiketta niin monta kertaa, kunnes •
näyttö on tilassa rasvanpoltto/askelmäärä.
Paina MODE-painiketta 5 sekunnin ajan, näytössä •
vilkkuvat metrijärjestelmän mittayksiköt.
Vaihda angloamerikkalaiseen järjestelmään painamalla •
UP-painiketta.
Ota asetus käyttöön ja poistu asetustilasta painamalla •
yhtä painikkeista MODE tai SET.
Kuva: Rasvapoltto/Askelmäärä
- 41 -
Page 44

Matkan ja kalorikulutuksen
tarkastaminen
Paina MODE-painiketta niin monta kertaa, kunnes •
näyttö on tilassa rasvanpoltto/askelmäärä.
Vaihda näyttötilaan rasvanpoltto/matka painamalla •
UP-painiketta.
Vaihda näyttötilaan rasvanpoltto/kalorikulutus paina-•
malla uudelleen UP-painiketta.
Vaihda takaisin näyttötilaan rasvanpoltto/askelmäärä •
painamalla uudelleen UP-painiketta.
Kuva: Rasvapoltto/Askelmäärä
- 42 -
Page 45

Tietojen nollaaminen
Paina MODE-painiketta niin monta kertaa, kunnes •
näyttö on tilassa rasvanpoltto/askelmäärä.
Paina 3 sekunnin ajan UP-painiketta, askelmäärä, •
matka, rasvanpoltto ja kalorikulutus nollataan.
Kuva: Rasvapoltto/Askelmäärä
Radiokäyttö
Liitä kuulokkeet liitäntäholkkiin.
Avaa kuulokkeiden johto kokonaan, koska se toimii
antennina ja näin vastaanoton laatu paranee.
Huomio:
Musiikin kuuntelu kuulokkeilla pitemmän aikaa
ja täydellä äänenvoimakkuudella voi aiheuttaa
kuulovammoja!
- 43 -
Page 46

Kytke radio päälle painamalla painiketta • .
Merkkivalo syttyy.
Käynnistä asemahaku painamalla painiketta SEEK +. •
Nyt laite hakee taajuuskaistaa ylöspäin, kunnes se
löytää riittävän vahvan radioaseman.
Hae seuraavaksi korkeamman taajuuden omaava •
radioasema painamalla uudelleen painiketta SEEK +.
Hae taajuuskaistaa alaspäin riittävän vahvan •
lähetyssignaalin omaavaa radioasemaa painamalla
painiketta SEEK -.
Aseta haluamasi äänenvoimakkuus painikkeilla VOL+/•
VOL-.
Sammuta radio painamalla painiketta •
uudelleen.
Merkkivalo sammuu.
- 44 -
Page 47

Paristojen vaihtaminen
CR2032 CR2032
Kuva: Paristojen vaihtaminen
Huomaa:
Paristonvaihdon jälkeen kaikki tallennetut tiedot ovat
poissa. Askelpituus ja paino on syötettävä uudelleen.
Jos näyttö muuttuu heikoksi tai radioasema kuuluu huonommin, vaihda paristot uusiin.
Ruuvaa laitteen taustapuolella sijaitseva paristokotelo auki
ja irrota paristokotelon kansi.
Vaihda paristot (2 x 3V CR2032). Varmista tällöin paristojen
oikea napaisuus.
Plusmerkin on osoitettava ylöspäin.
Aseta paristokotelon kansi jälleen paikoilleen ja ruuvaa
paristokotelo kiinni.
- 45 -
Page 48

Puhdistus ja hoito
Älä upota laitetta veteen, äläkä päästä koteloon vettä.
Puhdista laite pelkällä kevyesti kostutetulla liinalla.
Älä käytä hankaavia tai kemiallisia puhdistusaineita.
Ne voivat vahingoittaa laitteen muovipintoja.
Varmista, ettei näytölle jää vesipisaroita. Vesi voi aiheuttaa
pysyviä värinmuutoksia.
- 46 -
Page 49

Vianetsintä
Näyttö heikko: Vaihda paristot (katso myös Pariston-•
vaihto).
Radioasema kuuluu koko ajan huonommin: Vaihda •
paristot (katso myös Paristonvaihto). Avaa kuulokkeiden
johto kokonaan.
Näytössä virheellisiä merkkejä: Palauta askelmittari •
takaisin toimitustilaan, paina tätä varten terävällä esineellä laitteen taustapuolella olevaan reikään (RESET).
Etäisyys näytetään väärin: Tarkista askelpituuden •
syöttötieto.
Kalorikulutus ja rasvanpoltto näytetään väärin: •
Tarkista askelpituuden ja painon syöttötiedot.
- 47 -
Page 50

Hävittäminen
Älä missään tapauksessa heitä laitetta
tavallisen talousjätteen sekaan. Tämä tuote
on eurooppalaisen direktiivin 2002/96/EC
mukainen.
Hävitä laite hyväksytyn jätteenhuoltoyrityksen tai kunnallisen
jätehuollon kautta. Noudata voimassa olevia määräyksiä.
Ota epävarmoissa tapauksissa yhteyttä jätelaitokseesi.
Paristojen/akkujen hävittäminen
Paristoja/akkuja ei saa hävittää kotitalousjätteiden
seassa. Jokaisella käyttäjällä on lakisääteinen velvollisuus
luovuttaa paristot/akut kuntansa/kaupunginosansa tai
kaupan keräilypisteeseen.
Näin varmistetaan, että paristot/akut hävitetään ympäristöystävällisellä tavalla. Palauta paristot/akut ainoastaan
purkautuneina.
Hävitä kaikki pakkausmateriaalit ympäristö-
ystävällisellä tavalla.
- 48 -
Page 51

Takuu ja huolto
Laitteella on kolmen vuoden takuu alkaen ostopäivästä.
Laite on valmistettu huolellisesti ja tarkistettu tarkasti ennen
toimitusta.
Säilytä ostokuitti todisteeksi ostosta. Ota takuutapauksessa
puhelimitse yhteyttä lähimpään huoltopisteeseen. Vain
näin voidaan taata tuotteesi maksuton lähettäminen
huoltoon.
Takuu koskee ainoastaan materiaali- ja valmistusvirheitä,
ei kuitenkaan kuljetusvaurioita, kuluvia osia tai herkästi
vaurioituvien osien, esim. kytkinten tai akkujen vaurioita.
Tuote on tarkoitettu ainoastaan yksityiseen käyttöön.
Tuotetta ei siten saa käyttää ammatillisiin tarkoituksiin.
Väärä tai asiaton käyttö, väkivallan käyttö ja muiden kuin
valtuutetun huoltopisteen suorittamat korjaukset aiheuttavat
takuun raukeamisen.
Tämä takuu ei rajoita kuluttajan lakisääteisiä oikeuksia.
- 49 -
Page 52

Takuukorjaus ei pidennä takuuaikaa. Tämä koskee myös
vaihdettuja ja korjattuja osia. Mahdollisesti jo oston yhteydessä esiintyvistä vaurioista ja puutteista on ilmoitettava
välittömästi pakkauksen avaamisen jälkeen, viimeistään
kuitenkin kahden päivän sisällä ostopäiväyksestä.
Takuuajan umpeutumisen jälkeen suoritetut korjaukset ovat
maksullisia.
Kompernass Service Suomi
Tel.: 010 30 935 80
(Soittamisen hinta lankaliittymästä: 8,21 snt/puh + 5,9 snt/min /
Matkapuhelimesta: 8,21 snt/puh + 16,90 snt/min)
e-mail: support.fi @kompernass.com
- 50 -
Page 53

Maahantuoja
KOMPERNASS GMBH
BURGSTRASSE 21
44867 BOCHUM, SAKSA
www.kompernass.com
- 51 -
Page 54

- 52 -
Page 55

INNEHÅLLSFÖRTECKNING SIDAN
Föreskriven användning 55
Säkerhetsanvisningar 56
Leveransens innehåll 57
Funktioner 58
Tekniska data 58
Beskrivning 60
Bära stegräknaren 61
Ta fram steglängd 61
Förberedelser 62
Ställa in steglängd 62
Ställa in kroppsvikt 63
Ställa in tid 64
Använda stoppuret 65
Använda timerfunktionen 65
- 53 -
Page 56

Ställa in måttenhet 67
Kontrollera distans och kaloriförbrukning 68
Nollställa data 69
Radiodrift 69
Byta batterier 71
Rengöring och skötsel 72
Åtgärda fel 73
Kassering 74
Garanti och service 75
Importör 77
Läs igenom bruksanvisningen innan du börjar använda
apparaten och spara den för senare bruk. Lämna över
bruksanvisningen tillsammans med apparaten om du överlåter den till någon annan person.
- 54 -
Page 57

Föreskriven användning
Stegräknaren ska fästas i linningen eller bältet och
användas för att räkna stegen när man springer, vandrar,
joggar, osv. Den kan dessutom användas för att ta emot
radiosändningar på UKV.
Den här apparaten är endast avsedd för privat bruk och
ska inte användas yrkesmässigt.
Alla användningssätt utöver de som beskrivs här är förbjudna och kan leda till skador på person och material.
Tillverkaren ansvarar inte för skador som är ett resultat av
missbruk och felaktig behandling, användande av våld eller
för att personer som inte är auktoriserade gjort ändringar på
apparaten. Den här apparaten har de tekniska förutsättningarna för inställning av ett frekvensområde utanför det
tillåtna på 87,5–108 MHz. Olika länder kan ha olika
nationella regler för tillordning av radiofrekvensområden.
Kom ihåg att du inte får utnyttja, överlåta eller missbruka
information som tagits emot utanför det tillåtna radiofrekvensområdet.
- 55 -
Page 58

Säkerhetsanvisningar
Läs igenom bruksanvisningen noga innan du börjar •
använda apparaten och spara den för senare bruk.
Lämna över bruksanvisningen tillsammans med apparaten om du överlåter den till någon annan person.
Se till så att det aldrig kommer in vätska i apparaten •
och doppa aldrig ner den i vatten för att undvika
skador.
Akta så att det inte kommer in främmande föremål i •
apparaten.
Öppna aldrig några delar av höljet, med undantag •
av batteriluckan. Förutom att batterierna måste bytas
ibland innehåller apparaten inga delar som ska
underhållas.
Rör inte vid displayen med vassa föremål och utsätt •
den inte för tryck för att undvika skador.
Vänd dig till kundtjänst om apparaten inte fungerar •
som den ska eller har synliga skador.
Ta ut batterierna om du inte ska använda apparaten •
under en längre tid – batterierna laddar ur sig själva i
facket och kan börja läcka.
- 56 -
Page 59

Om batterierna läcker: Ta på skyddshandskar och •
rengör batterifacket med en torr trasa.
Använd alltid bara nya batterier av den typ som anges •
i tekniska data.
Kasta aldrig in batterier i en eld. Kortslut inte batterierna. •
Försök aldrig ladda upp batterier som inte är uppladdningsbara. Risk för explosion!
Håll batterier på avstånd från småbarn. Små barn kan •
stoppa batterier i munnen och svälja dem. Uppsök
omedelbart läkarvård om någon råkat svälja ett
batteri. Det är livsfarligt!
Leveransens innehåll
Kontrollera att leveransen är komplett och inte har några
synliga skador innan du börjar använda apparaten.
Stegräknare
Hörlurar av typ KH260E
2 st. CR2032 batterier
Denna bruksanvisning
- 57 -
Page 60

Funktioner
Stegräknaren är utrustad med följande funktioner:
Klocka med 12/24-timmars visning (CLOCK)•
Stoppur (STW)•
Timerfunktion (TIMER)•
Stegräknare (STEP)•
Distans (DIST)•
Kaloriförbrukning (KCAL)•
Fettförbränning (FAT B.)•
UKV-radio med autoscan•
Tekniska data
RADIO:
Spänningsförsörjning: 1 st. 3 V av typ CR2032
Frekvensområde: 87,5 - 108 MHz
Uteff ekt: 100 mW
Max. utspänning
för uttag till hörlurar: ≤ 150 mV
- 58 -
Page 61

Impedans, hörlurar: 32 Ω
Sensitivitet: 97 dB +/- 3 dB vid 1 kHz
Nominell eff ekt: 30 mW
Avkänningsspänning
för bredband. (WBCV): 400 mV
Stegräknare:
Spänningsförsörjning: 1 st. 3 V av typ CR2032
Stoppur: 0 – 99h, 59 min, 59 s
Timerfunktion: 99h, 59 min, 59 s
Steglängd: 30-180 cm
Vikt: 10-150 kg
Stegräknare: 0 – 99999 steg
Distans: 0 – 199,99 km
Fettförbränning: 0 – 999,9 g
Kaloriförbrukning: 0 – 99999 kcal
Drifttemperatur: -10°C – 40°C
Förvaringstemperatur: -20°C – 60°C
Mått : 5,7 x 3,1 x 5,9 cm
Vikt: ca 54 g
(inkl. batterier och hörlurar)
- 59 -
Page 62

Beskrivning
1 LCD-display (två rader med olika visningslägen och
bakgrundsbelysning)
2 Indikatorlampa (lyser grönt när radion är på)
3 Knapp
4 VOL+/VOL– (öka/minska volym)
5 RESET (återställa apparatens fabriksinställningar)
6 Bältesclips (för att fästa stegräknaren i bältet eller
linningen)
7 Skruv till batterifackets lock
8 Knapp MODE (växla mellan olika visningslägen)
9 Knapp SET (hämta inställningsläget)
0 Knapp UP (göra inställningar, starta/stoppa timer-
funktionen och stoppuret)
q Knapp SEEK+/SEEK- (sök uppåt/neråt i frekvensbandet
efter radiosändare)
w Uttag för hörlurar
(sätta på/stänga av radion)
- 60 -
Page 63

Bära stegräknaren
Fäst stegräknaren i bältet eller i linningen på dina träningsbyxor med fästclipset ca en handbredd från höften.
Displayen ska vara vänd uppåt.
Observera:
Om du sätter på dig stegräknaren på fel sätt kan displayen visa felaktiga värden.
correct
incorrect
Ta fram steglängd
Gå en uppmätt sträcka, t ex mellan två lyktstolpar och
räkna dina steg. Dividera sträckan med antalet steg och
skriv in värdet i cm eller inches.
Exempel: 6 meter / 10 steg = 60 cm i steglängd
- 61 -
Page 64

Förberedelser
Innan du använder apparaten första gången ska du ta
bort de genomskinliga isoleringsremsorna ur batterifacket
(se även Byta batterier).
Ställa in steglängd
Bild: Fettförbränning/Antal steg
Den här inställningen behöver bara göras före det första
användningstillfället och efter ett batteribyte.
Tryck upprepade gånger på knappen MODE tills •
visningen för Fettförbränning/Antal steg kommer upp.
Tryck på knappen UP för att växla till läge Fettför-•
bränning/Distans.
Håll knappen SET inne i 3 sekunder. Standardvärdet •
för steglängd (60 cm) blinkar.
Tryck på knappen UP för att ställa in steglängden •
(30 – 180 cm).
Tryck på knappen SET för att godkänna inställningen •
och gå ut ur inställningsläget.
- 62 -
Page 65

Ställa in kroppsvikt
Bild: Fettförbränning/Antal steg
Den här inställningen behöver bara göras före det första
användningstillfället och efter ett batteribyte.
Tryck upprepade gånger på knappen MODE tills •
visningen för Fettförbränning/Antal steg kommer upp.
Tryck två gånger på knappen UP för att växla till läge •
Fettförbränning/Kaloriförbrukning.
Håll knappen SET inne i 3 sekunder. Standardvärdet •
för kroppsvikt (60 kg) blinkar.
Tryck på knappen UP för att ställa in kropssvikten •
(10 – 150 kg).
Tryck på knappen SET för att godkänna inställningen •
och gå ut ur inställningsläget.
- 63 -
Page 66

Ställa in tid
Bild: Klocka/Stoppur
Tryck upprepade gånger på knappen MODE tills •
visningen av Klocka/Stoppur kommer upp.
Håll knappen SET inne i 3 sekunder. 24-timmarsformatet •
blinkar.
Tryck på knappen UP för att växla mellan 12-timmars •
och 24-timmars format.
Tryck på knappen SET för att bekräfta inställningen •
och gå vidare till timinställningen.
Använd knappen UP för att ställa in timmarna.•
Tryck på knappen SET för att växla till minutinställningen.•
Använd knappen UP för att ställa in minuterna.•
Tryck på knappen SET för att godkänna inställningen •
och gå ut ur inställningsläget.
- 64 -
Page 67

Använda stoppuret
Bild: Klocka/Stoppur
Tryck upprepade gånger på knappen MODE tills
•
visningen av Klocka/Stoppur kommer upp.
Använd knappen UP för att starta och stanna stoppuret.•
Tryck på knappen SET för att nollställa stoppuret.•
Använda timerfunktionen
Tryck upprepade gånger på knappen MODE tills •
visningen av Klocka/Timer kommer upp.
Håll knappen SET inne i 3 sekunder. •
Timvisningen blinkar.
Använd knappen UP för att ställa in timmar för timern.•
Bild: Klocka/Timer
- 65 -
Page 68

Tryck på knappen SET för att bekräfta inställningen •
och gå vidare till minutinställningen.
Använd knappen UP för att ställa in minuter för timern.•
Tryck på knappen SET för att bekräfta inställningen •
och gå vidare till sekundinställningen.
Använd knappen UP för att ställa in sekunderna.•
Tryck på knappen SET för att godkänna inställningen •
och gå ut ur inställningsläget.
Använd knappen UP för att starta och stoppa timern.•
När den inställda tiden har gått hörs en signal i en •
minut.
Tryck på någon av knapparna MODE, SET eller •
UP för att stänga av signalen.
- 66 -
Page 69

Ställa in måttenhet
Stegräknare kan ställas in på det metriska (m, g, kg, km)
eller det angloamerikanska måttsystemet (in, oz, lb, mi).
Vid leveransen är det metriska systemet inställt som
standard.
Tryck upprepade gånger på knappen MODE tills •
Fettförbränning/Antal steg kommer upp.
Håll knappen MODE inne i 5 sekunder. Det metriska •
systemets måttenheter blinkar på displayen.
Använd knappen UP för att växla till det anglo-•
amerikanska systemet.
Tryck på någon av knapparna MODE eller SET för att •
godkänna inställningen och gå ut ur inställningsläget.
Bild: Fettförbränning/Antal steg
- 67 -
Page 70

Kontrollera distans och
kaloriförbrukning
Tryck upprepade gånger på knappen MODE tills •
Fettförbränning/Antal steg kommer upp.
Tryck på knappen UP för att växla till läge •
Fettför-bränning/Distans.
Tryck på knappen UP igen för att växla till •
Fettför-bränning/Kaloriförbrukning.
Tryck på knappen UP en gång till för att gå tillbaka till •
Fettförbränning/Antal steg.
Bild: Fettförbränning/Antal steg
- 68 -
Page 71

Nollställa data
Tryck upprepade gånger på knappen MODE tills •
Fettförbränning/Antal steg kommer upp.
Håll knappen UP inne i 3 sekunder. Nu ställs värdena för •
antal steg, distans, fettförbränning och kaloriförbrukning
tillbaka på noll.
Bild: Fettförbränning/Antal steg
Radiodrift
Koppla hörlurarna till uttaget.
Du måste linda ut hela sladden till hörlurarna, eftersom
den också fungerar som antenn och mottagningen blir
bättre om du rullar ut den fullständigt.
OBS:
Att lyssna på musik på hög volym genom hörlurar
en längre tid kan leda till hörselskador!
- 69 -
Page 72

Tryck på knappen • för att sätta på radion. Indikatorlampan börjar lysa.
Tryck på knappen SEEK + för att starta en sändar-•
sökning. Apparaten söker nu uppåt i frekvensbandet
tills en tillräckligt stark sändare hittas.
Tryck på knappen SEEK + igen för att söka efter en •
sändare på närmsta högre frekvens.
Tryck på knappen SEEK - för att söka neråt i frekvens-•
bandet efter tillräckligt starka sändare.
Ställ in volymen med knapparna VOL+/VOL-.•
Tryck på knappen •
en gång till för att stänga av
radion. Indikatorlampan slocknar.
- 70 -
Page 73

Byta batterier
CR2032 CR2032
Bild: Byta batterier
Observera:
När man byter batterier försvinner alla data som sparats.
Man måste ställa in steglängd och kroppsvikt på nytt.
Byt batterier när visningen på displayen blir otydlig eller
radiomottagningen sämre.
Skruva loss luckan till batterifacket på apparatens baksida.
Byt batterierna (2 st. 3V CR2032). Kom ihåg att lägga
in dem med polerna rätt. Plustecknet ska peka uppåt.
Skruva fast luckan på batterifacket igen.
- 71 -
Page 74

Rengöring och skötsel
Doppa aldrig ner apparaten i vatten och se till så att det
inte kommer in vätska innanför höljet.
Rengör bara apparaten med en något fuktig trasa.
Använd inga slipande eller kemiska rengöringsmedel.
Då kan plastytan skadas.
Se till så att det inte fi nns några vattendroppar kvar på
displayen. Vatten kan orsaka missfärgningar som aldrig
går bort.
- 72 -
Page 75

Åtgärda fel
Visningen är otydlig på displayen: Byt batterierna •
(se avsnitt Byta batterier).
Radiomottagningen blir sämre och sämre: Byt batte-•
rierna (se avsnitt Byta batterier). Linda ut hela sladden
till hörlurarna.
Det syns konstiga tecken på displayen: Återställ •
stegräknarens fabriksinställningar genom att trycka
in ett spetsigt föremål i hålet på apparatens baksida
(RESET).
Distansvärdet stämmer inte: Kontrollera inställningen •
för steglängd.
Värdena för kaloriförbrukning och fettförbränning •
stämmer inte: Kontrollera inställningen för steglängd
och kroppsvikt.
- 73 -
Page 76

Kassering
Apparaten får absolut inte kastas bland
hushållssoporna. Produkten faller under
den EU-direktiv 2002/96/EC.
Lämna in den till ett företag som har tillstånd att ta hand
om den här typen av uttjänta apparater eller till din kommunala avfallsanläggning. Följ gällande föreskrifter.
Kontakta din avfallsanläggning om du har några frågor.
Kassera batterier
Vanliga batterier och uppladdningsbara batterier får inte
kastas bland hushållssoporna. Den som använder någon
typ av batterier är skyldig enligt lag att lämna in dem till
ett insamlingsställe i sin kommun eller stadsdel eller lämna
tillbaka dem till återförsäljaren.
Den här bestämmelsen är till för att batterier ska kunna
kasseras utan att skada miljön. Lämna bara in urladdade
batterier för återvinning/destruktion.
Lämna in allt förpackningsmaterial till miljövänlig
återvinning.
- 74 -
Page 77

Garanti och service
Du erhåller 3 års garanti på apparaten, räknat från köpdatum. Den här apparaten har tillverkats med omsorg
och genomgått en noggrann kontroll innan leveransen.
Var god bevara kassakvittot som köpbevis. Vi ber dig
kontakta vår kundtjänst per telefon vid garantifall. Bara
då kan du skicka in produkten utan kostnad.
Garantin gäller endast för material- eller fabrikationsfel,
den täcker inte transportskador, förslitningsdelar eller
skador på ömtåliga delar, som t ex knappar och batterier.
Produkten är endast avsedd för privat bruk och får inte
användas yrkesmässigt. Vid missbruk och felaktig behandling, användande av våld och vid ingrepp som inte
gjorts av vår auktoriserade servicefi lial upphör garantin
att gälla.
Den lagstadgade garantin begränsas inte av denna garanti.
Garantitiden förlängs inte för att man utnyttjat garantiförmånerna. Det gäller även för utbytta eller reparerade
delar. Eventuella skador och brister som existerar redan
vid köpet måste rapporteras så snart apparaten packats
upp, dock senast två dagar efter köpet. När garantitiden
är slut kostar det pengar att reparera apparaten.
- 75 -
Page 78

Kompernass Service Sverige
Tel.: 0770 93 00 35
e-mail: support.sv@kompernass.com
Kompernass Service Suomi
Tel.: 010 30 935 80
(Soittamisen hinta lankaliittymästä: 8,21 snt/puh + 5,9 snt/min /
Matkapuhelimesta: 8,21 snt/puh + 16,90 snt/min)
e-mail: support.fi @kompernass.com
- 76 -
Page 79

Importör
KOMPERNASS GMBH
BURGSTRASSE 21
44867 BOCHUM, GERMANY
www.kompernass.com
- 77 -
Page 80

- 78 -
 Loading...