


247.775860
Table of contents
 Loading...
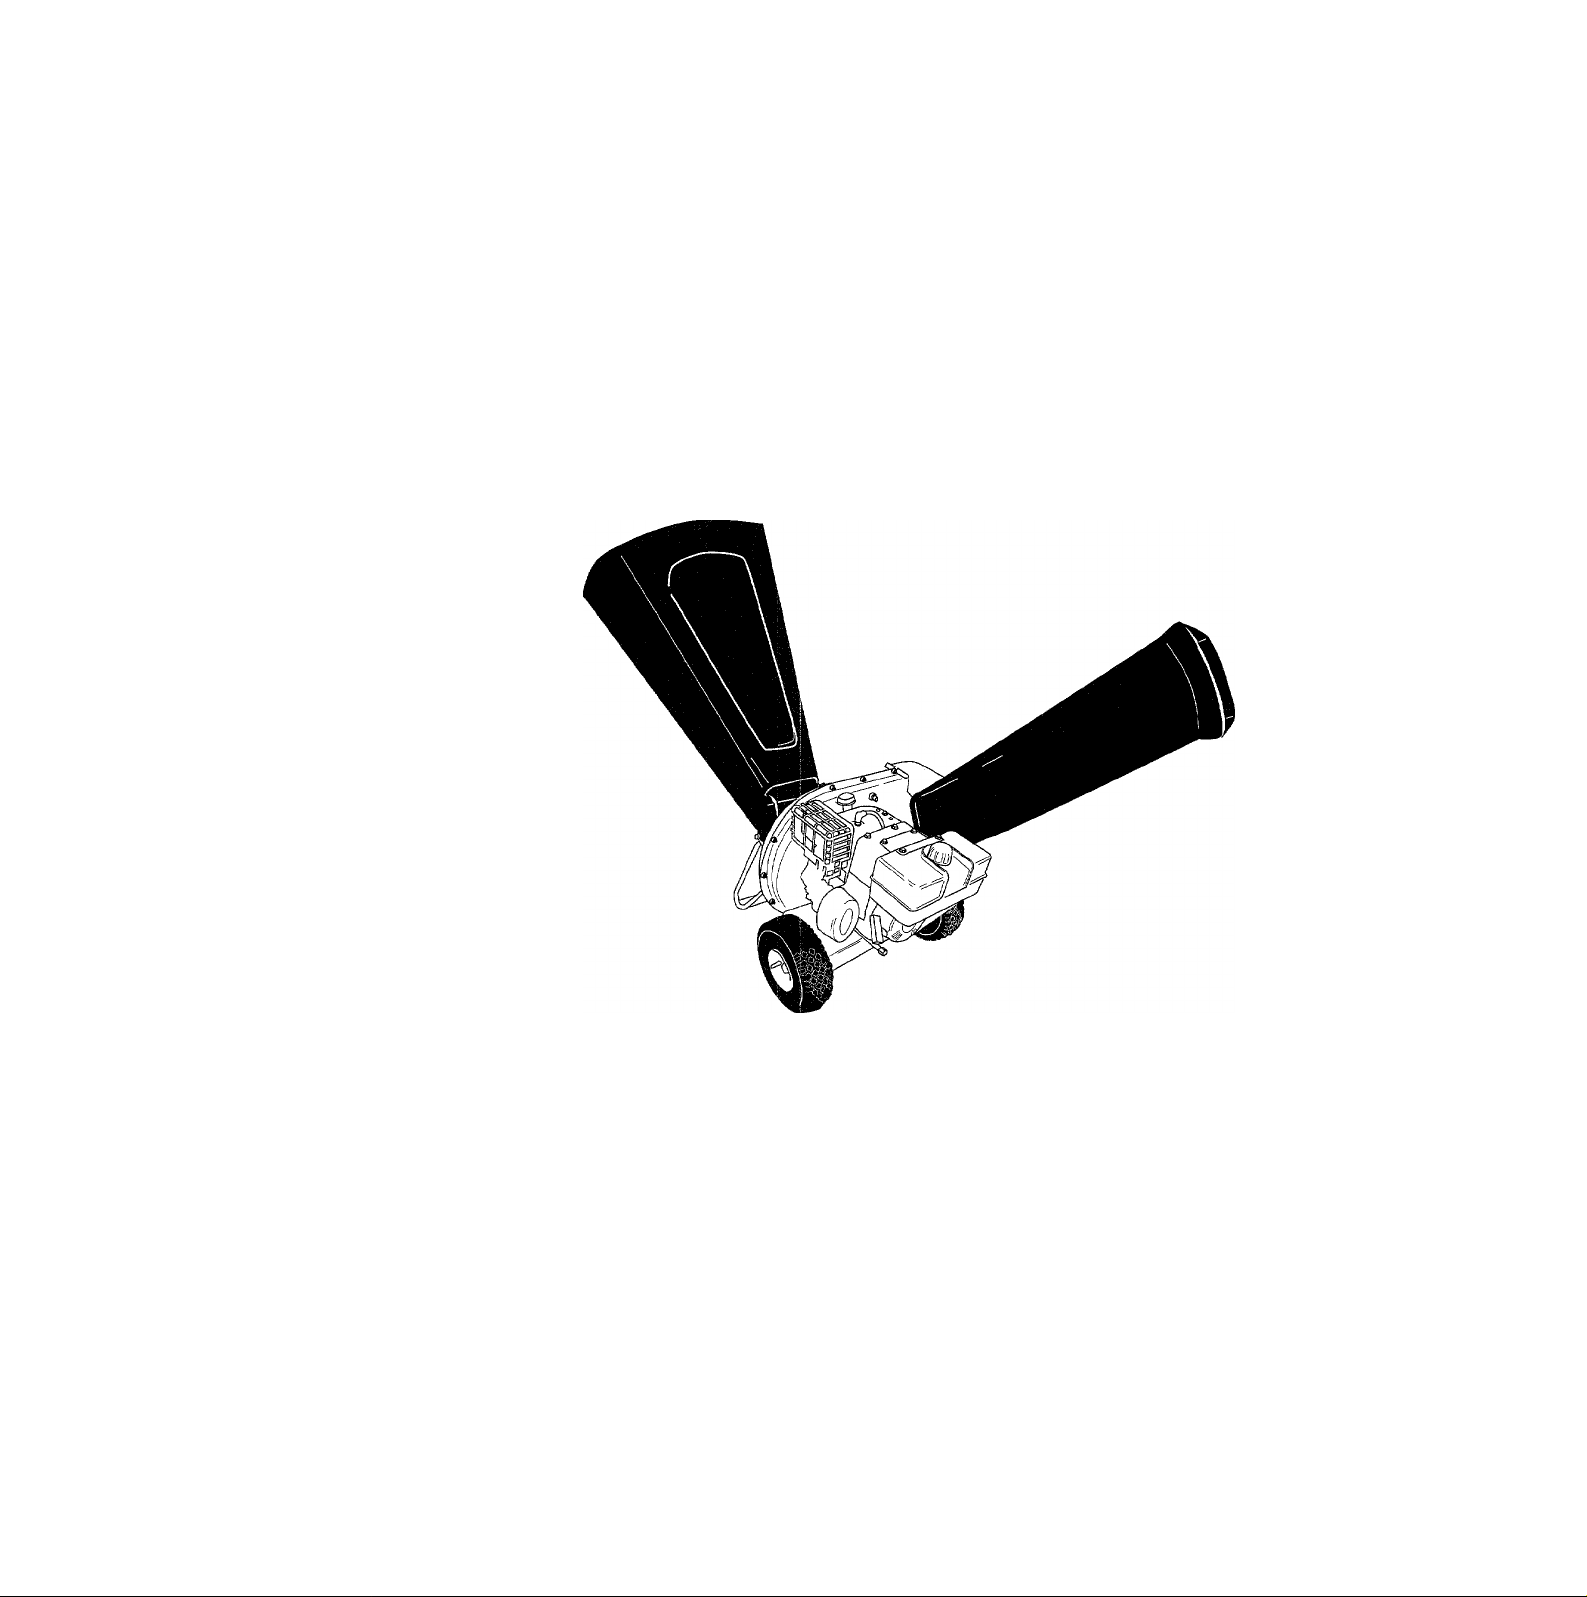
Owner’s Manual
CRAFTSMAN
8.0 Horse Power
3” diameter chipping capacity
CHIPPER-SHREDDER
Model No.
247.775860
CAUTION: Before using this product,
read this manual and follow all Safety
Rules and Operating Instructions.
Sears, Roebuck and Co., Hoffman Estates, IL 60179, U.S.A.
Printed in U.S.A.
770-0549M
(R970110)

TABLE OF CONTENTS
Content
Page Content
Page
Warranty Information
2
Service & Adjustment
14
Safe Operation Practices
3
Off-Season Storage
17
Assembly
5
Trouble-Shooting
18
Operation
8
Repair Parts
19
Maintenance
11
WARRANTY INFORMATION
One-Year Warranty on Craftsman Chipper-Shredder
For one year from the date of purchase, when this Craftsman chipper-shredder is maintained, lubricated, and
tuned up according to the operating and maintenance instructions in the operator’s manual. Sears will repair, free
of charge, any defect in material or workmanship.
This warranty excludes the blades, chipper blades, flails, air cleaners, spark plugs, catcher bags and tires which
are expendable parts and become worn during normal use.
If this chipper-shredder is used for commercial or rental purposes, this warranty applies for only 30 days from the
date of purchase.
WARRANTY SERVICE IS AVAILABLE BY CONTACTING THE NEAREST SEARS SERVICE CENTER IN THE
UNITED STATES. THIS WARRANTY APPLIES ONLY WHILE THIS PRODUCT IS IN USE IN THE UNITED
STATES.
This warranty gives you specific legal rights, and you may also have other rights which vary from state to state.
Sears, Roebuck and Co., D/817wa, Hoffman Estates, II 60179
ACCESSORIES
These accessories were
available when the chipper
shredder was purchased.
They are also available at
most Sears retail outlets,
catalog and service centers.
Most Sears stores can order
repair parts for you when you
provide the model number of
your chipper-shredder.
Spark Air
Plug Filter
Engine Gas
Oil Can
Stabilizer
Tow Hitch Kit
PRODUCT SPECIFICATION
HORSEPOWER;
8H.P.
CRANKCASE CAPACITY:
26oz. SAE 30 ENGINE OIL
PULE TANK CAPACITY:
4 Quart (UNLEADED)
RESISTOR SPARK PLUG:
(N4C)
GAP
.030
TIRE PRESSURE
24 PSI
Model Number
..........................................................
Serial Number...........................................................
Date of Purchase.......................................................
Record both serial number and date of purchase and
keep in a safe place for future reference.

SAFE OPERATION PRACTICES
A
This symbol points out important safety instructions which, if not foilowed, could endanger the per-
sonai safety and/or property of yourself and others. Read and follow all instructions in this manual before
attempting to operate your chipper shredder. Failure to comply with these instructions may result in per
sonal injury. When you see this symbol—heed its warning.
A
DANGER
Your chipper-shredder was built to be operated according to the rules for safe operation in
this manual. As with any type of power equipment, carelessness or error on the part of the oper
ator can result in serious injury. If you violate any of these rules, you may cause serious
injury to yourself or others.
A
WARNING; The Engine Exhaust from this product contains chemicals known to the State of California
to cause cancer, birth defects or other reproductive harm.
1. GENERAL OPERATION
• Read this owner’s guide carefully in its entirety before
attempting to assemble this machine. Read,
understand, and follow all instructions on the machine
and in the manual(s) before operation. Be completely
familiar with the controls and the proper use of the
machine before operating it. Keep this manual in a
safe place for future and regular reference and for
ordering replacement parts.
• Your chipper-shredder is a powerful tool, not a
plaything. Therefore, exercise extreme caution at all
times. Your unit has been designed to perform two
jobs; to chip and shred vegetation found in a normal
yard. Do not use it for any other purpose.
• Never allow children under age 16 to operate the unit.
Children 16 years and older should only operate the
unit under close parental supervision. Only
responsible individuals who are familiar with these
rules of safe operation should be allowed to use your
unit.
• Keep the area of operation clear of all persons,
particularly small children and pets. Stop the engine
when they are in the vicinity of the unit. Keep work
area clean and clear of branches or obstacles which
could cause you to stumble or fall.
• When feeding material into this equipment, be
extremely careful that pieces of metal, rocks, bottles,
cans or other foreign objects are not included.
Personal injury or damage to the machine could result.
• Always wear safety glasses or safety goggles, during
operation and while performing an adjustment or
repair, to protect eyes from foreign objects that may be
thrown from the machine.
• Wear sturdy, rough-soled work shoes and close fitting
slacks and shirt. Shirt and slacks that cover the arms
and legs and steel-toed shoes are recommended. Do
not wear loose fitting clothes or jewelry and secure hair
so it is above shoulder length. They can be caught in
moving parts. Never operate a unit in bare feet,
sandals or sneakers. Wear gloves when feeding
materiai in the chipper chute or shredder hopper.
Never place your hands, feet, or any part of your body
into the shredder hopper, chipper chute, discharge
opening, or near any moving part while the engine is
running. Keep clear of the discharge opening at all
times. If it becomes necessary to push material into
the chipper chute or shredder hopper, use a smail
diameter stick, NOT YOUR HANDS.
If it is necessary for any reason to unclog the feed
intake or discharge openings or to inspect or repair any
part of the machine where a moving part can come in
contact with your body or ciothing, stop the machine,
aliow it to cool, disconnect the spark plug wire from the
spark plug and move it away from the spark plug
before attempting to unclog, inspect or repair.
Do not operate unit while under the influence of alcohol
or drugs.
The machine should only be operated on a level
surface. Never operate your unit on a slippery, wet,
muddy or icy surface. Keep your work area clean and
clear of branches or obstacles which could cause you
to stumble and fall. Do not overreach. Maintaining
proper footing and balance is essential to preventing
accidents.
Do not allow an accumulation of processed material to
build up in the discharge area as this will prevent
proper discharge and can result in kick-back from the
chipper chute.
Keep your face and body back from chipper chute to
avoid accidental bounce back of any material.
Do not transport machine while engine is running.
If the cutting mechanism strikes a foreign object or if
your machine should start making an unusual noise or
vibration, immediately stop the engine and allow the
machine to come to a complete stop. Disconnect the
spark plug wire and move it away from the spark plug.
Take the following steps.
a. Inspect for damage.
b. Repair or replace any damaged parts.
c. Check for any loose parts and tighten to assure
continued safe operation.
Never attempt to attach or remove catcher bag when
engine is running. Shut the engine off and wait for the

impeller to come to a complete stop. The impeller
continues to rotate for a few seconds after the engine
is shut off. Never place any part of the body in the
impeller area until you are sure the impeller has
stopped rotating.
• Muffler and engine become hot and can cause a burn.
Do not touch.
• Do not allow leaves or other debris to build-up on
engine’s muffler. The debris could ignite and cause a
fire.
• Do not attempt to shred or chip material larger than
specified in this manual. Personal injury or damage to
the machine could result.
• Do not operate engine if air cleaner or cover over
carburetor air-intake is removed, except for
adjustment. Removal of such parts could create a fire
hazard.
• Only use accessories approved for this machine by the
manufacturer. Read, understand, and follow all
instructions provided with the approved accessory.
• If situations occur which are not covered by this
manual, use care and good judgment. Contact your
dealer for assistance.
• Keep discharge chute deflector, chipper chute door,
and all other guards and safety devices in place and
operating properly.
• Only operate unit in good daylight. Do not operate unit
at night or in dark areas where your vision may be
impaired.
2. CHILDREN
Tragic accidents can occur if the operator is not alert to the
presence of small children. Children are often attracted to
the chipper-shredder and the chipping and shredding
activity. Never assume that children will remain where you
last saw them.
• Keep children out of the work area and under the
watchful eye of a responsible adult other than the
operator.
• Be alert and turn the unit off if a child enters the area.
• Never allow children under the age of 16 to operate the
chipper-shredder.
3. SERVICE
• Use extreme care in handling gasoline and other fuels.
They are extremely flammable and the vapors are
explosive.
a. Store fuel and oil in approved containers, away
from heat and open flame, and out of the reach of
children. Check and add fuel before starting the
engine. Never remove gas cap or add fuel while
the engine is running. Allow engine to cool at
least two minutes before refueling.
b. Replace gasoline cap securely and wipe off any
spilled gasoline before starting the engine as it
may cause a fire or explosion.
c. Extinguish all cigarettes, cigars, pipes and other
sources of ignition.
d. Never refuel unit indoors because flammable
vapors will accumulate in the area.
e. Never store the machine or fuel container inside
where there is an open flame or spark such as a
gas hot water heater, space heater, clothes dryer
or furnace.
• Never run your machine in an enclosed area as the
exhaust from the engine contains carbon monoxide,
which is an odorless, tasteless and deadly poisonous
gas.
• To reduce fire hazard, keep engine and muffler free of
leaves, grass, and other debris build-up. Clean up fuel
and oil spillage. Allow unit to cool at least 5 minutes
before storing.
• Before cleaning, repairing, or inspecting, make certain
the impeller and all moving parts have stopped.
Disconnect the spark plug wire and keep wire away
from spark plug to prevent accidental starting. Do not
use flammable solutions to clean air filter.
• Check the blade and engine mounting screws at
frequent intervals for proper tightness. Also visually
inspect blades for wear and/or damage (e.g., bent,
cracked). Replace with blades which meet original
equipment specifications.
• Keep all nuts, bolts, and screws tight to be sure the
equipment is in safe working condition.
• Never tamper with safety devices. Check their proper
operation regularly.
• After striking a foreign object, immediately stop the
engine, disconnect the spark plug wire from the spark
plug, and thoroughly inspect the unit for any damage.
Repair damage before starting and operating unit.
• Do not alter or tamper with the engine’s governor
setting. The governor controls the maximum safe
operating speed of the engine. Over-speeding the
engine is dangerous and will cause damage to the
engine and to other moving parts of the machine.
4. YOUR RESPONSIBILITY
A
Restrict the use of this power machine to
persons who read, understand and follow the
warnings and instructions in this manual and on
the machine.
SAVE THESE INSTRUCTIONS
FOR FUTURE REFERENCE.
A
This unit is equipped with an internal combustion engine and should not be used on or near any unimproved forest-
covered, brush-covered or grass-covered land unless the engine’s exhaust system is equipped with a spark arrester
meeting applicable local or state laws (if any). If a spark arrester is used, it should be maintained in effective working
order by the operator.
In the State of California the above is required by law (Section 4442 of the California Public Resources Code). Other
states may have similar laws. Federal laws apply on federal lands. A spark arrester for the muffler is available through
your nearest Sears Authorized Service Center (See the REPAIR PARTS section of this manual.)
ASSEMBLY
Hopper
Discharge Chute
Chipper Chute
IMPORTANT: This unit is shipped without gasoline
or oil in the engine. After assembly, see
OPERATION section of this manual for proper fuel
and engine oil fill-up.
NOTE: To determine right and left hand sides of your
chipper-shredder, stand behind the unit with the
engine farthest away from you.
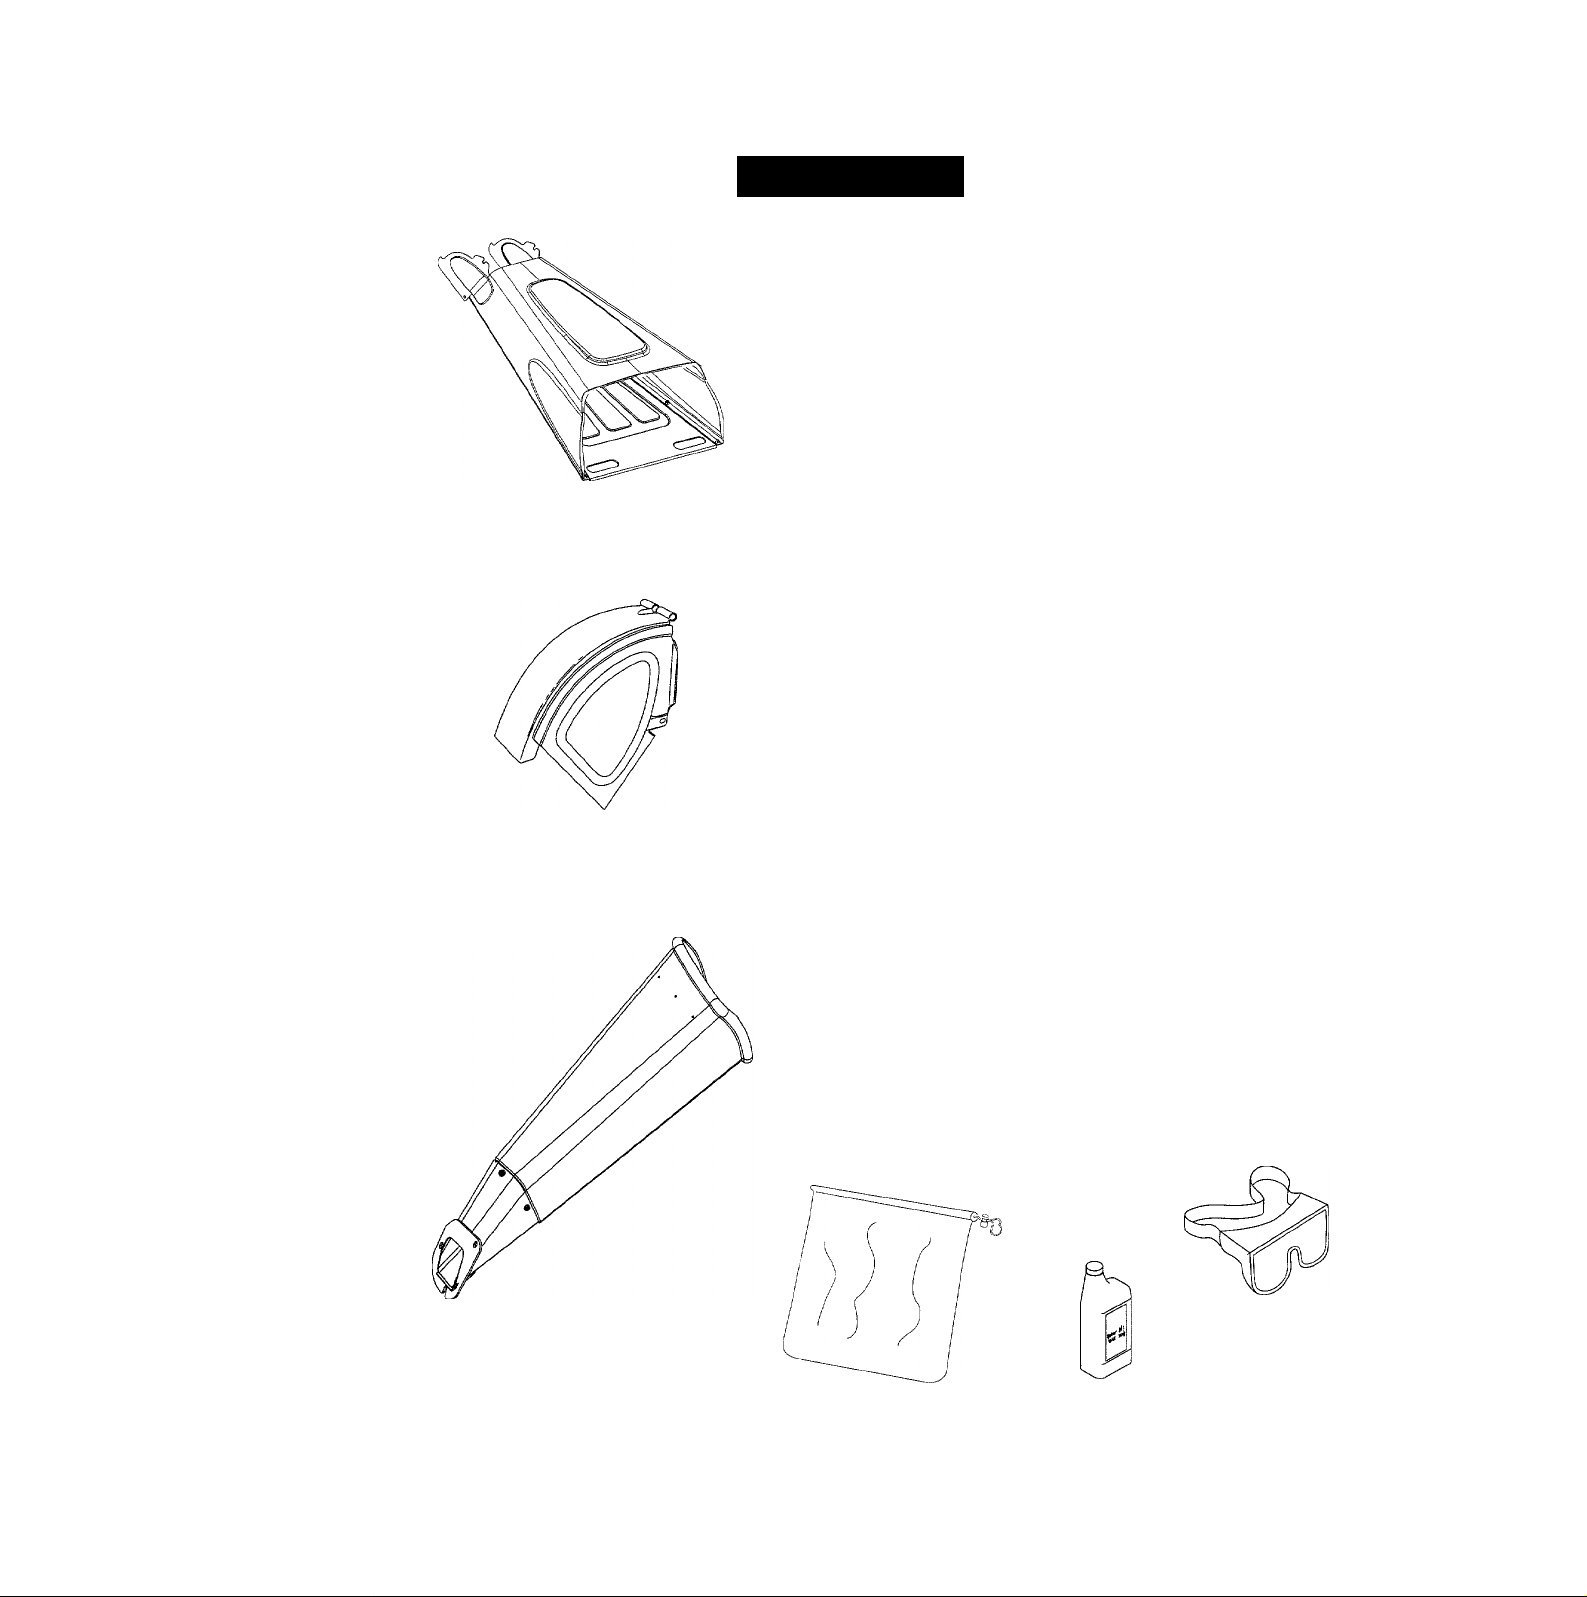
Your chipper-shredder has been completely assembled
at the factory, except for the hopper assembly, chipper
chute, discharge chute and the catcher bag.
These parts are shipped loose in the carton. A pair of
safety glasses and a bottle of oil are also included in
the carton.
1. REMOVE CHIPPER-SHREDDER
FROM CARTON
• Cut the corners of the carton.
• Remove all packing inserts.
• Remove all loose parts including owner’s
manual. See figure 1.
• Roll chipper-shredder out of the carton.
• Make certain all parts and literature have been
removed before the carton is discarded.
2. LOOSE PARTS
a. Hopper Assembly
b. Discharge Chute
c. Chipper Chute
d. Catcher Bag
e. Bottle of Oil
f. Safety Glasses
g. Owner’s Manual (not shown in figure 1)
Safety
Glasses
Catcher Bag
Bottle
of Oil
Figure 1
5
3. TOOLS REQUIRED
1. 1/2" or Adjustable Wrenches
2. 7/16" or Adjustable Wrenches
3. Funnel
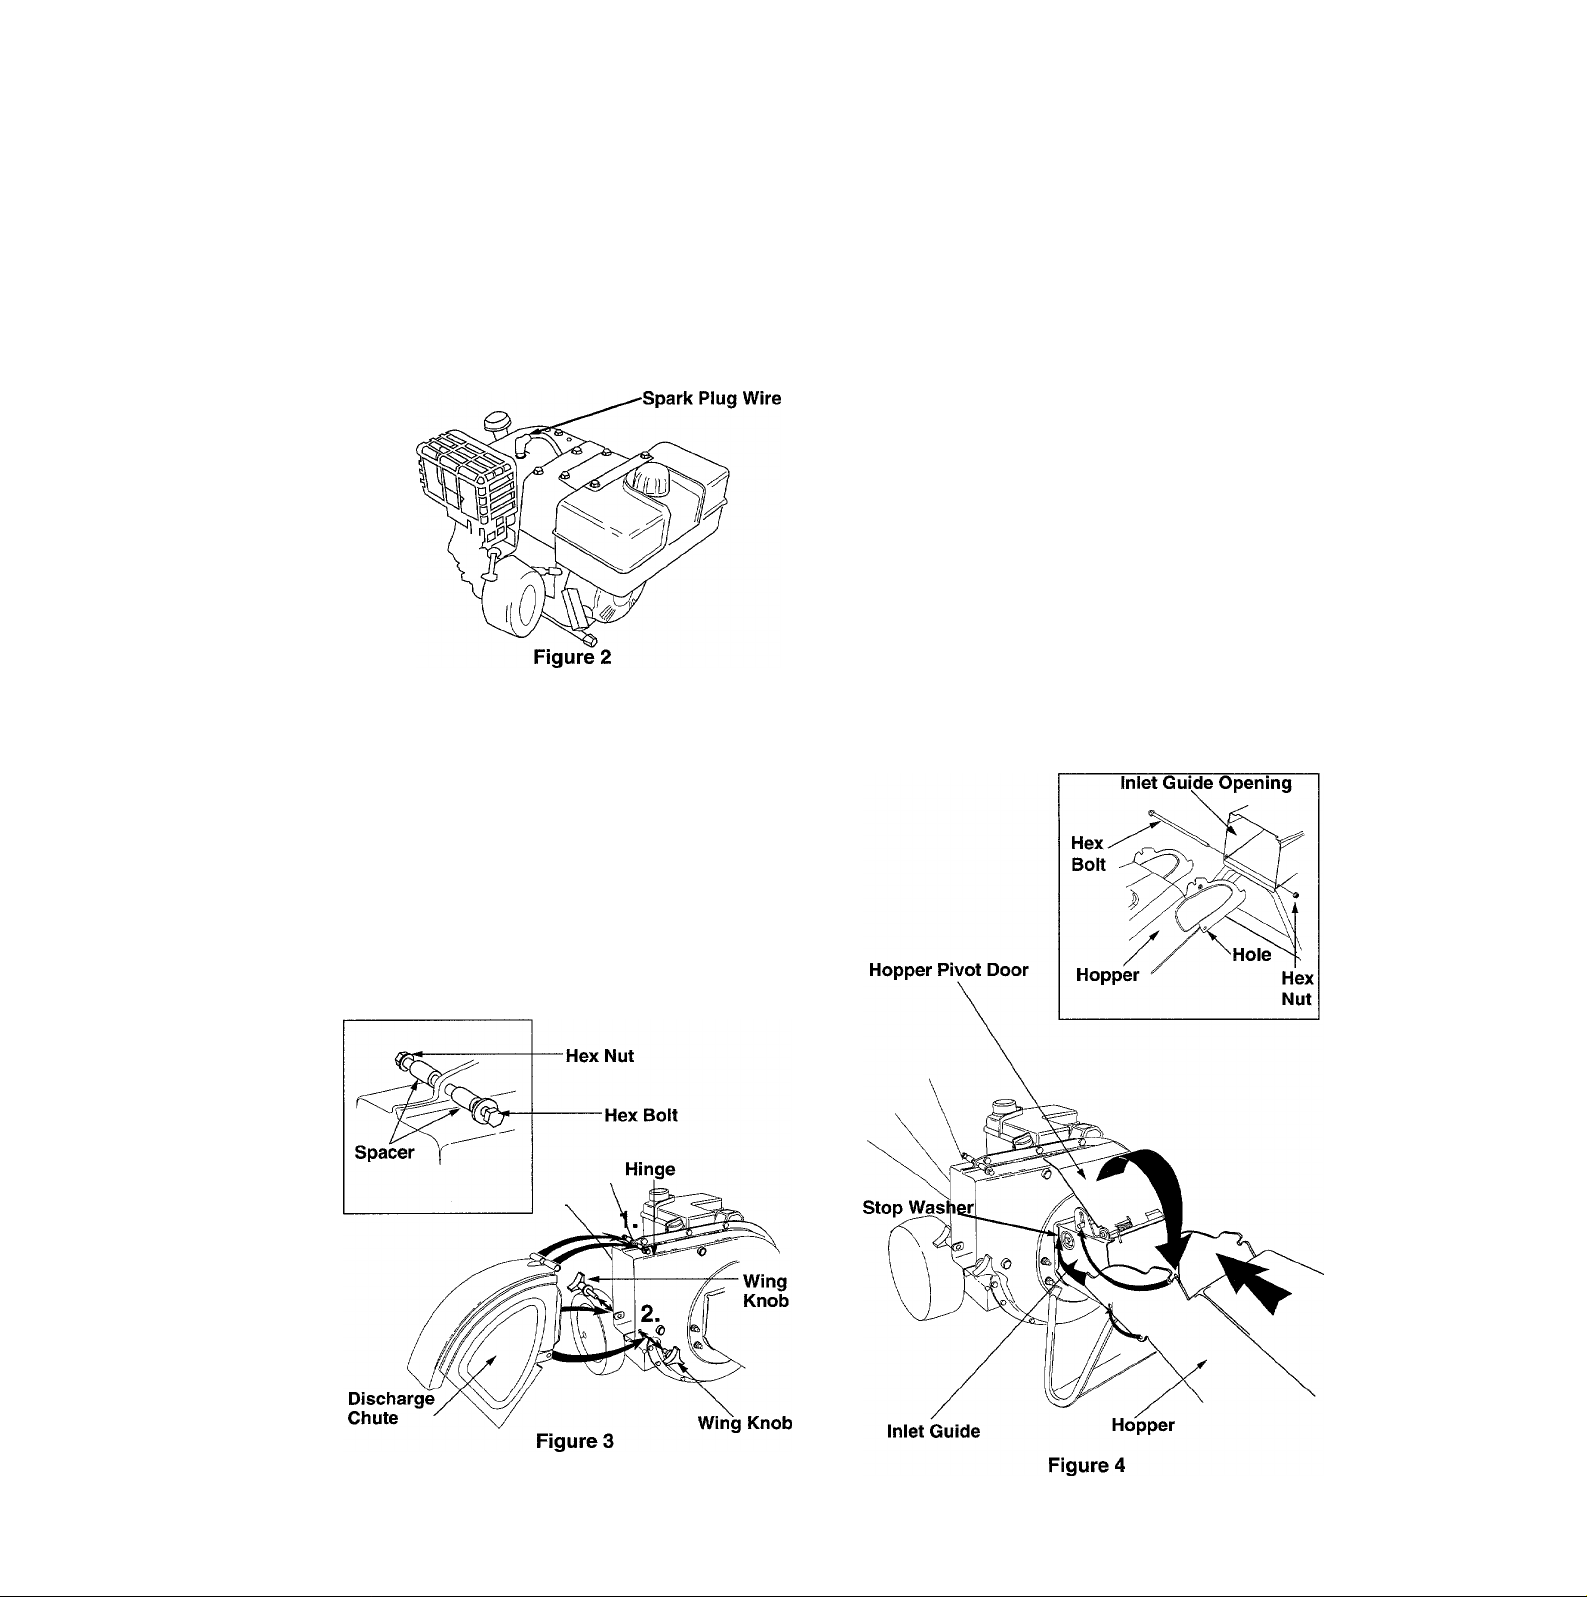
4. DISCONNECTING SPARK PLUG
• Disconnect the spark plug wire and move it
away from the spark plug before assembiing the
chipper-shredder. See figure 2.
5. ATTACHING DISCHARGE CHUTE
• Remove the wing knobs from each side of the
discharge opening on the chipper-shredder. See
figure 3.
• Using two 7/16" wrenches, remove hex iock
nut, two spacers, and the hex boit from top of
the housing assembiy. For easy assembly, do
not remove the second spacer from the hex bolt.
• Place the discharge chute in position on the
discharge opening. Insert hex bolt and spacer
through hinge on discharge chute and housing
(spacer fits inside of hinge). See figure 3 inset.
• Piace second spacer over hex boit inside the
other part of the hinge. Secure with hex lock nut.
Tighten securely.
• Secure both sides of discharge chute to housing
using wing knobs that you earlier removed.
Tighten wing knobs.
6. ATTACHING HOPPER ASSEMBLY
• Remove the 8-3/8” iong hex bolt and the hex nut
from the bottom of the inlet guide opening.
• Piace the hopper assembiy on the ground and
hoid it in the position shown in step 1 in figure 4.
• Holding the hopper, push hopper pivot door
down inside the hopper. See figure 4.
• Siide the hopper assembiy towards the chipper
shredder housing so that the upper guide on the
hopper assembly slides under the stop washer
on each side of the inlet guide. See figure 4.
• Align the two hoies (one on each side) of the
iower hopper with the two hoies (one on each
side) of the iniet guide.
• insert the hex boit (that you earlier removed)
from the ieft through the hole on the hopper and
the iniet guide. Insert the hex nut onto the bolt
from the other side. See figure 4 inset.
Tighten the bolt. This will secure the hopper
assembly to the inlet guide.
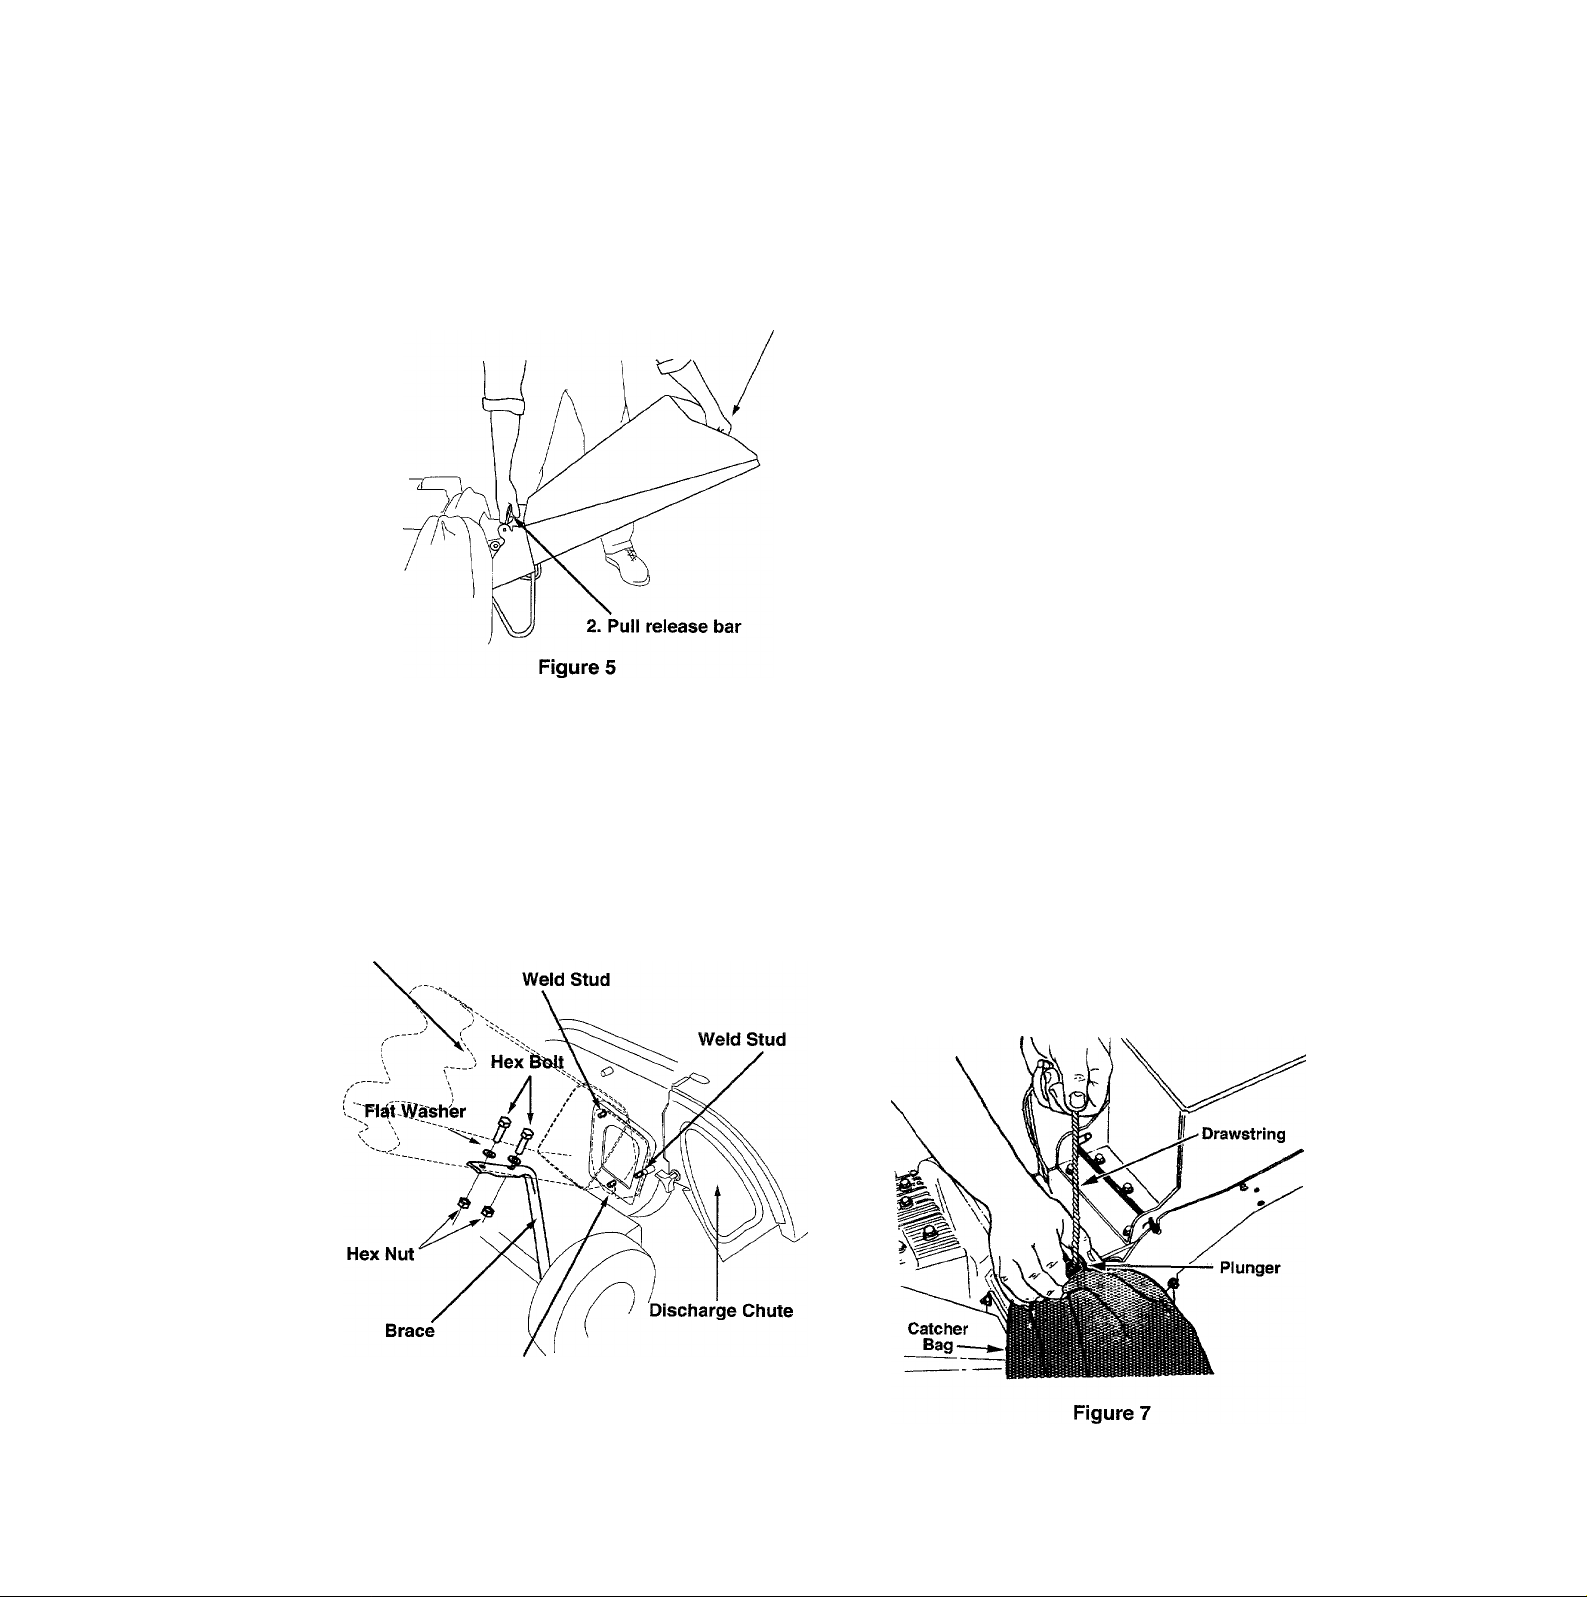
To raise \he hopper, hold the hopper by the
hand-hold and lift it up till it clicks into position.
To lowerthe hopper, hold the hopper by the
hand-hold and pull the release bar. The hopper
should drop down. See figure 5.
1. Lift hopper up
7. ATTACHING THE CHIPPER
CHUTE
• Remove the three cupped washers and hex
nuts from the weld studs beside the opening on
the left side of the housing. See figure 6.
Chipper
Chute
• Remove the two sets of hex bolt, lock nut, and
flat washer from the two holes on the upper end
of the brace.
• Place the chipper chute over the weld studs so
the slot on the chute is towards the bottom. Align
the three holes on the chute with the three weld
studs. See figure 6.
• Secure with the three pairs of cupped washers
and hex nuts that you earlier removed. Do not
tighten the nuts at this time. Make sure to place
the cupped side of the washer against the
chipper chute.
• Your unit is shipped with one end of the brace
already secured to the lower frame. Loosen the
bolts securing the brace to the frame.
• Align the holes on the chute with the holes on
the brace. See figure 6.
• insert one each of the hex bolts , lock nuts, and
flat washers (that you earlier removed) through
each hole in the chute and the brace. See figure
6 for the correct order. Tighten the bolts.
• Tighten the bolts securing the brace to the frame.
• Tighten the three nuts on the weld studs.
8. ATTACHING THE CATCHER BAG
Your chipper-shredder is equipped with a catcher bag
to catch the shredded material.
• To attach the bag, place the opening of the bag
over the chute deflector so it completely covers
the chute deflector.
• Depress the plunger on the draw- string, and pull
on the drawstring until the bag is tight around the
chute opening. Release plunger to lock it into
position. See figure 7.
Weld Stud
Figure 6

OPERATION
Read this owner’s manual and safety rules before operating your chipper-shredder. Compare the illustrations
with your chipper-shredder to familiarize yourself with the location of various controls and adjustments. Save
this manual for future reference.
The operation of any chipper-shredder can result in foreign objects being thrown into the eyes, which can result
in severe eye damage. Always wear safety glasses provided with the chipper-shredder or eye shields before
chipping or shredding, or while performing any adjustments or repairs.
1. KNOW YOUR CHIPPER-SHREDDER
Hopper Assembly
Chipper
Chute
Figure 8
Starter Handle
2. OPERATING CONTROLS
Release Bar
Used to release the hopper when raising or lowering.
See figure 8.
Choke Lever
Used to enrich the fuel mixture in the carburetor
when starting a cold engine. See figure 8.
Starter Handle
Used to manually start the engine. See figure 8.
Hopper Assembly
Allows leaves and small branches upto 1” diameter to
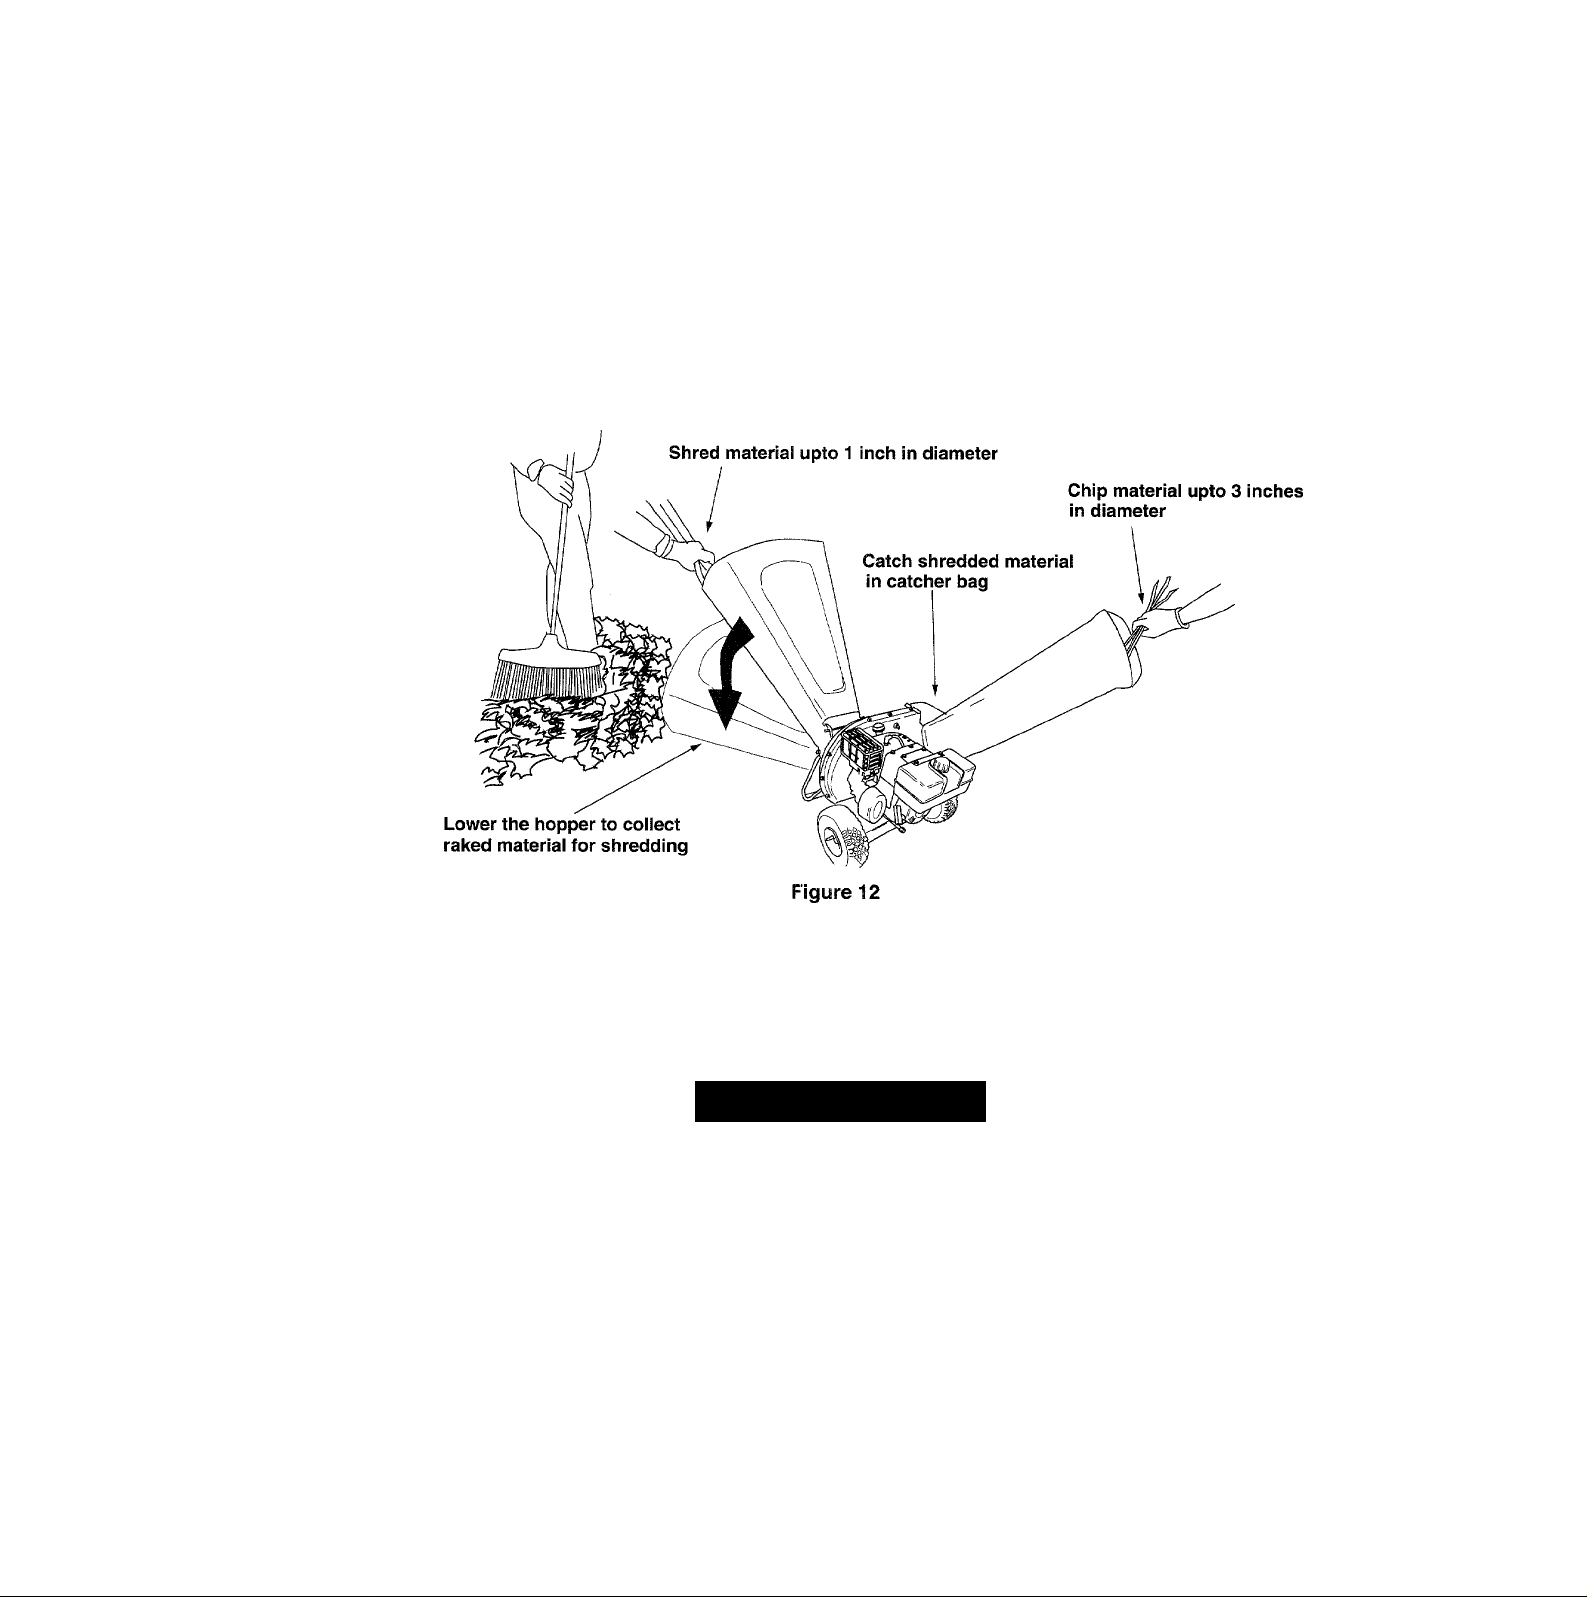
be fed into the impeller for chipping and shredding.
Lower the hopper to collect raked material for
shredding.
Throttle Control
Regulates speed of the engine. See figure 8.
Chipper Chute
Allows bulky vegetation like stalks or heavy branches
upto 3” diameter to be fed into the impeller for
chipping and shredding. See figure 8.
Catcher Bag (Not Shown)
Used to collect the shredded material.
MEETS ANSI SAFETY STANDARDS
Sears chipper-shredders conform to the safety standard B 71.6 -1990 of the American National Standards Institute.

stopping Engine
Move throttle control lever to STOP position.
Disconnect spark plug wire and move away from
spark plug to prevent accidental starting.
A
WARNING: Before using your chipper
shredder, again refer to the safety rules on
pages and 4 of this manual. Always be
careful.
3. GAS AND OIL FILL-UP
Oil (Packed with unit)
• Only use high quality detergent oil rated with
API service classification SF, SG or SH. Select
the oil’s viscosity grade according to your
expected operating temperature. Follow the
chart below.
Colder
32°F
5W30
Warmer
SAE 30
NOTE: Although multi-viscosity oils (5W30, 10W30,
etc.) improve starting in cold weather, these
multiviscosity oils will result in increased oil
consumption when used above 32°F. Check the oil
level more frequently to avoid possible engine
damage from running low on oil.
Fill engine with oil as follows.
• Remove oil fill dipstick. See figure 9
Remove dipstick
Remove cap
• With chipper-shredder on level ground, use a
funnel to fill engine with oil to FULL mark on
dipstick. Capacity is approximately 26 ounces.
Be careful not to overfill.
• Check oil level.
• Add oil if necessary.
• Replace dipstick and tighten.
NOTE: Do not overfill. Oil bottle packed with unit
contains 26 oz. of oil.
Gasoline
WARNING: Experience indicates that alcohol
blended fuels (called gasohol or using ethanol or
methanol) can attract moisture which leads to
separation and formation of acids during storage.
Acidic gas can damage the fuel system of an engine
while in storage. To avoid engine problems, the fuel
system should be emptied before storage for 30
days or longer. Drain the gas tank, start the engine
and let it run until the fuel lines and carburetor are
empty. Use fresh fuel next season. See STORAGE
instructions for additional information. Never use
engine or carburetor cleaner products in the fuel tank
or permanent damage may occur.
Fill gas tank with gas as follows.
• Remove fuel cap.
• Make sure the container (from which you will
pour the gasoline) is clean and free from rust or
foreign particles. Never use gasoline that may
be stale from long periods of storage in the
container.
• Fill fuel tank with clean, fresh, lead-free
automotive gasoline. DO NOT use Ethyl or high
octane gasoline. See figure 9.
• Replace fuel cap.
WARNING: Do not fill closer than 1/2 inch
of top of fuel tank to prevent spills and to
allow for fuel expansion. If gasoline is
accidently spilled, move chipper-shredder
away from area of spill. Avoid creating any
source of ignition until gasoline vapors have
disappeared.
Check the fuel level periodically to avoid running
out of gasoline while operating the chipper
shredder.
If the unit runs out of gas as it is shredding or
chipping, it may be necessary to unclog the unit
before it can be restarted. Refer to Removing
the Flail Screen in SERVICE AND
ADJUSTMENT section.
A

4. STARTING ENGINE
A
WARNING: Be sure no one other than
the operator is standing near the chipper
shredder while starting or operating. Do not
operate this chipper-shredder unless the
chute deflector has been properly installed
and is secured with the hand knobs.
NOTE: To prevent the unit from sliding, place your
foot firmly against the tire.
plug.
Move starter switch to “ON” position.
Move choke lever to CHOKE position (in the
direction of the arrow),
if restarting a warm engine after a short
shutdown, move choke lever to “No Choke”
position.
Grasp starter handie and pull rope out slowly
until engine reaches start of compression cycle
(rope will pull slightly harder at this point). Let
the rope rewind slowly.
Pull rope with a rapid full arm stroke. Let rope
return to starter slowly.
When engine starts, move choke lever to half
choke position until engine runs smoothly and
then to No Choke position.
If engine fails to start after three pulls, move
choke lever to No Choke position and pull starter
rope again.
If engine fires, but does not continue to run,
move choke lever to Full Choke position and pull
rope again.
Move choke lever to OFF position as engine
warms up.
NOTE: A noise will be heard when finding the start of
the compression cycle. This noise is caused by the
flails and fingers which are part of the shredding
mechanism falling into place, and should be
expected. In addition, the flails and fingers will be
noisy after the engine is started, until the impeller
reaches full speed.
5. STOPPING ENGINE
• Move starter switch to OFF position.
• Disconnect spark plug wire and move away from
spark plug to prevent accidental starting.
6. USING YOUR CHIPPER-SHREDDER
A
WARNING: Do not attempt to shred or
chip any material other than vegetation
found in a normal yard (i.e., branches,
leaves, twigs, etc.).
The chipper-shredder is designed for three
different methods of operation.
a. Leaves and small branches up to 1''
diameter (maximum) can be fed into the
hopper assembly when it is in the raised or
lowered position. See figure 12.
b. Bulky material, such as stalks or heavy
branches, up to 3” in diameter should be
fed into the chipper chute. See figure 12.
A
WARNING: Do not put material larger
than is specified into the hopper, and/or into
the chipper chute. Personal injury or
damage to the machine could result.
• If it becomes necessary to push material into the
chipper-shredder, use a small diameter stick -
NOT YOUR HANDS. The stick should be small
enough that it will be ground up if it gets into the
impeller assembly.
7. LOWER THE HOPPER ASSEMBLY
• To lower the hopper assembly, use one hand to
grasp the hand-hold at the top of the hopper
assembly and lift slightly. See figure 5.
• Pull up on the release bar, and lower the hopper
assembly to the ground. Release the bar. See
figure 5.
WARNING: Never remove chute deflector
till the unit has completely stopped. Never
shut off the engine until all chipping is
completed.
For best performance, it is important to keep the
shredding blade and the chipper blades sharp. If the
composition of the material being discharged
changes (becomes stringy, etc.) or if the rate at which
the material is discharged slows down considerably, it
A
10
is likely that the shredding blade and/or chipper
blades are dull and need to be sharpened or
replaced. Refer to Service and Adjustments section.
IMPORTANT: There is a flail screen located inside
the housing in the discharge area. If the flail screen
becomes clogged, remove and clean as instructed in
the Service and Adjustments section.
A
WARNING: The chipper-shredder
discharges materials with considerable
velocity. Keep away from the area around the
discharge chute. Always stop the engine
and disconnect spark plug wire when
removing or attaching the bag, changing
containers, or removing the shredded
material. Wear safety glasses and gloves
whenever using your chipper-shredder.
MAINTENANCE
1. GENERAL RECOMMENDATIONS
• Always observe safety rules when performing
any maintenance.
• The warranty on this snow thrower does not
cover items that have been subjected to operator
abuse or negligence. To receive full value from
the warranty, operator must maintain the chipper
shredder as instructed in this manual.
• Some adjustments will need to be made
periodically to maintain your unit properly.
A
All adjustments in the Service and Adjustments
section of this manual should be checked at least
once each season.
Follow the maintenance schedule given below.
Periodically check all fasteners and make sure
these are tight.
WARNING: Always stop the engine and
disconnect the spark plug wire before
performing any maintenance or
adjustments. Never remove discharge
chute till the engine has completely stopped.
11

CUSTOMER RESPONSIBILITIES
MAINTENANCE
<2?
/ # ,/ ,/
er
• •c-'
<c^
SERVICE DATES
o
z>
o
o
cr
Q.
Oil pivot points
Clean shredder
LU
z
o
UJ
Check engine oil
Change engine oil
Service air cleaner
Clean engine
Reset spark plug
</
Clean muffler
2. CLEANING
• Clean the chipper-shredder by running water
• from a hose through the hopper assembly and
chipper chute with the engine running. Allow
the chipper-shredder to dry thoroughly.
• Wash the bag periodically with water. Allow to
dry thoroughly in the shade. Do not use heat.
3. ENGINE MAINTENANCE
Engine Oil
• Only use high quality detergent oil rated with
API service classification SF, SG or SH. Select
the oil’s viscosity grade according to your
expected operating temperature. Refer to
page 9 of this manual for viscosity chart.
• The four-cycle engine of your chipper
shredder will normally consume some oil.
Therefore, check engine oil level regularly
approximately every five hours of operation
and before each usage.
• Stop engine and wait several minutes before
checking oil level. With engine on level ground,
the oil must be to FULL mark on dipstick .
• Change engine oil after the first five hours of
operation, and every twenty-five hours
thereafter.
To Drain Oil
Drain oil while engine is warm. Follow the
instructions given below.
• Remove oil drain plug. Catch oil in a suitable
container.
• When engine is drained of all oil, replace drain
plug securely.
• Refill with fresh oil. Refer to GAS AND OIL
FILL-UP section.
• Replace dipstick.
Air Cieaner
The air cleaner prevents damaging dirt, dust, etc.,
from entering the carburetor and being forced into
the engine and is important to engine life and
performance. The air cleaner consists of a pre
cleaner or foam filter, and a paper filter.
Never run
12

the engine without air cleaner completely assembled.
To Service Air Cleaner:
1. Service pre-cleaner after every 25 hours of use,
or at least once a season,
2. Service filter every 100 hours of use, or at least
once a season.
3. Service pre-cleaner and filter more often under
dusty conditions.
• Remove wing nut and cover.
• Slide pre-cleaner off filter. Clean the inside of
base and cover thoroughly.
Cooling Fins
BASE-
PAPER FILTER FOAM HLTER (IF SO EQUIPPED)
COVER
WING NUT
Figure 13
• Clean pre-cleaner as follows:
a. Wash in water and detergent solution, and
squeeze (do not twist) until all dirt is
removed.
b. Rinse thoroughly in clear water.
c. Wrap in a clean cloth and squeeze (do not
twist) until completely dry, or allow to air dry.
d. Saturate with engine oil and squeeze (don’t
twist) to distribute oil and remove excess oil.
NOTE: If the pre-cleaner is torn or damaged in any
way, repiace it.
• If necessary, replace paper filter (do not attempt
to clean). Install new filter on base.
• Slide pre-cleaner over filter.
• Install cover and wing nut.
• Tighten wing nut securely.
Clean Engine
• Clean engine periodically. Remove dirt and
debris with a cloth or brush.
• Frequently remove grass clippings, dirt and
debris from cooling fins, air intake screen and
levers and linkage. This will help ensure
adequate cooling and correct engine speed.
See figure 14
Figure 14
• Yeariy or every 25 hours, whichever occurs first,
remove the blower housing and clean the areas
shown in figure 14 to avoid overspeeding,
overheating and engine damage. Clean more
often if necessary.
NOTE: Cleaning with a forceful spray of water is not
recommended as water could contaminate the fuei
system.
A
WARNING: Temperature of muffler and
nearby areas may exceed 150° F(65°C).
Avoid these areas.
Spark Plug
• Clean the spark plug and reset the gap to .030"
at least once a season or every 50 hours of
operation. See figure 15. Spark plug
replacement is recommended at the start of
each season. Refer to engine parts list for
correct spark plug type.
NOTE: Do not sandblast spark plug. Spark plug
should be cleaned by scraping or wire brushing and
washing with a commercial solvent.
13

Muffler
A
WARNING: Do not operate the chipper
shredder without a muffler, or tamper with
the exhaust system. Damaged mufflers or
spark arresters could create a fire hazard.
A
Inspect periodically, and replace if necessary. If
your engine is equipped with a spark arrester
screen assembly, remove every 50 hours for
cleaning and inspection. Replace if damaged.
WARNING: Always stop engine,
disconnect spark plug wire, and move it
away from spark plug before performing
any adjustments or repairs.
4. LUBRICATION
Lubricate the pivot points on the release bar, hopper
assembly, chute deflector and chipper chute once a
season using a light oil. See figure 16
Figure 16: Lubrication Chart
SERVICE & ADJUSTMENTS
1. REMOVING THE FLAIL
SCREEN
If the discharge area becomes clogged, remove
the flail screen and clean area as follows.
• Stop engine, make certain the chipper
shredder has come to a complete stop and
disconnect spark plug wire from the spark
plug before unclogging the chute.
• Remove the two hand knobs on each side of
the discharge chute (also called the chute
deflector).
• Lift the discharge chute up, and keep it out
of the way.
• Remove two hairpin clips from the clevis
pins which extend through the housing.
Remove the clevis pins. See figure 17.
• Pull the flail screen from inside the housing.
See figure 17.
• Clean the screen by scraping or washing
with water.
• Reinstall the screen.
• Put the discharge chute back to its original
position and tighten the hand knobs.
NOTE: Be certain to reassemble the flail screen
with the curved side down.
14
Loading...