


XM2
WEB: corsair.com |
BLOG: corsair.com/blog |
PHONE: (888) 222-4346 |
FORUM: forum.corsair.com |
SUPPORT: support.corsair.com |
YOUTUBE: youtube.com/corsairhowto |
© 2020 CORSAIR MEMORY Inc. All rights reserved. CORSAIR and the sails logo are registered trademarks in the United States and/or other countries. All other trademarks are the property of their respective owners. Product may vary slightly from those pictured. 49-002310 AA
XM2
M.2 SSD Water Block (2280)

ENGLISH........................................................ |
1 |
FRANÇAIS..................................................... |
5 |
DEUTSCH...................................................... |
9 |
DANSK......................................................... |
13 |
SUOMI......................................................... |
17 |
SVENSKA..................................................... |
21 |
NORSK........................................................ |
25 |
ITALIANO..................................................... |
29 |
ESPAÑOL..................................................... |
33 |
PУССКИЙ...................................................... |
37 |
IMPORTANT NOTICE
Quick Start Guide is a general installation guide and does not cover the specifics of individual case or radiator mounting.
CORSAIR recommends you thoroughly leak-test your custom cooling system for at least 24 hours to ensure that the system is securely sealed and operating reliably. CORSAIR warranty does not cover any hardware damage resulting from poorly executed, improper and otherwise hasty assembly of your custom watercooling system.
Disassembly of CORSAIR HYDRO X products is highly discouraged due to complex design of components. Such action may result in irreparable mechanical, electrical or chemical damage that may void the warranty.
For an exact and up-to-date product compatibility list, please refer to CORSAIR website.
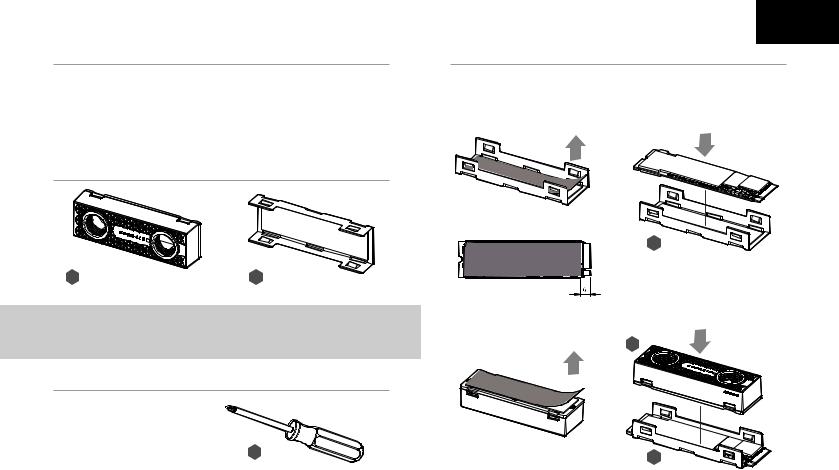
PACKAGE CONTENTS
A B
A— x1 XM228 WATER BLOCK WITH PREINSTALLED THERMAL MATERIAL
B— x1 XM228 MOUNTING CLIP WITH PREINSTALLED THERMAL MATERIAL
PREREQUISITES (NOT INCLUDED)
C — x1 PHILLIPS-HEAD SCREWDRIVER
ENGLISH
INSTALLATION
Precaution: Take care to discharge any electrostatic charges.
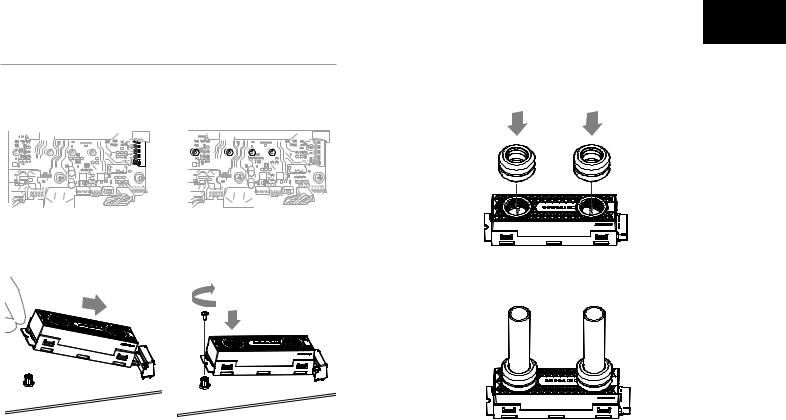
1.Remove protective film from thermal pad (Figure 1). Place your M.2 NVMe (with bottom side facing down) onto XM2 2280 Mounting clip (B)(Figure2) around 6mm from the edge (Figure 3).
Figure 1 |
Figure 2 |
Figure 3
B
2.Remove protective film from thermal pad (Figure 1). Place and press down XM2 2280 Water block (A) onto your M.2 NVMe with XM2 2280 Mounting clip (B) until the clip closes (Figure 2).
Figure 1 |
A |
Figure 2 |
|
|
B
1 |
2 |

INSTALLATION
3. |
Power down your system. |
|
|
|
|
|
|
|
|
|
|
|
|
|
|
|
|
|
|
|
|
|
|
|
|
|
|
|
|
|
|
|
|
|
|
|
|
|
|
|
|
|
|
|
|
|
|
|||||||||||||||||||||||||||||||||||||||||||||
4. Identify an available M.2 key M 2280 slot on |
5. Remove any cover from the M.2 slot and |
|||||||||||||||||||||||||||||||||||||||||||||||||||||||||||||||||||||||||||||||||||||||||||
|
your system, referring to your motherboard or |
|
|
screws. Take care to ensure no screws |
||||||||||||||||||||||||||||||||||||||||||||||||||||||||||||||||||||||||||||||||||||||||
|
system documentation. |
|
|
remain on standoffs for shorter M.2 cards. |
||||||||||||||||||||||||||||||||||||||||||||||||||||||||||||||||||||||||||||||||||||||||
|
|
|
|
|
|
|
|
|
|
|
|
|
|
|
|
|
|
|
|
|
|
|
|
|
|
|
|
|
|
|
|
|
|
|
|
|
|
|
|
|
|
|
|
|
|
|
|
|
|
|
|
|
|
|
|
|
|
|
|
|
|
|
|
|
|
|
|
|
|
|
|
|
|
|
|
|
|
|
|
|
|
|
|
|
|
|
|
|
|
|
|
|
|
|
|
|
|
|
|
|
|
|
|
|
|
|
|
|
|
|
|
|
|
|
|
|
|
|
|
|
|
|
|
|
|
|
|
|
|
|
|
|
|
|
|
|
|
|
|
|
|
|
|
|
|
|
|
|
|
|
|
|
|
|
|
|
|
|
|
|
|
|
|
|
|
|
|
|
|
|
|
|
|
|
|
|
|
|
|
|
|
|
|
|
|
|
|
|
|
|
|
|
|
|
|
|
|
|
|
|
|
|
|
|
|
|
|
|
|
|
|
|
|
|
|
|
|
|
|
|
|
|
|
|
|
|
|
|
|
|
|
|
|
|
|
|
|
|
|
|
|
|
|
|
|
|
|
|
|
|
|
|
|
|
|
|
|
|
|
|
|
|
|
|
|
|
|
|
|
|
|
|
|
|
|
|
|
|
|
|
|
|
|
|
|
|
|
|
|
|
|
|
|
|
|
|
|
|
|
|
|
|
|
|
|
|
|
|
|
|
|
|
|
|
|
|
|
|
|
|
|
|
|
|
|
|
|
|
|
|
|
|
|
|
|
|
|
|
|
|
|
|
|
|
|
|
|
|
|
|
|
|
|
|
|
|
|
|
|
|
|
|
|
|
|
|
|
|
|
|
|
|
|
|
|
|
|
|
|
|
|
|
|
|
|
|
|
|
|
|
|
|
|
|
|
|
|
|
|
|
|
|
|
|
|
|
|
|
|
|
|
|
|
|
|
|
|
|
|
|
|
|
|
|
|
|
|
|
|
|
|
|
|
|
|
|
|
|
|
|
|
|
|
|
|
|
|
|
|
|
|
|
|
|
|
|
|
|
|
|
|
|
|
|
|
|
|
|
|
|
|
|
|
|
|
|
|
|
|
|
|
|
|
|
|
|
|
|
|
|
|
|
|
|
|
|
|
|
|
|
|
|
|
|
|
|
|
|
|
|
|
|
|
|
|
|
|
|
|
|
|
|
|
|
|
|
|
|
|
|
|
|
|
|
|
|
|
|
|
|
|
|
|
|
|
|
|
|
|
|
|
|
|
|
|
|
|
6. Insert and secure M.2 with screw.
ENGLISH
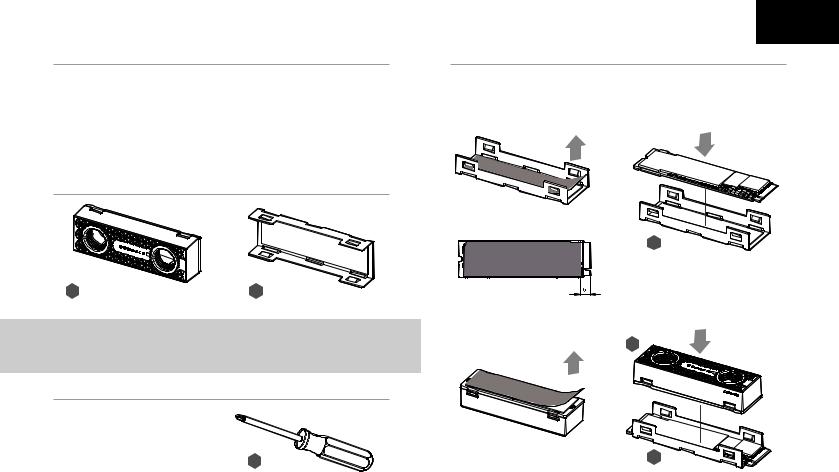
7.Install the two (2) appropriate CORSAIR XF G1/4'' BSPP threaded-type fittings (not included) into the water block ports and tighten them by hand. Do not use any tools to tighten (i.e. pliers)
8.Install tubing and secure it to finalize the adding of the water block to the water-cooling loop.
Do not forget to leak test the system before fully powering on your PC.
9. Flow orientation is not important. This product works great with flow in either direction.
3 |
4 |

AVIS IMPORTANT
Le guide de démarrage rapide est un guide d'installation général et ne couvre pas les spécificités de cas individuel ou le montage du radiateur.
CORSAIR vous recommande de réaliser minutieusement un test de détection de fuites dans votre système de refroidissement personnalisé pendant au moins 24 heures pour vous assurer que le système est étanche et fonctionne de manière fiable. La garantie CORSAIR ne couvre pas les dommages matériels résultant d'un assemblage mal exécuté, incorrect et par ailleurs précipité de votre système de refroidissement par eau personnalisé.
Le démontage des produits CORSAIR HYDRO X est fortement déconseillé en raison de la conception complexe des composants. Une telle action peut entraîner des dommages mécaniques, électriques ou chimiques irréparables pouvant annuler la garantie.
Pour une liste exacte et à jour de la compatibilité des produits, veuillez consulter le site Web CORSAIR.
CONTENU DE L’EMBALLAGE
A B
A— WATERBLOCK x1 XM228 AVEC MATÉRIAU THERMIQUE PRÉINSTALLÉ
B— CLIP DE MONTAGE X1 XM228 AVEC MATÉRIAU THERMIQUE PRÉINSTALLÉ
PRÉREQUIS (NON INCLUS)
C — TOURNEVIS CRUCIFORME PHILLIPS
FRANÇAIS
GUIDE D’INSTALLATION
Attention : assurez-vous que toute charge électrostatique est déchargée.
1.Retirez le film protecteur du tampon thermique (Figure 1). Placez votre M.2 NVMe (face inférieure vers le bas) sur le clip de montage du XM2 2280 (B) (Figure 2) à environ 6 mm du bord (Figure 3).
Figure 1 |
Figure 2 |
Figure 3
B
2.Retirez le film protecteur du tampon thermique (Figure 1). Placez et appuyez sur le waterblock XM2 2280
(A) sur votre M.2 NVMe avec le clip de montage XM2 2280 (B) jusqu'à ce que le clip se ferme (Figure 2).
Figure 1 |
A |
Figure 2 |
|
|
B
5 |
6 |
GUIDE D’INSTALLATION
3. |
Éteignez votre système. |
|
|
|
|
|
|
|
|
|
|
|
|
|
|
|
|
|
|
|
|
|
|
|
|
|
|
|
|
|
|
|
|
|
|
|
|
|
|
|
|
|
|
|
|
|
|
|
|
|||||||||||||||||||||||||||||||||||||||||||
4. Identifiez un slot M.2 clé M 2280 disponible |
|
5. Retirez la protection du slot M.2 et les vis. |
||||||||||||||||||||||||||||||||||||||||||||||||||||||||||||||||||||||||||||||||||||||||||
|
sur votre système, en vous référant à votre |
|
|
|
|
Veillez à ce qu’il ne reste aucune vis sur les |
||||||||||||||||||||||||||||||||||||||||||||||||||||||||||||||||||||||||||||||||||||||
|
documentation système ou carte mère. |
|
|
|
|
entretoises pour les cartes M.2 plus courtes. |
||||||||||||||||||||||||||||||||||||||||||||||||||||||||||||||||||||||||||||||||||||||
|
|
|
|
|
|
|
|
|
|
|
|
|
|
|
|
|
|
|
|
|
|
|
|
|
|
|
|
|
|
|
|
|
|
|
|
|
|
|
|
|
|
|
|
|
|
|
|
|
|
|
|
|
|
|
|
|
|
|
|
|
|
|
|
|
|
|
|
|
|
|
|
|
|
|
|
|
|
|
|
|
|
|
|
|
|
|
|
|
|
|
|
|
|
|
|
|
|
|
|
|
|
|
|
|
|
|
|
|
|
|
|
|
|
|
|
|
|
|
|
|
|
|
|
|
|
|
|
|
|
|
|
|
|
|
|
|
|
|
|
|
|
|
|
|
|
|
|
|
|
|
|
|
|
|
|
|
|
|
|
|
|
|
|
|
|
|
|
|
|
|
|
|
|
|
|
|
|
|
|
|
|
|
|
|
|
|
|
|
|
|
|
|
|
|
|
|
|
|
|
|
|
|
|
|
|
|
|
|
|
|
|
|
|
|
|
|
|
|
|
|
|
|
|
|
|
|
|
|
|
|
|
|
|
|
|
|
|
|
|
|
|
|
|
|
|
|
|
|
|
|
|
|
|
|
|
|
|
|
|
|
|
|
|
|
|
|
|
|
|
|
|
|
|
|
|
|
|
|
|
|
|
|
|
|
|
|
|
|
|
|
|
|
|
|
|
|
|
|
|
|
|
|
|
|
|
|
|
|
|
|
|
|
|
|
|
|
|
|
|
|
|
|
|
|
|
|
|
|
|
|
|
|
|
|
|
|
|
|
|
|
|
|
|
|
|
|
|
|
|
|
|
|
|
|
|
|
|
|
|
|
|
|
|
|
|
|
|
|
|
|
|
|
|
|
|
|
|
|
|
|
|
|
|
|
|
|
|
|
|
|
|
|
|
|
|
|
|
|
|
|
|
|
|
|
|
|
|
|
|
|
|
|
|
|
|
|
|
|
|
|
|
|
|
|
|
|
|
|
|
|
|
|
|
|
|
|
|
|
|
|
|
|
|
|
|
|
|
|
|
|
|
|
|
|
|
|
|
|
|
|
|
|
|
|
|
|
|
|
|
|
|
|
|
|
|
|
|
|
|
|
|
|
|
|
|
|
|
|
|
|
|
|
|
|
|
|
|
|
|
|
|
|
|
|
|
|
|
|
|
|
|
|
|
|
|
|
|
|
|
|
|
|
|
|
|
|
|
|
|
|
|
|
|
|
|
|
|
|
|
|
|
|
|
|
|
|
|
|
|
|
|
|
|
|
|
|
|
6. IInsérez le M.2 et sécurisez-le avec une vis.
FRANÇAIS
7.Installez les deux raccords filetés (2) CORSAIR XF G1/4'' BSPP appropriés (non inclus) dans les ports du waterblock et serrez-les manuellement. N'utilisez aucun outil pour les serrer (par ex. des pinces).
8.Installez le tube et fixez-le pour finaliser le montage du waterblock à la boucle de refroidissement par eau. N'oubliez pas de réaliser un test de détection de fuites dans le système avant de démarrer complètement votre PC.
9.L'orientation de l'écoulement n'est pas importante. Ce produit fonctionne très bien avec un écoulement dans les deux sens.
7 |
8 |
WICHTIGER HINWEIS
Die Kurzanleitung ist eine allgemeine Installationsleitung und deckt die Besonderheiten des Einzelfalls oder die Kühlermontage nicht ab.
CORSAIR empfiehlt, dass Sie Ihr kundenspezifisches Kühlsystem mindestens 24 Stunden lang gründlich auf Dichtheit prüfen, um sicherzustellen, dass das System sicher abgedichtet ist und zuverlässig funktioniert. Die CORSAIR-Garantie deckt keine Hardwareschäden ab, die durch schlecht ausgeführte, unsachgemäße und anderweitig voreilige Montage Ihres kundenspezifischen Wasserkühlungssystems entstanden sind.
Von der Demontage von CORSAIR HYDRO X-Produkten wird aufgrund des komplexen Designs der
Komponenten dringend abgeraten. Solche Maßnahmen können zu irreparablen mechanischen, elektrischen oder chemischen Schäden führen, was das Erlöschen der Garantie bedeutet.
Eine genaue und aktuelle Produktkompatibilitätsliste finden Sie auf der CORSAIR-Website.
PACKUNGSINHALT
A B
A— x1 XM228 WASSERBLOCK MIT VORINSTALLIERTEM THERMISCHEN MATERIAL
B— x1 XM228 MONTAGECLIP MIT VORINSTALLIERTEM THERMISCHEN MATERIAL
VORAUSSETZUNGEN (NICHT ENTHALTEN)
C — PHILLIPS KREUZSCHLITZ-SCHRAUBENDREHER
DEUTSCH
INSTALLATIONSANLEITUNG
Vorsicht: immer etwaige elektrostatische Aufladungen entladen.
1.Entfernen Sie die Schutzfolie vom Wärmepad (Abbildung 1). Setzen Sie Ihren M.2 NVMe (mit der Unterseite nach unten) auf den XM2 2280-Montageclip (B) (Abbildung 2), etwa 6 mm vom Rand entfernt (Abbildung 3).
Abbildung 1 |
Abbildung 2 |
Abbildung 3
B
2.Entfernen Sie die Schutzfolie vom Wärmepad (Abbildung 1). Setzen Sie den XM2 2280-Wasserblock
(A) mit dem XM2 2280-Montageclip (B) auf Ihren M.2 NVMe und drücken Sie ihn nach unten, bis der Clip einrastet (Abbildung 2).
Abbildung 1 |
A |
Abbildung 2 |
|
|
B
9 |
10 |
 Loading...