


Gaming Audio Series™ SP2500
ENGLISH |
3 |
FRANÇAIS 9
DEUTSCH 15
ITALIANO 21
ESPAÑOL 27
РУССКИЙ |
33 |

2
Keeping in touch
You can learn more about your Gaming Audio Series SP2500 and stay in contact with other SP2500 owners by:
•Becoming a fan on Facebook at facebook.com/corsairmemory
•Subscribing to the Corsair blog at blog.corsair.com
•Following us on Twitter at twitter.com/corsairmemory
•Visiting the Corsair audio page at corsair.com/audio
For technical support contact information, see Technical Support later in this guide.
Important safety information
No user serviceable parts inside. Risk of electric shock – do not open. This device uses 100-240VAC 50/60Hz, 2.2 Amperes.
This device complies with part 15 of the FCC rules. Operation is subject to the following two conditions: (1) This device may not cause harmful interference, and (2) this device must accept any interference received, including interference that may cause undesired operation.
Complies with rules 47CFR 15 B and 21 CFR 1040.10.
What’s in the box
•Subwoofer
•Satellites (two)
•Satellite stands (two)
•Desktop controller with attached interface cable
•Satellite cable set (two cables)
•3.5mm-to-RCA PC audio cable
•Power cable
•Hook-and-loop fastening tape dots
•Quick start guide (this booklet)
Installation
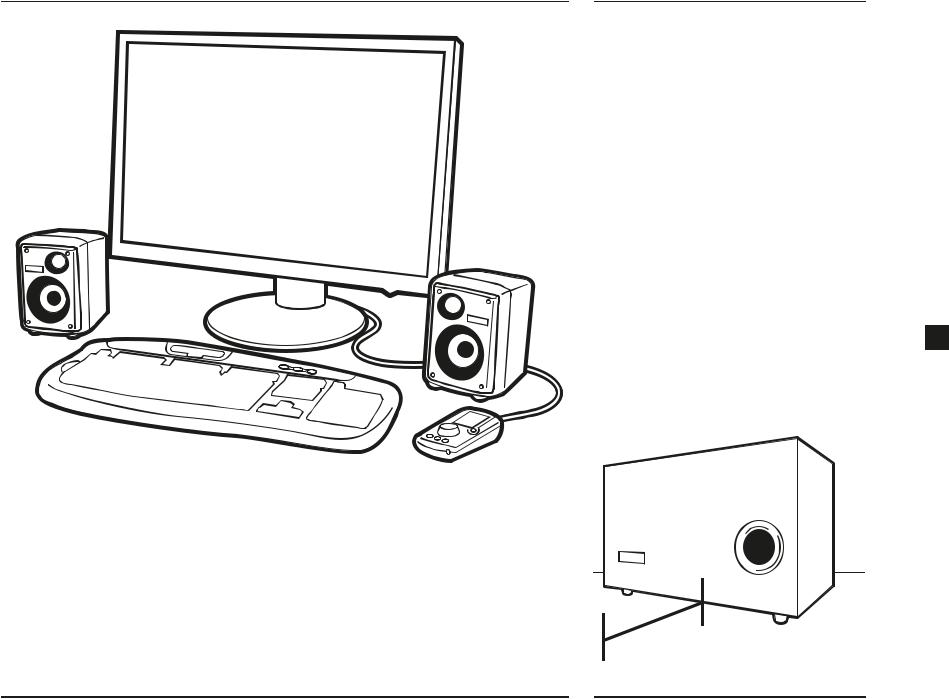
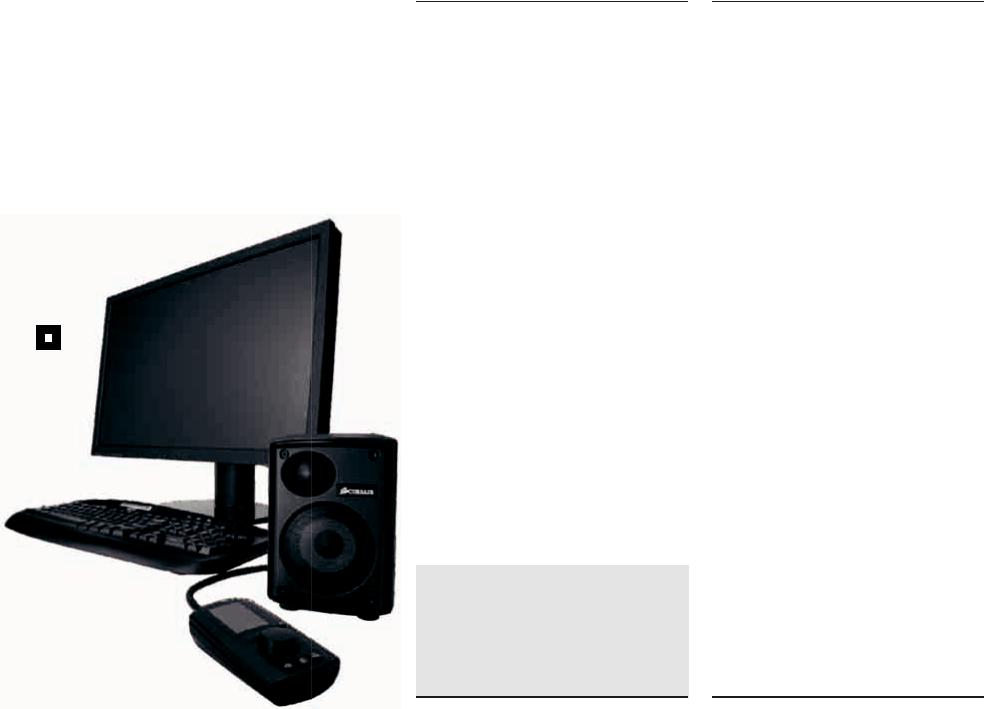
Proper satellite placement
The satellites have an asymmetrical design, with the tweeter closer to the center of the sound field. This design philosophy, similar to that used with studio monitors, allows for superior stereo imaging and for the use of sufficiently large drivers in a compact enclosure. When placing the satellites on the desktop, make sure they are oriented as shown in the illustration.
Optional: using the satellite stands
While the Gaming Audio Series SP2500 will provide fantastic sound at almost any angle, for optimal stereo imaging, you will want to make sure that the satellites are aimed at the listener. See “Tips for the best sound” later in this guide for more information.
The satellites have an upward angle of 2.5 degrees. To increase the upward angle to 11 degrees, place the satellite stands under the front feet. To give the satellites a downward angle (for instance, if you will be placing them on a shelf), place the stands under the rear feet.
Tips for subwoofer placement
For best results, place the subwoofer with the port 3 facing towards you. In case of placement near an
object in front of the port, you should allow at least 25cm (10 inches) of clearance between the port and the object.
25cm (10")

Making the connections
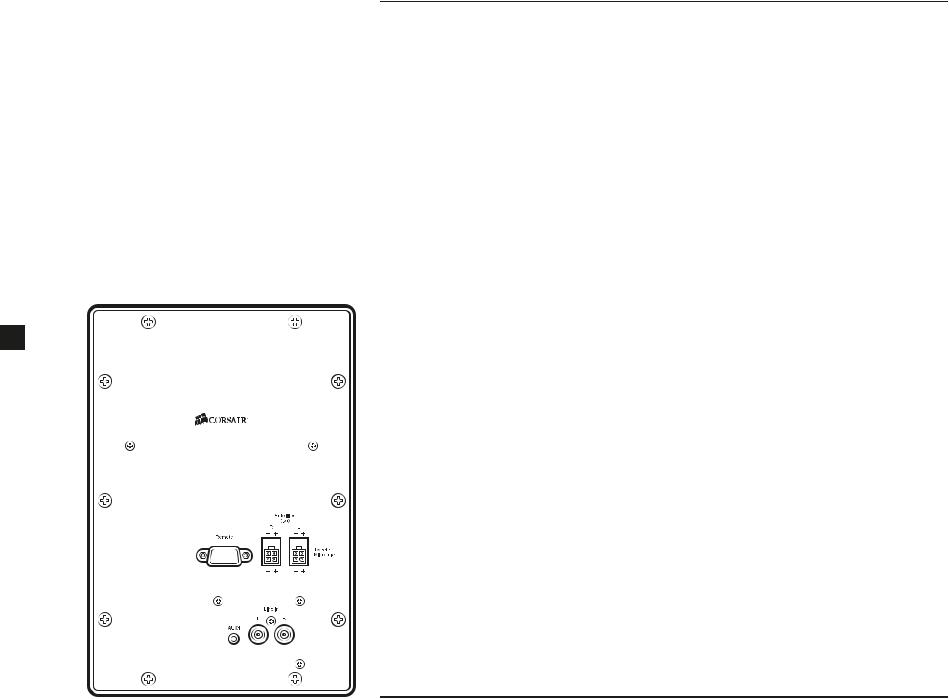
Connecting the satellites to the subwoofer
Each satellite is connected to the subwoofer using the included satellite cable. The ATX connectors are keyed and color coded to ensure a correct connection: Right is RED and Left is WHITE. Press each connector lightly into the back of the subwoofer and the satellite until you hear a light click. To release the connector, press the tab.
Tip: Four-pole ATX connectors and heavy gauge wire provide a succinct solution for the challenge of providing discrete amplified signals to the midrange and tweeter. They eliminate the need to run two pairs of speaker cables to each satellite. If you’d like to replace or extend these cables, check your local electronics store, or visit the Corsair store at store.corsair.com.
Connecting the subwoofer to your PC
Use the included two-meter stereo audio cable to connect the Line In input on the subwoofer (the RCA connectors) to your PC’s 3.5mm stereo line level output. On most desktop PCs with color-coded audio outputs, this connector will be colored lime green. On some desktop PCs and most notebook PCs, this
4 output will be marked with a headphone icon. You can alternatively use the lime green colored AUX1 audio input on the back of the subwoofer by using your own 3.5mm stereo audio cable.
Connecting the subwoofer to a console gaming system
Most gaming systems provide audio output via stereo RCA cables. You may connect your gaming system to the SP2500 subwoofer with a standard stereo RCA cable set, available at most any consumer electronics retailer. If the PC is connected to the Line In RCA connectors on the subwoofer, you can alternatively connect the console to the 3.5mm AUX1 audio input on the back of the subwoofer.
Connecting the desktop controller to the subwoofer
The desktop controller connects to the subwoofer via the 15-pin D-Sub connector.
WARNING: do not connect the controller to a VGA card, or any other 15-pin connector other than the one found on the SP2500 subwoofer.
Tip: we have included hook-and-loop fastening tape dots if you’d like to help secure the controller to your desk. Use of the tape dots is strictly optional, and we recommend applying them only after you’ve used the desktop controller and you have a good feeling for its natural home on your desk.
Tip: the USB connector on the back of the desktop controller is used for optional firmware updates. It is not necessary to connect the desktop controller to your PC via USB for normal use. The SP2500 is not a USB audio device.
Optional: connecting auxiliary devices and headphones
In addition to your PC, you can connect two more devices to the SP2500 via the auxiliary inputs. The first is built in to the desktop controller, and the second can be found on the subwoofer. If you would like to listen to audio from a device that has only audio out via RCA connectors, such as a gaming console, RCA-to-3.5mm adapters are readily available at stores that carry electronics and audio.
If you have a pair of analog headphones with a stereo 3.5mm cable, you can connect it to the headphone output on the desktop controller. Connecting a pair of headphones automatically mutes output to the speakers, so you will probably not want to connect your headphones right away.
WARNING: take care when connecting headphones to the SP2500 the first time. We recommend turning the SP2500 volume down all the way before wearing your headphones, and then slowly turning it up.
Turn on the SP2500
You are now ready to start using the desktop controller and enjoy listening to game, music and movie audio on your SP2500.
1.Turn on your PC
2.Press the POWER button on the desktop controller
WARNING: Before playing an audio source, see
Using the desktop controller for instructions on adjusting the volume.
Using the desktop controller
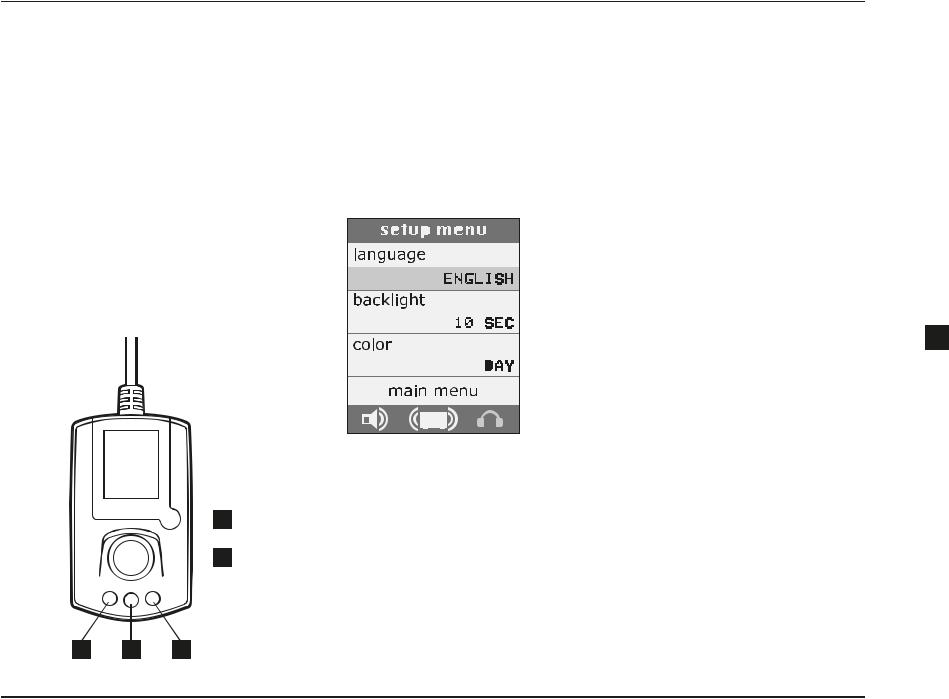
About the controller
The desktop controller is used to adjust volume, select the input source (your PC, or one of the two auxiliary connectors), and select EQ and program settings (more on this later). There are four controls:
1.POWER: toggles the power.
2.MENU: displays the main menu.
3.VOLUME: displays the master volume control.
4.SUBWOOFER: displays the subwoofer output.
5.CONTROL DIAL: allows you to scroll through menus and menu selections, adjust master volume, and subwoofer output.
The desktop controller will automatically switch to the volume screen after a short period of inactivity.
 1
1
 5
5
First-time use: selecting the display language
The first time you turn on the SP2500, the desktop controller will display the setup menu. The first option in the setup menu allows you to choose your display language. Rotate the dial to highlight language,
click the wheel to select the language menu, and then rotate the wheel to scroll through the language choices. Click the wheel again to select your preferred language.
You can change the language at any time by returning to the setup menu. Press the MENU button, scrolling to highlight setup menu, and click the wheel.
Selecting an audio source
If the screen is not displaying the main menu, press MENU to activate it. Rotate the dial to highlight input, and then press the dial. Rotate the dial again to scroll through the input options, and then press the dial again to select your source:
LINE IN: the stereo RCA inputs on the back of the subwoofer.
AUX1: the 3.5mm stereo input located on the subwoofer.
AUX2: the 3.5mm stereo input located on the desktop controller.
Adjusting volume and subwoofer output
The master volume controls the output of both the satellites and the subwoofer.
To adjust the master volume, press the VOLUME button. The master volume screen will appear. Rotate the dial to adjust the volume. Press the dial to mute the audio.
To adjust subwoofer output on its own, press the SUBWOOFER button to display the subwoofer output screen. Rotate the dial to adjust the volume, and press the dial to mute the subwoofer.
Using the setup menu
The setup menu contains options that you probably won’t be setting every day:
backlight: adjusts the length of time before the backlight fades after you’ve used the controller.
color: allows you to toggle between the Day and Night interface color schemes.
Selecting a program or EQ mode
Programs and EQ modes are selected from the main
menu. Press the MENU button, if necessary, to display 5 the main menu, scroll to program or EQ and press the
dial, and then rotate the dial again to scroll through the options. Press the dial again to select an option.
Details on each of the programs and EQ settings are covered on the next page.
3 |
2 |
4 |
Programs |
EQ settings |
Programs harness the power of the Gaming Audio Series SP2500 Digital Signal Processor (DSP)
to provide dynamic audio effects that can’t be accomplished with equalization alone.
None
This default setting has no audio programs applied.
Late Night
This setting allows you to listen without disturbing others. It lowers the subwoofer output, adjusts the digital crossover so that bass tones are directed to the satellites, and applies dynamic range compression to help prevent sudden volume changes.
Wide
Provides a more spacious sound and simulates the effect of the satellite speakers being farther apart than they are.
Karaoke
Reduces or eliminates the vocals in songs. It works best with tracks where the vocals are mixed to the center.
Dynamic Pop
Combines dynamic range compression, as well as applying an equalization curve that enhances the bass and treble. It produces an effect similar to the experience of listening to music on many popular all-in-one audio systems.
Stadium, Concert Hall, Club and Theatre
Applies reverb, delay, and echo to simulate a huge, large, medium-large or medium-sized environment.
Firmware updates
The USB connector on the desktop controller is used for possible firmware updates. No firmware updates are yet planned, but see Keeping in touch, earlier in this guide, to learn how to stay on top of the latest news.
Reference
The default setting, with no equalization applied.
Mod X™
The audio for many films is mastered to an equalization curve called the “X Curve,” which is optimized to make the audio sound great when you are in a theatre – that is, a large room with the speakers far away. If the audio is not remastered when the film is released on DVD or Blu-Ray, it won’t sound as good as it can. Selecting Mod X applies an equalization curve that modifies the X Curve mastering, which results in equalization that’s more
appropriate for a typical home listening environment.
Classical, Pop, and Jazz
EQ settings tuned for particular musical genres.
Action and Drama
These cinematic settings apply Mod X processing along with genre-specific EQ settings. Drama helps provide clear dialog, and Action helps ensure that those explosions sound great.
FPS and Action Gaming
The FPS setting is ideal for multi-player games and other games where clear vocals are important. Relating to other players primarily via automatic weapons? Choose Action Gaming.
Headphones
Many inexpensive and midrange headphones do not reproduce midrange sounds as well as higher-quality headphones. This setting compensates for this, by applying diffuse field equalization to produce a more pleasing frequency response curve. If you own a pair of high-quality headphones, you probably won’t need this setting. We recommend that when using headphones, you try listening with this setting both on and off, and choose the setting that sounds
best for you.

Tips for the best sound
Setting the output level on your PC and your other devices
Most PCs with built-in audio, as well as most PC sound cards, have audio circuitry that’s capable of playing at 100% volume without distortion. For best results, we recommend setting your PC’s audio output to maximum, and using the Gaming Audio Series SP2500 controller to adjust the volume. Of course, there are exceptions, and if you detect distortion when your PC’s volume is set to 100%, lower it accordingly.
However, many portable digital audio players use audio circuitry that cannot be used at 100% volume without noticeable distortion. When connecting a digital audio player to the SP2500, we recommend setting the player’s volume at approximately 80%, and lowering it if you detect distortion.
Use a high-quality sound card
A high-quality speaker system is just one part of getting great sound out of your PC. If you’ve connected the SP2500 to your PC’s built-in audio circuitry, consider making the investment in a high-quality add-in sound card. Dedicated sound cards often provide greater dynamic range, a higher signal-to-noise ratio, and lower distortion than the audio circuitry built into motherboards.
Don’t forget the satellite stands
The SP2500 satellites are engineered to provide excellent soundstaging – that level of sonic accuracy that allows you to close your eyes and get a strong feeling for the audio environment and the exact placement of the performers (or sound effects) within it. As with all speaker systems, the SP2500 has a “sweet spot” in which the best sound staging presentation is heard, and you’ll be in that sweet spot when the satellites are directed toward your ears.
The satellite feet are designed to angle the satellites upward, but don’t hesitate to place the satellite stands under the front feet if you need a little more lift. Likewise, if you’ll be placing the satellites above your head, you can place the stands under the rear feat to give them a downward angle.
Specifications
νFrequency response: 35Hz – 20kHz ±3dB
ν220 Watts total power
νSubwoofer dimensions: 46 x 25.8 x 29.7 cm
νSatellite dimensions: 10.8 x 12 x 15.9 cm
Subwoofer
ν20.3cm 120W (IEC60268-5 24hr continuous rating) subwoofer with durable rubber surround
νBridged dual 60 Watt class-D amplifiers with integrated DSP for 120 Watts of power
νUltra-efficient integral power supply with 100V – 240V AC input
Satellites
νBi-amplified, two-way design 76.2mm 40W (IEC60268-5 24hr continuous rating) midrange drivers
ν25.4mm 40W (IEC60268-5 24hr continuous rating) ferrofluid-cooled silk diaphragm tweeters
ν50 Watts per satellite:
•40 Watt midrange amplifiers
•10 Watt tweeter amplifiers
7

8
Restez en contact
Vous pouvez en savoir plus sur votre Gaming Audio Series SP2500 et rester en contact avec les autres détenteurs d'un appareil SP2500 en :
•Devenant fan sur Facebook à l'adresse facebook.com/corsairmemory
•Souscrivant au blog Corsair à l'adresse blog.corsair.com
•Suivant notre actualité sur Twitter à l'adresse twitter.com/corsairmemory
•Consultant la page Corsair audio à l'adresse corsair.com/audio
Pour savoir comment contacter le service d'assistance technique, reportez-vous à la section Assistance technique à la fin ce guide.
Consignes de sécurité importantes
Pas de pièces à démonter pour le service à l'intérieur. Risque d'électrocution ; ne pas ouvrir. Cet appareil fonctionne à 100-240 V CA, 50/60 Hz et 2,2 A.
Cet appareil est conforme à l'article 15 de la réglementation FCC. Son fonctionnement est soumis aux deux conditions suivantes : (1) L'appareil ne devrait pas provoquer d'interférences nocives et (2) il doit accepter toute interférence reçue, y compris les interférences risquant d'entraîner un fonctionnement incorrect.
Il est conforme aux réglementations 47 CFR 15 B et 21 CFR 1040.10.
Contenu de l'emballage
•1 caisson de basse
•2 satellites
•2 cales pour satellite
•1 télécommande avec câble d'interface relié
•1 jeu de 2 câbles pour satellite
•1 câble audio RCA 3.5 mm pour PC
•1 câble d'alimentation
•Pastilles adhésives
•Guide de démarrage rapide (ce livret)
Installation
Positionnement correct des satellites
Les satellites présentent une conception asymétrique, les aigus étant plus proches du centre du champ acoustique. Comparable à celle des moniteurs de studio, cette conception permet une reproduction stéréophonique de qualité supérieure et l'utilisation d'amplis suffisamment grands dans un espace réduit. Lorsque vous positionnez les satellites sur le bureau, assurez-vous de les orienter comme indiqué sur l'illustration.
Facultatif : utilisation des cales
Si le Gaming Audio Series SP2500 offre un son exceptionnel depuis presque tous les angles, il est préférable, pour bénéficier d'une qualité stéréophonique optimale, de s'assurer que les
satellites soient bien orientés vers l'auditeur. Pour plus d'informations à ce sujet, reportez-vous à la section “ Conseils pour obtenir un son optimal ” ci-dessous.
Les satellites sont inclinés vers l'avant selon un angle |
|
de 2.5 degrés. Pour augmenter cet angle à 11 degrés, |
|
placez les cales sous l'avant des satellites. Pour donner |
|
aux satellites un angle arrière (si vous les placez sur |
|
une étagère en hauteur par exemple), positionnez les |
9 |
cales à l'arrière. |
Conseils pour le positionnement du caisson de basse
Pour des résultats optimaux, positionnez le caisson de basse de sorte que le port soit en face de vous. Si vous placez un objet devant le port, laissez une distance d'au moins 25 cm entre le port et cet objet.
25 cm (10")
Établissement des connexions
Connexion des satellites au caisson de basse
Chaque satellite est connecté au caisson de basse à l'aide du câble fourni à cet effet. Pour éviter toute confusion, les connecteurs ATX comportent une inscription et un code couleur : le droit est ROUGE et le gauche, BLANC. Enfoncez légèrement chaque connecteur à l'arrière du caisson de basse et du
satellite jusqu'à ce que vous entendiez un léger “ clic ”. Pour libérer le connecteur, appuyez sur la languette.
Astuce : les connecteurs à quatre pôles ATX et le câble gros calibre offrent une solution rapide au délicat problème de l'envoi de signaux distincts amplifiés vers les médiums et les aigus. Ils évitent d'avoir à raccorder deux paires de câbles d'enceinte à chaque satellite.
Si vous souhaitez remplacer ou rallonger ces câbles, rendez-vous chez votre revendeur de matériel électronique ou sur la boutique Corsair (store.corsair.com.).
Connexion du caisson de basse à votre PC
Utilisez le câble audio stéréo de deux mètres fourni pour connecter l'entrée ligne du caisson de basse (connecteurs RCA) à la sortie niveau de ligne stéréo 3.5 mm de votre PC. Sur la plupart des PC de bureau équipés de sorties audio, ce connecteur est de couleur
10 vert pâle. Sur certains PC de bureau et la plupart des PC portables, cette sortie est signalée par une icône représentant un casque. Vous pouvez également connecter votre propre câble audio stéréo 3.5 mm à l'entrée audio AUX1 vert pâle située à l'arrière du caisson de basse.
Connexion du caisson de basse à une console de jeu
La plupart des consoles de jeu offrent une sortie audio via les câbles RCA stéréo. Vous pouvez connecter votre console de jeu au caisson de basse SP2500 à l'aide d'un câblage RCA stéréo standard, en vente chez la majorité des détaillants en électronique grand public. Si votre PC est déjà raccordé aux connecteurs RCA de l'entrée ligne du caisson de basse, vous pouvez également connecter la console à l'entrée audio AUX1 3.5 mm située à l'arrière du caisson de basse.
Connexion de la télécommande au caisson de basse
La télécommande est reliée au caisson de basse via le connecteur D-Sub 15 broches.
AVERTISSEMENT : ne connectez pas la télécommande à une carte VGA ou à un connecteur 15 broches autre que celui du caisson de basse SP2500.
Astuce : des pastilles adhésives sont fournies pour vous permettre de fixer la télécommande sur votre bureau. L'utilisation de ces pastilles n'est nullement obligatoire. Par ailleurs, nous vous recommandons de les appliquer seulement une fois que vous avez commencé à utiliser la télécommande et que vous avez repéré l'emplacement qui vous convient naturellement.
Astuce : le connecteur USB situé à l'arrière de la télécommande sert aux mises à jour facultatives du microcode. Il n'est pas nécessaire de connecter la télécommande à votre PC par USB pour une utilisation normale. Le SP2500 n'est pas un périphérique
audio USB.
Facultatif : connexion de périphériques auxiliaires et d'un casque
Outre votre PC, vous pouvez connecter deux autres périphériques au SP2500 via les entrées auxiliaires. L'une de ces entrées se trouve sur la télécommande et la seconde, sur le caisson de basse. Si vous voulez lire un contenu audio à partir d'un périphérique qui ne dispose que d'une sortie audio via les connecteurs RCA, tel qu'une console de jeu, vous trouverez facilement des adaptateurs RCA 3.5 mm dans les points de vente de matériel électronique et audio.
Si vous possédez un casque analogique équipé d'un câble stéréo de 3.5 mm, vous pouvez le connecter à la sortie casque de la télécommande. La connexion d'un casque coupe automatiquement le son en provenance des haut-parleurs : vous n'allez donc sans doute pas brancher votre casque dans l'immédiat.
AVERTISSEMENT : soyez prudent lorsque vous connectez un casque au SP2500 pour la première fois. Avant de mettre votre casque, nous vous recommandons de baisser complètement le volume du SP2500, puis de l'augmenter progressivement.
Mise sous tension du SP2500
Vous êtes maintenant prêt à utiliser la télécommande et à profiter du son de vos jeux, morceaux de musique et films sur votre SP2500.
1.Allumez votre PC.
2.Appuyez sur le bouton MARCHE de la télécommande.
AVERTISSEMENT :avant de lire une source audio, reportez-vous à la section Utilisation de la télécommande ci-dessous pour obtenir des instructions sur le réglage du volume.
 Loading...