

INSTRUCTION MANUAL
FOR
DIGITAL BLOOD PRESSURE MONITOR
REF CH-463E
0801
Contents
3 - GENERAL REMARKS
5 - PRECAUTIONS FOR USE AND MAINTENANCE
8 - UNIVERSAL DESIGN
9 - IDENTIFICATIONS OF PARTS
10 - LOADING THE BATTERIES
11 - USING AC ADAPTER (OPTION)
12 - REMOVING THE BATTERIES
12 - RESETTING OPERATION
13 - SETTING THE CLOCK
17 - MEASURING YOUR BLOOD PRESSURE
19 - TIPS FOR OBTAINING ACCURATE MEASUREMENTS
23 - AUTOMATIC CHANGEOVER FEATURE
23 - HOW TO CALL UP THE VALUES STORED IN MEMORY TO THE
DISPLAY
24 - HOW TO CALL UP THE DATA STORED IN MEMORY
25 - HOW TO DELETE THE DATA STORED IN MEMORY
26 - KEY TO DISPLAY ICONS
27 - ABOUT “BLOOD PRESSURE”
28 - BLOOD PRESSURE Q&A
29 - BEFORE REQUESTING REPAIRS OR TESTING
30 - SPECIFICATIONS
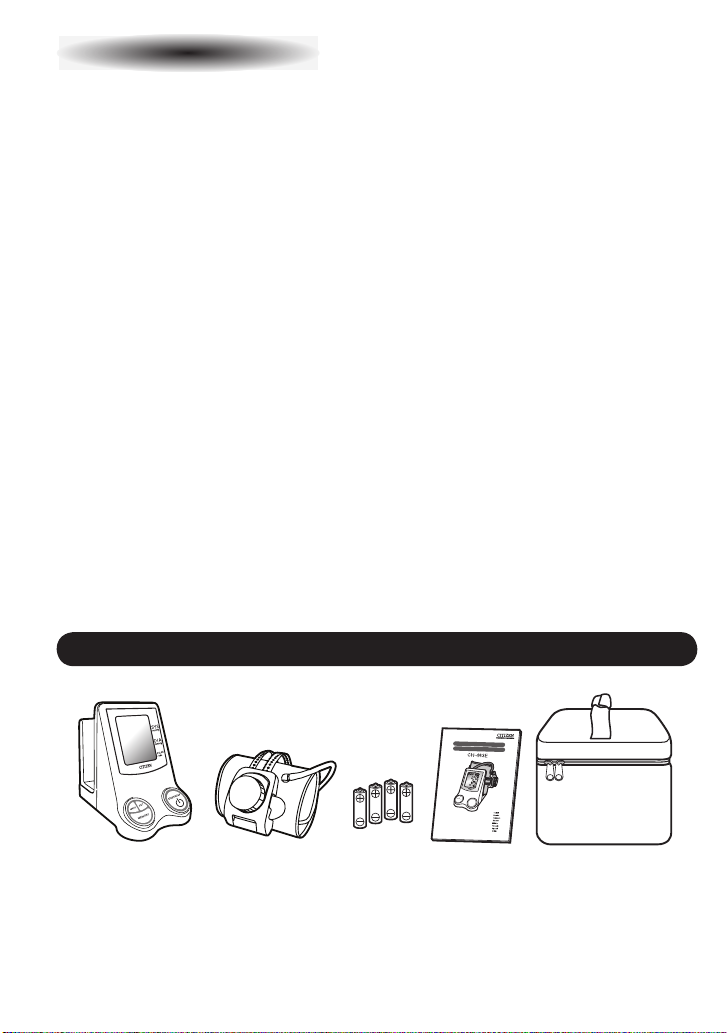
Ensure that you have all the following components
Blood pressure
monitor unit
Arm Cuff (for monitor)
4 AA-size
batteries
- Eng 2 -
Instruction
Manual
Carrying Case

GENERAL REMARKS
General remarks on blood pressure and blood pressure measurement
1. To defl ate the cuff quickly, press the “START/STOP” switch.
2. The attached cuff is suitable for arm circumferences of 20-32 cm.
3. When attaching the cuff, the air hose should be placed on the inside of your arm on top
of the artery.
4. Self measurement is not therapy! In no event should you change the dosage of your
medication prescribed by your physician.
5. As preparation for measuring your blood pressure, you should urinate and then remain
relatively still for 10 to 15 minutes prior to measurement.
6. Exercising, eating, drinking, smoking, etc., prior to measurement may affect the results.
7. Your blood pressure varies constantly throughout the day. Measurements should be
taken regularly at the same time each day.
8. DO NOT place too much emphasis on the results of one measurement. Keep a
continuing record of your blood pressure variations. A complete picture can only be
obtained from a large number of readings.
9. Emotional stress tends to cause your blood pressure to rise.
To obtain correct blood pressure measurements
1. Take fi ve or six deep breaths and then relax before measuring your blood pressure. If you
are tense when taking the measurement, you will not get a valid reading.
2. Your blood pressure will be elevated if you are anxious or irritated, suffering from lack of
sleep or constipation, or have just taken some exercise or eaten a meal.
3. Wrap the cuff around your arm and tighten it so that one fi nger can be inserted between
the cuff and arm. (
4. DO NOT measure your blood pressure after bathing or drinking.
5. If you feel the need to urinate, do so before measuring your blood pressure.
6. Measure your blood pressure where the room temperature is around 20°C. DO NOT
measure your blood pressure when it is too cold (below 10°C) or too hot (above 40°C) in
the room.
7. DO NOT try to measure your blood pressure immediately after drinking coffee or tea or
after smoking.
8. Measure your blood pressure when you are relaxed and still. Keep the center of the cuff
at the level of your heart and DO NOT move your arm or talk.
See page 18)
English
- Eng 3 -
English
GENERAL REMARKS
9. DO NOT measure blood pressure when the cuff has been on your arm for a few minutes
or more. During this time, your arm will have built up a higher blood pressure and you will
not get valid reading.
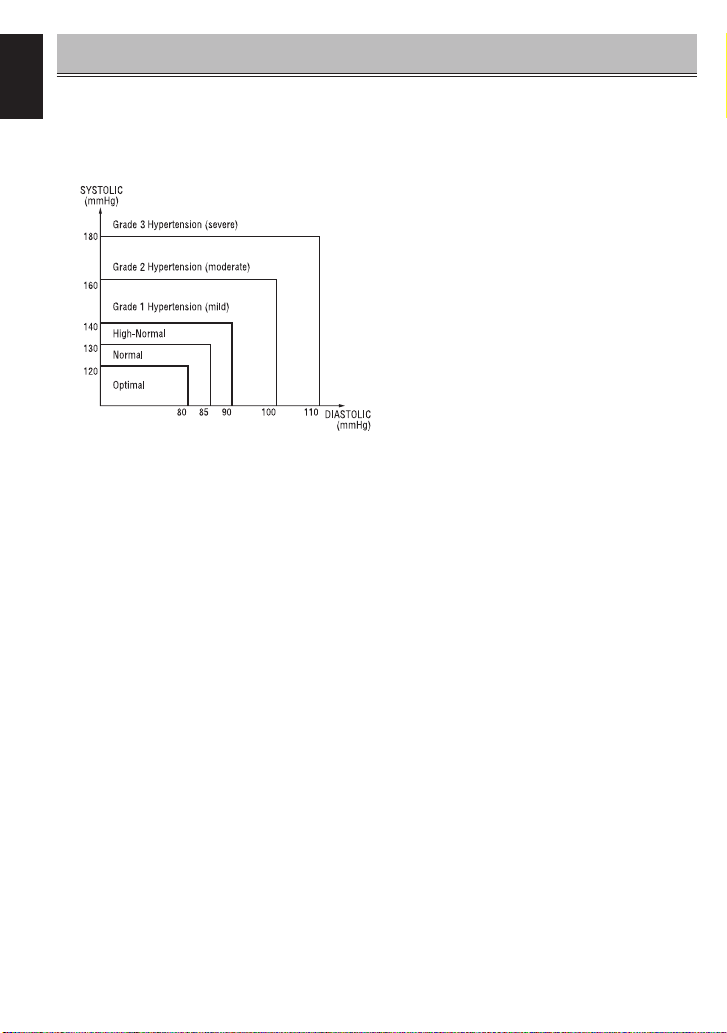
10. The fi gure below shows the blood pressure classifi cations under the WHO standards.
Remarks:
The graph is not exact, but may be
used as a guide in understanding
non-invasive blood pressure
measurements. The device is only
intended for use with adults.
Defi nitions and Classifi cations of Blood Pressure Levels
Measure your blood pressure at the same time each day.
* Your blood pressure changes all the time. This means that data gathered over a long
period has far more signifi cance than data from just one measurement. For this reason,
you must measure your blood pressure on a daily basis. Ideally, you should measure your
blood pressure at the same time each day wherever possible.
- Eng 4 -

PRECAUTIONS FOR USE AND MAINTENANCE
Precautions for use
1. If you suffer from heart disease, high blood pressure or other circulatory disease, consult
your physician before using the monitor.
2. If the cuff pressure feels abnormal or you experience any other irregularity while using the
cuff, reduce the pressure immediately by pressing the “START/STOP” switch and then
consult the sales outlet where you purchased the monitor.
3. If you think the measurement is abnormal or if measurement makes you feel unwell,
discontinue use and consult your physician.
4. Blood pressure measurement may not be possible for anyone with a weak pulse or
arrhythmia.
5. Repeated blood pressure measurement may cause problems such as congestion or
swelling in some people.
6. Frequently repeated blood pressure measurements will not give accurate results. Allow
an interval of about 3 minutes between measurements.
7. If you suffer from a severe problem with blood circulation in your arms, consult your
physician before using the monitor. Failure to do so could be hazardous to your health.
8. Measurement may not be possible for anyone with insuffi cient blood fl ow to the area
where measurements will be taken or who suffers from a frequent irregular heartbeat.
Consult your physician for advice on whether to use the monitor.
9. DO NOT wrap the cuff around an injured arm.
10. DO NOT wrap the cuff around an arm in which a drip (intravenous infusion) is inserted or
which is being used for blood transfusion as part of medical treatment. Doing so could
result in an injury or a serious accident.
11. DO NOT use the monitor in the vicinity of fl ammable gases such as those used for
anaesthesia. Doing so could ignite the gases and cause an explosion.
12. DO NOT use the monitor in enriched oxygen environments such as a hospital’s
hyperbaric chamber or oxygen tent. Doing so could ignite the oxygen and cause a fi re.
13. DO NOT use mobile phones near the monitor as this could result in a malfunction.
14. If you use a cardiac pacemaker, consult your physician before using the monitor.
English
- Eng 5 -
English
PRECAUTIONS FOR USE AND MAINTENANCE
15. Be sure to use this unit only for measuring blood pressure. DO NOT use it for any other
purpose.
16. DO NOT use this unit on infants.
17. Blood pressure measurement may not be possible for anyone with common arrhythmias
such as atrial or ventricular premature beats or atrial fi brillation.
Maintenance Precautions
1. DO NOT store the blood pressure monitor in locations exposed to direct sunlight, high
temperatures (over 60°C), low temperatures (below -20°C), high relative humidity (over
95%) or excessive amounts of dust.
2. DO NOT drop the blood pressure monitor or subject it to other shocks or vibration.
3. Remove the batteries if the monitor will be left unused for a long period.
4. DO NOT attempt to disassemble the monitor.
5. DO NOT deform the cuff or bend the air hose excessively.
6. If the monitor is very dirty, wipe it clean with a cloth moistened with sterilizing alcohol or a
neutral detergent. Then wipe it with a dry cloth.
7. NEVER clean the blood pressure monitor with thinners or benzene, as this could damage
the monitor.
8. To clean the cuff, wipe it with a moist cloth. Avoid hard rubbing as this will cause air
leakages. Take care also not to get water into the air hose.
Symbols Explanation:
: Device complies with the requirements of the EC Directive 93/42/EEC. Registered
with the CE Marking.
: Type B applied part
: Attention, consult accompanying documents.
: Appliance compliance WEEE directive
: Manufacturer
: Batch Code
LOT
The device has been tested and homologated in
accordance with EN60601-1-2 for EMC.This does not
Warning
guarantee in any way that the device will not be affected by
electromagnetic interference. Avoid using the device in high
electromagnetic environment.
- Eng 6 -
PRECAUTIONS FOR USE AND MAINTENANCE
Nature and frequency of maintenance:
This product is designed for use over an extended period of time;
however, it is generally recommended that it be inspected every two
years to ensure proper function and performance.
Protect the nature environment:
Please help to protect natural environment by respecting national and/or local recycling
regulations when disposing of the battery and the product at the end of their useful live.
WEEE MARK
If you want to dispose this product, do not mix with general household
waste. There is a separate collection systems for used electronics products in
accordance with legislation under the WEEE Directive (Directive 2002/96/EC) and
is effective only within European Union.
Reference European standard:
The blood pressure measuring device corresponds to regulation EN60601-1-2.
Calibration:
The blood pressure measuring device is generally recommended to have the monitor
inspected every two years to ensure correct functioning and accuracy. Please contact a
distributor.
CITIZEN SYSTEMS(H.K.) LIMITED
FLAT A-B, 4TH FLOOR, HUNG MOU INDUSTRIAL
BUILDING, 62 HUNG TO ROAD, KWUN TONG,
KOWLOON, HONG KONG
European Representative:
Name : WvW electronishe Geräte Vertrieb GmbH
Address : Fintelmannstraße, 20/Eingang, Martin-Heydert-Straße,
D-14109 Berlin, Germany
*For technical data, please contact our European Representative.
English
- Eng 7 -

English
UNIVERSAL DESIGN
This product has been developed with the concept of Universal Design to ensure safe and
easy use for a broader range of users. The product’s shape and color was designed to
portray “warmth” and “gentleness” and have functional qualities that compliment the human
body, which make it “easy to understand,” “safe to use,” and “easy to use.”
k
c
o
l
c
)
h
m
t
r
i
a
l
w
a
/
r
P
a
d
M
n
B
e
l
a
c
(
e
l
p
H
f
u
l
m
e
m
o
r
y
0
m
6
e
o
l
B
o
(
d
u
l
s
e
p
/
M
e
t
a
p
a
h
s
r
e
s
u
a
u
s
r
t
r
e
s
m
s
u
r
e
m
t
e
o
n
r
t
e
s
s
e
/
N
u
m
e
n
t
d
b
e
r
o
f
a
t
e
&
t
i
m
e
)
n
a
e
g
r
a
L
a
e
l
p
m
i
S
u
f
i
t
u
a
e
b
c
e
l
b
i
g
e
L
d
d
n
t
a
r
u
g
fi
n
o
c
l
L
a
r
g
e
a
n
d
p
r
e
s
s
s
w
i
t
c
t
e
c
r
a
s
r
a
h
n
o
i
e
a
s
y
-
t
o
h
-
b
u
t
t
o
n
o
c
e
l
y
t
s
-
d
a
r
n
o
t
a
s
t
f
f
S
u
c
h
t
i
w
t
e
k
c
o
p
e
g
a
m
o
t
u
A
a
e
m
y
b
n
o
i
t
a
r
u
g
fi
n
e
l
p
m
i
s
c
i
t
n
i
s
f
o
s
n
n
o
t
t
u
b
e
l
g
e
n
m
t
e
r
u
s
a
e
m
- Eng 8 -
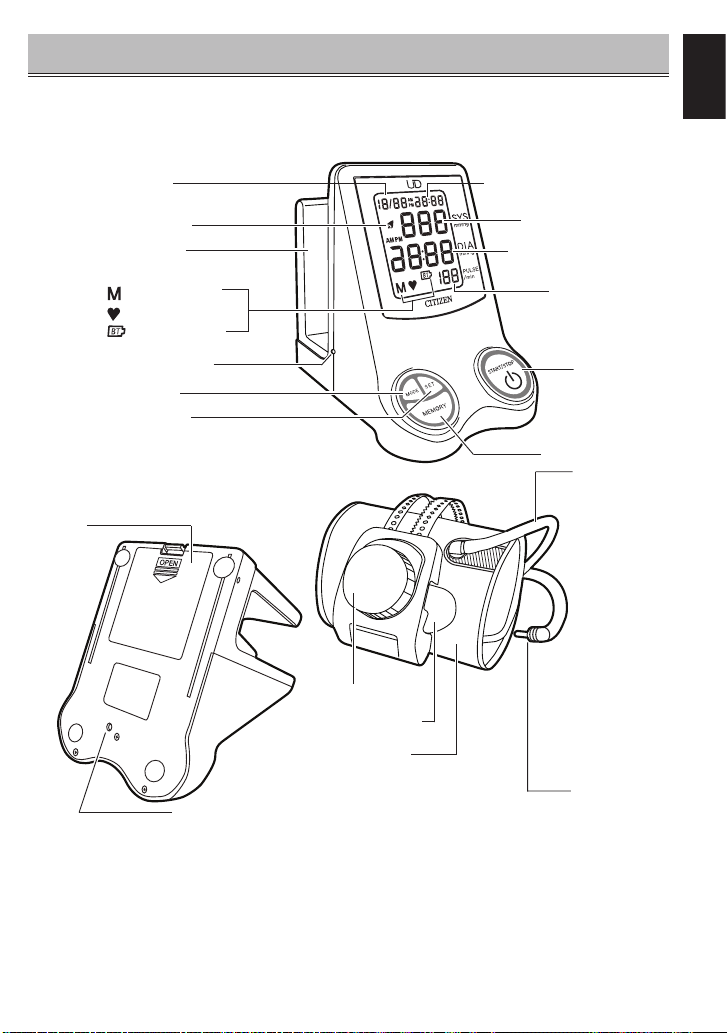
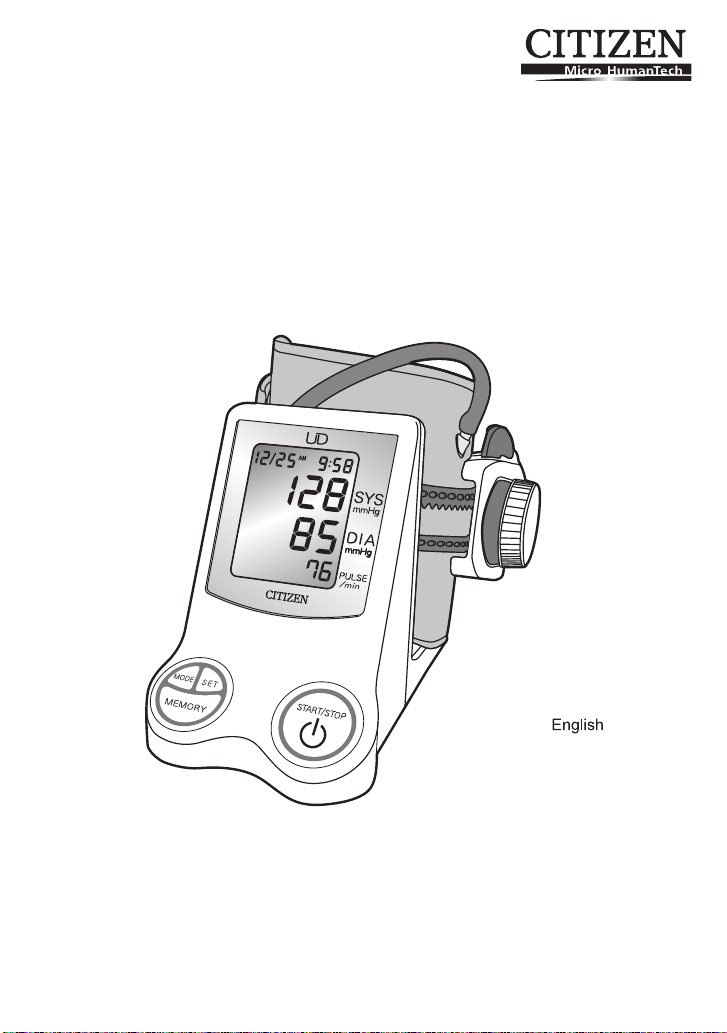
IDENTIFICATION OF PARTS
Component names
Date display
Alarm icon
Cuff holding pocket
Memory icon
Measurement icon
Battery icon
Air hose socket
MODE Switch
SET Switch
Battery
cover
Main Unit
Time display
Systolic blood pressure
display
Diastolic blood
pressure display
Pulse display
START/STOP
Switch
a Stand-by
MEMORY Switch
Air hose
English
RESET switch
Knob
Release lever
- Eng 9 -
Cuff
Cuff
Air hose
connector
English
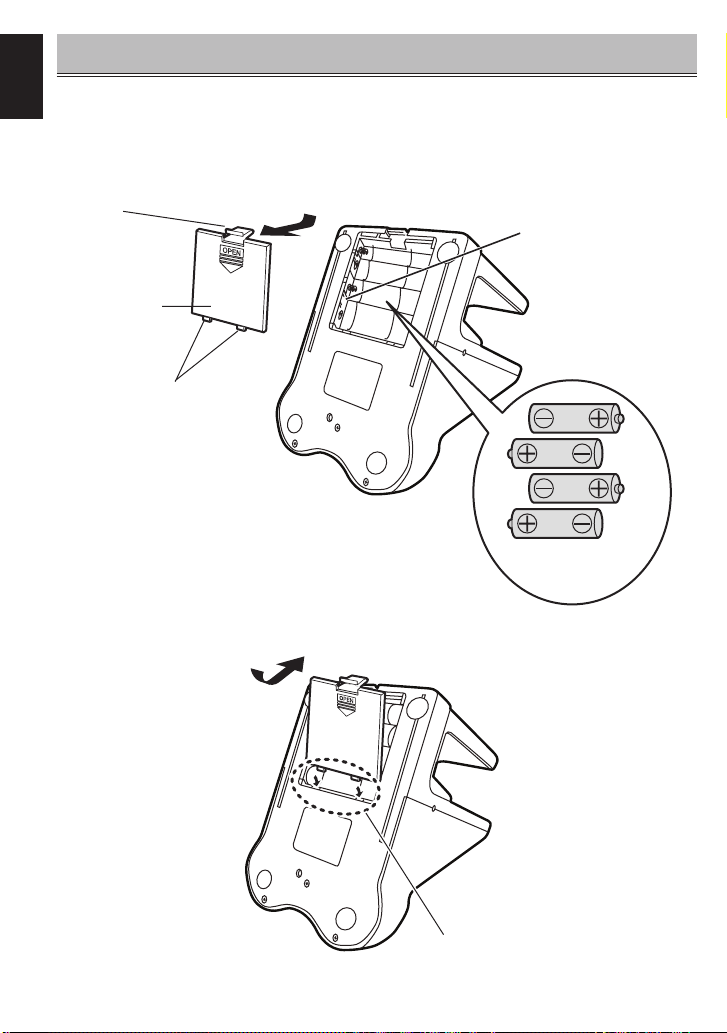
LOADING THE BATTERIES
(Batteries supplied with the unit should be loaded in compartment before putting the Blood
pressure monitor in use.)
1 Open the cover of battery compartment.
Pressing the hook down, pull the cover toward you to open.
Hook
Battery
compartment
cover
Lug (projecting
section)
2 Place batteries in the compartment.
Put the batteries paying attention to the positive
and negative terminal symbols m and ,.
Battery
compartment
4 “AA” batteries
3 Close the battery compartment cover.
Fitting the lugs of the
cover at the mating
recesses of the battery
compartment body,
push the hook to close
the cover.
- Eng 10 -
* If the Blood pressure monitor is
left unused for an extended period
of time, the batteries should be
removed from the compartment.
Fit the lugs (projections)
at the recesses.

USING AC ADAPTER (OPTION)
Using the optional dedicated AC adapter for the CITIZEN blood pressure monitor (CH-463E)
allows you to measure your blood pressure without having to worry about the amount of
remaining charge in the batteries.
1. Insert the AC adapter plug into
the socket on the blood pressure
monitor.
AC adapter socket
2. Plug the AC adapter into a mains
power outlet.
AC adapter plug
AC ADAPTER (OPTION)
Ref: AC-230CZ
• If you plan to use the AC adapter for an extended period of time, remove the batteries. If
the batteries are left in the compartment, electrolyte may leak from the batteries and cause
a fault in the blood pressure monitor.
• If the AC adapter is used as the only power supply for the monitor, unplugging the AC
adapter will erase the data stored in the monitor’s memory. It is recommended that you
make a note of any important data .
• When only batteries are used to supply power to the monitor, the AC adapter should be
unplugged from the monitor. Leaving the AC adapter plugged into the blood pressure
monitor could cause a malfunction.
English
The dedicated AC adapter for the CH-463E is optional.
The AC adapter is available from retailers stocking CITIZEN digital blood pressure
monitors.
- Eng 11 -

English
REMOVING THE BATTERIES
• When the icon is displayed, or where the clock is no longer shown or nothing appears
in the display, replace the old batteries with four new ones. All four batteries should be
changed at once.
• The memory is erased if the batteries are removed for replacement. It is recommended to
make note of the data stored in memory prior to changing batteries.
• Do not use rechargeable batteries.
• Do not use alkaline and manganese batteries together.
• The monitor is powered by the batteries provided. Note that they may not last as long as
indicated.
• Batteries included are for demonstration purposes only. Battery life maybe shorter than
specifi ed.
• When disposing of used batteries, comply with governmental regulations or environmental
public institution’s rules that apply in your country /area.
RESETTING OPERATION
• When you put the Blood pressure monitor
in use for the fi rst time, be sure to press the
RESET switch mounted on the back of the main
unit to reset after loading the batteries in the
compartment.
• If the main unit fails to work normally while it is
in use, the normal state may be restored to the
unit by carrying out resetting operation.
• Resetting operation erases the entire data in
memory. The clock will re-start from 12:00am on
January 1, 2007.
- Eng 12 -

SETTING THE CLOCK
1 Initial state. (When you load the batteries in the unit for the fi rst time,
carry out the reset procedure.)
* Date/hour/alarm setting when the batteries are fi rst loaded
into the unit.
Data and time: 12:00 am, January 1, 2007
Alarm: 12:00 am, alarm is in OFF state
2 Date and time correcting procedure
The alarm time, current time and calendar should be set in the written order.
• Each time you press the “MODE” switch, the data item to be modifi ed changes in the
sequence shown below. The selected item fl ashes on and off.
1. Alarm, minute s 2. Alarm, hours 3. Seconds 4. Minutess 5. Hours 6. Years
7. Months 8. Day of months 9. Time system (12-hour or 24-hour system)
• Press “SET” switch to increase the indicated value in increments of one.
Hold down the “SET” switch on to advance the setting continuously.
• The aforementioned switch performance will not be carried out for the correction of “3)
Second” and “9) Time system (12-hour or 24-hour system).”
• After the completion of correction of all items as required, press “START/STOP” switch
to restore the time indication to the display.
Date display
Time display
English
SET Switch
MODE Switch
MEMORY Switch
START/STOP
Switch
a Stand-by
- Eng 13 -

English
SETTING THE CLOCK
3 Correcting the “minute” of an alarm time
• Press “MODE” switch for one second or more to place the
unit in the alarm-time minute correction state.
• Press “SET” switch to increase the minute of the alarm time
in increments of one minute.
4 Correcting the “hour” of an alarm time
• After the completion of the alarm-time minute correction as
described above, press “MODE” switch to place the unit in
the alarm-time hour correction state.
• Press “SET” switch to increase the hour of the alarm time in
increments of one hour.
5 Correcting the “second” of the current time
• After the completion of the alarm-time hour correction as
described above, press “MODE” switch to place the unit in
the current-time second correction state.
• Press “SET” switch to reset the second indication to 00.
Press “SET” switch according to a time signal. Note that
the minute indication on the display will advance when the
seconds given is 30 to 59 seconds of a minute.
6 Correcting the “minute” of the current time
• After the completion of the current-time second correction as
described above, press “MODE” switch to place the unit in
the current-time minute correction state.
• Press “SET” switch to increase the minute of the current time
in increments of one minute.
- Eng 14 -

SETTING THE CLOCK
7 Correcting the “hour” of the current time
• After the completion of the current-time minute correction as
described above, press “MODE” switch to place the unit in
the current-time hour correction state.
• Press “SET” switch to increase the hour of the current time in
increments of one hour.
8 Correcting the “year”
• After the completion of the current-time hour correction as
described above, press “MODE” switch to place the unit in
the year correction state.
• Press “SET” switch to increase the year of the current time in
increments of one year.
• The year can be set in the range of 2007 and 2036.
9 Correcting the “month”
• After the completion of the year correction as described
above, press “MODE” switch to place the unit in the month
correction state.
• Press “SET” switch to increase the month of the current time
in increments of one month.
English
10 Correcting the “day of the month”
• After the completion of the month correction as described
above, press “MODE” switch to place the unit in the day-ofthe-month correction state.
• Press “SET” switch to increase the day of the month of the
current time in increments of one day.
- Eng 15 -

English
SETTING THE CLOCK
11 Changeover of the “time system”
• After the completion of the day-of-the-month correction as
described above, press “MODE” switch to place the unit in
the time system selection state.
• Every time “SET” switch is pressed, the 12-hour system
(12H) and (24H) will be changed over.
• Press “MODE” switch after activating the time system
indication on the display to revert the display to the time
indication. This completes the clock setting procedure.
12 How to set the alarm
• While the alarm symbol is shown on the display, the alarm will sound for 30 seconds
when the alarm time is reached. The alarm sounds only when the time indication is
shown on the display.
• To stop the alarm, press any switch.
• To change over the alarm status between SET/RELEASE, press “SET” switch while the
time indication is shown on the display.
Time indication
(without alarm)
SET
switch
Alarm time indication
SET switch
- Eng 16 -
Time indication
(with alarm)
Alarm mark
1s
later

MEASURING YOUR BLOOD PRESSURE
1
ATTACHING THE ARM CUFF
Release lever
1 Press the release lever on the cuff to
open the cuff.
2 Slip the arm cuff through your arm so that
the blue marker comes to the palm side.
3 Adjust the position of the arm cuff so that the blue marker is located in
the center of your arm and the hem of the cuff is 1 to 2 cm above your
elbow.
English
Blue marker
* The cuff should be put on the bare arm or over a light-weight underwear.
* If you wear a heavy-weight top, please remove it.
- Eng 17 -

English
MEASURING YOUR BLOOD PRESSURE
4 Turn the knob clockwise until it
idles.
5 Place your arm on a table or the like so that the center of the cuff
comes to the height of your heart.
6 Relax your arm and lightly open the palm upward.
■ To loosen the cuff just press the release lever marked “PUSH”.
Turning the knob
clockwise tightens
the cuff. Turning it
to the left will have
no effect.
If the release lever does not work, you can
still release the cuff by pressing on the tab in
the hole to the left of the knob with a pointed
object such as a pen.
- Eng 18 -

TIPS FOR OBTAINING ACCURATE MEASUREMENTS
Your blood pressure varies according to your posture, the time of day and a range of other
factors. Ideally, you should measure your blood pressure in the same posture at the same
time every day.
■ Taking measurements while sitting
1 Place your arm on a table or similar surface with
your forearm extended.
2 It is important to have the arm cuff level with
your heart.
3 Open your hand slightly on the table so that your
palm is facing up and your fi ngers are relaxed.
4 Do not move your body or talk while taking the
measurement.
■ Measurement in laying posture
* Relax yourself not to apply
pressure to the arm cuff.
1 Lie down your head facing the celling.
2 Lightly open your hand with palm up and straighten your arm.
3 Relax your body, arm and fi ngers.
4 Do not move your body or talk during measurement.
English
■ You may use your right arm to measure your blood pressure.
Blood pressure rate is likely to differ by as much as 10mmHg when measured on the left arm
instead of the right (or vice-versa). Measure your blood pressure on the same arm each day.
- Eng 19 -

English
MEASURING YOUR BLOOD PRESSURE
2
Plug the air hose connector into
the main unit.
• Plug the air hose connector fi rmly into
the air hose socket on the main unit as
illustrated.
3
Start measurement.
Air hose socket
• Press the "START/STOP" switch.
• All of the segment will be displayed.
• The
• The
mark comes on.
mark goes out. Now, the pump activates.
- Eng 20 -

MEASURING YOUR BLOOD PRESSURE
• The Blood pressure monitor automatically carries out
pressurization until the pressure that is best suited to the
blood pressure measurement is reached.
• When the unit determines that an adequate pressure is
not obtained, the unit starts pressurization again.
• Wait a while after the completion of pressurization. Then,
mark comes on and the unit automatically starts
the
measuring your blood pressures.
• When the unit detects your pulse, the
on and off, then the unit gives your blood pressure value
on the lower section of the display.
• Upon completion of measurement, the buzzer sounds
and the unit automatically exhausts air from the cuff.
Then, the Systolic blood pressure/Diastolic blood
pressure/pulse will appear on display.
• As long as the unit functions correctly, the blood
pressure and the pulse rate for the result with the record
of the time and date are automatically stored in memory
as one set of data.
• Up to 60 sets of measurement data can be stored
in the memory. If you measure your blood pressure
when 60 sets of measurements have already been
stored in memory, the earliest set of measurements
is automatically deleted to make way for the new
measurements.
mark fl ashes
English
- Eng 21 -

English
MEASURING YOUR BLOOD PRESSURE
[Manual pressurization]
• Keep “START/STOP” switch held pressed until
the pressure value you want to stop pressurization
is reached (approximately 40mmHg higher
than the Systolic blood pressure). You can stop
pressurization by the unit by releasing the switch at
the aforementioned value is reached.
The upper pressure limit is 280mmHg.
4
Revert the display to the time indication.
5
Store the cuff in the pocket.
• Press “START/STOP” switch to revert the display
to the time indication.
* When you want to stop measurement, press
“START/STOP” switch. The air in the cuff is
exhausted to stop measurement.
• Wrap the air hose lightly on the cuff with the air
hose connector inserted into the main unit. Then,
put it in the cuff pocket.
• Place the unit as a clock, at such a location that
you can observe the display easily.
When putting the monitor into the carrying case,
wedge the cuff in beside the monitor unit.
- Eng 22 -

AUTOMATIC CHANGEOVER FEATURE
• Press “START/STOP” switch after the completion of blood pressure measurement to
revert the display to the time display. If you do not press the switch and leave the unit, the
“Automatic changeover feature” of the unit will work approximately three minutes later to
automatically revert the display to the time indication. If you leave the unit for three minutes
without performing operations, the display will automatically changeover to the time
indication.
HOW TO CALL UP THE VALUES STORED IN MEMORY TO THE DISPLAY
• Except for the case where the unit is engaged in measurement, press “MEMORY” switch
to call up the values (measurement results) stored in memory to the display.
• The value stored in memory is numbered in the order of measurements. For example,
when 60 sets of data are stored in memory, the data number 1 represents the latest data.
Data number: 1, 2, 3 … … 59, 60
▲▲
The earliest dataThe latest data
• The number of measurements that can be stored in memory is 60 sets. Then, when
storing 61st data in memory, the 1st data stored in memory will be automatically deleted.
In this way, the unit automatically delete data stored in memory in order of storage to
accept new data.
• If you press “MEMORY” switch with no data stored in memory, the clock indication will
remain on the display.
English
- Eng 23 -

English
HOW TO CALL UP THE DATA STORED IN MEMORY
• Press the “MEMORY” switch.
• “A” that represents the average value appears on the
upper left section of the display. Then, the average
of the whole data stored in memory appears on the
display.
• Press the “MEMORY” switch again. This recalls and
displays fi rst the memory number and then the last set
of data stored.
• Press the “MEMORY” switch again. This recalls and
displays the second last set of data stored. Each time
you press this switch, the unit displays the data prior to
the last set of data displayed.
- Eng 24 -

HOW TO DELETE THE DATA STORED IN MEMORY
• The data stored in memory can be deleted.
• Press “MEMORY” switch to call up the data you want
to delete to the display. Keep the switch held pressed
for three seconds or more to delete the data. Then,
the buzzer sounds to let you know the completion of
deletion of the data.
• After the completion of data deletion, the average value
of the whole data stored in memory will appear on the
display. When all sets of data stored in memory are
deleted to leave no data to be shown on the display,
the unit will return the display to the state (the time
or measurement result indication) before “MEMORY”
switch is pressed.
English
- Eng 25 -

English
KEY TO DISPLAY ICONS
Icon displayed Condition/Cause Corrective action
Insuffi cient pressure. Repeat measurement again.
Appears when the bloodpressure could not be
measured accurately.
The pressure is 281 mmHg
or higher.
Appears when the batteries
are running low.
Detected problem in the
device.
Reapply cuff properly and
measure again.
If the pressure does not
automatically decline during
measurement, immediately
press the “START/STOP”
switch and turn the unit off.
To take the measurement
again, refer to P.21 and
correctly re-apply pressure.
Replace the batteries.
Ask purchased store.
- Eng 26 -

ABOUT “BLOOD PRESSURE”
What is blood pressure?
The heart is a pump that circulates blood throughout your body. Blood is pumped from the
heart at a constant pressure into arteries. This pressure is called the arterial blood pressure
and represents, in general terms, your blood pressure. Blood pressure is indicated by several
kinds of pressures, including the systolic pressure that occurs when the heart pumps blood
and the diastolic pressure that occurs when blood returns to the heart.
(Systolic)
Left atrium
Left
ventricle
Artery Artery
The artery wall expands.
Contraction
(Diastolic)
Left atrium
Left
ventricle
Normal state is restored
to the artery wall.
Dilation
Your blood pressure changes all the time.
Your blood pressure differs according to your age, gender and a range of other factors. It is
likely to be affected by your biorhythm during the day and by your posture, physical activities,
mental activities, level of stress and even by the air temperature. The blood pressure of a
healthy person generally varies within a day.
Systolic blood pressure
English
Blood pressure value (mmHg)
Diastolic blood pressure
Time of day
- Eng 27 -
English
BLOOD PRESSURE Q&A
Q Why is the blood pressure measured at home different from that measured by the
physician or at a hospital?
A Your blood pressure may vary due to exercise, the ambient temperature or your mental
state. When you have a physician or nurse measure your blood pressure, the pressure
value is likely to be 10 to 20 mmHg higher than usual due to anxiety and/or stress.
Knowing what affects your blood pressure helps you to better monitor your health.
Q Why does the blood pressure obtained vary with measurement?
A Our blood pressure is adjusted by the function of automatic nerve. Blood pressure differs
with every heart beat. We are likely to think that our blood pressure is constant, but it
varies if you take measurements in repetition. Blood pressure is susceptible to the time of
day, such as forenoon and afternoon, season and atmospheric temperature. In addition,
blood pressure is easily affected by mental stress or emotional ups and downs. It tends
to increase when you feel tension or decrease when you are relaxed.
Q What is the benefi t of measuring my blood pressure at home?
A Blood pressure measurements taken at home give reliable data as they can be
taken when you are in a stable and relaxed condition. Physicians place considerable
importance on blood pressure measurements taken at home. You should measure
your blood pressure at the same time each day and record the variations in your blood
pressure.
Always consult your physician for an interpretation of your blood
pressure readings and to determine the proper treatment.
- Eng 28 -

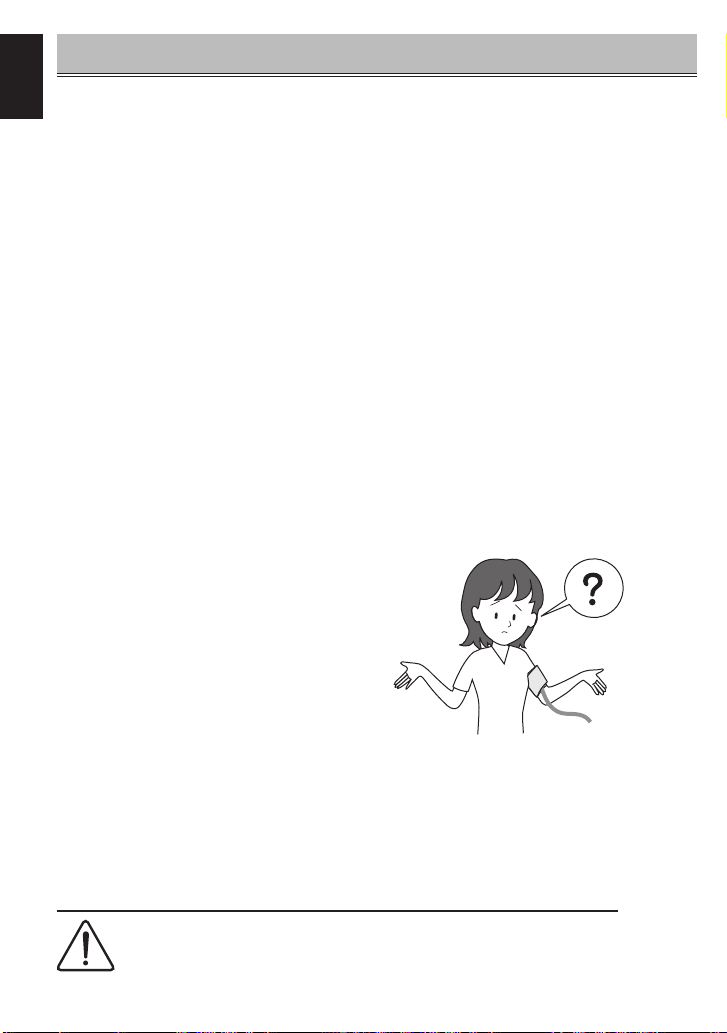
BEFORE REQUESTING REPAIRS OR TESTING
Make sure to check the following before sending your blood pressure monitor away to be
tested or repaired.
Problem Checks Response
Display stays blank when
you press the “START/
STOP” switch.
No measurements can be
taken.
Your blood pressure readings are abnormally high or low
compared with those taken in hospital.
Other phenomena
Check whether the batteries
are dead.
Check whether the batteries
are installed the right way
round (m and , oriented
correctly).
Check whether the
measurement icon
displayed.
Check whether the arm cuff
is applied correctly.
Did you stay calm during
measurement?
Note that blood pressure measurement may not be
possible for someone with an extremely weak pulse or
cardiac arrhythmia (irregular pulses).
is
Replace all the batteries with
new ones.
Load the batteries in the
correct direction.
Attach the arm cuff properly.
Measure your blood
pressure again, making sure
to remain still.
See page 28.
Remove the batteries from
the unit and change them
with new ones.
English
- Eng 29 -

English
SPECIFICATIONS
Model Number: CH-463E
Measurement system: Oscillometric method
Measurement Localization Upper Arm
Cuff: Arm cuff
Arm circumference range: 20.0 to 32.0 cm
Measurement range:
Accuracy:
LCD displays:
Switch: 5 (START/STOP, MEMORY, MODE, SET, RESET)
Infl ation: Automatic Infl ation by internal pump
Defl ation:
Rated voltage: 6V DC
Exhaust: Electromagnetic quick exhaust valve
Power supply:
Battery duration:
Automatic changeover function: Approx. 3 min. (after activated)
Memory capacity: 60 sets of data including date and time
Dimensions: 112(W) x 148(D) x 152(H) mm
Weight: Approx. 520g w/o batteries cuff: approx. 250g
Operating conditions:
Storage conditions:
Electric shock protection: Internal power unit
Safety Classifi cation: Type B Equipment
Mode of operation: Continuous operation
Protection against ingress of water: IPX0
Accessories
Pressure 0 to 280 mmHg
Pulse 40 to 180 pulse/min
Pressure ±3 mmHg
Pulse ±5% of reading
Clock ±20 second/Month
Pressure 3 digits
Pulse 3 digits
Date 4 digits
Time 4 digits with AM/PM mark
Icons
Alkaline Approx. 500 times
Manganese Approx. 150 times
Temperature 10°C to 40°C
Humidity 30% to 85% RH
Temperature -20°C to 60°C
Humidity 10% to 95%RH
: Memory icon, : Measurement icon, : Alarm
:Battery icon
icon,
Automatic speed defl ation system controlled by internal
electromagnetic valve.
4 AA batteries (LR6) or optional AC/DC adapter (6V
DC, 1A)
Set includes an arm cuff, 4 AA batteries for the monitor
(LR6), Instruction Manual, carrying case.
3W ( : direct current)
(170 mmHg, once/day,
22°C)
- Eng 30 -

CITIZEN is a registered trademark of Citizen Holdings Co., Japan.
CITIZEN es una marca registrada de Citizen Holdings Co., Japón.
Design and Specification are subject to change without notice.
 Loading...