

• Before using the watch, read this instruction manual
carefully for safe and correct use.
CAUTION
• After reading this manual, keep it handy for future
reference.
Safety Precautions (Instructions to be followed at all times)
This manual contains the following instructions that should be strictly followed at all
times to prevent injury to yourself and other persons as well as damage to property.
WInjuries and damage that might be caused by using the watch improperly or
neglecting any of the instructions or precautions contained in this manual are
classified with the following symbols.
WARNING Can cause serious injury or death
CAUTION Can or will cause minor or moderate injury or damage
WImportant instructions that should be followed are classified with the following
symbol.
Warning (caution) symbol followed by instructions that should be followed or precautions that should be observed.
Prohibition symbol followed by [do nots] (What you should not do)
2
WARNING
Diving is inherently dangerous. When wearing this watch while diving, please
make sure that you have a correct understanding of the handling of it as
described in these instructions and observe the correct operating procedure at
all times.
The water depth gauge of this watch is not certified for use as an officially
sanctioned measuring instrument. It should only be used as a reference
instrument for a rough indication of water depth.
• Although this watch is equipped with a water depth gauge and altimeter, do
not attempt to measure altitude at elevated locations immediately after diving.
Moving to elevated locations (such as mountain climbing or flying in an airplane) after diving without allowing a suitable rest period can cause the
occurrence of decompression sickness (bends).
3
English

• Diving while wearing this watch is limited to recreational diving only (nondecompression diving). Do not wear this watch during decompression diving,
saturation diving or when diving at high altitudes. Although the watch can be
worn in the water over a temperature range of +10°C to +40°C, water depth
is not displayed correctly in water other than saltwater (specific gravity:
1.025).
• Sudden atmospheric changes and changes in water temperature may affect
the display and performance of this watch. It is necessary to use the watch
in combination with other instruments in such cases. The display of this
watch should only be used for reference purposes as a rough indicator.
• Although the use of this watch is limited to recreational diving, even recreational diving can be dangerous. The user is strongly recommended to use
this watch only as a supplementary instrument during diving after having first
received the proper scuba diving training from a qualified instructor, acquiring
the necessary experience and skills for safe diving, and completely mastering
the handling and operation of this watch.
4 5
CONTENTS
WARNING ................................................................................................... 3
1. Features ................................................................................................. 8
2. Use of this Watch ................................................................................. 10
A. Use During Diving B. Use of Altimeter and Barometer
3. Digital Display ...................................................................................... 18
4. Names and Functions of Components .............................................. 20
5. Setting Analog Time ............................................................................ 24
6. Changing the Mode .............................................................................. 26
7. Using the Time / Calendar Mode.......................................................... 29
A. Setting the Digital Time and Date B. Temperature Measurement
C. Display of Changes in Barometric Pressure
8. Using the Alarm Mode ......................................................................... 33
A. Setting the Alarm Time
9. Using the Chronograph Mode ............................................................. 35
A. Chronograph Measurement

17. Altimeter Applications ........................................................................ 68
A. Measuring Altitude when Mountain Climbing B. Other Applications
C. Prominent Mountains and Lowlands Around the World (Reference)
18. Low Battery Warning Function .......................................................... 72
19. Other Functions .................................................................................. 73
A. Button Function Display B. Rotating Bezel C. Compass
D. No Decompression Limits
20. Battery ................................................................................................. 78
21. Troubleshooting ................................................................................. 80
22. Care for Long Term Use ..................................................................... 82
23. All-Reset .............................................................................................. 89
24. Specifications ..................................................................................... 90
7
10. Using the Log Memo Mode ................................................................ 38
A. Recalling Log Data B. Deleting Log Data
C. Explanation of Log Data Terms
11. Using the Dive Alarm Mode ............................................................... 42
A. Setting the Depth Alarm and Dive Time Alarm
12. Using the Altitude Memo Mode ......................................................... 46
A. Recalling a Point Memo B. Deleting a Point Memo
13. Using the Water Depth Measurement Mode ..................................... 49
A. Water Depth Measurement and Display B. Measurement of Dive Time
C. Measurement of Water Temperature
D. Warning Functions During Water Depth Measurement
14. Using the Surface Mode ..................................................................... 55
15. Altimeter Basic Features .................................................................... 57
16. Using the Altitude Measurement Mode ............................................ 59
A. Altitude Correction
B. Continuous Altitude Measurement and Fixed Duration Altitude Measurement
6
1. Features
This watch is a combination watch equipped with a water depth gauge that
measures water depth during diving, and an altimeter that measures altitude
during mountain climbing and other high altitude activities.
<Water Depth Measurement Function>
• Begins measurement of water depth automatically simply by wearing on the
wrist and entering the water.
• Measures water depth in 0.1 m units down to a maximum depth of 80 m.
• Automatically records diving data (log data) of the four most recent dives.
• Equipped with various warning functions necessary for ensuring safe diving.
<Altitude Measurement Function>
• Measures altitude in 5 m units over a range from -300 m to 6,300 m.
• Measures barometric pressure in 1 hPa (1 hectopascal = 1 millibar) units
over a range from 452 hPa to 1050 hPa.
• Equipped with an altitude memo function that enables altitude, barometric
pressure, time and other data to be stored in memory for a maximum of six
measurement points.
<Other Functions>
• Temperature measurement function that allows measurement of water temperature while diving and air temperature on land.
• Chronograph function (24 hour register) able to measure time in 1/100 second units.
• 24-hour alarm function
All repairs performed on this watch, including battery replacement, are
to be performed by a Citizen Service Center since special techniques
and equipment are required for making final adjustments and checks
after repairs (including battery replacement) have been completed.
Please contact a Citizen Service Center when having your watch
repaired or inspected.
8 9

A. Use During Diving
CAUTION: Please observe the following for safe diving.
• When using this watch during diving, always make sure to receive the necessary education and training and observe diving rules.
• Always make sure to use the “buddy system” *1 when diving.
• This watch is recommended to be used for recreational diving only to depths
of no more than 20 m in consideration of safety.
• It is recommended that the battery be replaced promptly. The battery life of
this watch is approximately 2 years after a new battery has been installed
(although this varies considerably depending on the frequency of use of the
water depth measurement function and other functions).
• Please make sure to allow for a suitable rest period after diving in accordance with rules for diving safety. Flying in an airplane or moving to high
altitudes without allowing a suitable rest period after diving can cause decompression sickness (bends).
*1:The buddy system refers to diving in pairs so that each person can look out
for the safety of the other.
11
2. Use of this Watch
CAUTION
• When using this watch, please make sure that you have a thorough understanding of its handling and precautions relating to its use to ensure that it is
used correctly. Please note that handling this watch in a manner not
described in these instructions may cause it to function improperly.
WARNING
• The water depth measurement functions as well as the altitude and barometric pressure measurement functions of this watch are not certified for use as
officially sanctioned measuring instruments. They should only used as auxiliary measurements.
• The measured values for water depth, altitude and barometric pressure displayed by this watch should only be used for reference purposes as rough
indications of their respective values.
10

CAUTION
-
Diving Precautions
<Before Diving>
• Check that the display of the watch is in a mode other than the altitude measurement mode or chronograph measurement mode.
• Check that “ER” or “CHEk” is not displayed on the digital display.
• Check that the crown is firmly pressed in and screwed in to the lock position.
• Check that the band is securely fastened to the watch body.
• Check that there are no cracks, chips or other abnormalities in the watch
band or glass.
• Check that the rotating bezel rotates normally.
• Check that the time and date are set correctly.
• Check that the water depth alarm and dive time alarm are set correctly.
• Check that the second hand is moving properly.
* If the second hand is moving at two-second intervals, this indicates that the
battery is nearly worn down. Please have the battery replaced at a Citizen
Service Center.
13
PROHIBITED: Prohibited Uses During Diving
Do not use this watch for diving under the following conditions:
• When the low battery warning function has been activated
•••The second hand of the watch moves at two-second intervals when the
battery level becomes low.
• When the watch stops or when an abnormality occurs (please be careful not
to bump the watch on diving equipment, rocks or other hard objects).
• When the water depth measurement function is used outside the guaranteed
temperature range or at high altitudes
•••The temperature range over which the water depth measurement accuracy
of this watch is guaranteed is +10°C to +40°C.
•••Water depth cannot be measured at altitudes more than 4,000 m above
sea level.
• When behavior or the situation is judged to be dangerous
•••This watch is not made to be used as a preventive or emergency device
for shipwrecks or other maritime accidents.
• When the watch is used in atmospheres containing helium gas (such as during saturated diving)
•••Use of the watch under these conditions can cause failure or damage to
the watch.
12

CAUTION
-
Diving at High Altitudes or in Fresh Water
• Do not use this watch when diving at high altitudes more than 4000 m above
sea level since it is unable to measure water depth correctly under these
conditions.
• When diving at high altitudes or in fresh water, only use the watch after
receiving special safety training.
• Since this watch displays water depth by converting on the basis of sea
water (specific gravity: 1.025), the water depth displayed when diving in fresh
water is actually 2.5% deeper. For example, when the watch displays a
water depth of 20 m in fresh water, the actual water depth is 20 x 1.025 =
20.5 m.
15
<During Diving>
• Avoid ascending too rapidly. Attempting to ascend at an excessively rapid
rate can have detrimental effects on the body such as causing the bends.
Observe a safe ascent rate at all times.
• Never attempt to operate the crown underwater. This can cause a malfunction
due to impaired water resistance.
• Caution is required since the alarm may be difficult to hear due to breathing
noise underwater.
<After Diving>
• Allow a suitable rest period after diving while referring to the surface mode
(measurement of elapsed time after diving).
• Rinse off any sea water, mud or sand adhering to the watch with fresh water
after confirming that the crown is screwed in and locked in position, and then
wipe off any excess moisture with a dry cloth.
• Do not attempt to remove any debris or dirt trapped in the sensor by remov-
ing the sensor cover or poking with a sharp object. If debris should happen
to enter the sensor, rinse with fresh water. When debris cannot be removed
by rinsing, consult a Citizen Service Center.
14

the same barometric pressure, display values (for altitude and barometric
pressure) may change if the temperature changes.
PROHIBITED
-
Prohibited Uses of Altitude and Barometric
Pressure Measurement Functions
Do not use the altitude or barometric pressure measurement function of this
watch under the following conditions:
• When behavior or the situation is judged to be dangerous
• When there are sudden changes in barometric pressure and temperature
due to changes in weather conditions
• When barometric pressure is being adjusted such as in an airplane or building
• When altitude changes greatly in a short time (such as when skydiving)
CAUTION
-
Pressure Sensor
• The pressure sensor used in this watch is a high-precision device. Never
attempt to disassemble it or poke it with a sharp object.
• The altitude measurement function may not operate properly if air is not
allowed to flow to the sensor. Be careful to prevent debris and dust from
entering the sensor as much as possible. In case debris, dust or other dirt
becomes trapped in the sensor, rinse the sensor with fresh water. If the
debris cannot be removed by rinsing, please consult a Citizen Service Center.
17
B. Use of Altimeter and Barometer
CAUTION
-
Altitude and Barometric Pressure Measurement Functions
• The altitude displayed by this watch is approximate altitude as calculated by
applying external barometric pressure as detected with a pressure sensor to
the relationship between altitude and barometric pressure of an international
standard atmospheric model. Consequently, even when altitude is measured
at the same location, the displayed altitude varies if the barometric pressure
changes. In order to measure altitude correctly, it is necessary to always
correct altitude at a location where the correct altitude is clearly indicated.
For further details, refer to Section 15 entitled, “Altimeter Basic Features”.
• Since barometric pressure displayed by this watch is the external barometric
pressure detected by a pressure sensor at the location of the measurement,
the displayed barometric pressure changes if altitude changes. In addition, it
also differs from the barometric pressure indicated on weather maps (barometric pressure converted to that at 0 m above sea level). Use the barometric pressure measurement function of this watch as a general reference for
monitoring changes in barometric pressure at the same location.
• Both the altitude and barometric pressure measurement functions of this
watch are subject to the effects of temperature changes. Even in the case of
16

• Dive Alarm [D.AL]
This mode is used to display and set the depth alarm and dive time alarm.
• Altitude Memo [A.log ]
This mode is used to recall and display the altitude memos of six points
stored in memory in the altitude measurement mode.
• Surface Mode
This mode is used to automatically measure and display the elapsed time
until 24 hours from completion of diving. (This mode only displays 24 hours
of elapsed time after making a continuous dive to a depth of 1 m or more for
at least 3 minutes.)
[Water Depth Measurement Mode]
This mode is used when diving. It is used to measure and display current
water depth and dive time at 1 second intervals while diving.
[Altitude Measurement Mode]
This mode is used when mountain climbing and so forth. It is used to measure
and display altitude and barometric pressure either at 1 second or 15 minute
intervals. In addition, this mode is also used to correct altitude to measure altitude more accurately.
19
3. Digital Display
The digital display of this watch uses three major modes consisting of the
“Standard Mode”, “Water Depth Measurement Mode” and “Altitude Measurement Mode”. There are several other modes (functions) contained in the
“Standard Mode”, such as the time, calendar and alarm modes. Please refer
to the respective sections describing the use of each mode for further details.
[Standard Mode]
• Time/Calendar [TME]
This mode is used to display and correct the time and date. Measurement of
temperature and barometric pressure are also performed in this mode.
• Alarm [ALM]
This mode is used to switch the alarm on and off, and set the alarm time.
• Chronograph [CHR]
This mode is used to measure and display time with the chronograph function (measures up to 24hours).
• Log Memo [D.log]
This mode is used to recall and display the four most recent sets of diving
data automatically stored in memory during water depth measurement.
18
21
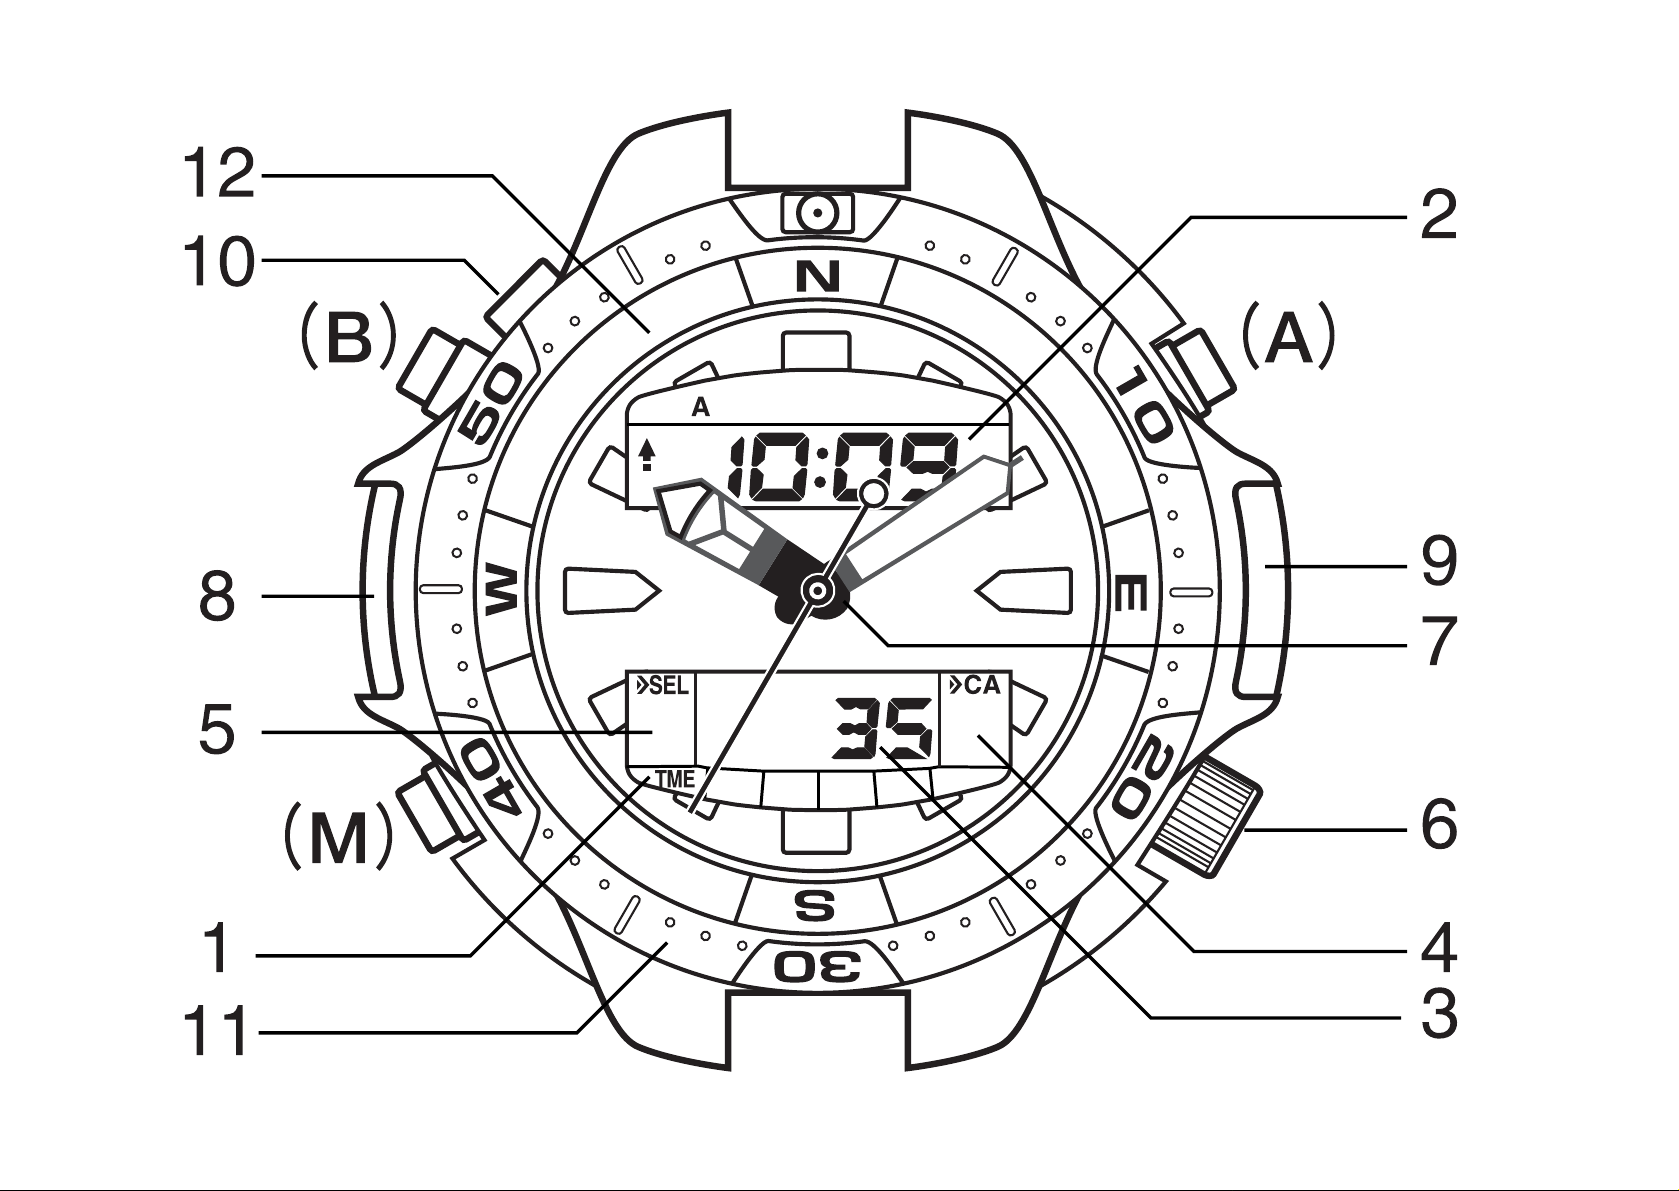
4. Names and Functions of Components
Please read this section while referring to the watch illustration shown in the
inside cover.
20
Name / Mode Time / Calendar
Switches between seconds
and date / day display
Temperature / barometric
pressure measurement
---
To correction mode
To alarm mode
To altitude measurement mode
TME
Hours, minutes
Seconds / date, day
Alarm
Switches between
on and off
Alarm monitor
---
To correction mode
To chronograph mode
ALM
Hours, minutes
ON / OFF
Chronograph
Starts and stops the
chronograph
---
Split time / reset
---
To log memo mode
CHR
Hours, minutes
Seconds,1 / 100 seconds
Press once
Button (A)
Button (B)
Button (M)
Press for at least 2
seconds
Press once
Press for at least 2
seconds
Press once
Press for at least 2
seconds
1: Mode mark
2: Digital display [1]
3: Digital display [2]
Log Memo Dive Alarm Altitude Memo Surface
Recalls the memo
---
Recalls the memo
---
---
Dive alarm monitor
--- ---
Switches display contents
---
Switches display contents
---
---
To correction mode
--- ---
To dive alarm mode To altitude memo mode To surface mode To time/calendar mode
To altitude measurement mode
D.log D.AL A.log
---
Log data Depth alarm Point data
Elapsed time
(hours, minutes)
Log data Dive time alarm Point data SF.m
[Standard Mode]

7 : Analog time: Continuously displays the current time (hours, minutes,
seconds) with the respective hands.
8 : Pressure sensor 1: Detects water pressure to measure and display water
depth.
9 : Pressure sensor 2: Detects barometric pressure to measure and display
altitude and barometric pressure.
10 : Water sensor: The watch automatically switches to the water depth
measurement mode when this water sensor gets wet (except during display
in the altitude measurement mode, during chronograph measurement and
when correcting settings in any of the modes).
11 : Rotating bezel: Elapsed time can be measured by using this rotating bezel.
12 : Compass: A rough approximation of direction can be determined from the
position of the sun by using this compass (only applicable to models
equipped with a compass).
V
Button Symbols
The button symbols used in the explanatory illustrations of each section
have the meanings indicated below.
(( )): Press the button for at least 2 seconds ( ): Press the button once.
23
[Water Depth Measurement Mode/Altitude Measurement Mode]
22
4 :
Button (A) function display: Functions of button (A) are displayed with marks
5 :
Button (B) function display: Functions of button (B) are displayed with marks
6 : Crown: Used to set analog time.
Name / Mode
Water depth measurement mode
(during measurement)
Altitude measurement mode
(during measurement)
Press once
Recalls maximum water depth/
water temperature
Starts/stops elapsed time
Press for at
least 2 seconds
Button (A)
Button (B)
Button (M)
Recalls maximum water depth/
water temperature
Stores memo of point data
Press once
---
Switches between altitude
display/barometric pressure display
Press for at
least 2 seconds
---
Measures temperature (when measuring
altitude for a fixed period of time)
Press once
---
Switches the display (within the altitude
measurement mode)
Press for at
least 2 seconds
---
To [Standard Mode]
1: Mode Mark Displays on digital display [1] Displays on digital display [1]
2: Digital display [1] Depth (m)
Altitude (m)/barometric pressure (hPa)
3: Digital display [2] Dive time (minutes, seconds) Elapsed time (hours, minutes)

<Screw-Locking Crown>
• Unscrew the crown to loosen it before turning.
• Always make sure that the crown is screwed in and locked in position after
turning.
• Do not press any of the buttons with the crown pulled out.
• Do not attempt to turn the crown when there are water droplets on the watch
or when underwater. This can allow water to enter inside the watch and
impair water resistance.
25
5. Setting Analog Time
(1) After unscrewing the crown to loosen it, pull the crown out. The second
hand stops when the crown is pulled out.
(2) Turn the crown to set the time.
(3) The second hand starts to move when the crown is returned to the normal
position.
(4) Securely screw the crown in to lock in position.
24
Normal position
Time correction position
Crown
• When the water sensor of this watch becomes wet in any of the modes of the
standard mode (except during chronograph measurement), the mode automatically changes to the water depth measurement mode.
• When button (M) is pressed for at least 2 seconds in any of the modes of the
standard mode (except during chronograph measurement), the mode
changes to the altitude measurement mode (altitude correction display).
27
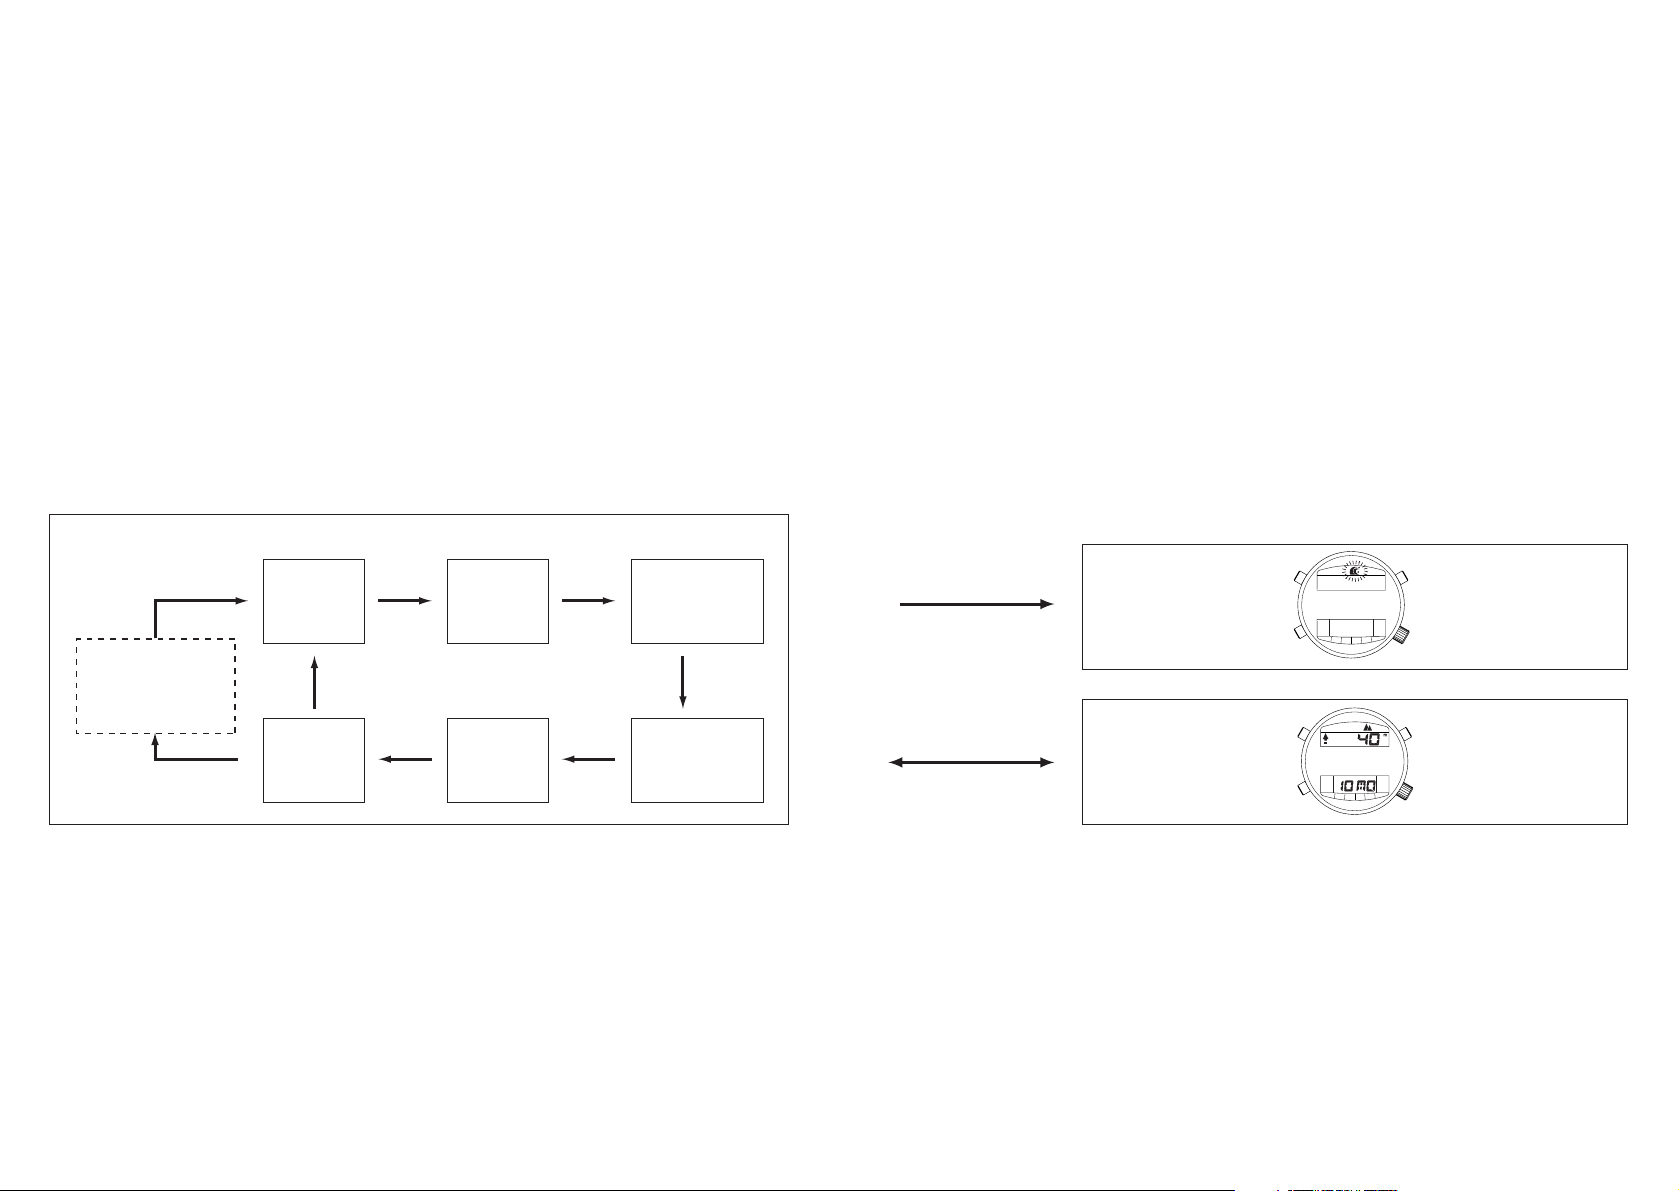
6. Changing the Mode
• The mode changes in the following order each time button (M) is pressed:
Time/calendar c alarm c chronograph c log memo c dive alarm c altitude memo c surface (after diving).
26
(M) (M)
(M)(M)
(M)(M)
(M)
(M)
* Please refer to the
section 13 entitled,
“Using the Water
Depth Measurement
Mode” for further
details.
When water
sensor gets wet
((M))
[Water Depth Measurement Mode]
(preliminary state)
[Altitude Measurement Mode] (altitude correction
display)
* Please refer to the
section 16 entitled,
“Using the Altitude
Measurement Mode”
for further details.
[Standard Mode]
Surface
*Only displayed for
24 hours after
diving.
Time/
calendar
<TME>
Alarm
<ALM>
Chronograph
<CHR>
Altitude
memo
<A.log>
Dive alarm
<D.AL>
Log memo
<D.log>

7. Using the Time / Calendar Mode
This mode is used to display the current time and date.
• The watch alternates between displaying “hours , minutes and seconds” and
“hours, minutes, date and day” each time button (A) is pressed during the
normal display.
• Temperature and barometric pressure are displayed for 3 minutes when button (A) is pressed for at least 2 seconds during the normal display.
29
* The surface mode only displays 24 hours of elapsed time after completion
of a continuous dive of at least 3 minutes duration. In other cases, pressing button (M) when the watch is in the altitude memo mode switches the
watch to the time/calendar mode.
* When none of the buttons are pressed for at least 3 minutes when the
watch is in the alarm mode, reset state of the chronograph mode, log
memo mode, dive alarm mode or altitude memo mode, the watch automatically returns to the time/calendar mode.
* The watch cannot be changed to the water depth measurement mode or
altitude measurement mode when the low battery warning function has
been activated.
28
Seconds
Hours /
minutes
Date / day
Barometric
pressure
Temperature
TME
TME
TME
(A)
(B)
(M)
(A)
((A))
(A)

* The year can be set from 1998 to 2099.
* Make sure that AM [A] and PM [P] are set correctly when using the 12-
hour timekeeping system.
* If none of the buttons are pressed for about 3 minutes when the display is
flashing, the watch automatically returns to the normal display.
* Pressing button (M) when the display is flashing immediately returns the
watch to the normal display.
* The calendar function is completely automatic. Once it is set, it does not
require adjustment for the end of the month or leap years.
B. Temperature Measurement
• Since the thermometer installed in this watch measures and displays temperature inside the watch, it is affected by body temperature when the watch is
worn. In order to measure air temperature accurately, remove the watch
from your wrist and allow it to acclimate to the environment in which temperature is to be measured for at least one hour.
• The measured temperature value of this watch should only be used as a
rough indicator of temperature.
31
* Pressing button (A) again during display of temperature and barometric pres-
sure returns the watch to the time/calendar display.
* Although the measured value of barometric pressure does not change during
the time the value is displayed, the measured value for temperature is updated every 10 seconds.
A. Setting the Digital Time and Date
(1) Press button (M) to switch to the time/calendar mode.
(2) Press button (B) for at least 2 seconds. The display flashes indicating that
the time and date can be set. The location of the display that is flashing
indicates the characters that can be set.
(3) The location on the display that is flashing changes in the order shown
below each time button (B) is pressed.
• Seconds cminutes c hours cmonth c date c day cyear c 12 / 24-hour
timekeeping system.
(4)
Press button (A) to set the characters at the location on the display that is flashing. (Pressing button (A) continuously causes the characters to advance rapidly.)
• When setting the seconds, pressing button (A) returns the seconds to
“00” seconds. (When this is done while the seconds are between 30 and
59 seconds, the minutes advance by 1 minute.)
• The 12/24-hour timekeeping system is switched between 12 and 24 hours
each time button (A) is pressed.
(5) Press button (M) to return to the normal display.
30

C. Display of Changes in Barometric Pressure
This watch is equipped with a function that automatically measures
barometric pressure on the hour. This function informs the wearer
of whether the current barometric pressure is higher or lower than
that measured for the previous hour with an arrow mark. This function is used as a rough indicator of changes in barometric pressure.
The change in barometric pressure is displayed in the time/calendar mode.
• When there has been a large rise in barometric pressure :
• When there has been a small rise in barometric pressure :
• When there has been a large drop in barometric pressure :
• When there has been a small drop in barometric pressure :
• When there has been little change in barometric pressure :No arrow
* The barometric pressure change display is canceled when the watch is
changed to the “Altitude Measurement Mode” or when all-reset is performed. In this case, the change in barometric pressure is displayed starting on the next hour.
* Barometric pressure is not measured exactly on the hour when using
chronograph measurement or when the watch is in the altitude measurement mode or water depth measurement mode. In this case, the change in
barometric pressure is displayed based on the results of comparison with
that measured two hours ago.
8. Using the Alarm Mode
Once the alarm is set (switched on), it sounds for 15 seconds at the same time
every day. When the alarm sounds, it can be turned off by pressing any button.
3332
Arrow indicating
change in
barometric pressure
[Alarm On]
Set alarm time
[Alarm Off]
Alarm on mark
(A)
(B)
(M)
<Switching the Alarm On and Off>
The alarm can be turned ON (set) and OFF (canceled) by pressing button (A).
When the alarm has been set, the alarm on mark ( ) is continuously displayed on the digital display.
ALM
ALM
(A)
(A)

9. Using the Chronograph Mode
The chronograph function provided with this watch is able to measure elapsed
time in 1/100 second units up to a maximum of 23 hours, 59 minutes and 59
seconds. After 24 hours have elapsed, the chronograph returns to the reset
display (0:00’00”00) and stops.
35
A. Setting the Alarm Time
(1) Press button (M) to switch to the alarm mode.
(2) Press button (B) for at least two seconds. The “hours” flash.
(3) Press button (A) to set the “hours”. (Pressing button (A) continuously caus-
es the characters to advance rapidly.)
(4) Press button (B). The “minutes” flash.
(5) Press button (A) to set the “minutes”.
(6) Press button (M) to return the watch to the normal display.
* If none of the buttons are pressed for about 3 minutes when the display is
flashing, the watch automatically returns to the normal display.
* Pressing button (M) when the display is flashing immediately returns the
watch to the normal display.
* If none of the buttons are pressed for about 3 minutes when in the alarm
mode, the watch automatically returns to the time/calendar mode.
<Alarm Tone Monitor>
The alarm tone can be monitored by pressing button (A) in the alarm mode.
The alarm tone can be heard for as long as button (A) is pressed.
34
*1: The chronograph automatically returns to
the measurement mode after 10 seconds.
Measurement
Stop
Split time
Hours, minutes
Seconds, 1/100 seconds
[Chronograph Reset Display]
(B)
*1
(B)
(B)
(A)
(A)
(A)
(B)
(M)
CHR

* If none of the buttons are pressed for about 3 minutes during the chrono-
graph reset display, the watch automatically returns to the time/calendar
mode.
* The mode cannot be switched during chronograph measurement (including
when split time is being displayed).
However, when the mode is switched by pressing button (M) when the
chronograph is stopped, the time when the chronograph was stopped is
maintained.
Split Time: The amount of time that elapses from the starting point to
some intermediate point.
37
A. Chronograph Measurement
<Elapsed Time>
(1) Press button (M) to switch to the chronograph mode.
(2) Press button (A) to start or stop the chronograph.
(3) Press button (B) when the chronograph is stopped to reset.
<Split Time>
(1) Press button (M) to switch to the chronograph mode.
(2) Press button (A) to start or stop the chronograph.
(3) Pressing button (B) during measurement of elapsed time displays the split
time for about 10 seconds. The most recent split time is measured and
displayed whenever button (B) is pressed. (The SP mark flashes when
split time is being displayed.)
(4) Press button (B) while the chronograph is stopped to return the watch to
the chronograph reset display.
V
Confirmation Tone
The watch produces a confirmation tone whenever the chronograph is start-
ed, stopped, reset or the split time is displayed.
36
Split time
Split time
Starting point Goal
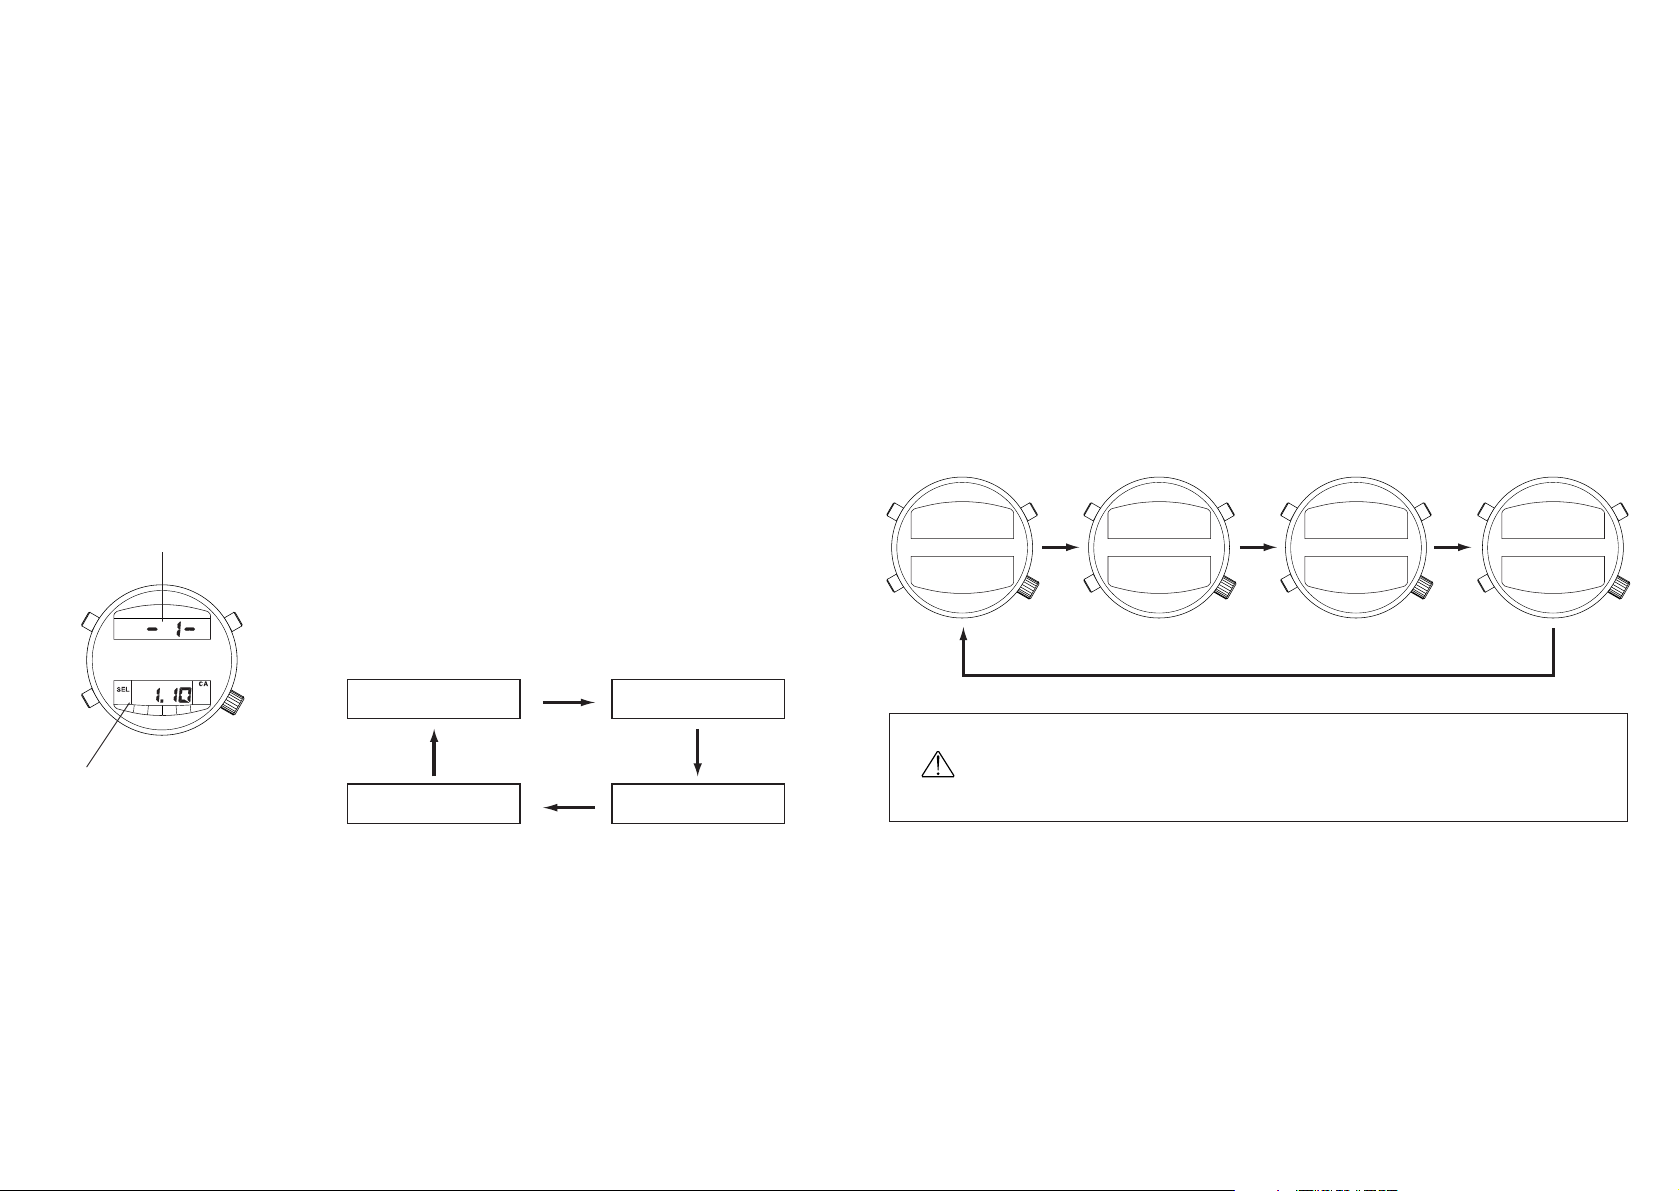
(3) The display changes in the order shown below each time button (A) is
pressed. The log data of one dive is displayed using four separate displays.
39
10. Using the Log Memo Mode
This watch automatically stores the log data from one dive (number of dive,
dive date, dive starting time, maximum depth, dive time, average depth, minimum water temperature) in memory when it is worn while diving. Log data
from a maximum of the four most recent dives can be recalled and displayed.
A. Recalling Log Data
(1) Press button (M) to switch to the log memo mode.
(2) Each time button (B) is pressed, the watch dis-
plays the four most recent sets of log data starting with the most recent log data and going
back in order.
38
Whenever a new dive is started, the log data of the oldest of the
four sets of log data is automatically deleted. It is recommended
that you record necessary data in a log book or other record
beforehand.
Number of dive on that date
Dive date
D.log
(A)
(B)
(M)
Log data of most
recent dive
Log data of fourth
most recent dive
Log data of second
most recent dive
Log data of third
most recent dive
(A) (A) (A)
(A)
Number of dive
Dive date
or switches
automatically after
2 seconds
Dive starting
time
Dive date Dive time
Average depth
Minimum water
temperature
Maximum
depth
(B)
(B)
(B)
(B)

C. Explanation of Log Data Terms
1. Number of dive: The number shown indicates the number of the dive made
on that day.
*
The dive count starts over from 1 when the day changes.
2. Dive date: Date on which the dive was made (month, date).
3. Dive starting time: Time when measurement of water depth started (when
water depth exceeded 1 meter).
4. Maximum depth: Depth at the deepest point of the dive.
5. Dive time:
Total amount of elapsed time while diving at a depth of 1 meter or
more. Measurement of dive time stops when the water depth
becomes less than 1 meter. It continues from the time it stopped
if diving is resumed at a depth of 1 meter or more within 10 minutes after measurement of dive time stopped.
• Dive time is measured up to a maximum of 99 minutes, 59
seconds. It continues measuring elapsed time from 00 seconds after 100 minutes have elapsed.
6. Average depth: Average depth for a single dive.
7. Minimum water temperature:
The lowest water temperature for a single dive.
41
* A series of hyphens (
————
) is displayed when there is no log data stored in
memory.
* When there are less than four sets of log data in memory, the log data
stored in memory is repeatedly displayed whenever button (B) is pressed.
* When there has been an abnormality or error in water depth measurement,
the displays of maximum depth and average depth flash or the letters “ER”
are displayed.
* If none of the buttons are pressed for about 3 minutes in the log memo
mode, the watch automatically returns to the time/calendar mode.
B. Deleting Log Data
All log data is deleted by simultaneously pressing buttons (A) and (B) for at least 2 seconds.
A tone confirming deletion of log data sounds
at this time.
* Individual sets of log data cannot be deleted.
40
(A)
(B)
D.log
* This watch is also equipped with a rapid ascent warning function that
sounds an alarm when the ascent rate while diving exceeds 1.5 meters in
10 seconds.
* Caution is required when using these alarms since they may be difficult to
hear depending on surrounding conditions (air bubbles, etc.) and the manner in which the watch is worn.
A. Setting the Depth Alarm and Dive Time Alarm
(1) Press button (M) to switch to the dive
alarm mode.
(2) Press button (B) for at least 2 seconds.
The dive time alarm display changes to
a display indicating the number of times
the alarm sounds, and the depth display flashes.
43
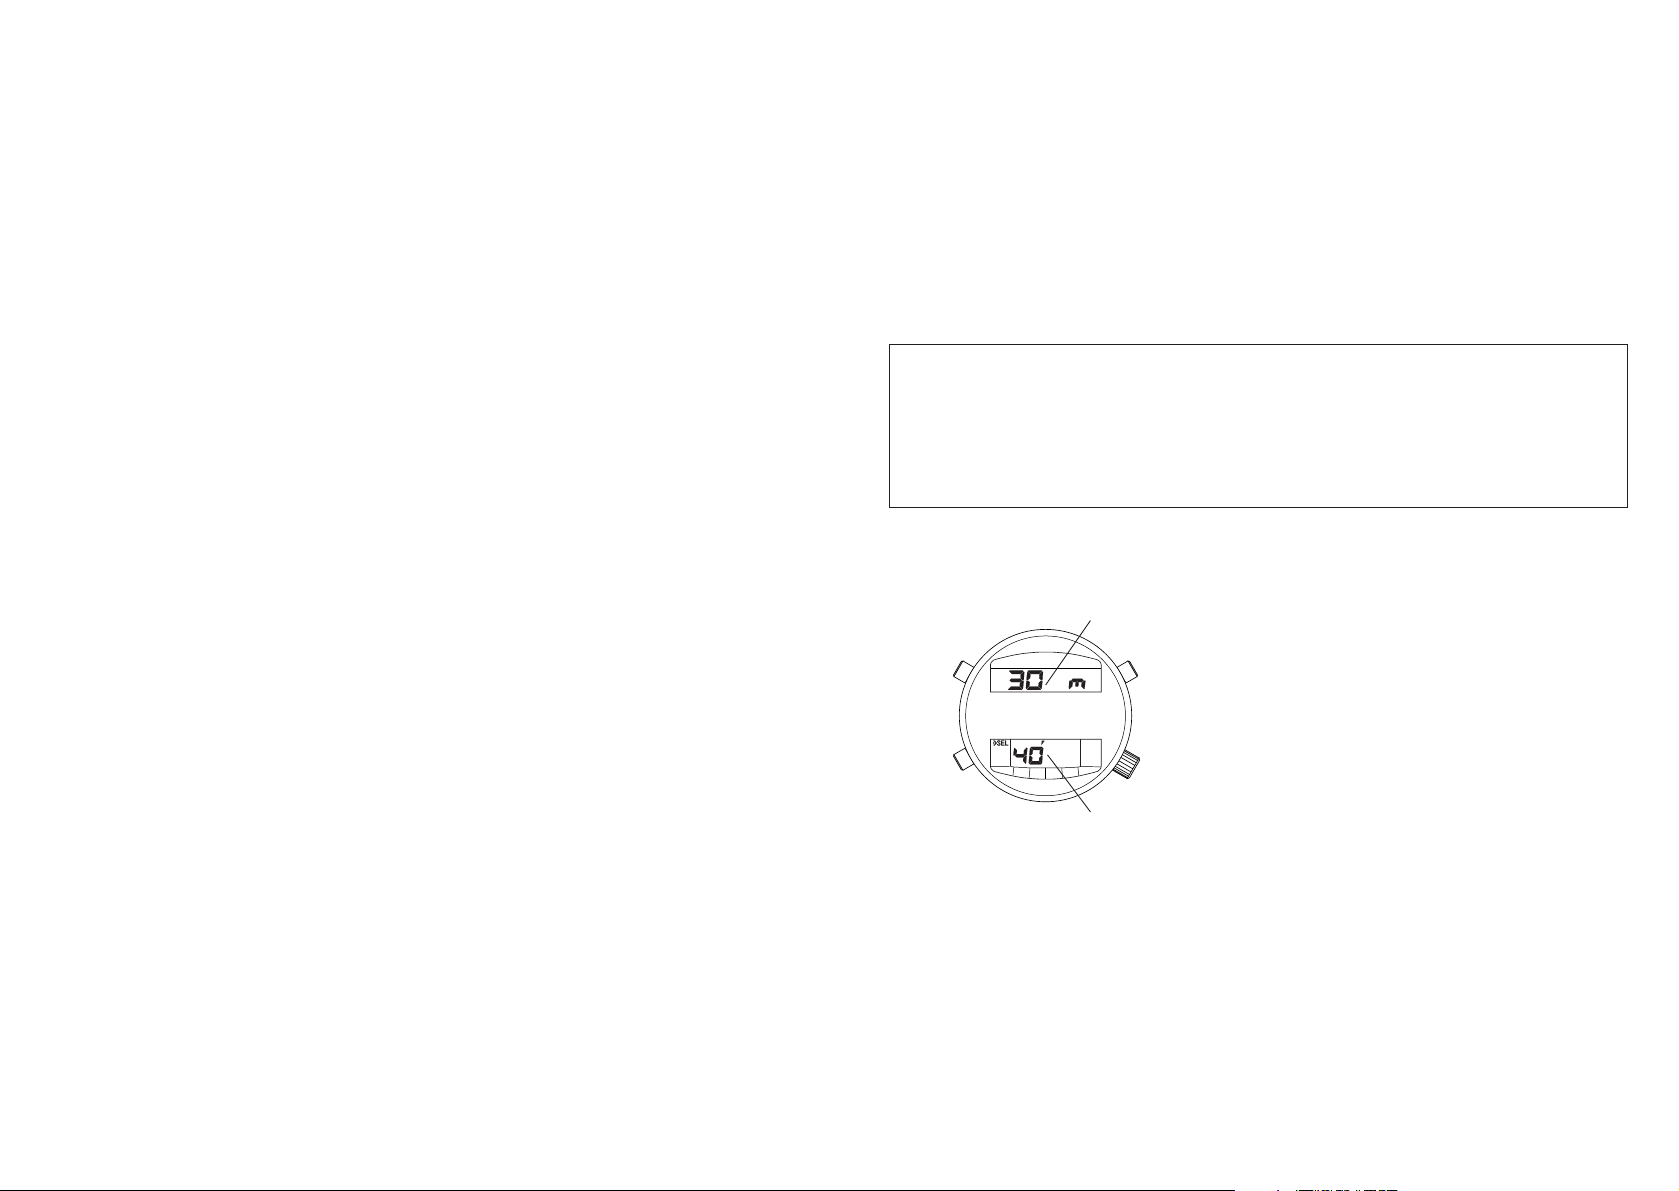
11. Using the Dive Alarm Mode
The dive alarm mode uses a depth alarm and dive time alarm. When the
alarm sounds for either the depth alarm or dive time alarm, it can be stopped
by pressing any button.
<Depth Alarm Function>
The alarm sounds for a maximum of 15 seconds when the set depth is
reached while diving. After the alarm has sounded once, it continues to sound
at 1 minute intervals (for the set number of times) when diving is continued
beyond the set depth. The alarm stops sounding when the diver returns to a
depth shallower than the set depth.
• Depth alarm setting range: 1 m to 80 m (in 1 m units)
• Number of times alarm sounds: 1 to 5 times, ON (sounds continuously for 15
seconds at 1 minute intervals), OFF (does not sound)
<Dive Time Alarm Function>
The alarm sounds for 15 seconds when the set dive time elapses after starting
a dive. This alarm sounds only once.
• Setting range: 5 to 95 minutes (5 minute increments),
——
(alarm does not sound)
42
Depth alarm
Dive time alarm (minutes)
(M)
(A)
(B)
D.AL.

* If none of the buttons are pressed for about 3 minutes when the display is
flashing, the watch automatically returns to the normal display.
* Pressing button (M) when the display is flashing immediately returns the
watch to the normal display.
* If none of the buttons are pressed for about 3 minutes when the watch is in
the dive alarm mode, it automatically returns to the time/calendar mode.
<Dive Alarm Monitor>
Each of the alarm tones of the depth alarm, dive time alarm and rapid ascent
warning alarm can be monitored for about 4 seconds each in that order by
pressing button (A) in the dive alarm mode. Each alarm tone can be heard in
sequence for as long as button (A) is pressed.
45
(3) Press button (A) to set the depth. (Pressing button (A) continuously causes
the characters to advance rapidly.)
Each time button (A) is pressed, the depth increases by 1 meter.
(4) Press button (B). The display indicating the number of times the alarm
sounds flashes.
(5) Press button (A) to set the number of times the alarm sounds.
• When desiring to have the depth alarm sound repeatedly, set the characters to “ON”, and when desiring to have the alarm not sound at all, set the
characters to “OFF”.
(6) Press button (B). The dive time display flashes.
(7) Each time button (A) is pressed, the dive time increases in 5 minute incre-
ments.
• When desiring to have the dive time alarm not sound at all, set the dive
time to “
——
”.
(8) Press button (M) to return the watch to the normal display.
44
4746
(3) The display changes in the order shown below each time button (A) is
pressed. The contents of one point memo are displayed using four separate displays.
12. Using the Altitude Memo Mode
In this mode, point memos (point number, memo date, memo time, altitude,
barometric pressure, temperature and altitude and temperature differences as
compared with the previous point) can be recalled and displayed for a maximum of six locations previously stored in memory during altitude measurement.
A. Recalling a Point Memo
(1) Press button (M) to switch to the altitude memo
mode.
(2) The point number changes in order starting with
the oldest point memo each time button (B) is
pressed
A maximum of six points can be stored in memory as point
memos. When more point memos are necessary, save the new
memo in the altitude measurement mode after first deleting all
point memos in memory.
Point no.
Memo date
A.log
(A)
(B)
(M)
(B) (B)
(B)
(B)
(B) (B)
Point no.
Memo date
or switches
automatically after
2 seconds
Memo time
Memo date
Altitude/barometric pressure
Temperature
Altitude
difference
Temperature
difference
(A) (A) (A)
(A)
* Altitude and barometric pressure are alternately displayed. Altitude is displayed
in “m”, while barometric pressure is displayed in “hPa”.
* When displaying altitude and temperature differences, a comparison is made with
the values of the previous point number. A “ “ is displayed if the altitude or temperature has risen, and a “ “ is displayed if the altitude or temperature has fallen. A series of hyphens (
----
) is displayed for the altitude and temperature differ-
ences of point no. 1 since there is no previous data for comparison.
* A series of hyphens “
----
” is displayed when there are no point memos stored in
memory.
* When there are less than six point memos in memory, only the point memos
stored in memory are repeatedly displayed whenever button (B) is pressed.
* If none of the buttons are pressed for about 3 minutes in the altitude memo
mode, the watch automatically returns to the time/calendar mode.
B. Deleting a Point Memo
All point memos are deleted by simultaneously pressing buttons (A) and (B) for at least 2
seconds. A tone confirming deletion of point
memos sounds at this time.
* Individual point memos cannot be deleted.
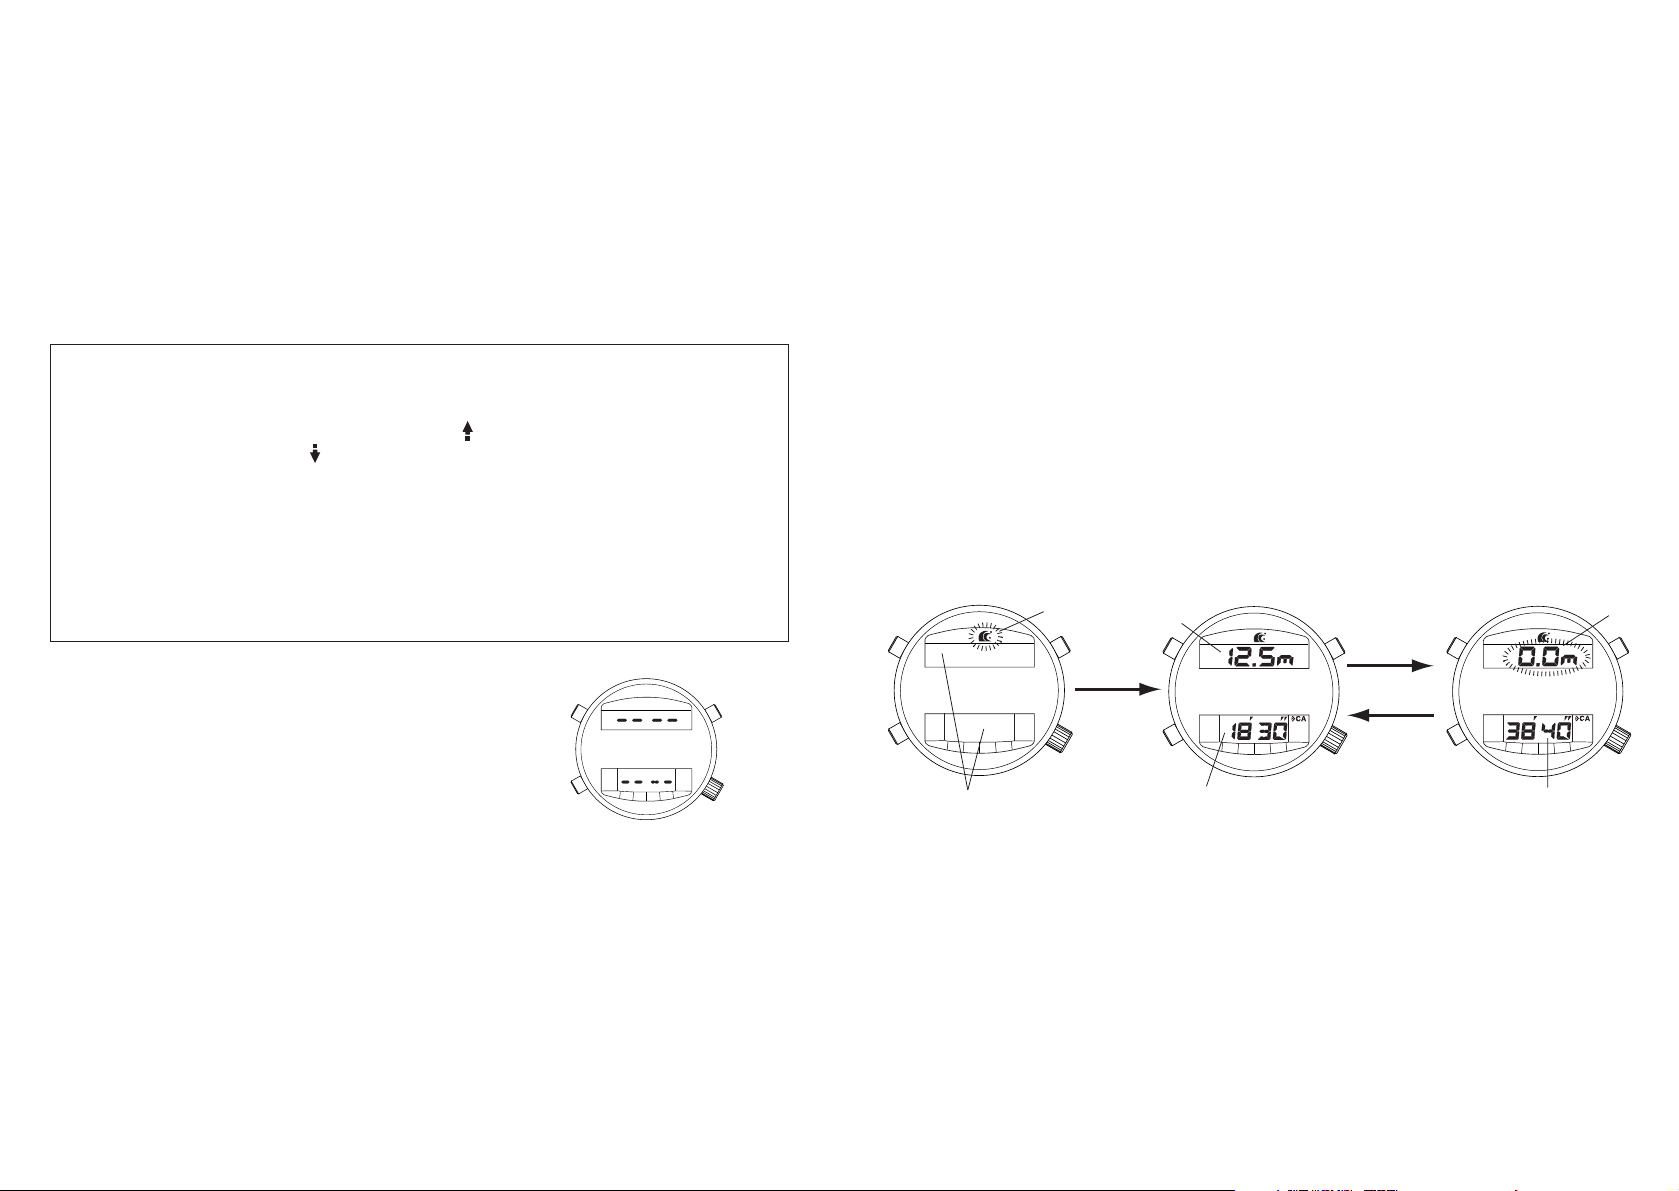
13. Using the Water Depth Measurement Mode
When the water sensor gets wet in any of the standard modes (except during
chronograph measurement), the watch automatically switches to the water
depth measurement mode (preliminary dive display). When water depth
exceeds 1 meter during the preliminary dive display, water depth measurement
begins, and water depth is measured once every second.
4948
A.log
(A)
(B)
<Preliminary Dive
Display>
<Water Depth and Time
Measurement Display>
<After Dive 0m Display>
Mark flashes
Display before switching to
preliminary dive display
When water
depth
exceeds
1 meter
Current
depth
Elapsed time
When water depth
becomes less than
1 meter
When water
depth exceeds
1 meter
0.0 m
flashes
Dive time

A. Water Depth Measurement and Display
51
• During the preliminary dive display, the mode displayed prior to switching to the preliminary dive display is maintained.
• During the water depth measurement display, maximum depth and water temperature
are displayed while button (A) is pressed.
• During the after dive 0 m display, the maximum depth and minimum water temperature of the current dive are displayed while button (A) is pressed.
<Terminating Water Depth Measurement Mode>
• Pressing button (M) for at least 2 seconds during the after dive 0 m display returns
the watch to the surface mode or time/calendar mode.
• The watch automatically returns to the surface mode or time/calendar mode after
about 10 minutes have elapsed during the after dive 0 m display. The watch changes
to the water depth measurement display when diving is resumed below a depth of 1
meter within 10 minutes after the previous dive.
After completion of a dive, make sure to carefully wipe off any
moisture from the water sensor. If the water depth measurement
mode is terminated while the water sensor is still wet, “CHEk” is
still displayed even after the watch returns to a standard mode.
Note that while “CHEk” is displayed, the watch will not switch to
the water depth measurement mode even if diving is resumed.
50
Water depth is measured every
second, and the depth at that time
is displayed.
• Measuring range: 1.0 m to 80.0 m
(0.1 m units)
* Water depth of less than 1.0 m:
0.0 m is displayed
* Water depth of more than 80.0
m: “
----
” is displayed.
* When “ER” (error) is displayed
during diving, this indicates that
there is an error in water depth
measurement at that time.
0m
1m
25.5m
80.0m
Depth

C. Measurement of Water Temperature
When the water depth exceeds 1.0 meter, the watch begins to measure water
temperature starting after 1 minute . Water temperature is displayed while button (A) is pressed during water depth measurement.
Measuring range: -9.9°C to +40.0°C (0.1°C units)
D. Warning Functions During Water Depth Measurement
This watch is equipped with the following three warning functions. These
warning functions should be used for reference purposes to ensure safe diving.
<Rapid Ascent Warning Function>
The rapid ascent warning alarm sounds when the
ascent rate while diving exceeds 1.5 meters in 10
seconds. “SLOW” is displayed on the digital display during the time the rapid ascent warning
alarm is sounding. The alarm continues to sound
until a proper ascent rate is achieved.
5352
B. Measurement of Dive Time
When water depth exceeds 1.0
meter, measurement of dive time
starts automatically. When water
depth again becomes less than 1.0
meter, measurement of dive time
stops. However, if diving is
resumed below a depth of 1.0
meter within 10 minutes after dive
time measurement stopped, the
watch continues to measure and
display dive time from the time dive
time measurement stopped.
• Measuring range: 0 minutes 00
seconds to 99 minutes 59 seconds (1 second units)
* Measurement repeats after 100
minutes have elapsed.
0m
1m
Depth
Stops
Within 10
minutes
StartsStarts
(A)

14. Using the Surface Mode
The surface mode automatically measures elapsed time following completion
of a dive for a maximum of 23 hours and 59 minutes. This can be used as a
general indicator of the amount of rest time on the surface.
* The surface mode is displayed when the water depth measurement mode is
terminated after diving to a depth of more than 1 meter for 3 consecutive
minutes in the water depth measurement mode.
* The surface mode is no longer displayed after 24 hours have elapsed follow-
ing completion of a dive.
* When the watch is in the surface mode, none of the buttons can be operated
except for switching the mode.
55
<Abnormal Depth, Warning Function>
When water depth changes rapidly by more than 4 meters in 1
second during water depth measurement, the watch interprets
this as being an abnormal depth, and “ER” and diving time are
alternately displayed on digital display [2]. This display continues until the water depth measurement mode is terminated.
“ER” is also displayed when altitude exceeds 4000 meters
when on land or when there is an abnormality in the pressure
sensor. The watch will not switch to the water depth measurement mode while “ER” is displayed.
<Water Sensor Check Warning Function>
Once the water sensor has been activated and the watch
switches to the preliminary dive display of the water depth
measurement mode, and it remains displayed for more than 1
hour without changing to the water depth measurement display, “CHEk” appears on the digital display to urge the wearer
to check the water sensor. This display continues until activation of the water sensor is canceled. While “CHEk” is displayed, none of the buttons can be operated except for mode
switching and measurement of temperature/barometric pressure in the time/calendar mode.
54
SF.M (abbreviation for surface mode)
(M)

15. Altimeter Basic Features
This watch is designed to calculate altitude from changes in barometric pressure using the relationship between barometric pressure and altitude based on
the conditions of standard atmosphere*1. “Altitude Correction” is necessary to
ensure accurate display of the altitude while using this watch.
*1: Standard Atmosphere
Standard atmosphere refers to the “ICAO Standard Atmosphere” employed by
ICAO (International Civil Aeronautics Organization in 1964). It is defined as
having a barometric pressure of 1013.25 hPa and air temperature of 15°C at
sea level. Actual atmospheric states are constantly changing with time even at
the same location.
5756
If the watch is switched to the altitude measurement mode within
24 hours after the watch entered the surface mode, “SF.ck” is initially displayed for 10 seconds. The watch then switches to the
altitude measurement mode. This is displayed to urge the wearer
to check whether or not a suitable rest period has been taken
after diving, since moving to a high altitude soon after diving can
result in the risk of decompression sickness (bends).
Barometric pressure (hPa) Altitude (m) Temperature (°C) Temperature difference per 1,000 m
540.2 5,000
-
17.5
616.4 4,000
-
11.0
701.1 3,000
-
4.5 Approx. 6.5°C
795.0 2,000 2.0
898.7 1,000 8.5
1013.25 0 15.0

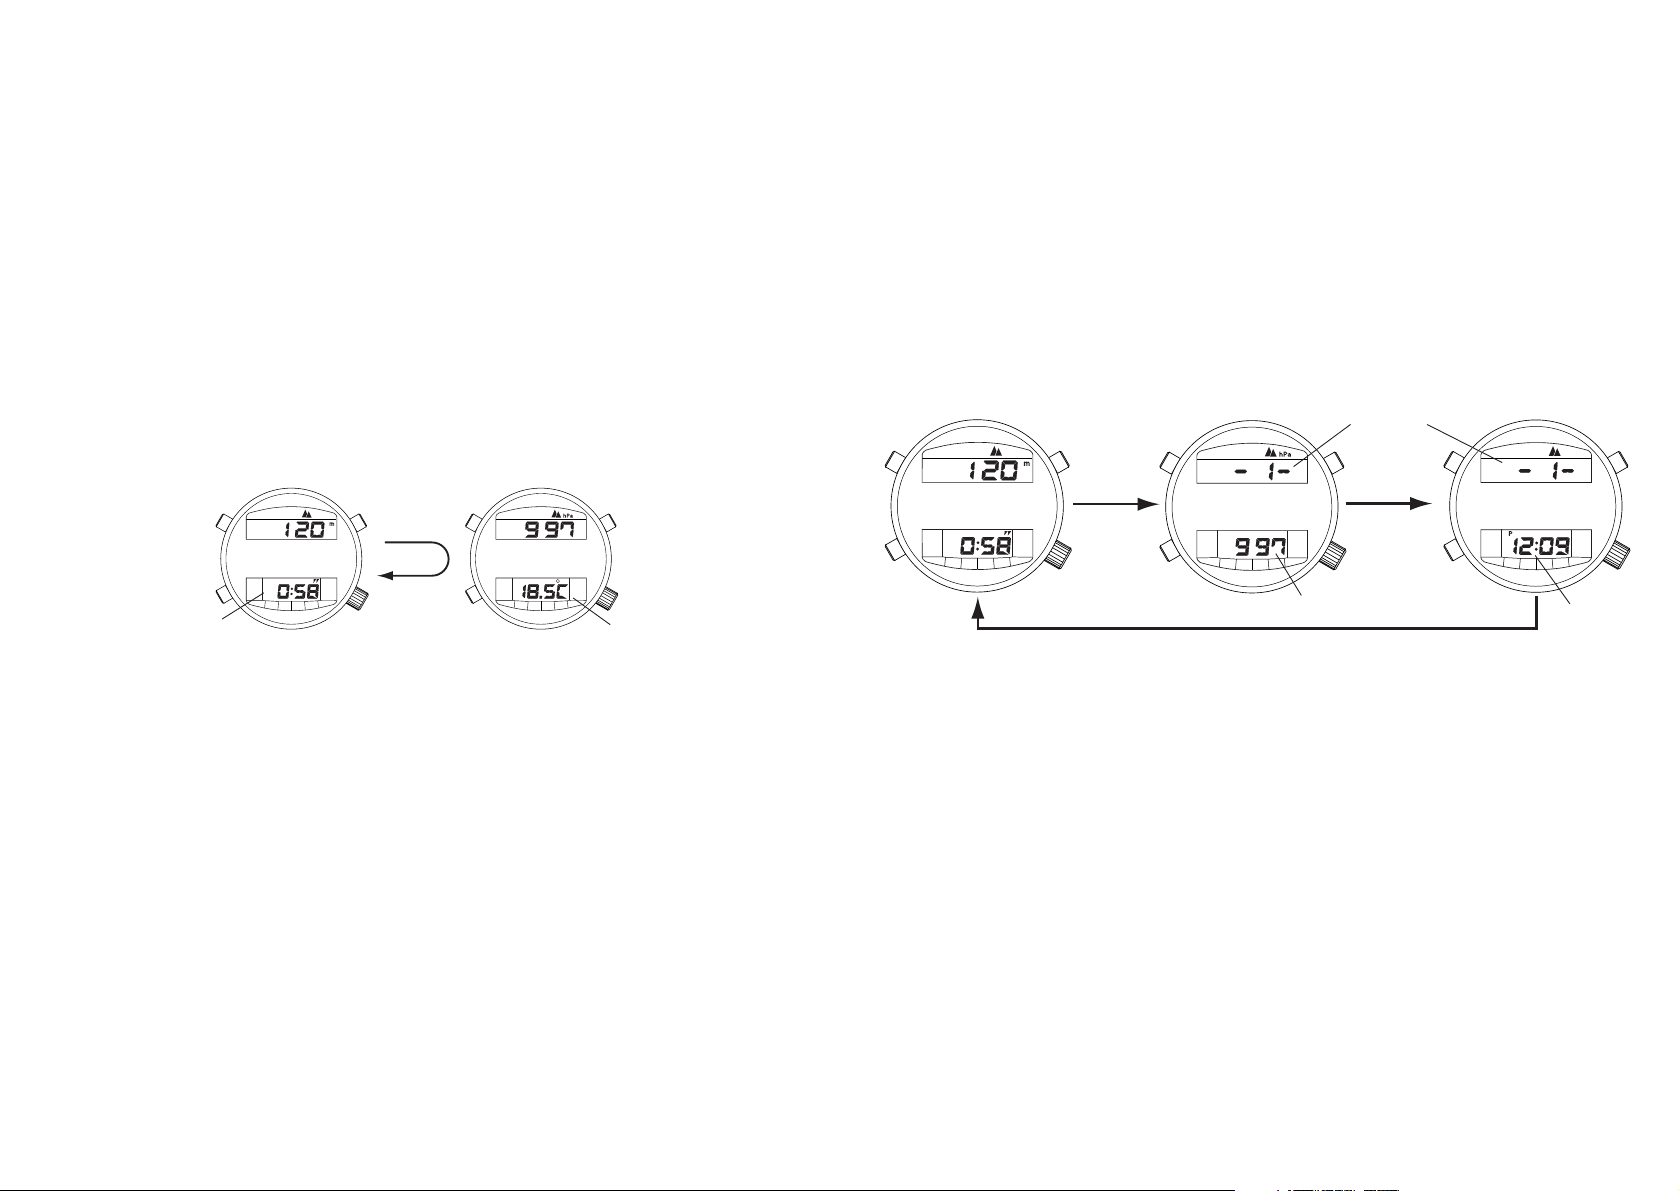
16. Using the Altitude Measurement Mode
The watch switches to the altitude measurement mode (altitude correction display) when button (M) is pressed for at least 2 seconds in any of the standard
modes (except during chronograph measurement). During altitude measurement, altitude and elapsed time from the start of altitude measurement are displayed. In addition, pressing the appropriate buttons allows the watch to save
data, including altitude, barometric pressure and time for a maximum of 6
points, in memory in the form of altitude memos.
59
<Altitude Correction>
In order to accurately measure altitude for mountain climbing and so forth, it is
necessary to set the displayed altitude to the correct altitude at a location that
serves as a reference for correct altitude (triangulation point, first order leveling
point or altitude shown on an accurate map). This procedure is referred to as
altitude correction. Since the altitude displayed on the watch changes by
about 10 meters when barometric pressure changes by 1 hPa (1 hectopascal =
1 millibar), it is necessary to correct altitude several times per day under conditions such as when the weather changes rapidly while mountain climbing.
58
Peak
1st altitude correction (triangulation
point or other reference point)
Starting point
2nd altitude correction
(reference point)
<Altitude Correction
Display>
<Continuous Altitude
Measurement Display>
<Fixed Duration Altitude
Measurement Display>
Arrow
Altitude
Date and
day
or switches
automatically
after 5
minutes
Mark flashes
Altitude
Elapsed time
or switches
automatically
after 5
minutes
Elapsed
time
(M) (M)
(M)

A. Altitude Correction
(1) Press button (B) during the altitude correction
display to change the direction of the arrow
(correcting up or down). Corrections can be
made upward when the arrow is pointing up,
and downward when the arrow is pointing
down.
(2) Press button (A) to correct the altitude. Alti-
tude is corrected in 5 m units each time button
(A) is pressed. Pressing button (A) continuously causes the change to advance rapidly.
* Altitude correction range:
-
300 m to 6300 m (in 5 m units)
A series of hyphens “
————
” is displayed when the measured altitude exceeds
the altitude correction range. Altitude cannot be corrected by pressing button
(A) when this is displayed.
* After altitude has been corrected, altitude is measured based on this correct-
ed value. This corrected value is maintained until the next time altitude correction is performed.
61
The altitude measurement mode is composed of the following three displays.
The display changes in the order shown on the previous page each time button (M) is pressed.
Altitude Correction Display :
The altitude displayed on the watch can be corrected to the actual altitude
before and during altitude measurement.
Continuous Altitude Measurement Display :
Altitude is measured every second and displayed continuously for 5 minutes,
allowing changes in altitude to be monitored continuously.
Fixed Duration Altitude Measurement Display :
Altitude is measured and displayed every 15 minutes of elapsed time measurement (00, 15, 30 and 45 minutes).
*
A series of hyphens “
————
” is displayed during measurement of altitude and
barometric pressure. None of the buttons are operable while “
————
” is displayed.
<Auto Shift Function>
• When none of the buttons are pressed for about 5 minutes during the altitude
correction display, the watch automatically switches to the continuous altitude
measurement display.
• When about 5 minutes elapse during the continuous altitude measurement
display, the watch automatically switches to the fixed duration altitude measurement display.
60
Arrow
Upward
correction
Downward
correction
(B)

B. Continuous Altitude Measurement and Fixed Duration
Altitude Measurement
<Switching Between Altitude Display and Barometric Pressure Display>
The watch switches between the altitude display and barometric pressure display whenever button (B) is pressed during the continuous altitude measurement display or fixed duration altitude measurement display.
• Altitude measuring range: -300 m to +6300 m (in 5 m units)
* “
————
” is displayed when the measuring range is exceeded.
• Barometric pressure measuring range: 452 to 1050 hPa (in 1 hPa units)
* “
————
” is displayed when the measuring range is exceeded.
* An “m” is displayed during altitude display, while “hPa” is displayed during
barometric pressure display.
63
Always make sure to perform altitude correction at a location where
altitude does not change. Since altitude is not measured during the
altitude correction display, if altitude changes during altitude correction,
the actual altitude and altitude displayed on the watch do not agree,
thereby preventing altitude from being measured accurately.
In addition, since the altitude and barometric pressure measurements
performed by this watch are affected by temperature, only perform altitude correction after allowing the watch to acclimate to the surrounding
temperature.
<Deleting Corrected Value>
The corrected altitude is deleted by simultaneously pressing buttons (A) and
(B) for at least 2 seconds during the altitude correction display. After the corrected value is deleted, approximate altitude is displayed corresponding to the
conditions of standard atmosphere. The altitude displayed at this time differs
from the actual altitude.
* When a series of hyphens “
————
” are flashing on the altitude correction dis-
play, since this may indicate that there is an abnormality in altitude measurement or altitude correction, try deleting the corrected value and repeating the
altitude correction procedure.
62
Altitude
Barometric
pressure
(B)
(M)
(B)
(A)
(2) When button (A) is pressed during point (P1 through P6) and barometric
pressure display, the time at that time is stored in memory in the form of a
time memo. After this procedure, the point number (P1 through P6) and
time are displayed for 10 seconds.
(3) Pressing button (A) during display of the point number (P1 through P6) and
time returns the watch to the altitude measurement display.
65
<Temperature Measurement>
Temperature is displayed for about 10 seconds when button (B) is pressed for
at least 2 seconds during the fixed duration altitude measurement display. The
watch also alternates between display of altitude and barometric pressure during this time.
<Storage of Altitude Memos in Memory>
(1) Press button (A) for at least 2 seconds during the continuous altitude mea-
surement display or fixed duration altitude measurement display. A tone
confirming button operation sounds and the altitude and barometric pressure at that time are stored in memory in the form of an altitude memo.
After this procedure, the point number (P1 through P6) and barometric
pressure are displayed for 10 seconds.
64
Elapsed time
(B)
(B)
Temperature
Point no.
Barometric pressure Time
<Altitude Measurement
Display>
<Altitude / Barometric
Pressure Memo Display>
<Time Memo Display>
(A)
((A))
(A)
(A)
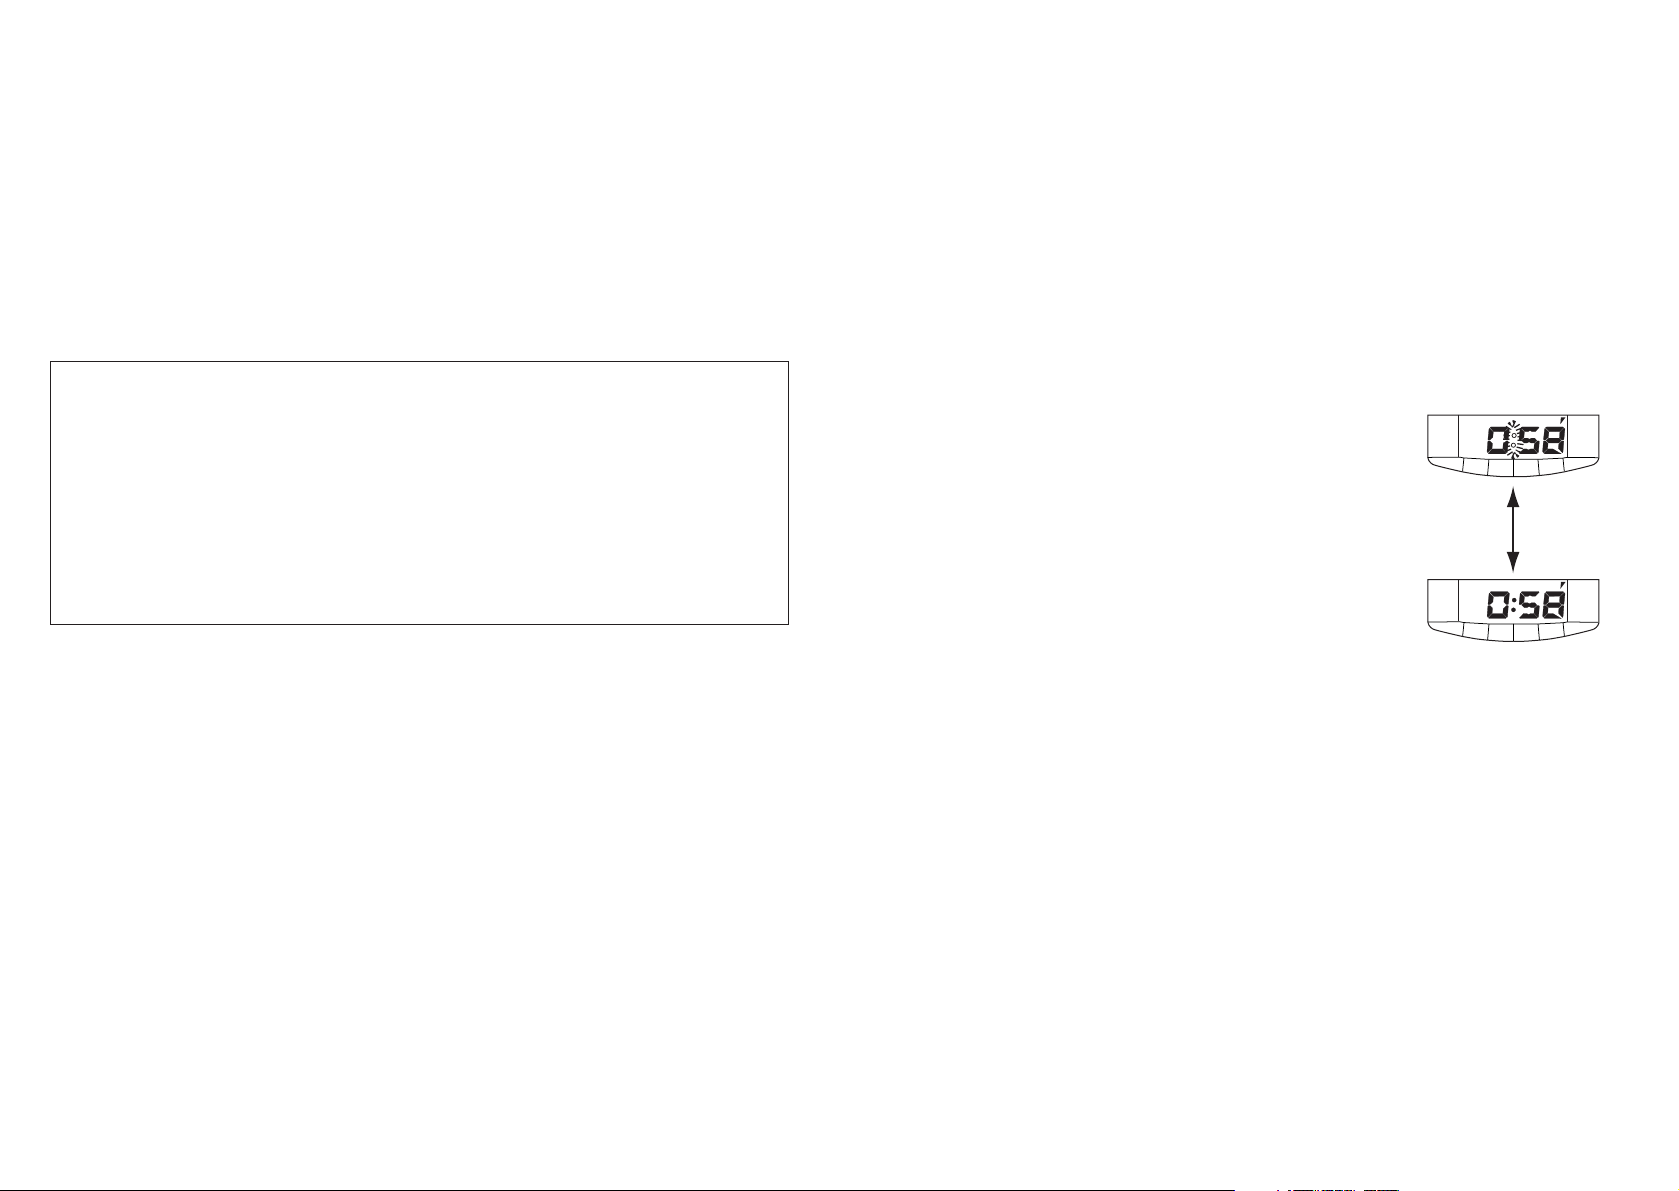
<Elapsed Time Measurement>
Measurement of elapsed time starts automatically
when the watch is initially switched to the continuous altitude measurement display.
The amount of time that elapses from the start of
altitude measurement during the continuous altitude
measurement display or fixed duration altitude measurement display is measured and displayed.
Pressing button (A) during measurement of elapsed
time causes a tone confirming button operation to
sound and makes it possible to stop and resume
measurement of elapsed time.
* During measurement of elapsed time, the colon (:)
of digital display [2] flashes. The colon is displayed continuously when measurement is
stopped.
• Elapsed time measuring range : 0 hours 00 minutes to 23 hours 59 minutes
(in 1 minute units)
* Measurement repeats after 24 hours have
elapsed.
67
* If none of the buttons are pressed for about 10 seconds after performing
the procedure of (1) or (2) above, the watch automatically returns to the
altitude measurement display. Time is not stored in memory if the procedure of (2) is not performed.
* A maximum of 6 altitude memos can be stored in memory. When button
(A) is pressed for at least 2 seconds after storing 6 points of altitude
memos in memory, “FL” and “
————
” are displayed and data is not stored in
memory. If additional memos are desired to be stored in memory, it is necessary to delete all point memos in the altitude memo mode of the standard
mode.
66
<Display when Measurement
is in Progress>
<Display when Measurement
is Stopped>
(A)

tinuous altitude measurement display. Altitude measurement and elapsed
time measurement start automatically.
(2) Switching to the continuous altitude measurement display or fixed duration
altitude measurement display during climbing provides a continuous display
of altitude and elapsed time. Pressing button (B) during altitude measurement switches the display between altitude and barometric pressure.
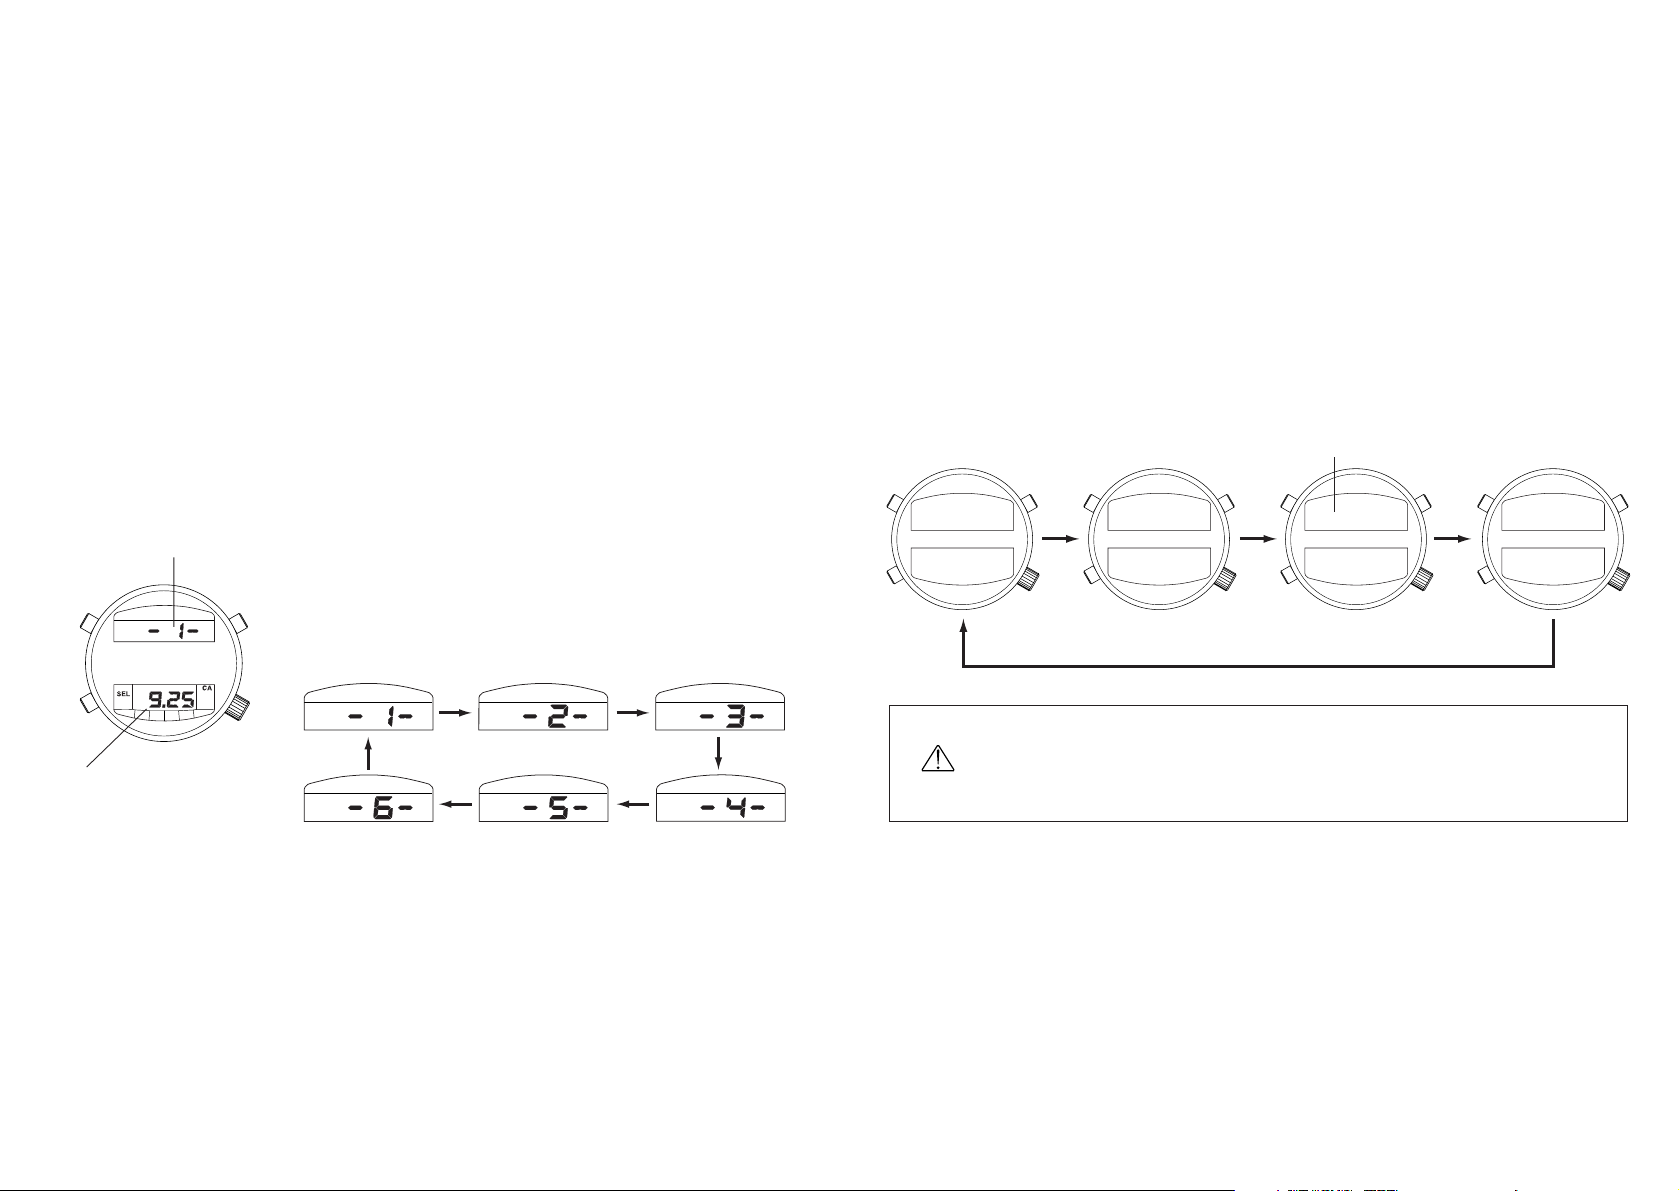
4. Storing Altitude and Time in Memory at Check Points while Climbing
(1) When button (A) is pressed for at least 2 seconds during the altitude mea-
surement display, “-1-” (point no.) is displayed which represents the first
memo. Data including altitude, barometric pressure and temperature at
that location are stored in memory in the form of an altitude memo.
(2) Press button (A) again to store the time in memory.
(3) A maximum of 6 points can be stored in memory as altitude memos by
repeating steps (1) and (2).
5. Terminating Altitude Measurement after Arriving at the Peak
(1) Stop measurement of elapsed time by pressing button (A) during the alti-
tude measurement display. When desiring to store data at the peak, per-
form the procedure for storing altitude memos in memory (4.-(1),(2)).
(2) Press button (M) for at least 2 seconds to return to the standard mode.
This terminates altitude measurement.
69
17. Altimeter Applications
The following is an introduction to specific applications of the altimeter of this
watch. Please read the explanations of the uses of each function for further
details regarding the respective operating procedure.
A. Measuring Altitude when Mountain Climbing
1. Deleting the Altitude Memo of the Previous Climb to Store Data of the
Current Climb
(1)
Press button (M) to switch to the altitude memo mode of the standard mode.
(2) Press buttons (A) or (B) to recall the altitude memos of the previous climb.
Necessary data displayed at this time should be recorded in a log.
(3) Simultaneously press buttons (A) and (B) to delete all altitude memos.
2. Ensuring Accurate Altitude Measurement Before Climbing
(1) Press button (M) for 2 seconds or more to switch from the standard mode
to the altitude measurement mode.
(2) Press buttons (A) or (B) during the altitude correction display to align the
altitude displayed on the watch with a display of correct altitude as determined by triangulation and so forth.
3. Starting Altitude Measurement
(1) Press button (M) during the altitude correction display to switch to the con-
68
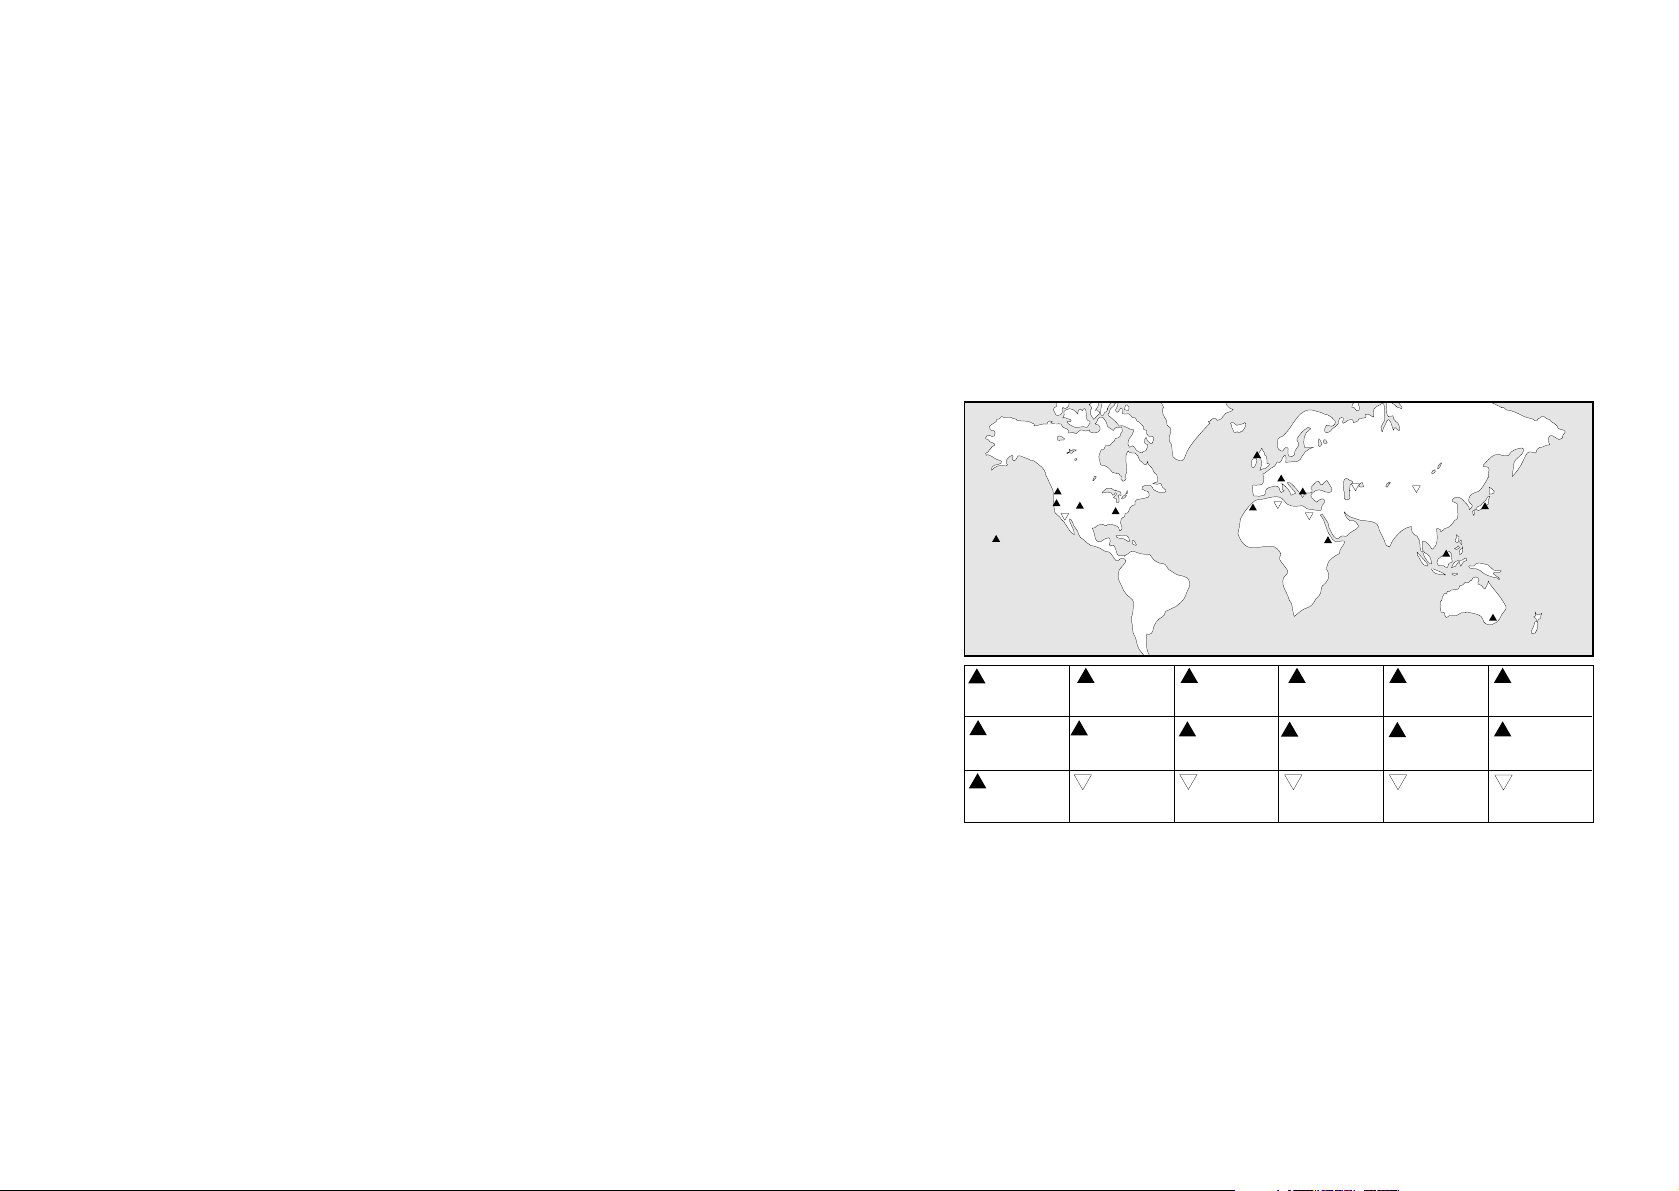
C.
Prominent Mountains and Lowlands Around the World
(Reference)
71
B. Other Applications
<Monitoring Changes in Altitude>
Switch the watch to the continuous altitude measurement display in the altitude
measurement mode when riding on a train or cable car as it travels through
the mountains. Changes in altitude can be monitored for a maximum of 5 minutes in 1 second increments.
<Determination of Altitude Difference from Starting Point>
Perform altitude measurement after correcting the altitude to 0 meters during
the altitude correction display. The altitude displayed when the destination is
reached can be read directly from the watch as the difference in altitude
between the starting point and destination.
70
1
2 3 4 5 6
7
8
9
10
11
12
14
15
16 17
18
13
Mt.Mauna Kea
(USA)
4,205 m
Mt. Toubkal
(Morocco)
4,165 m
Mt. Kosciusko
(Australia)
2,230 m
Mt. Rainier
(USA)
4,392 m
Mt. Matterhorn
(Switzerland)
4,477 m
Death Valley
(USA)
-
85 m
Mt. Shasta
(USA)
4,317 m
Mt. Olimbos
(Greece)
2,917 m
Lake Melrhir
lowlands
(Algeria) -24 m
Mt. Elbert
(USA)
4,398 m
Mt. Ras Dashan
(Ethiopia)
4,620 m
Qattara
lowlands
(Egypt) -133 m
Mt. Mitchell
(USA)
2,037 m
Mt. Kinabalu
(Malaysia)
4,094 m
Caspian Sea
lowlands
-
28 m
Mt. Ben Nevis
(UK)
1,344 m
Mt. Fuji
(Japan)
3,776 m
Turfan basin
(China)
-
154 m
6
8
2
3
14
1
4
5
7
9
15
16
10
17
18
11
12
13
19. Other Functions
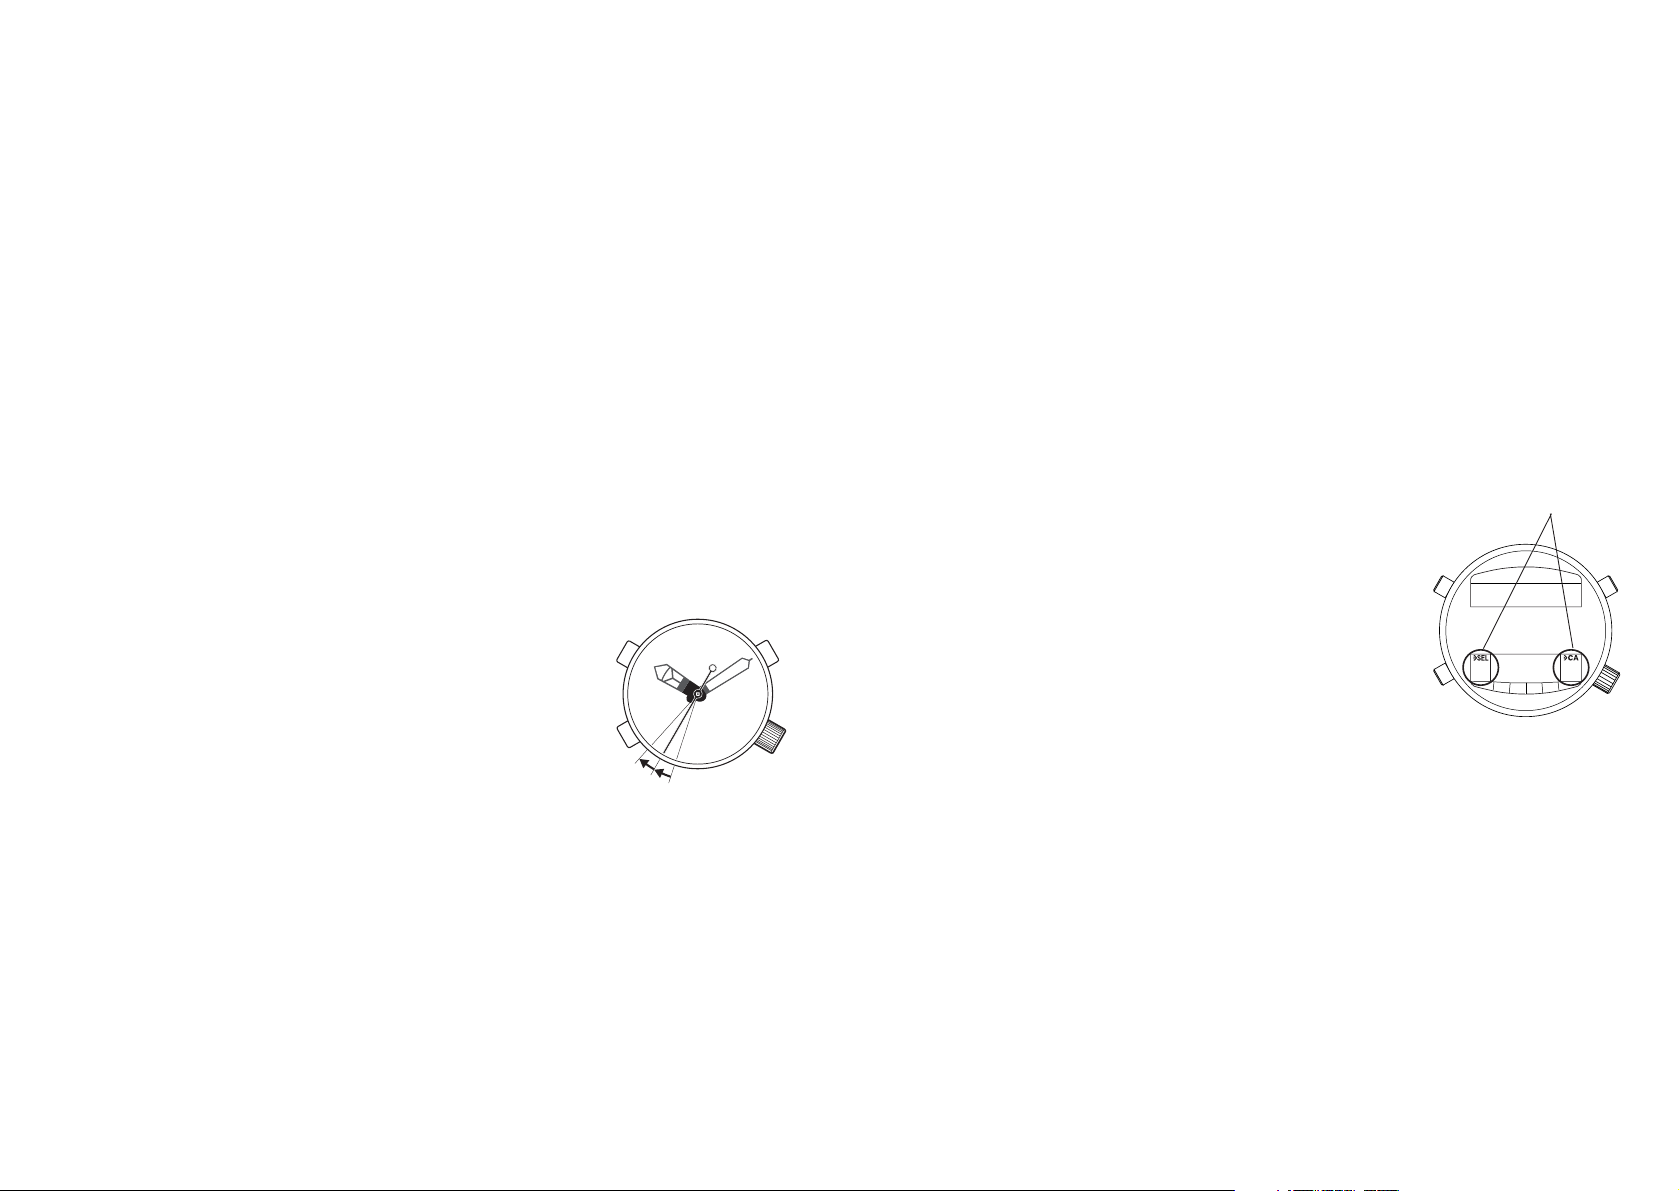
A. Button Function Display
This watch is equipped with two displays that indicate the functions of buttons
(A) and (B) using marks and abbreviations.
<Meanings of Marks and Abbreviations>
>> : Press button for at least 2 seconds
SEL : Switches display or setting
SPL : Measures and displays split time
RES : Resets chronograph measurement
CA : Recalls a display
SET : Sets a display
STA : Starts the chronograph
STP : Stops the chronograph
* These indications of button functions are not intended to indicate button func-
tions under all conditions. They are only meant to serve as a guide for operating the watch.
73
18. Low Battery Warning Function
When the battery of the watch approaches the end of its service life, the
second hand begins to move at two-second intervals (the second hand
advances by two increments in two seconds). When this happens, have
the battery replaced as soon as possible.
The functions of the watch are restricted according to the conditions described
below when the low battery warning function has been activated.
• Alarm and confirmation tones do not sound.
• Temperature cannot be measured in the time mode.
• The watch cannot be switched to the water depth mea-
surement mode (including the preliminary dive display).
When the low battery warning function is activated during
measurement of water depth, although measurement of
water depth continues until completion of that dive, the
depth alarm and dive time alarm do not sound.
• The watch cannot be switched to the altitude measurement mode. When the low battery warning function is
activated during continuous altitude measurement, the
watch switches to fixed duration altitude measurement.
72
Indicate button functions
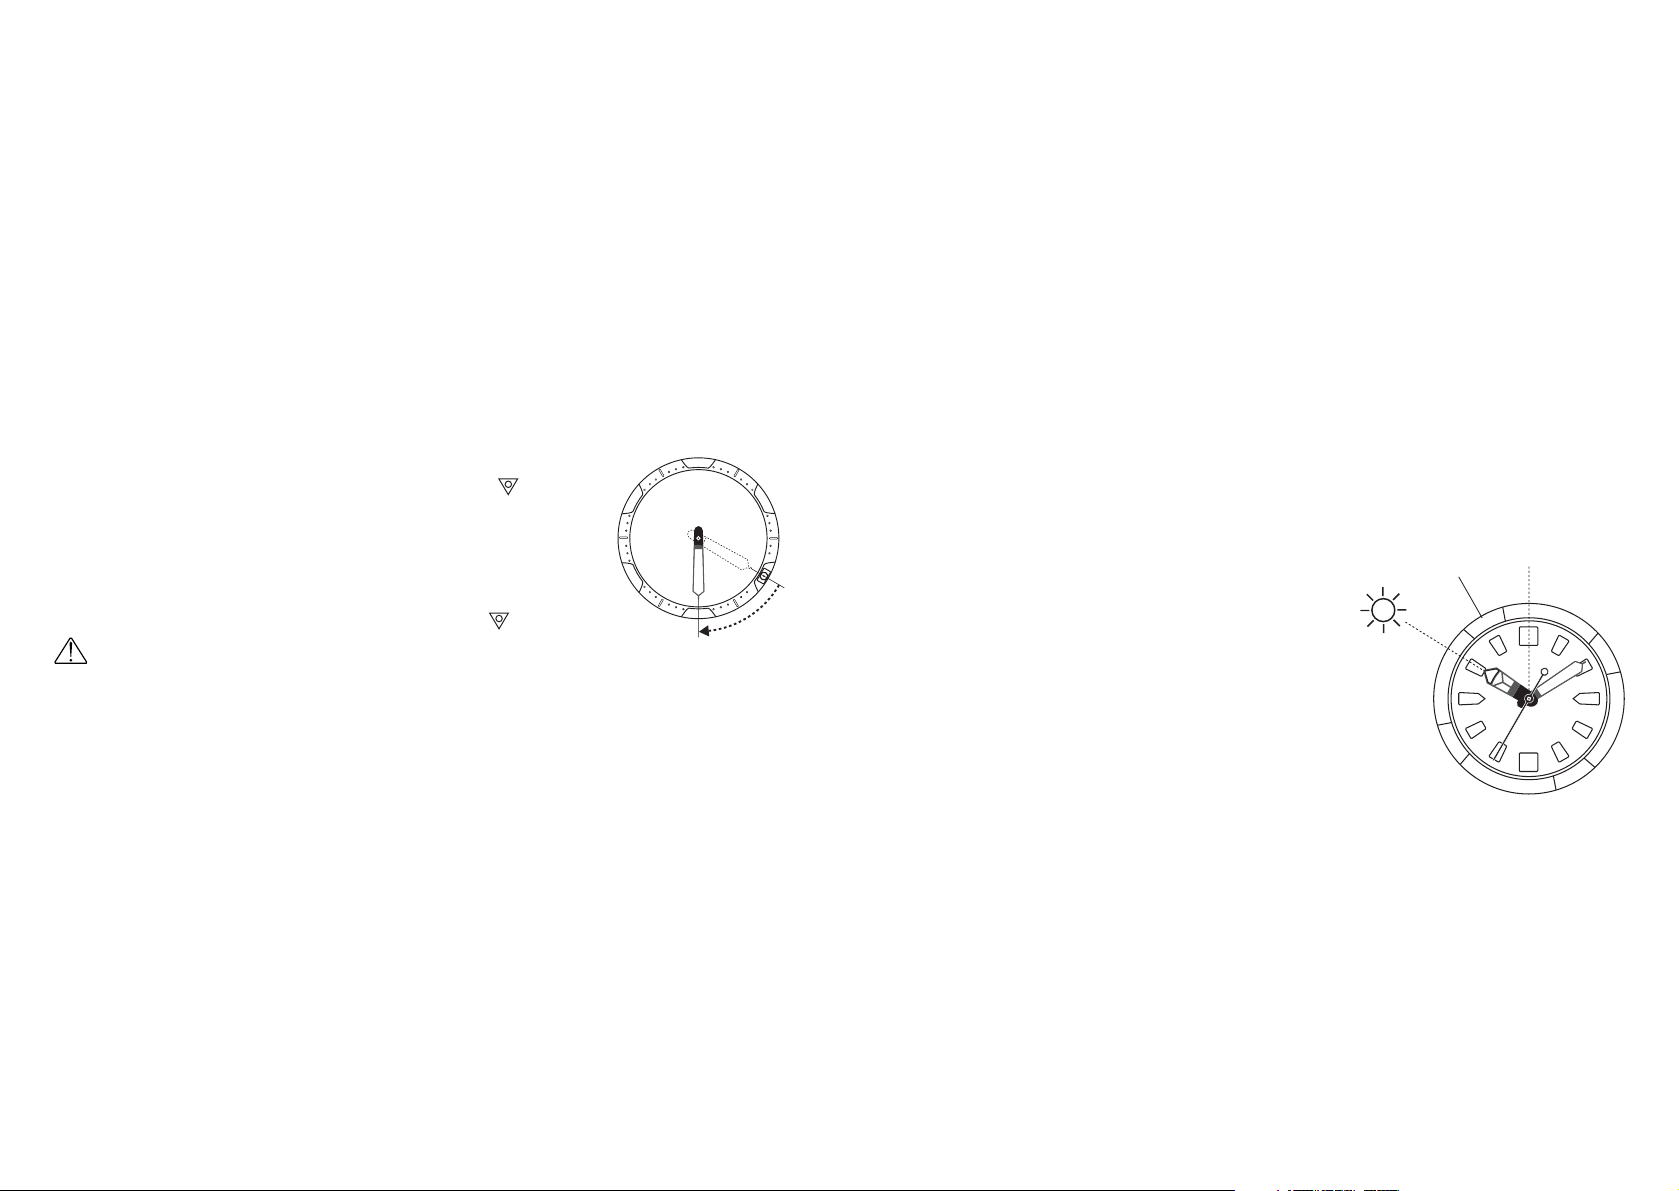
C. Compass (only applicable to models equipped with a compass)
This compass function can be used to obtain an approximate determination of
direction based on the location of the sun. This compass can only be used in
the northern hemisphere.
<Using the Compass>
With the dial facing upward, align the hour
hand of the watch with the direction of the sun.
Since the position halfway between the hour
hand and the 12:00 position on the watch dial
corresponds to south, direction can be roughly
determined by aligning the “ S” mark of the
compass with the direction of south as determined above. This determination is subject to
a certain amount of error, however, depending
on the latitude and season. The compass
should therefore only be used as a rough indicator of direction.
75
B. Rotating Bezel
The rotating bezel is a rotating ring attached to the watch body. It can be used
to measured elapsed time while diving.
<Using the Rotating Bezel>
Turn the rotating bezel to the left and align the ““ mark
(zero mark) with the minute hand before starting the dive.
Elapsed time can then be read from the minute marks on
the rotating bezel to which the minute hand is pointing.
Example : In the illustration at right, the rotating bezel
indicates that 10 minutes have elapsed since
the start of the dive (location of the ““ mark).
CAUTION
• The rotating bezel can only be rotated in the counter-clockwise direction to
prevent erroneous operation. Caution : Do not attempt to forcibly rotate the
rotating bezel in the clockwise direction since this can damage it.
• When using the rotating bezel, remember that it should only be used as a
rough indicator of elapsed time and an appropriate margin of safety should
always be allowed.
74
South
12:00
50
40
30
20
10
10 minutes have elapsed
N
W
S
E

CAUTION
• The table of no decompression limits is provided for one-time diving.
• Since the no decompression limits differ depending on the diver's physical
condition and varies among individuals, use this table as a guideline only.
• In case of diving that requires the diver to take a rest for decompression
before ascending to the surface, always follow a reliable manual exclusively
compiled for diving.
77
D. No Decompression Limits
The range within which the diver can rise to the surface without rest for
decompression is determined by the depth and elapsed time of the dive. The
ranges are called "No Decompression Limits".
A table of "No Decompression Limits" compiled according to the U.S. Navy
Diving Manual (1993 edition) is printed on the watchband of this watch (there
are some models that do not have this table on the watchband).
Example: Read the
table as follows.
In case the maximum
dive depth is 21m
and the elapsed time
is 50 minutes or
shorter, the diver is
not required to take a
rest for decompression while ascending
to the surface.
76
DEPTH.m N.D.TIME
12 200
15 100
18 60
21 50
24 40
27 30
30 25
33 20
36 15
39 10
42 10
45 5
N.D.LIMITS
No Decompression
Limits
-How to read no decompression limitsDEPTH.m N.D.TIME
(Max.depth in meters) (No decompression time)
12m ……………………200Min
15m ……………………100Min
18m ……………………60Min
21m ……………………50Min
24m ……………………40Min
27m ……………………30Min
30m ……………………25Min
33m ……………………20Min
36m ……………………15Min
39m ……………………10Min
42m ……………………10Min
45m ……………………5Min

<Replacing the Battery>
• The battery of this watch must be replaced at a Citizen Service Center.
Please have the battery replaced at a Citizen Service Center.
• When replacing the battery, the service center also inspects water resistance
and performs other checks, including replacement of the packing as necessary.
• All log memos, altitude memos and other data are erased as a result of battery replacement. Please retain a separate record of this data when it is
required for future use.
• Leaving the battery in the watch after it has become worn down can cause
leakage of battery fluid resulting in damage. It is recommended that you
have the battery replaced promptly.
• With long-term use of this watch overseas you run the risk of being unable to
have the watch serviced, if a malfunction should happen to occur, due to the
absence of a Citizen Service Center in some locations. It is recommended
that you have the battery replaced and any necessary maintenance performed prior to traveling overseas.
• Battery replacement and any accompanying inspections or parts replacement
are performed at normal service rates even during the warranty period.
79
20. Battery
<Battery Life>
The battery life of this watch is approximately 2 years after a new battery has
been installed.
Typical Conditions of Use for Battery Life of 2 Years:
Alarm: 15 seconds/day
Temperature measurement: 3 minutes/day
Water depth measurement: 50 times/year (1 hour/measurement)
Altitude measurement: 100 times/year (continuous altitude measurement: 10
minutes, fixed duration altitude measurement: 8 hours/measurement)
* Battery life varies depending on the frequency of use of the alarm and other
functions.
<Battery Installed in Watch at Purchase>
The battery pre-installed in the watch at the time of purchase is a monitor battery provided only for the purpose of viewing functions and performance.
Please be aware that the battery may not last for the full two years after purchase for this reason.
78

<Watch Cannot be Switched to Another Mode from the Water Depth
Measurement Mode>
When there has been a pressure change of 1000 hPa or more with the water
sensor still activated by perspiration and so forth at a high altitude (such as in
an airplane) and barometric pressure changes occur in a short period of time,
the water depth measurement display may not return to 0.0 m after returning to
a lower altitude (earth), thereby preventing the watch from leaving the water
depth measurement mode.
When this happens, pull the crown out after loosening the screw to cancel the
water depth measurement mode. (Since the display of analog time becomes
incorrect when the crown is pulled out, make sure to reset the analog time
after performing this procedure.)
<Watch Exhibits an Abnormal Display or Operation>
If the watch is accidentally subjected to a strong shock or intense static electricity,
the display or operation of the watch may rarely become abnormal (such as
the digital display being incorrect or the alarm sounding continuously). When this
happens, perform the all-reset procedure as described in Section 23 “All-Reset”.
If the problem is still not resolved even after the all-reset procedure has been
performed, please consult your nearest Citizen Service Center.
81
21. Troubleshooting
<When the Second Hand Moves at Two-Second Intervals>
The low battery warning function is activated when the battery approaches the
end of its service life. Have the battery replaced promptly when this occurs.
<CHEk Remains Displayed for a Long Time>
It is possible that the water sensor is continuing to operate due to the presence
of sand, dirt, perspiration or other debris on the sensor. When this happens,
rinse off the debris with water and carefully wipe off any moisture with a dry
cloth.
<ER Remains Displayed for a Long Time>
• ER is displayed during use on land (excluding locations at an altitude of 4000
m or higher).
• ER remains displayed even when considerable time has passed after diving.
In the above cases, there is the possibility of a problem with the pressure sensor. When this happens, discontinue using the watch and consult your nearest
Citizen Service Center.
80

8382
Minor exposure
to water
(washing face,
rain, etc.)
Dial or Case (case back)
Indication
Specifications
Water-resistant
to 200M
Examples of use
OK OK
Moderate exposure
to water (washing,
kitchen work,
swimming, etc.)
OK
Marine sports
(skin diving)
OK
Scuba diving
(with air tank)
NO
Operation of the
crown with
moisture visible
AIR DIVER'S 200M
22. Care for Long Term Use
WARNING: Water Resistance Performance
This watch is water resistant to 200 meters.
Although it can be used for air diving using an air
tank (scuba diving), it cannot be used for saturation
diving involving the use of helium gas.
<Maintaining Water Resistance>
Please have your watch inspected at a Citizen Service Center once every 1-2
years to maintain water resistance. Have the packing, glass, crown or other
parts replaced as necessary.
NO
Saturation diving
(helium enriched
enviroment)

CAUTION: Luminous Dial
• The luminous paint used for the dial of this watch is mainly made from a
luminescent material, which is harmless to the human body and the environment since it contains no toxic substances such as radioactive materials.
This luminous paint stores light of the sun and indoor lighting and emits light
in a dark place. However, its luminance gradually fades because it discharges stored light. The duration that the luminous paint emits light differs
depending on the illuminance and distance from the light source when it
stores light. If the luminous paint stores insufficient light, it will not emit light
in a dark place, or even if it emits light, its luminance rapidly fades. Therefore, carefully expose the luminous dial to light so that the luminous paint
stores sufficient light especially before diving. It is recommended that you use
an underwater flashlight to apply light to the watch during diving.
85
CAUTION
• Be sure to use the watch with the crown pressed in (normal position). If your
watch has a screw-type crown, be sure to tighten the crown completely.
• Do NOT operate the crown with wet fingers or when the watch is wet. Water
may enter the watch and compromise water-resistance.
• If moisture has entered the watch, or if the inside of the crystal is fogged up
and does not become clear within a day, immediately take the watch to a
Citizen Service Center for repair. Leaving the watch in such a state will allow
corrosion to form inside.
• If seawater enters the watch, place the watch in a box or plastic bag and
immediately take it in for repair. Otherwise, pressure inside the watch will
increase, and parts (crystal, crown, buttons, etc.) may come off.
CAUTION : Repairs performed on this watch
All repairs performed on this watch, including battery replacement, are to be
performed by a Citizen Service Center. Request repairs or inspection to a
Citizen Service Center.
84

CAUTION: Operating environment
• Use the watch within the operating temperature range specified in the instruction manual.
Using the watch where temperatures are outside the specified range may
result in deterioration of functions or even stoppage of the watch.
• Do NOT use the watch in places where it is exposed to high temperature,
such as in a sauna.
Doing so may result in a skin burn.
• Do NOT Ieave the watch in a place where it is exposed to high temperature,
such as the glove compartment or dashboard of a car.
Doing so may result in deterioration of the watch, such as deformation of
plastic parts.
• Do NOT place the watch close to a magnet.
Timekeeping will become inaccurate if you place the watch close to magnetic
health equipment such as a magnetic necklace or a magnetic latch of a
refrigerator door, a handbag clasp or the earphone of a mobile phone. If this
has occurred, move the watch away from the magnet and reset the time.
87
CAUTION: Keep your watch clean.
• Dust and dirt tend to collect in gaps in the back of the case or band. Accumulated dust and dirt may cause corrosion and soil your clothing. Clean the
watch occasionally.
Cleaning the Watch
• Use a soft cloth to wipe off dirt, perspiration and water from the case and
crystal .
• Use a soft, dry cloth to wipe off perspiration and dirt from the leather band.
• To clean a metal, plastic, or rubber watchband, wash away dirt with mild
soap and water. Use a soft brush to remove accumulated dust and dirt from
the gaps in the metal band. If your watch is not water resistant, take it to a
Citizen Service Center.
• Avoid using solvents (thinner, benzine, etc.), as they may mar the finish.
WARNING: Handling of the battery
• Keep the battery out of the reach of small children. If a child swallows the
battery, contact a physician immediately.
86

23. All-Reset
The all-reset procedure is used to return all functions of the watch, including
the time and calendar, to their initial states. Perform this all-reset procedure
when the display of the watch is abnormal and after replacing the battery.
(1) Loosen the crown screw and pull the crown out.
(2) Press all three buttons simultaneously. A tone
confirming the all-reset procedure sounds.
(3) Push the crown in to the normal position. A tone
confirming this operation sounds.
(4) After resetting the analog time, screw the crown in
to the lock position.
This completes the all-reset procedure. After performing this procedure, only use the watch after
first correctly resetting the display of each mode.
89
• Do NOT place the watch close to household appliances that generate static
electricity.
Timekeeping may become inaccurate if the watch is exposed to strong static
electricity, such as is emitted from a TV screen.
• Do NOT subject the watch to a strong shock such as dropping it onto a hard
floor.
• Avoid using the watch in an environment where it may be exposed to
chemicals or corrosive gases.
If solvents, such as thinner and benzine, or substances containing such
solvents come in contact with the watch, discoloration, melting, cracking, etc.
may result. If the watch comes in contact with mercury used in thermometers,
the case, band or other parts may become discolored.
88
All log data and altitude memos are erased when the all-reset
procedure is performed. Make sure to retain a separate
record of this data when it is required for future use.
(A)
(B)
(M)
TME
A.log
ALM
D.AL.
CHR
D.log

* The effects of changes in temperature (per 10°C) are as shown below.
Altitude: Max. 120 m / Barometric pressure: Max. 12 hPa
* Guaranteed accuracy temperature range: -20°C to +40°C
5. Temperature measurement accuracy : Displayed value ±3°C
6. Watch operating temperature range :
-
20°C to +60°C
7. Display Functions
• Time: Hours, minutes seconds
• Calendar: Date, day (year and month displayed only during setting)
• Alarm: Hours, minutes, ON/ OFF
• Chronograph: Hours, minutes, seconds, 1/100 seconds, split time (24 hour
register)
• Log memo: Log data of four most recent dives; number of dive, dive date,
dive starting time, maximum depth, dive time, average depth, minimum
water temperature
• Depth alarm: 1 to 80 m (1 m units), number of times alarm sounds (0
-
5
times or continuously)
• Dive time alarm: 5 to 95 minutes (5 minute units)
• Altitude memo: Maximum of 6 points can be stored in memory as altitude
memos; point number (1 through 6), memo date, memo time (hours, minutes), altitude, barometric pressure, temperature, and altitude and temperature differences (as compared with the previous memo)
• Surface mode: Measurement of elapsed time after diving (24 hour timekeeping system)
91
24. Specifications
1. Model : C900
2. Timekeeping accuracy : Within ±20 seconds per month (when worn at normal temperatures of +5°C to +35°C)
3. Water depth measurement accuracy : ±(3% of displayed value +30 cm), provided that the working temperature is constant
* Guaranteed accuracy temperature range: +10°C to +40°C (the
accuracy of water depth measurement is affected by changes in
the temperature at which the watch is worn)
4. Altitude / barometric pressure measurement accuracy
Accuracy when measured at a constant temperature:
Altitude:Altitude of 3000 m or less above sea level: ± (5% of altitude differ-
ence + 10 m)
Altitude of 3001 m or more above sea level: ± (8% of altitude difference + 10 m)
* Altitude measurement accuracy is the relative accuracy when
measured based on standard atmosphere after correcting altitude.
Barometric pressure : Altitude of 3000 m or less above sea level: ± (5% of
barometric pressure difference + 1 hPa)
Altitude of 3001 m or more above sea level: ± (8% of barometric
pressure difference + 1 hPa)
* Only use the display of barometric pressure as a rough indicator
for determining changes in barometric pressure.
90

• Temperature measurement: -9.9°C to +40.0°C (0.1°C units)
• Altitude measurement:
-
300 to +6300 m (5 m units)
• Barometric pressure measurement: 452 hPa to 1050 hPa (1 hPa units)
• Elapsed time measurement: 24 hour timekeeping system (1 minute units)
• Water depth measurement: 1.0 m to 80.0 m (0.1 m units)
• Diving time measurement: 00 minutes 00 seconds to 99 minutes 59 sec-
onds (1 second units)
8. Other Functions :
Altitude correction function, barometric pressure change display,
water sensor, rapid ascent warning function, abnormal depth warning function, water sensor check warning function, low battery warning function and button function display
9. Battery Used : Lithium battery, 1 pc.
10. Battery Life :
Approx. 2 years (after installing a new battery); refer to Section 20
“Battery” for details regarding the conditions for estimating battery
life.
* Specifications are subject to change without notice.
92
 Loading...