


 Loading...
MA1810-EB © 2018 CASIO COMPUTER CO., LTD.
Operation Guide 5560
Contents
Basic Operations
Watch Face Items
Navigating Between Modes
Mode Overview
Using the Crown
Hand and Day Indicator Movement
Solar Charging
Using Mobile Link with a Mobile Phone
Getting Ready
AInstall the required app on your phone. B Configure Bluetooth settings.
C Pair the watch with a phone.
Auto Time Adjustment
Configuring World Time Settings
Viewing Stopwatch Data
Configuring Timer Settings
Setting the Alarm
Adjusting Hand and Day Indicator Alignment
Phone Finder
Configuring Watch Settings
Returning the Watch to Its Factory Default Settings
Changing the Home City Summer Time Setting
Checking the Watch Charge Level
Connection
Connecting with a Phone
Canceling a Connection with a Phone
Using the Watch in a Medical Facility or
Aircraft
Unpairing
After Purchasing Another Phone
Watch Settings
Setting the Time/Date
Configuring Dual Time Settings
Swapping Your Current Location Time and
Dual Time Settings
Stopwatch
Measuring
Measuring a Split Time
Timer
Setting the Time
Using the Timer
Alarm
Configuring Alarm Settings
Turning the Alarm On or Off
Stopping the Alarm
Light
Turning On the Illumination Light
Adjusting Hand and Day Indicator
Alignment
Adjusting Hand and Day Indicator Alignment
Moving to Another Time Zone
Other Information
Summer Time Switching
Supported Phones
Specifications
Mobile Link Precautions
Copyrights and Registered Copyrights
Troubleshooting
1

Operation Guide 5560
Basic Operations
This section provides an overview of the watch and its operations.
Note
●The illustrations included in this operation guide have been created to facilitate explanation. An illustration may differ somewhat from the item it represents.
Watch Face Items


|
|
|
|
|
|
|
||
|
A Day of week
In the Calendar Mode, the mode hand points to the current day of the week.
B [ST]
In the Stopwatch Mode, the mode hand points to [ST].
C [TR]
In the Timer Mode, the mode hand points to [TR].
D [AL]
In the Alarm Mode, the mode hand points to [AL].
E Charge level
The second hand indicates the current battery charge level in this area when (D) is pressed in the Calendar Mode.
F e
When the watch is connected with a phone, the second hand points to e.
G [R]
When the watch is standing by for connection with a phone, the second hand points to [R].
H [A] / [P]
When configuring time settings in your current location (Home City), the second hand indicates whether it is an a.m. time or a p.m. time.
[A]: AM
[P]: PM
I Alarm settings
In the Alarm Mode, the second hand indicates if the alarm turned on or off.
[ON]: Alarm turned on [OFF]: Alarm turned off
Navigating Between Modes
Press (A) to cycle between modes.
●Hold down (A) for about two seconds to enter the Calendar Mode.
Calendar Mode
|
30 |
A |
A |
Alarm Mode |
Stopwatch Mode |
Timer Mode
AA
●Connecting with a Phone
Hold down (C) for about two seconds to establish a connection with a phone.
●To disconnect, press any button.
●The watch cannot connect with a phone while a stopwatch measurement or timer operation is in progress.
Before connection |
After connection |
|
C |
30 |
30 |
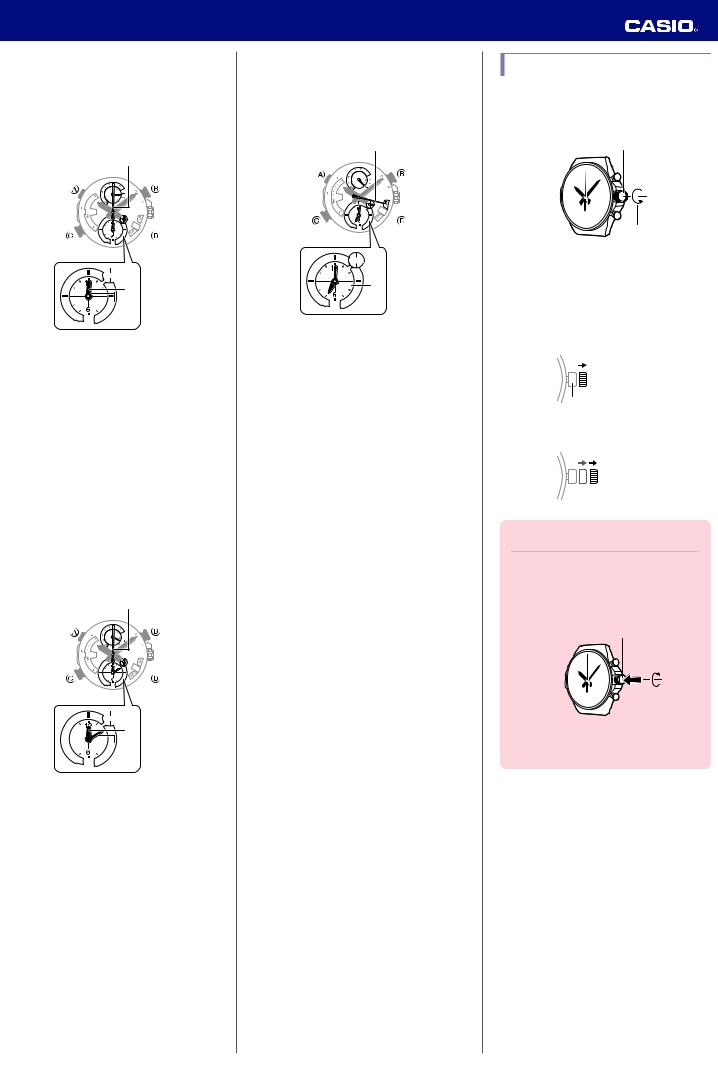
Mode Overview
● Calendar Mode
In this mode, the main hour and minute hands indicate the current time in your current location (Home City), while the dial hour and minute hands show another time (Dual Time).
Illumination
|
30 |
Charge level


ACurrent day of the week in your current location (Home City)
BCurrent second in your current location (Home City)
C Dual Time
D Dual Time 24-hour hand
The hand points to the A-side for a.m. times, and to the P-side for p.m. times.
Checking the Charge Level
Press (D) to have the second hand indicate the current battery charge level.
lChecking the Charge Level
Swapping the Current Location Time and World Time
Hold down (B) for about three seconds.
Phone Finder
Hold down (D) for about 1.5 seconds.
Any button
2
Operation Guide 5560
● Stopwatch Mode
In this mode, the main hour and minute hands indicate the current time in your current location (Home City), while the other hands show elapsed time as measured by the stopwatch.
Start/
Stop
30
Split/
Reset


A Stopwatch seconds
B Stopwatch hours
C Stopwatch minutes
D Stopwatch 24-hour hand
The hand points to the A-side for hours 0 through 11, and to the P-side for hours 12 through 23.
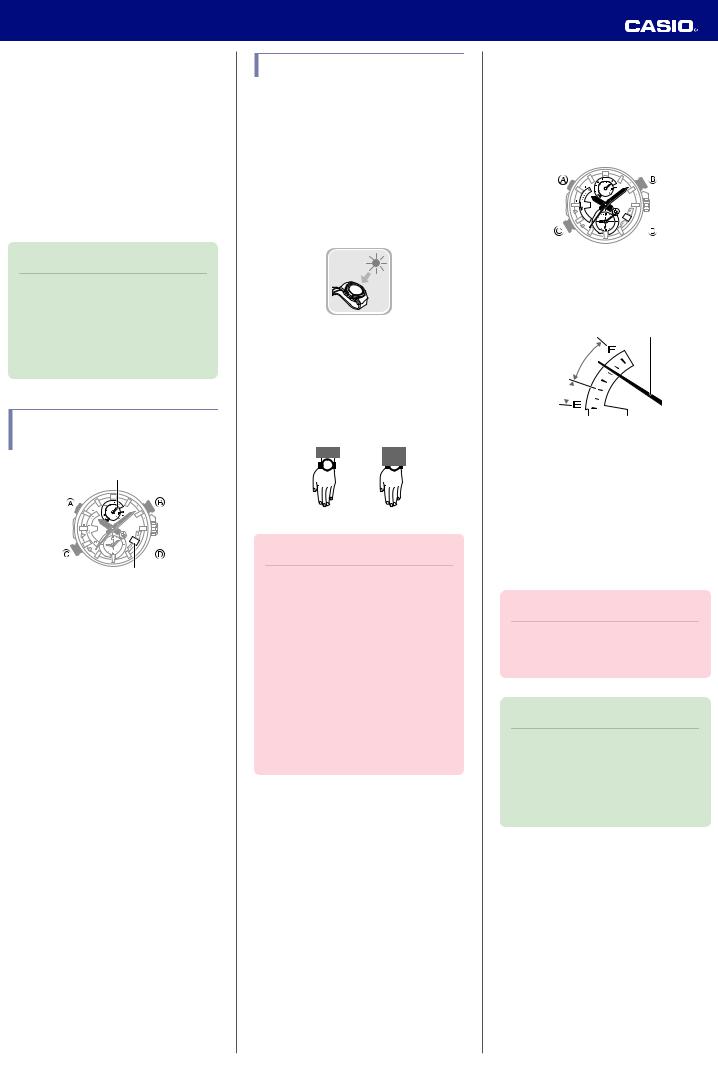
● Timer Mode
The main hour and minute hands indicate the current time.
The second hand, and the small hour and minute hands indicate the current countdown time.
Start/
Stop
30
Reset


A Timer seconds
B Timer minutes
C Timer hours
D Timer 24-hour hand
The hand points to the A-side for hours 0 through 11, and to the P-side for hours 12 through 23.
● Alarm Mode
In this mode, the main hour and minute hands indicate the current time in your current location (Home City), while the dial hour and minute hands show the alarm time setting.
Illumination
30
Enabling/ Disabling the
Alarm


A Alarm enable/disable
The second hand will point to [ON] while the alarm is turned on, and to [OFF] while it is turned off.
lTurning the Alarm On or Off
B Alarm time
C Alarm 24-hour hand
The hand points to the A-side for a.m. times, and to the P-side for p.m. times.
Using the Crown
The watch’s crown is a screw-in (screw lock) type. To use the crown, you first need to rotate it towards you (leftwards) to loosen it.
Crown
Loosen
● Pulling Out and Pushing In the Crown
To perform a crown operation, pull it out to the first or second click and then rotate it. Do not pull the crown with too much force.
First click
Normal timekeeping
Second click
Important!
●To prevent loss of water resistance and/or damage due to impact, be sure to screw the crown in by rotating it away from you as you push it in.
Screw in
●When pushing the crown back in, take care not to apply too much force.
3
Operation Guide 5560
● Fast Forward/Fast Reverse
After pulling out the crown, rotating it quickly in succession in either direction will cause the hands to move forward or back at high speed. While the hands are moving forward at high speed, quickly rotating the crown in succession again will increase the speed even further.
● Stopping Fast Forward/Fast Reverse
Rotate the crown in the direction opposite that of the ongoing operation or press any button.
Note
●If you do not perform any operation for about two minutes after pulling out the crown, crown operations will automatically become disabled. If that happens, push the crown back in and then pull it out again.
Hand and Day Indicator
Movement
Mode hand
30

Day indicator
●Mode Hand and Day Indicator Movement
Changing the day setting of the watch will also cause the mode hand to move.
● Day
●It can take anywhere from about 15 to 30 seconds for the day indicator to change after timekeeping reaches midnight. The mode hand moves as the day indicator changes.
●The day indicator will not change while a time measurement operation is in progress in the Stopwatch Mode.
Solar Charging
This watch runs on power supplied from a rechargeable (secondary) battery that is charged by a solar panel. The solar panel is integrated into the face of the watch, and power is generated whenever the face is exposed to light.
● Charging the Watch
When you are not wearing the watch, put it in a location where it is exposed to bright light.
While you are wearing the watch, make sure that its face (solar panel) is not blocked from the light by the sleeve of your clothing. Power generation efficiency is reduced even when the face of the watch is blocked only partially.
YES NO
Important!
●Depending on light intensity and local conditions, the watch may become hot to the touch when exposed to light for charging. Take care to avoid burn injury after charging. Also, avoid charging the watch under hightemperature conditions like the ones described below.
On the dashboard of a vehicle parked in the sun
Near an incandescent light bulb or other source of heat
Under direct sunlight or in other hot areas for long periods
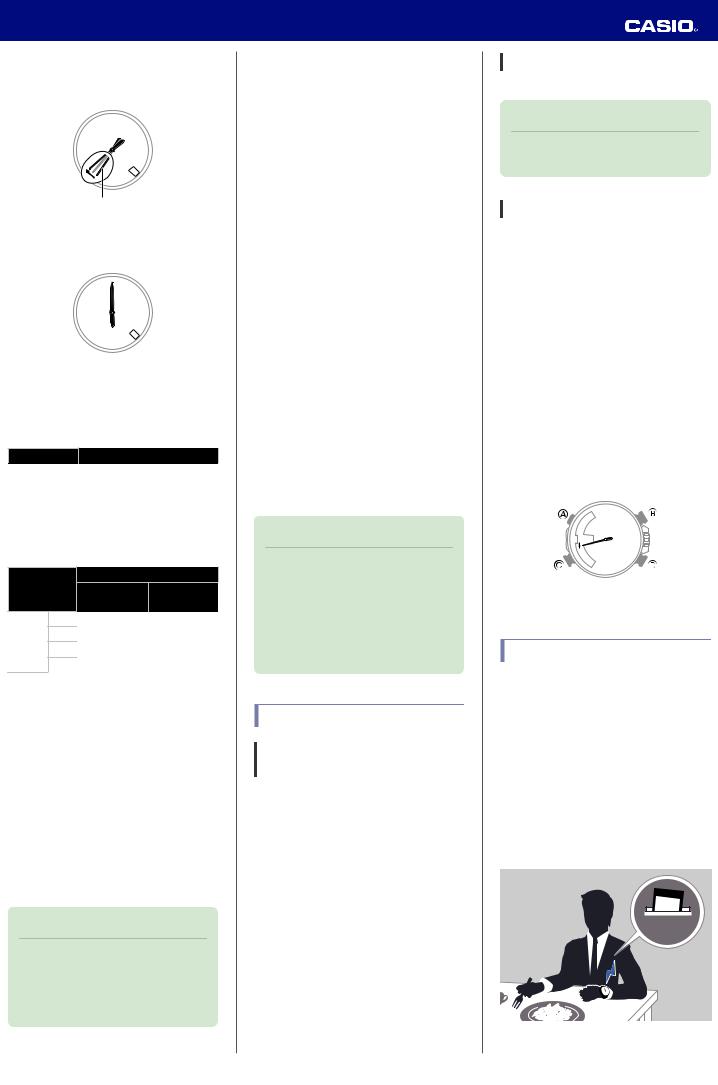
● Checking the Charge Level
You can determine the watch’s current charge level by checking the second hand.
1. Hold down (A) for about two seconds.
This will cause the watch to enter the Calendar Mode.
30

2. Press (D).
This will cause the second hand to indicate the current charge level.
Second hand

A Fully charged
B Charged
CLow
●Remaining Charge and Dead Battery
You can determine if the charge level is low by checking the hand movement. Functions become disabled as battery power goes low.
Important!
●Should the battery go low or go dead, expose the face (solar panel) to light as soon as possible.
Note
●Exposing the watch face to light after the battery goes dead will cause the second hand to revolve counterclockwise until it stops at second 57. This indicates charging has started.
4
Operation Guide 5560
Low Battery Power
The second hand jumps at two-second intervals.
30
Second hand
Dead Battery
All hands and the day indicator are stopped.
1
● Charging Time Guidelines
The table below shows guidelines for approximate charging times.
Required Charging Time for 1-day Use
Light Intensity Approximate Charging Time
|
|
|
|
High |
A |
8 minutes |
|
B |
30 minutes |
||
p |
C |
48 minutes |
|
Low |
|||
D |
8 hours |
||
|
Time Required to Achieve Next Charge Level
Light Intensity |
Approximate Charging Time |
||
Charge Level |
Charge Level |
||
|
|
1 |
2 |
High |
A |
2 hours |
22 hours |
B |
5 hours |
82 hours |
|
p |
C |
8 hours |
132 hours |
Low |
|||
|
D |
90 hours |
- |
Light Intensity
A Sunny day, outdoors (50,000 lux)
B Sunny day, near a window (10,000 lux)
C Overcast day, near a window (5,000 lux)
D Indoor fluorescent lighting (500 lux)
Charge Level 1 :
Time from dead battery until hand movement starts
Charge Level 2 :
Time from hand movement start until a full charge
Note
●The charge level is indicated by the second hand.
lChecking the Charge Level
●Actual charging time depends on the local charging environment.
● Power Saving
Leaving the watch in a dark location for about one hour between the hours of 10 p.m. and 6 a.m. will cause the second hand to stop, and the watch to enter Level 1 power saving. If the watch is left in this condition for six or seven days, all hands will stop at 12 o’clock and the watch will enter Level 2 power saving.
Level 1 :
Second hand stops to save power.
Level 2 :
The following operations are stopped to save power: all hand movement (excluding the day indicator), Bluetooth connection, and alarm alerts.
Recovering from Power Saving Operation
Press any button or place the watch in a welllit area to recover from power saving.
Using Mobile Link with a Mobile Phone
While there is a Bluetooth connection between the watch and phone, the watch time setting is adjusted automatically. You can also change the watch’s other settings.
Note
●This function is available only while CASIO WATCH+ is running on the phone.
●This section describes watch and phone operations.
X : Watch operation Y : Phone operation
Getting Ready
A Install the required app on your phone.
In Google Play or the App Store, search for the CASIO “CASIO WATCH+” app and install it on your phone.
B Configure Bluetooth settings.
Enable the phone’s Bluetooth.
Note
●For details about setting procedures, see your phone documentation.
C Pair the watch with a phone.
Before you can use the watch in combination with a phone, you first need to pair them.
1.Move the phone to be paired with close to (within one meter of) the watch.
2.Y On the Home Screen, tap the “CASIO WATCH+” icon.
3.Y Perform the operation shown on the screen of the phone to be paired with.
●If a pairing prompt message appears, perform the operation shown on the phone screen.
●When pairing starts, the second hand will move to 12 o’clock. When pairing is complete, the second hand will move to e.
Auto Time Adjustment
You can configure watch settings to connect with a phone at preset times each day and adjust its time settings in accordance with information obtained from an online time server.
● Using Auto Adjust
Your watch adjusts its time setting four times a day according to a preset schedule. If you leave your watch in the Calendar Mode, it will perform the adjustment operation automatically as you go about your daily life, without any operation required by you.
12:30
5
Operation Guide 5560
Important!
●Note that the watch will not perform auto time adjustment if it enters the Calendar Mode while any one of the conditions below exists.
While a stopwatch elapsed time measurement or timer countdown operation is in progress
Battery power is low.
Watch is in Level 2 power saving.
While the watch is too far away from its paired phone
While communication is not possible due to radio interference, etc.
While the phone is updating its system
Note
●If the watch does not indicate the correct time even if is able to connect with a phone, correct the hand and date indicator positions.
lAdjusting Hand and Day Indicator
Alignment
●If there is a World Time City specified with CASIO WATCH+, its time will also be synchronized automatically.
●The watch will connect with the phone and perform auto time adjustment at around 12:30 a.m., 6:30 a.m., 12:30 p.m. and 6:30 p.m. The connection is automatically terminated after auto time adjustment is complete.
●Summer Time
Once the watch is connected with a phone and its time is adjusted with the phone time, its Home City time and World Time will automatically switch between standard time and summer time as required, even if the watch is no longer connected with the phone. lSummer Time Switching
●Adjusting the time setting manually with a watch operation will cancel auto standard time/summer time switching.
●A CASIO WATCH+ screen shows information about summer time periods.
● Triggering Immediate Time Adjustment
The watch will synchronize its time setting to that of the phone immediately when they are connected with each other. Whenever you want to adjust the watch’s time setting based on your phone's time, perform the procedure below to connect with a phone.
1. X Press (C).
This causes the second hand to move to [R]. When the watch connects with a phone, the second hand will normally
move to eand then the watch’s time setting will synchronize with the phone’s time.
●The watch will disconnect from the phone automatically after time synchronization is complete.
30

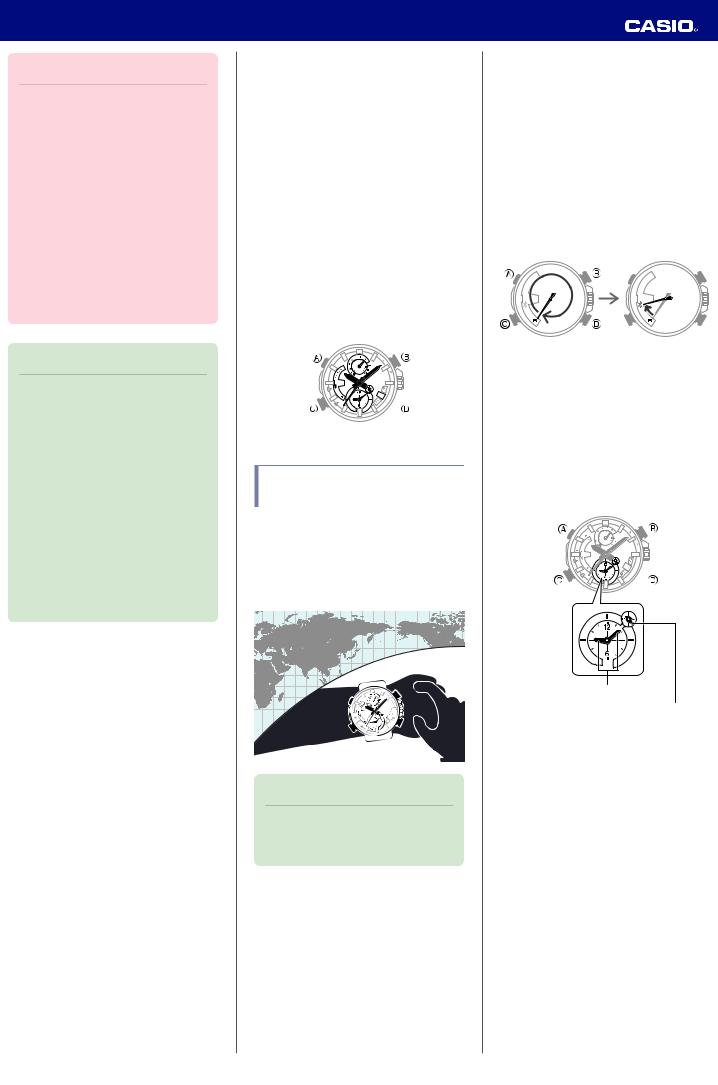
Configuring World Time
Settings
Specifying a World Time City with CASIO WATCH+ causes the city’s time to be indicated by the small hour and minute hands. Watch settings can be configured for auto summer time switching for the World Time City.
30 |
Note
●CASIO WATCH+ World Time lets you select from among approximately 300 cities as the World Time City.
●Selecting a World Time City
1.Y On the Home Screen, tap the “CASIO WATCH+” icon.
2.X Hold down (C) for about two seconds.
●The second hand will move to [R]. Keep
(C) depressed until the second hand starts moving again and completes one full revolution, stopping again at [R].
●The second hand will move from [R] to
ewhen a connection is established between the watch and phone.
3.Y Perform the operation shown on the phone screen. The World Time setting will be reflected on the watch.
The dial hour and minute hands, and the small 24-hour hand indicate the current time in the selected city and time zone.
●You can determine whether a World Time is a.m. or p.m. by checking the position of the small 24-hour hand.
30

World Time hour and minute
World Time hour (24-hour)
6
Loading...