


5266
MO1207-EB
© 2012 CASIO COMPUTER CO., LTD.
Operation Guide 5266
ENGLISH
Congratulations upon your selection of this CASIO watch.
About This Manual
• Depending on the model of your watch, digital display text appears
either as dark fi gures on a light background, or light fi gures on a
dark background. All sample displays in this manual are shown
using dark fi gures on a light background.
• Button operations are indicated using the letters shown in the
illustration.
• Note that the product illustrations in this manual are intended for
reference only, and so the actual product may appear somewhat
different than depicted by an illustration.
•
The measurement functions built into this watch are not intended for taking measurements
that require professional or industrial precision. Values produced by this watch should be
considered as reasonable representations only.
• Note that CASIO COMPUTER CO., LTD. assumes no responsibility for any damage or loss
suffered by you or any third party arising through the use of this product or its malfunction.
•
To ensure correct direction readings by this watch, be sure to perform bidirectional
calibration before using it. The watch may produce incorrect direction readings if you do not
perform bidirectional calibration. For more information, see “To perform bidirectional
calibration” (page E-24).
•
Keep the watch away from audio speakers, magnetic necklace, cell phone, and other
devices that generate strong magnetism. Exposure to strong magnetism can magnetize the
watch and cause incorrect direction readings. If incorrect readings continue even after you
perform bidirectional calibration, it could mean that your watch has been magnetized. If this
happens, contact your original retailer or an authorized CASIO Service Center.
Warning !
Things to check before using the watch
1. Check the Home City and the daylight saving time (DST) setting.
Use the procedure under “To confi gure Home City settings” (page E-12) to confi gure your Home
City and daylight saving time settings.
Important!
Proper Hijri calendar, Prayer Time Mode, and Moon Age Mode data depend on correct Home
City, time, and date settings in the Timekeeping Mode. Make sure you confi gure these settings
correctly.
2. Confi gure latitude and longitude settings for your current location.
See “To select a Home City by confi guring latitude and longitude settings” (page E-14).
3. Set the current time.
See “Confi guring Current Time and Date Settings” (page E-15).
The watch is now ready for use.
E-1
E-2
Contents
E-2 About This Manual
E-3 Things to check before using the watch
E-7 Mode Reference Guide
E-11 Timekeeping
E-12 Confi guring Home City Settings
E-12 To confi gure Home City settings
E-13 To change the Daylight Saving Time (summer time) setting
E-14 Confi gure latitude and longitude settings for your current location
E-14 To select a Home City by confi guring latitude and longitude settings
E-15 Confi guring Current Time and Date Settings
E-15 To change the current time and date settings
E-17 To specify a Hijri date offset
E-19 Hand Home Position Adjustment
E-19 To adjust home positions
E-20 Determining the Direction to Qibla
E-20 To determine Qibla
E-22 To take a direction reading
E-24 To perform bidirectional calibration
E-26 To perform magnetic declination correction
E-4
E-28 Viewing Prayer Names and Prayer Times
E-29 To display today’s prayer times
E-30 To view prayer times on a specifi c date
E-31 To turn a prayer alarm on or off
E-32 To stop a sounding prayer alarm
E-33 To select a prayer time calculation method (FAJR, ISHA)
E-36 Using Moon Data
E-36 To look up the Moon age on a specifi c date
E-37 Thermometer
E-37 To enter and exit the Thermometer Mode
E-38 To correct the temperature value
E-40 Specifying Temperature Unit
E-40 To specify the temperature unit
E-41 Using the Alarm
E-41 To enter the Alarm Mode
E-42 To set an alarm time
E-42 To test the alarm
E-43 To turn an alarm and the Hourly Time Signal on and off
E-43 To stop the alarm
E-44 Using the Stopwatch
E-44 To enter the Stopwatch Mode
E-44 To perform an elapsed time operation
E-44 To pause at a split time
E-3
E-5
Operation Guide 5266
E-45 Using the Countdown Timer
E-45 To enter the Countdown Timer Mode
E-45 To specify the countdown start time
E-46 To perform a countdown timer operation
E-46 To stop the alarm
E-47 Illumination
E-47 To turn on illumination
E-47 To change the illumination duration
E-49 Button Operation Tone
E-49 To turn the button operation tone on and off
E-50 Troubleshooting
E-53 Specifi cations
E-6
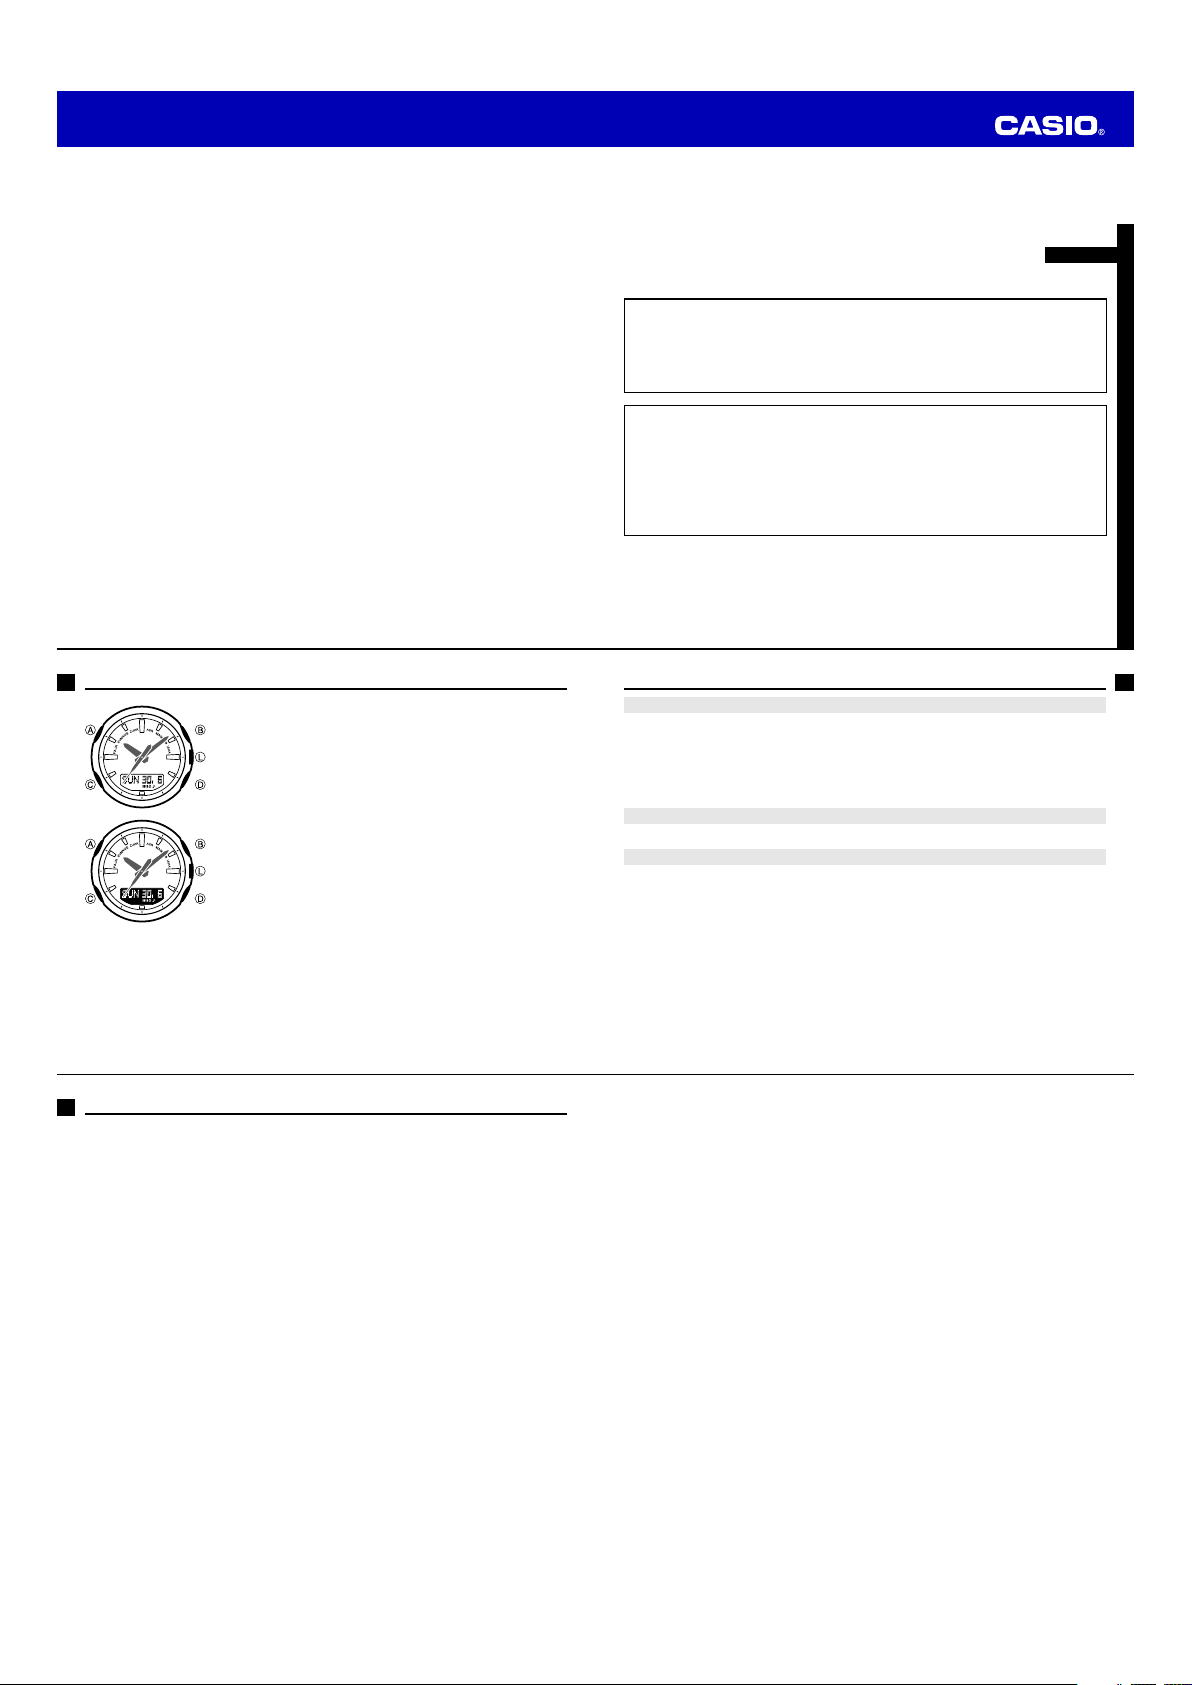
Selecting a Mode
• The illustration below shows which buttons you need to press to navigate between modes.
• To return to the Timekeeping Mode from any other mode, hold down C for about two seconds.
• In any mode, press L to illuminate the display.
Thermometer Mode
Moon Age Mode
Mode Reference Guide
Your watch has 9 “modes”. The mode you should select depends on what you want to do.
To do this: Enter this mode: See:
• View the current time and date in the Home City
• Confi gure Home City and daylight saving time (DST) settings
• Confi gure current location latitude and longitude settings
• Confi gure time and date settings
• Specify the Hijri calendar offset
• View the Qibla
• Take direction readings and display one of 16 direction
indicators and the angle relative to magnetic north
View today’s prayer name and prayer times Today’s Salat Time Screen E-28
View the prayer name and prayer times for a specifi ed date SALAT Time Search Mode E-28
Determine a Moon age value Moon Age Mode E-36
Determine the temperature at your current location Thermometer Mode E-37
Set an alarm time Alarm Mode E-41
Use the stopwatch to measure elapsed time Stopwatch Mode E-44
Use the countdown timer
• You also can take digital compass readings in the Qibla Mode (page E-22).
SALAT Time Search Mode Timekeeping Mode Qibla Mode
Timekeeping Mode E-11
Qibla Mode E-20
Countdown Timer Mode
E-45
E-7
Stopwatch ModeAlarm Mode
E-8
General Functions (All Modes)
The functions and operations described in this section can be used in all of the modes.
Auto Return Features
• If you do not perform any button operation for two or three minutes in the Salat Search Mode,
Moon Age Mode, or Alarm Mode, the watch will automatically return to the Timekeeping Mode.
• If you do not perform any button operation for one or two minutes in the Thermometer Mode or
Qibla Mode, the watch will automatically return to the Timekeeping Mode.
• If you leave a screen with fl ashing digits on the digital display for two or three minutes without
performing any operation, the watch exits the setting screen automatically.
Initial Screens
When you enter the Alarm Mode, the data you were viewing when you last exited the mode
appears fi rst.
Scrolling
TheB and D buttons are used on the setting screen to scroll through data on the digital display.
In most cases, holding down these buttons during a scroll operation scrolls through the data at high
speed.
E-10
Countdown Timer Mode
Today’s Salat
Time Screen
Timekeeping
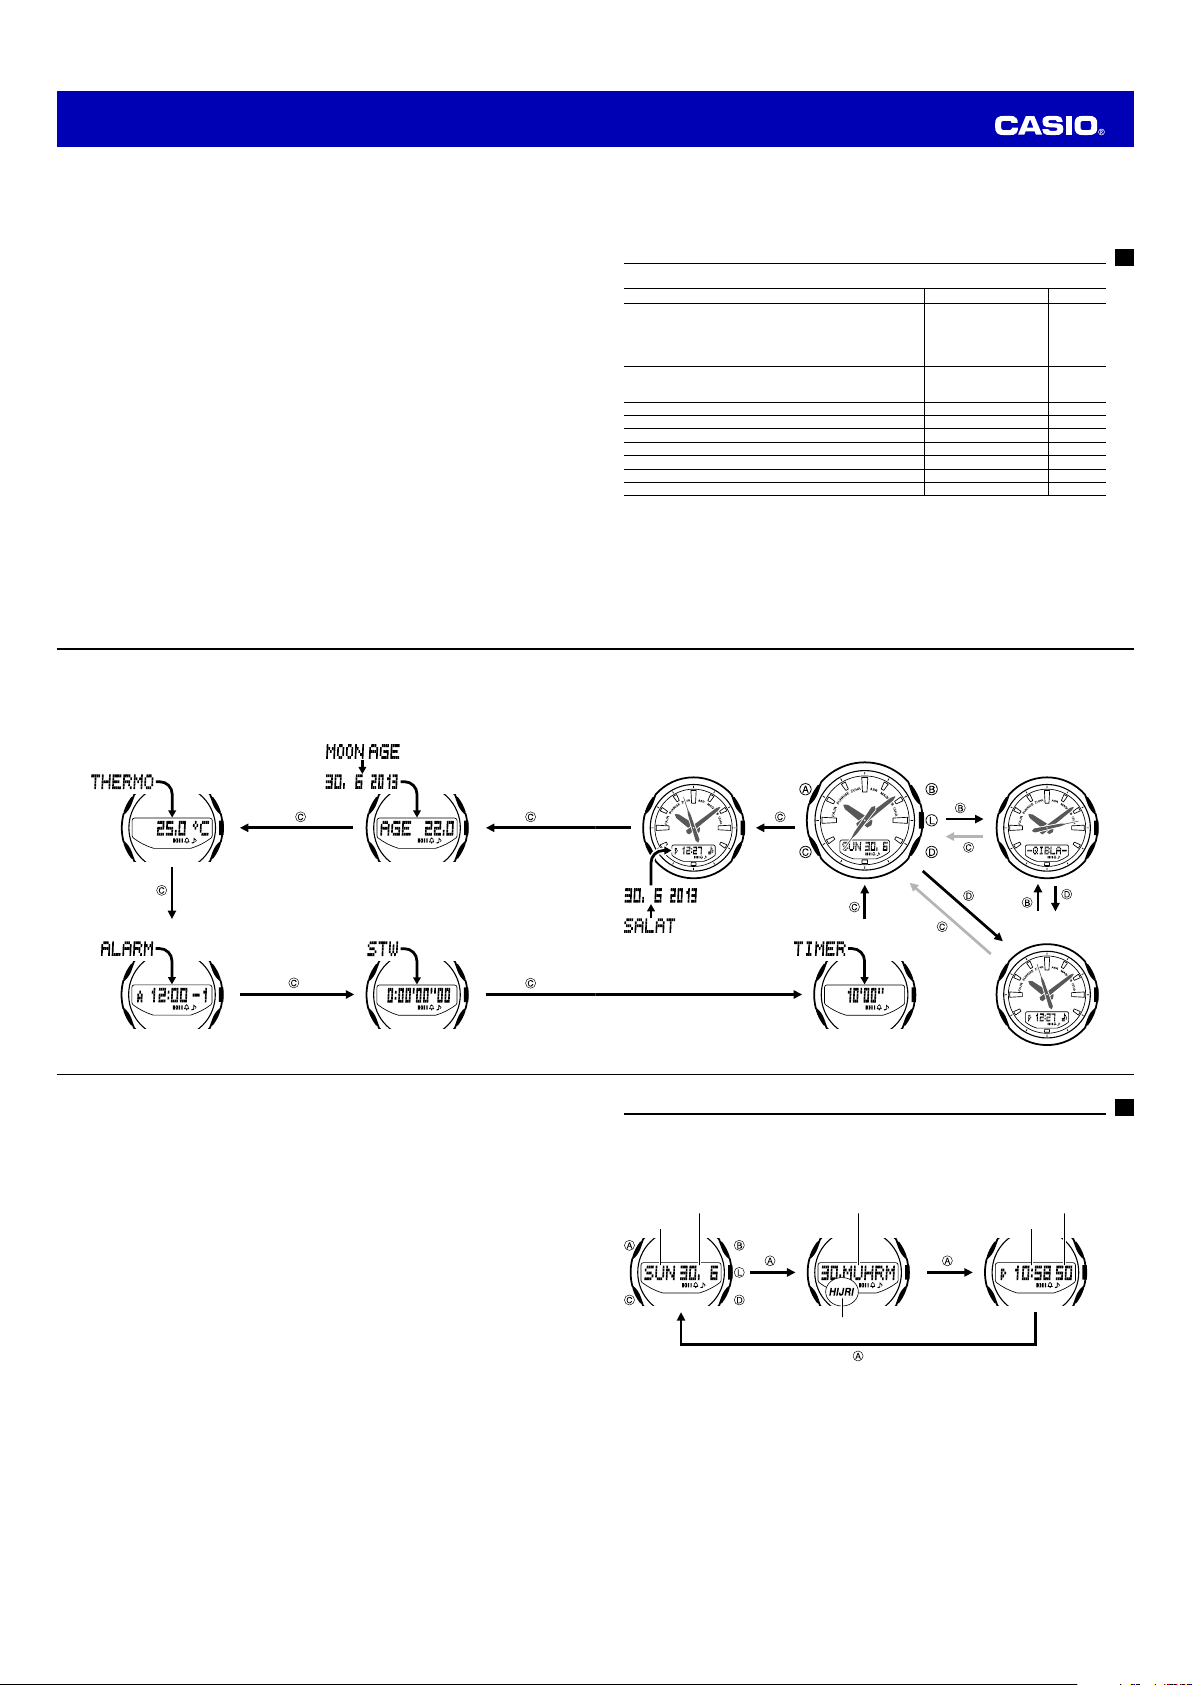
Use the Timekeeping Mode to set and view the current time and date.
• Each press of A in the Timekeeping Mode cycles the digital display between the current
Gregorian calendar date, the current Hijri calendar date, and the current time.
• The HIJRI indicator on the digital display indicates that the Hijri calendar date is displayed.
Date screen (Gregorian) Date screen (Hijri) Regular timekeeping
Day Month Day Month
Day of week
HIJRI indicator
screen
Seconds
Hour : Minutes
E-9
E-11
Operation Guide 5266
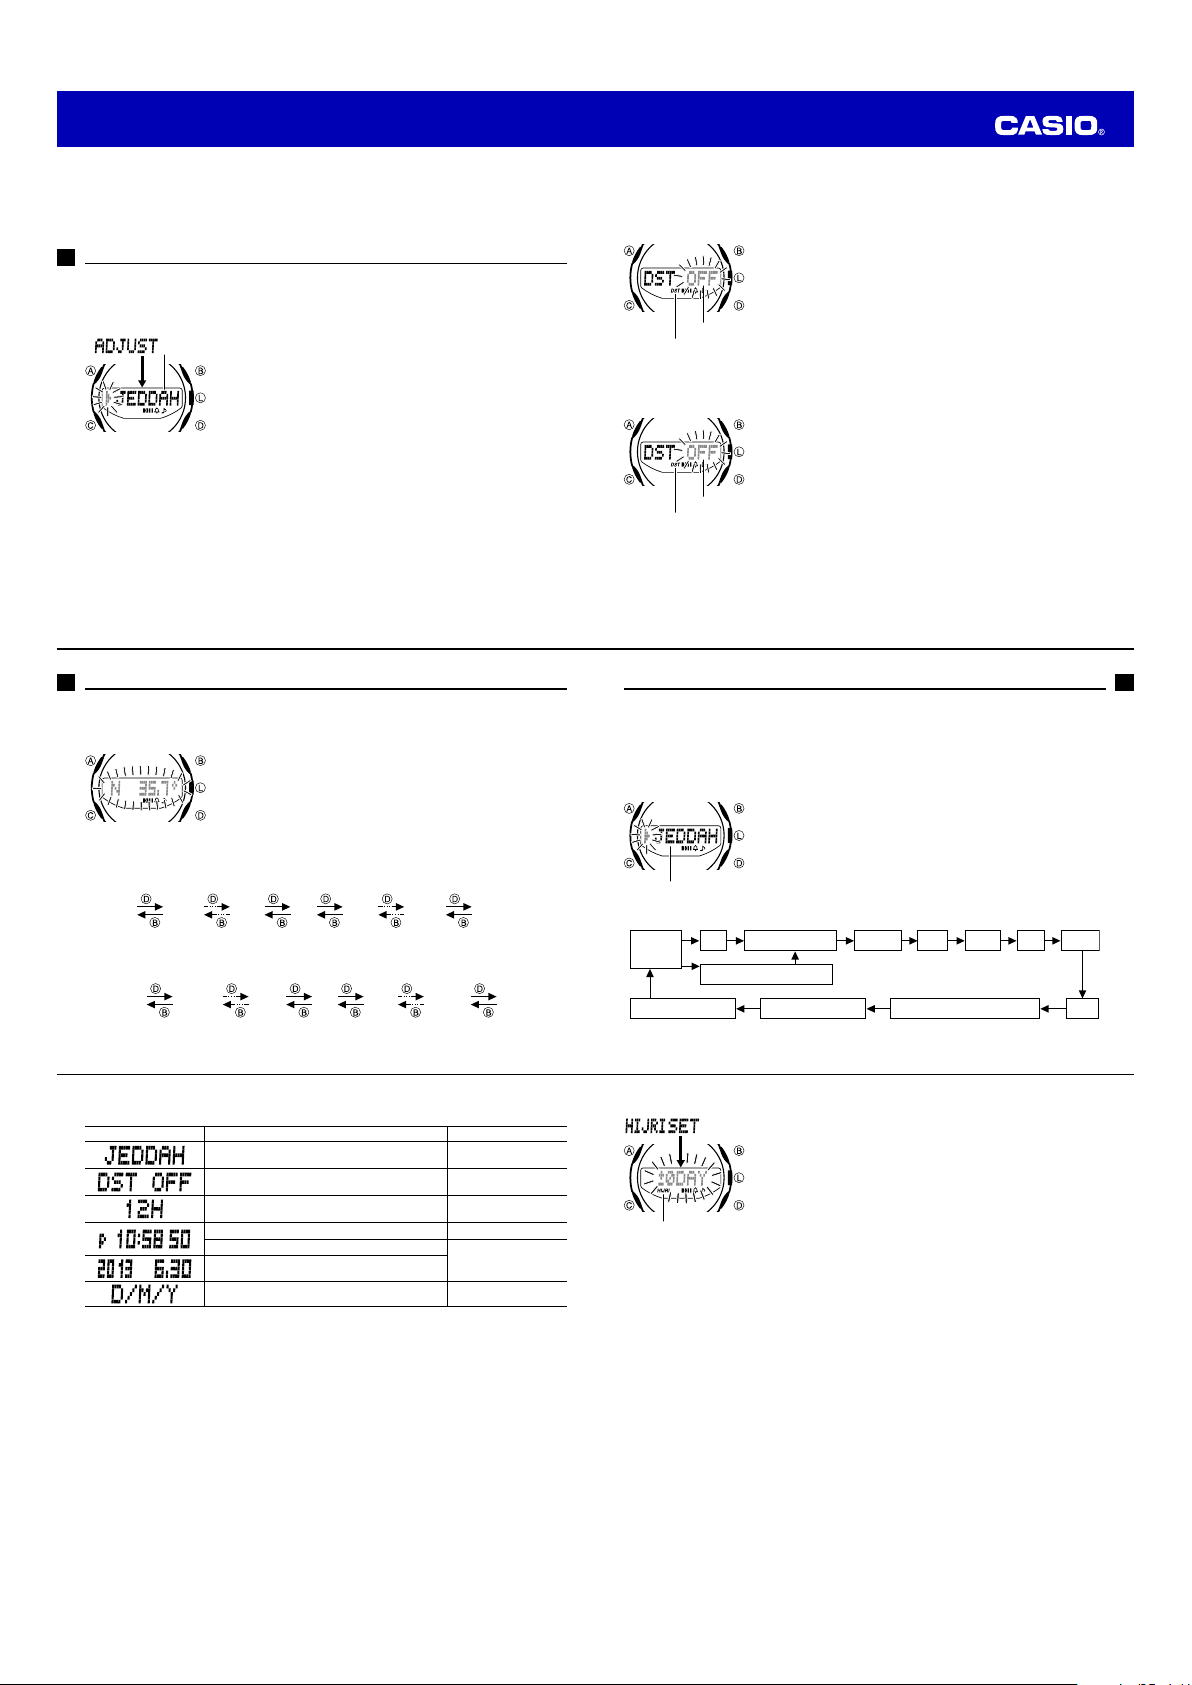
Confi guring Home City Settings
There are two methods you can use to confi gure Home City settings: selecting a Home City and
then selecting standard time or daylight saving time (DST), or selecting
specifying an UTC offset.
To confi gure Home City settings
City Name
2. Press D (East) and B (West) to scroll through city names until the one you want to use as your
Home City data is displayed.
• If you selected CUSTOM in place of a Home C ity, press C here to display the UTC offset
setting sc reen. Use D (+) and B (–) change the U TC differenti al value in 15- minute
increments . When you sel ect CUSTOM, the stand ard time/daylig ht saving time s election
screen does not appear. Jump to ste p 5 of this procedu re.
1. In the Timekeeping Mode, hold down A for at least two seconds
ADJUST
until
mode. Release A after
• The city na me of the curren tly selected H ome City data will
• The watch will exi t the settin g mode automa tically if you do n ot
• For details about city d ata, see the “ City Data Table” at th e back
appears on the digital display. This is the setting
ADJUST
appear on th e digital display w ith an arrow (
left.
perform a ny operation fo r about two o r three minutes .
of this manual.
3. Press C to display the DST setting screen.
4. Press D to toggle between Daylight Saving Time (
• Note that you c annot switch between sta ndard time and day light saving tim e (DST) whi le
CUSTOM is selected as you r Home Cit y.
E-12
DST ON
CUSTOM
appears.
▲
) fl ashing to the
) and Standard Time (
and then
DST OFF
).
Confi gure latitude and longitude settings for your current location
You can ensure correct display of Qibla, prayer times, and moon ages by confi guring latitude and
longitude settings for your current location.
To select a Home City by confi guring latitude and longitude settings
3. Use D (+) and B (–) to change the fl ashing value in 0.1° increments.
• Holding do wn D or B while the lati tude or longi tude setti ng screen is displ ayed will scroll
the value to the left of the deci mal point (the valu e to the right doe s not change) at high
speed.
S 62.0° S 61.9° S 0.1° N 0° N 0.1° N 61.9° N 62.0°
4. When the latitude is the value you want, press C to display the longitude setting screen with the
current longitude setting fl ashing.
5. Use D (+) and B (–) to change the fl ashing value in 0.1° increments.
W 179.9° W 179.8° W 0.1° E 0° E 0.1° E 179.9° E 180°
6. When the settings are the way you want, press A to return to the Timekeeping Mode.
E-14
1. In the Timekeeping Mode, hold down A for at least two seconds
ADJUST
until
mode. Release A after
• Your current Hom e City data will appear on the d igital display
2. Press A to display to the latitude setting screen with the current
latitude setting fl ashing.
appears on the digital display. This is the setting
ADJUST
appears.
with an arrow (
▲
) fl ashing to the lef t.
5. When the setting is the way you want, press A twice to return to the
Timekeeping Mode.
• The DST indicator ap pears to indicate that Daylight Saving Time
is turned on.
Note
Setting
DST indicator
• After you sp ecify cit y data, the watch w ill use UTC* of fsets to
calculate the c urrent time for ot her time zone s based on the
current time in your Home Ci ty.
* Coordinated Universal Time, the world-wide scientifi c standard
of timekeeping.
The reference point for UTC is Greenwich, England.
To change the Daylight Saving Time (summer time) setting
1. In the Timekeeping Mode, hold down A for at least two seconds
ADJUST
Setting
DST indicator
until
ADJUST
• The name of t he city curren tly selected as yo ur Home Cit y will
2. Press C to display the DST setting screen.
3. Press D to toggle between Daylight Saving Time (
Standard Time (
4. When the setting is the way you want, press A twice to return to the
Timekeeping Mode.
• The DST indicator ap pears to indicate that Daylight Saving Time
• Note that you c annot switch be tween standard time and daylight
appears on the digital display. Release A after
appears.
appear on th e digital display w ith an arrow (
left.
DST OFF
).
▲
) fl ashing to the
DST ON
) and
is turned on.
saving time (D ST) while CUSTOM is selected as your H ome
City.
E-13
Confi guring Current Time and Date Settings
You can use the procedure below to adjust the current time and date settings if they are off.
Changing the digital Home City data should cause the analog time setting to change accordingly. If
the analog time does not indicate the digital time, check the home positions of the hands and make
adjustments if necessary (page E-19).
This watch displays Hijri calendar months and days. The watch normally calculates and displays
Hijri calendar dates automatically. If necessary, you can correct the displayed data by ±3 days.
To change the current time and date settings
City name
3.
PressC to move the fl ashing in the sequence shown below to select the other settings.
City data
CUSTOM
Date Display Format
• The followi ng steps explain h ow to confi gure tim ekeeping set tings only.
1. In the Timekeeping Mode, hold down A for at least two seconds
ADJUST
until
mode. Release A after
•
2. Use D and B to select the city data you want.
• Select you r Home Cit y data before chan ging any other se tting.
• For full infor mation on cit y data, see the “City Dat a Table” at the
DST
12/24-Hour Format
UTC Offset/GMT Differential
Illumination Duration Button Operation Tone On/Off
appears on the digital display. This is the setting
ADJUST
The name of t he city curren tly selected as yo ur Home Cit y will
appear on th e digital display w ith an arrow (
appears.
back of this manual.
Seconds Hour Minute Year Month
▲
) fl ashing to the le ft.
Day
E-15
4. When the timekeeping setting you want to change is fl ashing, use B and/or D to change it as
described below.
Screen To do this: Do this:
Change the city name
Toggle between Daylight Saving Time (
Standard Time (
Toggle between 12-hour (
timekeeping.
Reset the seconds to
Change the hour or minute
Change the year, month, or day
Select the date display format (DMY, YMD, MDY) Press D.
DST OFF
00
).
12H
DST ON
) and 24-hour (
24H
) and
)
UseD (East) and
(West).
PressD.
PressD.
PressD.
UseD (+) and B (–).
B
5. When the settings are the way you want, press A twice to return to the Timekeeping Mode.
Note
• For information about selecting a Home City and confi guring the DST setting, see “Confi guring
Home City Settings” (page E-12).
• The watch’s built-in full automatic calendar makes allowances for different month lengths and
leap years. Once you set the date, there should be no reason to change it except after you have
the watch’s battery replaced.
• Changing your Home City setting will cause all of the following settings to become initialized:
latitude and longitude (to the location of the Home City), the prayer calculation method (Fajr,
Isha, Asr), and the Qibla declination (in accordance with the selected Home City). Note that
these settings are not initialized when
E-16
CUSTOM
is selected for the Home City setting.
To specify a Hijri date offset
HIJRI indicator
Note
• The Hijri offset setting is temporary. At the end of each month, the watch automatically corrects
the Hijri date and returns the Hijri offset to
• Note that the Hijri offset also returns to
date setting or the latitude and/or longitude settings.
• Changing the watch’s Gregorian date setting can cause an error in the displayed Hijri until the
watch performs automatic Hijri date correction at the end of the month (on the 29th or 30th day
of the month). If the Hijri date display is wrong, adjust it by changing the Hijri date offset.
Hijri Calendar Precautions
Hijri dates displayed by this calculator are the results of calculations. Actual Hijri dates may be
determined by religious authorities based on observations of a New Moon following sundown. This
can result in dates calculated by the watch being different from actual Hijri dates.
1. In the Timekeeping Mode, hold down A for at least four seconds
HIJRI SET
until
mode. Release A after
• Releasing A will cause the current Hijri date offset to fl ash on the
digital display.
2. Use D (+) and B (–) to change the offset within a range of ±3
days.
3. When the setting is the way you want, press A.
• This will display the corrected Hijri date.
appears on the digital display. This is the setting
HIJRI SET
appears.
±0DAY
.
±0DAY
whenever you change the watch’s Gregorian
E-17
 Loading...