


MA1011-EA
Operation Guide 5182
ENGLISH
Congratulations upon your selection of this CASIO watch.
x Note that the product illustrations in this manual are intended for reference only, and so the actual product may appear somewhat different than depicted by an illustration.
Note that CASIO COMPUTER CO., LTD. assumes no responsibility for any damage or loss suffered by you or any third party arising through the use of this product or its malfunction.
E-1
|
|
About This Manual |
Things to check before using the watch |
|
|
|
|
|
|
|
|
|
|

 Left Dial Hand
E-2
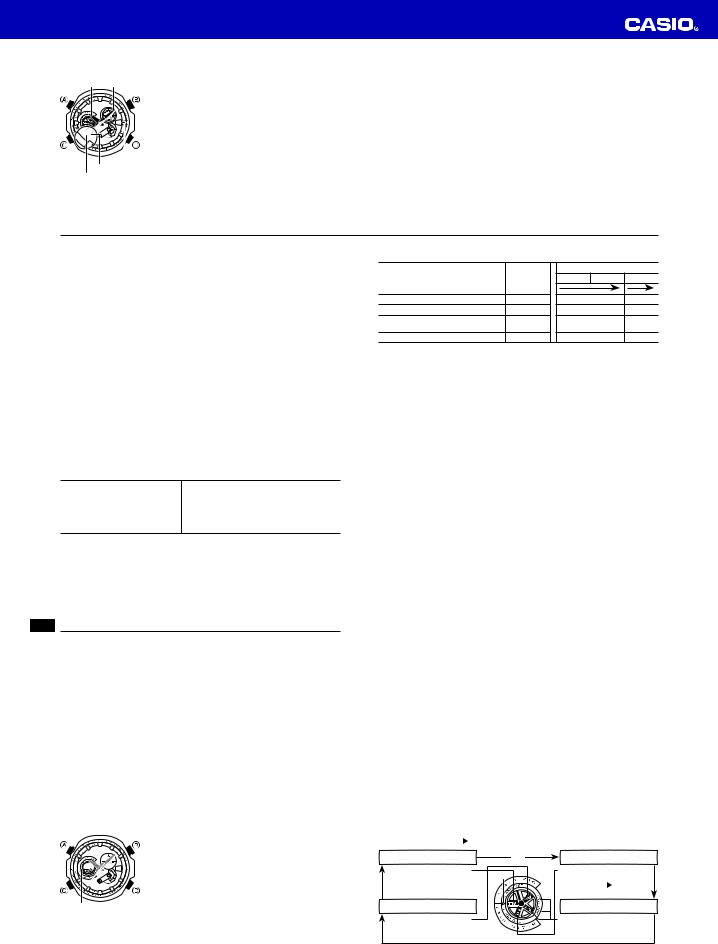
Button operations are indicated using the letters A through D shown in the illustration.
Hand Functions
z Hour Hand
x Second Hand
c Minute Hand
vLeft Dial Hand:
Indicates the current mode (TM, ST, WT, AL).
b Right Dial Hands: Indicate a time, in 24-hour format, depending on the current mode.
n24-hour Hand:
Indicates the current 24-hour timekeeping hour.
m Day
This User’s Guide uses numbers shown above to identify watch hands and indicators.
1.Hold down C at least two seconds to enter the Timekeeping Mode, and then observe the movement of the x Second Hand.
 Is the x Second Hand moving smoothly at one-second intervals?
|
|
NO |
|
|
YES |
|
|
|
|
||||
|
Is the x Second Hand moving at |
The watch is charged sufficiently. |
||||
|
two-second intervals or is it stopped |
For details about charging, see |
||||
|
completely? |
“Charging the Watch” (page E-8). |
||||
|
|
YES |
|
|
NEXT |
|
|
|
|
|
|||
|
|
|
||||
|
|
|
|
|
|
|
|
Power is low. Charge the watch by placing |
|
Go to step 2. |
|||
|
it in a location where it is exposed to light. |
|
||||
|
|
|
|
|
||
|
|
|
|
|||
|
For details, see “Charging the Watch” |
|
|
|
|
|
|
(page E-8). |
|
|
|
|
|
|
|
|
|
|
|
|
E-3
2. Check the Home City and the daylight saving time (DST) setting.
Use the procedure under “To confi gure summer time and other Home City settings” (page E-24) to confi gure your Home City and daylight saving time settings.
Important!
Proper World Time setting depends on correct Home City, time, and date settings in the Timekeeping Mode. Make sure you configure these settings correctly.
3. Set the current time.
See “Configuring Current Time and Date Settings” (page E-27).
The watch is now ready for use.
E-4
Contents
E-2 About This Manual
E-3 Things to check before using the watch
E-8 Charging the Watch
E-15 To recover from the sleep state
E-16 Mode Reference Guide
E-18 To determine the watch’s current mode
E-18 To return to the Timekeeping Mode from any other mode E-19 To select a mode
E-20 To select a setting mode
E-23 Timekeeping
E-24 Configuring Home City Settings
E-24 To configure summer time and other Home City settings
E-5
E-27 Configuring Current Time and Date Settings
E-27 To change the current time setting E-31 To change the current date setting
E-35 Using the Stopwatch
E-36 To perform elapsed time measurement E-36 To perform an elapsed time operation
E-40 Checking the Current Time in a Different Time Zone
E-48 Adjusting Home Positions
E-49 To adjust home positions
E-54 Troubleshooting
E-58 Specifications
E-41 To view the time in another time zone
E-42 To specify standard time or daylight saving time (DST) for a time zone
E-44 To swap your Home City and World Time City
E-46 Using the Alarm
E-47 To change the alarm time setting
E-47 To turn the alarm on or off
E-47 To stop the alarm
E-6 |
E-7 |
|
|
Charging the Watch
The face of the watch is a solar cell that generates power from light. The generated power charges a built-in rechargeable battery, which powers watch operations. The watch charges whenever it is exposed to light.
Charging Guide
Whenever you are not |
|
When wearing the watch, |
wearing the watch, leave |
|
make sure that its face is |
|
||
it in a location where it is |
|
not blocked from light by the |
exposed to light. |
|
sleeve of your clothing. |
x Best charging |
|
x The watch may enter a |
performance is achieved |
|
sleep state (page E-14) if |
by exposing the watch to |
|
its face is blocked by your |
light that is as strong as |
|
sleeve even only partially. |
possible. |
|
|
Warning!
Leaving the watch in bright light for charging can cause it to become quite hot. Take care when handling the watch to avoid burn injury. The watch can become particularly hot when exposed to the following conditions for long periods.
x On the dashboard of a car parked in direct sunlight x Too close to an incandescent lamp
x Under direct sunlight
Important!
x Keep the watch in an area normally exposed to bright light when storing it for long periods. This helps to ensure that power does not run down.
x Storing the watch for long periods in an area where there is no light or wearing it in such a way that it is blocked from exposure to light can cause power to run down. Make sure that the watch is exposed to bright light whenever possible.
E-8 |
E-9 |
Operation Guide 5182
Power Levels
|
You can get an idea of the watch’s power level by |
|
observing the movement of the x Second Hand in the |
|
Timekeeping Mode. |
|
x If the x Second Hand is moving normally at one-second |
|
intervals, power is at Level 1. |
|
x If the x Second Hand is moving at two-second intervals, |
|
power is at Level 2, which is quite low. Expose the watch |
|
to light as soon as possible so it can charge. |
|
|
Moves at two-second intervals.
E-10
Level |
Hand Movement |
Function Status |
1 |
Normal. |
All functions enabled |
2 |
x Second Hand moves at two-second |
Beeper disabled |
intervals. |
||
|
m Day changes to 1 (home position). |
|
3 |
x Second Hand stopped. |
All functions disabled |
z Hour Hand and c Minute Hand |
||
|
stopped at 12 o’clock. |
|
x When power drops to Level 3, all functions will be disabled but the watch will continue to keep time internally for about one week. If you recharge the battery sufficiently during this period, the analog hands will move automatically to the correct setting and regular timekeeping will resume. After one week, all settings (including timekeeping) will be cleared. Recharging the battery will reset all settings to their initial factory defaults.
E-11
Power Recovery Mode
The watch is designed to go into a power recovery mode that stops hand operation temporarily whenever power suddenly drops below a certain level due to overuse of the alarm tone over a short period. Note that all operations are disabled while the watch is in the power recovery mode.
The hands will move to the correct positions and the watch will resume normal operation after power recovers (in about 15 minutes). Putting the watch in a location where it is exposed to light will help power to recover sooner.
Charging Times |
|
|
|
|
|
|
Daily |
Level Change *2 |
|||
|
Level 3 |
Level 2 |
Level 1 |
||
Exposure Level (Brightness) |
Operation |
||||
|
*1 |
|
|
|
|
Outdoor sunlight (50,000 lux) |
8 minutes |
2 hours |
27 hours |
||
Window sunlight (10,000 lux) |
30 minutes |
6 hours |
100 hours |
||
Window sunlight on cloudy day |
48 minutes |
10 hours |
162 hours |
||
(5,000 lux) |
|||||
|
|
|
|
||
Indoor fluorescent lighting (500 lux) |
8 hours |
112 hours |
– – – |
||
*1 Approximate exposure each day to generate power for normal daily operation.
*2 Approximate exposure to take power up one level.
x The above times are for reference only. Actual times depend on lighting conditions. x For details about the operating time and daily operating conditions, see the “Power
Supply” section of the Specifications (page E-59).
E-12 |
E-13 |
|
|
Power Saving
Power Saving enters a sleep state automatically whenever the watch is left for a certain period in an area where it is dark. The table below shows how watch functions are affected by Power Saving.
x There actually are two sleep state levels: “second hand sleep” and “function sleep”.
To recover from the sleep state
Move the watch to a well-lit area or press any button.
Elapsed Time in Dark |
Operation |
|
60 to 70 minutes (second hand sleep) |
x Second Hand only stopped at 12 o’clock, all |
|
other functions enabled |
||
|
||
|
x All functions, including analog timekeeping, |
|
6 or 7 days (function sleep) |
disabled |
xInternal timekeeping maintained
x The watch will not enter a sleep state between 6:00 AM and 9:59 PM. If the watch is already in a sleep state when 6:00 AM arrives, however, it will remain in the sleep state.
x The watch will not enter a sleep state while it is in the Stopwatch Mode.
E-14 |
E-15 |
|
|
Mode Reference Guide
Your watch has four “modes”. The mode you should select depends on what you want to do.
Note
x There are also various setting modes, which you can enter by holding down A in the Timekeeping Mode. See “Setting Modes” (page E-20) for more information.
To do this: |
Enter this mode: |
See: |
|
x View the current time in your Home City and in one of 29 other |
Timekeeping |
|
|
cities around the globe |
E-23 |
||
Mode |
|||
x View the current date in the Home City |
|
||
|
|
||
Use the stopwatch to measure elapsed time |
Stopwatch Mode |
E-35 |
|
x Select one of 29 cities (time zones) around the world and view |
|
|
|
the current time there |
World Time Mode |
E-40 |
|
x Select daylight saving/summer time (DST) or standard time |
|||
|
|
||
for a time zone |
|
|
|
Set an alarm time |
Alarm Mode |
E-46 |
|
|
|
|
E-16 |
E-17 |
|
|
Selecting a Mode
With this watch, everything starts from the Timekeeping Mode.
To determine the watch’s current mode
Check the position of the v Left Dial Hand as shown
under “To select a mode” (page E-19).


 To return to the Timekeeping Mode from any other
mode
Hold down C for at least two seconds.
To select a mode
Press C to cycle between the modes as shown below. The v Left Dial Hand indicates the currently selected mode.
The v Left Dial Hand rotates so the indicator for the current mode (TM, ST, WT, AL) is aligned with the pointer .
Timekeeping Mode |
C |
Stopwatch Mode |
v Left Dial Hand indicates |
|
v Left Dial Hand indicates |
TM. |
|
ST, then aligns the dial hand |
|
|
with the pointer . |
Alarm Mode |
|
World Time Mode |
v Left Dial Hand indicates |
|
v Left Dial Hand indicates |
AL. |
|
WT, then aligns the dial hand |
|
|
with STD or DST. |
E-18 |
E-19 |

Operation Guide 5182
Setting Modes
The watch has a number of setting modes that you can use to confi gure its settings. In the Timekeeping Mode, hold down A until the setting mode you want is selected as described below. Release A when the setting mode you want is selected.
To select a setting mode
Hold down A.
x Second Hand moves to 12 o’clock.  (3 seconds)

E-20
x Second Hand moves to 1 o’clock, indicating the Home City Setting Mode. See “To confi gure summer time and other Home City settings” (page E-24).
|
(3 seconds) |
x Second Hand moves to 2 o’clock, indicating the Time
Setting Mode. See “To change the current time setting”
(page E-27).

 (3 seconds)
E-21
x Second Hand moves to 3 o’clock, indicating the Home Position Adjustment Mode. See “To adjust home positions”
(page E-49).
 (3 seconds)

Watch returns to normal timekeeping.
x If the x Second Hand home position is off due to the watch having been subjected to strong magnetism or other abnormal treatment, the second hand may point to other positions than those described in the above procedure.
Timekeeping
Use the Timekeeping Mode to view the current time and date. To enter the Timekeeping Mode from any other mode, hold down C at least two seconds.
|
Hand Functions |
|
z Hour Hand |
|
x Second Hand |
|
c Minute Hand |
|
v Left Dial Hand: Indicates TM. |
|
b Right Dial Hands: |
|
Indicate the current time in the World Time City |
|
(page E-40) in 24-hour format. |
n24-hour Hand:
Indicates the current 24-hour timekeeping hour.
m Day
E-22 |
E-23 |
|
|
Configuring Home City Settings
There are two Home City settings: actually selecting the Home City and selecting either standard time or daylight saving time (DST).
To configure summer time and other Home City settings
Note


 x This watch does not have a city code that corresponds
to Newfoundland.
1. Use A as shown under “Setting Modes” (page E-20) to
enter the “Home City Setting” mode.
x The watch will exit the setting mode automatically if you do not perform any operation for about two or three minutes.
x For details about city codes, see the “City Code Table” at the back of this manual.
2.To change the Home City setting, press D to move the x Second Hand clockwise.
|
x Press D as many times as necessary until the |
|
x Second Hand is pointing at the city code you want |
|
to select as your Home City. |
|
x Holding down D causes the x Second Hand to move |
|
at high speed. |
|
x Each time you change the city code setting, the |
|
z Hour Hand, c Minute Hand, n 24-hour Hand and |
|
m Day move to the current time and date for that city |
|
code. Do not perform the next operation until these |
|
hands stop moving. |
3.Press B to select STD (standard time) or DST (daylight saving time) for the
currently selected city code.
x While you are selecting the Home City code, the v Left Dial Hand will indicate the setting (STD, DST) of the currently selected city code.
− The following explains each of the available summer time settings.
E-24 |
E-25 |
|
|
STD |
With this setting, the watch always indicates standard time. It does |
|
not indicate summer time. |
||
|
||
|
|
|
DST |
With this setting, the watch advances its time setting by one hour |
|
to indicate summer time (daylight saving time). |
||
|
x Note that you cannot change the summer time setting while UTC is selected as your Home City.
4.After all the settings are the way you want, press A to return to the Timekeeping Mode.
Note
x After you specify a city code, the watch will use UTC* offsets to calculate the World Time based on the current time in your Home City.
*Coordinated Universal Time, the world-wide scientific standard of timekeeping. The reference point for UTC is Greenwich, England.
Configuring Current Time and Date Settings
You can confi gure current time and date settings.
To change the current time setting
1. Use A as shown under “Setting Modes” (page E-20) to enter the “Time Setting” mode.
x The x Second Hand will move to 12 o’clock. This is
the time setting mode.

E-26 |
E-27 |
|
|
x In the following steps, each press of C cycles between settings as shown below.
Hour/Minute |
Year (tens digit) |
Year (ones digit) |
Day |
|
Month |
2.Use D (+) and B (–) to change the time (hour and minute) setting.
|
x Each press of either button will move the hands |
|
(z Hour Hand and c Minute Hand) one minute. |
|
x Holding down D or B will start high-speed z Hour |
|
Hand and c Minute Hand movement in the applicable |
|
direction. To stop high-speed hand movement, press |
|
any button. |
|
x The n 24-hour Hand and z Hour Hand move in sync |
|
with each other. |
|
|
|
x When setting the time, make sure that the n 24-hour |
|
Hand indicates the proper a.m./p.m. hour. |
|
x If you want to change the date setting at this time, |
|
press C and perform the procedure starting from |
|
step 3 under “To change the current date setting” |
|
(page E-31). |
E-28 |
E-29 |
 Loading...