


MO1807-EA © 2018 CASIO COMPUTER CO., LTD.
Operation Guide 5595
ENGLISH
Congratulations upon your selection of this CASIO watch.
To ensure that this watch provides you with the years of service for which it is designed, carefully read and follow the instructions in this manual, especially the information under “Operating Precautions” and “User Maintenance”.
E-1
|
|
About This Manual |
|
Things to check before using the watch |
|
|
x Depending on the model of your watch, display text appears either as dark figures on a light background, or light figures on a dark background. All sample displays in this manual are shown using dark figures on a light background.
x Button operations are indicated using the letters shown in the illustration.
x Note that the product illustrations in this manual are intended for reference only, and so the actual product may appear somewhat different than depicted by an illustration.
1. Check the Home City and the daylight saving time (DST) setting.
Use the procedure under “To configure Home City settings” (page E-12) to configure your Home City and daylight saving time settings.
Important!
x Proper World Time Mode data depend on correct Home City, time, and date settings in the Timekeeping Mode. Make sure you configure these settings correctly.
2.Set the current time.
x See “Adjusting the Digital Time and Date Settings” (page E-15).
The watch is now ready for use.
E-2 |
E-3 |
|
|
Contents
About This Manual …………………………………………………………………… E-2 Things to check before using the watch ………………………………………… E-3 Mode Reference Guide ……………………………………………………………… E-7 Timekeeping ……………………………………………………………………………E-11
Configuring Home City Settings ……………………………………………………E-12
To configure Home City settings ………………………………………………E-12 To change the Daylight Saving Time (summer time) setting ………………E-14
Adjusting the Digital Time and Date Settings ……………………………………E-15
To configure the digital time and date settings ………………………………E-15
Checking the Current Time in a Different Time Zone……………………………E-19
To enter the World Time Mode ………………………………………………E-19 To view the time in another time zone ………………………………………E-19
E-4
To specify standard time or daylight saving time (DST) for a city …………E-20
Countdown Timer………………………………………………………………………E-21
To enter the Countdown Timer Mode…………………………………………E-21 To configure the countdown timer ……………………………………………E-24 To perform a countdown timer operation ……………………………………E-26 To stop the alarm ………………………………………………………………E-26
Using the Stopwatch …………………………………………………………………E-27
To enter the Stopwatch Mode …………………………………………………E-27 To perform an elapsed time operation ………………………………………E-28 To pause at a split time…………………………………………………………E-28 To measure two finishes ………………………………………………………E-28
Using the Alarm ………………………………………………………………………E-30
To enter the Alarm Mode ………………………………………………………E-31 To set an alarm time ……………………………………………………………E-32 To test the alarm ………………………………………………………………E-33
E-5
To turn an alarm and the Hourly Time Signal on and off……………………E-33 To stop the alarm ………………………………………………………………E-33
Adjusting the Analog Hand Setting…………………………………………………E-34
To adjust the analog time ………………………………………………………E-34
Illumination ……………………………………………………………………………E-36
To turn on illumination …………………………………………………………E-36 To change the illumination duration …………………………………………E-37
Troubleshooting ………………………………………………………………………E-38
Specifications …………………………………………………………………………E-39
Operating Precautions ………………………………………………………………E-41
User Maintenance ……………………………………………………………………E-52
Mode Reference Guide
Your watch has 6 “modes”. The mode you should select depends on what you want to do.
To do this: |
Enter this mode: |
See: |
|
x View the current date in the Home City |
|
|
|
x Configure Home City and daylight saving time (DST) |
Timekeeping Mode |
E-11 |
|
settings |
|
|
|
x Configure time and date settings |
|
|
|
View the current time in one of 27 cities |
World Time Mode |
E-19 |
|
(29 time zones) around the globe |
|||
|
|
||
Use the countdown timer |
Countdown Timer Mode |
E-21 |
|
Use the stopwatch to measure elapsed time |
Stopwatch Mode |
E-27 |
|
Set an alarm time |
Alarm Mode |
E-30 |
|
Adjust the analog hands |
Hand Setting Mode |
E-34 |
E-6 E-7
Selecting a Mode
x Press C to cycle between the modes as shown below.
x In any mode (except when a setting screen, with flashing digits is on the display), press B to illuminate the display.
Timekeeping Mode World Time Mode Countdown Timer Mode Stopwatch Mode Alarm Mode Hand Setting Mode
C |
C |
C |
C |
C |
|
|
|
|
C |
E-8 |
E-9 |
Operation Guide 5595
General Functions (All Modes)
The functions and operations described in this section can be used in all of the modes.
Auto Return Features
If you leave a setting screen with flashing digits on the display for two or three minutes without performing any operation, the watch exits the setting screen automatically.
Initial Screens
When you enter the World Time Mode or Alarm Mode, the data you were viewing when you last exited the mode appears first.
Scrolling
The B and D buttons are used on the setting screen to scroll through data on the display. In most cases, holding down these buttons during a scroll operation scrolls through the data at high speed.
E-10
Timekeeping
|
Minutes |
Use the Timekeeping Mode to set and view the current |
||
Hour |
time and date. |
|
|
|
|
|
|
||
|
|
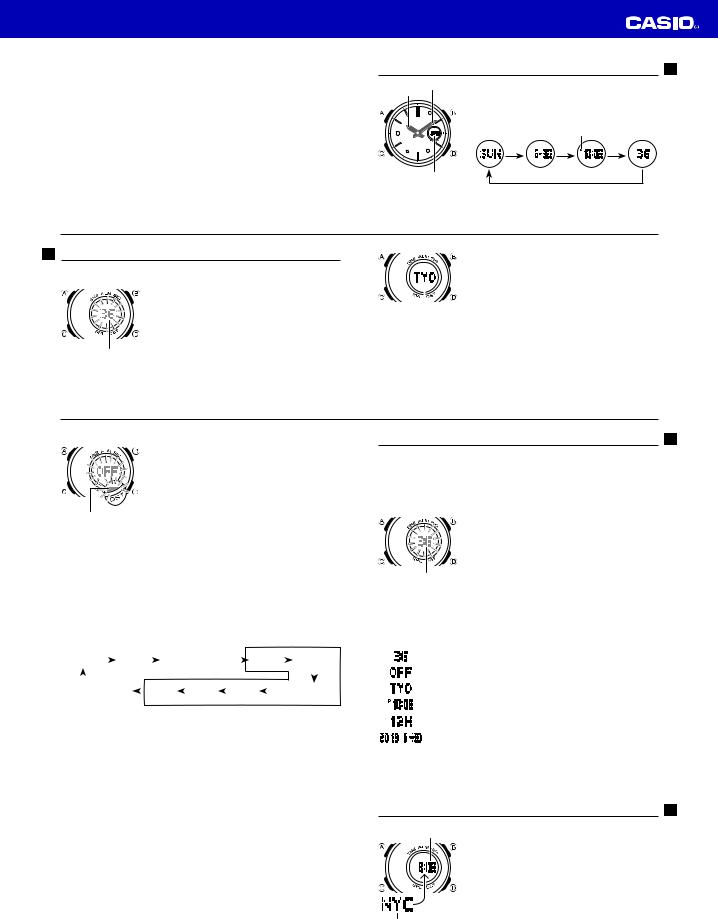
x Each press of D cycles the digital display contents as |
||
|
|
shown below. |
|
|
|
|
Day of the Week Month-Day |
Hour : Minutes |
Seconds |
|
|
|
P indicator |
|
D |
D |
D |
Day of week
D
E-11
Configuring Home City Settings
There are two Home City settings: actually selecting the Home City, and selecting either standard time or daylight saving time (DST).
Seconds
E-12
Note
x After configuring Home City and/or Daylight Saving Time (summer time) settings, be sure to adjust the analog hands to match the digital settings.
x See “Adjusting the Analog Hand Setting” (page E-34).
To configure Home City settings
1.In the Timekeeping Mode, hold down A for about two seconds until the seconds start to flash. This is the
setting screen.
x The watch will exit the setting screen automatically if you do not perform any operation for about two or three minutes.
2. Press C twice to move the flashing to the city code. x For details about city codes, see the “City Code
Table” at the back of this manual.
|
|
3. Press D (East) and B (West) to select the city code |
|
|
you want to use as your Home City. |
|
|
x Keep pressing D or B until the city code you want |
City Code |
to select as your Home City appears on the display. |
|
|
||
4.After the setting is the way you want, press A to return to the Timekeeping Mode.
Note
x After you specify a city code, the watch will use UTC* offsets in the World Time Mode to calculate the current time for other time zones based on the current time in your Home City.
*Coordinated Universal Time, the world-wide scientific standard of timekeeping. The reference point for UTC is Greenwich, England.
E-13
To change the Daylight Saving Time (summer time) setting
1. In the Timekeeping Mode, hold down A for about two seconds until the seconds start to flash. This is the setting screen.
2. Press C to display the DST setting screen.
3. Press D to toggle between Daylight Saving Time (ON) and Standard Time (OFF).
4. After the setting is the way you want, press A to DST indicator return to the Timekeeping Mode.
x The DST indicator appears to indicate that Daylight Saving Time is turned on.
Adjusting the Digital Time and Date Settings
Use the procedure below to adjust the digital time and date settings.
Note
x After adjusting the digital time and date setting, be sure to adjust the analog hands so the settings match.
x See “Adjusting the Analog Hand Setting” (page E-34).
To configure the digital time and date settings
1. In the Timekeeping Mode, hold down A for about two seconds until the seconds start to flash. This is the setting screen.
Seconds
E-14 |
E-15 |
|
|
2.Press C to move the flashing in the sequence shown below to select the other settings.
3.When the timekeeping setting you want to change is flashing, use D and/or B to change it as described below.
|
|
|
|
|
|
|
|
|
|
|
|
|
|
|
|
|
|
|
|
|
|
|
Time and Date |
|||||
|
|
C |
|
|
|
|
C |
|
|
|
|
|
|
|
|
C |
|
|
|
|
|
C |
|
|
||||
Seconds |
|
|
DST |
|
|
|
Home City Code |
|
|
|
Hour |
|
|
|
Minutes |
|||||||||||||
|
|
|
|
|
|
|
|
|
|
|
|
|
|
|
|
|
|
|
|
|
|
|
|
|
|
|
|
|
C |
|
|
|
|
|
|
|
|
|
|
|
|
|
|
|
|
|
|
|
|
|
|
|
|
|
|
|
C |
|
|
|
|
|
|
|
|
|
|
|
|
|
|
|
|
|
|
|
|
|||||||||
Illumination Duration |
|
|
|
|
Day |
|
|
|
Month |
|
|
|
Year |
|
|
|
12/24-Hour Format |
|||||||||||
C |
|
|
|
C |
C |
|
C |
|
||||||||||||||||||||
|
|
|
|
|
|
|
|
|
|
|
|
|
|
|
|
|
|
|||||||||||
|
|
|
|
|
|
|
|
|
|
|
|
|
|
|
|
|
|
|||||||||||
x The following steps explain how to configure timekeeping settings only.
Screen |
To do this: |
Do this: |
|
Reset the seconds to 00 |
Press D. |
|
|
|
|
Toggle between Daylight Saving Time (ON) |
Press D. |
|
and Standard Time (OFF) |
|
|
|
|
|
Change the city code |
Use D (East) and B (West). |
|
|
|
|
Change the hour or minute |
Use D (+) and B (–). |
|
|
|
|
Toggle between 12-hour (12H) and 24-hour |
Press D. |
|
(24H) timekeeping |
|
|
Change the year, month, or day |
Use D (+) and B (–). |
|
|
|
4. Press A to exit the setting screen.
E-16 |
E-17 |
|
|
Note
x For information about selecting a Home City and configuring the DST setting, see “Configuring Home City Settings” (page E-12).
x While 12-hour format is selected for timekeeping, a P indicator will appear for times from noon to 11:59 p.m. No indicator appears for times from midnight to 11:59 a.m. With 24-hour format, time is displayed from 0:00 to 23:59, without any
P indicator.
x The watch’s built-in full automatic calendar makes allowances for different month lengths and leap years. Once you set the date, there should be no reason to change it except after you have the watch’s battery replaced.
x The day of the week changes automatically when the date changes.
Checking the Current Time in a Different Time Zone
Current time in the currently selected World Time City
Currently selected
World Time City
You can use the World Time Mode to view the current time in one of 29 time zones (27 cities) around the globe. The city that is currently selected in the World Time Mode is called the “World Time City”.
To enter the World Time Mode
Use C to select the World Time Mode as shown on page E-8.
To view the time in another time zone
In the World Time Mode, use D (East) to scroll through city codes.
E-18 |
E-19 |
Operation Guide 5595
To specify standard time or daylight saving time (DST) for a city
1. In the World Time Mode, use D (East) to display the city code (time zone) whose Standard Time/Daylight
Saving Time setting you want to change.
2. Hold down A for about two seconds.
x This toggles the city code you selected in step 1 between Daylight Saving Time (DST indicator displayed) and standard time (DST indicator not displayed).
x Using the World Time Mode to change the DST setting of the city code that is selected as your Home City also will change the Timekeeping Mode time DST setting.
x Note that you cannot switch between standard time/daylight saving time (DST) while GMT is selected as the World Time City.
x The standard time/daylight saving time (DST) setting affects only the currently selected time zone. Other time zones are not affected.
E-20
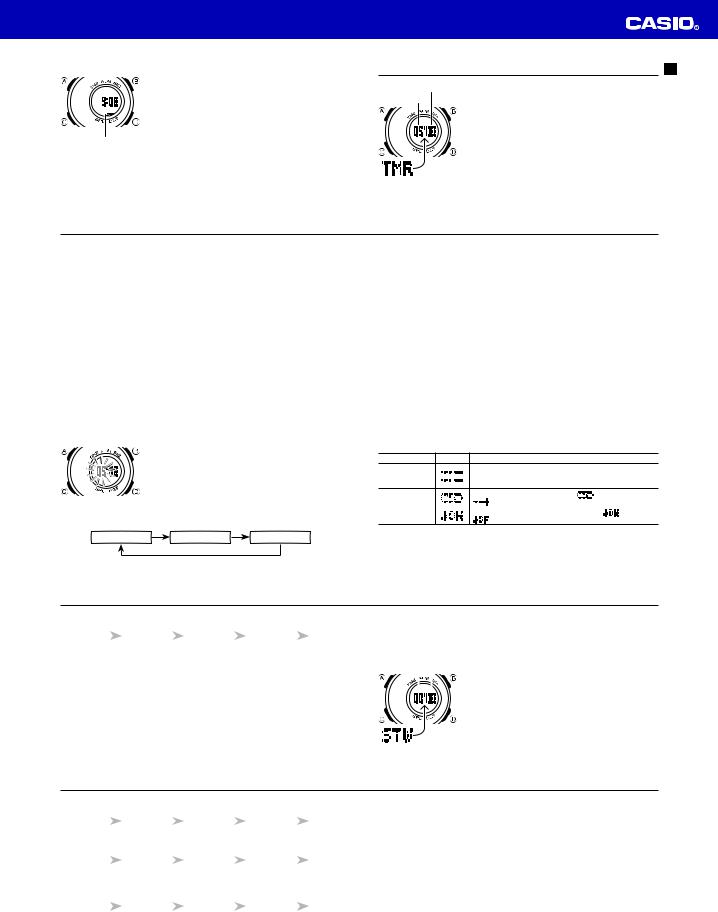
Countdown Timer
Seconds
Minutes
The countdown timer can be set within a range of one minute to 60 minutes. An alarm sounds when the
countdown reaches zero. The countdown timer also has an auto-repeat feature and a progress beeper that signals the progress of the countdown.
To enter the Countdown Timer Mode
Use C to select the Countdown Timer Mode as shown on page E-8.
Configuring the Countdown Timer
The following are the settings you should configure before actually using the countdown timer.
Countdown start time; Auto-repeat on/off; Progress beeper on/off
E-21
x See “To configure the countdown timer” on page E-24 for information about setting up the timer.
Auto-repeat
When auto-repeat is turned on, the countdown automatically restarts from the countdown start time when it reaches zero. If left running, the countdown is repeated a total of eight times, after which it stops automatically.
When auto-repeat is turned off, the countdown stops when it reaches zero and the display shows the original countdown start time.
x Pressing D while an auto-repeat countdown is in progress pauses the current countdown. You can resume the auto-repeat countdown by pressing D, or you can press A to reset to the countdown time starting value.
Countdown Timer Beeper Operations
The watch beeps at various times during a countdown so you can keep informed about the countdown status without looking at the display. The following describes the types of beeper operations the watch performs during a countdown.
Countdown End Beeper
The countdown end beeper lets you know when the countdown reaches zero. x When the progress beeper is turned off, the countdown end beeper sounds for
about 10 seconds, or until you press any button to stop it.
x When the progress beeper is turned on, the countdown end beeper sounds for about one second.
Progress Beeper
When the progress beeper is turned on, the watch uses beeps to signal countdown progress as described below.
x Starting from five minutes before the end of the countdown, the watch emits four short beeps at the top of each countdown minute.
x 30 seconds before the end of the countdown, the watch emits four short beeps. x The watch emits a short beep for each of the last 10 seconds of the countdown. x If the countdown start time is six minutes or greater, the watch emits a short beep for each second of the final 10 seconds before the five-minute point is reached.
Four short beeps are emitted to signal when the five-minute point is reached.
E-22 |
E-23 |
|
|
To configure the countdown timer
1. While the countdown start time is on the display in the Countdown Timer Mode, hold down A until the current countdown start time starts to flash, which indicates the setting screen.
x If the countdown start time is not displayed, use the procedure under “To perform a countdown timer operation” (page E-26) to display it.
2.Press C to move the flashing in the sequence shown below to select other settings.
CC
Start Time |
Auto-repeat |
Progress Beeper |
C
3.When the setting you want to change is flashing, use B and D to change it as described below.
Setting |
Screen |
Button Operation |
Use D (+) and B (–) to change the setting.
Start Time 


 x You can set a start time in the range of 1 to 60 minutes in 1-minute increments.
Auto-repeat |
Press D to toggle auto-repeat on ( |
displayed) and off |
||
( |
displayed). |
|
|
|
|
|
|
||
Progress Beeper |
Press D to toggle the progress beeper on ( |
) and off |
||
( |
). |
|
|
|
|
|
|
||
4.Press A to exit the setting screen.
x You can also perform steps 1 and 2 of the above procedure whenever you need to view the current auto-repeat and progress beeper settings.
E-24 E-25
To perform a countdown timer operation |
|
|
|
Using the Stopwatch |
|
|
|||||
D |
|
D |
|
D |
|
D |
|
A |
The stopwatch measures elapsed time, split times, and two finishes. |
|
|
|
|
|
|
|
|
||||||
Start |
Stop |
Resume |
(Stop) |
Reset |
|
|
|
||||
x Before starting a countdown timer operation, check to make sure that a countdown operation is not in progress (indicated by the seconds counting down). If it is, press D to stop it and then A to reset to the countdown start time.
To stop the alarm
Press any button.
E-26
|
Seconds |
To enter the Stopwatch Mode |
|
Minutes |
|
Use C to select the Stopwatch Mode as shown on |
|
|
page E-9. |
||
|
|
|
|
|
|
|
|
E-27
To perform an elapsed time operation |
|
|
|
Note |
|||||||
D |
|
D |
|
|
D |
|
D |
|
A |
x The Stopwatch Mode can indicate elapsed time up to 59 minutes, 59 seconds. |
|
|
|
|
|
|
x An ongoing elapsed time measurement operation will continue internally even if |
||||||
Start |
Stop |
(Resume) |
(Stop) |
Reset |
|||||||
you change to another mode. However, if you exit the Stopwatch Mode while a |
|||||||||||
|
|
|
|
|
|
|
|
|
|
||
To pause at a split time |
|
|
|
|
|
split time is displayed, the split time will not be displayed when you return to the |
|||||
|
|
|
|
|
Stopwatch Mode. |
||||||
|
|
|
|
|
|
|
|
|
|
||
D |
|
A |
|
|
A |
|
D |
|
A |
|
|
|
|
|
|
|
|||||||
Start |
Split |
Split release |
Stop |
Reset |
|
||||||
|
|
(SPL displayed) |
|
|
|
|
|
|
|||
To measure two finishes |
|
|
|
|
|
|
|||||
D |
|
A |
|
|
D |
|
A |
|
A |
|
|
|
|
|
|
|
|||||||
Start |
Split |
Stop |
Split release |
Reset |
|
||||||
|
|
(SPL displayed) |
Second runner |
Display time of |
|
|
|||||
|
|
First runner finishes. finishes. |
second runner. |
|
|
||||||
|
|
Display time of first |
|
|
|
|
|
|
|||
|
|
runner. |
|
|
|
|
|
|
|||
E-28 |
|
|
|
|
|
|
|
|
E-29 |
||
 Loading...