

Page 1

Photo Printer
Quick Start Guide
Quick Start Guide
Quick Start GuideQuick Start Guide
Page 2

Getting Help from Canon
Getting Help from Canon
Getting Help from CanonGetting Help from Canon
Help Us Help You Better
Before you contact Canon, please record the following information.
Serial Number (located on the back of the printer):
Model Number (located on the top of the printer):
Setup Software and User’s Guide CD version number (USCD X.X)
located on your CD-ROM:
Purchase Date:
Canon U.S.A. Customer Technical Support Sequence*
1. Internet — www.canontechsupport.com
For quick and comprehensive self-help in an intuitively guided interactive troublesh
environment, the place to start is our helpful tech support web site. In addition, th
driver downloads, answers to frequently asked questions, product information, and
“where to buy” instructions are found here.
2. Email Tech Support — www.canontechsupport.com
For individual attention to a special issue, try emailing our friendly technical enginee
specially trained to communicate quick, easy, and logical solutions to your inquir
24 hours.
3. Toll-Free Live Tech Support — (1-800-828-4040)
This option provides live telephone technical support, free of service charges, M
Saturday (excluding holidays), during your product's 1 year limited warranty period.
Telephone Device for the Deaf (TDD) support is available at ((((1-866-251-3752
1-866-251-3752)))).
1-866-251-37521-866-251-3752
ooting
e latest
rs,
ies within
onday-
4. Extended Service and Support — www.canonesp.com
Canon CarePAK Extended Service Plan is a cost-attractive and easy-to-use extended
program that provides up to three full years of service and support coverage at a ve
attractive price. CarePAK offers toll-free Canon technical support and includes C
superb InstantExchange product replacement program. For further information a
extending your Canon service and support, call (1-800-385-2155), or visit our web site at
www.canonesp.com
www.canonesp.com. CarePAK must be purchased during your product’s warra
www.canonesp.comwww.canonesp.com
For more information and updated program specifics, please visit our we
www.canontechsupport.com
www.canontechsupport.com.
www.canontechsupport.comwww.canontechsupport.com
* Support program specifics are subject to change
without notice.
b site at
service
ry
anon’s
bout
nty period.
Page 3
Photo Printer
Photo Printer
Photo PrinterPhoto Printer
Quick Start Guide
Quick Start Guide
Quick Start GuideQuick Start Guide
Page 4

Canon PIXMA iP90 Photo Printer Quick Start Guide
Copyright
Copyright
CopyrightCopyright
This manual is copyrighted by Canon U.S.A., Inc. with all rights reserved. Under the copyright laws,
this manual may not be reproduced in any form, in whole or in part, without the prior written
consent of Canon U.S.A., Inc.
© 2005 Canon U.S.A., Inc.
Disclaimer
Disclaimer
DisclaimerDisclaimer
Canon U.S.A., Inc. has reviewed this manual thoroughly in order that it will be an easy-to-use
guide to your Canon PIXMA iP90 Photo Printer. All statements, technical information and
recommendations in this manual and in any guides or related documents are believed reliable, but
the accuracy and completeness thereof are not guaranteed or warranted, and they are not intended
to be, nor should they be understood to be, representation or warranties concerning the products
described.
Specifications are subject to change without notice.
ENERGY STAR partner, Canon U.S.A., Inc., has determined that this product meets
As an
ENERGY STAR guidelines for energy efficiency.
the
All information regarding non-Canon products was compiled from publicly available information. No
representation is made regarding the accuracy thereof.
Trademarks
Trademarks
TrademarksTrademarks
• Canon, BCI and PhotoRecord are registered trademarks and PIXMA is a trademark of Canon Inc.
• Macintosh, Mac and the Mac logo are registered trademarks of Apple Computer, Inc., registered
in the U.S. and other countries.
• Microsoft® and Windows® are registered trademarks of Microsoft Corporation in the U.S. and
other countries.
• IrDA Feature Trademark and IrDA Logo are owned by the Infrared Data Association.
• The Bluetooth® word mark and logos are owned by the Bluetooth SIG, Inc. and any use of such
marks by Canon, Inc. is under licence.
• All other product and brand names are trademarks of their respective owners.
Canon U.S.A., Inc.
One Canon Plaza
Lake Success, NY 11042
Page 5

Contents
Contents
ContentsContents
Basic Printing
Basic Printing
Basic PrintingBasic Printing
Turning on the Printer . . . . . . . . . . . . . . . . . . . . . . . . . . . . . . . . . . . . . . . . . . . . . . . . . . . . . . . . . . . . . . . 2
Turning off the Printer. . . . . . . . . . . . . . . . . . . . . . . . . . . . . . . . . . . . . . . . . . . . . . . . . . . . . . . . . . . . . . . 3
Loading Paper . . . . . . . . . . . . . . . . . . . . . . . . . . . . . . . . . . . . . . . . . . . . . . . . . . . . . . . . . . . . . . . . . . . . . 4
Using Speciality Media. . . . . . . . . . . . . . . . . . . . . . . . . . . . . . . . . . . . . . . . . . . . . . . . . . . . . . . . . . . . . . 8
Printing with Windows . . . . . . . . . . . . . . . . . . . . . . . . . . . . . . . . . . . . . . . . . . . . . . . . . . . . . . . . . . . . . 10
Printing with Macintosh . . . . . . . . . . . . . . . . . . . . . . . . . . . . . . . . . . . . . . . . . . . . . . . . . . . . . . . . . . . . 12
Canceling Printing. . . . . . . . . . . . . . . . . . . . . . . . . . . . . . . . . . . . . . . . . . . . . . . . . . . . . . . . . . . . . . . . . 14
Printing Data through Infrared Communication . . . . . . . . . . . . . . . . . . . . . . . . . . . . . . . . . . . . . . . . . 15
Advanced Printing
Advanced Printing
Advanced PrintingAdvanced Printing
Printing Photographs Directly from a PictBridge Compliant Device. . . . . . . . . . . . . . . . . . . . . . . . . 23
Accessing Printer Driver . . . . . . . . . . . . . . . . . . . . . . . . . . . . . . . . . . . . . . . . . . . . . . . . . . . . . . . . . . . . 29
Adjusting Print Quality for Photographs . . . . . . . . . . . . . . . . . . . . . . . . . . . . . . . . . . . . . . . . . . . . . . . 30
Using the Bundle Software . . . . . . . . . . . . . . . . . . . . . . . . . . . . . . . . . . . . . . . . . . . . . . . . . . . . . . . . . . 37
Printing Borderless Photographs. . . . . . . . . . . . . . . . . . . . . . . . . . . . . . . . . . . . . . . . . . . . . . . . . . . . . 38
Printing Maintenance
Printing Maintenance
Printing MaintenancePrinting Maintenance
When Printing Becomes Faint or Colors are Incorrect . . . . . . . . . . . . . . . . . . . . . . . . . . . . . . . . . . . . 41
Printing the Nozzle Check Pattern . . . . . . . . . . . . . . . . . . . . . . . . . . . . . . . . . . . . . . . . . . . . . . . . . . . . 42
Print Head Cleaning. . . . . . . . . . . . . . . . . . . . . . . . . . . . . . . . . . . . . . . . . . . . . . . . . . . . . . . . . . . . . . . . 47
Print Head Deep Cleaning. . . . . . . . . . . . . . . . . . . . . . . . . . . . . . . . . . . . . . . . . . . . . . . . . . . . . . . . . . . 52
Aligning the Print Head . . . . . . . . . . . . . . . . . . . . . . . . . . . . . . . . . . . . . . . . . . . . . . . . . . . . . . . . . . . . . 57
Replacing an Ink Tank. . . . . . . . . . . . . . . . . . . . . . . . . . . . . . . . . . . . . . . . . . . . . . . . . . . . . . . . . . . . . . 61
Contents
Troubleshooting
Troubleshooting
TroubleshootingTroubleshooting
Cannot Install the Printer Driver. . . . . . . . . . . . . . . . . . . . . . . . . . . . . . . . . . . . . . . . . . . . . . . . . . . . . . 70
Print Quality is Poor or Contains Errors . . . . . . . . . . . . . . . . . . . . . . . . . . . . . . . . . . . . . . . . . . . . . . . . 72
Troubleshooting Printer Hardware. . . . . . . . . . . . . . . . . . . . . . . . . . . . . . . . . . . . . . . . . . . . . . . . . . . . 74
Paper Does Not Feed Properly . . . . . . . . . . . . . . . . . . . . . . . . . . . . . . . . . . . . . . . . . . . . . . . . . . . . . . . 75
Handling Error Messages . . . . . . . . . . . . . . . . . . . . . . . . . . . . . . . . . . . . . . . . . . . . . . . . . . . . . . . . . . . 76
An Error Message Appears on the Screen . . . . . . . . . . . . . . . . . . . . . . . . . . . . . . . . . . . . . . . . . . . . . . 78
Cannot Print Properly through Infrared Communication . . . . . . . . . . . . . . . . . . . . . . . . . . . . . . . . . . 81
Cannot Print Properly from the Digital Camera. . . . . . . . . . . . . . . . . . . . . . . . . . . . . . . . . . . . . . . . . . 82
Appendix
Appendix
AppendixAppendix
Printing Photographs Directly from Canon Bubble Jet Direct Compatible Digital Cameras . . . . . . 84
User’s Guide Table of Contents . . . . . . . . . . . . . . . . . . . . . . . . . . . . . . . . . . . . . . . . . . . . . . . . . . . . . . 86
Accessory Options. . . . . . . . . . . . . . . . . . . . . . . . . . . . . . . . . . . . . . . . . . . . . . . . . . . . . . . . . . . . . . . . . 87
Traveling Abroad with the Printer . . . . . . . . . . . . . . . . . . . . . . . . . . . . . . . . . . . . . . . . . . . . . . . . . . . . 89
Specifications . . . . . . . . . . . . . . . . . . . . . . . . . . . . . . . . . . . . . . . . . . . . . . . . . . . . . . . . . . . . . . . . . . . . 91
Safety Precautions . . . . . . . . . . . . . . . . . . . . . . . . . . . . . . . . . . . . . . . . . . . . . . . . . . . . . . . . . . . . . . . . 94
Regulatory Information. . . . . . . . . . . . . . . . . . . . . . . . . . . . . . . . . . . . . . . . . . . . . . . . . . . . . . . . . . . . . 96
CANON U.S.A., INC. LIMITED WARRANTY --- (USA Only). . . . . . . . . . . . . . . . . . . . . . . . . . . . . . . . . . . 97
Index
Index. . . . . . . . . . . . . . . . . . . . . . . . . . . . . . . . . . . . . . . . . . . . . . . . . . . . . . . . . . . . . . . . . . . . . . . . . . . . . . . . . . . . . . 99
IndexIndex
1
Page 6
Basic Printing
Basic Printing
Basic Printing
Basic PrintingBasic Printing
This
Note
Quick Start Guide
printer and how to use them. For more information, view the iP90
Guide
installed on your computer, or use the online help within your
printer driver interface.
describes some of the features of your iP90
User's
While in the printer's Properties window, press the F1
the upper right corner. Then click the feature you want to know more
about, or click Help
While in the Page Setup
lower left corner.
Click provides detailed information about each setting.
When the Help window appears, select your desired topic.
Page Setup dialog box or Print
Page SetupPage Setup
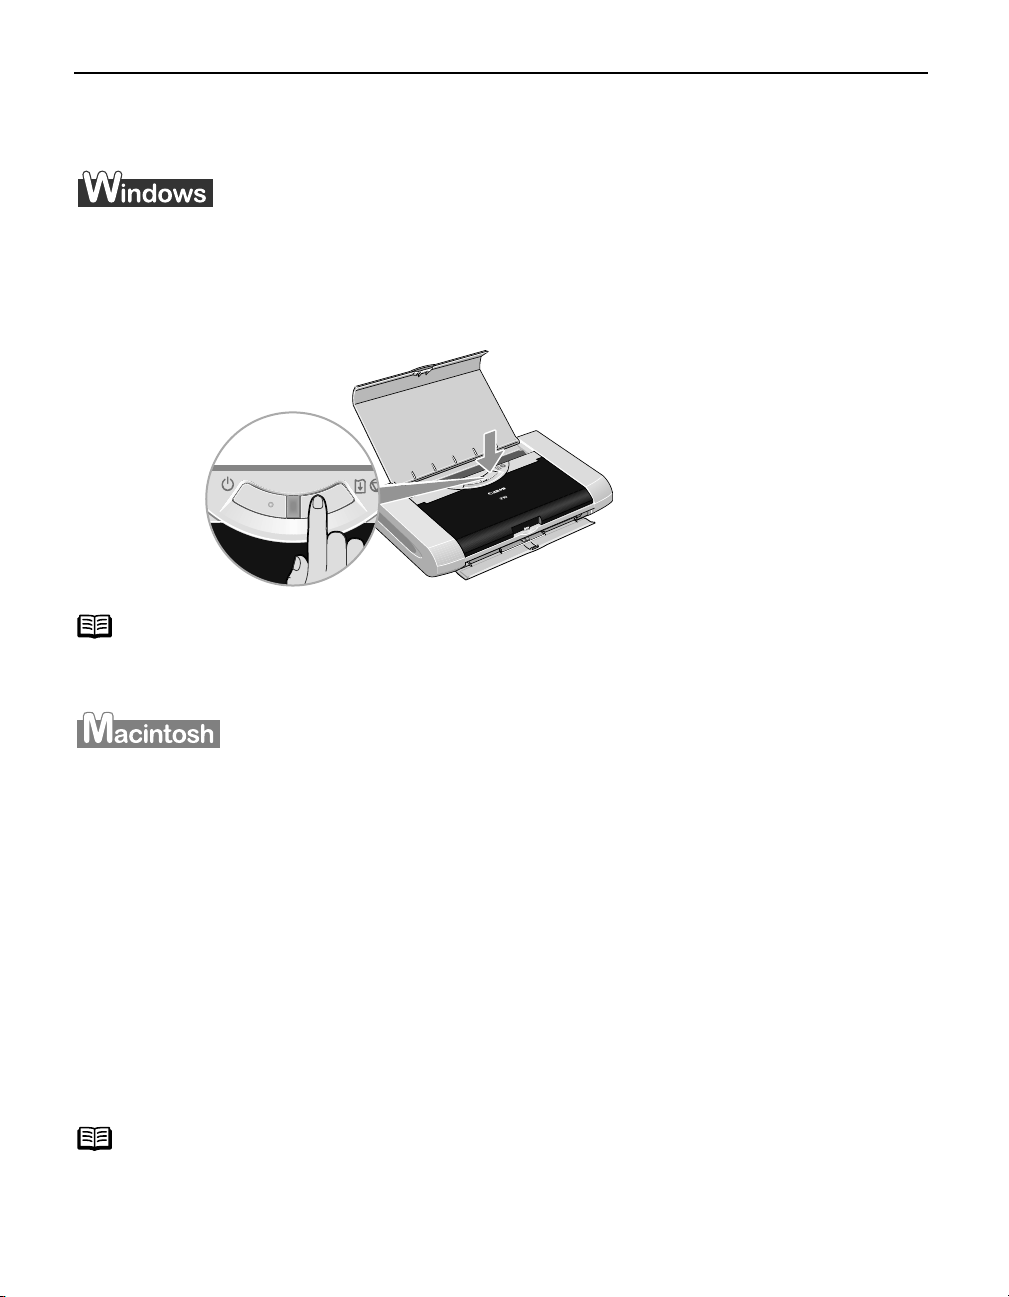
Turning on the Printer
1 Open the Paper Support.
2 Press the POWER button.
The POWER
POWER lamp flashes while the printer warms up and changes to steady (non-
POWERPOWER
flashing) green when the printer is ready.
Help when displayed.
HelpHelp
F1 key, or click in
F1F1
Print dialog box, click in the
PrintPrint
Important If the POWER
2
POWER lamp changes to orange and begins flashing, refer to the
POWERPOWER
section "Handling Error Messages
Handling Error Messages" on page 76.
Handling Error MessagesHandling Error Messages
Page 7
Turning off the Printer
1 To turn off the printer, press the POWER button.
When the POWER lamp stops blinking, the printer is turned off.
Important About the Power Plug
When removing the power plug after turning off the printer, be sure to
check that the POWER lamp is not lit. If the power plug is removed from
the wall outlet with the POWER lamp lit or blinking, the printer cannot
protect the print head and may be unable to print.
Basic Printing
3
Page 8

Basic Printing
Loading Paper
Print Media to Avoid
Do not use the following types of paper. Using such paper will not only produce
unsatisfactory results, but can also cause the printer to jam or malfunction.
• Folded, curled or wrinkled paper
• Damp paper
• Paper that is too thin (less than 64 gsm or 17 lb)
• Paper that is too thick* (more than 105 gsm or 28 lb)
*non-Canon branded paper
•Picture postcards
• Postcards with an affixed photo or sticker
• Envelopes with a double flap
• Envelopes with pressure seals
• Envelopes with an embossed or treated surface
Preparing the Printer
• For detailed information on the speciality media Canon provides for use with its
various printers, refer to the section "Using Speciality Media
Using Speciality Media" on page 8.
Using Speciality MediaUsing Speciality Media
• Consult "Printing Media" in the
speciality media into the printer.
User’s Guide
for detailed instructions on how to load
1 Flatten the four corners of the paper before loading it.
Important When paper is curled, gently bend them in the opposite direction until
the paper becomes completely flat.
4
Page 9
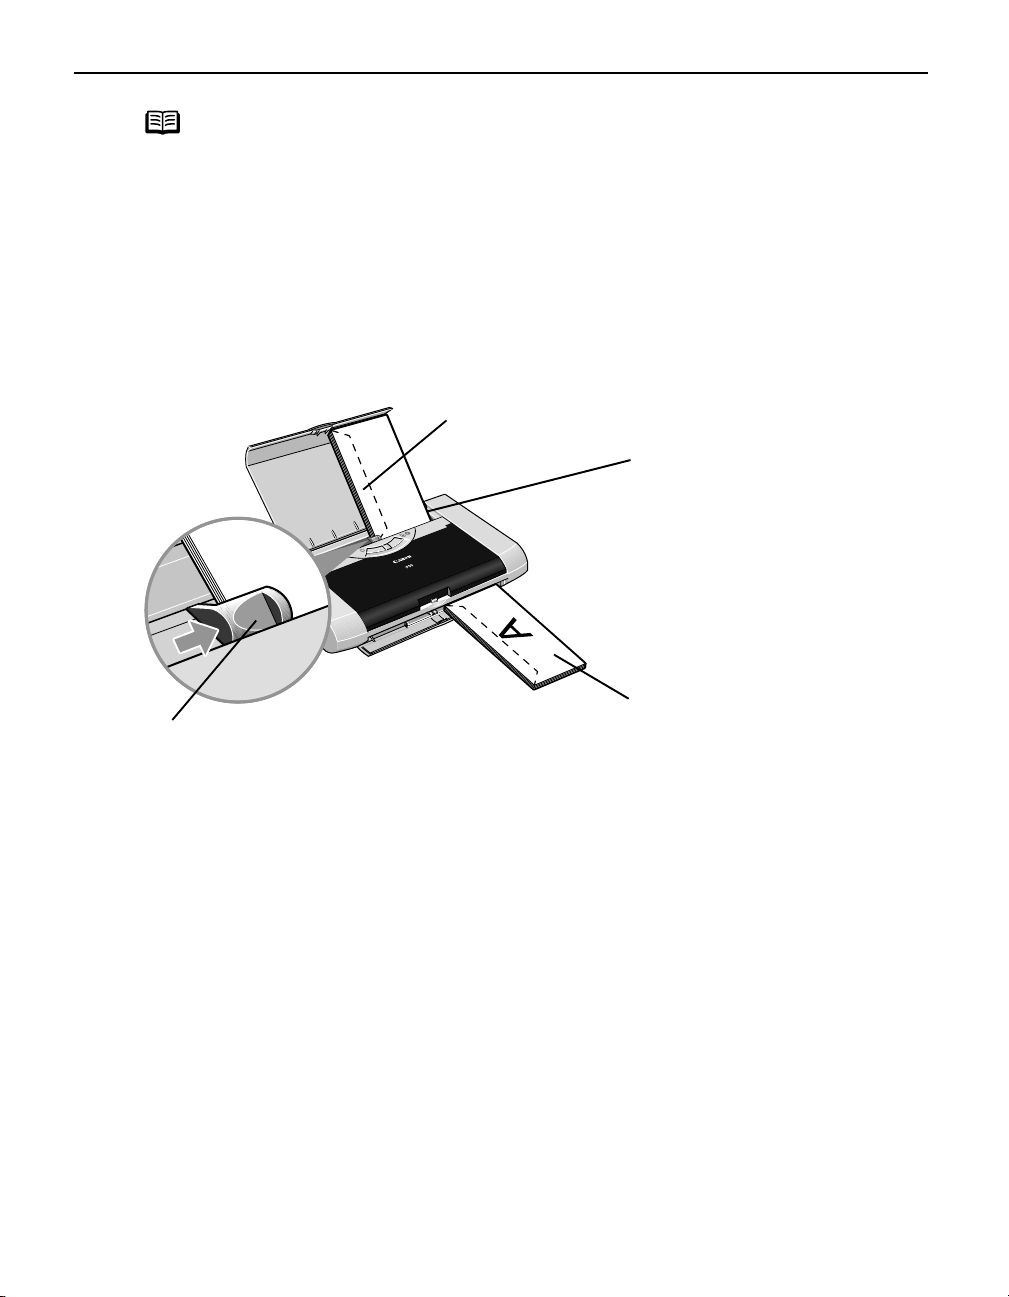
2 Prepare to load paper.
(1)O
Basic Printing
pen thePaper Support andPaper
Output Slot Cover.
(2) Move the Paper Thickness Lever to the
correct position for the media in use.
Move to the right position for plain
paper. Move to the left position for
envelope, and T-Shirt Transfers.
Note
• Place the printer on a flat surface.
• Do not place any obstacles in front of the printer to secure the space
for paper output.
• Remove each sheet as soon as paper is out. If the Paper Output Slot
Cover is stacked with printed sheets, they may be folded or jammed.
• When performing duplex printing, pay great attention to the dust and
stain on the area (desk, etc.) where the printed paper is ejected.
Printing with dust and stain remaining on this area can have a bad
effect on the printing result and printer.
3 Load the paper.
Loading Plain Paper
(1) Insert the paper into the Auto Sheet
Feeder with the print side facing up.
When loading the 4"×6"paper, load
sheets in the portrait position (short
side facing down).
Load Limit Mark
Load Limit Mark
Load Limit Mark Load Limit Mark
Do not load beyond this Load Limit mark.
(2) Align the paper stack against the right
side of the Auto Sheet Feeder.
(3) Slide the Paper Guide against the left
side of the stack of paper.
5
Page 10
Basic Printing
Fold th
Note
• Do not stack more than 10 sheets in the Paper Output Slot Cover.
• Do not touch the printed surfaces until the ink dries. For specific
drying times, refer to the instructions packaged with your media.
Loading Envelopes
Use either DL or US Comm. #10 size envelopes.
Important • Do not use envelopes with embossed or treated surfaces, a double
flap, pressure seals or sticker flaps.
• Select either DL Env.
size you are using.
DL Env. or Comm. Env. #10
DL Env.DL Env.
Comm. Env. #10 according to the envelope
Comm. Env. #10Comm. Env. #10
e envelope flap shut.
(1) Align the envelope
against the right side of
the Auto Sheet Feeder.
The flap of the envelope
will appear with its flap
facing up on the left side.
A maximum of 5
envelopes can be loaded
at once.
Printing direction
(2) Slide the Paper Guide against the left side of
the envelope.
(3) Select Envelope
Page Size
Page Size.
Page SizePage Size
For the printer driver setting, refer to "Printing with Windows
"Printing with Macintosh
Envelope in Media Type
EnvelopeEnvelope
Printing with Macintosh" on page 12.
Printing with MacintoshPrinting with Macintosh
Media Type, and then select Comm. Env. #10
Media TypeMedia Type
Comm. Env. #10 or DL Env
Comm. Env. #10Comm. Env. #10
Printing with Windows" on page 10,
Printing with WindowsPrinting with Windows
DL Env. in
DL EnvDL Env
6
Page 11
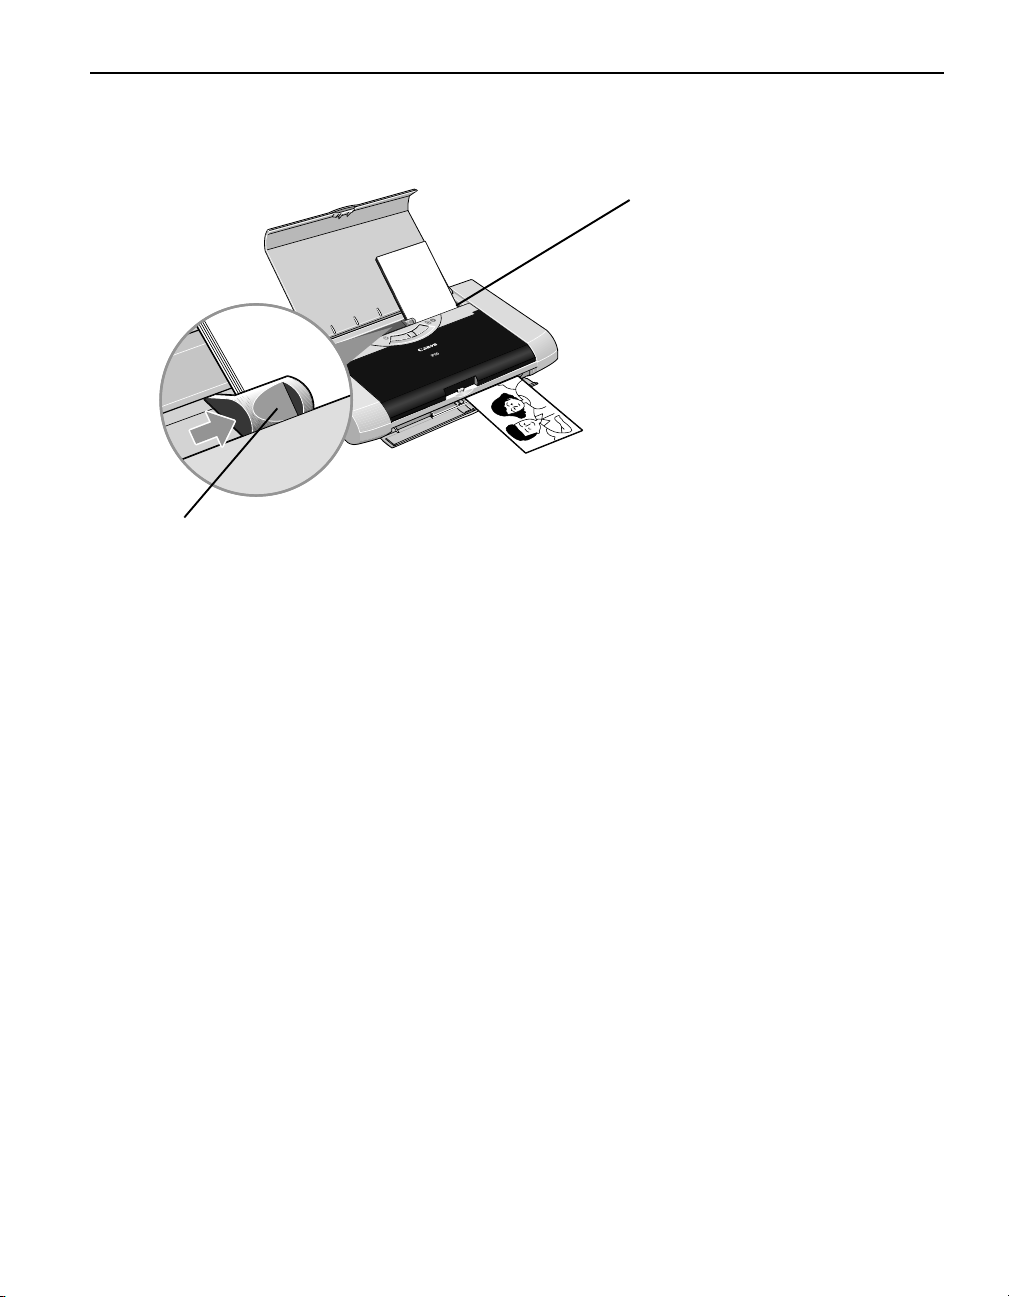
Loading 4" x 6" size papers
You can print on 4" x 6" size papers.
(2) Slide the Paper Guide against the left side of
the stack of paper.
Basic Printing
(1) Align the paper stack
against the right side of the
Auto Sheet Feeder.
Despite the direction of the
photograph, load the paper
in the vertical direction.
You can load a maximum of
10 sheets of 4" x 6" paper.
(When using the Photo
Paper Plus Double Sided
PP-101D, set only one
sheet at a time)
(3) Select 4 x 6 in
For the printer driver setting, refer to "Printing with Windows
"Printing with Macintosh
4 x 6 in in Page Size
4 x 6 in4 x 6 in
Printing with Macintosh" on page 12.
Printing with MacintoshPrinting with Macintosh
Page Size.
Page SizePage Size
Printing with Windows" on page 10,
Printing with WindowsPrinting with Windows
7
Page 12
Basic Printing
Using Speciality Media
Canon recommends that you use genuine Canon media to ensure optimal print quality.
Photo Quality Media
•Photo Paper Pro
• Photo Paper Plus Glossy
• Photo Paper Plus Double Sided
•Photo Paper Plus Semi-Gloss
• Matte Photo Paper
• Glossy Photo Paper
Media Suited to Business
Documents
• High Resolution Paper
• Transparencies
8
Page 13
Canon Speciality Media
Basic Printing
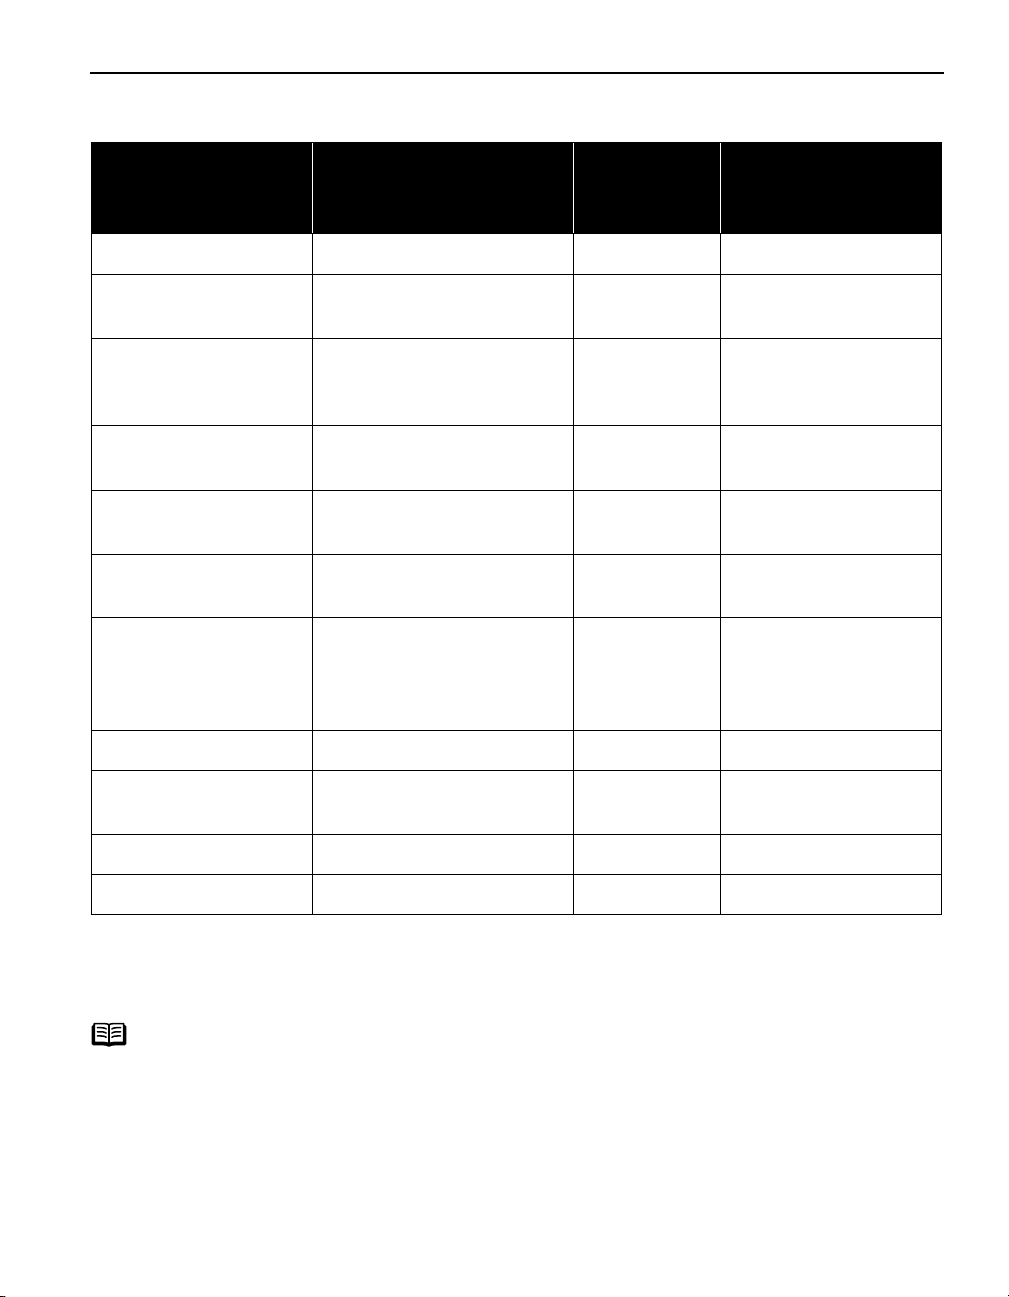
Media Name Paper Support Load Limit Paper
Thickness
Printer Driver Settings
for Media Type
Lever Position
Super White Paper Letter: up to 3mm Right Plain Paper
Photo Paper Pro Letter: up to 1 sheet
Right Photo Paper Pro
4"×6": up to 10 sheets
1
Photo Paper Plus
Glossy
Letter: up to 5 sheets*
5"×7": up to 10 sheets
Right Photo Paper Plus
Glossy
4"×6": up to 10 sheets
Photo Paper Plus
Double Sided
Photo Paper Plus
Semi-Gloss
Matte Photo Paper Letter: up to 10 sheets
Letter: 1 sheet
5"×7": 1 sheet
Letter: up to 5 sheets
4"×6": up to 10 sheets
Right Photo Paper Plus
Double Sided
Right Photo Paper Plus
Glossy
Right Matte Photo Paper
4"×6": up to 10 sheets
1
Glossy Photo Paper Letter: up to 10 sheets*
Right Glossy Photo Paper
4"×6": up to 10 sheets
Credit Card: up to 10
sheets
High Resolution Paper Letter: up to 10 sheets Right High Resolution Paper
Photo Stickers*
2
1 sheet Right Photo Paper Plus
Glossy
T-Shirt Transfers 1 sheet Left T-Shirt Transfers
Transparencies Up to 10 sheets*
*1 When paper cannot be fed normally, load the necessary number of sheets in the Auto Sheet Feeder with them separating
from each other to avoid them from sticking together.
*2 When Windows is being used, you can specify the print setting easily by using the PhotoRecord software provided with
the
Setup Software & User’s Guide CD-ROM
For instructions on how to print from the software applications, refer to the
Note
• When using plain paper (64 gsm or 17 lb), up to 30 sheets can be set. Set
1
.
the Paper Thickness Lever (gray) to the right and select Plain Paper
printer driver Media Type
Media Type.
Media TypeMedia Type
• For a detailed description of print media types, refer to "Printing Media
User’s Guide
the
.
Right Transparencies
Photo Application Guide
.
Plain Paper from the
Plain PaperPlain Paper
Printing Media" in
Printing MediaPrinting Media
9
Page 14
Basic Printing
l
Printing with Windows
Note
• The menu screens and dialog boxes that appear may vary, depending on the
software application you are using.
• The steps described in this section are for printing in Windows XP Service
Pack 2 (hereafter, called Windows XP SP2).
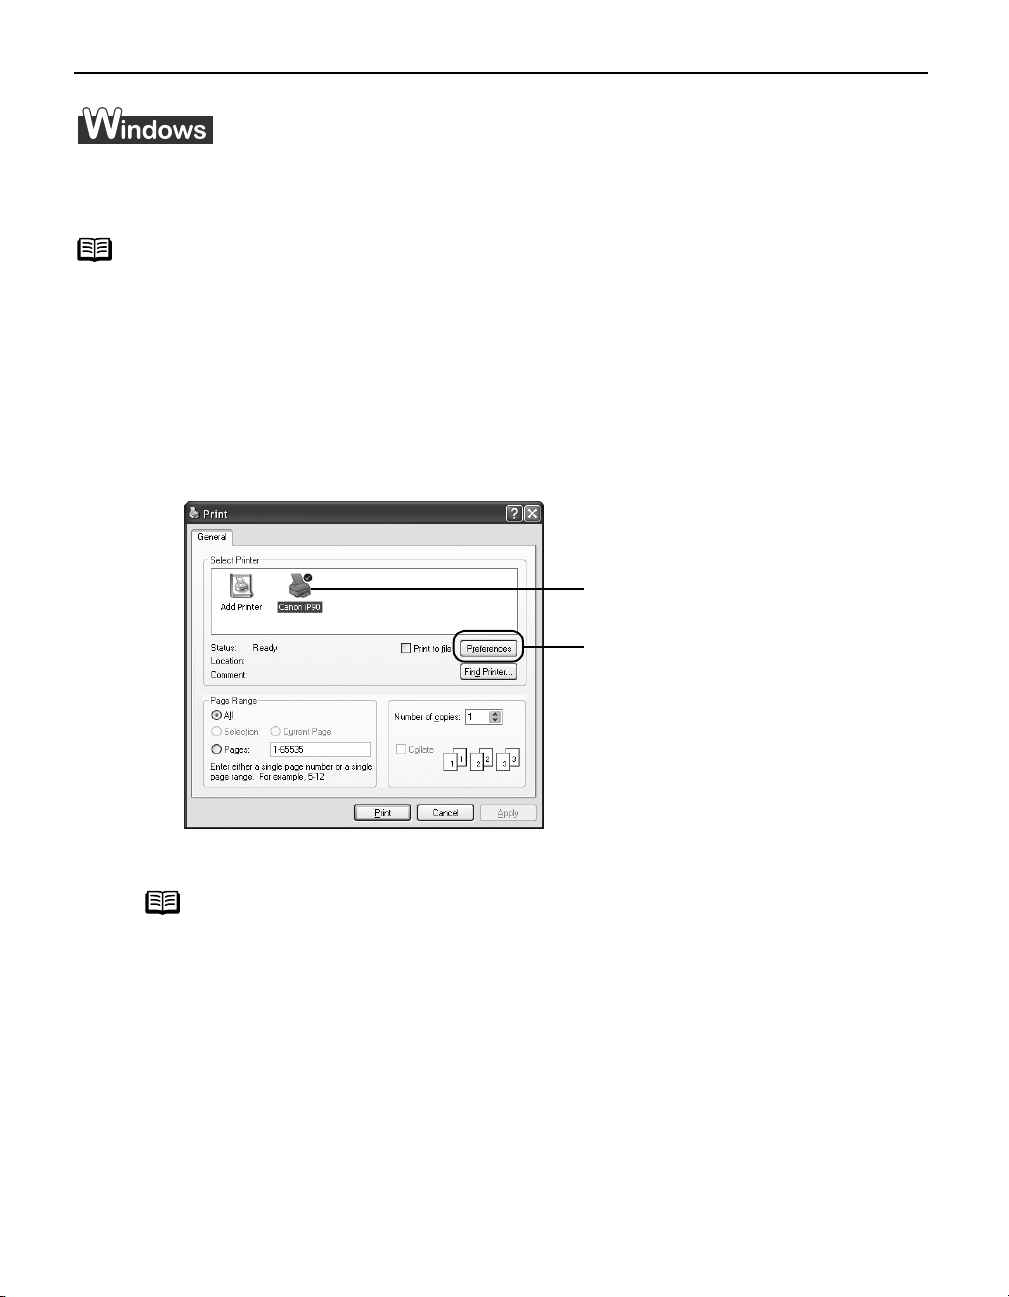
1 Create a document or open a file to print.
2 Open the Printer Properties dialog box.
(1) Select Print
Print from the application's File
PrintPrint
File menu.
FileFile
(2) Ensure that Canon iP90
selected.
Click Preferences
(3)
Properties
Properties
PropertiesProperties
Canon iP90 is
Canon iP90Canon iP90
Preferences or
PreferencesPreferences
.
10
Note
In Windows 2000, click the Main
Main tab in the Print
MainMain
Print dialog box.
PrintPrint
Page 15
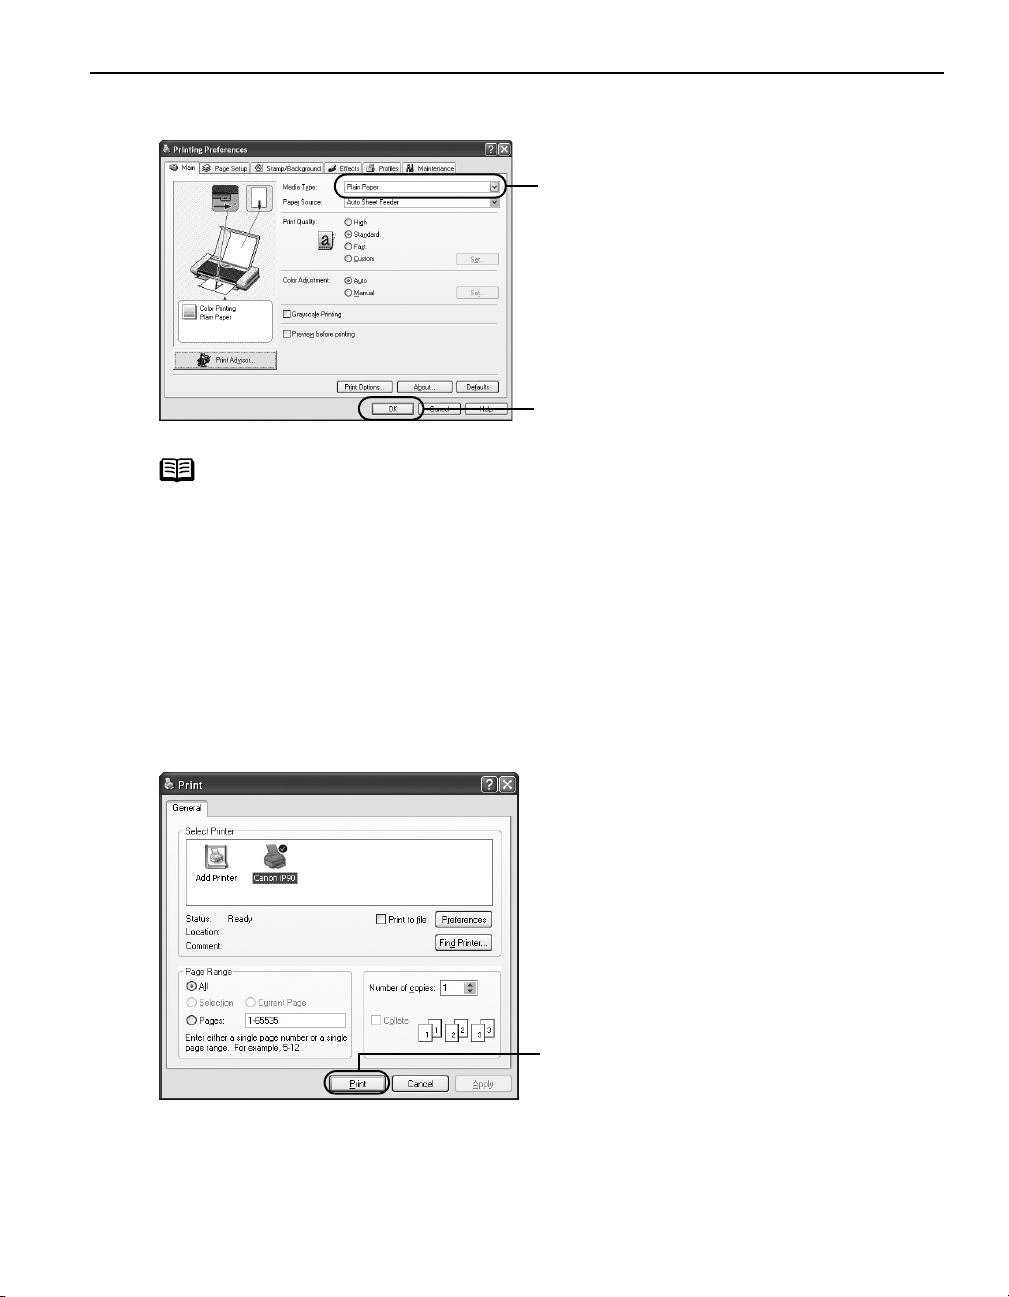
3 Specify the required settings.
Basic Printing
Note
•From the Page Setup
printed.
• To adjust Print Quality
Main
Main tab. You can control the quality in the Set Print Quality
MainMain
box.
• For details about other printer driver functions, refer to “(Windows)
Printer Driver Functions” in the
• Select Preview before printing
displays a preview screen that allows you to confirm the selected
printing effects and how your document will look when printed.
Some applications do not contain the function to display the preview.
4 Print the document.
(1) Click Media Type
(2) Click OK
Page Setup tab select the correct document size to be
Page SetupPage Setup
Print Quality settings, select Custom
Print QualityPrint Quality
Preview before printing by clicking the check box. This
Preview before printingPreview before printing
Media Type to select
Media TypeMedia Type
the media loaded in the
printer.
OK.
OKOK
Custom and click Set
CustomCustom
Set Print Quality dialog
Set Print QualitySet Print Quality
User’s Guide
or Help.
Set on the
Set Set
(1) Click Print
Print.
PrintPrint
11
Page 16
Basic Printing
Note
You can cancel a print job in progress by simply pressing the RESUME/
CANCEL
CANCEL button on the printer.
CANCEL CANCEL
See "Canceling Printing
Canceling Printing" on page 14.
Canceling PrintingCanceling Printing
Printing with Macintosh
Note
• The menu screens and dialog boxes that appear may vary, depending on the
software application you are using.
• The steps described in this section are for printing in Mac OS X v.10.3.x.
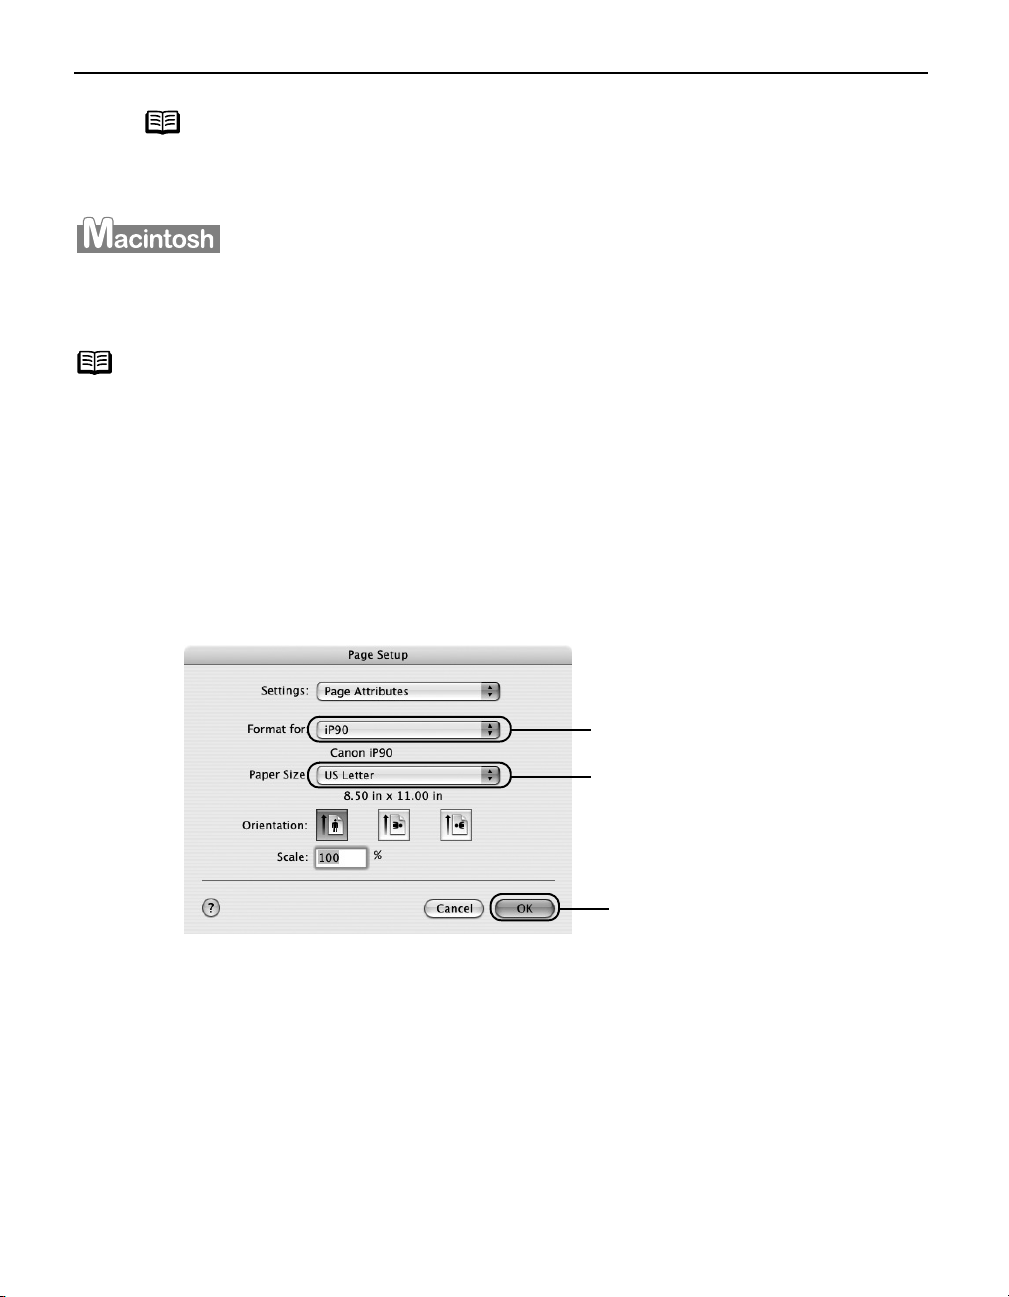
1 Create a document or open a file to print.
2 Select Paper Size.
(1) Select Page Setup
The Page Setup
Page Setup from the application's File
Page SetupPage Setup
Page Setup dialog box opens.
Page SetupPage Setup
File menu.
FileFile
RESUME/
RESUME/RESUME/
12
(2) Select iP90
(3) Select the desired paper
(4) Click OK
iP90 from Format for
iP90iP90
size from the Paper Size
pop-up menu.
OK.
OKOK
Format for.
Format forFormat for
Paper Size
Paper SizePaper Size
Page 17
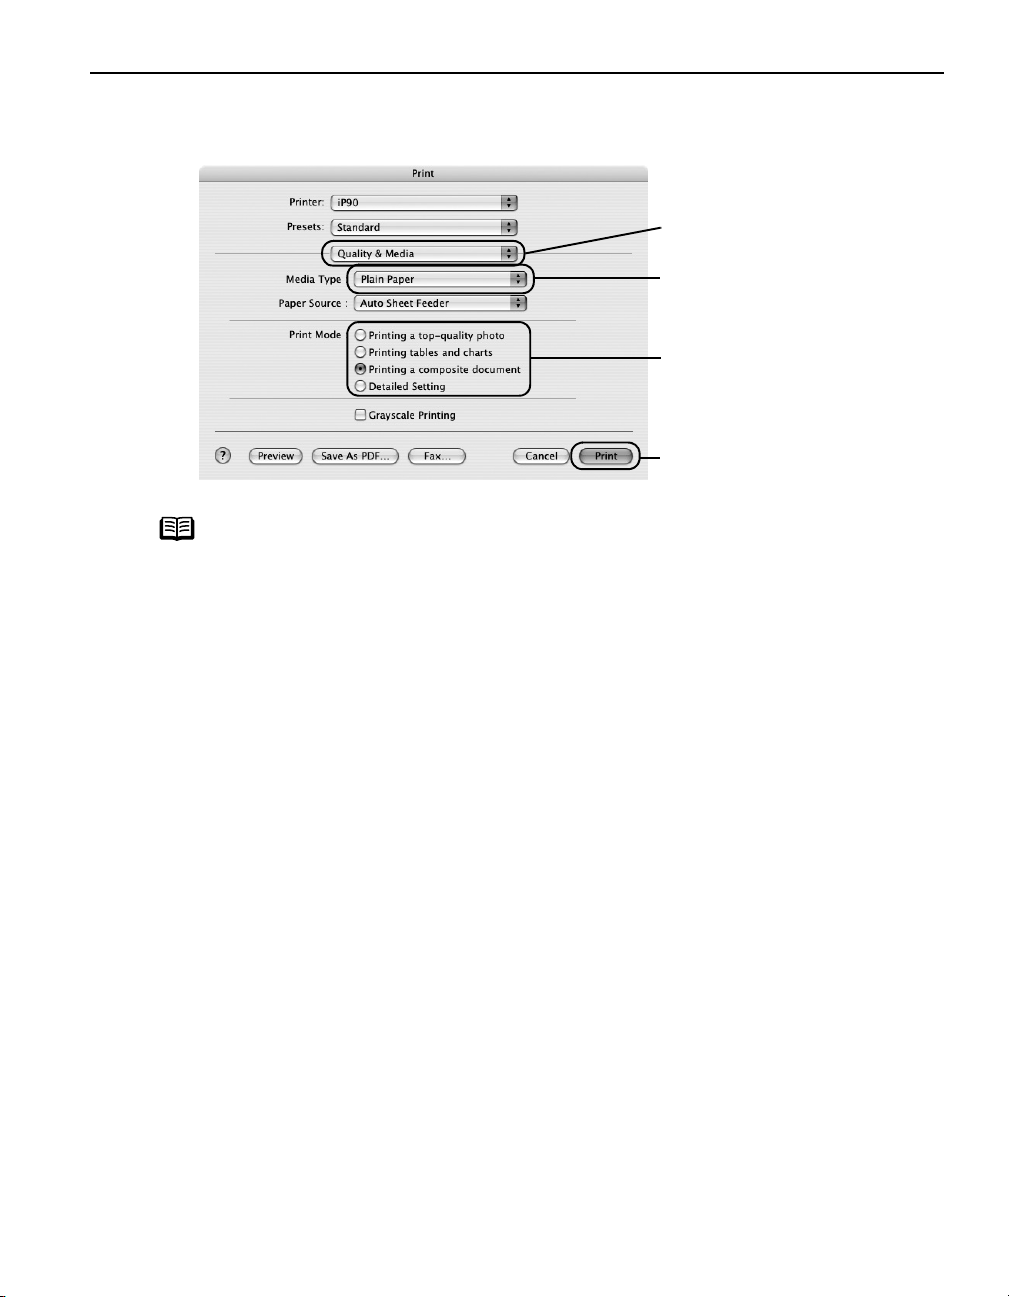
3 Specify the required settings.
Basic Printing
(1) Select Print
Print from the application's File
PrintPrint
Note
• When you select the print mode appropriate to your document from
• For details about other printer driver functions, refer to “(Macintosh)
• You can cancel a print job while printing.
File menu.
FileFile
(2) Select Quality & Media
from the pop-up menu.
(3) Select the Media Type
from the pop-up menu.
(4) Select the print mode
appropriate to your
document from the Print
Mode
Mode.
ModeMode
(5) Click Print
the Print Mode
Print Mode, the document will be printed in the color and print
Print ModePrint Mode
quality suited to the characteristics of the Media Type
selected.
Printing a top-quality photo
Printing a top-quality photo: Select when printing documents
Printing a top-quality photoPrinting a top-quality photo
consisting mainly of photographs and graphics featuring fine color
gradation.
Printing tables and charts
Printing tables and charts: Select when printing documents
Printing tables and chartsPrinting tables and charts
consisting mainly of graphs and graphics (illustrations) with strong
color definition.
Printing a composite document
Printing a composite document: Select when printing documents
Printing a composite documentPrinting a composite document
consisting mainly of text.
Detailed Setting
Detailed Setting: You can fine-tune Print Quality and Halftoning
Detailed SettingDetailed Setting
settings.
See "Adjusting Print Quality
Adjusting Print Quality" on page 30.
Adjusting Print QualityAdjusting Print Quality
Printer Driver Functions” in the
See "Canceling Printing
Canceling Printing" on page 14.
Canceling PrintingCanceling Printing
User’s Guide
Media Type you have
Media TypeMedia Type
Quality & Media
Quality & MediaQuality & Media
Media Type
Media TypeMedia Type
Print.
PrintPrint
or Help.
Print
Print Print
13
Page 18
Basic Printing
Canceling Printing
You can cancel a print job while printing with the RESUME/CANCEL
RESUME/CANCEL button on the printer.
RESUME/CANCELRESUME/CANCEL
1 Press the RESUME/CANCEL button while printing.
Printing is canceled and the paper is ejected.
Click Cancel Printing
Cancel Printing on the BJ Status Monitor to stop printing. To display the BJ
Note
1 Select Print
Cancel PrintingCancel Printing
Status Monitor, click Canon iP90
The BJ Status Monitor opens automatically when a printer error occurs.
Print from the File menu in your application program.
PrintPrint
Canon iP90 on the taskbar.
Canon iP90Canon iP90
The Print dialog box opens.
2 Select Edit Printer List
The Printer List opens.
Edit Printer List from the Printer pop-up menu.
Edit Printer ListEdit Printer List
3 Double-click the printer name displayed in the Name list
The iP90 dialog box opens.
4 Select the desired document, then click Delete
Note
14
To temporarily stop a job in progress, click Pause
list, click Stop Printing
Stop Printing.
Stop PrintingStop Printing
Delete icon.
DeleteDelete
Pause. To cancel all the jobs in the
PausePause
Page 19
Basic Printing
Printing Data through Infrared Communication
If you have a computer, PDA or mobile phone with an Infrared Port for wireless data
communication, you can print data with a cordless connection with the printer. You can also
print images, an address book, a schedule, or memos received from a PDA or mobile phone
in a specified format through infrared communication.
Requirements for Infrared Communication with the Computer
Printing through infrared communication can be performed under Windows XP,
Windows Me, Windows 2000 or Windows 98. In order to use infrared communication,
your computer must satisfy the following requirements:
CPU Intel Pentium or higher
IrDA IrDA 1.1 compliant
Baud rate (communication speed) Max. 4 Mbps
Infrared communication devices Infrared communication port incorporated in the
computer
Note
• When printing through infrared communication, the Microsoft
infrared communication driver must have been installed in Windows
98 computer or later.
• In Windows 98 or Windows Me, check whether the infrared
communication driver has been installed. To activate the Infrared
Port, carry out the following operation:
1.Click Start
2.Check whether the Wireless Link
In Windows 98, follow the procedure below:
3.Double-click the Infrared
4.Check whether the Enable infrared communication
• Before printing data or using a maintenance function of the printer
driver, ensure that the name of the printer is displayed by placing the
mouse pointer on the Wireless Link
Infrared
Infrared icon) on the Control Panel.
InfraredInfrared
• In Windows XP or Windows 2000, the BJ Status Monitor is not
displayed.
Start, and select Settings
StartStart
icon (Windows 98) is displayed in the window.
If this icon is displayed, the required infrared driver has already
been installed. If this icon is not displayed, change the BIOS
setting to activate (turn on) the Infrared Port. For the procedure,
refer to your computer manual.
selected. If the check box is not selected, select it.
Settings and then Control Panel
SettingsSettings
Wireless Link icon (Windows Me) or the Infrared
Wireless LinkWireless Link
Infrared icon.
InfraredInfrared
Enable infrared communication check box is
Enable infrared communicationEnable infrared communication
Wireless Link icon (For Windows 98, click the
Wireless LinkWireless Link
Control Panel.
Control PanelControl Panel
Infrared
InfraredInfrared
15
Page 20
Basic Printing
Requirements for Infrared Communication with the PDA
In order to use infrared communication, your PDA must satisfy the following
requirements:
PDA The PDA must have an IrDA port and support the file transfer
using IrOBEX (Infrared Object Exchange) protocol
Printable contents
Character code
• Microsoft Pocket PC 2002
Contacts (perform printing from the contacts list), Calendar,
Tasks, and Image (JPEG images only)
• Palm Computing Palm OS 3.5/4.1/5.0
Contacts, Date Book, To Do List, and Memo Pad (text only;
printing hand-written memo pad is not supported)
•Alphanumeric code
• ISO 8859-1/2/5
Requirements for Infrared Communication with the Mobile Phone
In order to use infrared communication, your mobile phone must satisfy the following
requirements:
Mobile phone Mobile phone must have an IrDA port and support IrMC ver 1.1.
Printable contents Address book, Mail, Photo image(JPEG image only)
*The contents which can be used change with usage's mobile
phone.
Character code
• Alphabet-Numeric code
• ISO 8859-1/2/5
Setting the Media Type, Paper Size, and Layout When Printing From
a PDA or Mobile Phone
You can select the media type, page size, layout and borderless printing in the Canon
iP90 Setup Utility
iP90 Setup Utility when printing from a PDA or mobile phone.
iP90 Setup UtilityiP90 Setup Utility
Canon
Canon Canon
Important Before using the Canon iP90 Setup Utility
your computer with a USB cable and install the printer driver and Canon
iP90 Setup Utility
iP90 Setup Utility.
iP90 Setup UtilityiP90 Setup Utility
Canon iP90 Setup Utility, you must connect this printer to
Canon iP90 Setup UtilityCanon iP90 Setup Utility
1 Set up the printer.
(1) Ensure that the Universal AC Adapter is connected securely.
When using the optional battery, ensure that it has been charged.
16
Canon
Canon Canon
Page 21
(2) Connect the printer to your computer with a USB cable.
Wind
ind
Wind
(3) Open the Paper Support, turn on the printer, and then turn on the computer.
2 Start the Canon iP90 Setup Utility.
ows
ows
owsWindows
W
Click Start
Start and select All Programs
StartStart
Programs
Programs), Canon Utilities
ProgramsPrograms
Setup Utility
Setup Utility and Canon iP90 Setup Utility
Setup UtilitySetup Utility
The Canon iP90 Setup Utility
Canon iP90 Setup Utility screen
Canon iP90 Setup UtilityCanon iP90 Setup Utility
appears.
Macintosh
Macintosh
MacintoshMacintosh
Open the Applications
double-click the Canon iP90 Setup Utility
folder and the Canon iP90 Setup Utility
icon.
The Canon iP90 Setup Utility
Canon iP90 Setup Utility screen
Canon iP90 Setup UtilityCanon iP90 Setup Utility
appears.
*Windows XP SP2 is used as an example
here.
The same operation is applicable in
Macintosh.
Canon Utilities, Canon iP90
Canon UtilitiesCanon Utilities
Applications folder, and then
ApplicationsApplications
Canon iP90 Setup Utility
Canon iP90 Setup UtilityCanon iP90 Setup Utility
All Programs (or
All ProgramsAll Programs
Canon iP90 Setup Utility.
Canon iP90 Setup UtilityCanon iP90 Setup Utility
Canon iP90 Setup Utility
Canon iP90 Setup UtilityCanon iP90 Setup Utility
Basic Printing
Canon iP90
Canon iP90 Canon iP90
3 Specify the paper size and layout.
Changing the Photo Print Settings
(1) Click Infrared/Bluetooth connection Print Settings
(2) Click Change
Infrared/Bluetooth connection Print Settings tab.
Infrared/Bluetooth connection Print SettingsInfrared/Bluetooth connection Print Settings
Change on Photo Print Settings
ChangeChange
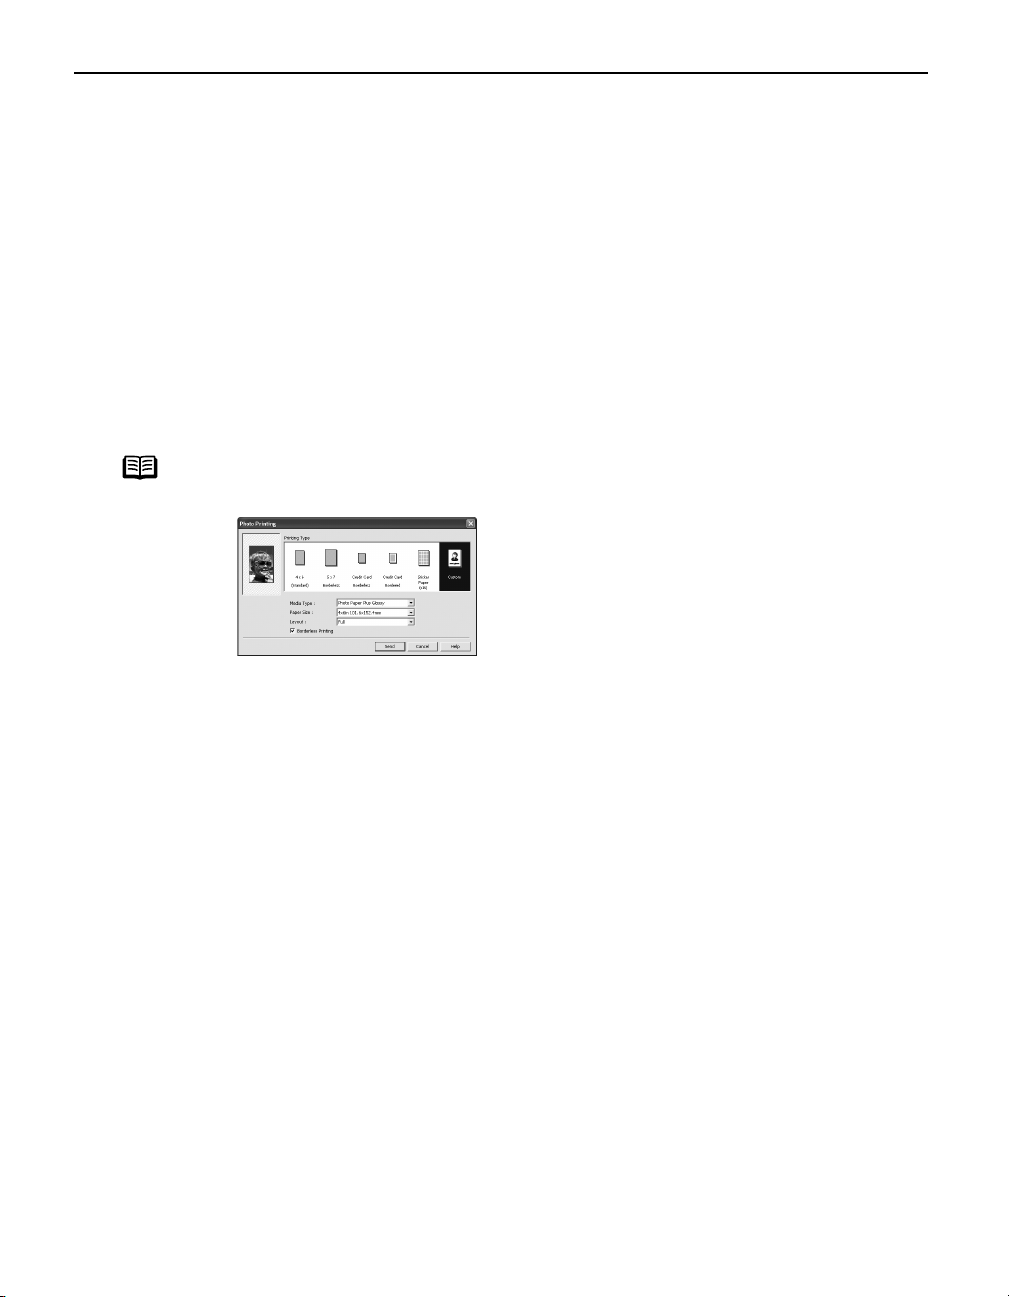
The Photo Printing
Photo Printing dialog box appears.
Photo PrintingPhoto Printing
Photo Print Settings.
Photo Print SettingsPhoto Print Settings
17
Page 22
Basic Printing
(3) Select a desired layout for printing.
4×6
(Standard)
5×7
Borderless
Credit Card
Borderless
Credit Card
Bordered
Sticker
Paper (×16)
Note
Prints a photo on Photo Paper Plus Glossy 4"×6"/101.6×152.4 mm
paper without a border.
Prints a photo on Photo Paper Plus Glossy 5"×7"/127.0×177.8 mm
paper without a border.
Prints a photo on Photo Paper Plus Glossy Credit Card 2.13"×3.39"/
54×86 mm without a border.
Prints a photo on Photo Paper Plus Glossy Credit Card 2.13"×3.39"/
54×86 mm with a border.
Prints 16 photos on Photo Paper Plus Glossy Sticker paper with a
border.
Click Custom
Custom if you want to specify the media type, paper size, layout, and
CustomCustom
borderless printing.
18
- Media Type............... Specifies the type of media loaded on the
printer.
- Paper Size................ Specifies the size of paper loaded on the
printer.
- Layout...................... Specifies how many images to print on a sheet.
- Borderless Printing ... Specifies whether to perform borderless
printing or not.
*Refer to the
type.
(4) Click Send
Send.
SendSend
You can perform printing from a PDA or mobile phone with the specified media
type and layout.
For details about printing from PDA or mobile phone, refer to the section
"Performing Infrared Communication
Performing Infrared Communication" on page 21.
Performing Infrared CommunicationPerforming Infrared Communication
User’s Guide
for more detailed information on media
Page 23
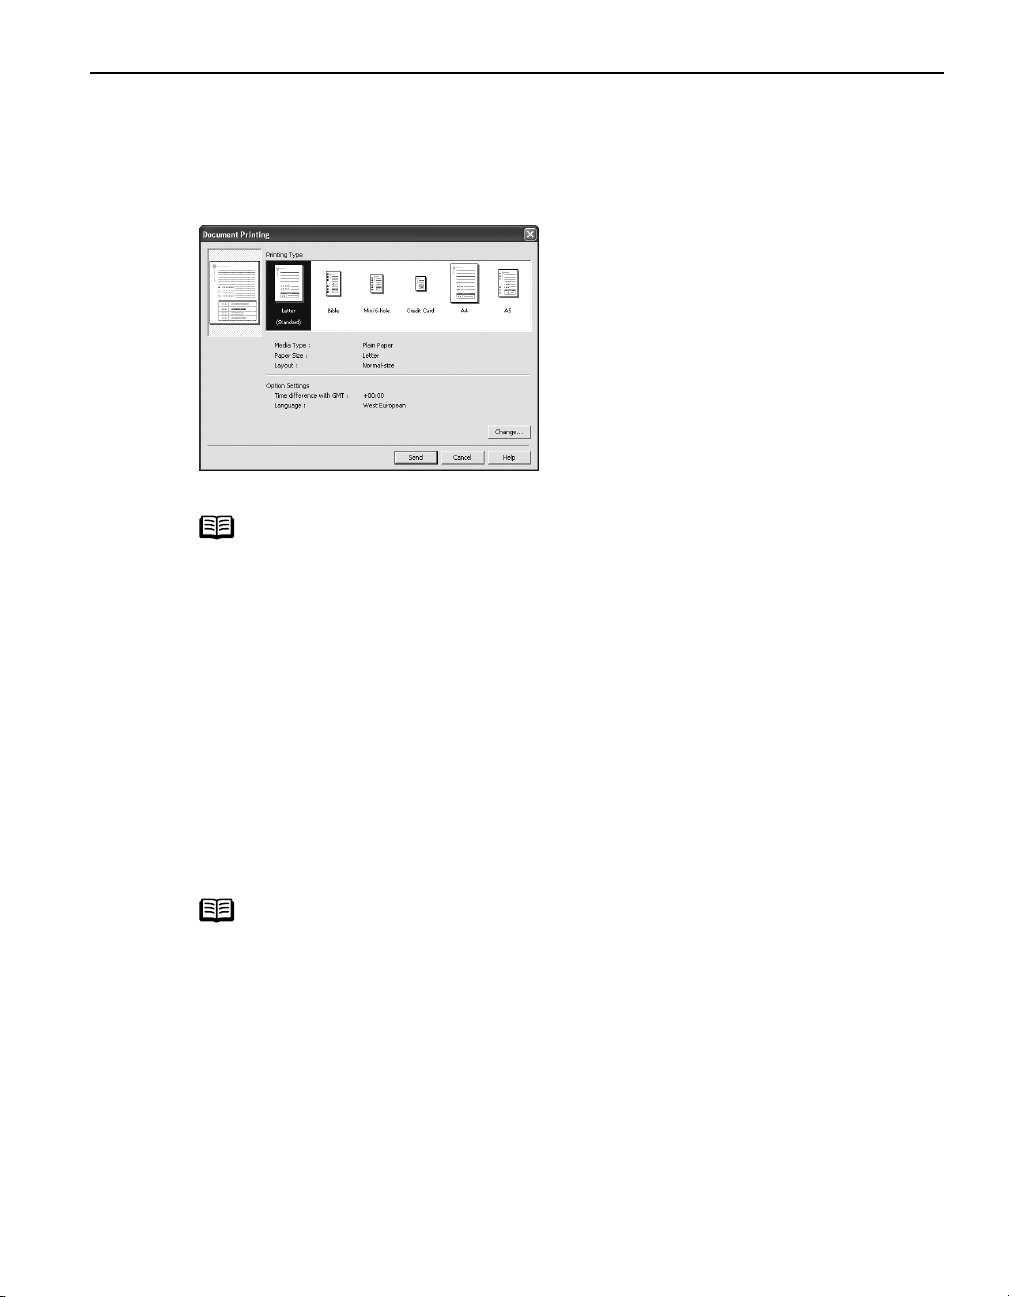
Changing the Document Print Settings
Basic Printing
(1) Click Infrared/Bluetooth connection Print Settings
(2)
(3) Select the printing type for the document.
Infrared/Bluetooth connection Print Settings tab.
Infrared/Bluetooth connection Print SettingsInfrared/Bluetooth connection Print Settings
Click
Change
Change
ChangeChange
The Document Printing
Document Printing dialog box appears.
Document PrintingDocument Printing
Note
on
Document Print Settings
Document Print Settings
Document Print SettingsDocument Print Settings
Bible, Mini 6-hole and A5 size papers are used for a personal
organizer.
When Printing these papers:
• Select 3.66"×6.69"/93×170mm for Bible
80×126mm for Mini 6-hole
A5 as paper size.
• Load only one sheet at a time.
• Do not use paper thinner than 64 gsm or 17lb.
Mini 6-hole and 8.27"×5.83"/210×148mm for
Mini 6-holeMini 6-hole
.
Bible, 3.15"×4.96"/
BibleBible
(4) Click Send
Send.
SendSend
You can perform printing from a PDA or mobile phone with the specified media
type and layout.
For details about printing from PDA or mobile phone, refer to the section
"Performing Infrared Communication
Performing Infrared Communication" on page 21.
Performing Infrared CommunicationPerforming Infrared Communication
Click Change
Note
Change on Document Printing
ChangeChange
settings.
Time difference with GMT
Time difference with GMT: when printing time-specifiable data,
Time difference with GMTTime difference with GMT
such as a schedule, you can reflect the time difference by specifying
the country in which the data was created.
Language
Language: You can adopt the Language if incorrect text is printed.
LanguageLanguage
Document Printing dialog to change the following
Document PrintingDocument Printing
19
Page 24

Basic Printing
Note
Following limitations apply on transmittable data
• It does not support printing a downloaded content or photo and a photo
attached to an email for security reason.
• It does not support printing video files.
• Depending on your device, the Fine print quality option may not be available
due to the restriction on the infrared transfer capacity.
• Depending on your device, it may not print data stored in a memory card.
• It automatically sets the image quality and orientation (Portrait or
Landscape) according to the image size.
• It automatically sets the margin according to the image size.
• Depending on the size of an image, it may take a while for this printer to
start to print after starting the infrared transfer.
20
Page 25

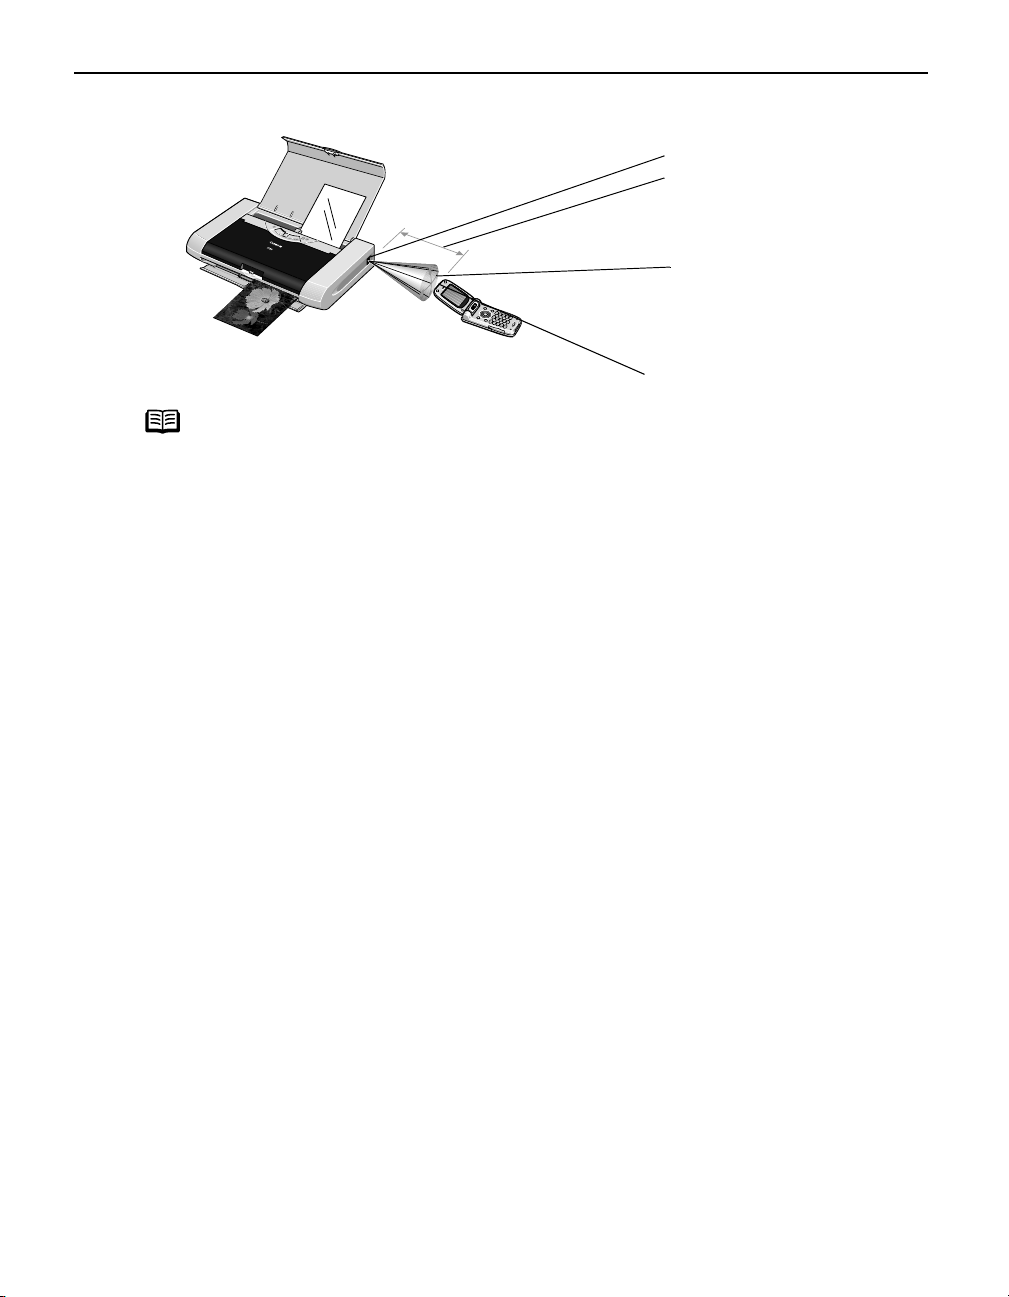
Basic Printing
Performing Infrared Communication
When performing infrared communication, also refer to your computer, mobile phone
or PDA manual.
1 Set up the Printer.
(1) Ensure that the Universal AC Adapter is connected securely.
When using the optional battery, ensure that it has been charged.
(2) Open the Paper Support and turn on the printer.
(3) Load the paper on the Paper Support.
2 Start Infrared Communication.
(1) Align the Infrared Port of the computer to that of the printer at a distance of less
than 31.5 inch (80 cm). When printing from a mobile phone or PDA, place it at a
distance of less than 7.87 inch (20 cm).
The effective angle of the Infrared Port of the printer is about 10° from the
central axis in both vertical and horizontal directions.
The allowable distance of communication with the printer depends on the
computer, mobile phone or PDA you use. For this distance, refer to your
computer, mobile phone or PDA manual.
When printing with the computer
When printing with the computer
When printing with the computerWhen printing with the computer
Infrared Port of printer
Less than 31.5 inch (80
cm)(Do not block with any
obstacle.)
Effective angle
(in both vertical and
horizontal direction): About
10°
Infrared Port of computer
21
Page 26
Basic Printing
When printing with a mobile phone or PDA
When printing with a mobile phone or PDA
When printing with a mobile phone or PDAWhen printing with a mobile phone or PDA
Infrared Port of printer
Less than 7.87 inch (20
cm)(Do not block with any
obstacle.)
Effective angle
(in both vertical and
horizontal direction): About
10°
Infrared Port of mobile phone
Note
• By pressing the RESUME/CANCEL button, you can print the same
image data transmitted from the mobile phone right before.
• Do not place any obstacle between the Infrared Ports of the printer
and PDA, mobile phone or computer. Data cannot be transmitted
between them. Check the orientation and positions of the Infrared
Ports of the printer, mobile phone and PDA or computer. Oppose
these ports properly as mentioned above.
• During printing, be careful not to interrupt infrared communication
with the printer. If it is interrupted, turn off the printer and cancel the
printing document from the print queue list in case of the computer,
and turn off only the printer in case of the mobile phone or PDA.
Placing the pointer on the Wireless Link
the Infrared
Infrared icon) on the status bar or Control Panel
InfraredInfrared
Wireless Link icon (In Windows 98, click
Wireless Link Wireless Link
Control Panel allows you to
Control PanelControl Panel
check whether the IrDA transmission has been interrupted.
22
Page 27
Advanced Printing
Advanced Printing
Advanced Printing
Advanced PrintingAdvanced Printing
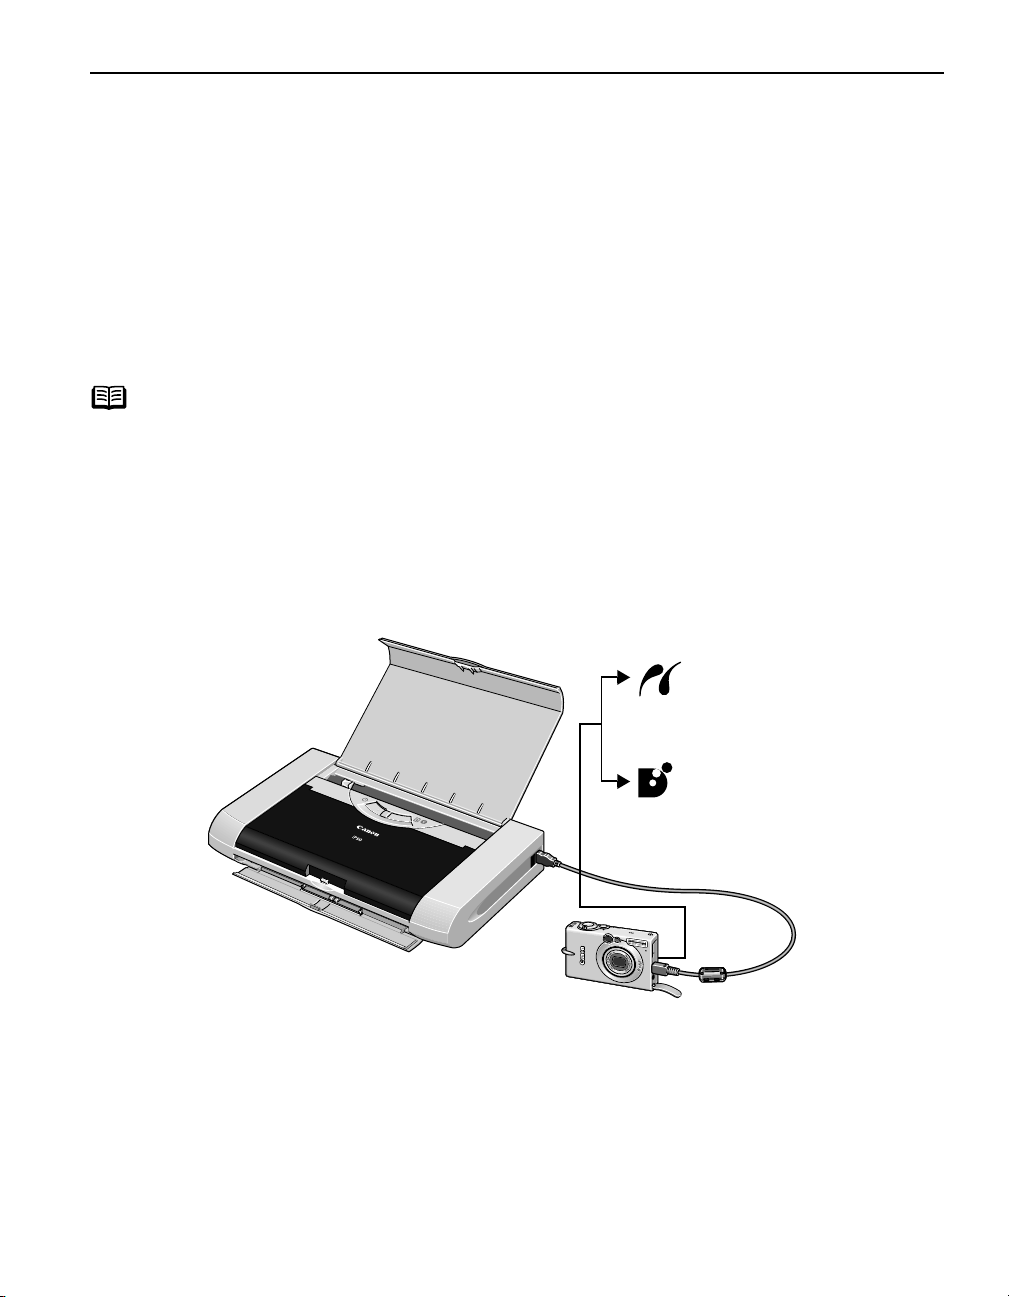
Printing Photographs Directly from a PictBridge Compliant Device
Connecting a PictBridge compliant device such as a digital camera,
camcorder or mobile phone to the printer allows you to print recorded images
directly without using a computer.
Note
• PictBridge is an Industry standard enabling a range of digital photo
solutions, including the direct printing of photos from a digital still camera,
digital camcorder or mobile phone* without the need to use a computer.
• Canon Bubble Jet Direct allows you to print photos from a Canon Bubble Jet
Direct compatible (PictBridge incompatible) digital camera or digital
camcorder without a computer by simply connecting the digital camera or
digital camcorder to this printer.
For details, refer to "Printing Photographs Directly from Canon Bubble Jet
Direct Compatible Digital Cameras
Direct Compatible Digital Cameras" on page 84
Direct Compatible Digital CamerasDirect Compatible Digital Cameras
* Hereafter, a digital still camera, digital camcorder and mobile phone are collectively called a PictBridge
compliant device.
Printing Photographs Directly from Canon Bubble Jet
Printing Photographs Directly from Canon Bubble Jet Printing Photographs Directly from Canon Bubble Jet
See Printing Photographs
Printing Photographs
Printing Photographs Printing Photographs
Directly from a PictBridge
Directly from a PictBridge
Directly from a PictBridge Directly from a PictBridge
Compliant Device
Compliant Device on page
Compliant DeviceCompliant Device
26
See Printing Photographs
Printing Photographs
Printing Photographs Printing Photographs
Directly from Canon Bubble
Directly from Canon Bubble
Directly from Canon Bubble Directly from Canon Bubble
Jet Direct Compatible Digital
Jet Direct Compatible Digital
Jet Direct Compatible Digital Jet Direct Compatible Digital
Cameras
Cameras on page 84
CamerasCameras
23
Page 28

Advanced Printing
Connecting to a PictBridge Compliant Device
To connect a PictBridge compliant device to this printer, use the USB cable supplied
with the device.
Caution Do not connect any equipment other than PictBridge compliant devices or
Canon Bubble Jet Direct Compatible Digital Camera to the Direct Print Port
of the printer. Otherwise, electric shock, fire, or damage to the device
could result.
Note
• When printing photos with the digital device connected to the printer, it
is advisable to use the AC adapter supplied with the device. If you use
the device battery, be sure to charge it fully.
• Depending on the model or brand of your device, you may have to
select a mode of printing photos in compliance with PictBridge before
connecting the device.
You may also have to turn on the device or select Play mode manually
after connecting the device to the printer.
Perform necessary operations according to the instruction manual
supplied with your device.
• When printing from your PC, be sure to unplug the cable connecting the
device.
1 Set up the printer
Ensure that the Universal AC Adapter is connected securely.
If you do use a battery pack, ensure that it is fully charged.
2 Open the Paper Support and turn on the printer.
24
Page 29

Advanced Printing
3 Load 4"×6" paper into the Auto Sheet Feeder in the portrait position (short
side facing down).
(1) When loading Canon Speciality Media,
load them with the glossy side facing
up.
(2) Align the paper against the right side of
the Auto Sheet Feeder.
(3) Slide the Paper Guide against the left
side of the paper.
4 Connect the PictBridge compliant device to the printer.
(1) Ensure that the device is turned off.
(2) Connect the camera to the
printer using a USB cable.
Note
Some types of the device turn on automatically, when connected to the
printer. For a device not turns on automatically, turn it on manually.
25
Page 30

Advanced Printing
(3) Turn on and set up the device for direct printing.
When the connection between the device and printer has been established, the
POWER lamp on the printer flashes once.
Note
Either one of the following icons will display on the LCD display of the device
when the printer is correctly connected.
The power-on sequence may differ depending on the model or brand of
the device.
A PictBridge compatible device
A Canon Bubble Jet Direct compatible device
Printing Photographs Directly from a PictBridge Compliant Device
When operating the device, be sure to follow the instructions given in the instruction
manual supplied with the camera. Let’s take a look at the paper size, paper type,
layout, image optimization modes, and date printing modes that can be set on a
PictBridge compliant device connected to the printer.
Default Device Settings
When a PictBridge compliant device is connected and printing is started with no
printing option selected, this printer operates based on the following default
settings:
Note
- Paper size.................. 4"×6"
- Paper type ................. Photo (Photo Paper Plus Glossy)
- Layout ....................... Borderless
- Trimming ................... Off (No trimming)
- Image optimize .......... Exif Print
- Date print .................. Off (No printing)
The Canon iP90 Setup Utility allows you to make these settings. For
details, refer to the
User’s Guide
.
26
Note
About the Settings Explained Below
The settings explained below cannot be made depending on the brand
or model of your device. If a setting cannot be made, the default setting
explained above is used.
Names of settings that are displayed on a Canon PictBridge compliant
device are used in the description given below. Different names may be
displayed on your device depending on the brand or model.
For details, refer to your device’s instruction manual.
Page 31

Advanced Printing
About Image Data Format for Printing
This printer can handle only Exif/JPEG and PNG image data to produce photos.
About “Paper Size” and “Paper Type”
To change the paper size or paper type, operate your device to select the PictBridge
print setup mode and confirm or change the settings.
By default, 4"×6" is selected in “Paper Size” and “Photo”(Photo Paper Plus Glossy)
is selected in “Paper Type” for this printer. To use Photo Paper Pro, select “Fast
Photo” in “Paper type”.
The following sizes and types of paper can be loaded in the printer by selecting
options in “Paper Size” and “Paper Type”.
“Paper Size” setting “Paper Type” setting Paper loaded in printer
4"×6" (Default) Photo (Default) Photo Paper Plus Glossy
Photo Paper Plus Semi-Gloss
Glossy Photo Paper
Photo Stickers*2
Fast Photo Photo Paper Pro
5"×7" *1 Photo Photo Paper Plus Glossy
Credit Card Photo Glossy Photo Paper
8.5"×11" (Letter)*3 Photo Photo Paper Plus Glossy
Photo Paper Plus Semi-Gloss
Glossy Photo Paper
Fast Photo Photo Paper Pro
*1 This size can be selected only for Canon PictBridge compatible cameras (Note that it cannot be selected for
some models).
*2 This paper is exclusively used to print photo stickers. When printing on sticker paper, select “4"x6"” in “Paper
Size.”
*3 When you selected “8.5"x 11"(Letter)” in “Paper Size”, you can select “Plain Paper” in “Paper Type”. When you
selected “Plain Paper” in “Paper Type”, bordered printing will be performed even if you select “Borderless” in
“Layout”.
About “Layout” and “Trimming”
By default, “Borderless” is selected in “Layout” and “Off (No trimming)” is selected
in “Trimming” for this printer.
Note
When you using Photo Stickers (PS-101), do not set “Borderless
Printing” in Layout setting.
27
Page 32

Advanced Printing
About “Image optimize”
If you use a Canon PictBridge-compliant camera, you can select “VIVID”, “NR”, or
“VIVID+NR”. (Note that these options cannot be selected for some models.)
Note
• When “VIVID” is selected, green and blue portions of photos are
• When “NR” (Noise Reduction) is selected, noise in blue portions,
• When “VIVID+NR” is selected, functions of both “VIVID” and “NR” are
About “Date print”
By default, “Off” is selected for this printer.
If you select an image which has had the shooting date embedded in it using a
camera with the print mode, set that function to off. If you set this function to on,
dates will appear twice on the printed image.
Note
• Never disconnect the USB cable during printing.
• When disconnecting the USB cable between the device and printer,
• Controls of the digital camera cannot be used for the following:
printed vividly.
such as the sky, and dark portions is removed.
performed.
follow the instructions given in the instruction manual of the device.
- Print quality setting
- Printer maintenance
28
Page 33

Accessing Printer Driver
The Printer Properties
Printer Properties dialog box can be opened from either within an
Printer PropertiesPrinter Properties
application, or directly from the Windows Start
Start menu.
StartStart
Advanced Printing
Note
• This manual refers to Windows XP SP2 operation.
The operations may vary depending on your operating system.
• Depending on your application program, the command and menu names
may differ, and there may be more steps involved in opening the Printer
Properties
Properties dialog box. For more details, see the user's manual for your
PropertiesProperties
application.
Printer
PrinterPrinter
Opening the Printer Properties Dialog Box from Your Application
Program
1 In your application, select the command to print a document.
The Print
Print dialog box can usually be opened by selecting Print
PrintPrint
Print from the File
PrintPrint
File menu.
FileFile
2 Ensure that Canon iP90 is selected. Then click Preferences (or Properties).
The Printer Properties
Printer Properties dialog box opens.
Printer PropertiesPrinter Properties
Opening the Printer Properties Dialog Box Directly from the Start
Menu
This method is used for maintenance operations such as Print Head cleaning or to
specify printer settings common to all application programs.
When the Printer Properties
appear including the Details
dialog box is opened from within an application.
Printer Properties dialog box is opened from the Start
Printer PropertiesPrinter Properties
Details tab. These do not appear when the Printer Properties
DetailsDetails
Start menu, additional tabs
StartStart
Printer Properties
Printer PropertiesPrinter Properties
For more information about these additional tabs, refer to your Windows
documentation.
1 Click Start and select Control Panel, Printers and Other Hardware, and then
Printers and Faxes.
For non-Windows XP users, click Start
Start, select Settings
StartStart
Settings, and then Printers
SettingsSettings
Printers.
PrintersPrinters
2 Select the Canon iP90 icon.
3 Open the File menu and select Printing Preferences (or Properties).
The Printer Properties
Printer Properties dialog box opens.
Printer PropertiesPrinter Properties
29
Page 34

Advanced Printing
Adjusting Print Quality for Photographs
Improving Printed Images
Two important factors control the quality and output of your printed images:
Paper and Ink
Paper and Ink
Paper and InkPaper and Ink
Using recommended Canon paper, speciality media and ink for printing
photographs can significantly improve the quality of your printouts. See inside the
back cover for a list of Canon media and inks for this printer.
For more detailed information, refer to "Printing Media
Printer Driver Settings
Printer Driver Settings
Printer Driver SettingsPrinter Driver Settings
The printer driver has a variety of settings that can be used to enhance the colors
and output of your photographs. Many of these features are covered in this chapter.
Printing Media" in the
Printing MediaPrinting Media
User's Guide
.
Note
You can also access the online help in either of the following ways
depending on your operating system:
• Press the F1
• Click in the upper right corner, then click the feature you want to
know more about.
• Click Help
• Click in the Page Setup
F1 key
F1F1
Help when displayed.
HelpHelp
Page Setup dialog box or the Print
Page SetupPage Setup
Print dialog box.
PrintPrint
Adjusting Print Quality
Features that affect the appearance and quality of your printed images can be
controlled with the printer driver.
PIXMA iP90 automatically adjusts printer settings to improve print quality based on the
media type (plain paper, Photo Paper Pro, and so on). You can also customize Print
Quality
Quality settings if desired.
QualityQuality
To manually adjust Print Quality settings:
To manually adjust Print Quality settings:
To manually adjust Print Quality settings:To manually adjust Print Quality settings:
1 Open the Printer Properties dialog box.
Print
Print Print
30
See"Opening the Printer Properties Dialog Box from Your Application Program
Opening the Printer Properties Dialog Box from Your Application Program"
Opening the Printer Properties Dialog Box from Your Application ProgramOpening the Printer Properties Dialog Box from Your Application Program
on page 29.
Page 35

Advanced Printing
2 Select Custom in Print Quality, then click Set to open the Set Print
Quality dialog box.
3 Move the slide bar to adjust the Print Quality.
4 When the process is complete, click OK.
1 Open the Print dialog box.
See "Printing with Macintosh
Printing with Macintosh" on page 12.
Printing with MacintoshPrinting with Macintosh
2 Select Quality & Media from the pop-up menu, and then click Detailed
Setting.
3 Move the slide bar to adjust the Print Quality.
4 When the process is complete, click OK.
31
Page 36

Advanced Printing
To automatically optimize the image:
To automatically optimize the image:
To automatically optimize the image:To automatically optimize the image:
Photo Optimizer PRO
Photo Optimizer PRO automatically adjusts the photographic image created with a
Photo Optimizer PROPhoto Optimizer PRO
digital camera. Use this feature to compensate for unsatisfactory color balance and
over- or under-exposure before printing.
1 Open the Printer Properties dialog box.
See"Opening the Printer Properties Dialog Box from Your Application Program
Opening the Printer Properties Dialog Box from Your Application Program"
Opening the Printer Properties Dialog Box from Your Application ProgramOpening the Printer Properties Dialog Box from Your Application Program
on page 29.
2 Click the Effects tab.
3 Select the Photo Optimizer PRO check box.
32
4 Click OK.
Page 37

To use Vivid Photo option:
To use Vivid Photo option:
To use Vivid Photo option:To use Vivid Photo option:
Vivid Photo
Vivid Photo intensifies the background colors found in photos that have fields,
Vivid PhotoVivid Photo
trees, oceans and skies while maintaining natural skin tones in the images.
Advanced Printing
Note
To use Vivid Photo, select the Vivid Photo
To use Vivid Photo, select the Vivid Photo
In Windows Me or Windows 98
If Background Printing has been disabled, the Vivid Photo function is
not available.
Vivid Photo check box on the Effects
Vivid PhotoVivid Photo
Vivid Photo check box under Special Effects
Vivid PhotoVivid Photo
Effects tab.
EffectsEffects
Special Effects.
Special EffectsSpecial Effects
33
Page 38

Advanced Printing
To reduce noise from images captured with a digital camera:
To reduce noise from images captured with a digital camera:
To reduce noise from images captured with a digital camera:To reduce noise from images captured with a digital camera:
Photo Noise Reduction
Photo Noise Reduction function reduces noise from blue portions such as those
Photo Noise ReductionPhoto Noise Reduction
found in the skies and dark portions of images captured with a digital camera.
Note
To use Photo Noise Reduction, select the Photo Noise Reduction
Effects
Effects tab.
EffectsEffects
In Windows Me or Windows 98
If Background Printing has been disabled, the Photo Noise Reduction
function is not available.
Photo Noise Reduction check box on the
Photo Noise ReductionPhoto Noise Reduction
34
To use Photo Noise Reduction, select the Photo Noise Reduction
Special Effects
Special Effects.
Special EffectsSpecial Effects
Photo Noise Reduction check box under
Photo Noise ReductionPhoto Noise Reduction
Page 39

Advanced Printing
Saving and Recalling Driver Settings
When you change printer driver settings for a specific print job, such as printing black
and white photos or printing documents with a special background, you can save and
name these settings for future use on similar print jobs.
1 Open the Printer Properties dialog box.
See "Opening the Printer Properties Dialog Box from Your Application
Opening the Printer Properties Dialog Box from Your Application
Opening the Printer Properties Dialog Box from Your Application Opening the Printer Properties Dialog Box from Your Application
Program
Program" on page 29.
ProgramProgram
2 Click the Profiles tab.
3 Enter new settings in Profiles.
(1) Click Add to Profiles.
The Add to Profiles
Add to Profiles dialog box opens.
Add to ProfilesAdd to Profiles
(2) Enter a name of profile for
(3) Select an icon.
(4) Enter a description on the
4 Click OK.
5 Click OK on the Profiles tab.
This registers your printer driver print settings.
Note
You can retrieve or delete the print settings profile at any time.
Retrieving profile:
Retrieving profile: Select the desired profile from Printing Profiles,
Retrieving profile:Retrieving profile:
and click Retrieve
Deleting unwanted profile:
Deleting unwanted profile: Select the desired profile from Printing
Deleting unwanted profile:Deleting unwanted profile:
Profiles,
Profiles, and click Delete
Profiles,Profiles,
For details, click Help
Retrieve from Profiles
RetrieveRetrieve
Delete.
DeleteDelete
Help and refer to the topic of this function.
HelpHelp
Add to Profiles.
Add to Profiles.Add to Profiles.
registering the settings.
registering profile.
Profiles.
ProfilesProfiles
Printing Profiles,
Printing Profiles,Printing Profiles,
Printing
Printing Printing
35
Page 40

Advanced Printing
1 Open the Print dialog box.
See "Printing with Macintosh
Printing with Macintosh" on page 12.
Printing with MacintoshPrinting with Macintosh
2 Select all of the necessary settings.
3 Register new printer driver settings.
Save Preset
Save Preset dialog box opens.
Save PresetSave Preset
4 Click OK.
This registers your printer driver settings.
Note
You can retrieve or change the saved printer driver settings any time.
Retrieving print settings
Retrieving print settings: Select the name of the print settings to retrieve
Retrieving print settingsRetrieving print settings
from the Presets
Changing drivers settings
Changing drivers settings: When registered print settings are selected, you
Changing drivers settingsChanging drivers settings
can delete them or change their name.
Presets in the Print
PresetsPresets
Print dialog box.
PrintPrint
(1) Select Save As
(2) Enter a name of your printer
driver settings.
Save As from the pop-
Save As Save As
up menu.
36
Page 41

Advanced Printing
Using the Bundle Software
The
Setup Software & User’s Guide CD-ROM
the photographs taken by a digital camera and print them as photo-lab quality prints.
Please use the application(s) suitable for your print purposes.
includes photo applications designed to edit
Note
• To install applications, refer to the
• For details about photo applications, refer to the
Easy Setup Instructions
Photo Application Guide
.
Easy-PhotoPrint (Windows/Macintosh)
You can make a Borderless Print easily and quickly, just by selecting a photograph
taken with a digital camera and the paper type on which to print. Also it has tools to
correct red eye caused by the camera’s flash or smooth and beautify facial skin. It is
compatible with Exif Print*.
PhotoRecord (Windows)
You can create fun and unique photo albums with decorative themes such as frame,
background, and clip-art. You can also copy or move decorated photos.
It is compatible with Exif Print*.
Easy-WebPrint (Windows)
You can easily print out homepages displayed on Internet Explorer in full size
without its right-hand side being cropped. This application is automatically added
to the Internet Explorer toolbar. Internet Explorer 5.5 or later must be installed.
For more information on the applications, refer to the
* Exif Print is the worldwide standard. Under Exif Print, the digital camera can record data tags for specific camera
settings and functions such as whether the flash was on or off, if the camera was in portrait or night scene mode,
etc.
Canon PIXMA Printers support Exif Print and use a suitable photo application to read the camera data precisely,
producing optimal prints. This enables you to create prints that reproduce color more accurately.
Photo Application Guide
.
.
37
Page 42

Advanced Printing
Printing Borderless Photographs
This chapter describes the steps used to print from photo applications included with your
Setup Software and User’s Guide CD-ROM
using the Borderless Printing mode.
Note
Note
Follow the steps below to create color prints of digital camera photographs with EasyPhotoPrint using the Borderless Printing function. This chapter describes the steps used to
print borderless photos with Easy-PhotoPrint under Windows XP. The steps used under
Macintosh are basically the same. Easy-PhotoPrint supports Exif Print. Easy-PhotoPrint can
handle only JPEG files (file name extension: .jpg and .jpeg).
Media Types Suitable for Borderless Printing
- Photo Paper Plus Glossy (LTR, 4"×6", 5"×7")
- Photo Paper Plus Semi-Gloss (LTR, 4"×6")
- Photo Paper Plus Double Sided (LTR, 5"×7")
- Photo Paper Pro (LTR, 4"×6")
- Matte Photo Paper (LTR, 4"×6")
- Glossy Photo Paper (LTR, 4"×6", Credit Card)
You can edit images taken with a digital camera by using the Red-Eye Correction
function and Digital Face Smoothing function and print them with EasyPhotoPrint. For more information, refer to the
Photo Application Guide
.
1 Start Easy-PhotoPrint.
(1) Store the photographs you took with your digital camera in a folder on the hard
disk.
This section describes how to print photographs stored in the folder on the hard
disk.
38
(2)
Click Start
Start, select All Programs
StartStart
and then Easy-PhotoPrint
Double-click the hard disk icon, the Applications
folder, and then double-click the Easy-PhotoPrint
The Image Selection
Easy-PhotoPrint.
Easy-PhotoPrintEasy-PhotoPrint
Image Selection sheet is displayed.
Image SelectionImage Selection
All Programs (or Programs
All ProgramsAll Programs
Programs), Canon Utilities
ProgramsPrograms
Applications folder, the Easy-PhotoPrint
ApplicationsApplications
Easy-PhotoPrint icon.
Easy-PhotoPrintEasy-PhotoPrint
Canon Utilities, Easy-PhotoPrint
Canon UtilitiesCanon Utilities
Easy-PhotoPrint,
Easy-PhotoPrintEasy-PhotoPrint
Easy-PhotoPrint
Easy-PhotoPrintEasy-PhotoPrint
Page 43

2 Select photographs.
(1) Select the folder containing the photograph you want to print.
All photographs in the selected folder are displayed.
Advanced Printing
Guidance
Thumbnail
Folder window
(2) Click [ ]
Note
[ ] on the thumbnail of the photograph you want to print and specify the
[][]
number of copies.
Clicking the Correct/Enhance
you to edit and enhance the photos to be printed. For more information,
refer to the
Increases the number of copies.
Displays the specified number of copies.
Decreases the number of copies.
Correct/Enhance button on the Image Selection
Correct/EnhanceCorrect/Enhance
Photo Application Guide
.
Image Selection tab allows
Image SelectionImage Selection
39
Page 44

Advanced Printing
3 Select the paper.
4 Select the layout.
(1) Click the Paper
Selection
Selection tab.
SelectionSelection
(2) Select the size of paper
you use from Paper Size
(3) Select the type of paper
you use from Media
Type
Type.
TypeType
(1) Click the Layout/
Print
Print tab.
PrintPrint
(2) Select Borderless (full)
Paper
Paper Paper
Paper Size.
Paper SizePaper Size
Media
Media Media
Layout/
Layout/ Layout/
Borderless (full).
Borderless (full)Borderless (full)
40
Note
(3) Load the media specified in the Paper Selection
(4)
Clicking the Correct/Enhance
to edit and enhance the photos to be printed. For more information, refer to
Photo Application Guide
the
Click Print
Print.
PrintPrint
Click Print
Print. When the confirmation message is displayed, click OK
PrintPrint
the Print
Print dialog box.
PrintPrint
Correct/Enhance button on the Layout/Print
Correct/EnhanceCorrect/Enhance
.
Paper Selection tab.
Paper SelectionPaper Selection
Layout/Print tab allows you
Layout/PrintLayout/Print
OK. Click Print
OKOK
Print in
PrintPrint
Page 45

Printing Maintenance
Printing Maintenance
Printing Maintenance
Printing MaintenancePrinting Maintenance
When Printing Becomes Faint or Colors are Incorrect
When printing becomes faint or colors are incorrect, the Print Head Nozzles are probably
clogged. Follow the procedures below to clean the nozzles.
Step 1
"Printing the Nozzle Check Pattern
Printing the Nozzle Check Pattern" on page 42
Printing the Nozzle Check PatternPrinting the Nozzle Check Pattern
After Print Head cleaning, print
the nozzle check pattern.
If the print quality is poor, perform
a Print Head cleaning
If the pattern is printed normally,
click Exit.
Step 2
Step 3
Step 4
Note
"Print Head Cleaning
Print Head Cleaning" on page 47
Print Head CleaningPrint Head Cleaning
If the problem remains after performing Print Head cleaning three times
"Print Head Deep Cleaning
Print Head Deep Cleaning" on page 52
Print Head Deep CleaningPrint Head Deep Cleaning
If the problem still remains
"Replacing an Ink Tank
Replacing an Ink Tank" on page 61
Replacing an Ink TankReplacing an Ink Tank
• If ruled lines are printed misaligned, adjust the Print Head position.
See"Aligning the Print Head
Aligning the Print Head" on page 57.
Aligning the Print HeadAligning the Print Head
• If ink tank replacement does not resolve the problem, the Print Head may be
worn out. Contact the Customer Care Center.
41
Page 46

Printing Maintenance
Printing the Nozzle Check Pattern
Print the nozzle check pattern to determine whether the ink ejects properly from the Print
Head Nozzles. Use this function when printed results are blurred or the color is incorrect.
Note
The nozzle check pattern can also be printed by pressing the RESUME/CANCEL
button on the printer.
(1) Ensure that the printer is turned on, and then load a sheet of Letter paper.
(2) Hold down the RESUME/CANCEL
twice, and then release it immediately.
RESUME/CANCEL button until the POWER
RESUME/CANCELRESUME/CANCEL
POWER lamp flashes
POWERPOWER
RESUME/CANCEL
RESUME/CANCELRESUME/CANCEL
Printing the Nozzle Check Pattern
1 With the printer on, load a sheet of Letter-sized plain paper in the printer.
2 Open the Printer Properties
See "Opening the Printer Properties Dialog Box Directly from the Start Menu
page 29.
Printer Properties dialog box.
Printer PropertiesPrinter Properties
Opening the Printer Properties Dialog Box Directly from the Start Menu" on
Opening the Printer Properties Dialog Box Directly from the Start MenuOpening the Printer Properties Dialog Box Directly from the Start Menu
3 Print the Nozzle Check Pattern.
(1)
(1) Click the Maintenance
(1)(1)
Maintenance tab.
MaintenanceMaintenance
42
(2)
(2) Click Nozzle Check
(2)(2)
Nozzle Check.
Nozzle CheckNozzle Check
Page 47

Printing Maintenance
(3)
(3) Click Print Check Pattern
(3)(3)
Print Check Pattern.
Print Check PatternPrint Check Pattern
Note
(4) When the confirmation message is displayed, click OK
(5) Confirm the nozzle check pattern.
See "Examining the Nozzle Check Pattern
Examining the Nozzle Check Pattern" on page 45.
Examining the Nozzle Check PatternExamining the Nozzle Check Pattern
OK.
OKOK
Click the Initial Check
Items
Items button.
ItemsItems
Confirmation
message for printing
the nozzle check
pattern is displayed.
Initial Check
Initial Check Initial Check
1 With the printer on, load a sheet of Letter-sized plain paper in the printer.
2 Open the BJ Printer Utility
(1) Double-click the hard disk icon where the printer driver was installed, the
(2) Double-click the Printer Setup Utility
BJ Printer Utility dialog box.
BJ Printer UtilityBJ Printer Utility
Note
Applications
Applications folder, and then the Utilities
ApplicationsApplications
If you are using an OS other than Mac OS X v.10.3, double-click the Print Center
icon.
The BJ Printer Utility cannot be used with Bluetooth communication.
Utilities folder.
UtilitiesUtilities
Printer Setup Utility icon.
Printer Setup UtilityPrinter Setup Utility
Print Center
Print CenterPrint Center
(3) Select iP90
(4) Select iP90
iP90 from the Name
iP90iP90
iP90 from the Product
iP90iP90
Name list and click Utility
NameName
Product list and click Maintenance
ProductProduct
Utility or Configure
UtilityUtility
Maintenance.
MaintenanceMaintenance
Configure.
ConfigureConfigure
43
Page 48

Printing Maintenance
3 Print the Nozzle Check Pattern.
(1) Select Test Print
pop-up menu.
(2) Click Nozzle Check
(3) Click Print Check Pattern
Test Print from the
Test PrintTest Print
Nozzle Check.
Nozzle CheckNozzle Check
Print Check Pattern.
Print Check PatternPrint Check Pattern
Note
Click the Initial Check
Items
Items button.
ItemsItems
Confirmation
message for printing
the nozzle check
pattern is displayed.
Initial Check
Initial Check Initial Check
44
(4) Confirm the nozzle check pattern.
See "Examining the Nozzle Check Pattern
Examining the Nozzle Check Pattern" on page 45.
Examining the Nozzle Check PatternExamining the Nozzle Check Pattern
Page 49

Printing Maintenance
Examining the Nozzle Check Pattern
The nozzle check pattern should appear as follows when ink is discharged properly.
Examine the nozzle check pattern output by the printer.
Note
If the ink level is low, the nozzle check pattern is not printed properly.
Replace an ink tank.
See "Replacing an Ink Tank
Replacing an Ink Tank" on page 61.
Replacing an Ink TankReplacing an Ink Tank
1 Confirm the printed nozzle check pattern.
(1)
(2)
(1) Lines missing in this pattern indicate that the Print Head of black ink requires
cleaning.
When with lines missing (black ink)
(2) White stripes in this pattern indicate that the Print Head of color ink requires
cleaning.
When white stripes appear (color ink)
45
Page 50

Printing Maintenance
2 When cleaning is necessary, click the Cleaning
Cleaning button on the Pattern Check
CleaningCleaning
Pattern Check
Pattern CheckPattern Check
dialog.
*
*Click the Cleaning
cleaning.
See "Print Head Cleaning
If there are neither missing lines nor white stripes in the nozzle check pattern, click Exit
(Windows) or Quit
Cleaning button on the Pattern Check
CleaningCleaning
Print Head Cleaning" on page 47.
Print Head CleaningPrint Head Cleaning
Quit (Macintosh) to finish the nozzle check.
QuitQuit
Pattern Check screen to proceed to Print Head
Pattern CheckPattern Check
Exit
ExitExit
*
46
Page 51

Printing Maintenance
Print Head Cleaning
If missing lines or white stripes are found in the printed nozzle check pattern, perform Print
Head cleaning to unclog the Print Head Nozzles. Cleaning the Print Head consumes ink, so
perform Print Head cleaning only when necessary.
Note
• The Print Head can also be cleaned by pressing the RESUME/CANCEL
on the printer.
1. Ensure that the printer is turned on.
2. Hold down the RESUME/CANCEL
once, and then release it.
• If you pressed the Cleaning button on the Examining the Nozzle Check
Pattern screen displayed after the nozzle check pattern was printed, start
the Print Head cleaning procedure from 3-(3).
RESUME/CANCEL button until the POWER
RESUME/CANCELRESUME/CANCEL
RESUME/CANCEL button
RESUME/CANCELRESUME/CANCEL
POWER lamp flashes
POWERPOWER
1 Ensure that the printer is turned on.
2 Open the Printer Properties dialog box.
See "Opening the Printer Properties Dialog Box Directly from the Start Menu
Opening the Printer Properties Dialog Box Directly from the Start Menu" on
Opening the Printer Properties Dialog Box Directly from the Start MenuOpening the Printer Properties Dialog Box Directly from the Start Menu
page 29.
47
Page 52

Printing Maintenance
play
3 Start Print Head Cleaning.
(1) Click the Maintenance
(2) Click Cleaning
(3) Select the ink nozzle group to be
cleaned, then click Execute
Maintenance tab.
MaintenanceMaintenance
Cleaning.
CleaningCleaning
Note
Click the Initial Check
Items
Items button.
ItemsItems
Confirmation
message for Print
Head Cleaning is
dis
Execute.
ExecuteExecute
Initial Check
Initial Check Initial Check
ed.
48
(4) When the confirmation message is displayed, click OK
Print Head cleaning starts when the POWER lamp starts blinking.
Important Do not perform any other operations until the Print Head cleaning
finishes. This takes about 60 seconds.
OK.
OKOK
Page 53

4 Check the Print Head condition.
Printing Maintenance
(1) Click Print Check Pattern
(2) Observe the printed nozzle check pattern to check the Print Head condition.
(3) If the problem persists after you performed Print Head normal cleaning three
Print Check Pattern in the Nozzle Check dialog appeared after cleaning is
Print Check PatternPrint Check Pattern
complete.
When the confirmation message is displayed, click OK.
A nozzle check pattern will be printed.
Do not perform any operation until printing of the nozzle check pattern is
completed.
See "Examining the Nozzle Check Pattern
Examining the Nozzle Check Pattern" on page 45.
Examining the Nozzle Check PatternExamining the Nozzle Check Pattern
times, execute Print Head deep cleaning.
See "Print Head Deep Cleaning
Print Head Deep Cleaning" on page 52.
Print Head Deep CleaningPrint Head Deep Cleaning
1 Ensure that the printer is turned on.
2 Open the BJ Printer Utility dialog box.
Note
The BJ Printer Utility cannot be used with Bluetooth communication.
(1) Double-click the hard disk icon where the printer driver was installed, the
Applications
Applications folder, and the Utilities
ApplicationsApplications
(2) Double-click the Printer Setup Utility
If you are using an OS other than Mac OS X v.10.3, double-click the Print Center
icon.
(3) Select iP90
(4) Select iP90
iP90 from the Name
iP90iP90
iP90 from the Product
iP90iP90
Printer Setup Utility icon.
Printer Setup UtilityPrinter Setup Utility
Name list and click Utility
NameName
Product list and click Maintenance
ProductProduct
Utilities folder.
UtilitiesUtilities
Utility or Configure
UtilityUtility
Configure.
ConfigureConfigure
Maintenance.
MaintenanceMaintenance
Print Center
Print CenterPrint Center
49
Page 54

Printing Maintenance
3 Start Print Head Cleaning.
(1) Select Cleaning
(2) Click Cleaning
(3) Select the ink nozzle group to be
Cleaning from the
CleaningCleaning
pop-up menu.
Cleaning.
CleaningCleaning
cleaned, then click OK
Note
Click the Initial Check
Items
Items button.
ItemsItems
Confirmation
message for Print
Head Cleaning is
displayed.
OK.
OKOK
Initial Check
Initial Check Initial Check
50
Print Head cleaning starts when the POWER lamp starts blinking.
Important Do not perform any other operations until the Print Head cleaning
finishes. This takes about 60 seconds.
Page 55

4 Check the Print Head condition.
Printing Maintenance
(1) Click Print Check Pattern
(2) Observe the printed nozzle check pattern to check the Print Head condition.
(3) If the problem persists after you performed Print Head normal cleaning three
Print Check Pattern in the dialog appeared after cleaning is complete.
Print Check PatternPrint Check Pattern
A nozzle check pattern will be printed.
Do not perform any operation until printing of the nozzle check pattern is
completed.
See "Examining the Nozzle Check Pattern
Examining the Nozzle Check Pattern" on page 45.
Examining the Nozzle Check PatternExamining the Nozzle Check Pattern
times, execute Print Head deep cleaning.
See "Print Head Deep Cleaning
Print Head Deep Cleaning" on page 52.
Print Head Deep CleaningPrint Head Deep Cleaning
51
Page 56

Printing Maintenance
Print Head Deep Cleaning
If print quality does not improve by standard Print Head cleaning, try Print Head deep
cleaning, which is a more powerful process. Print Head deep cleaning consumes more ink
than standard Print Head cleaning, so perform this procedure only when necessary.
1 Ensure that the printer is turned on.
2 Open the Printer Properties dialog box.
See "Opening the Printer Properties Dialog Box Directly from the Start Menu
Opening the Printer Properties Dialog Box Directly from the Start Menu" on
Opening the Printer Properties Dialog Box Directly from the Start MenuOpening the Printer Properties Dialog Box Directly from the Start Menu
page 29.
52
Page 57

3 Start Print Head Deep Cleaning.
Printing Maintenance
(1) Click the Maintenance
(2) Click Deep Cleaning
(3) Select the ink nozzle group to be cleaned,
then click Execute
Maintenance tab.
MaintenanceMaintenance
Deep Cleaning.
Deep CleaningDeep Cleaning
Execute.
ExecuteExecute
Note
(4) When the confirmation message is displayed, click OK
Print Head deep cleaning starts when the POWER
Important Do not perform any other operations until the Print Head deep cleaning
is completed (about two to three minutes).
POWER lamp starts blinking.
POWERPOWER
Click the Initial Check
Items
Items button.
ItemsItems
Confirmation
message for Print
Head Deep Cleaning
is displayed.
OK.
OKOK
Initial Check
Initial Check Initial Check
53
Page 58

Printing Maintenance
4 Check the Print Head condition.
(1) Print a nozzle check pattern to check the Print Head condition.
See "Printing the Nozzle Check Pattern
Printing the Nozzle Check Pattern" on page 42.
Printing the Nozzle Check PatternPrinting the Nozzle Check Pattern
(2) If the problem persists, perform step 3 again.
(3) If the problem persists, the printer may have run out of ink.
See "Replacing an Ink Tank
Replacing an Ink Tank" on page 61.
Replacing an Ink TankReplacing an Ink Tank
(4) If the problem persists, the Print Head may be damaged. Contact the Canon
Customer Care Center.
1 Ensure that the printer is turned on.
2 Open the BJ Printer Utility dialog box.
Note
(1) Double-click the hard disk icon where the printer driver was installed, the
Applications
Applications folder, and then the Utilities
ApplicationsApplications
(2) Double-click the Printer Setup Utility
If you are using the OS other than Mac OS X v.10.3, double-click the Print Center
icon.
(3) Select iP90
(4) Select iP90
The BJ Printer Utility cannot be used with Bluetooth communication.
Utilities folder.
UtilitiesUtilities
Printer Setup Utility icon.
Printer Setup UtilityPrinter Setup Utility
Print Center
Print CenterPrint Center
iP90 from the Name
iP90iP90
iP90 from the Product
iP90iP90
Name list and click Utility
NameName
Product list and click Maintenance
ProductProduct
Utility or Configure
UtilityUtility
Maintenance.
MaintenanceMaintenance
Configure.
ConfigureConfigure
54
Page 59

3 Start Print Head Deep Cleaning.
Printing Maintenance
(1) Select Cleaning
(2) Click Deep Cleaning
(3) Select the ink nozzle group to be
Cleaning from the
Cleaning Cleaning
pop-up menu.
Deep Cleaning.
Deep CleaningDeep Cleaning
cleaned, then click OK
OK.
OKOK
Note
Print Head deep cleaning starts when the POWER lamp starts blinking.
Important Do not perform any other operations until the Print Head deep cleaning
finishes. This takes about two to three minutes.
Click the Initial Check
Items
Items button.
ItemsItems
Confirmation
message for Print
Head Deep Cleaning
is displayed.
Initial Check
Initial Check Initial Check
55
Page 60

Printing Maintenance
4 Check the Print Head condition.
(1) Print a nozzle check pattern to check the Print Head condition.
See "Printing the Nozzle Check Pattern
Printing the Nozzle Check Pattern" on page 42.
Printing the Nozzle Check PatternPrinting the Nozzle Check Pattern
(2) If the problem persists, perform step 3 again.
(3) If the problem persists, the printer may have run out of ink.
See "Replacing an Ink Tank
Replacing an Ink Tank" on page 61.
Replacing an Ink TankReplacing an Ink Tank
(4) If the problem persists, the Print Head may be damaged. Contact the Canon
Customer Care Center.
56
Page 61

Printing Maintenance
Aligning the Print Head
If ruled lines are displaced or the print result is unsatisfactory, Print Head alignment is
required.
ì
1 With the printer on, load a sheet of Letter-sized plain paper in the printer.
Move the Paper Thickness Lever (gray) to the right position.
2 Open the Printer Properties dialog box.
See "Opening the Printer Properties Dialog Box Directly from the Start Menu
Opening the Printer Properties Dialog Box Directly from the Start Menu" on
Opening the Printer Properties Dialog Box Directly from the Start MenuOpening the Printer Properties Dialog Box Directly from the Start Menu
page 29.
3 Print the pattern.
(1) Click the Maintenance
(2) Click Print Head Alignment
(3) Click Print Head Alignment
When the confirmation message is
displayed, click OK
The pattern will be printed.
Maintenance tab.
MaintenanceMaintenance
Print Head Alignment.
Print Head AlignmentPrint Head Alignment
Print Head Alignment.
Print Head AlignmentPrint Head Alignment
OK.
OKOK
Click Check Setting
Check Setting to
Note
Check SettingCheck Setting
print the current
setting and finish the
operation.
57
Page 62

Printing Maintenance
(4) After the pattern is printed, click Yes
4 Align the Print Head.
(1) Look at the print out. From the patterns, select the most even, least irregular
patterns.
(2) Enter the numbers.
(3) Click OK
OK.
OKOK
Yes.
YesYes
58
Note
Less noticeable white stripes More noticeable white stripes
(4) When the confirmation message is displayed, click OK
If it is difficult to pick up the best pattern on Column H, pick the setting
that produces the least noticeable vertical white stripes.
OK.
OKOK
Page 63

Printing Maintenance
1 With the printer on, load a sheet of Letter-sized plain paper in the printer.
Move the Paper Thickness Lever (gray) to the right position.
2 Open the BJ Printer Utility dialog box.
Note
(1) Double-click the hard disk icon where the printer driver was installed, the
Applications
Applications folder, and the Utilities
ApplicationsApplications
(2) Double-click the Printer Setup Utility
If you are using an OS other than Mac OS X v.10.3, double-click the Print Center
icon.
(3) Select iP90
(4) Select iP90
The BJ Printer Utility cannot be used with Bluetooth communication.
Utilities folder.
UtilitiesUtilities
Printer Setup Utility icon.
Printer Setup UtilityPrinter Setup Utility
iP90 from the Name
iP90iP90
iP90 from the Product
iP90iP90
Name list and click Utility
NameName
Product list and click Maintenance
ProductProduct
Utility or Configure
UtilityUtility
Maintenance.
MaintenanceMaintenance
Configure.
ConfigureConfigure
3 Print the pattern.
(1)
(1) Select Test Print
(1)(1)
(2)
(2) Click Print Head Alignment
(2)(2)
Test Print from
Test Print Test Print
the pop-up menu.
Print Head Alignment.
Print Head AlignmentPrint Head Alignment
Print Center
Print Center Print Center
(3)
(3) Click Print Head Alignment
(3)(3)
Print Head Alignment.
Print Head AlignmentPrint Head Alignment
The pattern will be printed.
Click Check
Check
Note
Check Check
Setting
Setting to print
SettingSetting
the current setting
and finish the
operation.
59
Page 64

Printing Maintenance
4 Align the Print Head.
(1) Look at the print out. From the patterns, select the most even, least irregular
patterns.
(2) Enter the numbers.
(3) Click Send
Note
Less noticeable white stripes More noticeable white stripes
If it is difficult to pick up the best pattern on Column H, pick the
setting that produces the least noticeable vertical white stripes.
Send.
SendSend
60
Page 65

Printing Maintenance
Replacing an Ink Tank
If the print result is not improved after maintenance such as Print Head
cleaning, an ink tank runs out of ink. Replace the ink tank with a new one.
When replacing an ink tank, check the model number very carefully.
The printer will not print properly if the wrong ink tank is used, or installed in
the incorrect position.
Black: BCI-15 Black Color: BCI-16 Color
Replacing an Ink Tank
When an ink tank runs out of ink, replace it using the following steps.
1 Ensure that the printer is turned on, and then open the Print Head Cover.
The Print Head Holder moves to the center.
61
Page 66

Printing Maintenance
2 Remove the empty ink tank.
(1) Push the tab.
(2) Remove the ink tank.
Then lift it from its slot.
Do not touch the Lock lever; remove only the ink tank.
Important • Handle ink tanks carefully to avoid staining your clothes or
surrounding area.
• Discard empty ink tanks according to the local laws and regulations
regarding disposal of consumables.
3 Prepare a replacement ink tank.
62
(1) Unpack a new ink tank and remove the orange Protective Cap.
Protective Cap
Important • Do not re-attach the Protective Cap once you have removed it.
• Once the Protective Cap is removed, do not touch the open ink port.
Page 67

4 Insert the ink tank.
(1) Insert a new ink tank with it slightly slanted.
(2) Push down on the on the ink tank until it clicks into place.
5 Close the Print Head Cover.
The Print Head Holder moves to the right.
Important When an ink tank is replaced, the ink counter must be reset.
See "Resetting the Ink Counter
Resetting the Ink Counter" on page 64
Resetting the Ink CounterResetting the Ink Counter
Printing Maintenance
Note
• To maintain optimal print quality, use an ink tank within six months
of its first use.
• Once an ink tank has been used, do not remove it from the printer
and leave it out in the open. This will cause the ink tank to dry out
and the printer may not function properly if it is reinstalled.
• Color ink consumption may occur even when black-and-white or
grayscale printing is specified.
Color ink is consumed in the head cleaning and deep cleaning,
which are necessary to maintain the printer’s capabilities.
• When an ink tank runs out of ink, replace the ink tank with a new one
immediately.
If printing is continued with no ink in the ink tank, a problem may
occur. And, the Low Ink Warning dialog which tells the exchange
time of the ink tank cannot be indicated properly.
63
Page 68

Printing Maintenance
Resetting the Ink Counter
When an ink tank is replaced, the ink counter must be reset.
The low ink warning is only displayed properly if the ink counter is reset.
Message Prompting Confirmation of Ink Tank Replacement
If an ink tank is removed, the printer will send a message prompting you to confirm
replacement of the ink tank at the start of the next print job.
When an ink tank has been replaced, follow the procedure below to reset the ink
counter. The low ink warning is only displayed properly if the ink counter is reset.
Important If infrared communication is performed in Windows XP or Windows 2000,
the printer will not send the message asking for confirmation of ink tank
replacement.
This is why it is important to open the printer driver's Properties dialog box
and manually reset the ink tank counter in the Maintenance tab whenever
an ink tank is replaced.
1 Check the message, and click Yes.
Mistakenly clicking No
properly. If this happens, be sure to open the driver’s Properties dialog box and
manually reset the ink tank counter in the Maintenance tab.
See "Resetting the Ink Counter in the Printer Properties dialog box
Resetting the Ink Counter in the Printer Properties dialog box" on page 65
Resetting the Ink Counter in the Printer Properties dialog boxResetting the Ink Counter in the Printer Properties dialog box
No, instead, will prevent the low ink warning from functioning
NoNo
2 Select the replaced ink tank, and click OK.
The dialog box allows you to select the replaced ink tank.
When both black and color ink tanks have been replaced, select both Black and
Color.
If you have not replaced the ink tank with a new one, click Cancel
Cancel.
CancelCancel
64
Page 69

Printing Maintenance
Resetting the Ink Counter in the Printer Properties dialog box
1 Open the Printer Properties
See "Opening the Printer Properties Dialog Box Directly from the Start Menu
2 Click Ink Counter Reset
3 Select the newly installed ink tank, then click OK
Printer Properties dialog box and click the Maintenance
Printer PropertiesPrinter Properties
Opening the Printer Properties Dialog Box Directly from the Start Menu" on
Opening the Printer Properties Dialog Box Directly from the Start MenuOpening the Printer Properties Dialog Box Directly from the Start Menu
page 29
Ink Counter Reset.
Ink Counter ResetInk Counter Reset
OK.
OKOK
Maintenance tab.
MaintenanceMaintenance
1 Open the BJ Printer Utility dialog box.
Note
(1) Double-click the hard disk icon where the printer driver was installed, the
Application
Application folder, and the Utilities
ApplicationApplication
(2) Double-click the Printer Setup Utility
If you are using an OS other than Mac OS X v.10.3, double-click the Print Center
icon.
(3) Select iP90
The BJ Printer Utility cannot be used with Bluetooth communication.
Utilities folder.
UtilitiesUtilities
Printer Setup Utility icon.
Printer Setup UtilityPrinter Setup Utility
iP90 from the Name
iP90iP90
Name list and click Utility
NameName
Utility or Configure
UtilityUtility
Configure.
ConfigureConfigure
Print Center
Print Center Print Center
(4) Select iP90
iP90 from the Product
iP90iP90
Product list and click Maintenance
ProductProduct
Maintenance.
MaintenanceMaintenance
65
Page 70

Printing Maintenance
2 Reset the Ink Counter.
(1) Select Remaining ink level setting
(2) Click Ink Counter Reset
(3) Select the newly installed ink tank.
(4) Click OK
Remaining ink level setting
Remaining ink level settingRemaining ink level setting
from the pop-up menu.
Ink Counter Reset.
Ink Counter ResetInk Counter Reset
OK.
OKOK
66
Page 71

Printing Maintenance
How Low Ink Warning Setting Works
The low ink warning notifies you of low ink levels during printing. The Low Ink Warning
has been preset to be automatically displayed.
When you reset the ink counter, it will assume that the ink tank is full regardless of how
much ink actually remains. The reset is the only way to match the counter value with an
actual ink volume. Reset the ink counter when installing a new ink tank.
Low Ink Warning Display
The '!' shows a low ink level in the ink tank.
The color ink becomes low.
Note
The color ink becomes low.
How to Check Ink Level
Open the Printer Properties
then Start Status Monitor
See "Opening the Printer Properties Dialog Box Directly from the Start
Printer Properties dialog box. Click the Maintenance
Printer PropertiesPrinter Properties
Start Status Monitor.
Start Status MonitorStart Status Monitor
Opening the Printer Properties Dialog Box Directly from the Start
Opening the Printer Properties Dialog Box Directly from the Start Opening the Printer Properties Dialog Box Directly from the Start
Menu
Menu" on page 29.
MenuMenu
Maintenance tab and
MaintenanceMaintenance
If the ink level becomes low, the low ink warning is displayed when
printing is performed.
Open the BJ Printer Utility
BJ Printer Utility, and then select Ink Level Information
BJ Printer UtilityBJ Printer Utility
Ink Level Information from
Ink Level InformationInk Level Information
the pop-up menu.
See "Open the BJ Printer Utility dialog box.
Open the BJ Printer Utility dialog box." on page 65.
Open the BJ Printer Utility dialog box.Open the BJ Printer Utility dialog box.
67
Page 72

Printing Maintenance
How to Display Low Ink Warning Correctly
• Reset the ink counter every time you install a new ink tank.
The ink counter cannot work correctly unless you synchronize it with the actual ink
level. The ink counter can only be adjusted when it is reset at the time a new ink tank
is installed.
• Do not reset the ink counter of an ink tank in use.
Synchronization of the counter and the actual ink level will not work properly.
Important If you did not reset the counter when you installed the current ink tanks,
the low ink warning may not function correctly, until the next time you
replace the ink tanks. Also, ensure that you treat both counters
separately.
Refer to "Low Ink Warning Accompanied by Ink Tank Icon With a '?'
page 80.
Low Ink Warning Accompanied by Ink Tank Icon With a '?'" on
Low Ink Warning Accompanied by Ink Tank Icon With a '?'Low Ink Warning Accompanied by Ink Tank Icon With a '?'
68
Page 73

Troubleshooting
Troubleshooting
Troubleshooting
TroubleshootingTroubleshooting
Troubleshooting usually falls into one of the following categories. In this chapter you will
find the most common printing problems. Refer to the
information on topics not covered in this section.
• "Cannot Install the Printer Driver
Cannot Install the Printer Driver" on page 70
Cannot Install the Printer DriverCannot Install the Printer Driver
• "Print Quality is Poor or Contains Errors
Print Quality is Poor or Contains Errors" on page 72
Print Quality is Poor or Contains ErrorsPrint Quality is Poor or Contains Errors
• "Troubleshooting Printer Hardware
Troubleshooting Printer Hardware" on page 74
Troubleshooting Printer HardwareTroubleshooting Printer Hardware
• "Paper Does Not Feed Properly
Paper Does Not Feed Properly" on page 75
Paper Does Not Feed ProperlyPaper Does Not Feed Properly
• "Handling Error Messages
Handling Error Messages" on page 76
Handling Error MessagesHandling Error Messages
• "An Error Message Appears on the Screen
An Error Message Appears on the Screen" on page 78
An Error Message Appears on the ScreenAn Error Message Appears on the Screen
• "Cannot Print Properly through Infrared Communication
Cannot Print Properly through Infrared Communication" on page 81
Cannot Print Properly through Infrared CommunicationCannot Print Properly through Infrared Communication
• "Cannot Print Properly from the Digital Camera
Cannot Print Properly from the Digital Camera" on page 82
Cannot Print Properly from the Digital CameraCannot Print Properly from the Digital Camera
When an Error Occurs
When an error occurs in printing such as the low ink tank or paper jams, a troubleshooting
message is displayed automatically.
The message may vary depending on your operating system.
User's Guide
for additional
* When infrared communication is performed in Windows XP or Windows 2000, a BJ Status
Monitor screen is not displayed.
69
Page 74

Troubleshooting
Cannot Install the Printer Driver
Problem Possible Cause Try This
Cannot Install the
Printer Driver
Installation
procedure not
followed correctly
Other applications
running in the
background
Installation does
not start
automatically when
the CD-ROM is
inserted into the
drive
Follow the
If the installer was forced to terminate due to an error, remove the CD-ROM from
the CD-ROM drive and restart your computer. Reinstall the printer driver. If this
problem persists, contact the Customer Care Center.
Other applications, such as anti-virus software, running in the background can
interfere with the printer driver installation. Close all open software applications
before reinstalling the printer driver. Refer to the
installing the printer driver.
If printer driver installation did not start automatically when you inserted the CDROM into the CD-ROM drive:
1. Click Start
2. Double-click the CD-ROM
For non-Windows XP, open the My Computer
ROM
ROM icon.
ROMROM
Easy Setup Instructions
Start and select My Computer
StartStart
My Computer.
My ComputerMy Computer
CD-ROM icon.
CD-ROMCD-ROM
My Computer window, and then double-click the CD-
My ComputerMy Computer
for proper printer driver installation.
Easy Setup Instructions
for
CD-
CD-CD-
Installation CD-ROM
not working
properly
Double-click the CD-ROM
Ensure that there are no problems with the
CD-ROM icon on your desktop to start installation.
CD-ROMCD-ROM
Setup Software & User’s Guide CD-
ROM.
Use Windows Explorer to ensure that the CD-ROM can be read.
Ensure that the CD-ROM
If there is any problem with the CD-ROM
CD-ROM icon is displayed on the desktop.
CD-ROMCD-ROM
CD-ROM, contact the Customer Care Center.
CD-ROMCD-ROM
70
Page 75

Problem Possible Cause Try This
Cannot Install the
Printer Driver
Unable to proceed
beyond the Printer
Connection Screen
Troubleshooting
If you cannot proceed beyond the Printer
Connection
Connection screen;
ConnectionConnection
• When connecting with a USB cable
1. Click Cancel
Cancel.
CancelCancel
2. When the Installation Failure
displayed, click Start Over
3. Easy Install
Easy Install screen is displayed, click
Easy InstallEasy Install
Back
Back.
BackBack
4. Click Exit
5. Turn the printer off.
6. Restart the computer.
7. Carefully follow the procedures
described in the
and reinstall the printer driver.
• When connecting through infrared
communication
1. Click Cancel
2. When the Installation Failure
displayed, click Start Over
3. Easy Install
Easy Install screen is displayed, click
Easy InstallEasy Install
Back
Back.
BackBack
4. Click Custom Install
5. Click Next
6. Click Install
7. Click Yes
screen.
8. Click Manual Selection
Connection
Connection screen.
ConnectionConnection
9. Select a port.
- Windows XP/Windows 2000: [IR]
- Windows Me/Windows 98: [LPT3]
A port name other than [LPT3:] may be
displayed depending on the type of your
computer.
10.Click Next
Installation Failure screen is
Installation FailureInstallation Failure
Start Over.
Start OverStart Over
Exit, then remove the CD-ROM.
ExitExit
Easy Setup Instructions
Cancel.
CancelCancel
Installation Failure screen is
Installation FailureInstallation Failure
Start Over.
Start OverStart Over
Custom Install.
Custom InstallCustom Install
Next.
NextNext
Install.
InstallInstall
Yes on the License Agreement
YesYe s
Manual Selection on the Printer
Manual SelectionManual Selection
Next.
NextNext
License Agreement
License AgreementLicense Agreement
Printer
Printer Printer
Printer
Printer Printer
71
Page 76

Troubleshooting
Print Quality is Poor or Contains Errors
Problem Possible Cause Try This
Ink does not eject
properly/Printing is
Blurred/ Colors are
Wrong/White
Streaks appear
Ink tank is not seated
properly
Print Head Nozzles
clogged
Incorrect paper type
Glossy photo paper
other than Canon
speciality media is
used
Print Quality not set
properly
Check that the ink tanks are firmly seated in the Print Head and reseat them if
necessary.
See "Insert the ink tank.
Insert the ink tank." on page 63.
Insert the ink tank.Insert the ink tank.
Print the nozzle check pattern to check for uneven ink output.
See "Printing the Nozzle Check Pattern
Printing the Nozzle Check Pattern" on page 42.
Printing the Nozzle Check PatternPrinting the Nozzle Check Pattern
When a specific color is missing from the nozzle check pattern, clean the Print
Head.
If ink supply is uneven: See "Print Head Cleaning
On the Main
Main tab, ensure that the Media Type
MainMain
loaded.
In the Print
Print dialog box, select Quality & Media
Print Print
then ensure that the Media Type
Selecting Other Photo Paper
Load one sheet at a time and remove each sheet as soon as it is printed.
Be sure to set the Print Quality
Macintosh.
On the Main
Other Photo Paper from Media Type
Other Photo PaperOther Photo Paper
Print Quality setting to High
Print QualityPrint Quality
Main tab, click High
MainMain
Print Head Cleaning" on page 47.
Print Head CleaningPrint Head Cleaning
Media Type selected matches the media
Media TypeMedia Type
Quality & Media from the pop-up menu, and
Quality & MediaQuality & Media
Media Type selected matches the media loaded.
Media TypeMedia Type
Media Type, which may resolve the problem.
Media TypeMedia Type
High for the Print
HighHigh
Print Quality
PrintPrint
High for Windows or Fine
High High
Quality setting.
QualityQuality
Fine for
Fine Fine
Printed Ruled Lines
are Displaced
72
Media not loaded with
the print-side up
Print Head is
misaligned
Incorrect Paper
Thickness Lever (gray)
position
Print Quality not set
properly
1. In the Print
Print dialog box, select Quality & Media
Print Print
then click Detailed Setting
2. Drag the Print Quality
Check that your paper is loaded with the correct print side facing up.
Consult "Printing Media
to load and handle your media.
Align the Print Head. See "Aligning the Print Head
Set the Paper Thickness Lever (gray) according to the printing paper type.
See "Loading Paper
Be sure to set the Print Quality
Macintosh.
On the Main
1. In the Print
then click Detailed Setting
2. Drag the Print Quality
Detailed Setting.
Detailed SettingDetailed Setting
Print Quality slide bar to the Fine
Print QualityPrint Quality
Printing Media" in the
Printing MediaPrinting Media
Loading Paper" on page 4.
Loading PaperLoading Paper
Print Quality setting to High
Print QualityPrint Quality
Main tab, click High
MainMain
Print dialog box, select Quality & Media
Print Print
Detailed Setting.
Detailed SettingDetailed Setting
Print Quality slide bar to the Fine
Print QualityPrint Quality
High for the Print
HighHigh
Quality & Media from the pop-up menu, and
Quality & MediaQuality & Media
Fine end.
FineFine
User’s Guide
Aligning the Print Head" on page 57.
Aligning the Print HeadAligning the Print Head
Print Quality
PrintPrint
Quality & Media from the pop-up menu, and
Quality & MediaQuality & Media
for detailed instructions on how
High for Windows or Fine
High High
Quality setting.
QualityQuality
Fine end.
FineFine
Fine for
Fine Fine
Page 77

Problem Possible Cause Try This
Printed Paper Curls
or Ink Blots
Back of Paper is
Smudged
Printed Surface is
Scratched
Paper being used is
too thin
Incorrect paper type
Paper Feed Roller is
dirty
Inside of the printer is
dirty
Paper Feed Roller is
dirty
Media is curled If media is curled, its print side may be smudged by touching Print Head.
Inappropriate paper
type used
Use High Resolution Paper, Photo Paper Pro or other Canon speciality paper to
print images that have high color saturation.
On the Main
Main tab, ensure that the Media Type
MainMain
loaded.
In the Print
Print dialog box, select Quality & Media
Print Print
then ensure that the Media Type
Clean the Paper Feed Roller.
See "Paper Does Not Feed Properly
Paper Does Not Feed Properly" on page 75.
Paper Does Not Feed ProperlyPaper Does Not Feed Properly
If the inside of the printer is dirty, printed paper may be smudged. Periodically
clean the inside of the printer.
See "Cleaning the Inside of the Printer
Cleaning the Inside of the Printer" in the
Cleaning the Inside of the PrinterCleaning the Inside of the Printer
Clean the Paper Feed Roller.
See "Paper Does Not Feed Properly
Paper Does Not Feed Properly" on page 75.
Paper Does Not Feed ProperlyPaper Does Not Feed Properly
Hold the opposite corners of the media, and gently bend them in the opposite
direction to uncurl the media.
Check to see if the paper you are printing on is too thick or curled.
See "Print Media to Avoid
Print Media to Avoid" on page 4.
Print Media to AvoidPrint Media to Avoid
Note that smudging may occur at the top and bottom edges of paper when
using Borderless Printing. Ensure that the paper you are using is compatible
with Borderless Printing.
See "Media Types Suitable for Borderless Printing
Media Types Suitable for Borderless Printing" on page 38.
Media Types Suitable for Borderless PrintingMedia Types Suitable for Borderless Printing
Quality & Media from the pop-up menu, and
Quality & MediaQuality & Media
Media Type selected matches the media loaded.
Media TypeMedia Type
Troubleshooting
Media Type selected matches the media
Media TypeMedia Type
User’s Guide
.
Paper Thickness Lever
(gray) position is not
proper
If all four corners or the printing surface of the paper is curled, the paper may
become dirty or the paper may not feed properly. Use the paper after
correcting paper curl as follows.
(1) Face up the printing surface
paper to avoid damaging the surface.
(2) Roll up the paper in a direction opposite to paper curl as the figure below.
(1) (2)
(3) Check the printing paper if paper curl is corrected within approximately
2 to 5 mm
It is recommended to print the curl-corrected paper one sheet at a time.
Set the Paper Thickness Lever (gray) in suitable position for your media.
See "Canon Speciality Media
If the paper is scratched even when printing on plain paper (right ), set
Paper Thickness Lever (gray) to the left ( ).
Return the Paper Thickness Lever (gray) to the right ( ) after printing.
*2
Canon Speciality Media" on page 9.
Canon Speciality MediaCanon Speciality Media
*1
, and cover it with a non-printing regular
*1
*1
*2
73
Page 78

Troubleshooting
Troubleshooting Printer Hardware
Problem Possible Cause Try This
Printer Does Not
Start or Printer
Stops During
Print Jobs
Printer cable is too
long
There may be
problems in your
operating system
Avoid using USB cables longer than 16.4 feet.
Restart your computer. It may solve the problem.
Delete an undesired print job if there is any. Use BJ Status Monitor in Windows or
Printer Setup Utility
Printer Setup Utility in Macintosh for the deletion. If you are using the OS other
Printer Setup UtilityPrinter Setup Utility
than Mac OS X v.10.3, use the Print Center
Print Center for deletion.
Print CenterPrint Center
Cannot Print to
End of Job
The infrared
communication
distance or the
Infrared Port angle
is incorrect
Incorrect page size
selected
During infrared
communication,
infrared rays were
interrupted or
another infrared
communication unit
is operating nearby
1. Open the Printer Properties
See "Opening the Printer Properties Dialog Box from Your Application Program
on page 29.
2. Click Maintenance
3. Click Display Print Queue
4. Select Cancel All Documents
When the confirmation messages is displayed, click Yes
The print job is deleted.
1. Select Applications
2. Double-click the Printer Setup Utility
If you are using an OS other than Mac OS X v.10.3, double-click the Print Center
icon.
3. Double-click iP90
4. Click to select an undesired document and click .
The print job is deleted.
Place the printer at a distance of 31.5 inch/80 cm from the computer. Ensure that
the Infrared Ports are at a proper angle and there are no obstacles between them.
Retry printing.
The allowable distance and angle for infrared communication depend on the
functions of the computer in addition to environmental conditions.
See "Printing Data through Infrared Communication
Ensure that the page size setting matches the size of the paper loaded in the
printer:
-Check the Paper Size
matches the size of the paper loaded.
-Check the Page Setup
the Page Setup
the paper loaded.
If infrared communication between the infrared ports of the printer and computer
or PDA is interrupted by any obstacle for ten seconds or longer during printing, the
paper on which data is being printed is ejected and the printer is reset. Remove the
obstacle and retry printing.
If another infrared communication unit is operating nearby, printing can stop due
to interference. When printing a document through infrared communication, do not
operate other infrared communication units like a television remote control.
See "Printing Data through Infrared Communication
Printer Properties dialog box.
Printer PropertiesPrinter Properties
Opening the Printer Properties Dialog Box from Your Application Program"
Opening the Printer Properties Dialog Box from Your Application ProgramOpening the Printer Properties Dialog Box from Your Application Program
Maintenance tab and then Start Status Monitor
MaintenanceMaintenance
Display Print Queue.
Display Print QueueDisplay Print Queue
Cancel All Documents in the Printer
Cancel All Documents Cancel All Documents
Note In Windows Me or Windows 98
Printing Data through Infrared Communication" on page 15.
Printing Data through Infrared CommunicationPrinting Data through Infrared Communication
Page Setup dialog box (for Macintosh) to ensure that it matches the size of
Page SetupPage Setup
Printing Data through Infrared Communication" on page 15.
Printing Data through Infrared CommunicationPrinting Data through Infrared Communication
In Windows Me or Windows 98
In Windows Me or Windows 98In Windows Me or Windows 98
Click to select an undesired document and select Purge Print
Documents
Documents in the Printer
Documents Documents
Applications from the Go
ApplicationsApplications
Printer Setup Utility icon in the Utilities
Printer Setup UtilityPrinter Setup Utility
iP90 displayed under Name
iP90iP90
Paper Size setting from within your application to ensure that it
Paper SizePaper Size
Page Setup tab in the Printer Properties
Page SetupPage Setup
Start Status Monitor.
Start Status MonitorStart Status Monitor
Printer menu.
PrinterPrinter
Printer menu.
PrinterPrinter
Go menu.
GoGo
Name in the Printer List
NameName
Printer Properties dialog box (for Windows) or
Printer PropertiesPrinter Properties
Yes .
YesYe s
Utilities folder.
UtilitiesUtilities
Printer List.
Printer ListPrinter List
Purge Print
Purge Print Purge Print
Print Center
Print CenterPrint Center
74
Page 79

Paper Does Not Feed Properly
Problem Possible Cause Try This
Paper Does Not
Feed Properly
Inappropriate paper
type used
Paper Feed Roller is
dirty
Paper Jams Remove the paper according to the following procedure.
• Check to see if the paper you are printing on is too thick or curled.
See "Print Media to Avoid
Print Media to Avoid" on page 4.
Print Media to AvoidPrint Media to Avoid
• Check if the paper exceeds the load limit mark. If it exceeds, load less paper.
See "Load the paper.
Load the paper." on page 5.
Load the paper.Load the paper.
Follow the steps described below to clean the Paper Feed Rollers.
If envelopes or post cards do not feed properly, even after correcting any paper
curl, clean the Paper Feed Roller.
1. Ensure that the printer is turned on and there is no paper loaded in the printer.
2. Hold the RESUME/CANCEL
flashes three times.
The paper roller rotates as it cleans.
3. Repeat this cleaning operation one more time.
4. Load a sheet of plain paper in the printer.
5. Hold the RESUME/CANCEL
flashes three times, then feed a sheet of paper.
1. Slowly pull the paper out, either from the Auto Sheet Feeder or from the Paper
Output Slot Cover, whichever is easier.
RESUME/CANCEL button down and release after the POWER
RESUME/CANCELRESUME/CANCEL
RESUME/CANCEL button down and release after the POWER
RESUME/CANCELRESUME/CANCEL
Troubleshooting
POWER lamp
POWERPOWER
POWER lamp
POWERPOWER
• If the paper tears and a piece remains inside the printer, open the Print Head
Cover and remove it.
Caution
Caution Be careful not to touch any components inside the printer.
CautionCaution
After removing all paper, close the Print Head Cover.
• If you cannot pull the paper out, turn the printer off and turn it back on.
The paper will be ejected automatically.
2. Reload the paper into the printer and press the RESUME/CANCEL
If you cannot remove the paper or if the paper tears inside the printer, or if the
Paper jam error (See "Handling Error Messages
removing the paper, contact the Customer Care Center.
Handling Error Messages" on page 76) continues after
Handling Error MessagesHandling Error Messages
RESUME/CANCEL button.
RESUME/CANCELRESUME/CANCEL
75
Page 80

Troubleshooting
Handling Error Messages
When a printer error occurs, the POWER/ERROR
POWER/ERROR lamp flashes. The number of flashes
POWER/ERRORPOWER/ERROR
indicates the type of error that has occurred. Count the flashes and then take appropriate
action to correct the error.
Number of
Flashes
Two flashes Printer is out of
Three flashes Paper jam If a paper jam occurs, clear the jammed paper, reload paper in the printer, then
Four flashes Ink tanks installed
Five flashes No Print Head
Eight flashe s Waste in k absorber *
Nine flashes A specified period
Twelve flashes Low battery level Follow the procedure below.
* The waste ink absorber absorbs ink used during cleaning.
Possible Cause Try This
paper
incorrectly
installed/Defective
Print Head
almost full
of time has lapsed
without receiving
any response from a
digital camera/The
digital camera or
digital video
camcorder is not
compatible with this
printer
Reload paper and press the RESUME/CANCEL
press the RESUME/CANCEL
Reinstall the ink tanks. Ensure that the tanks are firmly seated in the Print Head.
Install a Print Head correctly. Press the POWER
press the POWER
Print Head may be defective. Contact the Customer Care Center.
The printer has a built-in waste ink absorber to hold the ink consumed during Print
Head cleaning. Eight flashes indicates that this absorber is nearly full.
Press the RESUME/CANCEL
Contact the Customer Care Center.
Disconnect the cable, press the RESUME/CANCEL
cable again.
If the error persists, the connected digital camera or digital video camcorder may
be incompatible with this printer. Use a compatible digital camera or digital video
camcorder.
1. Turn off the printer.
2. Connect the supplied Universal AC Adapter or load a charged battery.
3. Turn on the printer.
RESUME/CANCEL button. See "Paper Jams
RESUME/CANCELRESUME/CANCEL
POWER button again to turn on the printer. If the same error occurs, the
POWERPOWER
RESUME/CANCEL button to clear the error so printing can continue.
RESUME/CANCELRESUME/CANCEL
Note For details on handling of the battery, refer to the
User’s Guide
RESUME/CANCEL button.
RESUME/CANCELRESUME/CANCEL
POWER button to turn off the printer, and
POWERPOWER
RESUME/CANCEL button, and then connect the
RESUME/CANCELRESUME/CANCEL
.
Paper Jams" on page 75.
Paper JamsPaper Jams
LK-51B/CK-51B
76
Page 81

Note
Troubleshooting
POWER lamp flashes alternately green and orange
POWER lamp flashes alternately green and orange
POWER lamp flashes alternately green and orangePOWER lamp flashes alternately green and orange
An error that requires contacting the Customer Care Center may have occurred.
Disconnect the printer cable from the printer, and then turn the printer off and
unplug the printer from the power supply. Reconnect the printer cable, and then
plug the printer back in and turn the printer back on after leaving it for a while.
If the problem remains, contact the Customer Care Center.
POWER lamp (green) repeats the illumination sequence (Bluetooth
POWER lamp (green) repeats the illumination sequence (Bluetooth
POWER lamp (green) repeats the illumination sequence (Bluetooth POWER lamp (green) repeats the illumination sequence (Bluetooth
Communication is used)
Communication is used)
Communication is used)Communication is used)
When Bluetooth Communication is used and BJ Status Monitor is active with the
printer power ON, the green POWER
which it goes out twice every 5 seconds even if nothing is printed. This
operation is not abnormal but it indicates that Bluetooth Communication is
checking the printer condition. When BJ Status Monitor ends, the POWER
will stay lit.
POWER lamp repeats the illumination sequence in
POWERPOWER
POWER lamp
POWERPOWER
77
Page 82

Troubleshooting
An Error Message Appears on the Screen
Problem Possible Cause Try This
Error Writing/Output
to USBnnn or
MPUSBPRNnn
Printer not ready The POWER
Paper is not loaded Load paper and press the RESUME/CANCEL
Faulty connection Ensure that the printer cable is securely connected to the computer.
Printer Port settings
and printer
interface do not
match
Printer driver is not
installed properly
The message
"Cannot write to the
XXX port" is
displayed
POWER lamp will flash green when the printer is warming up or when a print
POWERPOWER
job is being sent to the printer. It will glow a steady (non-flashing) green when it
is ready for use or when a print job is completed.
RESUME/CANCEL button.
RESUME/CANCELRESUME/CANCEL
Note
Note If you are using a switching hub or other device, disconnect the
NoteNote
Select the destination port as follows:
• When connected to the computer with a USB cable
Confirm that the destination Printer Port is set to MPUSBPRNnn (Canon iP90
or USBnnn (Canon iP90
• When performing infrared communication
Open the Printer Properties dialog box directly from the Start menu.
See "Opening the Printer Properties Dialog Box Directly from the Start Menu
on page 29.
Ensure that the Infrared Port is selected as the destination port on the Ports
tab or Details
· When using Windows XP or Windows 2000
· When using Windows Me or Windows 98
Uninstall then reinstall the printer driver.
1. Click Start
2. Follow the on-screen instructions to uninstall the driver.
3. Follow the procedures described in the
the printer driver.
If the Infrared Port is not selected as the print port of the printer driver, the
message "Cannot write to the xxx port" (xxx is the name of the printer port) is
displayed and printing does not start. Select the IR
Me/Windows 98) and retry printing.
See "Printing Data through Infrared Communication
printer and reconnect it directly to the computer and try printing
again.
If successful, the problem may have been with the device.
There could also be a problem with the cable(s). Replace the
cable(s) and try printing again.
Canon iP90) (Where nn represents a number)
Canon iP90Canon iP90
Opening the Printer Properties Dialog Box Directly from the Start Menu"
Opening the Printer Properties Dialog Box Directly from the Start MenuOpening the Printer Properties Dialog Box Directly from the Start Menu
Details tab.
DetailsDetails
The port [IR] is used as the infrared communication port.
The Infrared Port name is followed by the text "Infrared Printing (LPT) Port"
which is enclosed in parentheses.
Example: LPT3: (Infrared Printing (LPT) Port)
* A port other than the LPT3 port may be selected depending on the
computer setting.
Follow the procedures described in the
reinstall the printer driver.
Refer to the
correct action to take.
User’s Guide
Start, and select All Programs
StartStart
for instructions on how to verify status and the
All Programs (or Programs
All Programs All Programs
Easy Setup Instructions
Programs), Canon iP90
ProgramsPrograms
Easy Setup Instructions
Printing Data through Infrared Communication" on page 15.
Printing Data through Infrared CommunicationPrinting Data through Infrared Communication
Canon iP90)
Canon iP90Canon iP90
Canon iP90, and Uninstall
Canon iP90Canon iP90
and reinstall
IR port (LPT3
LPT3 port in Windows
IRIR
LPT3LPT3
and
Uninstall.
UninstallUninstall
Ports
PortsPorts
78
Page 83

Problem Possible Cause Try This
“Error No.: 300”
“Error No.:1700”
“Error No.:2001”
Have you replaced
an ink tank with a
new one? message is
displayed
Printer not ready If the POWER
Printer not properly
connected
You r p rin te r na me is
not displayed in the
Printer List
Printer List of
Printer ListPrinter List
Printer Setup Utility
Printer Setup Utility
Printer Setup UtilityPrinter Setup Utility
(or Print Center
Print Center)
Print CenterPrint Center
Waste ink absorber
almost full
A specified period
of time has elapsed
without receiving a
response from the
digital camera/The
digital camera or
digital video
camcorder
connected is not
compatible with
this printer
If the ink tank has
been replaced with
a new one
If the ink tank has
been removed for a
certain period (the
ink tank has not
been replaced)
POWER lamp is off, turn the printer on.
POWERPOWER
If the POWER
POWER lamp is flashing green, the printer is initializing. Wait until the
POWERPOWER
POWER
POWER lamp stops flashing.
POWERPOWER
Ensure that the printer is securely connected to the computer.
Note
Note If you are using a switching hub or other device, disconnect the
NoteNote
1. Select Applications
2. Double-click the Printer Setup Utility
If you are using an OS other than Mac OS X v.10.3, double-click the Print
Center
Center icon.
CenterCenter
3. Ensure that iP90
If iP90
The printer has a built-in waste ink absorber to hold the ink used during print
head cleaning. Eight flashes indicates that this absorber is nearly full.
Press the RESUME/CANCEL
printing. Before the waste ink absorber becomes completely full, contact the
Customer Care Center.
Disconnect the camera cable, press the RESUME/CANCEL
and reconnect the cable.
If the error is still unresolved, there is a possibility that you are using a digital
camera or digital video camcorder that is not supported by this printer. Use a
digital camera or digital video camcorder compatible with this printer.
Click
See "
Click
You can choose the option to disable the diaplay of this confirmation message.
1. Ensure that the printer is turned on and open the Printer Properties
box.
2. Click the Maintenance
3. Clear the check box of Display a confirmation message of ink tank
replacement
replacement and click Send
replacement replacement
printer and reconnect it directly to the computer and try printing
again.
If successful, the problem may have been with the device.
There could also be a problem with the cable(s). Replace the
cable(s) and try printing again.
Applications from the Go
ApplicationsApplications
iP90 is not displayed in the Printer List
iP90iP90
Note
Note If the problem persists, delete all unnecessary documents
NoteNote
RESUME/CANCEL button to clear the error so you can continue
RESUME/CANCELRESUME/CANCEL
Yes
Yes
to reset the ink counter.
YesYes
Resetting the Ink Counter
Resetting the Ink Counter
Resetting the Ink CounterResetting the Ink Counter
No
No
on the dialog box described above.
NoNo
Printer Setup Utility icon in the Utilities
Printer Setup UtilityPrinter Setup Utility
iP90 is displayed in the Printer List
iP90iP90
from the Extensions and Control Panels folder.
" on page 64.
Maintenance tab and then click Low Ink Warning Setting
MaintenanceMaintenance
Display a confirmation message of ink tank
Display a confirmation message of ink tank Display a confirmation message of ink tank
Send.
Send Send
Troubleshooting
Go menu.
GoGo
Printer List.
Printer ListPrinter List
Printer List, reinstall the printer driver.
Printer ListPrinter List
RESUME/CANCEL button on the printer
RESUME/CANCELRESUME/CANCEL
Utilities folder.
UtilitiesUtilities
Printer Properties dialog
Printer PropertiesPrinter Properties
Low Ink Warning Setting.
Low Ink Warning SettingLow Ink Warning Setting
Print
Print Print
79
Page 84

Troubleshooting
Problem Possible Cause Try This
Low Ink Warning
Accompanied by Ink
Tank Icon With a '?'
Failure to reset ink
counter when
installing new ink
tank
The ink tank level accompanied by the ink tank icon with the “?” indicates ink
tank is not synchronized with its ink counter.
Always be sure to reset the ink counter in your printer driver when you replace an
ink tank. See "Resetting the Ink Counter
Note
Note
NoteNote
Resetting the Ink Counter" on page 64.
Resetting the Ink CounterResetting the Ink Counter
A “?” is displayed next to the Ink counter between the time one
ink tank is removed and the ink counter is reset when the next
one is installed. When you want to suspend the ink replacing
message and “?”, change a setup in accordance with the
following process.
1. Ensure that the printer is turned on.
2. Open the Printer Properties
See "Opening the Printer Properties Dialog Box Directly from
3. Click the Maintenance
Setting
Setting icon.
SettingSetting
4. Clear a check box of Display low ink warning
Send
Send.
SendSend
5. When the confirmation message is displayed, click OK
Printer Properties dialog box.
Printer PropertiesPrinter Properties
Opening the Printer Properties Dialog Box Directly from
Opening the Printer Properties Dialog Box Directly from Opening the Printer Properties Dialog Box Directly from
the Start Menu
the Start Menu" on page 29
the Start Menuthe Start Menu
Maintenance tab and then click Low Ink Warning
MaintenanceMaintenance
Low Ink Warning
Low Ink Warning Low Ink Warning
Display low ink warning off and click
Display low ink warningDisplay low ink warning
OK.
OKOK
80
1. Ensure that the printer is connected with the computer by USB
cable.
2. Ensure that the printer is turned on.
3. Double-click the hard disk icon where the printer driver was
installed, the Applications
4. Double-click the Printer Setup Utility
If you are using an OS other than Mac OS X v.10.3, doubleclick the Print Center
5. Select iP90
6. Select iP90
7. Select Remaining ink level setting
8. Clear the check box of Display the Remaining Ink Level
click Send
9. When the confirmation message is displayed, click OK
Applications folder, and then the Utilities
ApplicationsApplications
Printer Setup Utility icon.
Printer Setup UtilityPrinter Setup Utility
Print Center icon.
Print CenterPrint Center
iP90 from the Name
iP90iP90
iP90 from the Product
iP90iP90
Remaining ink level setting from the pop-up menu.
Remaining ink level settingRemaining ink level setting
Send.
SendSend
Name list and click Utility
NameName
Product list and click Maintenance
ProductProduct
Display the Remaining Ink Level and
Display the Remaining Ink LevelDisplay the Remaining Ink Level
Utilities folder.
UtilitiesUtilities
Utility or Configure
UtilityUtility
Configure.
ConfigureConfigure
Maintenance.
MaintenanceMaintenance
OK.
OKOK
Page 85

Troubleshooting
Cannot Print Properly through Infrared Communication
Problem Possible Cause Try This
Cannot Print
Properly through
Infrared
Communication
The required driver
is not installed
The infrared
communication
driver is inactive
The installation
place, distance,
and/or angle is
improper
The requirements
for infrared
communications
with the computer
or other devices are
not satisfied
The selected printer
port is wrong
When using other than Windows 98 or later must have been preinstalled and
Microsoft Infrared Communication Driver must be installed in the computer.
See "Printing Data through Infrared Communication
Printing Data through Infrared Communication" on page 15.
Printing Data through Infrared CommunicationPrinting Data through Infrared Communication
In Windows XP, Windows 2000, or Windows Me
1. Check whether the Wireless Link icon is displayed on the task bar.
2. Place the mouse cursor on the Wireless Link icon.
Ensure that "iP90 is the range" is displayed.
If the name of another unit is displayed, change the orientation of this unit or
turn it off.
In Windows 98
Start the infrared monitor and check whether the infrared communication driver
is active.
1. Click Start
Start, Settings
Settings, and Control Panel
StartStart
2. Double-click the Infrared Monitor.
3. Click the Options
4. Check the Enable infrared communication
Check the installation place, distance, or angle according to the Section
"Printing Data through Infrared communication."
•Printing from a computer
Computer which provided with the infrared communication port based on the
IrDA version 1.1 standard.
• Printing from a PDA or mobile phone
The model which provided an IrDA port and which was based on the IrMC
version 1.1.
Check the printer port setting.
1. Open the printer driver Properties dialog box from the Start
2. Click Ports
destination port.
• In Windows XP or Windows 2000
The port [IR] is used as the infrared communication port.
• In Windows Me or Windows 98
The infrared port name is followed by the text "Infrared Printing (LPT) Port"
which is enclosed in parentheses.
Example: LPT3: (Infrared Printing (LPT) Port)
* A port other than the LPT3 port may be selected depending on the computer
setting.
To check whether the printer is connected to the computer through infrared
communication, follow the procedure below.
• In Windows XP, Windows 2000, or Windows Me
1. When the infrared port of the computer is moved close to the Infrared Port of
2. Place the cursor on the
• When using Windows 98
Start the infrared monitor to check whether the Infrared Communication
Driver is active.
1. Click
2. Double-click the
3. Check whether "iP90 is in range" is displayed on the
SettingsSettings
Options tab.
OptionsOptions
Enable infrared communication check box.
Enable infrared communicationEnable infrared communication
Ports tab or Details
PortsPorts
the printer, the
If "iP90 is in range" is displayed, the printer is ready for printing.
If the name of another unit is displayed, change its orientation or turn it off.
Start
Start
, then click
StartStart
If the name of another unit is displayed, change its orientation or turn it off.
Control Panel.
Control PanelControl Panel
Infrared Monitor.
Infrared Monitor.Infrared Monitor.
Start menu.
Details tab to ensure that the Infrared Port is selected as the
DetailsDetails
Wireless Link
Wireless Link
Wireless LinkWireless Link
Infrared
Infrared
InfraredInfrared
icon appears on the task bar.
Wireless Link
Wireless Link
Wireless LinkWireless Link
Settings
Settings
SettingsSettings
icon.
and
Control Panel
Control Panel
Control PanelControl Panel
icon.
StartStart
.
Status
Status
tab.
StatusStatus
81
Page 86

Troubleshooting
Cannot Print Properly from the Digital Camera
The following are the possible errors that may occur when printing directly from a digital still
camera or digital video camcorder*, and the countermeasures to eliminate them.
* Hereafter, a digital still camera and digital video camcorder are collectively called a digital camera or camera.
Camera Error Message Possible Cause Try This
Printer in use Images are being printed from
Printer warming up The printer is warming up Wait until warm-up ends. When it is ready, the printer starts
No paper /Paper error No paper is loaded Load the paper in the Auto Sheet Feeder of the printer and
Paper Jam A paper jam occurrs in the
Printer cover open The Print Head Cover is open Close the Print Head Cover.
No Print Head No Print Head is installed (The
Waste tank (Waste ink
absorber*
Ink tank is empty Replace the ink tank with a
Printer error The battery level is low (The
1
*
2
*
2
) full
To resume printing, you can press the RESUME/CANCEL
The waste ink absorber absorbs ink used during cleaning.
the computer
printer
POWER
POWER lamp on the printer
POWERPOWER
flashes five times)
The Print Head is defective
(The POWER
POWER lamp on the
POWERPOWER
printer flashes five times)
The waste ink absorber*
nearly full
new one
POWER
POWER lamp on the printer
POWER POWER
flashes twelve times)
An error requiring servicing
might have occurred (The
POWER
POWER lamp on the printer
POWERPOWER
flashes alternately orange and
green)
RESUME/CANCEL button on the printer instead of selecting Continue
RESUME/CANCELRESUME/CANCEL
Wait until printing ends. The printer automatically starts
printing the images from the camera after completing the
current printing.
printing automatically.
select Continue
Continue*
ContinueContinue
Select Cancel
Cancel in the display on your camera to cancel the print
Cancel Cancel
job. Remove the jammed paper, load new media, and press the
RESUME
RESUME/CANCEL
RESUMERESUME
Install a Print Head according to the
If a Print Head has already been installed, remove it, and then
reinstall it.
If the problem still remains, the Print Head may be defective.
Contact the Customer Care Center.
2
is
The printer has a built-in waste ink absorber to hold the ink
used during Print Head cleaning. This error message indicates
that the waste ink absorber is nearly full.
Selecting Continue
printing. Printing can be continued for a while, but printing
cannot be continued when the waste ink absorber becomes full.
Contact the Customer Care Center as soon as possible.
Printing resumes once the Print Head Cover is closed after an
ink tank replacement.
You can continue printing by selecting Continue
on your camera with the ink tank empty. But, it is recommended
you replace it with a new one immediately after printing. It may
damage the printer if you continue printing with empty ink
tanks.
Follow the procedure below.
1. Turn off the printer.
2. Connect the supplied Universal AC Adapter or load a charged
battery.
3. Turn on the printer.
Select Cancel
Cancel in the display on your camera to cancel the print
CancelCancel
job.
Disconnect the cable connected to the camera, turn off the
printer, and unplug the power cord of the printer from the
outlet. Leave the printer for a while, plug the power cord of the
printer back in the outlet, turn on the printer, and connect the
camera to the printer.
If the error persists, contact the Customer Care Center.
1
in the display on your camera.
CANCEL button.
CANCELCANCEL
1
Continue*
ContinueContinue
in the display on your camera resumes
Easy Setup Instructions
Continue*
ContinueContinue
Continue.
ContinueContinue
1
in the display
.
82
Page 87

Troubleshooting
Note
• PictBridge or Canon Bubble Jet Direct compatible digital cameras can be
connected to your printer for direct printing.
• This section describes errors that are indicated on Canon-brand PictBridgeor Bubble Jet Direct-compatible cameras. The error messages and
operations may vary depending on the camera you are using.
For errors on non-Canon PictBridge-compatible cameras, count the number
of flashes the POWER
the error and take the appropriate action. For details, see "Handling Error
Messages
Messages" on page 76.
MessagesMessages
• Connecting a digital camera not compatible with PictBridge or a Bubble Jet
Direct makes the POWER
case, unplug the cable connecting the camera to the printer, and press the
RESUME/CANCEL
RESUME/CANCEL button on the printer.
RESUME/CANCELRESUME/CANCEL
• A communication time out occurs if printing takes a long time or if it takes
too much time to send data. This may stop printing. In such cases,
disconnect the cable between the printer and the camera, press the
RESUME/CANCEL
RESUME/CANCEL button on the printer, and reconnect the cable between
RESUME/CANCELRESUME/CANCEL
the printer and the camera. Then, turn the camera on, if it does not
automatically turn on. If the problem is still unresolved, select some other
photo and check if it can be printed or not.
• The Print Head Nozzles may be clogged if printing becomes faint or colors
are incorrect. See "When Printing Becomes Faint or Colors are Incorrect
page 41.
• If the paper is curled or its surface is scratched during printing, make sure
that you are using the correct type of paper. If this error occurs even when
you are using the correct type of paper, select Prevent paper abrasion
Custom Settings
Custom Settings in the printer driver. See "Print Quality is Poor or Contains
Custom SettingsCustom Settings
Errors
Errors" on page 72.
ErrorsErrors
• To disconnect the cable connected between a digital camera and printer,
follow the procedure below.
1. Disconnect the cable from the printer.
POWER lamp on the printer makes and check for the cause of
POWERPOWER
Handling Error
Handling Error Handling Error
POWER lamp on your printer flash nine times. In such a
POWERPOWER
When Printing Becomes Faint or Colors are Incorrect" on
When Printing Becomes Faint or Colors are IncorrectWhen Printing Becomes Faint or Colors are Incorrect
Prevent paper abrasion on
Prevent paper abrasionPrevent paper abrasion
Print Quality is Poor or Contains
Print Quality is Poor or Contains Print Quality is Poor or Contains
2. Turn off the digital camera.
3. Disconnect the cable from the digital camera.
When disconnecting the cable, be sure to hold the connector by its sides.
• For the errors indicated on the camera and their solution, also refer to the
user’s manual of the camera. For other troubles with a digital camera,
contact the manufacturer of the camera.
83
Page 88

Appendix
Appendix
Appendix
AppendixAppendix
Printing Photographs Directly from Canon Bubble Jet Direct Compatible Digital Cameras
Let’s take a look at the media types that can be set on the Canon Bubble Jet Direct
compatible digital camera connected to this printer and their limitations.
Media Types for Digital Camera
When you connect a digital camera, you can use the following media:
Digital Camera Setting Media Type
Card #1 Photo Paper Pro 4"×6"/101.6×152.4 mm
Card #2 Photo Paper Plus Glossy, Photo Paper Plus Semi-Gloss,
or Glossy Photo Paper 4"×6"/101.6×152.4 mm
Card #3 Photo Paper Plus Glossy 5"×7"/127.0×177.8 mm
LTR Photo Paper Pro, Photo Paper Plus Glossy, Photo Paper
Plus Semi-Gloss, or Glossy Photo Paper Letter
84
A4 Photo Paper Pro, Photo Paper Plus Glossy, Photo Paper
Plus Semi-Gloss, or Glossy Photo Paper A4
Page 89

Appendix
Note
• For digital camera method of operations and troubleshooting, refer
to your digital camera’s manual.
For print error messages, refer to "Cannot Print Properly from the
Digital Camera
Digital Camera" in the
Digital CameraDigital Camera
• By operating the digital camera, you can make the following prints:
- You can make a standard print from the image displayed in the
single display mode or in the index display mode.
- You can print specified numbers of images, or make an index print
by editing the DPOF.
- For the images taken with an Exif Print-compatible digital camera,
the Photo Optimizer PRO function can be used.
- If date printing is set from a digital camera, the date when a
photograph was taken is to be printed (excluding the index print).
- Images will be scaled automatically according to the image size
set on the digital camera and the size of the media set on the
printer.
• The digital camera does not support the following functions:
- Print quality setting
- Printer maintenance
• Images other than Exif may not be index printed.
User’s Guide
Cannot Print Properly from the
Cannot Print Properly from the Cannot Print Properly from the
.
85
Page 90

Appendix
User’s Guide Table of Contents
Your printer’s
User’s Guide
offers detailed information on the following topics.
How to Use This Manual
How to Read This Manual
Safety Precautions
Printer Parts and Their Function
Front View
Operation Panel
Rear View
Inside the Printer
Further Printing Techniques
Printing Photographs
Printer Driver Functions (Windows)
Printer Driver Functions (Macintosh)
BJ Printer Utility (Macintosh)
Printing Media
Compatible Media Types
Photo Paper Pro PR-101
Photo Paper Plus Glossy PP-101
Photo Paper Plus Semi-Gloss SG-101
Matte Photo Paper MP-101
Glossy Photo Paper GP-401
High Resolution Paper HR-101N
Photo Paper Plus Double Sided PP-101D
T-Shirt Transfers TR-301
Transparencies CF-102
Photo Stickers PS-101
Envelopes
Checking the Status of the Printer
BJ Status Monitor Functions (Windows)
Printer Setup Utility (or Print Center)
(Macintosh)
Routine Maintenance
When Printing Becomes Faint or Colors are
Incorrect
Printing the Nozzle Check Pattern
Print Head Cleaning
Print Head Deep Cleaning
Aligning the Print Head
Replacing an Ink Tank
Using the Canon iP90 Setup Utility
Function of the Canon iP90 Setup Utility
Starting the Canon iP90 Setup Utility
Setup Utility Functions (Windows)
Setup Utility Functions (Macintosh)
Troubleshooting
Cannot Install Printer Driver
Print Quality is Poor
Printer Does Not Start or Stops During Print
Jobs
Paper Does Not Feed Properly or Paper Jams
The POWER Lamp Flashes Orange
An Error Message is Displayed on the Screen
Cannot Print Properly from the Digital Camera
Cannot Print Properly through Infrared
Communication (Windows)
Problems Relating to Windows (Windows)
Appendix
Printing Area
Deleting Selected Printers (Macintosh)
Uninstalling Printer Drivers
Uninstalling the On-screen Manual
Cleaning the Inside of the Printer
Transporting Printer
Traveling Abroad with the Printer
Specifications
Index
86
FAQS
Page 91

Accessory Options
The following options are available for this printer.
Confirm the product names when you purchase the options.
Canon Cradle Kit CK-51B
This option is a kit that consists of a stand dedicated to this printer and a portable kit
LK-51B (battery charger and lithium-ion battery). The lithium-ion battery can be
charged with the printer placed upright.
Canon Portable Kit LK-51B
This option is a battery kit that consists of a battery charger and a lithium-ion battery.
Use this kit together with the printer in locations where there is no power supply
(during business trip, etc.).
Appendix
Canon Li-ion Battery LB-51
This option is available as an additional lithium-ion battery for the portable kit LK-51B.
87
Page 92

Appendix
Canon Automobile Power Unit PU-100U
This option is a unit that allows you to supply power from a cigarette lighter outlet to
your printer for operation or battery charging.
Bluetooth Unit BU-10
This option is a unit that allows you to print wireless from a Bluetooth compatible
computer.
For further information on the installation or the Bluetooth settings, refer to the
Bluetooth Unit BU-10 User’s Guide
.
88
Page 93

Traveling Abroad with the Printer
Before traveling abroad with the printer, ensure that the following notes.
About Universal AC Adapter and Power Cord
The Universal AC Adapter can be used abroad to power the printer from power supplies
ranging from AC 100 V to 240 V. However, the specification of the power cord differs for
each country, please purchase the power cord suitable for the specification of each
country.
*1 *2
*1 Power Cord
*2 Universal AC Adapter
Appendix
(1) Power Cord
The specification of the power cord changes with each country.
(2) Universal AC Adapter
Universal AC Adapter is not dependent on the specification of each country. It is
common also abroad and can use.
Fill Out the CIWS Card
Fill out the CIWS Card (Canon International Warranty System) with the date of purchase
and the name of where the printer was purchased. Carry this warranty card with you
when you travel, so you can request repairs or servicing of the printer at your
destination. For details, refer to the CIWS card.
89
Page 94

Appendix
The Cautions When Carrying Printer
• Pack up firmly in the case of carrying bag. For details, refer to Transporting Printer.
• Be careful not to give it the strong vibration which puts a serious thing on the
carrying bag, and a shock. Printer itself sometimes breaks down, and ink sometimes
leaks out.
• When you remove the power cord, check that the POWER lamp is off completely. If
the power cord is pulled out while the POWER lamp is on or flashing, it will become
the failure.
Note
X-ray and any other baggage inspection devices have no
adverse effect on this printer.
90
Page 95

Appendix
Specifications
Printer
Printing resolution:
Printing resolution: 4800* x 1200 dpi. max.
Printing resolution:Printing resolution:
Print width:
Print width: 203.2 mm max. (8.0 in)
Print width:Print width:
Resident print control mode:
Resident print control mode: Canon extended mode
Resident print control mode:Resident print control mode:
Receive buffer:
Receive buffer: 42 KB
Receive buffer:Receive buffer:
Interface:
Interface: USB/IrDA Ver.1.1/Direct Print Port/Bluetooth Ver.1.1(option)
Interface:Interface:
Acoustic noise level:
Acoustic noise level: Approx. 40 dB (A) (in the highest print quality mode)
Acoustic noise level:Acoustic noise level:
Operating environment:
Operating environment: Temperature: 5 to 35°C (41 to 95°F)
Operating environment:Operating environment:
Storage environment:
Storage environment: Temperature: 0 to 40°C (32 to 104°F)
Storage environment:Storage environment:
Power supply:
Power supply: AC 100-240 V, 50/60 Hz
Power supply:Power supply:
Power consumption:
Power consumption: Standby: 1 W or lower
Power consumption:Power consumption:
Dimensions
Dimensions
Dimensions Dimensions
(with Paper Support and Paper Output Tray retracted):
(with Paper Support and Paper Output Tray retracted):
(with Paper Support and Paper Output Tray retracted):(with Paper Support and Paper Output Tray retracted):
4800* x 1200 dpi. max.
4800* x 1200 dpi. max.4800* x 1200 dpi. max.
(*Ink droplets can be placed in a pitch of 1/4800 inch at minimum.)
(*Ink droplets can be placed in a pitch of 1/4800 inch at minimum.)
(*Ink droplets can be placed in a pitch of 1/4800 inch at minimum.)(*Ink droplets can be placed in a pitch of 1/4800 inch at minimum.)
203.2 mm max. (8.0 in)
203.2 mm max. (8.0 in)203.2 mm max. (8.0 in)
(for Borderless Printing: 215.9 mm/8.5 in)
(for Borderless Printing: 215.9 mm/8.5 in)
(for Borderless Printing: 215.9 mm/8.5 in)(for Borderless Printing: 215.9 mm/8.5 in)
Canon extended mode
Canon extended modeCanon extended mode
42 KB
42 KB42 KB
USB/IrDA Ver.1.1/Direct Print Port/Bluetooth Ver.1.1(option)
USB/IrDA Ver.1.1/Direct Print Port/Bluetooth Ver.1.1(option)USB/IrDA Ver.1.1/Direct Print Port/Bluetooth Ver.1.1(option)
Approx. 40 dB (A) (in the highest print quality mode)
Approx. 40 dB (A) (in the highest print quality mode)Approx. 40 dB (A) (in the highest print quality mode)
Temperature: 5 to 35°C (41 to 95°F)
Temperature: 5 to 35°C (41 to 95°F)Temperature: 5 to 35°C (41 to 95°F)
Humidity: 10 to 90%RH (no condensation)
Humidity: 10 to 90%RH (no condensation)
Humidity: 10 to 90%RH (no condensation)Humidity: 10 to 90%RH (no condensation)
Temperature: 0 to 40°C (32 to 104°F)
Temperature: 0 to 40°C (32 to 104°F)Temperature: 0 to 40°C (32 to 104°F)
Humidity: 5 to 95% RH (no condensation)
Humidity: 5 to 95% RH (no condensation)
Humidity: 5 to 95% RH (no condensation)Humidity: 5 to 95% RH (no condensation)
AC 100-240 V, 50/60 Hz
AC 100-240 V, 50/60 HzAC 100-240 V, 50/60 Hz
Standby: 1 W or lower
Standby: 1 W or lowerStandby: 1 W or lower
Printing: Approx. 10 W
Printing: Approx. 10 W
Printing: Approx. 10 WPrinting: Approx. 10 W
OFF: Approx. 0.2 W
OFF: Approx. 0.2 W
OFF: Approx. 0.2 WOFF: Approx. 0.2 W
310 (W) x 174 (D) x 51.8 (H) mm
310 (W) x 174 (D) x 51.8 (H) mm
310 (W) x 174 (D) x 51.8 (H) mm310 (W) x 174 (D) x 51.8 (H) mm
12.20 (W) x 6.85 (D) x 2.04 (H) in
12.20 (W) x 6.85 (D) x 2.04 (H) in
12.20 (W) x 6.85 (D) x 2.04 (H) in12.20 (W) x 6.85 (D) x 2.04 (H) in
Weight:
Weight: Approx. 1.8 kg (4 lb.)
Weight:Weight:
Print Head:
Print Head: Black: 160
Print Head:Print Head:
Approx. 1.8 kg (4 lb.)
Approx. 1.8 kg (4 lb.)Approx. 1.8 kg (4 lb.)
Black: 160 x
Black: 160Black: 160
Cyan, Magenta, Yellow: 128 x 2 x 3 nozzles per each color (600 dpi)
Cyan, Magenta, Yellow: 128 x 2 x 3 nozzles per each color (600 dpi)
Cyan, Magenta, Yellow: 128 x 2 x 3 nozzles per each color (600 dpi)Cyan, Magenta, Yellow: 128 x 2 x 3 nozzles per each color (600 dpi)
x 2 nozzles (600 dpi)
2 nozzles (600 dpi)
x x
2 nozzles (600 dpi)2 nozzles (600 dpi)
91
Page 96

Appendix
Universal AC Adapter
Dimensions:
Dimensions: 4.65 (W) x 2.28 (D) x 1.02 (H) in
Dimensions:Dimensions:
Weight:
Weight: Approx. 200 g (0.44 lb)
Weight:Weight:
Rated input:
Rated input: AC 100 to 240 V
Rated input:Rated input:
Rated output:
Rated output: DC 16 V, 1.8 A
Rated output:Rated output:
Camera Direct Print
••••Canon
Canon Bubble Jet Direct
Bubble Jet Direct
Canon Canon
Bubble Jet DirectBubble Jet Direct
Compatible Paper
Compatible Paper Card #1 (Photo Paper Pro 4"×6" /101.6×152.4 mm), Card #2 (Photo
Compatible PaperCompatible Paper
Layout Print
Layout Print Standard: Borderless/with border, Index Print: 6-80 images
Layout PrintLayout Print
Print Quality
Print Quality Standard
Print QualityPrint Quality
Effect
Effect Exif Print compatible
EffectEffect
DPOF Version
DPOF Version Ver. 1.00 compatible (Index print, number of copies, select images,
DPOF VersionDPOF Version
4.65 (W) x 2.28 (D) x 1.02 (H) in
4.65 (W) x 2.28 (D) x 1.02 (H) in4.65 (W) x 2.28 (D) x 1.02 (H) in
Approx. 200 g (0.44 lb)
Approx. 200 g (0.44 lb)Approx. 200 g (0.44 lb)
AC 100 to 240 V
AC 100 to 240 VAC 100 to 240 V
DC 16 V, 1.8 A
DC 16 V, 1.8 ADC 16 V, 1.8 A
Card #1 (Photo Paper Pro 4"×6" /101.6×152.4 mm), Card #2 (Photo
Card #1 (Photo Paper Pro 4"×6" /101.6×152.4 mm), Card #2 (Photo Card #1 (Photo Paper Pro 4"×6" /101.6×152.4 mm), Card #2 (Photo
Paper Plus Glossy, Photo Paper Plus Semi-Gloss, or Glossy Photo
Paper Plus Glossy, Photo Paper Plus Semi-Gloss, or Glossy Photo
Paper Plus Glossy, Photo Paper Plus Semi-Gloss, or Glossy Photo Paper Plus Glossy, Photo Paper Plus Semi-Gloss, or Glossy Photo
Paper 4"×6" /101.6×152.4 mm), Card #3 (Photo Paper Plus Glossy
Paper 4"×6" /101.6×152.4 mm), Card #3 (Photo Paper Plus Glossy
Paper 4"×6" /101.6×152.4 mm), Card #3 (Photo Paper Plus Glossy Paper 4"×6" /101.6×152.4 mm), Card #3 (Photo Paper Plus Glossy
5"×7" /127.0×177.8 mm), LTR (Photo Paper Pro, Photo Paper Plus
5"×7" /127.0×177.8 mm), LTR (Photo Paper Pro, Photo Paper Plus
5"×7" /127.0×177.8 mm), LTR (Photo Paper Pro, Photo Paper Plus 5"×7" /127.0×177.8 mm), LTR (Photo Paper Pro, Photo Paper Plus
Glossy, Photo Paper Plus Semi-Gloss, or Glossy Photo Paper Letter
Glossy, Photo Paper Plus Semi-Gloss, or Glossy Photo Paper Letter
Glossy, Photo Paper Plus Semi-Gloss, or Glossy Photo Paper Letter Glossy, Photo Paper Plus Semi-Gloss, or Glossy Photo Paper Letter
size), A4 (Photo Paper Pro, Photo Paper Plus Glossy, Photo Paper
size), A4 (Photo Paper Pro, Photo Paper Plus Glossy, Photo Paper
size), A4 (Photo Paper Pro, Photo Paper Plus Glossy, Photo Paper size), A4 (Photo Paper Pro, Photo Paper Plus Glossy, Photo Paper
Plus Semi-Gloss, or Glossy Photo Paper A4 size)
Plus Semi-Gloss, or Glossy Photo Paper A4 size)
Plus Semi-Gloss, or Glossy Photo Paper A4 size)Plus Semi-Gloss, or Glossy Photo Paper A4 size)
Standard: Borderless/with border, Index Print: 6-80 images
Standard: Borderless/with border, Index Print: 6-80 images Standard: Borderless/with border, Index Print: 6-80 images
(Depending on the size of print media)
(Depending on the size of print media)
(Depending on the size of print media)(Depending on the size of print media)
Standard
StandardStandard
Exif Print compatible
Exif Print compatibleExif Print compatible
Ver. 1.00 compatible (Index print, number of copies, select images,
Ver. 1.00 compatible (Index print, number of copies, select images, Ver. 1.00 compatible (Index print, number of copies, select images,
print special characters (date))
print special characters (date))
print special characters (date))print special characters (date))
••••PictBridge
PictBridge
PictBridgePictBridge
Paper size
Paper size Default (Photo Paper Plus Glossy 10
Paper sizePaper size
Paper Type
Paper Type Default (Photo Paper Plus Glossy), Photo (Photo Paper Plus Glossy),
Paper TypePaper Type
Layout
Layout Default (Borderless), Borderless, Bordered, 2-up/4-up/9-up/16-
LayoutLayout
Trim ming
Trimming Off (No trimming)
Trim mingTri mmin g
Image optimize
Image optimize Default (Exif Print), “VIVID”
Image optimizeImage optimize
Date print
Date print Default (Off: No printing)
Date printDate print
Default (Photo Paper Plus Glossy 10 x
Default (Photo Paper Plus Glossy 10Default (Photo Paper Plus Glossy 10
4"×6" (Photo Paper Plus Glossy, Photo Paper Pro, Photo Paper Plus
4"×6" (Photo Paper Plus Glossy, Photo Paper Pro, Photo Paper Plus
4"×6" (Photo Paper Plus Glossy, Photo Paper Pro, Photo Paper Plus 4"×6" (Photo Paper Plus Glossy, Photo Paper Pro, Photo Paper Plus
Semi-Gloss, Glossy Photo Paper, or Photo Stickers), 13
Semi-Gloss, Glossy Photo Paper, or Photo Stickers), 13 x
Semi-Gloss, Glossy Photo Paper, or Photo Stickers), 13Semi-Gloss, Glossy Photo Paper, or Photo Stickers), 13
xxxx 7" (Photo Paper Plus Glossy)*, A4/8.5"×11" (Photo Paper Plus
7" (Photo Paper Plus Glossy)*, A4/8.5"×11" (Photo Paper Plus
7" (Photo Paper Plus Glossy)*, A4/8.5"×11" (Photo Paper Plus 7" (Photo Paper Plus Glossy)*, A4/8.5"×11" (Photo Paper Plus
Glossy A4/Letter, Photo Paper Pro A4/Letter, Photo Paper Plus
Glossy A4/Letter, Photo Paper Pro A4/Letter, Photo Paper Plus
Glossy A4/Letter, Photo Paper Pro A4/Letter, Photo Paper Plus Glossy A4/Letter, Photo Paper Pro A4/Letter, Photo Paper Plus
Semi-Gloss A4/Letter, Glossy Photo Paper A4/Letter, Plain Paper
Semi-Gloss A4/Letter, Glossy Photo Paper A4/Letter, Plain Paper
Semi-Gloss A4/Letter, Glossy Photo Paper A4/Letter, Plain Paper Semi-Gloss A4/Letter, Glossy Photo Paper A4/Letter, Plain Paper
A4/Letter), Credit Card (Glossy Photo Paper)
A4/Letter), Credit Card (Glossy Photo Paper)
A4/Letter), Credit Card (Glossy Photo Paper)A4/Letter), Credit Card (Glossy Photo Paper)
****If using a Canon PictBridge-compatible camera, you can select it.
If using a Canon PictBridge-compatible camera, you can select it.
If using a Canon PictBridge-compatible camera, you can select it.If using a Canon PictBridge-compatible camera, you can select it.
Default (Photo Paper Plus Glossy), Photo (Photo Paper Plus Glossy),
Default (Photo Paper Plus Glossy), Photo (Photo Paper Plus Glossy), Default (Photo Paper Plus Glossy), Photo (Photo Paper Plus Glossy),
Fast Photo (Photo Paper Pro), Plain Paper
Fast Photo (Photo Paper Pro), Plain Paper
Fast Photo (Photo Paper Pro), Plain PaperFast Photo (Photo Paper Pro), Plain Paper
Default (Borderless), Borderless, Bordered, 2-up/4-up/9-up/16-
Default (Borderless), Borderless, Bordered, 2-up/4-up/9-up/16-Default (Borderless), Borderless, Bordered, 2-up/4-up/9-up/16up*
up*
up*up*
****When 4"×6" is selected from “Paper Size”, these options may be
When 4"×6" is selected from “Paper Size”, these options may be
When 4"×6" is selected from “Paper Size”, these options may be When 4"×6" is selected from “Paper Size”, these options may be
available in “Layout”. For details on “Layout”, see the
available in “Layout”. For details on “Layout”, see the
available in “Layout”. For details on “Layout”, see the available in “Layout”. For details on “Layout”, see the
Guide
Guide
....
GuideGuide
Off (No trimming)
Off (No trimming)Off (No trimming)
Default (Exif Print), “VIVID”****, “NR” (Noise Reduction)
Default (Exif Print), “VIVID”Default (Exif Print), “VIVID”
****If using a Canon PictBridge-compatible camera, you can select it.
If using a Canon PictBridge-compatible camera, you can select it.
If using a Canon PictBridge-compatible camera, you can select it.If using a Canon PictBridge-compatible camera, you can select it.
Default (Off: No printing)
Default (Off: No printing)Default (Off: No printing)
x 15 cm/4"×6"), 10
15 cm/4"×6"), 10 x
x x
15 cm/4"×6"), 1015 cm/4"×6"), 10
, “NR” (Noise Reduction)*, “VIVID+NR”*
, “NR” (Noise Reduction), “NR” (Noise Reduction)
x 15 cm/
15 cm/
x x
15 cm/15 cm/
x 18 cm/5"
18 cm/5"
x x
18 cm/5"18 cm/5"
Quick Start
Quick Start
Quick Start Quick Start
, “VIVID+NR”*
, “VIVID+NR”*, “VIVID+NR”*
92
Page 97

BJ Printer Driver System Requirements
•••• Use a computer equipped on which Windows XP, Windows
Use a computer equipped on which Windows XP, Windows
Use a computer equipped on which Windows XP, Windows Use a computer equipped on which Windows XP, Windows
2000, Windows Me, or Windows 98 can operate.
2000, Windows Me, or Windows 98 can operate.
2000, Windows Me, or Windows 98 can operate.2000, Windows Me, or Windows 98 can operate.
•••• USB interface or IrDA Ver.1.1
USB interface or IrDA Ver.1.1
USB interface or IrDA Ver.1.1USB interface or IrDA Ver.1.1
••••CD-ROM drive
CD-ROM drive
CD-ROM driveCD-ROM drive
•••• Available hard-disk space for printer driver installation
Available hard-disk space for printer driver installation
Available hard-disk space for printer driver installationAvailable hard-disk space for printer driver installation
(including temporary files)
(including temporary files)
(including temporary files)(including temporary files)
Windows XP/Windows 2000: 150MB
Windows XP/Windows 2000: 150MB
Windows XP/Windows 2000: 150MBWindows XP/Windows 2000: 150MB
Windows Me/Windows 98: 65MB
Windows Me/Windows 98: 65MB
Windows Me/Windows 98: 65MBWindows Me/Windows 98: 65MB
USB operation can only be guaranteed on a PC with pre-
USB operation can only be guaranteed on a PC with pre-
USB operation can only be guaranteed on a PC with pre-USB operation can only be guaranteed on a PC with preinstalled Windows XP, Windows 2000, Windows Me, or
installed Windows XP, Windows 2000, Windows Me, or
installed Windows XP, Windows 2000, Windows Me, or installed Windows XP, Windows 2000, Windows Me, or
Windows 98.
Windows 98.
Windows 98. Windows 98.
•••• Use a Macintosh series computer equipped with USB
Use a Macintosh series computer equipped with USB
Use a Macintosh series computer equipped with USB Use a Macintosh series computer equipped with USB
interface on which Mac OS X v.10.2.1 or later can operate.
interface on which Mac OS X v.10.2.1 or later can operate.
interface on which Mac OS X v.10.2.1 or later can operate.interface on which Mac OS X v.10.2.1 or later can operate.
••••USB interface
USB interface
USB interfaceUSB interface
••••CD-ROM drive
CD-ROM drive
CD-ROM driveCD-ROM drive
•••• Available hard-disk space for printer driver installation
Available hard-disk space for printer driver installation
Available hard-disk space for printer driver installationAvailable hard-disk space for printer driver installation
Mac OS X v.10.2.1 or later: 340 MB
Mac OS X v.10.2.1 or later: 340 MB
Mac OS X v.10.2.1 or later: 340 MBMac OS X v.10.2.1 or later: 340 MB
•••• The following functions are not supported:
The following functions are not supported:
The following functions are not supported:The following functions are not supported:
----Duplex Printing
Duplex Printing
Duplex PrintingDuplex Printing
---- Poster Printing
Poster Printing
Poster PrintingPoster Printing
---- Fit to Page Printing
Fit to Page Printing
Fit to Page PrintingFit to Page Printing
----Booklet Printing
Booklet Printing
Booklet PrintingBooklet Printing
---- Reverse Order Printing (except for Mac OS X v.10.3.x)
Reverse Order Printing (except for Mac OS X v.10.3.x)
Reverse Order Printing (except for Mac OS X v.10.3.x)Reverse Order Printing (except for Mac OS X v.10.3.x)
---- Photo Optimizer PRO
Photo Optimizer PRO
Photo Optimizer PROPhoto Optimizer PRO
Additional System Requirements for Electric Manual
•••• 15 MB free hard disk space
15 MB free hard disk space
15 MB free hard disk space15 MB free hard disk space
•••• Windows: Microsoft® Internet Explorer 5.0 or later.
Windows: Microsoft® Internet Explorer 5.0 or later.
Windows: Microsoft® Internet Explorer 5.0 or later.Windows: Microsoft® Internet Explorer 5.0 or later.
•••• Macintosh: Microsoft® Internet Explorer 5.0 or later, Safari 1.0 or later.
Macintosh: Microsoft® Internet Explorer 5.0 or later, Safari 1.0 or later.
Macintosh: Microsoft® Internet Explorer 5.0 or later, Safari 1.0 or later.Macintosh: Microsoft® Internet Explorer 5.0 or later, Safari 1.0 or later.
Appendix
93
Page 98

Appendix
Safety Precautions
Please read the safety warnings and cautions provided in this manual to ensure that you use
your printer safely. Do not attempt to use printer in any way not described in this manual.
Warning You may cause an electric shock/fire or damage the printer if you ignore any of
these safety precautions.
Choosing a location
Choosing a location Do not place the printer close to flammable solvents such as alcohol or thinners.
Choosing a locationChoosing a location
Power supply
Power supply Never attempt to plug in or unplug the printer from the power supply when your hands are wet.
Power supplyPower supply
Do not place the printer close to flammable solvents such as alcohol or thinners.
Do not place the printer close to flammable solvents such as alcohol or thinners.Do not place the printer close to flammable solvents such as alcohol or thinners.
Never attempt to plug in or unplug the printer from the power supply when your hands are wet.
Never attempt to plug in or unplug the printer from the power supply when your hands are wet.Never attempt to plug in or unplug the printer from the power supply when your hands are wet.
Always push the plug all the way into the power outlet.
Always push the plug all the way into the power outlet.
Always push the plug all the way into the power outlet.Always push the plug all the way into the power outlet.
Never damage, modify, stretch or excessively bend or twist the power cord.
Never damage, modify, stretch or excessively bend or twist the power cord.
Never damage, modify, stretch or excessively bend or twist the power cord. Never damage, modify, stretch or excessively bend or twist the power cord.
Do not place heavy objects on the power cord or universal AC adapter.
Do not place heavy objects on the power cord or universal AC adapter.
Do not place heavy objects on the power cord or universal AC adapter.Do not place heavy objects on the power cord or universal AC adapter.
Never plug the printer into a power socket that is shared with other
Never plug the printer into a power socket that is shared with other
Never plug the printer into a power socket that is shared with other Never plug the printer into a power socket that is shared with other
equipment (extension lead/cord, 2- or 3- way adapter, etc.).
equipment (extension lead/cord, 2- or 3- way adapter, etc.).
equipment (extension lead/cord, 2- or 3- way adapter, etc.).equipment (extension lead/cord, 2- or 3- way adapter, etc.).
Never use the printer if the power cord is bundled or knotted.
Never use the printer if the power cord is bundled or knotted.
Never use the printer if the power cord is bundled or knotted.Never use the printer if the power cord is bundled or knotted.
If you detect smoke, unusual smells or strange noises around the printer, immediately unplug the
If you detect smoke, unusual smells or strange noises around the printer, immediately unplug the
If you detect smoke, unusual smells or strange noises around the printer, immediately unplug the If you detect smoke, unusual smells or strange noises around the printer, immediately unplug the
printer at the power supply and call for service.
printer at the power supply and call for service.
printer at the power supply and call for service.printer at the power supply and call for service.
Periodically, unplug the printer and use a dry cloth to wipe off any dust or dirt
Periodically, unplug the printer and use a dry cloth to wipe off any dust or dirt
Periodically, unplug the printer and use a dry cloth to wipe off any dust or dirt Periodically, unplug the printer and use a dry cloth to wipe off any dust or dirt
collected on the plug and the power outlet. If the printer is placed at a location
collected on the plug and the power outlet. If the printer is placed at a location
collected on the plug and the power outlet. If the printer is placed at a location collected on the plug and the power outlet. If the printer is placed at a location
exposed to a lot of dust, smoke, or high humidity, the dust collected on the
exposed to a lot of dust, smoke, or high humidity, the dust collected on the
exposed to a lot of dust, smoke, or high humidity, the dust collected on the exposed to a lot of dust, smoke, or high humidity, the dust collected on the
plug absorbs moisture and may cause insulation failure and fire
plug absorbs moisture and may cause insulation failure and fire.
plug absorbs moisture and may cause insulation failure and fireplug absorbs moisture and may cause insulation failure and fire
Use the universal AC adapter that came with the printer (CANON, K30244). Do not use it for other
Use the universal AC adapter that came with the printer (CANON, K30244). Do not use it for other
Use the universal AC adapter that came with the printer (CANON, K30244). Do not use it for other Use the universal AC adapter that came with the printer (CANON, K30244). Do not use it for other
products.
products.
products. products.
Cleaning the printer
Cleaning the printer Use a damp cloth to clean the printer. Never use flammable solvents such as
Cleaning the printerCleaning the printer
Maintaining the printer
Maintaining the printer Do not attempt to disassemble or modify the printer. There are no user serviceable parts inside
Maintaining the printerMaintaining the printer
Working around the
Working around the
Working around the Working around the
printer
printer
printerprinter
Use a damp cloth to clean the printer. Never use flammable solvents such as
Use a damp cloth to clean the printer. Never use flammable solvents such as Use a damp cloth to clean the printer. Never use flammable solvents such as
alcohol, benzene or thinners.
alcohol, benzene or thinners.
alcohol, benzene or thinners.alcohol, benzene or thinners.
If flammable solvents come in contact with electrical components inside the
printer, it could cause a fire or electric shock.
Always unplug the printer from the power outlet before cleaning the printer.
Always unplug the printer from the power outlet before cleaning the printer.
Always unplug the printer from the power outlet before cleaning the printer.Always unplug the printer from the power outlet before cleaning the printer.
If you accidentally switch the printer on while cleaning it, you could injure yourself or damage the
printer.
Do not attempt to disassemble or modify the printer. There are no user serviceable parts inside
Do not attempt to disassemble or modify the printer. There are no user serviceable parts inside Do not attempt to disassemble or modify the printer. There are no user serviceable parts inside
the printer.
the printer.
the printer.the printer.
The printer contains high-voltage components. Never attempt any maintenance procedure not
described in this guide.
Do not use flammable sprays near the printer.
Do not use flammable sprays near the printer.
Do not use flammable sprays near the printer.Do not use flammable sprays near the printer.
This could cause a fire or electric shock if the spray comes into contact with electrical components
inside the printer.
94
Page 99

Appendix
Caution You may cause injury or damage the printer if you ignore any of these safety
precautions.
Choosing a location
Choosing a location Do not install the printer in a location that is unstable or subject to excessive vibration.
Choosing a locationChoosing a location
Power supply
Power supply Ensure that the area around the power outlet is kept clear at all times so you
Power supplyPower supply
Working around the
Working around the
Working around the Working around the
printer
printer
printerprinter
Do not install the printer in a location that is unstable or subject to excessive vibration.
Do not install the printer in a location that is unstable or subject to excessive vibration.Do not install the printer in a location that is unstable or subject to excessive vibration.
Do not install the printer in locations that are very humid or dusty, in direct sunlight, outdoors, or
Do not install the printer in locations that are very humid or dusty, in direct sunlight, outdoors, or
Do not install the printer in locations that are very humid or dusty, in direct sunlight, outdoors, or Do not install the printer in locations that are very humid or dusty, in direct sunlight, outdoors, or
close to a heating source.
close to a heating source.
close to a heating source.close to a heating source.
To avoid the risk of fire or electric shocks, install the printer in a location with an ambient
temperature range of 5°C to 35°C (41°F to 95°F) and humidity of 10% to 90% (condensation free).
Do not place the printer on a thick rug or carpet.
Do not place the printer on a thick rug or carpet.
Do not place the printer on a thick rug or carpet.Do not place the printer on a thick rug or carpet.
Ensure that the area around the power outlet is kept clear at all times so you
Ensure that the area around the power outlet is kept clear at all times so you Ensure that the area around the power outlet is kept clear at all times so you
can easily unplug the power cord if necessary.
can easily unplug the power cord if necessary.
can easily unplug the power cord if necessary.can easily unplug the power cord if necessary.
Never remove the plug by pulling on the cord.
Never remove the plug by pulling on the cord.
Never remove the plug by pulling on the cord.Never remove the plug by pulling on the cord.
Do not use an extension lead/ cord.
Do not use an extension lead/ cord.
Do not use an extension lead/ cord.Do not use an extension lead/ cord.
Never put your hands or fingers in the printer while it is printing.
Never put your hands or fingers in the printer while it is printing.
Never put your hands or fingers in the printer while it is printing.Never put your hands or fingers in the printer while it is printing.
Do not place any object on the printer.
Do not place any object on the printer.
Do not place any object on the printer.Do not place any object on the printer.
Do not carry or store the printer with the round side down.
Do not carry or store the printer with the round side down.
Do not carry or store the printer with the round side down.Do not carry or store the printer with the round side down.
A failure can result.
A failure can result.
A failure can result.A failure can result.
Do not place metal objects (paper clips, staples, etc.) or containers of flammable solvents (alcohol,
Do not place metal objects (paper clips, staples, etc.) or containers of flammable solvents (alcohol,
Do not place metal objects (paper clips, staples, etc.) or containers of flammable solvents (alcohol, Do not place metal objects (paper clips, staples, etc.) or containers of flammable solvents (alcohol,
thinners, etc.) on top of the printer.
thinners, etc.) on top of the printer.
thinners, etc.) on top of the printer.thinners, etc.) on top of the printer.
If any foreign object (metal or liquid) fall into the printer, unplug the power cord and call for
If any foreign object (metal or liquid) fall into the printer, unplug the power cord and call for
If any foreign object (metal or liquid) fall into the printer, unplug the power cord and call for If any foreign object (metal or liquid) fall into the printer, unplug the power cord and call for
service.
service.
service.service.
Print Heads and ink tanks
Print Heads and ink tanks For safety reasons store Print Heads and ink tanks out of the reach of small children.
Print Heads and ink tanksPrint Heads and ink tanks
Universal AC Adapter
Universal AC Adapter When you pack the universal AC adapter for travel or storage, never wrap the cord around the body
Universal AC AdapterUniversal AC Adapter
For safety reasons store Print Heads and ink tanks out of the reach of small children.
For safety reasons store Print Heads and ink tanks out of the reach of small children.For safety reasons store Print Heads and ink tanks out of the reach of small children.
If a child ingests any ink, consult a doctor immediately.
Do not shake print heads or ink tanks.
Do not shake print heads or ink tanks.
Do not shake print heads or ink tanks.Do not shake print heads or ink tanks.
Ink may leak out and stain clothing or the surrounding area.
Never touch the electrical contacts on a Print Head after printing.
Never touch the electrical contacts on a Print Head after printing.
Never touch the electrical contacts on a Print Head after printing.Never touch the electrical contacts on a Print Head after printing.
The metal parts may be very hot and could cause burns.
of AC adapter to prevent the cord from splitting or separating from the body of the AC adapter and
causing a short circuit.
95
Page 100

Appendix
Regulatory Information
Color Printer Model:
Color Printer Model: K10249
Color Printer Model: Color Printer Model:
This device complies with Part 15 of the FCC Rules. Operation is subject to the following two conditions: (1) This device may not
cause harmful interference, and (2) this device must accept any interference received, including interference that may cause
undesired operation.
Note: This equipment has been tested and found to comply with the limits for a Class B digital device, pursuant to Part 15 of
the FCC Rules. These limits are designed to provide reasonable protection against harmful interference in a residential
installation. This equipment generates, uses and can radiate radio frequency energy and, if not installed and used in
accordance with the instructions, may cause harmful interference to radio communications. However, there is no guarantee
that interference will not occur in a particular installation. If this equipment does cause harmful interference to radio or
television reception, which can be determined by turning the equipment off and on, the user is encouraged to try to correct the
interference by one or more of the following measures:
• Reorient or relocate the receiving antenna.
• Increase the separation between the equipment and receiver.
• Connect the equipment into an outlet on a circuit different from that to which the receiver is connected.
• Consult the dealer or an experienced radio/TV technician for help.
Use of a shielded cable is required to comply with Class B limits in Subpart B of Part 15 of the FCC Rules.
Do not make any changes or modifications to the equipment unless otherwise specified in the manual. If such changes or
modifications should be made, you could be required to stop operation of the equipment.
Canon U.S.A ., Inc.
One Canon Plaza
Lake Success, NY 11042
1-516-328-5600
K10249
K10249K10249
Canadian Radio Interference Regulations
Canadian Radio Interference Regulations
Canadian Radio Interference RegulationsCanadian Radio Interference Regulations
This digital apparatus does not exceed Class B limits for radio noise emissions from a digital apparatus as set out in the
interference-causing equipment standard entitled “Digital Apparatus”, ICES-003 of the Industry Canada.
Cet appareil numérique respecte les limites de bruits radio éléctiques applicables aux appareils numériques de Classe B
prescrites dans la norme sur le matériel brouilleur: “Appareils Numériques”, NMB-003 édictée par l’Industrie Canada.
96
 Loading...