

Canon MVX200 E, MVX200i E, MVX250i E Service Manual
Video Product
MVX250i E
MVX250i E
MVX200i E
MVX200i E
MVX200 E
MVX200 E
No. D17-8216, 8233
D17-8236
Digital Video Camera
iPAL
c
CANON INC. 2004
Canon Inc.
Digital Imaging Products Service Dept.
First Edition : Mar. 2004
First Print : Mar. 2004

GENERAL DESCRIPTION OF PRODUCT
CONTENTS
1. Product Overview --------------------------------------------------------------------------------------------------------------------------------1
1-1 Main Features -----------------------------------------------------------------------------------------------------------------------------1
1-1-1 Easy Direct Button ------------------------------------------------------------------------------------------------------------ 1
1-1-2 DV Messenger 2 --------------------------------------------------------------------------------------------------------------- 2
1-2 Product Specifications Comparison Chart --------------------------------------------------------------------------------------------3
1-3 Function and Performance List --------------------------------------------------------------------------------------------------------- 4
2. Technical Explanation------------------------------------------------------------------------------------------------------------------------- 10
2-1 Design ----------------------------------------------------------------------------------------------------------------------------------- 10
2-1-1 Design Concept-1 ----------------------------------------------------------------------------------------------------------- 10
2-1-2 Design Concept-2 ----------------------------------------------------------------------------------------------------------- 10
2-1-3 Differences in Appearance of Overseas Models MVX250i E, MVX200i E, MVX200 E ------------------------ 11
2-2 18× zoom lens -------------------------------------------------------------------------------------------------------------------------- 12
2-2-1 Features of 18× lens -------------------------------------------------------------------------------------------------------- 12
2-2-2 New technologies and new functions ------------------------------------------------------------------------------------- 12
2-3 Easy Direct Button ([ ] Print/Share button) ------------------------------------------------------------------------------ 13
2-3-1 Direct Print function -------------------------------------------------------------------------------------------------------- 13
2-3-2 Direct Transfer --------------------------------------------------------------------------------------------------------------- 14
2-3-2-1 Startup ------------------------------------------------------------------------------------------------------------ 15
2-3-2-2 ALL IMAGES ---------------------------------------------------------------------------------------------- 16
2-3-2-3 NEW IMAGES --------------------------------------------------------------------------------------------- 17
2-3-2-4
TRANSFER ORDERS------------------------------------------------------------------------------------ 18
2-3-2-5
2-3-2-6
3. Performance ------------------------------------------------------------------------------------------------------------------------------------- 21
4. System Diagram (Common to all Models) -------------------------------------------------------------------------------------------------- 35
5. Overview of viewfinder / LCD panel displays --------------------------------------------------------------------------------------------- 36
5-1 Camera mode --------------------------------------------------------------------------------------------------------------------------- 36
5-2 VCR mode ------------------------------------------------------------------------------------------------------------------------------ 43
5-3 Card / Camera mode ------------------------------------------------------------------------------------------------------------------- 47
5-4 Card Playback mode ------------------------------------------------------------------------------------------------------------------- 50
5-4-1 Still image Playback -------------------------------------------------------------------------------------------------------- 50
5-4-2 Motion video (Motion JPEG) Playback ---------------------------------------------------------------------------------- 51
5-4-3 Direct printing --------------------------------------------------------------------------------------------------------------- 52
5-5 Menu Display --------------------------------------------------------------------------------------------------------------------------- 53
5-6 Card-related screen displays ---------------------------------------------------------------------------------------------------------- 64
5-7 Direct print setting screen ------------------------------------------------------------------------------------------------------------- 71
5-8 Print designations ---------------------------------------------------------------------------------------------------------------------- 76
5-9 Warning displays ----------------------------------------------------------------------------------------------------------------------- 77
SELECT & TRANSFER --------------------------------------------------------------------------------- 19
WALL PAPER ---------------------------------------------------------------------------------------------- 20
1. Product Overview
1-1 Main Features
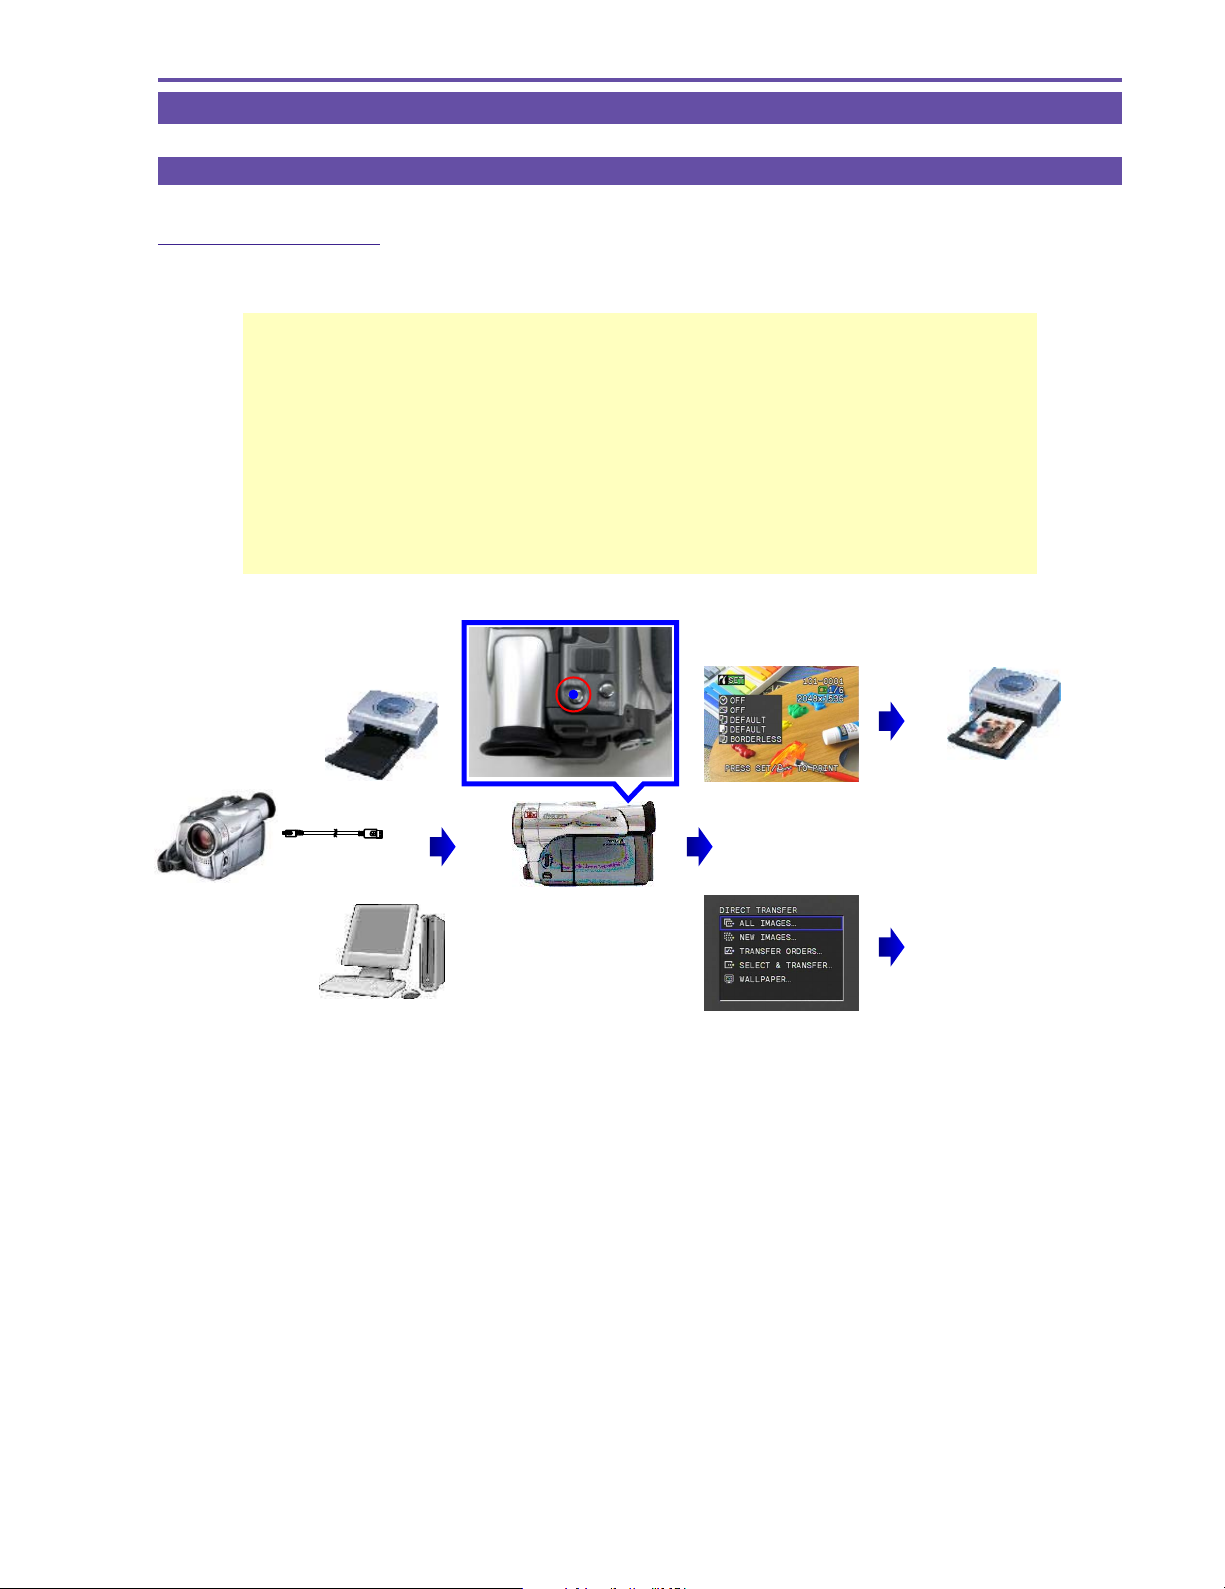
1-1-1 Easy Direct Button
The button turns on when the camcorder is connected to a printer or PC
The light turns on to indicate the button to press next for easy operation
MVX250i E, MVX200i E, MVX200 E
GENERAL DESCRIPTION OF PRODUCT
Easy Direct Button
(Print/Share Button)
Enables Easy Printing and PC File Transfer
Printer
PC
Connection to
Printer / PC
Lights up!
Visually check that
the camcorder is connected correctly
Print setup information is
displayed for 6 seconds
Pressing the Direct button
starts printing
Pressing the Direct button
starts file transfer to PC
The Transfer menu is
displayed
1
MVX250i E, MVX200i E, MVX200 E
GENERAL DESCRIPTION OF PRODUCT
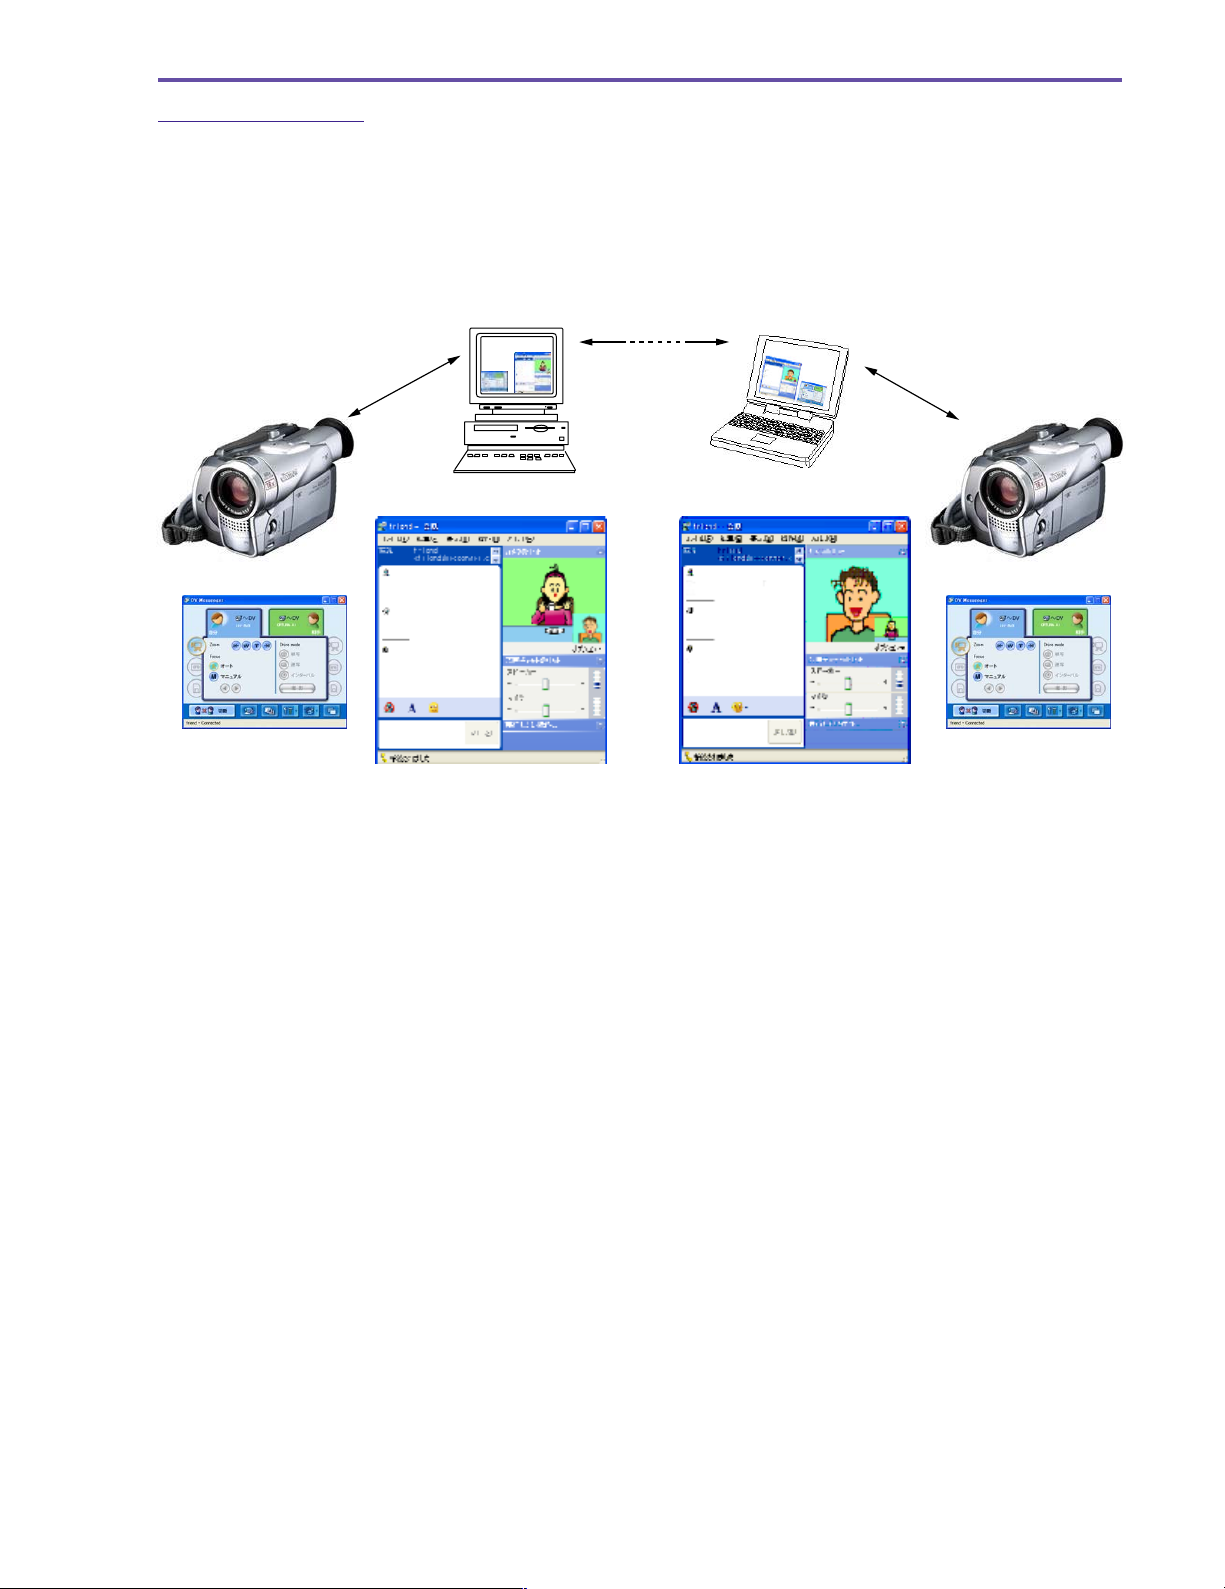
1-1-2 DV Messenger 2
A peer-to-peer (P2P) type bidirectional communications software using DV (Digital Video Camcorder)
◆ Allows bidirectional sending of audio/video content and messages (text/images) via the Internet.
◆ Basic specifications are compatible with Windows Messenger.
◆ Allows control (camera zoom and focus, VCR playback and stop, access to the memory card) of the digital video camcorder
from a remote PC.
◆ Remote home monitoring camera using the web camera function (enables monitoring of your home from a remote location)
IEEE1394
Internet
IEEE1394
2

MVX250i E, MVX200i E, MVX200 E
GENERAL DESCRIPTION OF PRODUCT
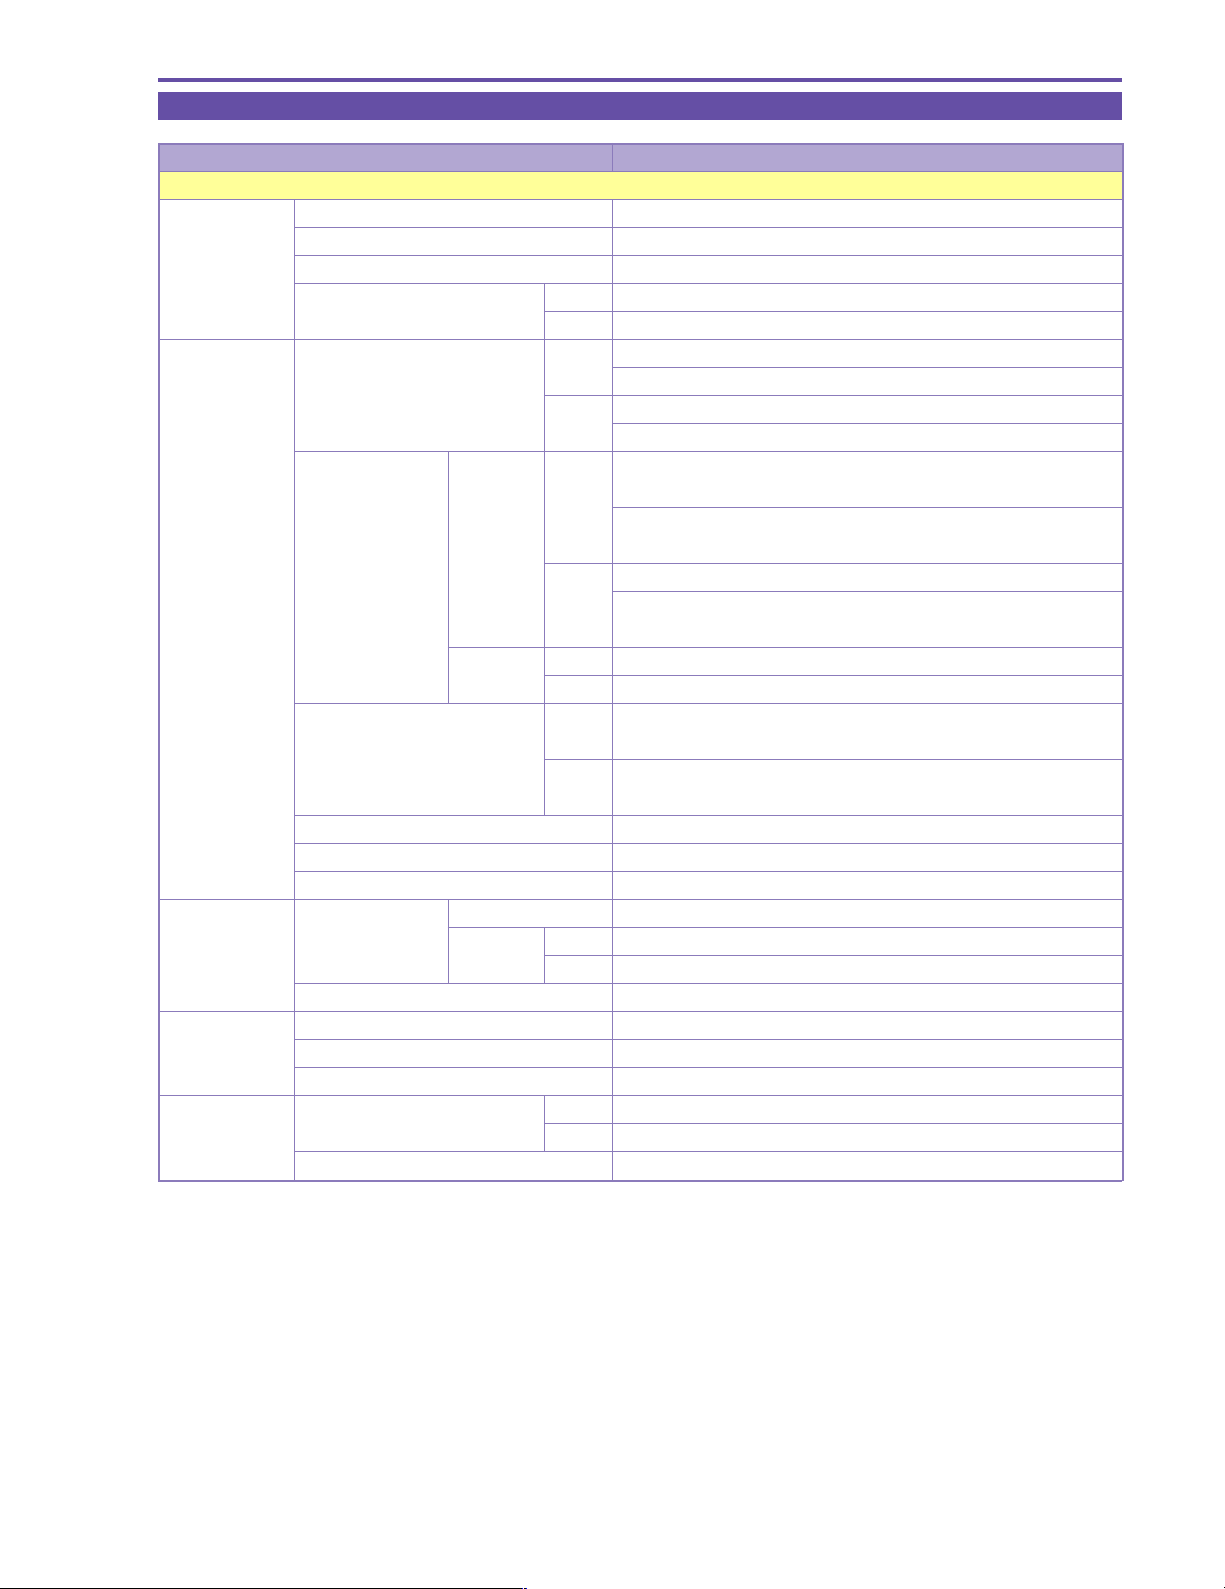
1-2 Product Specifications Comparison Chart
Specifications MVX250i E MVX200i E, MVX200 E
Zoom mag. Tape optical 18× / digital 360× optical 14× / digital 280×
Card optical 18× / digital 72× optical 14× / digital 56×
CCD 1/4.5-inch interlaced CCD (Total pixels : Approx. 1.33 megapixels)
(Effective pixels Tape motion video : Approx. 860,000 pixels
Card still image: Approx. 1,230,000 pixels)
Image stabilizer Electronic image stabilizer (during tape mode only)
Monitor 2.5-inch 123,000 pixel LCD monitor
EVF 0.33-inch 113,000 pixel color viewfinder
Memory card function ●(SD memory card, MultiMediaCard)
Card Still images Progressive Photo
recording (1024×768, 640×480)
Card motion video
recording
USB file transfer ●
Direct print ●(Support for Direct Print, Bubble Jet Direct, and PictBridge)
File transfer IEEE1394 / USB
Streaming IEEE1394
USB compatibility ● (USB 2.0 Full Speed class with PTP support)
Accessory shoe ● (Advanced accessory shoe not supported) ●
Auxiliary illumination White LED (Night+ : always on)
function ● (Super Night : Lights in accordance ×
Night mode ● (Night, Night+, Super Night) ● (Night)
High-resolution 16:9 ● (Letterbox display)
END search ●
S-Video terminal ●
DV, analog line inputs ●
Microphone terminal ● × *1
Wide attachment lens
supplied
Remote controller ●
supplied battery NB-2LH (MVX250i E only is supplied with BP-2L14)
AVI (Video data: Motion JPEG / Audio data: WAVE (monaural))
with brightness)
×
*1 : Not applicable to MVX200 E
3
MVX250i E, MVX200i E, MVX200 E
GENERAL DESCRIPTION OF PRODUCT
1-3 Function and Performance List
Item MVX250i E, MVX200i E, MVX200 E
Camera
Image sensing Image size 1/4.5-inch CCD
device System (filter) Interlacing (color correction filter)
Total pixels Approx. 1.33 megapixels
Effective pixels Tape Approx. 860,000 pixels
Card Approx. 1,230,000 pixels
Lens Optical zoom magnification, Tape MVX250i E : 18× 3.5 to 63 mm (Approx. 45.4 to 817.2 mm)
focal length MVX200i E, MVX200 E : 14× 3.5 to 49 mm (Approx. 45.4 to 635.6 mm)
(35mm equivalent) Card MVX250i E : 18× 3.5 to 63 mm (Approx. 37.9 to 682.2 mm)
MVX200i E, MVX200 E : 14× 3.5 to 49 mm (Approx. 37.9 to 530.6 mm)
Digital zoom
magnification (Approx. 3,269 mm / 16,344 mm equivalent)
focal length MVX200i E, MVX200 E : 56× / 280× 196 mm / 980 mm
(35mm equivalent) (Approx. 2,542 mm / 12,712 mm equivalent)
F number Tape MVX250i E : F1.8 to 3.4
Aperture leaves (Number of leaves) 2 leaves
Zoom speed Variable
Filter diameter 34mm P0.5
Noise reduction Camera Tape Either CCD-NR or Y/C-NR
Recorder C-NR system
Minimum Night mode 1.5 lx
illumination Low Light mode 3.0 lx
Auto mode(when auto slow shutter is selected)
Image Image stabilization system Tape Electronic system
stabilization Card None
Sensing method Angular velocity sensing
Magnification
System Tape CCD readout
Card None
Tape MVX250i E : 72× / 360× 252 mm / 1,260 mm
Card MVX250i E : 72× Approx. 252 mm (Approx. 2,728.8 mm equivalent)
MVX200i E, MVX200 E : 56× Approx. 196 mm
Card CCD readout
MVX200i E, MVX200 E : F1.8 to 3.1
Card MVX250i E : F1.8 to 3.4
MVX200i E, MVX200 E : F1.8 to 3.1
Motion
video
Still
image
Chroma-only, median filter
6.0 lx
(Approx. 2,122.4 mm equivalent)
4
MVX250i E, MVX200i E, MVX200 E
GENERAL DESCRIPTION OF PRODUCT
Item MVX250i E, MVX200i E, MVX200 E
Shooting functions
AE mode Program AE Tape
Card (Full Auto)
Photometric Center-bottom-weighted average Tape Full Auto, Auto, Sports, Portrait, Low Light, Night, Night+*, Super Night*
system (* : MVX250i E only)
Evaluation photometry (128-
segments) + All area photometry
Evaluative photometry (128- Card Full Auto, Auto, Sports, Portrait, Low Light, Night, Night+*, Super Night*
segments) (* : MVX250i E only)
Exposure AE lock ● (Except Green mode)
adjustment AE shift ×
Exposure correction ● ±11 steps
Manual gain setting ×
Back light correction ×
Shutter speed Auto mode Tape 1/25 to 1/500 sec (with auto slow shutter ON), 1/50 to 1/500 sec
Auto Tape 6 levels (1/50, 1/120, 1/250, 1/500, 1/1000, 1/2000 sec)
(Shutter speed setting) Card 3 levels (1/50, 1/120, 1/250 sec)
Low Light 1/12.5 sec (Low Light mode)
Night, Night+*, Super Night* Tape 1/6 to 1/500 sec
(* MVX250i E only) Card 1/2 to 1/250 sec
Iris control Auto iris
Auxiliary light Flash ×
Video light ×
White LED ● (MVX250i E only)
Image quality Color gain adjustment ×
adjustment Hue adjustment ×
(Custom preset) Sharpness adjustment ×
Setup adjustment ×
White balance Auto ●
Preset Outdoor, Indoor
Systems TTL, 128 segments
Focus Mode AF/MF, forced infinity
Manual focus SET button operation
16:9 Recording system Tape High image
Card ×
Area marker display ×
Tape
&
Card
Card 1/12.5 to 1/250 sec (with auto slow shutter ON), 1/25 to 1/250 sec
quality 16:9
(Full Auto)
(Auto, Sports, Portrait, Spotlight, Surf & Snow, Low Light, Night,
Night+*, Super Night * (* : MVX250i E only))
(Auto, Sports, Portrait, Spotlight, Surf & Snow, Low Light, Night,
Night+*, Super Night * (* : MVX250i E only))
128 segments (Spotlight mode, Surf & Snow (Sand & Snow mode))
(Disabled in Green mode, Spotlight mode, and Surf & Snow mode)
(with auto slow shutter OFF)
(with auto slow shutter OFF)
●
5
MVX250i E, MVX200i E, MVX200 E
GENERAL DESCRIPTION OF PRODUCT
Item MVX250i E, MVX200i E, MVX200 E
Shooting functions
Digital fade Tape Motion video Auto Fade, Wipe, Corner Wipe, Jump, Flip, Puzzle, Zigzag, Beam, Tide
(Activated by pressing Start/Stop button)
Still image ×
Card Motion video ×
Still image ×
Digital effect Tape
Card
Card mix Tape
Card
Multi-screen Tape
Card
Capture speed
Screen segments 4 (2 × 2) / 9 (3 × 3) / 16 (4 × 4)
Motion video Tape miniDV (SP, LP)
shooting Card Image size 320 × 240, 160 × 120 dots
(MVX250i E) Shooting
Still image Tape ×
recording Card Recording system Progressive photo
Negative-positive reversal ×
Built-in Video light × (MVX250i E only, equipped with white LED (lights in
Zebra pattern ×
Color bar display ×
Self-timer 10 sec / Remote controller : 2 seconds
Interval timer ×
Clearscan ×
Recorded image size and file format VGA : 640(H) × 480 (V), SXGA : 1280(H) × 960(V) / JPEG
Memory card SD memory card, MultiMediaCard
REC Search ●
REC Review ●
Standby switch ×
Power save (After five minutes in Recording pause) Power shutoff
Motion video/still image
Motion video/still image
Motion video/still image
Motion video/still image
Motion video/still image
Motion video/still image
Shutter speed ≥ 1/25sec
Shutter speed < 1/25sec
SDC-8M
time 160 × 120 dots (continuous, approx. 50 sec)
MMC-8M
Recording image Frame image
Single image ●
Continuous shooting ● (Fast, Normal)
AEB ●
Image size 1280 × 960, 640 × 480
Image quality Super Fine, Fine, Normal
Photo Form Dedicated still image button (in card mode only)
button
Card review ●
Flash photography ●
Pressed
halfway down
Art, Black & White, Sepia, Mosaic, Ball, Cube, Wave, Color Mask, Mirror
Black & White
Card Lumi key, Card Chroma key, Camera Chroma key, Animation
×
Supported (Disabled in Night mode, Night+ mode, and Super Night mode)
×
Manual, Fast (4 fields), Normal (6 fields), Slow (8 fields)
Manual, Fast (4 fields), Normal (8 fields), Slow (12 fields)
320 × 240 dots (continuous, approx. 20 sec)
320 × 240 dots (continuous, approx. 10 sec)
160 × 120 dots (continuous, approx. 30 sec) per shot
● (Only during recording standby)
(image setting menu obtained by pressing photo button + SET button)
(with VFL-1 (sold separately) attached (
Super Night mode, Night+ mode))
(VL-3 support in MVX250i E only (Advanced accessory shoe))
MVX250i E only
)
6

MVX250i E, MVX200i E, MVX200 E
GENERAL DESCRIPTION OF PRODUCT
Item MVX250i E, MVX200i E, MVX200 E
Shooting functions
Displayed text recording ×
Audio 16-bit 2-ch (48KHz)
12-bit 4-ch (32 kHz) Simultaneous 4-channel recording not possible
Wind screen ● With AUTO/OFF switch (built-in microphone only)
EVF Size 0.33-inch (TFT color RGB delta arrangement)
Pixels 113,000 pixels
Brightness adjustment ×
Color adjustment ×
Movable ×
LCD monitor Screen size 2.5-inch
Pixels 123,000 pixels
Brightness adjustment ●
Movable ● mirror shooting supported
VCR
Playback Frame playback Forward / Reverse
system Slow playback Forward / Reverse
2X SP playback Forward / Reverse
1X SP playback Forward / Reverse
Cue / review 11.5× speed
Search Photo search ×
Date search ●
Index search ×
End search ●
Special playback Playback zoom (5× zoom) ● (In tape playback and card still image playback)
effects D. effects Tape Art, Black & White, Sepia, Mosaic, Ball, Cube, Wave, Color Mask, Mirror
Card Black & White
D. fade Tape Auto fade, Wipe, Corner wipe, Jump, Flip, Puzzle, Zig Zag, Beam, Tide
Card ×
Multi screen 4, 9 or 16 screens (Tape only)
Data code display Time and Date display
Card Slide show ●
Index playback ●
(6-screen playback)
Card fast forward / rewind Card jump
Audio dubbing ● (Model MVX200 E : built-in microphone only)
AV insert ×
Zero set memory ●
Editing functions Simple editing ×
Special effects ×
7
MVX250i E, MVX200i E, MVX200 E
GENERAL DESCRIPTION OF PRODUCT
Item MVX250i E, MVX200i E, MVX200 E
System
Interface Microphone input ● (MVX250i E only)
(terminal) Headphone output ● (Also serves as AV terminal)
DV terminal Input / output. (However, output only on MVX200 E models.)
S-Video terminal Input / output. (However, output only on MVX200 E models.)
AV terminal Input/output, φ3.5mm jack (also serves as headphone terminal.
However, output only on MVX200 E models.)
Editing terminals (LANC terminal) ×
USB port ●
(mini-B Receptacle USB 2.0 Full Speed)
Memory card file transfer ●
Analog ⇒ DV signal conversion ● (excluding model MVX200 E)
Direct printer Camera direct ● (CP-10, CP-100)
Photo direct ● (PIXUS 50i, PIXUS BJ 895PD, PIXUS BJ 535PD)
PictBridge ● (CP-200/PC-300, Pixus 990i and other PictBridge compatible bubble-
jet printers)
My Camera Startup screen creation ●
settings Startup screen selection ●
Startup sound ●
Shutter sound ●
Self-timer sound ●
World clock ● (Date display (Japanese, North American or European format can be
selected))
Text titles ×
Speaker ●
Confirmation beep ●
Tally lamp ×
Remote control cord Supports 1 and 2,
Accessory shoe ● (Advanced accessory shoe compatible MVX250i E model only)
Video ID ● (ID2 : NTSC only)
Recording media Tape miniDV, SP,LP
Card SD memory card, MultiMediaCard
Illuminated keys ×
Custom keys ×
Night mode key ●
DV control ×
Internal battery charging ● (CA-570 connection)
Backup power Lithium coin battery (CR1616)
Battery pack power NB-2L, NB-2LH, BP-2L12, and BP-2L14 lithium ion batteries
8
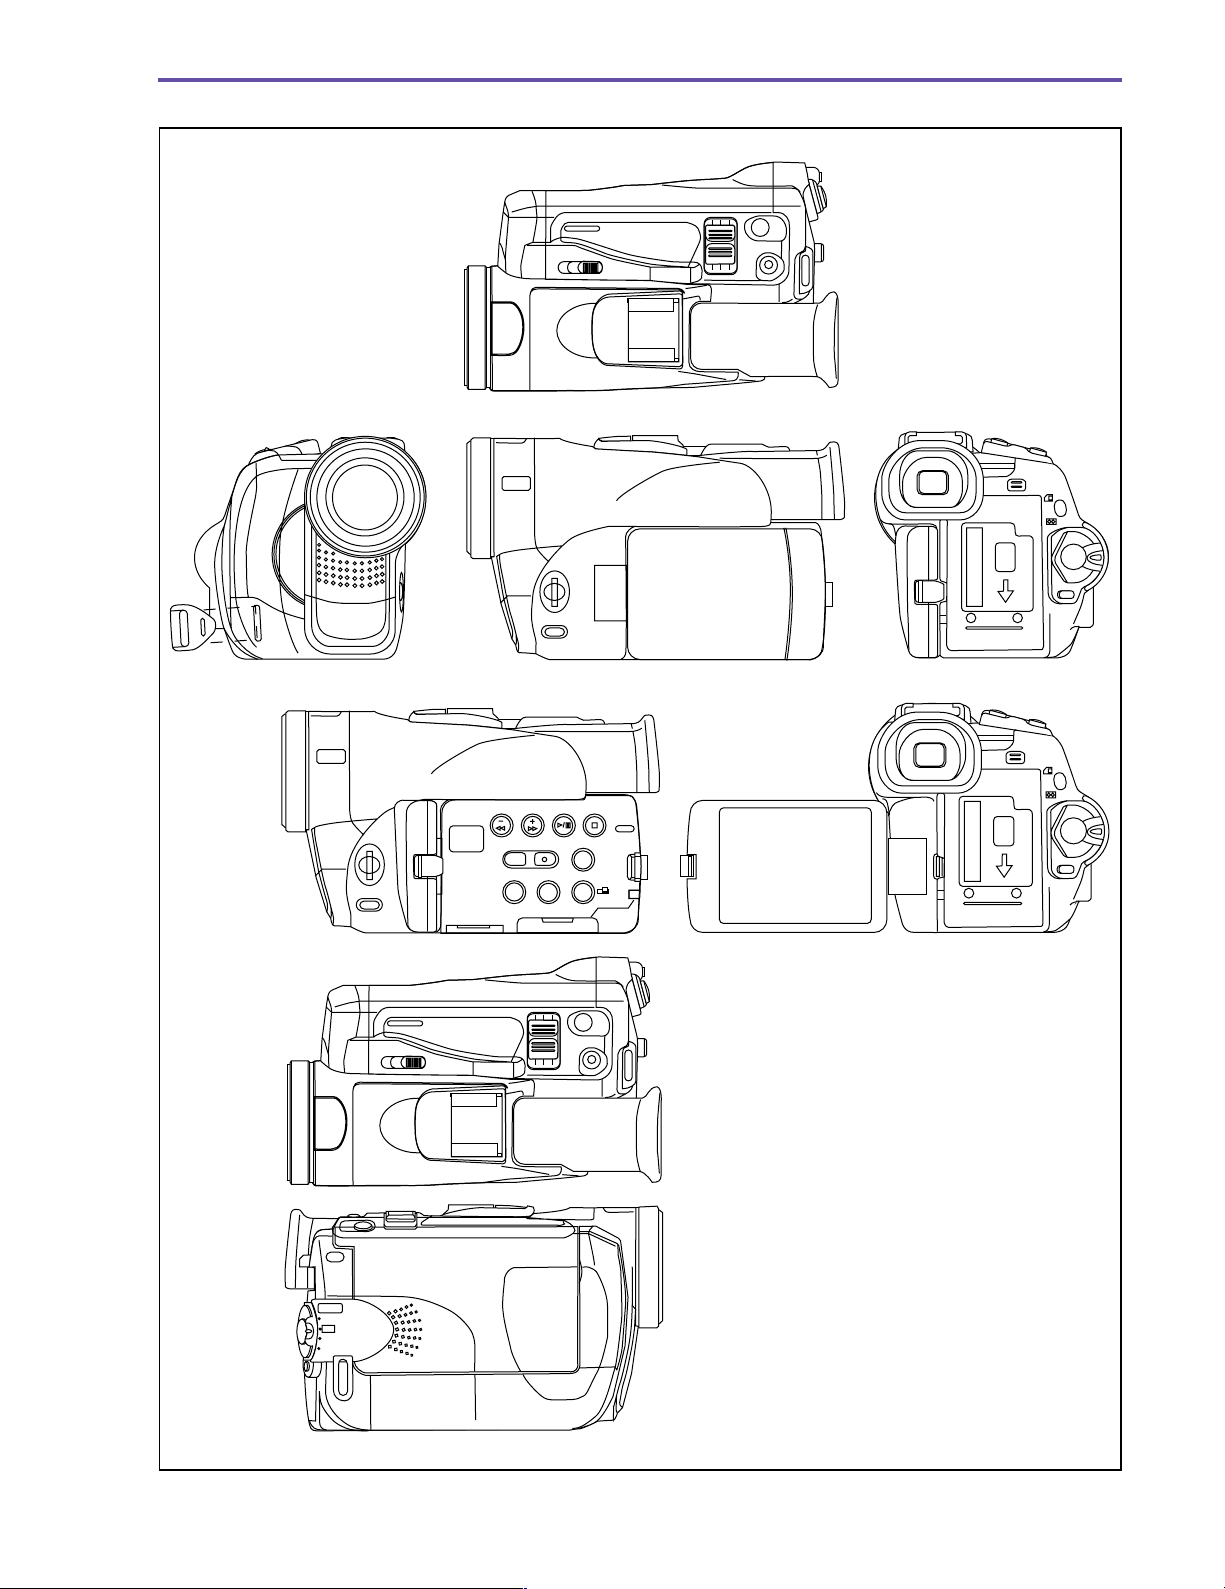
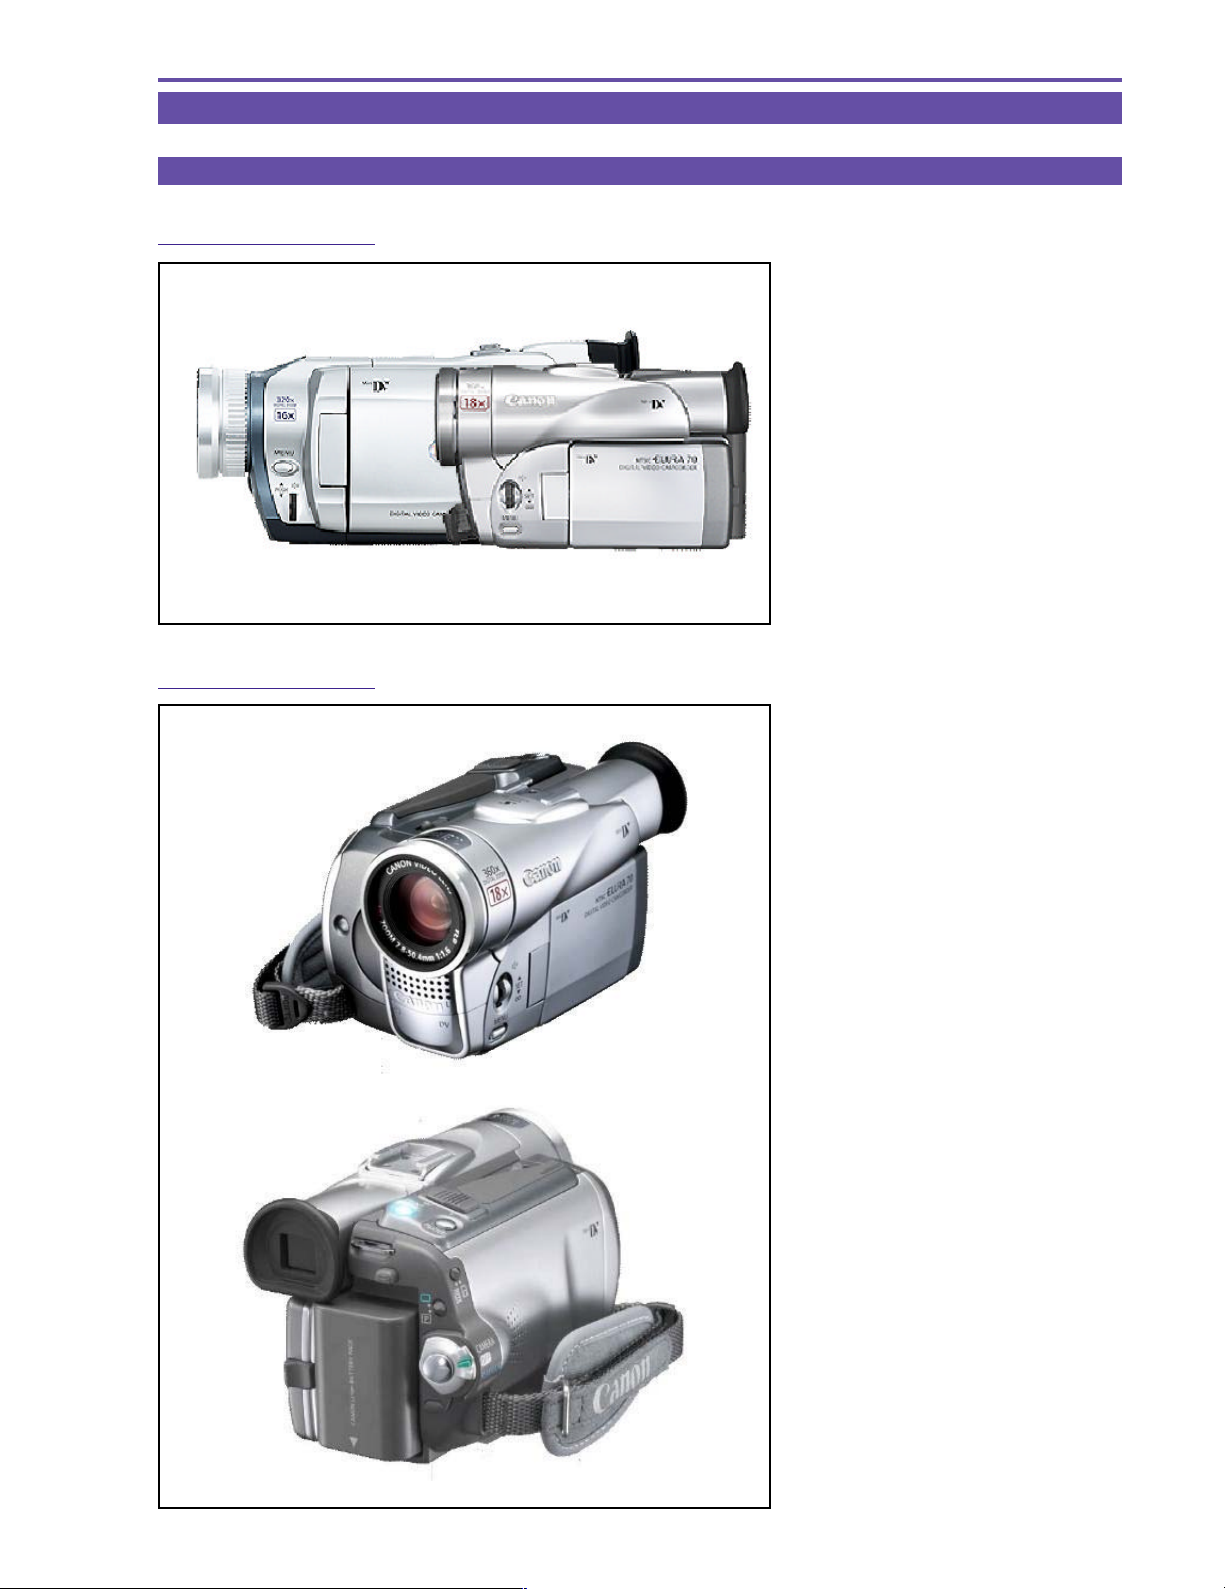
● External View
MVX250i E, MVX200i E, MVX200 E
GENERAL DESCRIPTION OF PRODUCT
Fig. 1
9
2. Technical Explanation
2-1 Design
2-1-1 Design Concept-1
MVX250i E, MVX200i E, MVX200 E
GENERAL DESCRIPTION OF PRODUCT
<Parallel Layout Design>
New concept design with short height Size about
40%
smaller than the MVX3i E
2-1-2 Design Concept-2
<Distinctive Body Design>
The design has a distinctive character line crossing diagonally over the lens section.
In this design, a brilliant metallic coating creates remarkable highlights and shadows under
light for creating a stunning impression.
<Brilliant Metallic Color>
Metallic colors are used for the cassette cover
side. Metal and chrome parts are also used for
the lens ring and Megapixel badge to provide a
sense of refinement.
<Round Grip>
In addition to the round-shaped grip for enabling
a stronger grip, the finger grips use elastomer
for allowing a firm hold.
10
<Easy Direct Buttons>
This is the first DVC to use the Easy Direct
Buttons. This makes printing as easy as pressing a button.

MVX250i E, MVX200i E, MVX200 E
GENERAL DESCRIPTION OF PRODUCT
2-1-3 Differences in Appearance of Overseas Models MVX250i E, MVX200i E, MVX200 E
Model MVX250i E
Model MVX200i E, MVX200 E
Grip top/Front lens Side/Side connector
cover are molded
Gray color
(finish is not used for cost reasons)
In comparison to the lens barrel section,
alow-contrast two-tone design is used with
alow-brightness, brilliant silver metallic finish.
Bluish, high-brilliance metallic finish
11
MVX250i E, MVX200i E, MVX200 E
GENERAL DESCRIPTION OF PRODUCT
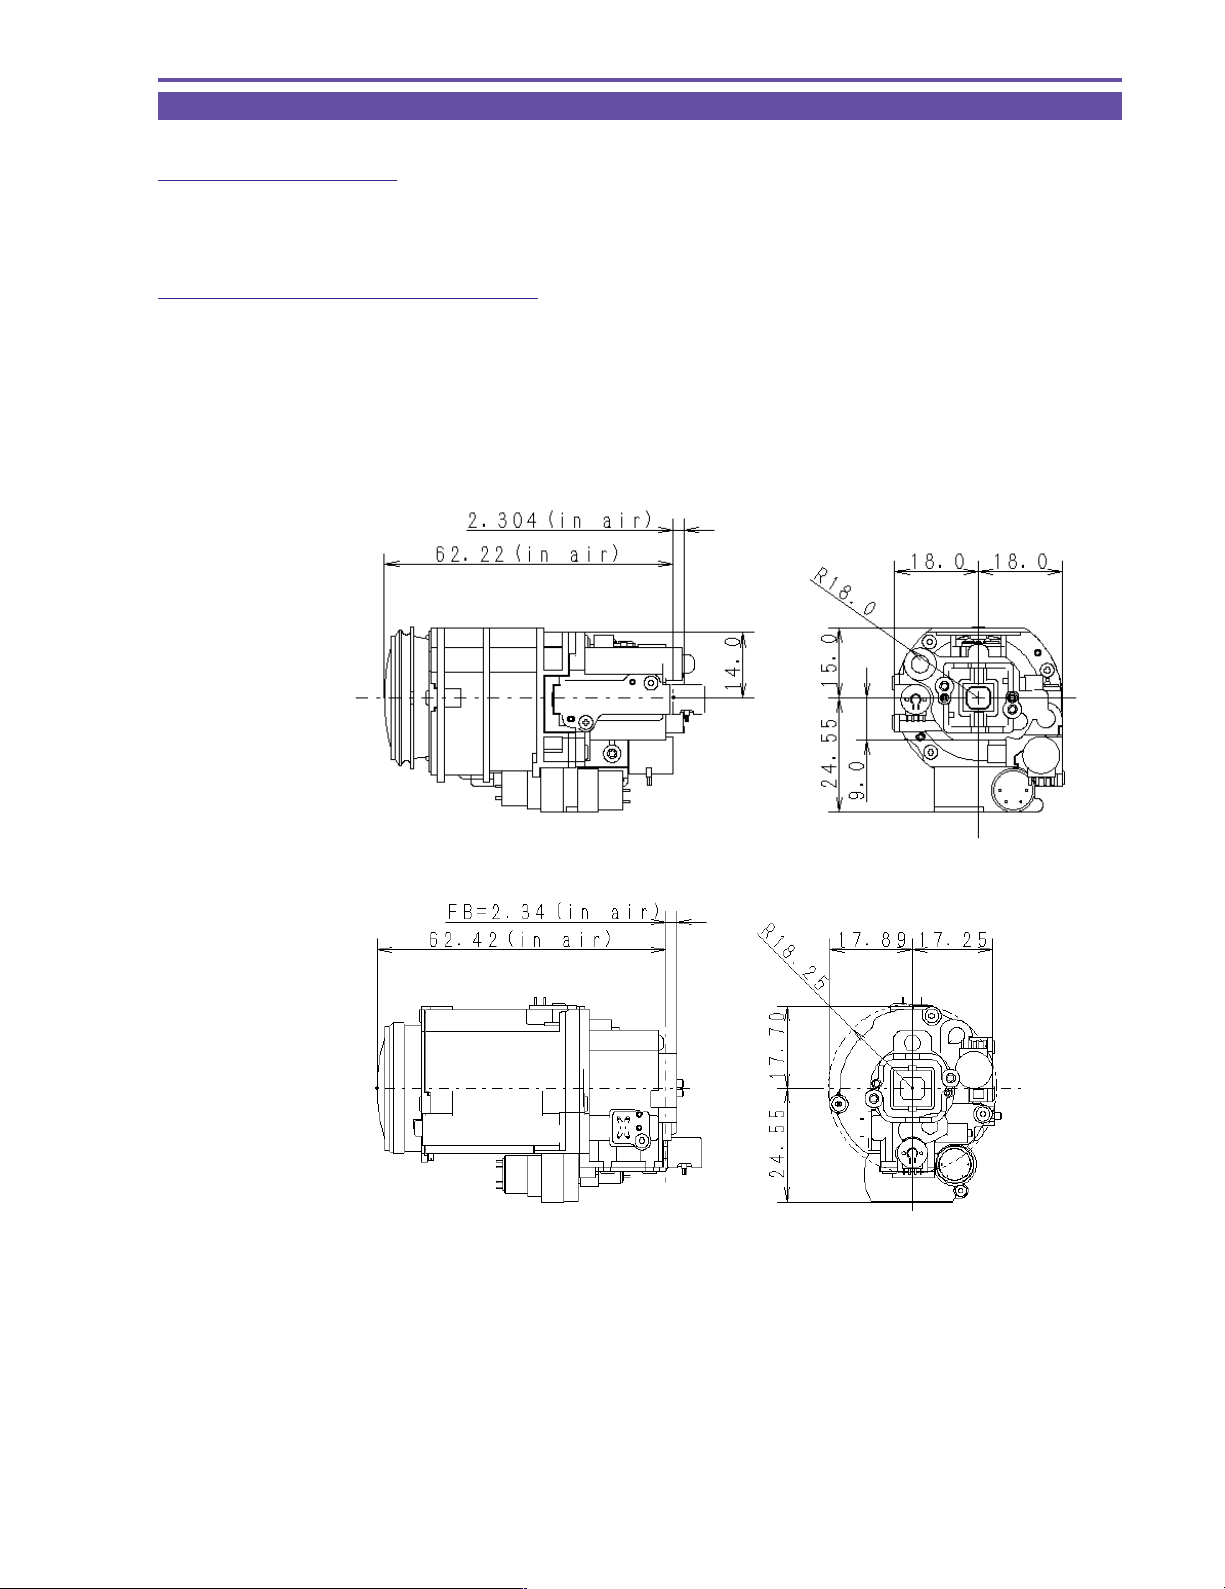
2-2 18× zoom lens
2-2-1 Features of 18× lens
· Highest zoom ratio in a mechanical unit
· Extremely high cost-performance ratio
2-2-2 New technologies and new functions
A two-sided aspherical lens and high-refraction glass are arranged efficiently to minimize the size despite an increased number of
lenses.
The movement amount of the compensator near the tele end was also increased to reduce the load on the variator and achieve an
efficient zoom ratio over the entire short length.
Lens incorporated in MVX250i E, MVX200i E, MVX200 E
Lens incorporated in MVX3i E
12
MVX250i E, MVX200i E, MVX200 E
SETUP
SETUP
GENERAL DESCRIPTION OF PRODUCT
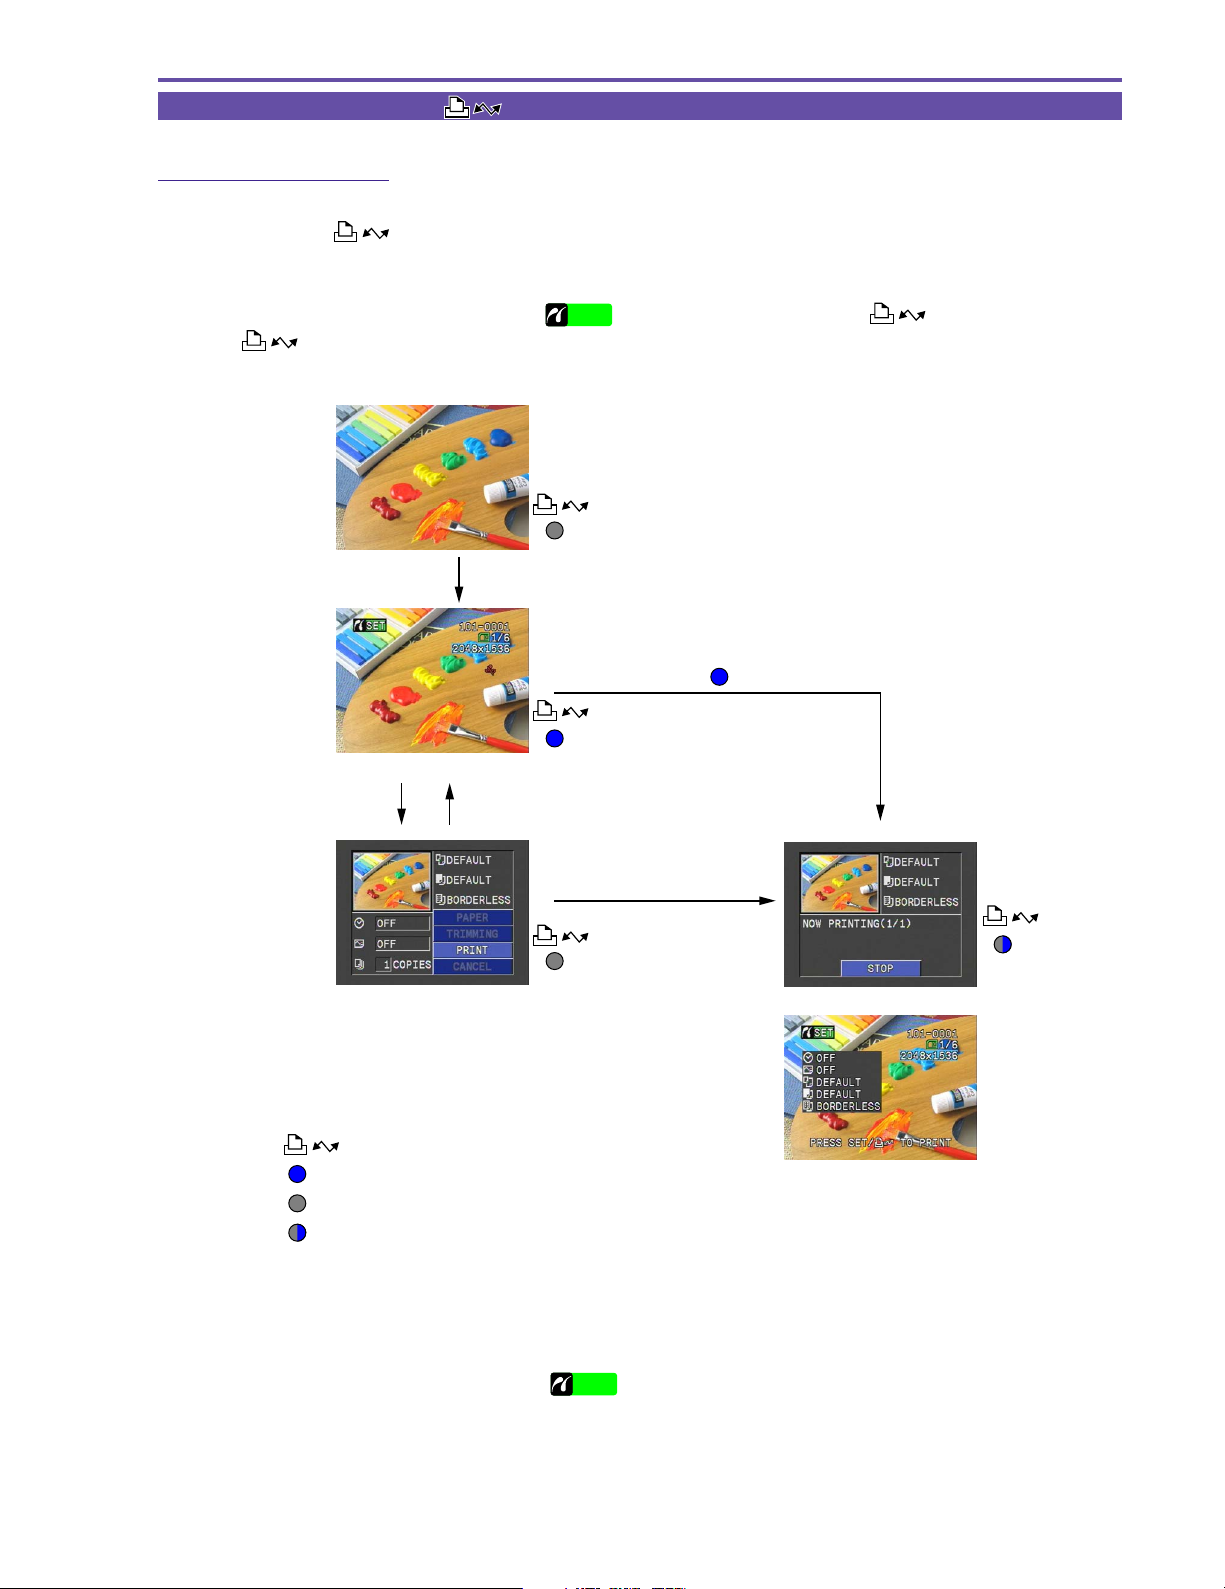
2-3 Easy Direct Button ([ ] Print/Share button)
2-3-1 Direct Print function
The Easy Direct Button enables you to immediately start printing by simply connecting the video camera to a Camera Direct compatible
printer and pressing the
(1)Connect the printer, and then turn on the printer.
(2)Set the video camera to Card Playback mode.
(3)Once the connection is made with the printer (
the
button to start printing.
(1)
(2)
button while it is lit.
Direct printer connection
or other indicator is displayed), the button lights up blue. Press
SETUP
Off
Press the button
On
(Press the MENU button)Press the SETUP button
(3)
Press the SETUP button
Off
* When still images are displayed for the first time after
connection, the setting status appears over the screen (2)
for six seconds (figure at right).
Button operation guide
Button lights up : Indicates button operation is possible.
Button turns off : Indicates button operation is not possible.
Button flashing : Indicates printing is in progress.
Flashing
The procedure for previous models is shown below.
(1)Connect the printer, and then turn on the printer.
(2)Set the video camera to Card Playback mode.
(3)Once the connection is made with the printer (
is displayed), press the SETUP button.
SETUP
(4)This changes to the Print Setting screen. Check that you are ready to start printing, and then press the SETUP button to start
printing.
With the Easy Direct Button, step (3) is eliminated for even easier searching and printing of multiple images.
13
MVX250i E, MVX200i E, MVX200 E
GENERAL DESCRIPTION OF PRODUCT
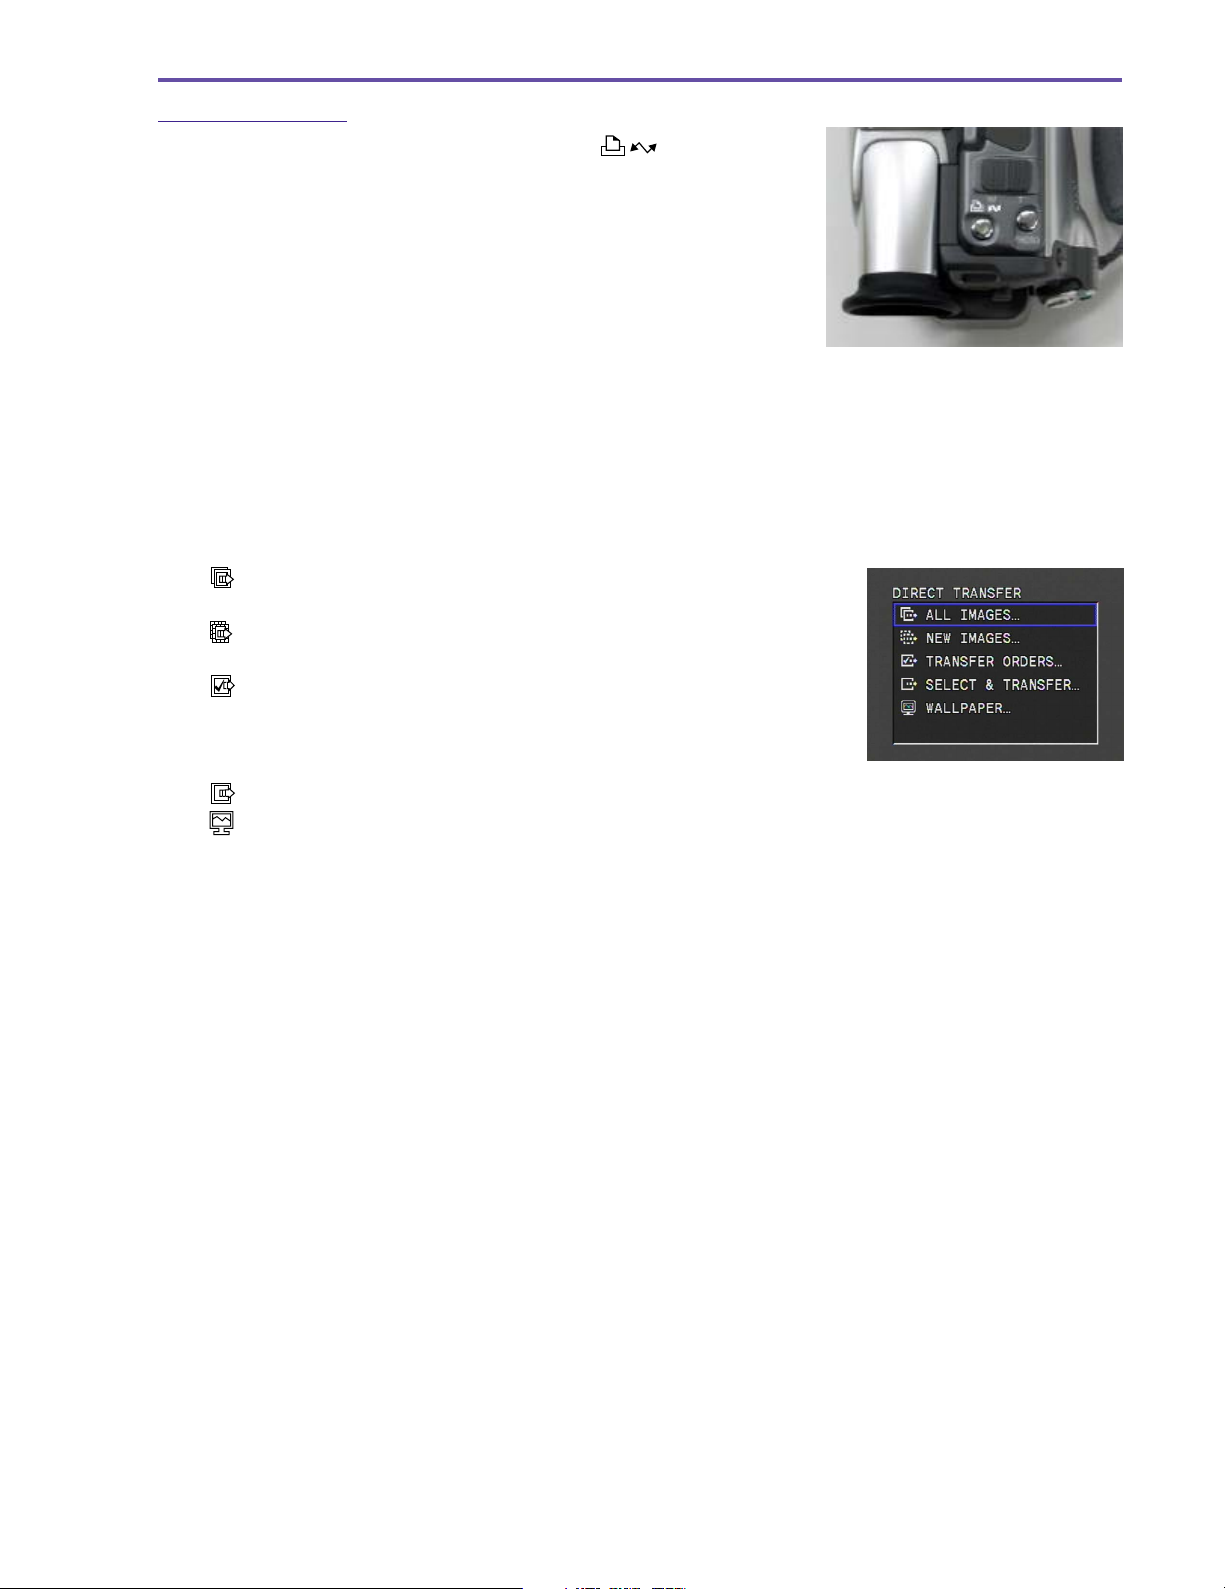
2-3-2 Direct Transfer
The Direct Transfer function uses the Easy Direct Button [ ] to easily transfer
images to a computer.
When the video camera is connected to a computer and set to Card Playback mode, the
Transfer menu is displayed on the video camera LCD screen. The user simply selects the
desired option from the menu and presses the Direct button to easily transfer the image to
the computer.
ZoomBrowser 4.6×, which supports Direct Transfer, must already be installed on the computer.
The supported OS are Windows XP, Windows 2000, Windows ME, and Windows 98 (Macintosh is not supported).
The transferred image is saved in a folder designated by ZoomBrowser.
The available files types for transfer are JPEG and Motion-JPEG (MPEG-4 is not supported).
(Note that only JPEG files can be transferred in the PC Wallpaper option.)
The Transfer menu has the following five options.
· ALL IMAGES... : This transfers all images recorded in the memory card
to the computer.
· NEW IMAGES... : This transfers images in the memory card that have
not been already transferred.
· TRANSFER ORDERS... : This uses the DPOF function to transfer only images
with a check mark. Note that the images need to be
designated for sending at the Send Designation Setting screen beforehand.
· SELECT &TRANSFER... : The user checks the images one at a time before transferring.
·
WALLPAPER... :This enables the user to check the image one at a time before transferring and setting as the
computer’s wallpaper in realtime.
14

MVX250i E, MVX200i E, MVX200 E
GENERAL DESCRIPTION OF PRODUCT
2-3-2-1 Startup
Set the video camera to Card Playback mode, and then connect to a computer with a USB cable.
Direct Transfer does not start unless a memory card is loaded.
After Direct Transfer is started, the image that is displayed first is determined by the following conditions.
1. “No Image Warning” is displayed if there are no recorded images in the memory card.
2. The Menu screen is displayed when the option that was last executed is not recorded, such as when using for the first time.
3. If
4. If SELECT &TRANSFER or WALL PAPER is recorded as the last executed option, the SELECT &TRANSFER
ALL IMAGES , NEW IMAGES or TRANSFER ORDERS is recorded as the last executed option, the Direct
Transfer menu screen is displayed.
screen is displayed.
Function Operation Description
The computer and
Startup
video camera are
connected by a
USB cable.
This proceeds to the Menu screen.
Startup condition 4
Menu screen
Select Image screen
Startup conditions 2 and 3
Function Operation Description
Function Operation Description
Button turns off
ALL IMAGES : See
NEW IMAGES : See
TRANSFER ORDERS : See
SELECT &TRANSFER : See
WALL PAPER : See
2.3.2.2 .
2.3.2.3 .
2.3.2.4 .
2.3.2.5 .
2.3.2.6
Button lights up
SELECT &TRANSFER : See 2.3.2.5
WALL PAPER : See 2.3.2.6
Button lights up
No Image Warning screen
15
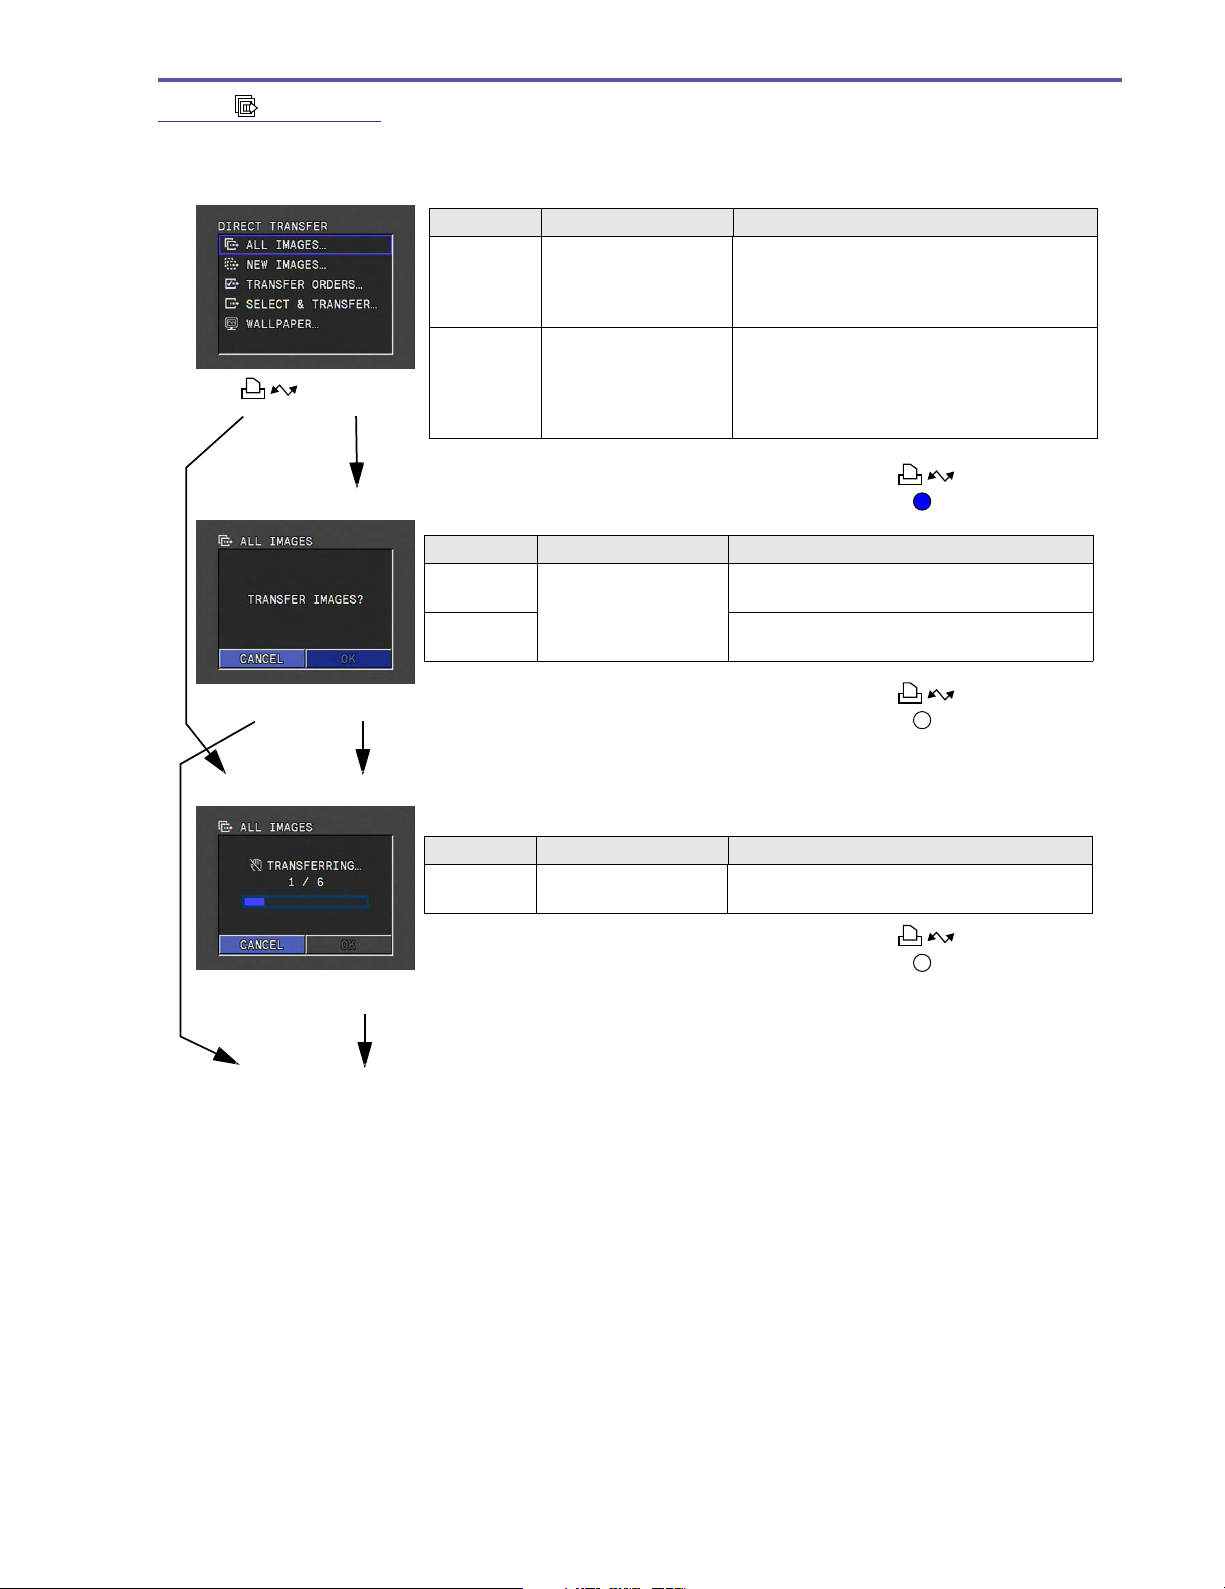
2-3-2-2 ALL IMAGES
This transfers all images in the camera and saves them to the computer.
Menu screen
Function Operation Description
Move the [SET] button
[ ]
Transfer all
images
[SET]
up and down to select
images, and then press
down the [SET] button.
Move the [SET] button
up and down to select
images, and then press
down the Easy Direct
button.
MVX250i E, MVX200i E, MVX200 E
GENERAL DESCRIPTION OF PRODUCT
• This proceeds to the Confirm Transfer
screen.
• The transfer confirmation is omitted, and
the Transfer in Progress screen is
displayed.
• The function executed last is recorded as
the selected function.
Confirm Transfer screen
Function Operation Description
Move the [SET] button
up and down to select
images, and then press
down the [SET] button.
Cancel
Cancel
OK
OK
Transfer in Progress screen (with progress bar)
Function Operation Description
Press down the [SET]
or [MENU] button.
Finish Transfer or Cancel
Cancel
• The transfer progress is based on the “Number of images for which transfer was
completed/Total number of images to be transferred
• If the number of images exceeds 9999, the value is fixed at 9999.
Button lights up
• This cancels the selected function and
returns to the Menu screen.
• This performs the transfer and proceeds to
the Transfer in Progress screen.
Button turns off
• This cancels the transfer and returns to the
Menu screen.
Button turns off
”
.
Return to Menu screen
16
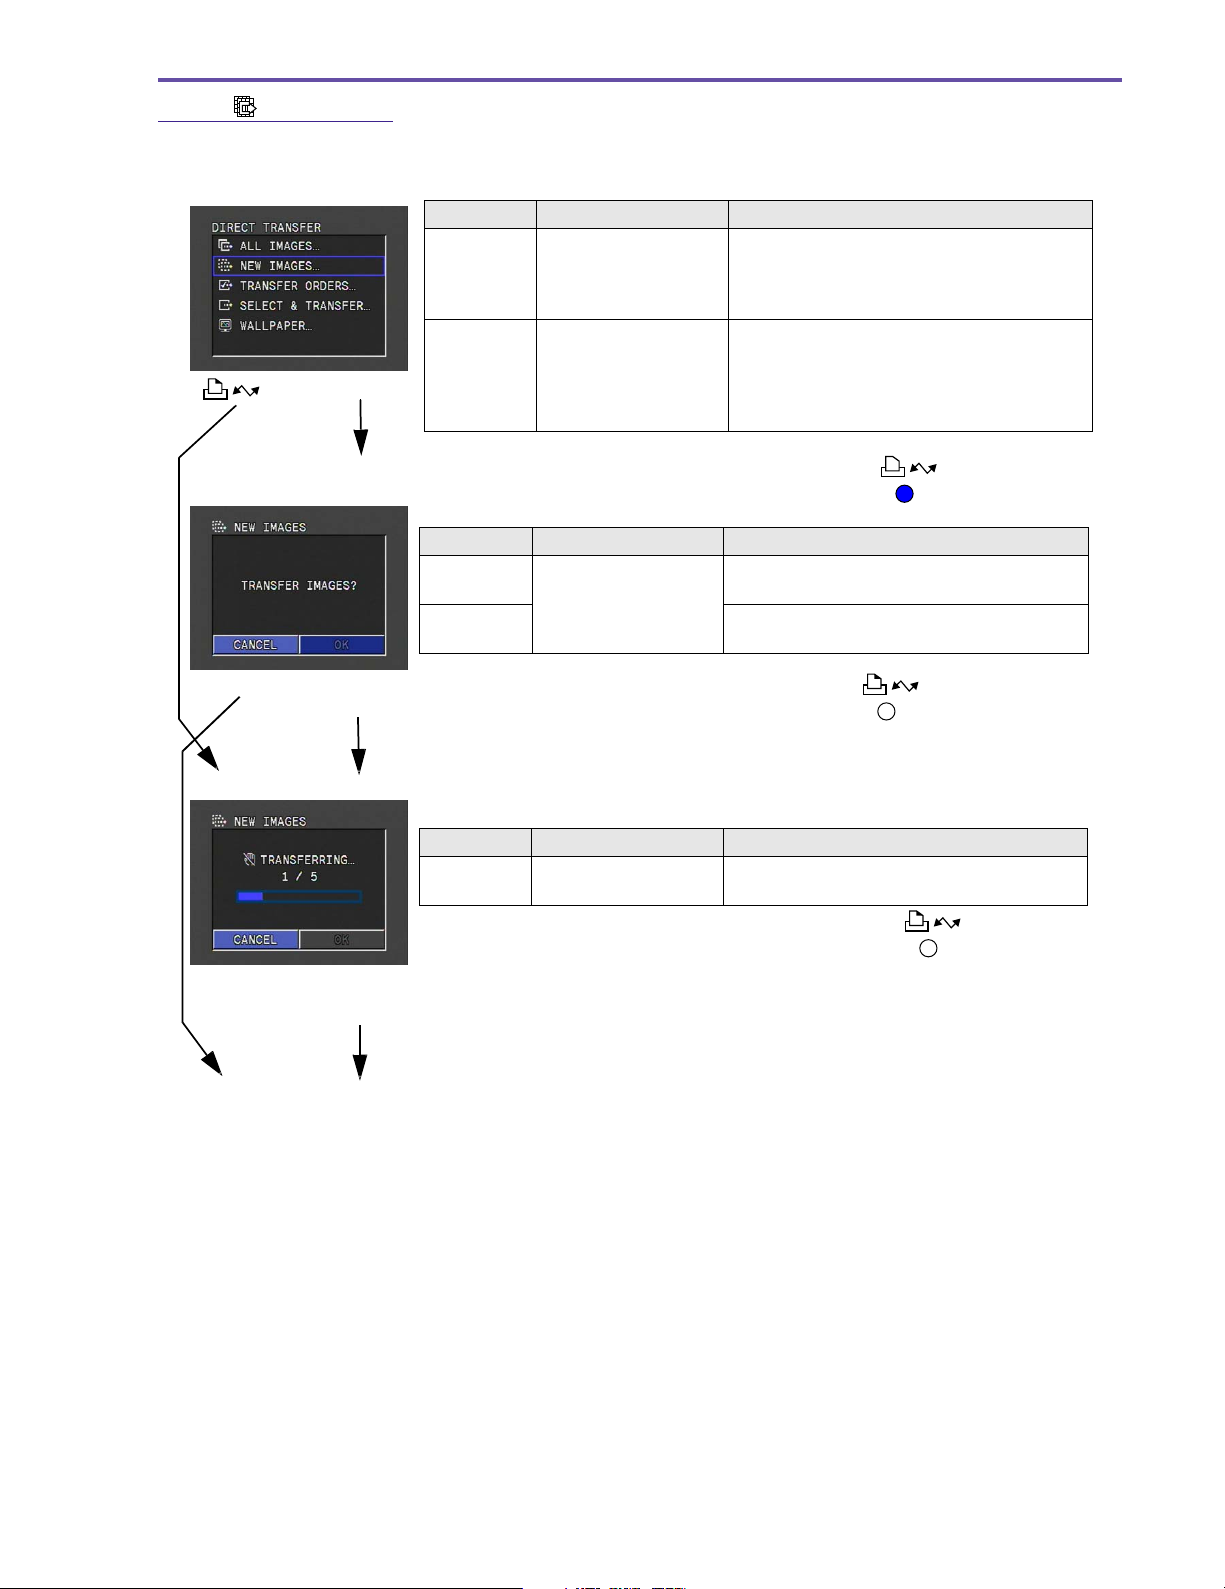
2-3-2-3 NEW IMAGES
All untransferred images are transferred and saved to the computer.
MVX250i E, MVX200i E, MVX200 E
GENERAL DESCRIPTION OF PRODUCT
Menu screen
[]
[SET]
Confirm Transfer screen
Cancel
OK
Function Operation Description
Transfer
untransferred
images
Function Operation Description
Cancel
OK
Move the [SET] button
up and down to select
images, and then press
down the [SET] button.
Move the [SET] button
up and down to select
images, and then press
down the Easy Direct
button.
Move the [SET] button
up and down to select
images, and then press
down the [SET] button.
• This proceeds to the Confirm Transfer
screen.
• The transfer confirmation is omitted, and
the Transfer in Progress screen is
displayed.
• The function executed last is recorded as
the selected function.
• This cancels the selected function and
returns to the Menu screen.
• This performs the transfer and proceeds to
the Transfer in Progress screen.
Button lights up
Button lights up
Transfer in Progress screen (with progress bar)
Function Operation Description
Press down the [SET]
or [MENU] button.
Finish Transfer or Cancel
Cancel
• The transfer progress is based on the “Number of images for which transfer was
completed/Total number of images to be transferred
• If the number of images exceeds 9999, the value is fixed at 9999.
Return to Menu screen
• This cancels the transfer and returns to the
Menu screen.
Button lights up
”
.
17
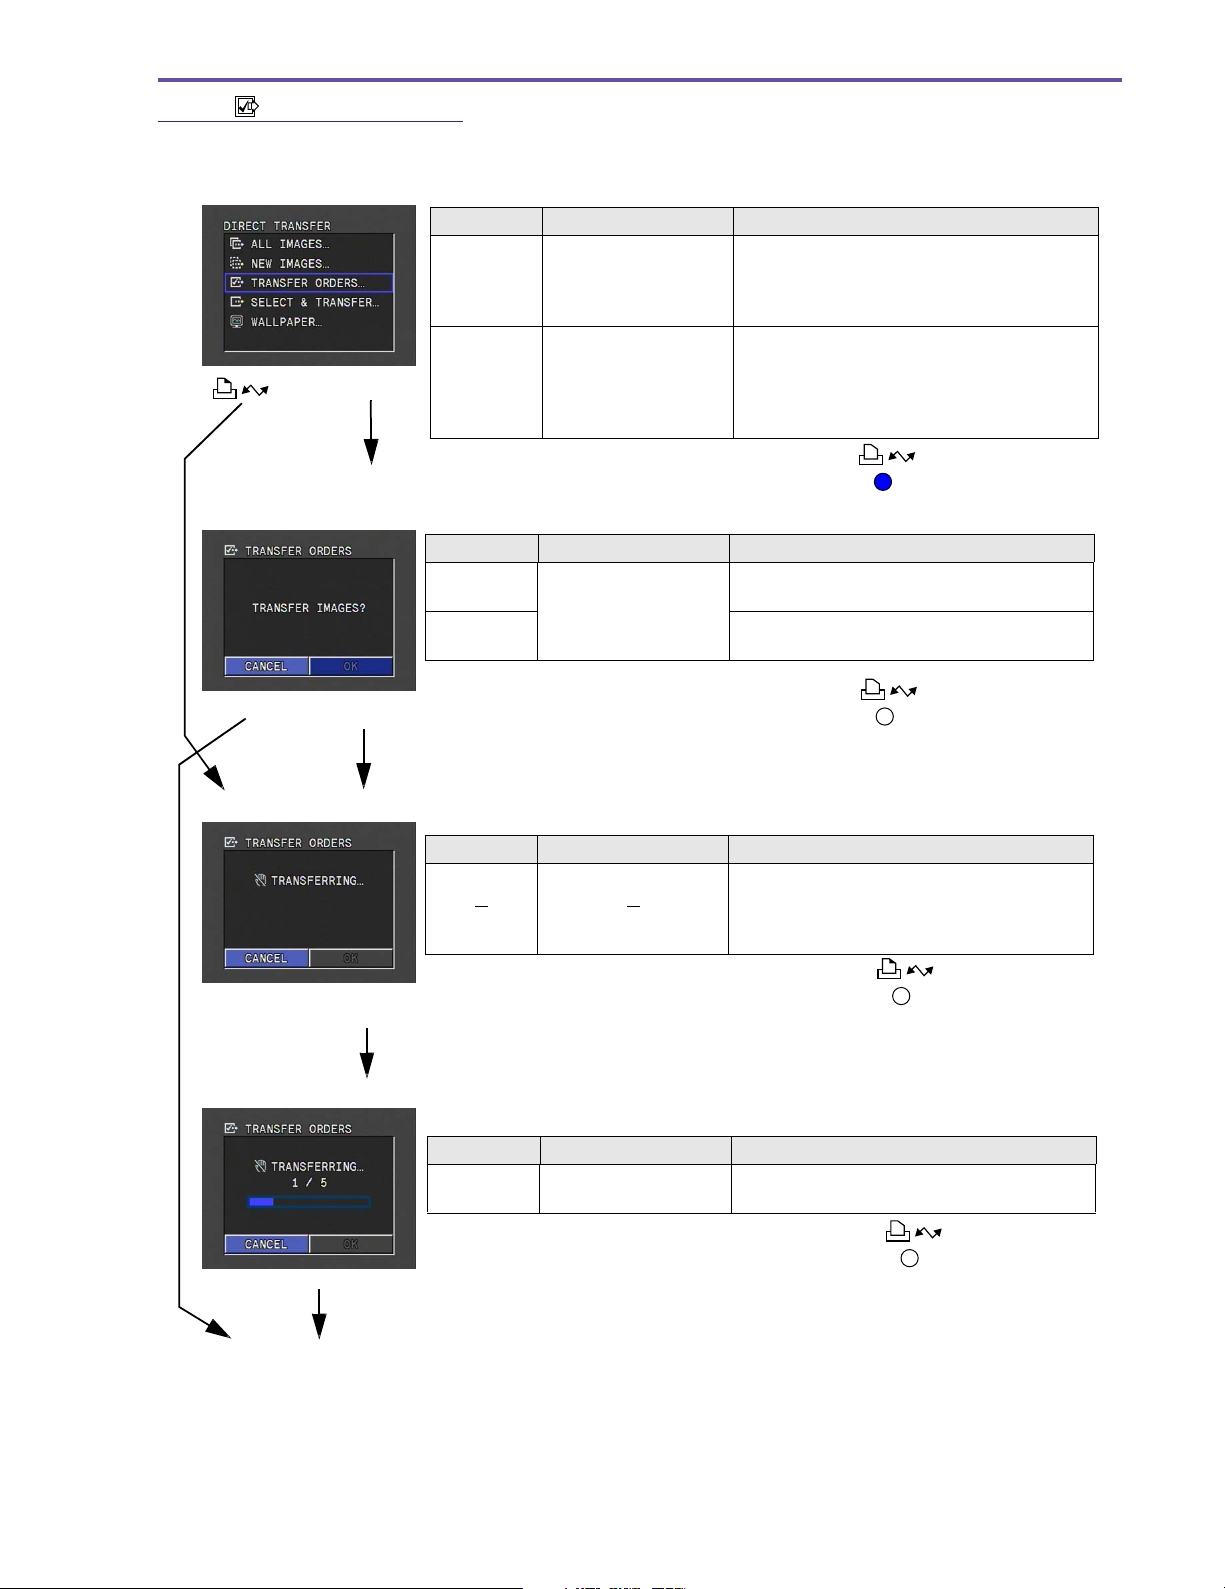
2-3-2-4 TRANSFER ORDERS
All images designated for sending are transferred and saved to the computer.
Menu screen
Function Operation Description
[]
[SET]
Confirm Transfer screen
Transfer
senddesignated
images
Function Operation Description
Cancel
OK
Move the [SET] button
up and down to select
images, and then press
down the [SET] button.
Move the [SET] button
up and down to select
images, and then press
down the Easy Direct
button.
Move the [SET] button
up and down to select
images, and then press
down the [SET] button.
MVX250i E, MVX200i E, MVX200 E
GENERAL DESCRIPTION OF PRODUCT
• This proceeds to the Confirm Transfer
screen.
• The transfer confirmation is omitted, and
the Transfer in Progress screen is
displayed.
• The function executed last is recorded as
the selected function.
Button lights up
• This cancels the selected function and
returns to the Menu screen.
• This performs the transfer and proceeds to
the Transfer in Progress screen.
Cancel
OK
Analyzing Send-designated Images screen
Function Operation Description
Analysis Complete
Transfer in Progress screen (with progress bar)
Function Operation Description
Press down the [SET]
or [MENU] button.
Finish Transfer or Cancel
Return to Menu screen
Cancel
• The transfer progress is based on the “Number of images for which transfer was
completed/Total number of images to be transferred
• If the number of images exceeds 9999, the value is fixed at 9999.
Button turns off
• After analysis of the send-designated
images is complete, this proceeds to the
Transfer in Progress screen (with progress
bar).
Button turns off
• This cancels the transfer and returns to the
Menu screen.
Button turns off
”
.
18
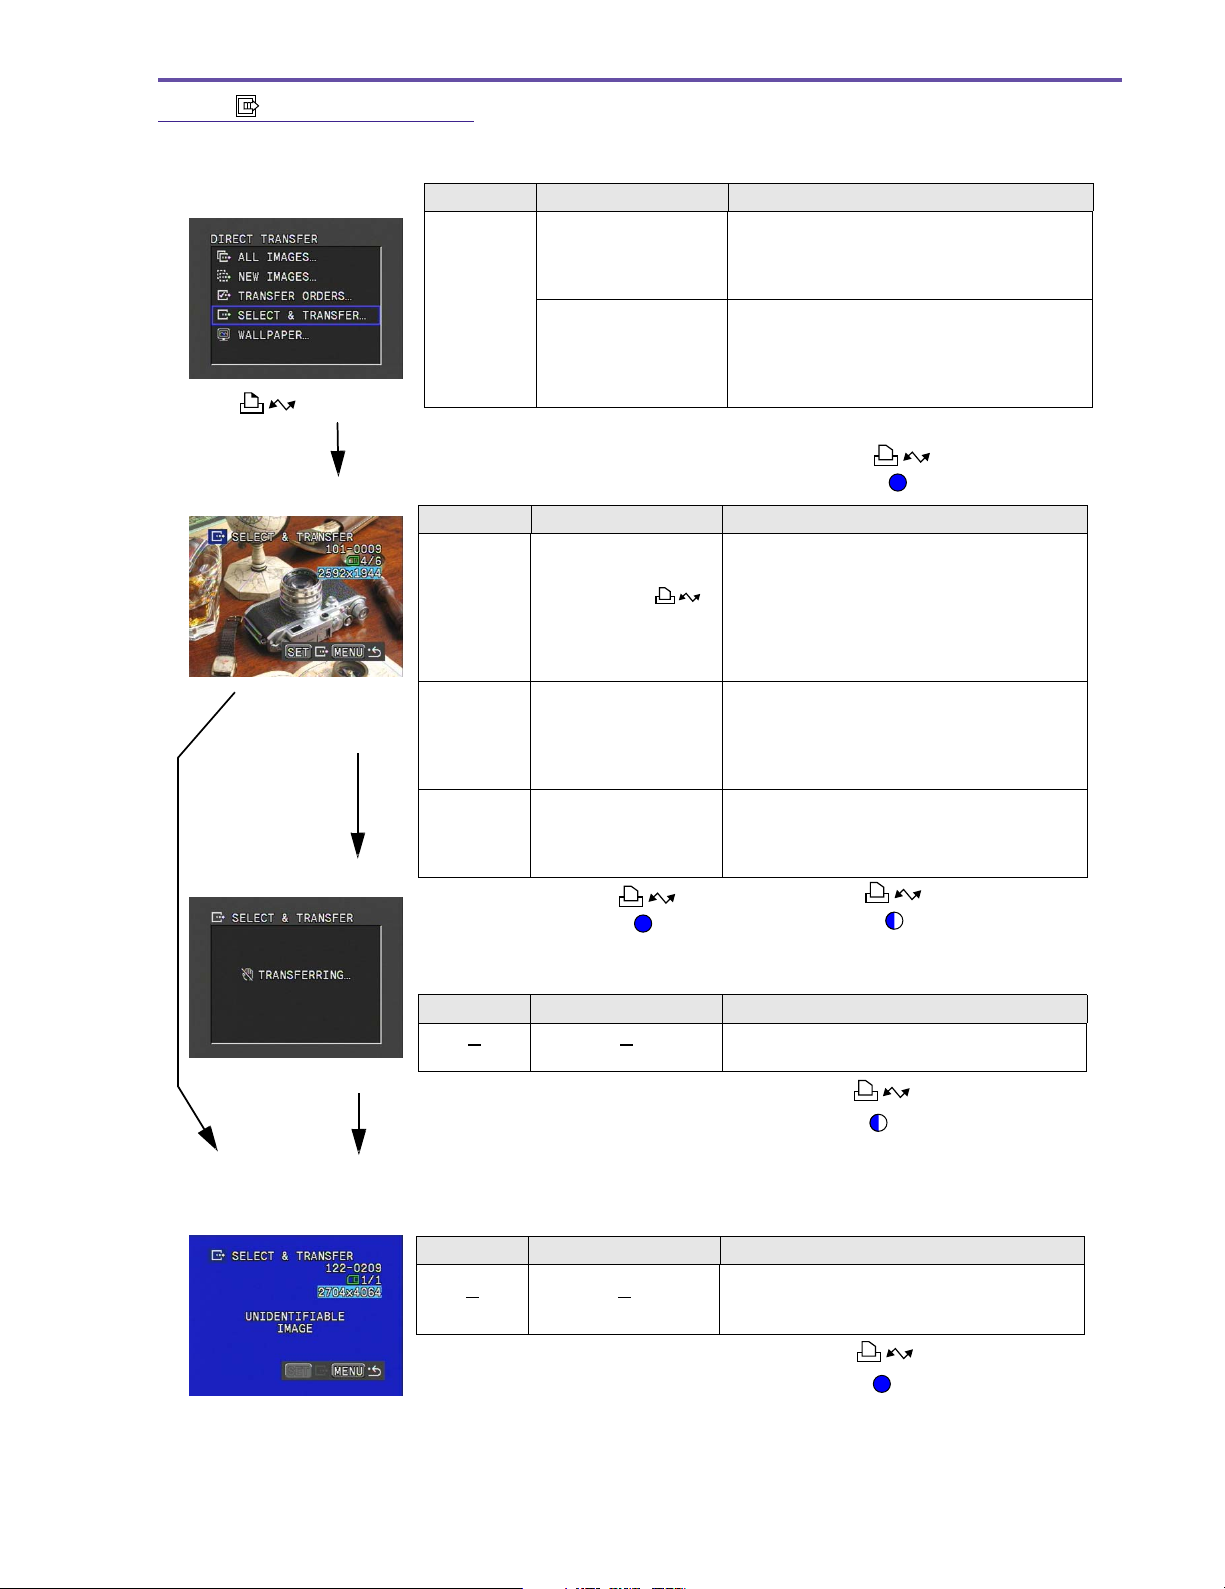
2-3-2-5 SELECT & TRANSFER
)
The user views the images one at a time and transfers and saves them to the computer.
MVX250i E, MVX200i E, MVX200 E
GENERAL DESCRIPTION OF PRODUCT
Menu screen
[]
or [SET]
Select Image screen
Function Operation Description
Move the [SET] button
up and down to select
images, and then press
Select
images for
transfer
Function Operation Description
Transfer
images
down the [SET] button.
Move the [SET] button
up and down to select
images, and then press
down the Easy Direct
button.
Press [SET] or
button.
[MENU] button while
image transfer is in
progress
Menu display Press [ MENU] button.
[MENU] button
while image
transfer is not in
progress
Change
image
Press [CARD +/
buttons.
Image Transfer in Progress screen (no progress bar)
• This proceeds to the Confirm Transfer
screen.
• The transfer confirmation is omitted, and
the Transfer in Progress screen is
displayed.
• The function executed last is recorded as
the selected function.
• This transfers the selected images.
• After inputting the transfer, the user can
immediately continue to select other images
and input transfer even while the transfer of
an image is in progress.
• If a file that cannot be played is selected for
transfer, a warning screen is displayed.
• If an image is being transferred, this
proceeds to the Transfer in Progress
screen.
• This returns to the Menu screen if an image
is being transferred.
• This moves the image selection forward/
–]
backward.
• Changes can be made even if image
transfer is in progress.
Button lights up
Button lights up
Button flashing
(Image transfer in progress
Transfer complete
Return to Menu screen
Warning screen
Function Operation Description
• When the transfer is completed, this returns
to the Menu screen.
Button flashing
Function Operation Description
• The warning screen is displayed for about
one second, and then it returns to the
Select Image screen.
Button lights up
19
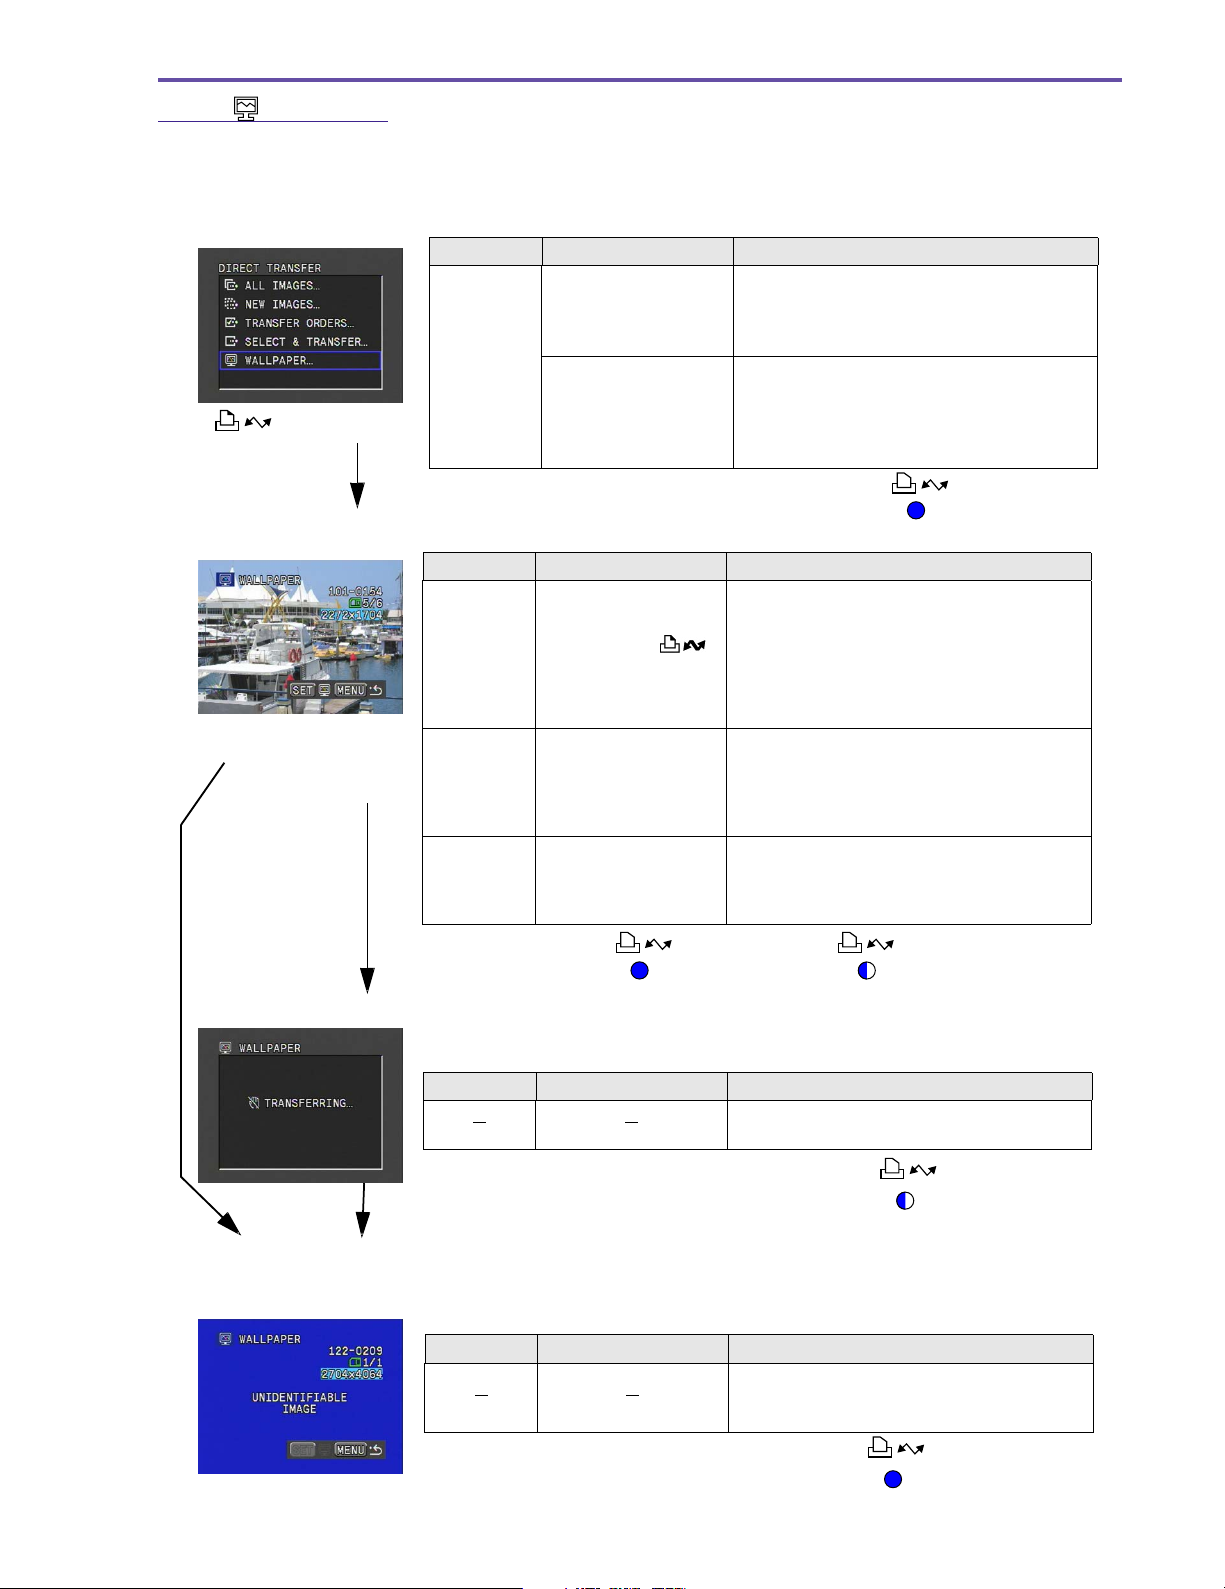
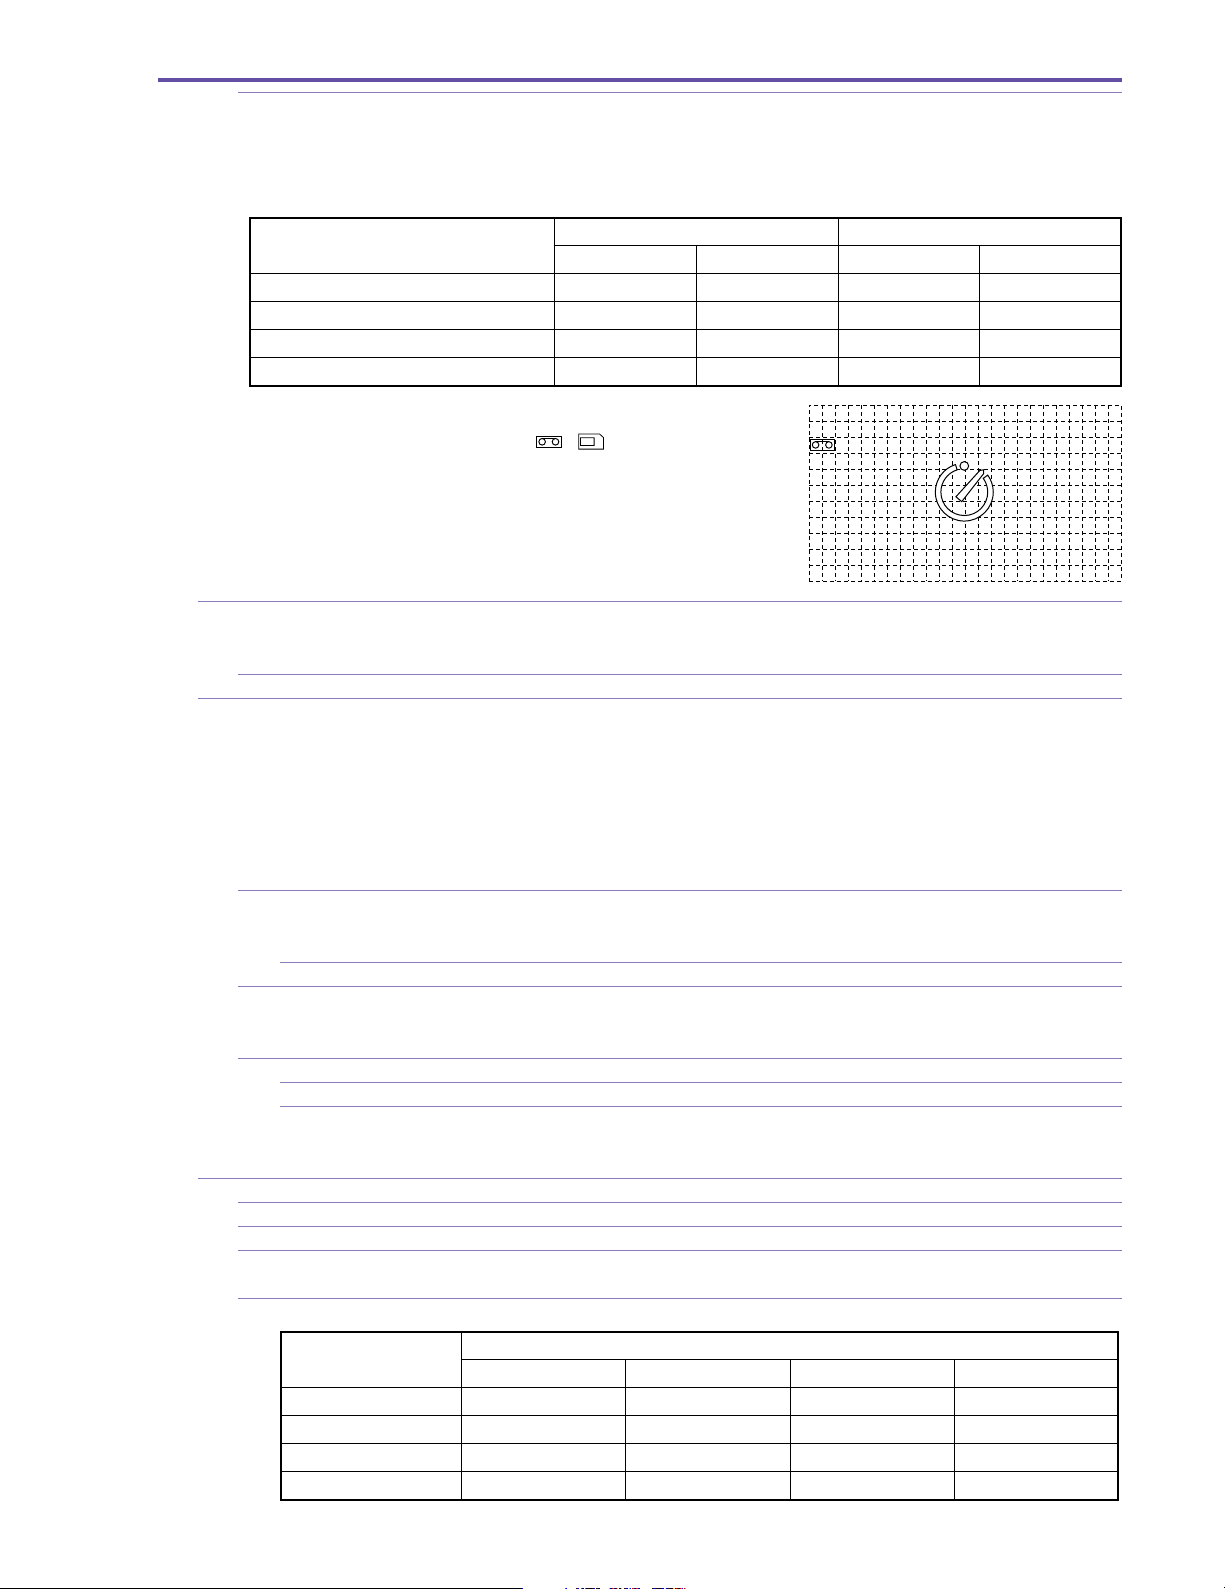
2-3-2-6 WALL PAPER
The user views the images one at a time and transfers and saves them to the computer.
The transferred image is displayed on the computer desktop
Menu screen
Function Operation Description
Move the [SET] button
[]
or [SET] button
Select Image screen
[MENU] button while
image transfer is in
progress
[MENU] button
while image
transfer is not in
progress
up and down to select
images, and then press
Set image as
computer
wallpaper
Function Operation Description
Transfer
images
Menu display Press [MENU] button
Change
image
down the [SET] button.
Move the [SET] button
up and down to select
images, and then press
down the Easy Direct
button.
Press [SET] or
button
–]
Press [CARD +/
buttons
• This proceeds to the Confirm Transfer
screen.
• The transfer confirmation is omitted, and
the Transfer in Progress screen is
displayed.
• The function executed last is recorded as
the selected function.
• This transfers the selected images.
• After inputting the transfer, the user can
immediately continue to select other images
and input transfer even while the transfer of
an image is in progress.
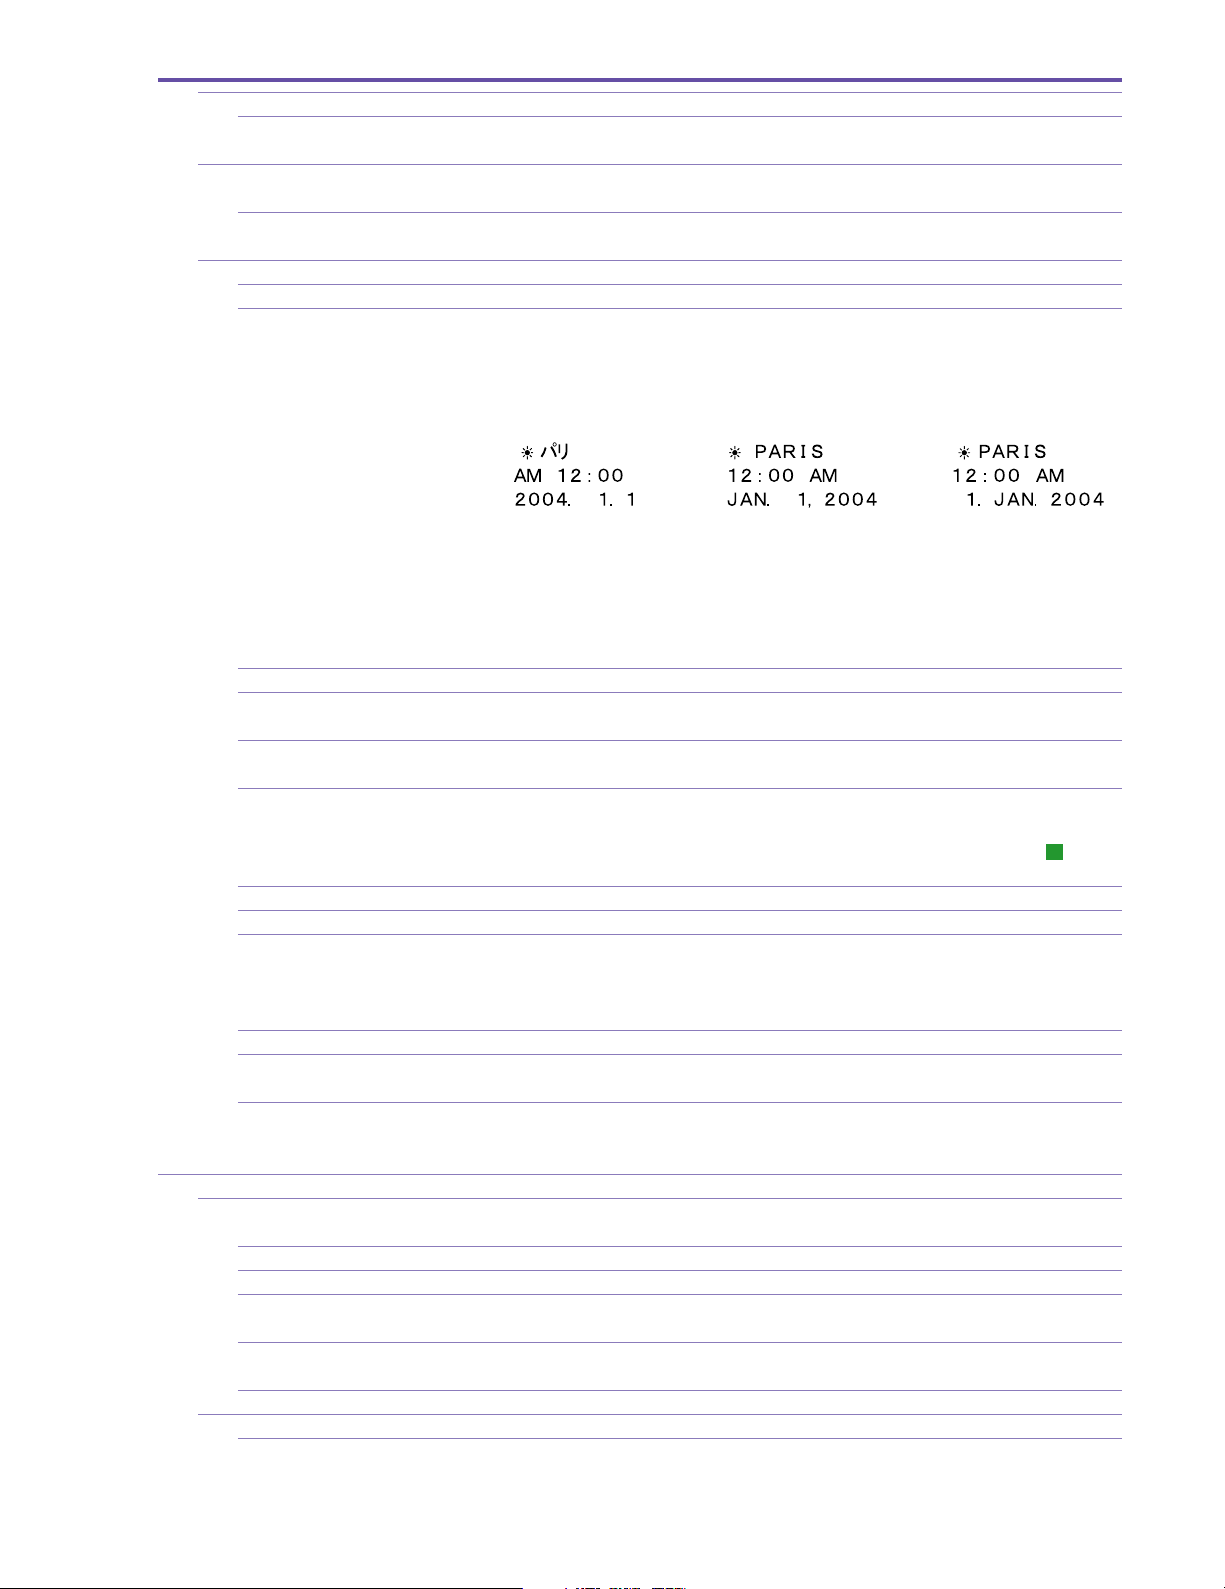
• A warning screen is displayed if the transfer
is made with a motion video file selected.
• If an image is being transferred, this
proceeds to the Transfer in Progress
screen.
• This returns to the Menu screen if an image
is being transferred.
• This moves the image selection forward/
backward.
• Changes can be made even if image
transfer is in progress.
MVX250i E, MVX200i E, MVX200 E
GENERAL DESCRIPTION OF PRODUCT
Button lights up
Image Transfer in Progress screen (no progress bar)
Function Operation Description
Return to Menu screen
Warning screen
Function Operation Description
Button lights up
Button flashing
(Image transfer in progress)
• When the transfer is completed, this returns
to the Menu screen.
Button flashing
• The warning screen is displayed for about
one second, and then it returns to the
Select Image screen.
Button lights up
20

MVX250i E, MVX200i E, MVX200 E
GENERAL DESCRIPTION OF PRODUCT
3. Performance
MVX250i E, MVX200i E, MVX200 E
1 Type VCR- integrated camera
2 Recording system Rotating two-head helical scan azimuth recording
Consumer electronics digital DVC (SD specs)
Complies with NTSC system (625 lines, 50 fields)
2-1 Video signal recording system Digital component recording.
R-Y, B-Y = 6.75MHz
2-1-1 Quantized bits 8bits
2-2 Audio signal recording system PCM digital recording.
16-bit : 48KHz 2 ch (Stereo 1)
12-bit : 32KHz 4 ch (Stereo 1 and 2)
2-3 Tracking 2-frequency pilot system
2-4 Tape speed Approx. 18.83mm / sec (in SP mode)
Approx. 12.57mm / sec (in LP mode)
2-5 Head drum
2-5-1 Drum diameter 21.7mm
2-5-2 Rpms 9000 / 1.001 rotations / minute
2-5-3 Heads Video heads : 2
3 Recording / playback time 80 minutes maximum (in SP mode), using 80-minute tape
120 minutes maximum (in LP mode), using 80-minute tape
3-1 Continuous recording time / actual recording time / playback time using battery
When viewfinder is used When LCD monitor is used
Continuous Actual Continuous Actual Continuous
recording recording recording recording playback
NB-2L Approx. 95 min Approx.50 min Approx. 75 min Approx. 40 min Approx. 85 min
NB-2LH Approx.115 min Approx. 65 min Approx. 90 min Approx. 50 min Approx.105 min
BP-2L12 Approx.200 min Approx.110 min Approx.150 min Approx. 85 min Approx.175 min
BP-2L14 Approx.240 min Approx.135 min Approx.190 min Approx.105 min Approx.220 min
4 Compatible cassette tape Mini DVC specs
4-1 Tape type Vapor - deposited metal tape
4-2 Tape width 6.35mm
4-3 Tape thickness 7µm or 5.3µm
5 Camera
5-1 Image sensing device 1 / 4.5 - inch interlaced CCD
5-1-1 Total number of pixels Approx. 1.33 megapixels (1363H × 975V)
5-1-2 Effective pixels
In tape recording Approx. 860,000 pixels (1072H × 804V)
In card recording Approx. 1,230,000 pixels (1280H × 960V)
High- resolution 16: 9 shooting Approx. 920,000 pixels (1280(H) × 720(V) when image stabilizer is OFF)
(in tape mode) Approx. 790,000 pixels (1184(H) × 666(V) when image stabilizer is ON)
5-1-3 Filter Color correction filter
5-1-4 Color separation system Differential readout
5-1-5 Signal configuration NTSC standard color TV signal
5-1-6 Scanning system 625 lines, 50 fields / 25 frames
5-1-7 Minimum subject illumination
In Auto mode Approx. 6.0 lx (1/25 sec. shutter speed)
In Low light mode Approx. 3.0 lx (1/12.5 sec. shutter speed)
In Night mode Approx. 1.5 lx (1/6 sec. shutter speed)
5-1-8 Subject illumination range Approx. 1.5 lx to approx. 100,000 lx
MVX250i E, MVX200i E, MVX200 E
21

MVX250i E, MVX200i E, MVX200 E
GENERAL DESCRIPTION OF PRODUCT
5-2 Photo lens
5-2-1 Nominal focal length
Tape recording MVX250i E 3.5 to 63 mm 18× zoom (35 mm film equivalent : 45.4 to 817.2 mm)
MVX200i E, MVX200 E
3.5 to 49 mm 14× zoom (35 mm film equivalent : 45.4 to 635.6 mm)
Card recording MVX250i E 3.5 to 63 mm 18× zoom (35 mm film equivalent : 37.9 to 682.2 mm)
MVX200i E, MVX200 E
3.5 to 49 mm 14× zoom (35 mm film equivalent : 37.9 to 530.6 mm)
5-2-2 Nominal diametric ratio
MVX250i E 1 : 1.8 (F3.4 on tele end)
1 : 1.8 (F3.3 on tele end)
MVX200i E, MVX200 E
1 : 1.8 (F3.1 on tele end)
5-2-3 Lens configuration 10 elements in 8 groups, using one two- sided aspherical lens
5-2-4 Focus adjustment Inner focus type, manually adjustable (adjusted by rotating multi- dial)
5-2-5 Minimum object distance 10 mm (AF linked ; wide end), 1 m for full zoom area (from lens tip)
5-2-6 Power zoom Multi- level adjustable power zoom. Slide lever operation. Zoom speed can be adjusted by mov-
ing slide lever.
Manual zoom not possible (No zoom ring)
5-2-6-1 Zoom speed
Optical zoom Approx. 4.3 seconds to approx. 50 seconds
Using electronic zoom Approx. 5.8 seconds to approx. 55 seconds
5-2-7 Focal length display None. Simple zoom display inside finder.
5-2-8 Macro mechanism Wide end macro
5-2-9 Macro shooting distance 10 mm (from lens front)
5-2-10 Filter diameter 34 mm P0.5
5-2-11 Accessory lens, filter Can use WD-H34, TL-H34, FS-34U
5-2-12 Lens hood None
5-2-13 Lens cap Included ; Screw-on type
5-3 Digital zoom
5-3-1 During tape recording
MVX250i E To 72× (approx. 252 mm (35 mm equivalent : 3,269 mm)), to 360× (approx. 1,260 mm (35 mm
equivalent : 16,344 mm))
MVX200i E, MVX200 E
To 56× (approx. 196 mm (35 mm equivalent: 2,542 mm)), to 280× (approx. 980 mm (35 mm
equivalent : 12,712 mm))
5-3-2 During card recording
MVX250i E To 72× (approx. 252 mm (35 mm equivalent : 2,728.8 mm))
MVX200i E, MVX200 E
To 5 6 × (approx. 196 mm (35 mm equivalent : 2,122.4 mm))
5-4 Image stabilization function Supported
5-4-1 System Electronic image stabilizer
5-4-2 Image stabilization detection Angular velocity sensing (using piezoelectric vibration sensor)
5-5 Shooting modes Motion video shooting mode, photo shooting mode (card recording)
5-5-1 Tape mode Normal motion video is recorded (interlaced scanning) on miniDV cassettes.
In addition, when an SD memory card (or MultiMediaCard) is installed and [ ] Fine], or [
] Normal] is selected for [Photo record] on the menu, still images (640 × 480) are recorded
on the memory card while motion video is recorded on the tape. (Simultaneous recording)
5-5-2 Card mode Still images (progressive photo images: JPEG) or motion video (Motion- JPEG 15 (12.5) frames/
sec audio (monaural)) can be recorded on SD memory card (or MultiMediaCard).
Refer to the memory card system on page 27.
5-6 Exposure control
5-6-1 Program AE Full Auto mode, Auto mode, Sports mode, Portrait mode, Spotlight mode, Surf (Sand) & Snow
mode, Low Light mode, Night mode, Night+ mode, Super Night mode (Night+, Super Night
mode are for MVX250i E only)
22

MVX250i E, MVX200i E, MVX200 E
GENERAL DESCRIPTION OF PRODUCT
5-6-2 AE photometric system
Tape recording Center- bottom- weighted average :
Full Auto mode, Auto mode, Sports mode, Portrait mode, Low Light mode,
Night mode, Night+ mode, Super Night mode (Night+ mode and Super
Night mode are for MVX250i E only)
All area average photometry + 128-segment (
Spotlight mode, Surf & Snow mode
Card recording Evaluative photometry (128- segment):
Full Auto mode, Auto mode, Sports mode, Portrait mode, Low Light mode,
Night mode, Night+ mode and Super Night mode (Night+ mode and Super Night mode are available in MVX250i E only.)
All area average photometry + 128- segment evaluative photometry :
Spotlight mode, Surf (Sand) &Snow mode
5-6-3 Exposure correction function
AE lock AE is locked by pressing the EXP lock button. After the AE is locked, the exposure level can be
corrected using the SET button (except in Full Auto mode).
Exposure correction amount ± 11 levels(–11 to 0 to +11).
Indicated as number in the viewfinder (EXP lock ± 0).
5-6-4 Electronic shutter
5-6-4-1 In Auto mode <Tape mode>
Auto : 1/25 to 1/500 sec (with auto slow shutter ON)
1/50 to 1/500 sec (with auto slow shutter OFF)
Select : 1/50, 1/120, 1/250, 1/500, 1/1000 or 1/2000 sec.
<Card mode>
Auto : 1/12.5 to 1/250 sec (with auto slow shutter ON)
1/25 to 1/250 sec (with auto slow shutter OFF)
Select : 1/50, 1/120 or 1/250 sec.
5-6-4-2 In Low Light mode 1/12.5 (fixed speed)
5-6-4-3 In Night mode
Tape recording 1/6 sec to 1/500 sec (same for Night+, Super Night modes of MVX250i E)
Card recording 1/2 sec to 1/250 sec (same for Night+, Super Night modes of MVX250i E)
5-7 AF (Auto Focus)
5-7-1 System TTL–video signal sensing
5-7-2 AF range finding area
During Tape mode Screen center
During Card mode One of 3 locations on screen selected (screen center only in full auto mode)
5-7-3 AF Range finding frame display
During Tape mode None
During Card mode Supported (During focus priority : User can select desired frame (green) from one of the 3- point
range finding frame display. Screen center only during Full Auto mode.)
5-7-4 AF operating range 10 mm to infinite (at wide end) ; 1 mm to infinite in full zoom area from lens front
5-7-5 AF operation illumination range Approx. 50 lx - 100,000 lx
5-7-6 AF mode switching Continuous AF / manual focus / infinite focus. AF ON/OFF switching is possible in all but Full
Auto mode (operation by pressing focus button).
Manual focus During manual focus (AF OFF), the MF indicator appears in the viewfinder.
Infinity focus The shooting distance can be forced to infinity by holding down the focus button in the auto
focus mode.
5-8 Viewfinder 0.33-inch Color LCD (approx. 113,000 pixels). ON when LCD monitor closed (panel facing in-
wards) and during mirror shooting
5-8-1 Rotation Possible (70 deg. upward to support low-angle shooting)
5-8-2 Detaching eyepiece Possible
5-8-3 Diopter movement range +1.0 to –5.0 diopter (when eye is at eyepiece)
5-8-4 Lens configuration Two elements in two groups
5-9 LCD monitor 2.5-inch Color LCD Approx. 123,000 pixels (560 (H) × 220 (V)) TFT active matrix drive RGB
delta arrangement; ON when LCD monitor not closed (panel facing inwards)
5-9-1 Angle adjustment Possible ; Monitoring is possible for high-angle, low-angle, and mirror shooting
16H × 8V)
evaluative photometry
:
23
MVX250i E, MVX200i E, MVX200 E
GENERAL DESCRIPTION OF PRODUCT
5-9-2 Information display Color display of operating mode, simple zoom position, remaining battery charge, remaining
tape, time code, warnings and other indications. The indicators are not displayed during mirror
shooting. 8 languages of Japanese, Chinese (simplified Chinese), English, German, French,
Italian, Spanish and Russian supported.
Relationship between LCD monitor and viewfinder
Camera mode, Card / Camera mode VCR mode and Card Playback
LCD panel position LCD panel CVF LCD panel CVF
Panel closed (panel facing inwards) OFF ON OFF ON
Panel closed (panel facing outwards) ON OFF ON OFF
Panel open ON OFF ON OFF
Mirror shooting
*2
*1 : Mirror mode possible by menu selection.
*2 : During mirror mode, only or and the self-timer display
appear.
5-10 White balance adjustment TTL 128-segments, new white extraction system FAWB. Includes set / preset (outdoor: 5,600 k;
indoor: 3,200 k)
(selected from camera menu).
5-10-1 Adjustment range 2,800 k to 8,000 k
5-11 Digital feature functions The following modes are provided : Fader, Effects, Multi-screen
Fader : Linked to Start/Stop button. Can be used 1 time when Fade mode displayed.
Effects : Effect continues until mode is turned OFF.
Multi-screen : Loads and displays multiple screens at set interval or manually. Displayed until
Card mix : Mixes and displays included sample images, images recorded on cards and mo-
5-11-1 Fader Audio synchronized fader
(Only in recording on tape) Auto Fade (Japanese model : Fade to white, Overseas model: Fade to black), Wipe, Corner Wipe,
Jump, Flip, Puzzle, Zigzag, Beam, Tide
5-11-1-1 Fade time Approx. 4 sec
5-11-2 Effects Art, Black and White, Sepia, Mosaic, Ball, Cube, Wave, Color Mask, Mirror (Only Black and
White is available during card recording)
Effect function turned ON / OFF from D. Effect button. Toggle operation
5-11-3 Multi-screen (tape recording only ; excludes Night mode)
5-11-3-1 Number of screens 4 (2 × 2), 9 (3 × 3), 16 (4 × 4)
5-11-3-2 Operation mode Manual, Fast (4 frames), Normal (6 frames), Slow (8 frames)
During Low Light mode, the settings are Fast (4 frames), Normal (8 frames), and Slow (12
frames)
5-12 Card Mix
5-12-1 Mix type Card Chroma Key, Card Lumi. Key, Camera Chroma Key, Card Animation
5-12-2 Mix level adjustment Possible. 32 levels
5-12-3 Animation type 3 types : Corner Animation, Straight Animation or Random Animation (Animation Titles are
already recorded in the supplied SD Memory Card SDC-8M.)
5-12-4 Availability in operation mode
*1
ON
ON ON OFF
(Mode indication goes out when Fader ends.)
mode is turned OFF.
tion video.
Camera
Card (Still Image) Card (Motion Video) Tape (Still Image) Tape (Motion Video)
Fader ×××●
Effect Black and White only Black and White only ●●
Multi-screen ××●●
Card Mix ××●●
24
MVX250i E, MVX200i E, MVX200 E
GENERAL DESCRIPTION OF PRODUCT
5-13 Built-in microphone Stereo using electret condenser microphone
5-13-1 Wind screen function Supported ; AUTO or OFF can be selected (Selected from menu. However, built-in microphone
only.)
5-14 Auxiliary light (MVX250i E, MVX250i E only)
Equipped with white LED
5-14-1 Lighting mode Night+ mode : LED is forcibly lighted.
Super Night mode : LED lights depending on brightness of the subject.
5-15 Other additional functions
5-15-1 Time code Displays recording time (0:00:00 to 7:59:59) and records in sub-code area.
5-15-2 Data code The date and camera information during recording are automatically recorded and can be dis-
played during playback.
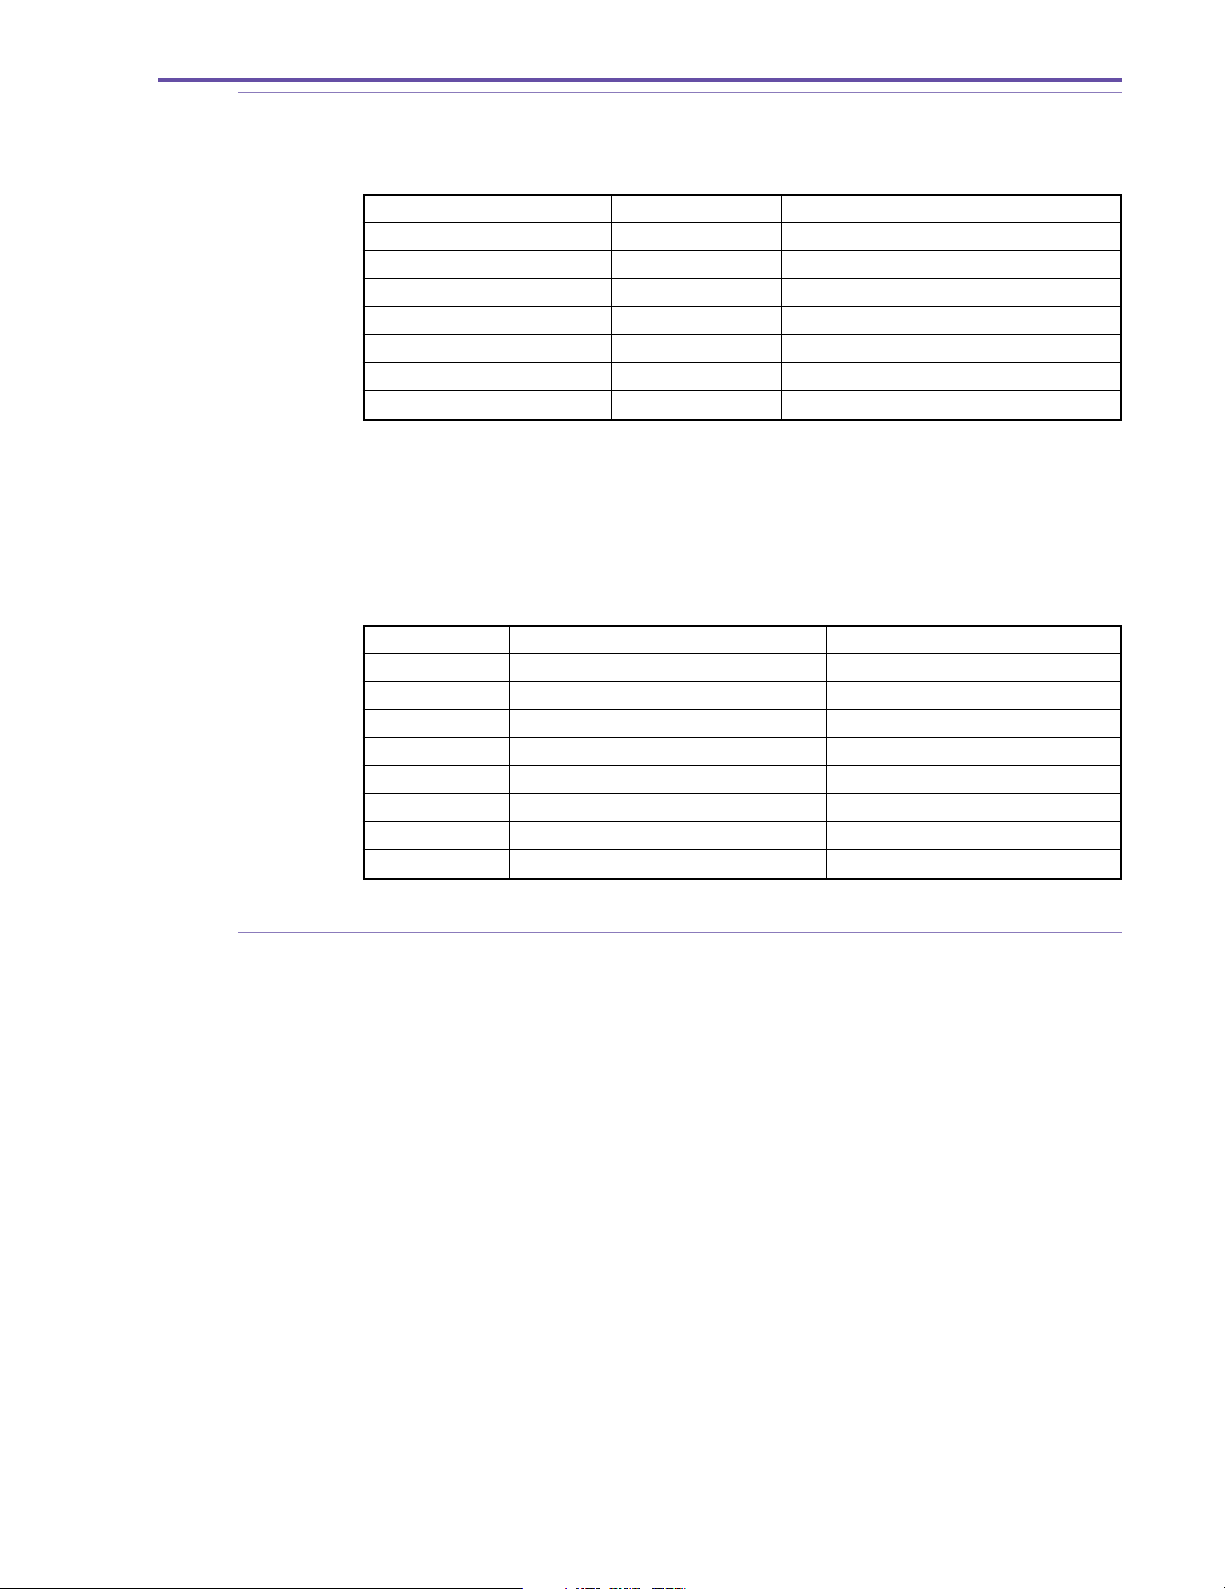
a. Time and date Automatic calendar range: January 1, 2004 through December 31, 2030 (the initial setting is
January 1, 2004)
One of the following three formats can be selected for the date / time display.
World clock capability (select the name of your destination city and the date and time are automatically adjusted to the local date and time.) Supports daylight savings time.
During playback, time can be displayed in three different modes (date only, time and date, or
time only). (Time and date can be displayed for January 1, 1990 through December 31, 2089.)
b. Camera data Shutter speed and aperture value information are recorded (but not displayed during recording),
and can be displayed during playback.
5-15-3 Accessory shoe Supported. Advanced accessory shoe supported (MVX250i E only)
5-15-4 REC Search mechanism Supported. Tape can be played (forward or reverse) by pressing the REC Search button while
camera recording is paused. (When REC Search ends, camera recording is paused again.)
5-15-5 REC Review Supported. Accessed by operating the Recording Check button when camera recording is paused
(in Tape mode only).
5-15-6 Zero Set Memory Supported. This function allows you to rewind or fast-forward the tape to the position where the
WL-D83 Zero Set Memory key is pressed (the counter value is set to 0:00:00). (During recording, only zero setting is allowed. This function can be used in Playback mode.) “M” display
appears at the far right of the counter.
5-15-7
Remote control reception ON/OFF
5-15-8 Headphone volume adjustment Possible. Adjustable with SET button
5-15-9 16:9 shooting High- resolution 16: 9 (CCD extraction equivalent to approx. 790,000 pixels when image stabi-
5-15-10 AEB shooting Included. (First shot : No correction, Second shot : -0.5 level, Third shot : +0.5 level)
5-15-11 Skin detail mode When skin areas are detected, they are expressed softly, and the small blemishes, lines, etc.
5-15-12 Still image check time setting The time used for checking still images can be set after the photo button is pressed and its
6 Recorder
6-1 Recording functions Camera shooting and recording, DV input recording**, analog input recording
6-1-1 Recording format Consumer electronics digital DVC (SD specs)
6-1-2 Tape speed Approx. 18.83 mm / second (in SP mode), approx. 12.57 mm / second (in LP mode)
6-1-3 DV input recording Complies with IEEE1394.
6-1-4 Analog input recording Records analog video / audio signals using an S-Video terminal or AV terminal.
6-1-5
Priority of terminals during recording
6-2 Audio Dubbing Recording Possible. (SD spec tapes only)
6-2-1 Insert-capable tape Only tapes with 12- bit/ SP recording (other than 4- channel simultaneous recording) can be used
Possible. This can be done in Camera mode and VCR mode (by selecting from menu).
lizer is ON or CCD extraction equivalent to approx. 920,000 pixels when image stabilizer is
OFF). If 16: 9 mode is selected, the screen switches to a letterbox display (with black bands
(masked) at the top and bottom)). In Tape mode only
become unnoticeable. ON or OFF setting possible.
operation is released. One of 6 settings; OFF (0 sec), 2, 4, 6, 8 or 10 seconds can be selected as
the setting mode.
** : MVX250i E, MVX200i E only
Records video / audio signals from a digital video camera connected through a DV cable.
(MVX250i E, MVX200i E only)
DV terminal > S-Video terminal > AV terminal (MVX250i E, MVX200i E only)
in Audio Dubbing Recording.
25

MVX250i E, MVX200i E, MVX200 E
GENERAL DESCRIPTION OF PRODUCT
6-2-2 Audio Dubbing signal input Audio signal from LINE (AV terminal) or microphone (external > internal). MVX200i E has no
external microphone terminal. MVX200 E has no external microphone terminal and line in
function.
6-2-3 Switching to Audio Dubbing Press audio dubbing button on remote control while playback is paused.
6-3 Playback functions Standard Playback and Superb Playback
6-3-1 Standard Playback
a. Video Video recorded in SP and LP modes
b. Audio 16-bit Supports the following sampling frequencies : 48 kHz, 44.1 kHz, 32 kHz.
12-bit Sampling frequency : 32 kHz
Stereo 1, Stereo 2, or mixed playback of Stereo 1 and Stereo 2 (variable mix ratio)
6-3-2 Special Playback Plays video only
a. Still image playback Pure frame playback
b. Fast-forward playback Approx. 11.5× speed.
c. Rewind playback Approx. 11.5× speed.
d. Frame playback Forward/reverse frame feeding
e. Slow playback Forward/reverse 1/3× speed
f. 1× SP playback Forward/reverse 1× speed
g. 2× SP playback Forward/reverse 2× speed
6-4 Tape fast-forward / rewind time Approx. 2 minutes and 20 seconds (using 60-minute tape)
6-5 Search
6-5-1 Date search If there is more than one recording date, this function cue up to the position where the date
changes. Forward/reverse date search (use the / keys on the remote control after selecting Date search with the remote control Search Select key)
Search can be set for up to 10 images before or after the current position.
6-5-4 Index search None
6-5-5 End search When a tape is played back upon completion of the shooting, this function transports the tape to
the position where the shooting last ended, it cues to the end of the shooting on the tape, and then
places the tape in the stop mode. Furthermore, when an end search is being performed, the tape
is played back starting about 4 seconds before the end of the shooting, enabling the image imme-
diately before the end to be checked. However, this function does not work when the tape has
been removed after shooting.
6-6 Input signals
6-6-1 DV terminal SD format signals complying with IEEE1394– AV / C protocol (MVX250i E, MVX200i E only)
6-6-2 AV terminal (MVX250i E, MVX200i E only)
a. Video signals
Types of signals PAL standard color video signals
Impedance 75 Ω
Signal level 1Vp-p (composite)
b. Audio signals
Types of signals Stereo audio signals
Impedance Min. 40 kΩ
Signal level −10dBv
6-6-3 S Video terminal (MVX250i E, MVX200i E only)
Signal configuration PAL Y/C separated video signal
Impedance 75 Ω
Signal level 0.3Vp-p (color burst signal)
6-6-4 Microphone terminal Included. (MVX250i E only)
6-6-5 USB terminal Supports USB 2.0 FullSpeed class.
6-7 Output signals (MVX250i E only)
6-7-1 DV terminal SD format signals complying with IEEE1394-AV/C protocol
6-7-2 AV terminal
a. Video signals
Types of signals PAL standard color video signals
Impedance 75 Ω
Signal level 1 Vp-p (composite)
Horizontal resolution
Self-recording/playback Approx. 530 TV lines (screen center)
Camera EE OUT Max. approx. 530 TV lines (screen center)
26

b. Audio signals
Types of signals Stereo audio signal
Impedance Max. 3 kΩ
Signal level −10 dBv
Frequency characteristic 60 Hz to 16 kHz (Range between 1 kHz standard ±3 dB)
Audio signal S/N
Built-in microphone input Min. 48 dB
External microphone input Min. 48 dB (However, the MVX200i E, MVX200 E model does not have an external micro-
phone input terminal.)
6-7-3 S-Video terminal
Signal configuration PAL Y/C separated video signal
Video signals 1 Vp-p (brightness + synchronization signal)
Color signal 0.3 Vp-p (Color burst signal)
Impedance 75 Ω
Signal level 0.3 Vp-p (Color burst signal)
Brightness signal S/N Min. 45 dB
Horizontal resolution
Self recording / playback Conforms to camera EE OUT
Camera EE OUT Max. approx. 530 TV lines (screen center)
6-7-4 Headphone terminal φ 3.5 mm stereo mini jack
Output impedance 100 Ω
Signal level −25 dBv (with 16 Ω load at maximum volume)
6-7-5 USB terminal Supports USB2.0 FullSpeed class
USB device class Independent class, PTP class, mass storage class, audio class, video class
Compatible computer systems Windows : IBM PC/AT compatible, NEC PC98-NX Series
Macintosh : Power Macintosh, PowerBook, iMac, iBook
PC operating system Windows : Windows 98, Windows 98SE, Windows ME, Windows 2000, Windows XP
Macintosh : Mac OS 9 or later
6-8 Memory card system
6-8-1 Types of memory cards used SD memory card, Multimedia card
6-8-2 Recordable image types
a. Still image JPEG recording
In Camera mode When [ ] Fine], or [ ] Normal] is selected for [PHOTO REC] on the [CAM SET UP]
menu, still images can be recorded on the memory card by operating the photo button while
motion video is being recorded on the tape. (Tape simultaneous recording function: VGA still
images)
In Card Recording mode Still image is recorded using the Photo button (image size and image quality are selectable).
Writing in Progress warning is displayed in the EVF/ LCD.
During playback mode Still image is recorded using the photo button during tape playback (pressed halfway down for
still image playback and pressed all the way down for recording). (VGA still images)
Also, DV input images (when no tape loaded or loaded tape is stopped) can be recorded by
pressing the photo button (pressing halfway captures still image of the DV input, pressing all the
way down records the image).
b. Motion video AVI (Video data: Motion JPEG / Audio data: WAVE (monoaural))
Records only camera images during Card Record mode and from tape during VCR mode (recording from DV input,
AV input and S- Video input are disabled).
Image quality in recording onto card from tape / DV input
MVX250i E, MVX200i E, MVX200 E
GENERAL DESCRIPTION OF PRODUCT
Source Source recording system Image recorded on card
Tape / DV input Progressive or frame motion video recording Progressive or frame image
Tape / DV input Normal motion video recording Simple pure frame image
Analog AV input Normal motion video recording Field image
27
MVX250i E, MVX200i E, MVX200 E
GENERAL DESCRIPTION OF PRODUCT
6-8-3 File names/folder names Based on the DCF (Design rule for Camera File systems) and still image (Exif 2.2) file manage-
ment specifications / DPOF (Digital Print Order Format) file management specifications, the
following names are assigned to recorded cards after formatting in the Format menu.
a. Card volume label CANON DV
Types of files Compression system Folder name and file name
Still image (Exif 2.2) file JPEG //DCIM/xxxCANON/IMG_yyyy.JPG
Motion video file Motion JPEG //DCIM/xxxCANON/MVIyyyy.AVI
Motion video thumbnail file (*1) JPEG //DCIM/xxxCANON/MVIyyyy.THM
Photo stitch JPEG //DCIM/xxxCANON/STz_yyyy.JPG
Zoom browser JPEG //DCIM/xxxCANON/AUT_yyyy.JPG
DPOF file TEXT //MISC/AUTPRINT.MRK
Work file TEXT //DCIM/CANONMSC/xxx.tmp
xxx : Folder No., yyyy : File number, z : A to Z
(*1) Comes from motion video file of same File No.
DCF folder and file name //DCIM/xxxCANON/AUT_yyyy.JPG
xxx : folder No., yyyy : file No.
b. File number Files are managed internally by folder No. and file No.
Photographed images are assigned file numbers from 0001 to 9900, and are stored in folders
(100 files to a folder). Each folder is assigned numbers 100 to 998.
Relationship between folder No. and file No.
Folder No. File No. Saved files
100 0001 0002 0003 ···· 0099 0100
101 0101 0102 0103 ···· 0199 0200
102 0201 0202 0203 ···· 0299 0300
···
198 9801 9802 9803 ···· 9899 9900 Photographed image recording area
200 0001 0002 0003 ···· 0099 0100
···
998 9801 9802 9803 ···· 9899 9900
Photographed images start from 101-0101, and are basically numbered to be greater than Directory No.- File No. of files saved on MultiMediaCards.
6-8-4 Recorded image size/image quality
a. Still image recording
In tape simultaneous recording 640 × 480 dots(VGA) / Switchable between Fine and Normal
In card / camera mode 1280 × 960 dots (XGA), 640 × 480 dots (VGA) / Switchable between Super Fine, Fine, and
Normal
During tape playback, line input, and card recording of DV input image
640 × 480 dots (VGA) / Switchable between Super Fine, Fine, and Normal
b. Motion video recording (Motion JPEG)
320 × 240, 160 × 120 dots 12.5 frames / sec
Sample image included at time of shipping
28
 Loading...