


 Loading...
Quick Start Guide Kurzanleitung
Guide de démarrage rapide Guida rapida all'installazione Guía de iniciación rápida Aan de Slag-gids
Guia de consulta rápida Introduktionsvejledning
Οδηγός Γρήγορης Εκκίνησης
Kort innføring Pikaopas Snabbguide Stručná příručka
Beüzemelési útmutató Szybkie wprowadzenie
Краткое руководство по началу работы
Stručná príručka
Hızlı Kurulum Kılavuzu
ENGLISH |
|
MAGYAR |
|
|
|
|
|
|
DEUTSCH |
|
POLSKI |
|
|
|
FRANÇAIS |
|
РУССКИЙ |
|
|
|
ITALIANO |
|
SLOVENSKY |
|
|
|
ESPAÑOL |
|
TÜRKÇE |
|
|
|
NEDERLANDS |
|
|
|
|
|
PORT DO BRASIL |
|
|
|
|
|
DANSK |
|
|
|
|
|
|
|
|
ΕΛΛΗΝΙΚΑ |
|
|
|
|
|
NORSK |
|
|
|
|
|
|
|
|
SUOMI |
|
|
|
|
|
|
|
|
SVENSKA |
|
|
|
|
|
ČESKY |
|
|
|
|
|

ENGLISH
Quick Start Guide
Please read this guide before operating this scanner. After you finish reading this guide, store it in a safe place for future reference.
|
Table of Contents |
|
|
Safety Precautions ......................................... |
3 |
Package Contents .......................................... |
4 |
Preparing the Scanner ................................... |
5 |
Installing the Software .................................... |
6 |
1

ENGLISH |
|
|
|
|
* Screens are based on Windows 7 operating system Home Premium and Mac OS X 10.7.x. |
||||
|
|
|||
|
|
|||
|
|
|
Actual screens may differ depending on the OS version. |
|
|
|
• |
Windows is a trademark or registered trademark of Microsoft Corporation in the U.S. and/ |
|
|
|
|
or other countries. |
|
|
|
• |
Mac and Mac OS are trademarks of Apple Inc., registered in the U.S. and other countries. |
|
|
|
• |
All other company names and products mentioned herein may be trademarks or |
|
|
|
|
registered trademarks of their respective companies. |
|
Warning
When you use this product, you should pay attention to the following legal issues:
•Scanning of certain documents, such as bank notes (bank bills), government bonds and public certificates, may be prohibited by law and may result in criminal and/or civil liability.
•You may be required under law to obtain authorization from a person possessing
copyrights or other legal rights to the item being scanned.
If you are uncertain of the legality of scanning any particular item, you should consult your legal adviser in advance.
The socket-outlet shall be installed near the equipment and shall be easily accessible.
Notes for Energy Saving Setting
For purpose of energy saving, this product will be automatically turned off after designated period without operation (The Auto Power Off function).
For instructions on how to change the setting, refer to the "On-Screen Manual".
Turning the Power Off
To turn the scanner off, be sure to press the ON button. Check the POWER lamp goes off, and then unplug the power cord.
If you unplug the power cord while the POWER lamp is lighting or blinking, the scanning unit does not move correctly.
2

Safety Precautions
 Safety Precautions
Make sure to read following precautions before using the scanner and accessories. Read the "On-Screen Manual" for precautions against product damages.
ENGLISH
 WARNING
Indicates a warning concerning operations that may lead to death or injury to persons if not performed correctly. In order to use the scanner safely, always pay attention to these warnings.
 WARNING
This product emits low level magnetic flux. If you use a cardiac pacemaker and feel abnormalities, please move away from this product and consult your doctor.
 WARNING
Fire or electrical shock may result when following acts are carried out.
•Do not place the scanner near flammable liquids such as alcohol or thinners.
•Do not use cables other than the one supplied.
•Do not plug the power cord into outlets with voltages other than the specified voltages.
•Always plug the power cord in all the way.
•Do not plug in /unplug the power cord with wet hands.
•Do not pull or excessively bend the power cord.
•Do not place heavy objects on the power cord.
•Do not twist or tie the power cord.
•Do not connect excessive numbers of plugs into one electrical outlet.
•Do not use multiple extension cords.
•If lightning strikes in your neighborhood, unplug the power cord from the outlet and refrain from using it.
•When cleaning the scanner, always unplug the power cord. Do not use flammable liquids such as alcohol, benzene or thinners. Wipe with a soft dry cloth.
•Do not take apart or modify the scanner and supplies.
Unplug the power cord once a month to see if the cord/plug shows anything unusual such as heat, rust, bent, scratch and split and so on. Unplug the power cord and call for service if above is observed since they may lead to a fire or an electric shock afterwards.
If you hear unusual noises, see smoke, feel excessive heat, smell anything unusual, drop metallic part or spill liquid into the scanner, immediately unplug the power cord and call for service. Continued use of the scanner may result in fire or electrical shock.
3

ENGLISH
Package Contents
Package Contents
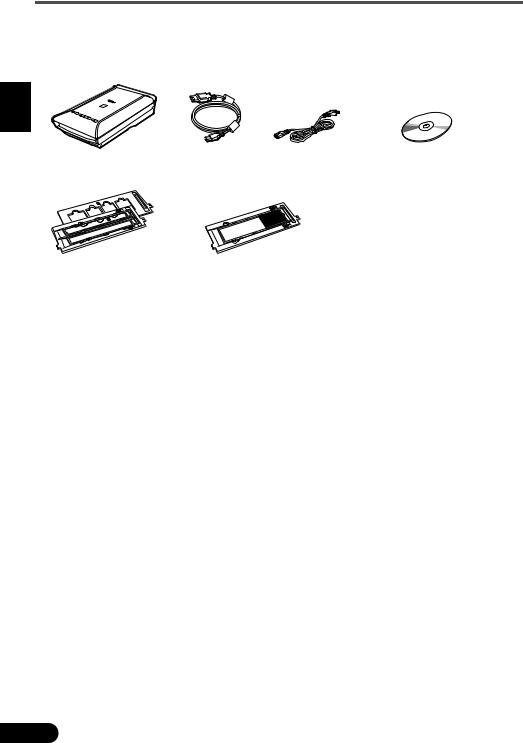
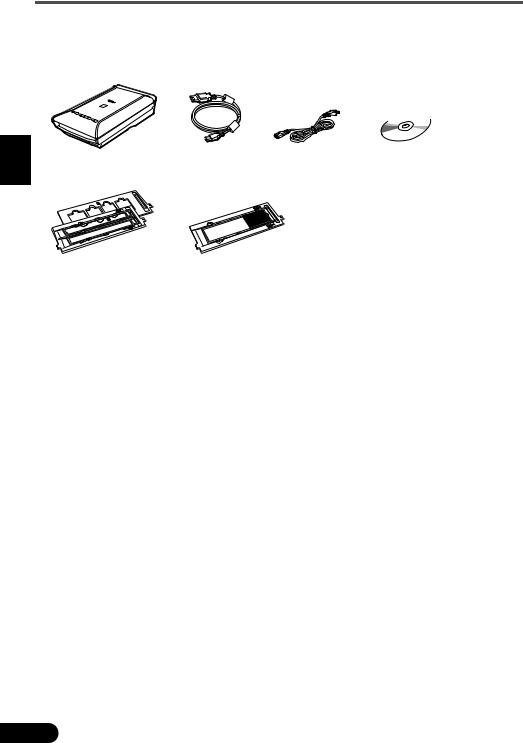
Scanner and Accessories
|
|
|
|
|
|
Scanner |
USB Cable |
Power Cord |
Setup CD-ROM |
||
Film Guides |
Film Guide |
(for 35 mm film strip/slide) |
(for 120 format film) |
Documentation
•Quick Start Guide (this document)
•Additional Documents
4
Preparing the Scanner
Preparing the Scanner
1 Peel the shipping tapes off the scanner.
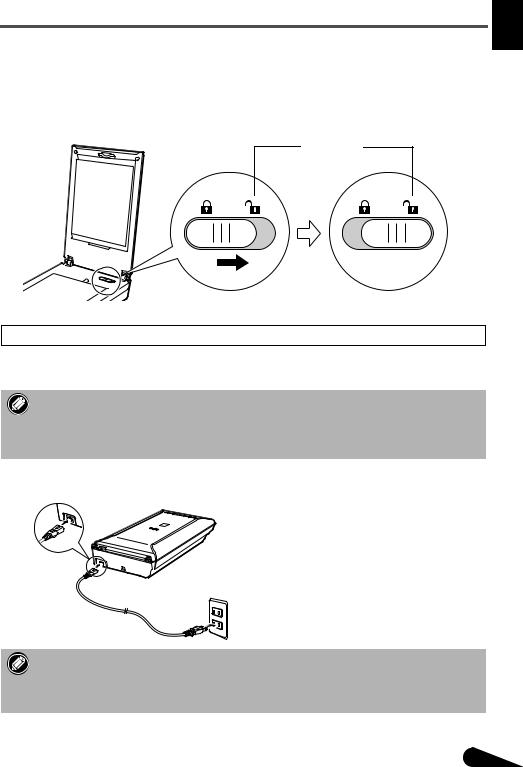
2 Open the document cover and slide the scanner lock switch toward the unlock mark ( ).
).
ENGLISH
Unlock Mark
• The document cover is locked temporarily at an angle of about 50 degrees.
3 Close the document cover.
4
5
•Handle the scanner with both hands. Be careful not to drop the scanner.
•When you carry or transport the scanner, press the ON button to turn the power off, and then
make sure to slide the scanner lock switch toward the lock mark ( ) to fasten the scanning unit.
Connect the supplied power cord to the scanner.
Plug the power cord into the electrical outlet.
•Only use the power cord provided with the scanner. Use of other cables may lead to a malfunction.
•Always attach the power cord to the scanner before plugging into the electrical outlet. Reversing this order may lead to malfunctions.
5

ENGLISH
Installing the Software
Installing the Software
• |
Quit all applications before installation. |
• |
Log on using an administrator account. |
• |
Internet connection may be required during the installation. Connection fees apply. |
• |
Internet connection is required during software installation. Connection fees apply. |
|
|
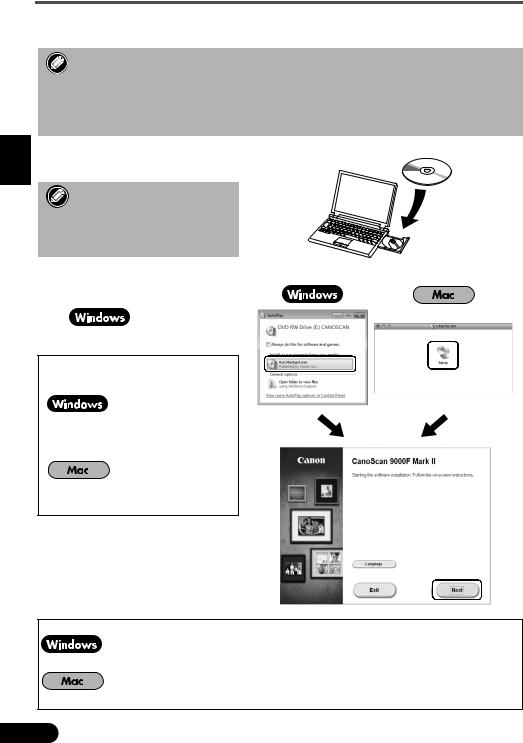
1 Insert the CD-ROM into the computer.
If the USB cable is already connected, unplug it. If a message appears on the computer, click Cancel.
2 Follow the on-screen instructions to proceed.
To select a language, click
Language.
If the CD-ROM does not autorun:
Double-click (My) Computer > CD-
ROM icon > MSETUP4.EXE.
Double-click the CD-ROM icon on the desktop.
To complete the installation, follow the on-screen instructions on the computer.
During installation, you will be prompted to connect the USB cable and turn the power on. After installation is completed, connect the USB cable and turn the power on.
6

Installing the Software
Use the On-Screen Manual on the Computer
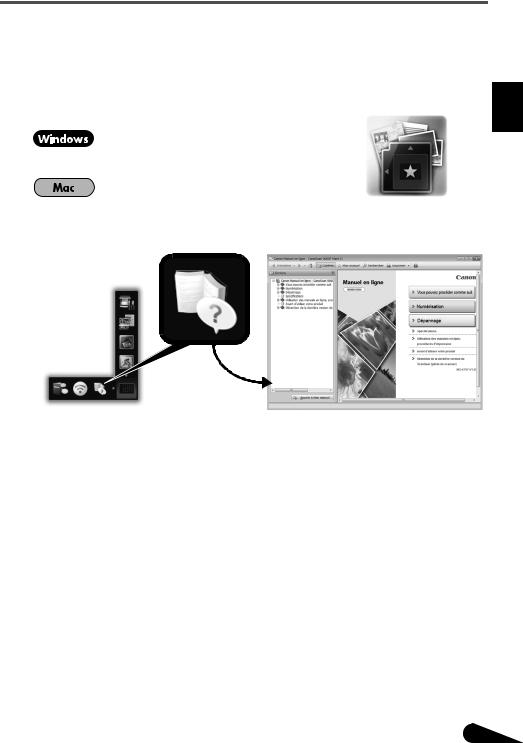
For more information about the functions and operation of the software and also the troubleshooting tips, refer to the "On-Screen Manual". You can start the "On-Screen Manual" from the Quick Menu.
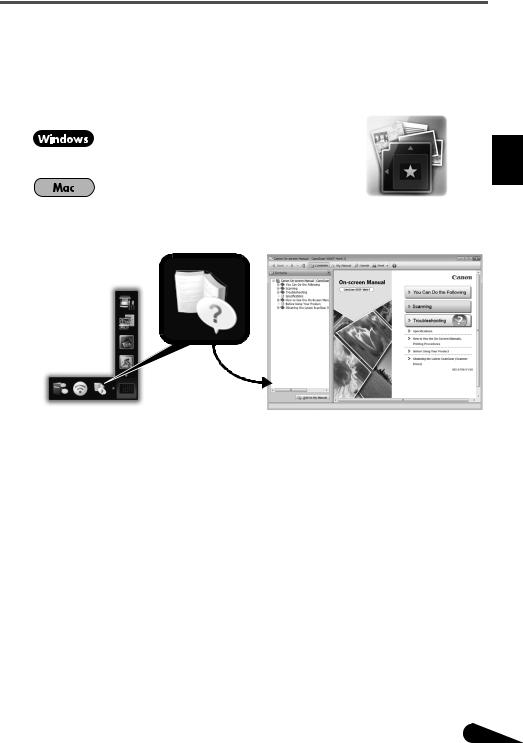
Starting the On-Screen Manual
1 Start the Quick Menu.
Double-click the Quick Menu shortcut icon on the desktop.
Click the Quick Menu icon in the Dock.
2 Click the on-screen manual icon on the Quick Menu.
• It requires the installations of the Quick Menu and the "On-Screen Manual".
Types of Document Supported
•A sheet of photo document and CD/DVD
•Several sheets of photo documents and CD/DVD
•Magazine and book
•Films
There are various ways to place documents in accordance with the document type and number of documents. For details, refer to the "On-Screen Manual".
ENGLISH
7

Kurzanleitung
DEUTSCH
Lesen Sie diese Anleitung vor dem Betrieb des Scanners durch. Bewahren Sie die Anleitung nach dem Lesen für den späteren Gebrauch an einem sicheren Ort auf.
|
|
Inhalt |
|
Sicherheitsvorkehrungen................................ |
3 |
Packungsinhalt ............................................... |
4 |
Vorbereitung des Scanners ............................ |
5 |
Installieren der Software ................................. |
6 |
1

|
* Die Bildschirme beziehen sich auf Windows 7 operating system Home Premium und Mac |
|
DEUTSCH |
|
OS X 10.7.x. Die tatsächlichen Bildschirme weichen möglicherweise je nach verwendeter |
|
Betriebssystemversion ab. |
|
|
|
|
|
• |
Windows ist eine Marke oder eingetragene Marke der Microsoft Corporation in den USA |
|
|
und/oder anderen Ländern. |
|
• |
Mac und Mac OS sind eingetragene Marken von Apple Inc. in den USA und anderen |
|
|
Ländern. |
|
• |
Alle anderen hier erwähnten Unternehmensnamen und Produkte können ebenfalls |
|
|
Marken oder eingetragene Marken des jeweiligen Herstellers sein. |
Warnung
Beachten Sie beim Gebrauch des Geräts die folgenden gesetzlichen Regelungen:
•Das Scannen bestimmter Vorlagen wie Geldscheine (Banknoten), Bundesobligationen und Urkunden ist untersagt und kann strafund zivilrechtlich verfolgt werden.
•Zum Scannen urheberrechtlich geschützten Materials kann die Genehmigung des Urheberrechtsinhabers erforderlich sein.
In Fällen, in denen Sie sich bezüglich der rechtlichen Lage nicht sicher sind, fragen Sie vorsorglich Ihren Rechtsberater.
Die Steckdose muss sich in der Nähe des Geräts befinden und leicht zugänglich sein.
Hinweise zur Energiespareinstellung
Dieses Produkt wird automatisch ausgeschaltet, wenn in einem bestimmten Zeitraum keine Bedienvorgänge am Gerät stattfinden (Funktion zum automatischen Ausschalten).
Anweisungen zum Ändern der Einstellung finden Sie im „On-Screen-Handbuch“.
Ausschalten des Geräts
Drücken Sie zum Ausschalten des Scanners die Taste EIN (ON). Vergewissern Sie sich, dass die POWER-Anzeige nicht mehr leuchtet, und ziehen Sie dann das Netzkabel ab.
Falls Sie das Netzkabel abziehen, während die POWER-Anzeige leuchtet oder blinkt, bewegt sich das Scan-Modul nicht einwandfrei.
2
Sicherheitsvorkehrungen
 Sicherheitsvorkehrungen
Lesen Sie die nachfolgenden Warnhinweise unbedingt, bevor Sie den Scanner und dessen Zubehör in Betrieb nehmen.
Lesen Sie das „On-Screen-Handbuch“, das Warnhinweise zu Produktschäden enthält.
DEUTSCH
 WARNUNG
Kennzeichnet Warnhinweise, die Vorgänge betreffen, welche bei unvorschriftsmäßiger Durchführung zu Verletzungen oder zum Tod führen können. Bitte beachten Sie diese Warnhinweise unbedingt, um einen sicheren Betrieb des Scanners zu gewährleisten.
 WARNUNG
Dieses Produkt erzeugt ein geringes Magnetfeld. Falls Sie einen Herzschrittmacher tragen und Auffälligkeiten feststellen, entfernen Sie sich von diesem Produkt und wenden Sie sich an einen Arzt.
 WARNUNG
Die folgenden Vorgänge können einen Brand oder Stromschlag zur Folge haben.
•Stellen Sie das Gerät keinesfalls in der Nähe von entflammbaren Flüssigkeiten wie Alkohol, Verdünner usw. auf.
•Verwenden Sie nur die mitgelieferten Kabel.
•Stecken Sie das Netzkabel nicht in Steckdosen mit einer niedrigeren Spannung als angegeben ein.
•Führen Sie das Netzkabel stets komplett in den Anschluss ein.
•Fassen Sie Netzkabel und -stecker beim Einund Ausstecken in die Steckdose nicht mit nassen Händen an.
•Ziehen Sie nicht am Netzkabel, und biegen Sie es nicht übermäßig.
•Legen Sie keine schweren Gegenstände auf das Netzkabel.
•Verdrehen Sie das Netzkabel nicht, und machen Sie keinen Knoten in das Kabel.
•Schließen Sie keine übermäßige Anzahl von Steckern an eine Steckdose an.
•Verwenden Sie keinesfalls mehrere Verlängerungskabel.
•Falls in der Nähe ein Blitz einschlägt, ziehen Sie das Netzkabel aus der Steckdose, und sehen Sie von einer Verwendung ab.
•Vor dem Reinigen des Scanners unbedingt das Netzkabel abziehen. Keinesfalls entflammbare Substanzen wie Alkohol, Benzin oder Verdünner zur Reinigung verwenden. Wischen Sie den Scanner mit einem weichen, trockenen Tuch ab.
•Den Scanner und die Verbrauchsmaterialien keinesfalls zerlegen oder verändern.
Ziehen Sie das Netzkabel einmal im Monat aus der Steckdose, um Kabel und Stecker auf Hitze, Rost, Verbiegung, Kratzer, Risse und Ähnliches zu überprüfen. Ziehen Sie das Netzkabel aus der Steckdose, und rufen Sie den Kundendienst an, wenn Sie oben Genanntes beobachten, da hierdurch ein Brand oder Stromschlag verursacht werden kann.
Ziehen Sie das Netzkabel sofort ab, und rufen Sie den Kundendienst an, wenn Sie ungewöhnliche Geräusche, Rauch, Geruch oder übermäßige Hitzeentwicklung feststellen bzw. Metallteile oder Flüssigkeiten in den Scanner gelangen. Bei Fortsetzung des Scannerbetriebs besteht die Gefahr von Brand oder Stromschlag.
3

DEUTSCH
Packungsinhalt
Packungsinhalt
Scanner und Zubehör
|
|
|
|
|
|
Scanner |
USB-Kabel |
Netzkabel |
Installations-CD-ROM |
||
|
|
|
(Setup CD-ROM) |
||
Filmvorlagenhalter |
Filmvorlagenhalter |
(für 35-mm-Filmstreifen/Dia) |
(für 120er Filme) |
Dokumentation
•Kurzanleitung (vorliegendes Dokument)
•Zusätzliche Dokumente
4

Vorbereitung des Scanners
Vorbereitung des Scanners
1 Ziehen Sie die für den Versand am Scanner angebrachten Klebebänder ab.
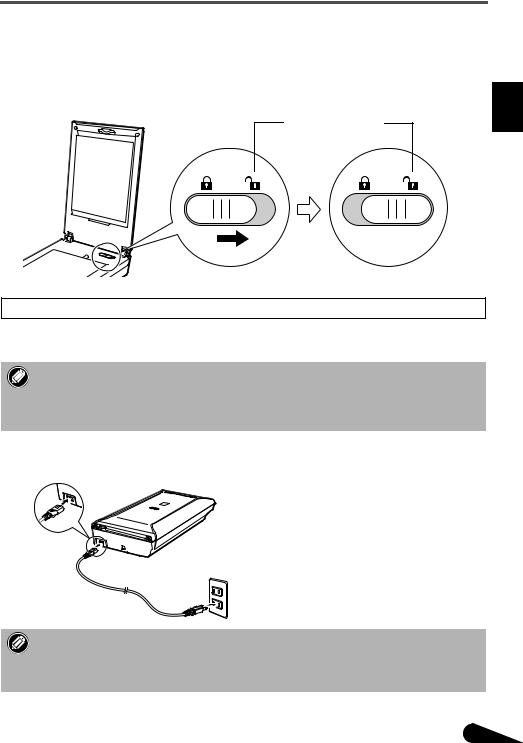
2 Öffnen Sie den Vorlagendeckel, und schieben Sie den Scanner-Sperrschalter in Richtung Entriegelungskennzeichen ( ).
).
DEUTSCH
Entriegelungskennzeichen
• Der Vorlagendeckel wird vorübergehend in einem Winkel von circa 50 Grad gesperrt.
3 Schließen Sie den Vorlagendeckel.
4
5
•Fassen Sie den Scanner stets mit beiden Händen an. Achten Sie darauf, den Scanner nicht fallen zu lassen.
•Drücken Sie beim Tragen oder Transportieren des Scanners die Taste EIN (ON), um das Gerät auszuschalten, und stellen Sie sicher, dass der Scanner-Sperrschalter in Richtung des
Verriegelungskennzeichens verschoben wurde ( ), damit das Scan-Modul verriegelt ist.
Schließen Sie das mitgelieferte Netzkabel an den Scanner an.
Stecken Sie das Netzkabel in die Steckdose.
•Verwenden Sie nur das im Lieferumfang des Scanners enthaltene Netzkabel. Der Gebrauch anderer Kabel kann zu Fehlfunktionen führen.
•Schließen Sie das Netzkabel immer zuerst an den Scanner an, bevor Sie es in die Steckdose stecken. Andernfalls kann es zu Fehlfunktionen beim Gerät kommen.
5

DEUTSCH
Installieren der Software
Installieren der Software
• Schließen Sie vor der Installation alle Anwendungen.
• Melden Sie sich über ein Administratorkonto an.
• Während der Installation ist möglicherweise eine Internetverbindung erforderlich. Es fallen Verbindungsgebühren an.
•Während der Softwareinstallation ist eine Internetverbindung erforderlich.
Es fallen Verbindungsgebühren an.
1 Legen Sie die CD-ROM in den Computer ein.
Wenn das USB-Kabel bereits angeschlossen ist, ziehen Sie es ab. Falls auf dem Computerbildschirm eine Meldung angezeigt wird, klicken Sie auf Abbrechen (Cancel).
2 Befolgen Sie die Anweisungen auf dem Bildschirm,
um fortzufahren.
Klicken Sie zur Auswahl einer Sprache auf Sprache (Language).
Falls die CD-ROM nicht automatisch gestartet wird:
Doppelklicken Sie auf
Computer bzw. Arbeitsplatz ((My) Computer) > CD-ROM- Symbol > MSETUP4.EXE.
Doppelklicken Sie auf das CD-ROM-
Symbol auf dem Desktop.
Befolgen Sie die Anweisungen auf dem Computerbildschirm, um die Installation abzuschließen.
Während der Installation werden Sie angewiesen, das USB-Kabel anzuschließen und das Gerät einzuschalten.
Schließen Sie nach Abschluss der Installation das USB-Kabel an und schalten Sie das Gerät ein.
6

Installieren der Software
Verwenden Sie das On-Screen-Handbuch auf dem Computer
Weitere Informationen zu den Funktionen und der Verwendung der Software sowie Tipps zur Fehlersuche finden Sie im „On-Screen-Handbuch“. Sie können das „On-Screen-Handbuch“ über das Quick Menu starten.
Starten vom On-Screen-Handbuch
1 Starten Sie das Quick Menu.
Doppelklicken Sie auf das Quick Menu-
Verknüpfungssymbol auf dem Desktop.
Kicken Sie auf das Quick Menu-Symbol im Dock.
2 Klicken Sie im Quick Menu auf das Symbol für das On-Screen-Handbuch.
• Die Installation von Quick Menu und „On-Screen-Handbuch“ ist erforderlich.
Unterstützte Dokumenttypen
•Ein Fotodokument und CD/DVD
•Mehrere Fotodokumente und CD/DVD
•Zeitschrift und Buch
•Filme
Je nach Dokumenttyp und Anzahl der Dokumente werden die Dokumente auf unterschiedliche Art platziert. Weitere Informationen finden Sie im „On-Screen-Handbuch“.
DEUTSCH
7

 Guidededémarragerapide
Lisez ce guide avant d'utiliser ce scanner. Quand vous avez terminé la lecture de ce guide, rangez-le en lieu sûr afin de pouvoir le consulter ultérieurement.
|
Table des matières |
|
|
Précautions de sécurité |
.................................. 3 |
Contenu de l'emballage .................................. |
4 |
Préparation du scanner |
.................................. 5 |
Installation des logiciels .................................. |
6 |
FRANÇAIS
1

* Les captures d'écran ont été prises sous Windows 7 operating system Home Premium et Mac OS X 10.7.x. Les écrans peuvent varier en fonction du système d'exploitation utilisé.
|
• |
Windows est une marque ou une marque déposée de Microsoft Corporation aux États- |
|
|
Unis et/ou dans d'autres pays. |
FRANÇAIS |
• |
Mac et Mac OS sont des marques d'Apple Inc., déposées aux États-Unis et dans d'autres |
|
pays. |
|
|
|
|
|
• |
Tous les autres noms et produits mentionnés ci-dessus sont susceptibles d'être des |
|
|
marques ou des marques déposées de leurs propriétaires respectifs. |
|
|
Avertissement
Lorsque vous utilisez ce produit, vous devez être attentif aux aspects légaux suivants :
•La numérisation de certains documents, notamment les billets de banque, les emprunts d'état et les certificats publics peut être interdite par la loi et peut constituer un délit ou entraîner une responsabilité civile.
•La loi peut exiger que vous obteniez l'autorisation du détenteur des droits d'auteur ou d'autres droits légaux avant de numériser un document.
Si vous n'êtes pas certain qu'il est légal de numériser un document particulier, adressez-vous au préalable à votre conseiller juridique.
La prise doit être installée à proximité de l'appareil et être facilement accessible.
Remarques concernant la gestion de l'alimentation
À des fins d'économie d'énergie, ce produit est automatiquement mis hors tension au bout d'une certaine période d'inactivité (fonction de mise hors tension automatique).
Pour plus d'informations sur la modification de ce paramètre, reportez-vous au « Manuel à l'écran ».
Mise hors tension
Pour mettre le scanner hors tension, appuyez sur le bouton MARCHE (ON). Vérifiez que le voyant ALIMENTATION (POWER) s'éteint, puis débranchez le cordon d'alimentation.
Si vous débranchez le cordon d'alimentation alors que le voyant ALIMENTATION (POWER) est allumé ou clignote, l'unité de numérisation ne se déplace pas correctement.
2

Précautions de sécurité
 Précautions de sécurité
N'oubliez pas de lire les précautions suivantes avant d'utiliser le scanner et ses accessoires.
Pour plus d'informations sur les précautions à prendre pour éviter l'endommagement du produit, reportez-vous au « Manuel à l'écran ».
 AVERTISSEMENT
Avertissements concernant des opérations qui peuvent entraîner la mort ou causer des blessures si elles ne sont pas effectuées correctement. Afin d'utiliser le scanner en toute sécurité, suivez toujours ces avertissements.
 AVERTISSEMENT
Ce produit émet un flux magnétique faible. Si vous portez un stimulateur cardiaque et que vous constatez des effets anormaux, éloignez-vous de l'appareil et consultez votre médecin.
 AVERTISSEMENT
Pour éviter les risques d'incendie ou d'électrocution, respectez les consignes suivantes.
•Ne placez pas le scanner près de liquides inflammables tels que de l'alcool ou des diluants.
•Utilisez exclusivement les câbles fournis.
•Ne branchez pas le cordon d'alimentation sur des prises ne fournissant pas les tensions spécifiées.
•Branchez toujours complètement le cordon d'alimentation.
•Ne branchez pas et ne débranchez pas le cordon d'alimentation avec des mains mouillées.
•Ne tirez pas sur le cordon d'alimentation et ne le pliez pas de façon excessive.
•Ne placez pas d'objets lourds sur le cordon d'alimentation.
•Ne tordez pas le cordon d'alimentation et ne le nouez pas.
•Ne branchez pas un nombre excessif de fiches sur une prise électrique.
•N'utilisez pas de barres multiprises.
•Par temps d'orage, débranchez le câble d'alimentation de la prise pour éviter d'utiliser le scanner.
•Lors du nettoyage du scanner, débranchez toujours le cordon d'alimentation. N'utilisez pas de liquides inflammables, tels que de l'alcool, du benzène ou des diluants. Essuyez le scanner avec un chiffon doux et sec.
•Ne démontez pas le scanner et les accessoires et ne les modifiez pas.
Débranchez le cordon d'alimentation une fois par mois pour détecter d'éventuels problèmes sur le cordon et la fiche (chaleur, rouille, pliure du cordon, rayures et fissures, etc.). Débranchez le cordon d'alimentation et contactez le service d'assistance si vous constatez l'un des problèmes répertoriés ci-dessus, car ils peuvent entraîner des risques d'incendie et d'électrocution.
Si vous entendez des bruits inhabituels, si vous apercevez de la fumée, si vous sentez une chaleur excessive ou une odeur étrange, si des pièces métalliques tombent ou encore si vous versez de l'eau dans le scanner, débranchez immédiatement le cordon d'alimentation et contactez le service d'assistance. L'utilisation du scanner dans ces conditions peut entraîner des risques d'incendie ou d'électrocution.
FRANÇAIS
3
Contenu de l'emballage
Contenu de l'emballage
Scanner et accessoires
FRANÇAIS
Scanner |
Câble USB |
Cordon d'alimentation |
CD-ROM d'installation |
Guides de film |
Guide de film |
(pour pellicule/diapositive 35 mm) |
(pour film au format 120) |
Documentation
•Guide de démarrage rapide (ce document)
•Documents supplémentaires
4
Préparation du scanner
Préparation du scanner
1 Retirez les bandes de protection du scanner.
2 Ouvrez le couvercle du scanner et faites glisser le bouton de verrouillage du scanner vers le repère de déverrouillage ( ).
).
Repère de déverrouillage
• Le couvercle du scanner est verrouillé provisoirement avec un angle de verrouillage de 50 degrés.
FRANÇAIS
3
4
5
Fermez le couvercle du scanner.
•Manipulez le scanner des deux mains. Veillez à ne pas le laisser tomber.
•Lorsque vous transportez le scanner, appuyez sur le bouton MARCHE (ON) pour le mettre hors tension, puis veillez à faire glisser le bouton de verrouillage du scanner vers le repère de
verrouillage (  ) pour attacher l'unité de numérisation.
Branchez le cordon d'alimentation fourni sur le scanner.
Branchez le cordon d'alimentation sur la prise électrique.
•Utilisez exclusivement le cordon d'alimentation fourni avec le scanner. L'utilisation d'autres câbles peut provoquer un dysfonctionnement.
•Raccordez toujours le cordon d'alimentation au scanner avant de le brancher sur la prise électrique. L'inversion de cette séquence pourrait provoquer des dysfonctionnements.
5
Installation des logiciels
Installation des logiciels
|
|
|
• |
Quittez toutes les applications avant l'installation. |
|
|
|
• |
Connectez-vous en utilisant un compte administrateur. |
|
|
|
• |
Une connexion Internet peut être requise lors de l'installation. Des frais de |
FRANÇAIS |
|
|
||
|
|
|
de connexion sont facturés. |
|
|
|
|
|
connexion sont facturés. |
|
|
|
• |
Une connexion Internet est requise lors de l'installation du logiciel. Des frais |
|
|
|
|
|
|
|
|
||
1 |
Insérez le CD-ROM dans |
|||
|
|
|
l'ordinateur. |
|
Si le câble USB est déjà branché, débranchez-le. Si un message apparaît sur l'écran de l'ordinateur, cliquez sur Annuler.
2 Suivez les instructions à l'écran pour continuer.
Pour sélectionner une langue, cliquez sur Langue.
Si le CD-ROM ne s'exécute pas automatiquement :
Double-cliquez sur Poste de travail /
Ordinateur > icône CD-ROM >
MSETUP4.EXE.
Double-cliquez sur l'icône CD-ROM située sur le bureau.
Pour terminer l'installation, suivez les instructions qui apparaissent sur l'écran de l'ordinateur.
Au cours de l'installation, il vous sera demandé de brancher le câble USB et de mettre l'appareil sous tension.
Une fois l'installation terminée, branchez le câble USB et mettez l'appareil sous tension.
6
Installation des logiciels
Consultez le Manuel à l'écran sur l'ordinateur
Pour obtenir plus d'informations sur les fonctions et le fonctionnement du logiciel ainsi que des astuces de dépannage, reportez-vous au « Manuel à l'écran ». Vous pouvez démarrer le « Manuel à l'écran » depuis Quick Menu.
Démarrage du Manuel à l'écran
1 Démarrez Quick Menu.
Double-cliquez sur l'icône Quick Menu située sur le bureau.
Cliquez sur l'icône Quick Menu située dans le dock.
2 Cliquez sur l'icône du Manuel à l'écran située dans Quick Menu.
• Vous devez installer Quick Menu et le « Manuel à l'écran ».
Types de documents pris en charge
•Une photo et un CD/DVD
•Plusieurs photos et CD/DVD
•Magazine / livre
•Films
La façon de placer le document dépend du type et du nombre de documents. Pour plus de détails, reportez-vous au « Manuel à l'écran ».
FRANÇAIS
7

 Guidarapidaall'installazione'
Leggere la presente Guida prima di utilizzare lo scanner. Al termine della lettura, conservarla in un luogo sicuro per poterla consultare in futuro.
|
Sommario |
|
|
Precauzioni per la sicurezza |
.......................... 3 |
Contenuto della confezione ............................ |
4 |
Preparazione dello scanner............................ |
5 |
Installazione del software ............................... |
6 |
ITALIANO
1

ITALIANO
*Le schermate si basano su Windows 7 operating system Home Premium e su Mac OS X 10.7.x. Le schermate effettive potrebbero variare in base alla versione del sistema operativo.
•Windows è un marchio o marchio registrato di Microsoft Corporation negli Stati Uniti e/o in altri paesi.
•Mac e Mac OS sono marchi di Apple Inc., registrati negli Stati Uniti e in altri paesi.
•Tutti gli altri nomi di aziende e prodotti citati nel presente documento potrebbero essere marchi registrati o marchi delle rispettive società.
Avvertenza
Quando si utilizza questo prodotto, prestare attenzione alle seguenti questioni legali:
•La scansione di determinati documenti quali banconote, titoli di stato e certificati pubblici, potrebbe essere vietata dalla legge e potrebbe comportare responsabilità penali e/o civili.
•In base alle normative, potrebbe essere necessario ottenere l'autorizzazione della
persona che detiene il copyright o altri diritti legali sul documento di cui si desidera eseguire la scansione.
In caso di dubbi sulla legalità della scansione di un documento, contattare preventivamente il proprio consulente legale.
La presa elettrica deve trovarsi in prossimità dell'apparecchiatura ed essere facilmente accessibile.
Note per l'impostazione del risparmio energetico
Per finalità di risparmio energetico, questo prodotto si spegne automaticamente dopo un periodo di inattività specificato (funzione di spegnimento automatico).
Per istruzioni su come modificare l'impostazione, consultare il "Manuale a video".
Spegnimento
Per spegnere lo scanner, premere il pulsante ON. Verificare che la spia ALIMENTAZIONE (POWER) sia spenta, quindi scollegare il cavo di alimentazione.
Se si scollega il cavo di alimentazione mentre la spia ALIMENTAZIONE (POWER) è accesa o lampeggia, l'unità di scansione non si sposta correttamente.
2

Precauzioni per la sicurezza
 Precauzioni per la sicurezza
Leggere le seguenti precauzioni prima di utilizzare lo scanner e gli accessori.
Leggere il "Manuale a video" per informazioni sulle precauzioni da adottare per evitare danni al prodotto.
 AVVERTENZA
Indica un'avvertenza riguardante le operazioni che, se non eseguite correttamente, possono provocare lesioni gravi o letali. Per utilizzare lo scanner in modo sicuro, rispettare sempre tali avvertenze.
 AVVERTENZA
Questo prodotto emette un flusso magnetico di bassa potenza. Gli utenti con pacemaker cardiaco che avvertono anomalie devono allontanarsi dal dispositivo e consultare il proprio medico.
 AVVERTENZA
Se non vengono effettuate le azioni riportate di seguito, potrebbero verificarsi incendi o scosse elettriche.
•Non collocare lo scanner in prossimità di liquidi infiammabili, come alcool o diluenti.
•Non utilizzare cavi diversi da quello in dotazione.
•Non collegare il cavo di alimentazione a prese con tensioni diverse da quelle specificate.
•Inserire sempre per intero la spina del cavo di alimentazione nella presa.
•Non collegare o scollegare il cavo di alimentazione con le mani bagnate.
•Non tirare o piegare eccessivamente il cavo di alimentazione.
•Non collocare oggetti pesanti sul cavo di alimentazione.
•Non torcere o legare il cavo di alimentazione.
•Non collegare un numero eccessivo di spine alla stessa presa elettrica.
•Non utilizzare più prolunghe contemporaneamente.
•In caso di fulmini e temporali, scollegare il cavo di alimentazione dalla presa scanner ed evitare di utilizzarlo.
•Scollegare sempre il cavo di alimentazione quando si pulisce lo scanner. Non utilizzare liquidi infiammabili quali alcool, benzene o diluenti. Pulire con un panno morbido
e asciutto.
•Non smontare né modificare lo scanner e i suoi componenti.
Scollegare il cavo di alimentazione una volta al mese per controllare l'eventuale presenza di anomalie del cavo o della spina, ad esempio calore, ruggine, piegature, graffi, versamenti di liquidi e così via. Nel caso in cui venissero riscontrate le anomalie riportate sopra, scollegare il cavo di alimentazione e richiedere assistenza poiché tali condizioni potrebbero causare incendio o scosse elettriche in un secondo momento.
In presenza di rumori od odori inconsueti, fumo, surriscaldamento o se dovessero verificarsi caduta di parti metalliche o versamento di liquidi nello scanner, scollegare immediatamente il cavo di alimentazione e richiedere assistenza. Se si continua a utilizzare lo scanner potrebbero verificarsi incendio o scosse elettriche.
ITALIANO
3
Contenuto della confezione
Contenuto della confezione
Scanner e accessori
ITALIANO
|
|
|
|
|
Scanner |
Cavo USB |
Cavo di |
CD-ROM di |
|
|
|
alimentazione |
installazione |
|
|
|
|
(Setup CD-ROM) |
|
Guide della pellicola |
Guida della pellicola |
(per pellicole/diapositive |
(per pellicole in formato 120) |
da 35 mm) |
|
Documentazione
•Guida rapida all'installazione (il presente documento)
•Documentazione aggiuntiva
4

Preparazione dello scanner
Preparazione dello scanner
1
2
Rimuovere il nastro adesivo di spedizione dallo scanner.
Aprire il coperchio dei documenti e fare scorrere l'interruttore di blocco dello scanner verso il segno di sblocco ( ).
).
Segno di sblocco
ITALIANO
• Il coperchio dei documenti viene bloccato temporaneamente con un angolo di circa 50 gradi.
3
4
5
Chiudere il coperchio dei documenti.
•Maneggiare lo scanner con entrambe le mani. Prestare attenzione a non farlo cadere.
•Per le operazioni di trasporto o di spostamento dello scanner, premere il pulsante ON per spegnerlo, quindi assicurarsi di fare scorrere l'interruttore di blocco dello scanner verso il
segno di blocco (  ) per fissare l'unità di scansione.
Collegare il cavo di alimentazione fornito allo scanner.
Collegare il cavo di alimentazione a una presa elettrica.
•Utilizzare unicamente il cavo di alimentazione fornito con lo scanner. L'utilizzo di cavi diversi potrebbe causare problemi di funzionamento.
•Collegare sempre il cavo di alimentazione allo scanner prima di inserirlo nella presa elettrica. Se questa procedura viene invertita, si potrebbero causare problemi di funzionamento.
5
ITALIANO
Installazione del software
Installazione del software
• Chiudere tutte le applicazioni prima di effettuare l'installazione.
• Effettuare l'accesso mediante un account amministratore.
•  Durante l'installazione potrebbe essere necessaria la connessione a Internet. I costi di connessione sono a carico del cliente.
•  Durante l'installazione software è necessaria la connessione a Internet. I costi di connessione sono a carico del cliente.
1 Inserire il CD-ROM nel computer.
Se il cavo USB è già collegato, scollegarlo. Se sul computer viene visualizzato un messaggio, fare clic su Annulla (Cancel).
2 Seguire le istruzioni a video per continuare.
Per selezionare una lingua, fare clic su Lingua (Language).
Se il CD-ROM non viene eseguito automaticamente:
Fare doppio clic su Risorse del computer ((My) Computer) > Icona del CD-ROM > MSETUP4.EXE.
Fare doppio clic sull'icona del
CD-ROM sul desktop.
Per completare l'installazione, seguire le istruzioni visualizzate sul computer.
Durante l'installazione verrà richiesto di collegare il cavo USB e di accendere lo scanner. Una volta completata l'installazione, collegare il cavo USB e accendere lo scanner.
6
Installazione del software
Utilizzo del Manuale a video sul computer
Per ulteriori informazioni sulle funzioni e sull'utilizzo del software e per i suggerimenti sulla risoluzione dei problemi, consultare il “Manuale a video“. È possibile avviare il “Manuale a video“ dal Quick Menu.
Avvio del Manuale a video
1 Avviare il Quick Menu.
Fare doppio clic sull'icona di scelta rapida Quick
Menu sul desktop.
Fare clic sull'icona Quick Menu nel Dock.
ITALIANO
2 Fare clic sull'icona del Manuale a video nel Quick Menu.
• Richiede le installazioni del Quick Menu e del "Manuale a video".
Tipi di documento supportati
•Un foglio di documento fotografico e CD/DVD
•Diversi fogli di documenti fotografici e CD/DVD
•Riviste e libri
•Pellicole
Esistono varie modalità di posizionamento dei documenti, in base al tipo di documento e al numero di documenti. Per ulteriori informazioni, consultare il "Manuale a video".
7

Guía de iniciación rápida 
Lea esta guía antes de utilizar el escáner. Después de leerla, guárdela en un lugar seguro para poder consultarla en el futuro.
|
Contenido |
|
|
Precauciones de seguridad |
............................ 3 |
Contenido del paquete.................................... |
4 |
Preparación del escáner ................................ |
5 |
Instalación del software .................................. |
6 |
ESPAÑOL
1
Loading...