


GB 10-10-2001 11:33 Pagina 27
CONTENTS
CHAP. 1 – GENERAL |
1.1 |
Important safety warnings ..................................... |
page |
28 |
|
1.2 |
Technical data ...................................................... |
page |
29 |
|
1.3 |
Installation and electrical connection ...................... |
page |
29 |
|
1.4 |
Accessories supplied............................................. |
page |
30 |
|
1.5 |
Ovenware to use .................................................. |
page |
31 |
|
1.6 |
Rules and general suggestions for using the oven ... |
page |
32 |
CHAP. 2 – USING THE CONTROLS AND SETTING THE MODES |
|
|
||
|
2.1 |
Setting the clock ................................................... |
page |
33 |
|
2.2 |
Programming the cooking ..................................... |
page |
34 |
|
2.3 |
Automatic sequence for defrosting and cooking...... |
page |
36 |
|
2.4 |
Recalling the pre-memorised recipes |
|
|
|
|
(“Automatic Functions” keys) ................................. |
page |
37 |
|
2.5 |
Quick Reheat ....................................................... |
page |
37 |
|
2.6 |
Child lock-out feature............................................ |
page |
37 |
|
2.7 |
Turntable stop key................................................. |
page |
37 |
|
2.8 |
Function “Memotime” ........................................... |
page |
37 |
CHAP. 3 – USING THE OVEN: SUGGESTIONS AND TIME GRIDS |
|
|
||
|
3.1 |
Defrosting ............................................................ |
page |
38 |
|
3.2 |
Reheating ............................................................ |
page |
39 |
|
3.3 |
Cooking starters, pasta and entrees ....................... |
page |
40 |
|
3.4 |
Cooking meat ..................................................... |
page |
40 |
|
3.5 |
Cooking side dishes and vegetables ...................... |
page |
41 |
|
3.6 |
Cooking fish......................................................... |
page |
42 |
|
3.7 |
Cooking desserts and cakes ................................. |
page |
42 |
|
3.8 |
Reheating/cooking using the |
|
|
|
|
“Automatic Functions” keys ................................... |
page |
43 |
|
3.9 |
Simultaneous cooking on 2 levels .......................... |
pag. |
44 |
CHAP. 4 – CLEANING AND MAINTENANCE |
|
|
||
|
4.1 |
Cleaning.............................................................. |
page |
46 |
|
4.2 |
Maintenance ........................................................ |
page |
47 |
27

GB 10-10-2001 11:33 Pagina 28
CHAPTER 1 – GENERAL
1.1 IMPORTANT SAFETY WARNINGS
Read these warnings carefully before starting using the oven for the first time. This will help to obtain the best results and to avoid mistakes.
1)This oven has been designed to defrost, reheat and cook food in the home. It must not be used for any other purpose, nor modified or tampered with in any way.
2)Before connecting the oven to the mains, check to be certain that the door closes tightly. Also check that the metal frame is not warped and that the hinges and hooks have not loosened. In the event that these parts have been damaged, the microwave oven cannot be used until a qualified technician has made the necessary repairs.
3)Do not attempt to operate the oven with the door open by tampering with the safety devices.
4)Do not operate the oven if objects of any kind get stuck between the front panel of the oven and the door.
Always keep the inside of the door (E) clean, using a damp cloth and non-abrasive detergents. Do not allow dirt or food remains to accumulate between the front panel of the oven and the door.
5)Never place heavy objects on the door when open. Never force the open door downwards. Never place hot pots/dishes on the open door.
6)Do not operate the oven if the feeder cable or the plug is damaged, as this may result in electric shocks.
7)Adjustment, repair and replacement of the feeder cable should only be carried out by personnel trained by the manufacturer or by his Service Centre. Repairs carried out by unqualified personnel may be dangerous.
8)If the oven should begin to smoke as a result of food burning inside, DO NOT OPEN THE DOOR. Turn the oven off immediately or disconnect the plug from the power socket.
9)Children or infirm persons should not be allowed to use this product unsupervised.
Do not allow children near the oven when it is in operation, as this may result in severe burns.
10)In order to avoid overheating and the consequent risk of fire, it is advisable to supervise the oven when cooking food in disposable containers made of plastic, cardboard or other inflammable materials, and when heating small quantities of food.
11)During use, the oven will become hot. Never touch the electrical element located in the oven cavity when the oven is on.
12)When heating liquids (water, coffee, milk, etc.) the contents may suddenly start to boil and spill violently as a result of delayed boiling, causing scalding. To avoid this happening, you should place a heat-resis-
tant plastic spoon or a glass rod in the container before starting to heat liquids.
13)Do not heat spirits with a high alcohol content, nor large quantities of oil, as these could catch fire!
14)After heating baby food (contained in feeding bottles or small jars) ALWAYS check the food before it
28
GB 10-10-2001 11:33 Pagina 29
CHAPTER11 - GENERAL
is eaten in order to avoid burns. It is also advisable to stir or shake the food in order to ensure even temperature.
When using commercially available bottle sterilisers, before turning the oven on, ALWAYS make sure the container is filled with the quantity of water indicated by the manufacturer.
N.B. When the oven is used for the first time it is possible that, for a period of approx. 10 minutes, it may produce a “new” smell and a small amount of smoke. This is only a result of protective substances applied to the heating element.
1.2 TECHNICAL DATA
ENERGY CONSUMPTION ventilated oven only function (CENELEC HD 376 norms)
To reach 200°C |
0,35 kWh |
To maintain a temperature of 200°C for an hour |
1,15 kWh |
|
|
Total consumption |
1,5 kWh |
• OUTPUT POWER - MICROWAVE: 1000 W (IEC705)For additional data, consult the serial plate glued in the upper side of the oven frame.
This appliance complies to E.E.C. directive no. 89/336 and 92/31 regarding Electromagnetic Compatibility, and to directive 89/109/E.E.C. regarding materials which come into contact with food.
1.3 INSTALLATION AND ELECTRICAL CONNECTION
1)Check that the turntable spindle (D) is inserted correctly in the special slot in the centre of the turntable.
2)Clean the inside with a soft, damp cloth.
3)Check that there is no damage as a result of transportation, and in particular that the door opens and closes properly.
4)Place the support (I) in the centre of the circular groove and fasten the turntable (H) to it. The spindle (D) should be inserted in the corresponding groove in the centre of the turntable.
5)Only connect the appliance to a power socket with a power capacity of at least 16A. Also make sure that the main switch installed in your home has a minimum power capacity of 16A in order to avoid it suddenly tripping while the oven is on.
6)Before use, check that the power supply voltage is the same as the one shown on the rating label and that the power outlet is properly earthed: the manufacturer disclaims any liability in the event of noncompliance with this safety regulation.
29
GB 10-10-2001 11:33 Pagina 30
|
CHAPTER 1 - GENERAL |
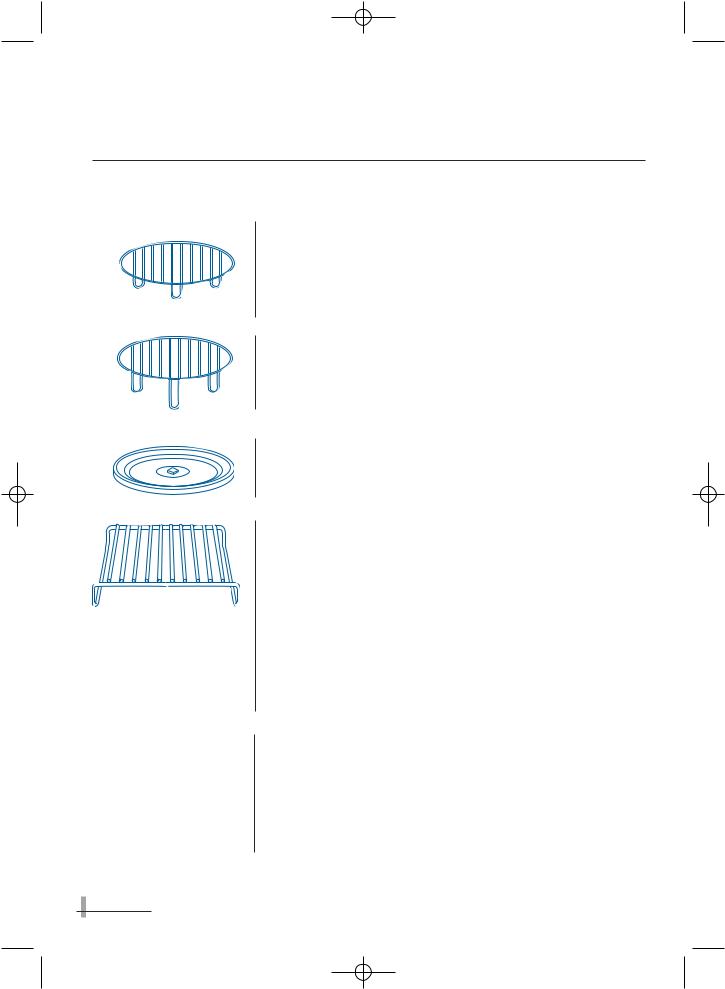
1.4 ACCESSORIES SUPPLIED |
1 |
LOW WIRE RACK
Fan Oven Only mode:
for all types of traditional cooking, especially cakes.
HIGH WIRE RACK
Grill Only mode:
for all types of grilled food.
TURNTABLE
The turntable is used for all the modes.
RECTANGULAR RACK
Only for ventilated oven. For all types of traditional cooking in large sized rectangular casserole dishes. Naturally, the food must be stirred and turned during the cooking process. Position this rack directly on the bottom of the oven. The rotating plate (H) can be left in place.
This rack cannot be used for microwave cooking.
MEDIUM WIRE RACK
Microwave-only function
For all types of cooking on two levels AT THE SAME TIME
(e.g., large amounts of food or different foods).
See the instructions on page 44
Combined microwave and fan oven mode and microwave + grill: for rapid cooking of meat, potatoes, some leavened cakes and desserts and gratinéed dishes (for example, baked lasagne).
30

GB 10-10-2001 11:33 Pagina 31
CHAPTER11 - GENERAL
1.5 OVENWARE TO BE USED
In the “Microwave Only” and “Microwave Combined” modes, all types of containers in glass (preferably Pyrex), ceramics, china and clay may be used provided that they are undecorated and free of metal parts (i.e. gilt trimmings, handles, feet etc.). Heat resistant plastic containers can also be used, but only for “Microwave Only” cooking. If you are still doubtful about using a particular container, you can perform a simple test. Place the empty container in the oven for 30 seconds at maximum power (“Microwave Only” function).
If the container is still cold or only slightly warm, it is suitable for microwave cooking. If it is very hot or gives out sparks, it is not suitable.
Containers in heat-resistant plastic may also be used. Paper napkins, cardboard trays and disposable plastic plates can also be used for short cooking times. The size and shape of the containers must be such as to allow them to rotate properly inside the oven.
Metal, wood, cane and crystal containers are not suitable for microwave cooking.
It is worth remembering that - since microwaves heat the food, not the dish - it is possible to cook the food directly on the plate on which it is to be served. This means that you do not need to use, and wash up, saucepans. However, remember that heat may be transferred from the food itself to the plate, making it necessary to use an oven glove.
If the oven has the “Fan Oven Only” or “Grill only” settings, all types of ovenware may be used. In any case, observe the guidelines shown in the following table:
|
|
|
|
Glass- |
|
|
|
Paper or |
Metal |
|
|
|
Glass |
Pyrex |
Clay |
Silver foil |
Plastic |
contain- |
|||
|
|
ceramics |
cardboard |
|||||||
|
|
|
|
|
|
|
ers |
|||
|
|
|
|
|
|
|
|
|
||
|
|
|
|
|
|
|
|
|
|
|
Mode: |
“Microwave Only” |
YES |
YES |
YES |
YES |
NO |
YES |
YES |
NO |
|
|
|
|
|
|
|
|
|
|
|
|
Modes: |
“Combined” |
NO |
YES |
YES |
YES |
NO |
NO |
NO |
NO |
|
|
|
|
|
|
|
|
|
|
|
|
Mode: |
“Fan Only” |
NO |
YES |
YES |
YES |
YES |
NO |
NO |
YES |
|
“Grill Only” |
||||||||||
|
|
|
|
|
|
|
|
|
31

GB 10-10-2001 11:33 Pagina 32
CHAPTER11 - GENERAL
1.6 FUNDAMENTAL RULES FOR MICROWAVE COOKING
1)Remember to stir food several times during cooking to ensure temperature evenness and to reduce cooking time.
2)It is also advisable to turn food during cooking.
3)Food with skin, shell or peel (e.g. apples, potatoes, tomatoes, frankfurters and fish) should be pierced in several places with a fork in order to let out the steam without the skin or peel bursting.
4)If many portions of the same food are cooked, for example if you want to boil potatoes, arrange them in a ring around the dish to obtain even cooking.
5)Cover the food with transparent film, grease proof paper, a glass lid or simply with an upturned plate in order to reduce the amount of condensation that forms inside the oven, on the shelf on which the food rests or around the door. Also food with a high water content (e.g. vegetables) cooks better if covered. Covering food also helps keep the inside of the oven clean. Use transparent film which is suitable for microwave ovens.
6)In “Microwave Only” mode and in the “Combined” modes, the oven must under no circumstances be preheated or made to work when empty (without food), as sparks may be produced which would result in damage to the appliance.
7)Do not cook eggs in their shells: the pressure which builds up on the inside would cause the egg to explode, even after cooking has finished. Do not heat up eggs which have already been cooked, unless they are scrambled.
8)Do not forget to open containers which are air-tight or sealed before heating or cooking food in the oven. The pressure on the inside of the container would rise, causing them to explode even after cooking has finished.
32

GB 10-10-2001 11:33 Pagina 33
CHAPTER 2 – USING THE CONTROLS AND MODES
2.1 SETTING THE CLOCK
•When the appliance is connected to the domestic power supply for the first time, or after a power cut, four dashes will appear on the display (----).
In order to set the clock, proceed as described below:
1 Press the Clock key (6).
(The hours flash on display 1)
150 300 500 750 1000 WATT
2 Set the desired time by turning the Time knob (14).
(The hours flash on display 1)
150 300 500 750 1000 WATT
3 Press the Clock key (6) again.
(The minutes flash on display 1)
150 300 500 750 1000 WATT
4 Set the desired minutes by turning the Time knob (14)
(The minutes flash on display 1)
150 300 500 750 1000 WATT
5 Press the Clock key (6) again.
(The display shows the time set)
150 300 500 750 1000 WATT
•If you wish to change the hour on the dial once it has been set, press the Clock key (6) before proceeding to set the new time as described above.
•It is possible to display the current time even after starting the mode set, by pressing the Clock key (6) (the time is displayed for 2 seconds).
33
 Loading...