

Page 1

Operation Manual
Mini Spray Dryer B-290
093001 en
Page 2

Page 3

Table of contents
1 About this manual . . . . . . . . . . . . . . . . . . . . . . . . . . . . . . . . . . . . . . .6
2 Safety. . . . . . . . . . . . . . . . . . . . . . . . . . . . . . . . . . . . . . . . . . . . . .7
2.1 User qualification . . . . . . . . . . . . . . . . . . . . . . . . . . . . . . . . . . . . 7
2.2 Proper use . . . . . . . . . . . . . . . . . . . . . . . . . . . . . . . . . . . . . . . 7
2.3 Improper use . . . . . . . . . . . . . . . . . . . . . . . . . . . . . . . . . . . . . . 8
2.4 Safety warnings and safety signs used in this manual . . . . . . . . . . . . . . . . . . 8
2.5 Product safety. . . . . . . . . . . . . . . . . . . . . . . . . . . . . . . . . . . . . 10
2.5.1 General hazards. . . . . . . . . . . . . . . . . . . . . . . . . . . . . . . . . . . . 10
2.5.2 Warning labels on housing and assemblies . . . . . . . . . . . . . . . . . . . . . . 14
2.5.3 Personal protective equipment . . . . . . . . . . . . . . . . . . . . . . . . . . . . 14
2.5.4 Safety elements and measures . . . . . . . . . . . . . . . . . . . . . . . . . . . . 15
2.6 General safety rules . . . . . . . . . . . . . . . . . . . . . . . . . . . . . . . . . . 16
3 Technical data . . . . . . . . . . . . . . . . . . . . . . . . . . . . . . . . . . . . . . . . 17
3.1 Scope of application and delivery . . . . . . . . . . . . . . . . . . . . . . . . . . . 17
3.1.1 Standard instrument. . . . . . . . . . . . . . . . . . . . . . . . . . . . . . . . . . 17
3.1.2 Standard accessories . . . . . . . . . . . . . . . . . . . . . . . . . . . . . . . . . 18
3.1.3 Standard accessories with the B-290 Advanced . . . . . . . . . . . . . . . . . . . 18
3.1.4 Standard accessories with the B-290 Acid resistant. . . . . . . . . . . . . . . . . . 18
3.1.5 Optional accessories . . . . . . . . . . . . . . . . . . . . . . . . . . . . . . . . . 19
3.2 Technical data overview . . . . . . . . . . . . . . . . . . . . . . . . . . . . . . . . 20
3.3 Materials used. . . . . . . . . . . . . . . . . . . . . . . . . . . . . . . . . . . . . 21
4 Description of function . . . . . . . . . . . . . . . . . . . . . . . . . . . . . . . . . . . 22
4.1 Functional principle of the drying gas . . . . . . . . . . . . . . . . . . . . . . . . . 22
4.2 Functional principle of the sample feed and dispersion . . . . . . . . . . . . . . . . 22
4.3 Outlet filter. . . . . . . . . . . . . . . . . . . . . . . . . . . . . . . . . . . . . . . 23
4.4 Inert Loop B-295 . . . . . . . . . . . . . . . . . . . . . . . . . . . . . . . . . . . 23
4.5 Dehumidifier B-296 . . . . . . . . . . . . . . . . . . . . . . . . . . . . . . . . . . 24
4.6 Spray chilling accessory. . . . . . . . . . . . . . . . . . . . . . . . . . . . . . . . 25
4.7 Connected accessories to the Mini Spray Dryer B-290 . . . . . . . . . . . . . . . . 25
4.7.1 Feed switch valve and remote control panel. . . . . . . . . . . . . . . . . . . . . . 26
4.7.2 Printer or PC for data output via RS-232 serial port . . . . . . . . . . . . . . . . . . 26
5 Putting into operation . . . . . . . . . . . . . . . . . . . . . . . . . . . . . . . . . . . . 27
5.1 Installation site. . . . . . . . . . . . . . . . . . . . . . . . . . . . . . . . . . . . . 27
5.2 Electrical connections . . . . . . . . . . . . . . . . . . . . . . . . . . . . . . . . . 27
5.3 Installing the compressed air maintenance unit and compressor (optional) . . . . . . 28
5.4 Installing the glass assembly . . . . . . . . . . . . . . . . . . . . . . . . . . . . . 29
5.5 Installing the spraying nozzle . . . . . . . . . . . . . . . . . . . . . . . . . . . . . 30
5.6 Installing the filters. . . . . . . . . . . . . . . . . . . . . . . . . . . . . . . . . . . 31
5.6.1 Inlet filter installation . . . . . . . . . . . . . . . . . . . . . . . . . . . . . . . . . . 31
5.6.2 Outlet filter installation . . . . . . . . . . . . . . . . . . . . . . . . . . . . . . . . . 31
5.6.3 PTFE filter membrane installation . . . . . . . . . . . . . . . . . . . . . . . . . . . 33
5.6.4 Cleaning filter installation . . . . . . . . . . . . . . . . . . . . . . . . . . . . . . . 34
5.7 Adjusting the peristaltic pump bed and choosing the feeding tube . . . . . . . . . . 35
5.8 Tubing installation . . . . . . . . . . . . . . . . . . . . . . . . . . . . . . . . . . . 37
5.9 Installing the compressor . . . . . . . . . . . . . . . . . . . . . . . . . . . . . . . 38
5.10 Quick hose couplings . . . . . . . . . . . . . . . . . . . . . . . . . . . . . . . . . 39
Table of contents
3 B-290 Operation Manual, Version I
Page 4

5.11 Installing the Inert Loop B-295 . . . . . . . . . . . . . . . . . . . . . . . . . . . . 39
5.12 Dehumidifier B-296 and Inert Loop B-295 combination . . . . . . . . . . . . . . . . 42
5.13 Installing the Dehumidifier B-296 . . . . . . . . . . . . . . . . . . . . . . . . . . . 42
5.14 Installing the Spray Chilling Accessory. . . . . . . . . . . . . . . . . . . . . . . . . 44
5.15 Installation check . . . . . . . . . . . . . . . . . . . . . . . . . . . . . . . . . . . 45
5.16 Additional cleaning measures for food, pharma and cosmetic applications . . . . . . 46
5.16.1 Primary cleaning. . . . . . . . . . . . . . . . . . . . . . . . . . . . . . . . . . . . 46
6 Operation . . . . . . . . . . . . . . . . . . . . . . . . . . . . . . . . . . . . . . . . . . 47
6.1 Layout of the operating and display elements . . . . . . . . . . . . . . . . . . . . . 48
6.2 Conversion tables for the parameters . . . . . . . . . . . . . . . . . . . . . . . . . 49
6.2.1 Flow meter spraying air (rotameter) . . . . . . . . . . . . . . . . . . . . . . . . . . 49
6.2.2 Peristaltic pump . . . . . . . . . . . . . . . . . . . . . . . . . . . . . . . . . . . . 49
6.2.3 Aspirator . . . . . . . . . . . . . . . . . . . . . . . . . . . . . . . . . . . . . . . 50
6.3 Spray process. . . . . . . . . . . . . . . . . . . . . . . . . . . . . . . . . . . . . 50
6.4 Optimizing parameters . . . . . . . . . . . . . . . . . . . . . . . . . . . . . . . . 51
6.5 End of spray process . . . . . . . . . . . . . . . . . . . . . . . . . . . . . . . . . 51
6.6 Recovering particles of the outlet filter . . . . . . . . . . . . . . . . . . . . . . . . . 51
6.7 Operation with the Inert Loop B-295 . . . . . . . . . . . . . . . . . . . . . . . . . 53
6.7.1 Status messages . . . . . . . . . . . . . . . . . . . . . . . . . . . . . . . . . . . 54
6.8 Operation with the Spray Chilling Accessory. . . . . . . . . . . . . . . . . . . . . . 55
6.9 Mini Spray Dryer B-290 acid resistant . . . . . . . . . . . . . . . . . . . . . . . . . 56
7 Maintenance and repairs . . . . . . . . . . . . . . . . . . . . . . . . . . . . . . . . . . 57
7.1 Housing . . . . . . . . . . . . . . . . . . . . . . . . . . . . . . . . . . . . . . . . 58
7.2 Glass assembly, tubes. . . . . . . . . . . . . . . . . . . . . . . . . . . . . . . . . 58
7.3 Nozzles . . . . . . . . . . . . . . . . . . . . . . . . . . . . . . . . . . . . . . . . 58
7.4 Aspirator cleaning . . . . . . . . . . . . . . . . . . . . . . . . . . . . . . . . . . . 59
7.5 Inert Loop B-295 and Dehumidifier B-296. . . . . . . . . . . . . . . . . . . . . . . 59
7.6 Outlet filter. . . . . . . . . . . . . . . . . . . . . . . . . . . . . . . . . . . . . . . 60
7.7 Calibrating the oxygen sensor of the Inert Loop B-295 . . . . . . . . . . . . . . . . 60
7.8 Replacing the oxygen sensor of the Inert Loop B-295 . . . . . . . . . . . . . . . . . 61
7.9 Spray chilling accessory. . . . . . . . . . . . . . . . . . . . . . . . . . . . . . . . 61
7.10 Customer service . . . . . . . . . . . . . . . . . . . . . . . . . . . . . . . . . . . 61
8 Troubleshooting . . . . . . . . . . . . . . . . . . . . . . . . . . . . . . . . . . . . . . . 62
8.1 Error messages and their remedy . . . . . . . . . . . . . . . . . . . . . . . . . . . 62
8.2 Malfunctions and their remedy. . . . . . . . . . . . . . . . . . . . . . . . . . . . . 63
9 Shutdown, storage, transport and disposal . . . . . . . . . . . . . . . . . . . . . . . . 65
9.1 Storage and transport . . . . . . . . . . . . . . . . . . . . . . . . . . . . . . . . . 65
9.2 Disposal. . . . . . . . . . . . . . . . . . . . . . . . . . . . . . . . . . . . . . . . 65
10 Spare parts. . . . . . . . . . . . . . . . . . . . . . . . . . . . . . . . . . . . . . . . . . 66
10.1 Spray nozzle . . . . . . . . . . . . . . . . . . . . . . . . . . . . . . . . . . . . . 66
10.2 Glass parts . . . . . . . . . . . . . . . . . . . . . . . . . . . . . . . . . . . . . . 70
10.3 Filters . . . . . . . . . . . . . . . . . . . . . . . . . . . . . . . . . . . . . . . . . 72
10.4 Tubings and connectors. . . . . . . . . . . . . . . . . . . . . . . . . . . . . . . . 72
10.5 Trolley . . . . . . . . . . . . . . . . . . . . . . . . . . . . . . . . . . . . . . . . . 73
10.6 Measurement pipe for gas flow . . . . . . . . . . . . . . . . . . . . . . . . . . . . 73
10.7 Feed switch valve . . . . . . . . . . . . . . . . . . . . . . . . . . . . . . . . . . . 74
10.8 Remote control panel . . . . . . . . . . . . . . . . . . . . . . . . . . . . . . . . . 74
10.9 Inert Loop B-295 . . . . . . . . . . . . . . . . . . . . . . . . . . . . . . . . . . . 74
10.10 Cylinder insulation . . . . . . . . . . . . . . . . . . . . . . . . . . . . . . . . . . . 75
10.11 Spray chilling accessory. . . . . . . . . . . . . . . . . . . . . . . . . . . . . . . . 76
Table of contents
4 B-290 Operation Manual, Version I
Page 5

10.12 Decontamination Glass-Set and sterile filter . . . . . . . . . . . . . . . . . . . . . . 77
10.13 Acid resistant accessories. . . . . . . . . . . . . . . . . . . . . . . . . . . . . . . 78
11 Declarations and requirements. . . . . . . . . . . . . . . . . . . . . . . . . . . . . . . 79
11.1 FCC requirements (for USA and Canada) . . . . . . . . . . . . . . . . . . . . . . . 79
11.2 Declaration of conformity . . . . . . . . . . . . . . . . . . . . . . . . . . . . . . . 80
11.3 Safety certificate. . . . . . . . . . . . . . . . . . . . . . . . . . . . . . . . . . . . 81
11.4 Health and safety clearance . . . . . . . . . . . . . . . . . . . . . . . . . . . . . . 82
Table of contents
5 B-290 Operation Manual, Version I
Page 6

1 About this manual
This manual describes the Mini Spray Dryer B-290 and its optional accessories and provides all information required for its safe operation and to maintain it in good working order.
It is addressed to laboratory personnel and operators in particular.
Read this manual carefully before installing and running your system and note the safety precautions
in chapter 2 in particular. Store the manual in the immediate vicinity of the instrument, so that it can be
consulted at any time.
No technical modifications may be made to the instrument without the prior written agreement of
BUCHI. Unauthorized modifications may affect the system safety or result in accidents. Technical data
are subject to change without notice.
NOTE
The symbols pertaining to safety are explained in chapter 2.
This manual is copyright. Information from it may not be reproduced, distributed or used for competitive purposes, nor made available to third parties. The manufacture of any component with the aid of
this manual without prior written agreement is also prohibited.
1 About this manual
The English manual is the original language version and serves as basis for all translations into other
languages. If you need another language version of this manual, you can download other versions at
www.buchi.com or reorder manuals from a BUCHI representative.
Abbreviations
EPDM: Ethylene Propylene Dimonomer
FFKM: Perfluoroelastomers
FPM: Fluoroelastomer
PEEK: Polyetheretherketone
PTFE: Polytetrafluoroethylene
POM: Polyoxymethylene
PFA: Perfluoroalkoxy
6 B-290 Operation Manual, Version I
Page 7

2 Safety
This chapter highlights out the safety concept of the instrument and contains general rules of behavior
and warnings from direct and indirect hazards concerning the use of the product.
For the users safety, all safety instructions and safety messages in the individual sections shall
be strictly observed and followed. Therefore, the manual must always be available to all persons
performing any tasks described herein.
2.1 User qualification
The instrument is designed and built in accordance with state-of-the-art technology. Nevertheless, risks
to users, property, and the environment can arise when the instrument is used carelessly or improperly.
The manufacturer has determined residual dangers emanating from the instrument
• if the instrument is operated by insufficiently trained personnel without supervision.
• if the instrument is not operated according to its proper use.
Appropriate warnings in this manual serve to make the user alert to these residual hazards.
Personnel without this training or persons who are currently being trained require careful instruction.
The present Operation Manual serves as the basis for this.
2 Safety
2.2 Proper use
The Mini Spray Dryer B-290 has been designed and built as laboratory instrument and for batch
production. It serves to spray-dry aqueous solutions or suspensions in one operating process.
In combination with the Inert Loop B-295, it is possible to work with organic solvents in “closed
mode”. Processing in “closed mode” requires N2 or CO2 as an inert gas.
The output particle size of the Mini Spray Dryer B-290 is between 2–25 µm. Thus, the instrument is
suited to generate particles in the inhalable size range from a solution of suspension.
• If the instrument is used with potentially toxic or hazardous substances in ‘open mode’, it has
to be installed inside a closed fume hood or glove box. In such cases, the complete processing
and system handling has to be performed within the ventilated box to avoid toxication and other
hazardous situations to the user and the environment.
• Spray drying of corrosive samples require handling in a closed fume hood. An acid proof system in
open loop is a variant of the Mini Spray Dryer B-290.
• In any case, all exhausts leaving the exhaust gas tubing have to be lead away instantly by a ventilation system, to remove possibly hazardous substances and fumes from the working area. The
ventilation system has to be equipped with safety measures such as outlet filters to avoid contamination of the environmen.
• Operation and handling can require additional personal protective equipment. Operate the instrument with respect to standard laboratory safety rules (i.e. as stated in the latest version of the WHO
“Laboratory biosafety manual”) at all times.
• If the Mini Spray Dryer B-290 is used in combination with other instruments (e.g. Chiller) all related
manuals are to be fully observed.
• Electrostatic charges are to be arrested from both the product collection vessel and the cyclone via
the standard grounding cable if the cyclone is equipped with a grounding socket.
• If the instrument is used for food, pharma and cosmetic products additional cleaning measures
(primary cleaning and in place disinfection) are required (see chapter 5.7).
7 B-290 Operation Manual, Version I
Page 8

2.3 Improper use
Applications not mentioned in section 2.2 are considered to be improper. Also, applications which do
not comply with the technical data (see section 3 of this manual) are considered to be improper. The
operator bears the sole risk for any damages or hazards caused by such improper use.
The following uses are expressly forbidden:
• Use of gases with unknown chemical composition.
• Spray drying of biohazardous materials such as viruses or bacteria.
• Spray drying of organic solvents without safety lamella curtain, Inert Loop B-295 and in open mode.
• Use of the instrument in rooms which require ex-protected instruments.
• Spray drying of substances which might explode or ignite due to the processing and the selected
parameters of the Mini Spray Dryer B-290 or installed sub systems.
• Spray drying of toxic substances.
• Use of samples which might produce oxygen during the processing.
• Unattended use.
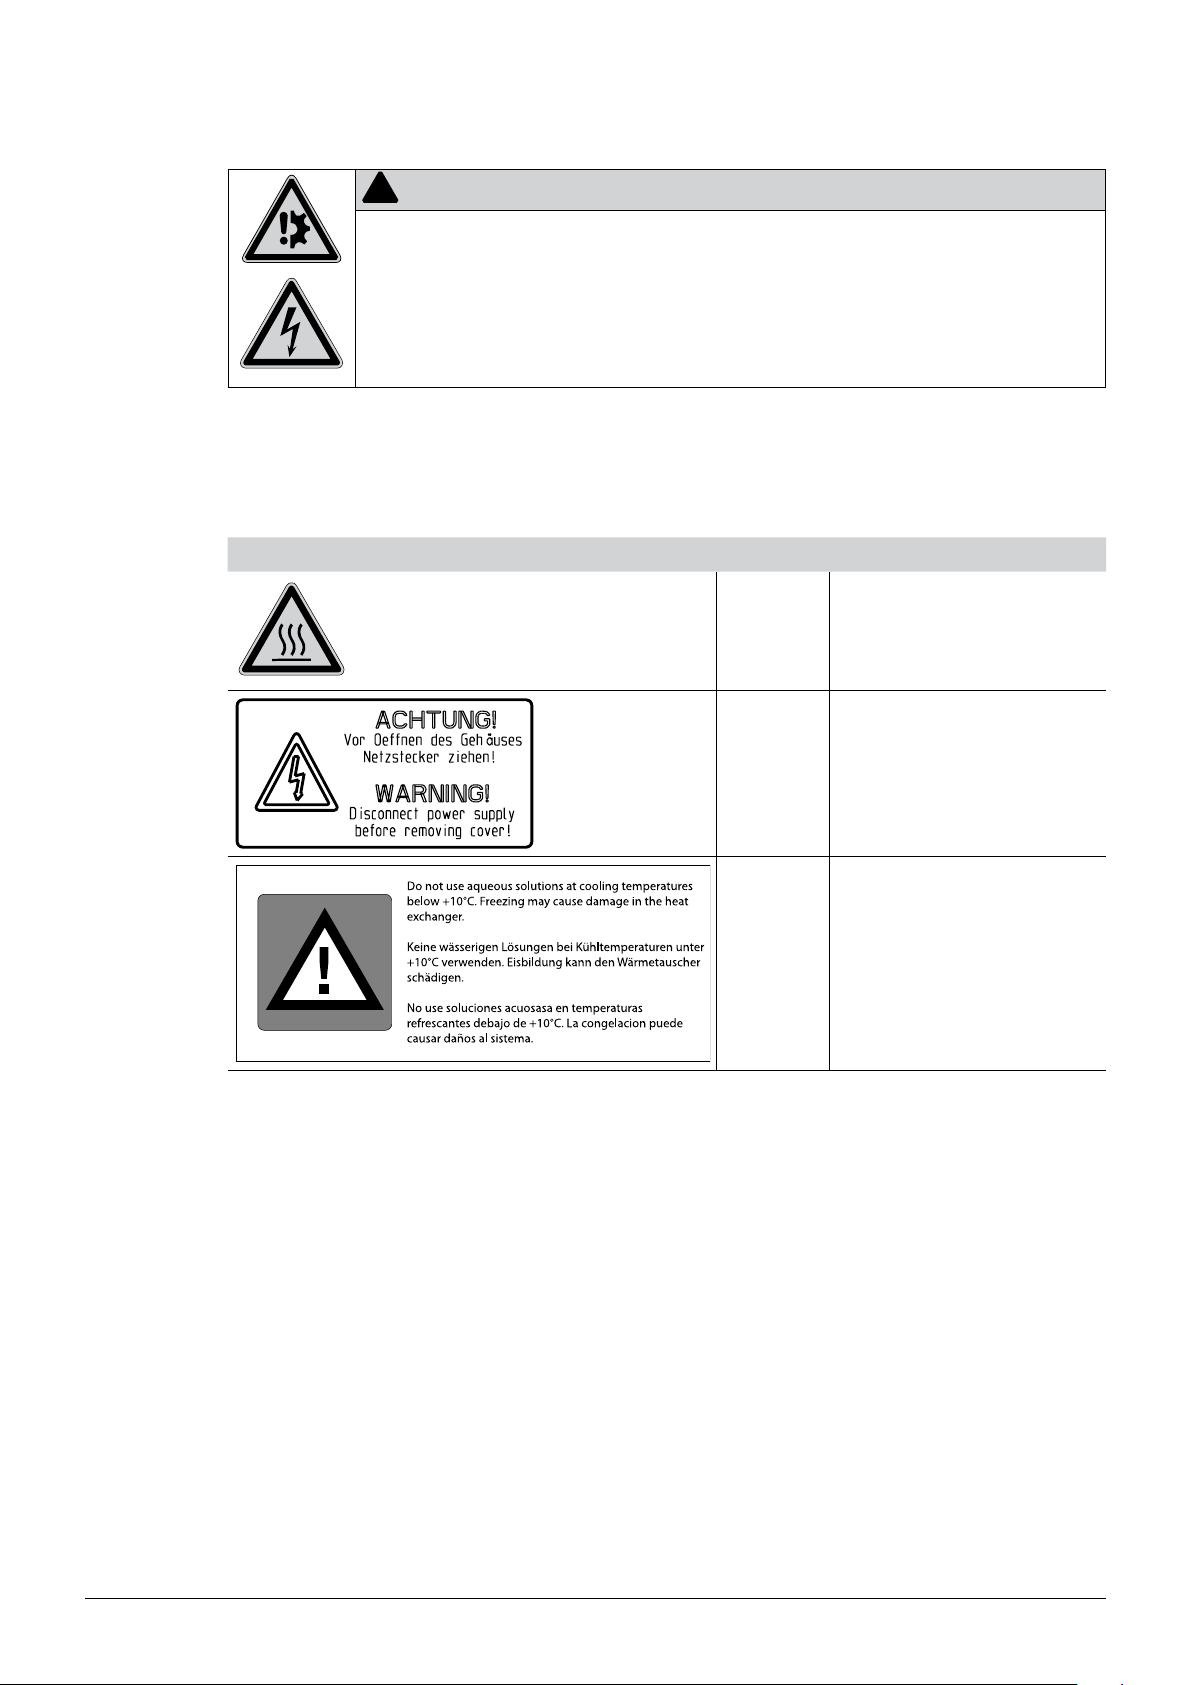
2.4 Safety warnings and safety signs used in this manual
2 Safety
DANGER, WARNING, CAUTION and NOTICE are standardized signal words for identifying levels of
hazards and risks related to personal injury and property damage. All signal words, which are related
to personal injury are accompanied by the general safety sign.
For your safety it is important to read and fully understand the table below with the different signal
words and their definitions!
Sign Signal word Definition Risk level
DANGER
WARNING
CAUTION
NOTICE
no
Supplementary safety information symbols may be placed in a rectangular panel on the left to the
signal word and the supplementary text (see example below).
Space for
supplementary
safety
information
symbols.
!
Supplementary text, describing the kind and level of hazard/risk seriousness.
• List of measures to avoid the herein described, hazard or hazardous situation.
• ...
• ...
Indicates a hazardous situation which, if not avoided, will
result in death or serious injury.
Indicates a hazardous situation which, if not avoided, could
result in death or serious injury.
Indicates a hazardous situation which, if not avoided, may
result in minor or moderate injury.
Indicates possible property damage, but no practices
related to personal injury.
SIGNAL WORD
★★★★
★★★☆
★★☆☆
★☆☆☆
(property damage only)
8 B-290 Operation Manual, Version I
Page 9

2 Safety
Table of supplementary safety information symbols
The reference list below incorporates all safety information symbols used in this manual and their
meaning.
Symbol Meaning
General warning
Electrical hazard
Heavy weight, avoid over exertion
Explosive gases, explosive environment
Harmful to life-forms
Hot item, hot surface
Device damage
Inhalation of substances
Chemical burns by corrosives
Fragile components
Wear laboratory coat
9 B-290 Operation Manual, Version I
Page 10

2 Safety
Wear protective goggles
Wear protective mask
Wear protective gloves
Additional user information
Paragraphs starting with NOTE transport helpful information for working with the device/software or its
supplementaries. NOTEs are not related to any kind of hazard or damage (see following example).
NOTE
Useful tips for the easy operation of the instrument/software.
2.5 Product safety
Safety warnings in this manual (as described in section 2.4) serve to make the user alert and to avoid
hazardous situations emanating from residual dangers by giving appropriate counter measures.
However, risks to users, property and the environment can arise when the instrument is damaged,
used carelessly or improperly.
2.5.1 General hazards
The following safety messages show hazards of general kind which may occur when handling the
instrument. The user shall observe all listed counter measures in order to achieve and maintain the
lowest possible level of hazard.
Additional warning messages can be found whenever actions and situations described in this manual
are related to situational hazards.
!
DANGER
Death by suffocation or serious poisoning by inhalation of inert gases.
• Do not inhale inert gases
• Directly withdraw released gases and gaeous substances by sufficient ventilation
• Only operate the instrument in ventilated environments
• Before opertation, check all parts, connections and sealings involved in the gasflow for proper
sealing
• Exchange worn out or defective parts immediately
10 B-290 Operation Manual, Version I
Page 11

2 Safety
!
DANGER
Death or serious poisoning by gases or particles due to O2- sensonr or filter malfunction
• Exchange defective O2-sensor immediately
• Exchange O2-sensor regularly within the specified maintenance intervals
• Exchange clogged filters immediately
• Exchange filters regularly within the specified maintenance intervals
• Dispose of filter immediately
!
DANGER
Death or serious poisoning by inhalation or incorporation of dried particles during spray process.
• Wear safety goggles
• Wear safety gloves
• Wear a suitable protective mask
• Wear a laboratory coat
• Check for proper sealing before use
• Do not inhale dried particles
• Stop drying gas flow before opening the drying circuit
11 B-290 Operation Manual, Version I
Page 12

!
DANGER
Death or serious posioning by inhalation or incorporation of dried particles at recovery.
• Wear safety goggles
• Wear safety gloves
• Wear a suitable protective mask
• Wear a laboratory coat
• Do not inhale dried particles
• Stop drying gas flow before opening the drying circuit
• Only recover particles in sufficiently ventilated flue or glove-box
• Do not disperse the dried particles
• Do not clean dusty parts with compressed air
2 Safety
!
WARNING
Death or serious injuries by use in explosive environments.
• Do not operate the instrument in explosive environments
• Do not operate the instrument with explosive gas mixtures
• Before operation, check all gas connections for correct installation
• Directly withdraw released gases and gaseous substances by sufficient ventilation
12 B-290 Operation Manual, Version I
Page 13

!
WARNING
Death or serious poisoning by contact or incorporation of harmful substances at use.
• Before operation, check the instrument for correct assembling
• Before operation, inspect sealings and tubes for good condition
• Exchange worn out or defective parts immediately
• Exchange clogged filters immediately
• Only operate the instrument in ventilated environments
• Directly withdraw released gases and gaseous substances by sufficient ventilation
• Perform a dry-run without sample material and check for gas leakages
!
CAUTION
Risk of minor poisoning by inhalation of ozone.
• Directly withdraw released gases and gaseous substances by sufficient ventilation
2 Safety
!
CAUTION
Risk of minor or moderate burnings when handling hot parts.
• Do not touch hot parts
• Let the system cool down for some minutes after use
!
NOTICE
Risk of instrument short-circuits and damage by liquids.
• Do not spill liquids over the instrument or its component parts
• Wipe off any liquids instantly
• Place the sample vessel onto the designated reservoir-plate on top of the instrument
• Ensure a safe positioning of the sample vessel
• Do not move the instrument when it is loaded with liquid
• Keep external vibrations away from the instrument
!
NOTICE
Risk of instrument damage by internal overpressure.
• External supply pressure must meet the system specifications
• Exchange clogged filters immediately
• Dispose of filter immediately
13 B-290 Operation Manual, Version I
Page 14
!
NOTICE
Risk of instrument damage by wrong mains supply.
• External mains supply must meet the voltage given on the type plate
• Check for sufficient grounding
2.5.2 Warning labels on housing and assemblies
The following warning sticker(s) can be found on the housing or assemblies of the Mini Spray Dryer
B-290 and Inert Loop B-295:
Symbol Meaning Location
2 Safety
2.5.3 Personal protective equipment
Always wear personal protective equipment such as protective eye goggles, protective clothing and
gloves. Wear protective mask to protect from inhalation of fine particles. The personal protective
equipment must meet all requirements of all data sheets for the chemicals used. These instructions
are an important part of the instrument and must be made available at all times to the operating
personnel at the place where the equipment is deployed. Additional protective measures can
be necessary according to the applications! The user is fully responsible for choosing adequate
measures!
Do not touch
hot item, hot
surface!
See text Sticker at the rear side, B-290
See text Sticker/label, located on the B-295
Label, located at the spray cylinder,
B-290
14 B-290 Operation Manual, Version I
Page 15

!
WARNING
Serious chemical burns by corrosives.
• Observe all data sheets of the used chemicals
• Handle corrosives in well ventilated environments only
• Always wear protective goggles
• Always wear protective gloves
• Always wear protective clothes
• Do not use damaged glassware
• Wear protective mask when working with inhalable particles
2.5.4 Safety elements and measures
2 Safety
To arrest electrostatic charges from the instrument, it is internally grounded. Electrostatic charges are
to be arrested from both the product collection vessel via the external (yellow) grounding cable for all
cyclones with grounding socket.
Heating
• Excess temperature protection against uncontrolled overheating.
• Automatic temperature control of the heater and inlet temperature.
• Heater can not be started before the closed loop is inert
Spraying (Pump)
• Pump can not be started before the closed loop is inert
Air/Gas
The system can be used in suction mode (standard) or in pressure mode. The suction procedure used
in the Mini Spray Dryer B-290 produces a light negative pressure in the instrument and thus rules out,
together with the inlet filter and outlet filter, a contamination of the environment through leaking from
the instrumen.
Automatic processing interruption when system pressure is too low in closed mode
• Outlet filter to protect the environment contamination of fine dust particles via exhaust gas tubing
N2 inert gas
The Mini Spray Dryer B-290 Advanced can be used to work with organic solvent in combination with
the Inert Loop B-295.
• Inertization against explosive gas mixtures
• oxygen concentration measurement (inside the Inert Loop B-295)
• pressure measurement (inside the Inert Loop B-295)
The heater and the pump stop if the oxygen level is > 6 vol.% or if the pressure level is < 10 mbar.
15 B-290 Operation Manual, Version I
Page 16

Glass
• Use of inert 3.3 borosilicate glass.
• Grounded coating of the inner surface of the cyclone to prevent any electrostatic charge of the
power.
• Screw couplings between glass connections to prevent glass breakage.
Optional system configuration with Inert Loop B-295
• Overpressure leakage detection.
• Safe gas condition (< 6 % O2 content) is detected and enables the regulation of the drying gas
mixture via a communication cable.
2.6 General safety rules
Responsibility of the operator
The head of the laboratory is responsible for training his/her personne.
The operator shall inform the manufacturer without delay of any safety-related incidents which might
occur during operation of the instrument or its accessories. Legal regulations, such as local, state and
federal laws applying to the instrument or its accessories must be strictly followed.
2 Safety
Duty of maintenance and care
The operator is responsible for the proper condition of instrument. This includes maintenance, service
and repair jobs that are performed and on schedule by authorized personnel only.
Spare parts to be used
Use only genuine consumables and spare parts for maintenance to assure good system performance,
reliability and safety. Any modifications of spare parts or assemblies are only allowed with the prior
written permission of the manufacturer.
Modifications
Modifications to the instrument are only permitted after prior consultation and with the written approval
of the manufacturer. Modifications and upgrades shall only be carried out by an authorized BUCHI
technical engineer. The manufacturer will decline any claim resulting from unauthorized modifications.
16 B-290 Operation Manual, Version I
Page 17

3 Technical data
This chapter introduces the reader to the instrument specifications. It contains the scope of delivery,
technical data, requirements and performance data.
3.1 Scope of application and delivery
The Mini Spray Dryer B-290 is available in three different set-ups:
Mini Spray Dryer B-290 Basic
• For aqueous applications with air in ‘open mode’
Mini Spray Dryer B-290 Acid resistant
• For acidic applications with air in ‘open mode’
Mini Spray Dryer B-290 Advanced
• For solvent applications in combination with Inert Loop B-295
• Optional use with Dehumidifier B-296
• Accessories are solvent resistant
3 Technical data
The scope of delivery can only be checked according to the individual delivery note and the listed
order numbers.
NOTE
For additional information on the listed products, see www.buchi.com or contact your local dealer.
3.1.1 Standard instrument
Table 3-1: Standard instrument
Product Order number
Mini Spray Dryer B-290 200 V 44781
Mini Spray Dryer B-290 230 V 44780
Mini Spray Dryer B-290 Advanced 200 V 44700
Mini Spray Dryer B-290 Advanced 230 V 44699
Mini Spray Dryer B-290
Acid resistant 200 V
Mini Spray Dryer B-290
Acid resistant 230 V
11056420
11056421
17 B-290 Operation Manual, Version I
Page 18

3.1.2 Standard accessories
3 Technical data
Table 3-2: Standard accessories
Product Order number
Operation Manual:
German 093000
English 093001
French 093002
Italian 093003
Spanish 093004
Glass assembly complete 044680
Compressed gas tube, 5 m with quick
coupling, complete
046356
Silicone tube for nozzle cooling, 4 m 004139
Silicone tube (per m) 004138
Cleaning brush for nozzle 044782
Polypress tube for gas stream, 3 m 046341
Hose clamps 004236
Spray Dryer Application Support and
910040
Training (1 day training and application
tests)
3.1.3 Standard accessories with the B-290 Advanced
3.1.4 Standard accessories with the B-290 Acid resistant
Table 3-3: Standard accessories with the B-290
Advanced
Product Order number
Lamella safety curtain 044783
Feed switch valve 044725
Spray cylinder, vertical outlet 044697
Nozzle cap, 1.4 mm 044649
Tygon tube MH 2075 transparent (per m) 046314
Tygon tube F 4040 A yellow (per m) 046315
Table 3-4: Standard accessories with the B-290
Acid resistant
Product Order number
Two-fluid nozzle acid resistant 11056320
Glass assembly acid resistant complete 11056386
Spray cylinder holder PFA coated 11056324
Cyclone metall cover PFA coated 11056327
Knurled screws PFA coated 11056325
Flange coupling PFA coated 11056326
Temperature sensor acid resistant 11056329
18 B-290 Operation Manual, Version I
Page 19

3.1.5 Optional accessories
3 Technical data
Table 3-4: Standard accessories with the B-290
Acid resistant (cont.)
Temperature sensor support adapter 11056318
Clamp ring ID 8 mm 11056387
O-ring FPM 8×1 mm 004221
Connecting nipple PFA coated 11056328
Connecting piece PFA coated 11056334
Needle 0.7 mm titanium 11056415
Nozzle tip 0.7 mm titanium 11056317
Table 3-5: Optional accessories
Product Order number
Inert Loop B-295 50 Hz, 200 V 044779
Inert Loop B-295 50 Hz, 230 V 044701
Inert Loop B-295 60 Hz, 200 V 046345
Inert Loop B-295 60 Hz, 230 V 046344
Dehumidifier B-296 50/60 Hz, 230 V 040188
Dehumidifier B-296 50/60 Hz, 200 V 040181
Spray chilling accessory 50/60 Hz, 230 V 040351
Spray chilling accessory 50/60 Hz, 200 V 040352
Brown glass assembly 044758
Two-fluid nozzle, complete 044698
Three-fluid nozzle, complete 046555
Three-fluid nozzle conversion kit 046556
Three-fluid nozzle acid resistant 11056971
Cylinder Insulation 040058
Remote control panel B-290 044702
Outlet filter acid resistant complete 11056333
Outlet filter, complete 044754
Inlet filter 011235
Compressed air maintenance unit 004366
Oil-free compressor, 230 V/50 Hz 027907
Oil-free compressor, 230 V/60 Hz 11055737
IQ/OQ Documentation B-290 11057023
OQ Documentation B-290 11057024
19 B-290 Operation Manual, Version I
Page 20

3.2 Technical data overview
Table 3-6: Technical data Mini Spray Dryer B-290
Power consumption max. 2900 W
Connection voltage 200–230 V ± 10 %
Frequency 50/60 Hz
Environmental conditions
Temperature
Altitude
Humidity
Evaporating capacity 1.0 l/h H2O, higher for organic solvents
Airflow max. of 35 m3/h
Motor control Frequency converter
Max. temperature input 220 °C
Heating capacity 2300 W
Heating control PT-100, fuzzy logic, control accuracy ± 2 °C
Interface Serial port RS-232 for all parameters
Spray gas Compressed air or nitrogen/200–800 l/h, 5–8 bar
Nozzle tip diameter 0.7 mm standard, other sizes 1.4 and 2.0 mm available
Possible particle diameter range 1–25 µm
Mean residence time 1.0–1.5 sec.
Pollution degree 2
Installation category II
Dimensions (W×H×D) 65×110×70 cm
Weight 46 kg
3 Technical data
for indoor use only
5–40 °C
up to 2000 m
maximum relative humidity 80 % for temperatures up to
31 °C decreasing linearly to 50 % relative humidity at 40 °C
Table 3-7: Technical data Spray Chilling accessory
Power consumption max. 400 W
Connection voltage 200–230 V ± 10 %
Frequency 50/60 Hz
Heating control (from B-290) PT-100, fuzzy logic, control accuracy ± 2 °C
Interface Serial port RS-232 for all parameters
Spray gas Compressed air or nitrogen/200–800 l/h, 5–8 bar
Nozzle tip diameter 0.7 mm standard, other sizes 1.4 and 2.0 mm available
Possible particle diameter range 20–200 µm
Mean residence time 1.0–1.5 sec.
Pollution degree 2
Installation category II
Dimensions (W×H×D) 20×20×30 cm
Weight 2.4 kg
Product vessel 87 mm height, 71 mm inner ∅
Batch volume 0.3 liter
20 B-290 Operation Manual, Version I
Page 21

3 Technical data
Table 3-7: Technical data Spray Chilling accessory (cont.)
Heating liquid water or a thermal oil (polyethylene glycol PEG 400 with
low viscosity)
Heating liquid volume 1.4 liter
Max. melting point of sample 70 °C
Table 3-8: Technical data Inert Loop B-295
Power consumption max. 1400 W
Connection voltage 200-230 V ± 10 %
Frequency 50/60 Hz
Min. outlet temperature down to –25 °C
Rate of cooling 800 W at –10 °C
Dimensions (W×H×D) 60×70×84.5 cm
Weight 88 kg
Table 3-9: Technical data Dehumidifier B-296
Power consumption 700 W
Connection voltage 200/230 V ± 10 %
Frequency 50/60 Hz
Min. outlet temperature + 2 °C
Rate of cooling 600 W at 0 °C
Dimensions (W×H×D) 35×40×60 cm
Weight 36 kg
3.3 Materials used
Table 3-10: Materials used
Component Material designation Material code
Glass assembly 3.3 borosilicate glass
Nozzle/heater/connection piece Stainless steel 1.4301/1.4305
Seal of product collection vessel FPM (FFKM)
Seal cyclone/cylinder Silicone
Preheat exchanger Inert Loop B-295 Stainless steel 1.4301
Polypress tube EPDM
Product feed tube Silicone and tygon
Molecular sieve bag of adsorption unit PEEK
Acid resistant coated metal PFA (perfluoroalkoxy polymer)
Acid resistant metal titanium, Alloy 600
Metal parts Mini Spray Dryer B-290 acid
resistant
PFA-coated
21 B-290 Operation Manual, Version I
Page 22

4 Description of function
This chapter explains the basic working principle of the Mini Spray Dryer B-290 Basic (open mode
only) and the Mini Spray Dryer B-290 Advanced (for closed mode operation). It also shows how the
instruments are structured and provides a general functional description of the assemblies.
4.1 Functional principle of the drying gas
The Mini Spray Dryer B-290 operates according to a co-current drying gas (e.g. air in open mode)
and product stream. This means that sprayed product and hot gas have the same flow direction from
downward.
2
1
3
4
5
7
4 Description of function
a Gas inlet (optional with attached inlet filter)
b Electric heater
8
c Concentric inlet of the hot gas around the
spray nozzle
d Spray cylinder
e Cyclone to separate particles from gas
stream
f Product collection vessel
g Outlet filter
h Aspirator to pump gas through system
6
Fig. 4.1: Functional principle of the drying air
4.2 Functional principle of the sample feed and dispersion
The Mini Spray Dryer has a integrated two-fluid nozzle: Compressed gas (normally air or N2) is used to
disperse the liquid body into fine droplets which are subsequently dried in the cylinder.
a Feed solution
4
5
Fig. 4.2: Functional principle of the sample feed and dispersion
6
3
2
1
b Peristaltic pump
c Two fluid nozzle
d Connection for cooling water
e Connection for compressed spray gas
f Automatic nozzle cleaning system
Spraying nozzle
The nozzle consists of the nozzle tip with a 0.7 mm dia meter hole and the nozzle cap
(1.4 or 1.5 mm in diameter). This geometry results in a mixing of fluid body and gas.
22 B-290 Operation Manual, Version I
Page 23

The nozzle cap has an inserted ruby stone with a precise opening and sharp edges to guaran tee a
N
precise and reproducible spray cone.
The smaller nozzle cap of 1.4 mm diameter leads to a lower consumption of spray gas, as the
concentric ring around the nozzle is smaller. This nozzle is recommended when nitrogen is used to
minimize operating costs. The larger nozzle cap opening of 1.5 mm is typically used when air serves
as spraying gas, as this design is more robust regarding concentric alignment to form a vertical and
uniform spray cone.
Optional nozzle sets with 1.4 mm or 2.0 mm nozzle tip diameter are available to increase the droplet
size and/or to spray more viscous samples or dispersions.
4.3 Outlet filter
The outlet filter, consisting of a polyester textile, prevents environmental pollution and the possible
corrosion of the aspirator by very fine particles which cannot be separated in the cyclone. It can be
washed by hand or machine. All needed connections are included.
The second filter included is made of a PTFE membrane. By counter-pulsing the filter with pressurised
air, some of the collected particles can be reco vered resulting in a higher yield (see chapter 6.6.
The manometer indicates the system pressure in front of the filter. With a clean filter, the corresponding
pressure drop is marked.
4 Description of function
4.4 Inert Loop B-295
Mini Spray Dryer B-290
Advanced
2
1
a Feed
b Product
c Exhaust gas
d Solvent
Fig. 4.3: Combined system of the Mini Spray Dryer B-290 and Inert Loop B-295
Inert Loop B-295
5
6
7
2
3
4
e Preheat exchanger
f Condensation
g Cooling unit
The Inert Loop B-295 is an accessory to enable the safe use of organic solvent in a closed loo.
The inert gas is loaded with solvent from the spray drying process. After precooling in a preheat
exchanger, the solvent is condensed in a refrigerator and collected in a closed bottle. The cleaned
gas stream is preheated in the preheat exchanger and flows back to the Mini Spray Dryer B-290
Advanced.
23 B-290 Operation Manual, Version I
Page 24

4.5 Dehumidifier B-296
4 Description of function
Dehumidifier B-296
Mini Spray Dryer B-290
8
7
1
2
3
4
a Ambient air
b Condensation
c Cooling unit
d Condensed water
Fig. 4.4: Open loop Mini Spray Dryer B-290 with Dehumidifier B-296 for inlet air conditioning
5
e Product
f Exhaust gas
g Compressed air as spray gas
h Feed
6
Use as inlet air conditioning
The Dehumidifier B-296 is an accessory to enable a drying under constant and reproducible humidity
conditions cooling to a dew point of 3–5 °C.
The drying air is passing the refrigerator of the Dehumidifier B-296. The humidity in the ambient air
condenses in the refrigerator and is collected in a closed bottle.
The dry air is then heated up by the heater of the Mini Spray Dryer B-29.
Use in the closed mode
The Dehumidifier B-296 is an accessory to enable the safe use of a water-organic solvent mixture in a
closed loop with up to 50 % organic solvents content.
The inert gas is loaded with water-solvent mixture from the spray drying process in an external preheat
exchanger.
The solvent condenses in the Dehumidifier B-296 and is collected in a receiving vessel.
24 B-290 Operation Manual, Version I
Page 25

4.6 Spray chilling accessory
During spray chilling a hot melt is dispersed into a cold gas stream. The droplets are solidified into
particles and are separated. The matrix substance and the active ingredients are heated above the
melting point. Highest melting point is 70 °C. The nozzle is also heated to prevent any blocking. No
additional thermostat is required, as the existing heating control and peristaltic pump in the instrument
are used. If the sample has a low melting point, then the inlet air is cooled to increase the temperature
gradient. If lower temperatures than 10 °C (provided by the B-296) are used, e.g. for hard fats, the
inlet air can be cooled to –5 °C by using a specially developed refrigeration unit (please contact your
local distributor.
1
4
4 Description of function
a Temperature sensor
b Circulating heating liquid to bath – nozzle –
peristaltic pump – bath
c Cold gas
d Heated feed sample
e Droplets spray
2
3
5
Fig. 4.5: Functional principle of the sample feed and dispersion
4.7 Connected accessories to the Mini Spray Dryer B-290
a Serial port RS-232 for data output to a PC
b Connection for the remote control panel
c Connection for Inert Loop B-295
1
Fig. 4.6: Rear connections of the Mini Spray Dryer B-290
2
3 4
d Connection for feed switch valve
25 B-290 Operation Manual, Version I
Page 26

4.7.1 Feed switch valve and remote control panel
Fig. 4.7: Feed switch valve and remote control panel
The remote control panel enables an easy operation even within a closed fume hood. The flow meter
for the spraying gas is the only parameter which cannot be adjusted via the remote control panel.
The feed switch valve is a useful tool together with the remote control panel. During the start and end
of the spray process, the feeding tube has to be moved from pure solvent to product solution and
vice versa. This can be automated by means of the feed switch valve. A Y-piece is inserted between
peristaltic pump and feed switch valve.
4 Description of function
4.7.2 Printer or PC for data output via RS-232 serial port
The Mini Spray Dryer B-290 is supplied with a standard protocol for data readout. This is of special
importance if the system is qualified and underlies special regulations.
The connection starts as soon as the heater is switched on.
The transmission rate is 2400 Baud/s, Parity: No.
The parameters are sent out every 30 seconds as an ASCII-Code, separated by a TAB (ASCII 09)
and ended with a RETURN (ASCII 0D). They can be read out e.g. via the program “HyperTerminal”
included in the Microsoft package.
The source is defined as follows:
No. Information Type Unit
1 Time since mains on integer s
2 Current temperature inlet integer °C
3 Current temperature outlet integer °C
4 Heater on/off 0/1
5 Set temperature inlet integer °C
6 Aspirator on/off 0/1
7 Aspirator rotation speed integer %
8 Pump on/off 0/1
9 Pump rotation speed integer %
10 Feed switch valve 1/2
11 Connection Inert Loop B-295 no/yes 0/1
12 Oxygen high 0/1
13 Pressure low 0/1
14 Error message integer
26 B-290 Operation Manual, Version I
Page 27

5 Putting into operation
This chapter describes how the instrument is installed and gives instructions on initial startup.
NOTE
Inspect the instrument for damages during unpacking. If necessary, prepare a status report immediately to inform the postal company, railway company or transportation company.
Keep the original packaging for future transportation.
5.1 Installation site
Put the instrument on a stable, horizontal surface. Consider the maximum product dimensions and
weight and the operation height of 1.30 meters for spray chilling applications. Make sure that you can
comfortably reach the instrument.
Installation on a mobile trolley is also possible. Obtain the environmental conditions as described in
section 3.2, technical data.
5 Putting into operation
Put the instrument on a stable, horizontal base.
!
Death or serious injuries by use in explosive environments.
• Do not operate the instrument in explosive environments
• Do not operate the instrument with explosive gas mixtures without inertization
• Before operation, check all gas connections for correct installation
• Directly withdraw released gases and gaseous substances by sufficient ventilation
!
Risk of minor or moderate injury by heavy weight of the instrument.
• Consult a second person to transport the instrument
• Do not tilt or drop the instrument
• Place the instrument on a stable, even and vibration-free surface
• Keep limbs out of crushing zone
• Lift the device at the right and left bottom reaching areas for the hands
5.2 Electrical connections
The Mini Spray Dryer B-290 is aimed to be installed mobile and is and is shipped with a flexible power
cord. After the installation, an electrical safety test is recommended to verify a safe system condition
such as sufficient grounding.
Warning
Caution
Risk of instrument damage by wrong mains supply.
• External mains supply must meet the voltage given on the type plate
• Check for sufficient grounding
27 B-290 Operation Manual, Version I
NOTICE
Page 28

5 Putting into operation
NOTE
To cut the power in case of an emergency by unplugging, the instruments or any other items
must not block the mains plug! External connections and extension lines must be provided with a
grounded conductor lead (3-pole couplings, cord or plug equipment). All used power cords must
meet the input power requirements.
Demands on the mains circuit
The mains circuit must
• provide the voltage that is given on the type plate of the instrument.
• be able to handle the load of the connected instrument(s).
• be equipped with adequat fusage and electrical safety measures, in particular proper grounding.
NOTE
Additional electrical safety measures such as residual current breakers may be necessary to meet
local laws and regulation!
External power switches (e.g. emergency stop switches) must meet IEC 60947-1 and IEC 60947-3
requirements. Such devices must be clearly labeled and accessible at any tim.
5.3 Installing the compressed air maintenance unit and compressor (optional)
To ensure the Mini Spray Dryer B-290 achieves an optimal atomization performance, the supply of
compressed air with a pressure of 5–8 bar is necessary. The compressed air must be dried and free of
impurities (contamination of the product through impure air). If this is not guaranteed, we recommend
the use of a WILKERSON maintenance unit.
Risk of instrument damage by internal overpressure.
• External supply pressure must meet the system specifications
• Exchange clogged or defective filters immediately
• Dispose of clogged or defective filter immediately
1
Notice
2
a Activated charcoal filter
b Filter
c Water separator
3
Fig. 5.1: Compressed air maintenance unit
If there is no compressed air plant available, the compressed air can be taken from an oil-free air
compressor with an output of 5– 8 bar as require.
28 B-290 Operation Manual, Version I
Page 29

5.4 Installing the glass assembly
!
CAUTION
Risk of minor or moderate cuts by sharp edges.
• Do not touch defective or broken glassware with bare hands
• Do not touch thin metal edges
To install the spray cylinder, proceed as follows:
5 Putting into operation
1
2
3
8
7
6
5
4
9
10
11
6
4
• Screw the seal holder b on the instrument
using the three knurled screws.
• Connect the separation flask d to the spray
cylinder c by closing the screw connection
(SVL 42) tightly.
• Screw the connection piece f on the cylinder
outlet flange with the left flange screw joint g.
The connection is sealed with a Viton o-ring.
• To mount the cylinder on the instrument,
hold the glass in the upper flange around the
nozzle and insert the connection piece into
the support element h.
• Open the fixation e.
• Press the glass flange on the above seal.
• Push the lever a carefully on the left side, so
that the flange of the cylinder is held firmly.
• Close the fixation e.
• Attach the cyclone k together with the
product collection vessel n to the connection
piece f with a second flange screw joint j.
• Screw the glass elbow i onto the top of the
cyclone.
• Connect the grounding cable l to the cover
of the product collection vessel m and to the
housing to minimize the electrostatic charge
of the powder.
12
13
14
29 B-290 Operation Manual, Version I
Page 30

5 Putting into operation
• Connect the outlet temperature sensor o to
the plug in the housing.
• Insert the outlet temperature sensor into the
connection piece f and screw it in. A metallic
ring and O-ring is inserted to seal the probe.
• Close all connections tightly.
15
6
Fig. 5.2: Installing the glass assembly
5.5 Installing the spraying nozzle
4
3
2
Fig. 5.3: Installing the spraying nozzle
3
5
• Insert the nozzle into the heater element at
the top of the instrument.
• The two fluid spraying nozzle has a connec-
tion for the feeding tube a, a connection for
the pressurized air or nitrogen b and two
connections c for an optional cooling/heating
1
with an external thermostat. The top connection d is for the implemented pneumatic
nozzle cleaning: a needle pushes through the
nozzle and prevents clogging.
The three fluid nozzle has a second feed supply
3
e instead of the nozzle cleaning.
The three fluid nozzle has two connections for
two feeding tubes. An external peristaltic pump
has to be mounted for the second feed supply.
12
Fig. 5.4: Installing the spraying nozzle
30 B-290 Operation Manual, Version I
Page 31

5.6 Installing the filters
5 Putting into operation
5.6.1 Inlet filter installation
Use
Pre-filtering of environmental air to keep most impurities and particles away from the spray drying
process.
Risk of instrument damage by internal overpressure.
• External supply pressure must meet the system specifications
• Exchange clogged or defective filters immediately
• Dispose of clogged or defective filters immediately
Notice
Fig. 5.5: Installing the inlet filter
To install the inlet filter directly connect it to the air inlet of the heater.
5.6.2 Outlet filter installation
Fig. 5.6: Installing the outlet filter
• Screw the support angle to the bottom side of the panel.
• Mount the filter directly.
• Install the connecting tubing between cyclone and filter with an SVL 42.
31 B-290 Operation Manual, Version I
Page 32

5 Putting into operation
• Unscrew all screw caps of the tubing at the filter head a and unhook the complete filter from the
holder.
• Unscrew the screw cap b and pull off the filter housing glass. Remove the sealing ring.
a
b
c
d
filter housing glass
Fig. 5.7: Outlet filter installation
• Unscrew the hose clamp c and pull off the filter cartridge.
• Remove the hose clamp d from the filter cartridge.
➡ Wash the polyester filter manually or in a laboratory washing machine. Use standard soap deter-
gents for cleaning.
For installation proceed in reverse order. Mind the correct mounting direction of the sealing ring (order
no. 040471) at the filter housing glass!
NOTE
The flange screw coupling made of aluminum (order no. 048539) is recommended for the use of
outlet temperatures higher than 80 °C for better sealing performance compared to the polymer
(POM) flange (order no. 034139).
filter cartridge
32 B-290 Operation Manual, Version I
Page 33

5.6.3 PTFE filter membrane installation
b
c
a
filter tube
5 Putting into operation
Fig. 5.8: Outlet fi lter membrane (PTFE) installation
• Pull out the end-cap a of the filter membrane.
• Unscrew the hose clamp b and pull off the filter membrane.
• Remove the hose clamp c from the filter tube.
➡ Gently flush the PTFE filter membrane manually only. Use standard soap detergents for cleaning.
It is recommended to exchange the filter membrane regularly.
For installation proceed in reverse order.
Wrap the end of the filter tube into the filter carrier and push in the end-cap (see Fig. 5.7).
33 B-290 Operation Manual, Version I
Page 34

5 Putting into operation
NOTE
Make sure the end-cap properly seals the filter carrier and the filter membrane! This is essential for
effective filtering.
Fig. 5.9: Installing the end-cap to seal the filter tube
Mind the correct mounting direction of the sealing ring (order no. 040471) at the filter housing glass!
NOTE
The flange screw coupling made of aluminum (order no. 048539) is recommended for the use of
outlet temperatures higher than 80 °C for better sealing performance compared to the polymer
(POM) flange (order no. 034139).
5.6.4 Cleaning filter installation
Use
• When connected to the air inlet at the heater the filter works as an inlet cleaning filter to remove
even finest particles from the drying air.
• When connected to the process air outlet tube the filter works as a safety element to hold back
finest product residues from the environmental air.
Fig. 5.10: Housing with filter cartridge
Installation as inlet cleaning filter
Install the filter between the heater air inlet and the inlet filter. The filter cascade will ensure maximal
particle free air in standard environment.
34 B-290 Operation Manual, Version I
Page 35

5 Putting into operation
Installation as safety outlet filter
Install the filter between the outlet filter and the Aspirator. This will hold back finest particles from the
Aspirator and the environment e.g. the laboratory air.
Fig. 5.11: Cleaning filter installed with stop cock
5.7 Adjusting the peristaltic pump bed and choosing the feeding tube
The pump bed of the peristaltic pump is adjusted ex works to the standard silicone tube.
If different tubes, e.g. the tygon tubes for organic solvents, are used, adjust the pump bed with an
allen key. Connect an adapter piece as a tube stopper between two feeding tubes to prevent slipping
in the peristaltic pump.
Adjusting the peristaltic pump bed
Risk of instrument short-circuits and damage by liquids.
• Do not spill liquids over the instrument or its component parts
• Wipe off any liquids instantly
• Place the sample vessel onto the designated reservoir-plate on top of the instrument
• Ensure a safe positioning of the sample vessel
• Do not move the instrument when it is loaded with liquid
• Keep external vibrations away from the instrument
Notice
35 B-290 Operation Manual, Version I
Page 36

5 Putting into operation
a Tube to spraying nozzle
b Handle, pump bed
c Distilled water
d Flow meter valve
e Adjusting screw, pump bed
Fig. 5.12: Pump bed adjustment
1. Remove spraying nozzle from the Mini Sprayer B-290 and hold spraying nozzle into a suitable
container.
2. Insert tube a in to the pump bed.
3. Put tube on the suction side into distilled water c.
4. Close pump bed with handle b.
5. Unscrew adjusting screw e 1 turn.
6. Open the flow meter valve d to 40 mm.
NOTE
Distilled water c is now flowing through the tubing without the feeding pump running.
7. Turn the adjusting screw e in until the water flow stops.
8. Turn adjusting screw ¼ further in.
9. Close flow meter valve to 0 mm.
10. Install spraying nozzle back into the Mini Sprayer B-290.
Choose the feeding tube according to the following table. For short processes, even unsuitable tubes
can be used, as swelling takes some time.
Table 5-1: Choosing the feeding tube
Solvent Silicone tube Tygon MH 2075 Tygon F 4040 A
Methanol suitable suitable suitable
Ethanol suitable suitable suitable
Acetone unsuitable suitable unsuitable
Toluoene unsuitable unsuitable unsuitable
Isopropanol suitable suitable suitable
Chloroform unsuitable unsuitable unsuitable
Dichloro methane unsuitable unsuitable unsuitable
THF unsuitable unsuitable unsuitable
Ethylacetate unsuitable suitable unsuitable
Hexane unsuitable unsuitable suitable
36 B-290 Operation Manual, Version I
Page 37

5.8 Tubing installation
The Mini Spray Dryer B-290 needs compressed gas for the two-fluid nozzle and the nozzle cleaner
between 5 and 8 bar. Therefore, the air or nitrogen is connected on the rear of the instrument via a
quick coupling.
Fig. 5.13: Quick coupling rear side
The Mini Spray Dryer B-290 can be used in an open or closed mode. The open mode is set in the
suction mode as a standard. However, if the exhaust gas is aggressive and could lead to a cor ro sion
of the aspirator, the instrument can also be run in a pressure mode. This mode leads to a higher noise
emission.
5 Putting into operation
NOTE
Risk of instrument malfunction when the instrument is operated with bent hoses.
• Always inspect the instrument for bends or kinks in hoses and eliminate them prior to operation.
• Exchange hoses with signs of mechanical stress such as small cracks and blind spots at the
surface immediately.
1
2
a Tubing between cyclone respectively filter and
aspirator
b Exhaust tube
Fig. 5.14: Open mode set-up in suction mode
37 B-290 Operation Manual, Version I
Page 38

5 Putting into operation
a Exhaust tube of cyclone or filter, respectively
b Tubing between aspirator and heater
2
1
Fig. 5.15: Open mode set-up in pressure mode
5.9 Installing the compressor
Use
For the spray process compressed air or gas is necessary. If no compressed air supply is available in
the laboratory the compressor can be installed instead.
Installation
• Place it in a dry, dust free and well tempered room with appropriate ventilation.
• Follow the compressors manual to install the device.
• Connect the outlet of the compressor to the compressed air inlet of the Mini Spry Dryer B-290.
Fig. 5.16: Oil- and dust-free air compressor
NOTE
Set the compressor to 6 bar output pressure to achieve recommended standard spray conditions.
38 B-290 Operation Manual, Version I
Page 39

5.10 Quick hose couplings
Use
For fast and reliable connecting/disconnecting of polypress tubes e.g. the tubing of Inert Loop B-295
and Dehumidifier B-296.
Installation
• Cut the polypress tube with a sharp knife or a special tube cutter into two halfs with a clean cut.
The tube ends must be straight!
• Slip one hose clamp over each tube end.
• Use one male and one female coupling adapter and install them at the tube ends.
• Secure the coupling adapters with the hose clamps.
• Test all tubes and connectors for tightness prior use!
Male coupling
5 Putting into operation
Female coupling (including a flat seal)
Fig. 5.17: Quick hose couplings
5.11 Installing the Inert Loop B-295
!
Danger
Death or serious poisoning by gases or particles due to O2– sensor or filter malfunction
• Exchange defective O2– sensor immediately
• Exchange O2– sensor regularly within the specified maintenance intervals
• Exchange clogged filters immediately
• Exchange filters regularly within the specified maintenance intervals
• Dispose of clogged or defective filters immediately
39 B-290 Operation Manual, Version I
Page 40

5 Putting into operation
!
Warning
Death or serious poisoning by contact or incorporation of harmful substances at use.
• Before operation, check the instrument for correct assembling
• Before operation, inspect sealings and tubes for good condition
• Exchange worn out or defective parts immediately
• Exchange clogged filters immediately
• Only operate the instrument in ventilated environments
• Directly withdraw released gases and gaseous substances by sufficient ventilatio.
• Perform a dry-run without sample material and check for gas leakages
The Inert Loop B-295 has wheels and can be placed
next to the Mini Spray Dryer B-290. Moreover it can be
used as a trolley if the instrument has been purchased in
2011 or later.
Connect the system to the mains supply with the power
cord.
Connect the two instruments with the communication cable to ensure their safe operation. The tubing is
described below.
Fig. 5.18: Inert Loop B-295
Fig. 5.19: Mini Spray Dryer B-290 Advanced with Inert Loop B-295 as trolley
40 B-290 Operation Manual, Version I
Page 41

5 Putting into operation
The Inert Loop B-295 has a sideward hose connection
for the exhaust gas. Due to the constant feeding with
nitrogen, a certain amount of it is permanently leaving
the system through this outlet tube. If air is sucked in
through the tube, this is an indication that the closed
loop is not tight.
a Tubing between outlet filter and aspirator inlet
b Nitrogen inlet
c Tubing between heater inlet and B-295 outlet
d Tubing between aspirator outlet and B-295 inlet
e Exhaust gas (nitrogen) outlet tube
1
3
Fig. 5.20: Tubing installation for closed mode operation with Mini Spray Dryer B-290 Advanced and Inert Loop B-295
5
41 B-290 Operation Manual, Version I
Page 42

5.12 Dehumidifier B-296 and Inert Loop B-295 combination
a Mini Spray Dryer B-290 outlet tube
b Dehumidifier B-296 outlet tube
c Inert Loop B-295 outlet tube
5 Putting into operation
Fig. 5.21: Tube connections B-290, B-296 and B-295
• Connect the Mini Spray Dryer B-290 outlet tube a with the inlet of the Dehumidifier B-296
• Connect the Dehumidifier B-296 outlet tube b to the Inert Loop B-295 inlet.
• Connect the outlet c of the Inert Loop B-295 to the Mini Spray Dryer B-290.
5.13 Installing the Dehumidifier B-296
NOTE
Disconnect the display from the front side and insert a LR 44 battery in the display.
Fig. 5.22: Installation of the display
42 B-290 Operation Manual, Version I
Page 43

5 Putting into operation
Used as inlet air conditioning system
Installation steps:
1. Place the Dehumidifier B-296 next to the Mini Spray Dryer B-290.
2. Connect the tubing a from the outlet (labelled on the enclosure) of the Dehumidifier B-296 to the
gas inlet of the Mini Spray Dryer B-290 heater.
3. Use hose clamps to fix the tubing.
4. Connect the power cord to the mains. The device can now be switched on.
a Dehumidifier B-296 outlet tube
Fig. 5.23: Tubing between the Mini Spray Dryer B-290 and the Dehumidifier B-296
Used in the closed mode
When mixtures of organic solvents and water (with less than 50 % solvents) are being processed in
‘closed loop’ configuration, the use of the Dehumidifier B-296 is highly recommended. The cooling
temperature is fixed to 0 °C.
a Inlet tubing B-296
b Outlet tubing B-296
Fig. 5.24: Tubing between the preheat exchanger and the Mini Spray Dryer B-290
Installation steps:
1. Place the Dehumidifier B-296 next to the Mini Spray Dryer B-290.
2. Connect the tubing b from the outlet (labelled on the enclosure) of the Dehumidifier B-296 to the
gas inlet of the Mini Spray Dryer B-290.
3. Connect the tubing a from the Mini Spray Dryer B-290 outlet to the inlet of the Dehumidifier
B-296 (labelled on the enclosure).
4. Use hose clamps to fix all Polypress tubings.
5. Connect the power cord to the mains. The device can now be switched on.
43 B-290 Operation Manual, Version I
Page 44

NOTE
See section 7.6 for information about the cleaning procedure of the Dehumidifier B-296.
5.14 Installing the Spray Chilling Accessory
2
1
6
a Product feed vessel
b Heating bath
c Heater
Fig. 5.25: Spray Chilling Accessory
3
4
5
5 Putting into operation
• Mount the complete bath b on the top of the
Mini Spray Dryer B-290.
• Use the knurled screws to fix the spray chilling
accessory on the Mini Spray Dryer B-290
cover panel. Plug in the heater c of the spray
chilling accessory instead of the standard
heater of the Mini Spray Dryer B-290.
• Connect the long temperature sensor d
instead of the standard outlet temperature
sensor to the electrical plug and put the
temperature sensor into the holder on top of
the heating bath.
d Temperature sensor
e Capillary inlet
f Capillary outlet
NOTE
The nozzle tip 1.4 mm with nozzle cap 2.0 mm are recommended to increase the droplet size and if
clogging occurs with the standard 0.7 mm nozzle. The resulting particle size is typically in the order
of the droplet size.
Open suction mode installation with the Dehumidifier B-296 to pre-cool the inlet air is recommended.
A slight negative pressure in the spray chamber forces the melted sample feed to enter the nozzle
after opening the feed valve.
1
3
4
7
2
5
4
4
7
8
5
4
10
9
4
4
11
44 B-290 Operation Manual, Version I
Page 45

5 Putting into operation
1
2
5
3
4
4
• Apply the tubes b to h according to the
above figures. For the tubes d and e, apply
cable binders to fixate them at their connection.
• Install the spray gas tube to the capillary inlet
connector on top of the heating bath.
• Connect the gas flow tube from the capillary
outlet to the nozzle inlet (gas).
• The feeding tube is connectable in two ways
1
6
depending on whether the nozzle cleaning
option is required or not.
• The heating liquid tubes are connected from
7
the bath to the nozzle port (C in) and from
the nozzle port (C out) throught the pump
back to the bath.
• This way, the nozzle is also heated to prevent
any solidification and blocking.
• Adjust the peristaltic pump bed to the 6 mm
silicone tube.
a Needle valve for dosage
b Feeding tube with nozzle cleaning option: Needle
valve - nozzle (feed)
c Cleaning gas nozzle: Instrument - nozzle (top)
d Heating liquid tube: Bath - nozzle (C in) -
nozzle (C out) - peristaltic pump - bath
e Drain tube for heating liquid
Fig. 5.26: Installing the spray chilling tubing with (left) or without nozzle cleaning option (right)
f Gas flow tube: Instrument - capillary inlet
g Gas flow tube: Capillary outlet - nozzle (gas)
h Feeding tube without nozzle cleaning option
i Nozzle cleaning unit
j Screw connection for feeding tube
k Closed feed connection
5
4
4
5.15 Installation check
Carry out an installation check after a successful installation and prior to the first spray drying
process.
• Inspect the glass visually for possible damage.
• Check the electrical connections.
• Make sure that the cover of the product collection vessel is connected to the instrument by means
of the cable for arresting electrostatic charges.
• Make sure that the outlet temperature probe is inserted in the coupling.
45 B-290 Operation Manual, Version I
Page 46

5 Putting into operation
5.16 Additional cleaning measures for food, pharma and cosmetic applications
For food, pharma and cosmetic products additional measures are required during the whole spray
drying process to establish the necessary hygienic level. Any risk of infection, diseases or contagion
must be excluded!
To disinfect the Mini Spray Dryer B-290 in place the glass does not have to be sterilized separately.
The device must not be opened before the experiment after the SIP (Sterilization In Place)
process.
NOTE
It is highly recommended to use a new set of tubes and filters to further reduce the risk of contamination between two spray drying processes. The filters must either be decontaminated and sterile or
disinfected prior to use.
5.16.1 Primary cleaning
All glass parts can be manually rinsed with a disinfection medium (e.g. ethanol) under hygienic conditions. Primary cleaning can be done mechanically e.g. by means of a disinfected brush. However, the
primary cleaning must effectively remove all residua of previous operations!
Because of the bandwith of possible materials to be processed with the Mini Spray Dryer B-290 it
is not possible to recommend a general purpose detergent. Contact your local hygienic specialist or
BUCHI representative for a suitable detergent for your specific application! NOTE the material list in
section 3.3.
Clean all used hoses with isopropanol 70 % and keep them at 110 °C for 30 minutes.
Sealings in contact with the product can be cleaned and disinfected in an ultrasonic bath with a corresponding disinfection medium. At reinstallation, mind hygienic handling!
NOTE
Do not bring the seals in contact with lubricants or other harmful substances!
After cleaning, the system must be assembled to run the in place disinfection process.
46 B-290 Operation Manual, Version I
Page 47

6 Operation
This chapter gives examples of typical instrument applications and instructions on how to operate the
instrument properly and safely.
6 Operation
!
Danger
Death or serious poisoning by inhalation or incorporation of dried particles during spray process.
• Wear safety goggles
• Wear safety gloves
• Wear a suitable protective mask
• Wear a laboratory coat
• Check for proper sealing before use
• Do not inhale dried particles
• Stop drying gas flow before opening the drying circuit
!
Warning
Death or serious poisoning by contact or incorporation of harmful substances at use.
• Before operation, check the instrument for correct assembling
• Before operation, inspect sealings and tubes for good condition
• Exchange worn out or defective parts immediately
• Exchange clogged filters immediately
• Only operate the instrument in ventilated environments
• Directly withdraw released gases and gaseous substances by sufficient ventilation
• Perform a dry-run without sample material and check for gas leakages
47 B-290 Operation Manual, Version I
Page 48

6.1 Layout of the operating and display elements
a Main switch
b Flow meter for spraying gas volume
c Needle valve for gas flow adjustment
1
2
3
Fig. 6.1: Switch, flow meter and valve
6 Operation
1
a LED display current value inlet air temperature
b LED display current value outlet air temperature
c LED display set value inlet air temperature
d LED display aspirator output in % of max. aspirator rate
e LED display pump output in % of max. pump rate
f LED display for nozzle cleaning
g Feed switch valve button
Fig. 6.2: Operating and display elements
2
3
4
5
6
14
15
12
13
h Nozzle cleaner interval adjustment
i Manual operation pneumatic nozzle cleaner
j Regulating push-button pump
k Main switch pump
l Regulating push-button aspirator
m Main switch aspirator
n Regulating push-button heating
o Main switch heating
10
11
8
7
9
48 B-290 Operation Manual, Version I
Page 49

6.2 Conversion tables for the parameters
6.2.1 Flow meter spraying air (rotameter)
The rotameter is an indicator for the spray gas flow. The table gives a correlation between indicated
height and volume throughput. The nozzle has a certain pressure drop which increases with higher
gas flow. As the gas volume strongly corresponds to the actual pressure, the table also contains a row
for the effective volume flow, determined in a spray process with air.
Height (mm) Liters/hour Pressure drop (bar) Actual volume flow (at standard
5 84
10 138
15 192
20 246 0.15 283
25 301 0.18 355
30 357 0.23 439
35 414 0.3 538
40 473 0.41 667
45 536 0.55 831
50 601 0.75 1052
55 670 1.05 1374
60 742 1.35 1744
65 819 1.8 2293
6 Operation
temperature and pressure)
in liters/hour
6.2.2 Peristaltic pump
Fig. 6.3: Pump settings versus throughput
The peristaltic pump can be adjusted to different tubes according to the inner and outer
diameters. With different tube diameters, the
absolute flow is varying. The diagram shows
the correlation for the standard silicone tube
(2 mm ID, 4 mm OD) for water.
49 B-290 Operation Manual, Version I
Page 50

6.2.3 Aspirator
Fig. 6.4: Aspirator settings versus throughput
6.3 Spray process
During the spray process some parts i.e. all glassparts can get hot according to the
temperature settings of the instrument!
6 Operation
The aspirator has a maximum gas flow rate
of approx. 35 m3/h. The flow depends on the
pressure drop of the overall system.
To determine the exact volume flow for steady
and re pro du cible operating conditions, a
measurement tube is supplied as an accessory. A handheld gas flow meter (hot-wire flow
meter) is required for the mea surement.
Caution
!
Risk of minor or moderate burnings when handling hot parts.
• Do not touch hot parts
• Let the system cool down for some minutes after use
To carry out the spray process, proceed as follows:
1. Switch on the instrument. The instrument carries out an auto matic self check and then switches
automatically to the operating mode.
2. Set the air flow to about 40 mm with the rotary valve.
3. Pre-select the desired inlet temperature with the push-button.
4. Turn on the aspirator. As a standard, the aspirator rate should be 100 % to maximize the sepa-
ration rate of the cyclone. If a small powder humidity is required, the aspirator rate can be
decreased.
5. Turn on the heating and wait until the system has reached steady conditions.
6. If necessary, turn on the nozzle cooling.
7. Switch on the peristaltic pump. Pure solvent, e.g. distilled water in case of aqueous solutions,
is now sprayed in. The spray cone is symmetrical and located in the axis of the spray cylinder. If
this is not the case, the nozzle may be dirty or defective.
8. Set the automatic nozzle cleaning in case of clogging substance.
9. The spray quantity of pure solvent can be changed by means of the push-button of the peristaltic
pump. The spray flow strongly influences the outlet temperature, since the water draws energy
from the air by evaporation. Thus the outlet temperature can be set to the desired value by
means of the quantity of sprayed solution via the pump speed of the peristaltic pump.
The outlet temperature can be regarded as the upper thermal load of the product, so make sure
that the product is not damaged as a result of an excessively high outlet temperature.
10. As soon as the desired operating conditions have been achieved and are stable, change the feed
tube from pure solvent to the prepared feed solution.
50 B-290 Operation Manual, Version I
Page 51

6.4 Optimizing parameters
The parameters relevant for the spray process (aspirator and pump performance as well as inlet
temperature) all correlate with and depend on each other. To give you an overview over the parameter
settings best suited for your process, special training papers can be downloaded directly from the
Internet.
Please visit our homepage www.buchi.com. In the section Fields of Activities/Spray Drying, you will
find the document to download.
6.5 End of spray process
• After the solution is completely spray dried, continue to spray pure solvent for a short time to
remove product deposits from the hoses and the nozzle. Air and solvent should alternate to ensure
an efficient cleaning.
• Pump the hoses empty, turn off the peristaltic pump and lower the pump bed.
• Turn off the nozzle cleaner.
• Turn off the heating. The system cools down now.
• As soon as the tempera ture in the instrument falls below 90 °C, you can turn off the aspirator.
• You can now remove the product collection vessel with the product.
• ATTENTION
Do not remove the product collection vessel when the aspirator is still on as the air stream might
blow the product out of the vessel into the surrounding area.
6 Operation
6.6 Recovering particles of the outlet filter
!
Danger
Death or serious poisoning by inhalation or incorporation of dried particles at recovery.
• Wear safety goggles
• Wear safety gloves
• Wear a suitable protective mask
• Wear a laboratory coat
• Do not inhale dried particles
• Stop drying gas flow before opening the drying circuit
• Only recover particles in sufficiently ventilated flue or glove-box
• Do not disperse the dried particles
• Do not clean dusty parts with compressed air
51 B-290 Operation Manual, Version I
Page 52

6 Operation
If the system is run with a PTFE filter, the fine particles can par tially be recovered by counter-pulsating
the filter membrane and blowing the particles away. For this purpose, proceed as follows:
Fig. 6.5: Recovering particles of the outlet filter
• Attach the PTFE membrane instead of the polyester filter and close the bottom with a polypropylene plug.
• Separate the manometer tube from the filter and remove the filter housing completely from the
holder.
• Put the filter on the product feed table. Disconnect the nozzle cleaning tube from the nozzle and
connect it to the filter housing.
• Close the outlet gas connection with an SVL 42 screw cap.
• With the nozzle cleaning set on level 1, a pressure blow is generated every 5 seconds on the inner
side of the filter leading to a separation of the fines from the membrane. The particles fall into the
glass and can be recovered.
52 B-290 Operation Manual, Version I
Page 53

6.7 Operation with the Inert Loop B-295
!
Danger
Death or serious poisoning by gases or particles due to O2– sensor or filter malfunction
• Exchange defective O2– sensor immediately
• Exchange O2– sensor regularly within the specified maintenance intervals
• Exchange clogged filters immediately
• Exchange filters regularly within the specified maintenance intervals
• Dispose of filter immediately
!
Danger
Death by suffocation or serious poisoning by inhalation of inert gases.
• Do not inhale inert gases
• Directly withdraw released gases and gaseous substances by sufficient ventilation
• Only operate the instrument in ventilated environments
• Before operation, check all parts, connections and sealings involved in the gasflow for proper
sealing
• Exchange worn out or defective parts immediately
6 Operation
a Switch on
b Switch off
c Temperature up
d Temperature down
e Display
f Signal lamp oxygen
g Signal lamp pressure
h Signal lamp operation
i Signal lamp power
Fig. 6.6: Display of the Inert Loop B-295
To operate the instruments, proceed as follows:
1. Switch on the Mini Spray Dryer B-290 Advanced. The instrument automatically detects the
connected periphery. Both signal lamps f and g at the Inert Loop B-295 are lit on. If the
oxygen signal lamp f is off, there might still be enough inert gas in the loop. In this case, open
one tube connection wherever possible and let the aspirator run for 2 minutes, as ambient
oxygen concentration is required to check the oxygen sensor prior to each process. The Inert
Loop B-295 starts immediately to cool down to the set temperature. If the instrument should not
yet cool please press the button a, if the instrument should be started again, press button b.
53 B-290 Operation Manual, Version I
Page 54

6 Operation
Usually the Inert Loop is set on -20°C for optimal solvent recovery. Some solvents tend to freeze
in the Inert Loop B-295, while working with those please adjust the set temperature to a higher
one, use the buttons c and d. The display of the Inert Loop B-295 e shows the set temperature and the current temperature.
2. Switch on the aspirator (see figure 6.2 on page 52).
3. Check whether the spray gas source is an inert gas, normally nitrogen. Open the needle valve
at the flow meter and adjust the flow to the requested level. The closed system now starts to be
inertised (see figure 6.2 on page 52).
4. As soon as a certain pressure drop threshold is reached by the gas flow and spraying gas, the
signal lamp of the pressure display g is switched off. If the pressure drops under the threshold
(due to glass breakage, stop of gas inlet, taking away of a glass component etc.), the peristaltic
pump and the heater are blocked. This is indi cated by a lit signal lamp g and the message PR
LO on the display of the Mini Spray Dryer B-290.
5. The overpressure in the system due to the constant flow inlet is limited by the exhaust outlet at
the Inert Loop B-295, which is permanently open. Therefore, no overpressure can built up. The
gas mixture from the exhaust outlet is slightly conta minated with solvents. This gas flow must
undergo an after treatment and be disposed of according to regional standards and laws.
6. The oxygen concentration decreases due to the con stant inlet of inert gas. As soon as the
concentration is below 6 %, the signal lamp of the oxygen control f goes off. If the oxygen
threshold of 6 % is exceeded (e.g. by using pressurized air instead of inert gas), the peristaltic
pump and the heater are blocked. This is indicated by a lit signal lamp f and the message O2
HI on the display of the Mini Spray Dryer B-290.
7. As soon as both signal lamps f and g go off, the peris tal tic pump and the heater are
unblocked and can be turned on. The spray process can be started. The blocking and signals
are reversible. If the pressure increases or the oxygen decreases, respectively, the pump and
heater are unblocked again and must be started manually.
8. At the left bottom side of the Inert Loop B-295 a flask is positioned to receive the condensed
solvent. To empty the flask, close the drain valve and take out the flask carefully.
6.7.1 Status messages
Table 6-1: Status messages at the Mini Spray Dryer B-290
Code Description Possible cause Corrective measure
O2 HI O2 sensor indicates exces-
sively high O2 content
PR LO Pressure monitor shows
operation taking place at too
low pressure
Oxygen connected instead of
nitrogen
System not yet sufficiently inert
(display on oxygen measurement
equipment still above threshold level
but falling)
Oxygen enters system because of a
leak
Leakage in gas circulation system or
clogged filter
Connect nitrogen supply
Wait until threshold level is reached
Check tubing system (seals in place
and in proper condition, cover firmly
closed)
Check tubing system (seals in place
and in proper condition, cover firmly
closed) or replace/clean filter
54 B-290 Operation Manual, Version I
Page 55

6.8 Operation with the Spray Chilling Accessory
To operate the Spray Chilling Accessory, proceed as follows:
1. Fill a heating liquid, e.g. water or a thermal oil (polyethylene glycol PEG 400 with low viscosity)
into the heating bath and check whether the tubings are connected correctly. For sample melting
points below 50 °C, water can be used as heating liquid. For melting points up to 70 °C thermal
oil or polyethylene glycol is recommended. Consider the maximum heating liquid volume of 1.4
liters. Close product vessel with the PTFE cover and close the spray chilling accessory with the
cover comprising the heating coil.
2. Switch on the Mini Spray Dryer B-290. The instrument is preset to the spray chilling mode, due
to the connected long temperature probe.
3. Keep the feeding needle valve closed. Fill in the sample product into the product feed vessel.
4. Switch on the peristaltic pump with a pump rate of 60 % to circulate the heating liquid from the
bath to the nozzle and back to the bath. Keep the heating liquid circulating.
5. Set the temperature of the heating bath. A heating temperature of about 50 % above the melting
point of the product is recommended (e.g. melting point 60 °C: heating bath 1.5×60 °C = 90 °C).
Switch on the heater.
6. Turn on the compressed air flow to approximately 40 mm. The air is preheated through the hot
capillary in the heating bath before entering the nozzle. Thus, the air will not lead to a cooling
down of the melt in the nozzle.
7. Wait approximately 1 hour until the system is heated up and has reached steady state temperature conditions. The temperature is displayed as OUTLET temperature on the Mini Spray Dryer
B-290.
8. Check if the melt in the product feed vessel is completely liquefied. Use a stirring stick to improve
the melting process.
9. In case of an optional cooling of the inlet air, switch on the Dehumidifier B-296. The INLET
temperature shows the temperature of the cooling air. Switch on the Dehumidifier B-296.
10. Switch on the aspirator. The aspirator generates the gas flow in the system. A setting of 100 %
is recommended. Wait until the complete system has reached steady state conditions. Inlet air
temperatures of around +10 °C to +15 °C can be reached with the Dehumidifier B-296. Check
that the melt in the product feed vessel is completely liquid.
11. Open the needle valve carefully and watch the liquefied feed entering the feeding tube between
needle valve and nozzle inlet. The hot melt will pour into the two fluid nozzle. In case of a blocked
nozzle, push the nozzle cleaning. The spray chilling process starts.
12. Wait until the entire product is dispersed. A spray chilling run is typically quick and the particles
are collected in the spray chamber and product collection vessel of the cyclone.
13. Switch off the aspirator, the heater, and the peristaltic pump and turn off the spray flow.
14. Remove the product collection vessel with the powder.
15. Carefully empty the heating liquid from the bath by opening the hose clamp of the drain tubing.
16. Let the spray chilling accessory cool down after the experiment with its covers on. Fill the spray
chilling accessory with the cleaning agent and open the needle valve.
17. If the accessory is blocked remove it for cleaning. Use hot water, soap solutions and a brush. Put
the blocked metal parts in a heating oven to melt the stocked product.
18. Wash all parts with water and let them dry.
19. The silicone tubing between the spray chilling accessory and the nozzle has to be replaced if it is
blocked or broken.
6 Operation
55 B-290 Operation Manual, Version I
Page 56

6.9 Mini Spray Dryer B-290 acid resistant
For basic operations please see chapters 6.1–6.7.
Nozzle cleaning instructions
1. Clean the nozzle parts immediately after each spray drying run.
2. Wash the nozzle parts with a mild detergent solution.
3. Rinse the parts with hot water and let them dry.
4. Examine the nozzle parts under a microscope to verify that they are clean.
5. Check the integrity of the O-rings. Replace if necessary.
NOTE
Do not use hydrochloric acid (HCl) for cleaning stainless steel.
Do not spray hydrochloric acid (HCl) because it will corrode the stainless steel parts.
6 Operation
56 B-290 Operation Manual, Version I
Page 57

7 Maintenance and repairs
This chapter gives instructions on all maintenance work to be performed in order to keep the
instrument in good working condition.
!
Danger
Death or serious poisoning by inhalation or incorporation of dried particles during maintenance.
• Wear safety goggles
• Wear safety gloves
• Wear a suitable protective mask
• Wear a laboratory coat
• Clean all parts thoroughly
• Only maintain the instrument in ventilated environments
• Do not inhale dried particles
• Stop drying gas flow before opening the drying circuit
7 Maintenance and repairs
Warning
!
Death or serious burning by electric current.
• Switch off the instrument, disconnect the power cord and prevent unintentional restart before
removing housing or parts of it
• Do not touch parts inside the instrument with wet hands
• Do not spill liquids over electronic components
• Do not squeeze cables, tubes or other items at reassembling
• Exchange defective cabling or tubing before reassembling
!
Warning
Death or serious injuries by compressed air and gases.
• Depressurize air and gas circuit first
• Wear safety goggles
57 B-290 Operation Manual, Version I
Page 58

!
CAUTION
Minor or moderate injuries by hot heating bath content.
• Do not drop any water into the hot heating liquid
• Wear safety goggles
7 Maintenance and repairs
Risk of instrument and instrument damage by liquids and detergents.
• Do not spill liquids over the instrument or parts of it
• Wipe off any liquids instantly
• Use ethanol or soapy water as detergent only
7.1 Housing
Check the housing for defects (switches, plugs) and clean it regularly with a damp cloth.
7.2 Glass assembly, tubes
Clean the glass assemblies after each spray process. The glass assemblies can be taken out and
cleaned with commercially available cleaning agents or in an ultrasonic bath. After the glass parts
have been cleaned and fully dried, check each part visually for cracks, scratches and for any parts
or sections that might have splintered off. Take out and replace any damaged glass parts. Clean the
tubes after each spray process with commercially available cleaning agent.
7.3 Nozzles
Notice
A special brush is supplied to clean the central tube of the nozzle body. Most efficient cleaning of all
nozzle types is done in an ultrasonic bath. Clean the tubes and nozzles after each spray process.
The tubes and nozzles can be cleaned with commercially available cleaning agents.
58 B-290 Operation Manual, Version I
Page 59

7.4 Aspirator cleaning
The aspirator of the Mini Spray Dryers can be contaminated from particles, especially when no outlet
filter is used. This is a description how to clean the aspirator efficiently and fast.
Fig. 7.1: Disconnecting Polypress tube
7 Maintenance and repairs
Disconnect the “Polypress” tube from the
glass assembly and heater respectively.
• Fill one vessel with water and prepare an empty canister with a small opening.
• Insert the exhaust tube from the aspirator into one third of the empty canister and fix the tube.
• Set the aspirator to 50 % and switch it on. Carefully move the inlet tube over the surface of the
water to suck in a mixture of air and water.
• Do not immerse the tube into the water. Be aware that no splashes are contaminating the ambient
at the outlet side.
• Increase the aspirator rate up to 80 %, continue to draw water through the aspirator. Be careful,
that the exhaust tube in the receiving tank remains in the air to prevent splashes.
• Continue this procedure unless clean water is coming out of the aspirator.
• Let the aspirator run for approximately 1 hour to dry residual water in the aspirator away.
7.5 Inert Loop B-295 and Dehumidifier B-296
The sealed working circuits of the devices and the optional heat exchanger in combination with the
Inert Loop B-295 and Dehumidifier B-296 can be flooded completely for cleaning purpose.
Risk of instrument and instrument damage by liquids and detergents.
• Do not spill liquids over the instrument or parts of it
• Wipe off any liquids instantly
• Use ethanol or soapy water as detergent only
Notice
• Switch off all relevant devices and unplug the respective power cords.
• Remove the molecular sieve bag for the duration of cleaning if installed.
• Check all sealings and tubes for good condition and proper sealing.
• Raise the exhaust tube and fill the system through the inlet with cleaning medium (e.g. ethanol).
59 B-290 Operation Manual, Version I
Page 60

• Provide a collection vessel to collect the cleaning medium flowing from the system. Open the drain
valve and lower the exhaust tube, so that the cleaning medium flows out.
• Rinse out and dry the condensate vessel.
• Reinstall the condensate vessel.
• To dry the working circuit connect the Mini Spray Dryer B-290 and dry it by running the Aspirator
with dry air.
7.6 Outlet filter
If the pressure drop of the outlet filter increases by more than 20 mbar relative to the clean filter, take
the filter out and wash it manually or in a laboratory washing machine or replace it by a new filter.
7 Maintenance and repairs
Risk of instrument damage by internal overpressure.
• External supply pressure must meet the system specifications
• Exchange clogged filters immediately
• Safely dispose filter immediately
Notice
7.7 Calibrating the oxygen sensor of the Inert Loop B-295
The oxygen sensor is already calibrated ex works. However, due to shipping and other influences, the
sensor might have to be calibrated again. At atmospheric condition, it has to display 21.0 ± 1.5 %.
• Remove the small front plate with a screwdriver
2 3 4
1
Fig. 7.2: Calibrating the oxygen sensor
• Remove the small front panel on the upper right side
with a screwdriver.
• Press menu d, C:01 will appear.
• Press UP b/DOWN a to change to C:02.
• Press Enter c, the oxygen concentration is shown on
the display.
• Press Enter c again to calibrate the sensor.
• Press Menu d to quit the menu mode.
60 B-290 Operation Manual, Version I
Page 61

7.8 Replacing the oxygen sensor of the Inert Loop B-295
After approximately 2 years of operation the oxygen concentration displayed by the sensor decreases
drastically.
The sensor should now be replaced. For this purpose:
• Open the front plate with an allen key.
• Disconnect the cable by turning the plug.
• Screw the sensor out and replace it by a new one.
• Reconnect the cable.
• Calibrate the sensor according to chapter 7.6, Calibrating the oxygen sensor.
Fig. 7.3: Replacing the oxygen sensor
7 Maintenance and repairs
7.9 Spray chilling accessory
Prior to cleaning, let the spray chilling accessory cool down with its covers on.
For cleaning, proceed as follows:
• Fill the spray chilling accessory with the cleaning agent and open the needle valve.
• If the accessory is blocked remove it.
• Use hot water, soap solutions and a brush for cleaning.
• Put the blocked metal parts in a heating oven to melt the stocked product.
• Wash all parts with water and let them dry.
• The silicone tubing between the spray chilling accessory and the nozzle has to be replaced if it is
blocked or broken.
7.10 Customer service
Only authorised service personnel are allowed to perform repair work on the instrument. These
persons have a comprehensive technical training and knowledge of possible dangers which might
arise from the instrument.
Addresses of official BUCHI customer service offices are given on the BUCHI website under:
www.buchi.com. If malfunctions occur on your instrument or you have technical questions or application problems, contact one of these offices.
The customer service offers the following:
• Spare part delivery
• Repairs
• Technical advice
61 B-290 Operation Manual, Version I
Page 62

8 Troubleshooting
This chapter helps to resume operation after a minor problem has occurred with the instrument. It lists
possible occurrences, their probable cause and suggests how to remedy the problem.
The troubleshooting table below lists possible malfunctions and errors of the instrument. The operator
is enabled to correct some of those problems or errors by him/herself. For this, appropriate corrective
measures are listed in the column “Corrective measure”.
The elimination of more complicated malfunctions or errors is usually performed by a BUCHI technical
engineer who has access to the official service manuals. In this case, please refer to your local BUCHI
customer service agent.
8.1 Error messages and their remedy
Table 8-1: Error messages and their remedy
Code Description Possible cause Corrective measure
001 Entry temperature sensor
interruption
002 Entry temperature sensor
short-circuit
003 Entry temperature exces-
sively high (> 230 °C)
004 Exit temperature sensor
interruption
005 Exit temperature sensor
short-circuit
006 Exit temperature exces-
sively high
010 Malfunction of frequency
converter
011 Heating malfunction See “System does not heat up” See “System does not heat up”
Defective sensor, sensor cable or
internal wiring
Defective sensor, sensor cable or
internal wiring
Defective heating control or heating
relay
Defective sensor, sensor cable or
internal wiring
Defective sensor, sensor cable or
internal wiring
Defective sensor, sensor cable or
internal wiring
Defective frequency converter or wiring Contact the BUCHI customer
8 Troubleshooting
Contact the BUCHI customer
service
Contact the BUCHI customer
service
Contact the BUCHI customer
service
Contact the BUCHI customer
service
Contact the BUCHI customer
service
Contact the BUCHI customer
service
service
Only for operation with the Remote Control Panel
100 Connection to Remote
Control Panel interrupted or
disconnected
Only for operation with the Inert Loop B-295
200 Connection to B-295 inter-
rupted or disconnected
201 B-295 plugged in while
operation in process
202 O2 alarm not given during
start-up
62 B-290 Operation Manual, Version I
Defective connection cable or instrument is not plugged in
Defective connection cable or instrument is not plugged in
Connection cable plugged in after
switching on instrument
Oxygen sensor “spent”
Oxygen measuring equipment defective
Check connection cable for
damage and insert plug, if necessary
Check connection cable for
damage and insert plug, if necessary
Restart the system
Replace the oxygen sensor
Contact the BUCHI customer
service
Page 63

Table 8-1: Error messages and their remedy (cont.)
Code Description Possible cause Corrective measure
203 Pressure alarm not given
during start-up
204 Humidity sensor above
Pressure switch defective or contaminated
Molecular sieve saturated with water Exchange the molecular sieve bag
threshold
8.2 Malfunctions and their remedy
Table 8-2: Malfunctions and their remedy
Malfunction Possible cause Corrective measure
Equipment cannot be switched on No voltage
Fuse has blown
Peristaltic pump does not deliver The rollers are not in contact with the
running surface
Product is delivered after the
spray flow is switched on although
the pump is switched off
Aspirator is noisy The aspirator is dirty
System does not heat up Heating circuit not plugged in
Nozzle blocked up Product is too concentrated
The pressure of the rollers on the
running surface is too weak
The operating mode is set to “Blow”
Heating is not switched on
Nominal entry temperature is below
room temperature
Fuse has blown
Heater defective
Faulty tubing system
(Faulty flow direction or no flow in the
heating system)
Encrustation on nozzle exit
Nozzle is not clean
Nozzle is defective (bent nozzle
needle)
8 Troubleshooting
Contact the BUCHI customer
service
and regenerate the used one
Insert mains plug/examine plug for
damage
Replace the fuse (3.15 A)
Elevate the running surface with the
lever
Adjust the lifting height of the running
surface with the hexagonal allen key
from beneath
Adjust the lifting height of the running
surface with the hexagonal allen key
from beneath
Clean the aspirator
If no discharge filter is fitted, this
should be done to avoid further
contamination of the aspirator
Reset to “Suction” mode if possible
Plug in heating circuit
Switch on heating circuit
Pre-select a new inlet temperature
Replace fuse (12.5 A)
Contact the BUCHI customer service
Check tubing system
Use a lower concentration in pump
Increase number of pulses for nozzle
cleaning
Cool nozzle with cooling water
Completely dismantle the nozzle
(nozzle cap, tip, cleaning needle)
and clean with water
Replace nozzle or defective element
63 B-290 Operation Manual, Version I
Page 64

8 Troubleshooting
Table 8-2: Malfunctions and their remedy (cont.)
Malfunction Possible cause Corrective measure
Product drips in spray chamber No spray flow
Insufficient spray flow
Open compressed air valve
Inspect pressure of air in the supply
tube (5–8 bar)
Insufficient aspirator performance Discharge filter blocked Dismantle filter and clean it
Deposits on the spray cylinder Nozzle is not clean
Nozzle is defective (bent nozzle
needle)
Product will not dry
Entry temperature is above the melting
point of the product
Product related deposits
Wide spray angle deposits droplet on
the spray cylinder wall
Glass elements become wet Peristaltic pump lever has become
Completely dismantle the nozzle and
clean with water
Replace nozzle or defective element
Reduce the temperature difference
between entry and exit
Increase rate of gas spray flow
(> 600 l/h)
Reduce peristaltic pump performance
Reduce entry temperature
No action possible
Narrow the spray angle by adjusting
the spray cap position
Tighten lever
loose
Irregular or pulsed spraying Leaks in the spray nozzle Check seals in the spray nozzle and
replace if necessary
Deposits in the cyclone Product related deposits
Static charge build-up
Product too moist
Temperature too high
No measure possible
Insert earthing cable
Increase exit temperature to dry the
product
Reduce aspirator performance to
reduce residence time of product
Exit temperature does not rise Sensor not inserted
Fault in tubing system
Entry temperature falls Heating is switched off
Heater plug is unplugged
Fuse has blown
Exit temperature falls No heating
Spraying too powerful
Place probe in coupling element
Check tubing system
Switch on heating
Insert heater plug
Replace fuse (12.5 A)
Follow measures under “Fall of entry
temperature”
Reduce production rate of peristaltic
pump
Exit temperature rises Nozzle blocked
Hose not dipped into stock solution
Change of concentration in stock
solution
No feed of product
Clean the nozzle by actuating the
cleaning button or by switching on
cleaning nozzle
Increase number of pulses for the
nozzle cleaning activity
Dip hose into product
Agitate product (magnetic agitator) to
obtain uniform concentration
Switch on peristaltic pump
64 B-290 Operation Manual, Version I
Page 65

9 Shutdown, storage, transport and disposal
9 Shutdown, storage, transport and disposal
This chapter instructs how to shut down the instrument, how to pack it for storage or transport, and
specifies the storage and shipping conditions.
!
WARNING
Death or serious poisoning by contact or incorporation of harmful substances.
• Wear safety goggles
• Wear safety gloves
• Wear a laboratory coat
• Clean the instrument and all accessories thoroughly to remove possibly dangerous substances
• Do not clean dusty parts with compressed air
• Store the instrument and its accessories at a dry place in its original packaging
9.1 Storage and transport
Switch off the instrument and remove the power cord. Clean the instrument thoroughly! Remove all
liquids and dusty residues before packaging the instrument.
NOTE
When returning the instrument to the manufacturer for repair work, please copy and complete the
health and safety clearance form (section 11) and enclose it with the instrument.
9.2 Disposal
To dispose of the instrument in an environmentally friendly manner, a list of materials is given in
chapter 3. This helps to ensure that the components are separated and recycled correctly.
Please follow valid regional and local laws concerning disposal.
You have to follow valid regional and local laws concerning disposal.
NOTE
For help, please contact your local authorities!
65 B-290 Operation Manual, Version I
Page 66

10 Spare parts
This section lists spare parts, accessories and options including their ordering information.
Only order spare parts and consumables from BUCHI to maintain the warranty status and to assure
best performance and reliability of the system and affected components. Any modifications to the
spare parts used are only allowed with the prior written permission of the manufacturer.
Always state the product designation, instrument serial and part numbers for warranty clearance when
ordering spare parts!
10.1 Spray nozzle
10 Spare parts
044782
044643
044628
0
38324
044618
0
44629
044634
044647
044649
Table 10-1: Spray nozzle
Description Order number
Needle for nozzle cleaning 044618
Screw connection product tube 044628
Screw connection air and cooling 044629
Nozzle tip (0.7 mm) 044634
Nozzle cleaning (0.7 mm), complete 044643
Nozzle cap (1.5 mm) 044647
Nozzle cap (1.4 mm ) 044649
Set of O-rings 044759
Metallic spring 038324
Cleaning brush for nozzle 044782
66 B-290 Operation Manual, Version I
Page 67

10 Spare parts
044628
046377
046375
044629
046556
Table 10-2: Three fluid nozzle
Description Order number
Three fluid nozzle, complete 046555
Three fluid nozzle conversion kit 046556
Screw connection product tube 044628
Screw connection air and cooling 044629
Inner nozzle tip (0.7 mm) 046554
Nozzle tip (2.0 mm) 046377
Nozzle cap (2.8 mm) 046375
Set of O-rings 044759
046554
Needle
Nozzle Cap
Nozzle Tip
Table 10-3: Spray Nozzle ∅ 1.4mm
Description Order number
Nozzle exchange set, complete 046380
Nozzle Tip (1.4 mm) 046376
Needle (1.4 mm) 046372
Nozzle Cap (2.2 mm) 046374
Table 10-4: Spray Nozzle ∅ 2.0mm
Description Order number
Nozzle exchange set, complete 046381
Nozzle Tip (2.0 mm) 046377
Needle (2.0 mm) 046373
Nozzle Cap (2.8 mm) 046375
Table 10-5: Spray Nozzle ∅ 0.5mm
Description Order number
Nozzle Tip (0.5 mm) 11056964
Needle (0.5 mm) 11056865
Nozzle Cap (1.4 mm) 044649
67 B-290 Operation Manual, Version I
Page 68

Table 10-6: Standard O-rings FKM, for all standard to medium-aggressive applications
Description Order number
O-ring for nozzle, FKM
038348
(green), 2×
21.0×2.0 mm
10 Spare parts
044645
044645
002103
004222
004222
16.0×2.0 mm
6.0×1.5 mm
3.0×1.5 mm
Set, complete
O-ring nozzle cap silicone
(red), 2×
O-ring for needle and
nozzle tip, FKM (green),
4×
O-ring for nozzle cleaner,
FKM (black), 2×
Set of standard O-rings,
complete
002103
004222
038348
044759
68 B-290 Operation Manual, Version I
Page 69

Table 10-7: Highly resistant O-rings FFKM, for all medium to aggressive applications
Description Order number
O-ring for screw coupling,
044469
FFKM (black), 2×
37.69×3.5 mm
10 Spare parts
046363
(044645)
(002103)
046361
046361
6.0×1.5 mm
3.0×1.5 mm
Set, complete
O-ring for nozzle tip,
FFKM (green), 2×
O-ring for nozzle cleaner,
FKM (black), 2×
Set of FFKM O-rings,
complete
046361
044469
046364
046363
NOTE
O-rings in brackets are part of the standard O-ring set, order no. 044759!
69 B-290 Operation Manual, Version I
Page 70

10.2 Glass parts
003551
040674
044710
044711
044712
004188
004343 (b.g.)
040162
046311
044726 (brown glass)
044673
046333
046334 (b.g.)
003551
040674
004189
004348 (b.g.)
004192
034139
040471
044678
044678
044727 (b.g.)
046358
10 Spare parts
Table 10-8: Glass parts 1
Description Order number
Glass assembly, complete 044680
Glass assembly with high performance
011056987
cyclone, complete
Screw cap SVL 42 003551
Separation flask 004188
Standard cyclone 004189
Large collection vessel for standard
011056990
cyclone 1.1 l
Standard cyclone complete with
042884
collection vessel
Seal to cyclone 004192
Flange screw coupling 034139
Outlet temperature sensor 040162
Seal to product collection vessel 040471
Silicone seal SVL 42 040674
Angle piece 046333
Cylinder, sideways outlet 044673
Product collection vessel 044678
Holder to spray cylinder 044710
O-ring to spray cylinder 044711
Screw to holder 044712
Cover to product collection vessel 046318
Resistant O-ring set in FFKM 046364
Plastic closure for product collection
046358
vessel
Set of peristaltic rolls 046311
Table 10-9: Glass parts in brown glass
(protection for light sensitive substances)
Description Order number
Glass assembly, complete 044758
Spray cylinder, sideways outlet 044726
Spray cylinder, vertical outlet 044728
Separation flask 004343
Angle piece 046334
Standard cyclone 004348
Product collection vessel 044727
70 B-290 Operation Manual, Version I
Page 71

10 Spare parts
032017
040133
046363
046343
046371
044681
001535
046368
11056879 b.g.
11056751
003223, 003561
or 005203
046367
11056878 b.g.
Table 10-10: Glass parts 2
Description Order number
O-ring FKM for screw coupling 001535
Tension spring 032017
Set flange screw coupling (2 units) 040133
Set O-ring and clamping ring (5 units) 046343
O-ring FFKM for screw coupling 046363
Coupling flange 044681
O-ring for temperature sensor 5.0×2.5
046371
FFKM
Table 10-11: High-performance cyclone
Description Order
number
High-performance cyclone 046368
Small product collection vessel 046367
Screw ring SVL 30 003223
PTFE seal SVL 30×20 005203
Silicone seal 30×20 003561
High-performance cyclone complete
046369
(all above numbers)
High-performance cyclone not coated 11056751
046358
005223
034139
11056901
040471
044678
Table 10-12: Large product collection vessel for
high-performance cyclone
Description
Screw cap SVL 30 005223
Flange screw coupling 034139
Coupling glass flange SVL 30 11056901
Sealing 040471
Product collection vessel 044678
Plastic closure 046358
Large product collection vessel complete
11056899
(all above numbers)
Table 10-13: High-performance cyclone in brown
glass (protection for light sensitive substances)
Description
High-performance cyclone, brown glass 11056879
Small product collection vessel, brown
11056878
glass
71 B-290 Operation Manual, Version I
Page 72

10.3 Filters
046309
003551
003575
016490
048539, 034139
040471
044624
035008/
046316
10 Spare parts
Table 10-14: Outlet filter
Description Order number
Outlet filter, complete 044754
Screw cap SVL 42 003551
PTFE Seal SVL 42 003575
Flange screw coupling POM copolymer 034139
Aluminum flange screw coupling for
048539
outlet temperatures higher than 80 °C
Seal to product collection vessel 040471
Polyester filter bags (6 units) 035004
Polyester filter bag (1 unit) 035008
Filter glass 044624
Filter tube, complete 046309
PTFE membrane filter 046316
Hose clamp 60 - 80 mm 016490
10.4 Tubings and connectors
003551
044679
046309
004236
046341 (3 m)
046329 (2 m)
046330 (0.6 m)
046310
004113
044407
Table 10-15: Inlet filter
Description Order number
Inlet filter, complete 011235
Replacement filter with seal 011238
Table 10-16: Tubing
Description Order number
Solaflex tube 8.0/13.5 mm (5 m) 004113
Silicone tube (per m) 004138
Silicone tube for nozzle cooling (4 m) 004139
ICO quick coupling 044407
Polypress tube (3 m) 046341
Polypress tube (2 m) 046329
Polypress tube (0.6 m) 046330
Filter tube, complete 046309
0.1 m flextube PFA 046310
72 B-290 Operation Manual, Version I
Page 73

10 Spare parts
Table 10-16: Tubing (cont.)
Description Order number
10.5 Trolley
The trolley consists of powder-coated stainless steel.
Dimensions (L×W×H): 850×420×560 mm
11056479 (Sealing)
045656
Tygon tube MH 2075 transparent (per m) 046314
Tygon tube F 4040 A yellow (per m) 046315
Screw cap SVL 42 003551
Connecting piece for polypress tube 044679
Hose clamp 25–40 mm 004236
Quick hose coupling 045656
Sealing FKM for hose coupling 11056479
Table 10-17: Trolley
Description Order number
Trolley 041257
10.6 Measurement pipe for gas flow
For the precise determination of the gas flow in absolute measures. A pipe generates a laminar flow
for the determination with a hot-wire instrument. The appropriate instrument can be supplied by Testo
(www.testo.com) type Test 435 with sensor No. 0635 1044.
gas flow
73 B-290 Operation Manual, Version I
Table 10-18: Measurement tube
Description Order number
Measurement pipe for gas flow 044790
Page 74

10.7 Feed switch valve
For safe and automated switching between pure solvent and product when starting and ending the
spray drying process.
046304
004251
044725
10 Spare parts
Table 10-19: Feed switch valve
Description Order number
Feed switch valve 044725
Y-piece connector 046304
Metal tube connector 004251
10.8 Remote control panel
10.9 Inert Loop B-295
11056989
046348
004105
027338
040398
Table 10-20: Remote control panel
Description Order number
Remote control panel 044702
Table 10-21: Inert Loop and Dehumidifier
Description Order number
Receiving vessel for solvent 040398
PTFE tube to receiving vessel 004105
PTFE hose connection SVL 22 027338
Oxygen sensor 046348
Extension communication cable
B-290/B-295 (3 m)
11056989
74 B-290 Operation Manual, Version I
Page 75

10.10 Cylinder insulation
10 Spare parts
Table 10-22: Dehumidifier B-296
Description Order number
Woulff bottle 041875
Screw cap SVL 22 003577
Closed screw cap SVL 22 005222
Gasket 22×17 PTFE 005155
PFTE hose connection SVL 22 027338
Polypress tube (2 m) 046329
Hose clamp 25–40 mm 004236
With the cylinder insulation the process is carried out with less product loss, closer to scale-up conditions, and more energy-efficient.
Table 10-23: Cylinder insulation
Description Order number
Cylinder insulation 040058
75 B-290 Operation Manual, Version I
Page 76

10.11 Spray chilling accessory
10 Spare parts
044629
043366
044782
045519
004139
040163
004133
046557
004222
042655
010804
Table 10-24: Spray Chilling accessories
Description Order number Description Order number
Screw connection 6/4 044629 Sealing D20, 10.5×2 010804
Silicone tubing D6/9 004133 PE tubing D4/6 004386
Silicone tubing D4/7 (pump tube) 004139 L-type connector D6 045519
Screw connection M5/M8 046557 Conversion kit for Spray Chilling accessory
(necessary for Mini Spray Dryer B-290 instruments older than 2005)
O-ring FKM 70, 6.0×1.5 004222 Cleaning brush 044782
Hose clip 042655 FEP tubing D4/6 043366
Temperature sensor 040163
76 B-290 Operation Manual, Version I
040060
Page 77

10.12 Decontamination Glass-Set and sterile filter
044433
044425
10 Spare parts
044435
044423
044434
044432
Table 10-25: Decontamination Glass-Set and sterile filter
Description Order number Description Order number
Separation flask D & D 044423 Spray cylinder D & D 044425
Small separation flask D & D 044424 Drain tubing complete 044432
Sterile Filter for Decontamination
System
Decontamination and Disinfectant Glass-Set
Support rod for sterile filter 048891
044435 Feed tubing 044433
044441 Ball valve 1” complete 044434
044424
048891
77 B-290 Operation Manual, Version I
Page 78

10.13 Acid resistant accessories
10 Spare parts
e
a
d
b
c
i
f
j
k
g
l
h
Table 10-26: Acid resistant accessories
Description Order number Description Order number
Nozzle set 1.4 mm titanium cpl. 11056415
a
Nozzle set 2.0 mm titanium cpl. 11056416
Outlet filter acid resistant cpl. 11056333
b
Cyclone metall cover PFA coated 11056327 Knurled screws PFA coated 11056325
c
Sensor support adapter 11056318
d
Clamp ring ID 8 mm 11056387 Three-fluid nozzle acid resist. 11056971
O-ring of fluoroelastomer 7×1.5 mm
Temperature sensor acid resistant
Needle 0.7 mm titanium 11056415
e
Nozzle tip 0.7 mm titanium 11056317 Connecting piece PFA coated 11056334
Nozzle cap 1.5 mm titanium 11057509 PTFE Seal SVL 42 003575
Needle 1.4 mm titanium 11056417
Nozzle tip 1.4 mm titanium 11056419
Nozzle cap 2.2 mm titanium 11057510
Needle 2.0 mm titanium 11056422
Nozzle tip 2.0 mm titanium 11056424
004223
11056329
Glass assembly acid resistant
f
complete
Spray cylinder holder PFA
g
coated
Two-fluid nozzle acid resistant 11056320
h
Filter body PFA coated 11056335
i
Flange coupling PFA coated 11056326
j
Connecting nipple PFA coated 11056328
k
FEP hose ID 6×1 mm 027900
l
n.a.
O-ring set FFKM 046364
11056386
11056324
Nozzle cap 2.8 mm titanium 11057511
78 B-290 Operation Manual, Version I
Page 79

11 Declarations and requirements
11.1 FCC requirements (for USA and Canada)
English:
This equipment has been tested and found to comply with the limits for a Class A digital device,
pursuant to both Part 15 of the FCC Rules and the radio interference regulations of the Canadian
Department of Communications. These limits are designed to provide reasonable protection against
harmful interference when the equipment is operated in a commercial environment.
This equipment generates, uses and can radiate radio frequency energy and, if not installed and used
in accordance with the instruction manual, may cause harmful interference to radio communications.
Operation of this equipment in a residential area is likely to cause harmful interference in which case
the user will be required to correct the interference at his own expense.
Français:
Cet appareil a été testé et s’est avéré conforme aux limites prévues pour les appareils numériques
de classe A et à la partie 15 des réglementations FCC ainsi qu’à la réglementation des interférences
radio du Canadian Department of Communications. Ces limites sont destinées à fournir une protection adéquate contre les interférences néfastes lorsque l’appareil est utilisé dans un environnement
commercial.
Cet appareil génère, utilise et peut irradier une énergie à fréquence radioélectrique, il est en outre
susceptible d’engendrer des interférences avec les communications radio, s’il n’est pas installé et
utilisé conformément aux instructions du mode d’emploi. L’utilisation de cet appareil dans les zones
résidentielles peut causer des interférences néfastes, auquel cas l’exploitant sera amené à prendre les
dispositions utiles pour palier aux interférences à ses propres frais.
11 Declarations and requirements
79 B-290 Operation Manual, Version I
Page 80

11.2 Declaration of conformity
11 Declarations and requirements
80 B-290 Operation Manual, Version I
Page 81

11.3 Safety certificate
11 Declarations and requirements
81 B-290 Operation Manual, Version I
Page 82

11.4 Health and safety clearance
Health and Safety Clearance
Declaration concerning safety, potential hazards and safe disposal of waste.
For the safety and health of our staff, laws and regulations regarding the handling of
dangerous goods, occupational health and safety regulations, safety at work laws and
regulations regarding safe disposal of waste (e.g. chemical waste, chemical residues
or solvents) require that this form must be completed, signed and enclosed to every
return shipment of equipment or defective parts.
Instruments or parts will not be accepted if this declaration is not present.
Equipment
Model: Part/Instrument no.:
1.A Declaration for non dangerous goods
We assure that the returned equipment:
is unused and new.
has not been exposed to toxic, corrosive, biologically active, explosive, radioactive
or other dangerous matters. No hazard emanates from the device!
is free of contamination (e.g.that chemicals, solvents or residues of pumped media
have been drained prior to shipment). No hazard emanates from the device!
11 Declarations and requirements
1.B Declaration for dangerous goods
Exhaustive list of dangerous substances the equipment has been exposed to:
Chemical, substance Danger classification
We assure that:
all hazardous substances (e.g. toxic, corrosive, biologically active, explosive,
radioactive etc.) which have been processed or been in contact with the equipment
are listed above.
the equipment has been cleaned, decontaminated and is free of transmissible
agents such as hazardous fungi, bacteria, viruses etc. If sterilization is applicable,
all in- and outlets of the equipment have been properly sealed the process.
2. Final Declaration
We hereby declare that:
- we know all about the substances which have been in contact with the equipment
and all questions have been answered correctly.
- we have taken all measures to prevent potential risks that might emanate from the
delivered equipment.
- this document will be attached clearly visible and securely to the outside of the
transport box.
Company name or stamp:
Place, date:
Name (print), job title (print):
Signature:
Health and Safety Clearance_20081110_KESS.doc_20081110 Version 1.0 Page 1/1
82 B-290 Operation Manual, Version I
Page 83

Page 84

BÜCHI Labortechnik AG
CH-9230 Flawil 1/Switzerland
T +41 71 394 63 63
F +41 71 394 65 65
www.buchi.com Quality in your hands
 Loading...