


 Loading...
LinkStation User Manual
www.buffalotech.com
35011114 ver.01

Table of Contents |
|
Chapter 1 |
|
Using your LinkStation..................................................... |
4 |
LinkStation Configuration Utility............................................... |
4 |
Adding shared folders.............................................................. |
7 |
Access Restrictions........................................................................ |
9 |
FTP Server..................................................................................... |
15 |
Direct Copy..................................................................................... |
18 |
Users/Groups........................................................................... |
20 |
Adding Users.................................................................................. |
20 |
Add users as shown below............................................................. |
20 |
Adding Groups................................................................................ |
22 |
Admin Password............................................................................. |
23 |
Network.................................................................................... |
24 |
Jumbo Frames................................................................................ |
24 |
System Settings....................................................................... |
26 |
Name, Date and Time..................................................................... |
26 |
System-Storage....................................................................... |
28 |
Check Disk..................................................................................... |
28 |
Format a Drive................................................................................ |
30 |
Adding Storage............................................................................... |
32 |
Remove Disk.................................................................................. |
36 |
System-Backup........................................................................ |
37 |
Time Machine................................................................................. |
37 |
System-Backup.............................................................................. |
42 |
RAID Arrays............................................................................. |
50 |
System-Maintenance............................................................... |
55 |
E-mail Notification........................................................................... |
55 |
System Power Management.................................................... |
57 |
LinkStation User Manual |
1 |

UPS Settings.................................................................................. |
57 |
Sleep Timer.................................................................................... |
58 |
Restore Factory Defaults................................................................ |
60 |
Format the LinkStation................................................................... |
62 |
Extensions............................................................................... |
63 |
WebAccess..................................................................................... |
63 |
Print Server..................................................................................... |
71 |
BitTorrent Client.............................................................................. |
78 |
Media Server.................................................................................. |
84 |
Using iTunes with the Media Server............................................... |
95 |
Web/Database Server (LS-WXL, LS-WSXL only)................... |
96 |
Chapter 2 |
|
NAS Navigator2................................................................. |
98 |
Chapter 3 |
|
Web Administration Tool.................................................. |
103 |
Home....................................................................................... |
103 |
Shared Folders........................................................................ |
104 |
Users/Groups........................................................................... |
107 |
Network.................................................................................... |
110 |
System..................................................................................... |
113 |
Extensions............................................................................... |
126 |
Appendix ..................................................................... |
130 |
Default Configuration Settings................................................. |
130 |
Mapping Additional Shares...................................................... |
131 |
Windows......................................................................................... |
131 |
LinkStation User Manual |
2 |
Mac OS X....................................................................................... |
132 |
File Sharing Security Level Change Tool................................. |
133 |
Status LED (LS-XHL, LS-CHL)................................................ |
135 |
Status LED (LS-WXL).............................................................. |
138 |
Status LED (LS-WSXL)........................................................... |
142 |
Compliance Information........................................................... |
145 |
Data Backup............................................................................ |
146 |
GPL Information....................................................................... |
146 |
LinkStation User Manual |
3 |

Chapter 1
Using your LinkStation
LinkStation Configuration Utility
To configure your LinkStation, use the web-based configuration utility from a browser on a computer connected to the same network.
1 |
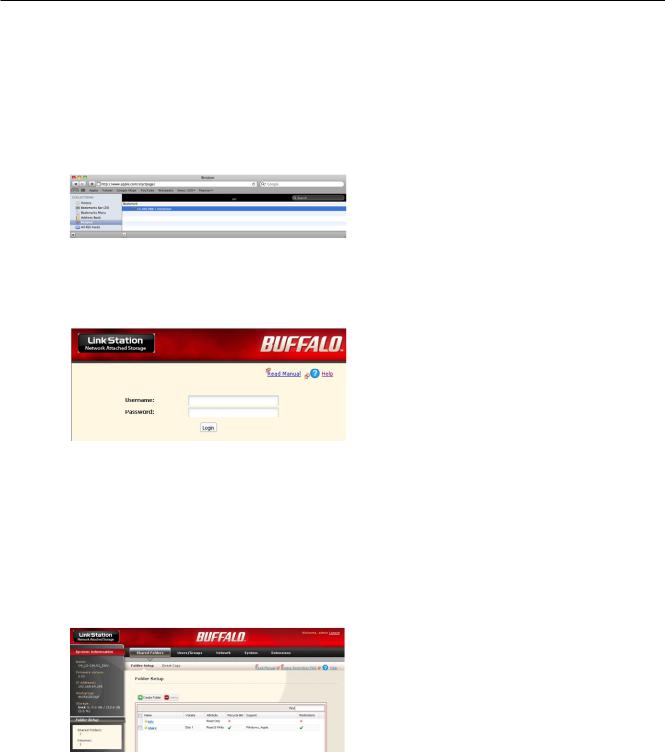
Launch NAS Navigator2. For Windows, click on the [BUFFALO NAS Navigator2] icon on your |
|
desktop. For Mac OS X, double-click on the [NAS Navigator2] icon in the Dock. |
2
3
Right-click on the LinkStation icon (on Mac OS X, click the icon while holding down the control key) and select [Open Web Setting] from the menu.
Notes: If multiple LinkStations and TeraStations are connected to the network, multiple icons will be displayed. Click on the correct LinkStation.
Record the LinkStation’s IP address from the bottom right of the NAS Navigator2 window.
Enter your username and password, and click [Login]. Initially, use the default username and password:
Username: admin
Password: password
After you log in, change the password for security.
LinkStation User Manual |
4 |

Using your LinkStation
4 This is the LinkStation’s configuration utility. This page displays the LinkStation’s current status, including name, IP address, workgroup, and hard drive settings.
Note: Use Firefox, Internet Explorer, or Safari with the configuration utility. Other browsers may not display it correctly.
The configuration utility is organized by tabs across the top. The following tabs are available.
•Shared Folder
Add/delete shared folders, set access restrictions, and configure for a direct copy.
•Users/Groups
Register and delete users/groups.
•Network
Register and delete a network or workgroup.
•System
Perform Name, time, disk check format, backup, mail notification settings, timer ON/OFF, UPS synchronization settings, initialization, complete disk format.
•Extensions
Configure for WebAccess, Print Server, and Time Machine.
LinkStation User Manual |
5 |
Using your LinkStation
To open the LinkStation’s configuration utility from a different computer, open a browser and type the LinkStation’s IP address into the URL field. You recorded the LinkStation’s IP address in step 2 on page 3.
If you have a Mac, you can open the configuration utility from "Bonjour".
1 Launch Safari.
2 Select [View] - [View Bookmark Bar] from Safari’s menu.
3 |
Select [Bonjour] from the left-side menu, then |
|
click on your LinkStation in the bookmark list. |
4 |
1 Enter your username and password. |
|
2 Click [Login]. |
Note:To log in as a guest, type "guest" as the username and leave the password blank.
5 |
The configuration utility opens. |
|
|
|
The LinkStation’s name, IP address and drive |
|
information are displayed on the left. |
LinkStation User Manual |
6 |
Using your LinkStation
Adding shared folders
By default, the LinkStation includes one shared folder “share”. You may add additional folders as follows.
1 |
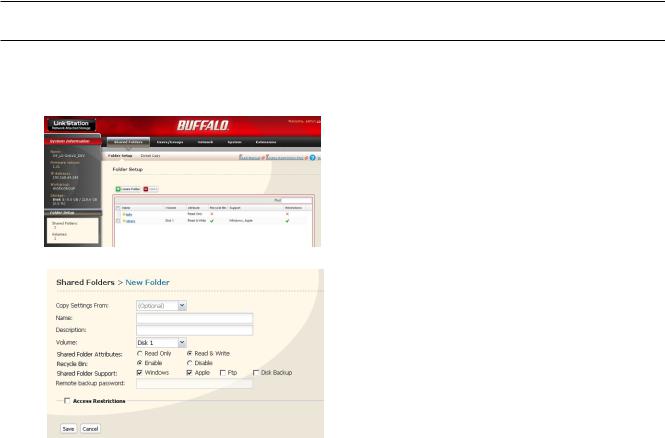
In the LinkStation configuration utility, navigate |
|
to [Shared Folders] and click [Folder Setup]. |
2
You have created a new share.
1 Enter desired characteristics for the new share.
Note: If you would like to copy the settings of an existing folder, select a source folder from the [Copy Settings from] dropdown.
2 Click [Save].
To protect your data from accidental deletion, you may enable a Recycle Bin for the share (not available for Apple and FTP connections). Deleted data in a shared folder will be temporarily moved to the [Recycle Bin] folder. To recover deleted data, open the Recycle Bin folder and move files.
Read-Only shares cannot be modified or deleted. To make a Read-Only share, select [Read Only] in the Shared Folder Configuration utility and click [Save].
Notes: • By default, shares are configured as [Read &Write].
•A shared folder set to Read Only cannot be written by any users or groups, even if they have read and write permissions. Read-Only folders are read-only for all users.
•Read Only shares are described as (Read Only)] in the shared folder description.
LinkStation User Manual |
7 |
Using your LinkStation
Notes:
•When using two-byte characters (such as Japanese), make folder or file names with 80 characters or less. You may not be able to copy a folder or a file whose name length is more than 80 characters.
•You cannot set hidden or read-only attributes to sub-folders or files on the LinkStation.
•If non-Roman alphabetical folder names or workgroup names do not display properly, rename the folder or workgroup with Roman alphabetical characters.
•Please don’t use any of the following words as the name of a shared folder. These words are reserved for internal use by the LinkStation:
info, spool, usbdisk1, usbdisk2, usbdisk3, usbdisk4, lost+found, global, printers, homes, lp, auth, test, ram, disk1, disk2, disk3, disk4, array1, array2, msdfs_root, mt-daapd
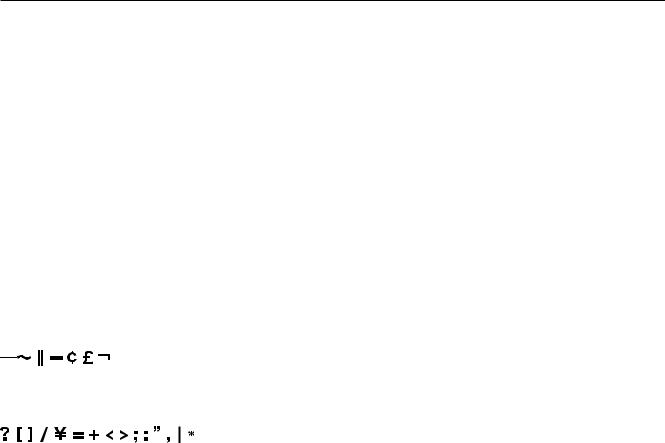
•The following characters are handled differently by Mac OS X andWindows. Avoid using these characters when sharing data between Mac OS X and Windows:
•The following characters are not displayed correctly byWindows, or by a Mac connected to the LinkStation via SMB.
Avoid their use in file names that will be used with the LinkStation.
•Never turn off the LinkStation or unplug its network cable while data is being written. Doing so may result in an incomplete file that cannot be opened or deleted. If this happens, restart the LinkStation, delete the file, then retry copying the file.
•Your OS may update the date and timestamp stored on the LinkStation’s hard drive, or on a USB drive connected to the LinkStation. This might result in inaccurate information for date-created or date-accessed data on the LinkStation.
•In the LinkStation’s configuration utility, or from a Mac OS X 10.6 or later, drive size is displayed in gigabytes, where 1 gigabyte = 1,000,000,000 bytes. This is also how drive capacity is expressed on your LinkStation’s packaging. However, if you check the drive size from an older Mac, or from a Windows computer, it may display the size of the drive in gibibytes, where 1 gibibyte = 1,073,741,824 bytes. Since a gibibyte is larger than a gigabyte, the displayed drive capacity will be a smaller number than the actual drive size.
LinkStation User Manual |
8 |

Using your LinkStation
Access Restrictions
There are several ways to restrict access to users of a LinkStation.
Access restrictions for locally registered users
The next page describes how to configure access restrictions for local users.
Access restrictions by using the Delegate Authority server feature
Follow the procedure on page 11 to configure.
Notes: • Permissions are assigned to shared folders. Child folders in a shared folder inherit their permissions from the parent folder. If a file or folder is moved into a new shared folder with different permissions from the folder it was originally in, it will now have the access restrictions from the new shared folder.
•When accessing the LinkStation fromWindows via SMB, changing permissions from the folder’s security tab in the properties screen of a folder is not supported. Access restrictions for shared folders on the LinkStation can only be configured from within the LinkStation’s configuration utility.
LinkStation User Manual |
9 |
Using your LinkStation
Restricting access for local users
You can set access restrictions for shared folders by username or group names for users that are registered on the LinkStation.
1 |
|
Create a new user accounts and passwords in Windows, or record existing Windows |
|
usernames and passwords. Each account on the LinkStation will have the same username |
|
|
|
|
|
|
and password as the user’s Windows account. |
2 |
Register users and groups on the LinkStation. |
|
|
1 Add users as described on page 20. |
|
|
2 Add groups as described on page 22. |
|
3 |
|
Configure access restrictions for groups and/or users. |
|
1 |
In the LinkStation configuration utility, navigate |
|
|
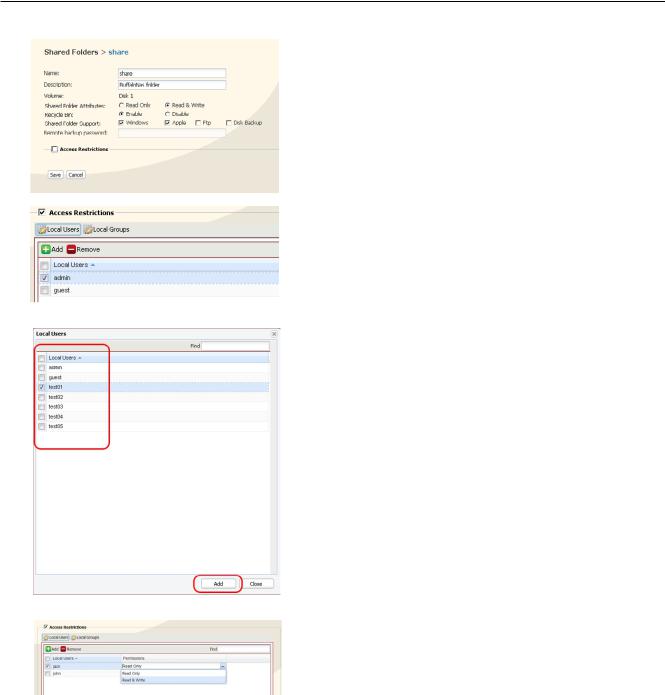
to Shared Folders/Folder Setup. |
2 |
Click a shared folder you want to set access |
|
|
|
restrictions for. |
LinkStation User Manual |
10 |
Using your LinkStation
3
4
5
6
7 Click [Save].
You have assigned access restrictions.
Check [Access Restrictions] to enable.
Click [Add].
Note: The procedure described here shows how to set access restrictions for users. To set access restrictions for a group of users, click [Local
Groups] - [Add].
1Check the users (or groups) that you want to permit to access the share.
.
2 Click [Add].
Select the level of access for the user or group you added.
•If you log on from a Microsoft Network Domain, you can set the access restrictions with the users and/or groups which are registered on the domain.
•If both read-only and read-and-write permissions are given to a user, that user will have read-only access.
LinkStation User Manual |
11 |

Using your LinkStation
Access restrictions by using the Delegate Authority server feature
You may administer all user accounts and passwords centrally from a delegate server as described below. This procedure is intended for network administrators only.
Notes: • You can set access restrictions on shared folders.You cannot set different restrictions on folders in a shared folder. Child folders in a shared folder inherit their permissions from the parent folder.
•When accessing the LinkStation fromWindows via SMB, changing permissions from the folder’s security tab in the properties screen of a folder is not supported. Access restrictions for shared folders on the LinkStation can only be configured from within the LinkStation’s configuration utility.
There are restrictions when administrating through a delegate authority server:.
•To access the LinkStation, you must be logged intoWindows with the account registered to the authentication server.
•If you use the Delegate Authority option, you cannot connect as a guest user via AFP.
•If you use the Delegate Authority option, you cannot connect anonymously via FTP.
Notes:
Windows Vista and Windows Server 2003/Server 2008 users need to change the security settings to use the Delegate Authority to External SMB server feature to restrict access.
[Start] - [BUFFALO] - [File Sharing Security Level Change Tool] - [File Sharing Security Level Change Tool], and then select [Change Security level] to change the security settings (Select "Recover default security level" change it back to the previous setting).
For Windows Vista, the "File Security Tool" on the LinkNavigator CD will change this setting for you automatically.
LinkStation User Manual |
12 |

Using your LinkStation
1
2
3
1In the configuration utility, navigate to [Network] - [Workgroup].
2Click [Modify Settings].
1Double click "Workgroup" (even if you are in a domain environment).
2Enter the workgroup name. To use a Windows Domain Controller as an external SMB authentication server, enter its name for the workgroup name.
3Select [Delegate Authority to External SMB Server].
1Enter the name or IP address of an authentication server.
Note: When connecting with AFP or FTP, an IP address is recommended.
2Check [Use Windows Domain Controller as Authentication Server], [Automatic User Registration] and [Enable Authentication Shared Folder].
3Enter the shared folder name for authentication.
4Click [Save].
LinkStation User Manual |
13 |

Using your LinkStation
4 The shared folder for authentication should be created on the LinkStation
A user that has been registered to the specified authentication server will be automatically registered as a user on the LinkStation when they open the shared folder for authentication (you can also register users directly).
Configuration of the Authentication Server is complete.
Notes:
•A user who is automatically registered will belong to the "hdusers" group.They added to other groups from within Group settings.
•You can restrict access to shared folders by username or group.
•The names of registered users are listed in [Users/Groups] - [External Users].To delete an automatically registered user, select that user and click [Delete].
•When connecting through AFP or FTP, always use an IP address. Using a server name may cause problems with authentication.
•To specify a server from another subnet, enter its IP address.
•AFP and FTP connections don’t support delegating authority to an external SMB server.
LinkStation User Manual |
14 |
Using your LinkStation
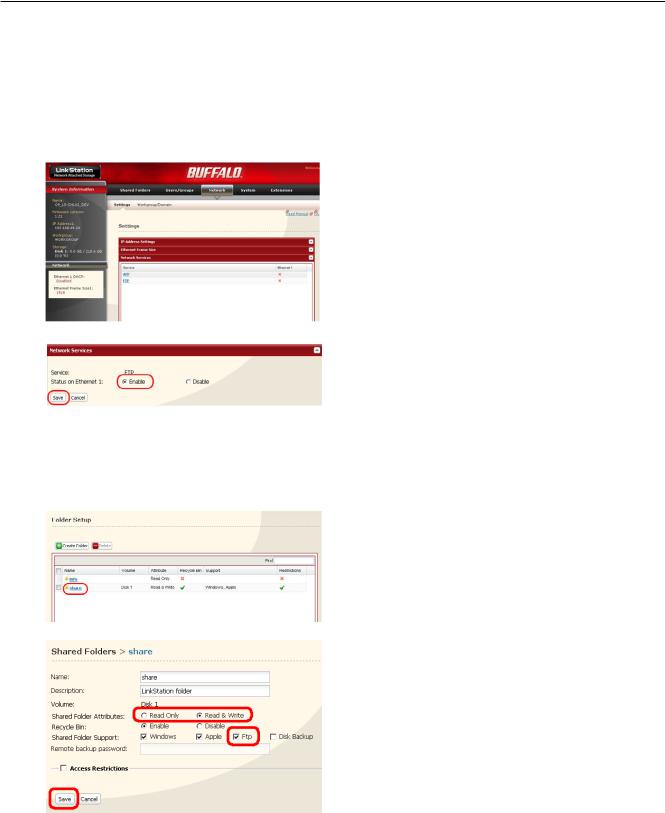
FTP Server
By default, the LinkStation’s shares are only accessible by users connected to the same network or router as the LinkStation. The optional FTP server allows users to access the LinkStation from outside of the local network. You may enable it as follows.
1 |
In the configuration utility, navigate to [Network] |
|
- [Settings] - [Network Services] and click [FTP]. |
2 |
1 |
Select [Enable]. |
|
2 |
Click [Save]. |
3 |
Click [Shared Folders] - [Folder Setup]. |
4 |
Click the folder to enable remote FTP access on. |
5 |
1 Select whether the shared folder is to be read- |
|
only or writable. |
||
|
||
|
2 Check [FTP]. |
|
|
3 Click [Save]. |
The folder is now configured for FTP access. Don’t forget to give read (or write) permissions for the FTP share to any users that will be accessing the share remotely. Folder permissions can only be changed from the LinkStation’s configuration utility. Changing them remotely with FTP client software is not supported.
LinkStation User Manual |
15 |

Using your LinkStation
To access to the LinkStation with an FTP client
Configure your FTP client software with the following settings:
• Host Name |
IP address of the LinkStation. |
• Username |
Username registered on the LinkStation |
• Password |
Password registered to the LinkStation |
• Port |
21 |
Example ftp://192.168.11.150/
•You cannot write by FTP if the shared folder is set to read-only on the LinkStation.
•Access restrictions are applied based on the settings in the LinkStation. The restrictions aren’t displayed for users without permissions for the share.
•To access your FTP share from outside of your network, you may need to configure your router and firewall. Consult your router documentation for more information.
•Shared folders appear as follows when connected by FTP:
-disk1 share
-usbdisk1
-info
•The internal hard drive of the LinkStation is displayed as disk1, and a USB hard drive
(optional) will be displayed as usbdisk1.
•"usbdisk1" is not displayed when the USB hard drive is not connected, or if access is restricted.
LinkStation User Manual |
16 |

Using your LinkStation
Accessing the LinkStation with an Anonymous user:
To allow anonymous access to your FTP share, disable access restrictions on the FTP share. Configure your FTP client as follows:
• Host Name |
IP address of the LinkStation |
• Username |
anonymous |
• Password |
any set of characters |
• Port |
21 |
Example ftp://192.168.11.150/
•To make your FTP share available from outside your network, you will need to configure your router and firewall. Consult your router’s documentation for information on how to allow FTP traffic.
•If the LinkStation joins a domain, anonymous users cannot access it.
•Folders created or copied via an AFP connection may not be deleted from the AFP connection. This is because an automatically generated ".AppleDouble" folder begins with a dot. To delete these files, use an SMB connection.
•Do not exceed 250 characters for a file/folder name including directory path when you are creating it by using an FTP connection. Otherwise, you cannot view or delete it in Explorer or other applications.
LinkStation User Manual |
17 |
Using your LinkStation
Direct Copy
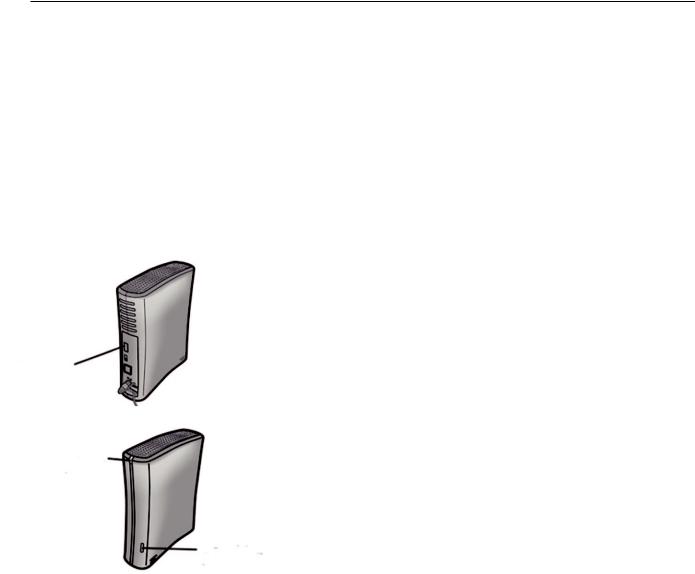
DirectCopy automatically copies movie, music, and images directly to the LinkStation from a USB device.
You can connect many types of USB devices to the LinkStation, including USB hard drives, USB flash drives, single-card card readers, digital cameras, and USB printers. USB hubs, mice, keyboards, and card readers that support 2 or more cards are not supported.
1 |
Connect to a USB device (USB flash/digital camera/hard disk/card reader) to the LinkStation. |
After the USB device is recognized, the function button is lit in blue for 60 seconds. After the function button is lit in blue, you can access the USB device.
USB
Connector
Status LED
If an unsupported USB memory device is connected to the LinkStation, then the function button will not light up in blue, and the device will not be mounted.
|
Function |
|
Button |
2 |
While the function button is blue, press it to automatically copy data from the USB device to |
|
a shared folder on the LinkStation. The function button will flash blue during the copy. Push |
|
the function button again to abort the copy. |
LinkStation User Manual |
18 |

Using your LinkStation
|
Files are copied to the folder: |
|
<shared folder>/pictures/yyyymmdd |
|
yyyy: year copied |
|
mm: month copied |
|
dd: date copied |
|
You may change the destination shared folder for DirectCopy in [Shared Folders] - [Direct |
|
Copy] - [Modify Settings] in the configuration utility. Subsequent DirectCopy folders are |
|
created at: |
|
<DirectCopy folder>/pictures/yyyymmdd/n |
|
yyyy: year copied |
|
mm: month copied |
|
dd: date copied |
|
n: 1st time n=0, 2nd time n=1, 3rd time=2 and so on. |
|
For USB Mass Storage class USB devices, files with following extensions will be copied. |
|
avi, divx, asf, mpg, mpe, m1v, vob, mts, m2ts, m2t, mpeg, mpeg2, vdr, spts, tp, ts, 3gp, mov, |
|
m4v, wmv, dvr-ms, xvid, mp4, jpg, jpeg, gif, png, tif, tiff, yuv, bmp, mp3, mpa, wma, aac, apl, |
|
ac3, lpcm, pcm, wav, m3u, m4a, m4b, aif, aiff, flac, ogg, mp2, mp1 |
|
For digital cameras that don’t follow the USB Mass Storage Class standard, all files on the |
|
device will be copied. |
3 |
When the access LED of the USB device goes off, the copy is finished. Dismount the USB |
|
device before unplugging it. |
To dismount the USB device if the LinkStation is on, hold in the function button for 3 seconds. The blue LED will go out, and the USB device is dismounted. You may now unplug it safely.
If you turn off the LinkStation, the USB device is already dismounted, and you can remove it safely.
LinkStation User Manual |
19 |
Using your LinkStation
Users/Groups
Adding Users
Add users as shown below.
1 |
1 |
In the configuration utility, navigate to [Users/ |
|
|
Groups] - [Local Users]. |
|
2 |
Click [Create User]. |
2 |
1 |
Enter a name and description for the user. |
|
2 |
Click [Save]. |
You have added a user.
Use the same username and password that the user logs into Windows with. If the username and passwords are different, the user may not be able to access restricted shares.
LinkStation User Manual |
20 |

Using your LinkStation
Notes:
•When using access restrictions, you can register up to 300 users on the LinkStation.
•Please do not use any of the following words as a username or a group name: root, bin, daemon, sys, adm, tty, disk, lp, sync, shutdown, halt, operator, nobody, mail, news, uucp, ftp, kmem, utmp, shadow, users, nogroup, all,
none, hdusers, admin, guest, man, www, sshd, administrator, ftpuser, apache, mysql
•If you are using Mac OS 9 or earlier, do not use more than 9 alphanumeric characters for the user password, the user will not be able to access shared folders on the LinkStation.
LinkStation User Manual |
21 |
Using your LinkStation
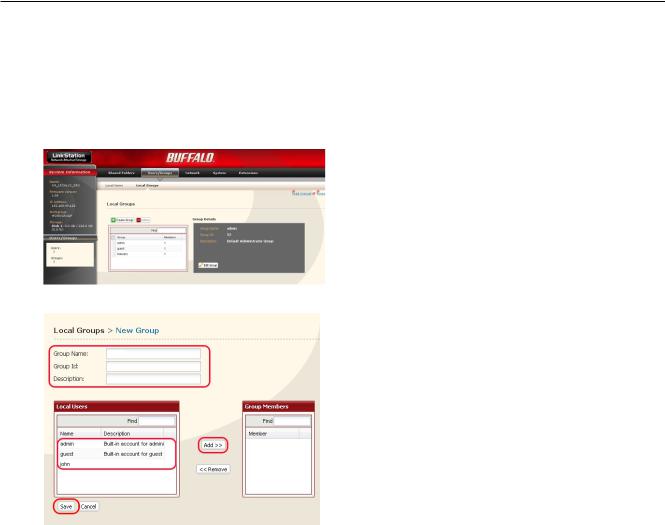
Adding Groups
Add groups as shown below:
1 |
1 |
In the configuration utility, navigate to [Users/ |
|
|
Groups] - [Local Groups]. |
|
2 |
Click [Create Group]. |
2 |
1 |
Enter a name and description for the group. |
|
2 |
Select users to include in the group. |
|
3 |
Click [Add], then [Save]. |
|
You have added a group. |
|
Please do not use any of the following words as a group name:
root, bin, daemon, sys, adm, tty, disk, lp, sync, shutdown, halt, operator, nobody, mail, news, uucp, ftp, kmem, utmp, shadow, users, nogroup, all,
none, hdusers, admin, guest, man, www, sshd, administrator, ftpuser, apache, mysql
LinkStation User Manual |
22 |
Using your LinkStation
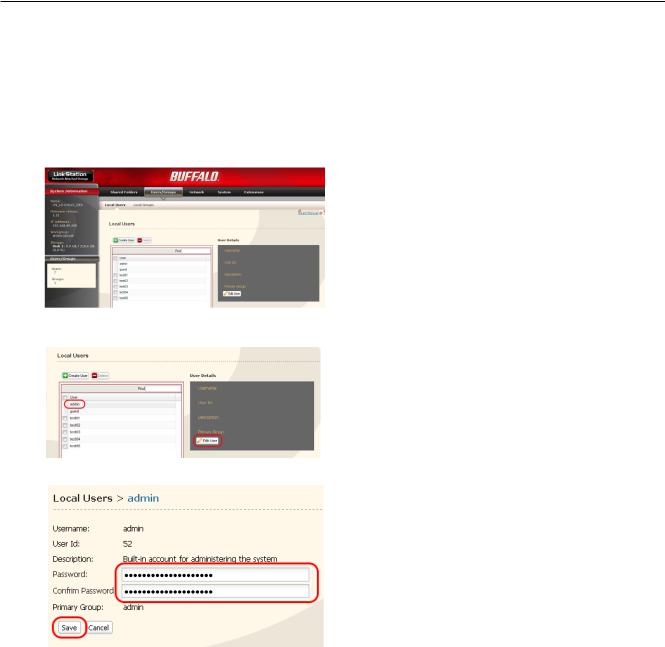
Admin Password
You may change the admin password as follows.
1
2
3
You have now changed the admin password.
In the configuration utility, navigate to [Users/ Groups - [Local Users].
Select [admin] and click [Edit User].
1Enter a new password (twice).
2Click [Save].
Notes: • The administrator's username, "admin" cannot be changed.
•You cannot set access restrictions or useWebAccess with the admin account. Use the admin account only to log in to the LinkStation configuration utility.
LinkStation User Manual |
23 |
Using your LinkStation
Network
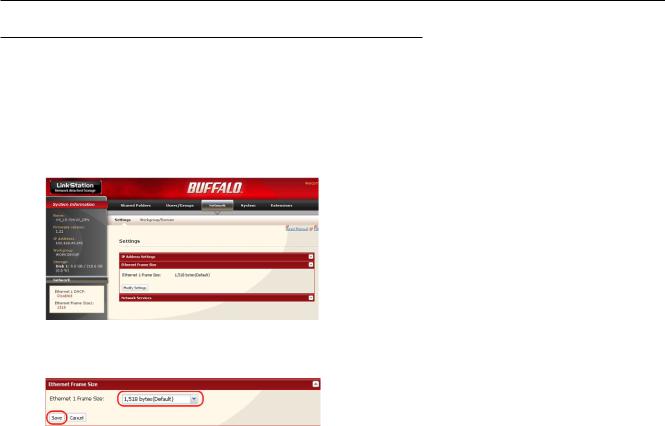
Jumbo Frames
If your other network devices support it, you may be able to increase network performance with jumbo frames.
1 |
In the configuration utility, navigate to [Modify |
|
Settings] in [Network] - [Settings] - [Ethernet |
Frame Size].
2 |
1 |
Select Ethernet Frame Size. |
|
||
|
2 |
Click [Save]. |
LinkStation User Manual |
24 |
Using your LinkStation
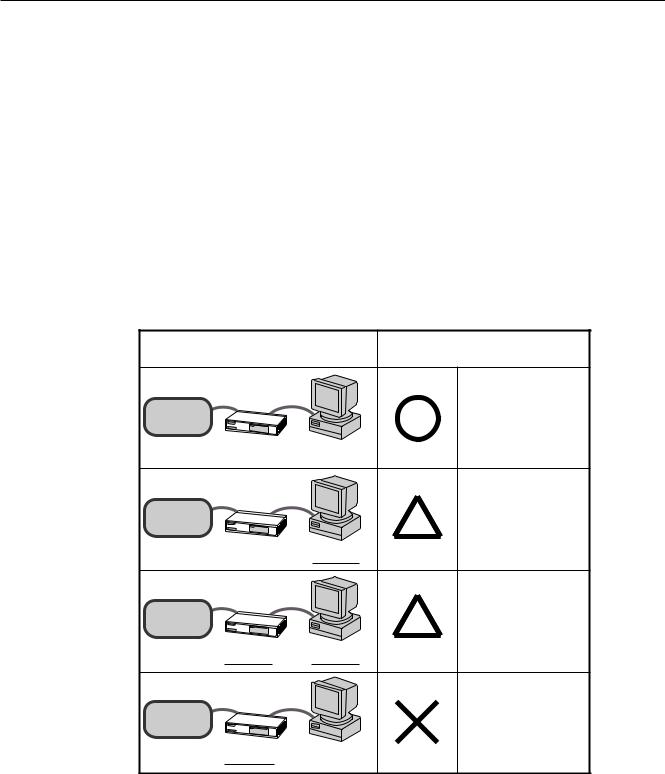
Notes: • To use the LinkStation with jumbo frames, your router/switch/hub must support jumbo frames. Otherwise, you will not be able to transfer data.
•To use jumbo frames (4102/7422/9694 bytes), your computer’s NICs and all switches, hubs, and routers on the transmission route need to support jumbo frames. If any device on the route doesn’t support jumbo frames, use standard transmission (1518 bytes) instead.
•If you are using jumbo frames and back up data from a LinkStation/TeraStation to another
LinkStation/TeraStation, set the Ethernet frame sizes of the LinkStations/TeraStations to the same settings (or the closest available). If the Ethernet frame sizes are significantly different, the backup job may fail. If you have problems with backup jobs, select the default frame size (1518 bytes).
Connection |
Transmission |
|
LinkStation |
|
Transmit |
|
Jumbo Frame |
|
|
|
( 4102 / 7422 / 9694 ) |
Jumbo Frame |
Jumbo Frame |
Jumbo Frame |
( 4102 / 7422 / 9694 ) |
supported |
supported |
LinkStation |
|
Transmit |
|
normally(1518) |
|
|
|
|
Jumbo Frame |
Jumbo Frame |
Jumbo Frame |
( 4102 / 7422 / 9694 ) |
Supported |
not supported |
LinkStation |
|
Transmit |
|
normally(1518) |
|
|
|
|
Jumbo Frame |
Jumbo Frame |
Jumbo Frame |
( 4102 / 7422 / 9694 ) |
not supported |
not supported |
LinkStation |
|
No transmission |
|
|
|
Jumbo Frame |
Jumbo Frame |
Jumbo Frame |
( 4102 / 7422 / 9694 ) |
not supported |
supported |
LinkStation User Manual |
25 |

Using your LinkStation
System Settings
Name, Date and Time
Configure the LinkStation’s host name, date, or time as follows:
1 |
In the configuration utility, navigate to [Modify |
|
Settings] in [System] - [Settings] - [Name]. |
2
3
Enter the LinkStation’s name and description, then click [Save].
In the configuration utility, navigate to [Modify Settings] in [System] - [Settings] - [Date and Time].
4 |
1 |
Enter the year, month, day, and time. |
|
2 |
Click [Save]. |
LinkStation User Manual |
26 |
Using your LinkStation
Click [Use Local Date/Time] to use your computer’s time settings for the LinkStation.
By default, the LinkStation adjust its clock automatically by using an NTP server.
NTP
NTP may not be usable in some networks.
The default NTP Server (ntp.jst.mfeed.ad.jp) belongs to Internet Multi Feed Inc. For more information, please visit www.jst.mfeed.ad.jp.
Use NTP at your own risk. Buffalo Technology is not responsible for any loss or damage caused by using of this service, stopping the service, or missing service.
You’ve completed hostname and time settings for the LinkStation.
Note: The LinkStation's internal clock may run at a slightly different speed from other clocks on you network, and over a long period of time your network devices may show different times. If clocks on your network vary by more than 5 minutes it may cause unexpected behavior. For best results, keep all clocks on the network set to the same time by adjusting them regularly, or use an NTP server to correct them all automatically.
LinkStation User Manual |
27 |

Using your LinkStation
System-Storage
Check Disk
A disk check tests the data on a drive in the LinkStation or connected via USB. Errors are fixed automatically. A disk check may run for more than ten hours. Shared folders cannot be accessed during the disk check. Do not turn off power to the LinkStation during the disk check.
If Auto power is set to [AUTO], then the LinkStation will turn off when the disk check is finished. Run a disk check as follows:
1
2
3
In the configuration utility, navigate to [System] - [Storage].
1 Select the hard drive to test.
2 Click [Check Disk].
Click [Check].
The Status LED on the front of the LinkStation will flash during the disk check.
Note: If a power outage disconnects the LinkStation in the middle of a disk check, then you may not be able to access shares on the LinkStation from Mac OS. This is because the database created by Mac OS is damaged. To resolve, navigate to [System] - [Storage] - [Check Disk] and check [Delete any hidden, non-essential Mac OS dedicated files].
Rerun the disk check when done.
LinkStation User Manual |
28 |

Using your LinkStation
Note: If you access a shared folder from a Macintosh computer, information files for Macintosh may be automatically generated. Do not delete these files from a Windows computer. Otherwise, you may no longer be able to access folders from the Macintosh. If you cannot access them, check [Delete any hidden, non-essential Mac OS dedicated files] in [System] - [Storage] - [Check Disk].
LinkStation User Manual |
29 |
Loading...