


User Guide
HD-WLU3R1 DriveStation Duo
РПЧЕТ
БГГЕУУ
EN
35011790 ver.01
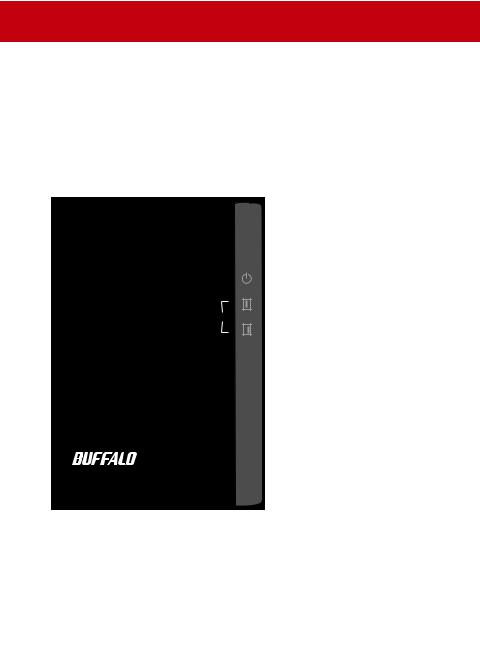
Front Panel Layout
Power LED
Power On: blue

 RAID Maintenance: purple Power Off: off

 Access LEDs
Access: blinking green Failure: red
Rebuild: blinking red Power Off: off
2

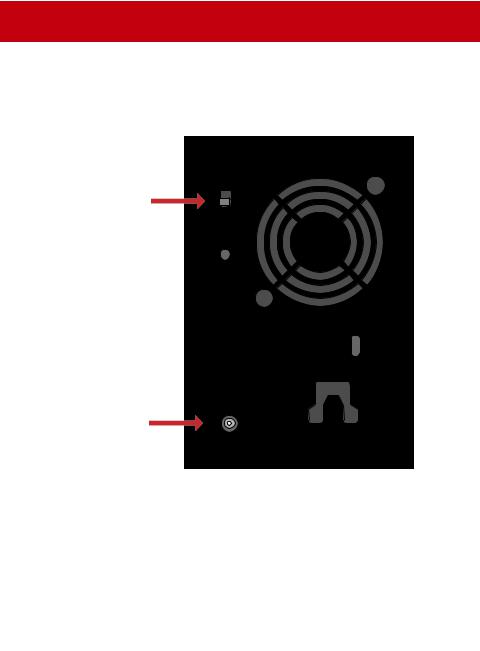
Back Panel Layout
Power Mode Switch ▲Auto ▼Off
RAID Mode
Button
USB 3.0 


DC in 

Note: To change between RAID modes, you may use either the RAID utility or the RAID mode button. The RAID utility is included with the software on your DriveNavigator CD. For more information on using the RAID mode button, see the Reference Guide.
3
DriveStation Setup
Congratulations on your new DriveStation Duo! With dual hard drives, the DriveStation Duo gives you many options for large capacity and easy-to-use redundancy.
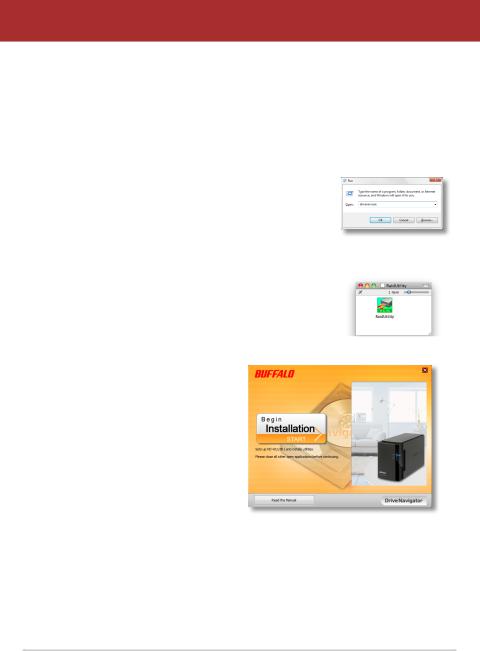
Insert the DriveNavigator CD into your computer’s CD-ROM drive.
On a PC, DriveNavigator should automatically launch. If it does not, click [Start] and select [Run]. In the Run dialog, enter “d:\DriveNavi.exe” (where d is the drive letter of your CD-ROM drive). Click [OK] to continue.
For a Mac, open the CD and click [RaidUtility.dmg] to begin installation.
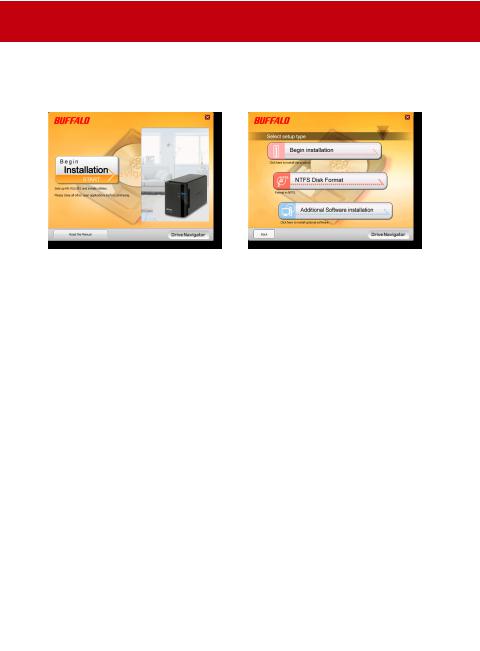
Click [Begin Installation]. Click [Next] to step through the installation. Mac users can skip this step.
4

The wizard will step you through setting up your DriveStation Duo, configuring your RAID settings, and reformatting if desired.
The DriveStation Duo may be connected to your computer with a USB connection.
After completing the setup wizard, your DriveStation Duo is installed and ready to use!
By default, your Duo is confi gured in RAID 1 mode. In RAID 1, data can be recovered even if one of the hard disks in DriveStation fails. However, the total available space is 1/2 of the maximum space.
If you prefer a different RAID confi guration, or if you prefer to use DriveStation as a single drive, you may use the RAID Utility to change your DriveStation’s RAID settings. Turn to the next page for instructions on using the RAID Utility.
Alternately, you may change the RAID mode with the RAID mode button as described in the Reference Guide.
Out of the box, the DriveStation is formatted with FAT32, allowing it to be used with most common operating systems. If you’re going to use it with programs that generate fi lesizes larger than 4 GB, such as backup software, reformat the DriveStation with NTFS or Mac OS Extended.
By default, all drives on the DriveStation are divided into 2 TB partitions. This allows older versions of Windows, such as 32-bit Windows XP and Windows Server 2003, to read the drives without additional software or service packs.
Users of newer operating systems may wish to re-partition the DriveStation with larger partitions, but this is not recommended for 32-bit Windows XP. Windows Server 2003 may be able to read larger partitions after the latest service pack is applied.
5
Using the RAID Utility
The RAID Utility allows you to confi gure your DriveStation Duo in several modes:
Normal mode - Appears to your computer as two separate hard drives. Note that normal mode only works with a USB connection.
Spanning mode - Appears to your computer as one large hard drive.
RAID 0 mode - Appears to your computer as a single drive. Higher performance than Spanning mode.
RAID 1 mode - Appears to your computer as a single drive. The second drive is an exact copy of the fi rst drive, for redundancy.
Notes:
Changing the mode of the drives in your Duo will erase all data on them! Back up any important data before using the RAID Utility.
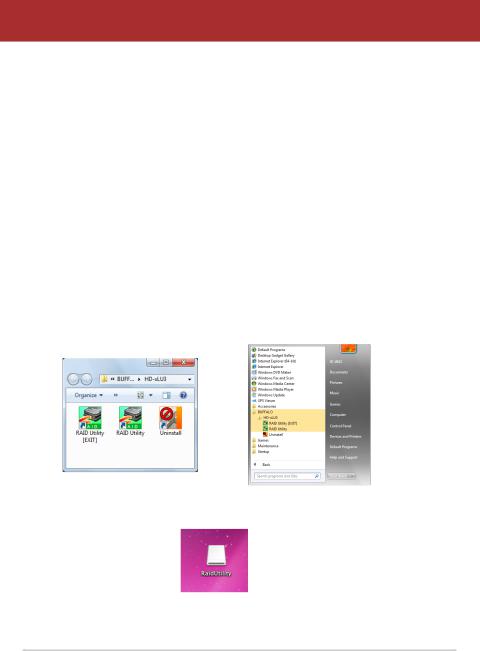
On a PC, launch the RAID Utility by clicking on [RAID Utility] in the DriveStation Duo program group, or from the Start menu.
On a Mac, double-click the RaidUtility icon on your desktop.
6
Using the RAID Utility
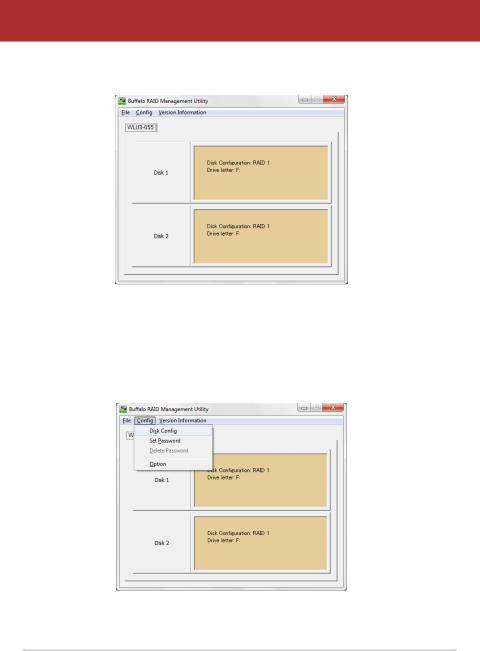
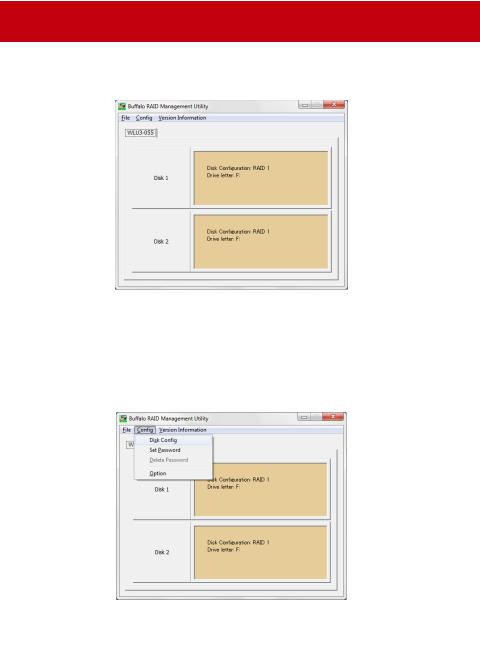
Once launched, the RAID Utility will briefl y scan for your DriveStation Duo. This may take a few seconds.
The initial screen will show your current confi guration. If your Duo is new, it will probably be in RAID 1 mode.
To change the RAID mode, click [Confi g] and choose [Disk Confi g].
7

Using the RAID Utility
Select the drive structure that you’d like to use.
On a PC, the disk can be formatted with FAT32 or NTFS. Select the format that you prefer. FAT32 is compatible with most Windows PCs and Macs. NTFS offers the best performance with Windows, but isn’t compatible with Mac. NTFS is recommended for use with backup, video editing and other programs that may need fi lesizes larger than 4 GB.
If you are using Windows XP, or Windows Server 2003 without SP1 or later, use compatability mode. Compatability mode will divide drives into 2 TB partitions that can be read by Windows XP or Windows Server 2003.
Click [Yes], and [Yes] again. Understand that this will erase any data on the drive!
8

Using the RAID Utility
To Windows Users
The message below may be displayed when you try to change the disk confi guration (such as by selecting NTFS format) using the RAID Management Utility.
If this message appears, wait until the changes to the disk confi guration are complete and “The setting was successfully changed” is displayed, then click [Cancel]. The disk is now ready to use.
If you inadvertently click [Format disk] in the above message, one of the following things will happen.
•If “You do not have suffi cient rights to perform this operation” is displayed, click [OK].
•If “Not Formattable” is displayed, click [Close].
•If the standard Windows format screen is displayed, click [Close].
Note: If the drive is formatted with the Windows format utility, changes to the disk confi guration may not complete normally. If this happens, use the RAID Management Utility to set the disk confi guration again.
9

Other Utilities (Windows Only)
The DriveStation Duo includes several optional utilities for use with Windows computers. To install and use these utilities, insert the CD-ROM that came with your DriveStation Duo into a Windows PC.
Click [Begin Installation] and then [Additional Software Installation].
TurboPC can increase data transfer speeds for your Buffalo product.
TurboCopy uses caching to increase data transfer speeds.
Backup Utility is software to back up and restore data from your PC. To use, select a source drive to be backed up and a target location for backup data.
RAMDISK Utility uses the memory in your computer as a virtual hard drive “RAM drive”. The RAM drive is recognised as a hard drive by your computer, and you can read and write data to it like any other hard drive.
Buffalo Tools Launcher lets you easily launch software from the Buffalo utility suite. Just click an icon to launch the desired Buffalo tool or utility.
eco Manager lets you put the DriveStation into sleep mode to save power. It works in RAID 0, RAID 1, and Spanning modes. Normal mode is not supported.
SecureLockMobile encrypts the data on your DriveStation, preventing the data from being accessed by anyone but you.
NovaBACKUP is backup software.
To learn more about installing and using these utilities, click on [View User Manual].
10
Replacing a Hard Drive
Caution:
Please do not lift the DriveStation Duo by its front cover. The front cover might come off.
Before removing hard drives, touch a metal object to dissipate static electricity in your body, or wear a static wrist strap.
Work carefully! Some of the metal edges inside the DriveStation Duo are sharp.
Damage done to the DriveStation Duo by improper disassembly is not covered by warranty.
Do not reverse the two drives, or your data may be lost.
Replacement drives should be the same capacity as the drive being replaced, or larger.
Do not use a hard drive that has previously been used in a DriveStation Duo as a replacement drive. Remove any partitions on it fi rst, or rebuilding might not work normally.
Replacement hard drives are available from www.buffalotech.com.
Replacing a drive can result in lower transfer speeds for DriveStation Duo depending on the performance of the replacement drive.
11

|
|
|
|
Replacing a Hard Drive |
1 |
|
|
|
Shut down the DriveStation and |
|
|
|
|
remove all cables. |
|
|
|
|
|
|
|
|
|
|
|
|
|
|
|
|
|
|
|
|
▲AUTO
▼OFF
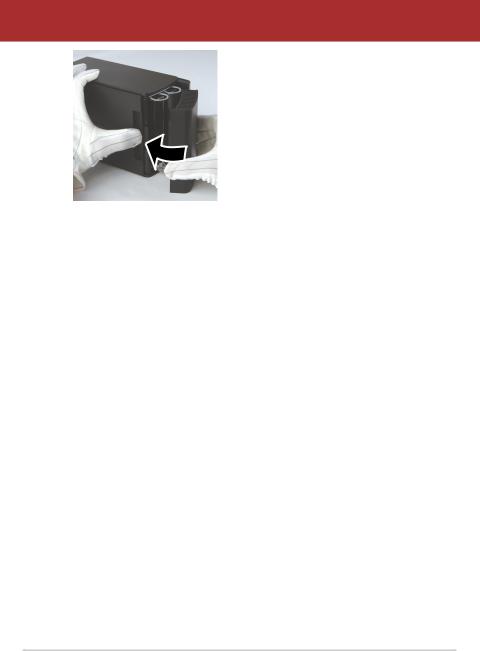
2 |
Pull the front cover forward while |
|
pressing gently on the hollow on |
the left side.
3 |
Remove the front cover. |
12
4
5
6
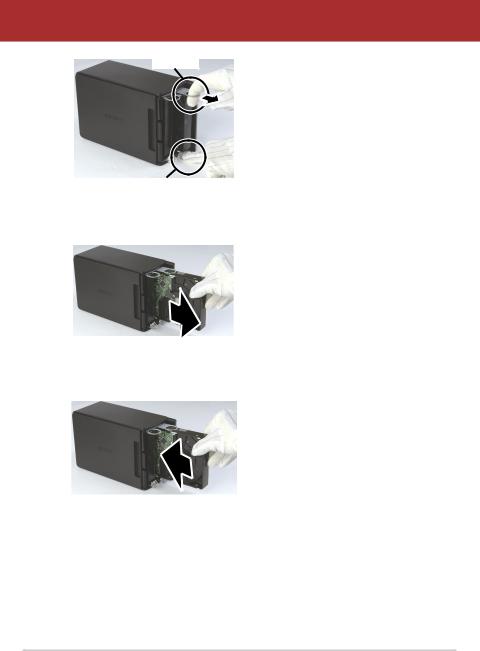
Tab
Knob
Replacing a Hard Drive
Press the release below the drive and pull the tab above the drive out 2 cm (about 1 inch) .
Remove the failed drive.
Insert the new drive until it clicks.
13
|
Replacing a Hard Drive |
7 |
Reattach the front cover. |
8 Reattach all cables and power on the DriveStation Duo.
Note: If the DriveStation Duo is in normal mode, format the new drive.
14

Troubleshooting
FAQ
The following is a list of common issues with the DriveStation. Following each issue are possible resolutions.
I cannot see the DriveStation in My Computer. (Windows)
Verify that the POWER light is on. If it is not, then ensure that the power switch is in the AUTO position.
If you have installed the Power Save Utility, then verify that the DriveStation was not put into power saving mode. Consult the manual for the Power Save Utility for additional help. The manual can be found on the DriveNavigator CD-ROM.
Verify that the hard drive inside the DriveStation is spinning. This can be verifi ed by placing your hand on the sides of the case and feeling for a slight vibration. Also, after the DriveStation has been powered on for fi fteen minutes or more it will begin to get warm. If neither of the proceeding tests verifi ed that the hard drive is spinning, then please contact technical support for further assistance.
My backup program can’t save fi les to the DriveStation.
Reformat your DriveStation with NTFS or Mac OS Extended. FAT32 is limited to 4 GB fi lesizes.
15

Technical Specifi cations
|
|
|
|
|
|||||||
Standard Compliance: |
|||||||||||
|
|
USB 3.0 |
|||||||||
Transmission Speed: |
Max. 5.0 Gbps (USB 3.0) |
||||||||||
|
|
|
|
|
|
|
|
||||
Power Consumption: |
|||||||||||
|
|
|
|
Max. 36 W |
|||||||
Dimensions: |
3.4” x 5.0” x 8.1” (86 x 127 x 204 mm) |
||||||||||
|
|
|
|
|
|
|
|
|
|
||
Weight: |
|
|
|
4.85 lbs. (2.2 kgs) |
|||||||
Operating Environment: |
41 - 95° F (5 - 35° C) |
||||||||||
|
|
|
|
|
|
20 - 80% humidity (non-condensing) |
|||||
|
|
|
|
|
|
|
|
|
|
|
|
|
OS Compatibility: |
|
|
|
Windows 7 (32-bit or 64-bit), |
||||||
|
|
|
|
|
|
Windows Vista (32-bit or 64-bit), |
|||||
|
|
|
|
|
|
Windows XP (32-bit), |
|||||
|
|
|
|
|
|
Windows Server 2008 R2 (64-bit), |
|||||
|
|
|
|
|
|
Windows Server 2008 (32-bit or 64-bit), |
|||||
|
|
|
|
|
|
Windows Server 2003 R2 (32-bit), |
|||||
|
|
|
|
|
|
Windows Server 2003 (32-bit), |
|||||
|
|
|
|
|
|
|
|
|
|
|
|
|
|
|
|
|
|
Mac OS X 10.4 or later |
|||||
16

www.buffalotech.com

User Guide
HD-WLU3R1 DriveStation Duo
РПЧЕТ
БГГЕУУ
DE
35011790 ver.01
Layout des Front-Panels
РПЧЕТ
БГГЕУУ
Strom-LED
Eingeschaltet: blau  RAID-Wartung: violett
Strom ausgeschaltet: Aus
 LEDs für die Anzeige
des Zugriffs
Zugriff: Blinkt grün Fehler: Rot Neuerstellung: Blinkt rot Strom ausgeschaltet: Aus
2
Layout der Rückseite
Power Mode Switch (Strommodusschalter)
▲Auto ▼Off (Aus)
RAID Mode
Button (RAID- 
Modus-Taste)
USB 3.0 

DC in (DC-Eingang)
Hinweis: Zum Wechseln zwischen RAID-Modi können Sie entweder die RAIDUtility oder die RAID-Modus-Taste verwenden. Die RAID-Utility wird mit der Software auf der DriveNavigator-CD mitgeliefert. Weitere Informationen zur Verwendung der RAID-Modus-Taste erhalten Sie im Referenzhandbuch.
3
Einrichtung der DriveStation
Herzlichen Glückwunsch zu Ihrem DriveStation Duo-Kauf! Mit zwei Festplatten erhalten Sie mit der DriveStation Duo viele Optionen für benutzerfreundliche Redundanz mit hoher Kapazität.
Legen Sie die DriveNavigator-CD ins CD-ROM-Laufwerk des Computers ein.
Auf einem PC sollte DriveNavigator automatisch gestartet werden. Wenn dies nicht der Fall ist, klicken Sie auf [Start] und wählen Sie [Ausführen] aus. Geben Sie im Dialogfenster [Ausführen] „d:\DriveNavi.exe“ ein (wobei „d“ für den Laufwerkbuchstaben Ihres CD-ROM-Laufwerks steht). Klicken Sie zum Fortfahren auf [OK].
Bei einem Mac-Computer öffnen Sie die CD und klicken
Sie zum Starten der Installation auf [RaidUtility.dmg].
Klicken Sie auf [Begin Installation (Installation starten)]. Klicken Sie auf [Next (Weiter)], um die einzelnen Installationsschritte auszuführen.
Dieser Schritt kann von Mac-Benutzern übersprungen werden.
4

Der Assistent führt Sie schrittweise durch das Einrichten der DriveStation Duo, das Konfigurieren der RAID-Einstellungen und ggf. das Neuformatieren.
Die DriveStation Duo kann über einen USB-Anschluss an den Computer angeschlossen werden.
Nach Abschließen des Setup-Assistenten ist die DriveStation Duo installiert und verwendungsbereit!
Die Duo ist standardmäßig im RAID 1-Modus konfiguriert. Im RAID 1-Modus können Daten auch dann wiederhergestellt werden, wenn eine der Festplatten in der DriveStation ausfällt. Der insgesamt verfügbare Speicherplatz beträgt jedoch nur die Hälfte des maximalen Speicherplatzes.
Wenn Sie eine andere RAID-Konfiguration oder die DriveStation als einzelne Festplatte bevorzugen, können Sie das RAID-Dienstprogramm verwenden, um die RAID-Einstellungen der DriveStation zu ändern. Anweisungen zur Verwendung der RAID Utility finden Sie auf der nächsten Seite.
Alternativ dazu können Sie den RAID-Modus, wie im Referenzhandbuch beschrieben, mit der RAID-Modus-Taste ändern.
Die DriveStation ist werkseitig mit FAT32 formatiert, sodass sie mit den gängigsten Betriebssystemen verwendet werden kann. Formatieren Sie die DriveStation auf NTFS oder Mac OS Extended um, wenn Sie das Gerät mit Programmen verwenden, die deren Dateien über 4 GB groß sind (z. B. Sicherungssoftware).
Standardmäßig sind alle Laufwerke der DriveStation in Partitionen von 2 TB aufgeteilt. So können die Laufwerke ohne zusätzliche Software oder Service Packs von älteren Windows-Versionen wie Windows XP mit 32 Bit und Windows Server 2003 gelesen werden. Benutzer neuerer Betriebssysteme möchten die DriveStation möglichweise mit größeren Partitionen neu partitionieren. Dies wird für Windows XP in der 32-Bit-Version jedoch nicht empfohlen. Windows Server 2003 ist nach dem Installieren des neuesten Service Pack möglicherweise in der Lage, größere Partitionen zu lesen.
5

Verwenden der RAID Utility
Das RAID-Dienstprogramm ermöglicht das Konfigurieren der DriveStation Duo in verschiedenen Modi:
Normal mode (Normalmodus ): Das Gerät wird vom Computer als zwei getrennte Festplatten erkannt. Beachten Sie, dass der Normalmodus nur mit einer USB-Verbindung funktioniert.
Spanning mode (Verbundmodus) -Auf Ihrem Computer wird eine große Festplatte angezeigt.
RAID 0 mode (RAID 0-Modus) - Auf Ihrem Computer wird ein einzelnes Laufwerk angezeigt. Dieser Modus bietet eine bessere Leistung als der Verbundmodus.
RAID 1 mode (RAID 1-Modus): Auf Ihrem Computer wird ein einzelnes Laufwerk angezeigt. Das zweite Laufwerk ist eine exakte Kopie des ersten Laufwerks zu Redundanzzwecken.
Hinweise:
Durch Ändern des Modus der Duo-Laufwerke werden alle vorhandenen Daten gelöscht! Sichern Sie daher alle wichtigen Daten, bevor Sie die RAID Utility verwenden.
Auf einem PC können Sie die RAID-Utility entweder über das Startmenü starten oder indem
Sie in der DriveStation Duo-Programmgruppe auf [RAIDUtility] klicken.
Auf einem Mac doppelklicken Sie auf das Symbol RaidUtility auf Ihrem Desktop.
6
Verwenden der RAID Utility
Nach dem Starten führt das RAID-Dienstprogramm einen Scanvorgang für die DriveStation Duo durch. Dieser Vorgang kann einige Sekunden dauern.
Auf dem Startbildschirm wird Ihre aktuelle Konfiguration angezeigt. Wenn die Duo neu ist, liegt das Gerät vermutlich im RAID 1-Modus vor.
Klicken Sie zum Ändern des RAID-Modus auf [Config (Konfigurieren)] und wählen Sie [Disk Config (Datenträger konfigurieren)].
7

Verwenden der RAID Utility
Wählen Sie die Laufwerksstruktur aus, die Sie verwenden möchten.
Auf einem PC kann der Datenträger mit FAT32 oder NTFS formatiert werden. Wählen Sie das gewünschte Format aus. FAT32 ist mit den meisten Windows-PCs und MacComputern kompatibel. NTFS bietet unter Windows die beste Leistung, ist jedoch nicht kompatibel mit Mac. NTFS wird für Sicherungen, Videobearbeitung und andere Programme empfohlen, die Dateien mit einer Größe von über 4 GB verwenden.
Wenn Sie Windows XP oder Windows Server 2003 ohne SP1 oder höher verwenden, verwenden Sie den Kompatabilitätsmodus. Der Kompatabilitätsmodus teilt die Festplatten in Partitionen mit 2 TB auf, die sowohl von Windows XP als auch Windows Server 2003 gelesen werden können.
Klicken Sie auf [Yes (Ja)] und erneut auf [Yes (Ja)]. Mit diesem Vorgang werden alle Daten auf dem Laufwerk gelöscht.
8

Verwenden der RAID Utility
Windows-Nutzer
Die folgende Nachricht wird möglicherweise angezeigt, wenn Sie mit dem RAID-Verwaltungsdienstprogramm die Laufwerkskonfiguration ändern möchten (z. B. durch die Auswahl des NTFS-Formats).
Wenn diese Nachricht angezeigt wird, warten Sie, bis die Änderungen an der Laufwerkskonfiguration abgeschlossen wurden und „The setting was successfully changed“ (Die Einstellung wurde erfolgreich geändert) angezeigt wird. Klicken Sie anschließend auf [Cancel (Abbrechen)]. Das Laufwerk kann nun verwendet werden.
Wenn Sie in der oben angezeigten Nachricht unbeabsichtigt auf [Format disk (Laufwerk formatieren)] klicken, wird eine der folgenden Meldungen angezeigt:
•Wenn „You do not have sufficient rights to perform this operation“ (Sie verfügen nicht über ausreichend Rechte, um diese Operation auszuführen) angezeigt wird, klicken Sie auf [OK].
•Wenn „Not Formattable“ (Nicht formatierbar) angezeigt wird, klicken Sie auf [Close (Schließen)].
•Wenn der Windows-Standardbildschirm angezeigt wird, klicken Sie auf [Close (Schließen)].
Hinweis: Wenn das Laufwerk mit dem WindowsFormatierungsprogramm formatiert wurde, werden Änderungen an der Laufwerkskonfiguration möglicherweise nicht erfolgreich abgeschlossen. Wenn dies der Fall ist, verwenden Sie das RAID-Verwaltungsdienstprogramm, um die Laufwerkskonfiguration erneut festzulegen.
9
Sonstige Dienstprogramme (nur Windows)
Die DriveStation Duo umfasst verschiedene optionale dienstprogramme, die mit Windows-Computern verwendet werden können. Legen Sie zum Installieren und Verwenden dieser Dienstprogramme die CD-ROM in einen Windows-PC ein, die mit der DriveStation Duo mitgeliefert wurde.
Klicken Sie auf [Begin Installation (Installation starten)] und dann auf [Additional Software Installation (Installation von zusätzlicher Software)].
Mit TurboPC kann die Geschwindigkeit von Datenübertragungen für das BuffaloProdukt verbessert werden.
TurboCopy steigert durch Zwischenspeicherung die Geschwindigkeit von
Datenübertragungen.
Backup Utility ist eine Software zum Sichern und Wiederherstellen von Daten auf Ihrem PC. Wählen Sie zum Verwenden dieser Software ein zu sicherndes Quelllaufwerk sowie ein Zielverzeichnis für die Sicherungsdaten aus.
RAMDISK Utility verwendet den Speicher Ihres Computer als virtuelle Festplatte („RAM-Laufwerk“). Das RAM-Laufwerk wird vom Computer als Festplatte erkannt, und Sie können darauf Datenleseund Datenschreibvorgänge wie auf jeder anderen Festplatte ausführen.
Mit Buffalo Tools Launcher können Sie auf einfache Weise Software aus der BuffaloSuite von Dienstprogrammen aufrufen. Klicken Sie einfach auf ein Symbol, um das gewünschte Buffalo-Tool bzw. -Dienstprogramm zu starten.
Mit eco Manager können Sie DriveStation zum Strom sparen in den Energiesparmodus versetzen. Dies funktioniert in den Modi „RAID 0“, „RAID 1“ und „Spanning“. Der Normalmodus wird nicht unterstützt.
SecureLockMobile verschlüsselt die Daten auf der DriveStation und verhindert, dass unbefugte Personen auf die Daten zugreifen können.
NovaBACKUP ist Sicherungssoftware.
Um weitere Informationen zum Installieren und Verwenden dieser Dienstprogramme zu erhalten, klicken Sie auf [View User Manual (Benutzerhandbuch anzeigen)].
10

Festplattenaustausch
Vorsicht:
Heben Sie die DriveStation Duo nicht an der Frontabdeckung an, da sich diese lösen könnte.
Berühren Sie vor dem Entfernen der Festplatte ein metallisches Objekt, um die statische Elektrizität Ihres Körpers abzuleiten. Alternativ können Sie ein Armband zur elektrostatischen Entladung tragen.
Gehen Sie vorsichtig vor! Einige der Metallkanten in der DriveStation Duo sind scharfkantig.
Durch unsachgemäße Handhabung hervorgerufene Schäden an der DriveStation Duo werden nicht von der Garantie abgedeckt.
Vertauschen Sie die beiden Laufwerke nicht, das sonst Ihre Daten verlorengehen können.
Ersatzlaufwerke sollten die gleiche oder eine höhere Kapazität aufweisen als das ersetzte Laufwerk.
Verwenden Sie keine Festplatte als Ersatzlaufwerk, die bereits in einer DriveStation Duo verwendet wurde. Entfernen Sie zuvor alle darauf vorhandenen Partitionen, da die Rekonstruktion sonst nicht ordnungsgemäß ausgeführt wird.
Ersatzlaufwerke erhalten Sie unter www.buffalotech.com.
Das Ersetzen eines Laufwerks kann je nach der Leistung des Ersatzlaufwerks zu niedrigeren Übertragungsgeschwindigkeiten der DriveStation Duo führen.
11

|
|
|
|
Festplattenaustausch |
1 |
|
|
|
Fahren Sie die DriveStation herunter |
|
|
|
|
und trennen Sie alle Kabel. |
|
|
|
|
|
|
|
|
|
|
|
|
|
|
|
|
|
|
|
|
▲AUTO ▼OFF
2
Ziehen Sie die Frontabdeckung nach vorne, während Sie vorsichtig auf die Aussparung auf der linken Seite drücken.
3 |
Entfernen Sie die Frontabdeckung. |
12

4
5
6
|
Festplattenaustausch |
RiegelTab |
Drücken Sie auf die Entriegelung |
|
unterhalb der Festplatte und |
|
ziehen Sie die Schlaufe über dem |
|
Laufwerk 2 cm heraus. |
TasteKnob
Nehmen Sie die fehlerhafte
Festplatte heraus.
Setzen Sie die neue Festplatte so ein, dass Sie ein Klicken hören.
13
 Loading...