


 Loading...
DriveStation with Encryption
HD-LXU3
User Manual
Layout............................................................................. |
2 |
Recommended Usage............................................. |
3 |
Encryption Installation and Setup (Windows PCs only)... |
6 |
Forgot your password?................................... |
11 |
Optional Software (Windows PCs only)................... |
13 |
Specifications................................................... |
15 |
1
2
3
4
5
6
35012220 ver.01

Table of Contents
1
2
Layout....................................................... |
2 |
Components..................................................................................... |
2 |
Recommended Usage................................ |
3 |
Warning........................................................................................... |
3 |
Locking the drive.............................................................................. |
5 |
3EncryptionInstallationandSetup(WindowsPCsonly)...6
4
5
Authentication procedure for encrypted HDD............................... |
10 |
Forgot your password?............................ |
11 |
Reset to factory defaults................................................................ |
11 |
Optional Software (Windows PCs only)... |
13 |
Installing software......................................................................... |
13 |
Optional Software.......................................................................... |
14 |
Buffalo Tools............................................................................................................ |
14 |
TurboPC EX.......................................................................................................... |
14 |
Backup Utility...................................................................................................... |
14 |
RAMDISK Utility.................................................................................................. |
14 |
Buffalo Tools launcher...................................................................................... |
14 |
Secure Lock Manager Easy.................................................................................... |
14 |
eco Manager for HD............................................................................................... |
14 |
DiskFormatterLite .................................................................................................. |
14 |
Picasa ........................................................................................................................ |
14 |
Google Chrome ...................................................................................................... |
14 |
6 |
Specifications.......................................... |
15 |
Specifications................................................................................. |
15 |

1 LayoutThe following section describes the parts of your DriveStation.
Components
Power/Access LED
|
|
|
Normal mode |
Encrypted mode |
normal |
|
Blue/Green |
- |
|
|
|
|||
Power On |
Locked |
|
- |
Red |
|
Authenticated |
- |
Blue/Green |
|
Access |
|
Blinking (Blue/Green) |
||
Power Off |
|
|
Off |
|
* “Blue” for USB 3.0 “Green” for USB 2.0 or 1.1
|
USB |
|
Security Slot |
||
|
||
Power Connector |
||
|
||
|
2HD-LXU3 User Manual
2 Recommended Usage
Warning
To avoid damage to data, follow these precautions:
•Never configure this unit as a destination for virtual memory.
•Never do any of the following while the data LED is blinking: Unplug the USB or power cable
Turn off your computer
Put your computer into standby, hibernate, or sleep mode Log off, log on, or switch users
●Some computers may display a delayed write when they return from an energy-saving state. If this happens, unplug the unit before putting your computer into the energy-saving mode.
●If the power/access/lock LED does not turn off when you turn off your computer, unplug the
USB cable from the DriveStation. Your data is not protected by encryption until the power/ access/lock LED turns off.
●Encryption is disabled by default. To protect your data with encryption, enable encrypted mode and configure a password.
●Keep your password in a safe place. If you forget your password, you will not be able to access data stored on the drive in encrypted mode.
●Encryption is not supported with Mac. To use this device with a Mac, do not enable Encryption.
●Please keep your password safe. Don’t give out your password to anyone.
●The first time you connect this unit, it may take about 20 seconds before the power/access
LED turns on.
●If your DriveStation is not detected, disconnect and then reconnect it.
Enter your password if encryption is enabled.
Even if the DriveStation icon is displayed in My Computer, you may not be able to access the DriveStation if the following things are true:
Secure Lock Manager Easy is not installedEncryption is activated and a password set
Your computer has gone into standby or hibernation mode If this happens, disconnect and then reconnect the DriveStation.
● If you use this unit with multiple partitions, format each partition before use.
HD-LXU3 User Manual 3

●When Mac OS is booted while the DriveStation is connected, the computer may not recognize it. If this happens, unplug the USB cable for a few seconds and then plug it in again.
●Some computers may not boot Windows while this unit is connected. If this happens, leave the
DriveStation disconnected until after the computer has booted. Consult your computer's manual for instructions on changing the BIOS settings to boot from an internal hard drive if you want to be able to turn on or off your computer while this unit is connected.
●The DriveStation supports hot-plugging. You can plug or unplug the USB cable while the DriveStation and your PC are on. However, never unplug the cable while the Power/ Access/Lock LED is blinking, as data is being accessed. If you unplug the DriveStation while the Power/Access/Lock LED is blinking, your data may be damaged or lost.
●Refer to the manuals for your computer and peripheral devices.
●Do not boot your operating system from the DriveStation.
●Do not lean any object against this unit. It may cause the unit to malfunction.
●If the DriveStation is connected to a USB 2.0 / 1.1 plug, Windows will display a message that a high-speed USB device is connected to a non high-speed USB hub. Move the DriveStation to a
USB 3.0 port for best performance, or click [X] to continue.
●You may hear some noise while the DriveStation is working, especially while it’s booting or being accessed. This is normal.
●After installing the driver for the DriveStation, several devices are added to Device Manager.
Display [Device Manager] by following the instructions below:
Windows 7/Vista Click [Start], right-click [Computer], and click [Manage]. When "A program needs your permission to continue" is displayed, click [Continue] and click [Device Manager].
Windows XP Click [Start] and right-click [My Computer]. Click [Manage] and then [Device Manager].
Device |
Device Name inDevice Manager |
|
Universal Serial Bus |
USB Mass Storage Device |
|
controllers |
||
|
||
Disk drives |
BUFFALO HD-LXU3 USB Device |
|
DVD/CD-ROM Drive |
BUFFALO Virtual Cdrom USB Device |
4HD-LXU3 User Manual

Locking the drive
In encrypted mode, the DriveStation will be locked in the following situations.
|
Windows 7/Vista/XP |
Mac OS |
|
Shutting down |
V |
|
|
Reboot |
V |
|
|
Unplug this unit |
V |
Encrypted mode |
|
Standby |
V |
||
is not supported |
|||
Hibernate |
V |
||
|
|||
Logging off |
- |
|
|
Switching user |
- |
|
|
V: Will be locked. |
|
|
|
- : Will not be locked |
|
|
*The DriveStation doesn’t lock when you log off or switch users.
Unplug the DriveStation to lock it.
*Encrypted mode is not supported with Mac OS and windows Server.
HD-LXU3 User Manual 5
3Encryption Installation and Setup (Windows PCs only)
This process will encrypt your hard drive (HDD).
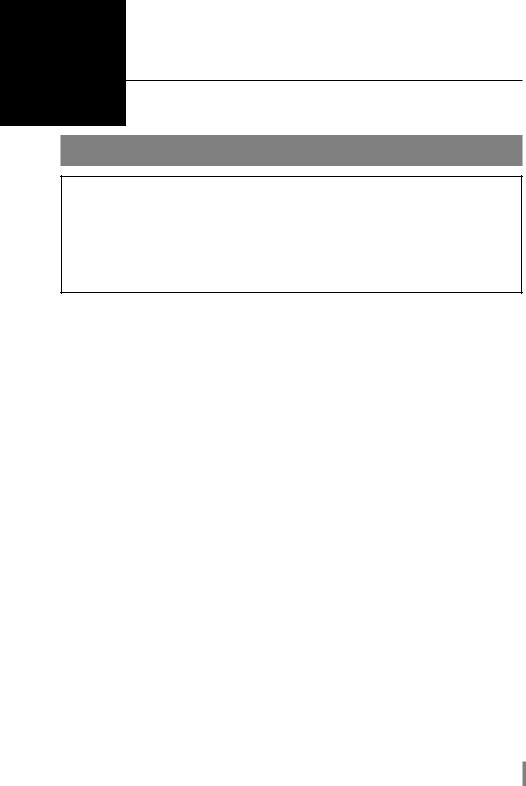
1Connect the HDD and double-click [HD-LXU3] from Windows Explorer. If the HDD is automatically detected by Windows, click [Open folder to view files].
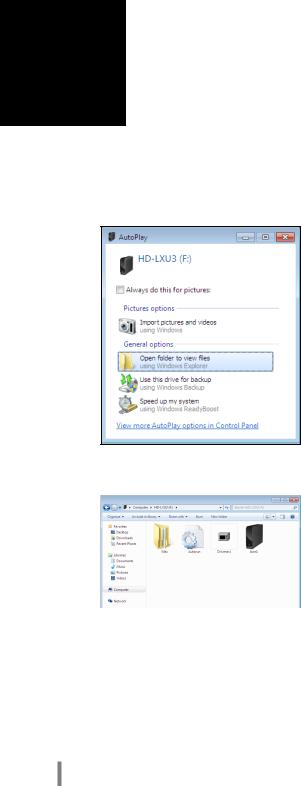
2A window is opened that displays the contents of the HDD. Click [Drivenavi].
6HD-LXU3 User Manual

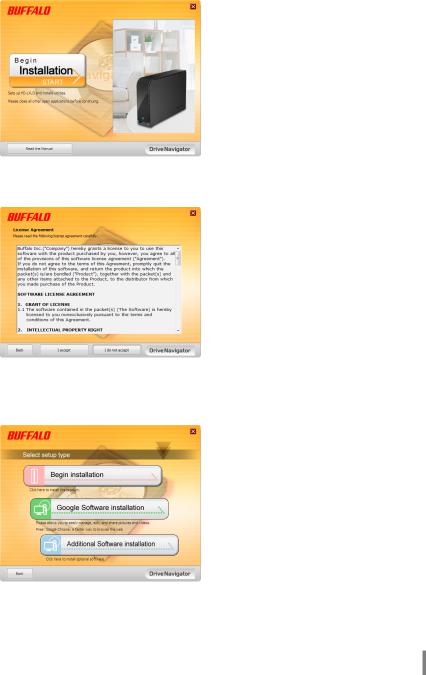
3The compressed file is extracted, and DriveNavigator opens. Click [Begin Installation].
4The License Agreement is displayed. Click [I accept].
5Under Select setup type, click [Begin installation].
HD-LXU3 User Manual 7
6
7
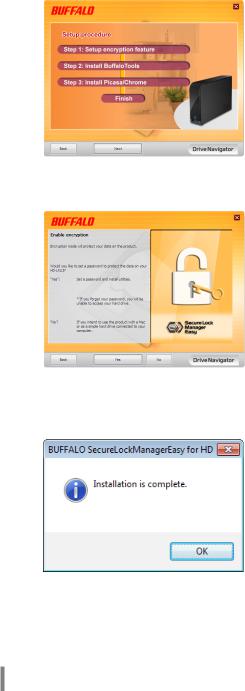
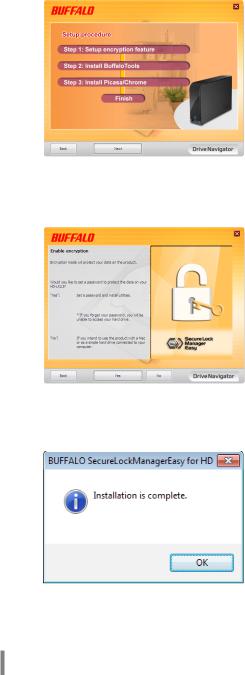
When Setup procedure is displayed, click [Next].
To enable encryption, click [Yes] for Enable encryption.
8The required files are copied. When “Installation is complete” is displayed, click [OK].
8HD-LXU3 User Manual
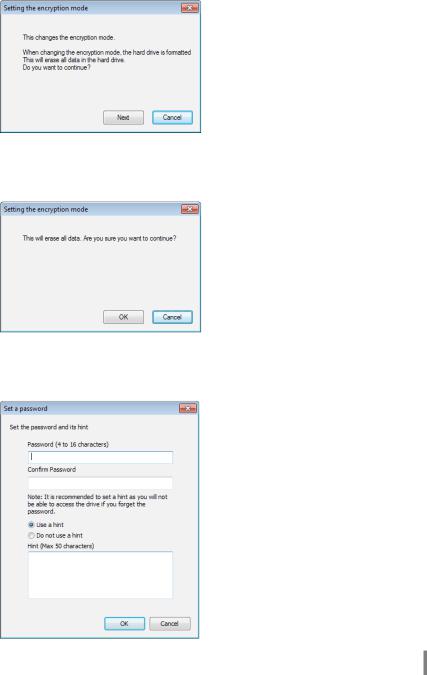
9When the Setting the encryption mode window is displayed, confirm the information in the message, and click [Next].
10 After confirming, the message “This will erase all data. Are you sure you want to continue?” is displayed. If you want to proceed, click [OK].
11 In Set a Password, enter the desired password. You can also include a password hint. When finished, click [OK].
HD-LXU3 User Manual 9
12 When the Completed window is displayed, the password is set. Click [OK].
13 Next, you can install “BUFFALO Tools” and other software including a wide array of convenient features. Install by following the on-screen instructions.
Authentication procedure for encrypted HDD
An encrypted HDD is recognized by the computer as a virtual CD at startup. When you attempt to access it, a window is displayed asking for the preset password.
If using the encrypted HDD on a PC where Secure Lock Manager Easy is not installed, run the
Password.exe file from the virtual CD to authenticate.
10 HD-LXU3 User Manual
4 Forgot your password?
If your DriveStation is in encrypted mode and you forget the password, follow the procedure below to reset the unit back to it’s default settings.
Note: A Windows computer is required to reset this drive. The Secure Lock Manager Easy software does not support Mac OS.
Reset to factory defaults
Restoring your drive to factory defaults will erase all data and passwords on the drive. To access data on an encrypted drive, you must enter the correct password.
After resetting to factory defaults, the drive will be formatted in NTFS. If you want to be able to use Mac OS, reformat the drive with Mac OS extended after resetting to factory defaults.
1Connect the drive to your computer.
If the password authentication screen is displayed, enter your password.
Note: If you forget your password and reset the unit to the factory defaults, close the screen.
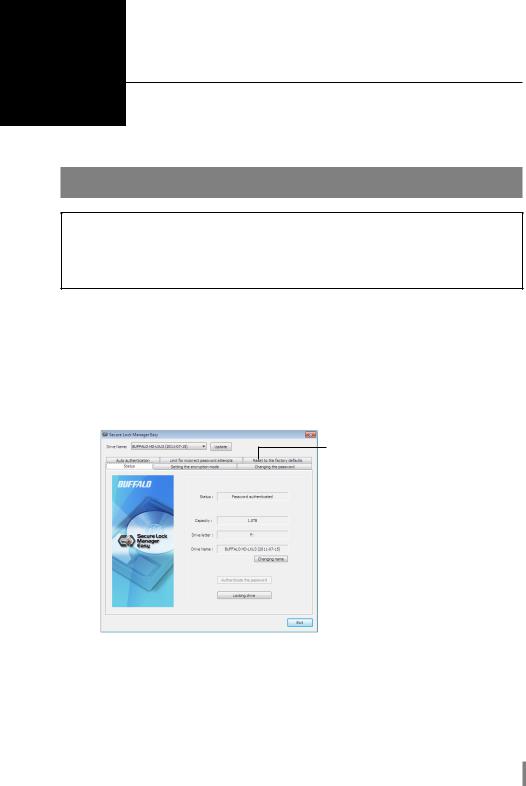
2Click [Start] - [(All) Programs] - [BUFFALO] - [SecureLockManagerEasy] - [SecureLockManagerEasy].
3
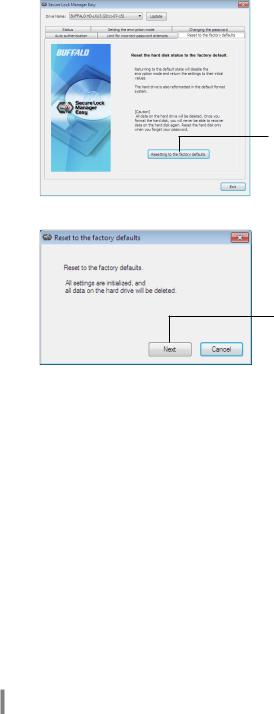
Click [Reset to the factory defaults].
HD-LXU3 User Manual 11
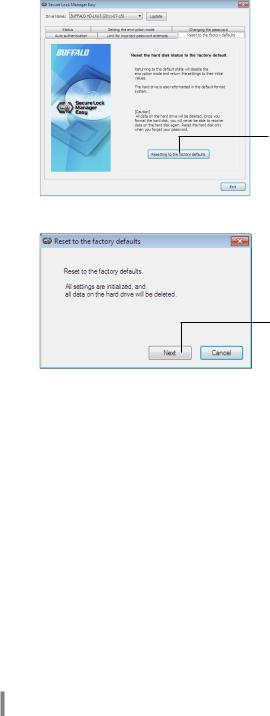
4
Reset to the factory defaults. Delete the password and all data that have been saved.
* The hard drive is formatted in NTFS and the encryption mode will be released.
5
Click [Next]
All data saved on the hard drive will be erased! You will not be able to undo this.
6When "The hard disk status is now reset to the factory defaults." is displayed, click [OK].
The reset is now complete. Wait until the hard drive is recognized. If it is not recognized, unplug the hard drive and reconnect it.
12 HD-LXU3 User Manual

5Optional Software (Windows PCs only)
The DriveStation includes several optional software packages for use with Windows computers. This software is not required to use the DriveStation; it is strictly optional. Although the DriveStation works perfectly with Mac OS X, no Mac software is included.
Installing software
To install optional software on your Windows computer, follow the steps below.
1Connect the DriveStation to your computer.
If encryption is enabled on your DriveStation, please enter the password.
2Right-click on [HD-LXU3] in My Computer and select [Open].
3Double-click on [DriveNavi.exe].
The DriveNavigator wizard will launch. If “A program needs your permission to continue” is displayed, click [Continue].
4
5
6
7
Click [Begin Installation].
The License Agreement will open. Click [I accept].
Click [Additional Software Installation].
Select the target software and click [Install].
The wizard will guide you through installation.
HD-LXU3 User Manual 13

Optional Software
Buffalo Tools
TurboPC EX
TurboPC EX can increase data transfer speeds for your Buffalo product.
Backup Utility
Backup Utility is software to back up and restore data from your PC. To use, select a source drive to be backed up and a target location for backup data.
RAMDISK Utility
This software uses the memory in your computer as a virtual hard drive "RAMDISK". The RAMDISK is recognized as a hard drive by your computer and you can read and write data to it like any other hard drive.
Buffalo Tools launcher
Buffalo Tools Launcher lets you easily launch software from the Buffalo utility suite. Just click an icon to launch the desired Buffalo tool or utility.
Secure Lock Manager Easy
This software controls the DriveStation's encryption features. Use it to enable encryption, set the password, configure auto-authentication, etc. Encryption is not enabled by default.
eco Manager for HD
eco Manager for HD lets you put the DriveStation into "sleep" mode to save power.
DiskFormatterLite
DiskFormatterLite is a software program that enables easy formatting of USB-connected hard drives.
Picasa
Picasa organizes and edits digital photos.
Note: An Internet connection is required to share digital photos or send photos via e-mail.
Google Chrome
Google Chrome is a web browser.
14 HD-LXU3 User Manual

6 Specifications
Specifications
Check Buffalo's website (www.buffalotech.com) for information about the latest products or compatible models.
Interface |
USB 3.0 |
Connector |
USB 3.0 Standard-B |
Transfer speed (Logical value) |
5 Gbps Maximum*1 |
Factory default format |
1 NTFS partition |
|
Encryption disabled |
External dimensions |
39 (W) x 189 (D) x 123 (H) mm |
|
(excluding protruding parts) |
Power Consumption |
18 W (Max) |
Power |
AC 100 - 240 V 50/60 Hz |
Compatible OS |
Windows XP (32-bit) |
|
Windows Vista (32-bit or 64-bit) |
|
Windows 7 (32-bit or 64-bit) |
|
Mac OS X 10.5 or later (models with Intel Processor)*2 |
*1 Connect the DriveStation to a USB 3.0 port for best transfer speeds. The DriveStation will function when connected to a USB 2.0 / 1.1 port, but data transfer will be much slower.
*2 With Mac OS X and Windows Server, encryption mode is not supported.
HD-LXU3 User Manual 15

DriveStation mit Verschlüsselung
HD-LXU3
Bedienungsanleitung
Aufbau............................................................... |
2 |
1 |
|
|
|
|
|
Empfohlene Verwendung........................... |
3 |
2 |
|
Verschlüsselungsinstallation und - |
|
|
|
|
3 |
||
einrichtung (nur Windows-Computer).... |
6 |
||
|
|
|
|
Passwort vergessen?................................... |
11 |
4 |
|
Optionale Software |
|
|
|
|
5 |
||
(nur Windows-Computer).......................... |
13 |
||
|
|
|
|
Spezifikationen............................................. |
15 |
6 |
|

Inhaltsverzeichnis
1
2
Aufbau......................................................... |
2 |
Bauteile.................................................................................................. |
2 |
Empfohlene Verwendung.......................... |
3 |
Warnung................................................................................................ |
3 |
Sperren des Laufwerks......................................................................... |
5 |
3 |
Verschlüsselungsinstallation und - |
|
|
einrichtung (nur Windows-Computer)........... |
6 |
|
Authentifizierungsverfahren für verschlüsselte Festplatten............. |
10 |
4 |
Passwort vergessen?................................ |
11 |
|
Rücksetzung auf die werkseitigen Standardeinstellungen............ |
11 |
5 |
Optionale Software |
|
|
(nur Windows-Computer)......................... |
13 |
|
Installieren der Software.................................................................... |
13 |
|
Optionale Software............................................................................. |
14 |
|
Buffalo Tools.......................................................................................................................... |
14 |
|
TurboPC EX........................................................................................................................ |
14 |
|
Backup Utility................................................................................................................... |
14 |
|
RAMDISK Utility............................................................................................................... |
14 |
|
Buffalo Tools launcher................................................................................................... |
14 |
|
Secure Lock Manager Easy............................................................................................... |
14 |
|
eco Manager for HD............................................................................................................ |
14 |
|
DiskFormatterLite................................................................................................................ |
14 |
|
Picasa........................................................................................................................................ |
14 |
|
Google Chrome.................................................................................................................... |
14 |
6 |
Spezifikationen......................................... |
15 |
Spezifikationen................................................................................... |
15 |

1 AufbauIm folgenden Abschnitt werden die Bauteile Ihrer DriveStation beschrieben.
Bauteile
Power LED/LED für die Zugriffsanzeige
|
|
Normalmodus |
Verschlüsselter |
|
|
Modus |
|
|
Normal |
Blau/Grün |
- |
Strom |
Gesperrt |
- |
Rot |
eingeschaltet |
Authentifiziert |
- |
Blau/Grün |
Zugriff |
Blinkend (Blau/Grün) |
||
Strom |
|
Aus |
|
ausgeschaltet |
|
|
|
|
|
|
|
|
|
* “Blau” für USB 3.0 |
|
|
|
“Grün” für USB 2.0 oder 1.1 |
|
|
USB |
|
Sicherheitsschlitz |
||
|
||
Stromanschluss |
||
|
||
|
2 HD-LXU3-Serie Bedienungsanleitung

2 Empfohlene Verwendung
Warnung
Um Schäden an Daten zu vermeiden, beachten Sie folgende
Vorsichtsmaßnahmen:
•Konfigurieren Sie dieses Gerät unter keinen Umständen als Ziel für virtuellen Speicher.
•Führen Sie unter keinen Umständen einen der folgenden Vorgänge aus, während die Daten-LED blinkt:
Trennen des USB-Kabels und Netzkabels Ausschalten des Computers
Versetzen des Computers in einen energiesparenden Zustand (Bereitschafts-, Ruheoder Energiesparmodus)
Abmelden, Anmelden oder Benutzerwechsel
●Bei manchen Computern wird beim Umschalten aus einem energiesparenden Modus möglicherweise ein verzögerter Schreibvorgang angezeigt. Entfernen Sie in diesem Fall das Gerät, bevor Sie Ihren Computer in den Energiesparmodus versetzen.
●Wenn die Status/Zugriff/Sperre-LED nicht erlischt, nachdem Sie Ihren Computer heruntergefahren haben, dann stecken Sie das USB-Kabel von der DriveStation ab. Ihre Daten werden nicht durch die Verschlüsselung geschützt, bis die Status/Zugriff/Sperre-LED erlischt.
●Der Verschlüsselungsmodus ist standardmäßig deaktiviert. Um Ihre Daten durch Verschlüsselung zu schützen, aktivieren Sie den Verschlüsselungsmodus und konfigurieren Sie ein Passwort.
●Bewahren Sie Ihr Passwort an einem sicheren Ort auf. Wenn Sie Ihr Passwort vergessen, ist kein Zugriff auf Daten möglich, die im Verschlüsselungsmodus auf dem Laufwerk gespeichert wurden.
●Der Verschlüsselungsmodus wird von Mac nicht unterstützt. Damit dieses Gerät mit einem Mac verwendet werden kann, darf der Verschlüsselungsmodus nicht aktiviert sein.
●Bewahren Sie Ihr Passwort bitte sicher auf. Teilen Sie Ihr Passwort niemandem mit.
●Beim ersten Anschließen des Geräts kann es ca. 20 Sekunden dauern, bis die Stromversorgungs/ Zugriffs-LED aufleuchtet.
●Wenn Ihre DriveStation nicht erkannt wird, dann trennen Sie sie und schließen Sie sie wieder an.
Geben Sie das Kennwort ein, wenn die Verschlüsselung aktiviert ist.
Auch wenn das DriveStation-Symbol unter “Arbeitsplatz” bzw. “Computer” angezeigt wird, können Sie möglicherweise nicht darauf zugreifen, wenn:
Secure Lock Manager Easy nicht installiert ist
die Verschlüsselung aktiviert und ein Kennwort festgelegt wurde odersich Ihr Computer im Ruhezustand oder Standby-Modus befindet
Sollte dieser Fall eintreten, dann trennen Sie die DriveStation und schließen Sie sie wieder an.
HD-LXU3-Serie Bedienungsanleitung |
3 |
|
|
●Wenn Sie dieses Gerät mit mehreren Partitionen verwenden, formatieren Sie jedes Volume vor dessen Verwendung.
●Wird Mac OS bei angeschlossener DriveStation gestartet, wird das Gerät möglicherweise nicht erkannt. Ziehen Sie in diesem Fall das USB-Kabel einige Sekunden lang ab und schließen Sie es dann wieder an.
●Bei manchen Computern kann Windows bei angeschlossenem Gerät nicht gestartet werden. Schließen Sie die DriveStation in diesem Fall erst nach dem Starten des Computers an. Anweisungen zum Ändern der BIOS-Einstellungen, um von einer internen Festplatte zu starten, entnehmen Sie dem Handbuch Ihres Computers, wenn Sie Ihren Computer bei angeschlossenem Gerät einoder ausschalten möchten.
●Die DriveStation unterstützt Hot-Plug. Sie können das USB-Kabel bei eingeschalteter DriveStation und eingeschaltetem PC abziehen oder anschließen. Achten Sie jedoch unbedingt darauf, das Kabel nicht zu trennen, während die Status/Zugriff/Sperre-LED blinkt, da dies bedeutet, dass auf Daten zugegriffen wird. Wenn Sie die DriveStation trennen, während die Status/Zugriff/Sperre-LED blinkt, führt dies möglicherweise zur Beschädigung und zum Verlust von Daten.
●Informationen sind den Handbüchern zu Ihrem Computer und Ihren Peripheriegeräten zu entnehmen.
●Starten Sie Ihr Betriebssystem nicht von der DriveStation aus.
●Lehnen Sie keine Gegenstände an dieses Gerät. Dies kann zur Fehlfunktion des Geräts führen.
●Ist die DriveStation mit einem USB-Anschluss 2.0 / 1.1 verbunden, zeigt Windows möglicherweise eine Meldung an, dass ein Hochgeschwindigkeits-USB-Gerät an ein Nicht-Hochgeschwindigkeits- USB-Hub angeschlossen wurde. Um eine optimale Leistung zu erzielen, schließen Sie die DriveStation an einen USB-Anschluss 3.0 an oder klicken Sie auf "X", um fortzufahren.
●Wenn die DriveStation arbeitet (besonders beim Start oder bei Zugriff), treten möglicherweise Betriebsgeräusche auf. Dies ist normal.
●Wenn der Treiber für die DriveStation installiert wird, werden verschiedene Geräte zum GeräteManager hinzugefügt.
Um den [Geräte-Manager] aufzurufen, gehen Sie wie folgt vor:
Windows 7/Vista Klicken Sie auf [Start], klicken Sie mit der rechten Maustaste auf [Computer] und klicken Sie auf [Verwalten]. Wird die Meldung "Zur Fortsetzung des Programms ist Ihre Zustimmung erforderlich" angezeigt, klicken Sie auf [Weiter] und anschließend auf [Geräte-Manager].
Windows XP Klicken Sie auf [Start] und klicken Sie mit der rechten Maustaste auf [Arbeitsplatz].
Klicken Sie auf [Verwalten] und anschließend auf [Geräte-Manager].
Gerät |
Geräte-Name im Geräte-Manager |
USB-Controller |
USB-Massenspeichergerät |
Laufwerk |
BUFFALO HD-LXU3 USB-Gerät |
DVD/CD-ROM-Laufwerk |
BUFFALO Virtuelles CD-ROM USB-Gerät |
4 HD-LXU3-Serie Bedienungsanleitung

Sperren des Laufwerks
Die DriveStation wird im Verschlüsselungsmodus in den folgenden Situationen gesperrt.
|
Windows 7/Vista/XP |
Mac OS |
|
Herunterfahren |
V |
|
|
Neustart |
V |
|
|
Entfernen dieses Geräts |
V |
Der Verschlüsselungsmodus wird |
|
Bereitschaftsmodus |
V |
||
nicht unterstützt |
|||
Ruhemodus |
V |
||
|
|||
Abmelden |
- |
|
|
Benutzerwechsel |
- |
|
V: Wird gesperrt
- : Wird nicht gesperrt
*Die DriveStation wird beim Abmelden oder bei Benutzerwechsel nicht gesperrt.
Entfernen Sie die DriveStation, um sie zu sperren.
*Der Verschlüsselungsmodus wird vom Mac OS und Windows Server nicht unterstützt.
HD-LXU3-Serie Bedienungsanleitung |
5 |
|
|

3 Verschlüsselungsinstallation und - einrichtung (nur Windows-Computer)
So verschlüsseln Sie Ihre Festplatte (HDD).
1 Schließen Sie die Festplatte an und doppelkicken Sie im Windows-Explorer auf [HD-LXU3]. Wenn die Festplatte automatisch von Windows erkannt wird, dann klicken Sie auf [Open folder to view files (Ordner öffnen, um Dateien anzuzeigen)].
2 Ein Fenster erscheint, in dem die Inhalte Ihrer Festplatte zu sehen sind. Klicken Sie auf [Drivenavi].
6 HD-LXU3-Serie Bedienungsanleitung
3 Die komprimierte Datei wird extrahiert und DriveNavigator gestartet. Klicken Sie auf [Begin Installation (Installation starten)].
4 Die Lizenzvereinbarung wird angezeigt. Klicken Sie auf [I accept (Ich stimme zu)].
5 Klicken Sie unter Select setup type (Installationsart auswählen) auf [Begin Installation (Einfache Einrichtung)].
HD-LXU3-Serie Bedienungsanleitung 7
6 Wenn Setup procedure (Installationsvorgang) angezeigt wird, dann klicken Sie
auf [Next (Weiter)].
7 Klicken Sie bei Enable encryption (Verschlüsselungsmodus konfigurieren) auf [Yes (Ja)].
8 |
Die erforderlichen Dateien werden kopiert.Wenn “Installation is complete |
|
(Installation ist abgeschlossen)” angezeigt wird, dann klicken Sie auf [OK]. |
8 HD-LXU3-Serie Bedienungsanleitung

9 |
Wenn das Fenster Setting the encryption mode (Verschlüsselungsmodus |
|
einstellen) angezeigt wird, dann bestätigen Sie die Informationen in der Nachricht, |
indem Sie auf [Next (Weiter)] klicken.
10 Nach der Bestätigung erscheint die Nachricht “This will erase all data. Are you sure you want to continue? (Dadurch werden alle Daten gelöscht. Möchten Sie den Vorgang wirklich fortsetzen?)”. Klicken Sie auf [OK], um fortzufahren.
11 Geben im Dialog Set a password (Kennwort festlegen) das gewünschte Kennwort ein. Sie können außerdem einen Kennworthinweis festlegen. Klicken Sie auf [OK], wenn Sie fertig sind.
HD-LXU3-Serie Bedienungsanleitung 9

12 Wenn das Fenster Completed (Abgeschlossen) angezeigt wird, ist das Kennwort festgelegt. Klicken Sie auf [OK].
13 Nun können Sie “BUFFALO Tools” und andere Programme installieren, die eine breite Palette an nützlichen Funktionen bieten. Befolgen Sie dazu die Anweisungen auf dem Bildschirm.
Authentifizierungsverfahren für verschlüsselte
Festplatten
Eine verschlüsselte Festplatte wird vom Computer beim Start als virtuelle CD erkannt. Wenn Sie versuchen, darauf zuzugreifen, erscheint ein Fenster, über das Sie nach dem Standardkennwort gefragt werden.
Führen Sie auf einem Computer, auf dem Secure Lock Manager Easy nicht installiert ist, die Datei Password.exe von der virtuellen CD aus, um die Authentifizierung vorzunehmen.
10 HD-LXU3-Serie Bedienungsanleitung

4 Passwort vergessen?
Befindet sich Ihre DriveStation im Verschlüsselungsmodus und Sie haben Ihr Passwort vergessen, führen Sie nachfolgende Schritte durch, um das Gerät auf die werkseitigen Standardeinstellungen zurückzusetzen.
Hinweis: Für die Rücksetzung dieses Laufwerks wird ein Windows-Computer benötigt. Die Software Secure Lock Manager Easy unterstützt das Mac-Betriebssystem nicht.
Rücksetzung auf die werkseitigen Standardeinstellungen
Durch das Zurücksetzen des Laufwerks auf die Werkseinstellungen werden alle Daten und Kennwörter auf dem Laufwerk gelöscht. Sie müssen das richtige Kennwort eingeben, um auf Daten auf einem verschlüsselten Laufwerk zugreifen zu können.
Nach dem Zurücksetzen auf die Werkseinstellungen ist das Laufwerk mit NTFS formatiert. Wenn Sie Mac OS verwenden möchten, dann formatieren Sie das Laufwerk mit Mac OS Extended, nachdem Sie es auf die Werkseinstellungen zurückgesetzt haben.
1
2
3
Schließen Sie das Laufwerk an Ihren Computer an.
Wird der Bildschirm zur Passwort-Authentifizierung angezeigt, geben Sie Ihr Passwort ein. Hinweis: Haben Sie Ihr Passwort vergessen und setzen Sie das Gerät auf die werkseitigen
Standardeinstellungen zurück, schließen Sie den Bildschirm.
Klicken Sie auf [Start] - [(Alle) Programme] - [BUFFALO] - [SecureLockManagerEasy] - [SecureLockManagerEasy].
Klicken Sie auf [Reset to the factory defaults (Auf Werkseinstellungen zurücksetzen)].
HD-LXU3-Serie Bedienungsanleitung |
11 |
|
|
4
5
6
Rücksetzung auf die werkseitigen
Standardeinstellungen. Löschen des
Passworts und aller gespeicherten Daten.
* Die Festplatte wird mit NTFS formatiert und der Verschlüsselungsmodus wird freigegeben.
Klicken Sie auf [Next (Weiter)].
Alle auf der Festplatte gespeicherten Daten werden gelöscht! Dieser Vorgang kann nicht rückgängig gemacht werden.
Wird die Meldung “The hard disk status is now reset to the factory defaults. (Der Status der Festplatte wurde auf die Werkseinstellungen zurückgesetzt.)” angezeigt, klicken Sie auf [OK].
Die Rücksetzung ist nun abgeschlossen. Warten Sie, bis die Festplatte erkannt wird. Wird sie nicht erkannt, entfernen Sie die Festplatte und schließen Sie sie wieder an.
12 HD-LXU3-Serie Bedienungsanleitung

5 |
Optionale Software |
|
(nur Windows-Computer) |
|
Im Produktumfang der DriveStation befinden sich verschiedene optionale |
|
Softwarepakete für Windows. Diese Software muss nicht installiert werden, um die |
|
|
|
DriveStation zu verwenden. Sie ist komplett optional. Zwar funktioniert die DriveStation |
|
problemlos mit Mac-OS-X-Systemen, allerdings befindet sich im Produktumfang keine |
|
Mac-Software. |
Installieren der Software
Folgen Sie den unten beschriebenen Schritten, um optionale Software auf Ihrem Windows-Computer zu installieren.
1
2
3
Schließen Sie die DriveStation an Ihren Computer an.
Sollte die Verschlüsselung auf Ihrer DriveStation aktiviert sein, so geben Sie das Kennwort ein.
Klicken Sie mit der rechten Maustaste unter Arbeitsplatz auf [HD-LXU3] und wählen Sie [Öffnen].
Doppelklicken Sie auf [DriveNavi.exe].
4
5
6
7
Der DriveNavigator-Assistent startet. Wird die Meldung “Zur Fortsetzung des Programms ist Ihre Zustimmung erforderlich” angezeigt, klicken Sie auf [Weiter].
Klicken Sie auf [Installation starten].
Der Lizenzvertrag wird geöffnet. Klicken Sie auf [Ich stimme zu].
Klicken Sie auf [Installation zusätzlicher Software].
Wählen Sie die Zielsoftware und klicken Sie auf [Installieren].
Der Installationsassistent wird Sie durch die Installation führen.
HD-LXU3-Serie Bedienungsanleitung |
13 |
|
|
Loading...