


Quick Setup Guide
LinkStation Pro

Table of Contents
English.................................................................................................................................. |
2 |
Deutsch ............................................................................................................................. |
12 |
Français.............................................................................................................................. |
22 |
Italiano ............................................................................................................................... |
32 |
Español .............................................................................................................................. |
42 |
Português.......................................................................................................................... |
52 |
Nederlands ....................................................................................................................... |
62 |
Svenska .............................................................................................................................. |
72 |
Norsk................................................................................................................................. |
82 |
Dansk................................................................................................................................. |
92 |
Suomi ............................................................................................................................... |
102 |
1

English
Quick Setup Guide
LinkStation Pro
Package Contents:
 LinkStation
 Ethernet Cable
 Power Cable
 LinkNavigator Installation CD
 Quick Setup Guide
 Warranty Card

Step 1: Connect your Cables
Plug LinkStation’s power cord and Ethernet cable into the back of the LinkStation.
Connect the power plug to a surge protector or power outlet. Plug the other end of the Ethernet cable into a hub, switch, or router on your local network.
3
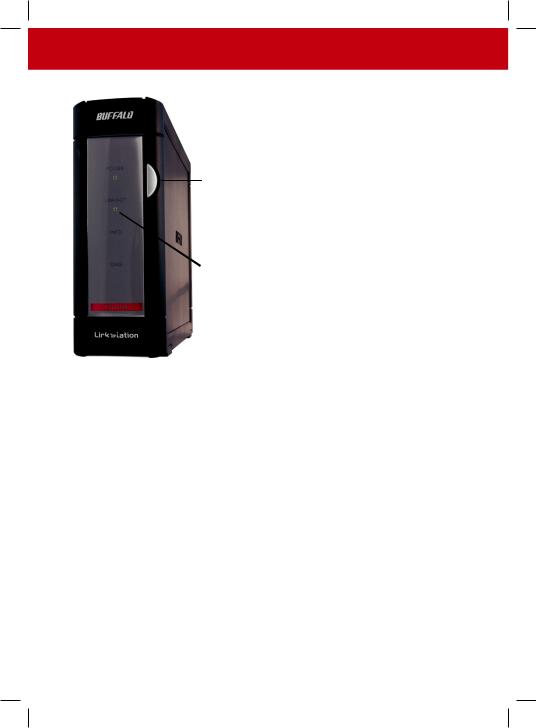
Step 2: Check your Connection
Press the power button on the front panel to turn |
|
your LinkStation on. |
|
Check the LINK/ACT LED on the front of the |
|
LinkStation. If it’s lit, then your LinkStation |
is |
connected properly. |
|
If the LINK/ACT LED on the front of LinkStation is not lit, your LinkStation is not properly connected to your network. Make sure that:
• both LinkStation and the hub, switch, or PC are powered on,
• the Ethernet cable is securely fastened to both devices, and
• the Ethernet cable is not damaged. To verify, try using another Ethernet cable.
If problems persist, contact our technical support.
4

Step 3: Installing Software
Insert the LinkNavigator CD into your computer’s CD-ROM drive. If Setup doesn’t launch automatically, you can launch
it manually by clicking Start, then Run.... When the Run dialog opens, type d:\setup.exe (where “d” is the drive letter of your CD-ROM). Press OK to continue.
If you are installing the software on a Mac, open the cd and click LinkNavigator to begin installation.
Press the Begin Installation button to start.
If you’re installing on a Mac, skip to the next page.
If you’re installing on a PC, click on
Connect this PC to LinkStation
(the green, lower button).
Click Next to step through the installation.
5
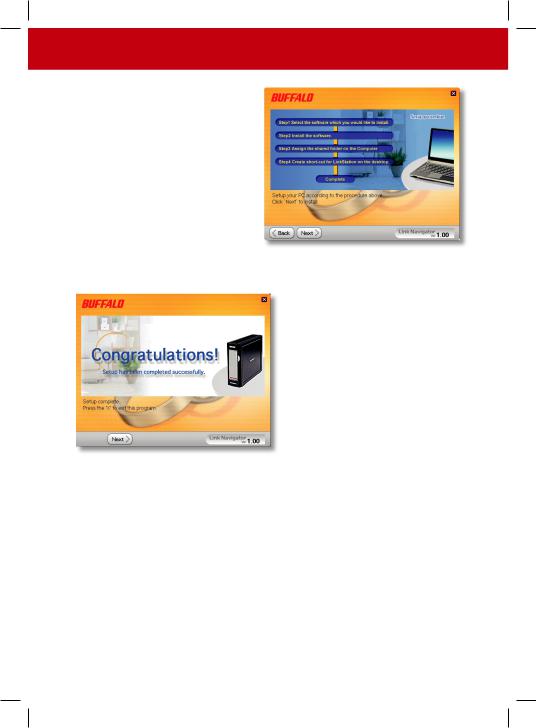
Step 3: Installing Software (Cont’d)
The wizard will now guide you through the installation process.
When installation is complete, you may close the installation window.
Congratulations! Your LinkStation is ready to use.
Please see the LinkStation User Manual on your LinkNavigator CD for more help and configuration options.
6

Using your LinkStation with a Windows PC
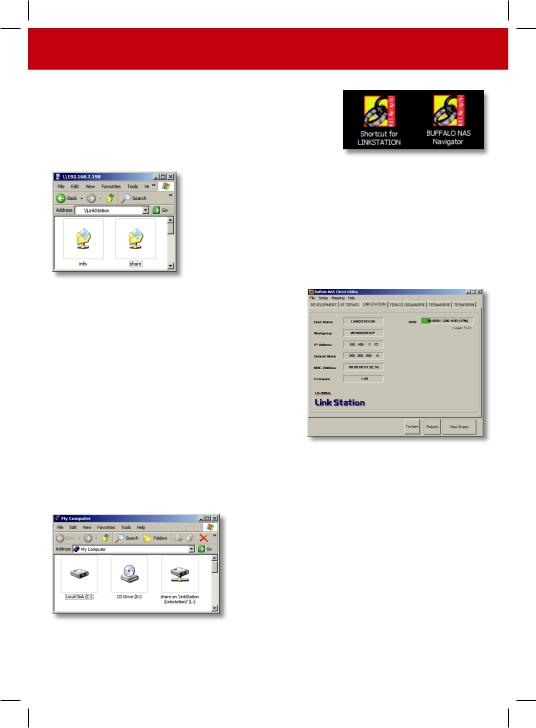
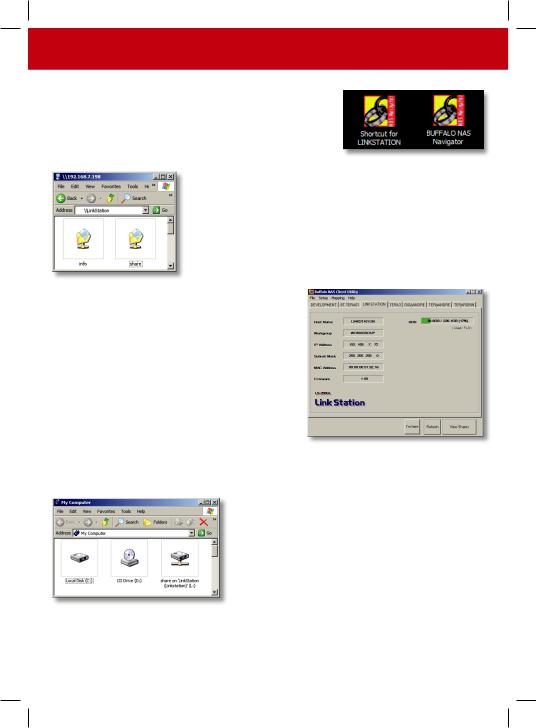
If you’re using a Windows PC, two new icons will be on your desktop: Shortcut for LinkStation and Buffalo NAS Navigator.
The LinkStation shortcut will take you directly to the folders on your LinkStation.
Share is the default location for adding all your files and folders. Info contains a copy of your user manual.
The Buffalo NAS Navigator icon opens the LinkStation’s client utility. This lets you view system information for your LinkStation(s). If you click Setup and choose Confi guration Settings, it will take you to the settings configuration screen, where you may change your LinkStation’s settings. The default logon username is “admin” and the password is “password”. Consult your user manual for more information on the Buffalo NAS Navigator and the Settings Configuration GUI.
Another way to access data on your LinkStation is through the mapped driveletter ‘L’. When the installation program ran, it mapped your LinkStation’s main “share” folder to the ‘L’ drive. Use this virtual hard drive like any other hard drive on your computer. You may add
additional shares and mapped drive letters to your LinkStation and PC; consult your user manual for more information.
7

Using your LinkStation with a Mac
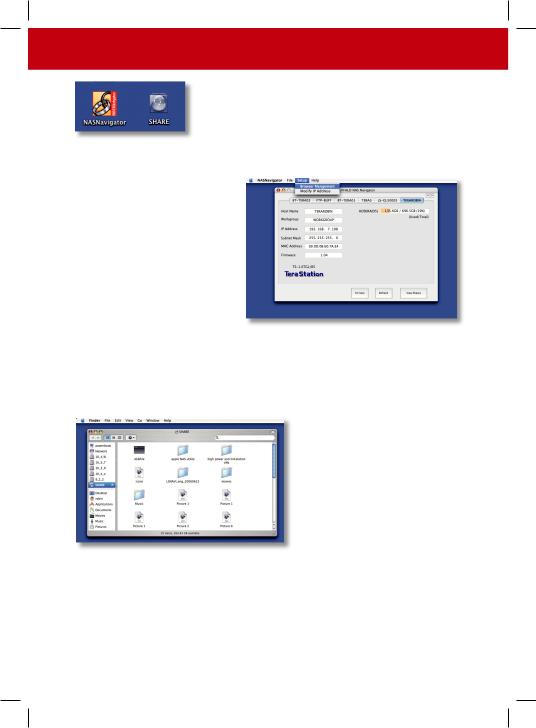
After installing the LinkNavigator software, your
Mac will have two new icons on the desktop.
The Share folder is the default location for adding all your files and folders. NASNavigator is the
LinkStation’s client utility.
Clicking NASNavigator icon opens the LinkStation’s client utility. This lets you view system information for your LinkStation(s). If you click
Setup and choose Browser Management, it will take you to the settings configuration GUI, where you may change your LinkStation’s settings. Until
you change it, the default logon username is “admin” and the password is “password”. Consult your user manual for more information on the Buffalo NAS Navigator and the Settings Configuration GUI.
Clicking Share opens the main folder on the LinkStation. You may add additional shares
to your LinkStation; consult your user manual for more information.
Firmware Language - The default language for the web interface is English.This can be changed on both PC & Mac by selecting the Basic screen, and then choosing your desired language from the Display Language drop down.You will also need to select the corresponding Windows Client Language. Click on Apply to implement your changes.You must log out and log in again to view your changes.
8

Technical Specifi cations
|
|
|
|
|
|
|
|
|
|
||||||||
LAN Standards: |
|||||||||||||||||
|
|
|
|
|
IEEE 802.3u, |
IEEE 802.3ab, |
IEEE 802.3 |
||||||||||
Transmission: |
1000BASE-T: 8B1Q4, PAM5; 100BASE-TX: 4B5B |
||||||||||||||||
|
|
|
|
|
|
MLT-3, MLT-3; 10BASE-T Manchester Coding |
|||||||||||
|
|
|
|
|
|
|
|
|
|
|
|||||||
Access Media: |
|
|
CSMA/CD |
||||||||||||||
Media Interface: |
RJ-45 |
||||||||||||||||
|
|
|
|
|
|
|
|
|
|
|
|
|
|
|
|
|
|
USB Standard: |
USB 2.0 |
||||||||||||||||
|
|
|
|
|
|
Hi-Speed (HS) |
|||||||||||
|
|
|
|
|
|
Full-Speed (FS) |
|||||||||||
|
|
|
|
|
|
Low-Speed (LS) |
|||||||||||
USB Connector: |
USB A Connector (2) |
||||||||||||||||
|
|
|
|
|
|
|
|
|
|
|
|
|
|
|
|
||
Data Transmission Speed: |
|||||||||||||||||
|
Max: 480 Mbps (HS Mode) |
||||||||||||||||
|
|
|
|
|
|
|
|
|
|
|
|
|
|
|
|||
|
|
|
|
|
|
Max: 12 Mbps (FS Mode) |
|||||||||||
Electric Current: |
100-240V A/C |
||||||||||||||||
|
|
|
|
|
|
|
|
|
|
|
|
|
|
||||
Power Consumption: |
|||||||||||||||||
|
|
~21W |
|||||||||||||||
Dimensions: |
60 x 160 x 216 mm. |
||||||||||||||||
|
|
|
|
|
|
|
|
|
|
|
|
|
|
|
|
|
|
Weight: |
1.6 Kg |
||||||||||||||||
Operating Temperature: |
5-35˚ C; 20-80% non-condensing |
||||||||||||||||
Technical Support
Buffalo Technology offers free technical support. See the back page of this quick start guide for contact information. Please also visit the web site at: http://www.buffalo-technology.com.
FCC Warning
This device complies with part 15 of the FCC Rules. Operation is subject to the following two conditions: (1) This device may not cause harmful interference, and (2) this device must accept any interference received, including interference that may cause undesired operation.
CE Mark Warning
This is a Class B product. In a domestic environment, this product may cause radio interference, in which case the user may be required to take adequate measures.
9
Environmental Information
•The equipment that you have purchased has required the extraction and use of natural resources for its production.
•The equipment may contain hazardous substances that could impact health and the environment.
•In order to avoid the dissemination of those substances in our environment and to diminish the pressure on the natural resources, we encourage you to use the appropriate take-back systems.
•The take-back systems will reuse or recycle most of the materials of your end life equipment in a sound way.
• The crossed-out wheeled bin symbol invites you to use those systems.
• If you need more information on the collection, reuse and recycling systems, please contact your local or regional waste administration.
10
http://www.buffalo-technology.com
Address: |
Buffalo Technology UK LTD |
|
|
176, Buckingham Avenue, |
|
|
Slough, Berkshire, SL1 4RD |
|
|
United Kingdom |
|
General Inquiries: |
|
|
sales@buffalo-technology.com |
||
Technical Support: |
|
|
Helpdesk Hours |
Monday-Thursday |
9:00 AM - 6:00 PM |
|
Friday |
9:00 AM - 4:30 PM |
Phone |
+353 61 70 80 50 |
|
Phone (UK only) |
08712 50 12 60 |
|
helpdesk@buffalo-technology.ie |
||
Deutsch
Handbuch für die Schnellinstallation
LinkStation Pro
Packungsinhalt:
 LinkStation
 Ethernet-Kabel
 Netzkabel
 LinkNavigator-Installations-CD
 Handbuch für die Schnellinstallation
 Garantiekarte

Schritt 1:Anschließen der Kabel
Schließen Sie an der Rückseite der LinkStation das zugehörige Netzkabel und das Ethernet-Kabel an.
Schließen Sie das Netzkabel an eine Steckdose oder an einen Überspannungsschutz an. Schließen Sie das andere Ende des Ethernet-Kabels an einen Hub, Switch oder Router im lokalen Netzwerk an.
13

Schritt 2: Überprüfen der Verbindung
Drücken Sie die Ein/Aus-Taste an der Vorderseite, um die LinkStation einzuschalten.
Achten Sie auf die LED LINK/ACT an derVorderseite der LinkStation.Wenn sie leuchtet, ist die LinkStation korrekt verbunden.
Falls die LED LINK/ACT an der Vorderseite der LinkStation nicht leuchtet, ist die LinkStation nicht korrekt mit dem Netzwerk verbunden. Stellen Sie sicher, dass
• sowohl die LinkStation als auch der Hub, Switch oder PC eingeschaltet sind
•das Ethernet-Kabel an beiden Geräten korrekt angeschlossen ist
•das Ethernet-Kabel nicht beschädigt ist. Um dies zu überprüfen, schließen Sie ein anderes Ethernet-Kabel an.
Falls das Problem weiterhin besteht, wenden Sie sich an unseren technischen Support.
14

Schritt 3: Installieren der Software
Legen Sie die LinkNavigatorCD in das CD-ROM-Laufwerk des Computers ein. Falls die Installation nicht automatisch gestartet wird, können Sie sie auch manuell starten. Klicken Sie hierzu zunächst auf Start und dann auf Ausführen.... Nachdem das Dialogfeld Ausführen… eingeblendet wird, geben Sie
d:\setup.exe ein („d“ ist der Laufwerksbuchstabe Ihres CD-ROM-Laufwerks). Klicken Sie auf OK, um die Installation zu starten.
Falls Sie die Software auf einem Mac installieren, öffnen Sie die CD, und klicken Sie auf das Symbol LinkNavigator, um mit der Installation zu beginnen.
Klicken Sie auf die Schaltfläche
Begin Installation
(Installation beginnen), um den Installationsprozess zu starten.
Falls Sie die Installation auf einem Mac vornehmen, blättern Sie weiter auf die nächste Seite.
Falls Sie die Installation auf einem PC vornehmen, klicken Sie auf
Connect this PC to LinkStation
(Diesen PC mit der LinkStation verbinden) (dies ist die grüne untere Schaltfläche).
Klicken Sie auf Next (Weiter), um die Installation zu durchlaufen.
15

Schritt 3: Installieren der Software (Fortsetzung)
Der Assistent führt Sie daraufhin durch den Installationsprozess.
Nachdem die Installation abgeschlossen ist, können Sie das Installationsfenster schließen.
Herzlichen Glückwunsch! Die LinkStation ist betriebsbereit.
Weitere Hilfe und Konfigurationsoptionen finden Sie im LinkStation User Manual (LinkStation-Benutzerhandbuch) auf der LinkStation-CD.
16
Verwenden der LinkStation in Kombination mit einem Windows-PC
Falls Sie einen Windows-PC benutzen, werden auf dem
Desktop zwei neue Symbole angezeigt: Shortcut for
LinkStation (Verknüpfung für die LinkStation) und
Buffalo NAS Navigator.
Die Verknüpfung LinkStation führt Sie direkt zu den Ordnern auf der LinkStation.
Share ist der Standardordner, dem Sie Ihre gesamten
Dateien und anderen Ordner hinzufügen können. Im Ordner
Info befindet sich eine Datei mit dem Benutzerhandbuch.
Indem Sie auf das Symbol Buffalo NAS Navigator klicken, öffnen Sie das ClientDienstprogramm der LinkStation. Auf diese Weise können Sie die Systeminformationen für die LinkStation(s) einsehen. Wenn Sie auf Setup klicken und dann Confi guration Settings (Konfigurationseinstellungen) auswählen, gelangen Sie zum Bildschirm für die Konfigurationseinstellungen, wo Sie die Einstellungen für die LinkStation ändern
können. Voreingestellt für die Anmeldung ist der Benutzername „admin“. Das zugehörige Kennwort lautet „password“. Weitere Informationen über den Buffalo NAS Navigator und die Bedienoberfläche für Konfigurationseinstellungen finden Sie im Benutzerhandbuch.
Eine weitere Möglichkeit, auf Daten auf der LinkStation zuzugreifen, bietet der ihr
zugeordnete Laufwerksbuchstabe „L“. Bei der Ausführung des Installationsprogramms wurde der Hauptordner „Share“ der LinkStation dem Laufwerk „L“ zugeordnet. Sie können diese virtuelle Festplatte wie jede andere Festplatte im
Computer benutzen. Sie können der LinkStation und dem PC weitere Freigaben und zugeordnete Laufwerksbuchstaben hinzufügen.Weitere Informationen finden Sie im Benutzerhandbuch.
17
Verwenden der LinkStation in Kombination mit einem Mac
Nachdem Sie die LinkNavigator-Software installiert haben, finden Sie auf dem Desktop des Mac zwei neue Symbole.
Share ist der Standardordner, dem Sie Ihre gesamten Dateien und anderen Ordner hinzufügen können. NASNavigator ist das Client-Dienstprogramm der LinkStation.
Durch Anklicken des Symbols
NASNavigator wird das Client-Dienstprogramm der LinkStation geöffnet. Auf diese Weise können Sie die Systeminformationen für die LinkStation(s) einsehen. Wenn Sie auf Setup klicken und dann Browser Management
(Browser-Verwaltung) auswählen, gelangen Sie zu der
Bedienoberfläche für die Konfigurationseinstellungen, wo Sie die Einstellungen für die LinkStation ändern können. Voreingestellt für die Anmeldung ist der Benutzername „admin“. Das zugehörige Kennwort lautet „password“. Weitere Informationen über den Buffalo NAS Navigator und die Bedienoberfläche für Konfigurationseinstellungen finden Sie im Benutzerhandbuch.
Durch Anklicken von Share wird der Hauptordner der LinkStation geöffnet. Sie können der LinkStation weitere Freigaben zuordnen.Weitere Informationen finden Sie im Benutzerhandbuch.
Firmware-Sprache - Englisch ist für die Bedienoberfläche als Standardsprache eingestellt. Sie können dies sowohl auf dem PC als auch auf dem Mac ändern, indem Sie zunächst den Bildschirm „Basic“ auswählen und anschließend aus dem Dropdown-Menü „Display Language“ (Anzeigesprache) die gewünschte Sprache auswählen. Sie müssen auch die entsprechende Sprache für den WindowsClient auswählen. Klicken Sie auf „Apply“ (Anwenden), um die Änderungen zu übernehmen. Um die Änderungen sehen zu können, müssen Sie sich zunächst abund dann erneut anmelden.
18

Technische Daten
|
|
|
|
|
|
|
|
|
|
||||||||||
LAN-Standards: |
|||||||||||||||||||
|
|
|
|
|
|
IEEE 802.3u, |
IEEE 802.3ab, |
IEEE 802.3 |
|||||||||||
Übertragung: |
1000BASE-T: 8B1Q4, PAM5; 100BASE-TX: 4B5B |
||||||||||||||||||
|
|
|
|
|
|
|
|
MLT-3, MLT-3; 10BASE-T Manchester Coding |
|||||||||||
|
|
|
|
|
|
|
|
|
|
|
|
|
|||||||
Zugriffsmedien: |
|||||||||||||||||||
|
|
|
|
|
CSMA/CD |
||||||||||||||
Medienschnittstelle: |
RJ-45 |
||||||||||||||||||
|
|
|
|
|
|
|
|
|
|
|
|
|
|
|
|
|
|
|
|
USB-Standard: |
USB 2.0 |
||||||||||||||||||
|
|
|
|
|
|
|
|
High Speed (HS) |
|||||||||||
|
|
|
|
|
|
|
|
Full Speed (FS) |
|||||||||||
|
|
|
|
|
|
|
|
Low Speed (LS) |
|||||||||||
USB-Stecker: |
USB A Steckverbinder (2) |
||||||||||||||||||
|
|
|
|
|
|
|
|
|
|
|
|
|
|
|
|
|
|
||
|
Datenübertragungsgeschwindigkeit: |
max. 480 Mbit/s (HS-Modus) |
|||||||||||||||||
|
|
|
|
|
|
|
|
|
|
|
|
|
|
|
|
|
|||
|
|
|
|
|
|
|
|
max. 12 Mbit/s (FS-Modus) |
|||||||||||
Stromversorgung: |
100-240V A/C |
||||||||||||||||||
|
|
|
|
|
|
|
|
|
|
|
|
|
|
|
|
||||
Leistungsaufnahme: |
|||||||||||||||||||
|
|
|
ca. 21 W |
||||||||||||||||
Abmessungen: |
60 x 160 x 216 mm. |
||||||||||||||||||
|
|
|
|
|
|
|
|
|
|
|
|
|
|
|
|
|
|
|
|
Gewicht: |
1,6 kg |
||||||||||||||||||
|
|
|
|
|
|
|
|
|
|
|
|
|
|
|
|
|
|
|
|
Umgebungstemperatur bei Betrieb: 5-35 °C, relative Luftfeuchte 20-80 %
(nicht kondensierend)
Technischer Support
Buffalo Technology leistet kostenfreien technischen Support. Sie finden die Kontaktinformationen auf der Rückseite dieser Kurzanleitung. Besuchen Sie auch unsere Website unter:
http://www.buffalo-technology.com.
FCC-Hinweis
Dieses Gerät entspricht Teil 15 der FCC-Vorschriften. Der Betrieb unterliegt folgenden beiden Bedingungen: (1) Dieses Gerät darf keine gefährlichen Funkstörungen verursachen, und (2) dieses Gerät muss jede empfangene Funkstörung annehmen, inklusive einer Funkstörung, die den Betrieb beeinträchtigt.
CE-Warnung
Dies ist ein Produkt der Klasse B. Im Wohnbereich kann dieses Produkt Funkstörungen verursachen. In diesem Fall kann der Betreiber dazu verpflichtet werden, Gegenmaßnahmen zu ergreifen.
19
Umweltschutz-Information
•Für die Herstellung des von Ihnen gekauften Produkts wurden natürliche Ressourcen verbraucht.
•Das Produkt kann gefährliche Substanzen enthalten, die Auswirkungen auf Gesundheit und Umwelt haben.
•Um die Ausbreitung dieser Substanzen in unserer Umgebung und den Verbrauch natürlicher Ressourcen zu verringern, fordern wir Sie auf, die entsprechenden Rücknahmesysteme zu nutzen.
•In den Rücknahmesystemen werden die meisten Materialien Ihrer ausgesonderten Geräte aufbereitet oder wieder verwendet.
•Das Symbol mit der durchgestrichenen Mülltonne lädt Sie ein, diese Systeme zu nutzen.
•Wenn Sie mehr Informationen über die Sammel-,Wiederverwendungs- und Wiederaufbereitungssysteme benötigen, wenden Sie sich an die regionalen Abfallzweckverbände.
20

http://www.buffalo-technology.com
Adresse: |
Buffalo Technology UK LTD |
|
176, Buckingham Avenue, |
|
Slough, Berkshire, SL1 4RD |
|
United Kingdom |
Allgemeine Fragen: |
|
sales@buffalo-technology.com |
Technischer Support:
Sprechzeiten des Helpdesks Montag - Donnerstag 9.00 Uhr bis 18.00 Uhr
|
Freitag |
9.00 Uhr bis 16.30 Uhr |
Telefon |
+353 61 70 80 50 |
|
Telefon (nur Großbritannien) 08712 50 12 60 |
|
|
helpdesk@buffalo-technology.ie |
||

Français
Guide d'installation rapide
LinkStation Pro
Contenu de l'emballage :
 Unité LinkStation
 Câble Ethernet
 Câble d'alimentation
 CD-ROM d'installation LinkNavigator
 Guide d'installation rapide
 Carte de garantie

Étape 1 : connecter vos câbles
Branchez le câble d'alimentation et le câble Ethernet à l'arrière de l'unité LinkStation.
Connectez le câble d'alimentation à un parasurtenseur ou à une prise de courant. Branchez l'autre extrémité du câble Ethernet à un concentrateur (hub), à un commutateur ou à un routeur sur votre réseau.
23

Étape 2 :vérifi er votre connexion
Pour allumer votre unité LinkStation, appuyez sur le bouton de mise en marche situé à l'avant du dispositif.
Vérifiez que le voyant LINK/ACT situé à l'avant de l'unité LinkStation est allumé. S'il est allumé, votre unité LinkStation est correctement connectée.
Si le voyant LINK/ACT situé à l'avant de l'unité LinkStation n'est pas allumé, votre unité LinkStation est mal connectée au réseau.Assurez-vous que :
•l'unité LinkStation et le concentrateur (hub), le commutateur ou le PC sont sous tension,
•le câble Ethernet est correctement branché aux deux dispositifs,
•le câble Ethernet n'est pas endommagé.Pour vérifi er le bon fonctionnement du câble
Ethernet, essayez d’en utiliser un autre.
Si le problème persiste, contactez l'assistance technique
24

Étape 3 : installer le logiciel
Insérez le CD LinkNavigator dans le lecteur de CD-ROM de votre ordinateur. Si le programme d'installation ne démarre pas automatiquement, vous pouvez le lancer manuellement en cliquant sur Démarrer, puis sur Exécuter. Lorsque la boîte de dialogue Exécuter apparaît, tapez d:\setup.
exe (« d » étant la lettre correspondant au lecteur de CD ROM). Cliquez sur OK pour continuer.
Si vous installez le logiciel sur un Mac, cliquez sur le CD, puis sur l'icône LinkNavigator pour lancer l'installation.
Appuyez sur le bouton Begin Installation (Commencer l'installation) pour démarrer.
Si vous effectuez l'installation sur un Mac, passez à la page suivante.
Si vous effectuez l'installation sur un PC, cliquez sur Connect this PC to LinkStation (Connecter ce PC à la LinkStation) (bouton vert inférieur).
Cliquez sur Next (Suivant) pour poursuivre l'installation.
25

Étape 3 : installer le logiciel (suite)
L'assistant va maintenant vous guider tout au long du processus d'installation.
Une fois l'opération terminée, vous pouvez fermer la fenêtre d'installation.
Félicitations ! Vous pouvez désormais utiliser votre LinkStation.
Reportez-vous au manuel d'utilisation disponible sur le CD LinkNavigator pour en savoir plus sur les options d'aide et de configuration.
26
Utiliser votre LinkStation avec un PC Windows
Si vous utilisez un PC Windows, deux nouvelles icônes apparaissent sur le bureau : Shortcut for LinkStation (Raccourci vers LinkStation) et Buffalo NAS Navigator (Navigateur NAS Buffalo).
Le raccourci LinkStation vous permet d'accéder directement aux dossiers de votre unité LinkStation.
Le dossier Share (Partager) est l'emplacement par défaut pour l'ajout de tous vos fichiers et dossiers. Le dossier Info (Infos) contient une copie de votre manuel d'utilisation.
L'icône Buffalo NAS Navigator (Navigateur NAS Buffalo) ouvre l'utilitaire client de LinkStation.Vous pouvez ainsi facilement consulter les informations relatives au système de vos LinkStations. Si vous cliquez sur Setup (Installation) et choisissez Confi guration Settings (Paramètres de configuration), vous accédez à l'interface utilisateur de configuration des paramètres, où vous pouvez modifier
les paramètres de la LinkStation. Le nom
d'utilisateur et le mot de passe par défaut sont « admin » et « password ». Consultez le manuel d’utilisation pour en savoir plus sur le Buffalo NAS Navigator et l'interface de configuration des paramètres.
Vous pouvez également accéder aux données de l'unité LinkStation via le lecteur « L ». Lors de son exécution, le programme d'installation a ajouté le dossier principal Share (Partager) de l'unité LinkStation au lecteur « L ». Utilisez ce disque dur virtuel comme tout autre disque dur
sur votre ordinateur.Vous pouvez ajouter d'autres dossiers de partage et unités de lecteur à votre LinkStation et à votre PC. Pour plus d'informations, reportez-vous au manuel d'utilisation.
27

Utiliser votre LinkStation avec un Mac
Une fois le logiciel LinkNavigator installé, deux nouvelles icônes apparaissent sur le bureau de votre Mac.
Le dossier Share (Partager) est l'emplacement par défaut pour l'ajout de tous vos fichiers et dossiers. NAS Navigator est l'utilitaire client de LinkStation.
Cliquez sur NAS Navigator
(Navigateur NAS) pour ouvrir l'utilitaire client de LinkStation. Vous pouvez ainsi facilement consulter les informations relatives au système de vos LinkStations. Si vous cliquez sur Setup (Installation) et
que vous choisissez Browser Management (Gestion
de navigation), vous accédez à l'interface utilisateur de configuration des paramètres, où vous pouvez modifier les paramètres de LinkStation. Le nom d'utilisateur et le mot de passe par défaut sont « admin » et « password », respectivement, jusqu'à ce que vous les modifiiez. Consultez le manuel d’utilisation pour en savoir plus sur le Buffalo NAS Navigator et l'interface de configuration des paramètres.
Cliquez sur Share (Partager) pour ouvrir le dossier principal sur la LinkStation.Vous pouvez ajouter des dossiers de partage supplémentaires à votre LinkStation. Pour en savoir plus, consultez votre manuel d'utilisation.
Langue du microprogramme - L'anglais est la langue par défaut de l'interface Web.Vous pouvez modifier ce paramètre sur les PC et sur les Mac en sélectionnant l'écran de base et en choisissant une autre langue dans le menu déroulant Display Language (Langue d'affichage).Vous devrez également sélectionner la langue du client Windows. Cliquez sur Apply (Appliquer) pour appliquer vos modifications. Si vous souhaitez voir vos modifications, vous devez fermer la session, puis la rouvrir.
28

Spécifi cations techniques
|
Normes LAN : |
|
|
|
|
|
|
|
|||||||
|
|
IEEE 802.3u, |
IEEE 802.3ab, |
IEEE 802.3 |
|||||||||||
Transmission : |
1000BASE-T : 8B1Q4, PAM5 ; 100BASE-TX : 4B5B |
||||||||||||||
|
|
|
|
|
MLT-3, MLT-3 ; 10BASE-T Codage Manchester |
||||||||||
Accès multimédia : |
|
|
|
|
|
|
|
|
|||||||
|
CSMA/CD |
||||||||||||||
Interface multimédia : |
RJ-45 |
||||||||||||||
|
|
|
|
|
|
|
|
|
|
|
|
|
|
|
|
Normes USB : |
USB 2.0 |
||||||||||||||
|
|
|
|
|
Haut débit (HS) |
||||||||||
|
|
|
|
|
Fonctionnement à plein régime (FS) |
||||||||||
|
|
|
|
|
Faible débit (LS) |
||||||||||
Connecteur USB : |
Connecteur USB A (2) |
||||||||||||||
Vitesse de transmission des données : |
|
|
|
|
|
|
|
|
|
|
|||||
480 Mbits/s maximum (mode HS) |
|||||||||||||||
|
|
|
|
|
|
|
|
|
|
|
|
|
|
||
|
|
|
|
|
12 Mbits/s (mode FS) |
||||||||||
Courant électrique : |
100-240V A/C |
||||||||||||||
|
Consommation : |
|
|
|
|
|
|
|
|
|
|
||||
|
|
|
~21W |
||||||||||||
Dimensions : |
60 x 160 x 216 mm. |
||||||||||||||
|
|
|
|
|
|
|
|
|
|
|
|
|
|
|
|
Poids : |
1,6 kg |
||||||||||||||
Température de fonctionnement : |
5-35 °C ; 20-80 % d'humidité (sans condensation) |
||||||||||||||
Assistance technique
Buffalo Technology propose une assistance technique gratuite.Vous trouverez les informations de contact à la fin de ce guide de démarrage rapide.Vous pouvez également visiter le site Web :
http://www.buffalo-technology.com.
Réglementation FCC
Ce dispositif est conforme à l'alinéa 15 de la réglementation FCC. Son utilisation est soumise aux conditions suivantes : ce dispositif (1) ne doit pas provoquer
d'interférences nuisibles et (2) doit supporter toute interférence extérieure, pouvant notamment entraîner un fonctionnement imprévu.
Avertissement concernant la marque CE
Ce produit est un produit de classe B. Dans un environnement résidentiel, ce produit peut être source de perturbations radioélectriques, auquel cas l'utilisateur peut être amené à prendre les mesures adéquates.
29
 Loading...