BUFFALO LS-WTGL, LS-WTGL-R1 User Manual

LS-WTGL/R1
LinkStation Pro Duo
QUICK SETUP GUIDE
EN DE FR IT ES PT NL SV NO DA FI
www.buffalotech.com
EN
Buffalo LinkStation Pro Duo (LS-WTGL/R1)
Package Contents
Thank you for purchasing a Buffalo LinkStation Pro Duo.
Package contents includes:
•LinkStation Pro Duo
•Ethernet Cable
•Power Cable
•LinkNavigator Installation CD
•Quick Setup Guide
•Warranty Card
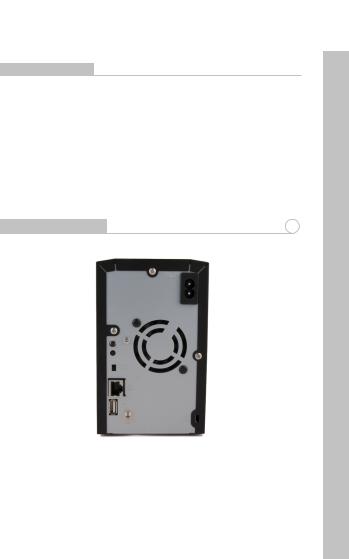
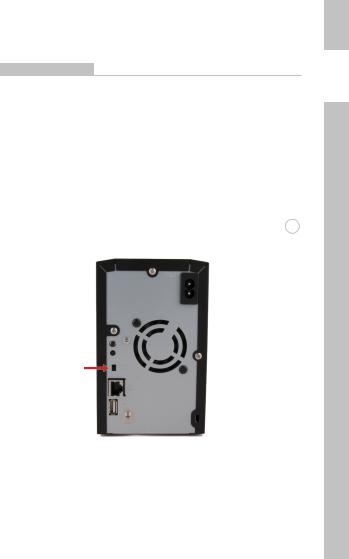
Back Panel Layout |
1 |
 Power Cable
Power Switch
Reset Button
Power Mode Switch
Ethernet Cable
(to router)
USB Port
Fig: 1
Note: Leave the Power Mode switch in the Manual position until installation is complete.

EN
Installing Your LinkStation - PC |
2 |
|
|
|
|
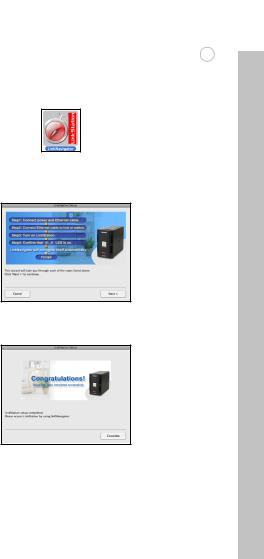
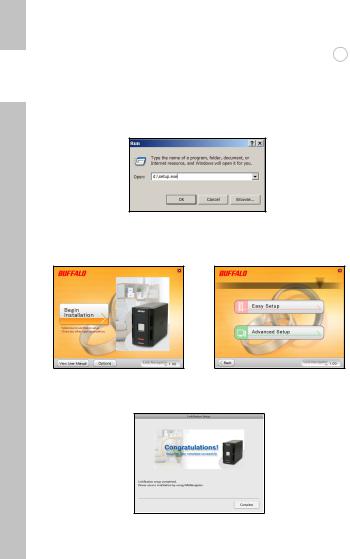
Insert the LinkNavigator CD into your computer’s CD-ROM drive. If Setup doesn’t launch automatically, you can launch it manually by clicking Start, then Run.... When the Run dialog opens, type d:\setup.exe (where “d” is the drive letter of your CD-ROM). Press OK to continue. (Fig: 2)
Fig: 2
Click on Begin Installation (Fig: 3) and select the Easy Setup option (Fig: 4). The wizard will guide you through the installation.
Fig: 3 |
Fig: 4 |
Click on the Complete button to finish the setup of your LinkStation (Fig: 5).
Fig: 5
EN
Installing Your LinkStation - Mac |
3 |
|
|
|
|
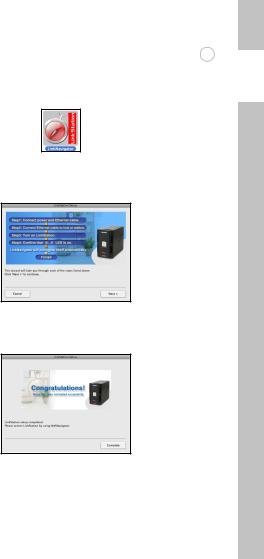
If you are installing the software on a Mac, open the CD and click the LinkNavigator icon to begin installation. (Fig: 6)
Fig: 6
The wizard will launch (Fig: 7) and guide you through the installation.
Fig: 7
Click on the Complete button to finish the setup of your LinkStation (Fig: 8).
Fig: 8
Congratulations! Your LinkStation is ready to use. Please see the LinkStation User Manual on your CD for more help and configuration options.
EN
Using Your LinkStation With a Windows PC |
4 |
|
|
|
|
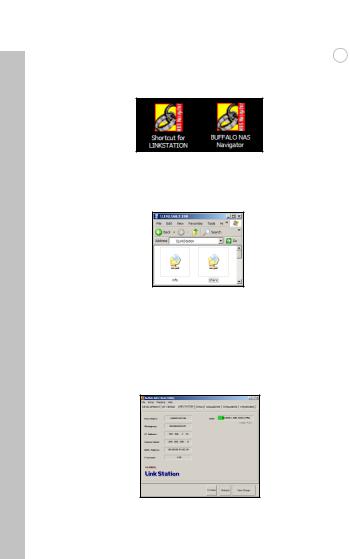
If you’re using a Windows PC, two new icons will be on your desktop: Shortcut for LinkStation and Buffalo NAS Navigator. (Fig: 9)
Fig: 9
The LinkStation shortcut will take you directly to the folders on your LinkStation. Share is the main folder that you can put files and folders in. Info contains a copy of your user manual. (Fig: 10)
Fig: 10
The Buffalo NAS Navigator icon opens the LinkStation’s client utility. (Fig:11) This lets you easily view system information for your LinkStation(s). If you click Setup and choose Configuration Settings, it will take you to the settings configuration GUI, where you may change your LinkStation’s settings. Until you change it, the GUI’s username is “admin” and the password is “password”. Consult your user manual for more information on the Buffalo NAS Navigator and the settings configuration GUI.
Fig: 11
EN
Using Your LinkStation With a Mac |
5 |
|
|
|
|
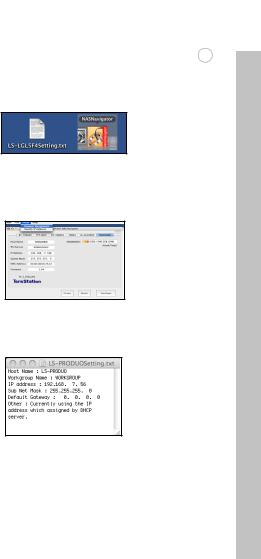
After installing the LinkNavigator software, your Mac will have new icons on the desktop and in the Dock. The LS-ProDuoSettings.txt file contains the IP address of your LinkStation. NASNavigator is the LinkStation’s client utility. (Fig: 12)
Fig: 12
Clicking NASNavigator opens the LinkStation’s client utility. (Fig: 13) This lets you easily view system information for your LinkStation and change its settings. Consult your user manual for more information on the Buffalo NAS Navigator.
Fig: 13
With the information in the LS-ProDuoSettings.txt file, (Fig: 14)you can easily connect to the LinkStation from any of your computers on your local network.
Fig: 14

EN
Using Your LinkStation With a Mac |
5 |
|
|
|
|
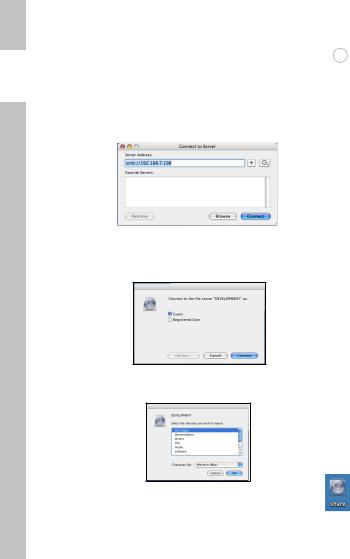
From the Finder, click Go, and then choose Connect to Server. In the Server Address field, enter your LinkStation’s IP address in the form smb://ipaddress (where “ipaddress” is your LinkStation’s IP address), and click Connect. (Fig: 15) You can get your LinkStation’s IP address from the LS-ProDuoSettings.txt file on your desktop.
Fig: 15
Select Guest and click on Connect. Note: If you have configured share permissions on your LinkStation, select Registered User and enter your login credentials. (Fig: 16)
Fig: 16
Select share from the list of folders on the LinkStation. (Fig: 17)
Fig: 17
The share will open. A link to it will appear on your desktop, as shown.

EN
Technical Specifications
Data Transfer: |
10/100/1000 Mbps |
Hard Drives: |
(2) SATA |
|
|
Main Connector: |
RJ-45 (Ethernet) |
USB Interface: |
USB 2.0/1.1 |
|
|
Protocol Support: |
TCP/IP |
|
SMB, FTP (File Sharing) |
|
HTTP (Management) |
|
NTP (Time Synchronisation) |
Power Supply: |
Internal; 100-240V 50/60Hz |
|
|
Client OS Support: |
Windows® 2000, XP, Vista™ |
|
Mac OS 10.3 or later |
Power Consumption: |
~32W |
|
|
Dimensions: |
100 x 163 x 225 mm |
Weight: |
2.8 Kg |
|
|
Operating Temperature: |
0-35˚ C; 20-80% non-condensing |
|
|
CE Mark Warning
This is a Class B product. In a domestic environment, this product may cause radio interference, in which case the user may be required to take adequate measures.

EN
Environmental Information
•The equipment that you have purchased has required the extraction and use of natural resources for its production.
•The equipment may contain hazardous substances that could impact health and the environment.
•In order to avoid the dissemination of those substances in our environment and to diminish the pressure on the natural resources, we encourage you to use the appropriate take-back systems.
•The take-back systems will reuse or recycle most of the materials of your end life equipment in a sound way.
•The crossed-out wheeled bin symbol invites you to use those systems.
•If you need more information on the collection, reuse and recycling systems, please contact your local or regional waste administration.
Contact Details
Address: |
Buffalo Technology UK Ltd |
|
2 Bracknell Beeches |
|
Old Bracknell Lane |
|
Bracknell |
|
Berkshire |
|
RG12 7BW |
|
United Kingdom |
General Inquiries: |
|
sales@buffalo-technology.com |
|
Technical Support: |
|
|
Buffalo Technology provide technical support |
|
in English, German, French, Italian and |
|
Spanish. |
|
For opening hours and relevant telephone |
|
numbers, please go to: |
|
http://www.buffalo-technology.com/contact |
Buffalo LinkStation Pro Duo (LS-WTGL/R1)
Packungsinhalt
Vielen Dank, dass Sie sich für die Buffalo LinkStation entschieden haben.
Der Packungsinhalt umfasst:
•LinkStation Pro Duo
•Ethernet-Kabel
•Netzkabel
•LinkNavigator-Installations-CD
•Handbuch für die Schnellinstallation
•Garantiekarte
Elemente auf der Rückseite |
1 |
|
|
|
|
 Netzkabel
Netzschalter
Reset-Taste
Betriebsmodus-
Schalter
Ethernet-Kabel
(zum Router)
USB-Anschluss
Abb. 1
Hinweis: Lassen Sie den Betriebsmodus-Schalter bis zum Abschluss der Installation in der Stellung Manuell.
DE
|
Installieren der LinkStation – PC |
2 |
|
DE |
|
|
|
Legen Sie die LinkNavigator-CD in das CD-ROM-Laufwerk des Computers ein. |
|||
|
Falls die Installation nicht automatisch gestartet wird, können Sie sie manuell |
||
starten. Klicken Sie hierfür auf Start und anschließend auf Ausführen. Wenn das Dialogfeld„Ausführen“ eingeblendet wird, geben Sie d:\setup.exe ein („d“ steht für den Laufwerksbuchstaben Ihres CD-ROM-Laufwerks). Klicken Sie auf OK, um die Installation fortzusetzen (Abb. 2).
Abb. 2
Klicken Sie auf Begin Installation (Installation beginnen) (Abb. 3), und wählen Sie die Option Easy Setup (Einfache Installation) (Abb. 4). Der Assistent führt Sie daraufhin durch die Installation.
Abb. 3 |
Abb. 4 |
Klicken Sie auf die Schaltfläche Complete (Fertig stellen), um die Installation der LinkStation abzuschließen (Abb. 5).
Abb. 5
10
Installieren der LinkStation – Mac |
3 |
|
|
|
|
Falls Sie die Software auf einem Mac installieren, öffnen Sie die CD, und klicken auf das Symbol LinkNavigator, um mit der Installation zu beginnen (Abb. 6).
Abb. 6
Der Assistent wird gestartet (Abb. 7) und führt Sie durch die Installation.
Abb. 7
Klicken Sie auf die Schaltfläche Complete (Fertig stellen), um die Installation der LinkStation abzuschließen (Abb. 8).
Abb. 8
Herzlichen Glückwunsch! Die LinkStation ist betriebsbereit. Weitere Hilfe und Konfigurationsoptionen finden Sie im LinkStation User Manual (LinkStationBenutzerhandbuch) auf der LinkStation-CD.
DE
11

|
Verwenden der LinkStation in Kombination mit einem Windows-PC |
|
4 |
|
DE |
Falls Sie einen Windows-PC benutzen, werden auf dem Desktop zwei neue |
|
|
|
|
Symbole angezeigt: Shortcut for LinkStation (Verknüpfung zur LinkStation) |
|
|
|
und Buffalo NAS Navigator (Abb. 9).
Abb. 9
Die Verknüpfung„LinkStation“ führt Sie direkt zu den Ordnern auf der LinkStation. Share (Gemeinsamer Ordner) ist der Hauptordner, in dem Sie Dateien und Ordner ablegen können. Info (Info) enthält eine Kopie des Benutzerhandbuchs. (Abb. 10)
Abb. 10
Wenn Sie auf das Symbol Buffalo NAS Navigator klicken, öffnen Sie das Client-Dienstprogramm der LinkStation (Abb. 11). Auf diese Weise können Sie ganz einfach Systeminformationen der LinkStation(s) einsehen.
Wenn Sie auf Setup klicken und anschließend Configuration Settings (Konfigurationseinstellungen) auswählen, gelangen Sie zum Bildschirm für die Konfigurationseinstellungen, wo Sie die Einstellungen für die LinkStation ändern können. Die Voreinstellung für den Benutzernamen der Bedienoberfläche ist„admin“, das zugehörige Kennwort lautet „password“. Weitere Informationen über den Buffalo NAS Navigator und die Bedienoberfläche für Konfigurationseinstellungen finden Sie im Benutzerhandbuch.
Abb. 11
12

Verwenden der LinkStation in Kombination mit einem Mac |
5 |
|
|
|
|
DE |
|
Nachdem Sie die LinkNavigator-Software installiert haben, finden Sie auf dem |
|||
Desktop und im Dock des Mac zwei neue Symbole. Die Datei LS-ProDuoSettings.txt enthält die IP-Adresse der LinkStation. NAS Navigator ist das Client-Dienstprogramm der LinkStation (Abb. 12).
Abb. 12
Wenn Sie auf das Symbol NAS Navigator klicken, wird das ClientDienstprogramm der LinkStation geöffnet (Abb. 13). Auf diese Weise können Sie ganz einfach Systeminformationen für die LinkStation(s) einsehen und die Einstellungen ändern. Weitere Informationen über den Buffalo NAS Navigator finden Sie im Benutzerhandbuch.
Abb. 13
Mithilfe der Informationen aus der Datei LS-ProDuoSettings.txt (Abb. 14) können Sie alle Computer in Ihrem lokalen Netzwerk ganz einfach mit der LinkStation verbinden.
Abb. 14
13
Verwenden der LinkStation in Kombination mit einem Mac |
5 |
|
|
|
|
DE |
Klicken Sie im Finder auf Go (Gehe zu), und wählen Sie Connect to Server (Mit |
||
|
|||
|
Server verbinden). Geben Sie in das Eingabefeld für die Serveradresse die |
||
|
IP-Adresse der LinkStation in folgender Form ein: smb://ipaddress (“ipaddress” |
||
|
steht hier für die IP-Adresse Ihrer LinkStation). Klicken Sie anschließend auf |
||
|
Connect (Verbinden). (Abb. 15) Die IP-Adresse der LinkStation finden Sie in |
||
|
der Datei LS-ProDuoSettings.txt auf Ihrem Desktop. |
||
|
|
|
|
|
|
|
|
Abb. 15
Wählen Sie„Guest“ (Gast), und klicken Sie anschließend auf„Connect“ (Verbinden). Hinweis: Wenn Sie auf der LinkStation Freigaben eingerichtet haben, wählen Sie Registered User (Registrierter Benutzer), und geben Sie Ihre Zugangsdaten ein. (Abb. 16)
Abb. 16
Wählen Sie aus der Ordnerliste auf der LinkStation den Ordner Share (Gemeinsamer Ordner) (Abb. 17).
Abb. 17
Der Ordner Share (Gemeinsamer Ordner) wird geöffnet. Ein Link dazu erscheint auf ihrem Desktop (siehe Abbildung).
14

Technische Daten
DE
Datenübertragung: |
10/100/1000 Mbit/s |
Festplatten: |
(2) SATA |
|
|
Hauptanschluss: |
RJ-45 (Ethernet) |
USB-Schnittstelle: |
USB 2.0/1.1 |
|
|
Unterstützte Protokolle: |
TCP/IP |
|
SMB, FTP (Gemeinsame Dateinutzung) |
|
HTTP (Verwaltung) |
|
NTP (Zeitsynchronisation) |
Stromversorgung: |
Intern, 100–240 V, 50/60 Hz |
|
|
Unterstützte Betriebssysteme: |
Windows® 2000/XP/Vista™ |
|
Mac OS 10.3 oder höher |
Stromverbrauch: |
~32 W |
|
|
Abmessungen: |
100 × 163 × 225 mm |
Gewicht: |
2,8 kg |
Umgebungstemperatur bei Betrieb:
0–35° C, relative Luftfeuchte
20–80 % (nicht kondensierend)
CE-Warnung
Dies ist ein Produkt der Klasse B. Im Wohnbereich kann dieses Produkt Funkstörungen verursachen, die vom Benutzer durch entsprechende Maßnahmen zu beseitigen sind.
15

Umweltschutz-Information
DE • Für die Herstellung des von Ihnen gekauften Produkts wurden natürliche Ressourcen verwendet.
•Das Produkt kann gefährliche Substanzen enthalten, die sich schädlich auf Gesundheit und Umwelt auswirken können.
•Um die Umweltbelastung durch diese Substanzen und den Verbrauch natürlicher Ressourcen zu verringern, fordern wir Sie dazu auf, die entsprechenden Rücknahmesysteme zu nutzen.
•Durch Nutzung eines Rücknahmesystems werden die meisten Materialien Ihrer ausgesonderten Geräte aufbereitet oder wieder verwendet.
•Das Symbol mit der durchgestrichenen Mülltonne fordert Sie dazu auf, ein solches System zu nutzen.
•Sollten Sie mehr Informationen über Sammel-, Wiederverwendungsund Wiederaufbereitungssysteme benötigen, wenden Sie sich an die regionalen Abfallzweckverbände.
Kontaktdaten
Adresse: |
Buffalo Technology UK Ltd. |
|
2 Bracknell Beeches |
|
Old Bracknell Lane |
|
Bracknell |
|
Berkshire |
|
RG12 7BW |
|
United Kingdom |
Allgemeine Fragen: |
|
sales@buffalo-technology.com |
Technischer Support:
Buffalo Technology bietet technischen Support in den Sprachen Deutsch, Englisch, Französisch, Italienisch und Spanisch. Unsere Geschäftszeiten und wichtige Telefonnummern finden Sie unter: http://www.buffalo-technology.com/contact
16

Buffalo LinkStation Pro Duo (LS-WTGL/R1)
Contenu de l'emballage
Merci d’avoir acheté l’unité Buffalo LinkStation Pro Duo.
Contenu de l'emballage :
•LinkStation Pro Duo
•Câble Ethernet
•Câble d'alimentation
•CD-ROM d'installation LinkNavigator
•Guide d'installation rapide
•Carte de garantie
FR
Présentation de la face arrière |
1 |
|
|
|
|
 Câble d'alimentation
Interrupteur Bouton de réinitialisation
Interrupteur
Câble Ethernet (relié au routeur)
Port USB
Fig. 1
Remarque : veuillez laisser l’interrupteur sur le mode Manual (Manuel) jusqu'à ce que l’installation soit terminée.
17
Installation de votre LinkStation - PC |
2 |
|
|
|
|
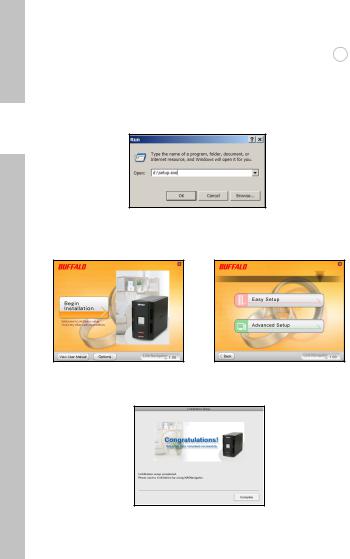
Insérez le CD LinkNavigator dans le lecteur de CD-ROM de votre ordinateur. Si le programme d'installation ne démarre pas automatiquement, vous pouvez le lancer manuellement en cliquant sur Démarrer, puis sur Exécuter. Lorsque la boîte de dialogue Exécuter apparaît, tapez d:\setup.exe (« d » étant la lettre
correspondant au lecteur de CD-ROM). Cliquez sur OK pour continuer. (Fig. 2)
FR
Fig. 2
Cliquez sur Begin Installation (Commencer l'installation), comme l'indique la figure 3), et sélectionnez l'option Easy Setup (Installation facile), comme l’indique la figure 4). L'assistant va vous guider tout au long de l'installation.
Fig. 3 |
Fig. 4 |
Cliquez sur le bouton Complete (Terminer) pour terminer l’installation de votre LinkStation, comme l’indique la figure 5).
Fig. 5
18
Installation de votre LinkStation - Mac |
3 |
|
|
|
|
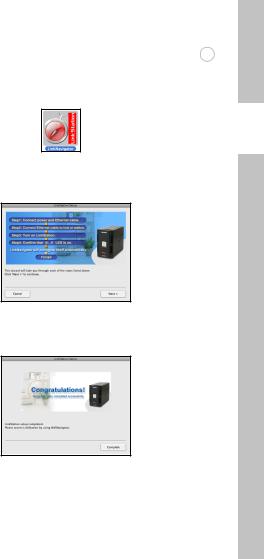
Si vous installez le logiciel sur un Mac, ouvrez le CD et cliquez sur l'icône LinkNavigator pour lancer l'installation. (Fig. 6)
FR
Fig. 6
L’assistant lancera l’installation, comme indiqué sur la figure 7), et il vous guidera tout au long du processus.
Fig. 7
Cliquez sur le bouton Complete (Terminer) pour terminer l’installation de votre LinkStation, comme l’indique la figure 8).
Fig. 8
Félicitations ! Vous pouvez désormais utiliser votre LinkStation. Reportez-vous au manuel d'utilisation LinkStation disponible sur le CD pour en savoir plus sur les options d'aide et de configuration.
19

Utiliser votre LinkStation avec un PC Windows |
4 |
|
|
|
|
Si vous utilisez un PC Windows, deux nouvelles icônes apparaissent sur le bureau : Shortcut for LinkStation (Raccourci vers LinkStation) et Buffalo NAS Navigator (Navigateur NAS Buffalo). (Fig. 9)
FR
Fig. 9
Le raccourci LinkStation vous permet d'accéder directement aux dossiers de votre unité LinkStation. Le dossier principal, Share (Partager), constitue l'endroit où vous pouvez stocker des fichiers et des sous-dossiers. Le dossier Info (Infos) contient une copie du manuel d'utilisation. (Fig. 10)
Fig. 10
L'icône Buffalo NAS Navigator (Navigateur NAS Buffalo) ouvre l'utilitaire client de LinkStation (Figure 11). Vous pouvez ainsi facilement consulter les informations relatives au système de vos LinkStation(s). Si vous cliquez sur Setup (Installation) et sélectionnez Configuration Settings (Paramètres de configuration), vous accédez à l'interface utilisateur de configuration des paramètres, où vous pouvez modifier les paramètres de la LinkStation. Le nom utilisateur et le mot de passe par défaut sont « admin » et « password », respectivement, jusqu'à ce que vous les modifiiez. Consultez le manuel d’utilisation pour en savoir plus sur le Buffalo NAS Navigator et l'interface de configuration des paramètres.
Fig. 11
20

Utiliser votre LinkStation avec un Mac |
5 |
|
|
|
|
Une fois le logiciel LinkNavigator installé, de nouvelles icônes apparaissent sur le bureau et dans le Dock de votre Mac. Le fichier LS-ProDuoSettings.txt contient l’adresse IP de votre LinkStation. NAS Navigator est l'utilitaire client de LinkStation. (Fig. 12)
FR
Fig. 12
Cliquez sur NAS Navigator (Navigateur NAS) pour ouvrir l'utilitaire client de LinkStation (Fig. 13). Vous pouvez ainsi facilement consulter les informations relatives à votre LinkStation et modifier ses paramètres. Consultez le manuel d’utilisation pour en savoir plus sur le Buffalo NAS Navigator.
Fig. 13
Grâce aux informations contenues dans le fichier LS-ProDuoSettings.txt, comme l’indique la figure 14, vous pouvez facilement vous connecter à une LinkStation à partir de tout ordinateur se trouvant sur votre réseau local.
Fig. 14
21
Utiliser votre LinkStation avec un Mac |
5 |
|
|
|
|
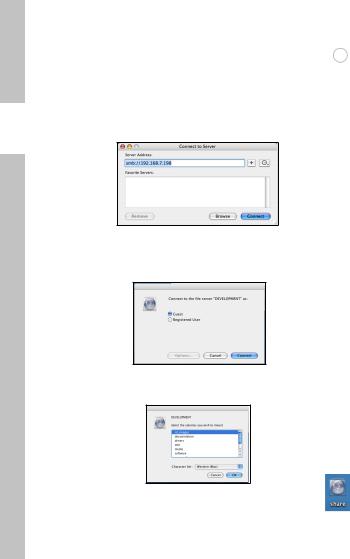
A partir du Finder, cliquez sur Go (Aller), puis sélectionnez Connect to Server (Connecter au serveur). Dans le champ Server Address (Adresse du serveur), entrez l'adresse IP de votre LinkStation sous la forme smb://ipaddress
(« ipadress » désignant l'adresse IP de votre LinkStation), puis cliquez sur Connect (Connecter) (Fig. 15). Vous pouvez obtenir l’adresse IP de votre
FR LinkStation à partir du fichier LS-ProDuoSettings.txt se trouvant sur votre bureau.
Fig. 15
Sélectionnez Guest (Invité) et cliquez sur Connect (Connecter). Remarque : si vous avez défini les droits de partage sur votre LinkStation, sélectionnez
Registered User (Utilisateur enregistré) et entrez vos identifiants de connexion. (Fig. 16)
Fig. 16
Sélectionnez share (Dossier de partage) à partir de la liste de dossiers située sur la LinkStation. (Fig. 17)
Fig. 17
Le dossier de partage s'ouvre. Un lien vous permettant d’y accéder apparaît sur votre bureau, comme l’indique la figure.
22

Spécifications techniques
Transfert de données : |
10/100/1 000 Mbits/s |
Disques durs : |
(2) SATA |
|
|
Connecteur principal : |
RJ-45 (Ethernet) |
Interface USB : |
USB 2.0/1.1 |
|
|
Protocoles pris en charge : |
TCP/IP |
|
SMB, FTP (Partage de fichiers) |
|
HTTP (Gestion) |
|
NTP (Synchronisation réseau) |
Alimentation : |
Interne, 100-240 Vca 50/60 Hz |
|
|
Compatibilité SE client : |
Windows® 2000, XP, Vista™ |
|
Mac OS 10.3 (ou versions supérieures) |
Consommation : |
~32 W |
|
|
Dimensions : |
100 x 163 x 225 mm |
Poids : |
2,8 kg |
Température de fonctionnement :
0-35 °C ; 20-80 % d'humidité
(sans condensation)
Avertissement concernant la marque CE
Ce produit est un produit de classe B. Dans un environnement résidentiel, ce produit peut être source de perturbations radioélectriques, auquel cas l'utilisateur peut être amené à prendre les mesures adéquates.
FR
23

|
|
Informations relatives à l'environnement |
|
||
|
|
• La production de l'équipement que vous avez acquis a nécessité l'extraction |
|||
|
|
et l'utilisation de ressources naturelles. |
|||
|
|
• L'équipement peut contenir des matières dangereuses susceptibles d'avoir |
|||
|
|||||
|
|
un impact sur la santé et l'environnement. |
|||
FR |
|
• Afin d'éviter la diffusion de ces matières dans notre environnement et de |
|||
|
réduire l'exploitation des ressources naturelles, nous vous encourageons à |
||||
|
|
utiliser les systèmes de récupération appropriés. |
|||
|
|
• Ces systèmes réutiliseront ou recycleront de manière saine la plupart des |
|||
|
|||||
|
|
composants de votre équipement périmé. |
|||
|
|
• Le symbole représentant une poubelle sur roues barrée d'une croix vous |
|||
|
|
invite à utiliser ces circuits. |
|||
|
|
• Pour en savoir plus sur les systèmes de collecte, de réutilisation et de |
|||
|
|
recyclage, veuillez contacter votre administration locale ou régionale |
|||
|
|
chargée de la gestion des déchets. |
|||
|
|
|
|
|
|
|
|
Coordonnées |
|
|
|
|
|
Adresse : |
Buffalo Technology UK Ltd |
||
|
|
|
|
2 Bracknell Beeches |
|
|
|
|
|
Old Bracknell Lane |
|
|
|
|
|
Bracknell |
|
|
|
|
|
Berkshire |
|
|
|
|
|
RG12 7BW |
|
|
|
|
|
Royaume-Uni |
|
|
|
Demandes générales : |
|
|
|
|
|
sales@buffalo-technology.com |
|||
Assistance technique :
Buffalo Technology propose une assistance technique en anglais, allemand, français, italien et espagnol.
Pour connaître les heures d'ouverture et les numéros de téléphone appropriés, visitez la page suivante : http://www.buffalo-technology.com/contact
24

Buffalo LinkStation Pro Duo (LS-WTGL/R1)
Contenuto della confezione
La ringraziamo per aver acquistato un dispositivo LinkStation Pro Duo di Buffalo.
Contenuto della confezione:
•LinkStation Pro Duo
•Cavo Ethernet
•Cavo di alimentazione
•CD di installazione di LinkNavigator
•Guida di installazione rapida
•Garanzia
IT
Layout del pannello posteriore |
1 |
|
|
|
|
 Cavo di alimentazione
Interruttore di alimentazione Pulsante Reset
Interruttore Power
Mode
Cavo Ethernet
(per router)
Porta USB
Fig. 1
Nota: lasciare l'interruttore Power Mode in posizione manuale fino al completamento dell'installazione.
25
Installazione del dispositivo LinkStation su PC |
2 |
|
|
|
|
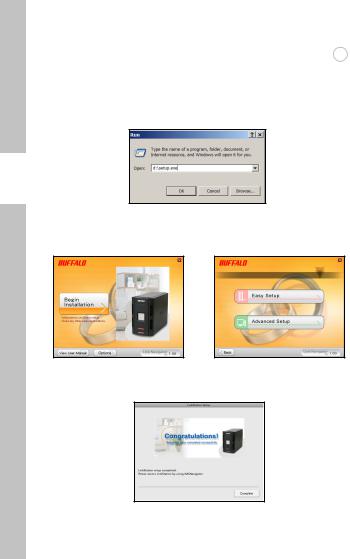
Inserire il CD di LinkNavigator nell'unità CD-ROM del computer. Se l'installazione non viene avviata automaticamente, è possibile eseguire questa operazione manualmente facendo clic su Start, quindi su Esegui.... Nella finestra di dialogo corrispondente, digitare d:\setup.exe (dove "d" corrisponde all'unità CD-ROM utilizzata). Premere OK per continuare (fig. 2).
IT
Fig. 2
Fare clic su Begin Installation (Avvia installazione) (Fig. 3) e selezionare l'opzione Easy Setup (Impostazione rapida) (Fig. 4). La procedura guidata consente di visualizzare l'installazione.
Fig. 3 |
Fig. 4 |
Fare clic sul pulsante Complete (Completa) per completare l'installazione del dispositivo LinkStation (Fig. 5).
Fig. 5
26
Installazione del dispositivo LinkStation su Mac |
3 |
|
|
|
|
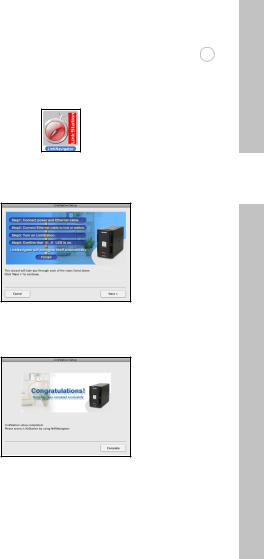
Se si sta eseguendo il software su un Mac, aprire il CD e fare clic sull'icona LinkNavigator per avviare l'installazione (fig. 6).
Fig. 6
Verrà avviata la procedura guidata (Fig. 7) e sarà visualizzato il processo di installazione.
Fig. 7
Fare clic sul pulsante Complete (Completa) per completare l'installazione del dispositivo LinkStation (Fig. 8).
Fig. 8
Congratulazioni. Il dispositivo LinkStation è pronto per essere utilizzato. Per ulteriori informazioni e per le opzioni di configurazione, consultare il Manuale per l'utente di LinkStation contenuto nel CD.
IT
27
 Loading...