

Page 1

NIRWa re 1.5
Operation Manual
11593587 en
Page 2

Imprint
Product Identification:
Operation Manual, NIRWare 1.5
115 93587 e n
Publication date:
04.2013, Version A
BÜCHI Labortechnik AG
Meierseggstrasse 40
Postfach
CH-9230 Flawil 1
E-Mail: quality@buchi.com
BUCHI reserves the right to make changes to the manual as deemed necessary in the interest of experience;
especially in respect to structure, illustrations and technical depth.
This manual is copyright. Information from it may not be reproduced, distributed, or used for competitive purposes, nor made available to third parties. The manufacture of any component with the aid of this manual without
prior written agreement is also prohibited.
Page 3

Contents
1. Welcome 1
2. Introduction 3
2.1. NIRWare Management Console ................................................................ 4
2.2. NIRWare Operator ..................................................................................... 6
2.3. NIRCal 5 ..................................................................................................... 7
3. General work flow 9
4. Software Installation 11
4.1. Important Notes ....................................................................................... 11
4.2. System requirements ............................................................................... 11
4.3. Installation procedure ............................................................................... 11
4.4. What has been installed ........................................................................... 13
4.5. Software removal ..................................................................................... 15
4.6. Software Licenses .................................................................................... 18
4.7. Software Registration ............................................................................... 19
4.8. Activating the licenses ............................................................................. 20
2.1.1. Application Designer ..................................................................... 4
2.1.2. Sample Management .................................................................... 4
2.1.3. Administrative Tools ...................................................................... 4
2.1.4. Security Designer .......................................................................... 5
2.1.5. Library Designer ............................................................................ 6
4.5.1. BUCHI NIRSolutions ................................................................... 15
4.5.2. BUCHI Database Manager ......................................................... 16
4.5.3. Microsoft SQL Server 2008 R2 ................................................... 16
4.5.4. Remove further software ............................................................. 18
5. Tutorial 21
5.1. Logon ....................................................................................................... 21
5.2. Defining a new password ......................................................................... 21
5.3. Creating a qualitative application ............................................................. 22
5.3.1. Introduction ................................................................................. 22
5.3.2. Creating an application for reference measurement .................. 24
5.3.3. Measuring reference spectra ...................................................... 27
5.3.4. Defining a property and a property value .................................... 36
5.3.5. Creating a basic calibration by using the NIRCal wizard ............ 40
5.3.6. Integrating a qualitative calibration into an application ............... 50
5.3.7. Routine use for ID check............................................................. 55
5.4. Creating a quantitative application ........................................................... 58
5.4.1. Introduction ................................................................................. 58
5.4.2. Creating an application for acquisition of calibration spectra ..... 59
5.4.3. Measuring reference spectra ...................................................... 62
5.4.4. Defining a property and a property value .................................... 70
5.4.5. Creating a basic calibration by using the NIRCal wizard ............ 76
5.4.6. Integrating a quantitative calibration into an application ............. 84
5.5. Content Uniformity Test (CUT) ................................................................ 90
NIRWare 1.5 Software Manual Contents iii
Page 4

5.5.1. Development of an application for Content Uniformity Testing
(CUT) of Solid Dosage Forms .................................................................. 90
5.6. Using applications and calibrations in Life Cycle state "Created" ......... 102
5.6.1. Application for development (Life Cycle state "Created") ......... 102
5.6.2. Application in routine use (Life Cycle state 'Approved') ............ 104
5.7. Importing license protected applications (e.g. BUCHI or Ingot Pre-
Calibrated Applications) ...................................................................................... 105
5.8. Measuring an SST ................................................................................. 106
5.8.1. Manual SST measurement ....................................................... 107
5.8.2. Automatic SST measurement ................................................... 107
5.9. Measuring a NADIA ............................................................................... 107
5.10. Measuring a reference ........................................................................... 109
5.10.1. Internal / External Reference .................................................. 109
5.11. Carrying out a measurement with the Operator..................................... 110
5.12. Extended Wavelength Range ................................................................ 125
5.12.1. How to Setup NIRWare for the Extended Range ................... 125
5.12.2. Limitations, Risks and Warnings ............................................. 128
6. NIRWare Suite 131
6.1. NIRWare Management Console ............................................................ 131
6.1.1. Management Console ............................................................... 131
6.1.2. Filter .......................................................................................... 134
6.2. Application Designer .............................................................................. 137
6.2.1. Introduction Application Designer ............................................. 137
6.2.2. Comparing external reference spectra and defining the tolerance
limit 142
6.2.3. Parameter list ............................................................................ 143
6.2.4. Assigning a property ................................................................. 143
6.2.5. Calculated property ................................................................... 147
6.2.6. Property settings ....................................................................... 153
6.2.7. Definition of calibration range, warning and action limits .......... 157
6.2.8. Bias and Slope calculation ........................................................ 158
6.2.9. Instrument parameters .............................................................. 162
6.2.10. Measurement cell specific settings ......................................... 168
6.2.11. Report parameters .................................................................. 169
6.2.12. Operator configuration parameters ......................................... 171
6.2.13. Bar code configuration ............................................................ 175
6.2.14. Settings for LIMS .................................................................... 177
6.2.15. Cyclic Measurement configuration .......................................... 178
6.3. Sample Management ............................................................................. 184
6.3.1. Introduction Sample Manager ................................................... 184
6.3.2. Batches ..................................................................................... 186
6.3.3. Properties .................................................................................. 189
6.3.4. Samples .................................................................................... 193
6.3.5. Measurements .......................................................................... 201
6.3.6. Reports overview ...................................................................... 212
6.4. Administrative Tools ............................................................................... 216
6.4.1. Introduction Administrative Tools .............................................. 216
6.4.2. System Logger .......................................................................... 217
6.4.3. Lifecycle Templates .................................................................. 219
6.4.4. NIRWare Configuration ............................................................. 222
6.4.5. Database Maintenance ............................................................. 223
6.4.6. Customer Information Configuration ......................................... 233
6.4.7. Import / Export .......................................................................... 234
6.5. Security Designer ................................................................................... 251
6.5.1. Introduction Security Designer .................................................. 251
6.5.2. Users and Groups ..................................................................... 252
6.5.3. Security Policies ........................................................................ 262
6.6. LIMS Interface ........................................................................................ 266
iv Contents NIRWare 1.5 Software Manual
Page 5

6.6.1. Introduction LIMS Interface ....................................................... 266
6.6.2. General Options ........................................................................ 267
6.6.3. Digital Signature Options .......................................................... 268
6.6.4. Import Options .......................................................................... 269
6.6.5. Export Options .......................................................................... 272
6.7. Library Designer ..................................................................................... 278
6.7.1. Introduction Library Designer .................................................... 278
6.7.2. Creating a new library ............................................................... 279
6.7.3. Spectra ...................................................................................... 284
6.7.4. Library Spectra Viewer .............................................................. 286
6.7.5. Validate Library ......................................................................... 287
6.7.6. Library Test ............................................................................... 289
6.8. Lifecycle ................................................................................................. 292
6.8.1. Lifecycle introduction ................................................................ 292
6.8.2. Lifecycle states ......................................................................... 293
6.8.3. Lifecycle actions ........................................................................ 294
6.8.4. Lifecycle transitions ................................................................... 295
6.8.5. Lifecycle templates ................................................................... 298
6.9. Administration ........................................................................................ 301
6.9.1. Installshield Update Service...................................................... 301
6.9.2. BUCHI Control System Service ................................................ 301
6.10. System test ............................................................................................ 303
6.10.1. SST ......................................................................................... 303
6.10.2. NADIA ..................................................................................... 304
7. NIRWare Operator 305
7.1. Introduction Operator ............................................................................. 305
7.2. Tab Overview ......................................................................................... 307
7.3. Operator Wizard ..................................................................................... 309
7.4. Select Application .................................................................................. 312
7.5. Deviating reference spectrum ................................................................ 313
7.5.1. Introduction ............................................................................... 313
7.5.2. Description ................................................................................ 313
7.5.3. Tips and Tricks .......................................................................... 315
7.6. Using the LIMS Interface ....................................................................... 316
7.6.1. Using LIMS Export only ............................................................ 316
7.7. Using bar codes ..................................................................................... 317
7.8. Service module ...................................................................................... 319
7.8.1. Introduction to the Service module ........................................... 319
7.8.2. Changing the instruments TCP/IP address .............................. 322
7.8.3. Activating the primary lamp after lamp change......................... 324
7.8.4. Resetting the lifetime counter of lamp or laser ......................... 325
7.8.5. Running an instrument setup .................................................... 326
8. Server installation of a database 329
8.1. Typical installation scenarios ................................................................. 329
8.1.1. Standalone ................................................................................ 329
8.1.2. Network installation ................................................................... 329
8.2. Worldwide connected N-500 network .................................................... 332
9. NIRWare Database Manager 333
9.1. NIRWare Database Manager................................................................. 333
9.1.1. Introduction ............................................................................... 333
9.1.2. Main window of NIRWare Database Manager.......................... 333
9.1.3. Restore database ...................................................................... 334
9.1.4. PC renamed .............................................................................. 335
NIRWare 1.5 Software Manual Contents v
Page 6

Page 7

ATTENTION
With the general “Read this” symbol, ATTENTIONs indicate the possibility of equipment
damage, malfunctions or incorrect process results, if instructions are not followed.
1. Welcome
Dear customer,
Thank you for choosing the BUCHI NIRFlex N-500 FT-NIR spectrometer with the NIRWare Software
Suite. We are sure that it will be a valuable tool for solving your analytical requirements.
NIRWare has been developed to design your complete NIR applications, to manage your samples
(spectra and reference values) and to customize the user interface for routine work. In addition it includes
all necessary tools for administration including import and export of calibrations and applications, security
and lifecycle settings.
The NIRWare Library Designer is an optional software module for identity control using direct spectral
comparison methods.
NIRWare does not include a module for calibration development. This is done using the new version of
the well-known and proven NIRCal 5 Chemometric Software. NIRCal and NIRWare are closely linked and
both use the identical database. The interaction between both is described in detail throughout this
manual.
BUCHI has made every effort to ensure the accuracy of the information given in this manual. We would
appreciate very much to be informed as soon as you may detect any mistake or omission.
BUCHI is going to improve its products and documentations continuously. Therefore the information in
this document will be subject to change without notice. It does not represent a commitment on the part of
BUCHI.
The software and/or files may be used or copied only in accordance with the terms of the license
agreement. Without the written permission, no part of this manual may be reproduced or transmitted in
any form or by any means, electronic or mechanical, including photocopying, recording, or information
storage or retrieval systems, for any purpose.
Should you come across any feature (important or minor), which needs improvement or extension, please
do not hesitate to contact us. Your feedback helps us to continuously improve our software and is highly
appreciated.
We are convinced that your new NIR system will be very helpful and beneficial for your daily work.
Flawil, March 2013
Warning notices used in this Online Help
NOTE
Useful tips for an easy operation of the software.
NIRWare 1.5 Software Manual Welcome 1
Page 8

2 Welcome NIRWare 1.5 Software Manual
Page 9

2. Introduction
NIR spectroscopy covers a wide variety of applications, which in turn place diverse demands on operation
and calibration. Especially the software of the NIR system must take this point into account and should
therefore be of modular and flexible design.
For years, the BUCHI NIRCal Chemometric Software has proven its worth as a powerful and flexible
software package for creating calibrations. It has been substantially expanded and improved for the new
generation now available. The wide variations in calibration creation requirements and routine use of NIR
spectroscopy have been given special consideration.
The NIRWare Software Suite allows creating routine applications which fulfill a wide variety of needs in
terms of data management and the necessary security settings. NIRCal and NIRWare are closely
interlinked in one single database.
BUCHI NIRWare Suite bundles several applications:
NIRWare Management Console including:
Application Designer
Sample Manager
Administrative Tools
Security Designer
Library Designer
NIRWare Operator
NIRCal 5, the advanced chemometric software used for calibration development
All data like applications, calibrations, spectra are stored in a database and are controlled by the lifecycle
management.
NIRWare 1.5 Software Manual Introduction 3
Page 10

2.1. NIRWare Management Console
NIRWare Management Console is related to Microsoft Management Console (MMC). It hosts all Snap-In
Modules of the NIRWare Suite except NIRWare Operator. The Management Console can be configured
for different Users or User Groups. Closely linked to the NIRWare Software Suite is the NIRCal
Chemometric Software.
2.1.1. Application Designer
The design of an application predominantly defines how the operator has to perform a specific analysis. It
includes the definition of instrument configuration and instrument parameters and the definition of the
required inputs (Batch number, sample name,...), the properties to estimate, the calibrations to be used,
the Standard Operating Procedure (SOP) displayed in order to guide the operator and finally to select the
report to be displayed.
The Application Designer is very flexible to customize a specific application. For easy use the basic mode
is available in which only a few entries are necessary to develop an application. For the advanced user
many options and features are available. Different report templates are available for qualitative and
quantitative applications.
2.1.2. Sample Management
NIRWare Sample Manager is designed to check previous measurement results and to enter reference
values.
The main concept of NIRWare Sample Manager is a software interface allowing to:
Manage Samples (assign reference values and properties to the sample)
Manage and Print-out results of previous measured samples and system tests
sign results electronically
Manage Properties (create and design properties)
For further details see section: Introduction Sample Manager
2.1.3. Administrative Tools
The entire software is database-oriented. In NIR spectroscopy, vast data volumes are processed. It must
be possible to manage these data easily. The NIRWare Administrative Tools allow backups and updates
to be made.
Audit Trail / System Logger
All relevant operations within all software modules, applications and calibrations are stored in the
Audit Trail. With this tool all changes are traceable. Other log functions for the system and errors
are also part of this tool. The Audit Trail is a required part of FDA’s 21 CFR Part 11 regulations.
Different filter functions are also available to select the requested entry.
4 Introduction NIRWare 1.5 Software Manual
Page 11

Life Cycle Templates
Different Life Cycle Templates can be selected for configuration. In order to simplify the use of the
lifecycle model there are three pre-defined lifecycle model templates: Unregulated, ER (Electronic
Records), and ERES (Electronic Records/Electronic Signatures), which cover different
requirements. The lifecycle involves all software modules, applications and calibrations.
NIRWare Configuration
In NIRWare Configuration, the IP address of the connected device and the database server to
which NIRWare connects are specified. In addition, installed language packages can be activated
and a reset of the grid configuration can be performed here.
Database Maintenance
Backup of the database and restore of previous backup files can be performed externally in the
BUCHI Database Manager (BDM). An Archive function is available.
Customer Information
Company name and address can be entered. This information will be shown in the header of result
reports.
Import / Export
The possibility of efficient and easy data exchange is highly significant. The import and export
functions of the Administrative Tools offer the required and direct options.
Applications, calibrations and samples can be exported from the database to an XML-File.
Applications, calibrations and samples previously exported as an XML-File can be imported to the
database.
For the selection different filter functions are available.
2.1.4. Security Designer
Especially in regulated environments, authorizations for access to the software or to individual software
modules must be precisely defined. A basic precondition for this task is an integrated user management
system.
Users and user groups
Access authorizations may be assigned exclusively to users and user groups registered in the
integrated user management system. For this purpose, you can create and manage users and user
groups with individual rights.
Security policies
All software components, including applications, can be fully protected against unauthorized
access.
Account Policy
With the aid of the Account Policy, the rules are defined for user names and passwords. For
example, it is possible to define the minimum length of the user name as well as the complexity
NIRWare 1.5 Software Manual Introduction 5
Page 12

and period of validity of the passwords. A password history check and an automatic logout function
are implemented as well.
2.1.5. Library Designer
For identity checking at goods receipt, it is not always necessary to apply chemometric procedures such
as cluster analysis or SIMCA. Often, a direct comparison of spectra will also produce unambiguous results
directly and require fewer reference samples than in chemometric models. With the aid of the Library
Designer, it is possible to create and manage the necessary spectral libraries. On the basis of existing
spectra, any number of libraries can be created which can be interlinked to allow spectra to be compared.
The Library Designer enables you to select from ten different algorithms for spectral comparison and to
define the acceptance criteria to ensure optimal matching to your specific task. At the push of a button,
you can perform internal and external validations of the libraries.
2.2. NIRWare Operator
All measurements are performed using the NIRWare Operator. Its user interface can be tailored to user
specific needs. The integrated standard operating procedures guides users through the application. In the
routine mode, only a few sample-specific entries are required, which may also be entered using a barcode
reader. The results are displayed directly in the report format on the monitor. Even users with little PC
experience will be able to use this software after just a short introduction
Additionally there are tools for instrument tests implemented.
6 Introduction NIRWare 1.5 Software Manual
Page 13

2.3. NIRCal 5
NIRCal 5 is the proven chemometric software. It is database oriented and includes an integrated user
management feature. Calibrations of NIRCal 5 are incorporated directly in the application with the
NIRWare Application Designer.
NIRCal is a chemometric software to analyze measured spectra and to develop calibrations.
General features of NIRCal:
Fully database oriented
Internal User Management (via NIRWare Security Designer)
Performance increase (up to 10 times faster than NIRCal 4.21)
Integrated lifecycle model
Please confer to the dedicated NIRCal manual for detailed information.
NIRWare 1.5 Software Manual Introduction 7
Page 14

Page 15

3. General work flow
In the development of a routine application, different software modules are used. The application
development cycle is summarized below:
1. Develop an application with NIRWare Application Designer
2. Measure the calibration samples with NIRWare Operator
3. Assign reference values to each sample with NIRWare Sample Manager
4. Analyze spectral data and develop a calibration with NIRCal 5
5. Assign the calibration to the application with NIRWare Application Designer
6. Measure and predict measured samples in routine use with NIRWare Operator
NIRWare 1.5 Software Manual General work flow 9
Page 16

The shown roadmap illustrates the workflow under the Life Cycle Template "Unregulated".
The Life Cycle Template "ER" (Electronic Records) and "ERES" (Electronic Records/Electronic
Signatures)", usually used in pharmaceutical industry, contains an additional step.
An application or calibration is set in the life cycle state "checked" for test runs before it can be set to the
"approved" state, which is used for released applications and calibrations.
10 General work flow NIRWare 1.5 Software Manual
Page 17

4. Software Installation
This chapter explains how to install or update the NIRWare Software Suite and introduces the license
philosophy.
4.1. Important Notes
A new version of NIRWare cannot be installed at the same time as a previous version. In case of an
existing installation of NIRware it will be removed by the setup of the new version. An existing NIRWare
database from a prior installation will be upgraded. Therefore it is recommended to backup all needed
data prior to installation.
NIRWare 1.5 can run on 32-bit and 64-bit versions of Windows. NIRCal 5.5 runs only on the 64-bit
versions of Windows. If you choose to install NIRWare 1.5 on a 32-bit operating system, NIRCal 5.5 will
not be installed.
A user with administrator rights for the operating system is required to install the software.
4.2. System requirements
The PC must fulfill the following requirements:
Windows 7 Professional / Enterprise / Ultimate (32-bit or 64-bit) SP1, 3 GB RAM or higher
Windows 8 Pro (64-bit), .NET 3.5 recommended, 3 GB RAM or higher
Intel Core i3 or higher and 1.4 GHz or faster
3GB RAM or higher
15GB free hard disk space
DVD-ROM drive
1 x 100 Mbit/s LAN (2x 100 Mbit/s LAN recommend)
1280x1024 display resolution
The firewall needs to be stopped during the installation procedure
ATTENTION
For security reasons, we highly recommend to disconnect from the internet before shutting
down a firewall.
4.3. Installation procedure
To install the NIRWare software, proceed as follows:
Insert the Installation DVD. If the installation window does not start automatically, then manually
run the executable ‘Start.exe’. In the opening window, click on ‘Install NIRWare 1.5 and NIRCal
5.5’.
NIRWare 1.5 Software Manual Software Installation 11
Page 18

The InstallShield Wizard with the list of software parts to be installed opens. Click ‘Install’ to start
the installation.
Wait during installation of .NET 4.0 and MS SQL Server 2008 R2…
After automatic installation of .NET 4.0 and MS SQL Server 2008 R2, click OK to confirm the
warning that any older NIRWare version will be automatically uninstalled when installing NIRWare
1.5.
Follow the installation wizard and use the default options.
Click OK to confirm the complete installation of NIRSolutions.
12 Software Installation NIRWare 1.5 Software Manual
Page 19

Click on green check mark to confirm or let the timer run its course. Ensure the setup finishes
successfully and no error message is shown.
Click Yes to confirm to restart your system
4.4. What has been installed
The following three shortcuts have been added to the desktop for all users (Windows 7 and Windows
Windows 7: These entries have been added to the start menu for all users
Windows 8: These tiles have been added to the Start screen of the user who has done the installation
NIRWare 1.5 Software Manual Software Installation 13
Page 20

The above tiles are only added to the Start screen of the user who installed NIRWare 1.5. Other users do
not see automatically any NIRWare 1.5 tiles on their start screens. Users who want to add NIRWare 1.5
tiles to their start screen have to select the desired apps (right click on the start screen and click on ‘All
apps’, or press the keys Windows-Q to open the search app view) and pin them to the start screen: Right
click on the app and then click on ‘Pin to Start’
Example: Pin NIRCal to Start.
Management Console, Operator and NIRCal
Windows 7: These applications can also be started using the Start menu:
Start / All Programs / Buchi / NIRSolutions / …
Windows 8: These applications can also be started using the Start screen, if they have been
pinned to the Start screen. Alternatively, just start typing the name of the application on the Start
screen until you see the desired application selected.
14 Software Installation NIRWare 1.5 Software Manual
Page 21

These three aplications are stored by default here:
C:\Program Files\Buchi\NIRSolutions
BUCHI Database Manager
Windows 7: This application can be started using the Start menu:
Start > All Programs > Buchi > Database Manager > Buchi Database Manager
Windows 8: This application can also be started using the Start screen, if it has been pinned to
the Start screen. Alternatively, just start typing the name of the application on the Start screen
until you see the desired application selected.
This application is stored by default here:
C:\Program Files\Buchi\Buchi Database Manager
4.5. Software removal
4.5.1. BUCHI NIRSolutions
Please uninstall the existing software version manually. For this purpose:
Windows 7: Start > Control Panel > Uninstall a program
Windows 8: On the Start screen start typing control panel until you see the app Control Panel
selected, then hit the enter key, then click on Uninstall a program
Select BUCHI NIRSolutions from the list and click Uninstall
Confirm the next few dialog boxes to uninstall BUCHI NIRSolutions, including the one that asks
for a reboot of your system.
The default shortcuts are removed after the reboot. Manually added shortcuts remain and have to
be deleted manually.
NIRWare 1.5 Software Manual Software Installation 15
Page 22

4.5.2. BUCHI Database Manager
Please uninstall the existing software version manually. For this purpose:
Windows 7: Start > Control Panel > Uninstall a program
Windows 8: On the Start screen start typing control panel until you see the app Control Panel
selected, then hit the enter key, then click on Uninstall a program
Select BUCHI Database Manager from the list and click Uninstall
Confirm the next few dialog boxes to uninstall BUCHI Database Manager
4.5.3. Microsoft SQL Server 2008 R2
Please uninstall the existing software version manually. For this purpose:
Windows 7: Start > Control Panel > Uninstall a program
Windows 8: On the Start screen start typing control panel until you see the app Control Panel
selected, then hit the enter key, then click on Uninstall a program
Select Microsoft SQL Server 2008 R2 (64-bit) from the list and click Uninstall/Change
Select Remove
16 Software Installation NIRWare 1.5 Software Manual
Page 23

Windows 8: If .NET 3.5 is not enabled then Windows asks to enable it.
To download and install this feature, an internet connection is needed.
Click OK to confirm the Setup Support Rules
Select the instance BUCHISQLSERVER and click Next to remove it
NIRWare 1.5 Software Manual Software Installation 17
Page 24

Click Select All to select all features and click Next to remove them
Click Next to confirm Removal Rules
Click Remove to confirm beeing Ready to Remove
Click Close to finish the uninstallation of SQL Server 2008 R2
4.5.4. Remove further software
The following software versions can be uninstalled easily by going to
Windows 7: Start > Control Panel > Uninstall a program
Windows 8: On the Start screen start typing control panel until you see the app Control Panel
selected, then hit the enter key, then click on Uninstall a program
Select the program and click Uninstall
Microsoft SQL Server 2008 R2 Management Objects (x64)
Microsoft SQL Server 2008 R2 Native Client
Microsoft SQL Server System CLR Types (x64)
The following software versions can also be uninstalled easily in the same way when they are not needed
by other installed software
SAP Crystal Reports runtime engine for .NET Framework 4 (32-bit)
SAP Crystal Reports runtime engine for .NET Framework 4 (64-bit)
4.6. Software Licenses
After Installation of NIRWare or NIRCal the software can be used in DEMO mode for 60 days. Within
these 60 days it is recommended to register the software and apply for a license.
18 Software Installation NIRWare 1.5 Software Manual
Page 25

4.7. Software Registration
The registration form can be saved as an *.xml file and needs to be sent to your BUCHI contact person,
for example as an email attachment.
The form can be opened using the "NIRWare Management Console" Menu: Help > Software
Registration... or clicking the button "Register..." on the startup of a trial version.
The registration form:
Please fill out the bold mandatory fields. The AN and SN numbers are necessary for new registrations;
they can be found on a sticker on the installation DVD.
Click OK and save the file in a convenient place. Email this saved file to your BUCHI sales representative.
NIRWare 1.5 Software Manual Software Installation 19
Page 26

4.8. Activating the licenses
- To activate the demo mode start the Management Console and select Demo mode.
- When the software is in demo mode it is valid for 60 days.
- To activate the software and make it a fully valid version, licenses are required.
- Licenses are provided by BUCHI.
- The form can be opened using the “NIRWare Management Console” --> Menu: Help > Software
Registration... or clicking the button “Register...” on the startup of a trial version.
20 Software Installation NIRWare 1.5 Software Manual
Page 27

5. Tutorial
5.1. Logon
The NIRWare Management Console, the NIRWare Operator and NIRCal 5 are protected by Logon.
After NIRWare is installed, four default users are provided, which do not require password entry at the
beginning.
Just type in the corresponding user name and click the green checkmark to log on.
The four default users are:
Administrator
QManager
Designer
Operator
NOTE
We highly recommend to define passwords for the four default users or deactivate the accounts after
creating new user accounts with password to control the software access.
5.2. Defining a new password
After a certain time, your password will expire. The number of password expiration days is defined in the
submenu Account Policy. You might get a warning before your password expires when a number of days
is defined for the property "Show Warning Before Expiration" in the submenu Account Policy.
When you are prompted to change your password, you can do so in the logon window:
NIRWare 1.5 Software Manual Tutorial 21
Page 28

Click on the icon behind the Password line. The logon window is extended:
Enter your new password in the corresponding line and confirm it below. Then click the check mark button
to save your changes.
5.3. Creating a qualitative application
5.3.1. Introduction
This tutorial describes how to create an application for identity check.
As an example, the NIRFlex N-500 is used with the measuring cell Solids and the Vial Add-on.
22 Tutorial NIRWare 1.5 Software Manual
Page 29

The application should be able to check the identity of four different types / forms of sugar: Fructose (=
fruit sugar), lactose (= milk sugar), sucrose (= crystal sugar) and fine sucrose (= sugar powder).
Note that sucrose and fine sucrose are of the same chemical composition and only differ in particle size.
The process of creating a ready-to-use NIR application requires reference samples. These are samples of
doubtless identity and quality. In combination with their NIR spectra (‘reference spectra’) they provide the
necessary data sets for calculating a chemometric calibration. The calibration can then be used for
prediction, which means deriving the identity information from the spectra of substances to be tested.
A typical use of an NIR application with such a calibration is the identity check of incoming substances in
a pharmaceutical plant.
It is recommended to use dedicated applications for reference measurement and routine use (=
prediction).
NOTE
The terms 'reference measurement', 'reference samples' or 'reference spectra' used in the tutorial
describes the data collected for calibration development.
To ensure that reference and unknown samples are measured under identical spectrometric conditions,
we suggest to start the development of the routine application with a copy of the application for reference
measurement, which is then adjusted.
Please keep in mind that only applications in the ‘Approved’ Lifecycle state are visible to (and usable by) a
user from the user group ‘Operators’.
These considerations are visualized in the following scheme:
NIRWare 1.5 Software Manual Tutorial 23
Page 30

The upper part of the scheme includes all steps regarding the reference samples.
The middle part shows the processes for designing an application for routine use.
The last part indicates the routine use, which is the goal of the development process.
In the following, we will use the term ‘Operator user’ for a user account from the user group ‘Operators’,
and ‘Administrator’ for one belonging to the user group ‘Administrators’.
For Logon as such a user, the correct user name and password are required for the corresponding dialog.
5.3.2. Creating an application for reference measurement
This first part of the tutorial covers the development process for a method that allows an operator to
collect spectra of reference samples. These are necessary for calculating a qualitative chemometric
calibration.
The application development starts in the NIRWare Management Console (MC).
Start the program by clicking the icon shown above and log on as a ‘Designer’ (access to 'Application
Designer' and 'Sample Management') or as an 'Administrator' (full access).
24 Tutorial NIRWare 1.5 Software Manual
Page 31

Left-click on ‘Application Designer’ in the tree menu on the left, then on the subtitle ‘New’. A dialog
appears for creating a new application
Fill in the application name and all other requested information into the white fields on the right side. The
‘SOP Text’ will later on tell the Operator how to perform the actual measurement, so it is important to give
a complete description which is easily understandable.
Click the Save icon to save the new application to the database.
Your newly created application is now shown in the tree menu.
NIRWare 1.5 Software Manual Tutorial 25
Page 32

Open it by double-clicking on its field in the tree menu, or by clicking once on the plus-symbol in front of it.
Then select its subtitle ‘Operator Configuration’. You will now see only one field for the SOP text.
To see all of the information fields on the right, click on the ‘Show Advanced Settings’ icon in the menu
bar .
The fields on the right are greyed out, indicating that they cannot be changed right now.
To change the settings, first click on the ‘Edit Data Set’ icon .
Notice the change in the icon bar for Lifecycle state from ‘Created Idle’ to ‘Created Editing’ (see above).
26 Tutorial NIRWare 1.5 Software Manual
Page 33

You can now make changes to all white fields. For our example, we just change the ‘Number of
measurement sequences’ from 1 to 3.
This will cause a triplicate measurement of every reference sample, which creates more variation in the
spectra set later used for calibration. Thus, we will get more robust calibrations.
Save all changes you made to the database by clicking the respective icon .
The fields are greyed out again afterwards, indicating successful saving.
The method for triplicate calibration sample measurement is now still in the ‘Created’ state, where only a
‘Designer’ or ‘Administrator’ can see and use it in the operator software.
To provide this method for the operator user, ‘Put the data set into the next state’ by clicking on the
corresponding icon .
Now the application is in the ‘Approved’ state.
NOTE
Approved applications cannot be changed anymore. To adjust something, you first have to create a copy
of the application, which again starts in the ‘created’ state. Then you can apply changes to this new
application.
The application is now ready for measurement of reference spectra with the Operator software.
5.3.3. Measuring reference spectra
To measure spectra of reference samples, the Operator software is used.
Measurement of reference spectra is the second step in the development process.
NIRWare 1.5 Software Manual Tutorial 27
Page 34

Start the operator software by clicking the corresponding icon and log on as an operator user.
Click the ‘Select application’ icon: .
28 Tutorial NIRWare 1.5 Software Manual
Page 35

Select the application you created for spectra measurement of the calibration samples.
Notice the access restrictions for the Operator: He can only see and use ‘Approved’ applications.
Click on the ‘New’ icon of the ‘Measurement description - Batch’ field to create a new batch.
NIRWare 1.5 Software Manual Tutorial 29
Page 36

Type in the name of your batch, then click on the green check mark button.
Then type in the information for AnalysisID and Sample names.
Note: For ‘real’ applications, use ‘speaking’ names that precisely identify each sample just from the name.
Also think of using the autoname functions described in the NIRWare documentation.
If you have filled in and checked all information, prepare the samples for measurement (i.e. place all vials
in the Autosampler) and press the green arrow button.
During the measurement sequence, the SOP text field is greyed out.
If an ‘Instrument Suitability Test’ (SST) starts, just wait until it is finished. Then the instrument will start
with the measurement sequence. This includes periodic measurement of internal and external references.
In our example with the vial Autosampler option, these measurements are automatized. With other
options, the software will give a description of what to do.
30 Tutorial NIRWare 1.5 Software Manual
Page 37

First, the external reference is measured.
Then the samples are measured. All spectra are displayed in one window.
Since the intensity of the external reference is so much higher than that of the sample spectrum, the latter
are just a flat line on the x-axis.
NIRWare 1.5 Software Manual Tutorial 31
Page 38

To have a closer look on the sample spectrum, deactivate the check box for ‘External Reference’ below
the graphic.
The vial autosampler will automatically continue with the next samples after confirmation of the following
message:
32 Tutorial NIRWare 1.5 Software Manual
Page 39

Turn the sample vials and click on the green check mark icon to start the next measurement sequence.
The spectra shown below are all from identical fructose samples.
The strong variations along the y-axis (shift) are typical for reflectance measurements of solids and result
from variations in particle size and –orientation, and other sources of variation, e.g. thickness of the glass
vials.
NIRWare 1.5 Software Manual Tutorial 33
Page 40

To zoom into the spectrum, click and hold the left mouse icon while dragging the cursor.
34 Tutorial NIRWare 1.5 Software Manual
Page 41

The selected frame will be magnified:
To change back to full view, click on the symbol with the magnification lens above the globus.
NOTE
In the Operator it is possible to delete spectra, but only right after they have been measured and if they
are not used for prediction with a calibration. This might be desirable if e.g. a vial was not correctly
positioned in the Autosampler. To delete a measurement, click the red cross button (red cross in the
upper left corner, not the one next to the magnification lens icon).
You can now select samples from the last measurement sequence for deletion.
To select (or deselect) a line in the list, press and hold the Ctrl-icon on your keyboard while left-clicking on
that line. Click on the red cross button to delete the selected measurements.
NIRWare 1.5 Software Manual Tutorial 35
Page 42

After completion of the measurement of your reference samples, switch to the NIRWare Management
Console to continue with the next step in application development: the assignment of properties and
property values. In this case, it means to add the substance identity behind each spectrum.
5.3.4. Defining a property and a property value
After the spectra of the reference samples have been measured, the properties (here: identities) have to
be connected to the reference samples. This is done in the NIRWare Management Console (MC). The so
created data sets are later on the basis for building a calibration in NIRCal.
Switch to the MC, and select ‘Sample Management’ from the tree menu.
36 Tutorial NIRWare 1.5 Software Manual
Page 43

Select ‘Properties’ to open a list with all properties that have been defined so far.
NOTE
If the property you need is not in the list, create it by clicking on ‘Properties’ in the tree menu, and then
selecting ‘new property’.
Define the type (here: identification) and name of the property.
Note: Additionally, it is possible to define several Substance IDs, for example a company specific number
code that is used as substance label. This code can be used later on in the Operator software to define
the expected substance in the ID application, instead of the substance name. Also type in your name to
document who created this property.
Click on the Save icon to write this property definition to the database.
Create all new properties accordingly.
Now we want to tell the computer which sample belongs to which property.
NIRWare 1.5 Software Manual Tutorial 37
Page 44

Switch to ‘Sample Management – Samples’ to open a list with all samples that have been measured.
Notice that in the list the ‘Time Stamp’ filter is set to a specific date.
Right click the time stamp icon to ignore, or left click on it to edit the filter settings
To shorten the list of samples, you can also use additional filters, e.g. on the ‘Application’ column. This
can be helpful if you used dedicated applications for reference spectra measurement of each sample type.
38 Tutorial NIRWare 1.5 Software Manual
Page 45

Select your reference samples by clicking on the topmost reference sample in the list. Then press and
hold the Shift-button on your keyboard while scrolling down the list (using the mouse or the arrow keys on
your keyboard). Alternative: By pressing ‘Ctrl-Shift-End’ on your keyboard you can highlight everything
from the first selection down to the end of the list.
Then click on the `Open existing data set`-icon in the upper left corner to create a new Sample Set .
A window with three lists opens: ‘available properties’, ‘assigned properties’, and ‘samples’.
This allows you to select properties for the samples by shifting them from the ‘available’ to the ‘assigned’
list.
NIRWare 1.5 Software Manual Tutorial 39
Page 46

Select a property that you want to assign to your samples. Then click on the right-arrow key to shift it to
the ‘assigned’ list. Repeat this process for all your properties.
Notice that this assignment created a matrix with check icons in the ‘Samples’ window. By activating the
check icons you can now easily create a matrix that connects sample (=row) and property (=column).
Save these data by clicking on the corresponding icon .
You can now switch to NIRCal to build a calibration based on this data set.
5.3.5. Creating a basic calibration by using the NIRCal wizard
This chapter describes how to create a calibration with NIRCal, using the data set of reference spectra
with previously assigned properties. The description here is limited to the use of the NIRCal wizard, since
40 Tutorial NIRWare 1.5 Software Manual
Page 47

detailed optimization procedures and description of NIRCal features are described in the NIRCal
documentation.
Start NIRCal and log on as an administrator.
NIRWare 1.5 Software Manual Tutorial 41
Page 48

From the menu, select View/Toolbars and select the Toolbars as shown in the picture
To load spectra from the database into your empty project, click on the binocular icon .
Select the spectra from the list, and click on the green check mark icon.
42 Tutorial NIRWare 1.5 Software Manual
Page 49

To simplify the selection, use appropriate filter settings, especially for ‘Time’ and ‘Application’. (Time: right
click to ignore time filter, left click to set time filter settings.)
Since we performed triplicate spectra measurement of each sample, we now find three spectra for each
individual sample.
Select the NIR-Explorer window, select ‘spectra’ from the tree menu and check if all spectra have been
correctly loaded.
Before calculating a first calibration, make sure that ‘CLU’ (for ‘cluster calibration’) is selected in the menu
bar
Click on the Overview icon to start a first calculation.
A message appears regarding Calibration- and Validation set selection (C-Set and V-Set):
NIRWare 1.5 Software Manual Tutorial 43
Page 50

Click on YES to let the C/V-selection wizard create a selection.
Note: It is highly recommended to perform the selection sample wise, so that ALL spectra of one
individual sample are EITHER in the C- OR V-Set. This is described in detail in the NIRCal
documentation. For our example, we will leave the result from the selection wizard untouched.
A full calculation is performed, and the result is visualized in nine windows.
In case that your spectra are all shown in the same color, they are all marked as selected. Press the ‘C’
icon to unselect, so that you can differentiate between the different property colors.
From the menu, select ‘Wizard - Calibration Wizard’ (see above). A dialog appears for defining general
parameters.
44 Tutorial NIRWare 1.5 Software Manual
Page 51

Select ‘identification’ as calibration type, and click on ‘OK’.
The wizard now starts with the optimization process, which will take a few minutes. The progress is
visualized in the ‘Calibration Q-Value overview’.
In the course of the optimization process, you see the Q-Value rise from zero (no working calibration) up
close to 1 (=perfect calibration).
After the wizard is finished, the results are shown in a list where the best calibrations (with the highest Qvalues) are found on top of the list.
NIRWare 1.5 Software Manual Tutorial 45
Page 52

The ten best results are stored in the NIRCal Explorer, and the one with the highest Q-value is set to
‘active’.
From the plot ‘Scores vs. Scores’ of PC1 vs. PC2 you can see an excellent separation for two of the four
properties.
Only one overlap is displayed.
But since we look at a 2-dimensional projection of a multidimensional space, we have to keep in mind that
an overlap might only result from the projection, and not from a spatial interpenetration of the clusters in
46 Tutorial NIRWare 1.5 Software Manual
Page 53

the multidimensional space. In other words: we have to check if the overlap is only a question of
perspective.
For this purpose, we select a projection to PC1 vs. PC3.
Notice that we see an overlap again, but of different clusters. The overlap from the first projection is now
resolved. This proves that the four clusters are in fact separated from each other.
This can be clearly demonstrated by using a 3D- instead of a 2D-projection:
Select from the menu ‘Graphics – Scores – 3D-Scatter’, and have a look at a 3D-projection on PC 1, 2
and 3
NIRWare 1.5 Software Manual Tutorial 47
Page 54
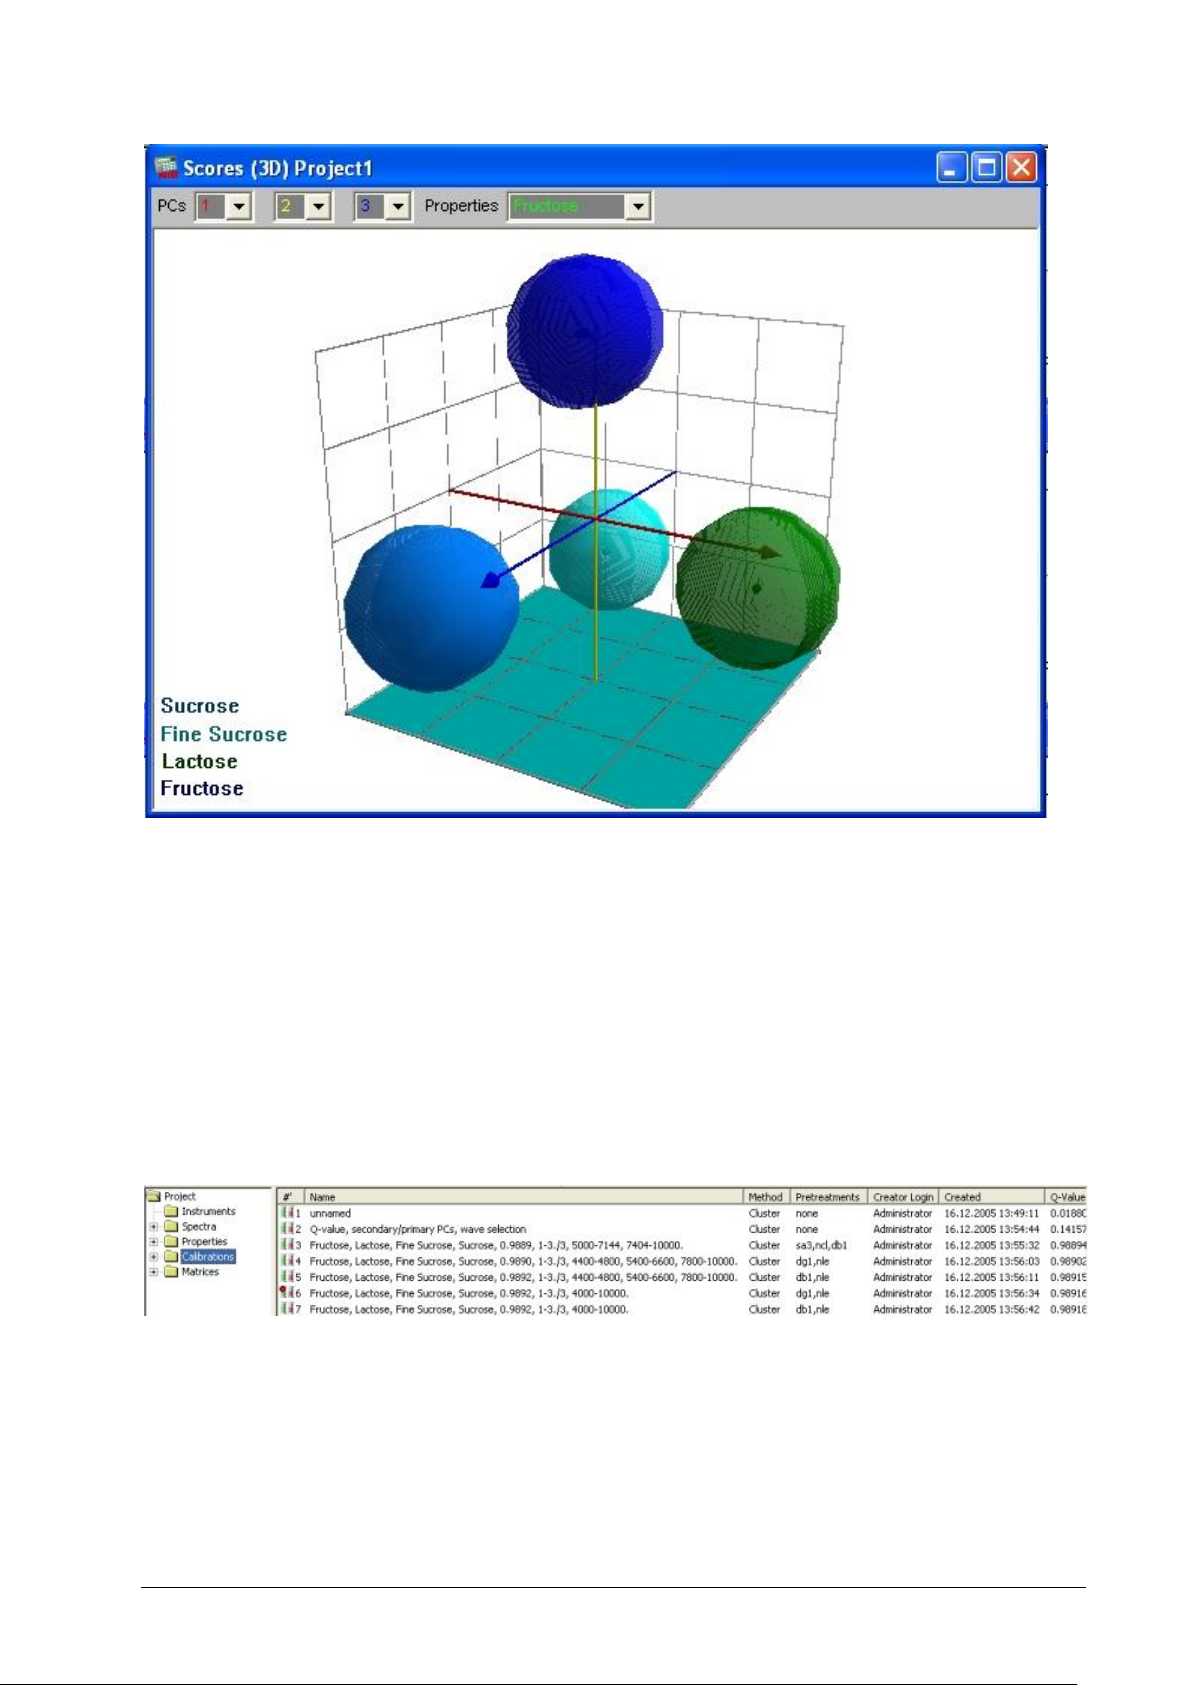
Click on the ‘R’ icon on your keyboard to start (and stop) the autorotation function.
The plot confirms that the calibration from the wizard is well capable to differentiate between all four sugar
types.
(Comment: For more complex examples, the same rule for overlap checking applies to 3D- as for 2Dprojections: Look at every overlap from different perspectives.)
Now switch again to the NIRCal Explorer window and have a look at the ‘Calibrations’
Note that the ten best calibrations are stored here. The one with the highest Q-value is set to active
(indicated by a red dot).
Since we only need one calibration, we select everything except for the one we want to keep. This is done
by holding down the Ctrl-Key while clicking in the list on the calibration to be selected. Then right-click on
the selection and choose ‘delete’. A confirmation message appears, which you will answer with YES.
48 Tutorial NIRWare 1.5 Software Manual
Page 55

To save the calibration to the database, click on the ‘save’ icon in the menu bar .
Type in a name for your NIRCal project and click on the ‘Save As’ icon.
So far the calibration is still in the ‘created’ state. If you would try to use it in an application, this would
prevent you from changing your application (!) into the next state, because an approved application
requires an approved calibration.
It is suggested to recalculate the first calibration. This is a master calibration, which organises the spectra
in the project and can never be put the approved LC state. Copy this calibration, open the copy (LC: Edit),
rename this: give a short name preferable with date at the end. Make a new calculation after renaming.
Put this calibration to "approved" state.
To put your application into the next state, right-click on the name of the calibration in the NC Explorer,
select ‘Lifecycle’ and ‘Next’.
NIRWare 1.5 Software Manual Tutorial 49
Page 56

Now your calibration is finished and in the approved state, so it can be used for integration into an
application. This is done in the NIRWare Management Console. (Please remember that only applications
with an approved calibration can be approved.)
5.3.6. Integrating a qualitative calibration into an application
The final step in creating an application for identity control with NIR is to integrate the calibration into the
application.
Remember that we started with an application for triplicate measurement of reference substances. This
serves now as a template for the routine application. In effect, we create a copy of the reference method,
make adjustments to this, and integrate the calibration. Adjustments involve mainly the number of
measurements per sample, the SOP text, and Reports. All instrument parameters remain untouched,
ensuring identical spectral conditions for both reference samples and those to be tested.
Both the creation of the routine use application and the integration of the calibration into this is performed
in the NIRWare Management Console (MC).
Load the existing application for data acquisition by choosing ‘Open’ from the ‘Application Designer’ in the
tree list. Then select the application from the list on the right:
50 Tutorial NIRWare 1.5 Software Manual
Page 57

The application is now available as a new point in the tree menu.
Click on the ‘Copy’ icon to create a copy of this application.
This copy starts in the ‘created’ state, while the original application remains ‘approved’.
To change the name, you first have to click on the ‘Edit’ icon .
This causes a change from ‘idle’ to ‘edit’ mode.
Now you can change application name and description
Save this change to the database by clicking on the ‘Save’ icon .
NIRWare 1.5 Software Manual Tutorial 51
Page 58

Next we change the ‘number of measurement sequences’ from 3 to 1.
From the tree menu, select the ‘Operator configuration’ menu of your application
Remember that the complete view as shown above is only visible if the icon ‘show advanced settings’
was activated.
Again, first change to ‘edit’ mode. Then change the number of measurement sequences to ‘1’. Also type
in an appropriate Standard Operation Procedure (SOP) description:
Save this dataset by clicking on the save icon again.
The application for routine use has been prepared, and the calibration can now be assigned to it.
52 Tutorial NIRWare 1.5 Software Manual
Page 59

On the Properties level click the button to make the property editable.
Select ‘Properties - New’ menu from the tree menu of your application and select the drop down-menu for
‘Assigned Calibration’.
In the ‘Assigned’ column, set a check-mark in front of the calibration you want to use. Click on the green
check-mark button to assign the chosen calibration to the application. A message appears, which you just
confirm:
NIRWare 1.5 Software Manual Tutorial 53
Page 60

The properties defined in the selected calibration are now automatically assigned to the application.
A 'Name' can be entered as a label to e.g. translate a foreign property name.
The ‘Unit’ field should be left blank, since we do not create a quantitative application.
Save all changes made to this data set .
Then select your application from the tree and save it also to the database .
Now this newly created application is ready for use in the operator software, but only for administrators.
54 Tutorial NIRWare 1.5 Software Manual
Page 61

NOTE:
To make this application also available for operators, select the application and put it in the approved
state .
You can now start with routine ID checking of sugar samples with the Operator software.
5.3.7. Routine use for ID check
The previously developed application was designed for routinely testing of the identity of sugar samples.
Similar applications are performed in the pharmaceutical industry, especially for ID testing of incoming raw
materials.
To use the previously created application for sugar ID check, switch to the Operator software and log on
as an ‘Operator’.
Select your application for routine measurement by clicking on the binocular icon .
Select your application from the list:
NIRWare 1.5 Software Manual Tutorial 55
Page 62

Create a new batch and define name and expected identity of the substance(s) you want to test:
56 Tutorial NIRWare 1.5 Software Manual
Page 63

We want to use the application to check if our sugar samples really consist of lactose (‘milk sugar’). For
demonstration purposes, we choose a sample of fructose (‘fruit sugar’) and one of lactose
As expected substance we choose lactose. If our calibration is working properly, the first sample will be
rejected, and the second one accepted.
Press the green arrow button to start the measurement sequence.
Since the identity of the first substance is (deliberately) not the expected one, the following message
appears:
Confirm by clicking on the green check mark button. The sample will then be measured a second time.
This is the default setting in case of a failed ID test, and can be adjusted in the Management console.
The second sample is accepted, since name, spectral deviations (residual) and distance to cluster are all
within the allowed limits of the calibration.
In the report of the rejected sample, we find also more information than just the fact that this sample was
rejected:
NIRWare 1.5 Software Manual Tutorial 57
Page 64
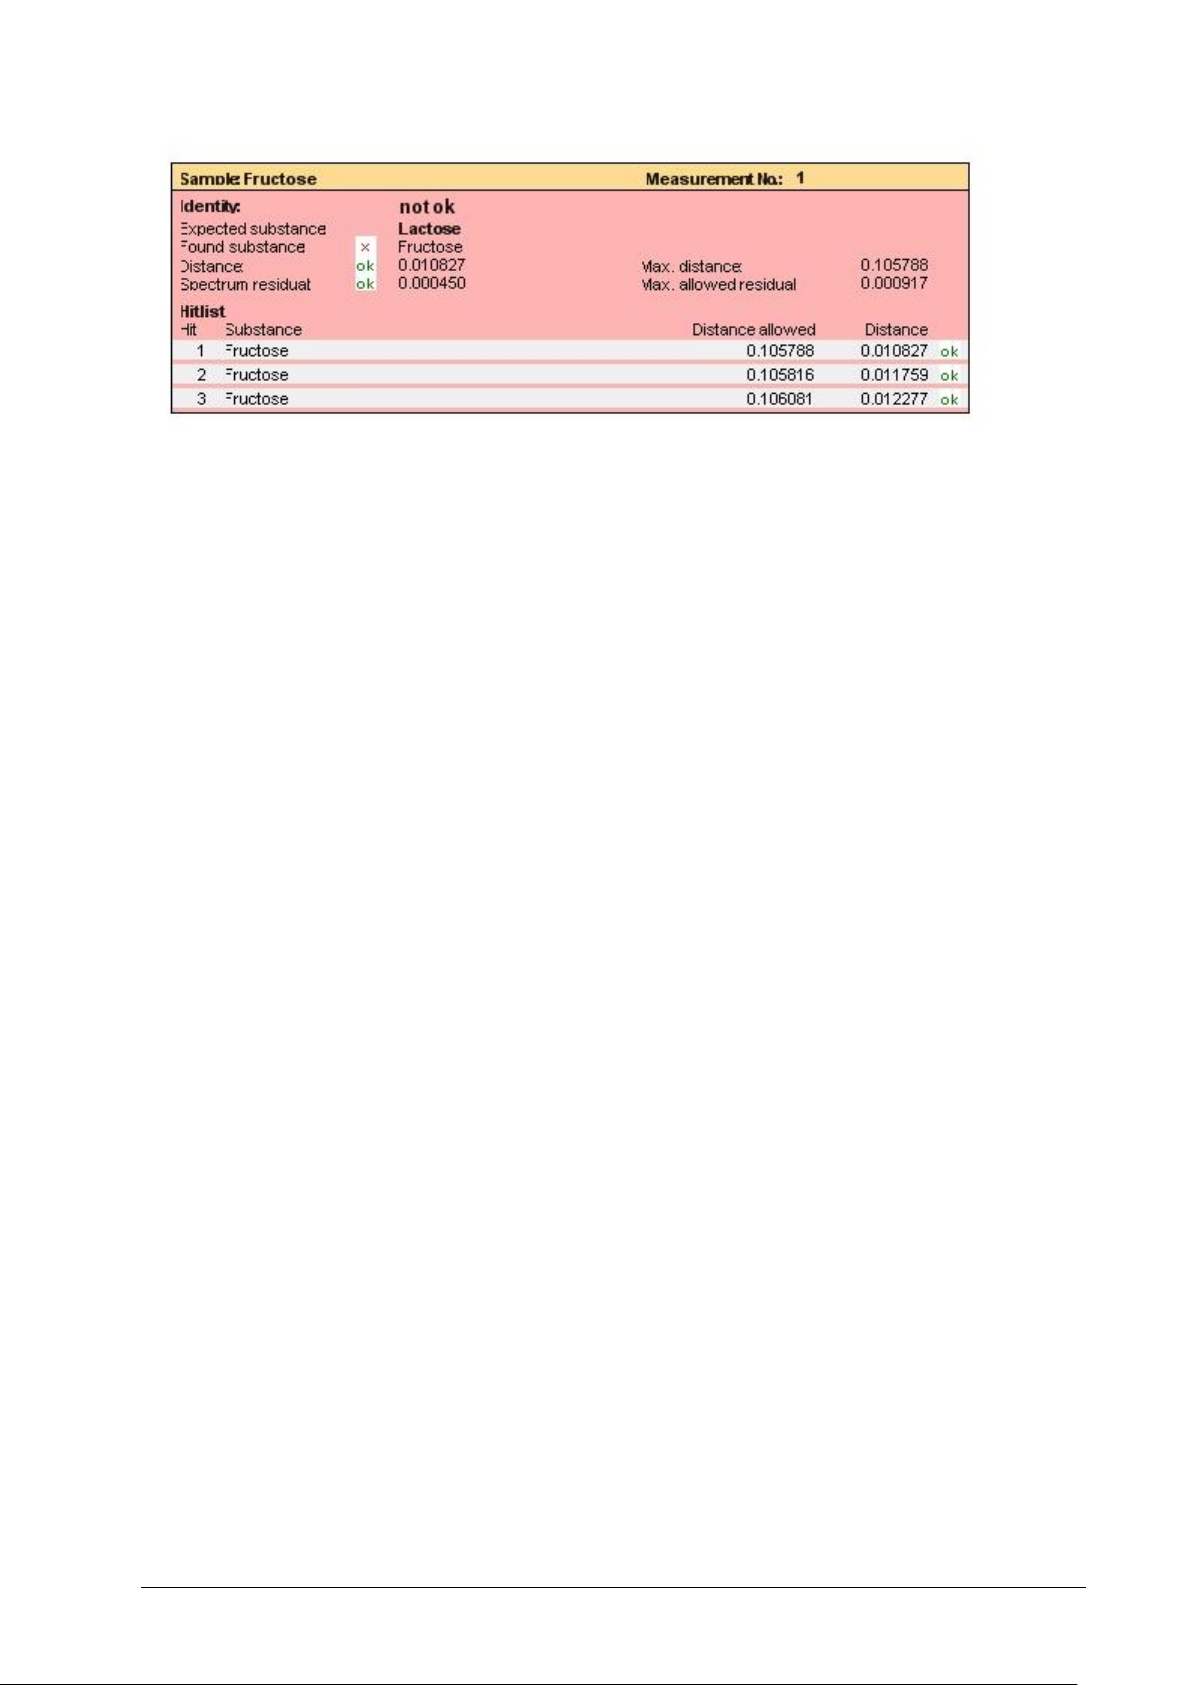
The spectrum residual is judged to be OK, which indicates that the spectrum is very similar to those that
the calibration was built on.
‘Distance OK’ tells us that the spectral representation falls within the boundaries of a cluster, but because
‘found’ and ‘expected’ substance differ, the sample is falling into the wrong cluster and is thus rejected.
So from the report you can be sure that the sample is not lactose, but -with high probability- fructose. With
this information a further investigation is now possible to check if just the label was wrong, or an
independent analytical method can be used to confirm the ID suggestion of the NIR application.
This example clearly shows that ID testing with NIR integrates a label check!
5.4. Creating a quantitative application
5.4.1. Introduction
This tutorial describes how to create an application for quantification. As an example, the NIRFlex N-500
is used with the solids cell and the vials (autosampler) option.
The application shall be capable of quantifying
a) the concentration of Lactose (‘milk sugar’) and
b) the concentration of Fine Sucrose (‘powder sugar’)
in a mixture of both substances. Concentrations are expressed in % wt. (g / 100 g). In NIRWare 1.5 if
there is a 2 component system like this, one property can be calibrated and the other calculated, e.g. Fine
Sucrose concentration = 100-Lactose concentration.
The process of creating a ready-to-use NIR application requires calibration samples. These are samples
of doubtless quality and composition. In combination with their NIR spectra (‘calibration spectra’) they
provide the necessary data sets for calculation of a chemometric calibration. The calibration can then be
used for prediction, which means deriving the identity information from the spectra of substances to be
tested.
It is recommended to use two dedicated applications for acquisition of calibration data and routine use
(=prediction).
NOTE
The terms 'reference measurement', 'reference samples' or 'reference spectra' used in the tutorial
describes the data collected for calibration development.
58 Tutorial NIRWare 1.5 Software Manual
Page 65

To ensure that all samples are measured under identical spectrometric conditions, we suggest to start the
development of the routine application with a copy of the application for acquisition of calibration data,
which is then adjusted.
Please keep in mind that only applications in the ‘approved’ Lifecycle state are visible to (and usable by) a
user of the ‘Operators’ user group.
These considerations are visualized in the following scheme:
The upper part of the scheme includes all steps regarding the calibration samples.
The middle part shows the processes for designing an application for routine use.
The last part indicates the routine use, which is the goal of the development process.
In the following, we will use the term ‘Operator user’ for a user account from the user group ‘Operators’,
and ‘Administrator’ for one belonging to the user group ‘Administrators’.
To log on as such a user, the correct user name and password are required for the corresponding dialog.
5.4.2. Creating an application for acquisition of calibration spectra
This first part of the tutorial guides you through the development process for a method that allows an
operator to collect spectra of calibration samples. These are required for calculation of a quantitative
chemometric calibration.
NIRWare 1.5 Software Manual Tutorial 59
Page 66

The application development starts in the NIRWare Management Console (MC).
Start the program and log on as an ‘Administrator’. Left-click on ‘Application Designer’ in the tree menu on
the left, then on the subtitle ‘New’. A dialog appears for creating a new application
60 Tutorial NIRWare 1.5 Software Manual
Page 67

Fill in the application name and all other requested information into the white fields on the right side. The
‘SOP Text’ will later on tell the Operator how to perform the actual measurement, so it is important to give
a complete description which is easily understandable.
Click the Save icon to save the new application to the database .
Your newly created application is now shown in the tree menu.
Open it by double-clicking on its field in the tree menu, or by clicking once on the plus-symbol in front of it.
Then select its subtitle ‘Operator Configuration’. You will now see only one field for the SOP text.
To see all of the information fields on the right, click on the ‘Show Advanced Settings’ icon in the menu
bar .
The fields on the right are grayed out, indicating that they cannot be changed right now.
NIRWare 1.5 Software Manual Tutorial 61
Page 68

To change the settings, first click on the ‘Edit Data Set’ icon .
Notice the change in the icon bar for Lifecycle state from ‘Created Idle’ to ‘Created Editing’ (see above).
You can now make changes to all white fields. For our example, we just change the ‘Number of
measurement sequences’ from 1 to 3.
This will cause a triplicate measurement of every reference sample, which creates more variation in the
spectra set later used for calibration. Thus, we will get more robust calibrations.
Save all changes you made to the database by clicking the respective icon .
The fields are greyed out again afterwards, indicating successful saving.
The method for triplicate reference sample measurement is now still in the ‘Created’ state, where only an
‘Administrator’ can see and use it in the operator software.
To provide this method for the operator user, ‘Put the data set into the next state’ by clicking on the
corresponding icon .
Now the application is in the ‘Approved’ state.
NOTE
Approved applications cannot be changed anymore. To modify any settings or parameters, create a copy
of the application. The copy will be generated in LC state "created" and can be edited.
The application is now ready for measurement of reference spectra with the Operator software.
5.4.3. Measuring reference spectra
To measure spectra of reference samples, the Operator software is used.
62 Tutorial NIRWare 1.5 Software Manual
Page 69

Measurement of reference spectra is the second step in the development process.
Start the operator software and log on as an ‘Operator’.
Then press the ‘Select application’ button and select the application you created for the
measurement of reference spectra:
NIRWare 1.5 Software Manual Tutorial 63
Page 70

The application is now loaded to the Operator. At the left side, you see fields to fill in information about
batch, analysis sequence and samples. Click on the ‘New’ button of the ‘Batch’ field to create a new
batch:
Type in the name of your batch, then click on the green check mark button:
Then type in the information for AnalysisID and Sample names:
64 Tutorial NIRWare 1.5 Software Manual
Page 71

NOTE
For ‘real’ applications, use ‘speaking’ names that precisely identify each sample just from the name! Also
think of using the autoname functions described in the NIRWare documentation.
If you have filled in and checked all information, prepare the samples for measurement (i.e. place all vials
in the autosampler) and press the green check mark button.
During the measurement sequence, the SOP text field is greyed out.
If an ‘Instrument Suitability Test’ (SST) starts, just wait until that is finished. Then the instrument will start
with the measurement sequence. This includes periodic measurement of internal and external references.
In our example with the vial autosampler option, these measurements are automatized. (With other
options, the software will give a description of what to do.)
First, the external reference is being measured:
Then the samples are being measured. All spectra are displayed in one window:
NIRWare 1.5 Software Manual Tutorial 65
Page 72

Since the intensity of the external reference is so much higher than that of the sample spectrum, the latter
are just a flat line on the x-axis.
To have a closer look on the sample spectrum, deselect the check box for ‘External Reference’ below the
graphic:
66 Tutorial NIRWare 1.5 Software Manual
Page 73

The vial autosampler will automatically continue with the next samples after confirmation of the following
dialog:
Click on the green check mark button to start the next measurement sequence.
The spectra shown below are all from identical sugar samples:
NIRWare 1.5 Software Manual Tutorial 67
Page 74

Variations in the spectra result from differences in size and orientation of the particles, and from variations
between the glass vials.
To zoom into the spectrum, click and hold the left mouse button while dragging the cursor.
68 Tutorial NIRWare 1.5 Software Manual
Page 75

The so defined frame will be magnified:
To change back to full view, click on the symbol with the magnification lens above the globus:
NOTE
It is possible to delete spectra, but only right after they were measured. This might be desirable if for
example a vial was not correctly positioned in the autosampler. To delete a measurement, click on the red
cross button (red cross in the upper left corner, not the one next to the magnification lens icon).
You can now select samples from the last measurement for deletion:
NIRWare 1.5 Software Manual Tutorial 69
Page 76

To select (or deselect) a line in the list, press and hold the Ctrl-button on your keyboard while left-clicking
on that line. Click on the ‘Delete’ button to delete the selected measurements.
After completion of the measurement of your reference samples, switch to the NIRWare Management
Console to continue with the next step in application development: the assignment of properties and
property values. (here: concentration values)
5.4.4. Defining a property and a property value
After the spectra of the reference samples have been measured, the properties (here: concentration
values) have to be connected to the calibration samples. This is done in the NIRWare Management
Console (MC). The so created data sets are later on the basis for building a calibration in NIRCal.
70 Tutorial NIRWare 1.5 Software Manual
Page 77

Switch to the NIRWare Management console, and select ‘Sample Management’ from the tree menu.
Switch to the MC, and select ‘Sample Management’ from the tree menu.
Select ‘Properties’ to open a list with all properties that have been defined so far:
NIRWare 1.5 Software Manual Tutorial 71
Page 78

If the property you need is not in the list, create it by clicking on ‘Properties’ in the tree menu, and then
selecting ‘new property’.
Define the type (here: qualification) and edit the name and unit of the property. Also type in your name to
document who created this property. Click on the Save icon to write this property definition to the
database. Create all new properties accordingly.
Now we want to tell the computer which sample belongs to which property.
Switch to MC – Sample Management – Samples to open a list with all samples that have been measured.
Notice that in the list the ‘Time Stamp’ filter is set to a specific date. Right click the time stamp button to
ignore, or left click on it to edit the filter settings:
72 Tutorial NIRWare 1.5 Software Manual
Page 79

To shorten the list of samples, you can also use additional filters, e.g. on the ‘Application’ column. This
can be helpful if you used dedicated applications for reference spectra measurement of each sample type.
Select your reference samples by clicking on the topmost reference sample in the list. Then press and
hold the Shift-button on your keyboard while scrolling down the list (using the mouse or the arrow keys on
your keyboard). Alternative: By pressing ‘Ctrl-Shift-End’ on your keyboard you can highlight everything
from the first selection down to the end of the list.
NIRWare 1.5 Software Manual Tutorial 73
Page 80

Then click on the ‘Open existing data set’-button in the upper left corner to create a new Sample Set
.
This opens a window with three lists: ‘available properties’, ‘assigned properties’, and ‘samples’. This
allows you to select properties for the samples by shifting them from the ‘available’ to the ‘assigned’ list.
Select a property that you want to assign to your samples:
followed by a click on the arrow key to the right.
The property ‘Lactose’ has now been shifted to the ‘assigned’ list.
74 Tutorial NIRWare 1.5 Software Manual
Page 81

Repeat this process for all of your properties:
The highlighted matrix cells allow you to define the lactose- and fine sucrose concentrations of each
sample:
Complete the matrix list, and save these data to the database by clicking on the save button .
You can now switch to NIRCal to build a calibration on this reference data set.
NIRWare 1.5 Software Manual Tutorial 75
Page 82

5.4.5. Creating a basic calibration by using the NIRCal wizard
This chapter describes how to create a calibration with NIRCal, using the reference spectra with
previously assigned properties.
The description here is limited to the use of the NIRCal wizard, since detailed optimization procedures and
description of NIRCal features are described in the NIRCal documentation.
Start NIRCal
and log on as an ‘Administrator’.
From the menu, select ‘View’ - ‘Toolbars’ and select the toolbars: Calibration, Database, File & Edit, Life
Cycle, Pretreatments, Wizard Workspace, Status Bar.
To load spectra from the database into your empty project, click on the binocular icon .
Select the spectra from the list, and click on the green check mark button:
76 Tutorial NIRWare 1.5 Software Manual
Page 83

To simplify the selection, use appropriate filter settings, especially for ‘Time’ and ‘Application’. (Time: right
click to ignore time filter, left click to set time filter settings.)
Since we performed triplicate spectra measurement of each sample, we now find three spectra for each
individual sample.
Select the NIR-Explorer window, select ‘spectra’ from the tree menu and check if all spectra have been
correctly loaded:
Now make sure that a quantitative method is selected (‘MLR’, ‘PCR’ or ‘PLS’) is selected in the menu bar:
Before we start with the calculations, let’s reconsider that we have reference samples with two property
values. And to this point, both are selected for calibration, as you can see in the NIRCal explorer:
NIRWare 1.5 Software Manual Tutorial 77
Page 84

It is not possible to develop only one calibration for determination of both properties. So we need
to create two calibrations, one for each property. First we start with a calibration for Lactose quantification,
so we deselect the unwanted property ‘Fine Sucrose’. This is done by selecting ‘Properties’ in the NIRCal
tree menu, followed by a right-click on the respective property name in the right part of the explorer
window. From the menu, select ‘Remove from Set’ – ‘Calibration Properties’:
Notice the change in the symbol in front of the property name ‘Fine Sucrose’:
Now we are ready for a first calculation with default settings by clicking on the ‘Overview’ button.
A message appears regarding Calibration- and Validation set selection (C-Set and V-Set):
78 Tutorial NIRWare 1.5 Software Manual
Page 85
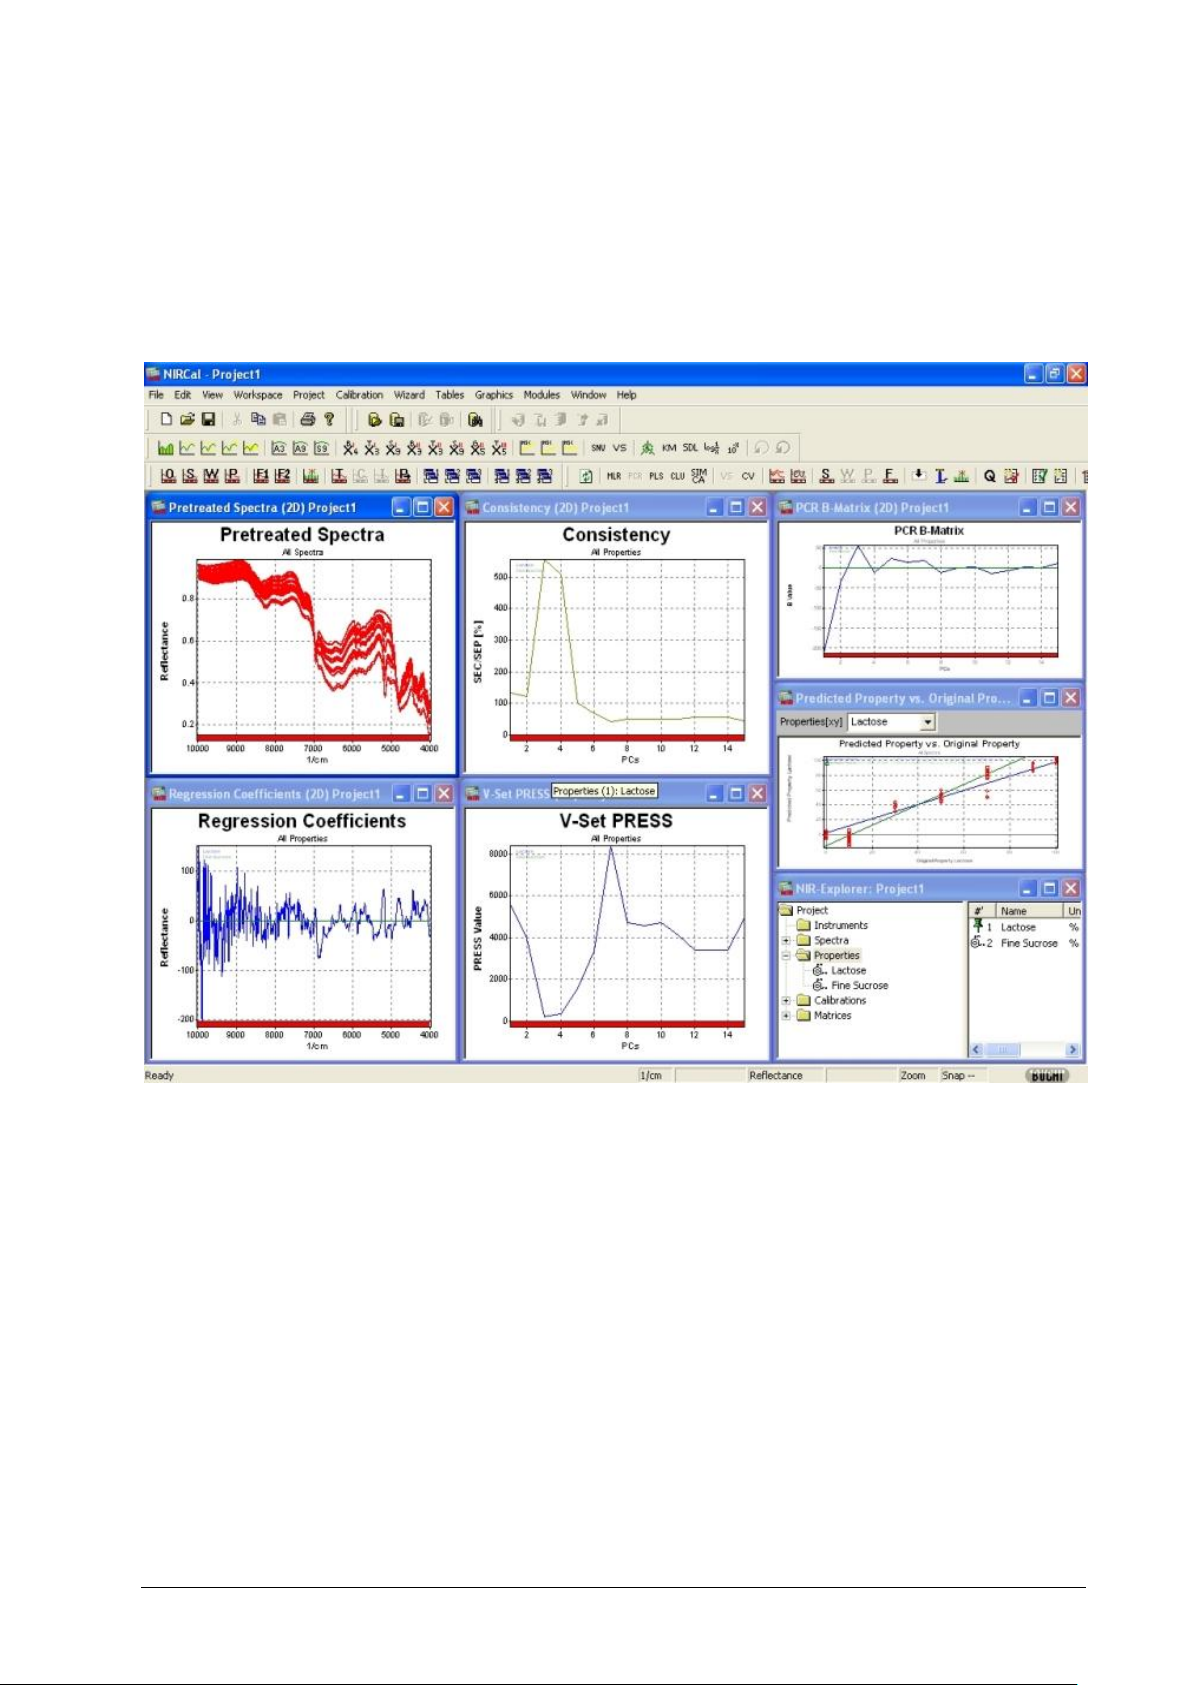
Click on YES to let the C/V-selection wizard create a selection.
Note: It is highly recommended to perform the selection sample wise, so that ALL spectra of one
individual sample are EITHER in the C- OR V-Set. This is described in detail in the NIRCal
documentation.
A full calculation is performed, and the result visualized in seven windows.
Notice that in the ‘Predicted property vs. original property’ window a diagonal calibration curve is shown
for the Property Lactose.
This is a good check for successful deselection of the unwanted property, because it confirms that the
actual calibration has only been calculated with regard to Lactose.
Optimization of the calibration is not a topic here, so we leave this job to the patented NIRCal Calibration
Wizard: from the menu, select Wizard/Calibration Wizard. A dialog appears for definition of general
parameters:
NIRWare 1.5 Software Manual Tutorial 79
Page 86

Select ‘quantification’ as calibration type, and click on ‘OK’. The wizard now starts with the optimization
process, which will take a few minutes. The progress is visualized in the ‘Calibration Q-Value overview’:
In the course of the optimization process, you see the Q-Value rise from zero (no working calibration) up
close to 1 (=perfect calibration).
After the wizard is finished, the results are shown in a list where the best calibrations (with the highest Qvalues) are found on top of the list:
80 Tutorial NIRWare 1.5 Software Manual
Page 87

Now switch again to the NIRCal Explorer window, and have a look on the ‘Calibrations’:
Note that the ten best calibrations are stored here. The one with the highest Q-value is set to active
(indicated by a red dot). Since we only need one calibration, we select everything, except for the one we
want to keep.
This is done by holding down the Ctrl-Key while left-clicking in the right window pane on the calibration to
be selected:
NIRWare 1.5 Software Manual Tutorial 81
Page 88

Right-click on the selection and choose ‘delete’. A confirmation message appears, which you will answer
with ‘YES’:
To change the name of the calibration, right-click on the calibration name in the left window pane and
select ‘Rename’ from the context menu:
82 Tutorial NIRWare 1.5 Software Manual
Page 89

In this case, we rename it to ‘Lactose Quan’.
(Hint: With more complex projects it is also a good idea to start with an identical project name for the
calibration name and then just add a suffix for the respective property. Example: ‘Sugar mixture – lactose’
and ‘Sugar mixture – fine sucrose’.)
To save the calibration to the database, click on the ‘Save’ button in the menu bar .
Type in a name for your NIRCal project and click on the ‘Save As’ button:
So far the calibration is still in the ‘created’ state. If you would try to use it in an application, this would
prevent you from changing your application (!) into the next state, because an approved application
requires an approved calibration.
It is suggested to recalculate the first calibration. This is a master calibration, which organise the spectra
in the project and can never be put the approved LC state. Copy this calibration, open the copy (LC: Edit),
rename this: give a short name preferable with date at the end. Make a new calculation after renaming.
Put this calibration to "approved" state.
NIRWare 1.5 Software Manual Tutorial 83
Page 90

and ‘Next’ .
Now your calibration is finished and in the approved state, so it can be used for integration into an
application.
Remember that the just created calibration works only for lactose. So we need to start over again to
create a second calibration project for fine sucrose. Create a new project by clicking on the respective
button and start over again with spectra loading etc.
In the end, you have two calibrations in individual projects, one specialised in Lactose quantification, the
other for Fine Sucrose. For 2 component system a second calibration is not necessary, the second
property can be calculated like: Property2= 100-Property1.
After creation of your calibrations in NIRCal, these have now to be integrated to your application. This is
done in the NIRWare Management Console.
5.4.6. Integrating a quantitative calibration into an application
The final step in creating an application for quantitative determination with NIR is to integrate the
calibration into the application.
Remember that we started with an application for triplicate measurement of reference substances. This
serves now as a template for the routine application. In effect, we create a copy of the reference method,
make adjustments to this, and integrate the calibration. Adjustments involve mainly the number of
measurements per sample, the SOP text, and Reports. All instrument parameters remain untouched,
granting identical spectral conditions for both reference samples and those to be tested.
84 Tutorial NIRWare 1.5 Software Manual
Page 91

Both the creation of the routine use application and the integration of the calibration into this is performed
in the NIRWare Management Console (MC) .
Load the application for reference measurement by choosing ‘Open’ from the ‘Application Designer’ in the
tree list. Then select the reference application from the list on the right:
The application is now available as a new point in the tree menu:
NIRWare 1.5 Software Manual Tutorial 85
Page 92

Click on the ‘Copy’ icon to create a copy of this application:
This copy starts in the ‘created’ state, while the original application remains ‘approved’:
To change the name, you first have to click on the ‘Edit’ icon .
This causes a change from ‘Idle’- to ‘Edit’ mode, allowing you now to make changes to the ‘Value’-fields.
Change the application name, then save .
The application for routine use has been prepared, and the calibration can now be assigned to it.
86 Tutorial NIRWare 1.5 Software Manual
Page 93

On the Properties level click the button to make the property editable.
Select ‘Properties - New’ menu from the tree menu of your application and select the drop down-menu for
‘Assigned calibration’ by clicking on the down arrow symbol at the end of the corresponding value field:
In the ‘Assigned’ column, set a check-mark in front of the calibration you want to use. Click on the green
check-mark button to assign the chosen calibration to the application. A message appears, which you just
confirm:
NIRWare 1.5 Software Manual Tutorial 87
Page 94

The property defined in the selected calibration is now automatically assigned to the application
(‘Assigned Property’).
A 'Name' can be entered as a label to e.g. translate a foreign property name.
88 Tutorial NIRWare 1.5 Software Manual
Page 95
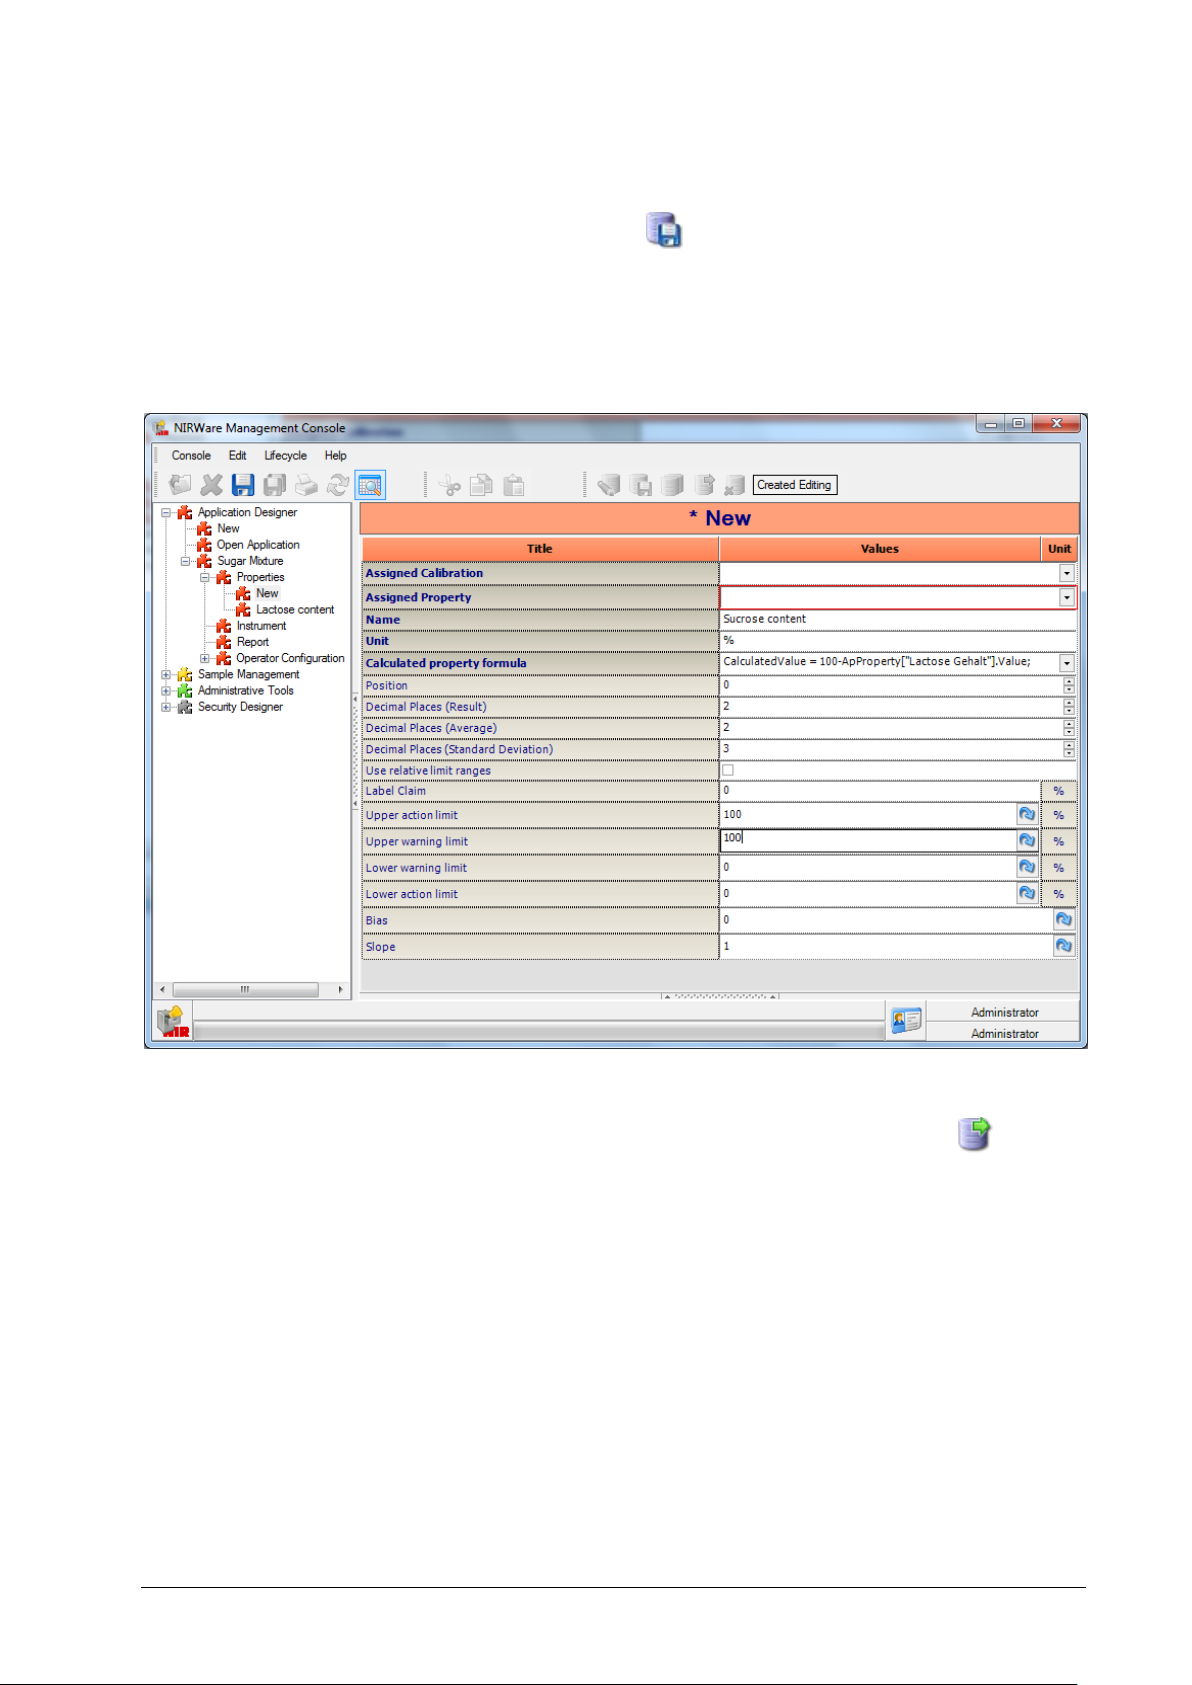
The ‘Unit’ field has to be filled out as well.
Save all changes to the database by clicking on the icon .
These steps have to be repeated for every other calibration to be used in the application. In this example
the Fine Sucrose is calculated = 100-Lactose content. Edit also the lower, upper, warning and action limits
beside the property name, unit.
Now you can already use this newly created application as an administrator user in the operator software.
To make this application visible to the operator user, you have to put it in the approved state .
Congratulations! You just finished the application development process! You can now start with routine
measurement of the contents of Lactose and Fine Sucrose in a mixture of both by using the Operator
software.
NIRWare 1.5 Software Manual Tutorial 89
Page 96

5.5. Content Uniformity Test (CUT)
5.5.1. Development of an application for Content Uniformity Testing
(CUT) of Solid Dosage Forms
The US Pharmacopeia, the European Pharmacopoeia and the Japanese Pharmacopoeia describe
detailed procedures to test the content uniformity of single dosage units. The test indicates the uniformity
of the active pharmaceutical ingredient (API) in the dosage unit, such as tablets or capsules, based on the
assay of a defined number of samples. This test is requested for batch release.
Develop a quantitative application as described in the chapter “Creating a quantitative
application” for the API.
After the quantitative application is successfully developed and tested, create a copy of
the application.
To activate the CUT procedure, click on to show the advanced settings of the
application.
90 Tutorial NIRWare 1.5 Software Manual
Page 97
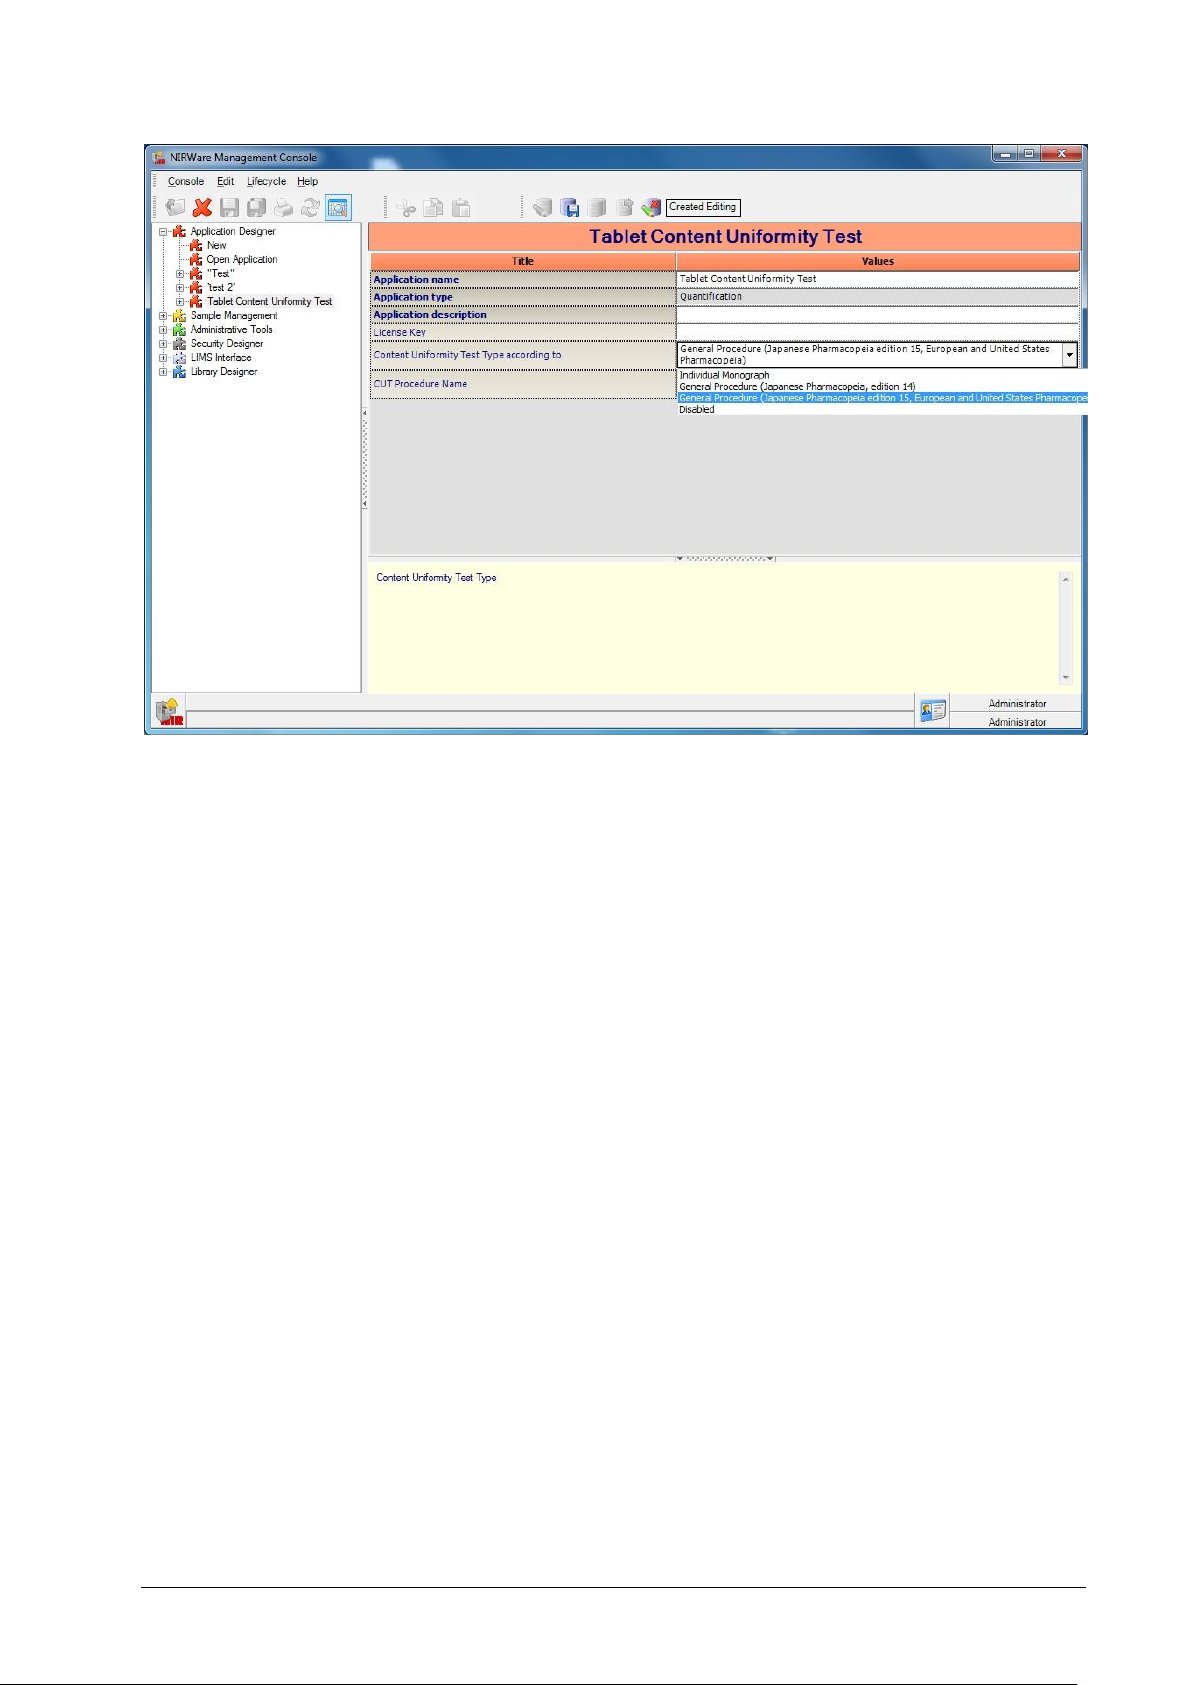
From the dropdown list under “Content Uniformity Test according to”, select the procedure you with to use
for testing (e.g. General Procedure (Japanese Pharmacopeia, edition 14)
General Procedure (Japanese Pharmacopeia edition 15, European and United States Pharmacopeia)).
For details, please refer to the parameter list of the Application Designer.
Please note.
Content Uniformity Test is only available for quantitative applications and for the modules NIRFlex Solids
Transmittance and NIRFlex Solids with Tablet Add-on.
For each calibrated property (e.g. API), enter the Label Claim for the CUT under
“Properties”.
NOTE:
A value different to 0 has to be entered.
NIRWare 1.5 Software Manual Tutorial 91
Page 98

The parameters L1, L2 and T are given by the respective Pharmacopeia.
Choosing "Individual Monograph", the values for L1, L2 and T can be edited.
It is recommended to use the Autoname function of the Operator Configuration to create
sample names automatically from basic entries as shown in the below example (autoname
part 1 = Batch information; autoname part 2 = none; autoname part 3 = Counter).
If CUT is activated in the application, the settings for "Number of repetition of measurements in case of an
Out Of Specification" case will be always 0 and "Number of measurement sequences" will be always 1
(even if specified otherwise in the application).
After all changes on settings are made, set the application in the approved state.
Start the operator and select the developed application for CUT.
92 Tutorial NIRWare 1.5 Software Manual
Page 99

Create a new batch. Each CUT is handled as an individual batch. When the CUT is
finished, the batch will be closed.
With the autoname function, the sample names are generated automatically.
NIRWare 1.5 Software Manual Tutorial 93
Page 100

Press on the Start Button to start the CUT. In case a SST is necessary, the following
message appears:
Follow the instructions and click OK. After the SST is finished successfully, the following
message appears:
94 Tutorial NIRWare 1.5 Software Manual
 Loading...