


Operation Manual
Sewing Machine
Product Code: 882-D00
Be sure to read this document before using the machine.
We recommend that you keep this document nearby for future reference.

TRADEMARKS
IMPORTANT:
READ BEFORE DOWNLOADING, COPYING, INSTALLING OR USING.
By downloading, copying, installing or using the software you agree to this license. If you do not agree to this license, do not download, install, copy or use the software.
Intel License Agreement For Open Source Computer Vision Library
Copyright © 2000, Intel Corporation, all rights reserved. Third party copyrights are property of their respective owners.
Redistribution and use in source and binary forms, with or without modification, are permitted provided that the following conditions are met:
•Redistribution’s of source code must retain the above copyright notice, this list of conditions and the following disclaimer.
•Redistribution’s in binary form must reproduce the above copyright notice, this list of conditions and the following disclaimer in the documentation and/or other materials provided with the distribution.
•The name of Intel Corporation may not be used to endorse or promote products derived from this software without specific prior written permission.
This software is provided by the copyright holders and contributors “as is” and any express or implied warranties, including, but not limited to, the implied warranties of merchantability and fitness for a particular purpose are disclaimed. In no event shall Intel or contributors be liable for any direct, indirect, incidental, special, exemplary, or consequential damages (including, but not limited to, procurement of substitute goods or services; loss of use, data, or profits; or business interruption) however caused and on any theory of liability, whether in contract, strict liability, or tort (including negligence or otherwise) arising in any way out of the use of this software, even if advised of the possibility of such damage.
All information provided related to future Intel products and plans is preliminary and subject to change at any time, without notice.
SD is a registered trademark or a trademark of SD-3C, LLC.
CompactFlash is a registered trademark or a trademark of Sandisk Corporation. Memory Stick is a registered trademark or a trademark of Sony Corporation. SmartMedia is a registered trademark or a trademark of Toshiba Corporation.
MultiMediaCard (MMC) is a registered trademark or a trademark of Infineon Technologies AG. xD-Picture Card is a registered trademark or a trademark of Fuji Photo Film Co. Ltd.
IBM is a registered trademark or a trademark of International Business Machines Corporation.
Microsoft, Windows and Windows Vista are registered trademarks or trademarks of Microsoft Corporation.
Each company whose software title is mentioned in this manual has a Software License Agreement specific to its proprietary programs.
All other brands and product names mentioned in this manual are registered trademarks of their respective companies. However, the explanations for markings such as ® and ™ are not clearly described within the text.

INTRODUCTION
INTRODUCTION
Thank you for purchasing this machine. Before using this machine, carefully read the “IMPORTANT SAFETY INSTRUCTIONS”, and then study this manual for the correct operation of the various functions. In addition, after you have finished reading this manual, store it where it can quickly be accessed for future reference.
IMPORTANT SAFETY INSTRUCTIONS
Please read these safety instructions before attempting to use the machine.
 DANGER - To reduce the risk of electrical shock
1Always unplug the machine from the electrical outlet immediately after using, when cleaning, making any user servicing adjustments mentioned in this manual, or if you are leaving the machine unattended.
 WARNING - To reduce the risk of burns, fire, electrical shock, or injury to
persons.
2Always unplug the machine from the electrical outlet when making any adjustments mentioned in the instruction manual.
•To unplug the machine, switch the machine to the symbol “O” position to turn it off, then grasp the plug and pull it out of the electrical outlet. Do not pull on the cord.
•Plug the machine directly into the electrical outlet. Do not use an extension cord.
•Always unplug your machine if the power is cut.
3Electrical Hazards:
•This machine should be connected to an AC power source within the range indicated on the rating label. Do not connect it to a DC power source or inverter. If you are not sure what kind of power source you have, contact a qualified electrician.
•This machine is approved for use in the country of purchase only.
4Never operate this machine if it has a damaged cord or plug, if it is not working properly, has been dropped or
damaged, or water is spilled on the unit. Return the machine to the nearest authorized dealer for examination, repair, electrical or mechanical adjustment.
•While the machine is stored or in use if you notice anything unusual, such as an odor, heat, discoloration or deformation, stop using the machine immediately and unplug the power cord.
•When transporting the sewing machine, be sure to carry it by its handle. Lifting the sewing machine by any other part may damage the machine or result in the machine falling, which could cause injuries.
•When lifting the sewing machine, be careful not to make any sudden or careless movements, otherwise you may injure your back or knees.
B-1

IMPORTANT SAFETY INSTRUCTIONS
5Always keep your work area clear:
•Never operate the machine with any air openings blocked. Keep ventilation openings of the sewing machine and foot control free from the build up of lint, dust, and loose cloth.
•Do not store objects on the foot controller.
•Do not use extension cords. Plug the machine directly into the electrical outlet.
•Never drop or insert foreign objects in any opening.
•Do not operate where aerosol (spray) products are being used or where oxygen is being administered.
•Do not use the machine near a heat source, such as a stove or iron; otherwise, the machine, power cord or garment being sewn may ignite, resulting in fire or an electric shock.
•Do not place this sewing machine on an unstable surface, such as an unsteady or slanted table, otherwise the sewing machine may fall, resulting in injuries.
6Special care is required when sewing:
•Always pay close attention to the needle. Do not use bent or damaged needles.
•Keep fingers away from all moving parts. Special care is required around the machine needle.
•Switch the sewing machine to the symbol “O” position to turn it off when making any adjustments in the needle area.
•Do not use a damaged or incorrect needle plate, as it could cause the needle to break.
•Do not push or pull the fabric when sewing, and follow careful instruction when free motion stitching so that you do not deflect the needle and cause it to break.
7This machine is not a toy:
•Your close attention is necessary when the machine is used by or near children.
•The plastic bag that this sewing machine was supplied in should be kept out of the reach of children or disposed of. Never allow children to play with the bag due to the danger of suffocation.
•Do not use outdoors.
8For a longer service life:
•When storing this machine, avoid direct sunlight and high humidity locations. Do not use or store the machine near a space heater, iron, halogen lamp, or other hot objects.
•Use only neutral soaps or detergents to clean the case. Benzene, thinner, and scouring powders can damage the case and machine, and should never be used.
•Always consult the operation manual when replacing or installing any assemblies, the presser feet, needle, or other parts to assure correct installation.
9For repair or adjustment:
•If the light unit is damaged, it must be replaced by an authorized dealer.
•In the event a malfunction occurs or adjustment is required, first follow the troubleshooting table in the back of the operation manual to inspect and adjust the machine yourself. If the problem persists, please consult your local authorized Brother dealer.
Use this machine only for its intended use as described in the manual.
Use accessories recommended by the manufacturer as contained in this manual.
Use only the interface cable (USB cable) included with this machine.
Use only a mouse designed specifically for this machine.
Use only the sensor pen included with this machine.
The contents of this manual and specifications of this product are subject to change without notice. For additional product information and updates, visit our website at www.brother.com
B-2

IMPORTANT SAFETY INSTRUCTIONS
SAVE THESE INSTRUCTIONS
This machine is intended for household use.
This appliance is not intended for use by persons (including children) with reduced physical, sensory or mental capabilities, or lack of experience and knowledge, unless they have been given supervision or instruction concerning use of the appliance by a person responsible for their safety. Children should be supervised to ensure that they do not play with the appliance.
This appliance can be used by children aged from 8 years and above and persons with reduced physical, sensory or mental capabilities or lack of experience and knowledge if they have been given supervision or instruction concerning use of the appliance in a safe way and understand the hazards involved. Children shall not play with the appliance. Cleaning and user maintenance shall not be made by children without supervision.
FOR USERS IN THE UK, EIRE, MALTA
AND CYPRUS ONLY
IMPORTANT
•In the event of replacing the plug fuse, use a fuse approved by ASTA to BS 1362, i.e. carrying the  mark, rating as marked on plug.
•Always replace the fuse cover. Never use plugs with the fuse cover omitted.
•If the available electrical outlet is not suitable for the plug supplied with this equipment, you should contact your authorized dealer to obtain the correct lead.
B-3

IMPORTANT SAFETY INSTRUCTIONS
Federal Communications Commission (FCC)
Declaration of Conformity (For USA Only)
Responsible Party: |
Brother International Corporation |
|
100 Somerset Corporate Boulevard |
|
Bridgewater, NJ 08807-0911 USA |
|
TEL : (908) 704-1700 |
declares that the product |
|
Product Name: |
Brother Sewing Machine |
Model Number: |
VQ3000 |
This device complies with Part 15 of the FCC Rules. Operation is subject to the following two conditions: (1) this device may not cause harmful interference, and (2) this device must accept any interference received, including interference that may cause undesired operation.
This equipment has been tested and found to comply with the limits for a Class B digital device, pursuant to Part 15 of the FCC Rules. These limits are designed to provide reasonable protection against harmful interference in a residential installation. This equipment generates, uses, and can radiate radio frequency energy and, if not installed and used in accordance with the instructions, may cause harmful interference to radio communications. However, there is no guarantee that interference will not occur in a particular installation. If this equipment does cause harmful interference to radio or television reception, which can be determined by turning the equipment off and on, the user is encouraged to try to correct the interference by one or more of the following measures:
•Reorient or relocate the receiving antenna.
•Increase the separation between the equipment and receiver.
•Connect the equipment into an outlet on a circuit different from that to which the receiver is connected.
•Consult the dealer or an experienced radio/TV technician for help.
•The included interface cable should be used in order to ensure compliance with the limits for a Class B digital device.
•Changes or modifications not expressly approved by Brother Industries, Ltd. could void the user’s authority to operate the equipment.
B-4

IMPORTANT SAFETY INSTRUCTIONS
Laser Notices (For U.S.A. only)
Laser Safety
This sewing machine is certified as a Class 1 laser product under the U.S. Department of Health and Human Services (DHHS) Radiation Performance Standard according to the Radiation Control for Health and Safety Act of 1968. This means that the sewing machine does not produce hazardous laser radiation.
IEC 60825-1 Specification
This sewing machine is a Class 1 laser product as defined in IEC 60825-1:2007 specifications.
The laser beam emitted by the laser unit installed in this machine is restricted to an output at a safe level. However, the machine contains 7-milliwat, 650-660nanometer wavelength, 6-12 degree at parallel divergence angle, 24-34 degree at perpendicular divergence angle, InGaAlP laser diodes. Therefore, eye damage may result from disassembling or altering this machine.
Safety precautions have been designed to prevent any possible laser beam exposure to the operator.
FDA Regulations
U.S. Food and Drug Administration (FDA) has implemented regulations for laser products manufactured on and after August 2,
1976. Compliance is mandatory for products marketed in the United States. The label shown on the back of the sewing machine indicates compliance with the FDA regulations and must be attached to laser products marketed in the United States.
Brother Industries, Ltd.
15-1, Naeshiro-cho, Mizuho-ku, Nagoya 467-8561, JAPAN
This product complies with FDA performance standards for laser products except for deviations pursuant to Laser Notice No. 50, dated June 24, 2007.
 CAUTION
•Use of controls, adjustments or the performance of procedures other than those specified in this manual may result in hazardous radiation exposure.
B-5

IMPORTANT SAFETY INSTRUCTIONS
Laser Notices (For countries except U.S.A.)
IEC 60825-1 Specification
This sewing machine is a Class 1 laser product as defined in IEC 60825-1:2007 specifications.
The laser beam emitted by the laser unit installed in this machine is restricted to an output at a safe level. However, the machine contains 7-milliwat, 650-660nanometer wavelength, 6-12 degree at parallel divergence angle, 24-34 degree at perpendicular divergence angle, InGaAlP laser diodes. Therefore, eye damage may result from disassembling or altering this machine.
Safety precautions have been designed to prevent any possible laser beam exposure to the operator.
 CAUTION
•This sewing machine has a Class 3B Laser Diode in the Laser Unit. The Laser Unit should not be opened under any circumstances.
•Use of controls, adjustments or the performance of procedures other than those specified in this manual may result in hazardous radiation exposure.
B-6

OUTSTANDING FEATURES
OUTSTANDING FEATURES
Setting Laser Guideline Marker as a Guide to Sew
The guideline marker shows the sewing position. You can adjust the sewing position by moving the guideline marker while checking the guideline marker on the fabric. You don’t need to look for the needle drop point to check the sewing position.
Other various adjustments are available using the guideline marker.
See “USING SENSOR FUNCTIONS WITH SEWING STITCH” on page B-64.
Useful Sensor Function - Variety
of Functions
When sewing, you can specify easily the guideline marker position, the needle drop position, the width and “L/R SHIFT” of the stitch, and sewing end point, using the sensor pen.
See “USING SENSOR FUNCTIONS WITH SEWING STITCH” on page B-64.
Expanding Your Creativity with Dual Feed Foot
Do you feel like trying a new material, like thin fabric or nylon fabric?
Included dual feed foot works very effectively when sewing those difficult materials. This foot also works effectively when you sew the different type of materials together, like thin fabric with thick fabric. You can adjust the feed length for the various fabric types.
See “Using the Dual Feed Foot” on page B-54.
B-7

WHAT YOU CAN DO WITH THIS MACHINE
WHAT YOU CAN DO WITH THIS MACHINE
B Basic operations
After purchasing your machine, be sure to read this section first. This section provides details on the initial setup procedures as well as descriptions of this machine’s more useful functions.
Chapter 1 Getting Ready |
Chapter 2 Sensor Functions |
To learn the operation of the principal parts and the |
Try the new function using the supplied sensor pen |
screens |
Page B-58 |
Page B-18 |
|
S Sewing
This section describes procedures for using the various utility stitches as well as other functions. It provides details on basic machine sewing in addition to the more expressive features of the machine, from sewing tubular pieces and buttonholes to sewing the character and decorative stitch patterns.
Chapter 1 Sewing Basics |
Chapter 2 Utility Stitches |
To learn how to prepare for sewing and basic sewing |
Pre-programmed with more than 100 frequently used |
operations |
stitches |
Page S-2 |
Page S-20 |
Chapter 3 Character/Decorative |
Chapter 4 MY CUSTOM STITCH |
Stitches |
Create original decorative stitches |
The variety of stitches widen your creativity |
Page S-102 |
Page S-76 |
|
A Appendix
This section provides important information for operating this machine.
Chapter 1 How to Create Bobbin |
Chapter 2 Maintenance and |
Work |
Troubleshooting |
To learn how to create bobbin work |
Find troubleshooting tips and pointers as well as how |
Page A-2 |
to keep your machine in the best working condition. |
|
Page A-14 |
B-8
CONTENTS
CONTENTS |
|
TRADEMARKS |
|
INTRODUCTION................................................. |
1 |
IMPORTANT SAFETY INSTRUCTIONS ................ |
1 |
OUTSTANDING FEATURES ................................. |
7 |
WHAT YOU CAN DO WITH THIS MACHINE..... |
8 |
NAMES OF MACHINE PARTS AND THEIR |
|
FUNCTIONS........................................................ |
11 |
Machine .............................................................................. |
11 |
Needle and Presser Foot Section .......................................... |
12 |
Operation Buttons................................................................ |
13 |
Using the Flat Bed Attachment ............................................. |
13 |
Included Accessories ........................................................... |
14 |
Options................................................................................ |
16 |
B Basic operations |
|
Chapter1 Getting Ready |
18 |
TURNING THE MACHINE ON/OFF .................. |
19 |
Setting Your Machine for the First Time ............................... |
20 |
LCD SCREEN ...................................................... |
22 |
Using the Machine Setting Mode Key ................................. |
25 |
Using the Sewing Machine Help Key .................................. |
30 |
Using the Operation Guide Function ................................... |
31 |
Using the Sewing Guide Function ........................................ |
32 |
Using the Pattern Explanation Function................................ |
33 |
LOWER THREADING......................................... |
34 |
Winding the Bobbin............................................................. |
34 |
Setting the Bobbin................................................................ |
39 |
Pulling Up the Bobbin Thread.............................................. |
41 |
UPPER THREADING .......................................... |
42 |
Upper Threading.................................................................. |
42 |
Using the Twin Needle Mode .............................................. |
45 |
Using Threads that Unwind Quickly .................................... |
47 |
CHANGING THE PRESSER FOOT ...................... |
49 |
Removing the Presser Foot ................................................... |
49 |
Attaching the Presser Foot .................................................... |
49 |
Attaching the Presser Foot with the Included Adapter .......... |
49 |
CHANGING THE NEEDLE.................................. |
51 |
ABOUT THE NEEDLE AND FABRIC ................... |
52 |
About the Needle................................................................. |
52 |
Fabric/Thread/Needle Combinations .................................... |
52 |
USING FUNCTIONS BY CONNECTING THE |
|
ACCESSORY TO THE MACHINE........................ |
53 |
Using USB Media ................................................................ |
53 |
Connecting the Machine to the Computer............................ |
53 |
Using a USB Mouse ............................................................. |
54 |
Using the Dual Feed Foot .................................................... |
54 |
Chapter2 Sensor Functions |
58 |
CONVENIENT SEWING FEATURES |
|
BY USING THE SENSOR PEN............................. |
59 |
CONNECTING THE SENSOR PEN ..................... |
59 |
Using the Sensor Pen Holder ............................................... |
60 |
USING THE SENSOR PEN .................................. |
61 |
Using the Sensor Pen ........................................................... |
61 |
Important Information about Sensor Pen .............................. |
61 |
Calibrating the Sensor Pen ................................................... |
62 |
USING SENSOR FUNCTIONS WITH SEWING |
|
STITCH............................................................... |
64 |
Sensor Function Area ........................................................... |
64 |
Specifying the Guideline Marker Position |
|
With the Sensor Pen............................................................. |
64 |
Specifying the Needle Drop Position With the Sensor Pen |
.... 66 |
Using the Sensor Pen to Specify the Stitching Width |
|
and Stitch Position................................................................ |
67 |
Using the Sensor Pen to Specify the Sewing End Point.......... |
69 |
S Sewing |
|
Chapter1 Sewing Basics |
2 |
SEWING .............................................................. |
3 |
Sewing a Stitch....................................................................... |
3 |
Sewing Reinforcement Stitches............................................... |
5 |
Automatic Reinforcement Stitching ........................................ |
5 |
Sewing Curves........................................................................ |
7 |
Changing Sewing Direction .................................................... |
7 |
Sewing Heavyweight Fabrics .................................................. |
7 |
Sewing Hook-and-Loop Fastener ............................................ |
8 |
Sewing Lightweight Fabrics .................................................... |
9 |
Sewing Stretch Fabrics............................................................ |
9 |
STITCH SETTINGS ............................................. |
10 |
Setting the Stitch Width ........................................................ |
10 |
Setting the Stitch Length ....................................................... |
10 |
Setting the “L/R SHIFT”......................................................... |
11 |
Setting the Thread Tension ................................................... |
12 |
USEFUL FUNCTIONS ........................................ |
13 |
Automatic Thread Cutting .................................................... |
13 |
Adjusting the Needle Drop Position with the Guideline |
|
Marker (For models equipped with the guideline marker)....... |
14 |
Using the Knee Lifter ............................................................ |
15 |
Pivoting................................................................................ |
15 |
Automatic Fabric Sensor System (Automatic Presser Foot |
|
Pressure)............................................................................... |
17 |
Needle Position – Stitch Placement ...................................... |
18 |
Locking the Screen ............................................................... |
18 |
Chapter2 Utility Stitches |
20 |
SELECTING UTILITY STITCHES ......................... |
21 |
Selecting a Stitch .................................................................. |
21 |
Saving Your Stitch Settings ................................................... |
22 |
SEWING THE STITCHES .................................... |
24 |
Straight Stitches .................................................................... |
24 |
Dart Seam ............................................................................ |
28 |
Gathering ............................................................................. |
29 |
Flat Fell Seam ....................................................................... |
29 |
Pintuck................................................................................. |
30 |
Zigzag Stitches ..................................................................... |
31 |
Elastic Zigzag Stitches .......................................................... |
33 |
Overcasting.......................................................................... |
33 |
Quilting................................................................................ |
35 |
Blind Hem Stitches............................................................... |
45 |
Appliqué .............................................................................. |
48 |
Shelltuck Stitches ................................................................. |
49 |
Scallop Stitches .................................................................... |
50 |
Crazy Quilting...................................................................... |
50 |
Smocking Stitches ................................................................ |
51 |
Fagoting ............................................................................... |
52 |
Tape or Elastic Attaching ...................................................... |
52 |
Heirloom.............................................................................. |
53 |
One-step Buttonholes........................................................... |
55 |
Darning................................................................................ |
58 |
Bar Tacks ............................................................................. |
59 |
Button Sewing ...................................................................... |
61 |
Eyelet ................................................................................... |
62 |
Multi-directional Sewing (Straight Stitch and Zigzag Stitch) ....... |
63 |
Zipper Insertion.................................................................... |
64 |
STITCH SETTING CHART .................................. |
67 |
B-9

CONTENTS
Chapter3 Character/Decorative Stitches |
76 |
SELECTING STITCH PATTERNS.......................... |
77 |
Selecting Decorative Stitch Patterns/7mm Decorative Stitch |
|
Patterns/Satin Stitch Patterns/7mm Satin Stitch |
|
Patterns/Cross Stitch/Utility Decorative Stitch Patterns.......... |
78 |
Characters ............................................................................ |
78 |
SEWING STITCH PATTERNS .............................. |
81 |
Sewing Attractive Finishes .................................................... |
81 |
Basic Sewing ........................................................................ |
81 |
Making Adjustments............................................................. |
82 |
EDITING STITCH PATTERNS ............................. |
84 |
Changing the Size ................................................................ |
86 |
Changing the Length (for 7mm Satin Stitch Patterns Only) .... |
86 |
Creating a Vertical Mirror Image .......................................... |
86 |
Creating a Horizontal Mirror Image...................................... |
86 |
Sewing a Pattern Continuously ............................................. |
86 |
Changing Thread Density (for Satin Stitch Patterns Only)...... |
87 |
Returning to the Beginning of the Pattern ............................. |
87 |
Checking the Image.............................................................. |
88 |
COMBINING STITCH PATTERNS ...................... |
89 |
Before Combining ................................................................ |
89 |
Combining Various Stitch Patterns........................................ |
89 |
Combining Large and Small Stitch Patterns........................... |
90 |
Combining Horizontal Mirror Image Stitch Patterns.............. |
91 |
Combining Stitch Patterns of Different Length ...................... |
91 |
Making Step Stitch Patterns |
|
(for 7mm Satin Stitch Patterns Only) ..................................... |
92 |
USING THE MEMORY FUNCTION.................... |
94 |
Stitch Data Precautions ........................................................ |
94 |
Saving Stitch Patterns in the Machine’s Memory................... |
95 |
Saving Stitch Patterns to USB Media..................................... |
96 |
Saving Stitch Patterns in the Computer ................................. |
97 |
Retrieving Stitch Patterns from the Machine’s Memory ......... |
98 |
Recalling from USB Media ................................................... |
99 |
Recalling from the Computer.............................................. |
100 |
Chapter4 MY CUSTOM STITCH |
102 |
DESIGNING A STITCH..................................... |
103 |
ENTERING STITCH DATA ................................ |
105 |
USING STORED CUSTOM STITCHES .............. |
110 |
Storing Custom Stitches in Your List ................................... |
110 |
Retrieving Stored Stitches ................................................... |
111 |
A Appendix |
|
Chapter1 How to Create Bobbin Work |
2 |
ABOUT BOBBIN WORK ...................................... |
3 |
PREPARING FOR BOBBIN WORK ....................... |
3 |
Required Materials ................................................................. |
3 |
Upper Threading .................................................................... |
4 |
Preparing the Bobbin Thread.................................................. |
5 |
CREATING BOBBIN WORK ................................. |
9 |
Positioning the Fabric and Sewing.......................................... |
9 |
Bobbin Work Free Motion Sewing........................................ |
11 |
ADJUSTING THE THREAD TENSION ................ |
12 |
TROUBLESHOOTING ........................................ |
13 |
Chapter2 Maintenance and Troubleshooting |
14 |
CARE AND MAINTENANCE............................... |
15 |
Restrictions on oiling............................................................ |
15 |
Precautions on storing the machine...................................... |
15 |
Cleaning the LCD Screen ..................................................... |
15 |
Cleaning the Machine Casing............................................... |
15 |
Cleaning the Race ................................................................ |
15 |
Cleaning the Cutter in the Bobbin Case Area........................ |
17 |
About the Maintenance Message.......................................... |
17 |
ADJUSTING THE SCREEN .................................. |
18 |
Adjusting the Brightness of the Screen Display..................... |
18 |
Touch Panel is Malfunctioning ............................................ |
18 |
TROUBLESHOOTING ....................................... |
19 |
Frequent troubleshooting topics........................................... |
19 |
Upper thread tightened up................................................... |
19 |
Tangled thread on wrong side of fabric................................ |
20 |
Incorrect thread tension ....................................................... |
22 |
Fabric is caught in the machine and cannot be removed ..... |
23 |
List of Symptoms.................................................................. |
26 |
ERROR MESSAGES............................................. |
29 |
SPECIFICATIONS............................................... |
31 |
UPGRADING YOUR MACHINE’S SOFTWARE ..... |
32 |
Upgrade Procedure Using USB Media ................................. |
32 |
Upgrade Procedure Using Computer ................................... |
33 |
INDEX................................................................ |
34 |
B-10

NAMES OF MACHINE PARTS AND THEIR FUNCTIONS
NAMES OF MACHINE PARTS AND THEIR FUNCTIONS
The names of the various parts of the sewing machine and their functions are described below. Before using the sewing machine, carefully read these descriptions to learn the names of the machine parts.
Machine
■ Front View
aTop cover
Open the top cover to thread the machine and wind the bobbin.
bPre-tension disk
Pass the thread around the pre-tension disk when winding the bobbin thread. (page B-34)
cThread guide for bobbin winding
Pass the thread through this thread guide when winding the bobbin thread. (page B-34)
dSpool pin
Place a spool of thread on the spool pin. (page B-42)
eSpool cap
Use the spool cap to hold the spool of thread in place. (page B-42)
fSupplemental spool pin
Use this spool pin to wind the bobbin thread, or to sew with the twin needle. (page B-34, B-45)
gBobbin winder
Use the bobbin winder when winding the bobbin. (page B-34)
hLCD (liquid crystal display)
Settings for the selected stitch and error messages appear in the LCD. (page B-22)
iSpeaker
jKnee lifter
Use the knee lifter to raise and lower the presser foot. (page S-15)
kKnee lifter slot
Insert the knee lifter into the slot. (page S-15)
lOperation buttons (7 buttons) and sewing speed controller
Use these buttons and the slide to operate the sewing machine. (page B-13)
mFlat bed attachment with accessory compartment
Store presser feet and bobbins in the accessory compartment of the flat bed attachment. When sewing cylindrical pieces, remove the flat bed attachment. (page B-13)
nThread cutter
Pass the threads through the thread cutter to cut them. (page B-44)
oThread guide plate
Pass the thread around the thread guide plate when threading upper thread. (page B-42)
■ Right-side/Rear View
aConnector for the presser foot
Connect the dual feed foot. (page B-54)
bHandle
Carry the sewing machine by its handle when transporting the machine.
cPresser foot lever
Raise and lower the presser foot lever to raise and lower the presser foot. (page B-49)
dAir vent
The air vent allows the air surrounding the motor to circulate. Do not cover the air vent while the sewing machine is being used.
eMain power switch
Use the main power switch to turn the sewing machine ON and OFF. (page B-19)
fFoot controller
Depress the foot controller to control the speed of the machine. (page S-4)
gPower cord receptacle
Insert the power cord into the machine receptacle. (page B-19)
hSensor pen holder connector
Connect the included sensor pen holder. The connector hole is covered with the protective cap when purchased. (page B-60)
iSensor pen jack
Connect the sensor pen. (page B-59)
jFoot controller jack
Insert the foot controller plug into its jack on the machine. (page S-4)
kUSB port for computer
In order to import/export patterns between a computer and the machine, plug the USB cable into the USB port. (page B-53, S-97)
lUSB port for mouse / media
In order to send patterns from/to USB media, plug the USB media directly into the USB port. (page B-53, S-96)
Connect the USB mouse to operate with mouse. (page B-54)
mHandwheel
Rotate the handwheel toward you (counterclockwise) to raise and lower the needle. The wheel should be turned toward the front of the machine.
B-11

NAMES OF MACHINE PARTS AND THEIR FUNCTIONS
Needle and Presser Foot Section
aButtonhole lever
The buttonhole lever is used with the one-step buttonhole foot to create buttonholes. (page S-55)
bPresser foot holder screw
Use the presser foot holder screw to hold the presser foot in place. (page B-49)
cPresser foot holder
The presser foot is attached to the presser foot holder. (page B-49)
dPresser foot
The presser foot consistently applies pressure to the fabric as sewing takes place. Attach the appropriate presser foot for the selected stitch. (page B-49)
eFeed dogs
The feed dogs feed the fabric in the sewing direction.
fBobbin cover
Open the bobbin cover to set the bobbin. (page B-39, S-32)
gNeedle plate cover
Remove the needle plate cover to clean the race. (page S-26)
hNeedle plate
The needle plate is marked with guides to help sew straight seams. (page S-26)
iNeedle bar thread guide
Pass the upper thread through the needle bar thread guide. (page B-42)
jNeedle clamp screw
Use the needle clamp screw to hold the needle in place. (page B-49)
Measurements on the needle plate, bobbin cover (with mark) and needle plate cover
The measurements on the bobbin cover are references for patterns with a middle (center) needle position. The measurements on the needle plate and the needle plate cover are references for stitches with a left needle position.
aFor stitches with a middle (center) needle position
bFor stitches with a left needle position
cLeft needle position on the needle plate <inch>
dLeft needle position on the needle plate <cm>
eMiddle (center) needle position on the bobbin cover (with mark) <inch>
fLeft needle position on the needle plate cover <inch>
B-12
NAMES OF MACHINE PARTS AND THEIR FUNCTIONS
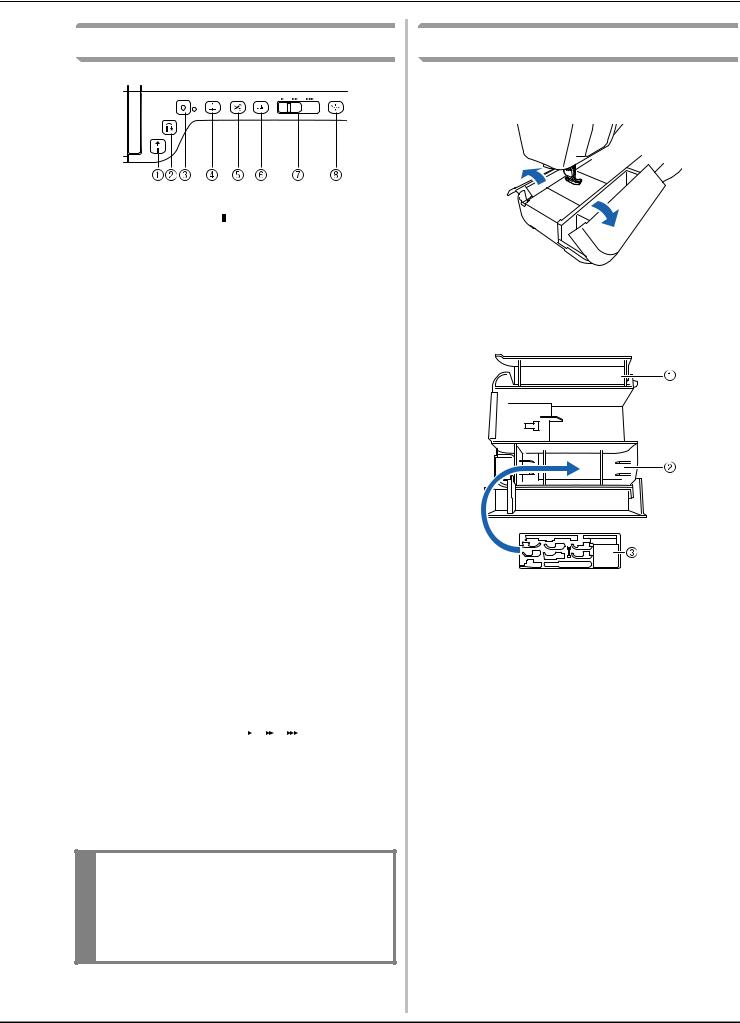
Operation Buttons
a“Start/Stop” button 
Press this button and the machine will sew a few stitches at a slow speed and then begin sewing at the speed set by the sewing speed controller. Press the button again to stop the machine. Hold the button in to sew at the machine’s slowest speed. The button changes color according to the machine’s operation mode.
Green: |
The machine is ready to sew or is sewing. |
Red: |
The machine cannot sew. |
b“Reverse Stitch” button 
For straight, zigzag, and elastic zigzag stitch patterns that take reverse stitches, the machine will sew reverse stitches at low speed only while holding down the “Reverse Stitch” button. The stitches are sewn in the opposite position.
For other stitches, use this button to sew reinforcement stitches at the beginning and end of sewing. Press and hold this button, and the machine sews 3 stitches in the same spot and stops automatically. (see page S-5)
c“Reinforcement Stitch” button 
Use this button to sew a single stitch repeatedly and tie-off. For character/decorative stitches, press this button to end with a full stitch instead of at a mid-point. The LED light beside this button lights up while the machine is sewing a full motif, and automatically turns off when the sewing is stopped. (see page S-5)
d“Needle Position” button 
Use this button when changing sewing direction or for detailed sewing in small areas. Press this button to raise or lower the needle position. With this button, you can lower and raise the needle to sew a single stitch.
e“Thread Cutter” button 
Press this button after sewing to automatically trim the excess thread.
f“Presser Foot Lifter” button 
Press this button to lower the presser foot and apply pressure to the fabric. Press this button again to raise the presser foot.
gSewing Speed controller 
Use this controller to adjust the sewing speed. Move the slide to the left to sew at slower speeds. Move the slide to the right to sew at higher speeds. Beginners should sew at a slow speed.
h“Automatic Threading” button 
Use this button to automatically thread the needle.
 CAUTION
•Do not press the thread cutter button after the threads have been cut. The needle may break and threads may become tangled, or damage to the machine may occur.
Using the Flat Bed Attachment
Pull the top of the flat bed attachment to open the accessory compartment.
A presser foot storage tray is stored in the accessory compartment of the flat bed attachment.
aStorage space of the flat bed attachment
bPresser foot storage space of the flat bed attachment
cPresser foot storage tray
There are also storage spaces for optional presser feet, such as the vertical stitch alignment foot “V”.
B-13

NAMES OF MACHINE PARTS AND THEIR FUNCTIONS
Included Accessories
1 |
2 |
3 |
4 |
5 |
6 |
7 |
8 |
9 |
10 |
11 |
12 |
13 |
14 |
15 |
16 |
17 |
18 |
19 |
20 |
21 |
22 |
||||
|
|
|
|
|
|
|
|
|
|
|
|
|
|
|
|
|
|
|
|
|
|
|
|
|
|
|
|
|
|
|
|
|
|
|
|
|
|
|
|
|
|
|
|
75/11 2 needles 90/14 2 needles
90/14 2 needles: 2.0/11 needle Ball point needle (gold colored)
23 |
24 |
25 |
26 |
27 |
28 |
29 |
30 |
31 |
32 |
33 |
34 |
35 |
36 |
37 |
38 |
39 |
40 |
41 |
42 |
43 |
44 |
45 |
46 |
|
|
|
|
|
|
|
|
|
|
47 |
48 |
49 |
50* |
*Included accessories vary depending on the countries or regions.
B-14

NAMES OF MACHINE PARTS AND THEIR FUNCTIONS
No. |
Part Name |
Part Code |
|
|
|
||
|
|
Americas |
Others |
|
|
|
|
1 |
Zigzag foot “J” (on machine) |
XF3022 |
-001 |
|
|
|
|
2 |
Monogramming foot “N” |
X53840-351 |
|
|
|
|
|
3 |
Overcasting foot “G” |
XC3098-051 |
|
|
|
|
|
4 |
Zipper foot “I” |
X59370-051 |
|
|
|
|
|
5 |
Buttonhole foot “A” |
X57789-251 |
|
|
|
|
|
6 |
Blind stitch foot “R” |
X56409-051 |
|
|
|
|
|
7 |
Button fitting foot “M” |
130489-001 |
|
|
|
|
|
8 |
Straight stitch foot |
SA167 |
F042N: |
|
|
|
XC1973-052 |
|
|
|
|
9 |
Free motion quilting foot “C” |
XF4737 |
-001 |
|
|
|
|
10 |
Free motion echo quilting foot |
XE0766-001 |
|
|
“E” |
|
|
|
|
|
|
11 |
1/4” quilting foot with guide |
SA185 |
F057: |
|
|
|
XC7416-252 |
|
|
|
|
12 |
Free motion open toe quilting |
XF4873 |
-001 |
|
foot “O” |
|
|
|
|
|
|
13 |
Dual feed foot |
DF1: XF4166-001 (EU area) |
|
|
|
XF3165-001 (other area) |
|
|
|
|
|
14 |
Adapter |
XF3613-001 |
|
|
|
|
|
15 |
Screw (small) |
XA4813-051 |
|
|
|
|
|
16 |
Needle set |
X58358-051 |
|
|
|
|
|
17 |
Twin needle |
X59296-151 |
|
|
|
|
|
18 |
Bobbin × 10 |
SA156 |
SFB: |
|
(One is on machine.) |
|
XA5539-151 |
|
|
|
|
19 |
Seam ripper |
XF4967 |
-001 |
|
|
|
|
20 |
Cleaning brush |
X59476-051 |
|
|
|
|
|
21 |
Eyelet punch |
XZ5051-001 |
|
|
|
|
|
22 |
Screwdriver (small) |
X55468-051 |
|
|
|
|
|
23 |
Screwdriver (large) |
XC4237-021 |
|
|
|
|
|
24 |
Disc-shaped screwdriver |
XC1074-051 |
|
|
|
|
|
25 |
Vertical spool pin |
XC8619-052 |
|
|
|
|
|
26 |
Spool cap (small) |
130013-154 |
|
|
|
|
|
27 |
Spool cap (medium) × 2 |
X55260-153 |
|
|
(One is on machine.) |
|
|
|
|
|
|
28 |
Spool cap (large) |
130012-054 |
|
|
|
|
|
29 |
Spool cap (special) |
XA5752-121 |
|
|
|
|
|
30 |
Bobbin clip × 10 |
XE3060-001 |
|
|
|
|
|
31 |
Spool felt (on machine) |
X57045-051 |
|
|
|
|
|
32 |
Spool net × 2 |
XA5523-050 |
|
|
|
|
|
33 |
Touch pen (stylus) |
XA9940-051 |
|
|
|
|
|
34 |
Knee lifter |
XA6941-052 |
|
|
|
|
|
35 |
USB cable |
XD0745-051 |
|
|
|
|
|
36 |
Bobbin case (gray, for bobbin |
XE8298-001 |
|
|
work) |
|
|
|
|
|
|
37 |
Straight stitch needle plate |
XF3076-001 |
|
|
|
|
|
38 |
Cord guide bobbin cover |
XE8991-101 |
|
|
(with single hole) |
|
|
|
|
|
|
39 |
Bobbin cover (with mark) |
XF0750-101 |
|
|
|
|
|
40 |
Bobbin cover (on machine) |
XE8992-101 |
|
|
|
|
|
41 |
Foot controller |
XD0501-151(EU area) |
|
|
|
XC8816-051 (other area) |
|
|
|
|
|
42 |
Wide table |
SAWT6200D |
WT10: |
|
|
(U.S.A.) |
XF4184-001 |
|
|
SAWT6200DC |
|
|
|
(Canada) |
|
|
|
|
|
43 |
Grid sheet set |
SA507 |
GS3: |
|
|
|
X81277-151 |
|
|
|
|
44 |
Sensor pen |
XF4992-001 (EU area) |
|
|
|
XF3116-001 (other area) |
|
|
|
|
|
45 |
Pen holder |
XF2973-001 |
|
|
|
|
|
46 |
Dust cover |
XF4569-001 |
|
|
|
|
|
47 |
Accessory bag |
XC4487-021 |
|
|
|
|
|
48 |
Operation manual |
This manual |
|
|
|
|
|
49 |
Quick Reference Guide |
XF3634-001 |
|
|
|
|
|
No. |
Part Name |
Part Code |
|
|
|
||
|
|
Americas |
Others |
|
|
|
|
50 |
MY CUSTOM STITCH CD* |
XE8901 |
-001 |
|
|
|
|
|
|
|
|
Memo
•Foot controller: Model T
This foot controller can be used on the machine with product code 882-D00. The product code is mentioned on the machine rating plate.
•Always use accessories recommended for this machine.
•Placing bobbin clips on bobbins helps prevent the thread from unwinding from the bobbin. In addition, snapping bobbin clips together allows the bobbins to be conveniently stored and prevents them from rolling around if they are dropped.
•Included accessories may vary depending on the country or region.
B-15

NAMES OF MACHINE PARTS AND THEIR FUNCTIONS
Options
The following are available as optional accessories to be purchased separately from your authorized Brother dealer.
1 |
2 |
3 |
4 |
5 |
6 |
7 |
8 |
9 |
10 |
11 |
No. |
Part Name |
Part Code |
|
|
|
||
|
|
Americas |
Others |
|
|
|
|
1 |
Multi-function foot controller |
SAMFFC |
MFFC1: |
|
|
(U.S.A.) |
XF4159-001 |
|
|
SAMFFCC |
MFFC1OC: |
|
|
(Canada) |
XF4471-001 |
|
|
|
(Australia) |
|
|
|
|
2 |
10 spool stand |
SA561 |
TS5: |
|
|
(U.S.A.) |
XF4175-001 |
|
|
SA561C |
|
|
|
(Canada) |
|
|
|
|
|
3 |
2 Spool stand |
SA562 |
TS6: |
|
|
(U.S.A.) |
XF4180-001 |
|
|
SA562C |
|
|
|
(Canada) |
|
|
|
|
|
4 |
Seam guide |
SA538 |
SG1: |
|
|
|
XC8483-052 |
|
|
|
|
5 |
Walking foot |
SA140 |
F033N: |
|
|
|
XC2214-052 |
|
|
|
|
6 |
Side cutter foot |
SA177 |
F054: |
|
|
|
XC3879-152 |
|
|
|
|
7 |
Free-motion quilting foot |
SA129 |
F005N: |
|
|
|
XC1948-052 |
|
|
|
|
8 |
Circular attachment |
SACIRC1 |
CIRC1: |
|
|
|
XE3527-001 |
|
|
|
|
9 |
Stitch in the ditch foot |
SA191 |
F065: |
|
|
|
XF2339-001 |
|
|
|
|
10 |
Vertical stitching alignment |
SA189 |
F063: |
|
foot “V” |
|
XE5224-001 |
|
|
|
|
11 |
USB mouse |
XE5334 |
-101 |
|
|
|
|
|
|
|
|
Memo
•All specifications are correct at the time of printing. Please be aware that some specifications may change without notice.
B-16

 Basic
Basic
operations
This section provides details on the initial setup procedures as well as descriptions of this machine’s more useful functions.
Page number starts with “B” in this section.
Chapter1 |
Getting Ready ....................................................... |
B-18 |
Chapter2 |
Sensor Functions ................................................... |
B-58 |
|
|
|

BBasic operations
Chapter 1
Getting Ready
TURNING THE MACHINE ON/OFF ........................ |
19 |
Setting Your Machine for the First Time ................................... |
20 |
LCD SCREEN............................................................ |
22 |
■ Utility Stitch Screen ................................................................. |
22 |
■ Key Functions........................................................................... |
23 |
Using the Machine Setting Mode Key ...................................... |
25 |
■ Selecting the “Eco Mode” or “Shutoff Support Mode”............. |
28 |
■ Changing the Pointer Shape When a USB Mouse Is Used ........ |
28 |
■ Selecting the Initial Screen Display .......................................... |
28 |
■ Choosing the Display Language................................................ |
29 |
■ Saving a Settings Screen Image to USB Media.......................... |
29 |
Using the Sewing Machine Help Key ....................................... |
30 |
Using the Operation Guide Function........................................ |
31 |
Using the Sewing Guide Function............................................. |
32 |
Using the Pattern Explanation Function.................................... |
33 |
LOWER THREADING .............................................. |
34 |
Winding the Bobbin.................................................................. |
34 |
■ Using the Supplemental Spool Pin............................................ |
34 |
■ Using the Spool Pin.................................................................. |
37 |
■ Untangling Thread from Beneath the Bobbin Winder Seat ...... |
38 |
Setting the Bobbin .................................................................... |
39 |
Pulling Up the Bobbin Thread................................................... |
41 |
UPPER THREADING ................................................ |
42 |
Upper Threading....................................................................... |
42 |
Using the Twin Needle Mode .................................................. |
45 |
Using Threads that Unwind Quickly......................................... |
47 |
■ Using the Spool Net ................................................................. |
47 |
■ Using the Vertical Spool Pin .................................................... |
48 |
CHANGING THE PRESSER FOOT............................ |
49 |
Removing the Presser Foot........................................................ |
49 |
Attaching the Presser Foot ........................................................ |
49 |
Attaching the Presser Foot with the Included Adapter.............. |
49 |
■ Attaching the Free Motion Echo Quilting Foot “E” .................. |
50 |
CHANGING THE NEEDLE ....................................... |
51 |
ABOUT THE NEEDLE AND FABRIC......................... |
52 |
About the Needle...................................................................... |
52 |
Fabric/Thread/Needle Combinations........................................ |
52 |
USING FUNCTIONS BY CONNECTING THE |
|
ACCESSORY TO THE MACHINE ............................. |
53 |
Using USB Media...................................................................... |
53 |
Connecting the Machine to the Computer................................ |
53 |
Using a USB Mouse .................................................................. |
54 |
■ Clicking a Key .......................................................................... |
54 |
■ Changing Pages ........................................................................ |
54 |
Using the Dual Feed Foot ......................................................... |
54 |
■ Attaching the Dual Feed Foot................................................... |
55 |
■ When the Snap-On Foot of the Dual Feed Foot is Detached.... |
56 |
■ Using the Dual Feed Position Lever.......................................... |
56 |
■ Adjusting the Amount of Fabric Feeding of the Dual Feed Foot ...... |
56 |
TURNING THE MACHINE ON/OFF
TURNING THE MACHINE ON/OFF
 WARNING
•Use only regular household electricity for the power source. Using other power sources may result in fire, electric shock, or damage to the machine.
•Make sure that the plugs on the power cord are firmly inserted into the electrical outlet and the power cord receptacle on the machine.
•Do not insert the plug on the power cord into an electrical outlet that is in poor condition.
•Turn the main power to OFF and remove the plug in the following circumstances: When you are away from the machine
After using the machine
When the power fails during use
When the machine does not operate correctly due to a bad connection or a disconnection During electrical storms
 CAUTION
•Use only the power cord included with this machine.
•Do not use extension cords or multi-plug adapters with many other appliances plugged in to them. Fire or electric shock may result.
•Do not touch the plug with wet hands. Electric shock may result.
•When unplugging the machine, always turn the main power to OFF first. Always grasp the plug to remove it from the outlet. Pulling on the cord may damage the cord, or lead to fire or electric shock.
•Do not allow the power cord to be cut, damaged, modified, forcefully bent, pulled, twisted, or bundled. Do not place heavy objects on the cord. Do not subject the cord to heat. These things may damage the cord, or cause fire or electric shock. If the cord or plug is damaged, take the machine to your authorized dealer for repairs before continuing use.
•Unplug the power cord if the machine is not to be used for a long period of time. Otherwise, a fire may result.
•When leaving the machine unattended, either the main switch of the machine should be turned to OFF or the plug must be removed from the socket-outlet.
•When servicing the machine or when removing covers, the machine must be unplugged.
•For U.S.A. only
This appliance has a polarized plug (one blade wider than the other). To reduce the risk of electrical shock, this plug is intended to fit in a polarized outlet only one way.
If the plug does not fit fully in the outlet, reverse the plug. If it still does not fit, contact a qualified electrician to install the proper outlet. Do not modify the plug in any way.
B
1
Ready Getting
Basic operations B-19

TURNING THE MACHINE ON/OFF
aInsert the power supply cord into the power cord receptacle, then insert the plug into a wall outlet.
aMain power switch
bPower supply cord
bTurn the main power switch to “I” to turn on the machine.
aOFF
bON
Note
•When the straight stitch needle plate is on the machine, the needle will automatically move to the middle position.
Memo
•When the machine is turned on, the needle and the feed dogs will make sound when they move; this is not a malfunction.
cWhen the machine is turned on, the opening movie is played. Touch anywhere on the screen to display the sewing screen.
 CAUTION
•Only touch the screen with your finger or the included touch pen. Do not use a sharp pencil, screwdriver, or other hard or sharp object. It is not necessary to press hard on the screen.
Pressing too hard or using a sharp object may damage the screen.
dTurn the main power switch to “O” to turn off the machine.
Memo
•If the machine is turned off in the middle of sewing in the “Sewing” function, the operation will not continued after turning the power on again.
Setting Your Machine for the First Time
When you first turn on the machine, set the language and time/date to your language and local time/date. Follow the procedure below when the settings screen appears automatically.
aPress  and
and  to set your local language.
bPress  .
.
cThe message screen, confirming if you want to set time/date, appears. To set the
time/date, press  ; to cancel the setting, press
  .
.
→The screen to set time/date appears.
B-20

dPress  or
or  to set time/date.
 a
a
 b
b
c |
|
|
|
|
|
d |
|
|
|
|
|
||
|
|
|
|
|
||
|
|
|
|
|
|
|
|
|
|
|
|
|
|
aPress to display the time on the screen.
bSet the year (YYYY), month (MM) and date (DD).
cSelect whether 24h or 12h setting to display.
dSet the current time.
ePress  to start using your machine.
→The clock starts from 0 second of the time you set.
Note
•The time/date you set may be cleared, if you don’t turn on the machine for a certain period.
TURNING THE MACHINE ON/OFF
B
1
Ready Getting
Basic operations B-21

LCD SCREEN
LCD SCREEN
 CAUTION
•Only touch the screen with your finger or the included touch pen. Do not use a sharp pencil, screwdriver, or other hard or sharp object. It is not necessary to press hard on the screen. Pressing too hard or using a sharp object may damage the screen.
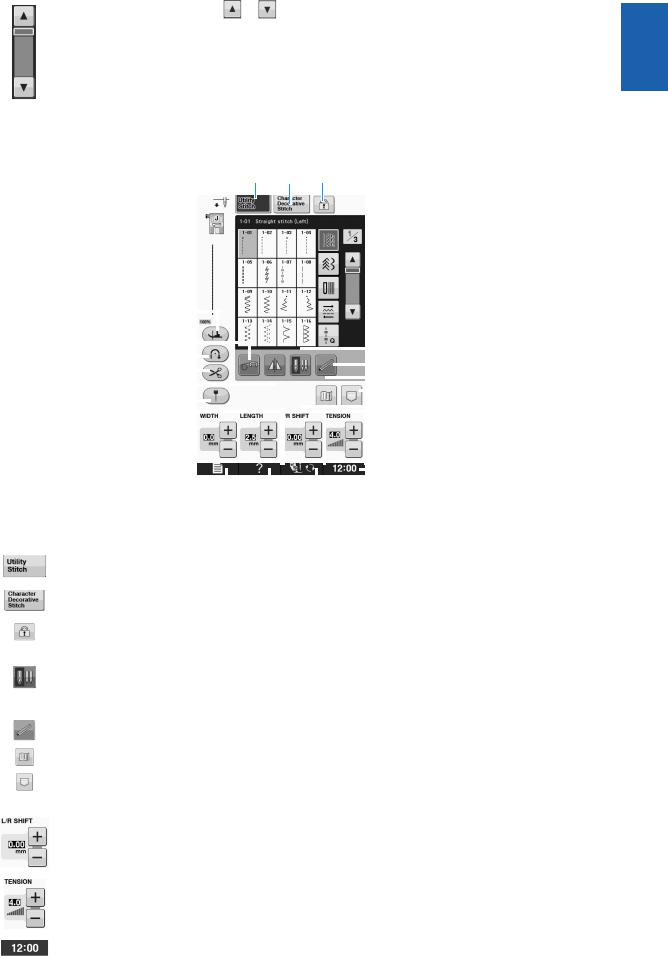
■Utility Stitch Screen
Press a key with your finger to select the stitch pattern, to select a machine function, or to select an operation indicated on the key. When the key display is light gray, the function is not currently available.
|
|
a |
|
|
|
|
|
|
|
|
|
|
|
|
|
|
|
|
|
|
|
|
|
|
|
|
|
|
|
|
|
|
|
|
|
|
|
|
|
|
|
|
|
|
|
||
|
|
b |
|
|
|
|
|
|
|
|
|
|
g |
|
|
|
|
|
|
|
|
|
|
|
|
|
|
|
|
||
|
|
c |
|
|
|
|
|
|
|
|
|
|
|
|
|
|
|
|
|
|
|
|
|
|
|
|
|
|
|
||
|
|
|
|
|
|
|
|
|
|
|
|
|
|
|
|
|
|
|
|
|
|
|
|
|
|
|
|
|
|
|
|
|
|
|
|
|
|
|
|
|
|
|
|
|
|
||
|
|
d |
|
|
|
|
|
|
|
|
|
|
h |
|
|
|
|
|
|
|
|
|
|||||||||
|
|
|
|
|
|
|
|
|
|
|
|
|
|
||
|
|
e |
|
|
|
|
|
|
|
|
|
|
f |
|
|
|
|
|
|
|
|
|
|
|
|
|
|
|
|
||
|
|
|
|
|
|
|
|
|
|
|
|
|
|
|
|
|
|
|
|
|
|
|
|
|
|
|
|
|
|
|
|
No. |
Display |
Key Name |
|
|
|
|
|
Explanation |
|
Page |
|||||
|
|
|
|
|
|
|
|
|
|
|
|
|
|
|
|
a |
|
Needle position |
Shows single or twin needle mode setting, and the needle stop |
– |
|||||||||||
|
|
setting display |
position. |
|
|
||||||||||
|
|
|
|
|
|
|
|
Single needle/down |
Single needle/up position |
|
|||||
|
|
|
|
|
|
|
|
|
position |
|
|
||||
|
|
|
|
|
|
|
|
Twin needle/down |
Twin needle/up position |
|
|||||
|
|
|
|
|
|
|
|
|
position |
|
|
||||
|
|
|
|
|
|
|
|
|
|
|
|
|
|
|
|
b |
|
Selected stitch |
Shows the name and code number of the selected stitch. |
S-3 |
|||||||||||
|
|
display |
|
|
|
|
|
|
|
|
|
|
|
|
|
|
|
|
|
|
|
|
|
|
|
|
|
|
|
|
|
c |
|
Presser foot display |
Shows the presser foot code. Attach the presser foot indicated in this |
B-49 |
|||||||||||
|
|
|
|
display before sewing. |
|
|
|||||||||
|
|
|
|
|
|
|
|
|
|
|
|
|
|
|
|
d |
|
Stitch preview |
Shows a preview of the selected stitch. When shown at 100%, the |
S-21 |
|||||||||||
|
|
|
|
stitch appears in the screen at nearly its actual size. |
|
||||||||||
|
|
|
|
|
|
|
|
|
|
|
|
|
|
|
|
e |
|
Pattern display size |
Shows the approximate size of the pattern selected. |
S-21 |
|||||||||||
|
|
|
|
|
|
|
|
: Nearly the same size as the sewn pattern |
|
||||||
|
|
|
|
|
|
|
|
: 1/2 the size of the sewn pattern |
|
|
|||||
|
|
|
|
|
|
|
|
: 1/4 the size of the sewn pattern |
|
|
|||||
|
|
|
|
* The actual size of the sewn pattern may differ depending on the type |
|
||||||||||
|
|
|
|
|
of fabric and thread that is used. |
|
|
||||||||
|
|
|
|
|
|
|
|
|
|
|
|
|
|
|
|
f |
|
Stitch selection |
Press the key for the pattern you want to sew. Use |
S-21 |
|||||||||||
|
|
screen |
|
|
|
|
|
|
|
|
|
|
|
|
|
|
|
|
|
|
|
|
|
|
|
to change to different stitch groups. |
|
||||
|
|
|
|
|
|
|
|
|
|
|
|
|
|
|
|
g |
|
Page display |
Shows additional pages that can be displayed. |
– |
|||||||||||
|
|
|
|
|
|
|
|
|
|
|
|
|
|
|
|
B-22
|
|
|
|
|
|
|
LCD SCREEN |
||
|
|
|
|
|
|
|
|
|
|
|
No. |
Display |
Key Name |
|
|
Explanation |
|
Page |
|
|
|
|
|
|
|
|
|
|
|
|
h |
|
Scroll key |
Press |
or |
, to move one page at a time, or touch anywhere on |
|
– |
|
|
|
|
|
|
|
|
|||
|
|
|
|
the bar to jump ahead for additional pages of stitches. |
|
|
|
||
|
|
|
|
|
|
|
|
|
|
*All key functions of the LCD are explained in the following “Key Functions”.
■Key Functions
a b c
B
1
Ready Getting
t |
|
|
|
|
|
|
||||||||||||||
|
|
|
|
|
|
|
|
|
|
|
|
|
|
|
|
|||||
|
|
|
|
|
|
|||||||||||||||
s |
|
|
|
|
d |
|||||||||||||||
r |
|
|
|
|
|
|
|
|
|
|
|
|
|
|
|
|
|
|
|
|
|
|
|
|
|
|
|
|
|
|
|
|
|
|
|
e |
|||||
|
|
|
|
|
|
|
|
|
|
|
|
|
|
|
|
|
|
|
||
q |
|
|
|
|
|
|
|
|
|
|
|
|
|
|
|
|
|
|
|
|
|
|
|
|
|
|
|
|
|
|
|
|
|
|
|
|
|
|
|
||
|
|
|
|
|
|
|
|
|
|
f |
||||||||||
p |
|
|
|
|
|
|
|
|
|
|
|
|
|
|
|
|
|
|
|
|
|
|
|
|
|
|
|
|
|
|
|
|
g |
||||||||
|
|
|
||||||||||||||||||
o |
|
|
|
|
|
|
|
|
|
|
|
|
|
|
|
|
|
|
|
|
|
|
|
|
|
|
|
|
|
|
|
|
|
|
|
|
|
|
|
||
|
|
|
|
|
|
|
|
|
|
|
|
|
|
h |
||||||
|
|
|
|
|
||||||||||||||||
n |
|
|
|
|
|
|
|
|
|
|
|
|
|
|
|
|
|
|
|
i |
|
|
|
|
|
|
|
|
|
|
|
|
|
|
|
|
|
|
|
||
|
|
|
|
|
|
|
|
|
|
|
|
|
|
|
|
|
|
|
|
j |
|
|
|
|
|
|
|
|
|
|
|
|
|
|
|
|
|
|
|
|
|
|
|
|
|
|
|
|
|
|
|
|
|
|
|
|
|
|
|
|
|
|
|
|
|
|
|
|
|
|
|
|
|
|
|
|
|
|
|
|
|
|
|
|
|
|
|
m |
l |
k |
|
|
|
|
|
|
|
|
|
|
|
|
No. |
Display |
Key Name |
|
|
Explanation |
Page |
|
|
|
|
|
|
|
|
||
|
a |
|
“Utility Stitch” key |
Press this key to select a straight stitch, zigzag stitch, buttonhole, blind hem |
S-21 |
|
||
|
|
|
|
stitch, or other stitches commonly used in garment construction. |
|
|
||
|
|
|
|
|
|
|
||
|
b |
|
“Character/ |
Press this key to select character or decorative stitch patterns. |
S-77 |
|
||
|
|
|
Decorative Stitch” key |
|
|
|
|
|
|
|
|
|
|
|
|
||
|
c |
|
Screen lock key |
Press this key to lock the screen. When the screen is locked, the various |
S-18 |
|
||
|
|
|
|
settings, such as the stitch width and stitch length, are locked and cannot be |
|
|
||
|
|
|
|
changed. Press this key again to unlock the settings. |
|
|
||
|
|
|
|
|
|
|
||
|
d |
|
Needle mode |
Press this key to select twin needle sewing mode. The sewing mode changes |
B-45 |
|
||
|
|
|
selection key |
between single needle mode and twin needle mode each time you press the |
|
|
||
|
|
|
(Single/Double) |
key. If the key display is light gray, the selected stitch pattern cannot be sewn |
|
|
||
|
|
|
|
in the twin needle mode. |
|
|
|
|
|
|
|
|
|
|
|
||
|
e |
|
Sensor function key |
Press this key to use the sensor function. |
B-64 |
|
||
|
|
|
|
|
|
|
||
|
f |
|
Image key |
Press this key to display an enlarged image of the selected stitch pattern. |
S-22 |
|
||
|
|
|
|
|
|
|
||
|
g |
|
Machine’s memory |
Press this key to select from 3 memory functions; retrieving, storing or reset. |
S-22, |
|
||
|
|
|
key |
|
|
|
S-95, |
|
|
|
|
|
|
|
|
S-97 |
|
|
|
|
|
|
|
|
||
|
h |
|
“L/R SHIFT” key |
Shows the tendency of Left/Right of the center line of the original zigzag stitch |
S-11 |
|
||
|
|
|
|
currently selected stitch pattern. |
|
|
||
|
|
|
|
|
|
|
||
|
i |
|
Thread tension key |
Shows the automatic thread tension setting of the currently selected stitch |
S-12 |
|
||
|
|
|
|
pattern. You can use the plus and minus keys to change the thread tension |
|
|
||
|
|
|
|
settings. |
|
|
|
|
|
|
|
|
|
|
|
||
|
j |
|
Clock key |
Press this key to set the clock to your local time. |
B-20 |
|
||
|
|
|
|
|
|
|
|
|
|
|
|
|
|
|
|
|
|
Basic operations B-23
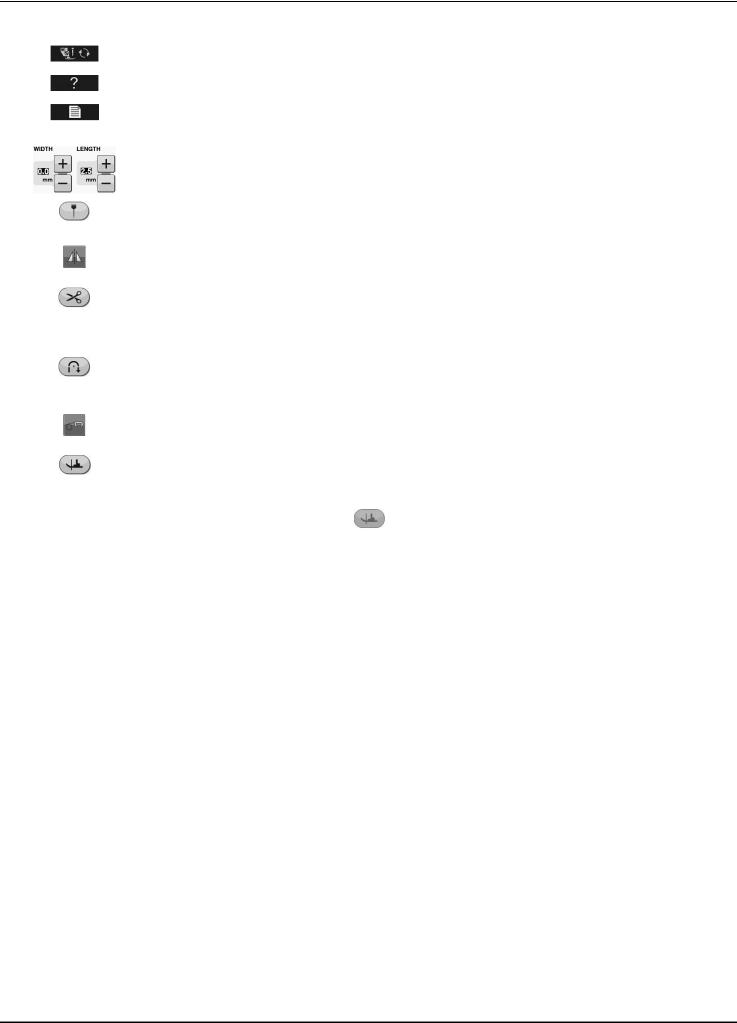
LCD SCREEN
No. |
Display |
Key Name |
|
|
Explanation |
Page |
|
|
|
|
|
||
k |
|
Presser foot/Needle |
Press this key before changing the needle, the presser foot, etc. This key locks |
B-49 to |
||
|
|
exchange key |
all key and button functions to prevent operation of the machine. |
B-51 |
||
|
|
|
|
|
||
l |
|
Sewing machine help |
Press this key to see explanations on how to use the machine. |
B-30 |
||
|
|
key |
|
|
|
|
|
|
|
|
|
||
m |
|
Machine setting |
Press this key to change the needle stop position, change the volume of |
B-25 |
||
|
|
mode key |
operation sound, adjust the pattern or screen, and change other machine |
|
||
|
|
|
settings. |
|
|
|
|
|
|
|
|
||
n |
|
Stitch width and |
Shows the zigzag width and stitch length settings of the currently selected |
S-10 |
||
|
|
stitch length key |
stitch pattern. You can use the plus and minus keys to adjust the zigzag width |
|
||
|
|
|
and stitch length settings. |
|
|
|
|
|
|
|
|
||
o |
|
Guideline marker key |
Press this key to display the guideline marker along the sewing line. The |
S-14 |
||
|
|
|
guideline marker makes it easier to sew stitches that align with the fabric edge |
|
||
|
|
|
or other marker on the fabric. |
|
|
|
|
|
|
|
|
||
p |
|
Mirror image key |
Press this key to create a mirror image of the selected stitch pattern. If the key |
S-21 |
||
|
|
|
display is light gray, a mirror image of the selected stitch pattern cannot be |
|
||
|
|
|
sewn. |
|
|
|
|
|
|
|
|
||
q |
|
Automatic thread |
Press this key to set the automatic thread cutting function. Set the automatic |
S-13 |
||
|
|
cutting key |
thread cutting function before sewing to have the machine automatically sew |
|
||
|
|
|
reinforcement stitches at the beginning and end of sewing (depending on the |
|
||
|
|
|
pattern, the machine may sew reverse stitches) and trim the threads after |
|
||
|
|
|
sewing. |
|
|
|
|
|
|
|
|
||
r |
|
Automatic |
Press this key to use the automatic reverse/reinforcement stitching setting. |
S-5 |
||
|
|
reverse/reinforcement |
If you select this setting before sewing, the machine will automatically sew |
|
||
|
|
stitch key |
reverse stitches or reinforcement stitches depending on the pattern, at the |
|
||
|
|
|
beginning and end of sewing. |
|
|
|
|
|
|
|
|
||
s |
|
Free motion mode |
Press this key to enter free motion sewing mode. |
S-40 |
||
|
|
key |
The presser foot is raised to an appropriate height and the feed dog is lowered |
|
||
|
|
|
for free motion quilting. |
|
|
|
|
|
|
|
|
||
t |
|
Pivot key |
Press this key to select the pivot setting. When the pivot setting is selected, |
S-15 |
||
|
|
|
stopping the machine lowers the needle and slightly raises the presser foot |
|
||
|
|
|
automatically. In addition, when sewing is restarted, the presser foot is |
|
||
|
|
|
automatically lowered. |
|
|
|
|
|
|
• |
If this key appears as |
, the pivot function cannot be used. |
|
|
|
|
• |
Be sure the needle position on page B-26 of Machine Settings is set to the |
|
|
|
|
|
|
down position. |
|
|
|
|
|
|
|
|
|
For additional operational information, refer to page reference number listed above.
B-24

LCD SCREEN
Using the Machine Setting Mode Key 
Press  to change the default machine settings (needle stop position, opening display, etc.).
 Memo
Memo
• Press or next to the page numbers, to display a different settings screen.
|
|
|
a |
|
|
f |
|
i |
|
|
|
|
|
|
|
||||
|
|
|
|
|
g |
|
|||
|
|
|
b |
|
|
|
j |
||
|
|
|
|
|
|
||||
|
|
|
|
|
|
||||
|
|
|
|
|
|
|
|||
|
|
|
|
|
|
|
k |
||
|
|
|
|
|
|
|
|||
|
|
|
|
|
|
|
|
|
|
|
|
|
|
|
|
|
|
|
|
|
|
|
|
|
|
|
|
|
l |
|
|
|
|
|
|
|
|
|
|
|
|
|
c |
|
|
|
h |
|
|
|
|
|
|
|
|
|
|||
|
|
|
|
|
|||||
|
|
|
d |
|
|
|
|
|
|
|
|
|
|
|
|
|
|
||
|
|
|
|
|
|
|
|
||
|
|
|
|
|
|
|
|
|
|
|
|
|
e |
|
|
|
|
|
|
|
|
|
|
|
|
|
|
||
m |
|
m |
|
m |
|
|
|||
|
aSelect whether to use the sewing speed controller to determine the zigzag width (see page S-39).
bMake adjustments to character or decorative stitch patterns (see page S-82).
cAdjust the presser foot height. (Select the height of the presser foot when the presser foot is raised.)
dAdjust the presser foot pressure. (The higher the number, the greater the pressure will be. Set the pressure at “3” for normal sewing.) (see page S-17)
If the dual feed foot is installed and its roller is lowered, the pressure setting is fixed at “2” and cannot be changed.
eFine tune the feed of the dual feed foot (see page B-54).
fSelect whether “1-01 Straight stitch (Left)” or “1-03 Straight stitch (Middle)” is the utility stitch that is automatically selected when the machine is turned on. (see page S-21)
gSelect whether “Utility Stitch” or “Quilt Stitch” displayed first on the stitch selection screen when the “Sewing” is selected.
hYou can activate this setting after connecting the optional multi-function foot controller. (These settings are not operable unless the optional multi-function foot controller is attached to the machine.)
iChange the height of the presser foot when sewing is stopped when the pivot setting is selected (see page S-15). Adjust the presser foot to one of the three heights (3.2 mm, 5.0 mm and 7.5 mm). (see page S-15)
jChange the height of the presser foot when the machine is set to free motion sewing mode (see page S-40).
kWhen set to “ON”, the thickness of the fabric is automatically detected by an internal sensor while sewing. This enables the fabric to be fed smoothly (see pages S-8 and S-17).
lAdjust the guideline marker position and brightness (see page S-14).
mPress to save the current settings screen image to USB media (see page B-29)
B
1
Ready Getting
Basic operations B-25
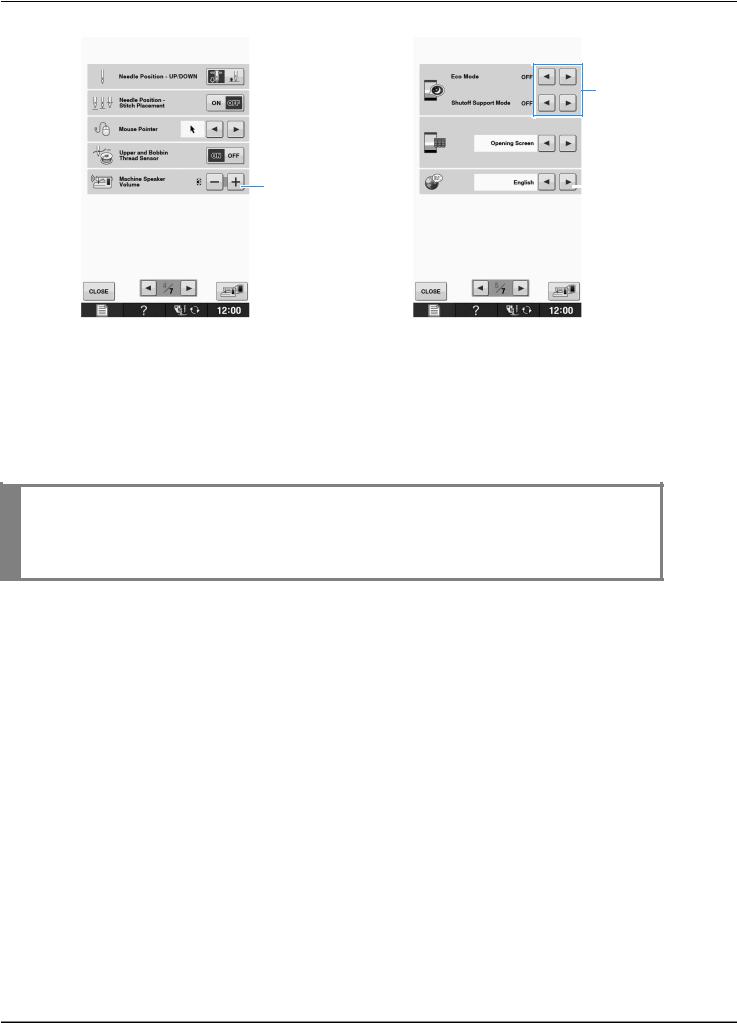
LCD SCREEN
 a
a
f
 b
b
 c
c
 g
g
 d
d
e |
|
h |
|
aSelect the needle stop position (the needle position when the machine is not operating) to be up or down. Select the down position when using the pivot key. (see page S-15)
bSelect the operation of the “Needle Position – Stitch Placement” button from the following two sequences (see page S-18).
Each press of the “Needle Position – Stitch Placement” button:
“ON” – raises the needle, stops it at a nearly lowered position, then lowers it “OFF” – raises the needle, then lowers it
cChange the shape of the pointer when a USB mouse is used (see page B-28).
dTurn the “Upper and Bobbin Thread Sensor” “ON” or “OFF”. If it is turned “OFF”, the machine can be used without thread. (see page S-4)
 CAUTION
•If “Upper and Bobbin Thread Sensor” is set to “OFF”, remove the upper thread. If the machine is used with the upper thread threaded, the machine will not be able to detect if the thread has become tangled. Continuing to use the machine with tangled thread may cause damage.
eChange the speaker volume. Increase the number for louder volume, decrease for softer volume.
fSelect to save the machine power by setting the “Eco Mode” or the “Shutoff Support Mode” (see page B-28).
gSelect the initial screen that is displayed when the machine is turned on (see page B-28).
hChange the display language (see page B-29).
B-26

LCD SCREEN
a
b
c
d
e f
g
B
1
Ready Getting
aChange the brightness of the needle area and work area lights.
bChange the screen display brightness (see page A-18).
cCalibrate the sensor function (see page B-62).
dDisplay the service count which is a reminder to take your machine in for regular servicing. (Contact your authorized dealer for details.)
eDisplay the total number of stitches sewn on this machine.
fThe “No.” is the internal machine number for the machine.
gDisplay the program version. “Version 1” shows the program version of the LCD panel, “Version 2” shows the program version of the machine.
Memo
•The latest version of software is installed in your machine. Check with your local authorized Brother dealer or at “ http://solutions.brother.com ” for available updates (see page A-32).
Basic operations B-27

LCD SCREEN
■Selecting the “Eco Mode” or “Shutoff Support Mode”
You can save the machine power by setting the eco mode or the shutoff support mode.
If you leave the machine without using for a specified period of time, the machine enters in one of these modes.
“Eco Mode”;
Machine will enter a sleep mode. Touch the screen or any operational button to continue sewing.
“Shutoff Support Mode”;
Machine will turn off after set period of time. Turn machine off and then back on to restart sewing.
Condition |
Eco Mode |
Shutoff Support |
|
|
Mode |
|
|
|
Available time |
0 - 120 (minute) |
1 - 12 (hour) |
|
|
|
“Start/Stop” button |
Green flashing |
Green slow flashing |
|
|
|
Suspended function |
Machine light, |
All functions |
|
Screen display, |
|
|
Guideline marker |
|
|
|
|
After recovering |
The machine starts |
You need to turn off |
|
from the previous |
the machine. |
|
operation. |
|
|
|
|
Press the “Start/Stop” button or touch the screen display to recover from these modes.
aPress  .
.
→The settings screen appears.
bDisplay page 5 of the settings screen.
cUse  or
or  to select the time until entering the mode.
Note
•If you turn off the machine while the machine is in the “Eco Mode” or the “Shutoff Support Mode”, wait for about 5 seconds before turning on the machine again.
■Changing the Pointer Shape When a USB Mouse Is Used
In the settings screen, the shape can be selected for the pointer that appears when a USB mouse is connected.
aPress  .
.
→The settings screen appears.
bDisplay page 4 of the settings screen.
cUse  or
or  to choose the pointer shape from the three settings available (
  ,
,  and
and  ).
).
dPress  to return to the original screen.
Memo
•The setting remains selected even if the machine is turned off.
■Selecting the Initial Screen Display
The Initial screen that appears on the machine can be changed.
aPress  .
.
→The settings screen appears.
bDisplay page 5 of the settings screen.
cUse  or
or  to select the setting for the initial screen display.
*Opening Screen: When the machine is turned on, the sewing screen appears after the opening movie screen is touched.
*Sewing Screen: When the machine is turned on, the sewing screen appears.
dPress  to return to the original screen.
B-28
 Loading...