

Page 1

Before you can use the machine, you must set up the hardware and install the driver.
Please read this “Quick Setup Guide” f or proper set up and installation instructions.
Step 1
Setting Up
the machine
MFC-890
Step 2
For the latest driver and to find the best solution for your problem or question, access the Brother
Solutions Center directly from the driver or go to http://solutions.brother.com
Keep this “Quick Setup Guide”, User’s Guide and supplied CD-ROM in a convenient place for
quick and easy reference at all times .
Setting Up the machine
Installing the Driver & Software
Setup is Complete!
®
USB
Windows
®
Parallel
Windows
4.0
®
NT
Windows
Installing the Driver & Software
OS
®
8.5-9.2
Mac
Quick Setup Guide
OS X
®
Mac
10.1/1 0.2.1 or greater
Page 2

■Getting Started
Carton Components
1
2
6
5
Quick Setup Guide
4
3
1. Control Panel
2. Scanner Cover Release Lever
3. Scanner Cover
Output P a pe r Suppor t Paper Support
Cable Ti e an d Filter Co r e for
Parallel Interface Cable
Carton components may differ from one country to another.
Save all packing materi als and the car ton.
■ The Parallel interf ac e cab le is not a standard accessory, if necessar y pur ch as e it.
■ For Parallel use a shield interface cable that is IEEE 1284-compliant.
■ Use only a parallel inter fac e c able or USB int er face c able that is not longer than 1.8 meters.
4. Document Cover
5. Paper Tray
6. Automatic Document Feeder (ADF)
Telephone Line Cord Power Cord USB Cable
CD-ROM
User’s Guide
Ink Cartridges
(Black, Cyan, Yellow, Magenta)
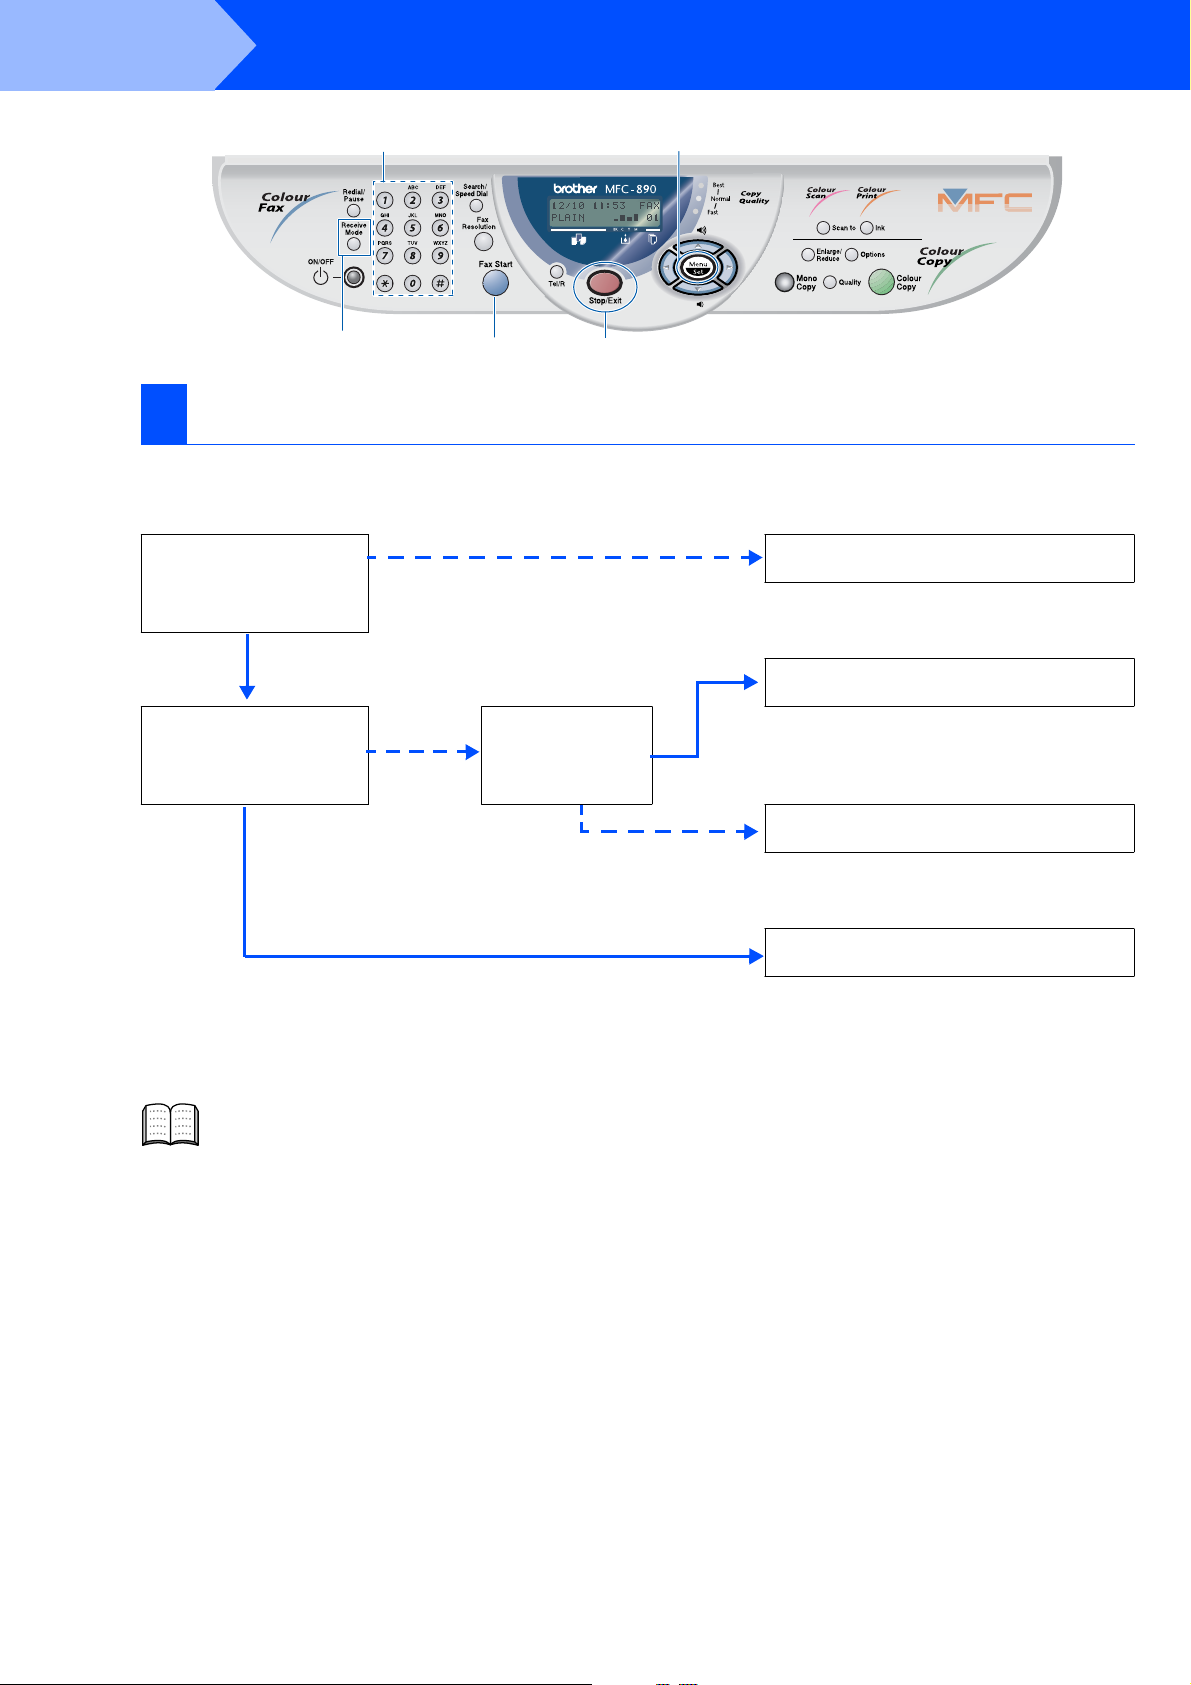
Control Panel
6879
12 34 5
1. ON/OFF key 4. Navigation keys 7. Ink key
2. Fax and Telephone keys 5. Copy keys and indicators 8. Scan to key
3. Stop/Exit key 6. Options key 9. Liquid Crystal Display (LCD)
For more details, see Chapter 1 "MFC-890 control panel overview" in the User's Guide.
Page 3

Table of Contents
Step 1
Step 2
Setting Up the machine
1. Removing the Protective Parts...........................................................................2
2. Attaching the Paper Supports............ ................................................................3
3. Load Paper .............. .... ... .... ........... .... ... .... ........... .... ... .... ........... .... ... ........... .... .... .3
4. Install Phone Line and Power Cord....................................................................4
5. Installing the Ink Cartridges................................................................................5
6. Colour Block Quality and Alignment Check......................................................7
7. Selecting a Rece iv e M od e............ .... ... ........... .... .... ........... ... .... ........... .... ... .........8
8. Setting a Date and Time......................................................................................9
9. Setting Your Station ID........................................................................................9
Installing the Driver & Software
Supplied CD-ROM (MFC Software Suite).......................................................................10
For USB Interfac e Cab le Us ers
(For Windows
■
■
■
For Parallel Interf ace Cable Users
(For Windows
■
■
■
For Windows NT
®
98/98SE/M e /2 00 0 Pro fes s io nal /XP)......................... .... .... ........... ... .... ...12
For Windows® 98/98SE/Me Users Only............................................................15
For Windows® 2000 Profes sional Users On ly......... .... ........... .... ... ........... .... ...17
For Windows® XP Users Only...........................................................................18
®
95/98/98S E/ 20 00 Prof es si o nal/ XP )........ .... ........... ... .... ........... .... ... .......19
For Windows® 95/98/98 SE/ M e Use rs On ly. ... ........... .... .... ........... ... .... ........... ...22
For Windows® 2000 Profes sional Users On ly......... .... ........... .... ... ........... .... ...23
For Windows® XP Users Only...........................................................................24
®
Workstation Version 4.0 Users .......................................................25
®
For Mac
For Mac
Indica tes warnings that
mus t be obser ved to
prevent possible
personal injury.
OS 8.5 - 9.2 Users............................................................................................28
®
OS X 10.1, 10.2.1 or Greater Users................................................................30
Warning Hint User’s Guide
Indicates cautions tha t
must be observed to use
the machine properly or
prevent damage to the
machine.
Indicates notes and
useful tips to remember
when using the machine.
Indicates referenc e to
the User’s Guide.
1
Page 4
Step 1
1
1
2
Setting Up the machine
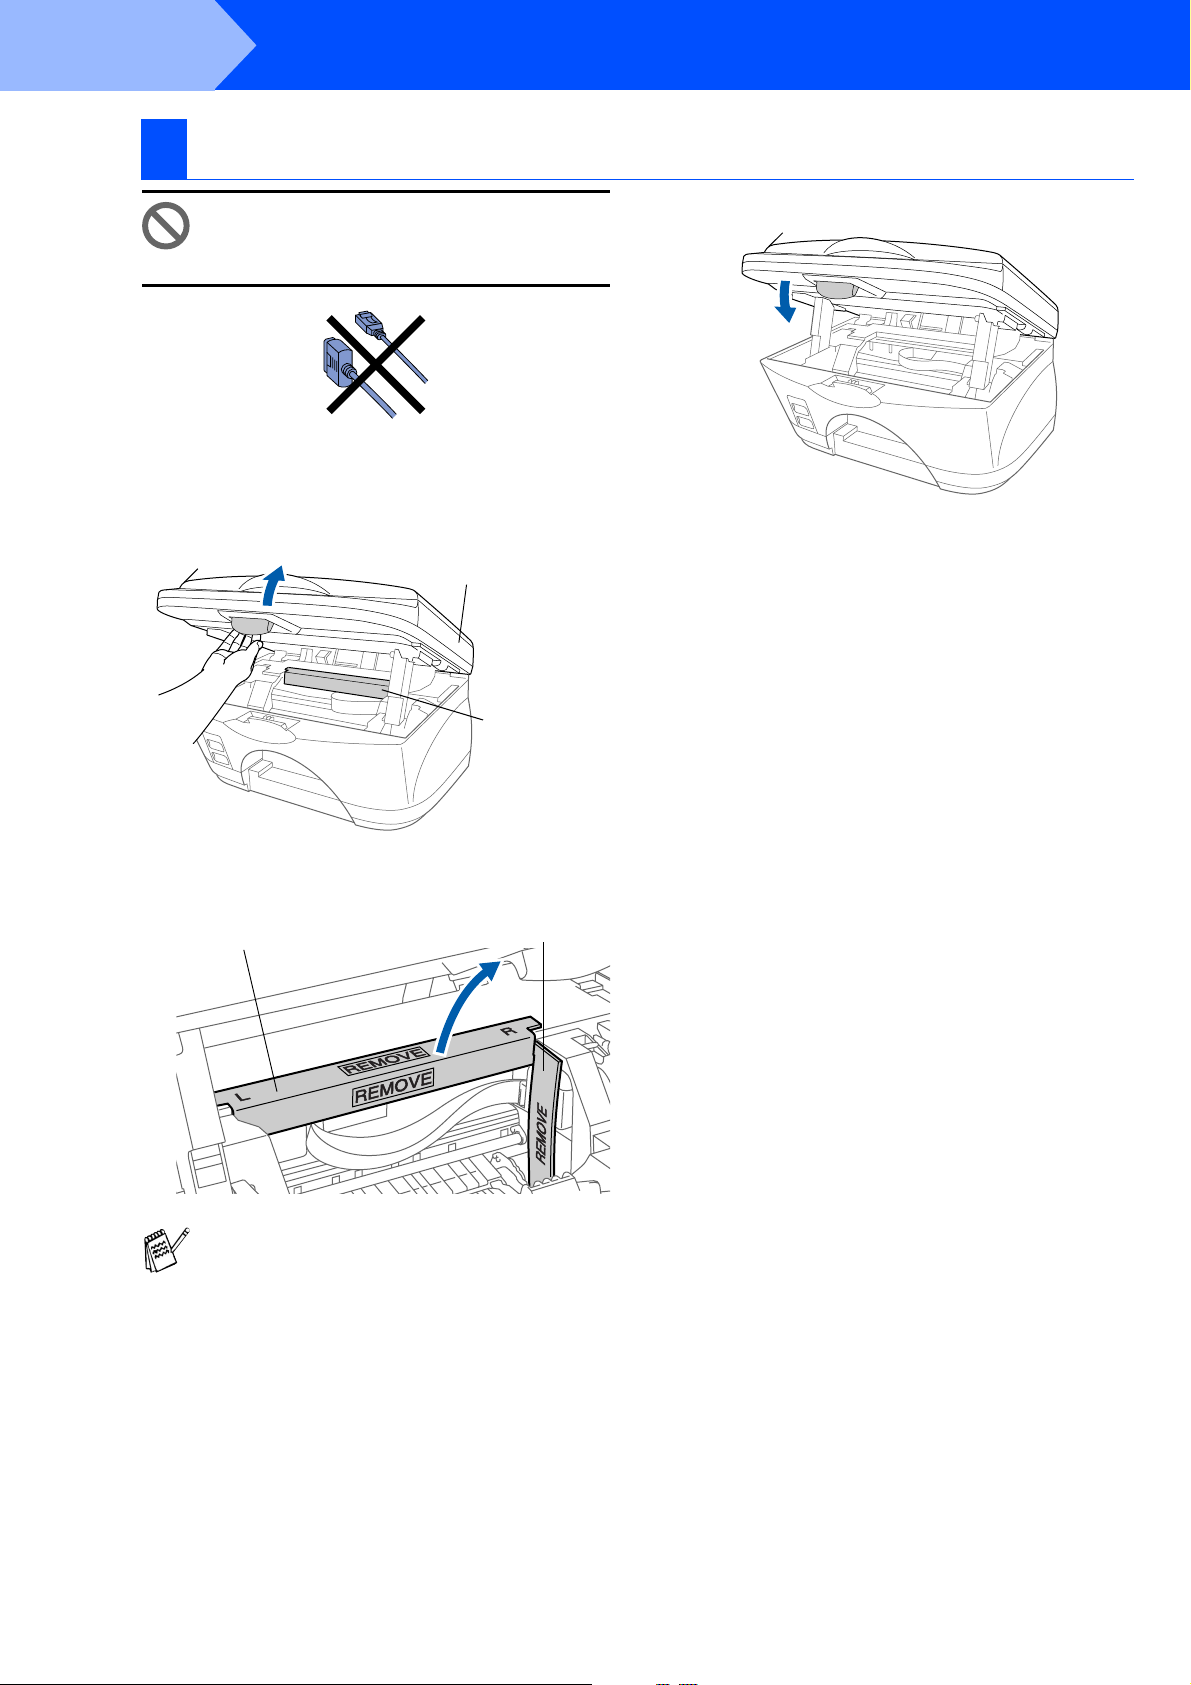
Removing the Protective Parts
Do NOT connect the interface cable.
Connecting the interface cable is
done when installing the driver.
Remove the protective seals.
Open the scanner cover by pulling the
release lever towards you.
Scanner cover
4
Close the scanner cover.
Protective
yellow bar
Remove the protective yellow bar and wiper
3
stopper.
Protective yellow bar
Do not throw away the protective yellow bar
and wiper stopper.
You will need it in the future to transport the
machine.
Wiper stopper
2
Page 5
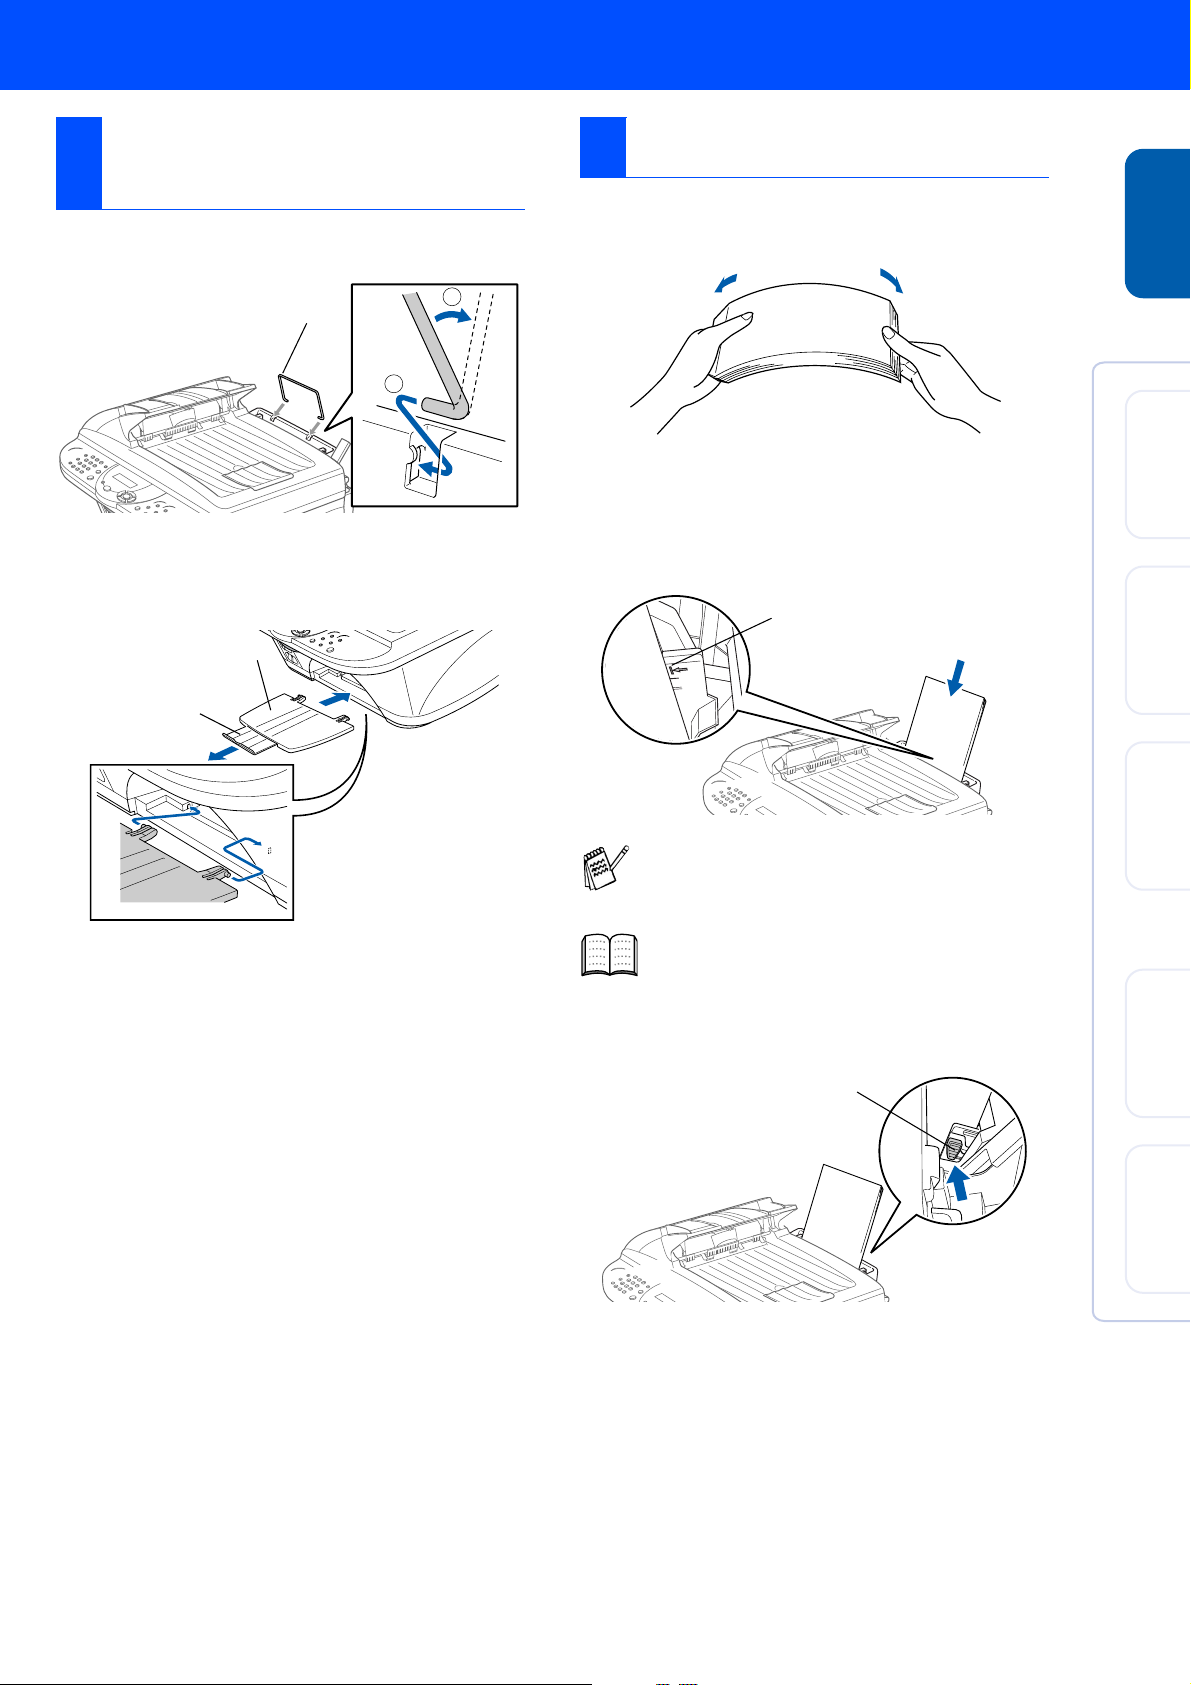
Attaching the Paper
2
Supports
Attach the paper support to the paper tray.
1
Paper support
1
Load Paper
3
Fan the stack of paper well to avoid paper
1
jams an d mis f ee ds .
Setting Up
the machine
2
®
Attach the output paper support to the paper
2
output slot, and then pull out the extension.
Output paper support
Output paper
support extension
Gently insert the paper .
2
Make sure the print side is towards you and
the paper is below the maximum paper
mark.
Up to here
You can load up to 100 sheets of 80 g/m2 A4
size paper.
For more details, see Chapter 2 “Paper ” in
User's Guide.
Press and slide the paper guide to fit the
3
paper wi dth.
Paper guide
USB
Windows
®
Parallel
Windows
4.0
®
NT
Windows
OS
®
8.5-9.2
Mac
OS X
®
Mac
10.1/1 0.2.1 or greater
3
Page 6
Step 1
4
1
Telephone Line
Cord
2
Setting Up the machine
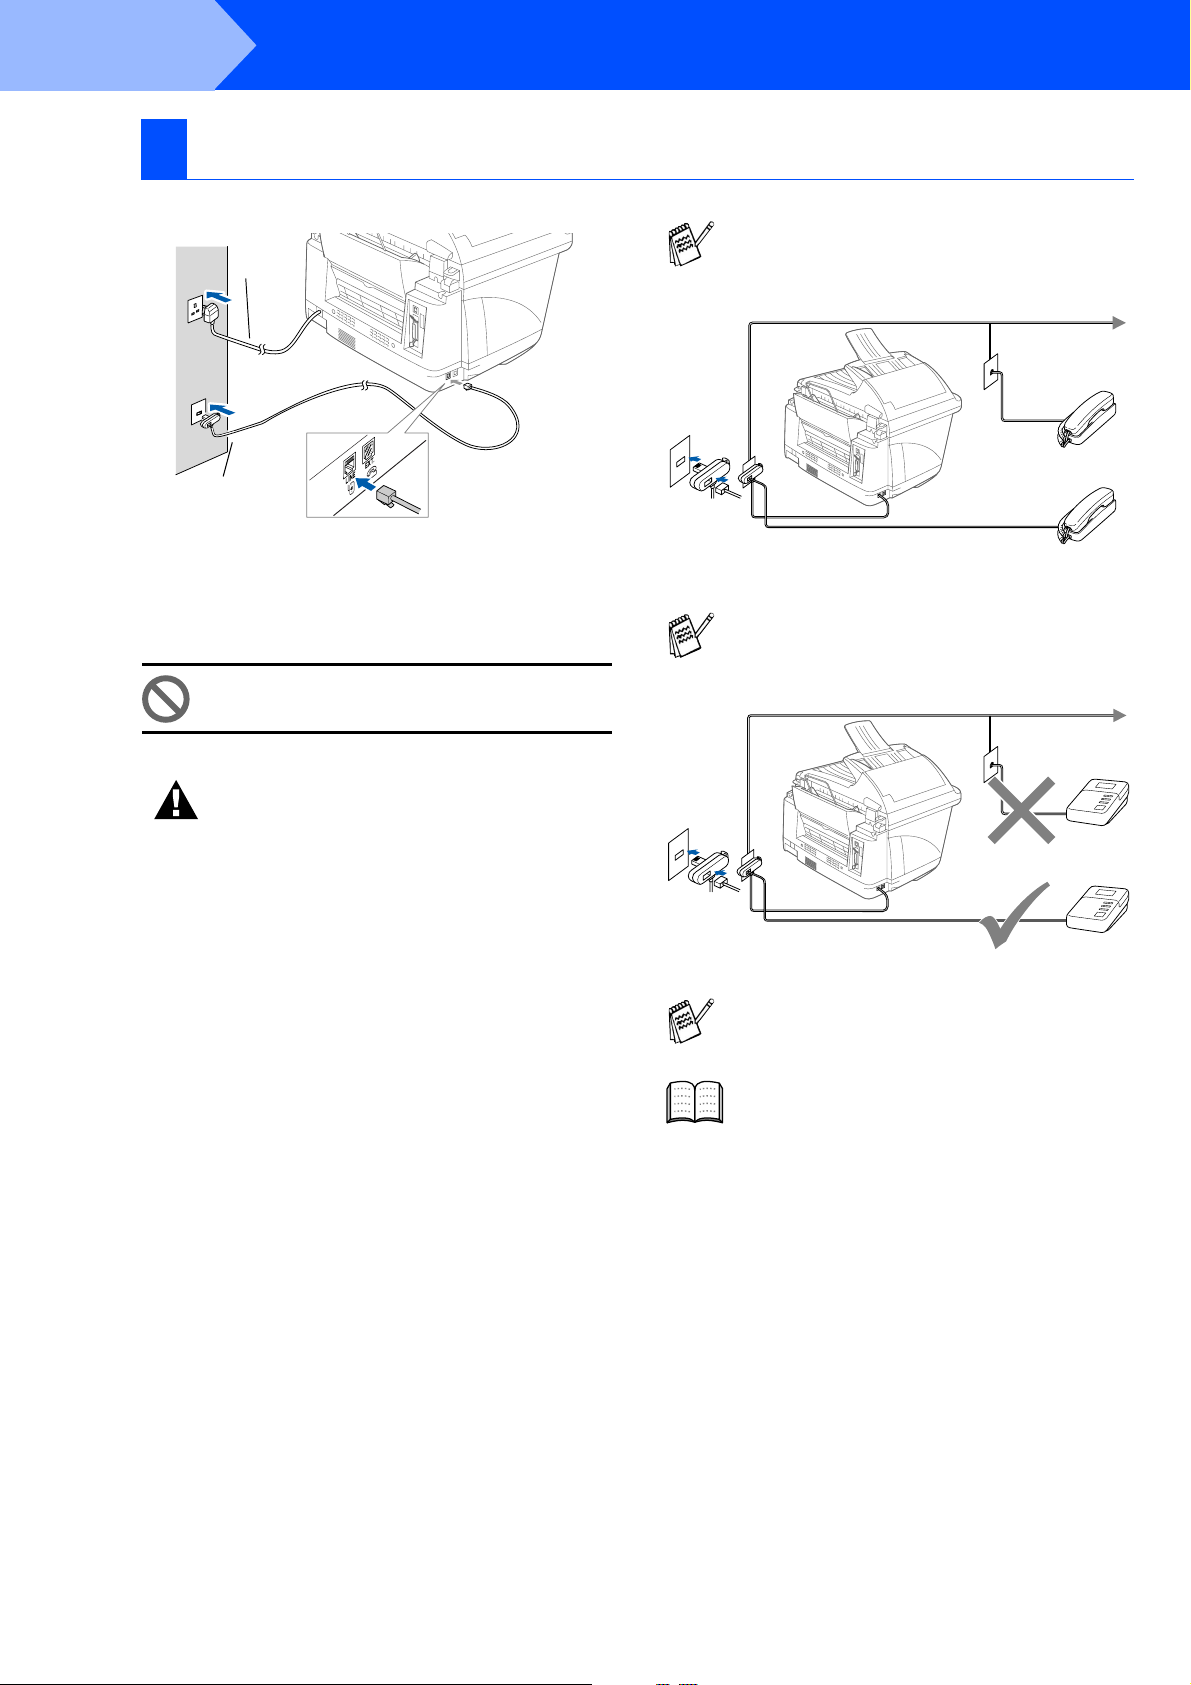
Install Phone Line and Power Cord
Connect the power cord.
Power Cord
Connect one end of the telephone line cord
to the jack on the machine marked LINE and
the oth er end to a modular wall jack.
Do not connect the Parallel or USB
cable yet.
(Example
for the U.K.)
If you are sharing one phone line with an
external telephone, connect it as shown
below.
If you are sharing one phone line with an
external telephone answering machine,
connect it as shown below.
Warning
■ This machine must be fitted with an earthed
plug.
■ Since the machine is earthed via the mains plug,
you can protect yourse lf f ro m potentially
hazardous electrical conditions on the telephone
network by keeping the power to the machine on
when you connect it to a telephone line.
Similarly, you can protect yourself when you
want to move the machine, by disconnecting the
telephone line first, and then the power cord.
TAD
TAD
(Example
for th e U. K.)
Please set the receive mode to
EXTERNAL TAD.
For more details, see Chapter 1
“Connecting the Machine” in User’s Guide.
4
Page 7
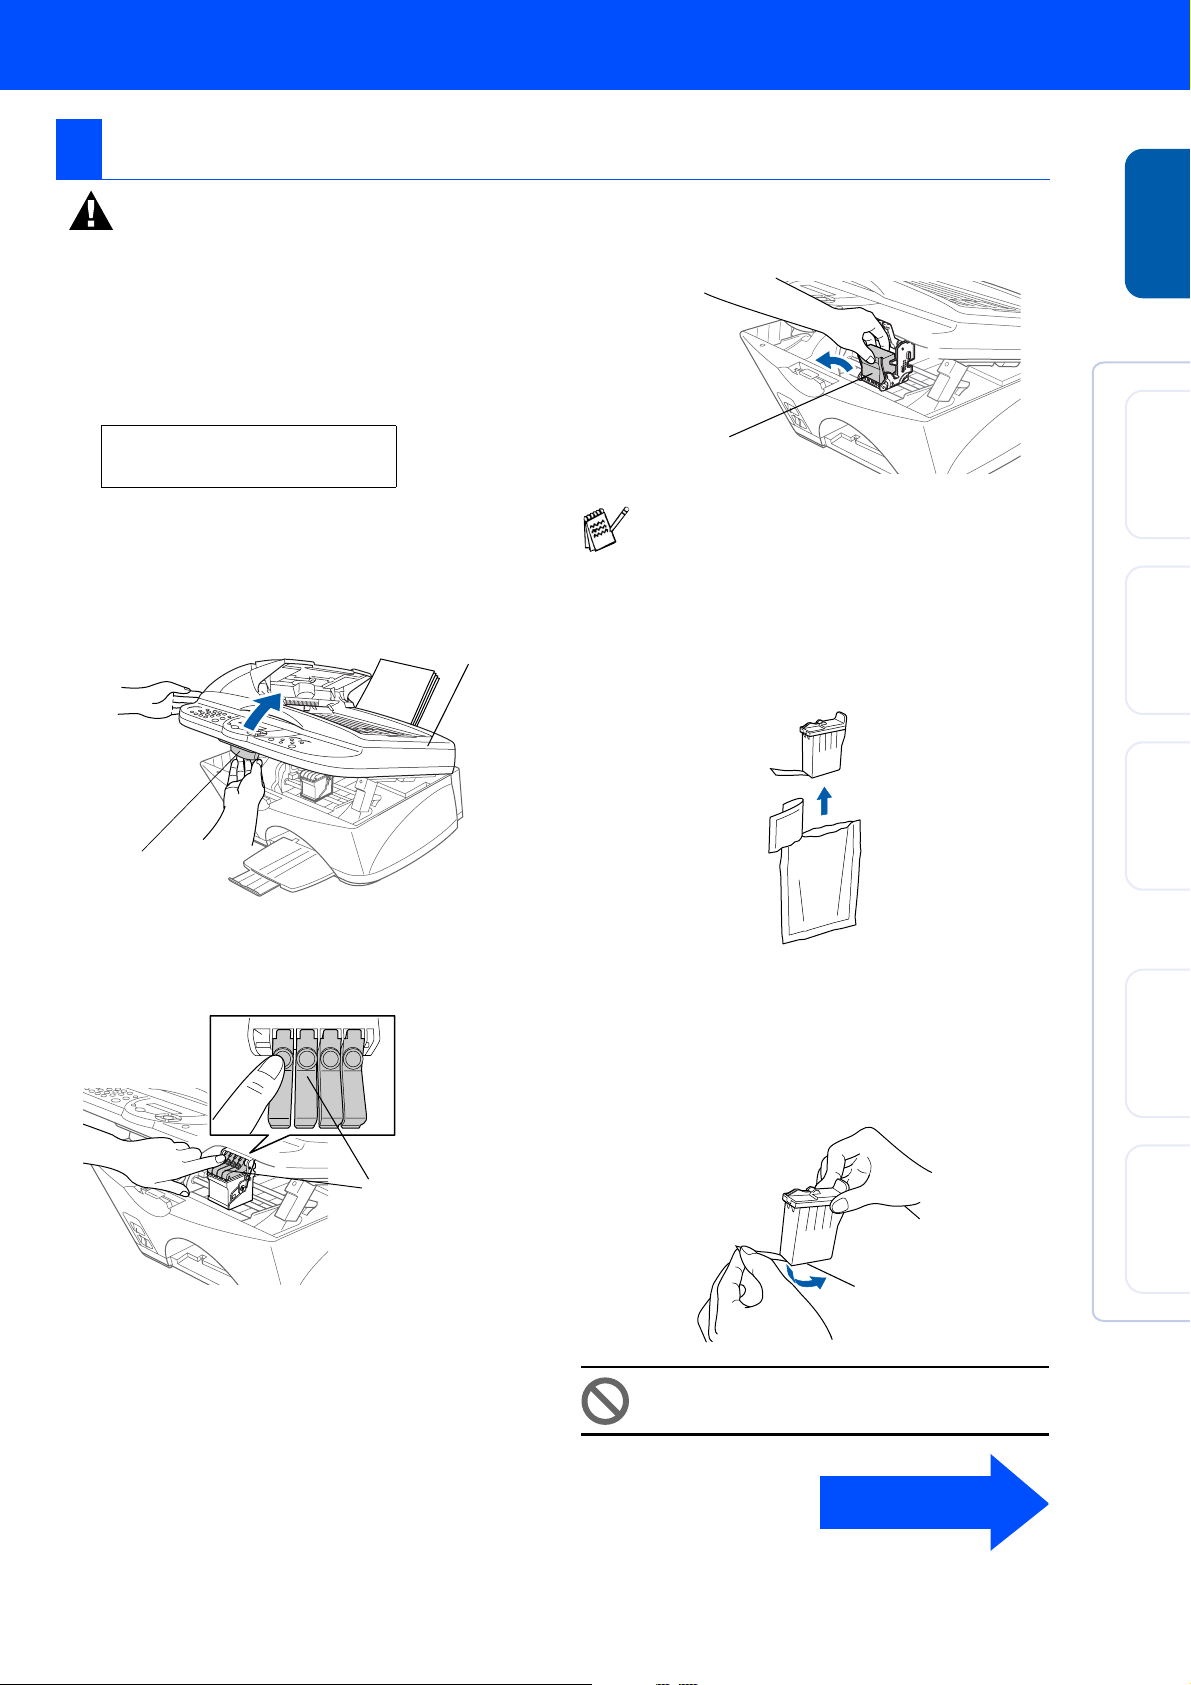
Installing the Ink Cartridges
5
Warning
If ink gets in your eyes irrigate them with water
immediately, and if irritation occurs consult a
doctor.
Make sure that the power is turned on.
1
The LCD shows;
CHECK CARTRIDGE
Open co ve r,t he n. ..
Open the scanner cover by pulling the
2
release lever towards you.
The print heads will move to the ink
replacement position.
Scanner cover
Remove the white shipping cover by pulling
4
it towards you.
White shi pping cover
■ The bottom of the white shipping cover is
wet with ink that will cause stains, so wipe
it clean before you place it down.
■ Do not throw away the white shipping
cover. You will need it when you transport
the machine.
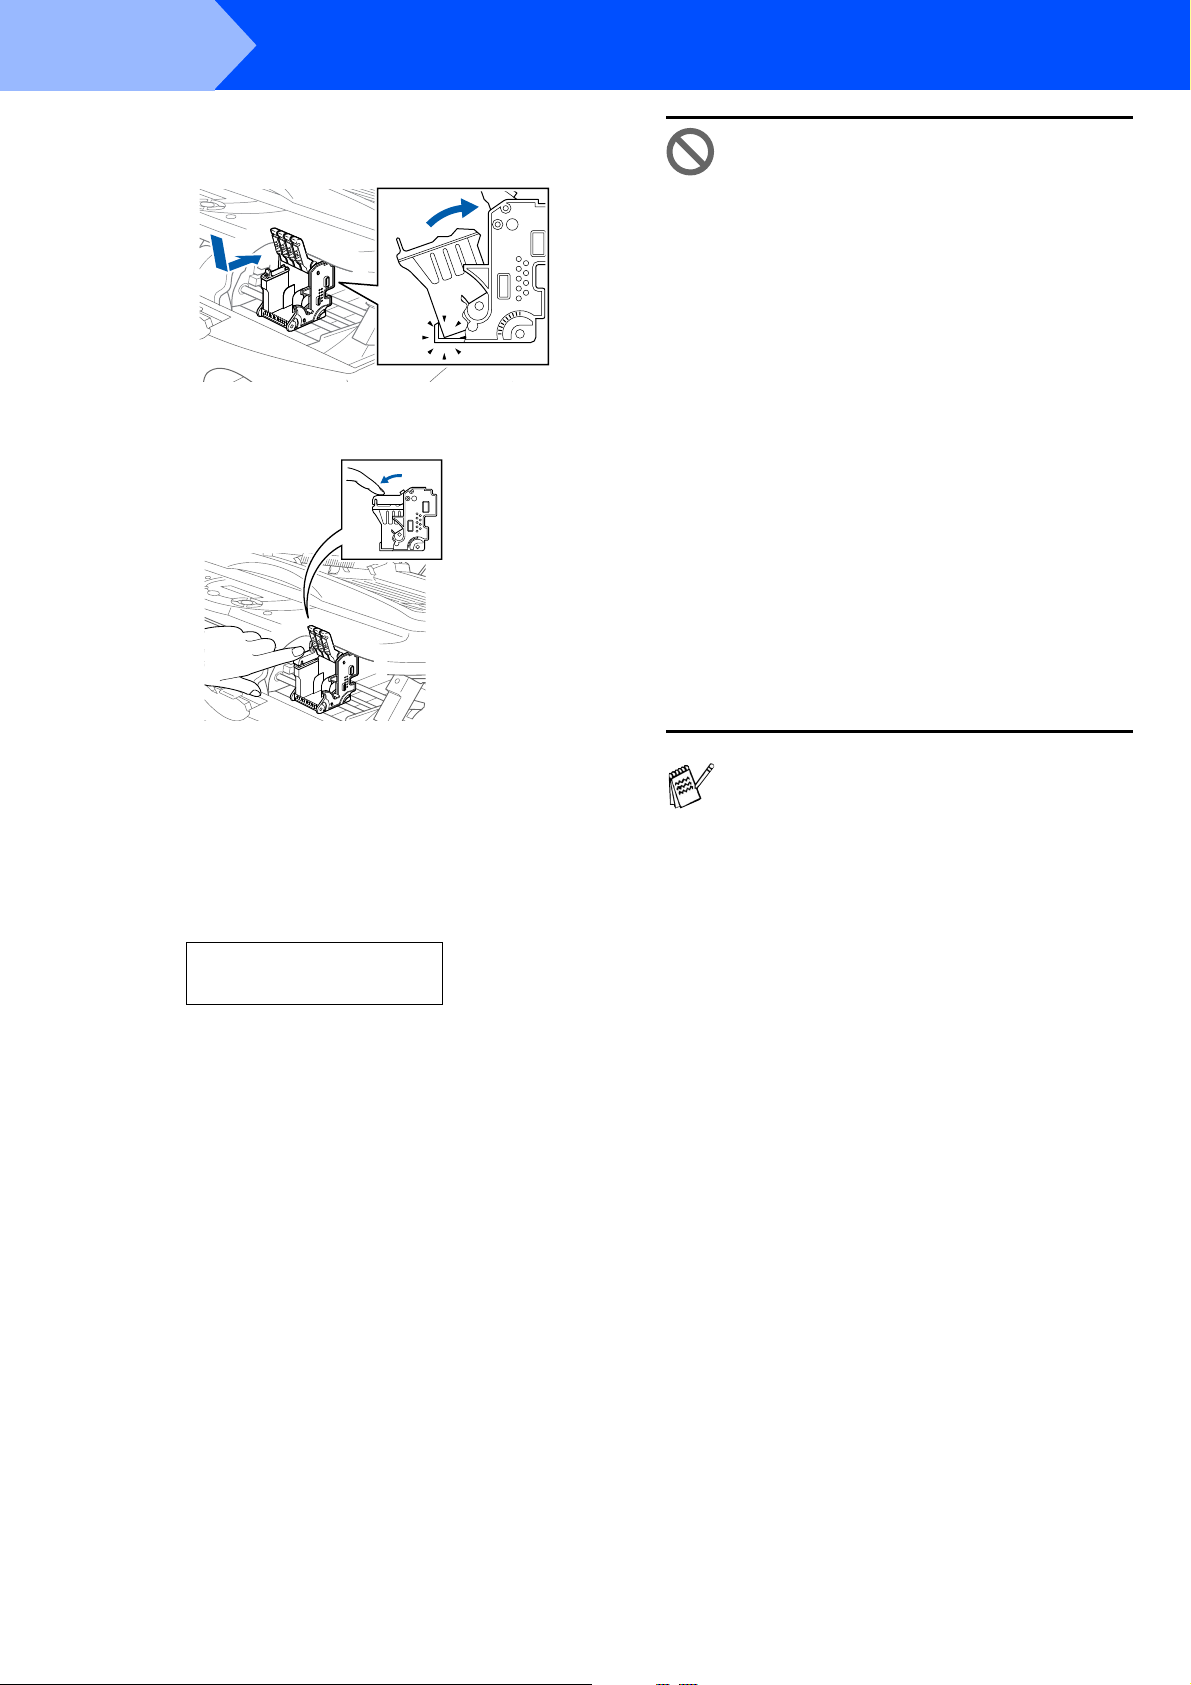
Take out black ink cartridge.
5
Setting Up
the machine
®
USB
Windows
®
Parallel
Windows
Release lever
Push the four coloured ink cartridge cov ers
3
one at a time so they pop up.
PUSH
PUSH
PUSHPUSH
Ink cartridge covers
Caref ully rem ove the sealing tape from the
6
bottom of the ink c artridge.
To prev ent s pilli ng ink and stai ning your
hands and clothing, peel the sealing tape
gently and slowly.
Opening
4.0
®
NT
Windows
OS
®
8.5-9.2
Mac
OS X
®
Mac
10.1/1 0.2.1 or greater
Do not touch the ink opening on the
cartridge or removed tape.
Continued
5
Page 8
Step 1
7
8
Setting Up the machine
Gently insert t he black i nk cartridge in the
black ink position.
Press the cover down until it clicks.
• DO NOT remove ink cartridges if
you do not need to replace them. If
you do so, it may reduce the ink
quantity and the machine will not
know the quantity of ink left in the
cartridge.
• DO NOT shake the ink cartridges. If
you do so, the ink may spill when
you take off the sealing tape. If ink
stains your body or clothing, wash
with soap or detergent
immediately.
• DO NOT refill the ink cartridges.
Attempting to use refilled
cartridges and using incompatible
inks may cause damage to the print
head in this machine and such
damage will not be covered by
warranty. Warrant y cove rag e does
not apply to problems caused by
the use of 3rd party ink or 3rd party
ink cartridges. Use only genuine
Brother ink cartridges.
Repeat Steps 5 to 8 to install each colour ink
9
cartridge. Match the colours of the ink
cartridge covers.
Close the scanner cover. The machine will
0
enter a head cleaning cycl e for
approximately six minutes.
CLEANING
PLEASE WA IT
■ If you mix the colours by installing an ink
cartridge in the wrong colour position, you
must clean the print head several times
after correctin g the car tridge installation
and before you start printing.
■ Once you open an ink cartridge, install it in
the machine and use it up within six
months of installation. Use unopened ink
cartridges by the expiration date written
on the cartridge package.
■ If INK EMPTY shows on the LCD after you
install the ink cartridges, check to make
sure the ink cartridges are installed
correctly.
6
Page 9
Colour Block Quality
6
and Alignment Check
When you have fini shed se lecting the
key (
colour, the LCD shows:
) or the key (NO) for each
YES
After the cleaning cycle is finished, the L CD
1
shows;
SET PAPER AND
PRESS FAX START
Make sur e the paper is loaded in the paper
2
tray.
Press the
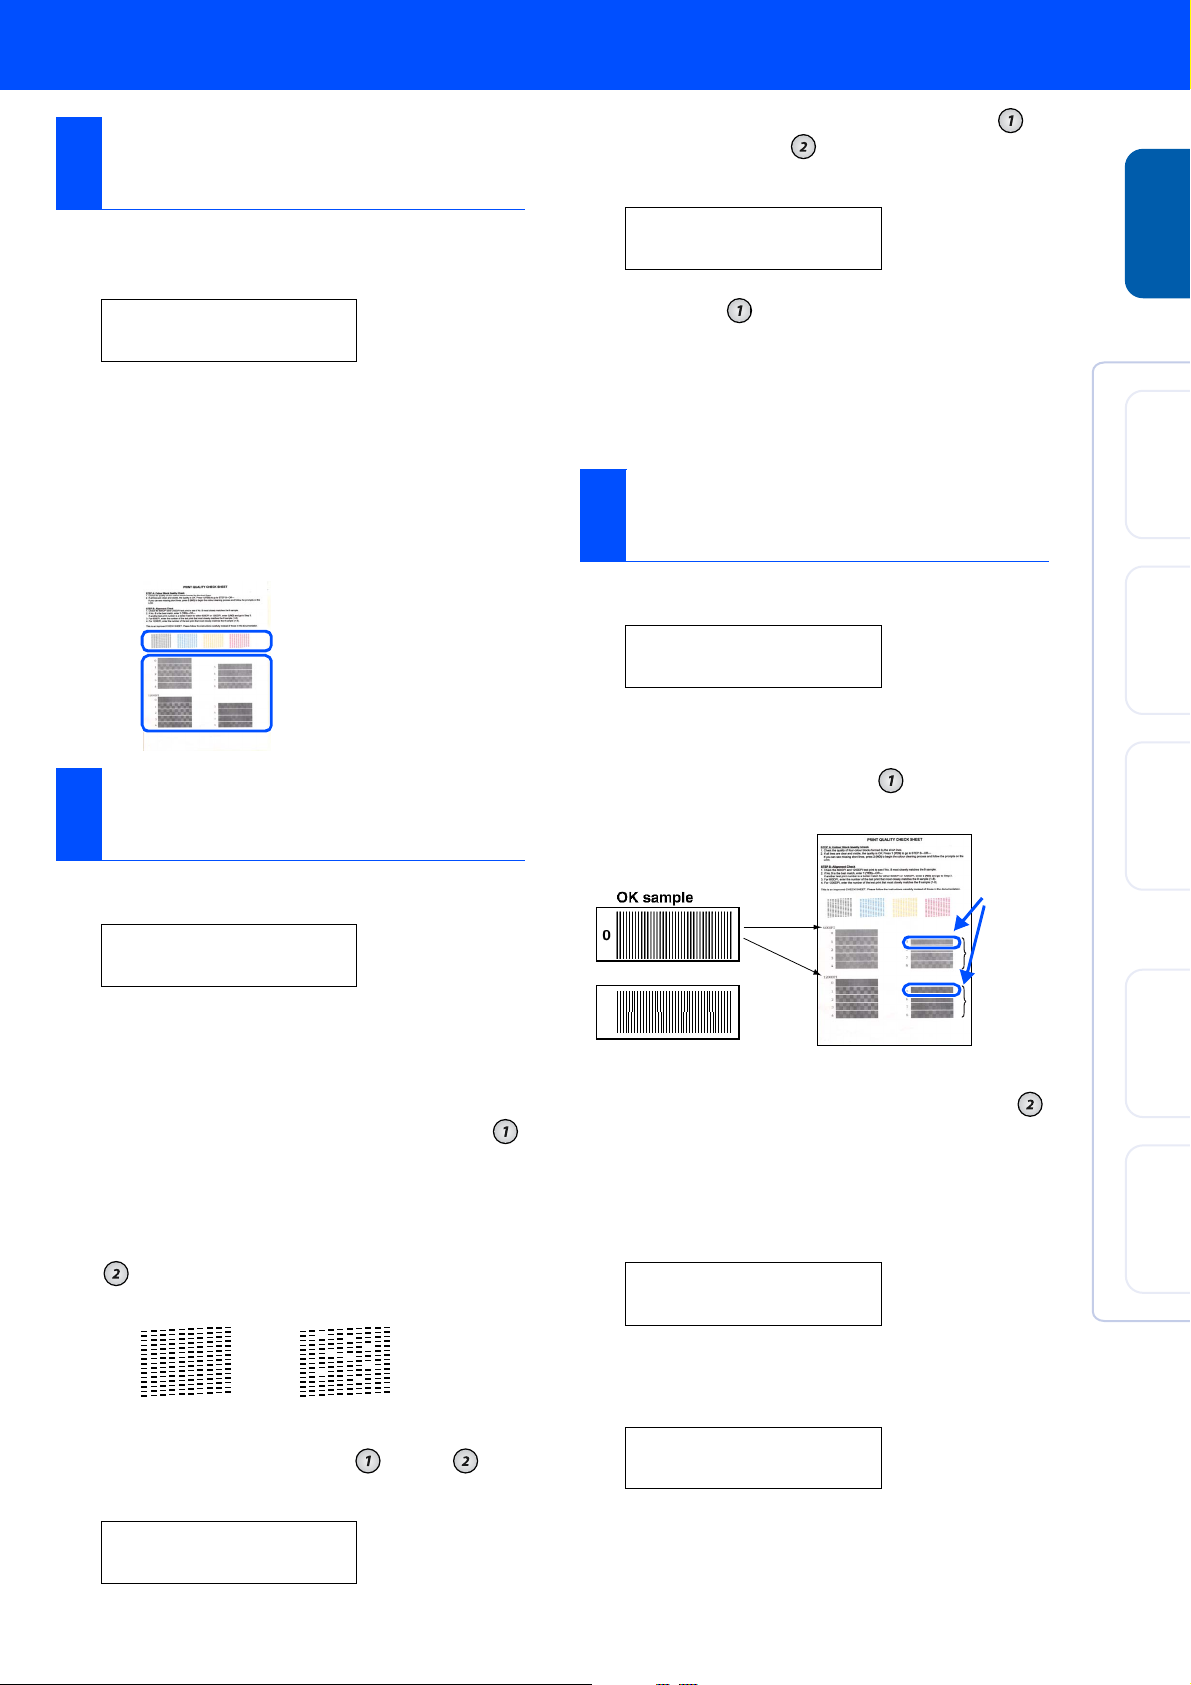
The machine starts printing the PRINT
3
QUALITY CHECK SHEET (only during
init i al ink c artridge in s t all at i on).
Fax Start
key.
Check in Step A
Check in Step B
Step A:Colour Block Quality Check
START CL EA NI NG?
1.YES 2. NO
Press the key (
starts cleanin g the colours.
After cleaning is finished, press the
Fax Start
PRINT QUALITY CHECK SHEET again
and goes back to the firs t step of STEP A.
key. The machine starts printing
), and t hen machine
YES
Step B:Alignment Check
The LCD shows:
1
IS STEP "B " OK?
1.YES 2. NO
Check the 600 DPI and 1200 D PI test print
to see if No.5 most closely matches the OK
sample (No.0). Press the key if No.5
matches it.
Setting Up
the machine
®
USB
Windows
®
Parallel
Windows
4.0
®
NT
Windows
The LCD shows:
1
IS STEP "A" OK ?
1.YES 2.NO
Check the quality of the four colour blocks
prin ted on th e sheet.
(BLACK/CYAN/YELLOW/MAGENTA)
If all lin es are clear and vi sible, press th e
2
key on the dia l pad to go to STEP B
Alignment Check.
—OR—
If you can se e missing short lin es, press the
key on the dial pad and go to step 3.
OK
The LCD asks you if the print quality is OK
3
for each colour. Press t he key or key
on the dial pa d.
Poor
Do NOT select
If anot her test pr int numbe r is a bette r match
1
for either 600 DPI or 1200 DPI, press the
key to select
For 600 DPI, select the number from 1 to 8
2
that most closely matches the No.0 sample
and ent er i t using the dial pad.
600DPI ADJUST
SELECT BEST #
For 1200 DPI, enter the number from 1 to 8
3
that most close ly ma tch es th e No.0 sample.
1200DP I AD JU ST
SELECT BEST #
and go to step 2.
NO
No.5
600 DPI
1200 DPI
OS
®
8.5-9.2
Mac
OS X
®
Mac
10.1/1 0.2.1 or greater
BLACK OK?
1.YES 2.NO
The Quality check is now complete.
7
Page 10
Step 1
Setting Up the machine
Dial pad
Receive Mode
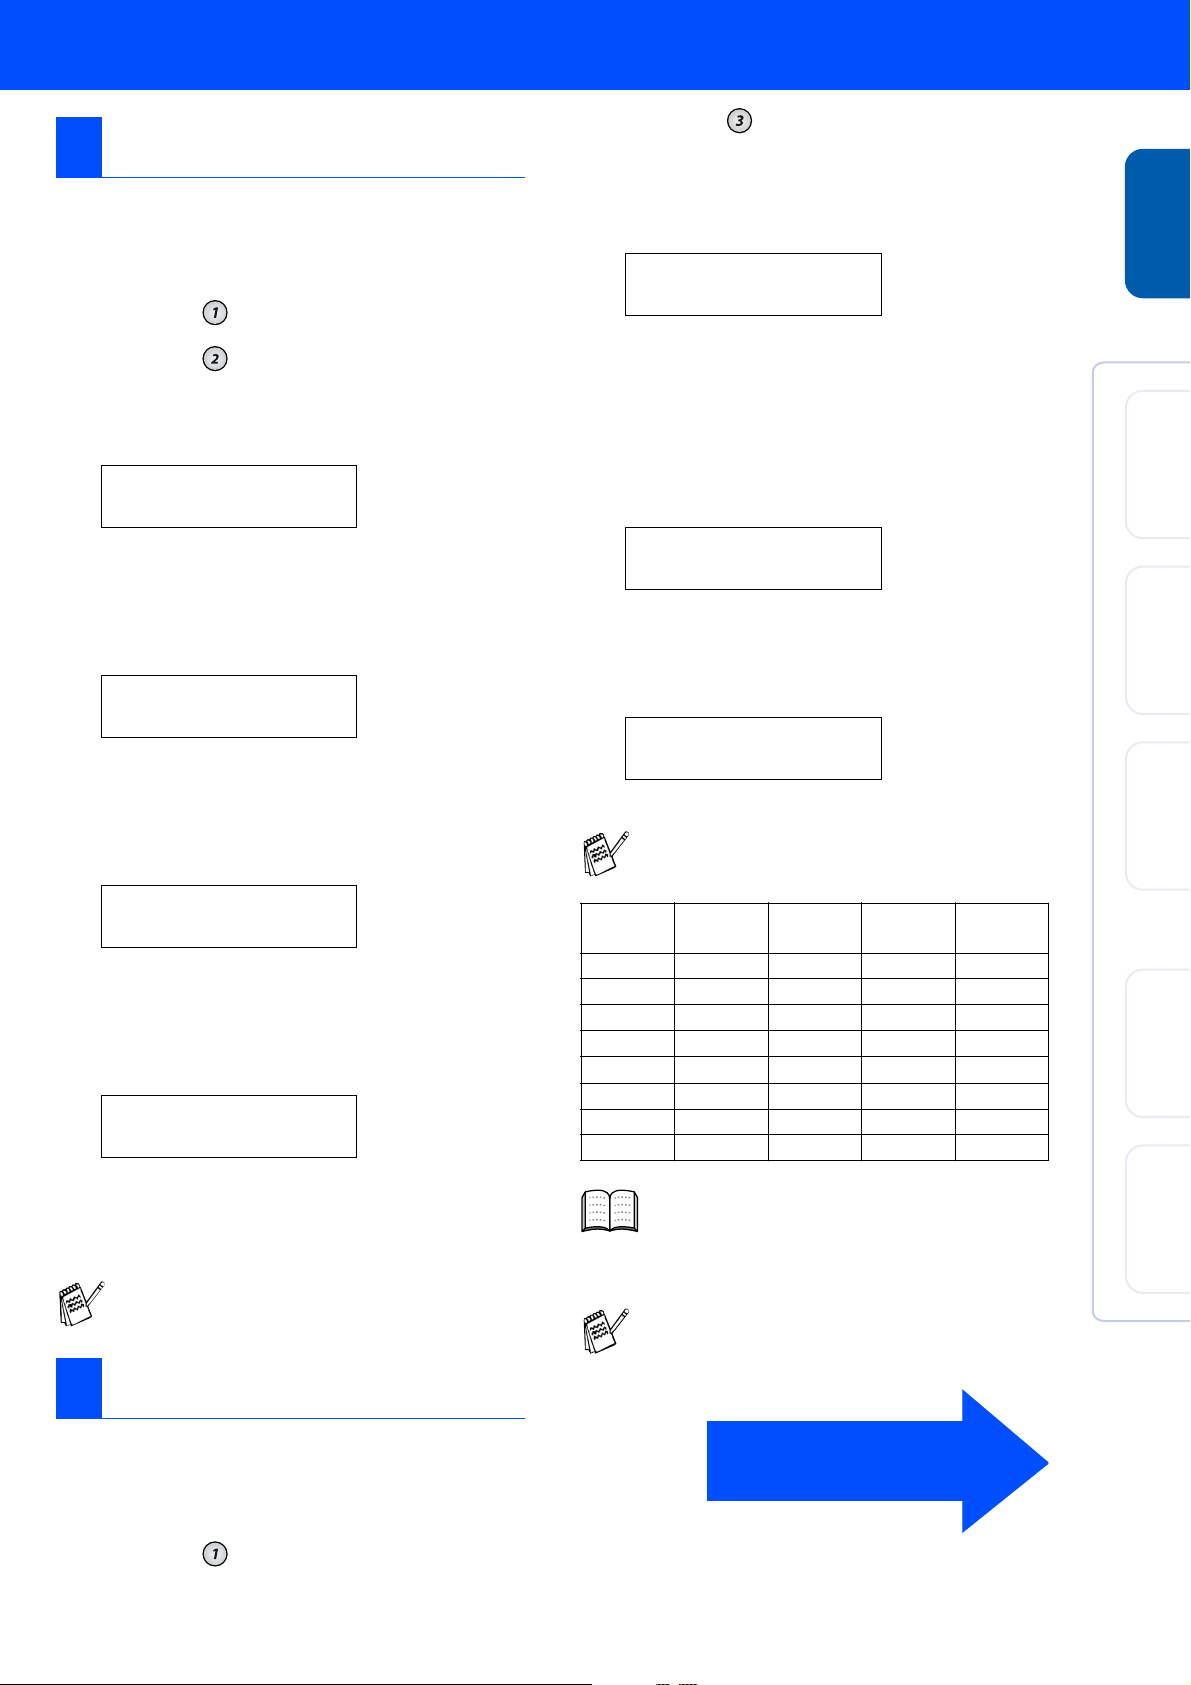
Selecting a Receive Mode
7
Choose the mode which best suits your needs by pressing the
You connect an external
telephone or external
telephone answering
machine to the machine.
Yes
Fax/Start
Stop/Exit
No
Menu/Set
Yes
Receive Mode
FAX ONLY
The machine automatically answers
every call as a fax.
FAX/TEL
key repeatedly.
You use the voice
message functio n of
your external telephone
answering machine.
For more details, see of Chapter 5 “ S etup Receive” in User’s Guide.
No
Yes
You want the
machine to
answer fax calls
only.
No
The machine controls the line and
automatically answers ev er y call . If the
call is not a fax will ring for you to pick up
the call.
MANUAL
You control the phone line and must
answer every call yourself.
EXTERNA L TA D
Your external answering machine (TAD)
automatically answers every call. Voice
messages are stored on the external
TAD. Fax messages are printed.
8
Page 11
Setting a Date and Time
8
The machine displays the date and time, and prints it
on every fax you send.
Press the
1
Press the key.
2
Press the key.
3
Enter the last two digits of the year on the
4
dial pad, and then press the
DATE/TIME
YEAR:03
(e.g. Enter
Enter the two digits for the month on the dial
5
pad, and then press the
DATE/TIME
MONTH:09
(e.g. Enter
Enter the two digits for the day on the dial
6
pad, and then press the
Menu/Set
0, 3
0, 9
key.
Menu/Set
for 2003.)
Menu/Set
for September.)
Menu/Set
key.
key.
key.
Press the key.
3
Enter your fax number (up to 20 digits) on
4
the dial pad, and then press the
key.
STATIO N ID
FAX:908XXXXXXXX
Enter your telephone number (up to 20
5
digits) on the di al pad, and then press the
Menu/Set
(If your telephone numbe r and fax nu m ber
are the same, enter the same numbe r
again.)
STATIO N ID
TEL:908XXXXXXXXX
Use the dia l pa d to en te r you r nam e (up to
6
20 char acters), and then press the
Menu/Set
STATIO N ID
NAME:ANDY
Refer to the following chart for entering your
name.
key.
key.
Menu/Set
Setting Up
the machine
®
USB
Windows
®
Parallel
Windows
4.0
®
NT
Windows
DATE/TIME
DAY:06
(e.g. Enter
Enter the ti m e in 24 - ho ur fo rma t on the dial
7
pad, and then press the
DATE/TIME
TIME:15:25
(e.g. Enter
Press the
8
If you want to repeat from step1, pres s the
Stop/Exit
Setting Your Station ID
9
You should store your name and fax number to be
printed on all fax pages that you send.
Press the
1
.)
0, 6
1, 5, 2, 5
Stop/Exit
key.
Menu/Set
Menu/Set
for 3:25 P.M.)
key.
key.
key.
Press
key
2 ABC2
3 DEF3
4 GHI 4
5 JKL5
6 MNO6
7 PQRS
8 TUV8
9 WXY Z
Press the
7
One
time
For more details, see Chapter 4 “Set ting
the Station ID” in User's Guide.
Stop/Exit
If you want to repeat from step1, press the
Stop/Exit
Go to Next page to
install the dri ve r
key.
Two
times
key.
Three
times
Four
times
OS
®
8.5-9.2
Mac
OS X
®
Mac
10.1/1 0.2.1 or greater
Press the key.
2
9
Page 12

Step 2
You can find a variety of information on the CD-ROM.
Installing the Driver & Software
Supplied CD-ROM (MFC Software Suite)
Install Software
You can install printer, PC FAX Send/Receiv e,
scanner drivers and the various utility items, including
Paper Port and TextBridge OCR.
User Guides
View the User’s Guide and other documentation in
PDF format.
Brother Solutions Center
You can access the Brother Solutions Center which is
a Web site offering information about your Brother
product including FAQs, User Guides, Driver updates
and Tips for using your machine.
MFC Software Suite Installer
You can install printer, PC FAX Send, and scanner
drivers for Mac OS 8.5 - 9.2 (scanner driver only
available for Mac OS 8.6 - 9.2)
Documents
View the User’s Guide and other documentations in
PDF format.
Mac OS X (For Nat iv e Ma c OS X 10.1 ,
10.2.1 or greater)
You can install the printer, scanner drivers and
remote setup program for Mac OS X. (Scanner driver
is only available for OS X 10.2.1 or greater.)
Brother Solutions Center
You can access the Brother Solutions Center which is
a Web site offering information about your Brother
product including FAQs, User Guides, Driver updates
and Tips for using your machine.
ReadMe!
You can get important information and
troubleshooting tips .
10
Page 13

Step 2
Follow the instructions on this page for your operating system and interface cable.
Installing the Driver & Software
USB Interface Cable Users................................Go to page 12
(For Windows
®
98/98SE/Me/2000 Professional/XP)
the MFC
Setting Up
®
USB
Windows
®
Windows
®
Parallel Interface Cable Users........................... Go to page 19
(For Windows
Windows NT® Workstat i on Versio n 4.0 Users
®
95/98/98SE/Me/2000 Professional/XP)
....Go to page 25
(For Parallel Interface Cable Users)
For Mac
®
OS 8.5 to 9.2 Users............................Go to page 28
®
Parallel
Windows
4.0
®
NT
Windows
OS
®
8.5-9.2
Mac
For Mac® OS X 10.1, 10.2.1 or Greater Users
Macintosh
......Go to page 30
11
OS X
®
Mac
10.1/1 0.2.1 or greater
Page 14

Step 2
For USB Interface Cable Users
(For Windows
Make sure that you have completed the instructions from Step 1 “Setting Up the
machine”.
If you are using Windows® 2000 Professional:
To access the PhotoCapture Center
your PC you must be connected using USB and you
may have to install a Windows
There are two ways to install the Windows
update:
A) Download Service Pack 3 from the Micros oft®
B) Install the Windows
Installing the Driver & Software
®
98/98SE/Me/200 0 Professional/XP)
™
features from
®
2000 update first.
®
2000
Web page and install it.
We recommend this method because it includes
other bug fixes for Windows
®
2000 update from the MFC
Software Suite instal ler .
You can install it by following the steps below:
1. Follow the installation steps from
2. Click OK to start installation of the update.
®
2000.
1
to 8.
Make sure any media cards are not inserted
1
into the media drive of the machine.
Unplug the machine from the AC outlet and
2
discon nec t it fro m you r comp uter , if you are
alrea dy conne cted to an interface cable.
Turn on your computer.
3
®
(For Windows
must be logged on as the administrator. )
2000 Professi onal/X P, you
3. Click OK to restart your PC.
4. After the PC restarts, the installation will
automatically continue.
If the installation does not continue
automatically, pleas e open the MFC
Software Suite insta ller men u again by
double-clicking the setup.exe program on
the Brother CD-ROM, and continue from
5
Step
to install the MFC Software Sui te.
Insert the supplied CD-ROM into your CD-
4
ROM drive.
Click your language.
5
The CD-ROM main menu will appear.
6
Click Install Soft ware.
If this window does not appear, use
Windows
program from the root directory of the
Brother CD-ROM.
®
Explorer to run the setup.e xe
12
Page 15

Step 2
Click MFC Software Suite in Main
7
Application.
When the PaperPort
9
window is displayed, click Next.
®
8.0 SE Setup
Setting Up
the machine
®
USB
Windows
Click Install.
8
MFC Software Suite includes Printer Driver,
Scanner Driver, ScanSoft
ScanSoft
Remote Setup and True Type fonts.
PaperPort
application for viewing scanned documents.
ScanSoft
into PaperPort
converts an image into text and inserts it into
your default word process or .
If you see the following screen, click OK to
install the Windows
updates are installed your PC will restart and
automatically continue the installation.
™
Text Bridge®, PC-FAX software,
®
is a document management
™
TextBri dge®, which is integrated
®
, is an OCR application that
™
PaperPort®,
®
updates. After the
After r eading an d accepti ng the License
0
Agreement, enter your user information and
click Next.
Select Typical and click Next.
A
Click Install and PaperPort® will start
B
installing on your computer.
Installing the Driver & Software
If the installation does not continue
automatically, please open the installer
menu again by double-clic k ing the
setup.exe program on the Brother
5
CD-ROM, and continue from Step
.
Continued
13
Page 16

Step 2
For USB Interface Cable Users
(For Windows
Installing the Driver & Software
®
98/98SE/Me/200 0 Professional/XP)
When the Registration scr een is displayed,
C
make your section and follow the on screen
instructions.
Click Finish to complete installation.
D
When Software License Agreement window
F
appears, click Yes.
Select Standard, and then click Next.
G
The application files will be copied to your
computer.
When the Brother MFC Software Suite
E
Installation window appears, click Next.
If an error message appears during the
installation process, or if you have previously
installed the MFC Software Su ite, you will
first have to uninstall it. From the Start
menu, select Programs, Brother, Brother
MFC Software Suite, Uninstall, and then
follow the instructions on the screen.
Windows® 98/98SE/Me Users ➝ Go to page 15
Windows
Windows
®
2000 Professional Users ➝ Go to page 17
®
XP Users ➝ Go to page 18
14
Page 17

Step 2
For Windows® 98/98SE/Me Users Only
When this scr een appears, turn on the
H
machine by plugging in the power cord.
Connect the USB interface cable to your
PC, and then con nec t it to the machi ne .
.
Accept the default Printer name by selecting
J
Yes, and then click Next.
Select Yes (recommended), and then click
K
Finish. A test page will be printed so you
can check the print quality.
Setting Up
the machine
®
USB
Windows
It will take a few secon ds for the insta llatio n
screen to ap pear.
The in st allation of the B r other dr i ver will
automatically start. Follow the instructions
on the screen.
Select BRUSB: USB Printer Port, and the n
I
click Next.
If the test page is printed correctly, click
L
Yes. If you click No, follow the prompts on
the scree n to c orr ect the probl e m.
Continued
Installing the Driver & Software
15
Page 18

Step 2
For USB Interface Cable Users
(For Windows
M
N
Installing the Driver & Software
®
98/98SE/Me/200 0 Professional/XP)
Click Finish to restart your computer.
After the computer restarts, click Yes to
have the Control Center loaded each time
Windows is started. The Control Center will
appear as an icon in the task tray.
If you click No the Scan ke ys on th e
machine will be disabled.
Even if you select NO, later you will be able
to launch the Brother Control Center to use
Scan to
the
Brother Control Center”, Chapter 14 in the
On-Line Documentati on (User ’s Guide) on
the CD-ROM.
The Brother PC fax, Printer and
Scanner drivers have been installed
and the installation is now complete.
key. See “AutoLoad the
16
Page 19

For Windows® 2000 Professional Users Only
Setting Up
the machine
When this scr een appears, turn on the
H
machine by plugging in the power cord.
Connect the USB interface cable to your
PC, and then con nec t it to the machi ne .
.
Click Finish to restart your computer.
K
After the computer restarts, click Yes to
L
have the Control Center loaded each time
Windows is started. The Control Center will
appear as an icon in the task tray.
If you click No the Scan keys on the
machine will be disabled.
.
®
USB
Windows
It will take a few secon ds for the insta llatio n
I
screen to ap pear.
The in st allation of the B r other dr i ver will
automatically start. Follow the instructions
on the screen.
If the Digi tal Signature Not Found dialog
J
boxes appear, click Yes to install the driver.
.
Even if you select NO, later you will be able
to launch the Brother Control Cente r to use
Scan to
the
Brother Control Center”, Chapter 14 in the
On-Line Documentation (User’s Guide) on
the CD-ROM.
key. See “AutoLoad the
The Brother PC fax, Printer and
Scanner drivers have been installed
and the installation is now complete.
Installing the Driver & Software
17
Page 20

Step 2
For USB Interface Cable Users
(For Windows
Installing the Driver & Software
®
98/98SE/Me/200 0 Professional/XP)
For Windows® XP Users Only
When this screen appears, turn on t he
H
mach in e by pl u gg i ng in the power cord.
Connect the USB interface cable to your
PC, and then connect it to the machine.
.
Click Finish to restart your computer.
I
The Brother PC fax, Printer and
Scanner drivers have been installed
and the installation is now complete.
It will take a few seconds f or the installation
screen to appear .
The installation of the Brother driver will
automat ically start. F o l low the instruc tions
on the screen.
18
Page 21

For Parallel Interface Cab le Users
(For Windows
Make sure that you have completed the instructions from Step 1 “Setting Up the
machine”.
Unplug the machi ne fr om the AC outl et an d
1
disconnect it from your computer, if you
have already connected an inte r face cabl e.
®
95/98/ 98SE/Me/2000 Professiona l/XP)
Click MFC Software Suite in Main
6
Application.
Setting Up
the machine
Turn on your computer.
2
(For Windows
®
2000 Professional/XP, you
must be logged on as the a dministrator.)
Insert the supplied CD-ROM into your CD-
3
ROM drive.
Click your language.
4
The CD-ROM main menu will appear.
5
Click Install Soft wa re .
Click Install.
7
MFC Software Suite includes Printer Driver,
Scanner Driver, ScanSoft
ScanSoft
Remote Setup and True Type fonts.
PaperPort
application for viewing scanned documents.
ScanSoft
into PaperPort
converts an image into text and inserts it into
your default word processor.
If you see the following screen, click OK to
install the Windows
updates are installed your PC will restart and
automatically continue the installation.
™
Text Bridge®, PC-FAX software,
®
is a document management
™
TextBridge®, which is integrated
®
, is an OCR application that
™
PaperPort®,
®
updates. After the
®
Parallel
Windows
Installing the Driver & Software
If this window does not appear, use
Windows
program from the root direc tory of th e
Brother CD-ROM.
®
Explorer to run the setup. ex e
If the installation does not con tinue
automatically, please open the installer
menu again by double-clicking the
setup.exe program on the Brother CD-
4
ROM, and continue from Step
.
Continued
19
Page 22

Step 2
For Parallel Interface Cab le Users
(For Windows
Installing the Driver & Software
®
95/98/ 98SE/Me/2000 Professiona l/XP)
When the PaperPort® 8.0 SE Setup window
8
is displayed, click Next.
After rea di n g an d ac ce pting the Li cense
9
Agreement, enter your user information and
click Next.
When th e R e gistration scr een is displ ayed,
B
make your selection and follow the on
screen instructions.
Click Finish to complete installation.
C
Select Typical and clic k Next.
0
Click Install and Pape rP or t® will start
A
installing on your computer.
When the Brother MFC Pro Suite
D
Installation window appears, click Next.
If an error message appears during the
installation process, or if you have previously
installed the MFC Software Suite, you will
first have to uninstall it. From the Start
menu, select Programs, Brother, Brother
MFC Software Suit e , Uninstall, and then
follow the instructions on the screen.
20
Page 23

Step 2
When Software License Agreement window
E
appears, click Yes.
Select Standard, and then click Next.
F
The application files will be copied to your
computer.
Setting Up
the machine
®
Parallel
Windows
You must attach the bundled filter core and
cable tie to the parallel interface cable before
you connect it to your PC and the machine.
Windows® 95/98/98SE/Me Users ➝ Go to page 22
Windows
Windows
®
2000 Professional Users ➝ Go to page 23
®
XP Users ➝ Go to page 24
Installing the Driver & Software
21
Page 24

Step 2
For Parallel Interface Cab le Users
(For Windows
Installing the Driver & Software
®
95/98/ 98SE/Me/2000 Professiona l/XP)
For Windows® 95/98/98SE/Me Users Only
When this screen ap pears, connect the
G
parallel interface cable to your PC, and then
connect it to the machine.
Turn on the machine by plugging in the
power cord.
.
Click Finish to restart your computer.
I
After the computer restarts, the installation
J
of the Brother driver will automatically start.
Follow the instructions on the screen.
Click Yes to have the Brother MFL-Pro
K
Control Center loaded each time Windows
is started. The Control Center will appear as
an icon in the task tray.
If you click No the Scan keys on the
machine will be disabled.
22
Click Next.
H
Even if you select NO, later you will be able
to launch the Brother Control Center to use
Scan to
the
Brother Control Center”, Chapter 14 in the
On-Line Documentation (User’s Guide) on
the CD-ROM.
The Brother PC fax, Printer and
Scanner drivers have been installed
and the installation is now complete.
key. See “AutoLoad the
Page 25

For Windows® 2000 Professional Users Only
Setting Up
the machine
When this screen appe ar s, connect the
G
parallel interf ace ca ble to your PC , and then
connect it to the machine.
Turn on the machine by plugging in the
power cord.
.
Click Finish to restart your computer.
I
After the computer restarts, the installation
J
of the Brother driver will automatically start.
Follow the ins t ru ct ions on the scr ee n.
If the Digital Signature Not Found dialog
K
boxes appear, click Yes to install the driver.
®
Parallel
Windows
Click the Next.
H
Click Yes to have the Control Center loaded
L
each ti m e Windows is started. The Control
Center will appear as an icon in the task
tray.
If you click No the Scan keys on the
machine will be disabled.
Even if you select NO, later you will be able
to launch the Brother Control Cente r to use
Scan to
the
Brother Control Center”, Chapter 14 in the
On-Line Documentation (User’s Guide) on
the CD-ROM.
The Brother PC fax, Printer and
Scanner drivers have been installed
and the installation is now complete.
key. See “AutoLoad the
Installing the Driver & Software
23
Page 26

Step 2
For Parallel Interface Cab le Users
(For Windows
Installing the Driver & Software
®
95/98/ 98SE/Me/2000 Professiona l/XP)
For Windows® XP Users Only
When this screen ap pears, connect the
G
parallel interface cable to your PC, and then
connect it to the machine.
Turn on the machine by plugging in the
power cord.
.
When th e following screen appears, clic k
H
Finish and wait as the PC restarts Windows
and continues the installation.
The Brother PC fax, Printer and
Scanner drivers have been installed
and the installation is now complete.
24
The installation of the Brother driver will
automat ically start. F o l low the instruc tions
on the screen.
Page 27

For Windo w s NT® Workstation Version 4.0 Users
Make sure that you have completed the instructions from Step 1 “Setting Up the
machine”.
Turn on your computer.
1
You must be logged on as the
Administrator.
Connect the parallel interface cable to your
2
computer, and then connect it to the
machine.
The CD-ROM main menu will appear.
6
Click Install Software.
Setting Up
the machine
Make sure you turned on the machine by
3
pluggi ng in the power co rd.
Insert the Supplied CD-ROM into your CD-
4
ROM drive.
Click your language.
5
If this window does not appear, use
Windows
program from the root director y of the
Brother CD-ROM.
Click MFC Software Suite in Main
7
®
Explorer to run the setup.exe
Application.
MFC Software Suite includes Printer Driver,
Scanner Driver, ScanSoft
ScanSoft
Remote Setup and True Type fonts.
PaperPort
application for viewing scanned documents.
ScanSoft
integrated into PaperPort
application that converts an image into text
and inserts it into your default word
processor.
™
Text Bridge®, PC-FAX software,
®
is a document management
™
TextBri d ge®, which is
™
PaperPort®,
®
, is an OCR
4.0
®
NT
Windows
Installing the Driver & Software
Continued
25
Page 28

Step 2
For Windo w s NT® Workstation Version 4.0 Users
Installing the Driver & Software
Click Install.
8
If you see the following screen, cl ick OK to
install the Windows
updates are installed your PC will restart and
automatically continue the installation.
If the installation does not continue
automatically, pleas e open the installer
menu again by double-clic k ing the
setup.exe program on the Bro ther CDROM, and continue from Step
®
updates. After the
6
.
After r eading and accept ing the License
0
Agreement, enter your user information and
click Next.
Select Typical and click Next.
A
Click Install and PaperPort® will start
B
installing on your computer.
When the PaperPort
9
window is displayed, click Next.
®
8.0 SE Setup
When th e R e gistration scr een is displ ayed,
C
make your selection and follow the on
screen instructions.
26
Page 29

Setting Up
the machine
Click Finish to complete installation.
D
When the Brother MFC So ftware Suite
E
Installation window appears, click Next.
If an error message appears during the
installation process, or you have previously
installed MFC Software Suit e, you will first
have to uninstall it. From the Start menu,
select Programs, Brother, Brother MFC
Software Suite, Uninstall, and then follow
the instructions on the sc re en.
When the Setup Type window appears,
G
select Standard, and then click Next.
Click Finish restart your com puter.
H
After the computer restarts, click Yes to
I
have the Control Center loaded each time
Windows is started. The Control Center will
appear as an icon in the task tray.
If you click No the Scan keys on the
machine will be disabled.
4.0
®
NT
Windows
Installing the Driver & Software
When Software License Agreement window
F
appears, click Yes If you agree to it and go
to next screen.
Even if you select NO, later you will be able
to launch the Brother Control Center to use
Scan to
the
Brother Control Center”, Chapter 14 in the
On-Line Documentation (User’s Guide) on
the CD-ROM.
The Brother PC fax, Printer and
Scanner drivers have been installed
and the installation is now complete.
key. See “AutoLoad the
27
Page 30

Step 2
For Mac® OS 8.5 - 9.2 Users
Make sure that you have completed the instructions from Step 1 “Setting Up the
machine”.
Installing the Driver & Software
Unplug the machine from the AC outlet and
1
disconnect it from your Macintosh
already connected an interface cable.
Turn on your Macintosh®.
2
Insert the supplied CD-ROM into your CD-
3
ROM drive.
Double-click the MFC Software Suite
4
Installer icon to install the printer and
scanner drivers.
®
if you
Connect the USB interface cable to your
6
Macintosh
machine.
Do not connect the machine to a USB
port on a keyboard or a non pow ered
USB hub.
Turn on the machine by plugging i n the
7
power cord.
®
, and then connect it to the
After the installation is completed, restart
5
your Macintosh
®
.
From the Apple® menu, open the Chooser.
8
28
Page 31

Click the MFL Pro Color i con you installed.
9
On the ri ght side of th e Chooser, select t he
printer to which you want to print. Close the
Chooser.
The Brother PC fax, Printer and
Scanner drivers have been installed
and the installation is now complete.
Setting Up
the machine
Installing the Driver & Software
OS
®
8.5-9.2
Mac
29
Page 32

Step 2
For Mac® OS X 10.1, 10.2.1 or Greater Users
Make sure that you have completed the instructions from Step 1 “Setting Up the
machine”.
Installing the Driver & Software
Unplug the machine from the AC outlet and
1
disconnect it from your Macintosh
already connected an interface cable.
Turn on your Macintosh®.
2
Insert the supplied CD-ROM into your CD-
3
ROM drive.
Double-click the Mac OS X folder to install
4
the pri nter dri ver and Remote Setup
program.
®
if you
Connect the USB interface cable to your
6
Macintosh
machine.
Do not connect the machine to a USB
port on a keyboard or a non powe red
USB hub.
Turn on the machine by plugging i n the
7
power cord.
®
, and then connect it to the
Double-click the MFL Pro_Color.pkg icon.
5
Follow the instr uctions on the s creen.
Open the Macintosh HD icon.
8
Open the Applications folder.
9
Open the Utilities folder.
30
Page 33

Step 2
Open the Printer Center icon.
0
Select Q uit Print er Cent er from the Printer
D
Center menu.
Setting Up
the machine
Click the Add Printer... button.
A
Select USB.
B
Select MFC-890, and then click the Add
C
button.
The Brother Printer, Scanner drivers
and Remote Setup Program have
been installed and the installation is
now complete.
(Scanner driver is only available for
OS X 10.2.1 or greater.)
Installing the Driver & Software
31
OS X
®
Mac
10.1/1 0.2.1 or greater
Page 34

Trademarks
The Brother logo is a registered trademark of Brother Industries, Ltd.
Brother is a registere d tradem ar k of Brother Industries, Ltd.
Multi-Function Link is a registered trademark of Brother International Corporation.
PhotoCapture Center is a trademar k of Bro ther International Corporation.
© Copyright 2002 Brother Industries, Ltd. All rights reserved.
Windows and Windows NT, Microsoft and MS-DOS are registered trademarks of Microsoft in the U.S. and other
countries.
Macintosh and QuickDraw, iMac and iBook are registered trademarks of Apple Computer, Inc.
PaperPort and TextBridge are registered trademarks of ScanSoft, Inc.
Hammermill and JetPrint PHOTO are a registered trademark of International Paper.
Smart Media is a trademark of Toshiba Corporation.
Compact Flash is a trademark of SanD is k Corporation.
Memory Stick is a trademark of Sony Corporation.
Each company whose software title is mentioned in this manual has a Software License Agreement specific to its
proprietary progr am s .
All other brand and product names mentioned in this manual are registered trademarks of their respective
companies.
Compilation and Publication
Under the supervision of Brother Industries Ltd., this manual has been compiled and published, covering the latest
product descriptions and specifications.
The contents of this manual and the specifications of this product are subject to change without notice.
Brother reserves the right to make changes without notice in the specifications and materials contained herein and
shall not be responsible for any damages (including consequential) caused by reliance on the materials presented,
including but not limited to typographical and other errors relating to the publication.
This product is designed f or use in a Profess ional Environment.
©2002 Brother Indust ri es , Ltd .
Page 35

UK
Version A
 Loading...