

Page 1
Scan to Network Guide
®
(Windows
)
To find basic information about network and advanced network
features of your Brother machine: See the uu Network User's Guide.
To find basic information about network scanning features of your
Brother machine: See the uu Software User's Guide.
To download the latest manual, please visit the Brother Solutions
Center at (http://solutions.brother.com/)
latest drivers and utilities for your machine, read FAQs and
troubleshooting tips or learn about special printing solutions from the
Brother Solutions Center.
. You can also download the
Version A
ENG
Page 2
Applicable models
Note
This User’s Guide applies to the following models.
5-line LCD models: DCP-8110DN/8150DN/8155DN/MFC-8510DN/8520DN/8710DW/8810DW/8910DW
Touchscreen models: DCP-8250DN/MFC-8950DW(T)
Definitions of notes
The following icons are used throughout this User’s Guide:
Notes tell you how you should respond to a situation that may arise or give tips
about how the operation works with other features.
Trademarks
The Brother logo is a registered trademark of Brother Industries, Ltd.
Microsoft, Windows, Windows Server and Internet Explorer are either registered trademarks or trademarks
of Microsoft Corporation in the United States and/or other countries.
Each company whose software title is mentioned in this manual has a Software License Agreement specific
to its proprietary programs.
Any trade names and product names of companies appearing on Brother products, related
documents and any other materials are all trademarks or registered trademarks of those respective
companies.
IMPORTANT NOTE
Please go to the Brother Solutions Center at http://solutions.brother.com/ and click Manuals on your model
page to download the other manuals.
Not all models are available in all countries.
i
Page 3

Table of Contents
1 Introduction 1
Overview....................................................................................................................................................1
Benefits to the customer ............................................................................................................................1
2 Configuration for Scan to Network using a Web Browser 2
Adding the Scan to Network file name.......................................................................................................2
Configuring the Scan to Network Default Settings.....................................................................................4
Synchronize with SNTP server..................................................................................................................6
3 Machine operation 8
Scan to Network using Scan to Network Profiles for 5-line LCD models...................................................8
How to set a new default for the file size...........................................................................................10
Scan to Network using Scan to Network Profiles for DCP-8250DN and MFC-8950DW(T).....................11
Entering text ............................................................................................................................................13
Entering text for 5-line LCD models...................................................................................................13
Entering text for DCP-8250DN and MFC-8950DW(T).......................................................................14
4 Digital Certificate for Signed PDF 15
Configure certificate for Signed PDF .......................................................................................................15
Supported Certificates .............................................................................................................................16
Digital Certificate Installation ...................................................................................................................17
Creating a self-signed certificate .......................................................................................................18
Creating a Certificate Signing Request (CSR) ..................................................................................19
How to install the certificate to your machine ....................................................................................21
Import and export the certificate and private key.....................................................................................22
How to import the self-signed certificate, the certificate issued by a CA, and the private key...........22
How to export the self-signed certificate, the certificate issued by a CA, and the private key...........22
Import and export a CA certificate .....................................................................................................23
5 Troubleshooting 24
Overview..................................................................................................................................................24
Identifying your problem ....................................................................................................................24
Network terms and PDF file format..........................................................................................................26
Network terms ...................................................................................................................................26
PDF file format...................................................................................................................................26
ii
Page 4

1
1
Introduction 1
Overview 1
When you choose Scan to Network, you can scan documents directly to a shared folder on a CIFS server
located on your local network or the internet. The Scan to Network feature supports Kerberos and NTLMv2
authentication.
The details required to use Scan to Network can be entered by using Web Based Management to
pre-configure and store the details in a Scan to Network profile. The Scan to Network profile stores user
information and configuration settings for use on a network, or the internet.
Benefits to the customer 1
You can scan the document directly to a CIFS server.
You can configure up to 10 Scan to Network profiles. Once you have configured Scan to Network profiles
using Web Based Management, you can operate Scan to Network from the machine's control panel
without using a computer.
Scan to Network supports Kerberos Authentication and NTLMv2 Authentication for secured
communication.
1
Page 5

2
Note
Configuration for Scan to Network using a
2
When you choose Scan to Network, you can scan documents directly to a shared folder on a CIFS server
located on your local network or the internet. The Scan to Network feature supports Kerberos and NTLMv2
authentication.
The details required to use Scan to Network can be entered by using Web Based Management to
pre-configure and store the details in a Scan to Network profile. The Scan to Network profile stores user
information and configuration settings for use on a network, or the internet.
• You must configure the SNTP protocol (network time server), or you must set the date, time and time zone
correctly for Authentication. For more information, see Synchronize with SNTP server uu page 6.
• We recommend to use Windows
4.0/5.0 for Macintosh. Please also make sure that JavaScript and Cookies are always enabled in
whichever browser you use. If a different web browser is used, make sure it is compatible with HTTP 1.0
and HTTP 1.1.
Web Browser
®
Internet Explorer® 7.0/8.0 or Firefox® 3.6 for Windows® and Safari
Adding the Scan to Network file name 2
2
a Start your web browser.
b Type “http://machine’s IP address/” into your browser's address bar (where “machine’s IP address” is the
IP address of the machine or the print server name).
For example: http://192.168.1.2/
c No password is required by default. If you have previously set a password, enter it and press .
d Click Scan.
e Click Scan to FTP/Network.
2
Page 6
Configuration for Scan to Network using a Web Browser
2
Note
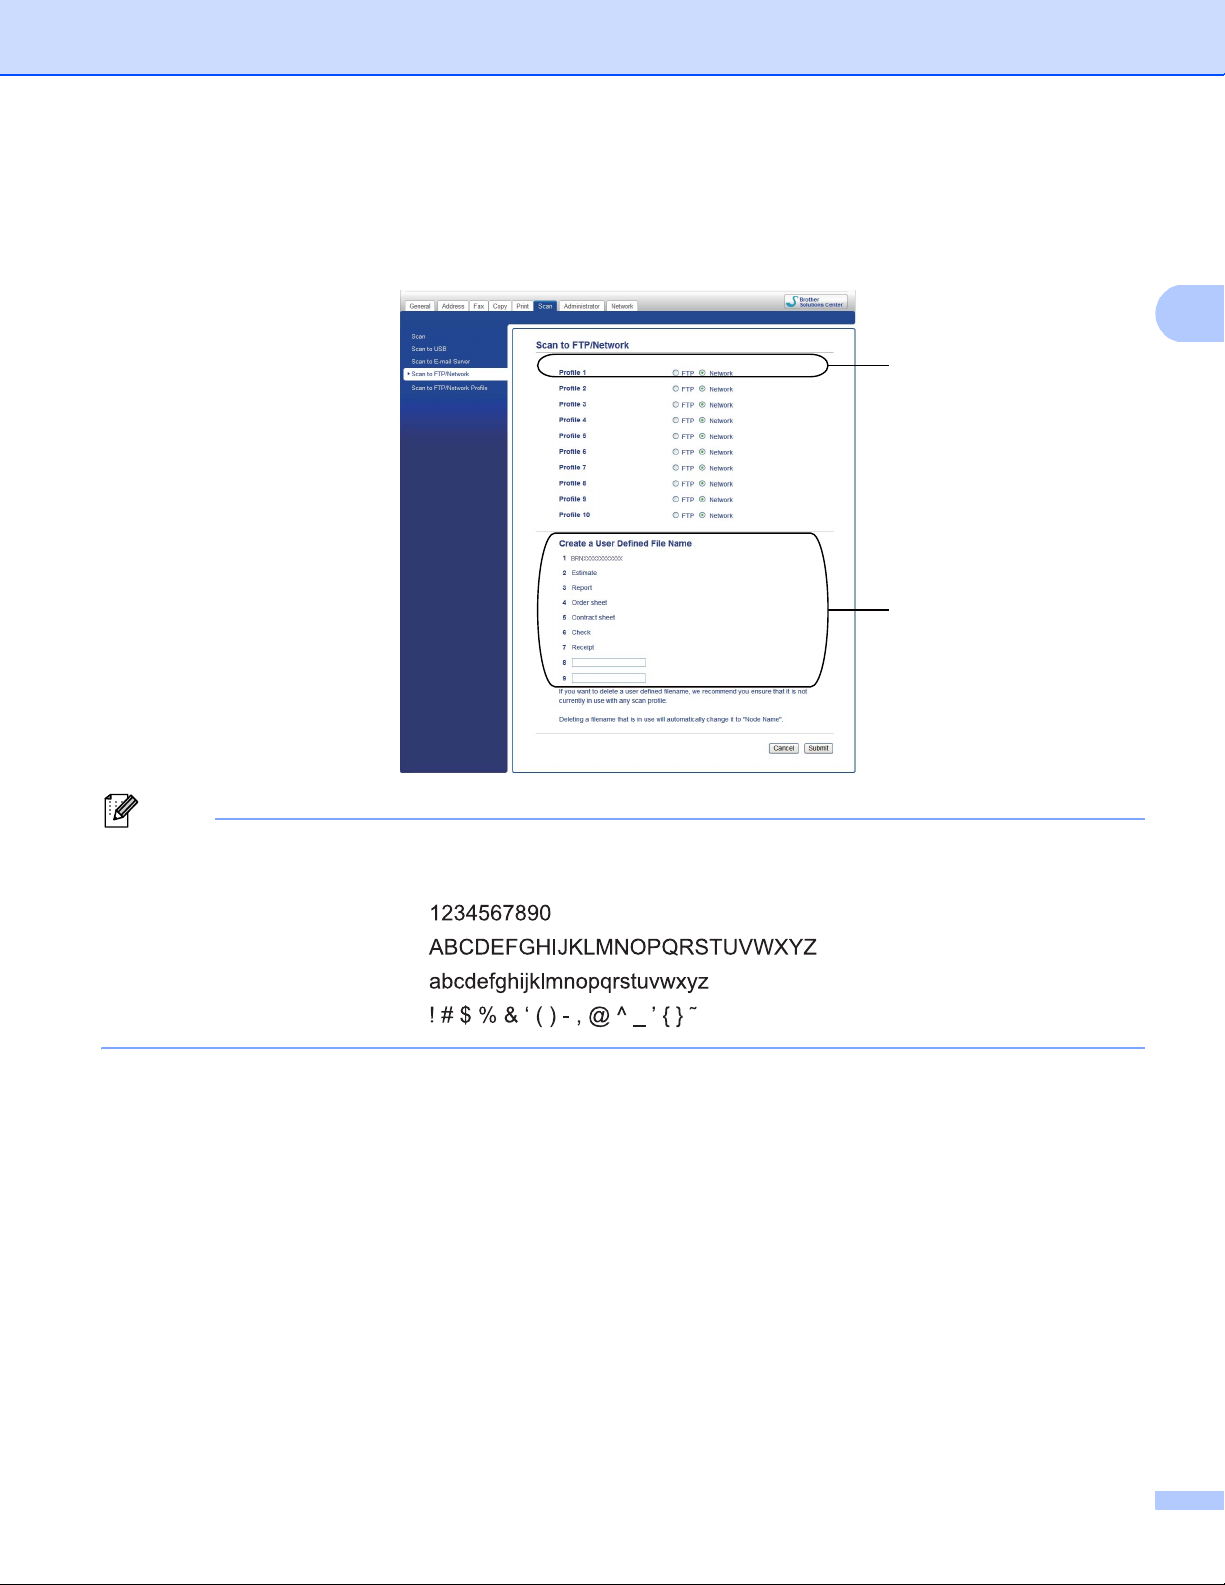
f Choose Network (1) in the profile numbers (1 to 10) you want to use for Scan to Network settings.
You can also store two user defined file names that can be used for creating a Scan to Network Profile
in addition to the seven preset file names in Create a User Defined File Name (2). A maximum of 15
characters can be entered in each of the two fields.
1
2
Using certain characters or symbols in a file name may cause a problem when accessing the file. We
recommend to only use combinations of the following characters in a file name.
g Click Submit.
3
Page 7
Configuration for Scan to Network using a Web Browser
2
Configuring the Scan to Network Default Settings 2
a Start your web browser.
b Type “http://machine’s IP address/” into your browser's address bar (where “machine’s IP address” is the
IP address of the machine or the print server name).
For example: http://192.168.1.2/
c No password is required by default. If you have previously set a password, enter it and press .
d Click Scan.
e Click Scan to FTP/Network Profile.
f Choose the Profile you want to configure in Scan to FTP/Network Profile.
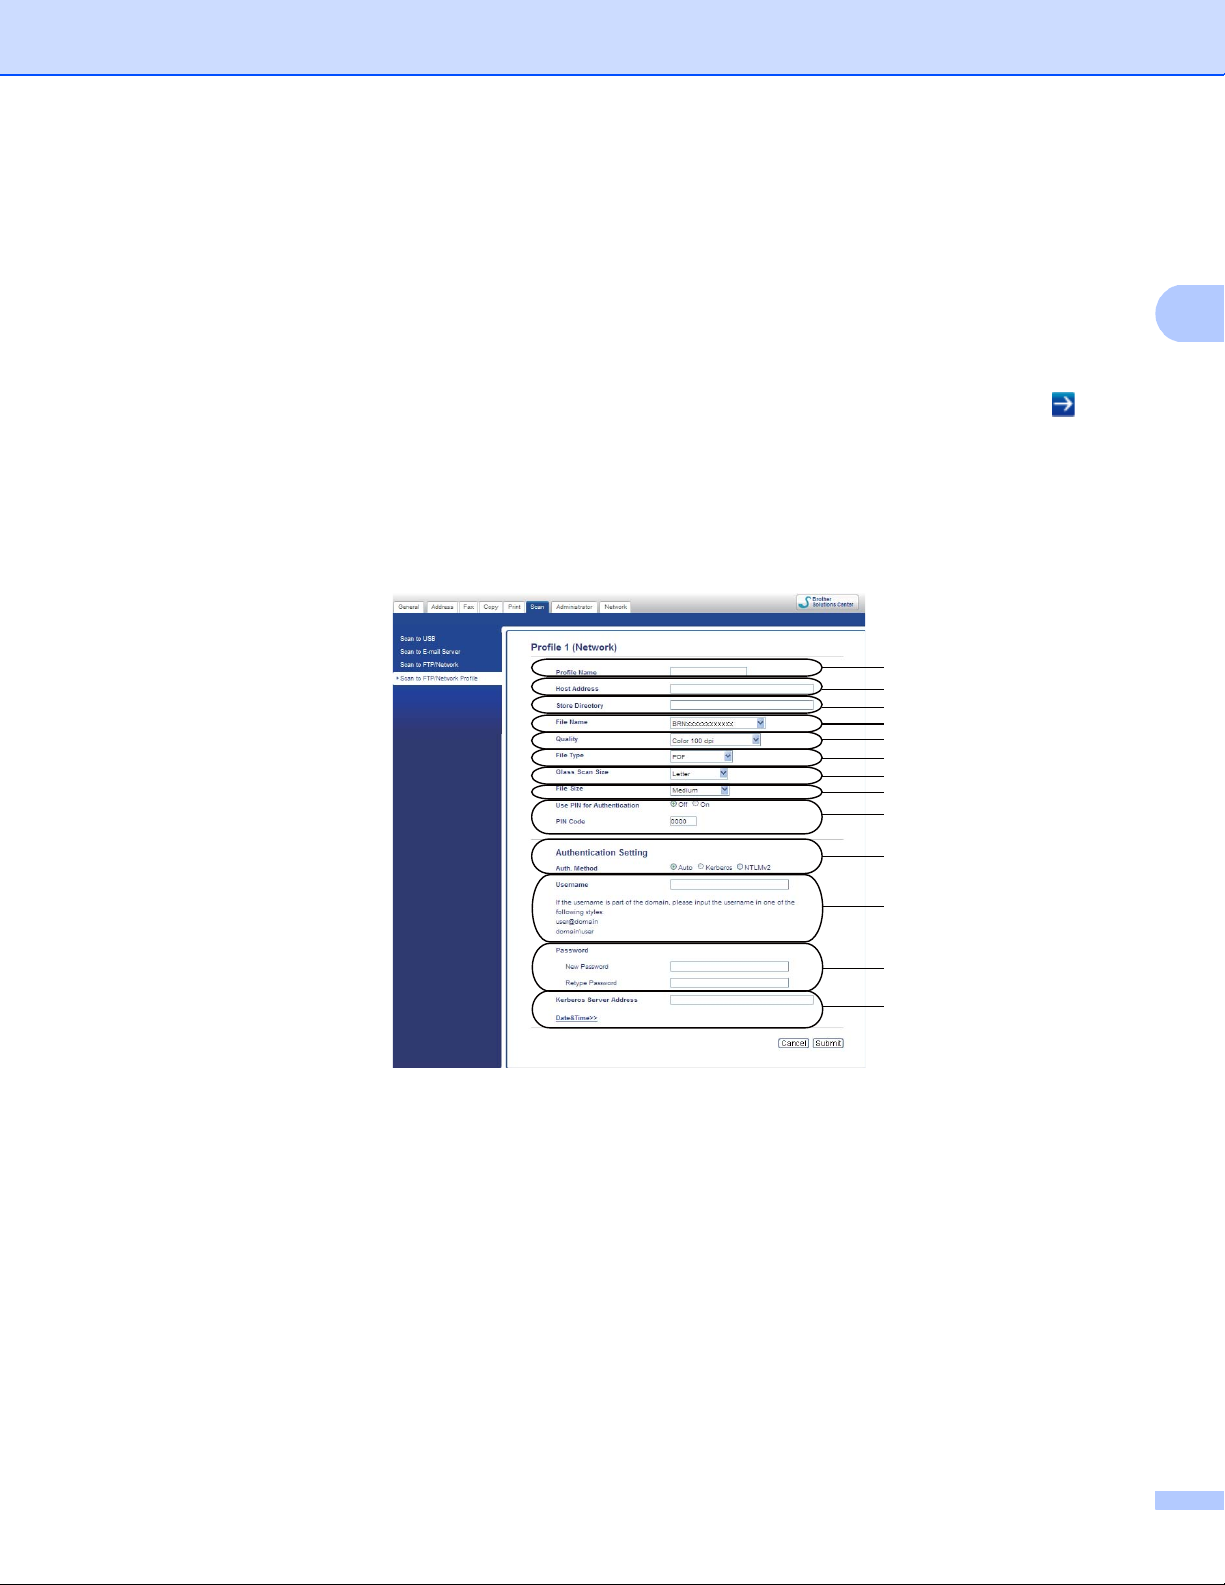
You can configure and change the following Scan to Network settings using a web browser.
1
2
3
4
5
6
7
8
9
10
11
12
13
1 Enter the name that you want to use for the Scan to Network profile. This name will be displayed on
the LCD of the machine and can be up to 15 characters.
2The Host Address is the domain name of the CIFS server. Enter the Host Address (for example
mypc.example.com) (up to 64 characters) or the IP address (for example 192.23.56.189).
3 Enter the destination folder where your document will be stored on the CIFS server (for example
brother\abc) (up to 60 characters).
4 Choose the file name you want to use for the scanned document. You can choose from seven preset
and two user defined file names. The file name that will be used for your document will be the file
name you selected plus the last 6 digits of the flatbed/ADF scanner counter plus the file extension
(For example, Estimate_098765.pdf). You can also manually enter a file name up to 15 characters.
4
Page 8

Configuration for Scan to Network using a Web Browser
2
Note
5 Choose the scan quality from the drop-down list. You can choose Color 100 dpi, Color 200 dpi,
Color 300 dpi, Color 600 dpi, Color Auto, Gray 100 dpi, Gray 200 dpi, Gray 300 dpi, Gray Auto,
B&W 300 dpi, B&W 200 dpi, B&W 200 x 100 dpi or User Select.
6 Choose the file type for the document from the drop-down list. You can choose PDF, PDF/A, Secure
PDF, Signed PDF, JPEG, XPS or User Select for color or gray scale documents and PDF, PDF/A,
Secure PDF, Signed PDF, TIFF or User Select for B/W documents.
7 (For Touchscreen models) If you are using the scanner glass, choose A4, Letter or Legal/Folio for
Glass Scan Size.
8 If you choose color or gray in the scan quality, choose the file size for the document from the
drop-down list. You can choose Large, Medium, Small or User Select.
9 If you want to protect the profile, check Use PIN for Authentication and enter a 4-digit PIN number
in PIN Code.
10 Choose the authentication method. You can choose Auto, Kerberos or NTLMv2. If you choose
Auto, the authentication method will be detected automatically.
11 Enter the Username that has been registered with the CIFS server for the machine (up to 96
characters).
12 Enter the Password for access to the CIFS server (up to 32 characters).
13 If you want to set the Kerberos Server Address manually, enter the Kerberos Server Address (for
example mypc.example.com) (up to 64 characters).
• If you choose User Select in the scan quality, file type or file size, you must choose those settings from
the machine’s control panel.
• If you choose Secure PDF, the machine will ask you to enter a 4 digit password using numbers 0-9 before
it starts scanning.
• If you choose Signed PDF, you must install a certificate on your machine using Web Based Management.
Choose Signed PDF from Administrator in Web Based Management. (See Digital Certificate for Signed
PDF uu page 15).
• For information on PDF/A, Secure PDF and Signed PDF, see PDF file format uu page 26.
g After you have configured the Scan to Network settings, click Submit.
5
Page 9
Configuration for Scan to Network using a Web Browser
2
Note
Synchronize with SNTP server 2
You must configure the SNTP protocol (network time server), or you must set the date, time and time zone
correctly on the control panel for Kerberos Authentication. The time must match the time used by the
Kerberos Server.
SNTP is the protocol used to synchronize the time used by the machine for Authentication with the SNTP
time server (this time is not the time displayed on the LCD of the machine). You can synchronize the time
used by the machine on a regular basis with the Coordinated Universal Time (UTC) provided by the SNTP
time server.
This function is not available in some countries.
a Start your web browser.
b Type “http://machine’s IP address/” into your browser's address bar (where “machine’s IP address” is the
IP address of the machine or the print server name).
For example: http://192.168.1.2/
c No password is required by default. If you have previously set a password, enter it and press .
d Click Network, and then click Protocol.
e Select the SNTP check box to activate the setting.
f Click Advanced Setting.
Status
Displays whether the SNTP server settings are enabled or disabled.
SNTP Server Method
Choose AUTO or STATIC.
• AUTO
If you have a DHCP server on your network, the SNTP server will automatically obtain the address
from that server.
• STATIC
Enter the address you want to use.
Primary SNTP Server Address, Secondary SNTP Server Address
Enter the server address (up to 64 characters).
The Secondary SNTP server address is used as a backup to the Primary SNTP server address. If the
Primary server is unavailable, the machine will contact the Secondary SNTP server. If you have a
Primary SNTP server, but no Secondary SNTP server, simply leave this field blank.
6
Page 10

Configuration for Scan to Network using a Web Browser
2
Note
Primary SNTP Server Port, Secondary SNTP Server Port
Enter the Port number (1 to 65535).
The Secondary SNTP server port is used as a backup to the Primary SNTP server port. If the Primary
port is unavailable, the machine will contact the Secondary SNTP port. If you have a Primary SNTP
port, but no Secondary SNTP port, simply leave this field blank.
Synchronization Interval
Enter the number of hours between server synchronization attempts (1 to 168 hours).
• You must configure Date&Time to synchronize the time used by the machine with the time server. Click
Date&Time and then configure Date&Time on the General screen. You can also configure the Date &
Time from the machine’s control panel.
• Choose the Synchronize with SNTP server check box. You also need to verify your time zone settings
correctly. Choose the time difference between your location and UTC from the Time Zone pull-down list.
For example, the time zone for Eastern Time in the USA and Canada is UTC-05:00.
Synchronization Status
You can confirm the latest synchronization status.
g Click Submit to apply the settings.
7
Page 11

3
3
After you configure Scan to Network settings, you can use the Scan to Network feature.
Machine operation 3
Scan to Network using Scan to Network Profiles for 5-line LCD models 3
a Load your document.
b Press (SCAN).
c Press a or b to choose Scan to Network. Press OK.
(For DCP-8155DN, MFC-8520DN, MFC-8810DW and MFC-8910DW) Go to step d.
(For DCP-8110DN, DCP-8150DN, MFC-8510DN and MFC-8710DW) Go to step e.
d Press a or b to choose 1sided, 2sided (L)edge or 2sided (S)edge.
Press OK.
e Press a or b to choose one of the profiles listed.
Press OK.
f If you check Use PIN for Authentication in Scan to FTP/Network Profile of Web Based Management,
the LCD will prompts you to enter a PIN number. Enter the 4-digit PIN number and then press OK.
If the profile is complete, you will automatically go to step k.
If User Select was configured using Web Based Management, you will be prompted to choose the
scan quality, file type and file size from the control panel.
If the profile is not complete, for instance, the quality or file type are not chosen, you will be prompted
to enter any missing information in the following steps.
g Choose one of the options below:
Press a or b to choose Color 100 dpi, Color 200 dpi, Color 300 dpi, Color 600 dpi,
Color Auto, Gray 100 dpi, Gray 200 dpi, Gray 300 dpi or Gray Auto. Press OK and go
to step h.
Press a or b to choose B&W 300 dpi, B&W 200 dpi or B&W 200x100 dpi. Press OK and go to
step i.
h Press a or b to choose PDF, PDF/A, Secure PDF, Signed PDF, JPEG or XPS. Press OK and go to step
j.
8
Page 12

Machine operation
3
Note
Note
i Press a or b to choose PDF, PDF/A, Secure PDF, Signed PDF or TIFF. Press OK and go to step k.
• If you choose Secure PDF, the machine will ask you to enter a 4-digit password using numbers 0-9 before
it starts scanning.
• If you choose Signed PDF, you must install and then configure a certificate to your machine using Web
Based Management.
• You cannot choose the file size when you scan a document in black and white. Black and white documents
will be stored in the TIFF file format and the data will not be compressed.
j Press a or b to choose the file size.
Press OK and go to step k.
k Do one of the following:
If you want to start scanning, press Start.
If you want to change the file name, go to step l.
l Press a or b to choose a file name you want to use and press OK. Press Start.
If you want to change the file name manually, go to step m.
m Press a or b to choose <Manual>. Press OK.
Enter the file name you want to use (up to 64 characters) and press OK. (For information on how to enter
text, see Entering text for 5-line LCD models uu page 13.)
Press Start.
9
Page 13

Machine operation
3
Note
How to set a new default for the file size 3
You can set your own default setting for the file size. For a higher quality scan, choose the large file size. For
a smaller file size, choose the small file size.
a Press Menu.
b Press a or b to choose General Setup. Press OK.
c Press a or b to choose Document Scan. Press OK.
d Press a or b to choose File Size. Press OK.
e Press a or b to choose Color or Gray. Press OK.
f Press a or b to choose Small, Medium or Large. Press OK.
g Press Stop/Exit.
You cannot choose the file size when you scan a document in black and white. Black and white documents
will be stored in the TIFF file format and the data will not be compressed.
10
Page 14

Machine operation
3
Note
Scan to Network using Scan to Network Profiles for DCP-8250DN and MFC-8950DW(T) 3
a Load your document.
b Press Scan.
c Press Scan to Network.
d Press a or b to choose one of the profiles listed.
e If you check Use PIN for Authentication in Scan to FTP/Network Profile of Web Based Management,
the LCD will prompts you to enter a PIN number. Enter the 4-digit PIN number and then press OK.
If the profile is complete, you will automatically go to step k.
If User Select was configured using Web Based Management, you will be prompted to choose the
scan quality, file type and file size from the control panel.
If the profile is not complete, for instance, the quality or file type are not chosen, you will be prompted
to enter any missing information in the following steps.
f Press Quality and then choose one of the options below:
Press d or c to choose Color 100 dpi, Color 200 dpi, Color 300 dpi, Color 600 dpi,
Color Auto, Gray 100 dpi, Gray 200 dpi, Gray 300 dpi or Gray Auto. Go to step g.
Press d or c to choose B&W 300 dpi, B&W 200 dpi or B&W 200x100 dpi. Go to step h.
g Press File Type and then choose PDF, PDF/A, Secure PDF, Signed PDF, JPEG or XPS.
Go to step i.
h Press File Type and then choose PDF, PDF/A, Secure PDF, Signed PDF, or TIFF. Go to step i.
• If you choose Secure PDF, the machine will ask you to enter a 4 digit password using numbers 0-9 before
it starts scanning.
• If you choose Signed PDF, you must install and then configure a certificate to your machine using Web
Based Management.
11
Page 15

Machine operation
3
Note
i If you are using the scanner glass, press Glass Scan Size.
Press to choose A4, Letter or Legal/Folio for the scanner glass setting and then choose one of the
options below:
If you choose color or gray for the quality in step f, go to step j.
If you choose black and white for the quality in step f, go to step k.
j Press File Size and then choose the file size.
Go to step k.
k Do one of the following:
If you want to start scanning, press Start.
If you want to change the file name, go to step l.
l Press d or c to display File Name. Press File Name.
Press a or b to choose a file name you want to use and press OK. Press Start.
If you want to change the file name manually, go to step m.
m Press a or b to choose <Manual>. Press OK. (For information on how to enter text, see Entering text for
DCP-8250DN and MFC-8950DW(T) uu page 14.)
Enter the file name you want to use (up to 64 characters) and press OK.
Press Start. Go to step n.
n The LCD shows Connecting. When the connection to the Network server is successful the machine
starts the scanning process.
If you are using the scanner glass, the LCD displays Next Page?. Press Yes or No depending whether
you wish to scan subsequent pages.
12
Page 16

Machine operation
3
Entering text 3
Entering text for 5-line LCD models 3
When setting certain menu selections, you will need to type text characters. The dial pad keys have letters
printed on them. The keys: 0, # and l do not have printed letters because they are used for special characters.
Press the appropriate dial pad key the number of times shown in this reference table to access the character
you want.
Press
Key
1 @. /1@. /1@
2 abcABC2ab
3 de fDEF3de
4 gh iGHI 4gh
5 jklJKL5jk
6 mn oMNO6mn
7 pqr sPQRS7
8 tuvTUV8tu
9 wxyzWXYZ9
one
time
two
times
three
times
four
times
five
times
six
times
seven
times
eight
times
nine
times
Inserting spaces 3
To enter a space, press c once between numbers. To enter a space in a name, press c twice between
characters.
Making corrections 3
If you entered a letter incorrectly and want to change it, press d or c to move the cursor to the incorrect
character, and then press Clear.
Repeating letters 3
To enter a character on the same key as the previous character, press c to move the cursor right before
pressing the key again.
Special characters and symbols 3
Press l, # or 0, then press d or c to move the cursor to the symbol or character you want. Press OK to choose
it. The symbols and characters will appear depending on your menu selection.
13
Page 17

Machine operation
3
Note
Entering text for DCP-8250DN and MFC-8950DW(T) 3
When you are setting certain menu selections, you may need to enter text into the machine.
Press repeatedly to choose between letters, numbers or special characters. Press to change
between upper case and lower case.
Inserting spaces 3
To enter a space, press the space key button or c.
Making corrections 3
If you entered an incorrect character and want to change it, use the arrow buttons to move the cursor under
the incorrect character. Then press . Enter the correct character. You can also insert letters by moving the
cursor and entering a character.
• The characters available may differ depending on your country.
• The keyboard layout may differ depending on the function you are setting.
14
Page 18

4
4
Digital Certificate for Signed PDF 4
Configure certificate for Signed PDF 4
If you choose Signed PDF, you must configure a certificate to your machine using Web Based Management.
To use Signed PDF, you must install a certificate to your machine and your computer.
a Start your web browser.
b Type “http://machine’s IP address/” into your browser's address bar (where “machine’s IP address” is the
IP address of the machine or the print server name).
For example: http://192.168.1.2/
c No password is required by default. If you have previously set a password, enter it and press .
d Click Administrator.
e Choose Signed PDF for a configuration.
f Choose the certificate from the Select the Certificate pull-down list.
g Click Submit.
15
Page 19

Digital Certificate for Signed PDF
4
Supported Certificates 4
The Brother machine supports the following certificates.
Self-signed certificate
This print server issues its own certificate. Using this certificate, you can easily use the SSL/TLS
communication without having a certificate from a CA. (See Creating a self-signed certificate uu page 18.)
Certificate from a CA
There are two methods for installing a certificate from a CA. If you already have a CA or if you want to use
a certificate from an external trusted CA:
• When using a CSR (Certificate Signing Request) from this print server. (See Creating a Certificate
Signing Request (CSR) uu page 19.)
• When importing a certificate and a private key. (See Import and export the certificate and private key
uu page 22.)
CA certificate
If you use a CA certificate that identifies the CA (Certificate Authority) itself and owns its private key, you
must import a CA certificate from the CA, prior to the configuration. (See Import and export a CA certificate
uu page 23.)
16
Page 20

Digital Certificate for Signed PDF
4
Note
Digital Certificate Installation 4
Signed PDF requires a digital certificate to be installed on both the machine and device which is sending data
to the machine, e.g. a computer. In order to configure the certificate, the user needs to log onto the machine
remotely through a web browser using its IP address.
a Start your web browser.
b Type “http://machine’s IP address/” into your browser's address bar (where “machine’s IP address” is the
IP address of the machine or the print server name).
For example: http://192.168.1.2/
c No password is required by default. If you have previously set a password, enter it and press .
d Click Network.
e Click Security.
f Click Certificate.
g You can configure the certificate settings.
To create a self-signed certificate using Web Based Management, go to Creating a self-signed certificate
uu page 18.
To create a Certificate Signing Request (CSR), go to Creating a Certificate Signing Request (CSR)
uu page 19.
1
2
1 To create and install a self-signed certificate
2 To use a certificate from a Certificate Authority (CA)
• The functions that are grayed and unlinked indicate they are not available.
• For more information on configuration, see the Help text in the Web Based Management.
17
Page 21

Digital Certificate for Signed PDF
4
Note
Creating a self-signed certificate 4
a Click Create Self-Signed Certificate.
b Enter a Common Name and a Valid Date.
• The length of the Common Name can be up to 64 characters. The node name is displayed by default.
• A warning will pop-up if you use the IPPS or HTTPS protocol and enter a different name in the URL than
the Common Name that was used for the self-signed certificate.
c You can choose the Public Key Algorithm and Digest Algorithm settings from the pull-down list. The
default settings are RSA(2048bit) for Public Key Algorithm and SHA256 for Digest Algorithm.
d Click Submit.
e The self-signed certificate is created and saved in your machine's memory successfully.
18
Page 22

Digital Certificate for Signed PDF
4
Note
Note
Creating a Certificate Signing Request (CSR) 4
A Certificate Signing Request (CSR) is a request sent to a CA in order to authenticate the credentials
contained within the certificate.
We recommend that the Root Certificate from the CA be installed on your computer before creating the
CSR.
a Click Create CSR.
b Enter a Common Name and your information, such as Organization.
Your company details are required so that a CA can confirm your identity and attest to the outside world.
• The length of the Common Name can be up to 64 characters. The Common Name is required.
• A warning will pop-up if you enter a different name in the URL than the Common Name that was used for
the certificate.
• The length of the Organization, the Organization Unit, the City/Locality and the State/Province can be
up to 64 characters.
•The Country/Region should be an ISO 3166 country code composed of two characters.
• If you are configuring X.509v3 certificate extension, choose the Configure extended partition check box
and then choose Auto (Register IPv4) or Manual.
19
Page 23

Digital Certificate for Signed PDF
4
Note
c You can choose the Public Key Algorithm and Digest Algorithm settings from the pull-down list. The
default settings are RSA(2048bit) for Public Key Algorithm and SHA256 for Digest Algorithm.
d Click Submit. The following screen will appear.
e After a few moments, you will be presented with the certificate, which can be saved into a small file or
copied and pasted directly into an online CSR form offered by a Certificate Authority. Click Save to save
the CSR file to your computer.
Follow your CA policy regarding the method to send a CSR to your CA.
f The CSR is created. For instructions on how to install the certificate to your machine, go to How to install
the certificate to your machine uu page 21.
20
Page 24

Digital Certificate for Signed PDF
4
Note
How to install the certificate to your machine 4
When you receive the certificate from a CA, follow the steps below to install it into the print server.
Only a certificate issued with this machine’s CSR can be installed. When you want to create another CSR,
make sure that the certificate is installed before creating another CSR. Create another CSR after installing
the certificate to the machine. Otherwise the CSR you have made before installing will be invalid.
a Click Install Certificate on the Certificate page.
b Specify the file of the certificate that has been issued by a CA, and then click Submit.
c Now the certificate has been created successfully and saved in your machine memory successfully.
21
Page 25

Digital Certificate for Signed PDF
4
Note
Import and export the certificate and private key 4
You can store the certificate and private key on the machine and manage them by importing and exporting.
How to import the self-signed certificate, the certificate issued by a CA, and the private key 4
a Click Import Certificate and Private Key on the Certificate page.
b Specify the file that you want to import.
c Enter the password if the file is encrypted, and then click Submit.
d Now the certificate and private key are imported to your machine successfully.
How to export the self-signed certificate, the certificate issued by a CA, and the private key 4
a Click Export shown with Certificate List on the Certificate page.
b Enter a password if you want to encrypt the file.
If a blank password is used, the output is not encrypted.
c Enter the password again for confirmation, and then click Submit.
d Specify the location where you want to save the file.
e Now the certificate and private key are exported to your computer.
22
Page 26

Digital Certificate for Signed PDF
4
Import and export a CA certificate 4
You can store a CA certificate on the machine by importing and exporting.
How to import a CA certificate 4
a Click CA Certificate on the Security page.
b Click Import CA Certificate and choose the certificate. Click Submit.
How to export a CA certificate 4
a Click CA Certificate on the Security page.
b Choose the certificate you want to export and click Export. Click Submit.
c Click Save to choose the destination folder.
d Choose the destination you want to save the exported certificate and then save the certificate.
23
Page 27

5
5
Troubleshooting 5
Overview 5
This chapter explains how to resolve typical network problems you may encounter when using the Brother
machine. If, after reading this chapter, you are unable to resolve your problem, please visit the Brother
Solutions Center at: (http://solutions.brother.com/)
.
Please go to the Brother Solutions Center at (http://solutions.brother.com/)
page to download the other manuals.
and click Manuals on your model
Identifying your problem 5
Make sure that the following items are configured before reading this chapter.
First check the following:
The power cord is connected correctly and the Brother machine is turned on.
All protective packaging has been removed from the machine.
The toner cartridges and drum unit are installed correctly.
The front and back covers are fully closed.
Paper is inserted correctly in the paper tray.
Go to the page for your solution from the lists below 5
Error messages when using the Scan to Network feature
See Error messages when you use the Scan to Network feature uu page 25
24
Page 28

Troubleshooting
5
Error messages when you use the Scan to Network feature
Error Message Cause Action
Server Time out Wrong Host Address If you have used your CIFS server's IP
address as the Host Address, confirm
the IP address.
If you have specified the DNS style as
the Host Address, confirm the Host
Address. For your DNS style address,
contact your network administrator.
If you have used your computer name as
the Host Address, confirm the computer
name. For the WINS server settings,
contact your network administrator.
Authenticate Err
Sending Error
Wrong username Confirm your username for the CIFS
server. For configuring your username,
see Configuring the Scan to Network
Default Settings uu page 4.
If the username is part of the domain,
make sure you have input the domain
name included to the username. For
example:
• user@domain
Authenticate Err
Wrong Date&Time
• domain\user
Wrong password Confirm your password for the CIFS server.
For configuring your password, see
Configuring the Scan to Network Default
Settings uu page 4.
Your machine's date and time settings are
not correct.
Make sure the date and time, and the time
zone settings are set correctly using the
machine's control panel so the machine
matches the time being used by the server
providing the authentication.
25
Page 29

Troubleshooting
5
Network terms and PDF file format 5
Network terms 5
CIFS
The Common Internet File System is the standard way that computer users share files and printers in
®
Windows
SNTP
The Simple Network Time Protocol is used to synchronize computer clocks on a TCP/IP network. You can
configure the SNTP settings using Web Based Management (web browser).
Kerberos
Kerberos is an authentication protocol which allows devices or individuals to securely prove their identity
to network servers using a single sign-on.
NTLMv2
NTLMv2 is the authentication method used by Windows to log into servers.
.
PDF file format 5
PDF/A
PDF/A is a PDF file format intended for long-term archiving. This format contains all the necessary
information for reproducing the document after long-term storage.
Secure PDF
Secure PDF is a PDF file format that has been password-protected.
Signed PDF
Signed PDF is a PDF file format that helps prevent data tampering and the impersonation of an author by
including a digital certificate within the document.
If you choose Signed PDF, you must install and then configure a certificate to your machine using Web
Based Management.
26
 Loading...