

Page 1

Laser Printer HL-760 Series
Quick Setup Guide
Read this guidebook first to set up your printer and
prepare your computer for the printer.
Save all packing materials and outer carton. They
are useful when shipping the printer.
The product names in this guidebook are trademarks or registered trade marks of each manufacturer. The specifications
are subject to change without notice.
©1996 Brother Industries Ltd.
UL7487001 Printed in China
Page 2
English: HL-YL Quick Setup Guide, Body
Action 1: Check the Supplied Items
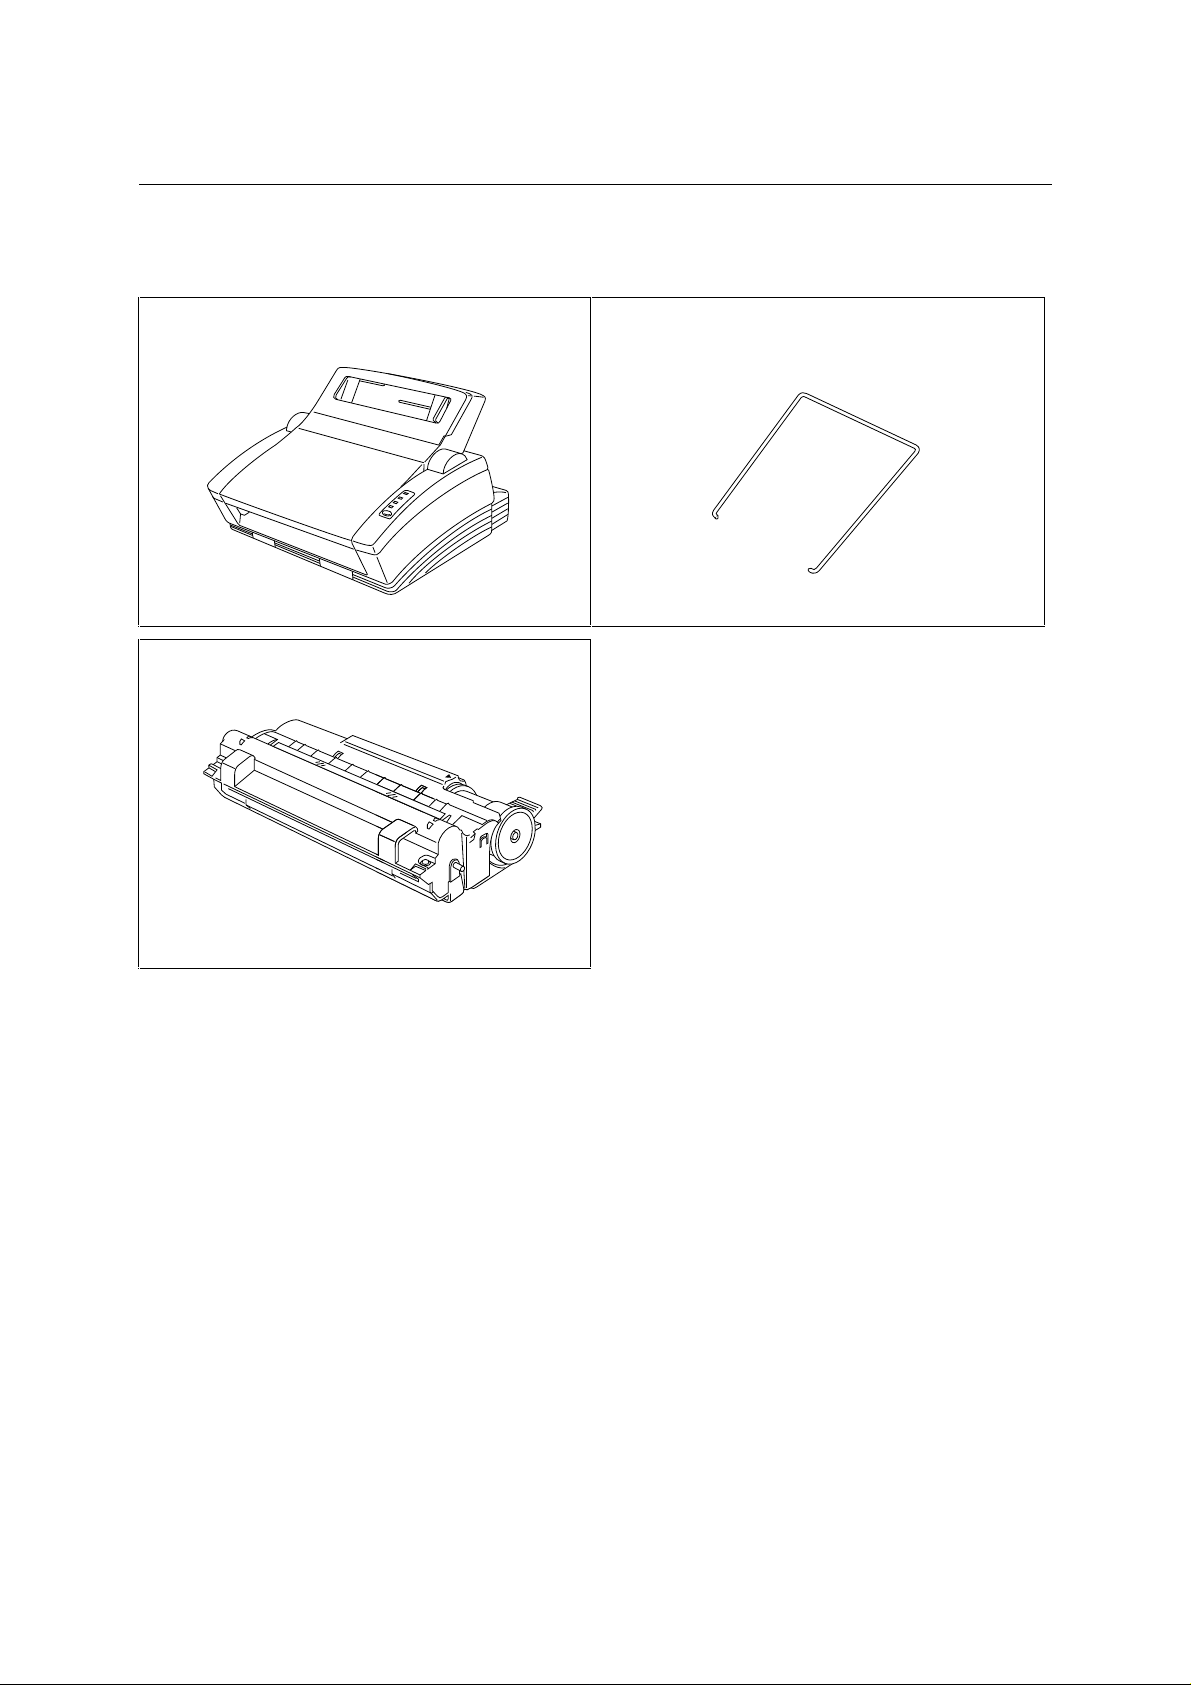
After taking the printer out of the carton and removing the packing materials, make sure that
the following items are not damaged and none are missing:
• Printer • Paper support
• Drum unit assembly (with Toner cartridge
included)
• 3.5” floppy disks for Windows® printer driver and fonts
• Quick setup guide (this guidebook)
• User’s guide
• Plastic Bag (for transporting the drum unit assembly)
• Dust Cover
NOTE
You will need to purchase an interface cable that matches the bi-directional IEEE 1284
compliant interface of your computer. If you do not know what cable you need, consult your
dealer.
1
Page 3
English: HL-YL Quick Setup Guide, Body
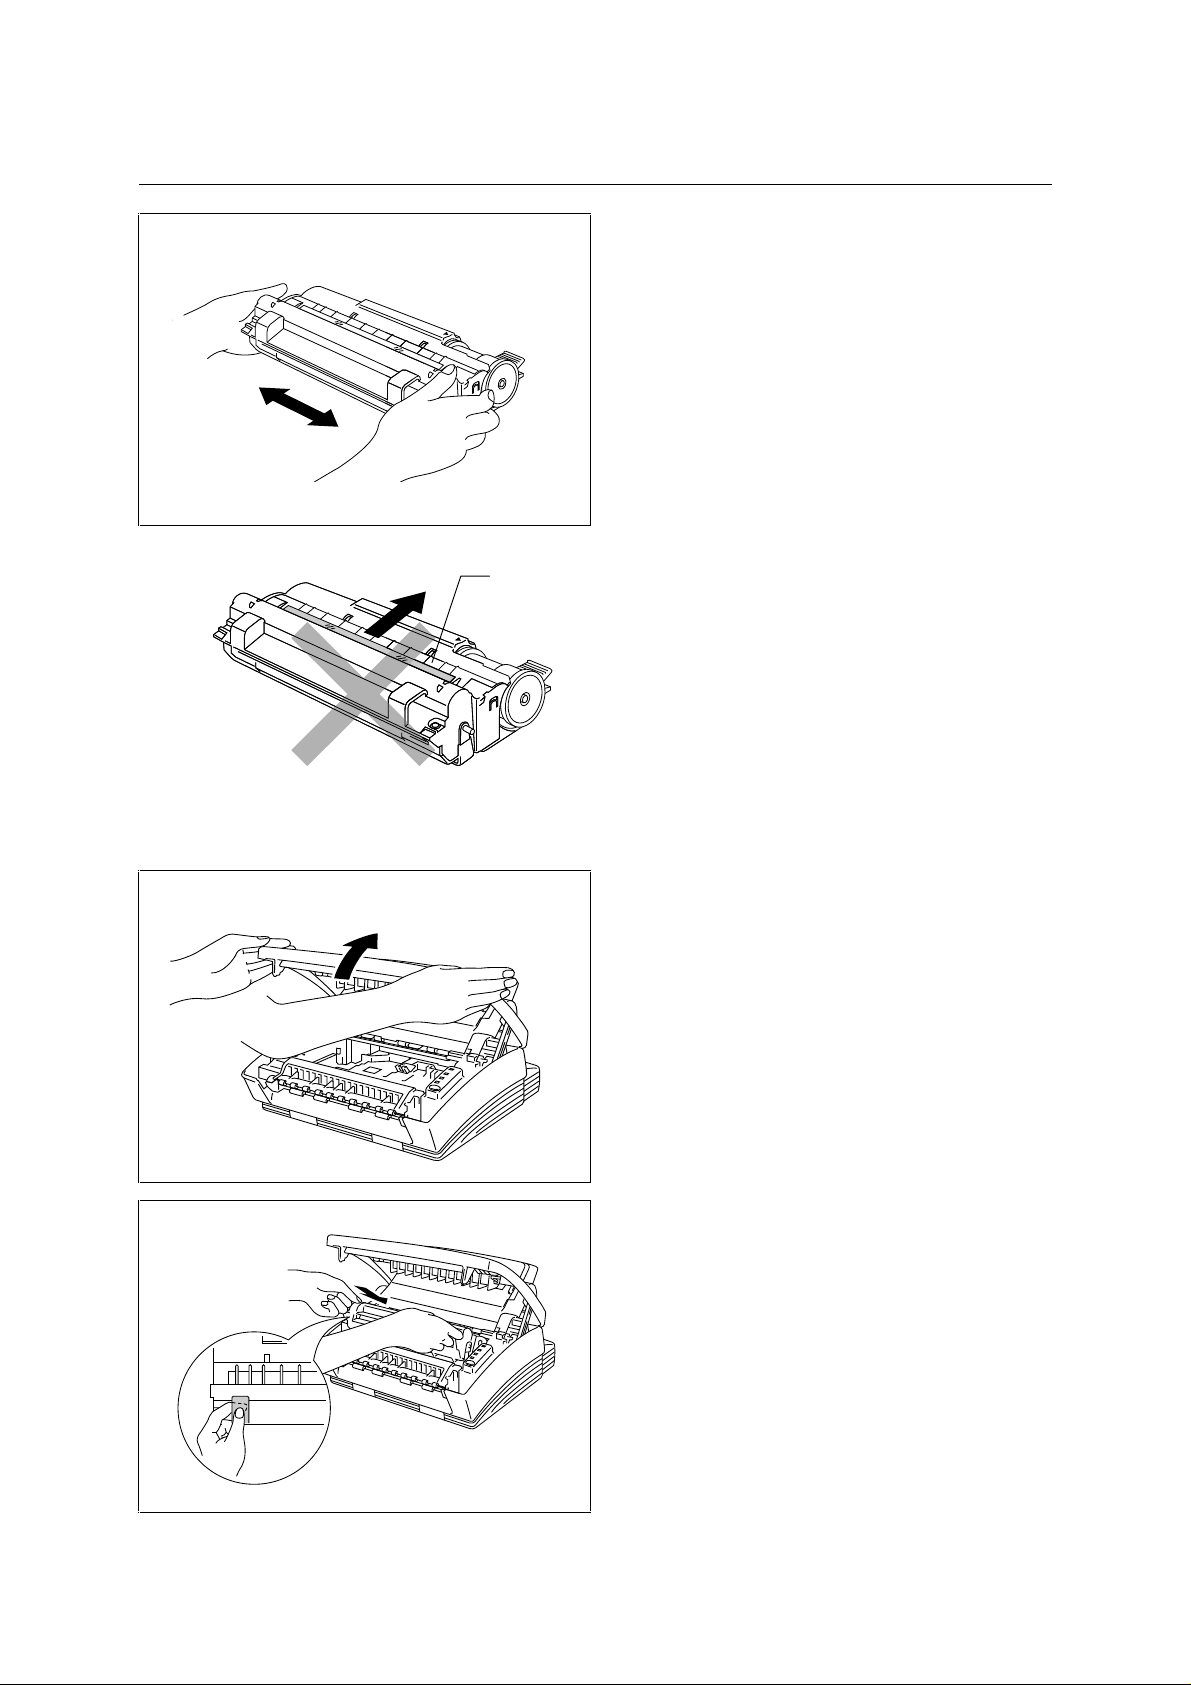
Action 2: Install the Toner Cartridge/Drum Unit
1
Unpack the drum unit assembly with the
toner cartridge included. Gently shake it
from side to side five or six times.
CAUTION
Do not expose the drum unit to light for
longer than a few minutes, as this will
damage the drum.
Starter Sheet
CAUTION
Do not remove the starter sheet.
This sheet will be ejected while the printer
is warming-up after installing a new drum
unit. (See Action 5 Illustration 4)
2
Open the top cover of the printer.
Make sure that the cover is correctly
latched open, indicated by a click.
3
Holding the drum by its handles, install it
into the printer.
2
Page 4

English: HL-YL Quick Setup Guide, Body
4
Close the top cover.
See “CHAPTER 5 MAINTENANCE” in
the User’s Guide for more information
about replacement of the toner cartridge.
3
Page 5
English: HL-YL Quick Setup Guide, Body
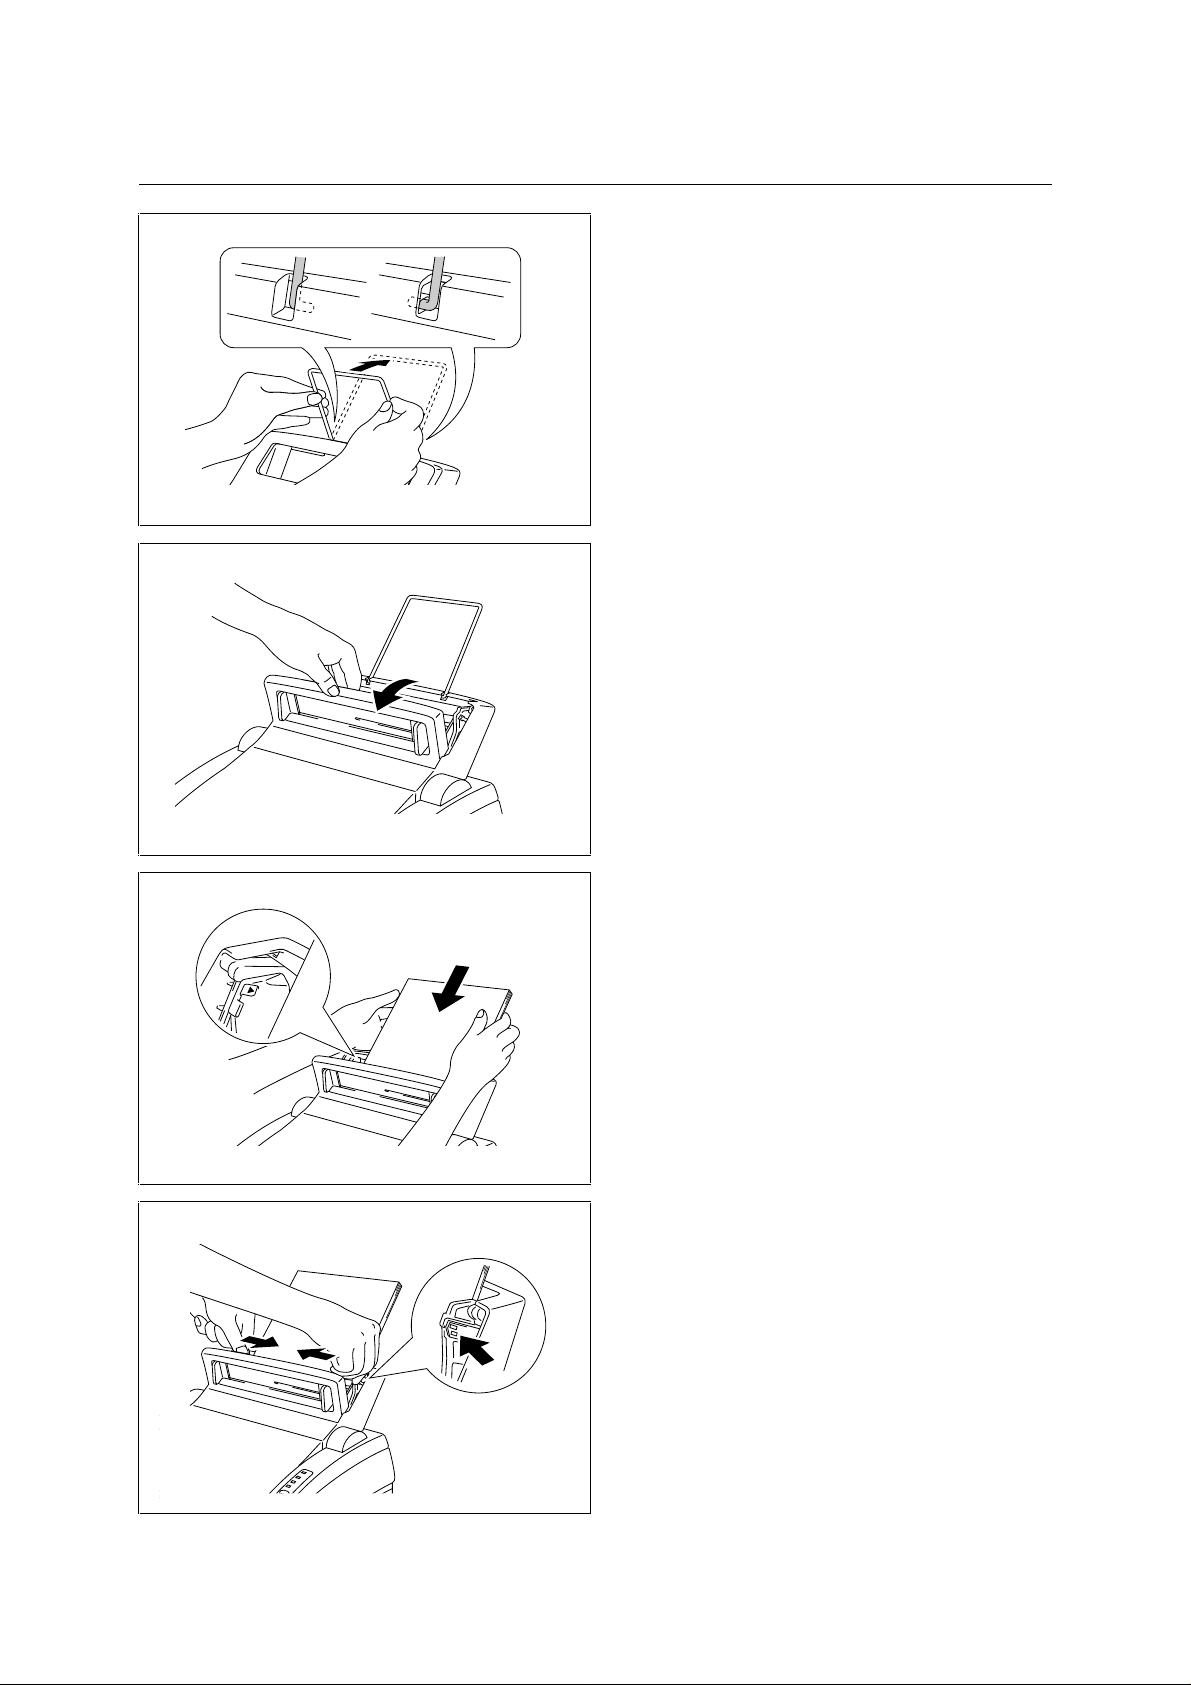
Action 3: Load Paper into Your Printer
1
Install the paper support onto the multipurpose sheet feeder.
2
Open the multi-purpose sheet feeder cover.
3
Load paper in the multi-purpose sheet
feeder.
NOTE
The feeder can hold up to 200 sheets of
plain paper or up to 10 envelopes.
Excessive sheets may cause paper jams.
Make sure that the paper is stacked below
the ▲ mark.
4
Move the paper guide to fit the paper width.
CAUTION
Failure to set the paper guide to the paper
width may cause paper skew and jam.
4
Page 6

English: HL-YL Quick Setup Guide, Body
5
Close the multi-purpose sheet feeder cover.
6 Open the output tray. ( ① )
Extend the extension support wire. ( ② )
The printer can handle paper within the following specifications:
Paper T ype Paper Size
Cut sheets A4, Letter, Legal, B5, A5, 3”x 5”, Executive, Custom size
(70-216 x 127-356 mm)
Envelopes DL, C5, COM-10, Monarch, 9” x 12”, C4
Post Card 70-216 x 127-356 mm
Organizer Day-Timer® J, K, L, M, 70-216 x 127-356 mm
Labels and
70-216 x 127-356 mm
Transparencies
See “CHAPTER 2 PAPER HANDLING” in the User’s Guide for more information.
5
Page 7

English: HL-YL Quick Setup Guide, Body
Action 4: Connect Your Printer to Your Computer
You must connect the printer to your computer with a suitable interface cable. A bi-directional
IEEE 1284 compliant parallel cable should be used for this connection, unless you are using
the optional serial interface board.
1
Make sure that the printer power switch is
off before connecting or disconnecting the
interface cable.
Also, make sure that the computer is turned
off.
2
Connect the parallel interface cable (printer
cable) to the parallel interface port of the
printer. ( ① )
Secure the connection with the wire clips.
( ② )
Connect the interface cable to the printer
port of the computer.
NOTE
The printer can also operate with an RS-232C/RS-422A serial interface by installing the
optional serial interface board. In some countries it might be pre-installed. For more
information, see “CHAPTER 4 OPTIONS” in the User’s Guide.
For the location of your computer’s parallel (or serial, if you are using the optional interface
board) printer port, refer to the User ’s Guide of your computer.
6
Page 8

English: HL-YL Quick Setup Guide, Body
Action 5: Plug in and Turn on Your Printer
1
Plug the power cord into the AC power
outlet.
NOTE
The shape of the power cord varies
according to the country of destination.
2 Turn on the power switch that is located on
the left side of your printer.
3
Make sure that the READY lamp is lit after
the printer has warmed up (approximately
20 seconds).
Drum
Alarm
Ready
Paper
Data
Toner
4 Make sure that the printer automatically
ejects the starter sheet while the printer is
warming-up immediately after installing a
Starter Sheet
new drum unit. You may discard the starter
sheet after it is automatically ejected.
7
Page 9

English: HL-YL Quick Setup Guide, Body
Printing a Test Sample Page
We recommend that you print a test page. Refer to the instructions below.
NOTE
• The following first-print test page operation will be invalid after the printer receives any
data from your computer.
• Additional test sample pages can be printed by using the “Test Print Mode” procedure in
Chapter 3 of the User’s Guide.
Press the control panel switch.
The printer will start printing a test sample
page.
NOTE
The printer can also print settings, fonts,
and hexadecimal values of received data.
For more information, see “Test Print
Mode” in Chapter 3 of the User’s Guide.
NOTE
If the printer does not print a test sample page, see “CHAPTER 6 TROUBLESHOOTING,
Q & A” of the User’s Guide. If you are still unable to print a test sample page after reviewing
the information in the User’s Guide, consult your dealer.
After printing the test sample page, you are ready to prepare your computer to work with the
printer. The software setup varies depending upon your computer and operating system. Refer
to the relevant following section:
Action 6-1: Prepare Windows 95 for the Printer
Action 6-2: Prepare Windows 3.1 for the Printer
Action 6-3: Prepare DOS for the Printer
Action 6-4: Prepare Macintosh for the Printer
8
Page 10
English: HL-YL Quick Setup Guide, Body
Action 6-1: Prepare Windows 95 for the Printer
You need to configure Windows 95 for the printer by installing the printer driver and
TrueType™-compatible fonts from the supplied disk into Windows 95.
1. Make sure that your printer is connected to your computer.
2. Turn on your printer.
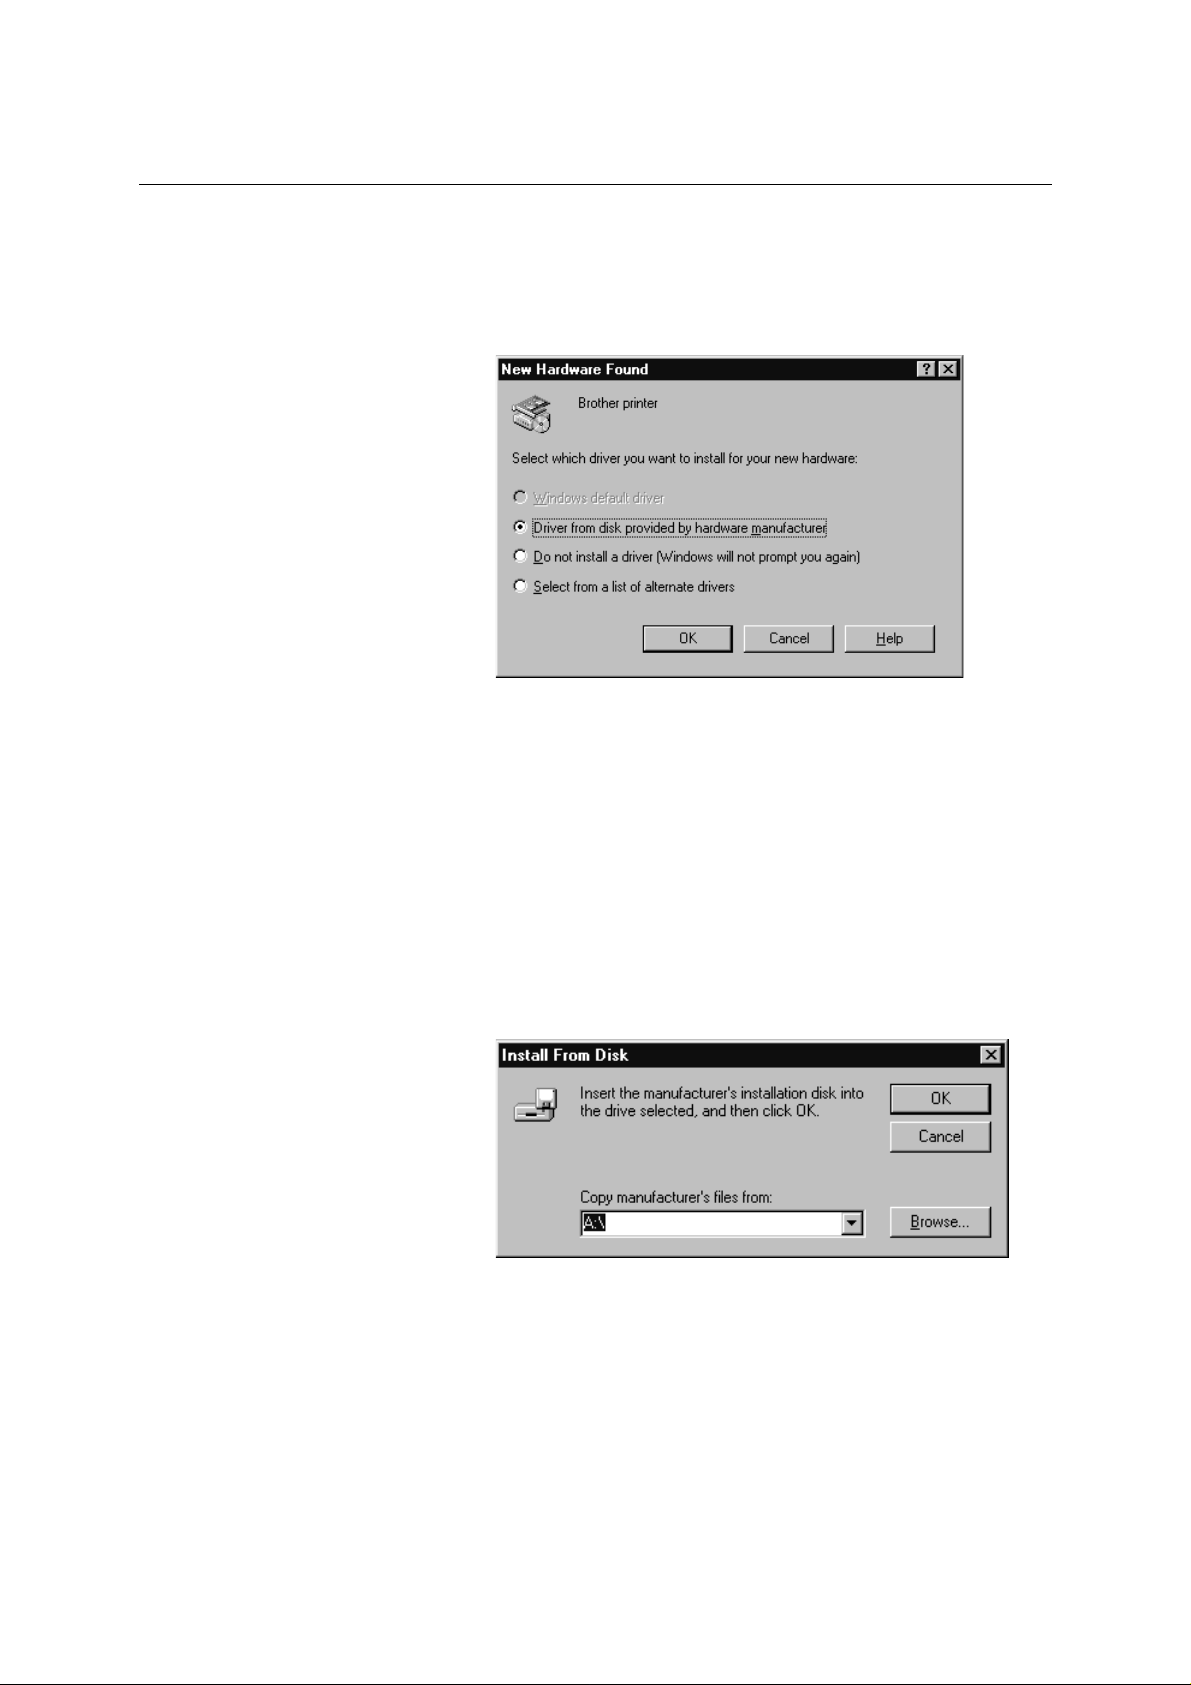
3. Turn on your computer
and start Windows 95.
The screen shown on the
right should appear . If
so, proceed to Step 4,
otherwise read the note
below.
NOTE
If Windows 95 does not recognize your printer automatically and does not display the message
“New Hardware Found” then you should follow these instructions:
1. Click the Start button and choose Run.
2. Insert the supplied disk for Windows into your floppy disk drive.
3. T ype A:SETUP and click the OK button or press the Enter key.
After the installer starts, you may skip the following steps and simply follow the instructions
that appear on the screen.
4. Make sure that the second option “Driver from disk provided by hardware manufacturer”
is checked.
5. Click the OK button. The
screen shown on the right
appears.
6. Insert the supplied disk for Windows 95 into the floppy disk drive. In most cases, this will
be drive A.
NOTE
If you wish to install from a drive other than drive A, type the drive name in the “Copy
manufacturer’s files from” box on the screen.
7. Click the OK button.
8. Follow the instructions that appear on the screen.
9
Page 11

English: HL-YL Quick Setup Guide, Body
Action 6-2: Prepare Windows 3.1 for the Printer
You need to configure Windows 3.1 for the printer by installing the printer driver and
TrueType-compatible fonts from the supplied disk into Windows 3.1.
Since the supplied printer driver and fonts are compressed on the disk, be sure to use the
supplied installer program to install them. These instructions assume you will install the
driver and fonts from the disk drive A.
1. Start Windows 3.1.
2. Insert the supplied disk for Windows into your floppy disk drive.
3. Choose Run from the File menu in the Program Manager.
4. Type the drive name where you inserted
the supplied disk and “SETUP” in the
box: for example, A:\SETUP. Click the
OK button or press the Enter key.
5. The installer program will begin. Follow the instructions on the computer screen.
(Be sure to restart Windows when the installation process is completed.)
NOTE
• The installer automatically updates your SYSTEM.INI Windows file by adding
DEVICE=bi-di.386 under the [386Enh] section. If any bi-directional parallel
communications device driver has previously been installed, it will be deactivated by this
new driver. If you want to use the driver that was previously installed, you should re-install
your previous driver. However, re-installing the previous driver will make the HL-760
series driver inactive.
• The installer makes the installed printer driver the Windows default.
• The installer automatically sets the printer port to the parallel interface, LPT1.
• If you select the status monitor ON, changes have been made to the SYSTEM.INI file. It is
necessary to restart Windows so that the changes become effective and the installed bidirectional parallel communications device driver can take effect.
10
Page 12

English: HL-YL Quick Setup Guide, Body
Action 6-3: Prepare DOS for the Printer
How to Use the Printer in Your DOS Application Software (without using the
Windows system)
Before working with application software that runs under DOS, if you do not already have a
suitable driver installed, you will need to install a printer driver that matches one of the
following supported emulations: HP LaserJet 5P, EPSON FX-850, or IBM Proprinter XL
printers.
The following table shows the combinations of printer drivers and printer emulation mode. To
get the most out of this printer, you should install an HP printer driver in your application
software.
Printer driver supported in your
application software
HP LaserJet 5L/5P
HP LaserJet 4/4L/4P
Emulation mode to be selected with
the remote printer console program
HP LaserJet 5P emulation mode
Auto emulation selection
HP LaserJet III/IIIP
Epson® FX-850
Epson FX-80
IBM® Proprinter® XL
IBM Proprinter
™
™
Epson FX-850 emulation mode
Auto emulation selection
IBM Proprinter XL emulation mode
Auto emulation selection
NOTE
• The best or recommended printer driver is indicated in bold.
• Be sure to choose the correct printer driver in your application software. Failure to do so
may cause poor or inconsistent results.
What Does Remote Printer Console Do?
The Remote Printer Console (RPC) is a utility program which runs in the DOS environment
and comprises the following two programs:
❏ Remote Printer Console Main Program
This program allows you to change various printer settings such as emulation, print
quality, fonts, page setup and so on from your computer screen. Since most DOS
applications have a printer settings menu which overrides the settings made by the RPC,
you may not need to use this utility program. This utility program is useful for application
software which does not control the printer’s settings and features.
❏ Printer Status Monitor Program
This utility program can monitor your printer’s status using bi-directional parallel
communications. If your printer has no paper, this utility program displays “Paper Empty”
error status and instructions for corrective action on your computer screen. This utility
program stays resident in your computer memory (Terminate-and-Stay Resident program)
and runs in the background.
11
Page 13

English: HL-YL Quick Setup Guide, Body
Remote Printer Console
Status Ready
Media Type Regular
Emulation Auto
Paper Size Letter
Orientation Portrait
Quality Normal
Copies 1
Memory Size 1048576 Bytes
Installing the Remote Printer Console
Before you install the program, make sure that you have the following hardware and
software:
DOS Version 3.3 or later
Monitor EGA/VGA or compatible
Option Mouse; the mouse driver must be installed.
(You can also operate the program with the keyboard.)
Follow these steps to install the remote printer console program:
1. Make sure your printer is connected to your computer and is ready (On-line).
2. Start your computer. If you are in Windows, exit and return to the DOS prompt. You must
be in the DOS prompt to proceed with installation.
3. Insert the supplied disk into your floppy disk drive (A: or B:).
4. Select drive A or B to be used by typing
A: or B: after the DOS prompt and
C:\>A:
pressing the Enter key.
5. Type RPCSETUP and press the Enter
key.
A:\>RPCSETUP
6. Follow the instructions on the screen.
Using the Remote Printer Console Main Program
Type C:\RPCX>RPCX and press the Enter
key to start the Remote Printer Console
main program.
The Main Screen will appear on your
computer screen as shown on the right.
Direct_Access Printer_Setup Console_Config Guide
Current Status
The RPC gets the current settings information from your printer when it starts if bidirectional communication is enabled between your computer and printer. Otherwise, RPC
shows its default settings. If you want to change settings, move the cursor to the desired item
and select the desired setting by using the Enter and Cursor keys. Then, press the Enter key to
make the selected setting valid. If you use a mouse, click the desired item to change the
setting.
[↑/↓] Select
[Alt+Character] Menu [F1] Help
[Enter]Setting
[Esc] Exit
12
Page 14

English: HL-YL Quick Setup Guide, Body
Menu
Direct Access
Printer Setup
Console Config
Guide
Help
Additionally, there are four sub-menus as shown in the table below. Select a sub-menu by
clicking the desired sub-menu with the mouse, by using the cursor key and the Enter key, or
by using the keys shown below to switch the screen to the sub menus.
Press the keys Functions
Alt + D You can directly control printer functions such as Print
Form, Self Print, Reset Printer, Sleep Control.
Alt + P You can enter the setting mode to change further
printer settings, such as, margin settings, continue
mode, reprint function, font, and sleep mode.
Alt + C You can change the environment settings for the RPC
program: color, Status Monitor configuration, etc.
Alt + G You can get into the Guide mode.
F1 You can get on-line help about the current highlighted
item by pressing F1.
Using the Printer Status Monitor Program
Type C:\RPCX>STMX and press the Enter key to make the Printer Status Monitor Program
stay resident in your computer memory. If there are any changes to the printer status, it
displays a message on your computer screen.
If the printer status monitor program stays resident in your computer, you can monitor the
printer status on your computer screen immediately using the hot-key sequence (Ctrl+Alt+R).
To remove the Printer Status Monitor program from your computer memory, type
C:\RPCX>STMX/R and press the Enter key.
❏ The RPC works in the environment where your printer is directly connected to your
computer. If you are using any printer buffer switches which do not support bi-directional
communication between the printer and computer, the program works only in the PC to
printer direction and cannot receive printer status information.
❏ The program does not work with printers on a network.
❏ If the RPC conflicts with some application software, exit your application software and
then run the RPC.
❏ The RPC may work in the DOS-compatible box screen mode of Windows, however, it is
recommended that you completely exit from Windows to the DOS prompt before using
the RPC.
❏ The Printer Status Monitor and some other Terminate-and-Stay programs cannot coexist in
the computer’s memory. If they do not work properly together, use them one at a time.
You can suspend the Printer Status monitor with any of the following methods or
commands.
• Type C:\RPCX>STMX/R and press the Enter key.
• Hold the space bar down while executing the AUTOEXEC.BAT file at DOS startup to
prevent the status monitor being loaded as a TSR program.
13
Page 15

English: HL-YL Quick Setup Guide, Body
Action 6-4: Prepare Macintosh for the Printer
You need to configure your computer for the printer by installing the printer driver and
TrueType-compatible fonts into the System Folder of your Macintosh computer, and select
your printer.
NOTE
You must have Macintosh System software version 6.0.7 or above to use this printer driver.
This printer driver only supports the 300 dpi mode when used with a Macintosh computer.
When setting up the printer to work with your Macintosh computer, you will need to use the
RS-422A serial interface. The serial interface board is an option. For information on options,
consult your dealer or refer to the User’s Guide for this printer.
The supplied high density floppy disk contains the printer driver and TrueType-compatible
fonts necessary for this printer to work with Macintosh computers.
Be sure to follow the steps below to install the printer driver by using the installer software:
1. Start your Macintosh computer.
2. Insert the supplied disk for the Macintosh computer into the disk drive. If your computer
does not support high density 1.4 MB diskettes, please contact your dealer or Brother
Printer Support.
3. Double-click the disk icons to open your hard disk and the inserted disk.
4. Double-click the Installer icon.
5. The installer starts running. Follow the instructions on the computer screen.
NOTE
After you have installed the printer driver, you need to select your printer with the Chooser
(which is located under the Apple menu) on the Macintosh computer.
14
Page 16

English: HL-YL Quick Setup Guide, Body
Shipment of the Printer
If for any reason you must ship your Printer, carefully package the Printer
to avoid any damage during transit. It is recommended that you save and
use the original packaging. The Printer should also be adequately insured
with the carrier.
Warning
When shipping the Printer, the DRUM UNIT assembly including the
TONER CARTRIDGE must be removed from the Printer and placed in the
plastic bag. Failure to remove and place it in the plastic bag during
shipping will cause severe damage to the Printer and will VOID THE
WARRANTY.
1 Remove the drum unit. 2 Place it in the plastic bag and seal the
bag completely.
3 Re-pack the printer.
15
 Loading...