


SLC50
Model SLC30/50
Issue 1/00
PRINTED ON
RECYCLED PAPER
INSTRUCTIONS AND RECIPES FOR USE
MODEL SLC30/SLC50
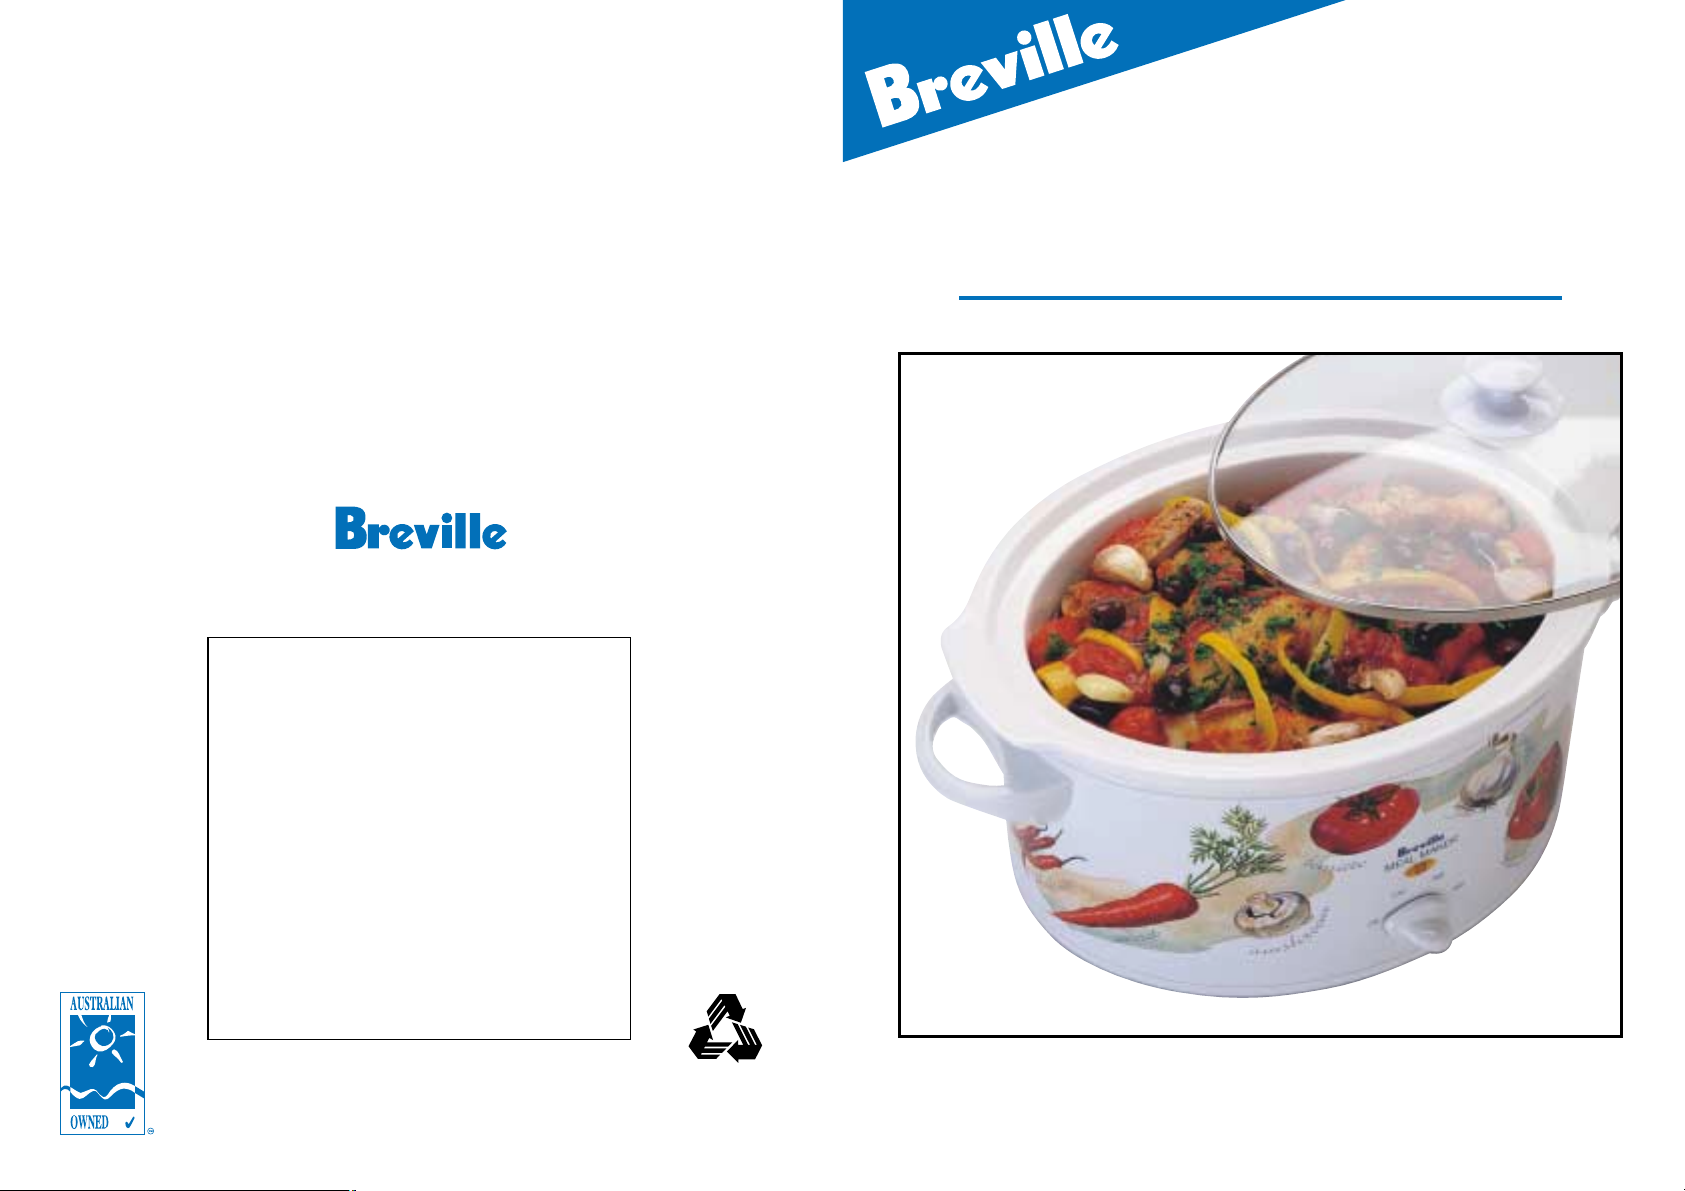
Meal Maker
Breville is a registered trademark of Breville Holdings Pty. Limited
ABN 98 000 092 928
© Copyright. Breville Holdings Pty. Limited 2004
Due to continual improvements in design or otherwise, the product you
purchase may differ slightly from the one illustrated in this booklet.
Breville Customer Care Centre
Australian Customers
✉
Breville Customer Care Centre
Locked Bag 2000
Botany NSW 2019
Australia
☎
Customer Service Ph: 1300 139 798
Fax (02) 9384 9601
Email Customer Service askus@breville.com.au
New Zealand Customers
✉
Breville Customer Service Centre
Private Bag 94411
Greenmount
Auckland, New Zealand
☎
Customer Service Ph: 09 271 3980
Fax 0800 288 513
Email Customer Service askus@breville.com.au

3
CONGRATULATIONS
On your purchase of your new Breville Meal Maker.
We have designed the Meal Maker slow cooker with
only the best in features and performance, so that
you, our valued customer, can enjoy a wide range of
'Flavoursome Foods' and 'Tender Moist Meats',
simply cooked to perfection every time.
• You can cook a variety of foods such as soups,
casseroles, curries, pot roasts and of course your,
own favourite recipes with little fuss or bother.
• You can use more economical cuts of meat
because the slow, cooking method tenderizes the
meat and intensifies the flavour of foods.
• You can be sure all food cooked in the Breville Meal
Maker is safe, as all of the settings reach
temperatures high enough and quick enough to
prevent bacterial growth.
• You can use the
Auto Setting to produce a
delicious hot meal, ready to serve, when you return
home after a busy day away.
• You can use the
High Setting for baking cakes,
cooking dried beans and pulses, or to just simply
produce your meal a little quicker.
• You can use the
Low Setting for an extended
period of time without burning or overcooking food.
We wish you, your family and friends many
memorable meals cooked in your Breville Meal
Maker.
2
CONTENTS
Page
Breville Recommends Safety First ........................................................................................4
Know Your Meal Maker ........................................................................................................5
Operating Your Meal Maker..................................................................................................6
A Beginner’s Guide to Slow Cooking....................................................................................8
Hints and Tips....................................................................................................................11
Care and Cleaning .............................................................................................................12
Recipes..............................................................................................................................13
Soups.....................................................................................................................13
Chicken ..................................................................................................................18
Beef, Pork, Veal and Lamb .....................................................................................22
Vegetarian...............................................................................................................32
Desserts .................................................................................................................37
5
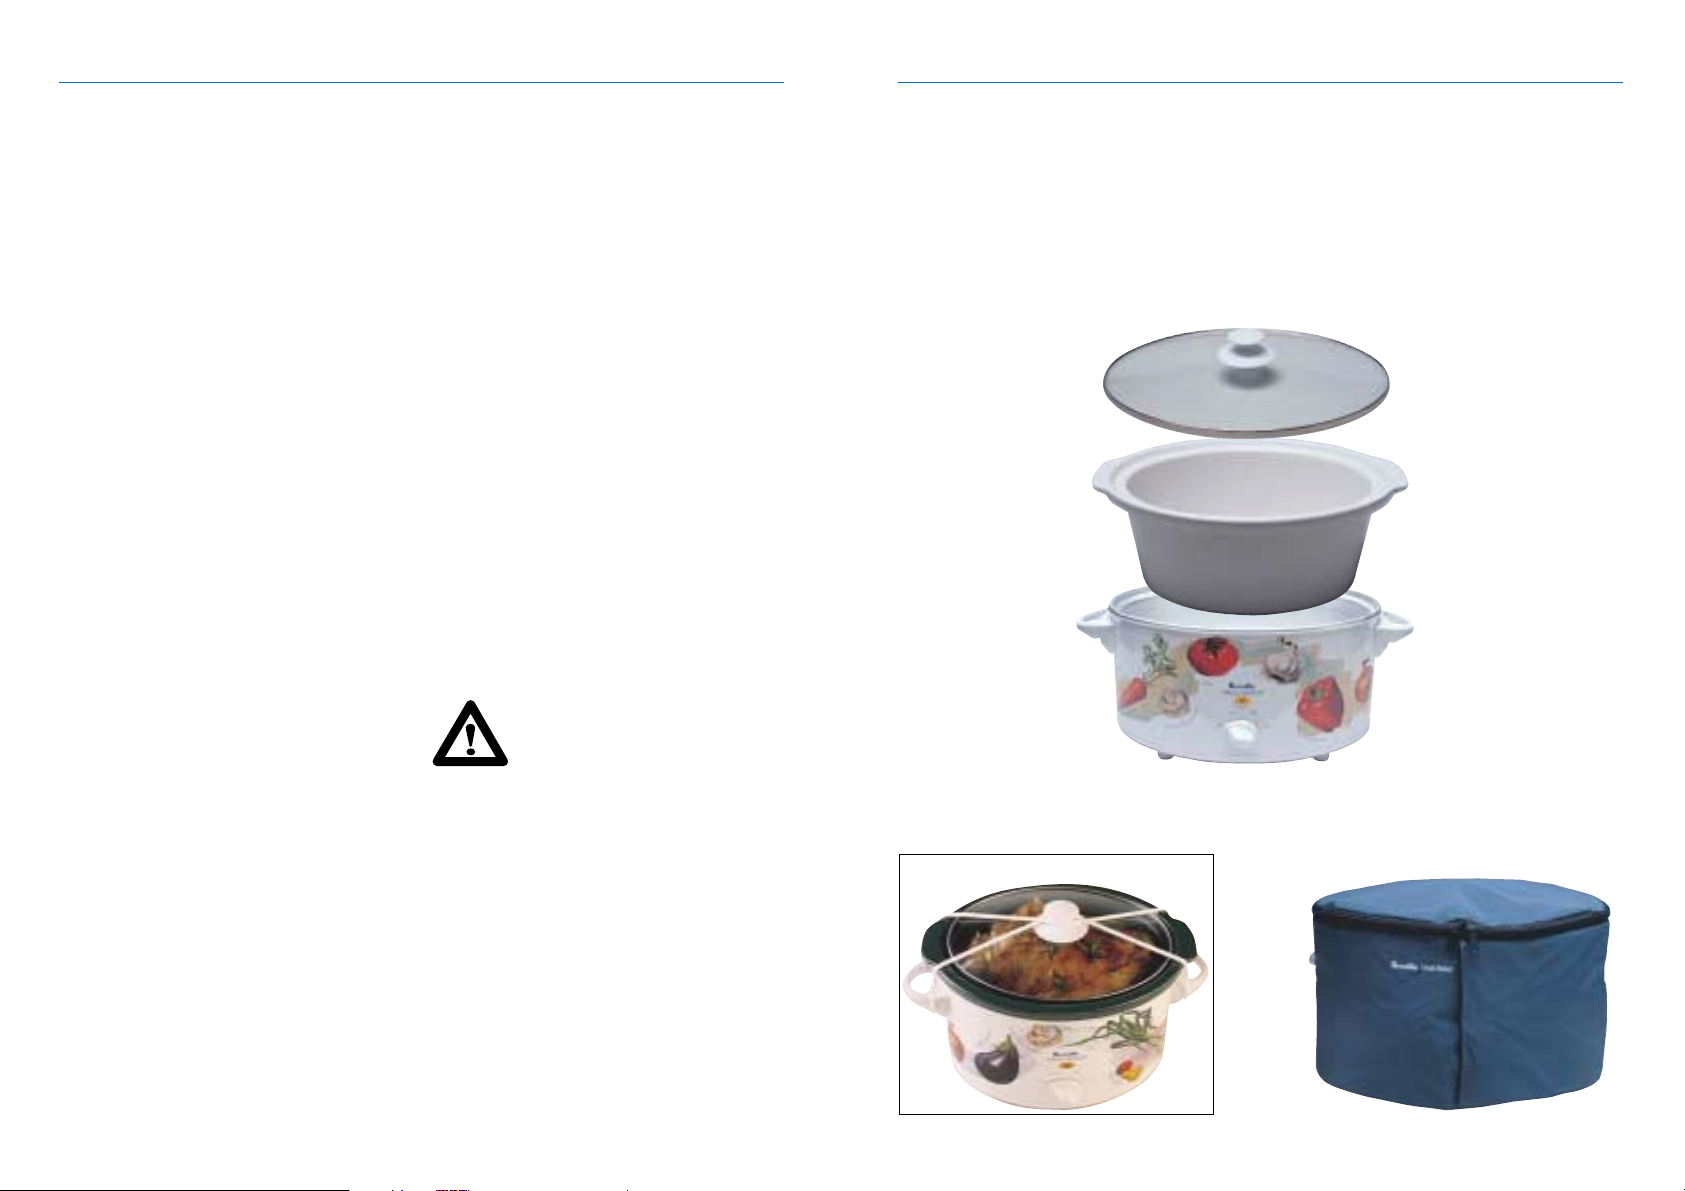
KNOW YOUR MEAL MAKER
1. Removable crockery pot (SLC30 3 litre
capacity, SLC50 5 litre capacity)
2. Wraparound element for even heating
3. 3 Temperature control settings dial,
with Hi, Low and Auto shift for greater
cooking control
4. Tempered glass cook’n’look lid allows
you to monitor food during cooking
5. Cool touch handles
6. Elastic lid holder
keeps lid secure and
firmly in place
7. Washable insulated travel carry case
for easy transport, protects against spills
and wipes easily (SLC50 only)
4
BREVILLE RECOMMENDS SAFETY FIRST
We at Breville are very safety conscious. We
design and manufacture consumer products
with you, our valued customer foremost in
mind. In addition we ask that you exercise a
degree of care when using any electrical
appliance and adhere to the following
precautions:
READ ALL INSTRUCTIONS BEFORE
OPERATING AND SAVE FOR FUTURE
REFERENCE.
• Do not touch hot surfaces. Use handles
or knobs. Allow to cool, before touching
or removing parts.
• Unplug from the power outlet when not in
use and before cleaning;
• To protect against electrical shock do not
immerse cord, plug, or base in water or
other liquid.
• The appliance is not intended for use by
young children or infirm persons without
supervision.
• Do not leave the appliance unattended
when in use. Young children should be
supervised to ensure that they do not
play with the appliance.
• If the cord, plug or actual appliance
becomes damaged in any way, return the
entire appliance to the nearest authorised
Breville service centre for examination
and or repair.
• Do not let the cord hang over the edge if
a table or counter, touch hot surfaces or
become knotted.
• Do not place this appliance on or near a
hot gas or electric burner, or where it
could touch a heated oven. Use the Meal
Maker well away from walls.
• This appliance is for household use only.
Do not use this appliance for anything
other than its intended use. Do not use
outdoors.
• To disconnect the Meal Maker turn the
Heat Control dial to the "OFF" position
and remove the plug from the power
outlet.
• Use extreme caution when using the
Meal Maker with hot oil or other hot
liquids.
• When opening the lid take care as heat
and steam generated during cooking will
escape.
• Do not use the meal maker to heat
leftovers.
• Always keep raw ingredients refrigerated
until used in the meal maker.
• Always thaw frozen meat/poultry before
cooking.
• Avoid sudden temperature changes. Do
not place frozen or very cold foods into
the heated crockery pot. The crockery
pot is not suitable for storing food in the
freezer.
DO NOT PLACE FOOD OR
LIQUIDS IN THE BASE OF THIS
APPLIANCE. COOK ONLY IN
THE MEAL MAKER'S
REMOVABLE CROCKERY POT.
SLC50
1.
2.
3.
4.
5. 5.
6.
7.
SLC30
7
OPERATING YOUR MEAL MAKER (CONTINUED)
AUTO SETTING
The AUTO setting will first cook a on high
temperature for a period of time to bring the
food quickly to the desirable temperature,
then reduce automatically to low
temperature for the completion of cooking.
This setting is ideal for slow cooking meals
overnight or when you are away for most of
the day. The food will cook safely and will be
ready on your return.
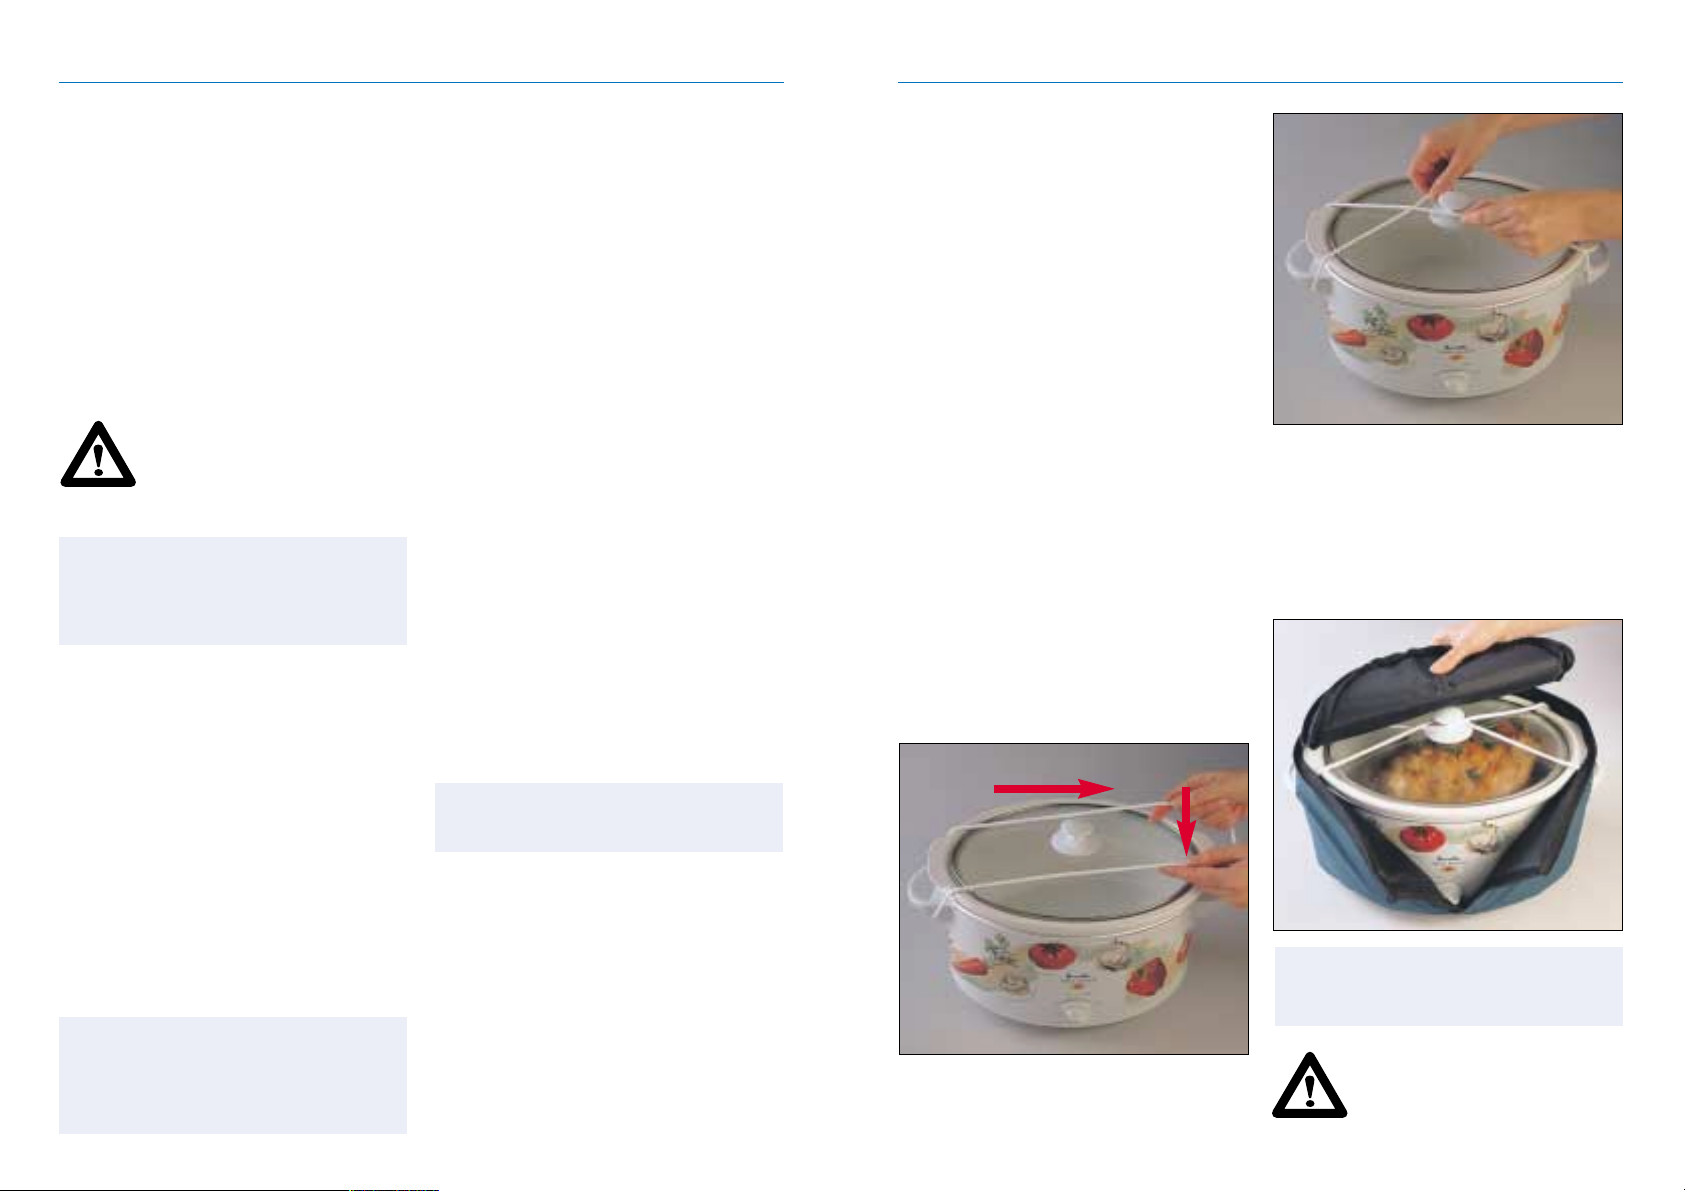
TRANSPORTING YOUR MEAL
MAKER
Your Meal Maker come complete with a lid
latch and insulated travel carry case (SLC50
only) for no fuss transport of the unit to
another location while keeping food hot.
To secure the lid latch place into the grooves
located underneath either of the handles.
Stretch the latch over the lid to the other
side of the Meal Maker and secure it
underneath the grooves on the other handle
(see Figure 1).
Once attached the latch can also be
crossed over the centre of the knob on the
glass lid to further secure the lid (see
Figure 2).
Once the lid latch has been attached, place
the Meal Maker inside the insulated travel
carry case (model SLC50 only), fitting the
unit handles through the openings in the
case. Seal the velcro flap at the front of the
case and zip the lid of the case closed (see
Figure 3).
NEVER PLUG IN AND TURN
THE MEAL MAKER ON WHEN
IT IS STILL IN THE INSULATED
TRAVEL CARRY CASE.
Figure 1
Figure 2
Figure 3
Always use caution when
carrying hot foods.
☛
NOTE!
6
OPERATING YOUR MEAL MAKER
Before first use
Place the Meal Maker on a flat, dry surface.
Remove any promotional labels or stickers.
Remove the crockery pot and glass lid.
Wash both in hot soapy, water with a mild
household detergent. Rinse and dry
thoroughly. Do not use harsh abrasives or
chemicals.
Step 1. Position the removable crockery pot
in the base of the Meal Maker. Place the
prepared food into the crockery pot. Place
the glass lid on the unit, centring it for best
results.
DO NOT PLACE FOOD OR
LIQUIDS IN THE BASE OF THIS
APPLIANCE. COOK ONLY IN
THE MEAL MAKER'S
REMOVABLE CROCKERY POT.
Step 2. With the temperature control dial
turned to the OFF position, plug the Meal
Maker into a 230/240V power outlet and
turn the power on.
Step 3. Select the desired temperature
setting, as recommended in the recipe
section, by turning the temperature control
dial to the desired setting.
AUTO, HIGH OR LOW SETTING
Step 4. When the cooking is completed,
turn the temperature control dial to the OFF
position. Switch off at the power outlet.
Carefully remove the crockery pot from the
Meal Maker base.
Step 5. Allow the Meal Maker enough time
to cool completely, before cleaning and
storing away.
USING THE TEMPERATURE
CONTROL SETTINGS
The Meal Maker has been developed with a
unique wrap-around side element, concealed
in the unit. This unique element provides the
low, even temperatures that make lengthy
cooking times possible. As a result of the
wrap-around element, food will not stick to
the base of the liner despite the long cooking
time, and the need to stir the food is almost
unnecessary. As food cooks just below
boiling point, very little steam is given off and
there is next to no evaporation, all of which
provides flavoursome, tender and moist
results, even with budget cuts of meat.
There are three settings to choose from and
most foods can be cooked successfully by
any one of these settings (unless otherwise
stated in the recipes).
LOW SETTING
The LOW heat setting gently simmers food
for an extended period of time without
overcooking or burning. No stirring is
required when using this setting. Ideal for
vegetable dishes and re-heating.
HIGH SETTING
The HIGH heat setting is used when baking,
cooking dried beans or pulses and will cook
food in half the time required for the LOW
heat setting. As food will boil when cooked on
the HIGH heat setting. It may be necessary to
add extra liquid, depending on the recipe and
the amount of time in which it is cooked.
Occasional stirring of stews and casseroles
will improve the flavour distribution. Food
should be monitored when using the high
setting, just like cooking in a pot with a lid on.
Always place the Meal Maker
on a dry, level surface and
never operate without the
crockery pot positioned in the
Meal Maker base.
☛
NOTE!
Always use oven mitts when
removing the crockery pot
containing hot liquids. Do not
place the heated crockery pot
on any surface affected by heat.
☛
NOTE!
When using the Low setting
to cook meat dishes, ensure
that the meat is prebrowned.
☛
NOTE!

9
A BEGINNER'S GUIDE TO SLOW COOKING
(CONTINUED)
Preparing meat and poultry
When selecting meat, look for the leanest
cuts. Trim the meat or poultry of any visible
fat, as the slow cooking process will result in
too much liquid from excess fat. If possible,
purchase chicken portions without skin. This
reduces the release of fat into the cooking
liquid. For casserole style recipes, cut the
meat into cubes, approximately 2.5cm to
3cm. Slow cooking allows for the use of less
tender cuts of meats. See the table below
for suitable cuts of meat.
Suitable Cuts for Slow Cooking
Beef Blade, brisket, chuck, round, shin,
fresh silverside, skirt, topside.
Lamb Best neck, forequarter, neck chops,
shanks, shoulder chops.
Veal Shoulder/forequarter chops and
steaks, neck chops, knuckle (osso
bucco).
Pork Leg steaks, butterfly steaks,
boneless loin chops, fillet.
Browning before slow cooking
Pre-browning meat and poultry, prior to slow
cooking, seals in the moisture, intensifies the
flavour and provides more tender results,
whilst producing richer flavours in other
foods, such as onions, capsicums and
leeks. Pre-browning may take a little extra
time, and whilst not strictly necessary, the
rewards are evident in the end results. It is
best to use a non-stick pan, reducing the
amount of oil needed.
Roasting
Roasting in the Meal Maker results in tender,
flavoursome meats that are easy to slice.
The long, slow, covered cooking process
breaks down and softens the connective
and muscle tissue within the meat. Therefore
the cheaper cuts of meat provide perfect
results cooked by this method. The addition
of liquid is not required for roasting, however
a minimal amount is necessary for pot
roasts. Elevate the meat to be roasted on an
inverted, heatproof saucer or plate. This will
assist in keeping the surface of the meat dry
and free from any fat released throughout
the cooking process. Optionally, the meat
can be placed in an oven bag and sealed,
following the instructions on the packaging.
Suitable Cuts for Roasting
Beef Blade, fillet, rump, rib roast, sirloin,
fresh silverside, topside.
Lamb Leg, mid loin, rack, crown roast,
shank, shoulder, mini roasts.
Veal Leg, loin, rack,
shoulder/forequarter.
Pork Loin, neck, leg. remove skin
and fat, racks
Suitable Cuts for Pot Roasting
Beef Blade, chuck, round, fresh
silverside, skirt, topside
Lamb Forequarter, shank, shoulder
Veal Shoulder/forequarter
Pork Loin, neck.
Preparing vegetables
Vegetables should be prepared and cut into
small even sized pieces to ensure more even
cooking. Whole potatoes are best, if cooked
on the HIGH heat setting. Frozen vegetables
must be thawed before adding to other foods
cooking in the Meal Maker, such as an
addition to a casserole. When cooking
vegetables and meat together in the Meal
Maker, the vegetables tend to cook at a
slower rate than the meat. To gain the best
results, position the vegetables on the base
and sides of the Meal Maker and place the
meat on top.
8
A BEGINNER'S GUIDE TO SLOW COOKING
In years gone by, food was cooked in large
pots and allowed to simmer for hours,
providing meals that were full of flavour,
moist and tender. The Meal Maker is
designed to produce these same results,
whilst leaving you the time to do other
things, making it perfect for the today's busy
lifestyles.
As most food is cooked over a period of
6-10 hours, it can be prepared in advance the
evening before, refrigerated in the removable
crockery pot, placed in the Meal Maker and
turned “ON” in the morning and left to cook
all day. When you arrive home a delicious,
hot meal will await you.
The guide below will help simplify the
process of slow cooking, allowing you to
obtain ultimate satisfaction from your Meal
Maker:
It's all in the timing
Always allow sufficient time for the food to
cook. It is almost impossible to overcook in
the Meal Maker, particularly when using the
LOW or AUTO setting. Most of the recipes
contained within this book can be cooked
on any one of the temperature settings,
however the cooking times will vary
accordingly. Each recipe will give specific
instructions, indicating the appropriate
temperature setting accompanied by the
suggested cooking times to use.
Adapting cooking times
Your favourite traditional recipes can be
adapted easily, by halving the amount of
liquid and increasing the cooking time
considerably. See the guide that follows for
suggested cooking times and settings when
adjusting your favourite recipes.
Traditional Meal Maker
Recipe Time: Recipe Time
15-30 minutes 4-6 hours on LOW heat
setting
60 minutes 6-8 hours on LOW heat
setting
1-3 hours 8-12 hours on LOW heat
setting
All food should be cooked with the glass lid
in place. Each time the lid is lifted, both the
heat and moisture in the food are lost.
Cooking times should thus be extended, by
approximately 30 minutes.
Liquid amounts
When food is cooking in your Meal Maker,
very little moisture boils away. To
compensate this, it is advisable to halve the
liquid content of traditional recipes.
However, if after cooking the liquid content
is excessive remove the lid and operate the
Meal Maker on the high heat setting for
30-45 minutes or until the liquid reduces by
the desirable amount.
Stirring the food
Little or no stirring is required when using
the LOW or AUTO setting. When using the
HIGH heat setting stirring ensures even
flavour distribution.
These times are approximate.
Times can vary depending on
ingredients and quantities in
recipes.
☛
NOTE!

11
HINTS AND TIPS
• Trim all visible fat from meat or poultry.
• Add milk or cream to recipes an hour or
two before required.
• Cook dried beans and pulses first (unless
stated otherwise in recipe), 1-2 hours on
HIGH, then add remaining ingredients,
cook on LOW or AUTO for remaining time.
This ensures tender results on completion.
• The cover should always be centred on
the crockery pot for best results.
• Stirring is not necessary when using LOW
or AUTO. However, stirring when using
HIGH ensures even flavour distribution.
• If there is too much liquid on completion
of cooking, remove the lid, turn the heat
temperature control dial to HIGH and
cook for 30-45 minutes until the liquid
reduces. Alternately, for a quicker
solution, pour liquid into a non-stick pan.
Cook over a high heat for approximately
5 minutes, or until liquid reduces by the
desired amount.
• Meat and poultry require at least 6-7
hours cooked on LOW. Always thaw
frozen meat or poultry before cooking in
the Meal Maker.
• Food preparation can be done ahead of
time, placed in the crockery pot, covered
and refrigerated overnight and cooked
the following day.
• Allow a 5cm distance between the food
and the top of the crockery pot.
Particularly with food that requires
simmering, such as soups and casseroles.
• When cooking curries and casseroles,
richer, more intense flavours will develop,
when the first stage is prepared by
traditional methods, i.e. cook the onions
and spices by pre-browning in a
non-stick pan.
• When baking cakes, always pre-heat the
Meal Maker with the crockery pot in
position.
• The removable crockery pot is safe for
use in microwave and regular ovens. The
lid however, should not be placed in the
microwave or oven.
DO’S
• Handle the crockery pot and glass lid
with care.
• Avoid using abrasive cleaners or metal
scouring pads, when cleaning the
crockery pot.
• Avoid hitting the crockery pot against
hard surfaces.
• Avoid extreme temperature changes in
the crockery pot and glass lid. For
example do not place into or under cold
water while still hot.
• Use oven mitts when lifting crockery pot
containing hot liquids.
DONT’S
• Use the crockery pot if chipped or
cracked.
• Operate the Meal Maker without the
crockery pot in position.
• Place the hot crockery pot onto a wet
surface.
• Use frozen meats or foods in your Meal
Maker. Always defrost them first.
• Place the lid in the microwave or oven.
NEVER
• Place water or other liquids into the base
of the Meal Maker.
• Immerse the base, cord or plug of the
Meal Maker in water.
• Touch hot surfaces with bare hands.
10
A BEGINNER'S GUIDE TO SLOW COOKING
(CONTINUED)
Dried Beans and Pulses
If time permits, overnight soaking of dried
beans and pulses is preferable, but not
absolutely necessary. After soaking, drain
and place in the Meal Maker and cover with
sufficient water to reach double their
volume. Cook beans on the HIGH setting for
2-4 hours or until tender. Pre-soaked beans
and pulses will cook a little faster.
Baking
When baking cakes, it is necessary to use
the HIGH setting and it is the one time that
preheating of the Meal Maker is required
prior to cooking. This should be carried out
with the crockery pot and lid in position for
20-30 minutes.
Place cake tins on an inverted, heatproof
saucer or plate. Cover the cake mixture to
be cooked, with aluminium foil or baking
paper to prevent moisture droplets. Do not
remove the cover until the cooking time has
elapsed. The cake will be cooked, when an
inserted skewer wipes clean.
High humidity, altitude and
minor fluctuations in power
may slightly effect cooking
times in the Meal Maker. As it
is almost impossible to
overcook in the Meal Maker,
allow plenty of time.
☛
NOTE!
 Loading...