


INSTRUCTIONS FOR USE
Washing machine
WTC96100

As part of our commitment to constantly improving our products, we reserve the right to make changes to them based on technical advances to their technical and functional features and appearance.
Warning:
Before installing and using your appliance, please carefully read this Guide to Installation and Use, which will allow you to quickly familiarise yourself with its operation.
2
1 / INTRODUCTION TO YOUR MACHINE
•CONTENTS |
Page |
Removing the transport packing . . . . . . . . . . . . . . . . . . . . . . . . . . |
. . . .4 |
Moving your machine . . . . . . . . . . . . . . . . . . . . . . . . . . . . . . . . . . . |
. . . .4 |
Connecting to the cold water supply . . . . . . . . . . . . . . . . . . . . . . . |
. . .4 |
Draining away the waste water . . . . . . . . . . . . . . . . . . . . . . . . . . . . |
. . .4 |
Connecting to the electricity supply . . . . . . . . . . . . . . . . . . . . . . . . |
. . .5 |
Installing your machine . . . . . . . . . . . . . . . . . . . . . . . . . . . . . . . . . . . |
. . .5 |
Loading your washing . . . . . . . . . . . . . . . . . . . . . . . . . . . . . . . . . . . |
. . .5 |
Loading the washing products . . . . . . . . . . . . . . . . . . . . . . . . . . . . |
. . .5 |
Page
Programming . . . . . . . . . . . . . . . . . . . . . . . . . . . . . . . . . . . . . . . . . . . . . .6 Details of the programmes and options . . . . . . . . . . . . . . . . . . . . . . . .7 Modifying a washing programme . . . . . . . . . . . . . . . . . . . . . . . . . . . . .8 Automatic safety systems . . . . . . . . . . . . . . . . . . . . . . . . . . . . . . . . . . .8 Cleaning the pump filter . . . . . . . . . . . . . . . . . . . . . . . . . . . . . . . . . . . . .9 Maintaining your machine . . . . . . . . . . . . . . . . . . . . . . . . . . . . . . . . . . .9 Incidents that may arise . . . . . . . . . . . . . . . . . . . . . . . . . . . . . . . . . . . .10 Messages shown on the display . . . . . . . . . . . . . . . . . . . . . . . . . . . . .10
Dear Customer,
You have just acquired a BRANDT washing machine and we would like to thank you.
We have invested all our dedication and know-how in this appliance so that it would best meet your needs. With innovation and performance, we designed it to be always easy to use.
In the BRANDT product range, you will also find a wide choice of ovens, microwaves, cooking hobs, ventilation hoods, cookers, dishwashers, driers, fridges and freezers, that you can coordinate with your new BRANDT washing machine.
Visit our website www.brandt.com where you will find all of our products, as well as useful and complementary information.
BRANDT
•SAFETY ADVICE
Important :
This machine is only for domestic use and is designed to wash, rinse and spin machine-washable textiles.
You must observe the following instructions. We will not accept any liability and the warranty will be void if you do not observe these recommendations since this could result in damage to the appliance or cause physical injury.
— This appliance is not intended for use by persons (including children) with reduced physical, sensory or mental capabilities, or lack of experience and knowledge, unless they have been given supervision or instruction concerning use of the appliance by a person responsible for their safety.
— The machine must only be used in accordance with its normal method of operation in order to avoid damaging your laundry and your machine. Only use washing and maintenance products certified for use in domestic washing machines.
—If you pre-treat your washing with stain removers, solvents or, in general, any inflammable or potentially highly explosive product, do not place them into the machine immediately.
Furthermore, you are also recommended not to use solvents or products in aerosol cans near to your washing machine or any electrical appliance in general in a poorly ventilated room (risk of fire and explosion).
—If any incidents occur and you cannot resolve them using the remedies we recommend (see the section “TROUBLESHOOTING”), call in a qualified technician.
—If you have to open your machine during a cycle (for example, to add or remove washing), depending on the stage the programme is at (during washing essentially), be careful of the temperature inside the machine, which may be very high (risk of severe scalds).
—When making a new installation, the machine must be connected to the water supply with a new hose: the old hose must not be re-used.
—Do not let children play with the machine and keep your pets away from it.
—You must immediately make any obsolete machine unusable. Disconnect and cut off the power cable flush with the machine. Turn off the water tap and remove the hose. Disable the door lock.
—If there is a risk of frost, disconnect the water hose and drain off any water that may remain in the drain hose by placing this as low as possible in a bowl.
•SAVING ENERGY
—Only programme a prewash when it is absolutely necessary: for example, for very dirty/badly shained laundry.
—A low temperature programme is sufficient for impeccable washing results when your washing is only slightly or moderately dirty.
—For washing that is only slightly dirty, select a short washing cycle .
—Use the right amount of washing products for the hardness of the water, the amount of washing and how dirty it is and follow the instructions on the detergent packs (use only low suds detergent).
•ENVIRONMENTAL PROTECTION
This appliance’s packaging material is recyclable. Help recycle it and protect the environment by dropping it off in the municipal receptacles provided for this purpose.
Your appliance also contains a great amount of recyclable material. It is marked with this label to indicate that in countries that are a members of the European Union the used appliances should
not be mixed with other waste.
This way, the appliance recycling organised by your manufacturer will be done under the best possible conditions, in compliance with European Directive 2002/96/EC on Waste Electrical and Electronic Equipment. Contact your town hall or your retailer for the used appliance collection points closest to your home.
We thank you doing your part to protect the environment.
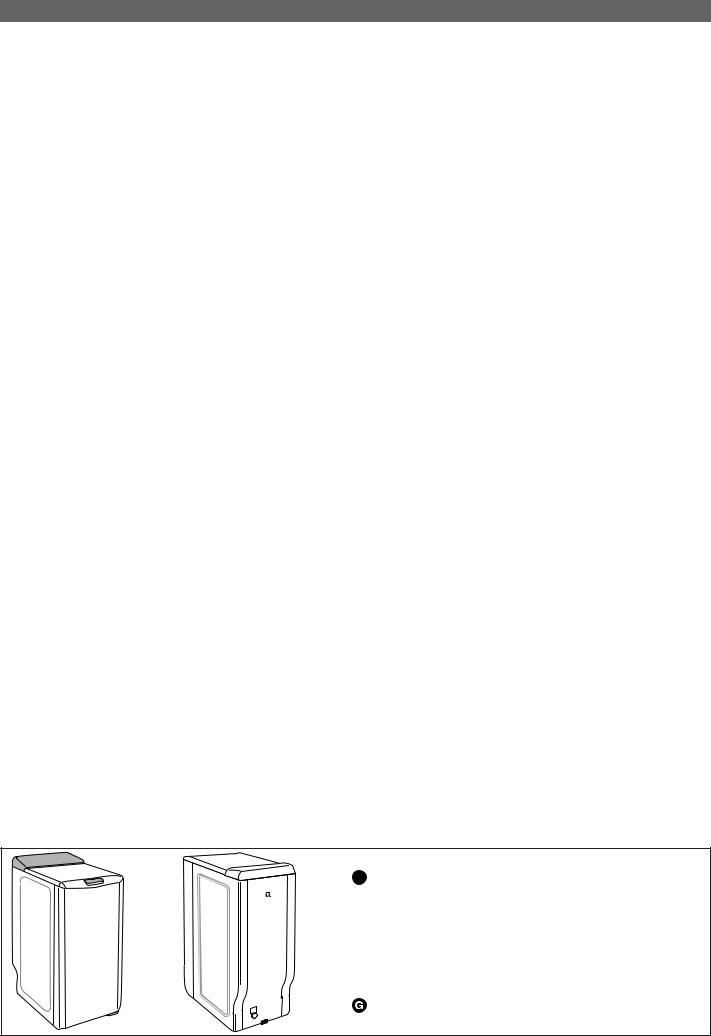
•DESCRIPTION OF YOUR MACHINE
A
A Control panel
 Handle for opening the lid (remains locked during the cycle)
 Lever for raising the machine on castors (depending on the model)
 Drain hose
 Cross clamp (must be removed before use)
 Water supply hose (not connected)
D 1 |
D 2 |
3
2 / INSTALLING YOUR MACHINE
•REMOVING THE TRANSPORT CLAMPS
Important:
Before using the machine in any way, you must first perform the following operations.
These comprise removing all the components designed to immobilise the drum in your machine during transport.
These so-called “releasing” operations are necessary for your machine to operate correctly and to conform to the prevailing safety standards. If they are not carried out completely, this could cause severe damage to your machine while it is operating.
— Remove the washing machine from its plinth (check that the wedge
A supporting the motor is not still inserted in the machine) (Diagram D3)
—Remove the 4 screws  with a screwdriver (Diagram D4)
—Remove the cross clamp  by removing the 2 screws
  (Diagram D5) using a 10 or 13mm spanner (depending on the model). (Ensure that you remove the two plastic braces fixed on the cross clamp at the same time as the clamp itself).
—Replace the screws  in their initial positions.
Warning:
You must block off the two holes using the hole covers provided  (supplied in the accessories bag) (Diagram D6)
— Remove the drum-tank assembly locking wedge (Diagram D7). To do this:
-Lift the lid on the machine
-Remove wedge 
-Remove wedge  .
.
Warning:
Remove the pipe support collars  You must block off the holes revealed with the hole covers
  supplied in the accessories bag (Diagram D8).
Advice:
We would recommend that you keep all the locking components since these must be refitted if you must subsequently transport your machine again.
Information:
Your machine has been scrupulously checked before it left the factory. You may therefore notice a little water still remaining in the tank or the products box.
•MOVING YOUR MACHINE
•Mounting it on castors
If your machine is equipped with removable castors, you will be able to move it quite easily.
To mount it on castors, swivel the lever on the bottom of the machine from the right to the far left (Diagram D9).
Important:
The machine must not rest on the “front” castors while it is operating: remember to return the lever to its initial position.
•CONNECTING TO THE COLD WATER SUPPLY
Connect the supply hose (Diagram D10):
—At one end to the connection on the back of the machine
—On the other end to a tap fitted with a threaded end 20mm dia. x 27 (3/4 BSP).
If you use a self-piercing tap, the useful aperture must have a minimum diameter of 6mm.
Water supply:
-Minimum water pressure: 0.1 MPa or 1 bar
-Maximum water pressure: 1 MPa or 10 bars
•Replacing a water supply hose
When replacing the hose, ensure that the hose is tightly fastened and that there is a seal at both ends.
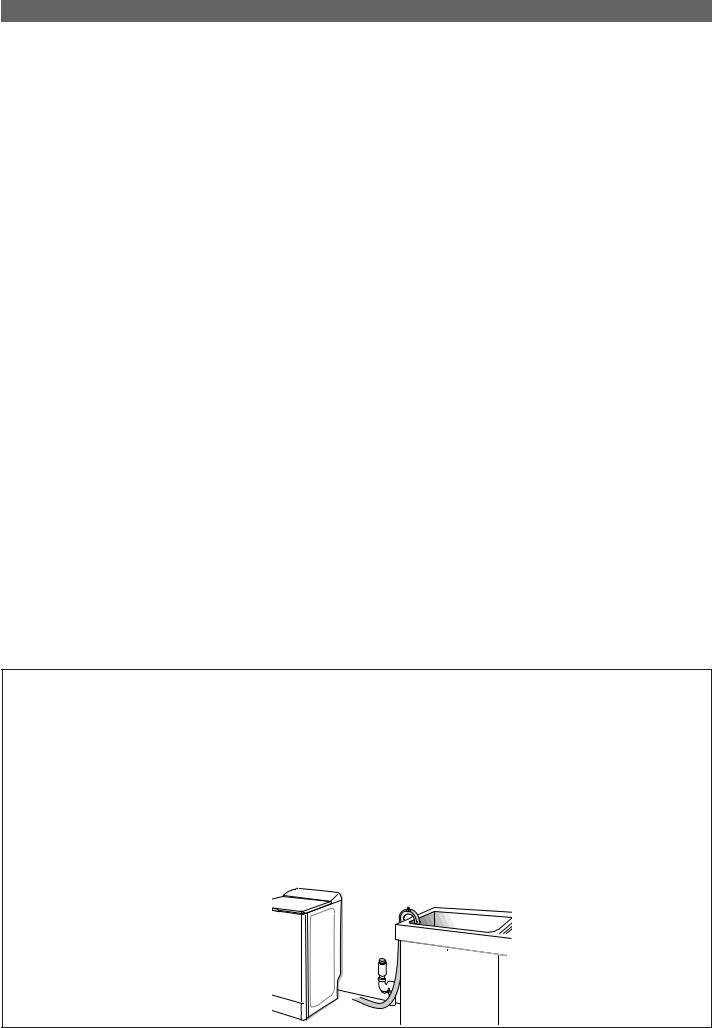
•DRAINING AWAY THE WASTE WATER
Fit the hose bracket provided inside your machine to the end of the drain hose and then connect the hose (Diagram D11) :
—Either, temporarily, over a sink or a bathtub.
—Or permanently to a ventilated U-bend.
If your installation does not have a ventilated U-bend, check that the connection is not sealed. In fact, to avoid any waste water flowing back into the machine, you are strongly recommended to leave an air gap between the machine’s drain hose and the drainpipe.
In any case, the drain hose bracket must be placed at a height of 65 to 90cm higher than the base of the machine.
Important:
Ensure that the drain hose is tied firmly in place with cord to avoid the bracket coming loose during draining and causing a flood. For correct draining of the waste water, make sure that the drain hose is as straight as possible. In fact, the more bends the less effective the drain pump.
The waste water can be drained away to the ground provided that the drain hose passes through a point 65 to 90cm higher than the base of the machine (Diagram D12).
D 3 |
|
|
|
D 7 D 8 |
D 9 |
|
|
|
D 4 |
|
|
|
|
|
D 5 |
2 |
1 |
|
|
|
|
|
a |
|
|
|
13 |
|
2 |
|
|
|
|
|
|
|
|
|
|
1 |
b |
|
|
|
|
|
|
A |
|
|
2 |
a |
|
2 |
1 |
|
|
|
|
|
1 |
|
|
|
|
|
|
|
|
|
|
D 10 |
|
3/4 |
D 11 |
D 12 |
|
|
|
|
|
|
|
|
|
|
10 mm |
|
|
|
|
|
|
4 |
|
 Loading...