


WASHING MACHINE
LAVE-LINGE
ΠΛΥΝΤΗΡΙΟ ΡΟΥΧΩΝ
LAVADORA
MÁQUINA DE LAVAR
ROUPA
 INSTALLATION, OPERATING
AND MAINTENANCE |
|
INSTRUCTIONS ............................ |
Page 2 |
F MANUEL D’INSTALLATION, |
|
D’UTILISATION |
|
ET D’ENTRETIEN........................ |
Page 13 |
Ο∆ΗΓΙΕΣ ΕΓΚΑΤΑΣΤΑΣΗΣ, |
|
ΧΡΗΣΗΣ ΚΑΙ |
|
ΣΥΝΤΗΡΗΣΗΣ .......................... |
Σελίδα 24 |
EMANUAL DE INSTALACIÓN, DE INSTRUCCIONES DE USO
Y MANTENIMIENTO .............. |
Página 35 |
PMANUAL DE INSTALAÇÃO, UTILIZAÇÃO
E MANUTENÇÃO .................... |
Página 46 |

Contents
Safety /environment and savings ........................ |
2 |
Releasing, moving and levelling .......................... |
3 |
Connecting to the cold water supply .................. |
3 |
Draining away the waste water ............................ |
3 |
Connecting to the electricity supply .................... |
3 |
Sorting and checking your washing .................... |
4 |
Access to the machine’s drum ............................ |
4 |
Inserting your washing .......................................... |
4 |
Closing the drum .................................................... |
4 |
Cleaning products .................................................. |
4 |
Programming ........................................................ |
5-7 |
Details of the functions and the options .......... |
7-8 |
Changing a programme.......................................... |
9 |
Automatic safety systems .................................... |
9 |
EEC/95/12 programme – characteristics............ |
9 |
Running maintenance / messages |
..10 |
Cleaning the pump and drying filters ................ |
10 |
Incidents that may arise ...................................... |
11 |
Textile care codes ................................................ |
11 |
Automatic fault diagnostics ................................ |
12 |
BEFORE READING THESE INSTRUCTIONS, REMOVE THE ILLUSTRATED PAGES IN THE CENTRE OF THIS DOCUMENT
This machine is only designed for domestic use and to wash, rinse, spin and, depending on the model, dry machine-washable textiles.
Safety advice |
|
Environment and savings |
In this manual, you will find the instructions required for the safety, installation and use of your machine and the relevant guarantees. Please keep these and pass them on if you sell the machine.
•Dispose of the packaging and of your wornout machine (after rendering it unusable by removing the hoses, cutting the power cable and breaking the lock on the lid) in accordance with the prevailing regulations.
•For a new installation, the machine must be connected to the water supply with a new hose: the old hose must not be re-used.
•Do not let children play with the machine or the cleaning and maintenance products (water unsuitable for drinking, ingestion of the products, risk of physical harm, etc.). Keep pets away from the machine.
•Protect your property and your machine by checking the condition of the hoses regularly. Never use solvents, inflammable products, explosive products or aerosols near to or in your machine. Use the machine in a well-ventilated, frost-free area and do not use an extension lead or a multiple adapter.
•Switch off the power supply to your machine after use.
•If your machine should break down, call a qualified washing machine engineer.
•Only use your machine in accordance with the instructions in this manual. Only use washing and maintenance products approved for domestic machines.
For washer-dryers:
•Before drying, remove the detergent dispensers placed in the drum with your washing. Their plastic material cannot withstand the drying temperatures.
•Fill your machine to the maximum. You thereby optimise your water and electricity consumption.
•Only programme a pre-wash when absolutely necessary: e.g. for heavily soiled sports or working clothes, etc.
•A programme with no pre-wash is sufficient for slightly or moderately soiled clothes.
•For slightly soiled clothes, select a short washing cycle (or an «Express» cycle, depending on the model).
•Gauge the amount of detergent according to the water hardness, the degree of soiling and the amount of washing. Always follow the manufacturer’s instructions on the detergent packets.
For washer-dryers:
•If you spin at high speed, little dampness will remain and you will therefore consume little electricity. Even synthetic textiles can be spun before drying.
•Choosing your drying time well also helps to save water and electricity.
•Avoid wasting water and electricity by not over-drying your laundry.
You will find the following symbols used throughout this manual. They mean:
Safety instructions (for your machine and your washing), which must be observed
An electrical risk,
Important advice and information
2

Releasing your machine
THE FOLLOWING OPERATIONS MUST BE PERFORMED BEFORE YOU USE THE MACHINE. Figs 1 & 2
First of all remove the piece of expanded polystyrene from under the lid. (Keep the transport material: you will need it if you move).
Rear transport clamp Fig. 1 to
Unscrew the 6 screws using a No. 10 tube spanner or a straight-edged screwdriver.
Remove the clamp.
Free the power cable from the plastic holder clipping it to the transport clamp.
Plug the holes left by the clamp using the plugs supplied and re-screw the 4 external screws into the casing.
Rear transport clamp Fig. 2 to
Unclip the plinth by pressing simultaneously on the side knobs and pulling them towards you.
Unscrew the screw holding the red plastic «front» clamp.
Remove the front clamp.
Plug the hole left by the clamp with the remaining plug.
Clip the plinth on again.
Moving and levelling
Setting on castors, moving
To move your machine, unclip and slide the castor release handle from right to left.
Your machine must not still be on its castors when in operation.
Check that it is plumb and stable to avoid vibration during spinning.
Levelling Fig. 6
-Set your machine on its castors.
-Unscrew the two screws with a straightedged screwdriver.
-Level the machine by adjusting the two feet using a flat spanner or a pair of pliers.
-Set the machine back on the floor by sliding the castor release lever to check the chocking.
-If the machine is correctly level, retighten the two locking screws.
To align your machine with your units, you can break off the fixing hooks for the hoses.
Take care not to squash the hoses!
If you cannot avoid installing the machine on a carpeted floor, adjust the feet so as to leave a large gap for ventilation.
Connecting your machine
Connecting to the cold water supply (Fig. 5)
Your washing machine can be connected to any cold water pipe. Connect the supply hose provided to a threaded 20x27 Ø tap (3/4 BSP) not forgetting to insert the seal supplied (depending on the model, the hose may already be fitted with a seal).
Water pressure may vary from 10 to 100 N/cm2 (1 – 10 bars). If the pressure is high, please provide a pressure regulator. Your water supplier can provide the necessary advice.
Draining away the waste water (Fig. 5)
NB: Ensure that the drain hose is tied firmly in place with cord, etc. to avoid a possible flood.
In all cases, the height of the drain hose bracket must be between 0.80m minimum and 1.10m maximum above the floor. The hose must be fastened to avoid it breaking and its opening must be above the surface of the water being drained away.
Connecting to the electrical supply (Fig. 5)
Please refer to the «Characteristics» section.
The socket must be easily accessible but out of children’s reach.
The installation must conform to the country’s regulations, in particular as regards earthing requirements and installation in showerrooms. The machine must be earthed.
Never use an extension lead or a multiple adapter for connecting to the socket.
* We cannot be held responsible for any incident caused by poor earthing of the machine or poor electrical installation.
The machine must be switched off (in the «Stop» position) when connecting to the electrical supply.
3

Preparing your washing
Failure to observe the following advice can cause severe and even irremediable damage (damage to the drum, torn washing, etc.) and rescinds the guarantee.
Sorting your washing
•Ensure that all your washing is machinewashable: check the labels on your washing (type, temperature, type of cleaning, etc.).
•Ensure that your coloureds do not run. •When washing a mixed load, use the washing programme for the most delicate textiles in the mix.
Checking your washing
•Empty the pockets and close any zips and press-studs.
•Remove any curtain hooks or place your curtains and any small items of laundry (ribbons, handkerchiefs, etc.) in a net bag. Button up pillowcases, etc.
•Remove any poorly attached buttons, pins and hooks.
Access to the machine’s drum (Figs. 3 - 4)
•Proceed as follows:
•Check that the machine is switched off. •Open the machine’s door (FIG. 4).
•Press the button on the front flap. (FIG. 3
)
Loading your washing
•For optimum washing performance, place the previously sorted and folded washing in the drum, distributing it evenly without heaping it up. Mix large and small items to obtain optimum spin-drying without unbalancing.
•Check that no items have fallen down the side the drum.
Closing the drum
•Close the drum using both hands, ensuring that the button returns to the correct position.
The coloured section must be visible (Fig. 3
).
CHECK THAT NO WASHING IS CAUGHT BETWEEN THE TWO FLAPS.
Washing products
Filling the products’ containers
Pre-wash container (powder  )
)

 Wash container (powder
  or liquid
 )
)
The «WASH» container may contain either powder or liquid but liquid detergents should not be used with programmes WITH pre-wash.
cl Bleach: bleach can be used as a
disinfecting or bleaching agent. Concentrated bleach must be diluted.
 Softener: Concentrated softener should be diluted with warm water.
Loading the washing products
Follow the dosage instructions on the pack. Warning: these are generally recommended for a full load of washing. Adapt the amounts to suit the condition of your washing.
Too much detergent can cause foam. An excessive amount of foam reduces your machine’s performance and increases the washing time and water consumption.
Do not forget to reduce the amounts when using concentrated detergents. See the instructions on the pack.
Reduce the product amounts by 10%
When the water is soft, when your washing is only slightly soiled and there is only a small amount. When the washing programme is short.
Detergents for woollens and delicate fabrics
Use an appropriate detergent for washing these textiles (avoid putting the detergent directly into the drum because some of these products can attack the metal).
4
Programming
Cycle progress |
|
|
|
Display |
|
|
|
Type of washing and temperature
|
1 |
B |
A |
90 |
60 |
excel |
|
|
40 |
|
|
|
|
|
|
|
60 |
|
|
40 |
30 |
|
30 |
|
30 |
40 |
|
|
On/Off
I /O
100 to 1500 rpm
M A D E I N F R A N C E
2 
 R
R 
 3
3 
 4
4 
 5
5
Start/Pause: press briefly |
|
|
|
|
|
|
|
|
|
|
Anti-creasing, Eco, Intensive wash options |
|
|
|
|
|
|
|
|
|
|
||
Cancel: long press |
|
|
|
|
|
|
|
|
|
|
Pre-wash, extra rinse options |
|
|
|
|
|
|
|
|
|
|
||
|
|
|
|
|
|
|
|
|
|
|
|
Spin speed |
|
|
|
|
|
|
|
|
|||
|
|
|
|
Selector for the spin speed, |
|||||||
|
|
|
|
||||||||
and delayed start |
|
delayed start and remaining time functions |
|||||||||
Apart from the «On/Off» button, all the buttons are sensitive and therefore do not remain depressed. During programming, all the buttons except for «Start/Pause» can be kept depressed but, for more precise adjustment, we recommend that you operate them with a series of brief presses.
You should operate the «Start/Pause» by pressing it briefly except when cancelling the programme or re-initialising the cycle counter, in which case it should be kept depressed.
(*) Details of the functions are provided in the following pages.
If one of the cycle progress lights B is lit when you switch on, cancel before carrying out any other operation.
Warning: the «On/Off» button cannot cancel a programme.
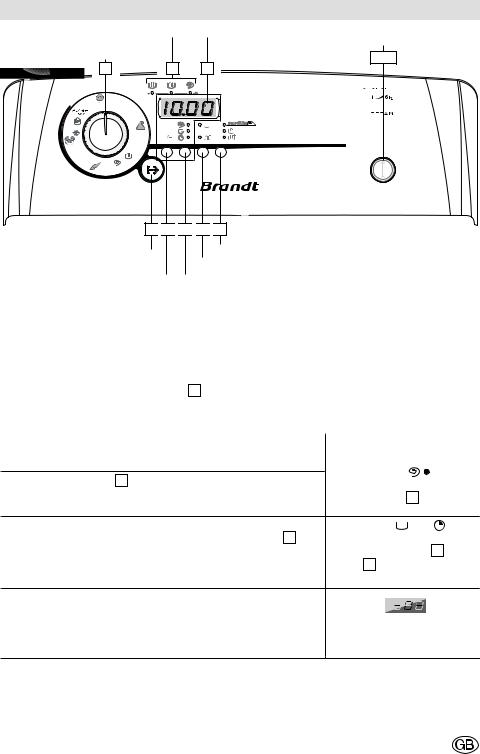
Programming a basic washing cycle: |
Lights and/or display |
|||||||||||
• Press in the «On/Off» button |
|
(1). |
|
|
|
|
|
|
|
|||
I /O |
Light |
|||||||||||
• Turn the selector 1 to select the programme and the |
||||||||||||
+ spin speed recommended |
||||||||||||
washing temperature. The machine proposes the |
||||||||||||
|
on A |
|||||||||||
recommended spin speed for the type of textile selected. |
|
|||||||||||
|
|
|
|
|
|
|
||||||
• If the spin speed is acceptable and you do not wish to use |
Lights |
|
|
|
and |
|||||||
|
|
|||||||||||
|
|
|||||||||||
any options or delayed start, press «Start/Pause» 2 . The |
+ display of the washing time |
|||||||||||
washing cycle will now start. |
remaining on A |
|||||||||||
|
|
|
|
|
(lights B illuminate successively |
|||||||
|
|
|
|
|
until the cycle is complete). |
|||||||
• At the end of the cycle, the display shows «-0-». |
|
|
|
|
|
|
|
|||||
Release the «On/Off» |
I /O |
button and wait 1-2 minutes for |
|
|
|
|
|
|
|
|||
|
|
|
|
|
|
|
||||||
the safety device to unlock the lid (2). |
|
|
|
|
|
|
|
|||||
To aid access to your washing, the opening to the drum is automatically positioned at the top.
(1) - Before starting your machine, check that the power cable is plugged in and the water tap is open. Also ensure that the drum doors and the lid are firmly closed
(2) - It is advisable, as a safety measure, to unplug the power cable and turn off the water tap.
5
Programming |
|
|||
Programming a full washing cycle: |
Lights and/or display |
|||
|
|
|
|
|
• Press in the «On/Off» button |
|
. |
|
|
I /O |
Light |
|||
• Turn the selector 1 to select the programme and the washing |
||||
+ spin speed |
||||
temperature. The machine proposes the recommended spin |
||||
recommended on A |
||||
speed for the type of textile selected. |
||||
|
||||
• Use the setting button R :
-Either to alter the proposed spin speed.
-Or to select drip dry.
The cycle will finish with a gentle spin at 100 rpm - Or to select stopping with the drum full of water.
The machine will stop with the drum full of water before the final spin.
•Use button 4 to select the «Pre-wash» and/or «Extra Rinse» options, if required
•Use button 5 to select the «Anti-creasing» and/or «Eco» and «Intensive wash» options, if required.
•Select immediate start by pressing the «Start/Pause» button 2 ...
Light  + e.g.:
or  or
or 
Lights  and options chosen
+ programme end selected
|
on A |
|||
Lights |
|
|
|
and |
|
|
|||
|
|
|||
+ display of washing time remaining A
• ... Or select a start delayed by 1 - 19 hours by using button 3 to select this option and then using button R to set the period of the delay.
Light
+ display of time remaining
before the cycle starts A
Adding or removing an item during the cycle (impossible during spin):
•Press the «Start/Pause» button 2 to interrupt the cycle.
•Add or remove the items of laundry.
•Press the «Start/Pause» button 2 to restart the cycle.
(*)The lid may take 1-2 minutes to unlock
If you have selected a «Delayed Start», you can instantaneously access the drum at any time during the phase before the washing cycle starts, without having to interrupt and restart the cycle.
Flashing light B
+ counter A stopped
Light B permanently lit + counter A restarts
Cancelling during programming or washing or during a pause:
• Hold down the «Start/Pause» button 2 for at least 1 second. |
Return to initial display |
This can be done at any time during the cycle or during |
|
programming, or even during a pause. |
|
If you do this while the machine is waiting to start during a delayed start, only the delayed start is cancelled.
Maintaining your washing machine’s performance:
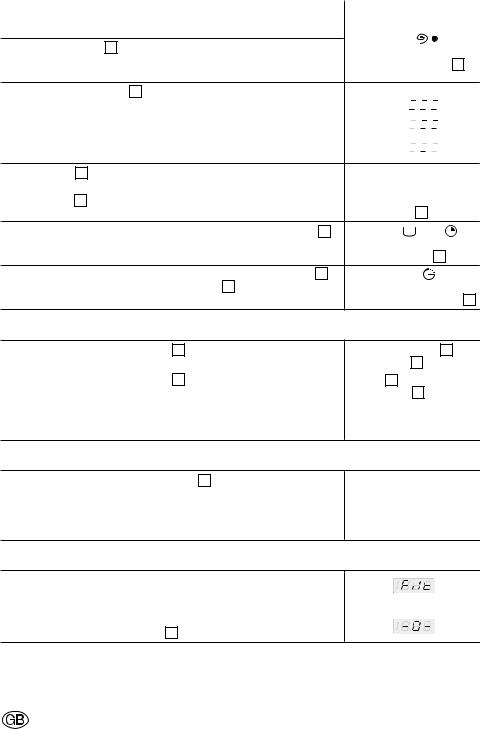
• When the «Filt» message is shown at the end of a cycle, you must clean the pump filter (see the section on «CLEANING THE PUMP FILTER»).
• After cleaning the filter, re-initialise the cycle counter by holding down the «Start/Pause» button 2 until the message «-0-» appears.
For more information, please refer to the section on «DETAILS OF THE FUNCTIONS».
Important: If you have stopped your machine by pressing the «On/Off» button or after a power failure, when the power is restored the washing cycle automatically returns to the point at which it was interrupted.
6

Programming
To select the most suitable programme for your type of washing, follow the instructions on the labels attached to most items.
Programmes table |
|
|
|
|
|
|
|
|
|
|
Type of fabric |
Temperature (°C) |
Max. load (kg) |
Pre-wash |
Extra rinse |
Anti-creasing |
Eco |
Intensive |
Drip-dry |
Full drum stop |
|
|
||||||||||
COTTON /WHITES/ COLOUREDS |
40°-90° |
6,0 |
● |
● |
● |
● |
● |
● |
● |
|
COTTON /WHITES/ COLOUREDS |
excel |
6,0 |
● |
● |
● |
● |
● |
● |
● |
|
40 |
||||||||||
|
|
|
|
|
|
|
|
|
||
SYNTHETICS |
30°-60° |
3 |
● |
● |
● |
● |
● |
● |
● |
|
DELICATES |
30°-40° |
2 |
|
● |
● |
|
|
● |
● |
|
WOOLLENS |
-40° |
1,5 |
|
● |
|
|
|
● |
● |
|
HAND-WASHABLE FABRICS |
|
1,0 |
|
● |
|
|
|
● |
● |
|
Special programmes |
|
|
|
|
|
|
|
|
|
|
|
40° |
3 |
|
|
|
|
|
● |
● |
|
RINSE only |
|
Depending on the textile |
|
|
|
|
|
● |
● |
|
SPIN only |
|
|
|
|
|
|
|
|
||
|
|
|
|
|
|
|
|
|
● : These functions can be used alone or in combinations: illogical combinations are impossible.
Details of the functions
COTTON « »
If your washing comprises hard-wearing white COTTONS or COLOUREDS
When washing coloureds do not exceed a maximum temperature of 60°C.
During the first few minutes of this programme, your machine automatically calculates the best programme to run for a perfect wash.
COTTON « » + « exce40 »
This cycle is designed for textiles that cannot be washed at temperatures above 40°C. It washes equally as effectively as a 60° cycle. To achieve this performance, it runs longer. This cycle is particularly suitable for full loads.
SYNTHETICS « »
»
If your washing comprises HARD-WEARING SYNTHETICS of MIXED FIBRES
DELICATES « »
»
If your washing comprises NET CURTAINS, DELICATE FABRICS or FRAGILE TEXTILES
BABYWEAR – WOOL «
 »
»
If your washing comprises WOOLLENS or MACHINE-WASHABLE WOOLLENS.
HAND-WASHABLE TEXTILES «  »
»
If your washing comprises SILK or PARTICULARLY DELICATE FABRICS
This programme enables you to refresh a small load of 3 kg of lightly soiled washing composed of WHITE or COLOURED COTTONS or HARD-WEARING SYNTHETICS. The cycle time is restricted to around 30 minutes.
In this programme, the washing temperature is automatically programmed to 40°C.
For this programme, the doses of detergent should be reduced by half.
7

Details of the functions (continued)
RINSE ONLY “ ”
”
A separate rinse followed by a choice of:
-Either spin and drain
-Or drain only («Drip-dry» option)
-Or a stop with the drum full of water.
SPIN ONLY “ ”
”
This allows a separate spin and drain.
In the case of «Rinse only» followed by a spin or of «Spin only», take care to select a suitable spin speed for the type of washing in the machine.
Details of the options
Pre-wash 
Specially designed for heavily soiled washing (mud, blood, etc.).
Detergent must be placed in the « » container in the products’ box.
Extra rinse 
«Especially for sensitive and allergic skin»: adds an extra rinse to the washing cycle.
Anti-creasing 
Makes you washing easier to iron.
This option allows you to wash and spin your washing more gently without any loss of performance.
Eco
The «Eco» function provides you with perfect washing results while saving on energy. It reduces the washing temperature and increases the agitation period.
Intensive wash
This function improves washing performance and handles reputedly stubborn stains by automatically increasing the temperature in the drum and the agitation time.
Delayed start 
You can delay the start of your programme by 1 to 19 hours to take advantage of off-peak rates or finish the cycle at a particular time.
To do this, press button 3 and select function « » (delayed start). Then press button R land select the cycle starting time.
While the machine is waiting to start, display A shows the time remaining before the cycle effectively starts.
Remaining time 
During programming, you can find out the length of the selected cycle by pressing button 3 and selecting function «  » (remaining time).
8
If you select the «time remaining» function while the machine is waiting to start in «Delayed Start» mode, it is the selected programme’s time that is permanently displayed.
(*) The time indicated by the machine at the start of the programme may vary during the course of the cycle:
-If you change the washing temperature (even during a spin) or if you add or cancel options, the time will be recalculated and updated on the display.
-Certain operating variables (for instance: detection of imbalance or foam, etc.) can also alter the cycle’s duration.
-If there is a power failure during washing, when the power is restored, the time displayed may be less than the actual remaining time. This time will be updated at the start of the rinsing phase.
Full drum stop
This is used for textiles that you do not wish to spin or if you envisage being absent for a long time after the washing is finished.
When this function is selected, the cycle interrupts before the final spin, enabling your washing to soak in the water to avoid creasing.
When the machine stops with the drum full of water, display A does not count off the time remaining but remains fixed (including the point) and cycle progress light « » flashes.
Then:
- You either wish to drain and spin.
In which case, select the Spin function « » using button 3 then use button R to set a suitable spin speed for your type of washing. The programme will shut down automatically.
- Or you just wish to drain.
In which case, select the Spin function « » and then use button R to display
  («Drip-dry» function).

Modifying a washing programme
During programming:
You can alter anything before you press the «Start / Pause» button 2 « ».
».
After the cycle starts:
•You cannot alter the type of textile (for example, change from «COTTON» to «SYNTHETICS» or from «SYNTHETICS» to «DELICATES», etc.).
If you turn the programme selector 1 to a different textile, the progress cycle light B which is lit at the time, and the display A flash for a few seconds to indicate that such an alteration is prohibited and will not be effected.
To change the type of fabric during the cycle, you must cancel the current programme and then programme a new cycle.
•However, you can change the washing temperature at the start of the washing phase for the same type of textile.
The time remaining will then be adjusted accordingly.
•You can also change the spin speed throughout the cycle.
•You can select «Drip-dry» and «Full drum
stop» up to the end of rinsing (until the cycle progress light « » goes out).
•You can change the period for a «delayed start» period throughout the whole of the waiting period, right up to the effective cycle starting time.
If you wish to cancel «Delayed start»
during this period, set display A to «0» and then briefly press button 2 « ». The cycle will then start immediately.
•You can only activate option « » (Prewash) during the waiting period for a «Delayed start».
•You can activate option « » (Extra rinse) up to the point that rinsing commences (until cycle progress light «
 » illuminates)
• You can |
only modify the |
options |
« |
» (Anti-creasing), « |
» (Eco) |
and « » (Intensive) during the waiting period for a «Delayed start».
•You can deactivate all the options at any time during the cycle provided that the particular action has not already been completed.
Automatic safety systems
Lid opening safety system:
As soon as washing commences, the lid on your machine is locked.
When the cycle is finished or when the machine has stopped with the drum full of water, the lid unlocks.
If you have programmed a «Delayed start», the lid is not locked until the waiting period is over and the cycle starts.
If you wish to open the lid during the cycle, press button 2 « » briefly and wait 1-2 minutes for the safety system to unlock the lid.
Water safety system:
The water is constantly controlled when the machine is operating to prevent any possible overflow.
Spin safety system:
Your washing machine is fitted with a safety system that restricts the spin when poor load distribution is detected.
In this case, your washing may be insufficiently spun. Redistribute your washing in the drum and programme a new spin.
Anti-foam system:
You machine can detect when too much foam is being produced during spinning.
At such times, spinning stops and the machine drains.
The cycle then restarts, adapting the spin rates and possibly adding an extra rinse.
Programmes for tests according to European Directive EEC/95/12 - Characteristics
Cotton - 60°C – 6Kg – duration 2h 19 min – power 1.14 kWh – water 48 l – no options – max. spin.
Characteristics: 230V – 50 Hz – 10A – 2200W.
Your machine complies with European Directives EEC/73/23 (Low Voltage Directive) and EEC/89/336 (Electromagnetic Compatibility), as modified by Directive EEC/93/68.
9

Running maintenance
«Filt» message:
After a certain number of cycles, your machine (depending on the model) will warn you that you should clean the pump filter
At the end of the cycle, the display A flashes and then shows:
You must reset the cycle counter to remove this message: if you do not do this, it will continue to be displayed at the end of every cycle.
To reset the cycle counter, when the «Filt» message is flashing, hold down the «Start / Pause» button « » until the normal end of cycle message «-0-» appears.
If you do not clean the pump filter regularly, this will affect your machine’s performance.
Cleaning the pump filter :
First of all drain the machine and then disconnect the plug (Fig. 8)
-Remove the plinth and place a floor cloth and a flat container under the access to the pump.
-If your machine is fitted with one, remove the purge hose.
-Open the stopper at the end of the hose and let the water flow into the container.
-Close the stopper, ensuring that it is pushed in well and reclip it in place.
-Unscrew the stopper for the drain pump’s filter.
-Clean the filter. To re-insert it, snap it in by orienting the small lug on the cylindrical surface upwards and screwing the stopper in fully.
-Re-install the plinth in its original position.
When you next wash, check that there are no leaks during filling.
Cleaning the machine
•Only use a sponge, liquid soap and water to clean the casing, the entry to the drum, the control panel and the products’ box, etc.
•Never use: abrasive powders, metal or plastic sponges, alcohol-based products, thinners, etc.
Cleaning the products’ box
-Pull the knob forward (Fig. 7 ), and lift the box out (Fig. 7 ),
-Clean everything with warm water, not forgetting to wash the removable siphon (blue). Check that you have replaced it correctly.
-Then re-insert the whole box, checking that it is positioned correctly.
Replacing the power cable: For the sake of your safety, this must necessarily be done by the manufacturer’s After-Sales service or a qualified electrician.
Regularly check: The condition of the water supply and drain hoses. If you notice the slightest cracking, do not hesitate to replace them.
Replacing the water supply hose (Fig. 9):
When changing, check that the hose is tight and that there is a seal on both ends.
When there is a risk of frost: Drain the drain circuit as shown above.
Removing the drum’s paddle:
If an item of washing falls between the drum and the side of the tub, empty the drum and close it.
-Turn the drum until the paddle locks.
-Unscrew the screw between the two openings (stamped TORX. T20) and remove it. The paddle will fall into the drum (use a terry towelling towel to cushion its fall as a precaution).
-Turn the drum back and open it.
-Recover the fallen item through the holes revealed by removing the paddle.
-To refit the paddle, slip it from front to back over its support.
-Close the drum and turn it. Hold the paddle while you re-insert the screw.
Cleaning the drying filter:
Clean this after every drying operation:
-Remove the filter from its housing (on the right, near to the opening for the drum) and pull it towards you.
-Clean it dry, removing any fluff it may have caught.
-Replace it in its housing, pushing it in fully.
10
Incidents that may occur
Points to be checked in the event of an incident occurring: (1) Washing machines (2) Washer-dryers
Possible causes / Remedies |
|
Possible causes / Remedies |
|
The cycle does not start (1 and 2) |
|
The drum doors open too slowly (depending |
|
• You have not pressed the «Start /Pause» |
|
on the model) |
|
button. |
|
• Your machine has not operated for a long |
|
• There is no power to the machine: |
|
time. |
|
- Check that the plug is correctly in the |
|
• It is located in too cold a position. |
|
socket. |
|
• Detergent residue (powder) is blocking the |
|
- Check the circuit breaker and the fuses. |
|
hinges. |
|
• The water tap is shut off. |
|
- In all cases, everything returns to normal |
|
• The machine’s lid is not closed properly. |
|
once the doors have opened initially. |
|
|
|
|
A pool of water forms around the machine (1 |
Heavy vibration during spin (1 and 2) |
|
||
• Your machine has not been correctly |
|
and 2) |
|
released: |
|
First of all remove the electrical plug from the |
|
- Check that all the transport material has |
|
socket and close the water tap. Then check |
|
been removed (see «RELEASING»). |
|
whether: |
|
• The floor is not horizontal. |
|
• The drain hose bracket is wrongly |
|
• Your machine is not stable on its four feet |
|
positioned in the drain pipe. |
|
(see «LEVELLING»). |
|
•The water hose’s connections to the |
|
|
|
|
machine and the tap are properly |
The washing is not spun or is insufficiently |
|
||
|
watertight: |
||
spun (1 and 2) |
|
- Check that the seals are in place and the |
|
• You have selected a programme with no |
|
connections are tight. |
|
spin, for example «Drip-dry». |
|
|
|
|
Foam overflows (1 and 2) |
||
• The spin safety system has detected poor |
|
||
distribution of the washing in the drum: |
|
• You have used too much detergent. |
|
- Untangle the washing and programme a |
|
• You have not used a detergent designed for |
|
new spin. |
|
washing machines: |
|
|
|
|
- Drain and then programme several rinses. |
The machine does not drain (1 and 2) |
|
||
|
Then restart the washing programme. |
||
• You have programmed «Full drum stop». |
|
|
|
|
The drying cycle does not start (2) |
||
• The pump or the drain filter is blocked: |
|
||
|
• You have not selected a drying time. |
||
- Clean them (see «RUNNING |
|
||
MAINTENANCE»). |
|
The washing is not as dry as you wish (2) |
|
• The drain hose is kinked or squashed. |
|
||
|
• The drying programme selected is not |
||
|
|
|
|
You wish just to wash but a drying cycle |
|
suitable for the type of textile placed in the |
|
starts automatically (2) |
|
machine (Pay attention to the information |
|
• You have programmed a drying cycle. |
|
provided on the labels sewn on the clothes). |
|
|
• The drying time selected is not suitable: |
||
|
|
|
|
The lid does not open (1 and 2) |
|
||
|
- For the level of dryness desired: increase |
||
• The programme has not yet finished. |
|
or reduce the drying time accordingly. |
|
The lid remains locked throughout the |
|
• The load of dried washing is greater than |
|
programme. |
|
the maximum authorised load (see |
|
|
|
|
“PROGRAMMES TABLE”). |
|
|
|
• The washing to be dried has not been spun |
|
|
|
sufficiently. |
|
|
|
|
Textile maintenance codes: |
|
F Dry cleaning. |
|
95 |
Do not exceed the indicated temperature. |
|
Do not use. |
|
Cold diluted bleach can be used. |
|
Heavy drying in a domestic machine. |
|
|
||
|
Ironing: |
|
|
|
|
Gentle drying in a domestic machine. |
|
|
|
||
|
• cold •• medium ••• hot. |
|
|
|
|
||
|
|
11 |
|
Automatic fault diagnostics
Your machine can automatically detect certain operating faults.
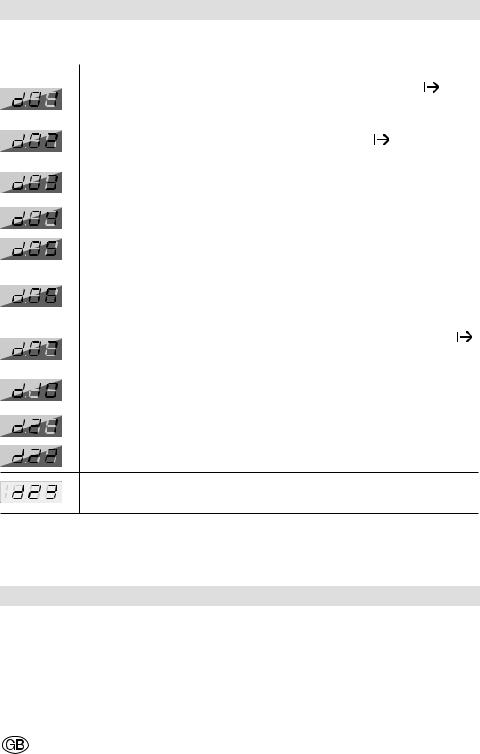
Particular messages are shown on the display to indicate what these faults are:
Message |
Possible causes / Remedies |
||
|
|
Filling fault. Check that the water tap is open, then press the « »button |
|
|
|
again to restart the cycle. If the fault persists, contact your breakdown |
|
|
|
engineer. |
|
|
|
||
|
|
|
|
|
|
Draining fault. Clean the pump filter (see the chapter on «CLEANING THE |
|
|
|
PUMP FILTER» for the procedure), then press the « »button again to |
|
|
|
restart the cycle. If the fault persists, contact your breakdown engineer. |
|
|
|
||
|
|
|
|
|
|
Heating fault. This message, which appears at the end of the cycle, indicates |
|
|
|
that the machine did not achieve the washing temperature you selected. |
|
|
|
Contact your breakdown engineer. |
|
|
|
||
|
|
|
|
|
|
Programming card fault. For your own safety, disconnect the machine and |
|
|
|
||
|
|
contact your breakdown engineer. |
|
|
|
|
|
|
|
Washing temperature fault. Contact your breakdown engineer. |
|
|
|
||
|
|
|
|
|
|
|
|
|
|
Drum rotation fault. After switching the machine off, check whether an item of |
|
|
|
washing or an object has slipped between the drum and the side of the tub, |
|
|
|
causing a blockage (see the section on «RUNNING MAINTENANCE»: |
|
|
|
removing the drum’s paddle” for details on how to access the bottom of the |
|
|
|
||
|
|
tub). If the fault persists, contact your breakdown engineer. |
|
|
|
|
|
|
|
Locking fault. Check that the lid is closed correctly, then press the « » |
|
|
|
button again to restart the cycle. If the fault persists, contact your breakdown |
|
|
|
engineer. |
|
|
|
||
|
|
Overflow. When this fault is detected, the supply of water is automatically cut |
|
|
|
off, the machine is drained and the cycle stops. Contact your breakdown |
|
|
|
engineer. |
|
|
|
||
|
|
|
|
|
|
Fault in the electronic unit. Your machine shuts down completely for its own |
|
|
|
||
|
|
safety. Contact your breakdown engineer. |
|
|
|
|
|
|
|
Drying temperature fault. Contact your breakdown engineer. |
|
|
|
||
|
|
|
|
Heating fault. This message, which appears at the end of the cycle, indicates that the machine did not achieve the drying temperature you selected. Contact your breakdown engineer.
When one of these faults occurs, do not forget to note down the message displayed (d01, d02, …. d23) so that you can inform your breakdown engineer of this during your call, making his work easier.
After-Sales service
Any work on your machine must be performed either by your dealer or by a qualified electrician approved by the manufacturer or his agent.
When you call, cite your machine’s complete reference (model, type and serial No.). This information is shown on the information plate fixed to the rear of your machine (see Fig. 9).
12

Sommaire
Sécurité / Environnement et économies ...... |
13 |
Débridage - Déplacement et mise à niveau .. |
14 |
Alimentation en eau froide.................................. |
14 |
Evacuation des eaux usées................................ |
14 |
Branchement électrique...................................... |
14 |
Tri et vérification du linge.................................... |
15 |
Accès au tambour de l’appareil ........................ |
15 |
Introduction du linge ............................................ |
15 |
Fermeture du tambour ........................................ |
15 |
Produits de lavage ................................................ |
15 |
Programmation ................................................ |
16-18 |
Détail des fonctions et des options .......... |
18-19 |
Modification d’un programme .......................... |
20 |
Sécurités automatiques ...................................... |
20 |
Programme CEE/95/12 - Caractéristiques ............ |
20 |
Entretien courant / Message ................ |
21 |
Nettoyage filtres pompe et séchage .............. |
21 |
Incidents pouvant survenir ................................ |
22 |
Codes entretien textiles............................................ |
22 |
Diagnostic automatique des défauts .............. |
23 |
AVANT DE LIRE CETTE NOTICE, DETACHEZ LES PAGES ILLUSTREES AU CENTRE DE CELLE-CI.
Cet appareil, destiné à un usage exclusivement domestique, a été conçu pour laver, rincer, essorer et, suivant le modèle, pour sécher les textiles pouvant être traités en machine.
Conseils de sécurité |
|
Environnement et économies |
Dans cette notice, vous trouverez les indications nécessaires pour la sécurité, l'installation, l'utilisation et les garanties de votre appareil. Conservez la et en cas de vente transmettez la .
•Eliminez conformément aux lois en vigueur l'emballage et votre appareil usagé après l’avoir rendu inutilisable: tuyaux enlevés, cordon électrique coupé et la serrure de couvercle détruite.
•Lors d’une nouvelle installation, l’appareil doit être connecté au réseau de distribution d’eau avec un tuyau neuf, le tuyau usagé ne doit pas être réutilisé.
•Ne laissez pas les enfants jouer avec votre appareil et les produits de lavage et d’entretien, (eau non potable, ingestion de produit, risque corporel...). Eloignez les animaux domestiques.
•Protégez vos biens et votre appareil : en vérifiant régulièrement l’état des tuyaux, en n’utilisant en aucun cas des solvants, des produits inflammables ou fort pouvoir détonnant, des aérosols près ou dans votre appareil... en utilisant un local bien aéré et hors gel, en n’utilisant pas de prolongateur ou de prise multiples.
•Mettez votre appareil hors tension après usage.
•En cas de panne, appelez un professionnel qualifié.
•N’utilisez, votre appareil que conformément
à cette notice, avec des produits de lavage ou d’entretien certifiés pour appareils domestiques.
Pour les machines séchantes :
•Retirez, avant le séchage, les doseurs de lessive mis dans le tambour avec le linge. Leur matière plastique ne supporterait pas les températures du séchage.
•Chargez la machine au maximum, vous optimiserez les consommations d’eau et d’énergie.
•Ne programmez le prélavage que lorsque c’est absolument nécessaire : par ex. pour des vêtements de sport ou de travail très sales, etc...
•Pour du linge peu ou moyennement sale, un programme sans prélavage suffit.
•Pour du linge peu sale choisissez un cycle de lavage court (ou “express” suivant le modèle).
•Dosez le produit de lavage selon la dureté de l’eau, le degré de salissure et la quantité de linge et respectez les conseils sur les paquets des produits lessiviels.
Pour les machines séchantes :
•Si vous essorez à grande vitesse, I’humidité résiduelle sera faible, donc faible consommation d’énergie. Même les textiles synthétiques doivent être essorés avant le séchage.
•Le temps de séchage bien choisi aide aussi à économiser énergie et eau.
•Ne surséchez pas votre linge pour éviter des consommations d’eau et d’énergie inutiles.
Au fil des pages de cette notice, vous découvrirez les symboles suivants qui vous signaleront :
les consignes de sécurité (pour vous, votre machine ou votre linge) à respecter impérativement,
un danger électrique,
les conseils et les informations importantes
13

Débridage
AVANT TOUTE UTILISATION, EFFECTUEZ LES OPERATIONS ILLUSTREES FIG. 1 et 2 Retirez préalablement la pièce en polystyrène expansé située sous le couvercle.(Conservez les pièces de bridage, elles vous seraient nécessaires si vous déménagiez).
Bride de transport arrière FIG. 1 à
Dévissez les six vis à l'aide d’une clé à tube de 10 ou d’un tournevis plat.
Retirez la bride.
Libérez le cordon électrique de la pièce plastique qui le lie à la bride de transport.
Bouchez les trous laissés par la bride à l'aide des caches fournis et revissez les 4 vis extérieures dans la carrosserie.
Bride de transport avant FIG. 2 à
Déclippez la plinthe en appuyant simultanément sur ses bossages latéraux et tirez la vers vous.
Dévissez la vis de maintien de la bride "avant" en plastique rouge
Retirez la bride avant.
Bouchez le trou laissé par la bride à l'aide du cache restant.
Reclippez la plinthe.
Raccordements
Déplacement, mise à niveau
Mise sur roulette - Déplacement
Pour déplacer votre appareil, déclippez et manœuvrez le levier de mise sur roulettes de la droite jusqu'à l’extrémité gauche.
Votre appareil ne doit pas reposer sur ses roulettes en fonctionnement.
Veillez à son aplomb et sa stabilité pour éviter les vibrations à l'essorage !
Mise à niveau FIG. 6
-Mettez votre appareil sur ses roulettes.
-Dévissez les deux vis à l'aide d'un tournevis plat.
-Réglez les deux pieds à l'aide d'une clef plate ou d’une pince pour réaliser la mise à niveau.
-Repositionnez au sol en manœuvrant le levier de mise sur roulettes pour vérifier le calage.
-Si le niveau est correct revissez les deux vis de blocage.
Pour placer votre appareil dans l'alignement de vos meubles, vous pouvez casser les crochets de fixation des tuyaux.
Attention à ne pas écraser les tuyaux !
Si vous ne pouvez pas éviter une installation sur un sol moquette réglez les pieds de façon à laisser un espace d’aération important.
Alimentation en eau froide (FIG. 5)
Votre lave-linge peut être branché sur tous les conduits d'eau froide. Branchez le tuyau d'alimentation fourni sur un robinet fileté Ø 20x27 (3/4 BSP) sans omettre le joint fourni, (selon le modèle, le tuyau peut déjà être équipé de joint).
La pression d'eau peut varier entre 10 à 100 N/cm2 (1-10 bar). Dans le cas d'une pression élevée, veuillez prévoir un régulateur de pression. Votre service des eaux vous donnera les renseignements nécessaires.
Evacuation des eaux usées (FIG. 5)
Nota : Veillez à bien maintenir le tuyau de vidange au moyen d'un lien afin d'éviter toute inondation.
Dans tous les cas, la hauteur du coude du tuyau doit être comprise entre 0,80 m. mini et 1,10 m. maxi. Le tuyau doit être fixé pour éviter qu'il ne se brise et son ouverture doit être au-dessus de la surface de l'eau évacuée.
Branchement électrique (FIG. 5)
Reportez-vous au chapître “caractéristiques”
La prise de courant doit être facilement accessible, mais hors de portée des enfants.
L'installation doit être conforme aux normes du pays, en particulier pour la mise à la terre et l’installation dans une salle d’eau. Ne supprimez jamais la mise à la terre.
Il ne doit pas être fait usage de rallonge électrique ou de prise multiple pour le raccordement à la prise de courant.
* Nous ne pouvons pas être tenus responsables pour tout incident causé par une mauvaise mise à la terre de l'appareil ou une mauvaise installation électrique.
L'appareil doit être hors tension (position arrêt) au moment du branchement sur le circuit électrique.
14
Préparation du linge
Le non respect des conseils suivants peut engendrer des dégâts graves, voire irrémédiables (tambour détérioré, linge déchiré, etc…) et annule la garantie.
Tri du linge
•Assurez vous que tout votre linge est lavable en machine : vérifiez l’étiquetage de votre linge ( nature, température, type de nettoyage...)
•Assurez vous que votre linge de couleur ne déteint pas.
•En cas de charge mixte, utilisez le programme du linge le plus fragile.
Vérification du linge
•Videz les poches et fermez les fermetures à glissières et à pression.
•Enlevez les crochets des voilages ou mettez vos voilages et vos petites pièces de linge ( rubans, pochettes, etc) dans un filet de lavage. Boutonnez les taies d'oreiller etc...
•Retirez les boutons mal cousus, les épingles, les agrafes.
Accès au tambour de l’appareil (FIG. 3 - 4) Procédez dans l’ordre suivant
•Vérifiez que l’appareil est hors tension. •Ouvrez la porte de votre appareil (FIG. 4). •Appuyez sur le poussoir du battant avant.
(FIG. 3 )
Introduction du linge
•Pour des performances de lavage optimum, placez le linge, préalablement trié et déplié, dans le tambour, sans le tasser et en le répartissant uniformément. Mélangez les grosses et les petites pièces pour obtenir un essorage optimum, sans formation de balourd.
•Veillez à ce qu'aucune pièce de linge ne tombe à côté du tambour.
Fermeture du tambour
•Fermez le tambour à deux mains en veillant au bon retour du poussoir en position. Partie colorée visible. (FIG. 3 ).
VEILLEZ A NE PAS COINCER DES PIÈCES DE LINGE ENTRE LES 2 BATTANTS.
Produits de lavage
Chargement de la boîte à produits
Bac prélavage (poudre  )
)
|
Bac lavage (poudre ou liquide ) |
Le bac ”lavage” peut contenir les poudres et les liquides, toutefois, ne pas utiliser de lessive liquide pour les programmes avec prélavage.
cl Javel : L’eau de javel est utilisable
comme agent désinfectant ou blanchissant. La javel concentrée doit être diluée.
 Assouplissant : L’assouplissant concentré est à diluer à l’eau chaude.
Dosage des produits de lavage
Suivez les dosages figurant sur l’emballage de vos produits de lavage. Attention : ils sont généralement préconisés, pour une charge maximale de linge. Adaptez votre dosage aux conditions de votre lavage.
Un dosage excessif génère de la mousse. Une surproduction de mousse diminue les performances de votre machine et augmente la durée de lavage ainsi que la consommation d’eau.
Pour les lessives concentrées, n'oubliez pas de diminuer les doses, consultez leur emballage.
Diminuez la dose de produits de 10% :
Lorsque, la teneur en calcaire de l’eau est faible, lorsque votre linge est peu sale et en faible quantité, Lorsque le programme est court.
Lessives pour lainages et textiles délicats
Pour laver ces textiles, utilisez une lessive appropriée (évitez de la mettre directement sur le tambour car certains de ces produits sont agressifs pour le métal).
15
Programmation
Déroulement du cycle |
|
|
|
|
|
Afficheur |
Marche/Arrêt |
||||||
|
|
|
|
|
|
||||||||
Nature du linge et température |
|
|
|
|
|
|
|
|
|
||||
|
|
|
|
|
|
I /O |
|
||||||
|
|
|
|
|
|
|
|
|
|
|
|
||
|
|
|
|
|
|
|
|
|
|
|
|
|
|
|
1 |
B |
A |
90 |
60 |
excel |
|
|
40 |
|
|
|
|
|
|
|
60 |
|
|
|
40 |
100 to 1500 rpm |
|
|
M A D E I N F R A N C E |
|
|
|
|
|
30 |
|
30 |
|
|
30 |
40 |
|
|
|
|
2 
 R
R 
 3
3 
 4
4 
 5
5
Départ/Pause : appui bref |
|
|
|
|
|
|
|
|
|
|
Options ”Anti-froissage” ”Eco” ”Lavage intensif” |
|
|
|
|
|
|
|
|
|
|
||
Annulation : appui long |
|
|
|
|
|
|
|
|
|
|
Options ”Prélavage” ”Rinçage plus” |
|
|
|
|
|
|
|
|
|
|
||
|
|
|
|
|
|
|
|
|
|
|
|
Réglage Vitesse d’essorage |
|
|
|
|
|
|
|
|
|||
|
|
|
|
Choix entre les fonctions : Vitesse d’essorage, |
|||||||
|
|
|
|
||||||||
& Départ différé |
|
Départ différé ou Temps restant |
|||||||||
Hormis la touche ”Marche/Arrêt”, toutes les touches sont sensitives. Elles ne restent donc pas enfoncées. Lors de la programmation, toutes les touches, hormis ”Départ/Pause”, peuvent être maintenues appuyées, mais, pour un réglage plus précis, nous vous conseillons d’agir sur elles par appuis brefs. L’action sur la touche ”Départ/Pause” se fait par appuis brefs sauf dans le cas d’une annulation de programme* ou pour réinitialiser le compteur de cycles* où vous devez la maintenir appuyée.
(*) Détail de ces fonctions dans les pages suivantes.
Lors de la mise sous tension, si un des voyants de déroulement du cycle B est allumé, faites une annulation avant toute autre manipulation.
Attention : La touche ”Marche/Arrêt” ne peut en aucun cas annuler un programme.
Programmation d’un cycle de lavage : |
Voyants et/ou afficheur |
|||
• Enfoncez la touche ”Marche/Arrêt” |
|
(1). |
|
|
I /O |
voyant |
|||
• Tournez le sélecteur 1 pour choisir le programme et la |
||||
+ vitesse d’essorage préconisée |
||||
température de lavage. La machine vous propose la vitesse |
sur A |
|||
d’essorage recommandée pour le type de textile sélectionné. |
||||
|
||||
•Si la vitesse d’essorage vous convient et que vous ne souhaitiez ni options ni départ différé, appuyez sur ”Départ/Pause” 2 . Le cycle de lavage débute.
•A la fin du cycle, l’afficheur indique ”-0-”.
Relâchez la touche ”Marche/Arrêt” I /O et attendez 1 à 2 min que la sécurité du couvercle se déverrouille (2).
Pour faciliter l’accès à votre linge, l’ouverture du tambour est automatiquement positionnée en haut.
voyants  et
et 
+décomptage du temps de lavage restant sur A
(les voyants B s’allument successivement jusqu’à la fin du cycle)
(1) - Avant de mettre votre machine en marche, vérifiez que le cordon électrique est branché et le robinet d’eau ouvert. Assurez-vous aussi de la bonne fermeture des portillons du tambour et du couvercle de la machine.
(2)- Par mesure de sécurité, à la fin d’un cycle, il est conseillé de débrancher le cordon électrique puis de fermer le robinet d'arrivée d'eau.
16
Programmation |
|
|||
Programmation complète d’un cycle de lavage : |
Voyants et/ou afficheur |
|||
|
|
|
|
|
• Enfoncez la touche ”Marche/Arrêt” |
|
. |
|
|
I /O |
voyant |
|||
• Tournez le sélecteur 1 pour choisir le programme et la température de |
||||
+ vitesse d’essorage |
||||
lavage. La machine vous propose la vitesse d’essorage recommandée |
||||
préconisée sur A |
||||
pour le type de textile sélectionné. |
||||
|
||||
• Choisissez, à l’aide de la touche de réglage R :
-soit de modifier la vitesse d’essorage proposée
-soit un égouttage.
Le cycle se terminera par un essorage doux à 100 trs/min. - soit un arrêt cuve pleine.
Votre machine s’arrêtera cuve pleine d’eau avant l’essorage final.
•Choisissez ou non les options ”Prélavage” et/ou ”Rinçage plus” par la touche 4
•Choisissez ou non les options ”Anti-froissage” et/ou ”Eco” et ”Lavage intensif” par la touche 5
•Choisissez un départ immédiat en appuyant sur ”Départ/Pause” 2 ...
voyant  + par ex.
ou 
ou 
voyants  et options choisies
+ fin de programme choisi sur A
voyants  et
et 
+décomptage du temps de lavage restant sur A
• ... ou choisissez un départ différé de 1 à 19 heures en sélectionnant cette |
voyant |
|
|
|
|||
option à l’aide de la touche 3 puis en réglant la durée à l’aide de la touche |
+ décomptage du temps |
||
R . |
restant avant départ du cycle |
||
|
sur A |
||
Mettre ou enlever une pièce pendant le cycle (impossible pendant l’essorage) :
•Appuyez sur la touche ”Départ/Pause” 2 pour interrompre le cycle.
•Mettez ou enlevez la ou les pièces de linge*.
•Appuyez sur la touche ”Départ/Pause” 2 pour relancer le cycle.
(*)le temps de déverrouillage du couvercle peut être de 1 à 2 minutes
Si vous avez choisi un départ différé, vous pouvez accéder instantanément au tambour à tout moment pendant la phase précédant le départ du cycle de lavage sans interrompre et relancer le cycle.
voyant B clignotant + compteur A arrêté
voyant B allumé fixe
+ reprise du décomptage sur A
Annulation en cours de programmation, de lavage ou pendant une pause :
• Appuyez sur la touche ”Départ/Pause” 2 pendant au moins une seconde. |
retour à l’affichage initial |
Cette opération peut se faire à tout moment, pendant le cycle ou |
|
pendant la programmation ou même pendant une pause. |
|
Si vous faites cette opération pendant la période d’attente d’un départ différé, seul le départ différé sera annulé.
Maintenir les performances de votre lave-linge :
• Quand, à la fin du cycle, s’affiche le message ”Filt”, vous devez nettoyer le filtre de la pompe (voir le chapitre ”NETTOYAGE DU FILTRE”).
• Après le nettoyage du filtre, réinitialisez le compteur de cycles en maintenant la touche ”Départ/Pause” 2 appuyée jusqu’à ce qu’apparaisse le message ”-0-”.
Pour avoir plus de précisions sur les différentes fonctions, reportez-vous au chapitre ”DÉTAIL DES FONCTIONS”.
Important : si vous avez arrêté votre machine en appuyant sur la touche ”Marche/Arrêt” ou après une coupure de courant, à la remise sous tension le cycle de lavage reprendra systématiquement là où il a été interrompu.
17
Programmation
Pour choisir le programme le mieux adapté à la nature de votre linge, conformez-vous aux indications figurant sur les étiquettes apposées sur la plupart des textiles.
Tableau des programmes |
|
|
|
|
|
|
|
|
|
|
Nature du textile |
Tempéfature (°C) |
Charge maxi (kg) |
Prélavage |
Rinçage plus |
Anti-froissage |
Eco |
Intensif |
Égouttage |
Arrêt cuve pleine |
|
|
||||||||||
COTON / BLANC / COULEUR |
40°-90° |
6,0 |
● |
● |
● |
● |
● |
● |
● |
|
COTON / BLANC / COULEUR |
excel |
6,0 |
● |
● |
● |
● |
● |
● |
● |
|
40 |
||||||||||
|
|
|
|
|
|
|
|
|
||
SYNTHÉTIQUE |
30°-60° |
3 |
● |
● |
● |
● |
● |
● |
● |
|
DÉLICAT |
30°-40° |
2 |
|
● |
● |
|
|
● |
● |
|
BERCE LAINE |
-40° |
1,5 |
|
● |
|
|
|
● |
● |
|
TEXTILES LAVABLES À LA MAIN |
|
1,0 |
|
● |
|
|
|
● |
● |
|
Programmes particuliers |
|
|
|
|
|
|
|
|
|
|
|
40° |
3 |
|
|
|
|
|
● |
● |
|
RINÇAGE seul |
|
selon le textile |
|
|
|
|
|
● |
● |
|
ESSORAGE seul |
|
|
|
|
|
|
|
|
● : Ces fonctions peuvent être utilisées seules ou cumulées - les combinaisons illogiques sont impossibles
Détail des fonctions
COTON “ ”
Pour une charge de linge composée de COTON blanc résistant ou de couleur
Pour le linge de couleur, ne dépassez pas la température de 60° maxi.
Dans les premières minutes de ce programme, votre lave-linge calcule automatiquement le programme à réaliser pour un lavage parfait.
COTON “ ” + “ exce40 ”
Ce cycle est destiné aux textiles ne pouvant pas être lavés au-dessus de 40°.Son efficacité de lavage est identique à un cycle de 60°, afin d’obtenir cette performance sa durée est prolongée. Ce cycle est particulièrement adapté aux charges maximales.
SYNTHÉTIQUE “ ”
”
Pour une charge de linge composée de SYNTHÉTIQUES RÉSISTANTS ou FIBRES MÉLANGÉES
DÉLICAT “ ”
”
Pour une charge de linge composée de
VOILAGES, TEXTILES DÉLICATS ou LINGE FRAGILE.
BERCE-LAINE “
 ”
”
Pour une charge de linge composée de LAINES ”LAVABLES EN MACHINE”
TEXTILES LAVABLES A LA MAIN “  ”
”
Pour une charge de linge composée de SOIE ou de TEXTILES PARTICULIEREMENT DÉLICATS
Ce programme vous permet de rafraîchir une charge de linge peu sale de 3 kg composée de
COTON, BLANC, COULEURS ou SYNTHÉTIQUES RÉSISTANTS.
Sa durée est limitée à 30 minutes.
Dans ce programme, la température de lavage est automatiquement programmée à 40°C.
Pour ce programme, les doses de lessive doivent être réduites de moitié.
18
 Loading...