


WASHING MACHINE
LAVE-LINGE
WÄSCHMASCHINE
LAVADORA
MÁQUINA DE LAVAR
ROUPA
VASKEMASKINE
WASMACHINE
PRALKA
AUTOMATICÁ PRAČKA
CT PA HA |
INSTALLATION, OPERATING AND |
|
MAINTENANCE INSTRUCTIONS ................ |
Page 3 |
|
MA HA |
|
|
ΠΛΥΝΤΗΡΙΟ ΡΟΥΧΩΝ |
F MANUEL D’INSTALLATION, |
|
|
D’UTILISATION ET D’ENTRETIEN.............. |
Page 11 |
, |
|
|
|
.................................. |
. 19 |
Ο∆ΗΓΙΕΣ ΕΓΚΑΤΑΣΤΑΣΗΣ, |
|
ΧΡΗΣΗΣ ΚΑΙ ΣΥΝΤΗΡΗΣΗΣ |
....................Σελίδα 27 |

You will find the following symbols used throughout this manual. They mean :
Safety instructions (for your machine and your washing), which must be observed
An electrical risk,
Important advice and information
FAu fil des pages de cette notice, vous découvrirez les symboles suivants qui vous signaleront :
les consignes de sécurité (pour vous, votre machine ou votre linge) à respecter impérativement,
un danger électrique,
les conseils et les informations importantes
DIm Laufe der Seiten geben folgende Symbole Hinweise auf:
die Sicherheitsvorschriften (für Sie, die Maschine oder die Wäsche), die unbedingt eingehalten werden müssen,
eine elektrische Gefahr,
Tipps und wichtige Informationen.
EA lo largo de las páginas de este manual, descubrirá los símbolos siguientes que le señalarán :
las consignas de seguridad (para usted, su máquina o su ropa) que respetar de modo imperativo,
un peligro eléctrico,
los consejos y las informaciones importantes
Door deze handleiding heen zult u de volgende symbolen aantreffen die u aangeven :
de veiligheidsvoorschriften (voor u, uw machine of uw was) die absoluut moeten worden nageleefd,
gevaar van elektrische aard,
tips en belangrijke informatie
W treści instrukcji można znaleźć poniższe symbole. Oznaczają one:
Instrukcje bezpieczeństwa (odnoszące się do pralki i procesu prania), które muszą być przestrzegane
Instrukcje bezpieczeństwa dotyczące instalacji elektrycznej
Ważna porada i informacja
CZ Na dalších stránkách tohoto návodu naleznete následující symboly, které vás upozorňují na:
Bezpečnostní doporučení (pro vás, pro vaši pračku a vaše prádlo), kterými je třeba se bezpodmínečně řídit,
Nebezpečí zásahu elektrickým proudem,
Doporučeni a důležité informace
! " #$ %& '( ' ) ) * #+)"%,- . .'#+ . , # () #/#0 1 , :
).) " 3# /)0#3 # ("+5 ' , ' 6)$+* #$ . 6 ( + ' 6)7# /)+*5), # ())#/!#" .# #7# #/+," *,
#3 # * 3# 9) 5 :+)& 1) & . #.,
' 9 () ).) " ;# . ,.
PAo longo das páginas deste manual, descobrirá os símbolos seguintes que assinalam :
as instruções de segurança (para si, a sua máquina ou a sua roupa) a respeitar imperativamente,
um perigo eléctrico,
os conselhos e as informações importantes
DK I denne betjeningsvejledning vil De støde på følgende symboler, som betyder:
Στις σελίδες που ακολουθούν θα ανακαλύψετε τα παρακάτω σύµβολα τα οποία επισηµαίνουν:
τις οδηγίες ασφαλείας (για σας, το πλυντήριο ή τα ρούχα σας) που πρέπει οπωσδήποτε να τηρείτε.
ηλεκτρικό κίνδυνο
τις σηµαντικές πληροφορίες και οδηγίες
Sikkerhedsregler (for Dem, maskinen eller vasketøjet), som skal overholdes.
Elektrisk fare
Vigtige råd og oplysninger
- 2 -
Contents
Page |
Page |
Removing the transport clamps from your machine |
..........................3 |
Installing your machine ............................................................................ |
3 |
Connecting your machine ........................................................................ |
4 |
Loading your washing .............................................................................. |
4 |
Loading the washing products................................................................ |
4 |
Programming ...................................................................................... |
5 & 6 |
Automatic safety devices ........................................................................ |
6 |
Details of functions.................................................................................... |
7 |
Modifying a washing programme............................................................ |
8 |
Incidents that may occur.......................................................................... |
8 |
Automatic fault diagnostics .................................................................... |
9 |
Running maintenance ............................................................................ |
10 |
Cleaning the pump filter ........................................................................ |
10 |
D1 |
|
D2 |
D3 |
|
|
|
F |
b |
|
|
|
|
|
|
|
B |
|
||
|
|
|
|
|
|
|
G |
|
a |
|
|
|
|
|
|
|
|
|
b |
13 |
|
C |
|
|
|
|
D |
a |
|
|
|
|
|
|
|
|
|
D4 |
|
|
|
2 |
|
|
|
2 |
1 |
|
|
|
1 |
|
|
|
|
|
|
|
|
A |
|
E |
|
|
|
|
|
|
|
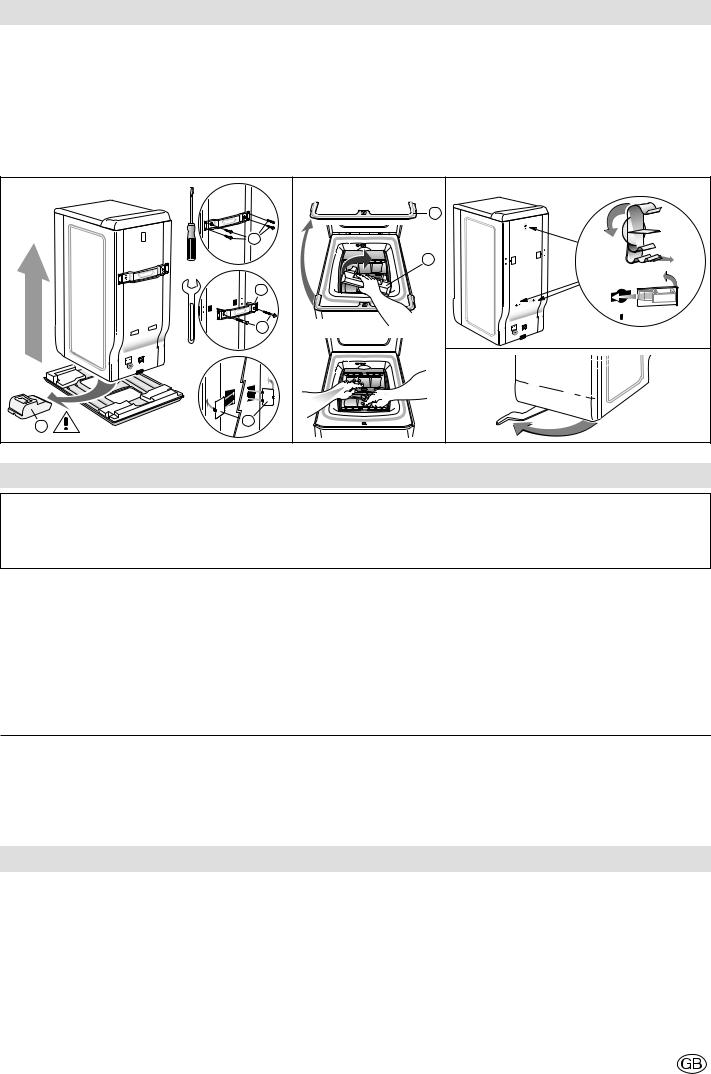
Removing the transport clamps from your machine |
see diagrams D1-D2-D3 |
|||
BEFORE USING THE MACHINE IN ANY WAY, YOU MUST FIRST PERFORM THE FOLLOWING OPERATIONS.
These comprise removing all the components designed to immobilise the drum in your machine during transport.
These so-called “releasing” operations are necessary for your machine to operate correctly and to conform to the prevailing safety standards.
If they are not carried out completely, this could cause severe damage to your machine while it is operating.
1 - Remove the washing machine from its plinth (check that the wedge |
5 - Remove the drum-tank assembly locking wedge (Diagram D2). |
|
supporting the motor is not still inserted in the machine) (Diagram |
To do this: |
|
D1. ) |
- Lift the lid on the machine |
|
2 - Remove the 4 screws with a screwdriver (Diagram D1. ) |
- Remove wedge |
|
- Remove wedge by turning it a quarter turn |
||
3 - Remove the cross clamp by removing the 2 screws (Diagram |
||
- Release the drum doors, locked in the lower position, by pressing |
||
D1. ) using a 10 or 13mm spanner (depending on the model). (Ensure |
down on both eaves simultaneously. |
|
that you remove the two plastic braces fixed on the cross clamp |
6 - Remove the pipe support collars You must block off the |
|
at the same time as the clamp itself). |
||
Replace the screws in their initial positions. |
holes revealed with the hole covers supplied in the accessories |
|
4 - You must block off the two holes using the hole covers provided |
bag (Diagram D3). |
|
|
(supplied in the accessories bag) (Diagram D1. )
We would recommend that you keep all the locking components since Your machine has been scrupulously checked before it left the factory.
these must be refitted if you must subsequently transport your machine again.
All these components, just like all the components in your machine, are made of recyclable materials and it is useful to bear this in mind when you eventually come to dispose of your machine at the end of its useful life.
You may therefore notice a little water still remaining in the tank or the products box.
Installing your machine
Mounting it on castors:
If your machine is equipped with removable castors, you will be able to move it quite easily.
To mount it on castors, swivel the lever on the bottom of the machine from the right to the far left (Diagram D4).
The machine must not rest on the “front” castors while it is operating: remember to return the lever to its initial position.
Levelling the machine:
Use a spirit level to check that the floor is horizontal: maximum slope 2°, i.e. a discrepancy of approximately 1cm over the width and of 1.5cm over the depth of the machine.
see diagram D4
Your machine’s surroundings:
If you are installing your machine next to another machine or a unit, we recommend that you leave a gap between them to allow for air circulation.
We also strongly recommend that you do NOT:
-Install your machine in a damp, poorly ventilated room.
-Install your machine in an area where it could be subject to water splashes.
-Install your machine on a carpeted floor.
If you cannot avoid doing this, please take every precaution to avoid blocking air circulation at the bottom of the machine in order to ensure that the internal components are well ventilated.
- 3 -
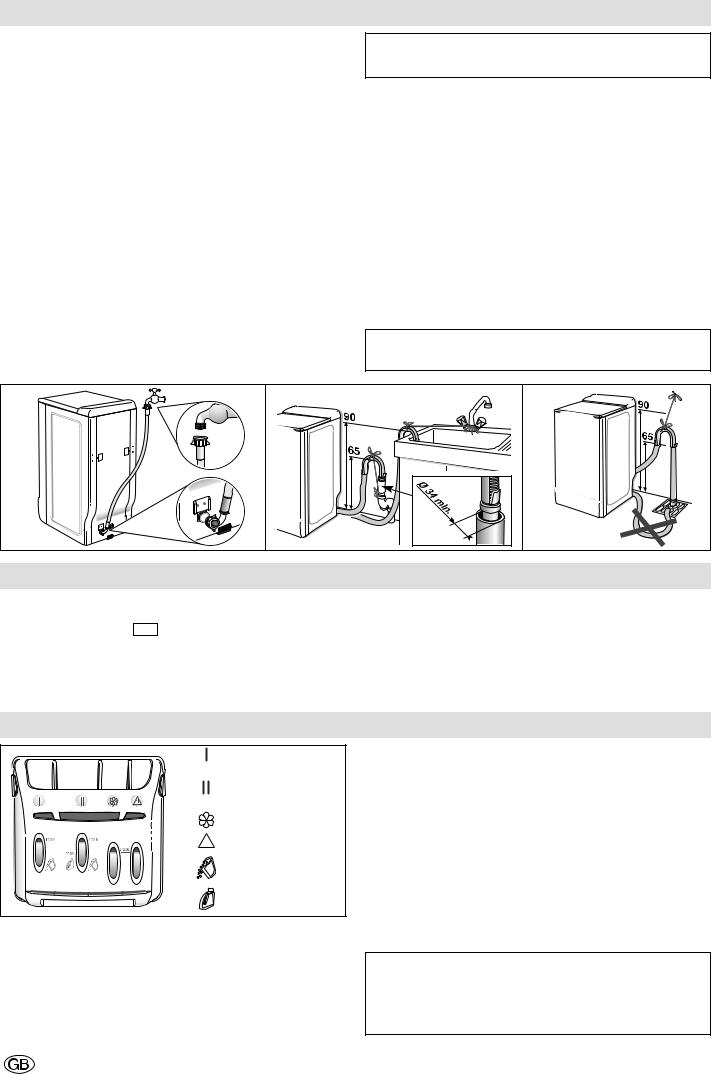
Connecting your machine
Connecting the cold water supply
Connect the supply hose (Diagram D5) :
-At one end to the connection on the back of the machine
-On the other end to a tap fitted with a threaded end 20mm dia. x 27 (3/4 BSP).
If you use a self-piercing tap, the useful aperture must have a minimum diameter of 6mm.
Water supply:
-Minimum water pressure: 0.1 MPa or 1 bar
-Maximum water pressure: 1 MPa or 10 bars
Draining away the waste water
Fit the hose bracket provided inside your machine to the end of the drain hose and then connect the hose (Diagram D6) :
•Either, temporarily, over a sink or a bathtub.
•Or permanently to a ventilated U-bend.
If your installation does not have a ventilated U-bend, check that the connection is not sealed. In fact, to avoid any waste water flowing back into the machine, you are strongly recommended to leave an air gap between the machine’s drain hose and the drainpipe.
In any case, the drain hose bracket must be placed at a height of 65 to 90cm higher than the base of the machine.
Ensure that the drain hose is tied firmly in place with cord to avoid the bracket coming loose during draining and causing a flood.
The waste water can be drained away to the ground provided that the drain hose passes through a point 65 to 90cm higher than the base of the machine (Diagram D7).
see diagrams D5-D6-D7
On any new installation (following a move or resale, etc.), the machine must be connected using new hoses. The old hoses must not be reused.
For your safety, you must comply with the instructions below.
Electrical supply
•Before connecting your machine, you must ensure that your installation’s electrical characteristics match those of your machine (see the details provided on the information plate affixed to the back of the machine).
•The electrical installation must comply with the prevailing standards and the Electricity Board’s regulations in the country concerned, particularly as regards Earthing and installation in shower rooms.
We cannot be held responsible for any incident caused by the machine being incorrectly earthed.
Advice on the electrical installation of your machine
•Do not use an extension lead, adapter or multiple socket.
•Never cut out the Earth wire.
•The socket must be readily accessible but out of the reach of children.
If in any doubt, please contact your installer.
Your machine conforms to European Directives EEC/73/23 (Low Voltage Directive) and EEC/89/336 (Electromagnetic Compatibility) as modified by Directive EEC/93/68.
D5 |
D6 |
D7 |
Loading your washing
Perform these actions in the following order:
Open the machine
•Check that the “On/Off” I /O button is released.
•Depending on the model, lift the opening handle or press the push button on the front of the machine.
The lid will open.
•Open the drum by pressing the button on the front door.
Insert your washing
For optimum washing performance, place your washing, preferably sorted and folded, in the drum, distributing it evenly without heaping it up. Mix large and small items to obtain an optimum, well-balanced spin.
Close the drum
Ensure that the drum is correctly closed.
Check that the three hooks and the border of the button are fully visible.
Loading the washing products
|
|
|
Pre-wash container |
|
|
|
|
(powder) |
|
|
|
|
Wash container |
|
|
|
|
(powder or liquid) |
|
|
|
|
Softener |
|
|
|
cl |
Bleach |
|
|
|
|
: |
POWDERED |
|
|
|
|
DETERGENT |
|
|
|
: |
LIQUID |
|
|
|
|
DETERGENT |
The “WASH” container may contain powder or liquid but liquid detergent should not be used for programmes WITH Pre-wash and/or WITH “Delayed Start” (depending on the model).
Concentrated softener should be diluted with warm water.
Concentrated bleach must be diluted.
To fill the product containers correctly, place the lid fully open.
Do not exceed the MAX level.
Dispensing the detergent
The amount of detergent to be used depends on the hardness of the water, the extent to which your washing is soiled and the amount of washing to be washed.
Please refer to the dosing instructions on your pack of detergent. Warning: in most cases, the detergent manufacturer’s recommendations apply to the drum filled to the maximum. Adjust the dosage correctly to the weight of the washing you have placed in the machine.
These recommendations will help you to avoid using too much detergent, which causes foam to be produced. Too much foam can reduce your machine’s performance and increase the length of the washing cycle and the consumption of water.
Detergents for woollens and delicate fabrics
You are recommended to use an appropriate detergent for washing these fabrics (avoid placing such detergents directly on the drum because they have an aggressive action on the metal).
Before your first wash
Before making your first wash, we recommend that you carry out a “COTTON 90 wash without pre-wash” and with no washing in the drum, using a 1/2 measure of your usual detergent in order to eliminate any residues from manufacturing that may remain in your machine.
- 4 -
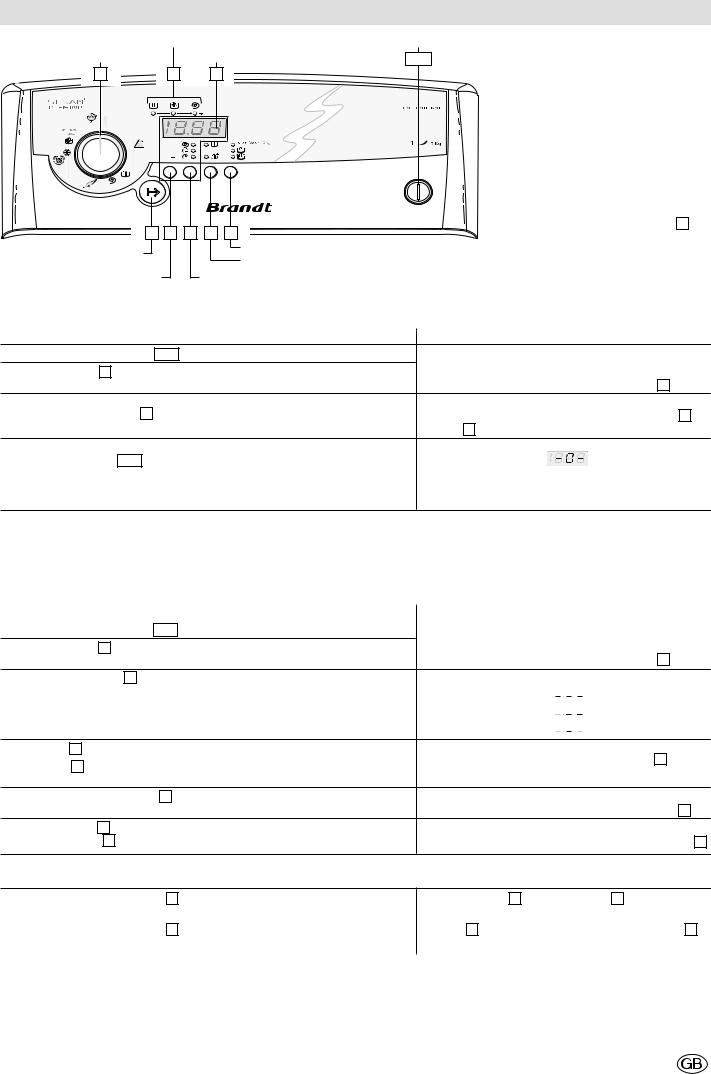
Programming |
|
|
|
|
||
|
|
Cycle progress |
|
On/Off |
Apart from the "On/Off" button, all the |
|
Type of washing and |
Display |
I /O |
buttons are sensitive and therefore do not |
|||
remain depressed. |
||||||
temperature |
1 |
B |
A |
|||
|
During programming, all the buttons except |
|||||
|
|
|||||
|
|
|
|
|
for "Start/Pause" can be kept depressed |
|
|
|
|
|
|
but, for more precise adjustment we |
|
|
|
|
|
100 to 1100 rpm |
recommend that you operate them using a |
|
90˚ |
60˚ 50˚C |
|
|
|
series of brief presses. |
|
|
60˚ |
|
You should operate the "Start/Pause" by |
|
|
pressing it briefly except when cancelling |
|
|
40˚ |
M A D E I N F R A N C E |
|
30˚ |
30˚ |
|
the programme* or re-initialising the cycle |
|
|
|
counter*, in which case it should be kept |
|
40˚ |
|
depressed. |
|
|
|
(*) Details of the functions are provided in |
|
|
|
the following pages. |
|
2 R |
3 4 5 |
If one of the cycle progress lights B is lit |
|
when you switch on, cancel before you carry |
||
Start/Pause: press briefly |
”Anti-creasing”, ”Eco”, ”Intensive wash” options |
out any other operation. |
|
Cancel: long press |
”Pre-wash”, ”Extra rinse” options |
Warning: the "On/Off" button cannot cancel |
|
Spin speed and delayed start |
Choice between spin speed, “Delayed Start” |
a programme. |
|
|
|||
|
setting |
or “Remaining Time” functions |
|
Programming a basic washing cycle: |
Lights and/or display |
||
• Depress the "On/Off" button I /O (1).
•Turn the selector 1 to select the programme and the washing temperature. The machine proposes the recommended spin speed for the type of fabric selected.
•If the spin speed is acceptable and you do not wish to use any options or delayed start, press "Start/Pause" 2 .
The washing cycle will now start.
•At the end of the cycle, the display shows ”-0-”
Release the "On/Off" I /O button and wait 1-2 minutes for the safety device to unlock the lid (2).


 : to assist access to your washing, the drum opening automatically positions itself at the top.
Light 
+ recommended spin speed shown on A
lights  and
and 
+ countdown of the washing time remaining on A (lights B light up successively until the cycle is complete)
(1) - Before starting your machine, check that the power cable is plugged in and the water tap is open. Also ensure that the drum doors and the lid are firmly closed.
(2)- As a safety measure, it is advisable to unplug the power cable and turn off the water tap.
Programming a full washing cycle: |
Lights and/or display |
• Depress the "On/Off" button I /O .
•Turn the selector 1 to select the programme and the washing temperature. The machine proposes the recommended spin speed for the type of fabric selected.
•Use the setting button R :
-Either to alter the proposed spin speed
-Or to select drip dry. The cycle will finish with a gentle spin at 100 rpm
-Or to stop with the drum full of water. Your machine will stop with the drum full of water before the final spin.
•Use button 4 to select the “Pre-wash” and/or “Extra Rinse” options, if desired
•Use button 5 to select the "Anti-creasing" and/or “Eco” and “Intensive Wash” options, if desired
•Use the “Start/Pause” button 2 to select an immediate start...
•... Or use button 3 to select a start delayed by 1-19 hours, setting the relevant delay using button R .
Light 
+ recommended spin speed shown on A
Light 
+  for example or
or 
Lights  and selected options
+ selected programme end shown on A
Lights  and
and 
+ countdown of the washing time remaining on A
Light 
+ countdown of remaining time before cycle starts on A
Adding or removing an item during the cycle (impossible during spin):
• Press the "Start/Pause" button |
2 |
to interrupt the cycle. |
Light B flashes + counter A stops |
• Add or remove the items of laundry*. |
|
||
• Press the "Start/Pause" button |
2 |
to restart the cycle. |
Light B permanently lit + countdown resumes on A |
(*) The lid may take 1-2 minutes to unlock. |
|
||
|
|
|
|
For more details on the various functions, please refer to "DETAILS OF THE FUNCTIONS".
Please note: if you have stopped your machine by pressing the "On/Off" button or if there has been a power failure, when power is restored to your machine, the washing cycle will restart automatically at the point at when the cycle was interrupted.
- 5 -
Programming
Cancelling while programming, washing or during a pause: |
Lights and/or display |
• Depress the "Start/Pause" button 2 for at least 1 second. |
return to initial display |
This can be done at any time during the cycle or during programming, or even |
|
during a pause. |
|
If you do this while the machine is in the waiting period for a delayed start, only |
|
the delayed start is cancelled. |
|
|
|
Maintaining your washing machine's performance:
• When the “Filt” message is displayed at the end of the cycle, you must clean the pump filter (see "CLEANING THE FILTER").
• After cleaning the filter, re-initialise the cycle counter by depressing the "Start/Pause" button 2 until the message ”-0-” is displaye..
For more details on the various functions, please refer to "DETAILS OF THE FUNCTIONS".
Please note: if you have stopped your machine by pressing the "On/Off" button or if there has been a power failure, when power is restored to your machine, the washing cycle will restart automatically at the point at when the cycle was interrupted.
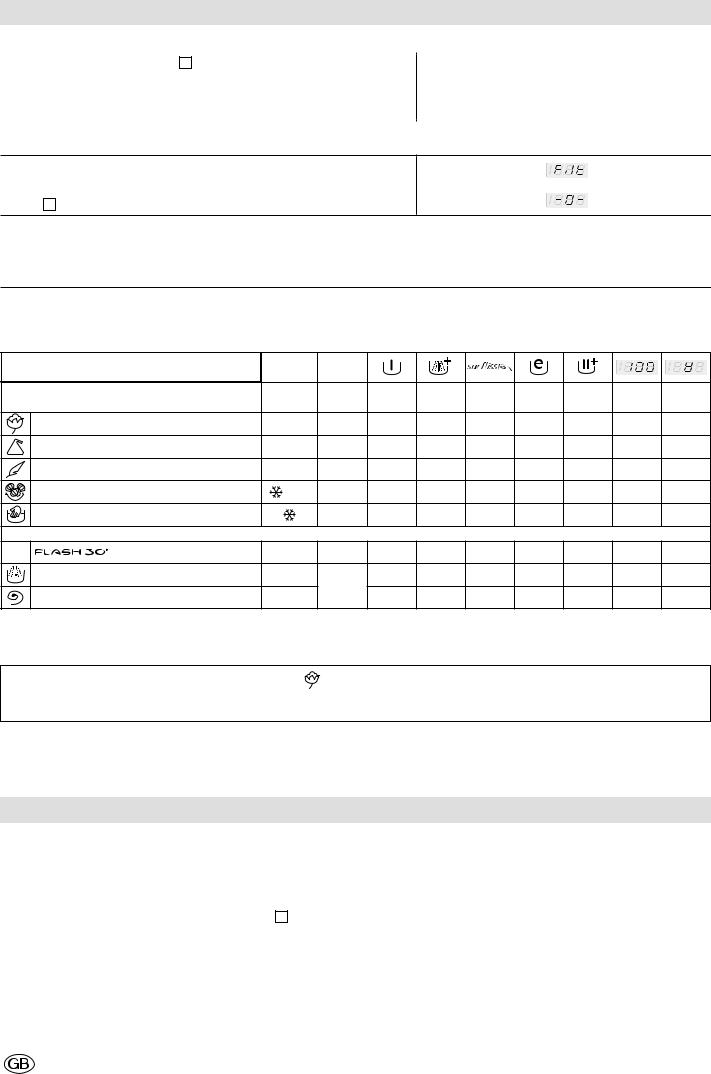
To select the most suitable programme for your type of washing, follow the instructions on the labels attached to most items.
Please refer to the meanings of the symbols at the end of this manual.
Programmes table |
|
|
|
|
|
|
|
|
|
Type of textile |
Temperature Max. load |
Pre-wash |
Extra |
Anti- |
Eco |
Intensive |
Drip-dry |
Full drum |
|
|
(°C) |
(kg) |
|
rinse |
creasing |
|
Wash |
|
stop |
COTTON/WHITES/COLOUREDS |
40°- 90° |
5.0 |
● |
● |
● |
● |
● |
● |
● |
SYNTHETICS |
30°- 60° |
2.5 |
● |
● |
● |
● |
● |
● |
● |
DELICATES |
30°- 40° |
1.0 |
|
● |
● |
|
|
● |
● |
WOOLLENS |
- 40° |
1.5 |
|
● |
|
|
|
● |
● |
HAND-WASHABLE TEXTILES |
|
1.0 |
|
● |
|
|
|
● |
● |
Special programmes |
|
|
|
|
|
|
|
|
|
|
40° |
2.5 |
|
|
|
|
|
● |
● |
RINSE only |
|
Depending |
|
|
|
|
|
● |
● |
SPIN only |
|
on the |
|
|
|
|
|
|
|
|
fabric |
|
|
|
|
|
|
|
|
● : These functions can be used alone or in combinations: no illogical combinations can be made.
STANDARD COMPARISON TESTING PROGRAMME
Programme ................................................................................ |
- 60° |
Duration |
............................................................................................1 : 58 |
Load .................................................................................................... |
5 kg |
Energy. ...................................................................................... |
0.95 kWh |
|
|
Water .................................................................................................... |
42 l |
To comply with the statement on the label, the tests are conducted in accordance with European Directive 92/75/EEC at nominal capacity, ensuring complete use of the CEI detergent from the start of the washing phase.
Automatic safety systems
Lid opening safety system: |
Water safety system: |
As soon as washing commences, the lid on your machine is locked.
When the cycle is finished or when the machine has stopped with the drum full of water, the lid unlocks.
If you have programmed a "Delayed start", the lid is not locked until the waiting period is over and the cycle starts.
If you wish to open the lid during the cycle, press button 2 " " briefly and wait 1-2 minutes for the safety system to unlock the lid.
Depending on when you wish to open the lid during the cycle, this time delay may be a little longer because a cooling down period may also have to be included.
In fact, to avoid your being severely burnt, the lid safety system will not open during the cycle unless the temperature inside the machine is below a certain threshold.
- 6 -
During operation, constant control of the water prevents any overflows.
Spin safety system:
Your washing machine is fitted with a safety system that restricts the spin when poor load distribution is detected.
In this case, your washing may be insufficiently spun. Redistribute your washing in the drum and programme a new spin.
Anti-foam system:
You machine can detect when too much foam is being produced during spinning.
At such times, spinning stops and the machine drains.
The cycle then restarts, adapting the spin rates and possibly adding an extra rinse.
Details of functions
Programmes
The main programmes provided by the machine are as follows:
COTTON " "
"
If your washing comprises hard-wearing white or coloured COTTONS
When washing coloureds do not exceed a maximum temperature of 60°C.
During the first few minutes of the programme, your machine automatically evaluates the washing load you have introduced and adapts the water consumption and the length of the programme accordingly to provide a perfect wash.
SYNTHETICS " "
"
If your washing comprises HARD-WEARING SYNTHETICS or MIXED FIBRES
DELICATES " "
"
If your washing comprises NETTING, DELICATE FABRICS or FRAGILE TEXTILES
A programme with a gentle mechanical action and very gentle spin in accordance with the type of fabric.
BABYWEAR-WOOLLENS "
 "
"
If your washing comprises WOOLLENS or MACHINE-WASHABLE WOOLLENS”
A programme with agitation and spin phases specially adapted to these types of fabrics
HAND-WASHABLE TEXTILES "  "
"
If your washing comprises SILK or PARTICULARLY DELICATE FABRICS
A programme with a very gentle mechanical action and no intermediate spins between rinses.
The cycle ends with a very gentle, progressive spin restricted to 600 rpm.
This programme enables you to refresh a small load of 2.5 kg of lightly soiled washing composed of WHITES, COTTONS, COLOUREDS or HARD-WEARING SYNTHETICS.
The cycle time is restricted to around 30 minutes
In this programme, the washing temperature is automatically programmed at 40°C.
For this programme, the doses of detergent should be reduced by half.
RINSE ONLY " "
"
A separate rinse followed by a choice of:
-Either spin and drain
-Or drain only ("Drip-dry" option)
-Or a stop with the drum full of water.
SPIN ONLY "  "
"
This allows a separate spin and drain.
In the case of "Rinse only" followed by a spin or "Spin only", ensure that you select a suitable spin speed for the type of washing in the machine.
Options
Pre-wash 
Specially designed for heavily soiled washing (mud, blood, etc.).
A specific initial agitation in cold water precedes a phase of heating to 30°C.
This agitation phase in cold water enables the particles soiling the washing to be removed before the water is heated.
Detergent must be placed in the " " container in the products box.
Extra rinse 
"Especially for sensitive and allergic skin": adds an extra rinse to the washing cycle.
Anti-creasing 
Makes your washing easier to iron.
This option enables your washing to be washed and spun more gently, while retaining identical washing performance.
Eco 
The "Eco" function enables you to obtain a perfect wash while saving on energy. It reduces the washing temperature and increases the agitation period.
Intensive wash 
This function improves the washing performance and enables reputedly stubborn stains to be handled by automatically increasing the temperature in the drum and the agitation time.
Delayed start 
You can delay the start of your programme by 1 to 19 hours to take advantage of off-peak rates or finish the cycle at a particular time.
To do this, select function “Delayed Start” function (light “  “) using button 3 and then select the cycle starting time using button R .
While the machine is waiting to start, the display A counts down the time remaining before the cycle effectively starts.
Remaining time 
During programming, you can find out the length of the programme you have selected* by selecting the “Remaining Time” function (light ”  ”)
”)
by pressing button 3 .
If you select the “Remaining Time” function during the waiting period for a delayed start, it is the selected programme’s duration that is permanently displayed.
(*) The time indicated by the machine at the start of the programme may vary during the course of the cycle:
-If you change the washing temperature (even during a spin) or if you add or cancel options, the time will be recalculated and then updated on the display.
-Certain operating variables (such as, for instance, detection of imbalance or foam, etc.) can also alter the cycle's duration.
-If there is a power failure during the washing phase, when the power is restored, the time displayed may be less than the actual remaining time. This time will be updated at the start of the rinsing phase.
Full drum stop
This is used for textiles that you do not wish to spin or if you foresee your being absent for a long time after the washing is finished.
When this function is selected, the cycle is interrupted before the final spin, allowing your washing to soak in the water to avoid creasing.
When the machine stops with the drum full of water, display A does
not count down the remaining time but remains fixed (including the point) and the cycle progress light “ ” flashes.
Then:
- Either you wish to drain and spin.
In which case, use button 3 to select the “spin” function (light ) and then use button R to set a suitable spin speed for your type of washing. The programme will terminate automatically.
- Or you wish simply to drain.
In which case, select the “spin” function (light ) and then use button R to display
 (“Drip Dry” function).
- 7 -

Modifying a washing programme
During programming:
Before pressing the "Start / Pause" button 2 “ ”, any modification is possible.
After the cycle starts:
•You cannot modify the type of textile (for example, change from
"COTTON" to "SYNTHETICS", "SYNTHETICS" to "DELICATES", etc.).
If you turn the programme selector 1 to a different textile, the progress cycle light B lit at the time and the display screen A flash for a few seconds to indicate that the change is forbidden and will not be effected.
To change the type of textile during the cycle, you must cancel the current programme and then programme a new cycle.
•On the other hand, provided that the type of textile is the same, you can change the washing temperature at the start of the washing phase.
The time remaining will then be adjusted accordingly.
•You can change the spin speed throughout the cycle.
•You can select “Drip-dry” and “Full drum stop” up to the end of the rinsing phase (until the cycle progress light "  " goes out).
•You can change the “delayed start” period throughout the whole of the waiting period up to the time the cycle effectively starts.
If you wish to cancel “Delayed Start” during this period, set the display A to “0” and then briefly press button 2 “ ”.
”.
The cycle will then start immediately.
•You can only activate the “ ” (Pre-wash) option during the waiting period for a “Delayed Start”.
•You can activate the “ ” (Extra Rinse) option up to the point that rinsing commences (until the cycle progress light "
  " illuminates).
• You can only alter the “


 ” (Anti-creasing), “
 ” (Eco) and “
 ” (Intensive Wash) options during the waiting period for a “Delayed Start”.
•You can deactivate all the options at any time during the cycle provided that the particular action has not been completed.
Incidents that may occur
Some incidents may occur while you are using your machine. These are the points to check:
The cycle does not start
•You have not pressed the "Start /Pause" button
•There is no power to the machine:
-Check that the plug is correctly in the socket
-Check the circuit breaker and the fuses.
•The water tap is closed
•The machine's lid is not closed properly
A puddle of water forms around the machine
First of all remove the plug and the fuse and shut off the water supply tap.
While the machine is operating, the permanent level control prevents the water from overflowing. If, despite this, water comes out of your machine, it may be that:
•The drain hook is wrongly positioned in the drain pipe.
•The water supply hose is not sealed tightly at the machine or tap end:
-Check that the seals are in place and the connections are tight.
Heavy vibration during spin
•All the transport materials have not been removed correctly from the machine:
-Check that all the transport wedges have been removed (see
"REMOVING THE TRANSPORT CLAMPS FROM YOUR MACHINE").
•The floor is not level.
•Your machine is resting on its two “front” castors (depending on the model):
-Reset your machine on its feet by pushing the castor engagement lever to the right.
The washing is not spun or not spun enough
•You have selected a programme with no spin, for example "Dripdry"
•The spin safety system has detected poor distribution of the washing in the drum:
- Untangle the washing and programme a new spin.
The machine does not drain
•You have programmed "Full drum stop"
•The pump filter is blocked:
- Clean it (see "CLEANING THE FILTER" for the relevant procedure)
•The drain hose is kinked or squashed
The lid does not open
•The programme has not yet finished
The lid remains locked throughout the programme.
The drum doors open very slowly
(On machines fitted with gently opening doors)
•Your machine has not operated for a long time
•It is located in too cold a position.
•Detergent residue (powder) is blocking the hinges
-In all cases, everything returns to normal after the doors have opened initially.
As a general rule, whatever the anomaly detected, you should stop the machine, unplug the power cable and shut off the water tap
- 8 -
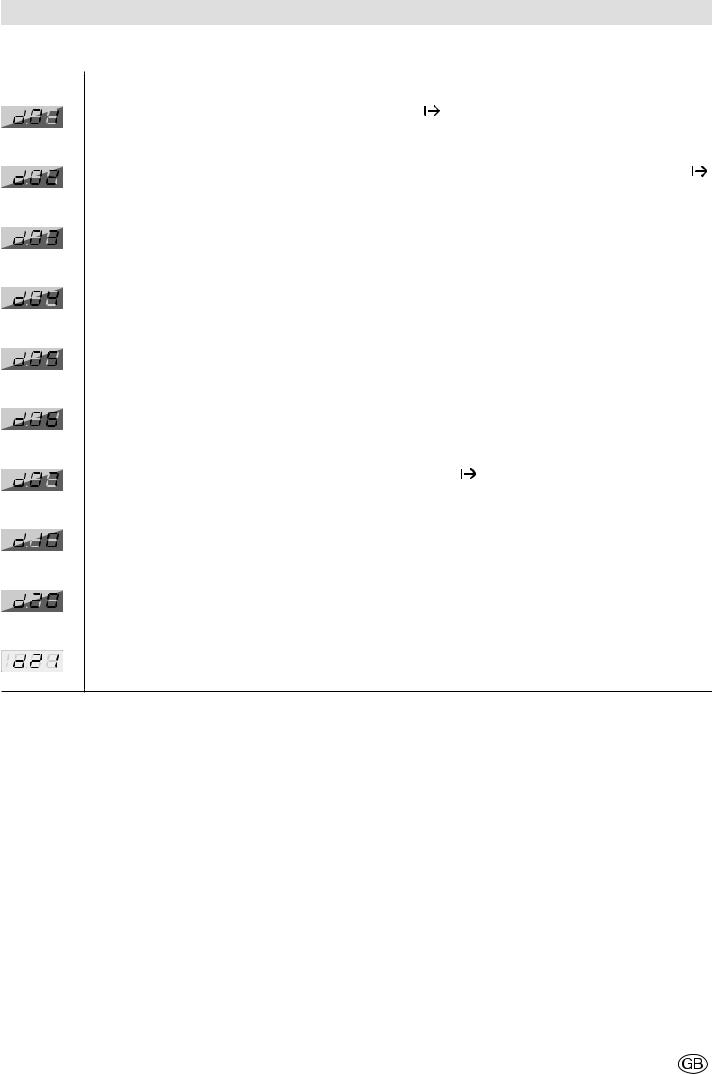
Automatic fault diagnostics
Your machine can automatically detect certain operating faults.
Particular messages are displayed to indicate the following faults:
Message |
Possible cause / remedy |
|
Filling fault. Check that the water tap is open, then press button " " again to restart the cycle. If the fault persists, contact |
|
|
|
your breakdown engineer. |
|
|
|
Draining fault. Clean the pump filter (see "CLEANING THE FILTER" for the relevant procedure), then press button " " |
|
|
|
again to restart the cycle. If the fault persists, contact your breakdown engineer. |
|
|
|
Heating fault. When this message appears at the end of the cycle, it indicates that the machine has not achieved the washing |
|
|
|
temperature you have selected. Contact your breakdown engineer. |
|
|
|
Programming card fault. For its own protection, your machine ceases to function. Contact your breakdown engineer. |
|
|
|
|
|
|
|
Temperature fault. Contact your breakdown engineer. |
|
|
|
|
|
|
|
Drum rotation fault. After switching the machine off, check whether an item of washing or an object has slipped between the |
|
drum and the tub, causing a blockage (see "CLEANING THE FILTER" for details on how to access the back of the tub). If the |
|
fault persists, contact your breakdown engineer. |
|
|
|
|
|
Locking fault. Check that the lid is closed correctly, then press button " " again to restart the cycle. If the fault persists, |
|
|
|
contact your breakdown engineer. |
|
|
|
Overflow. When this fault is detected, the supply of water is automatically cut off, the machine drains and the cycle stops. |
|
|
|
Contact your breakdown engineer. |
|
|
|
Water distribution fault in the products box. Contact your breakdown engineer. |
|
|
|
|
|
|
Fault in the electronic unit. For its own protection, your machine ceases to function. Contact your breakdown engineer
When one of these faults occurs, please remember to note down the message displayed (d01, d02, …. d21) so that you can inform your breakdown engineer of this during your call, making his work easier.
- 9 -
Running maintenance
Cleaning the machine.
To clean the casing:
Use only soap and water.
To clean all the plastic components (control panel, plinth, etc.):
Use only a cloth dampened with water. In all cases, do not use:
•Abrasive powders
•Metal or plastic sponges
•Alcohol-based products (alcohol, thinners, etc.)
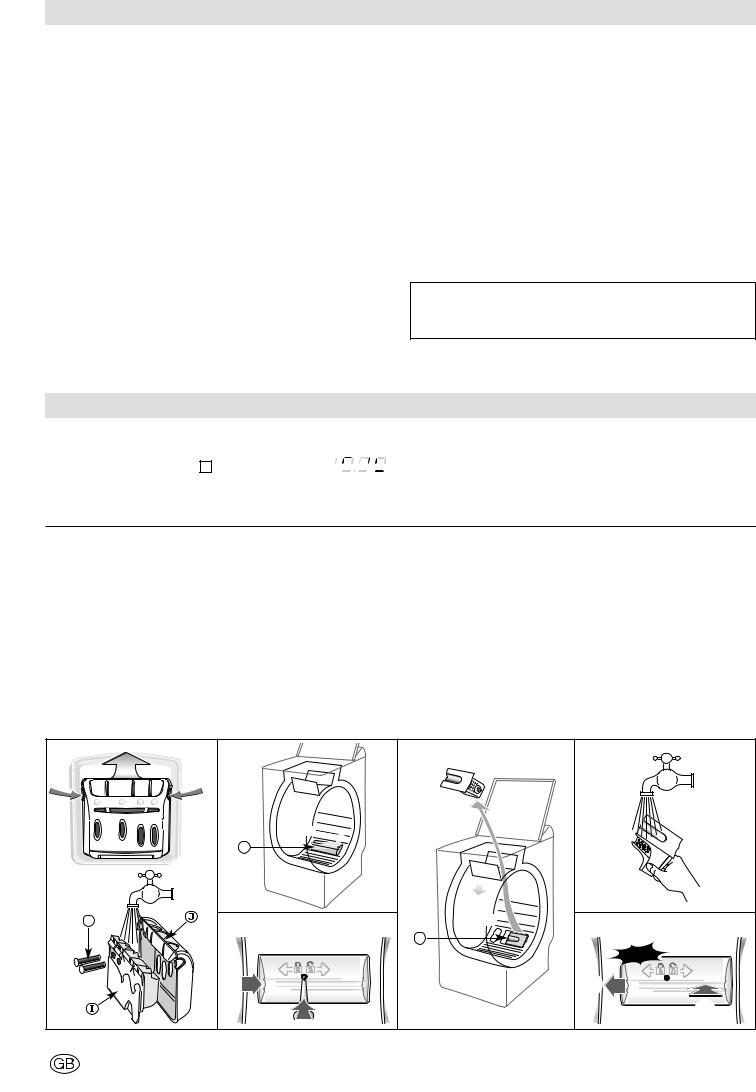
Cleaning the products’ box (Diagram D8).
Nettoyez régulièrement la boîte à produits. Pour cela :
-Press the bosses on each side of the box simultaneously to extract it from its housing.
-Remove the siphons from the rear of the box and separate the box from its front cover
-Rinse everything under the tap (taking care to empty any excess water remaining inside the box).
-Refit all the box’ components, ensuring that the box section itself is properly clipped into the cover and then re-insert the complete assembly into its location under the machine’s lid.
Frost risk
When there is a risk of frost, disconnect the water supply hose and empty any water remaining in the drain hose by placing this as low as possible in a basin.
see diagram D8
Care of the internal components
To ensure better hygiene, we recommend that you:
•Leave the lid open for a short time after washing.
•Clean the plastic and rubber access components to the tank approximately once a month using a slightly chlorinated product. Run a rinsing cycle to remove any residue of this product.
•Run a washing cycle at 90°C at least once a month.
Periodic checks
We recommend that you check the condition of the water supply and drain hoses. If you notice the slightest cracking, do not hesitate to replace them with identical hoses available from the manufacturer or his AfterSales service.
Replacing a water supply hose
When replacing the hose, ensure that the hose is tightly fastened and that there is a seal at both ends.
Replacing the power cable
For your safety’s sake, this operation must be performed by the manufacturer’s After-Sales service or a qualified professional electrician.
Cleaning the filter
After a certain number of cycles, your machine will warn you that you should clean the drain pump filter.
At the end of the cycle, the display A flashes and then shows: 
You must reset the cycle counter to remove this message: if you do not do this, it will continue to be displayed at the end of every cycle.
see diagrams D9-D10-D11-D12-D13
To reset the cycle counter, when the message ”Filt” is flashing, press down the "Start / Pause" button “ ” until the normal end of cycle message “-0-” appears.
If you do not clean the pump filter regularly, this can affect your machine’s performance.
Cleaning the pump filter
This filter catches any small objects inadvertently left in the clothes to avoid their disrupting the pump’s operation.
To clean the filter, proceed as follows:
-Open the drum doors. At the back of the drum, you will see a plastic component (Diagram D9)
-Unlock this component (Diagram D10). To do this:
•Insert a rod (a pencil or a screwdriver, for instance) into the hole in component
•While pressing down vertically with the rod, push component towards the right until it releases from its housing
-Remove component
-Turn the drum slightly towards the front of the machine with the doors
open (Diagram D11).
Through the openings freed by removing component you can now access the pump filter .
-Remove it from its housing (Diagram D11).
-Remove the various objects that may be inside it.
-Rinse it under the tap (Diagram D12).
-Re-insert it by pushing it fully into its housing, after checking that the housing is clean.
-Re-insert component , carefully positioning it in the openings at the back of the drum and pushing it to the left until it is perfectly engaged.
(Diagram D13).
D8 |
|
D9 |
D11 |
D12 |
|
|
K |
|
|
|
H |
D10 |
|
D13 |
|
|
L |
||
|
|
|
|
|
|
|
|
|
CLANG |
|
|
|
|
|
|
|
|
|
|
|
|
|
- 10 - |
|

Sommaire
Page |
Page |
Démontage des brides de transport de votre appareil |
....................11 |
Mise en place de votre appareil ............................................................ |
11 |
Raccordements de votre appareil ........................................................ |
12 |
Chargement du linge .............................................................................. |
12 |
Chargement des produits de lavage .................................................... |
12 |
Programmation .............................................................................. |
13 et 14 |
Sécurités automatiques.......................................................................... |
14 |
Détail des fonctions ................................................................................ |
15 |
Modification d’un programme de lavage ............................................ |
16 |
Incidents pouvant survenir .................................................................... |
16 |
Diagnostic automatique des défauts.................................................... |
17 |
Entretien courant .................................................................................... |
18 |
Nettoyage du filtre de pompe................................................................ |
18 |
D1 |
|
D2 |
D3 |
|
|
|
|
|
F |
b |
|
|
|
|
|
|
|
|
B |
|
|
||
|
|
|
|
|
|
|
|
|
G |
|
a |
|
|
|
|
|
|
|
|
|
|
|
b |
13 |
|
C |
|
|
|
|
|
D |
|
a |
|
|
|
|
|
|
|
|
|
|
D4 |
|
|
|
|
2 |
|
|
|
|
2 |
1 |
|
|
|
|
1 |
|
|
|
|
|
|
|
|
|
|
A |
|
E |
|
|
|
|
|
|
|
|
|
Démontage des brides de transport de votre appareil |
voir dessins D1-D2-D3 |
||||
AVANT TOUTE UTILISATION, IL EST IMPÉRATIF D'EFFECTUER LES OPÉRATIONS DÉCRITES CI-APRÈS.
Ces opérations consistent à retirer toutes les pièces qui servent à immobiliser la cuve de votre appareil pendant le transport.
Ces opérations dites ”de débridage” sont nécessaires pour le bon fonctionnement de votre appareil et le respect des normes en vigueur en matière de sécurité.
Si ces opérations n’étaient pas effectuées dans leur totalité, cela pourrait causer des dommages graves à votre appareil pendant son fonctionnement.
1 - Retirez le lave-linge de son socle (vérifiez que la cale servant au maintien du moteur n'est pas restée coincée sous la machine)
(Dessin D1. )
2 - Enlevez les 4 vis à l'aide d'un tournevis (Dessin D1. )
3 - Déposez la traverse en ôtant les deux vis (Dessin D1. ) à l'aide d'une clé de 10 ou de 13 mm (suivant le modèle)
(assurez-vous que les deux entretoises en plastique fixées sur la traverse, sont bien retirées en même temps que cette dernière).
Remontez les vis à leur emplacement initial.
4 - Obstruez impérativement les deux trous à l'aide des cacheorifices prévus à cet effet (fournis dans le sachet d'accessoires)
(Dessin D1. )
5 - Retirez la cale d'immobilisation de l'ensemble tambour-cuve (Dessin
D2).
Pour cela :
-soulevez le couvercle de la machine
-retirez la cale
-enlevez la cale en la tournant d’un quart de tour
-libérez les portillons du tambour, bloqués en position basse, en appuyant simultanément sur les deux volets.
6 - Enlever les colliers support tuyaux et obstruez impérativement les trous à l’aide des caches (fournis dans le sachet d'accessoires)
(Dessin D3).
Nous vous conseillons de conserver toutes les pièces de bridage, car il faudra obligatoirement les remonter si vous devez, par la suite, transporter votre machine.
Toutes ces pièces ainsi que celles composant l’ensemble de votre machine sont faites de matériaux recyclables. Il convient d’en tenir compte lors de leur mise en décharge à la fin de la vie de votre machine.
Avant sa sortie d’usine, votre appareil a été minutieusement contrôlé; il est donc possible que vous constatiez la présence d’un peu d’eau dans la cuve ou au niveau des boîtes à produits.
Mise en place de votre appareil
Mise sur roulettes :
Si votre machine est équipée de roulettes escamotables, vous pouvez la déplacer facilement.
Pour la mise sur roulettes, faites pivoter de la droite jusqu'à l'extrémité gauche le levier situé au bas de l'appareil (Dessin D4).
En fonctionnement, la machine ne doit pas reposer sur ses roulettes "avant" : n'oubliez pas de ramener le levier dans sa position initiale.
Mise à niveau :
Vérifiez à l'aide d'un niveau que le sol est horizontal : inclinaison maxi 2°, soit un écart d'environ 1 cm mesuré sur la largeur et de 1,5 cm sur la profondeur de la machine.
voir dessin D4
Environnement de l’appareil :
Si vous placez votre machine à côté d'un autre appareil ou d'un meuble, nous vous conseillons de toujours laisser entre eux un espace pour faciliter la circulation de l’air.
D’autre part, nous vous déconseillons fortement :
-d'installer votre appareil dans une pièce humide et mal aérée.
-d'installer votre appareil dans un lieu où il pourrait être soumis à des projections d’eau.
-d'installer votre appareil sur un sol en moquette.
Si vous ne pouvez l'éviter, prenez toutes les dispositions pour ne pas gêner la circulation de l'air à sa base, afin d’assurer une bonne ventilation des composants internes.
- 11 - |
F |
 Loading...