


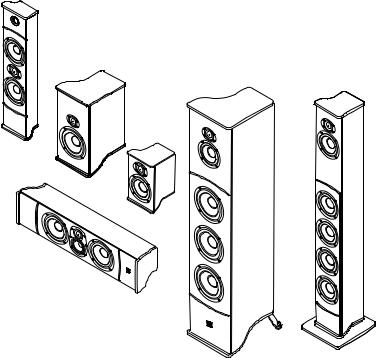
VS Series Loudspeakers
VS 336, VS 344, VS 325C, VS 224, VS 260, and VS 240
Español |
Italiano |
Deutsch |
Altavoces VS de Boston |
Altoparlanti Boston VS |
Boston VS Lautsprecher |
Manual del Propietario / |
Manuale dell’utente/Istruzioni |
Bedienungsanleitung |
Instrucciones de Seguridad / |
di sicurezza/Informazioni sulla |
/ Sicherheitshinweise / |
Información de Cumplimiento |
conformità |
Konformitätserklärung |
Français |
Svenska |
Haut-parleurs Boston VS |
Boston VS högtalare |
Guide de l’utilisateur / |
Bruksanvisning / |
Instructions de sécurité / |
säkerhetsanvisningar |
Informations relatives à la |
/ information om |
conformité |
överensstämmelse |
Information Compliance / Instructions Safety / Manual Owner’s

|
Introduction |
|
E |
Thank you for choosing Boston Acoustics. The Boston VS Series Loudspeakers – our best-performing, best-looking products – deliver |
|
a superb audio/video or audio-only experience. Innovative driver and cabinet designs yield exceptional sonic characteristics. Each |
||
N |
||
G |
VS Series model is voiced to blend with the others so they can be combined to deliver the best performance in any configuration. |
|
L |
|
|
I |
Adding to the sonic appeal of the VS Series is their visual appeal. The striking piano lacquer finish and high-gloss furniture-grade |
|
S |
end panels cover cabinets that are so much more than rectangular boxes. The structural elements of the cabinets are made of |
Hhigh-frequency-molded MDF which feature curved surfaces that reduce internal standing waves and panel resonances. Substantial internal braces enhance the strength of the cabinets to provide an ideal environment for the high performance drivers.
Features
•Elegant piano lacquer finish cabinet
•High-gloss multi-layer furniture-grade end panels
•High-frequency-molded MDF cabinet features curved surfaces, which reduce internal standing waves and panel resonances
•Long-throw woofers and midranges feature cast aluminum frames, Organic Composite Cone Material (OCCM), and rubber surrounds
•Super Wide Bandwidth (SWB) tweeters with a Coupled Dual Concentric Diaphragm (CDCD) minimizes phase shift and distortion while improving pistonic motion.
•MagnaGuard® video shielding
•5-way gold-plated precision binding posts
•Acoustically tuned ports
Specifications |
VS 336 |
VS 344 |
VS 325C |
VS 224 |
VS 260 |
VS 240 |
|
|
|
|
|
|
|
Frequency Range (±3dB): |
35Hz – 30kHz |
42Hz – 30kHz |
65Hz – 30kHz |
78Hz – 30kHz |
45Hz – 30kHz |
70Hz – 30kHz |
|
|
|
|
|
|
|
Recommended Amplifier |
10 – 400 watts |
10 – 250 watts |
10 – 250 watts |
10 – 200 watts |
10 – 250 watts |
10 – 150 watts |
|
|
|
|
|
|
|
Sensitivity: |
87dB SPL/2.8V/m |
87dB SPL/2.8V/m |
90dB SPL/2.8V/m |
87dB SPL/2.8V/m |
87dB SPL/2.8V/m |
86dB SPL/2.8V/m |
|
|
|
|
|
|
|
Nominal Impedance: |
8 ohms |
8 ohms |
8 ohms |
8 ohms |
8 ohms |
8 ohms |
|
|
|
|
|
|
|
Crossover Frequency: |
250 / 2,500Hz |
300 / 2,500Hz |
350 / 2,400Hz |
1,900Hz |
1,900Hz |
2,000Hz |
|
|
|
|
|
|
|
Bass Driver: |
Triple 61/2” |
Quadruple 41/2” |
Dual 51/4” |
Dual 41/2” |
61/2” |
41/2” |
|
(165mm) |
(114mm) |
(133mm) |
(114mm) |
(165mm) |
(114mm) |
|
|
|
|
|
|
|
Midrange Driver: |
41/2”(114mm) |
41/2”(114mm) |
3”(76mm) |
— |
— |
— |
|
|
|
|
|
|
|
High-Frequency Driver: |
1”(25mm) |
1”(25mm) |
1”(25mm) |
1”(25mm) |
1”(25mm) |
1”(25mm) |
|
SuperWide |
SuperWide |
SuperWide |
SuperWide |
SuperWide |
SuperWide |
|
Bandwidth |
Bandwidth |
Bandwidth |
Bandwidth |
Bandwidth |
Bandwidth |
|
|
|
|
|
|
|
Dimensions (H x W x D): |
461/16 x97/8 x 1213/16” |
44x53/8 x83/8” |
71/8 x283/16 x65/16” |
25x53/4 x 33/4” |
141/2 x9x101/4” |
97/16 x57/8 x63/8” |
|
(1170x250x325mm) |
(1117x148x161mm) |
(181x716x161mm) |
(632x148x96mm) |
(365x225x260mm) |
(240x150x162mm) |
|
|
|
|
|
|
|
Base Dimensions (W x D): |
|
83/8 x 83/8”(213x213mm) |
|
|
|
|
|
|
|
|
|
|
|
Weight: |
66.3 lbs (30.12kg) |
32.2 lbs (16.5kg) |
25.9 lbs (11.78kg) |
18 lbs (8.2kg) |
9 lbs (4.1kg) |
6.3 lbs (2.9kg) |
Boston Acoustics continually strives to update and improve its products. 2
The specifications and construction details are subject to change without notice.

Unpacking the System
Carefully unpack the speakers. If there is any sign of damage from transit, report it immediately to your dealer and/or delivery service. Keep the shipping carton and packing materials for future use.
The high-gloss finish of the VS Series cabinets is protected during shipment with a clear plastic film. Remove the film by lifting up a corner and carefully pulling it off. Repeat the procedure for all cabinet surfaces.
NOTE: The cloth grilles remain on the speaker during normal use. However, to remove a VS grille, place your fingers gently on edge of the grille and starting at one end of the speaker, pry along the length of the speaker until the grille pops off. To replace the grille, fit one long edge into position, and then gently push the other long side of the grille against the cabinet until the grille snaps into place.
Placement Options
VS 336, VS 344 – These are classic floor standing “tower” speakers. For best sound balance place it near an open wall surface, at least
3 feet (1m) away from the corners of the room.
VS 325C – This model is designed specifically for use as a center channel speaker in an A/V system. It should be centered on the television as close as possible to the screen. It can be placed either above or below the screen, on a shelf or wall mounted with the supplied bracket. Avoid placing the speaker in a semi-enclosed location. Such placement can produce undesirable sound characteristics.
VS 224, VS 260, VS 240 – These models can be used as the left, right, center or surround speakers in a stereo or multi-channel system. They can also be used as the left/right speakers in a stereo-only system. Each can be placed on a tabletop or a shelf, or wall-mounted using the supplied mounting bracket. The adjustable foot and the mounting bracket allow for vertical or horizontal orientation and optimal positioning.
3
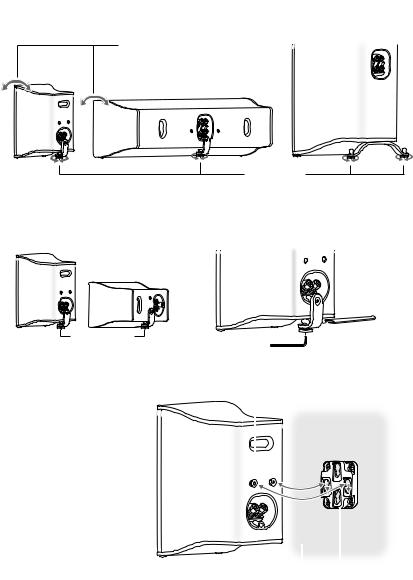
Adjustable Feet
Each of the VS Series models, except VS 344, is equipped with adjustable feet that lets you change the vertical angle of the speaker to suit your installation.
The VS speakers are supplied with an open ended wrench and a hex wrench to set the position of the adjustable feet. Put the hex wrench in the hole in the bottom of the adjustable foot. Put the open ended wrench around the recesses in the base of the cap. Turn the wrenches to set the position of the foot.
The VS 336 and VS 344 are supplied with carpet spikes. If the speakers are placed on a carpeted floor replace the feet with the carpet spikes. This provides additional stability and coupling for the speaker. Care should be used with the carpet spikes to avoid damage to the floor or injury.
To change the angle of the speaker . . . 

. . . rotate the feet.
Reposition the foot |
Use the open ended |
for horizontal use |
and hex wrenches to |
|
set the position of the foot. |
Wall-Mounting
The VS 240, VS 260, VS 224, and VS 325C can be wall-mounted using the supplied mounting bracket. Use the supplied hex wrench to remove the foot mounting screw and the foot. Then install the threaded mounting posts in the back of the cabinet.
Fasten the mounting plate to the wall with appropriate hardware. See the Note below. Be sure it is level. Connect the speakers. Insert the heads of the mounting posts through the keyhole openings in the mounting plate. Lower the speaker to seat the mounting posts in the mounting plate. When the speaker is positioned horizontally the vertically positioned keyhole openings are used.
mounting post
wall |
mounting plate |
NOTE: The customer is responsible for the correct selection and use
of mounting hardware (available through hardware stores) that will ensure the proper and safe wall-mounting of the speakers.
4
VS 224 Wall-Mounting
The VS 224 wall-mount bracket attaches to the wall directly for positioning the speaker flat on the wall. The angled mounting plate is used for angled positioning of the speaker on the wall. The angled mounting plate is attached to the wall and then the wall-mount bracket attaches to the
angled mounting plate. Make sure that the speaker is oriented in the proper direction before you start. The Port should be at the top of the speaker when installing. When attaching the wall-mount bracket to the wall or the angled mounting plate note that the large holes need to be located on top in both vertical and horizontal applications. When attaching the speaker you will  notice that it will shift slightly to the left when securely locked into the wallmount bracket.
wall-mount |
wall-mount bracket |
angled mounting |
||||||||||||||||
bracket |
horizontal postion |
plate |
||||||||||||||||
|
|
|
|
|
|
|
|
|
|
|
|
|
|
|
|
|
|
|
|
|
|
|
|
|
|
|
|
|
|
|
|
|
|
|
|
|
|
|
|
|
|
|
|
|
|
|
|
|
|
|
|
|
|
|
|
|
|
|
|
|
|
|
|
|
|
|
|
|
|
|
|
|
|
|
|
|
|
|
|
|
|
|
|
|
|
|
|
|
|
|
|
|
|
|
|
|
|
|
|
|
|
|
|
|
|
|
|
|
|
|
|
|
|
|
|
|
|
|
|
|
|
|
|
|
|
|
|
|
|
|
|
|
|
|
|
|
|
|
|
|
|
|
|
|
|
|
|
|
|
|
|
|
|
|
|
|
|
|
|
|
|
|
|
|
|
|
|
|
|
|
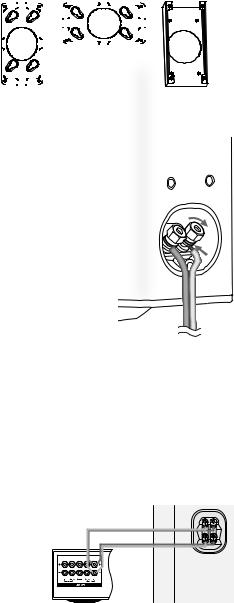
Speaker Connections
Before you connect the speakers turn off all the system components. The VS Speakers feature gold-plated 5-way binding posts. They can accept bare wires, pin lugs, spade lugs, banana plugs or dual banana plugs.
The illustration shows the bare wire speaker connection method. Remove about 3/8”(10mm)
of the wire insulation. Twist the strands of the wire into a neat bundle. Unscrew the hexagonal top of the terminal. Insert the wire into the hole in the terminal center post and turn the hexagonal top to clamp the wire in place.
If you are using pin lugs or spade lugs, attach them to the wires as specified by the manufacturer. Unscrew the hexagonal top of the terminal. Pin lugs are inserted into the hole in the terminal center post just like bare wire. Spade lugs fit around the terminal center post. Once the lug is in the terminal turn the hexagonal top to clamp it in place
If you are using single or dual banana plugs attached them to the wire as specified by the manufacturer. Do not unscrew the hexagonal top of the terminal. Simply insert the banana plugs into the holes in the back of the terminals.
For information on connecting the speaker wires to your receiver or amplifier, refer to its owner’s manual.
Important!
To ensure the best performance observe polarities when making speaker connections. The terminals have color coded rings—red for + and black for –. Connect each + terminal on the back of the amplifier or receiver to the respective + (red) terminal on each speaker.
Connect the – (black) terminals in the same way. If the connections are not made correctly it can cause poor bass response and imaging. Also, to avoid short circuits that may damage your equipment, be careful not to let any of the bare wires touch each other.
Bi-wiring
The VS 325C, VS 344, and VS 336 have dual input terminals that allow for bi-wiring. When a speaker is bi-wired two speaker wires are connected to the amplifier speaker terminals. The two wires are connected to the dual terminals. This improves the performance of the systems because it doubles the conductivity of the amplifier-to- speaker connection.
VS 336
Amplifier |
5

Bi-amplifying
The dual input terminals of the VS 325C, VS 344, and VS 336 also allow for bi-amplifying. Two separate amplifier channels are used to drive the speaker.
One channel drives the bass speakers while the other drives the midrange/tweeter.
This can provide significant improvements in audio quality and dynamic range.
In this configuration the metal straps that connect the two set of terminals are removed. The amplifier channel driving the midrange/tweeter is connected to the top terminals; the amplifier channel for the bass speakers is connected to the bottom terminals.
|
|
|
VS 336 |
|
|
mid-high channel |
|
|
|
|
bass channel |
Ch 1 |
Ch 2 |
Ch 3 |
Ch 4 |
Amplifier |
terminal strap removed |
||
Operation
When using the VS 240, VS 260, or VS 224 speakers in a Dolby® Digital or DTS™ home theater system, set the speaker type to“Small” in the system set up procedure. When using the VS 336, VS 344, or VS 325C in a Dolby® Digital or DTS™ home theater system, the speaker type setting can be set to either “Large” or “Small”. In the “Large” setting they may produce a more full sound. Try both settings and use the one that sounds best with the broadest range of source material. When using the speakers in a Dolby Pro Logic® home theater system, make sure the receiver’s center channel mode is set to “Normal.”
Some Dolby Digital receivers/processors offer different setup options for each source or surround mode (e.g., CD-stereo, videotape, Dolby Digital, Pro Logic). If you are using a subwoofer in your system follow your equipment’s instructions to ensure that the subwoofer output is turned on and that the speakers are set to “Small” in each mode.
If your receiver has an adjustable subwoofer crossover, we recommend setting it between 80Hz and 120Hz. Refer to the owner’s manual for your A/V receiver for any additional recommendations on system operation.
NOTE: A Boston Acoustics powered subwoofer will add impact and realism to both music and film sound tracks. Contact your Boston Acoustics dealer for recommendations on subwoofer models for your application.
Maintenance and Service
The high gloss finish of the VS Series cabinets is made to the standard of high quality furniture. It should be cared for in the same way. Before you use any cleaning or care products, test a small, inconspicuous part of the cabinet. Be sure the results are what you want before doing a final application.
For day-to-day care the speaker enclosures may be cleaned using a soft cloth to remove fingerprints or to wipe off dust. All wiring connections should be inspected and cleaned or remade at least once a year.
If a problem does occur, make sure that all connections are properly made, secure and clean. If a problem occurs in one loudspeaker, rewire that speaker in a different location within the system. Should the problem persist then the problem is within the speaker. If the speaker sounds fine in the new position it is a strong indication of a more in-depth issue with the electronics in the system. In the event that your speaker ever needs service, contact your local Boston Acoustics dealer or visit bostonacoustics.com/dealers for a list of dealers in your area.
Limited Warranty
Boston Acoustics warrants to the original purchaser of our VS Series speakers that they will be free of defects in materials and workmanship for a period of 5 years from the date of purchase.
Your responsibilities are to install and use them according to the instructions supplied, to provide safe and secure transportation to an authorized Boston Acoustics service representative, and to present proof of purchase in the form of your sales slip when requesting service.
6

Excluded from this warranty is damage that results from abuse, misuse, improper installation, accidents, shipping, or repairs/ modifications by anyone other than an authorized Boston Acoustics service representative.
This warranty is limited to the Boston Acoustics product and does not cover damage to any associated equipment. This warranty does not cover the cost of removal or reinstallation. This warranty is void if the serial number has been removed or defaced. This warranty gives you specific legal rights, and you may also have other rights which vary from state to state.
If Service Seems Necessary
First, contact the dealer from whom you purchased the product. If that is not possible, write to:
Boston Acoustics, Inc.
100 Corporate Drive
Mahwah, NJ 07430 USA
Or contact us via e-mail at: In Japan send e-mails to:
In Asia/Pacific countries send e-mails to:
support@bostona.com ba_info@dm-holdings.com. service@dm-singapore.com
We will promptly advise you of what action to take. If it is necessary to return a VS Series speaker to the factory, please ship it prepaid.
After it has been repaired, we will return it freight prepaid in the United States and Canada.
For EU Customers Only
This symbol found on the product indicates that the product must not be disposed of with household waste. Instead, it may be placed in a separate collection facility for electronic waste or returned to a retailer when purchasing similar product. The producer paid to recycle this product. Doing this contributes to reuse and recycling, minimizes adverse effects on the environment and human health and avoids any fines for incorrect disposal.
Boston Acoustics continually strives to update and improve its products. The specifications and construction details are subject to change without notice.
7

|
Introducción |
|
E |
Gracias por elegir Boston Acoustics. Los altavoces Boston VS Series, nuestros productos de mejor apariencia y funcionamiento, |
|
ofrecen una magnífica experiencia sólo de audio o de audio y video. Los innovadores diseños de los controles y el gabinete |
||
S |
||
P |
producen características de sonido excepcionales. Cada modelo de VS Series está sonorizado para armonizar con los otros de |
|
A |
manera que puedan combinarse para ofrecer el mejor funcionamiento en cualquier configuración. |
|
Ñ |
|
|
O |
Al atractivo de sonido de los VS Series se agrega su atractivo visual. La llamativa terminación de laca del piano y los paneles de |
Lextremo en cerezo grado mobiliario de alto brillo cubren un gabinete que es mucho más que unas cajas rectangulares. Los elementos estructurales de los gabinetes están hechos de MDF moldeado de alta frecuencia que presentan superficies curvadas que reducen las ondas internas y las resonancias en el panel. Abrazaderas internas sustanciales potencian la fuerza de los gabinetes para brindar un ambiente ideal de un funcionamiento de alto nivel.
Características
•Gabinete acabado en elegante laca tipo piano
•Paneles de extremo en grado mobiliario multi-capas de alto brillo
•Gabinete en MDF moldeado de alta frecuencia con superficies curvadas, que reducen las ondas internas y las resonancias en el panel.
•Los woofers de bajos con sección cónica larga y controles de medio rango presentan marcos de aluminio colado, en material de composita orgánica de los conos (OCCM), y recubrimientos de goma
•Los tweeters de bajos de súper banda ancha (SWB) con diafragma concéntrico doble acoplado (CDCD) reducen el cambio de fase y distorsión y mejoran el movimiento pistónico.
•Blindaje de video MagnaGuard®
•Postes de anclaje de precisión de 5 vías con acabado dorado
•Puertos afinados acústicamente
8

Especificaciones VS 336 |
VS 344 |
VS 325C |
VS 224 |
VS 260 |
VS 240 |
|
|
|
|
|
|
|
|
Rango |
35Hz – 30kHz |
42Hz – 30kHz |
65Hz – 30kHz |
78Hz – 30kHz |
45Hz – 30kHz |
70Hz – 30kHz |
de frecuencia (±3dB): |
|
|
|
|
|
|
|
|
|
|
|
|
|
Amplificador recomendado 10 – 400 vatios |
10 – 250 vatios |
10 – 250 vatios |
10 – 200 vatios |
10 – 250 vatios |
10 – 150 vatios |
|
|
|
|
|
|
|
|
Sensibilidad: |
87dB SPL/2,8V/m |
87dB SPL/2,8V/m |
90dB SPL/2,8V/m |
87dB SPL/2,8V/m |
87dB SPL/2,8V/m |
86dB SPL/2,8V/m |
|
|
|
|
|
|
|
Impedancia Nominal: |
8 ohms |
8 ohms |
8 ohms |
8 ohms |
8 ohms |
8 ohms |
|
|
|
|
|
|
|
Frecuencia de cruce: |
250 / 2,500Hz |
300 / 2,500Hz |
350 / 2,400Hz |
1,900Hz |
1,900Hz |
2,000Hz |
|
|
|
|
|
|
|
Frecuencia de cruce: |
Triple 61/2” |
Cuádruple 41/2” |
Doble 51/4” |
Doble 41/2” |
61/2” |
41/2” |
|
(165mm) |
(114mm) |
(133mm) |
(114mm) |
(165mm) |
(114mm) |
|
|
|
|
|
|
|
Controles |
41/2”(114mm) |
41/2”(114mm) |
3”(76mm) |
— |
— |
— |
de rango medio: |
|
|
|
|
|
|
|
|
|
|
|
|
|
Controles |
1”(25mm) |
1”(25mm) |
1”(25mm) |
1”(25mm) |
1”(25mm) |
1”(25mm) |
de alta frecuencia: |
Súper banda |
Súper banda |
Súper banda |
Súper banda |
Súper banda |
Súper banda |
|
ancha |
ancha |
ancha |
ancha |
ancha |
ancha |
|
|
|
|
|
|
|
Dimensiones |
461/16 x97/8 x 1213/16” |
44x53/8 x83/8” |
71/8 x283/16 x65/16” |
25x53/4 x 33/4” |
141/2 x9x101/4” |
97/16 x57/8 x63/8” |
(Alto x Ancho x Profundidad): (1170x250x325mm) |
(1117x148x161mm) |
(181x716x161mm) |
(632x148x96mm) |
(365x225x260mm) |
(240x150x162mm) |
|
|
|
|
|
|
|
|
Dimensiones básicas |
|
83/8 x 83/8” |
|
|
|
|
(ancho x profundidad): |
|
(213x213mm) |
|
|
|
|
|
|
|
|
|
|
|
Peso: |
66,3 lbs (30,12kg) |
32,2 lbs (16,5kg) |
25,9 lbs (11,78kg) |
18 lbs (8,2kg) |
9 lbs (4,1kg) |
6,3 lbs (2,9kg) |
Consulte la lista de Características de la página anterior para más información sobre los controles.
Boston Acoustics busca continuamente mejorar y actualizar sus productos.
Las especificaciones y detalles de construcción están sujetos a cambios sin previo aviso.
9
Desembalaje del sistema
Desembale cuidadosamente los altavoces. Si hay alguna señal de daños debidos al transporte, comuníqueselo inmediatamente a su distribuidor y/o a su servicio de entrega. Conserve el cartón de envío y los materiales de embalaje para una futura utilización.
La terminación de alto brillo de los gabinetes de VS Series está protegida durante el envío con una película de plástico de color claro. Retire la película levantando una esquina y tirando cuidadosamente de ella. Repita el procedimiento para todas las superficies del gabinete.
NOTA: Las rejillas de tela permanecen sobre el parlante durante el uso normal. Sin embargo, para retirar una rejilla VS, coloque sus dedos suavemente sobre el borde de la rejilla y comenzando por un extremo del parlante, haga palanca a lo largo de la extensión del parlante hasta que la rejilla se suelte. Para volver a colocar la rejilla, coloque uno de los bordes largos en posición y luego empuje suavemente el otro lado largo de la rejilla contra el gabinete hasta que la rejilla encaje en su lugar.
Opciones de colocación
VS 336, VS 344 – Este es un clásico altavoz “torre” para el piso. Para lograr el mejor equilibrio de sonido, colóquelo cerca de una superficie de pared abierta, al menos a 3 pies (1m) de las esquinas de la habitación.
VS 325C – Este modelo está específicamente diseñado para usarse como altavoz de canal central en un sistema A/V. Debe centrarse en la televisión lo más cercano posible a la pantalla. Puede ubicarse tanto en la parte superior como inferior de la pantalla, en un estante o en la pared con el soporte suministrado. Evite colocar el altavoz en un lugar semi cercado. Esta ubicación puede producir características de sonido no deseadas.
VS 224, VS 260, and VS 240 – Este modelo puede ser utilizado como altavoces de sonido envolvente o izquierda, derecha y centro en un sistema de canales múltiples o estéreo. El sistema VS 240 puede también usarse como los altavoces de izquierda/derecha en
10

un sistema solo estéreo. Puede situarse en un tablero de mesa o un estante, o instalarse en la pared con el soporte suministrado. El pie ajustable y el soporte para instalación de pared permiten una orientación vertical u horizontal y colocación óptima.
Pies ajustables |
Para cambiar el ángulo del altavoz . . . |
Cada uno de los modelos de la serie VS, con excepción del VS 344, está equipado con pies ajustables que le permiten cambiar el ángulo vertical del parlante para adecuarlo a su instalación.
Los altavoces VS cuentan con una llave española y una llave hexagonal
para fijar la posición de los pies ajustables. Coloque la llave hexagonal en el orificio de la base del pie ajustable. Coloque la llave española alrededor de los huecos de la base del pistón Gire las llaves para fijar la posición del pie.
 Vuelva a ubicar el
  pie para usarlo de forma horizontal.
. . . gire los pies.
 Use las llaves española y hexagonal para jar la posición del pie.
El VS 336 y el VS 344 tienen
pernos de alfombra. Si los altavoces se colocan en un piso alfombrado reemplace los pies por los clavos para alfombra. Esto le brinda una estabilidad adicional y acoplamiento para el altavoz. Los clavos para alfombra deben utilizarse con cuidado para evitar que se dañe el piso o que usted sufra una herida.
Instalación en la pared
Los VS 224, VS 240, VS 260 y VS 325C pueden montarse en la pared utilizando el soporte suministrado correspondiente. Utilice la llave hexagonal suministrada para retirar el tornillo de montaje del pie y el pie. Luego instale los postes de montaje con rosca en la parte trasera del gabinete.
Ajuste la placa de montaje a la pared con equipamiento físico adecuado. Vea la Nota de abajo. Asegúrese de que esté nivelado.
Conecte los altavoces. Inserte los cabezales de los postes de montaje a través de las aberturas del orificio de la llave de la placa de montaje. Baje el altavoz para sentar los postes de montaje en la placa. Cuando el altavoz está en una posición horizontal, se utilizan las aberturas que se encuentran en posición vertical.
poste de montaje
pared |
placa de montaje |
NOTA: El cliente es el responsable de la selección y utilización
correcta de los elementos de montaje (disponibles en ferreterías) que asegurarán un montaje en la pared adecuado y seguro de los altavoces.
11

Instalación en la pared del VS 224
El soporte para instalación en la pared del VS 224 se acopla directamente a la pared para ubicar el parlante en forma plana sobre la misma. La placa de montaje en ángulo se usa para ubicar el parlante en forma angulada sobre la pared. La placa de montaje en ángulo se acopla a la pared y luego se acopla en dicha placa el soporte de instalación en la pared. Asegúrese de que el parlante esté orientado correctamente antes de comenzar.
Al realizar la instalación el puerto debe estar en la parte superior del parlante. Cuando acople el soporte de instalación en la pared a la misma o la placa de montaje angulada, observe que los agujeros grandes deben estar ubicados en la parte superior, tanto en las aplicaciones verticales como en las horizontales. Cuando acople el parlante verá que el mismo se desplazará ligeramente hacia la izquierda al sujetarlo con firmeza en el soporte de instalación en la pared.
soporte para |
soporte para instalación |
|
|||||||||||||||||
instalación |
en la pared – posición |
placa de montaje |
|||||||||||||||||
en la pared |
horizontal |
angulada |
|||||||||||||||||
|
|
|
|
|
|
|
|
|
|
|
|
|
|
|
|
|
|
|
|
|
|
|
|
|
|
|
|
|
|
|
|
|
|
|
|
|
|
|
|
|
|
|
|
|
|
|
|
|
|
|
|
|
|
|
|
|
|
|
|
|
|
|
|
|
|
|
|
|
|
|
|
|
|
|
|
|
|
|
|
|
|
|
|
|
|
|
|
|
|
|
|
|
|
|
|
|
|
|
|
|
|
|
|
|
|
|
|
|
|
|
|
|
|
|
|
|
|
|
|
|
|
|
|
|
|
|
|
|
|
|
|
|
|
|
|
|
|
|
|
|
|
|
|
|
|
|
|
|
|
|
|
|
|
|
|
|
|
|
|
|
|
|
|
|
|
|
|
|
|
|
|
|
|
|
|
|
|
|
|
Conexiones del altavoz
Antes de conectar los altavoces, apague todos los componentes del sistema. Los altavoces VS cuentan con postes de anclaje de 5 vías con acabado dorado. Pueden admitir cables desnudos, agarraderas de clavijas, terminales de pala, enchufes banana o enchufes banana dobles.
La ilustración muestra el método de conexión del altavoz de cable desnudo. Desprenda aproximadamente 3/8”(10mm) del aislamiento del cable. Enrolle los hilos del cable haciendo un nudo prolijo. Desenrosque el extremo superior hexagonal del terminal. Inserte el cable en el orificio del poste central del terminal y gire el extremo superior hexagonal para sujetar el cable en su lugar.
Si está utilizando agarraderas de clavijas o terminales de pala, adjúntelos a los cables según lo especifique el fabricante. Desenrosque el extremo superior hexagonal del terminal. Las agarraderas de claviijas están insertadas en el orificio del poste central del terminal, al igual que el cable desnudo. Los terminales de pala encajan alrededor del poste central del terminal. Una vez que este elemente está en el terminal gire el extremo superior hexagonal para sujetarlo en su lugar.
Si está utilizando enchufes banana simples o dobles, adjúntelos a los cables según lo especifique el fabricante. No desenrosque el extremo superior hexagonal del terminal. Simplemente inserte los enchufes banana en los orificios de la parte trasera de los terminales.
Para obtener información sobre cómo conectar los cables de los altavoces a su receptor o amplificador, consulte con el manual de su propietario.
¡Importante!
Para asegurar el mejor rendimiento observe las polaridades al realizar las conexiones del altavoz. Los terminales tienen anillos de color de códigos: rojo para + y negro para –. Conecte cada terminal + de la parte trasera del amplificador o receptor al respectivo terminal
+ (rojo) de cada altavoz. Conecte los terminales – (negros) de la misma forma. Si las conexiones no se realizan correctamente puede provocar una mala respuesta de graves y de imágenes pobres. Igualmente, para evitar cortocircuitos que puedan dañar su equipo, tenga cuidado de no permitir que dos cables desnudos se toquen.
12

Doble cableado
Los VS 325C, VS 344, y VS 336 cuentan con terminales de doble entrada que permiten el doble cableado. Un altavoz tiene doble cableado cuando dos cables del mismo están conectados a los terminales del altavoz amplificador. Los dos cables están conectados a los terminales dobles. Esto mejora el rendimiento de los sistemas ya que duplica la conductividad de la conexión del amplificador al altavoz.
Doble amplificación
Los terminales de doble entrada de VS 325C, VS 344, y VS 336 también permiten la doble amplificación. Se utilizan dos canales amplificadores separados para controlar el altavoz. Un canal controla los altavoces de graves, mientras que el otro controla el medio rango/ tweeter. Esto puede implicar mejoras significativas en la calidad del audio y el rango dinámico.
En esta configuración, las agarraderas de metal que conectan los dos pares de terminales se han retirado. El canal amplificador que controla el medio rango/ tweeter está conectado a los terminales superiores; el canal amplificador para los altavoces de graves está conectado a los terminales inferiores.
VS 336
Amplificador |
VS 336
canal de medios/altos canal de bajos
Ch 1 |
Ch 2 |
Ch 3 |
Ch 4 |
Amplificador se ha retirado la agarradera del terminal
Funcionamiento
Cuando utilice los altavoces VS 224, VS 240, y VS 260 en un sistema de cine en casa Dolby® Digital o DTS™, ajuste el tipo de altavoz a la configuración“Small”en el procedimiento de configuración del sistema. Cunado utilice VS 325C, VS 344, o VS 336 en un sistema de cine en casa Dolby® Digital o DTS™ , la configuración del altavoz puede estar en“Large”o“Small”. En la configuración“Large”pueden producir un sonido más completo. Pruebe ambas configuraciones y utilice la que suene mejor con la más amplia gama de materiales de fuente. Cuando utilice el sistema en un sistema de cine en casa Dolby Pro Logic®, asegúrese de que el canal central del receptor esté en modo Normal.”
Algunos receptores/ procesadores equipados con Dolby Digital ofrecen diferentes opciones de configuración para cada fuente o modo“surround”(por ej., CD estéreo, videocasete, Dolby Digital, Pro Logic). Si utiliza un subwoofer en su sistema, siga las
instrucciones para su equipo a fin de asegurarse de que la salida del subwoofer está conectada y que los altavoces se encuentran en la configuración “Small” en cada modo.
Si su receptor tiene ajustes de frecuencia de cruce ajustables, recomendamos que la frecuencia de cruce del subwoofer se ajuste entre 80Hz y 120Hz. Remítase al manual del propietario de su receptor A/V para obtener cualquier recomendación adicional sobre el funcionamiento del sistema..
NOTA: Un subwoofer activado de Boston Acoustics añadirá impacto y realismo tanto a la música como a las bandas sonoras de películas. Póngase en contacto con su distribuidor de Boston Acoustics para que le recomiende los modelos de subwoofer adecuados para su aplicación.
Mantenimiento y Servicio
El acabado de alto brillo de los gabinetes de la Serie VS está realizado según el estándar de muebles de alta calidad. Se lo debe cuidar de la misma forma. Antes de utilizar cualquier producto de limpieza o de mantenimiento, pruebe en una parte pequeña e inadvertida del gabinete. Asegúrese de que los resultados son los que desea obtener antes de la aplicación final.
Para el cuidado cotidiano, los receptáculos del altavoz deben limpiarse con una tela suave a fin de quitar las huellas digitales o el polvo. Todas las conexiones de cableado deben inspeccionarse y limpiarse o establecerse de nuevo por lo menos una vez al año.
Si se produce algún problema, asegúrese de que todas las conexiones se han realizado adecuadamente y que están sujetas y limpias.
13

Si se produce un problema en un altavoz, vuelva a cablear ese altavoz en una ubicación diferente en el sistema. Si el problema persiste, el problema está en el altavoz. Si suena bien en la nueva posición, es una indicación muy clara de que hay un problema de mayor calado en la electrónica del sistema. En el caso de que sus altavoces necesiten asistencia técnica, póngase en contacto con su distribuidor local de Boston Acoustics o visite www.bostonacoustics.com para conseguir un listado de distribuidores en su zona.
Garantía limitada
Boston Acoustics garantiza al comprador original de nuestros altavoces de la Serie VS que éstos no cuentan con defectos en los materiales o en la mano de obra por un período de 5 años a partir de la fecha de compra.
Es responsabilidad suya instalarlos y utilizarlos de acuerdo con las instrucciones suministradas, proporcionar un transporte seguro hasta un representante de servicio autorizado de Boston Acoustics, y presentar la prueba de compra en forma de recibo de compra cuando sea necesario este servicio.
Quedan excluidos de esta garantía los daños que resulten del abuso, del mal uso, de una instalación inadecuada, de accidentes, del transporte, o de reparaciones/modificaciones por parte de cualquiera que no sea el representante de servicio autorizado de Boston Acoustics.
Esta garantía se limita al producto de Boston Acoustics y no cubre daños de equipos afines. Esta garantía no cubre los costos de desinstalación o reinstalación. Esta garantía será nula cuando se haya retirado o borrado el número de serie. Esta garantía le otorga derechos legales específicos y también le podrían corresponder otros derechos que varían de un país a otro.
Si cree que necesita asistencia técnica
Primero, póngase en contacto con el distribuidor al cual ha comprado el producto. Si esto no es posible, escriba a:
Boston Acoustics, Inc.
100 Corporate Drive
Mahwah, NJ 07430 USA
O póngase en contacto con nosotros por medio de un correo electrónico: En Japón, envíe un correo electrónico a:
En Asia/países del Pacífico envíe un correo elctrónico a:
support@bostona.com ba_info@dm-holdings.com. service@dm-singapore.com
Le indicaremos de inmediato qué acción tomar. Si es necesario devolver un altavoz de VS Series a la fábrica, le rogamos que lo envíe con franqueo prepago. Después de la reparación, lo devolveremos con costos de transporte pagados sólo en Estados Unidos y Canadá.
Sólo para clientes de la UE
Este símbolo que aparece en el producto indica que el producto no debe ser eliminado junto con los residuos domésticos. Sino que debe colocarse en un punto de recolección separada para desechos electrónicos o devuelto a un establecimiento minorista al comprar un producto similar. El fabricante ha pagado para reciclar este producto. Esta práctica contribuye a la reutilización y el reciclado, minimiza los efectos adversos sobre el medio ambiente y la salud humana y evita la imposición de multas por eliminación incorrecta de residuos.
Boston Acoustics busca continuamente actualizar y mejorar sus productos. Las especificaciones y detalles de construcción están sujetos a cambios sin previo aviso.
14
 Loading...