


Dishwasher
Lave-Vaisselle
en Operating instructions fr Guide d’Utilisation
9000999401 (9501)
Dear Valued Customer,
Welcome and congratulations on your new Bosch® dishwasher purchase! Our German engineers work tirelessly to craft machines with virtually silent operation, resource-sav- ing efficiency, and optimum quality. We know you’ll be pleased.
For other premium Bosch® appliances, visit us online at: www.bosch-home.com/us (USA)
or www.bosch-appliances.ca (Canada)
While there, don’t forget to register your new dishwasher by clicking on the Support tab or filling out the product registration card enclosed with your new unit.
If you have any questions or comments, please contact us at: 1-800-944-2904 or write us at:
http://www.bosch-home.com/us/customer-support/contact-us.html
Table of Contents |
|
Important Safety Instructions.................................................................... |
2-3 |
Dishwasher Components............................................................................ |
4-5 |
Dishwasher Setup...................................................................................... |
6-8 |
Dishware Materials....................................................................................... |
9 |
Loading the Dishwasher......................................................................... |
10-11 |
Rack Features............................................................................................. |
12 |
Dishwasher Cycles and Options.................................................................. |
13 |
Wash Cycle Information.............................................................................. |
14 |
Operating the Dishwasher...................................................................... |
15-17 |
Care and Maintenance............................................................................ |
18-19 |
Troubleshooting Guide........................................................................... |
20-22 |
Customer Service....................................................................................... |
23 |
Statement of Limited Product Warranty ..................................................... |
24 |

IMPORTANT SAFETY INSTRUCTIONS:
Please READ and SAVE this information
 WARNING
Misuse of the dishwasher can result in serious injury or death. Do not use the dishwasher in any way not covered in this manual or for any purpose other than those explained in the following pages.
Severe product damage and/or injury could result from the use of unqualified service technicians or non-original replacement parts. All repairs must be performed by a qualified service technician using only original equipment factory replacement parts.
Electrical shock or fire could result if the electrical supply for the dishwasher covered in this manual is incorrectly installed or if the dishwasher has been improperly grounded. Do not use the dishwasher covered in this manual unless you are certain the electrical supply has been correctly installed and the dishwasher has been properly grounded.
Never use harsh chemicals to clean your dishwasher. Some chloride-containing products can damage your dishwasher and may present health hazards!
NOTICE
Never use steam cleaning products to clean your dishwasher. The manufacturer will not be responsible for the possible damages or consequences.
It is highly recommended for the end user to become familiar with the procedure to shut off the incoming water supply and the procedure to shut off the incoming power supply. See the Installation Instructions or contact your installer for more information.
To avoid possible dishwasher damage, do not use harsh chemicals, abrasive cleaners, scouring pads (metal or plastic), or abrasive cloths/paper towels to clean your dishwasher’s exterior door panel. Your dishwasher's exterior door panel can be damaged by doing so.
NSF/ANSI 184 Certified residential dishwashers are not intended for licensed food establishments.
2

WARNING: To reduce the risk of fire, electrical shock, or serious injury, observe the following:
1This dishwasher is provided with Installation Instructions and this Use and Care Manual.
Read and understand all instructions before using the dishwasher.
2This appliance must be grounded to a metal, permanent wiring system, or an equipment grounding conductor must be run with the circuit conductors and connected to the equipment grounding terminal or lead on the dishwasher. See the Installation Instructions
included with this dishwasher for more information on electrical requirements.
3Use this dishwasher only for its intended function, which is the washing of household dish-
ware and kitchenware rated as dishwasher safe.
4Use only detergents or rinsing agents recommended for use in a dishwasher, and keep
them out of the reach of children.
5When loading items to be washed:
•Locate sharp items so they are not likely to damage the door seal.
•Load knives and other sharp utensils with their HANDLES UP to reduce the risk of cut-type injuries.
•Do not wash plastic items unless they are marked “dishwasher safe” or the equivalent. For plastic items not so marked, check the manufacturer’s recommendations.
•Do not operate your dishwasher unless all enclosure panels are in place.
•Do not tamper with or override controls and interlocks.
6Do not abuse, sit or stand on the door or dish racks of the dishwasher.
7To reduce risk of injury, do not allow children to play in or on the dishwasher.
8When children become old enough to operate the appliance, it is the responsibility of the parents/legal guardians to ensure the children are instructed in safe practices by qualified
persons.
9Under certain conditions, hydrogen gas may be produced in a hot water system that has not been used for two weeks or more. Hydrogen gas is explosive. Before using a dishwasher that is connected to a hot water system that has been unused for two weeks or longer, turn on all hot water faucets and let the water flow from each for several minutes. This will release any accumulated hydrogen gas. As the gas is explosive, do not smoke or
use an open flame during this time.
10Remove the dishwasher door to the washing compartment when removing an old dishwasher for service or discarding.
11To avoid floor damage and possible mold growth, do not allow wet areas to remain around or under the dishwasher.
12Protect your dishwasher from the elements. Protect against freezing to avoid possible damage to the fill valve. Damage caused by freezing is not covered by the warranty.
13This appliance must be grounded. In the event of a malfunction or breakdown, grounding will reduce the risk of electric shock by providing a path of least resistance for electric current. This appliance is equipped with a cord having an equipment-grounding conductor.
•Improper connection of the equipment-grounding conductor can result in risk of electric shock. Check with a qualified electrician or service representative if you are in doubt whether the appliance is properly grounded.
State of California Proposition 65 Warnings:
WARNING: This product contains one or more chemicals known to the State of California to cause cancer, birth defects, or other reproductive harm.
3

Dishwasher Components
Wash Cycles
Model |
Heavy |
Auto |
Eco |
Normal |
Express |
Rinse |
SGV68U53UC
SGX68U55UC
|
|
|
|
Wash Cycle Options |
|
||
|
Model |
Delay |
Half Load |
Delicate |
Sanitize Extra Shine ® |
|
|
|
|
|
|
|
|
|
|
|
SGV68U53UC |
|
|
|
|
|
|
|
SGX68U55UC |
|
|
|
|
|
|
|
|
|
|
|
|||
|
|
|
|
|
|
|
|
|
|
|
|
|
|
|
|
Additional Features |
|
|
|
Description |
|||
|
|
|
|||||
Rackmatic® |
|
3 position adjustable upper rack. The height of the upper rack can be |
|||||
|
|
|
adjusted in 3 positions to create more space. |
||||
|
|
|
|
|
|||
Cutlery Drawer |
|
Third level rack to maximize loading space. |
|
|
|||
|
|
|
|
|
|||
Time Remaining Indicator |
|
Indicates the cycle time remaining. |
|
|
|||
|
|
|
|
|
|
||
44 dBA Sound Level |
|
Quiet washing. |
|
|
|
||
|
|
|
|||||
Delay Start |
|
Start of a cycle can be delayed in 1-hour increments up to 24 hours. |
|||||
|
|
|
|||||
Rinse Cycle |
|
If you need to pre-rinse dishes to avoid odors, let the dishwasher do the work |
|||||
|
|
|
for you. Place unrinsed dishes inside dishwasher and select the “Rinse” |
||||
|
|
|
cycle. Uses less water than hand rinsing and very low energy. Note: Do not use |
||||
|
|
|
detergent in this cycle. |
|
|
|
|
|
|
||||||
Tab Tray / Upper Rack Handle |
Place detergent tabs inside the dispenser as normal. The tabs fall into the |
||||||
|
|
|
tab tray and dissolve perfectly every time. Also serves as an upper rack han- |
||||
|
|
|
dle. |
|
|
|
|
|
|
|
|||||
24/7 AquaStop® Leak Protec- |
|
If a leak has occurred, it shuts down operation and automatically pumps |
|||||
tion |
|
out water to avoid contact with the floor. |
|||||
|
|
|
|
||||
2 Flip Tine Rows in upper and |
Folds down to improve loading versatility. |
|
|
||||
lower racks |
|
|
|
|
|
|
|
|
|
|
|||||
Two Cup Shelves |
|
Can be used for cups or larger serving utensils. |
|||||
|
|
|
|||||
Infolight® |
|
A LED illuminates the floor to indicate the unit is running. |
|||||
|
|
|
|||||
Vase Holder |
|
Positions tall vases and other containers securely for thorough cleaning. |
|||||
|
|
|
|||||
Plastic Item Clips |
|
Securely holds light-weight plastic accessories (cups, lids, etc.). |
|||||
|
|
|
|
|
|||
Low Salt Notification Light |
|
Illuminates to indicate Salt is low. |
|
|
|||
|
|
|
|
|
|||
Low Rinse Aid Notification |
|
Illuminates to indicate Rinse Aid is low. |
|
|
|||
Light |
|
|
|
|
|
|
|
|
|
|
|||||
Sanitized Notification Light |
|
Illuminates to indicate sanitation requirements are met. Only available in |
|||||
|
|
|
Heavy, Auto, or Normal cycles. |
|
|
||
|
|
|
|
|
|
||
Energy Efficient 259 kWh |
|
ENERGY STAR® qualified. |
|
|
|
||
|
|
|
|
|
|
|
|
4

Cutlery drawer 
Upper rack
Flip tines
Salt container
Lower rack
Flip tines
Detergent dispenser
Upper rack spray arm
Tab tray / Rack handle Vent hole
Lower rack spray arm
Filter system
Rinse aid dispenser
5
Dishwasher Setup
Water Softening System
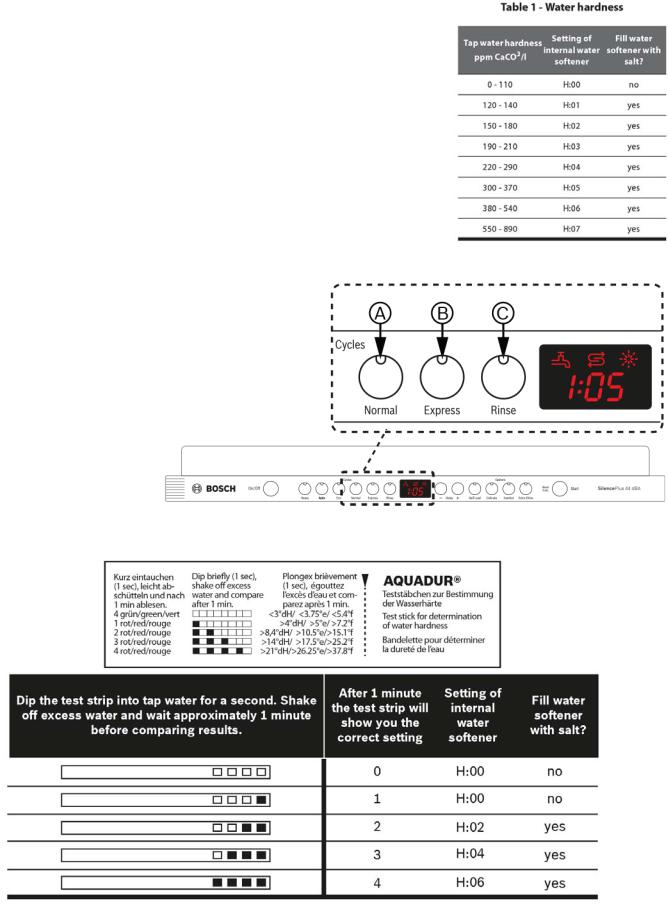
Your dishwasher requires soft water to ensure proper washing results and is equipped with an internal water softening system. However, if you have a household water softening system, the internal system provided is not needed.
For the water softening system to function properly, it will need to use dishwasher water softening salt. The amount of salt dispensed can be set from “H:00” to “H:07”. Salt is not used at H:00 (default factory setting). The amount of salt required depends on the degree of hardness of your tap water. See Table 1.
1Turn the unit on using the [ON/OFF] button.
2Hold down the “A” button (see Figure 1) and press [START] until the display indicates “H:00”.
3Release both buttons and press the “C” button to select the desired setting.
4 Save the selected setting |
Figure 1 |
by pressing [START] . |
|
Using the water hardness test strip
6
Salt
Figure 2
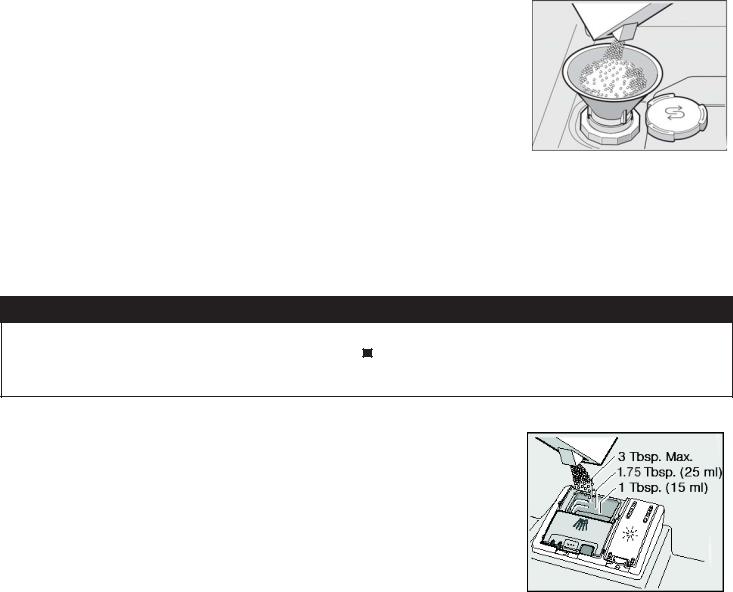
Only refill the salt container, using a funnel to pour, right before turning on the unit to ensure that salt overflow is immediately washed away. This prevents corrosion. See Figure 2.
1Open the screw cap of the salt container.
2Fill the container with water (only required when turning on the unit for the first time).
3 Add dishwasher salt until the water is displaced and runs out.
4Refill with salt as soon as the “Refill Salt” LED is lit.
Notice: Never fill the salt dispenser with detergent. It will destroy the water softening system. To prevent corrosion, refill with salt and immediately begin any cycle.
Note: Do not use salt tablets or any salt other than dishwasher water softening salt.
For more information about ordering salt please contact Customer Service (1-800-944-2904).
Detergent
Use only detergent specifically designed for dishwashers. For best results, use fresh powdered dishwashing detergent or detergent tabs.
NOTICE
To avoid dishwasher damage, do not use hand dishwashing products in your dishwasher.
To avoid dishwasher damage, do not use too much detergent if your water is soft. Using too much detergent with soft water may cause etching in glassware.
Figure 3
The dishwasher uses less water than most, therefore, less detergent is required. With soft water, 1 tablespoon (15 ml) of detergent will clean most loads. The detergent dispenser cup has lines that measure detergent (Figure 3) to 1 tablespoon (15 ml) and 2 tablespoons (25 ml). 3 tablespoons (45 ml) of detergent will completely fill the detergent dispenser.
Note: If you do not know the hardness of your water supply, use 15 ml (1 tbsp) of detergent. Increase the amount if necessary to the least amount required to get your kitchenware clean.
Use the measuring lines in the detergent dispenser cup as a guide to measure the amount of detergent recommended in Table 2.
Table 2- Recommended Detergent Amount
Wash Cycle |
Hard Water/ |
Medium Water/ |
Soft Water/ |
|
Heavy Soil |
Medium Soil |
Little Soil |
||
|
||||
|
|
|
|
|
Heavy |
3 tbsp (45 ml) |
3 tbsp (45 ml) |
1.75-3 tbsp (25-45 ml) |
|
|
|
|
|
|
Auto |
1.75-3 tbsp (25-45 ml) |
1.75 tbsp (25 ml) |
1-1.75 tbsp (15-25 ml) |
|
|
|
|
|
|
Eco |
1.75 tbsp (25 ml) |
1-1.75 tbsp (15-25 ml) |
1 tbsp (15 ml) |
|
|
|
|
|
|
Normal |
1.75-3 tbsp (25-45 ml) |
1.75 tbsp (25 ml) |
1-1.75 tbsp (15-25 ml) |
|
|
|
|
|
|
Express |
1.75 tbsp (25 ml) |
1-1.75 tbsp (15-25 ml) |
1 tbsp (15 ml) |
|
|
|
|
|
|
Rinse |
None |
None |
None |
|
|
|
|
|
|
|
|
|
|
7
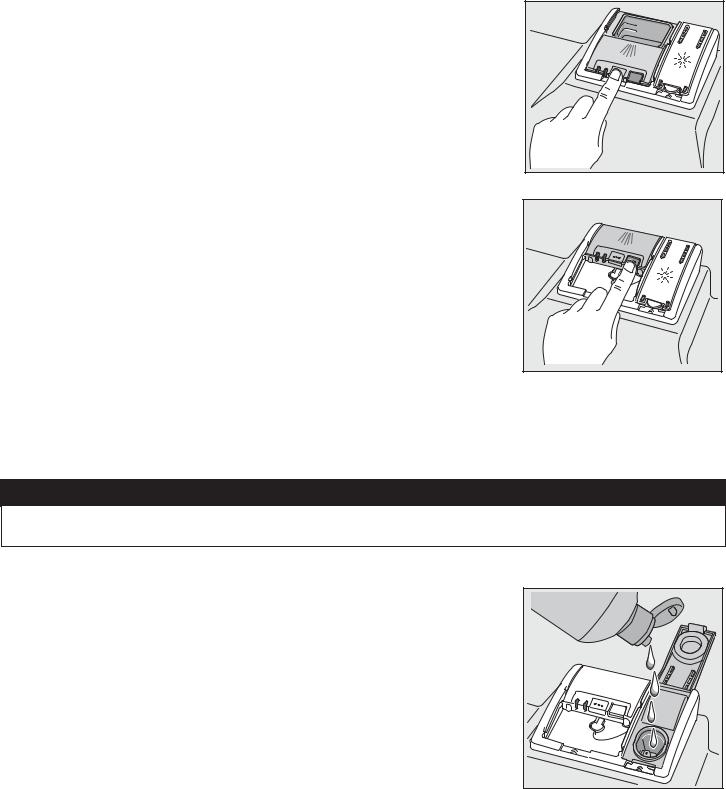
To Close: |
Figure 4 |
•Place finger as shown in Figure 4.
• Slide door closed and press down firmly until it clicks.
Figure 5
To Open:
•To open the cover, push the button as shown in Figure 5.
• Cover will slide open.
Rinse Aid
To achieve proper drying, always use a liquid rinse aid, even if your detergent contains a rinse aid or drying additive.
Note: The dishwasher indicates low rinse aid by turning on the “Refill Rinse Aid” LED in the display. If this light is on, you need to refill the rinse aid dispenser by following the directions below.
Adding Rinse Aid
NOTICE
To avoid oversudsing or clogging, do not overfill the rinse aid dispenser. Wipe up any spills with a damp cloth.
Figure 6
1 Add liquid rinse aid to the dispenser until it is full (see Figure 6). Do not overfill.
2 Close the lid. Lid must be fully closed until it clicks in order to seal.
3 Wipe up any excess rinse aid that may have puddled when the dispenser reservoir is full.
The indicator light will go out a few moments after the dishwasher door is shut. See page 16 for instructions on how to adjust the amount of rinse aid dispensed.
8
Dishware Materials
Note: Before using your dishwasher for the first time, check the information in this section. Some items are not dishwasher safe and should be hand washed; others require special loading.
Recommended
Aluminum: Colored anodized aluminum may fade over time. Minerals in your water may cause the aluminum to darken or spot. This can usually be removed with a soap-filled steel wool pad.
China, Crystal, Stoneware: Some hand-painted utensils may discolor, fade or spot. Hand wash these utensils. Position fragile glassware so that it will not fall over or come in contact with other utensils during the wash cycle.
Glass: Milk glasses may discolor or become yellow.
Non-stick Coatings: Apply a light coating of vegetable oil to non-stick surfaces after drying. Plastics: Make sure the plasticware is dishwasher safe.
Stainless Steel, Sterling Silver and Silver Plates: Load these so they do not come in contact with other metals.
Not Recommended
Acrylic: Crazing, small cracks throughout the acrylic, may occur.
Adhesive-Joined Pieces: Adhesives that join materials such as plastic, wood, bone, steel, copper, tin, etc. may loosen.
Bone-Handled Utensils: Handles may separate.
Iron: Iron will rust. Hand wash and dry immediately.
Non-Dishware Items: Your dishwasher is intended for use in cleaning ONLY standard household dishware and kitchenware.
Pewter, Brass, Bronze: These items will tarnish. Hand wash and dry immediately. Tin: Tin will stain. Hand wash and dry immediately.
Wood: Wooden bowls, wooden utensils and utensils with wooden handles can crack, warp and lose their finish.
9

Loading the Dishwasher
Do not pre-wash items with loosely attached soiling. Remove all food particles, bones, toothpicks and excessive grease. Items having burned-on, baked-on or starchy soils may require some pretreatment. Refer to the Dishware Materials section for more information about dishware suitability.
Load only dishwasher safe items into the dishwasher. Load dishes in the dishwasher racks so the insides of bowls, pots and pans are facing the spray arms as shown. Avoid nesting and contact points between dishes. Separate items of dissimilar metals. Use care to not block movement of the spray arms.
WARNING
The sharp points and edges of knives and other sharp utensils can cause serious injuries. Load knives and other sharp utensils with edges down. Do not allow children to handle or play near knives and sharp utensils.
NOTICE
To avoid dishwasher damage, do not load the dishwasher with paper products, plastic bags, packing materials or anything other than normal, dishwasher safe dishware and kitchenware.
Loading the Upper Rack
Ensure items do not protrude through the bottom of the racks and block the spray arms.
Note: When pushing the upper rack into the dishwasher, push it until it stops against the back of the tub so the upper rack spray arm connects to the water supply at the back of the tub. Do not push racks in using the door.
Loading the Lower Rack
Place large items in the lower rack. Load pots, pans and bowls upside down. Do not block vent with tall baking sheets. Load these items on the right side of the dishwasher.
Loading the Cutlery Drawer
The cutlery drawer horizontally positions knives, spatulas and other oversized tools for improved cleaning and easier loading and unloading. Arrange cutlery in the cutlery drawer.
Unloading the Dishwasher
When unloading the dishwasher, it is recommended to unload the lower rack first. Next, unload the silverware basket followed by the upper rack, and then the cutlery drawer. This prevents water from dripping down onto dishware.
Note: Dishes are more likely to chip when unloading before cooling.
10

Suggested Loading Pattern
Upper Rack |
Lower Rack |
Cutlery Drawer |
Additional Loading Pattern
Upper Rack Lower Rack Cutlery Drawer
11

Rack Features
Flip Tines
The upper and lower racks consist of tines that can be folded down depending on what you may need to load in the rack. To fold down, grasp the folding tine and release from notch. Push folding tine downward to desired position as shown in Figure 7.
RackMatic®
The height of the upper rack can be adjusted in 3 positions to create more space (see Figure 8).
1 Pull the empty upper rack out of the dishwasher until it stops. 2 To lower the rack, push the lever inward then upward.
3To raise, hold the empty rack by the sides and lift up.
Cutlery Drawer
The cutlery drawer horizontally positions knives, spatulas and other oversized tools for improved cleaning and easier loading and unloading. Arrange cutlery in the cutlery drawer as illustrated in Figure 9.
Plastic Item Clips
Light-weight plastic accessories (cups, lids, etc.) can be held securely by the plastic item clips (see Figure 10).
Cup Shelves
The shelf and the space underneath can be used for cups or for larger serving utensils (see Figure 11).
Figure 7
Figure 8
Figure 9
Figure 10
Figure 11
12
Dishwasher Cycles and Options
Wash Cycles
Note: In order to save energy, it is recommended to set the “Auto Power Off” feature to “P:01” (see the “Auto Power Off” section of this manual).
Heavy: Best for cleaning items with baked-on food or grease. These dishes would normally require soaking.
Auto: This is the most flexible cycle. With our most complex soil sensing capability, this cycle is perfect for use with mixed loads of dishware with varying amounts of food soil.
Eco: Best for delicate dishes and glasses, the Eco cycle lowers temperature and cycle length to decrease energy usage.
Normal: The Normal cycle is recommended for daily, regular, or typical use to completely wash a full load of normally soiled dishes.
In order to obtain optimal performance with minimum energy consumption, it is recommended to disable all available features except Auto Power Off as noted at the start of this section.
Note 1: See footnote for additional energy test setup instructions.
Express: Cleans lightly soiled dishes and reduces overall wash time. Use this cycle to clean glasses and dessert dishware that may need to be reused at the same event.
Rinse: Allows you to rinse food soil off of a partial load and hold them in the dishwasher until you are ready to run a full load.
Wash Cycle Options
Delay Start: Allows you to delay the start time of your dishwasher in one hour increments up to 24 hours.
Half Load: Can reduce water consumption when washing small, lightly soiled loads that fill approximately half of the dishwasher’s capacity.
Delicate: Available only in the Heavy, Auto and Normal cycles. This option’s lower temperature will reduce the risk of cloudy glasses.
Sanitize: The Sanitize feature is available only in the Heavy, Auto and Normal cycles. Select one of these cycles, press the “Sanitize Option” button and then press Start to activate the Sanitation features. The sanitize LED will light when sanitation requirements are met. The technical sanitation measures may also improve the drying results.
Note: The dishwasher automatically defaults to Auto when turned off and back on. If you used the sanitize option in your last cycle, the dishwasher will default to Auto with the Sanitize option selected when you turn it on.
Extra Shine®: Used in combination with a wash cycle (except Rinse), the Extra Shine® option raises the temperature and extends the drying time to further enhance drying results and provides a brilliant shine.
Note 1: The Energy Guide label was based on the Normal or Regular soil sensing cycle as follows: The unit was tested without any Rinse Aid (liquid) in the Rinse Aid chamber. A single dose of detergent was inserted into the Detergent Dispenser, with no detergent being used in the prewash. The unit was not subjected to truncated testing per the definitions in the test procedure. We recommend that
dish loads such as the one in the energy certification test have the rack position set in the highest position. |
13 |
|
Wash Cycle Information
The cycle times in this Use and Care Manual are based on normal soil loads and 120°F incoming water and will vary based on your actual conditions.
Table 3 - Wash Cycle Information
|
Heavy |
Auto |
Eco |
Normal |
Express |
Rinse |
|
|
|
|
|
|
|
cycle time |
110-135 min |
105-129 min |
80-85 min |
130-135 min |
30 min |
9 min |
|
|
|
|
|
|
|
water consumption |
18.6-24.2 L |
13.1-24.5 L |
9.3-14.5 L |
8.3-20.6 L |
10.5 L |
4.1 L |
|
4.9-6.4 gal |
3.5-6.5 gal |
2.5-3.8 gal |
2.2-5.4 gal |
2.8 gal |
1.1 gal |
|
|
|
|
|
|
|
wash temperature |
66-71°C |
53-66°C |
45-50°C |
45-55°C |
45°C |
incoming |
|
150-160°F |
127-150°F |
113-122°F |
113-131°F |
113°F |
incoming |
|
|
|
|
|
|
|
rinse temperature |
72°C |
70°C |
62°C |
62-69°C |
50°C |
incoming |
|
162°F |
158°F |
144°F |
144-156°F |
122°F |
incoming |
|
|
|
|
|
|
|
Half Load |
|
|
|
|
|
|
|
|
|
|
|
|
|
cycle time |
114 min |
95-105 min |
75-80 min |
110-120 min |
n/a |
n/a |
|
|
|
|
|
|
|
water consumption |
17.9 L |
10.2-16.5 L |
9.3-12.5 L |
10.9-14 L |
n/a |
n/a |
|
4.8 gal |
2.7-4.4 gal |
2.5-3.3 gal |
2.9-3.7 gal |
|
|
|
|
|
|
|
|
|
rinse temperature |
72°C |
70°C |
62°C |
69°C |
n/a |
n/a |
|
162°F |
158°F |
144°F |
156°F |
|
|
|
|
|
|
|
|
|
Delicate |
|
|
|
|
|
|
|
|
|
|
|
|
|
cycle time |
105-110 min |
90-105 min |
n/a |
105-120 min |
n/a |
n/a |
|
|
|
|
|
|
|
water consumption |
18.6-24.2 L |
13.1-24.5 L |
n/a |
8.3-20.6 L |
n/a |
n/a |
|
4.9-6.4 gal |
3.5-6.5 gal |
|
2.2-5.4 gal |
|
|
|
|
|
|
|
|
|
rinse temperature |
60°C |
60°C |
n/a |
60°C |
n/a |
n/a |
|
140°F |
140°F |
|
140°F |
|
|
|
|
|
|
|
|
|
Sanitize |
|
|
|
|
|
|
|
|
|
|
|
|
|
cycle time |
130-150 min |
125-150 min |
n/a |
140-155 min |
n/a |
n/a |
|
|
|
|
|
|
|
water consumption |
18.6-24.2 L |
13.1-24.5 L |
n/a |
8.3-20.6 L |
n/a |
n/a |
|
4.9-6.4 gal |
3.5-6.5 gal |
|
2.2-5.4 gal |
|
|
|
|
|
|
|
|
|
rinse temperature |
72°C |
72°C |
n/a |
72°C |
n/a |
n/a |
|
162°F |
162°F |
|
162°F |
|
|
|
|
|
|
|
|
|
Extra Shine® |
|
|
|
|
|
|
|
|
|
|
|
|
|
cycle time |
130-150 min |
125-150 min |
115-125 min |
140-155 min |
50 min |
n/a |
|
|
|
|
|
|
|
water consumption |
18.6-24.2 L |
13.1-24.5 L |
9.3-14.5 L |
8.3-20.6 L |
10.5 L |
n/a |
|
4.9-6.4 gal |
3.5-6.5 gal |
2.5-3.8 gal |
2.2-5.4 gal |
2.8 gal |
|
|
|
|
|
|
|
|
rinse temperature |
72°C |
72°C |
72°C |
72°C |
72°C |
n/a |
|
162°F |
162°F |
162°F |
162°F |
162°F |
|
|
|
|
|
|
|
|
|
|
|
|
|
|
|
Note: Only sanitizing cycles have been designed to meet the requirements of Section 6 of the NSF/ANSI Standard for Residential Equipment for soil removal and sanitization efficacy. There is no intention, either directly or indirectly, to imply that all cycles have passed sanitization performance tests.
14
Operating the Dishwasher
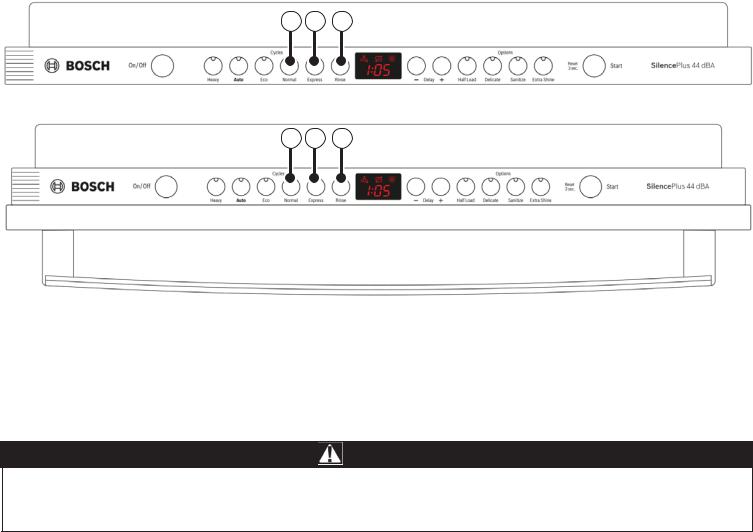
SGV68U53UC
A B C
SGX68U55UC
A B C
NOTE: For hidden controls only, the door must be opened before changing settings and closed after changing settings.
Buttons are sensitive and should be touched gently. Avoid any grease or food particles resting on the buttons as they could activate the dishwasher. Wiping and cleaning can also activate the dishwasher. For best results, use bare, clean hands when touching the buttons.
WARNING
To avoid risk of injury, always use caution when opening the door during or following a wash cycle as hot water or steam may escape. Do not fully open the door until water noises have stopped and steam has subsided.
Start the dishwasher
1Press the [On/Off] button.
2Select a cycle and desired options and press [Start].
Cancel a Cycle
1 Press and hold the [Start] button for approximately 3 seconds until the display reads “0:01”. 2 Wait about 1 minute while the dishwasher drains.
3Press the [On/Off] button.
Interrupt a Cycle
1Press the [On/Off] button to turn the unit off.
2To resume the cycle, press the [On/Off] button.
15
 Loading...